Transaction
- Order management
- Does the system support filtering and exporting orders?
- How to query yesterday's order revenue?
- What digital payment methods [Manual adjustment required] are supported for users to purchase courses?
- How to receive new order notifications via the APP?
- Which orders are eligible for refund?
- Will the asset management section synchronize data after an order refund?
- What are the order refund statuses?
- Is there a conflict between deleting the subscription relationship and refunding?
- Is there a limit on the refund amount?
- Which parts of the data will be affected after the refund operation?
- What is the closing time for pending payment orders?
- Tutorial on Using Payment Success Message Reminders
- Why is there no union_id in the file exported from order management?
- Which logistics companies' tracking numbers can be uploaded on elink?
- Tutorial on Using Batch Shipment
- Operation Guide for Self-pickup Delivery
- Qualification requirements
- What qualifications are required to sell physical goods?
- Categories available for individual business operators
- Product management
- Which marketing tools are supported by the physical product e-commerce function?
- How to set the minimum purchase quantity for products
- Tutorial on Using Product Purchase Limits
- Common Questions about Product Purchase Limits
- Delivery management
- Does it support setting shipping fees?
- Tutorial on Using Shipping Fee Templates
- Combined Order Instructions
- Instructions for Order Fulfillment and Shipping
- Split order instructions
- I can't find the shipping button on the order list. How come?
- Users are supported with door-to-door pick-up service for returns
- Evaluation Management
- How many times can students leave reviews after purchasing products?
- In what order are product reviews displayed?
- How many times can merchants reply to reviews?
- Where can I set the switch for reviews of physical products?
- Payment Settings
Order management
Does the system support filtering and exporting orders?
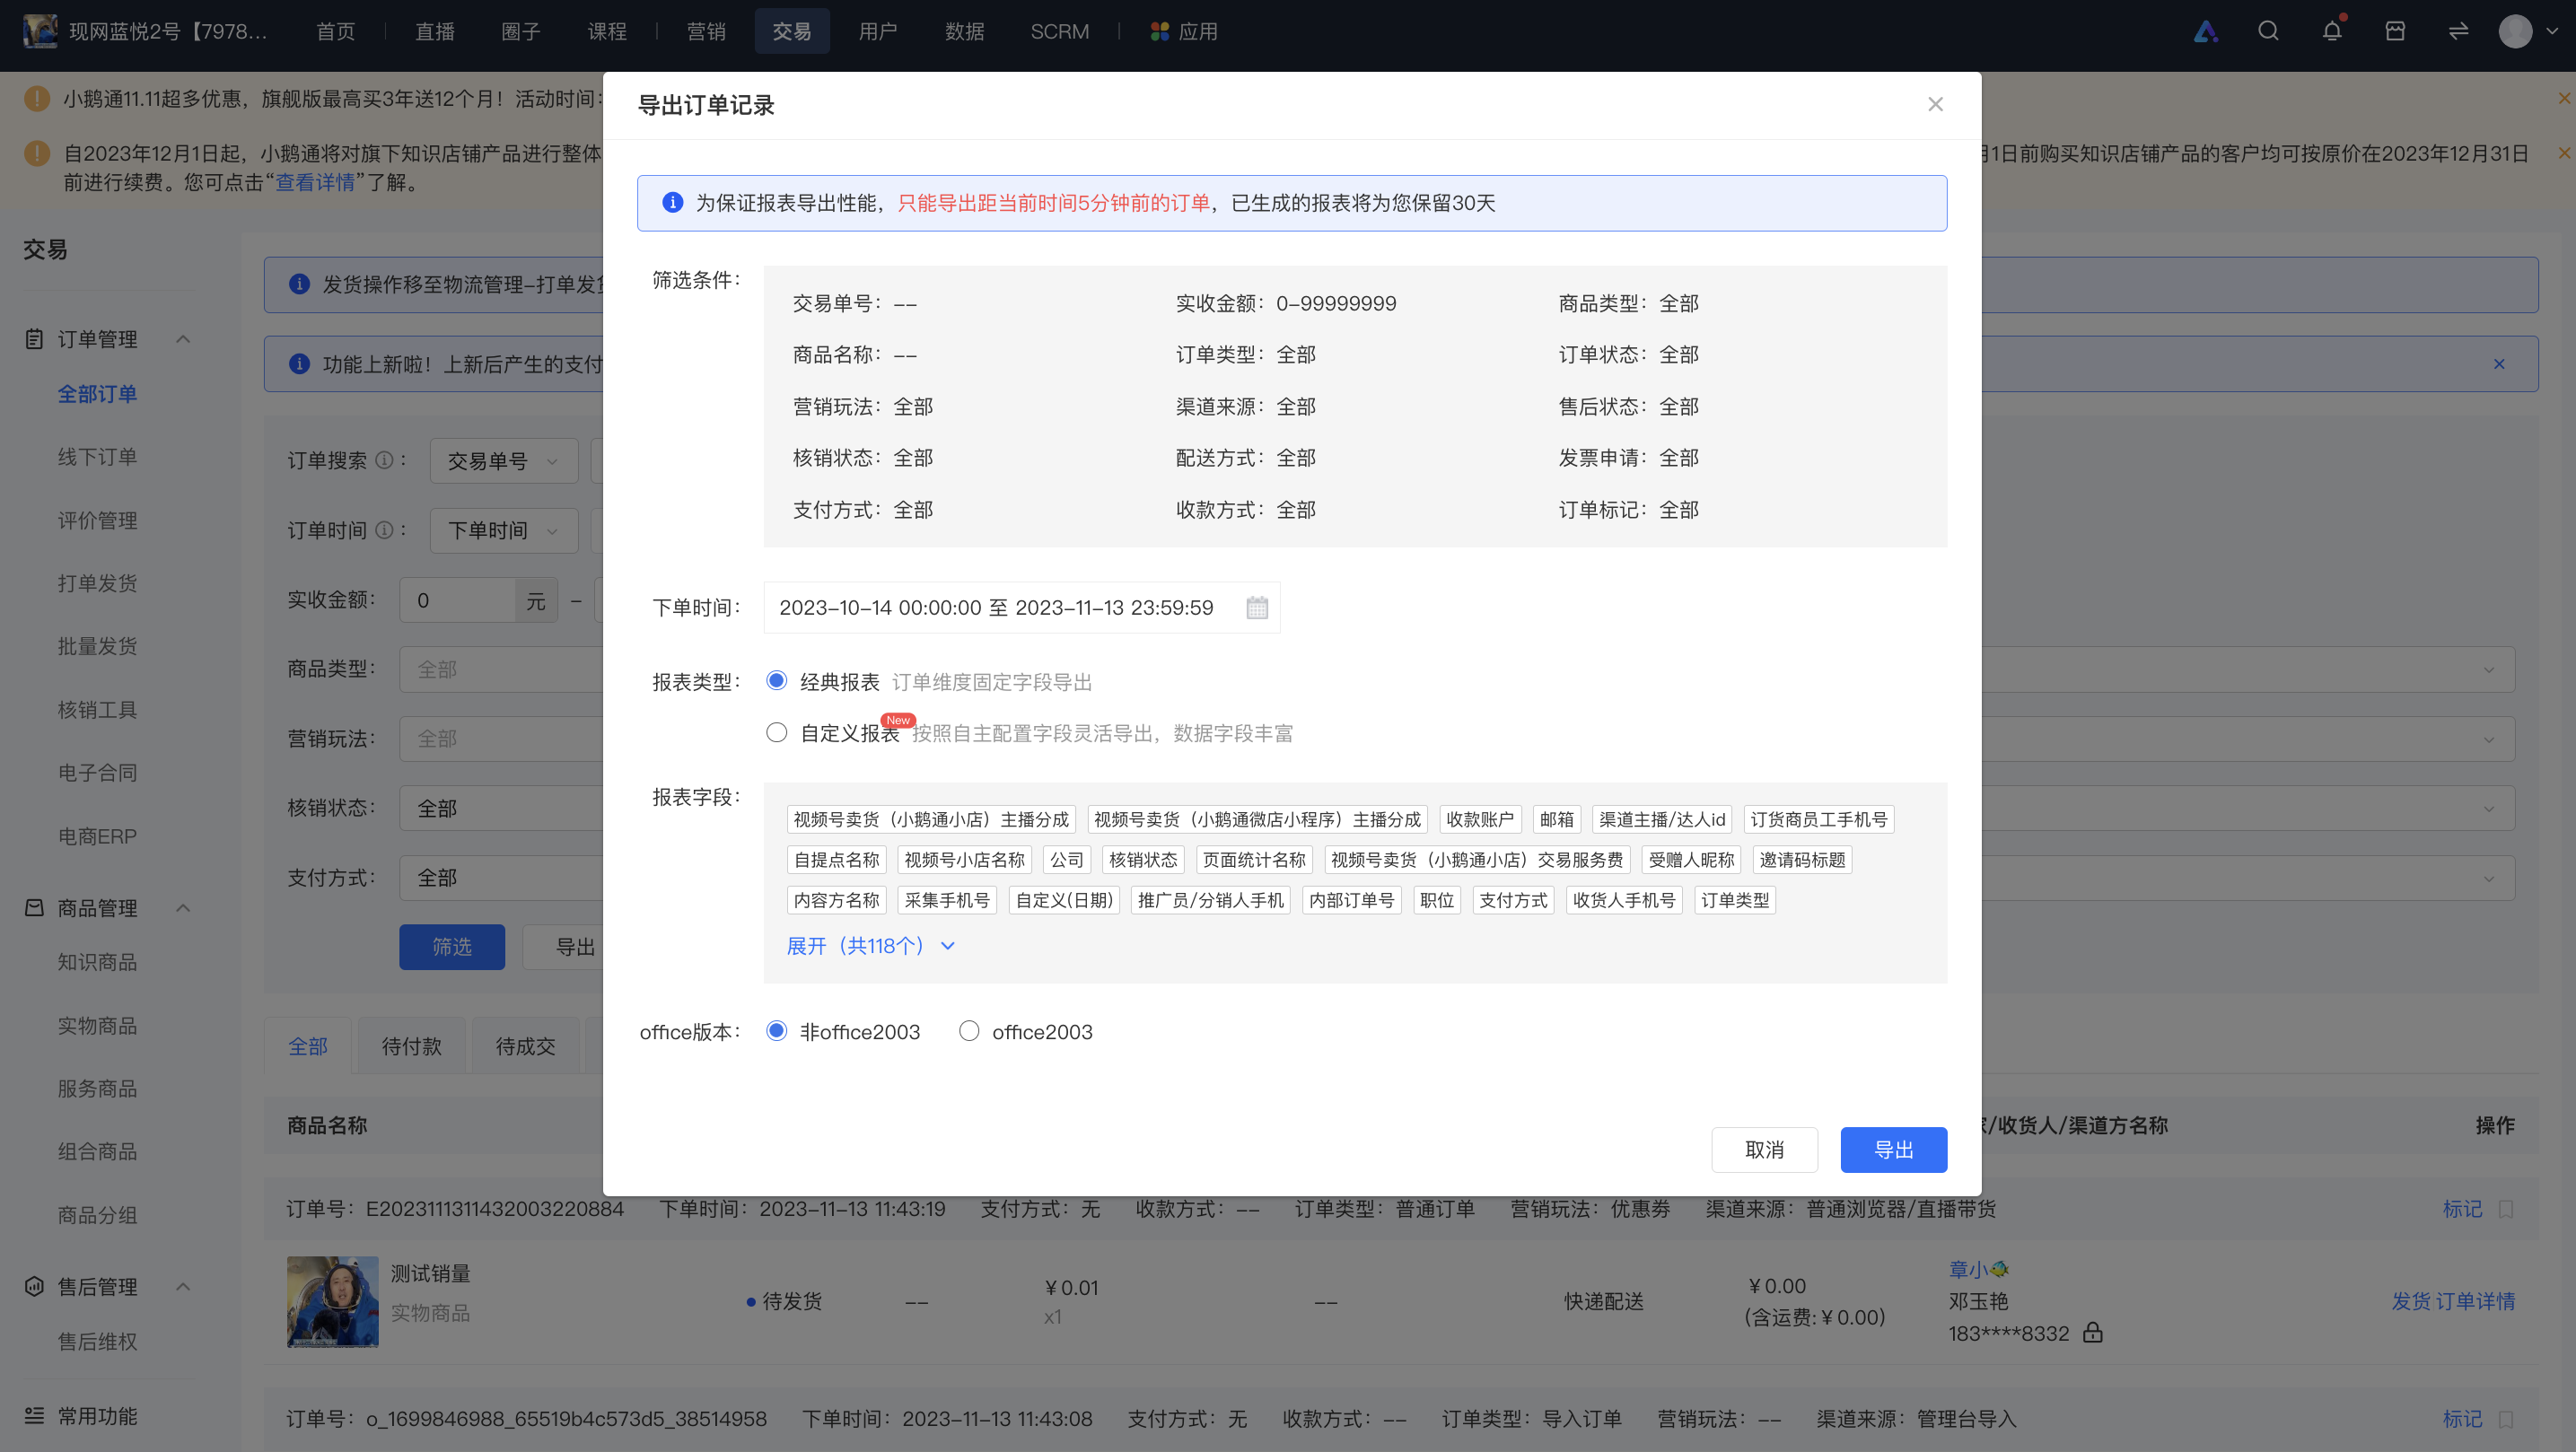
Yes, it is supported. You can go to [Management Console] - [Transactions] - [Order Management] - [All Orders], select the required conditions for filtering and querying, and then export and view the results.
How to query yesterday's order revenue?
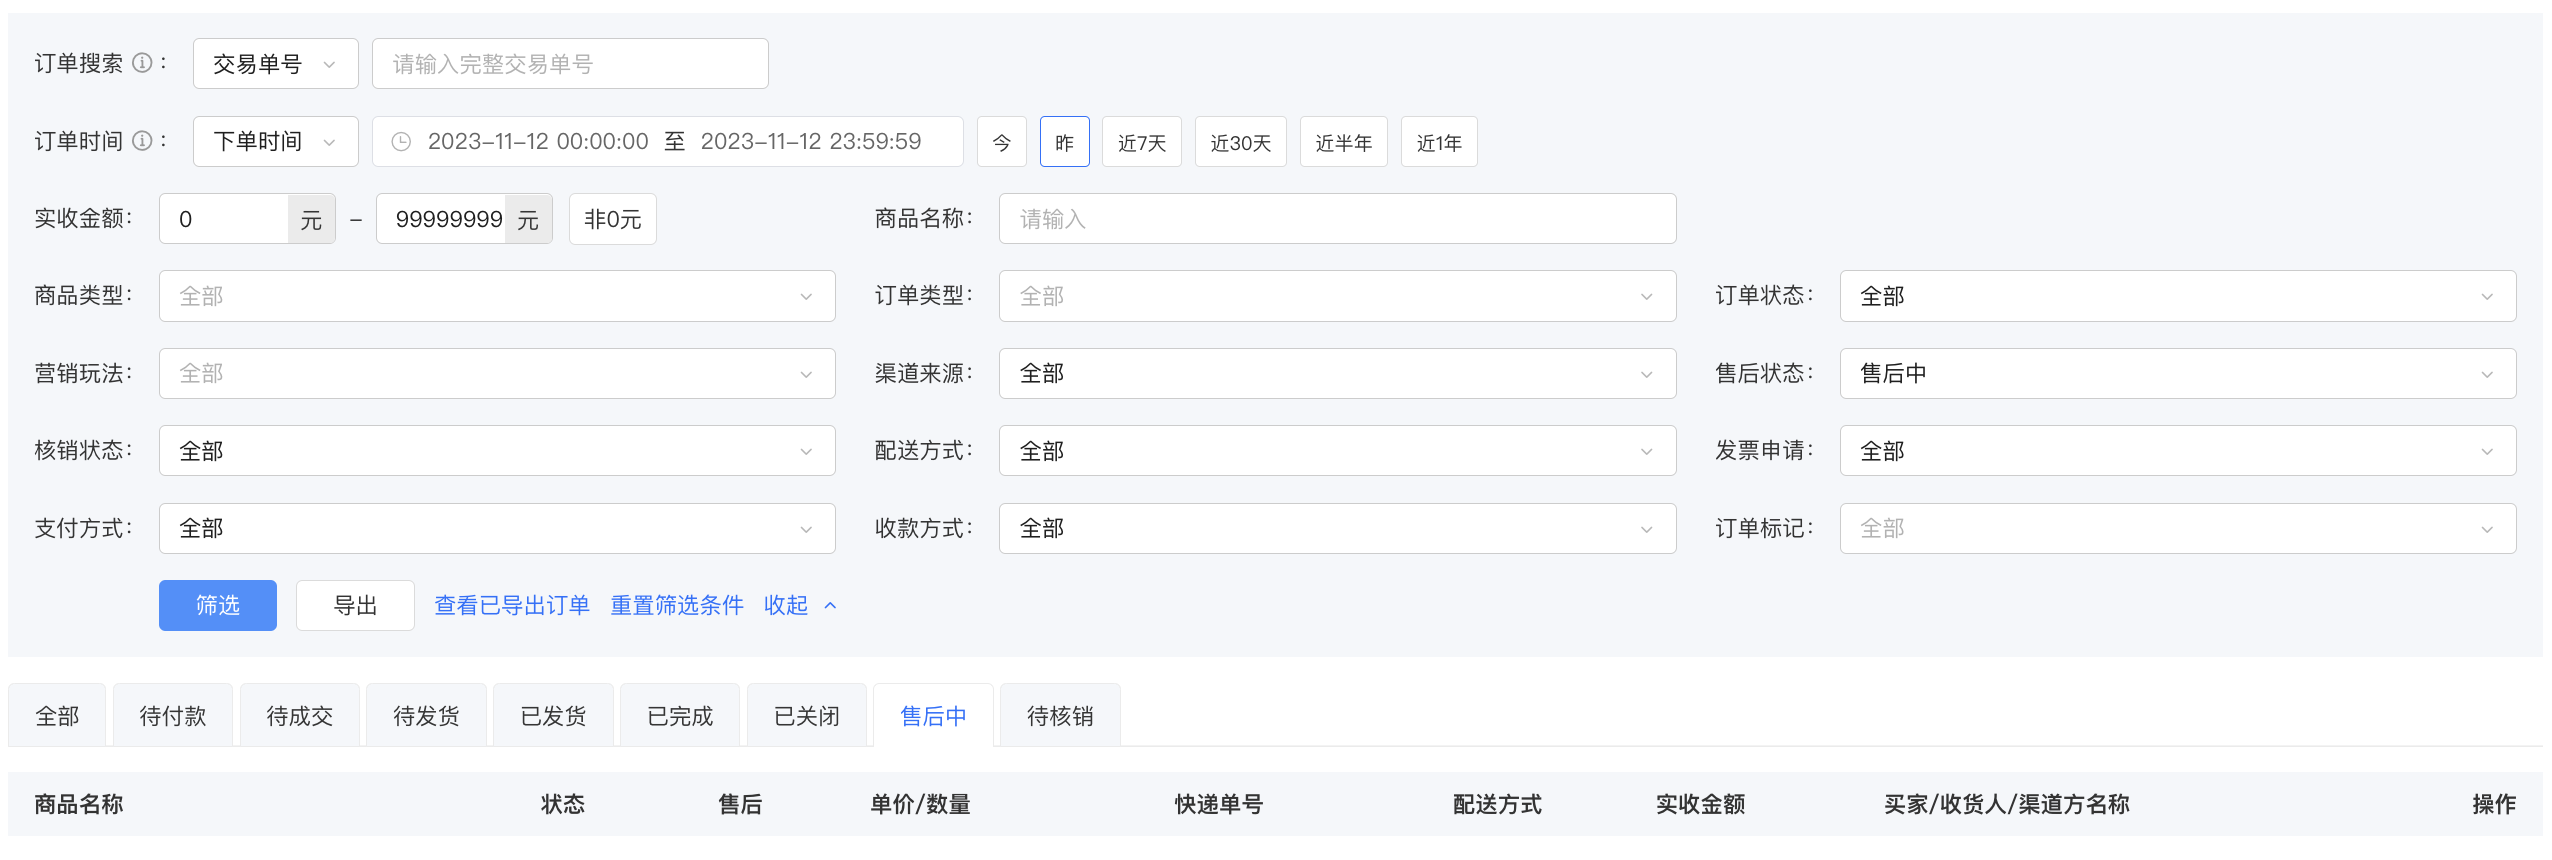
Go to [Management Console] - [Transactions] - [Order Management] - [Order Placement Time], set the [Order Placement Time] to yesterday's date, and you can view the order information. You can also set more order query conditions (order status, channel source, order status, order type, etc.)
What digital payment methods [Manual adjustment required] are supported for users to purchase courses?
Currently supported:WeChat Pay [Manual adjustment required]andAlipay Pay [Manual adjustment required] Two methods
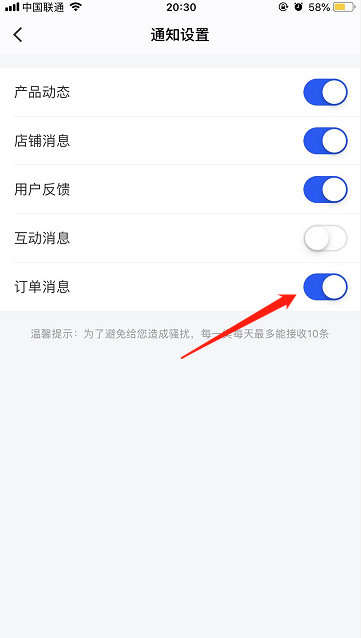
How to receive new order notifications via the APP?
1 / Scan the QR code with your mobile phone to download the APP.
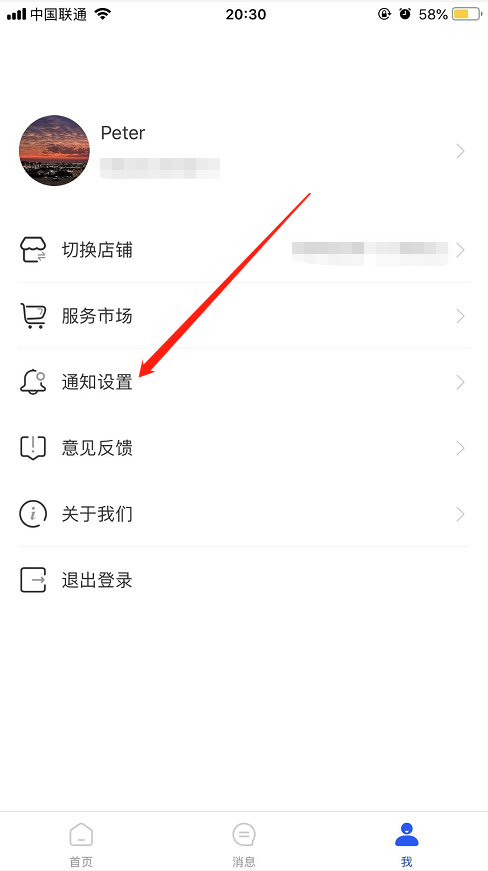
2 / Enter your Online Store and turn on the 'Order Notifications'.
After logging in, select your Online Store, go to [Me] - [Notification Settings], and turn on the 'Order Notifications'.
3 / Receive notifications
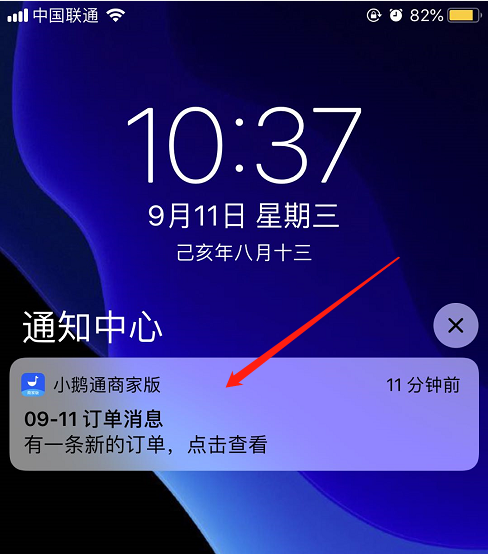
When there is a new order in your Online Store, you will receive an in - app notification. You can click on it to open the APP and view the details.
Which orders are eligible for refund?
Refundable order types:
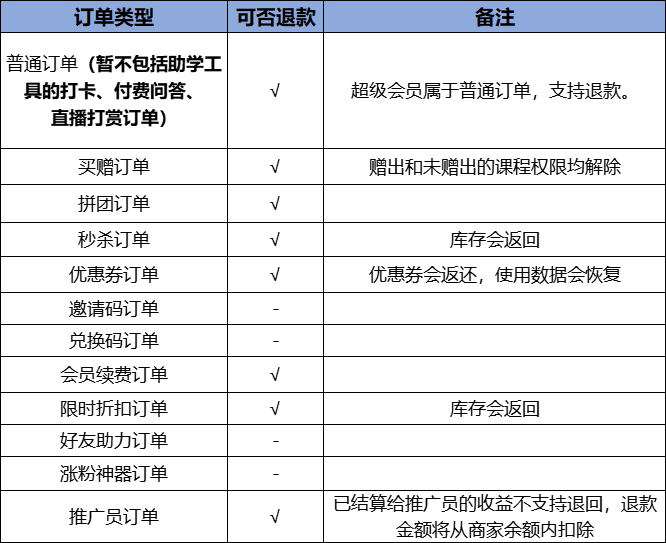
* All physical product orders support refunds.
Will the asset management section synchronize data after an order refund?
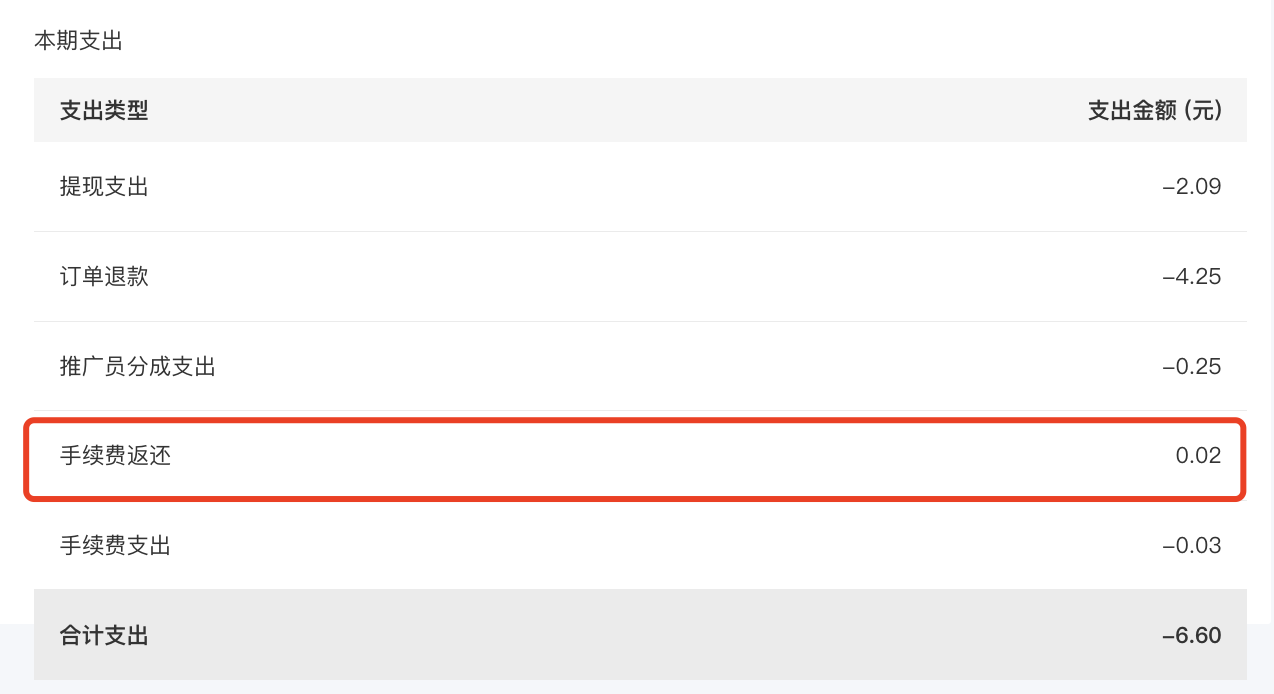
During asset management, the refund amount will be deducted, and the WeChat payment handling fee will be refunded.
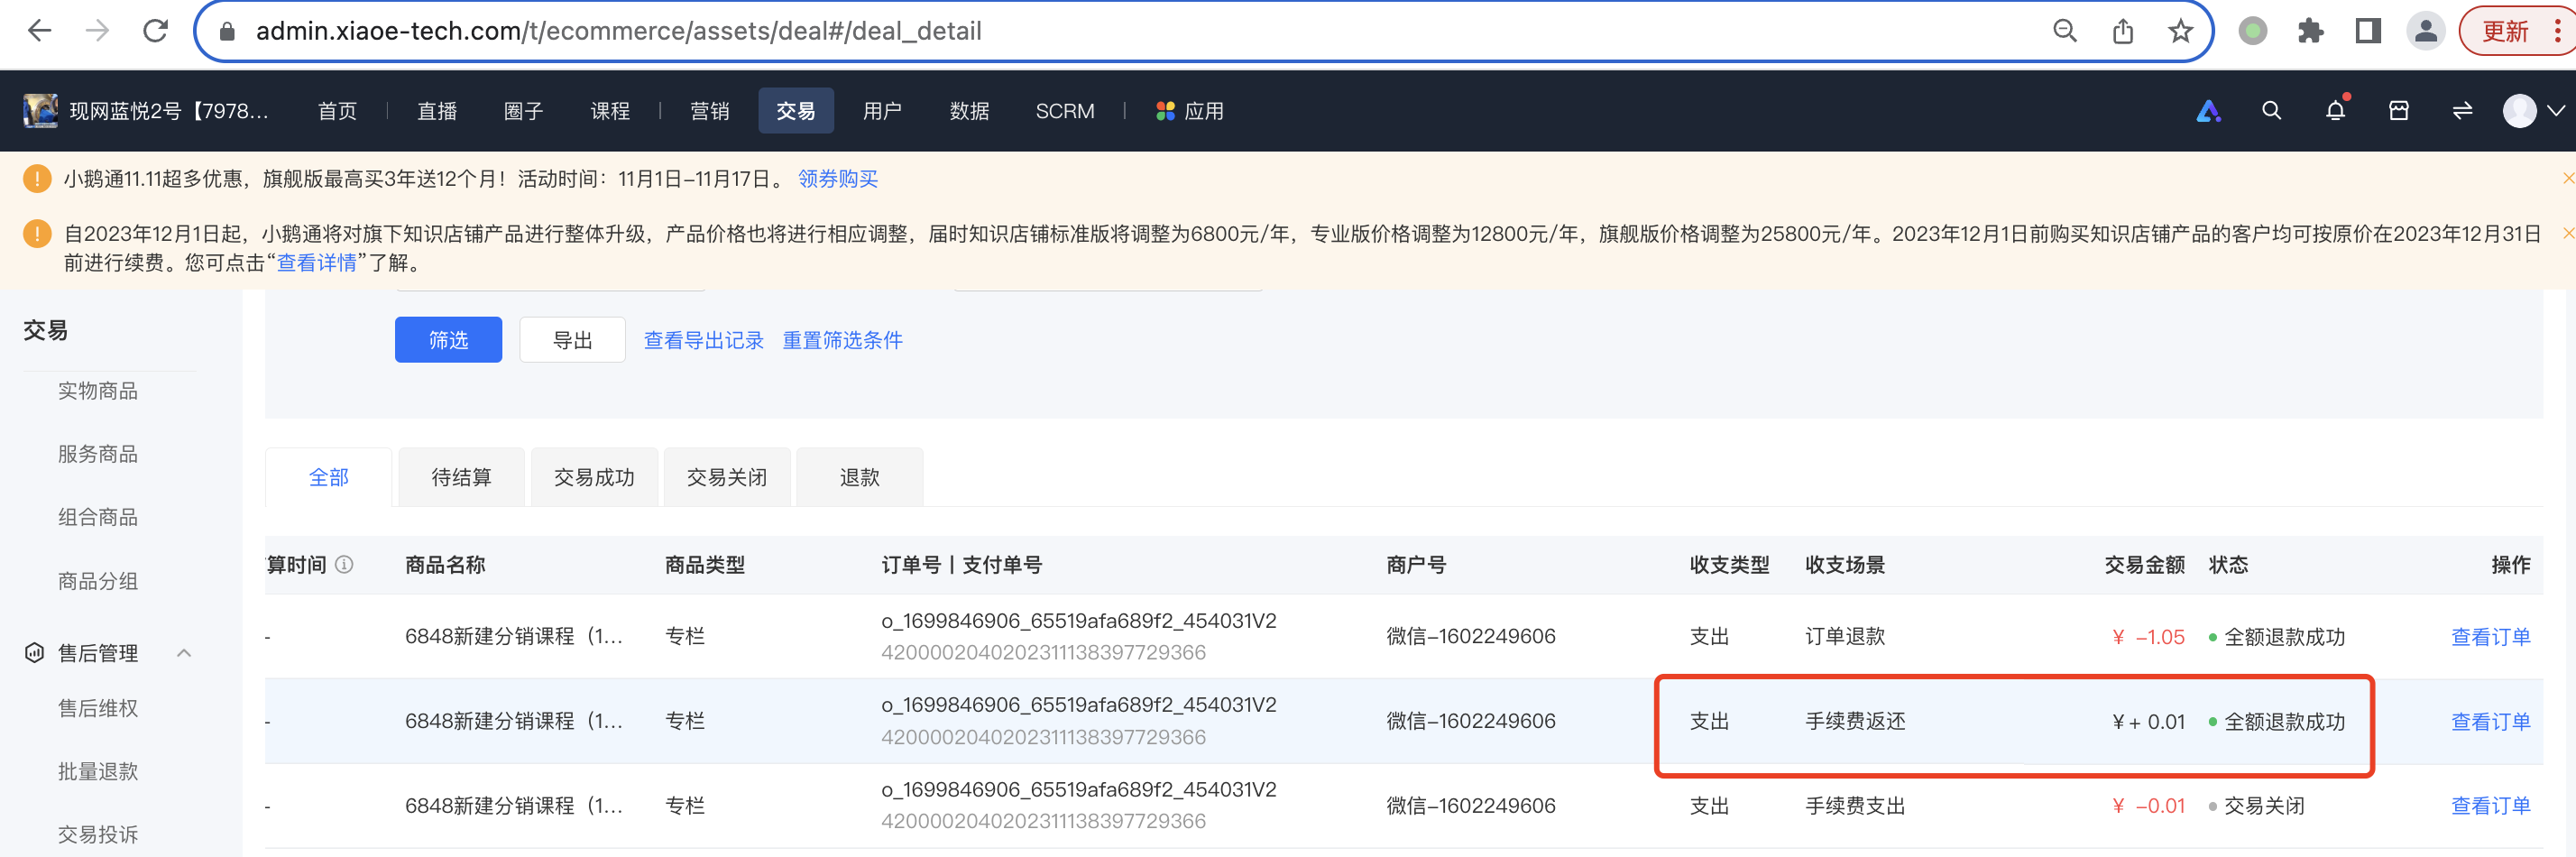
The bill summary will also be calculated accordingly:
What are the order refund statuses?
There are three statuses in total, namely: Refunding, Refund Successful, and Refund Failed.
Is there a conflict between deleting the subscription relationship and refunding?
Orders with deleted subscription relationships support refunds.
Is there a limit on the refund amount?
No restrictions.
Which parts of the data will be affected after the refund operation?
The data in the data analysis module does not include refund data; the coupon inventory and product inventory in marketing will be restored.
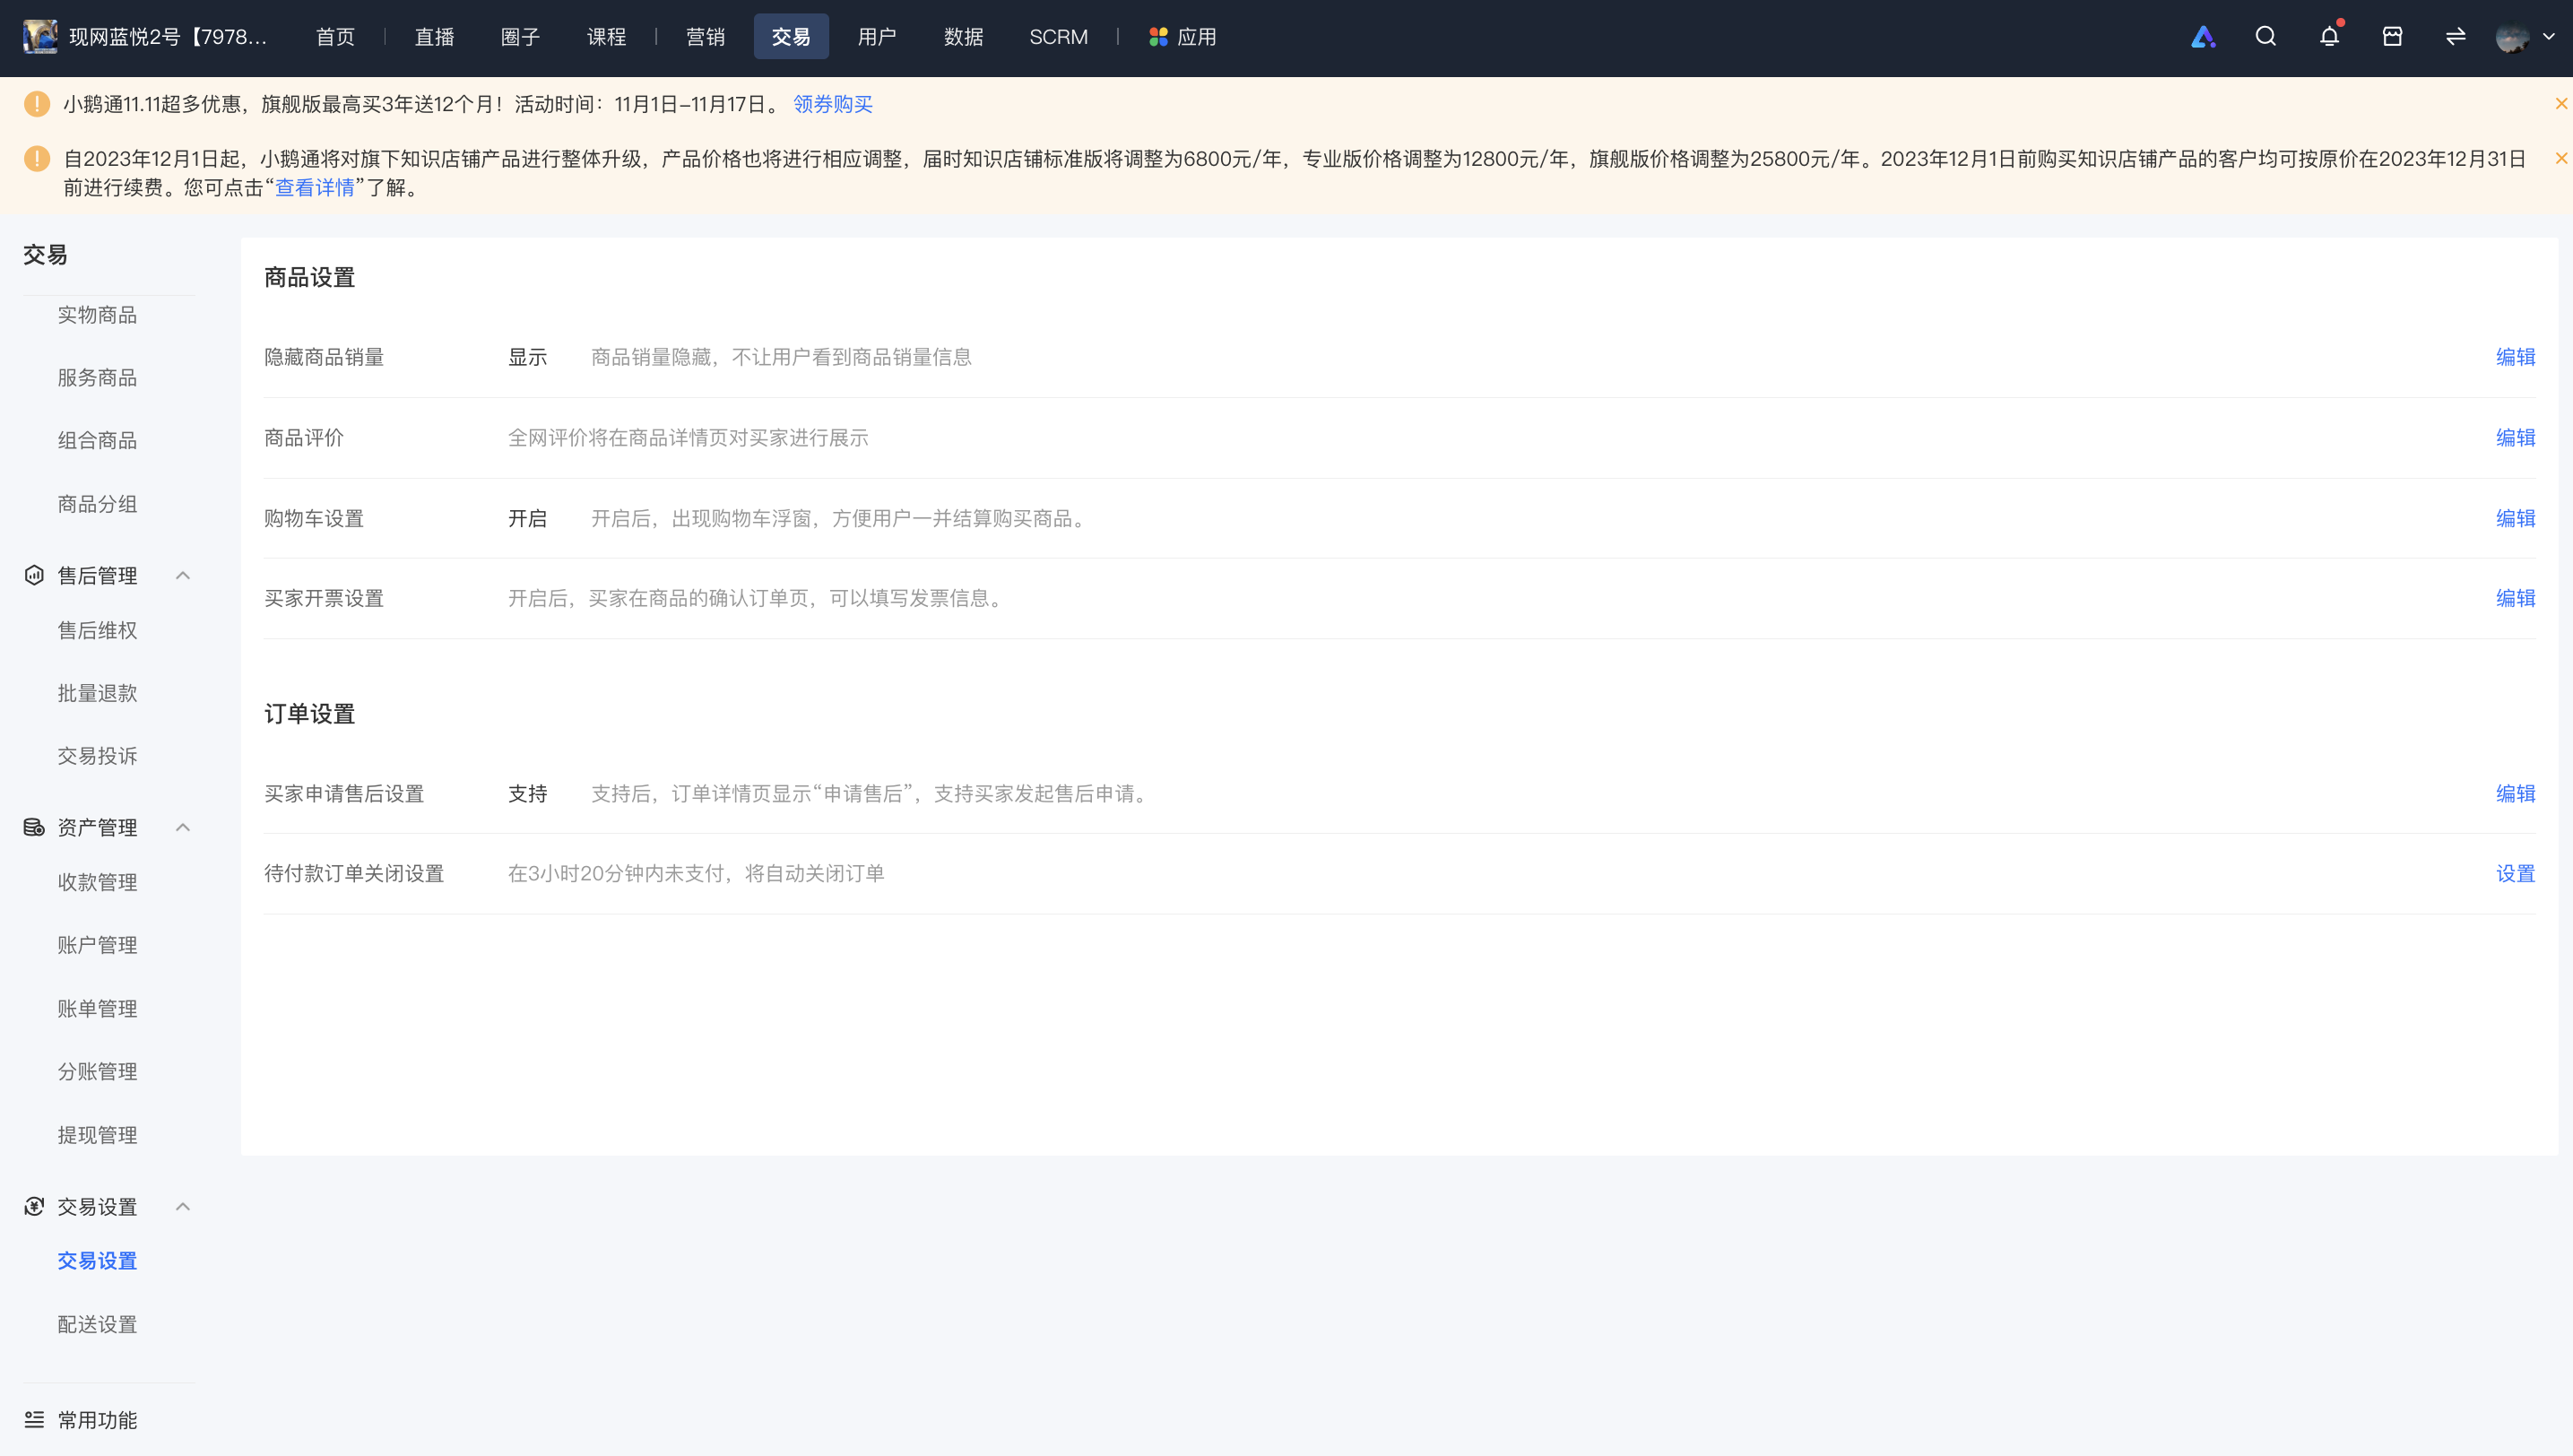
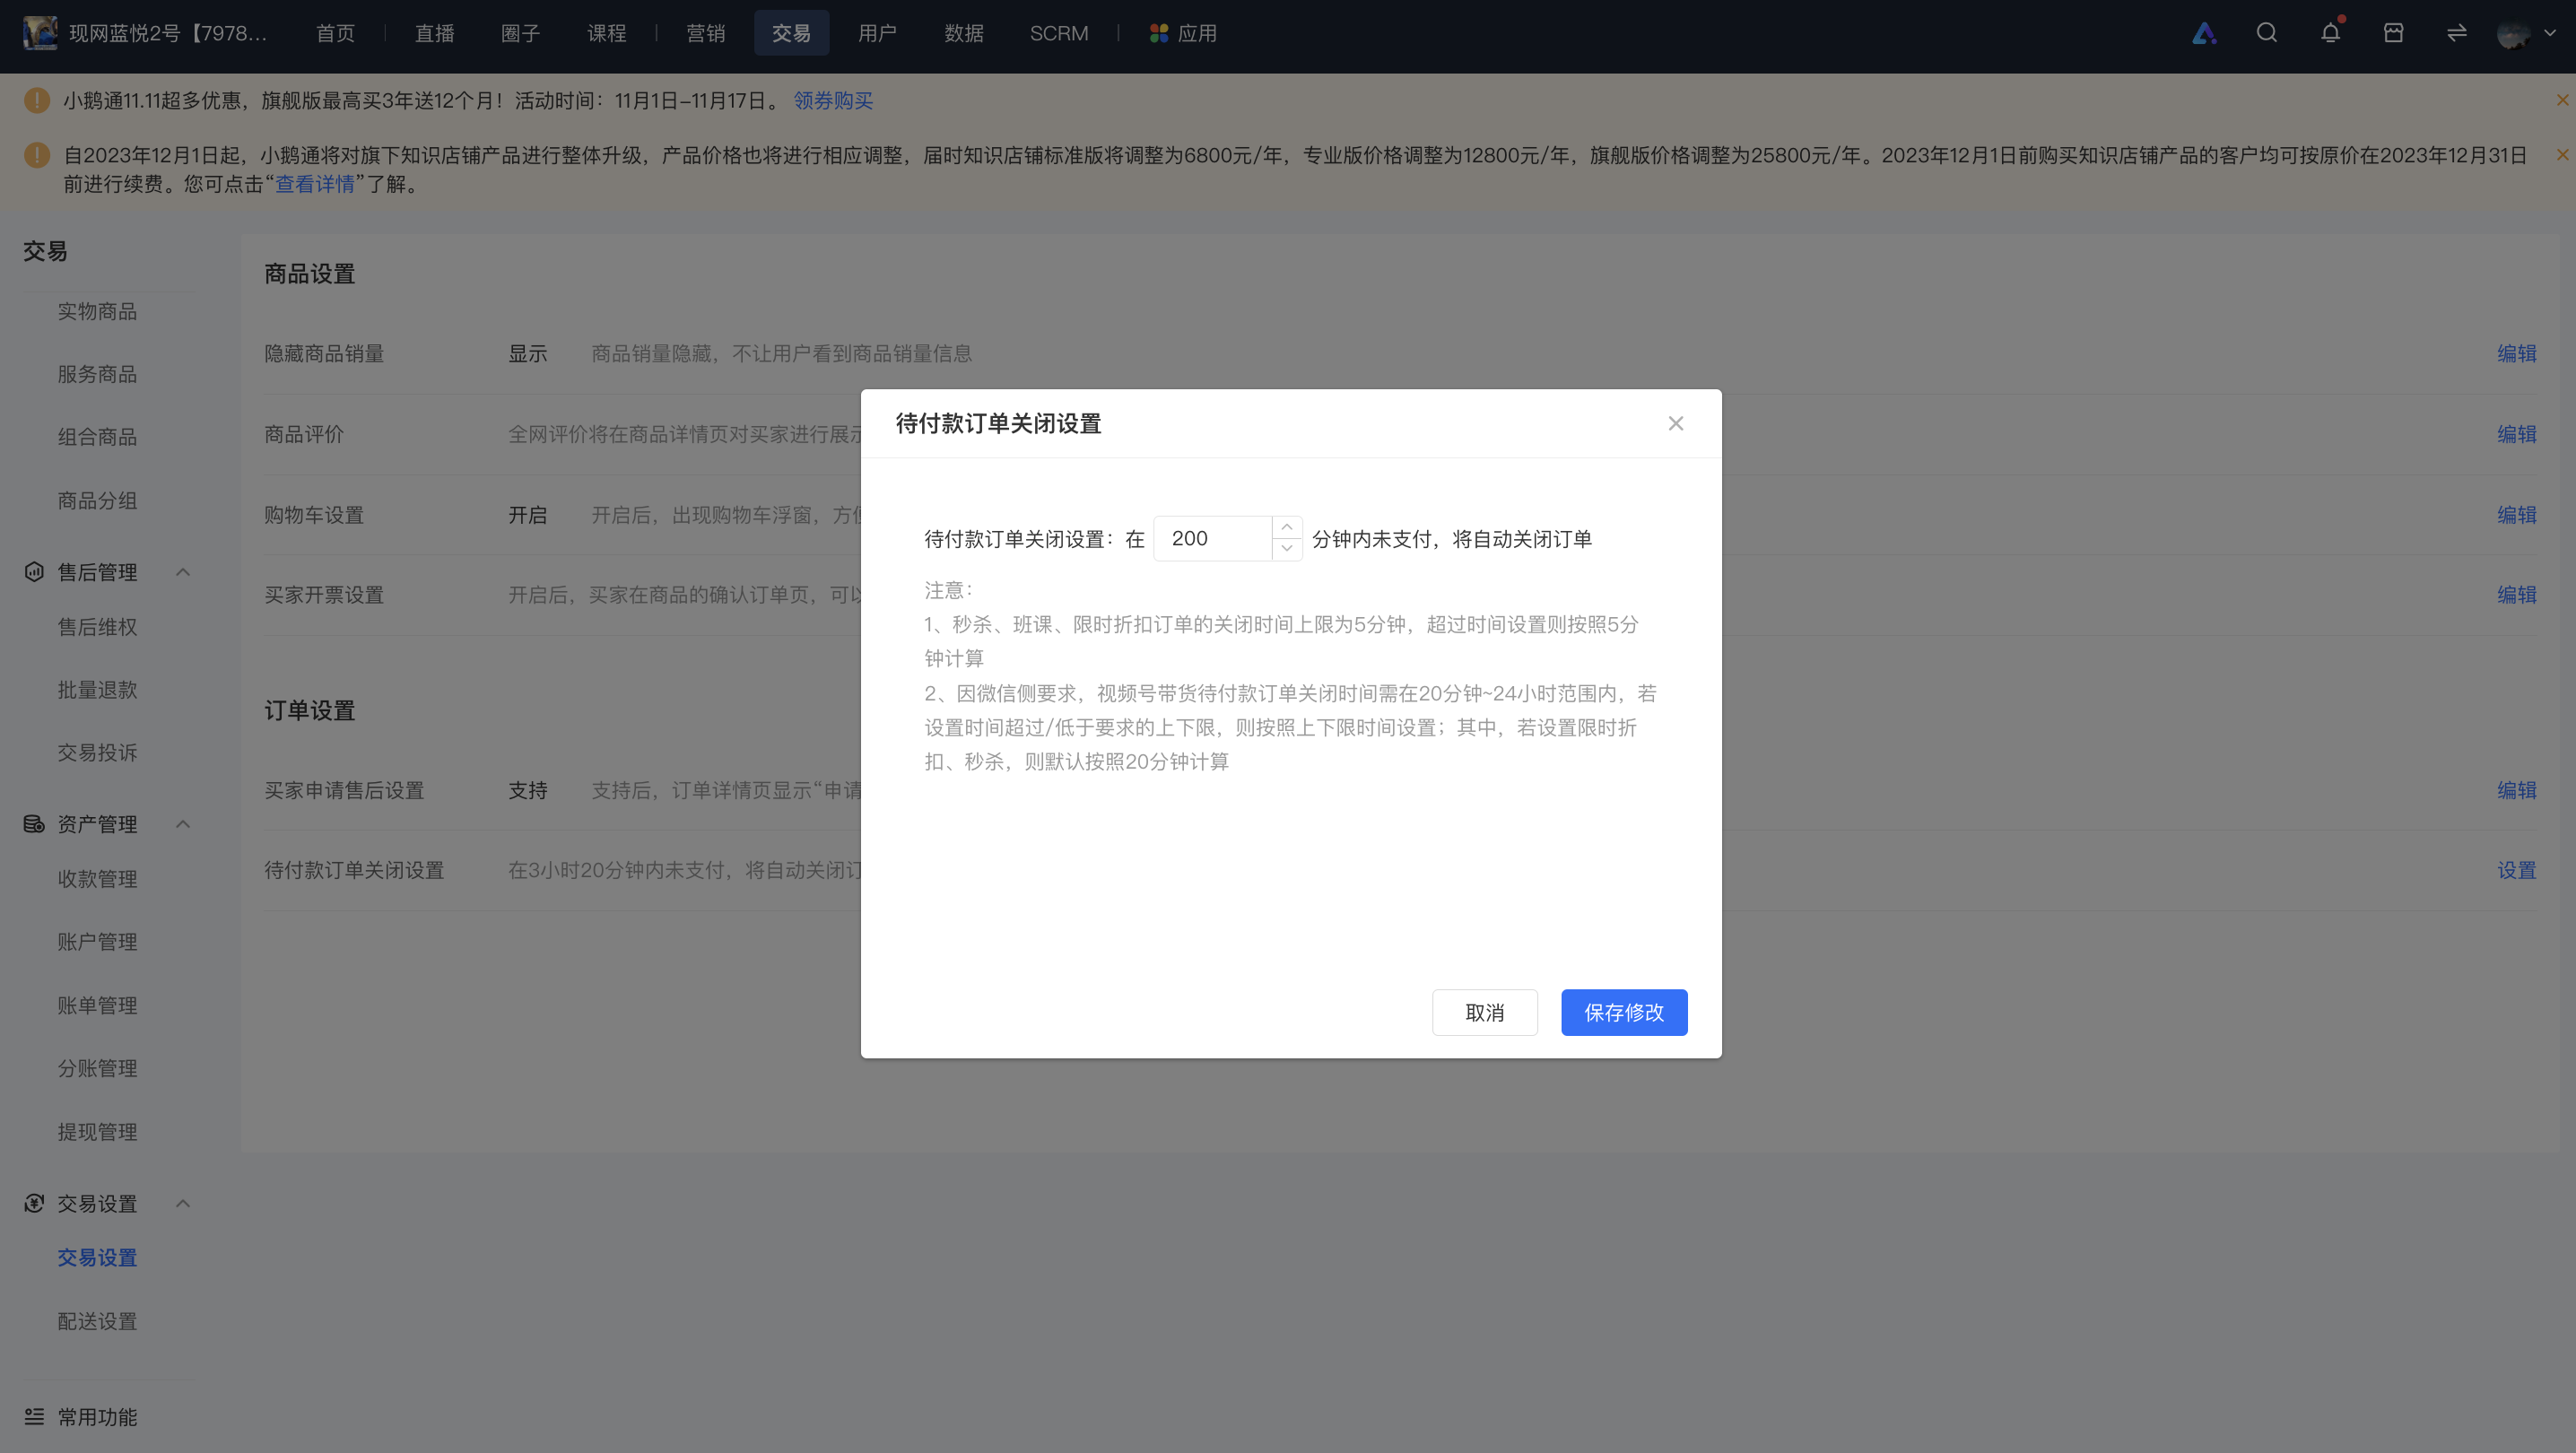
What is the closing time for pending payment orders?
The default closing time for orders pending payment is 120 minutes. Custom settings are supported, with a setting range of 1 - 1440 minutes (1440 minutes = 24 hours).
Note:The current closing time for orders of flash sales, courses, and limited-time discounts is 5 minutes. If the set time exceeds this, it will still be calculated as 5 minutes.
Operation path: Merchant Management Backend - Transactions - Transaction Settings - Settings for Closing Orders Pending Payment
Tutorial on Using Payment Success Message Reminders
I. Feature Introduction
After the user's payment is successful, they will receive a payment success message. By opening the template message or SMS, users can jump to the order details page via the link.
II. Purpose of Use
Users can find the corresponding order through the payment success message. For physical product orders, they can check the logistics status, and for knowledge product orders, they can quickly access the courses.
III. Operation Path
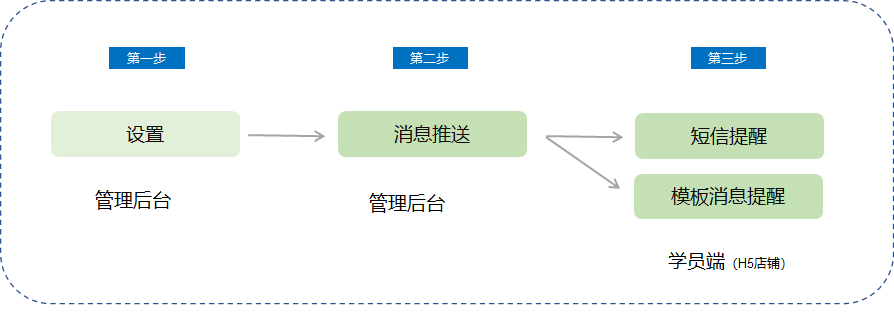
Merchant side: Merchant's PC management console → Settings → Push Settings (Message Push) → Enable Payment Success Message Reminder
Student side: WeChat template message/SMS → Order details page → Check logistics/Check courses/Check benefits
IV. Usage Tutorial
Step 1: Message Center
1. In the Message Center - Transaction and Logistics Reminders - Payment Success Reminder, you can choose two types of payment success message pushes: [Template Message] and [SMS].
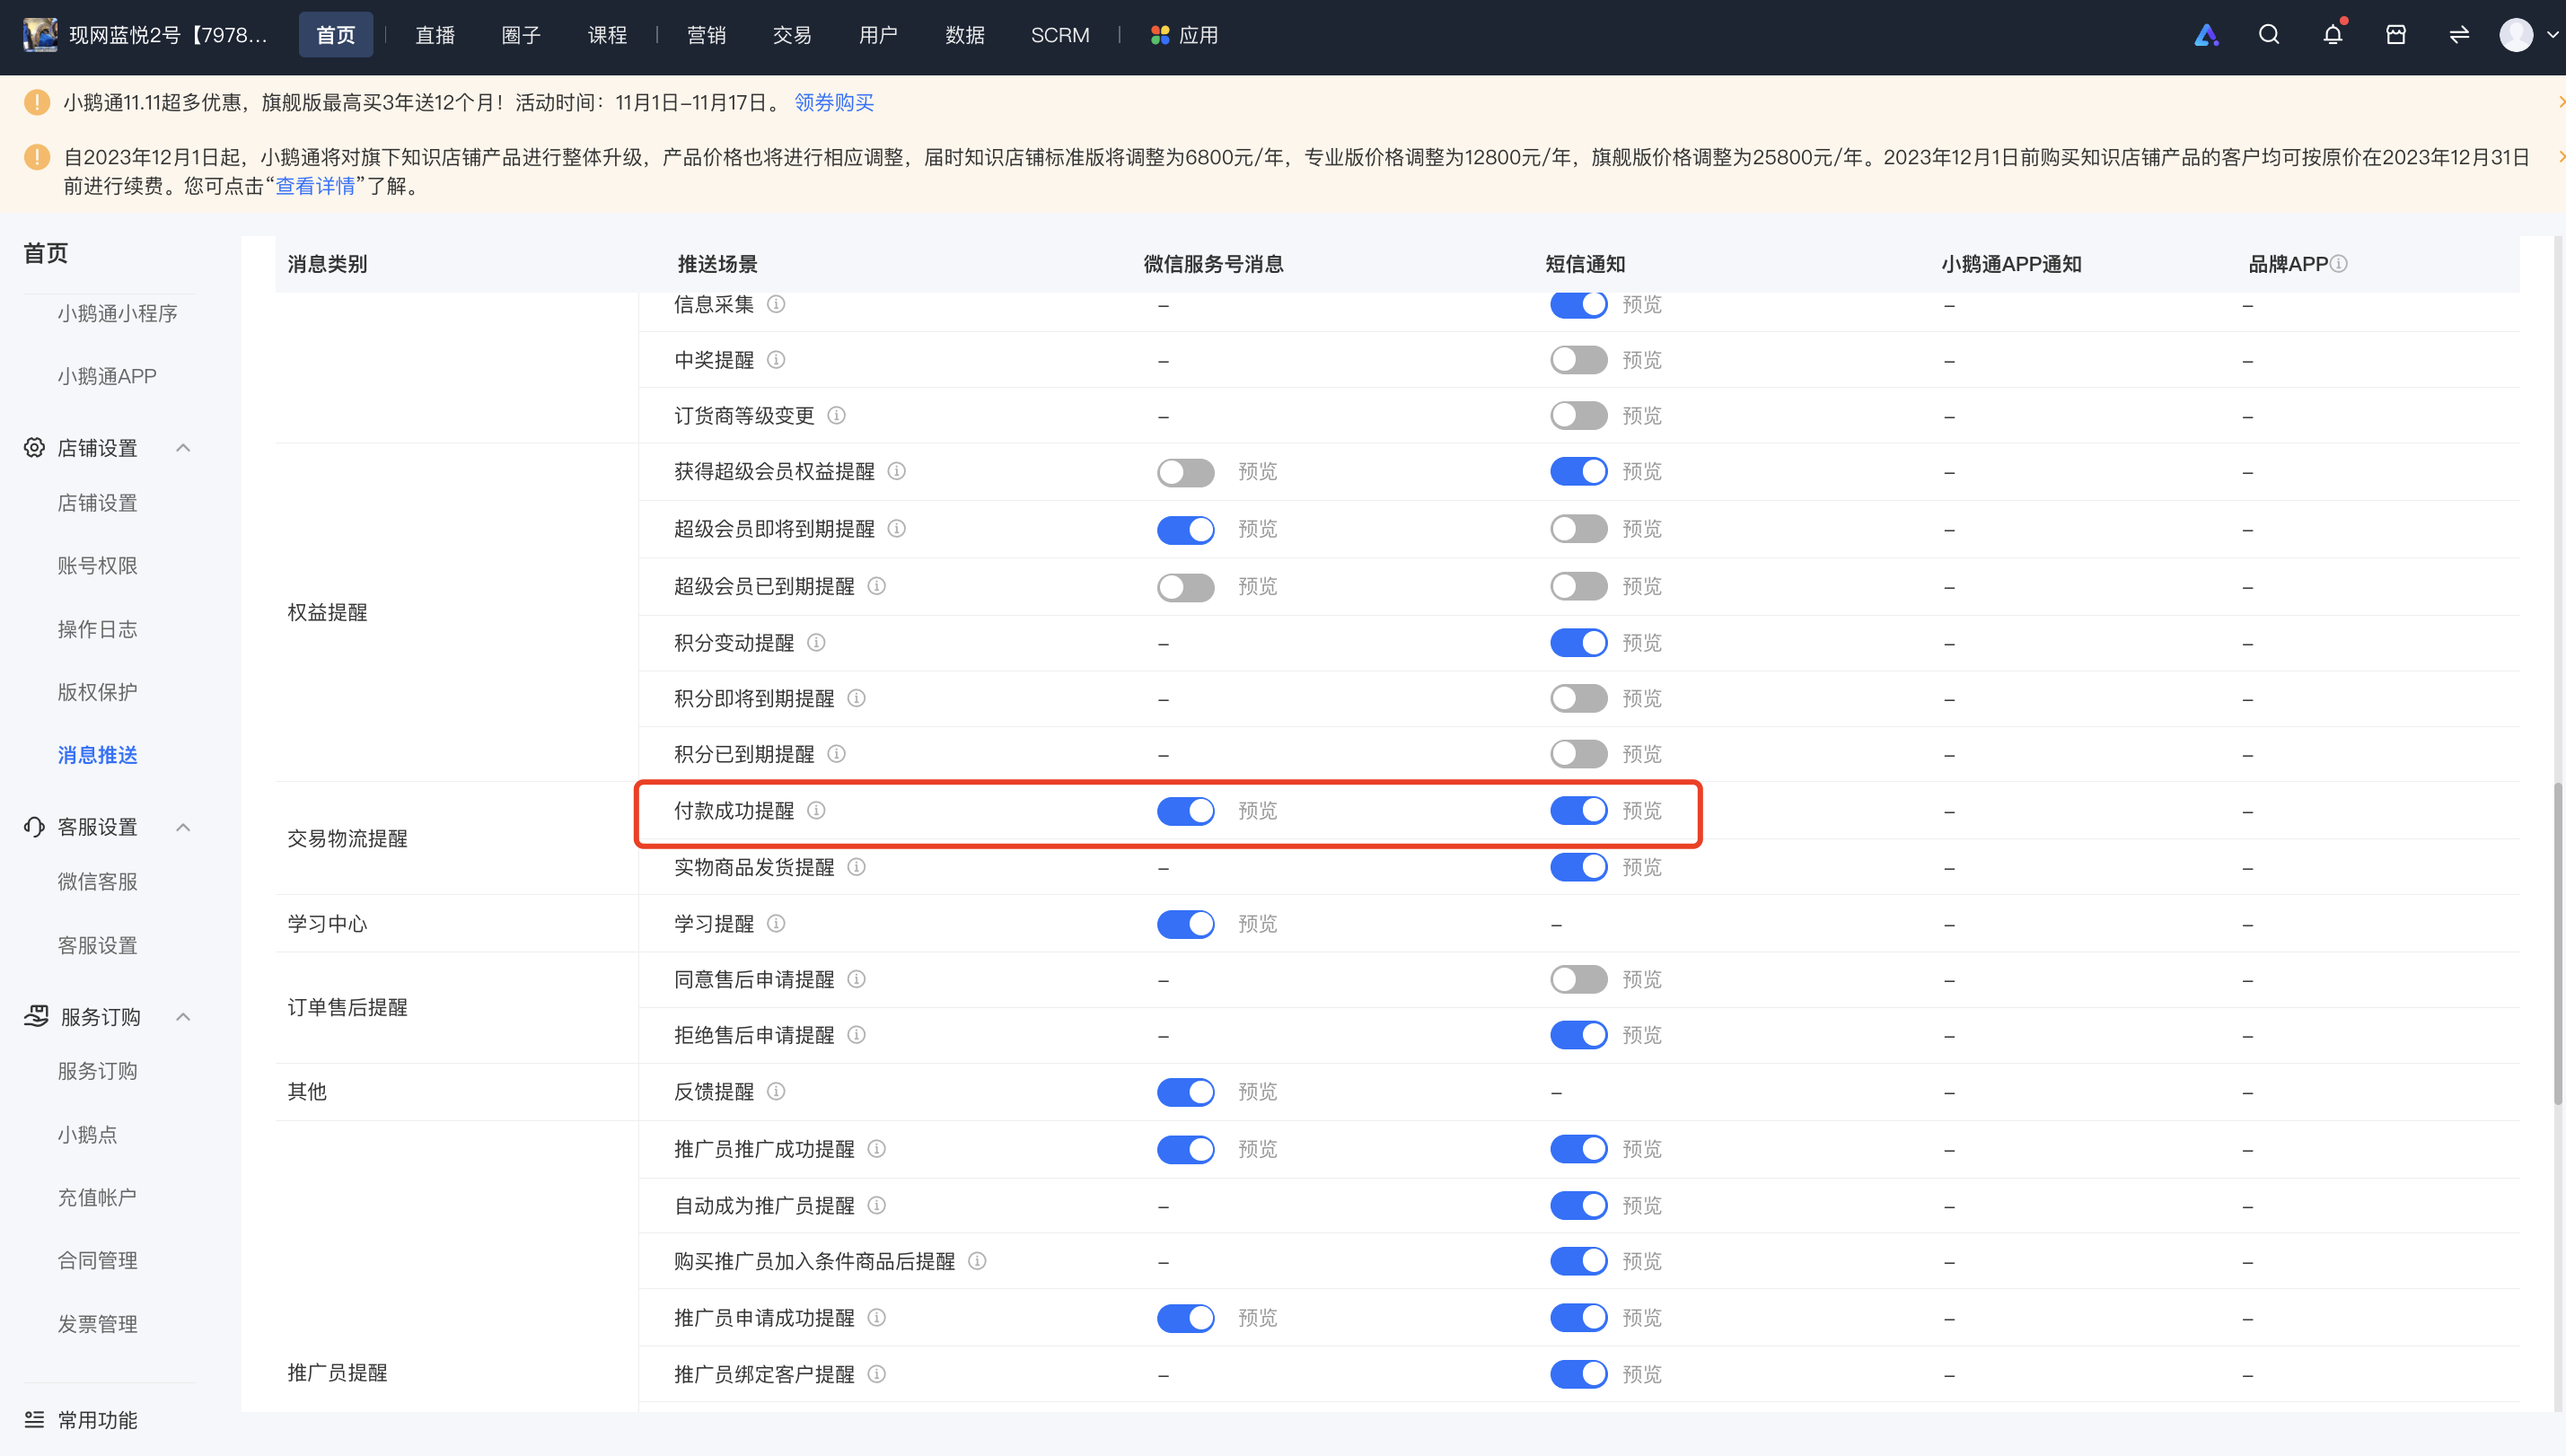
(Management background)
Step 2: Template Message
1. To enable template messages, you need to authorize the service account in advance. The payment success reminder does not support the individual mode and only supports the enterprise mode. Merchants must verify their service accounts.
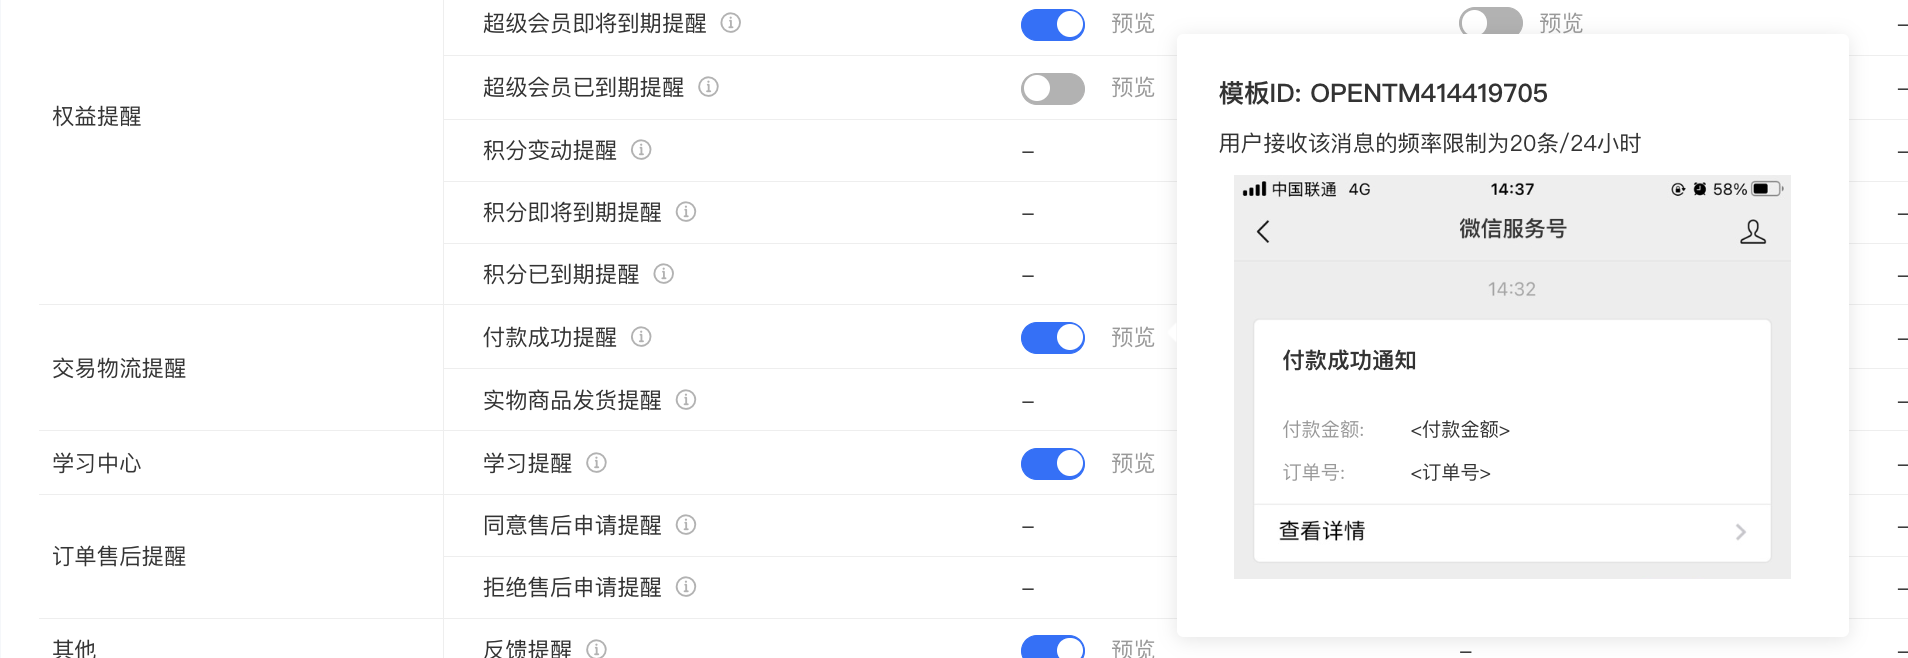
(Message Center)
2. The payment success template message reminder is pushed by default after payment and does not require users to enable it.
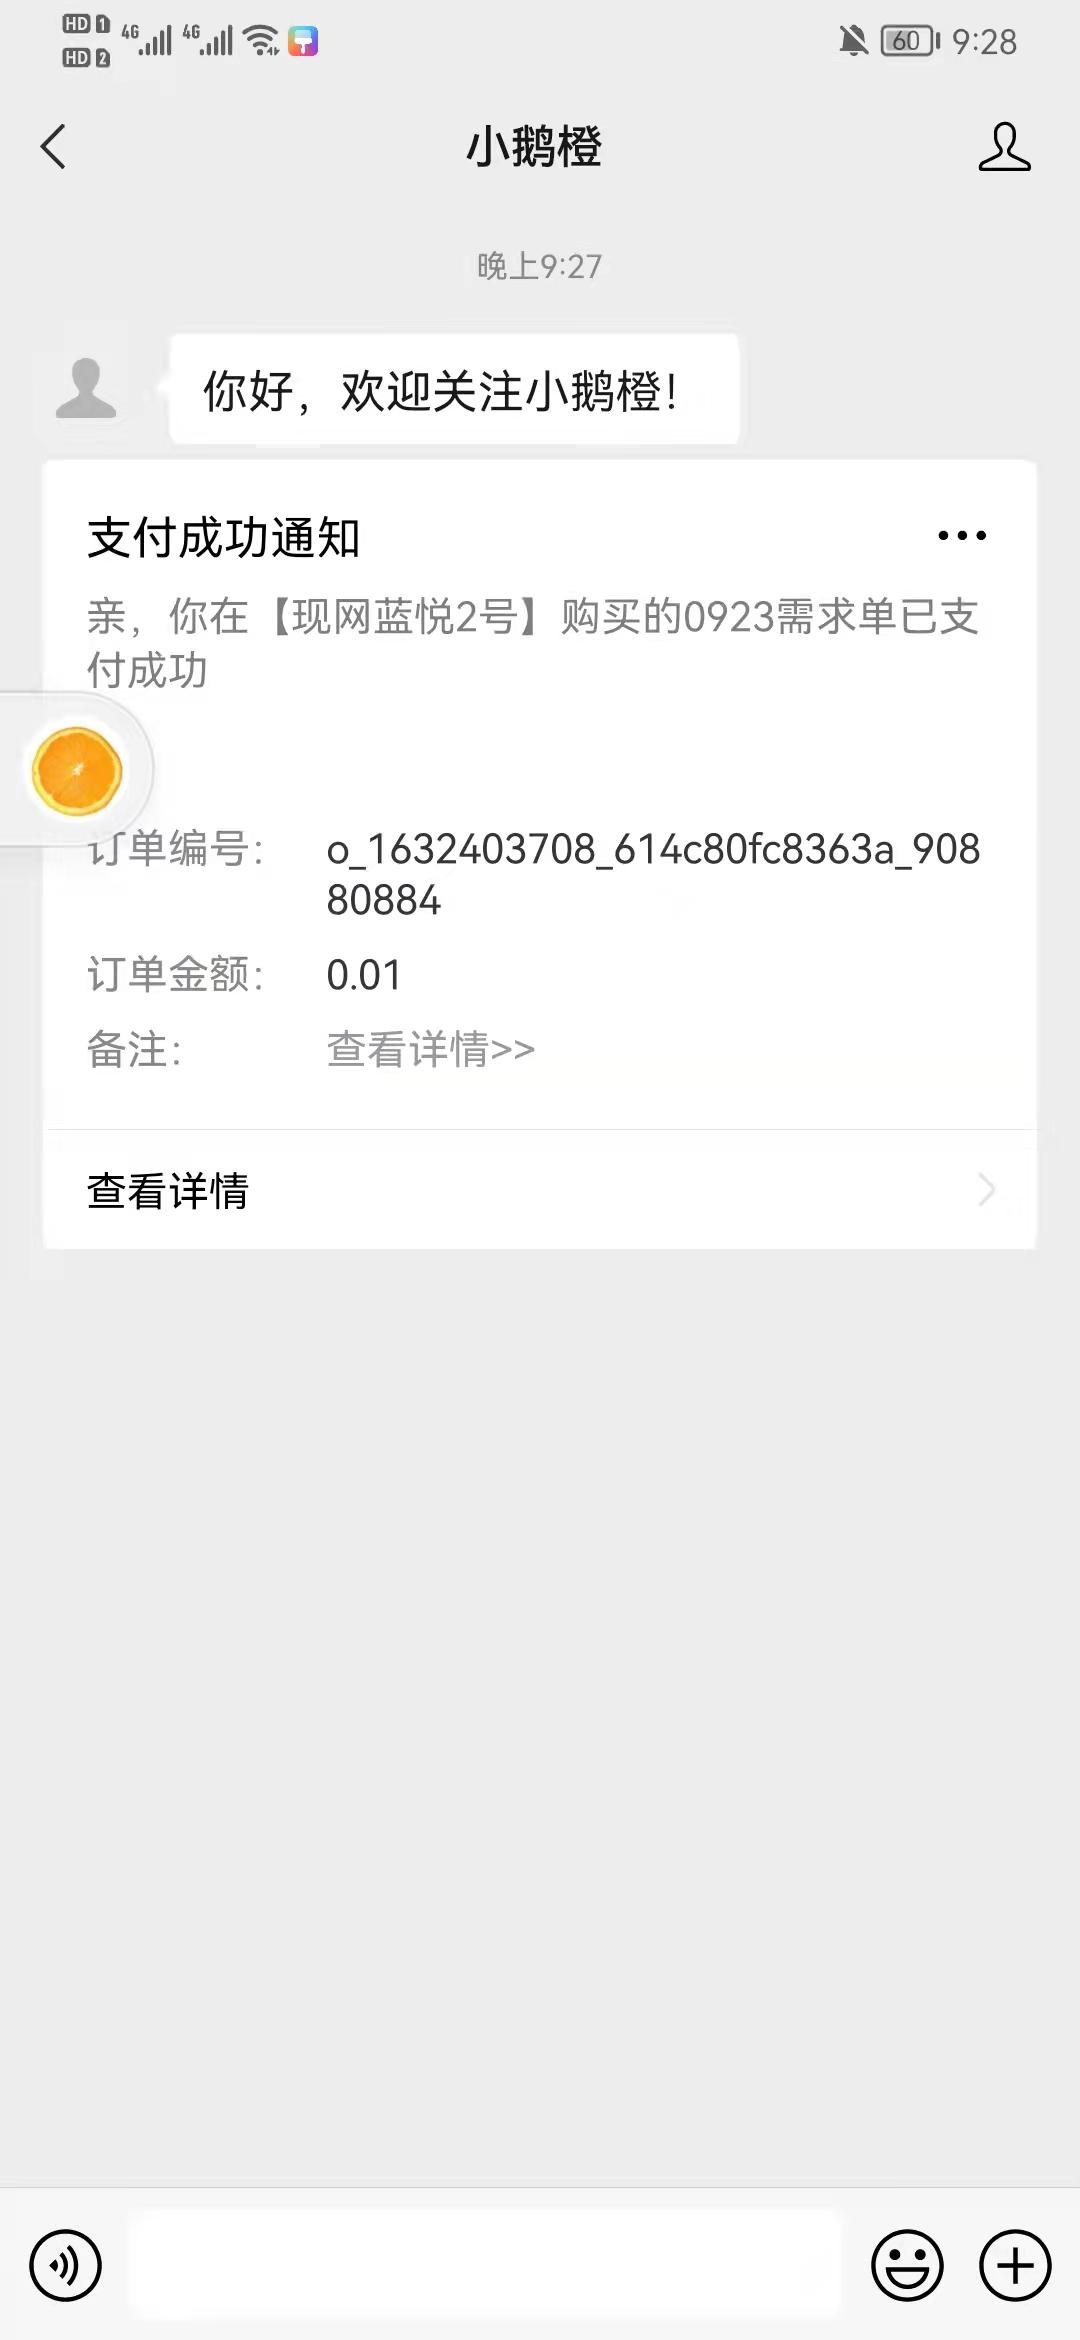
(Template Message)
3. Clicking on the template message can take you to the corresponding order details page, from which you can jump to the course details.
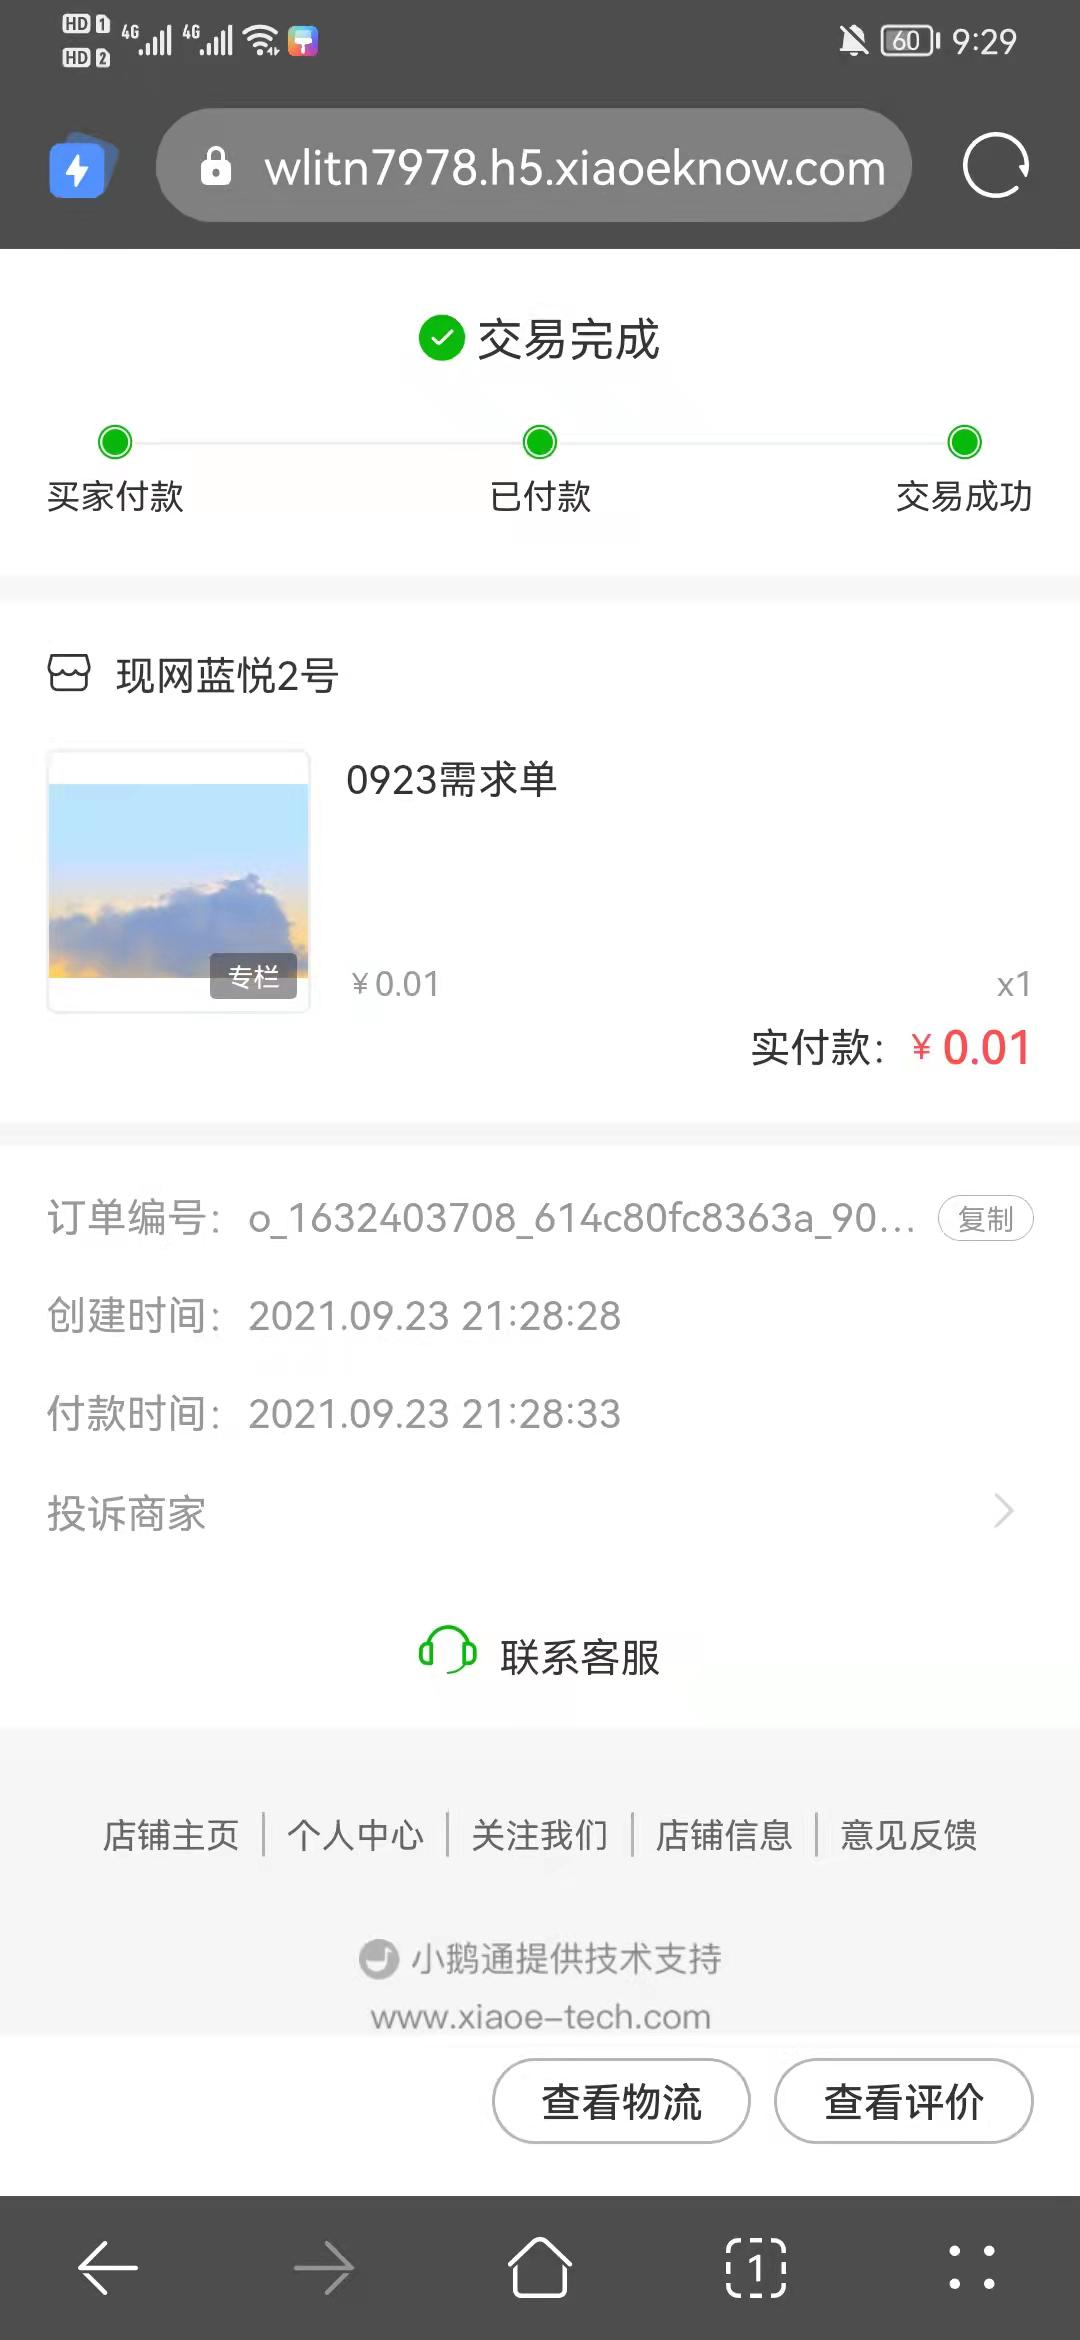
(Order Details)
Step 3: SMS Reminder
1. After enabling the SMS reminder, SMS will be sent to users who have bound their mobile phone numbers to the account.
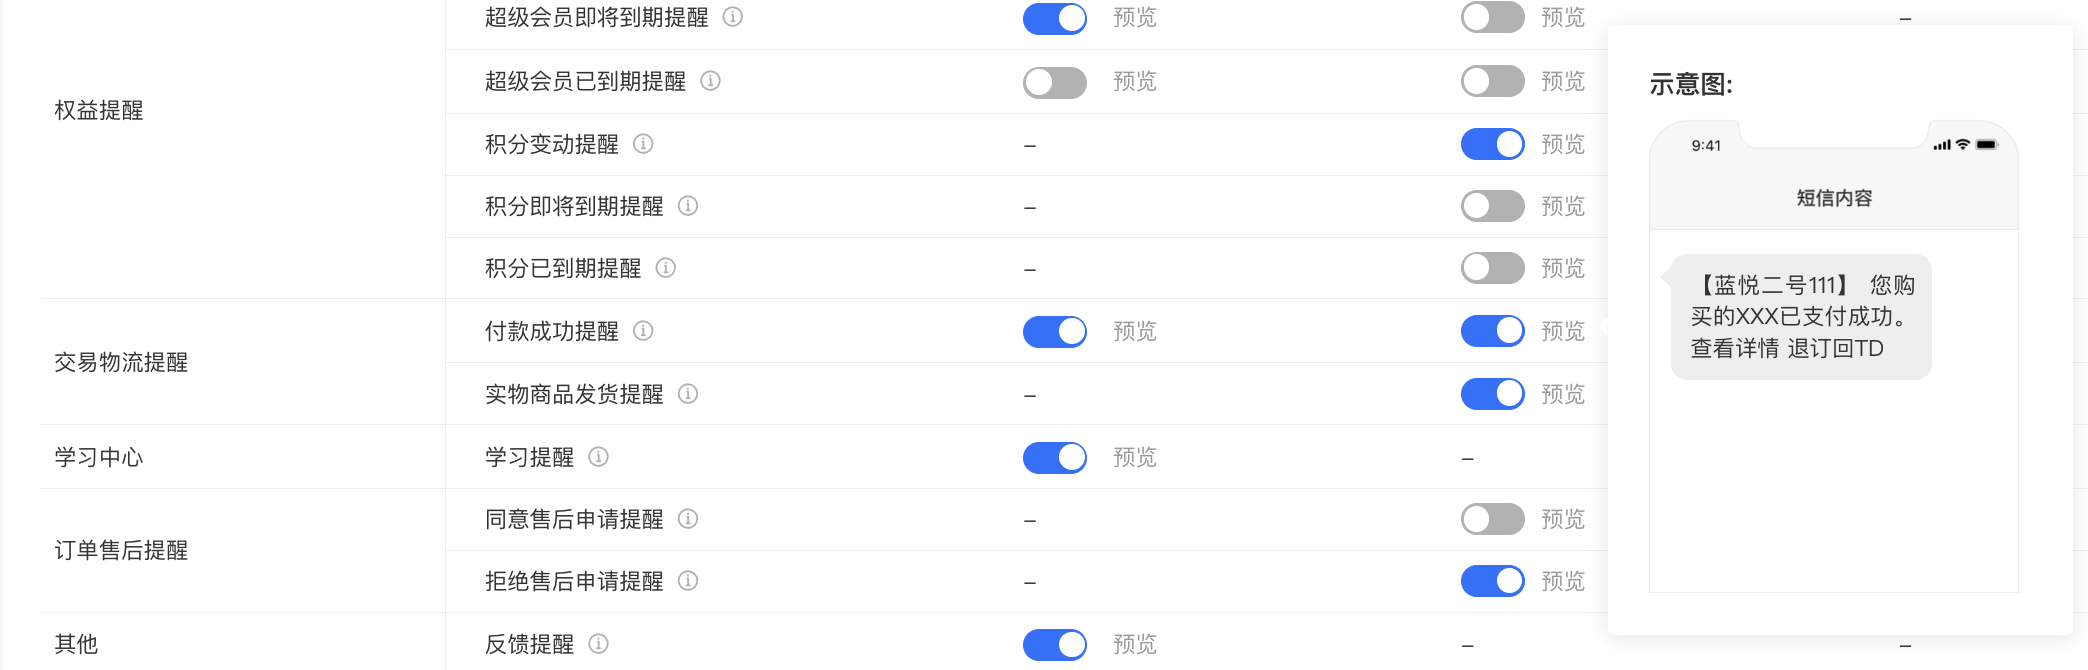
2. The SMS link can be directly opened to jump to the order details page. For physical product orders, you can check the logistics status on the order details page, and for knowledge product orders, you can jump to the course details.
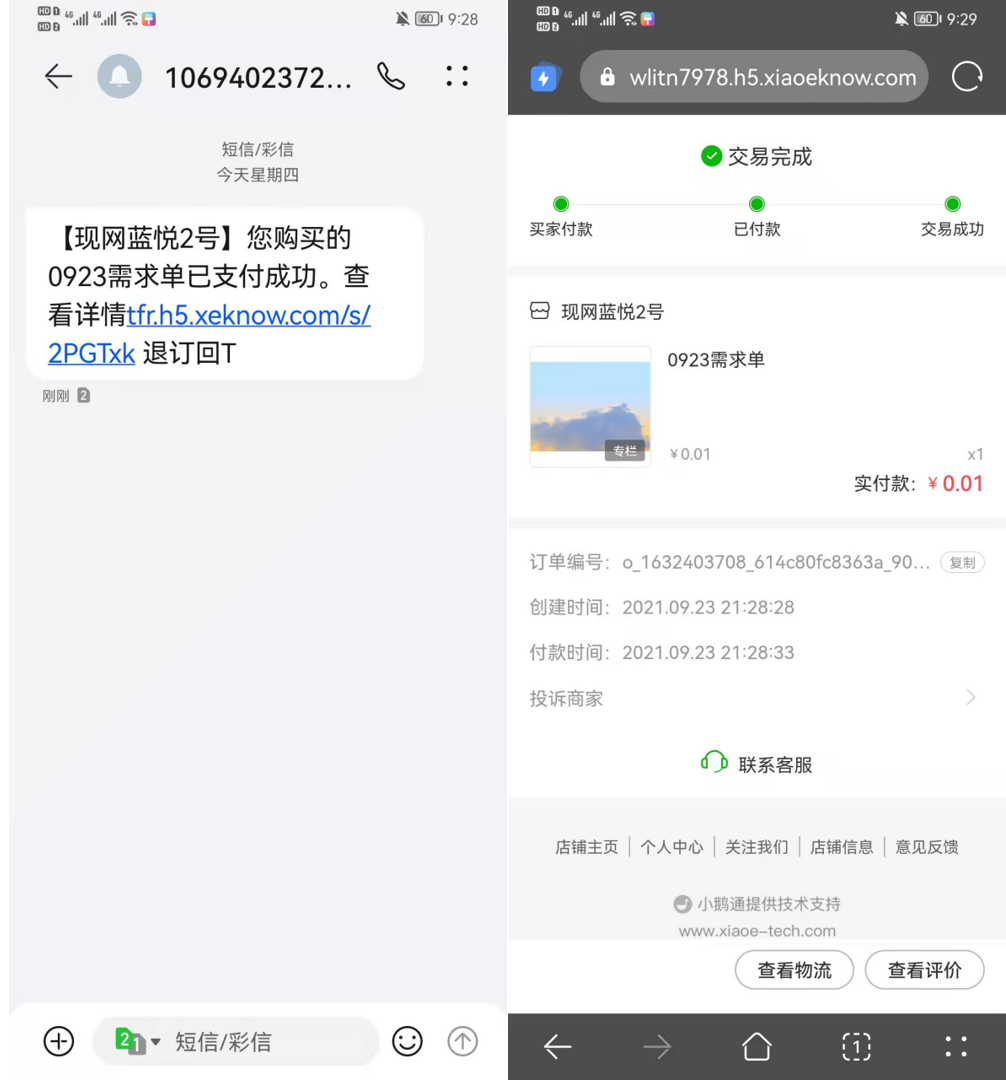
(SMS Details) (Order Details)
Why is there no union_id in the file exported from order management?
There may be the following three reasons:
1. The Official Account is not bound to the WeChat Open Platform.
The union_id is based on the WeChat Open Platform. For users to have a union_id, the prerequisite is that the Official Account authorized by the merchant to elink is bound to a WeChat Open Platform account.
2. The Official Account is already bound to the WeChat Open Platform, but the user registered before the Official Account was authorized to elink.
This is the case for old users. Users' union_id can only be obtained through WeChat login. In this case, users only need to log in to the store again. After going through the authorization login process once, the union_id will be supplemented.
3. The Official Account was first authorized to elink and then bound to the WeChat Open Platform after some time. The user registered during this time window.
Restricted by WeChat's login rules and considering the user experience, the union_ids of these users will not be automatically supplemented.
If it is confirmed that this is the case, merchants can unbind the Service Account and Mini Program on the elink Management Console. After re - authorizing the Service Account/Mini Program, users can automatically supplement their union_id by accessing the H5/Mini Program in WeChat again.
Which logistics companies' tracking numbers can be uploaded on elink?
Currently, it has been connected to 250 courier companies such as ZTO Express, BEST Express, and SF Express. The list is as follows:
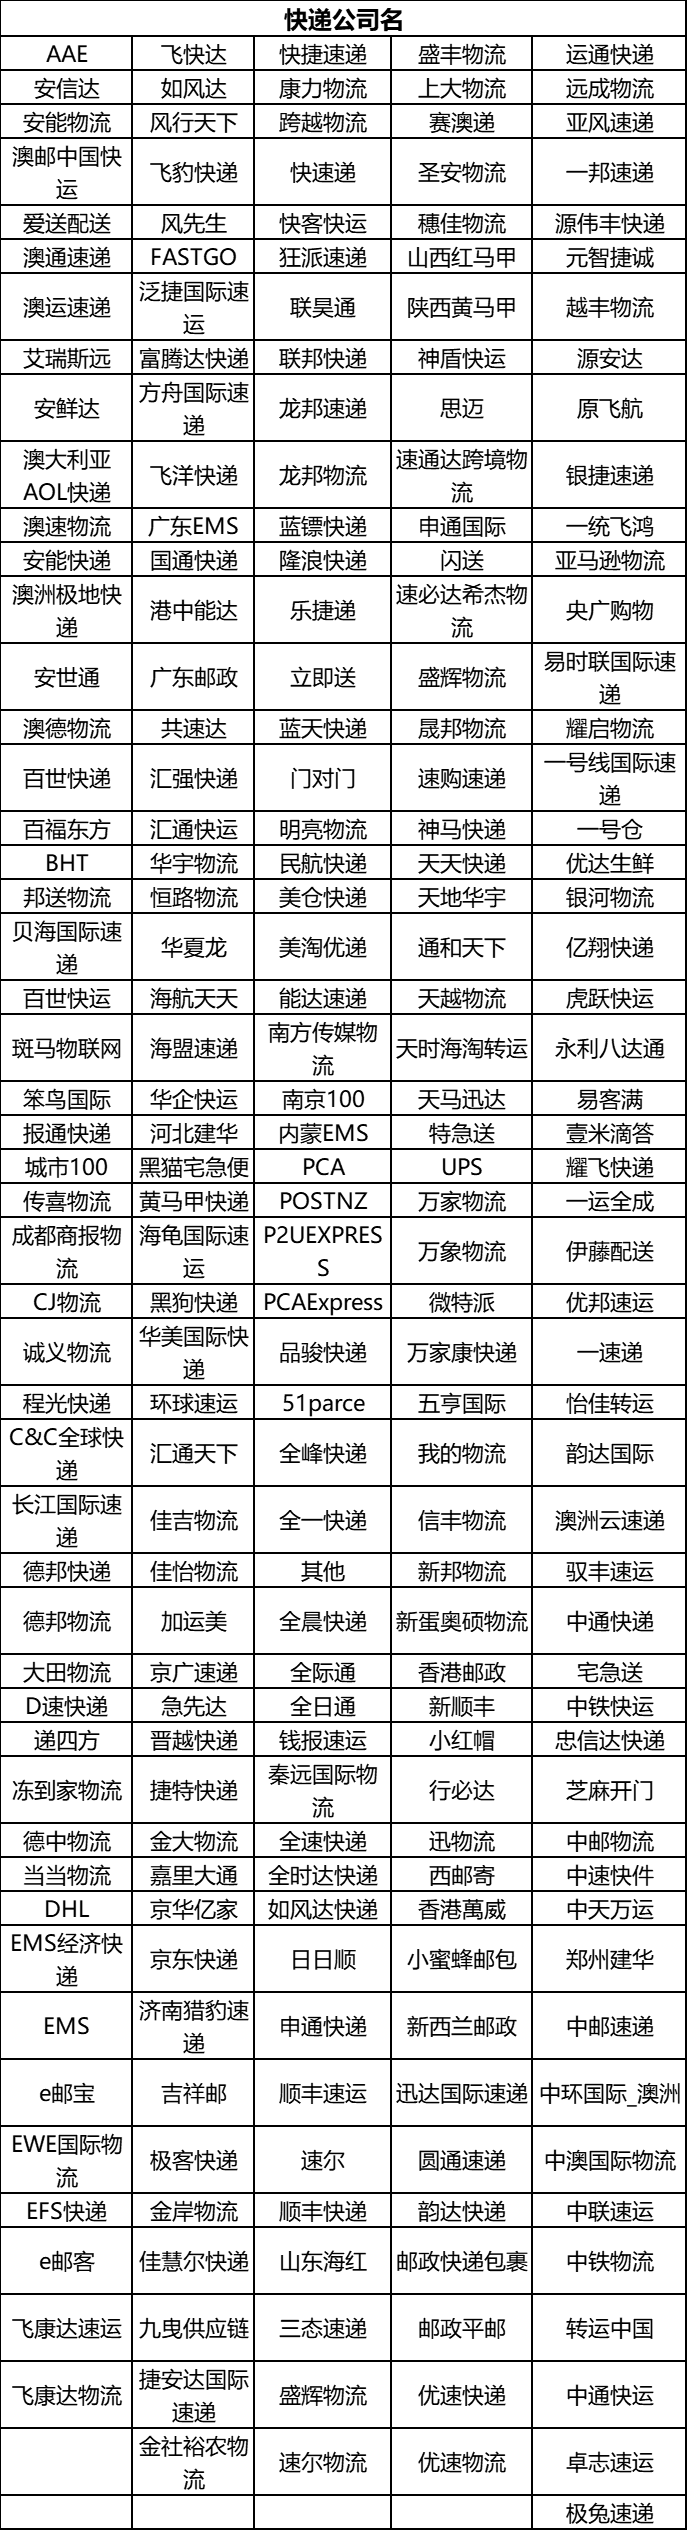
You can view or search for courier companies and select the courier name corresponding to the logistics company you use through Order - Order Query. Click on Order Shipment and choose to contact the courier by yourself.
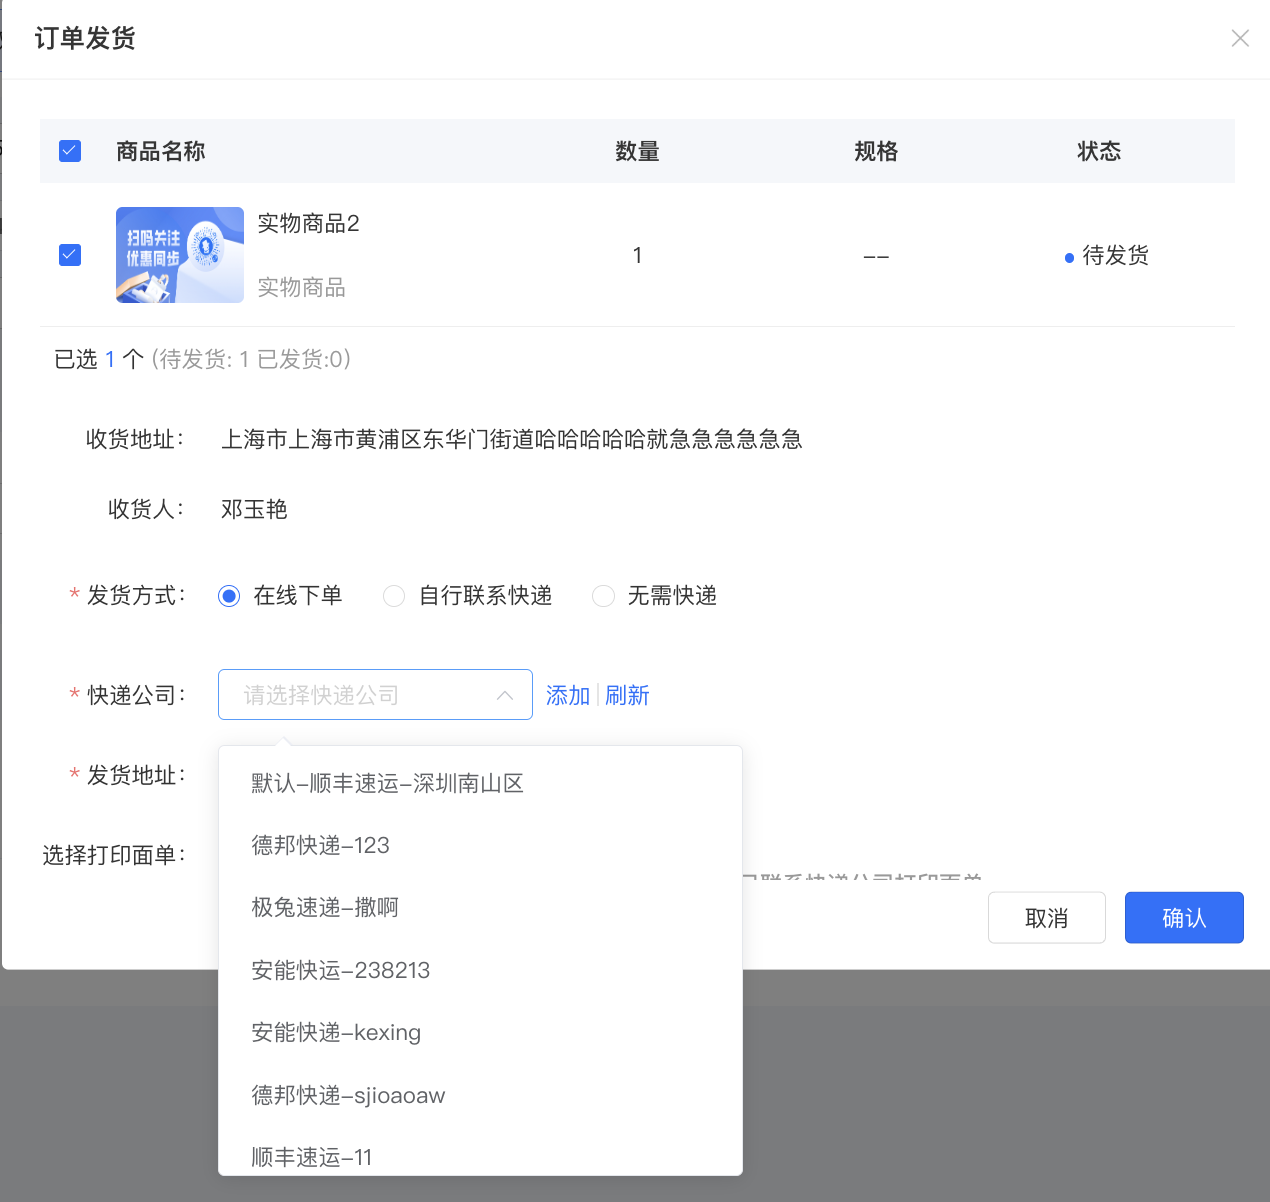
**Note:When using [Batch Manual Shipment], the courier company names in the downloaded template need to correspond to the names of the above - connected courier companies. Otherwise, a prompt indicating an incorrect courier company name will appear.
Tutorial on Using Batch Shipment
I. Feature Introduction
The batch order fulfillment feature for stores supports viewing the progress and results of batch processing, as well as the reasons for failed shipments. It allows merchants to process a larger number of orders for shipment at once and at a faster speed, helping them improve the efficiency of order fulfillment operations.
II. Purpose of Use
To optimize the operation experience and improve the operational efficiency of merchants. Merchants can use batch order fulfillment to handle course promotion and physical product shipments.
III. Use Cases
Xiaomao's store receives a large number of orders every day and needs to process multiple shipments. To improve the fulfillment efficiency, Xiaomao uploads a shipping template with tracking numbers for batch order fulfillment. In just one minute, hundreds to five thousand orders can be fulfilled at once. After uploading, merchants can view the progress and results of batch processing, modify failed orders, and resubmit them for shipment.
IV. Operation Path
Merchant side: Order Management → Batch Order Fulfillment → Upload Shipping Form → Complete Shipment and View Details;

V. Usage Tutorial
1. Click on Order Management → Batch Order Fulfillment;

2. Enter the Batch Order Fulfillment List → Click on Batch Order Fulfillment → Download the Template

**Note:
* A maximum of 5,000 records are supported (csv and xlsx formats are supported, and the file size should be controlled within 5MB).
* Please carefully fill in the logistics company and tracking number;
3. You can download the template and fill it out according to the format and requirements. Fill in the logistics company name as listed in the table. Currently, batch order fulfillment supports course promotion and physical product shipments:


**Note:Please fill in the full name of the corresponding logistics company. Incomplete information will result in shipment failure.
For example, filling in 'Zhongtong' as 'Zhong', 'zt', 'Zhongtong Package', etc. does not meet the requirements.
4. After uploading the file, you can view the shipment records: the total number of orders shipped, the number of successful shipments, and you can also download the records to view specific failures;

5. If all or some of the shipments fail, you can click the [Modify] button to update the logistics information for this batch;
**Note:Modifying and submitting the updated form information will overwrite the previously uploaded form.
Operation Guide for Self-pickup Delivery
I.Function Introduction
The headquarters can use this function to ship orders, record the express tracking numbers of the goods sent to the stores, and the logistics tracking of the orders. Merchants can view the logistics status on the B - end, and users can view the transportation status of the goods on the C - end. Note: Merchants need to contact the express company to place an order and collect information such as express tracking numbers on their own.
II.Purpose of Use
To show users the arrival status of goods at the store. When an order is in the 'Pending Pick - up' status, users can go to pick up the goods.
III.Use Scenarios
Xiaomin's store has many offline stores. The headquarters will send goods to different stores, but the transportation of goods takes a certain amount of time. Users don't know if the goods have arrived at the store. And if the goods have been sent to the store and the user applies for a refund, Xiaomin doesn't know if the order is in transit at this time. Therefore, for orders with self - pick - up stock preparation, users can view the logistics status. Merchants can handle refund requests for orders in transit on the B - end, and users can decide when to pick up the goods on the C - end based on the transportation status of the goods.
IV.Operation Path
Download the template and fill in the information - Ship on the B - end - Click Ship or Import in Bulk
V.Usage Tutorial
1.Single Order Shipping
1.1
Transactions - Self - pick - up Shipping - Ship

1.2
Fill in the logistics information - Confirm

1.3
The orders after shipping are displayed under [Shipped]

2.Bulk Shipping
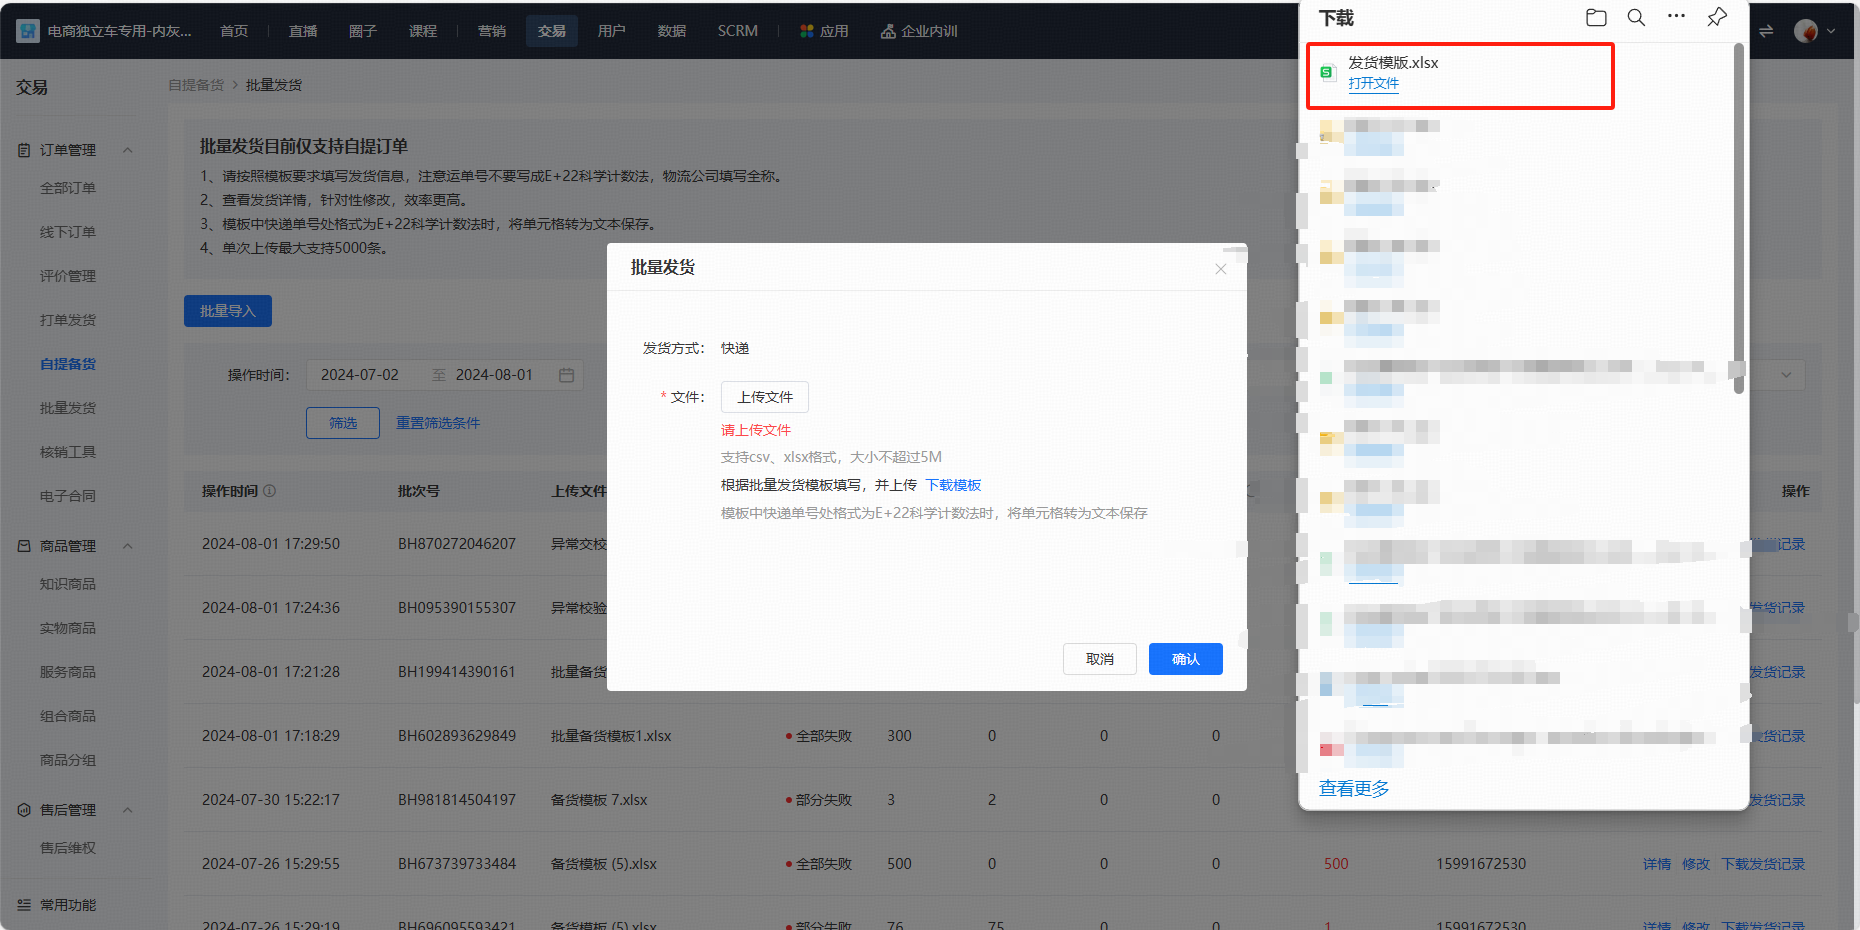
2.1 Download the shipping template
Transactions - Self - pick - up Shipping - Bulk Shipping - Bulk Import - Download Template


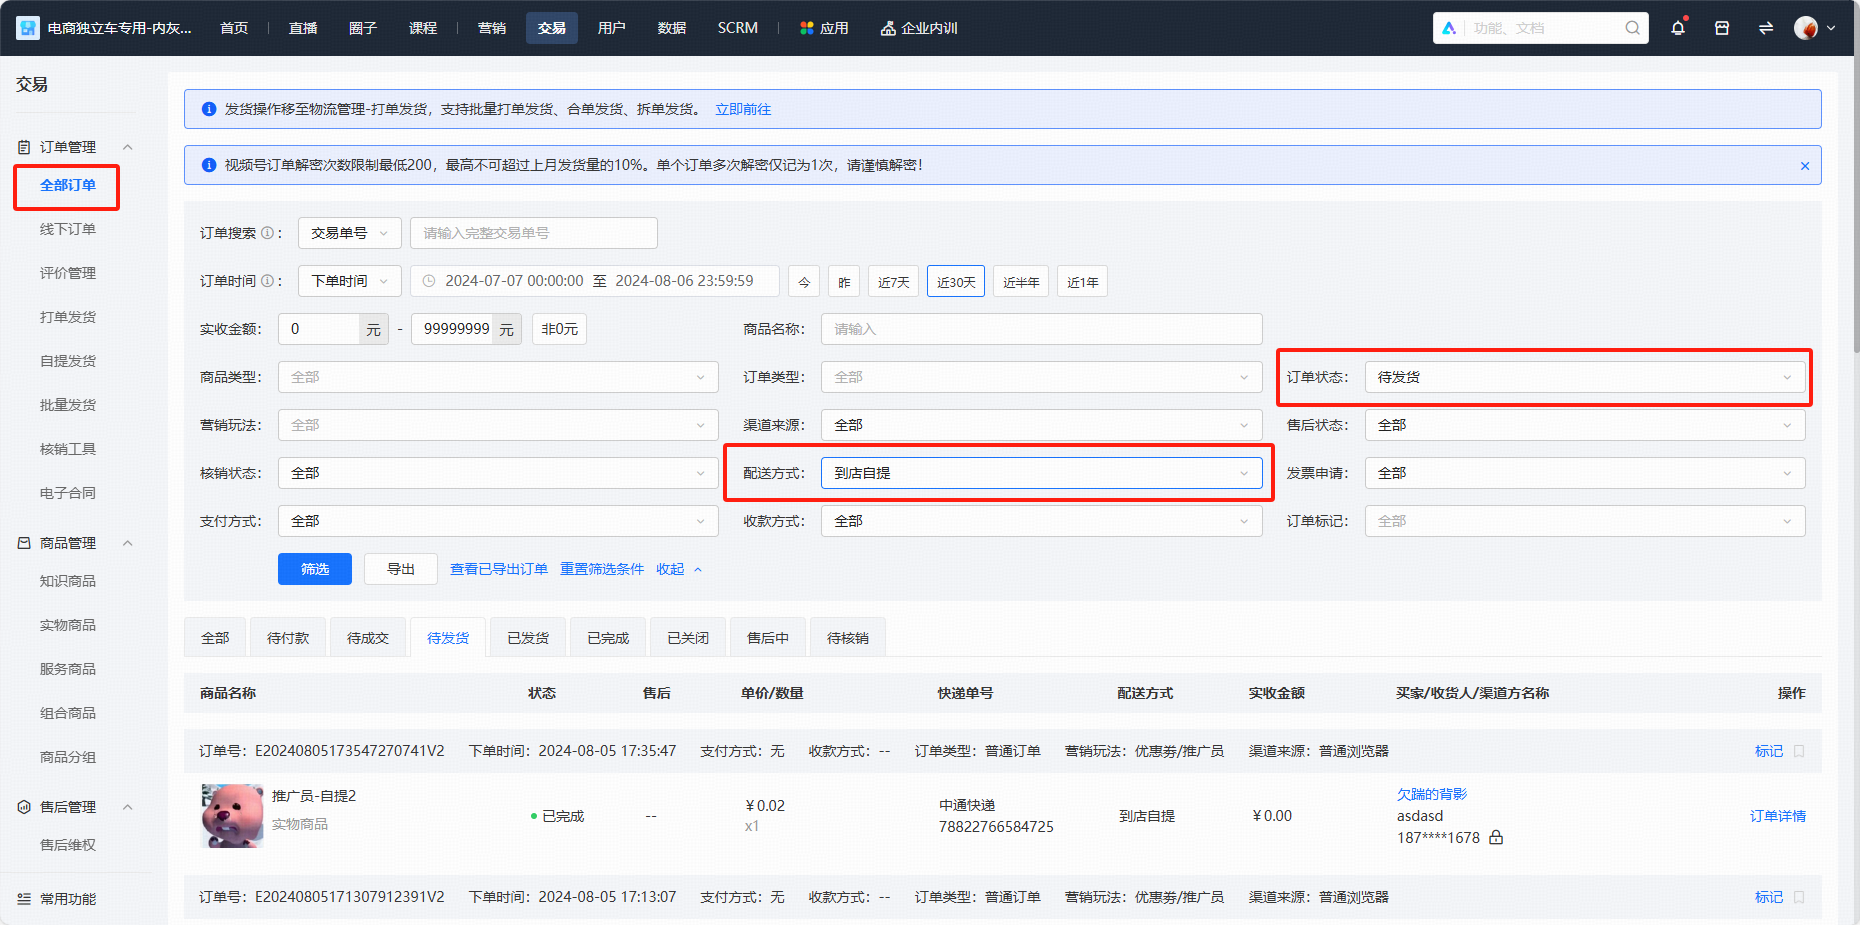
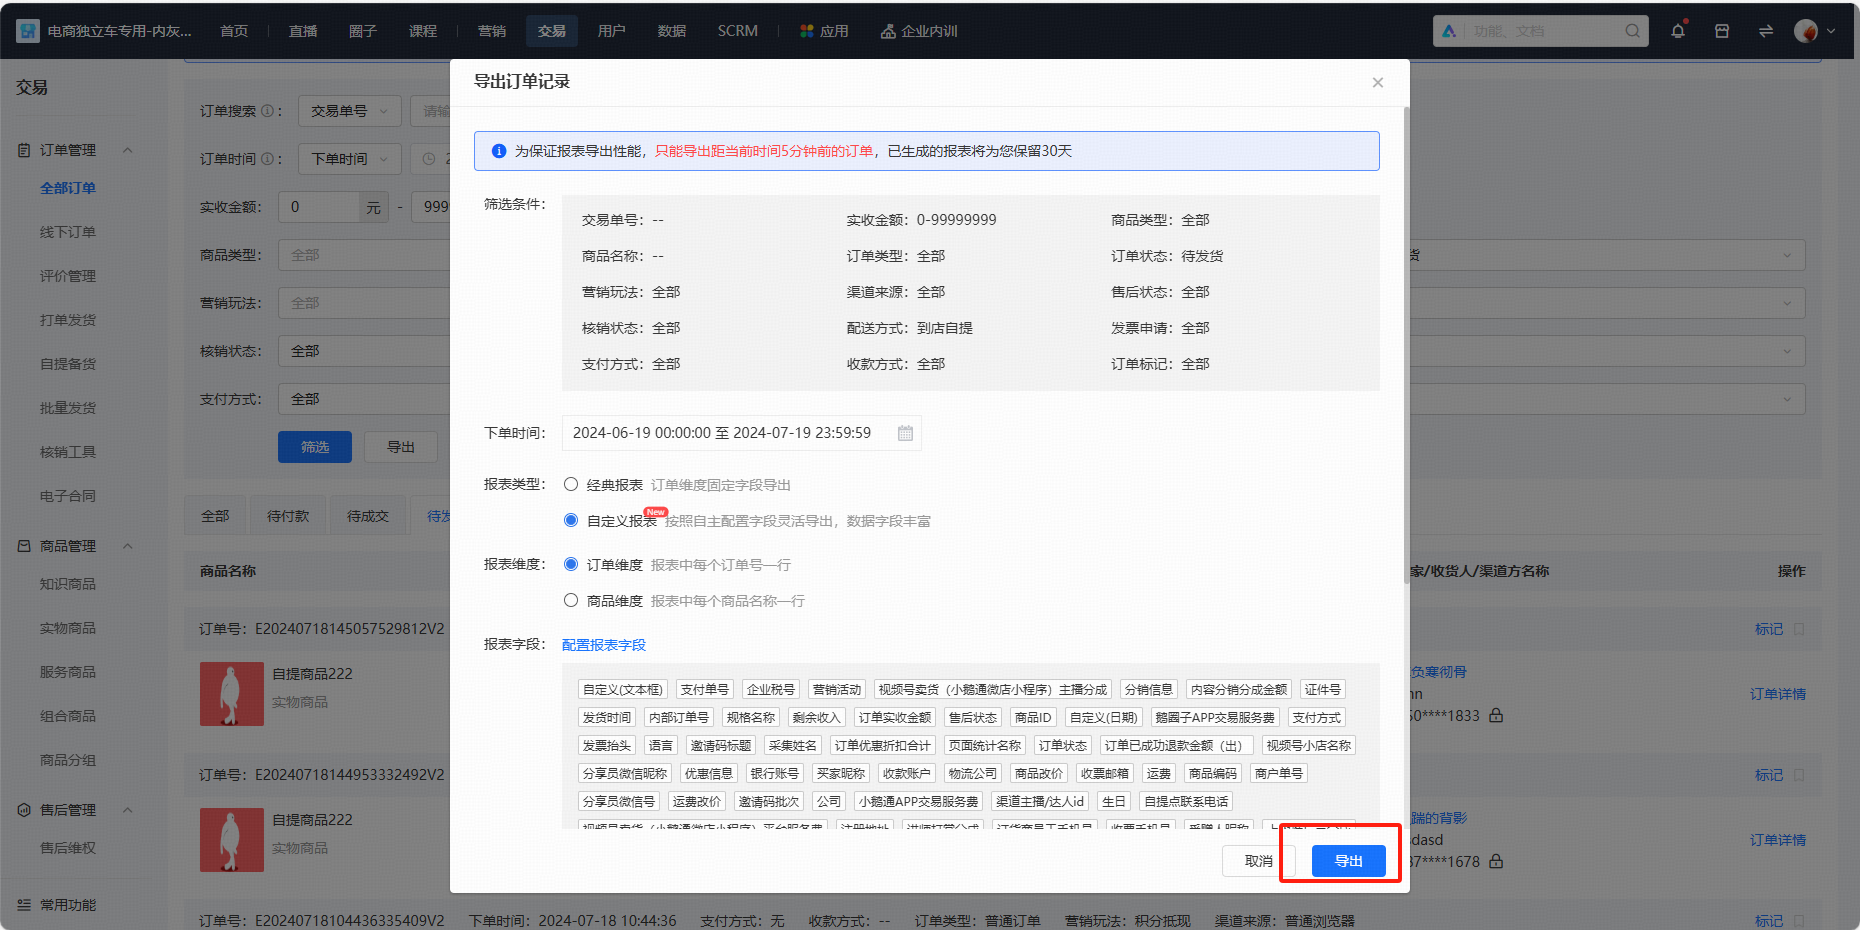
2.2 Export the list of self - pick - up orders pending shipping
Transactions - All Orders - Filter [Pending Shipping] [Self - pick - up at Store] - Export - Export
2.3 Fill in the information according to the template
Copy the internal order number from the order export form - Paste it into the order number field of the shipping template - Fill in the express company and tracking number - Save


2.4 Submit the form on the B - end
Bulk Shipping - Bulk Import - Upload File - Confirm

2.5 View the operation record
Transactions - Self - pick - up Shipping - Bulk Shipping (You can view the operation results)

Click Details (View the specific reason description)

Click Download Shipping Record (View the specific operation results of the orders)

3.Handle Refunds
3.1 Transactions - After - sales Rights Protection - Filter the after - sales status - You can handle refunds according to the shipping status

VI. Precautions
1.Please upload the correct express company and tracking number, and do not ship the same order repeatedly;
2.You can modify the logistics information before order verification;
3.If there is an after - sales situation for an order, you cannot operate the shipping. Orders in the process of shipping will also fail to be shipped;
4.The self - pick - up shipping function supports sending SMS to users. Please recharge the SMS push account in time. If the account balance is insufficient, the order can still be shipped, but SMS will not be sent.The shipping function supports sending SMS to users. Please top up your SMS push account in a timely manner. If the account balance is insufficient, the order can still be shipped, but SMS will not be pushed.
Qualification requirements
What qualifications are required to sell physical goods?
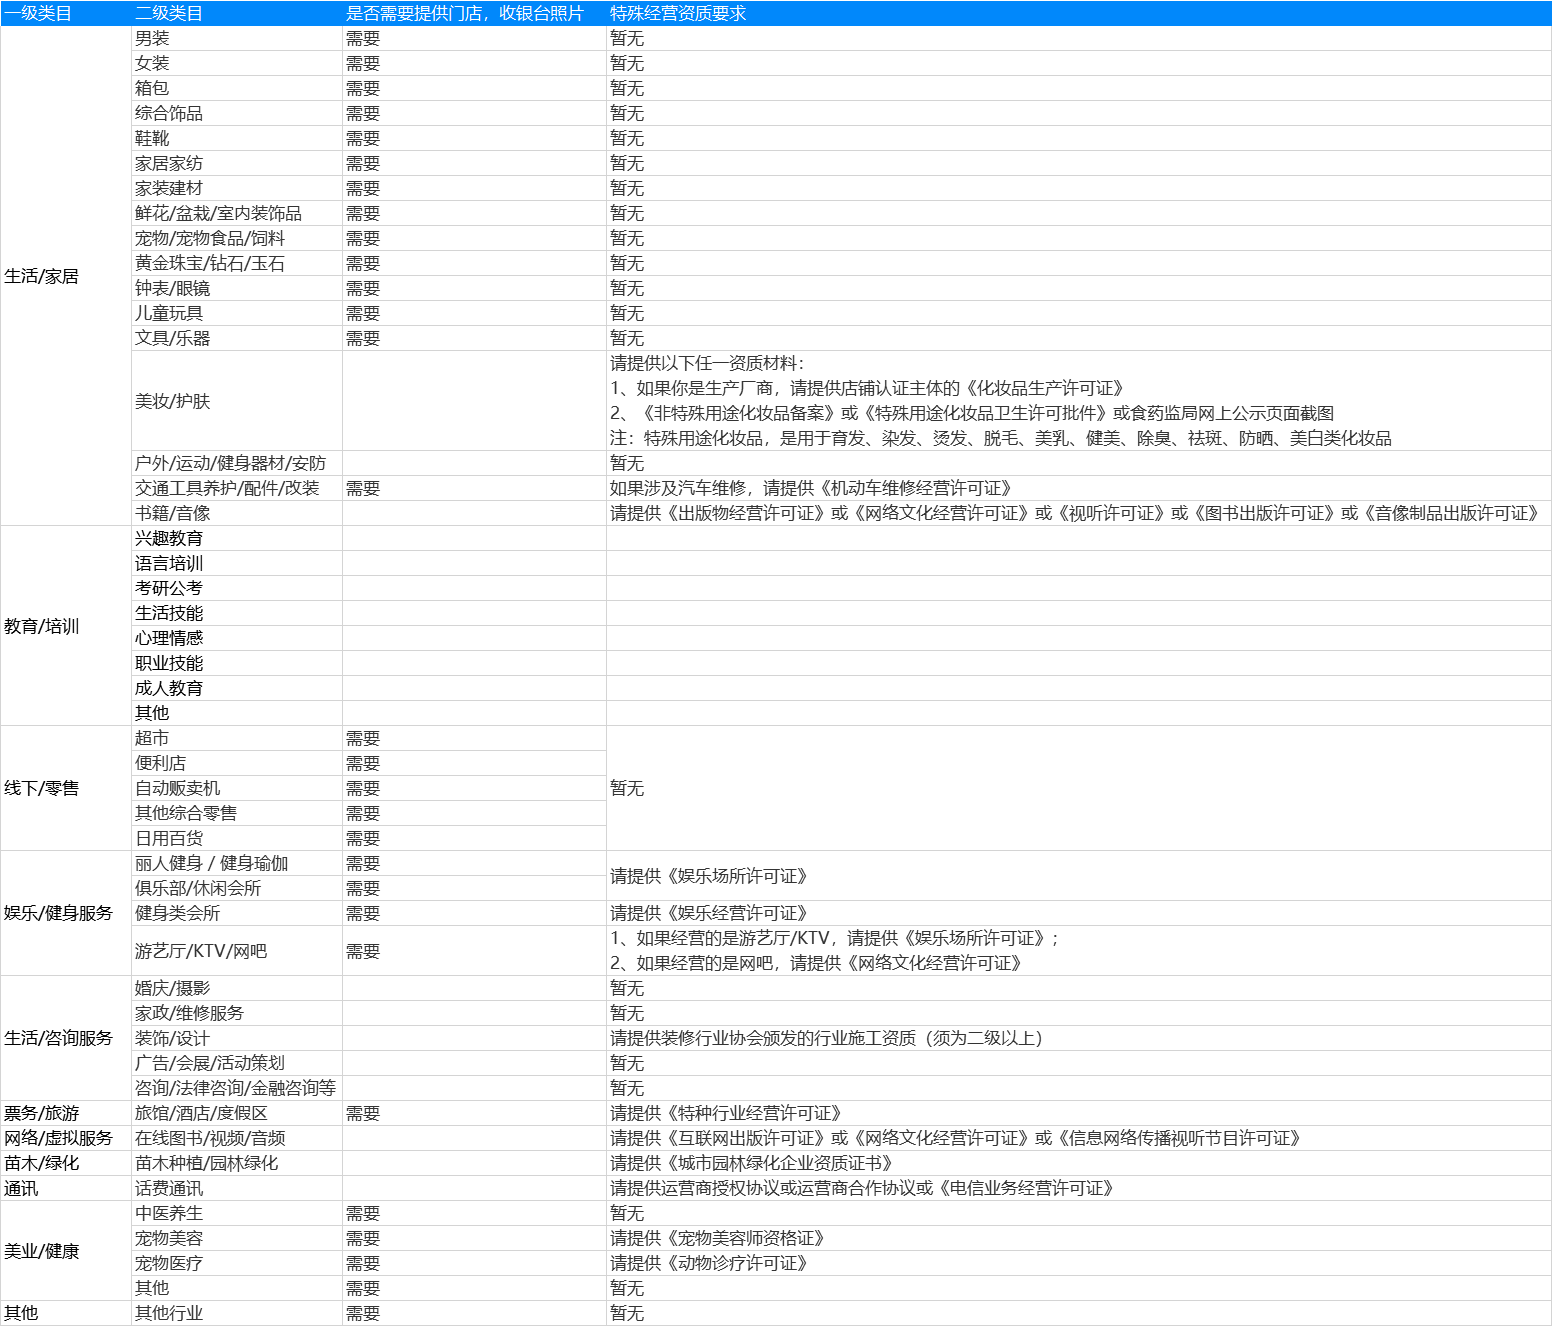
According to the provisions of national laws and regulations, when you operate in specific industries and sell physical goods, you need to meet the corresponding qualification requirements. You can refer toelink Industry Access Rules
Categories available for individual business operators
Product management
Which marketing tools are supported by the physical product e-commerce function?
Supports coupons, promo codes, promoters, payment rewards, limited-time discounts, Joint Orderg, viral posters, and page statistics
How to set the minimum purchase quantity for products
I. Feature Introduction
Can be setPhysical productsorPaid couponsMinimum order quantity to control the minimum number of items a user can purchase each time.
II. Use Cases
If the unit price of the physical products sold by the merchant is low, the merchant can set the minimum order quantity to 5 items, thereby increasing sales volume and average order value.
III. Operation Path
Merchant side: [Physical products] Merchant PC management console → Products → Product management → Create/Edit products
[Paid coupons] Merchant PC management console → Marketing → Paid coupons → Create/Edit paid coupons
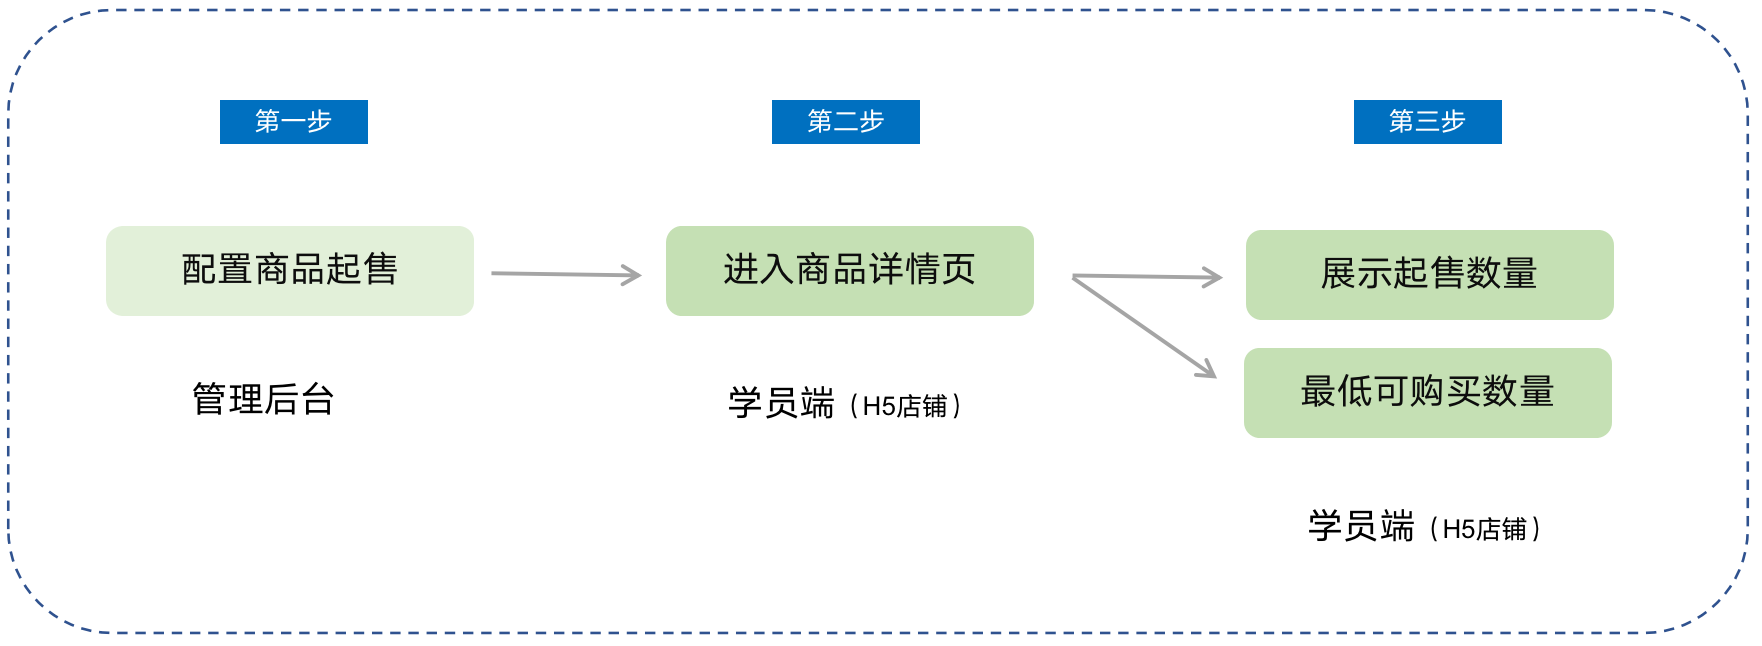
Student side: WeChat H5 store → Product detail page → Click to purchase
IV. Usage Tutorial
Step 1: Configure the minimum order quantity for products(Taking physical products as an example)
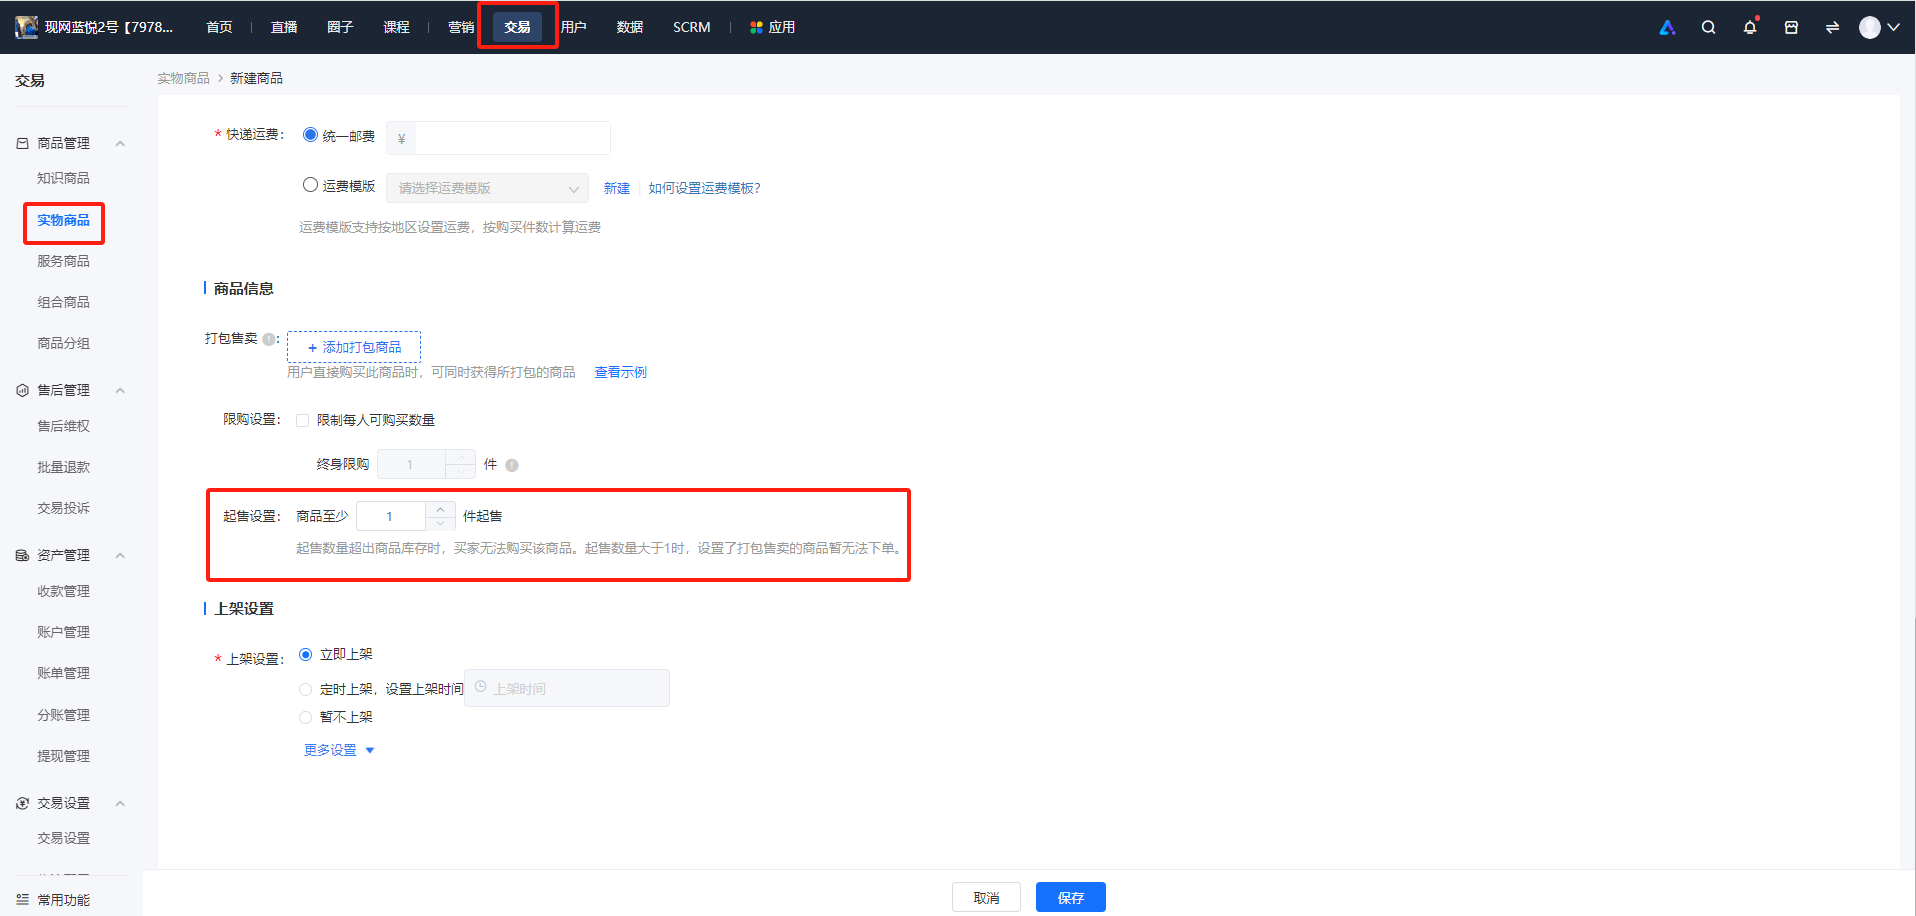
1. Log in to the store management backend, click [Transactions] - [Product management] - [Physical products], and click [New product].
2. In the [Product information] section, check [Minimum order quantity setting] and set the quantity.
**Note:When the minimum order quantity exceeds the product inventory, users cannot purchase the product. And when the minimum order quantity is greater than 1, associated products for sale cannot be ordered temporarily.
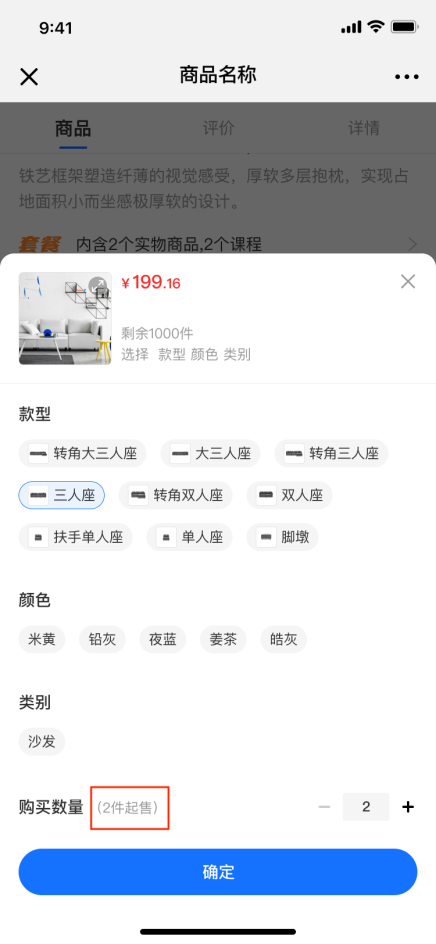
Step 2: Purchase on the student side
On the product detail page of physical products/paid coupons, it displaysthe minimum number of products that users can purchase.
Tutorial on Using Product Purchase Limits
I. Function Introduction
In scenarios such as clearance sales at low prices or new product launches, merchants can set purchase limits for products, restricting the number of items each user can purchase within a certain period. This helps merchants control individual users' purchasing behavior and improve the product's reach to users. Currently, this feature is applicable to the sales scenarios of [Physical Products] and [Paid Coupons].
II. Purpose of Use
(1) Cost control: Limited - purchase products have certain price advantages. By setting purchase limits, merchants can prevent users from bulk - buying products for resale.
(2) Creating a sense of product scarcity: Highlight the value of products and stimulate consumers' desire to buy.
(3) Preventing malicious inventory hoarding and fraudulent orders: In scenarios such as new product launches or special sales, more users can purchase products and enjoy the benefits.
III. Usage Scenarios
When a merchant plans a promotional event for physical products with low prices to attract more user traffic, they can set a limit of 3 items per user. This helps prevent users from buying a large number of low - priced products at once and reduces the occurrence of users taking advantage of the promotion.
IV. Operation Path
Merchant side: [Physical Products] Merchant's PC management console → Transactions → Product Management → Create/Edit Physical Products
[Paid Coupons] Merchant's PC management console → Marketing→ Marketing Campaigns→ Paid Coupons → Create/Edit Paid Coupons
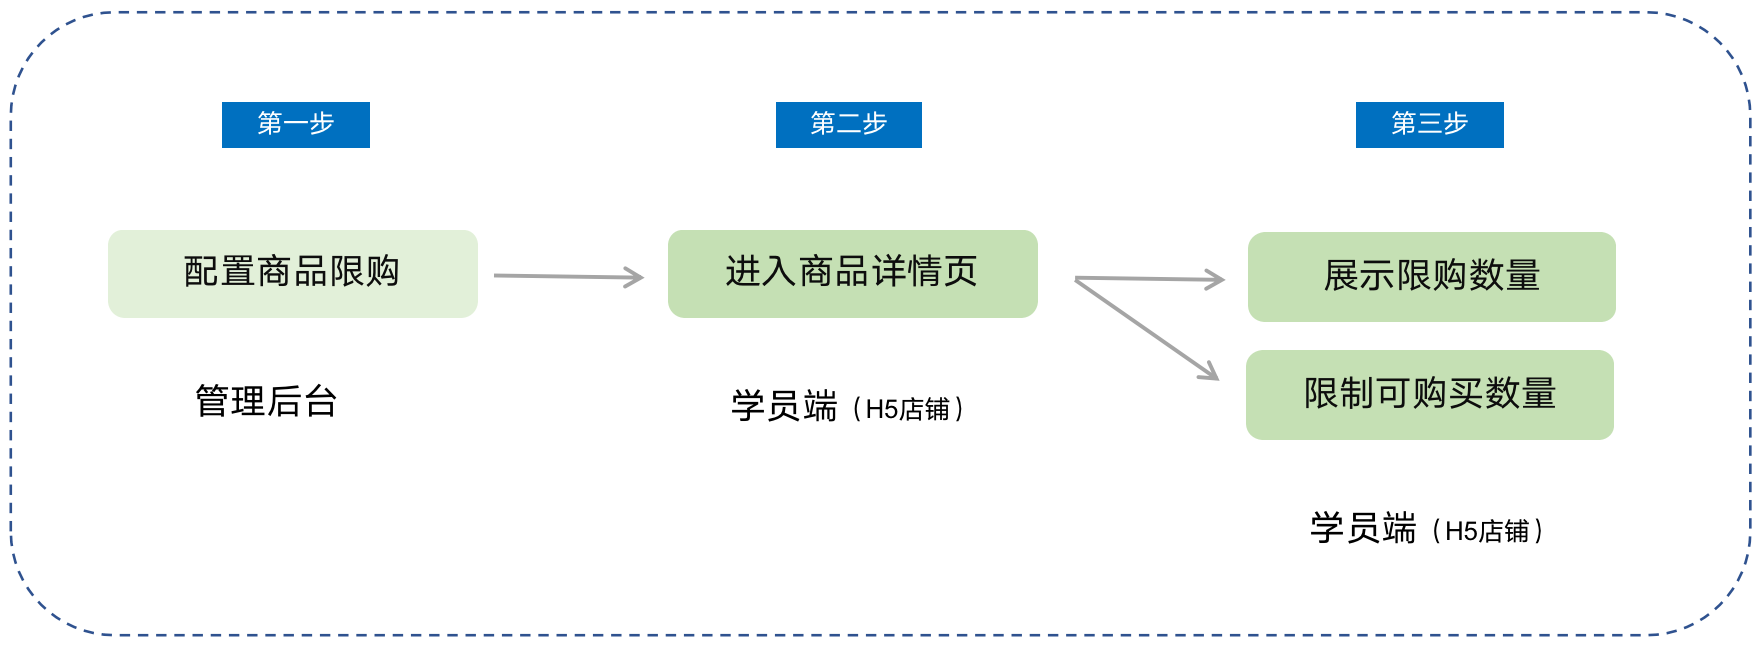
Student side: WeChat H5 Store → Product Details Page → Click to Purchase
V. Usage Tutorial
Step 1: Configure product purchase limits(Taking physical products as an example)
1. Log in to the store management backend. Click [Transactions] - [Product Management] - [Physical Products], and then click [New Product].
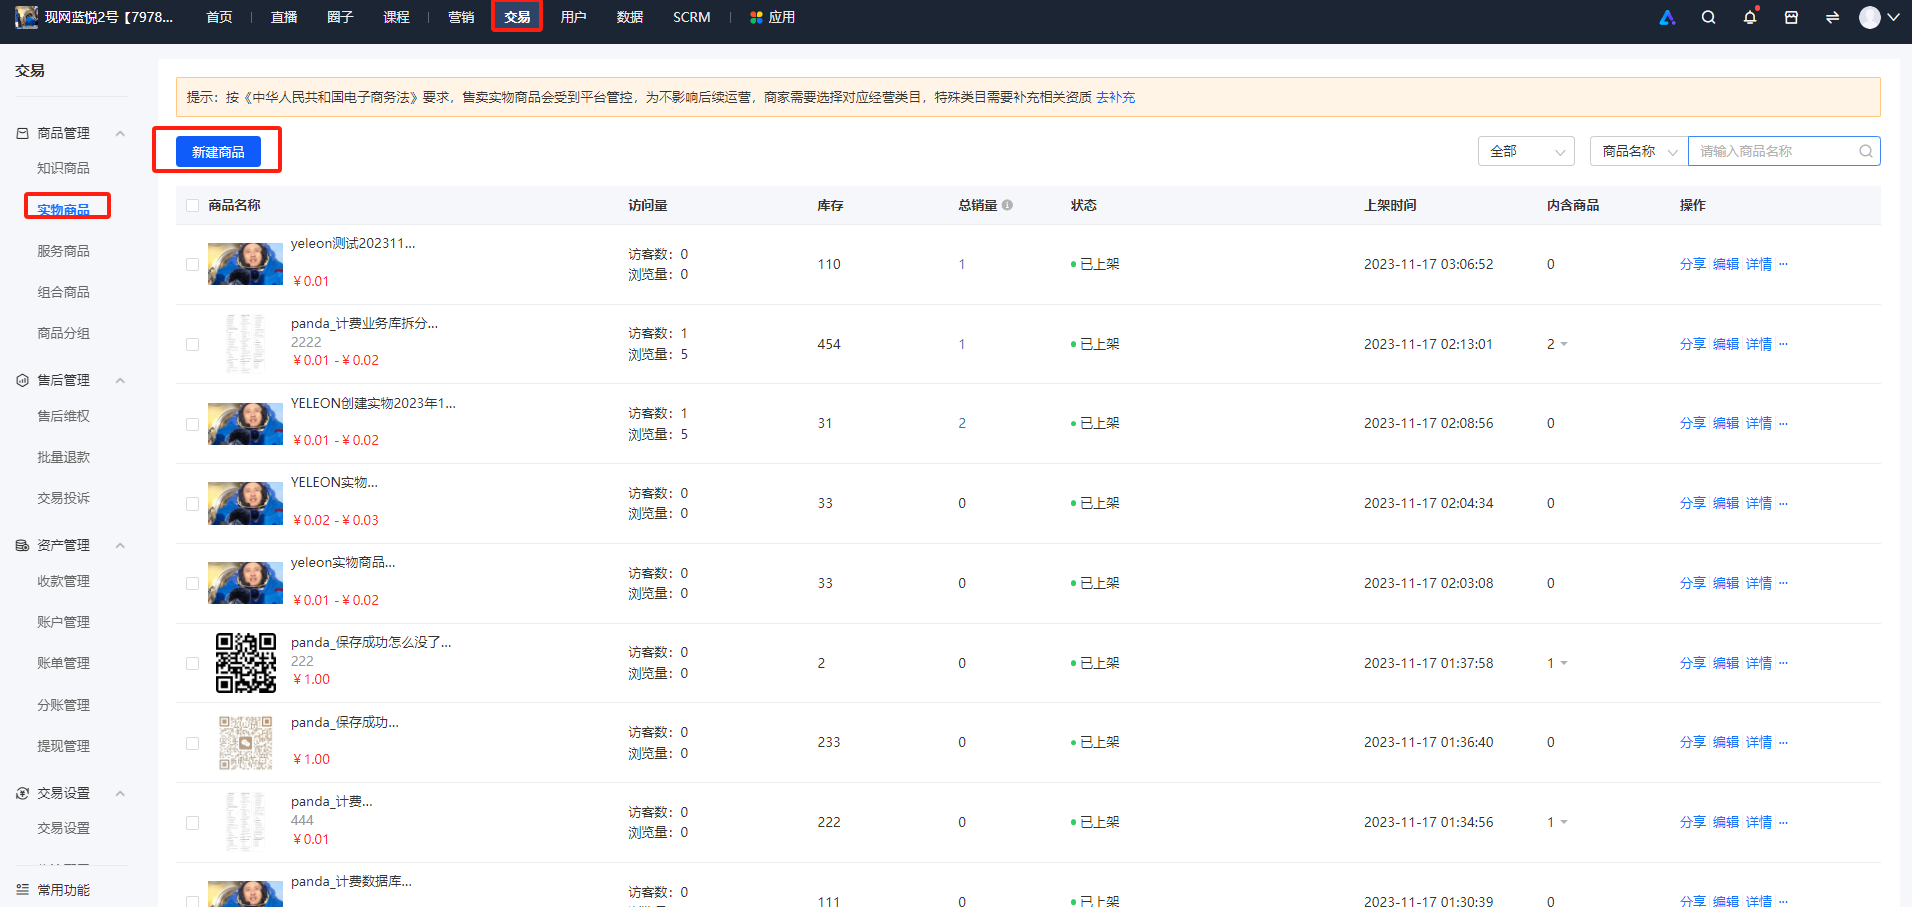
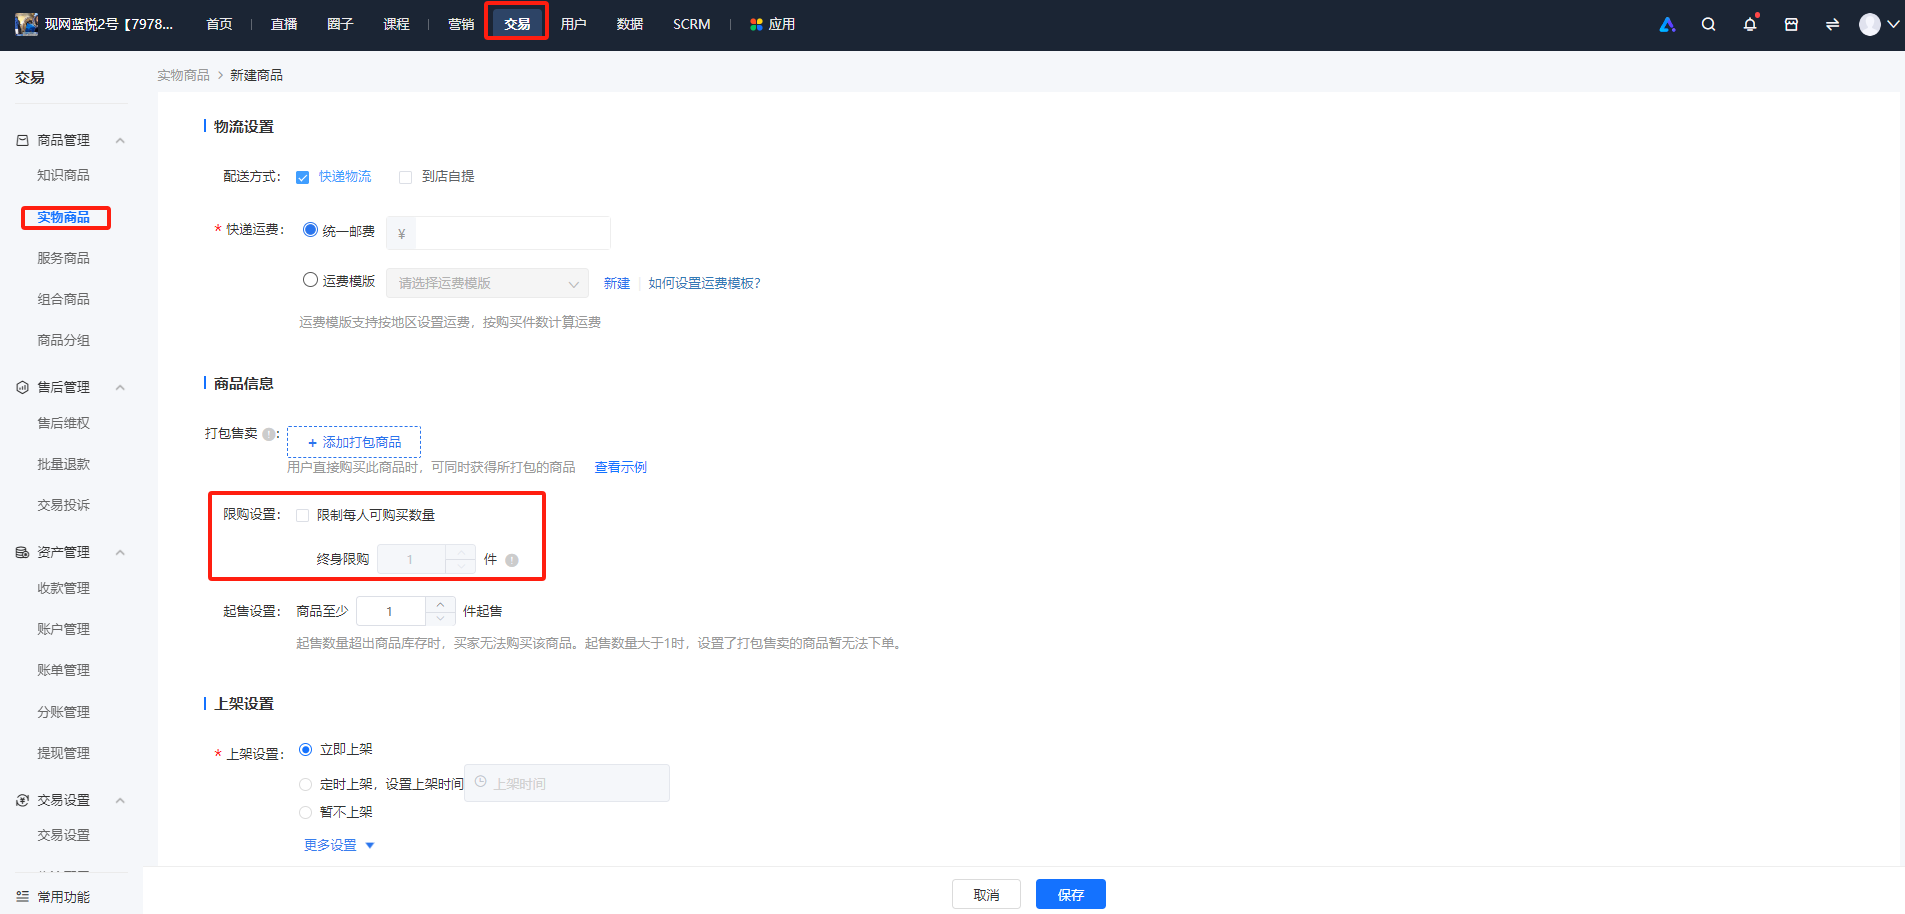
2. In the [Product Information] section, check [Purchase Limit Settings] and set the quantity. Currently, only lifetime purchase limits are supported, and periodic purchase limits are not available yet.
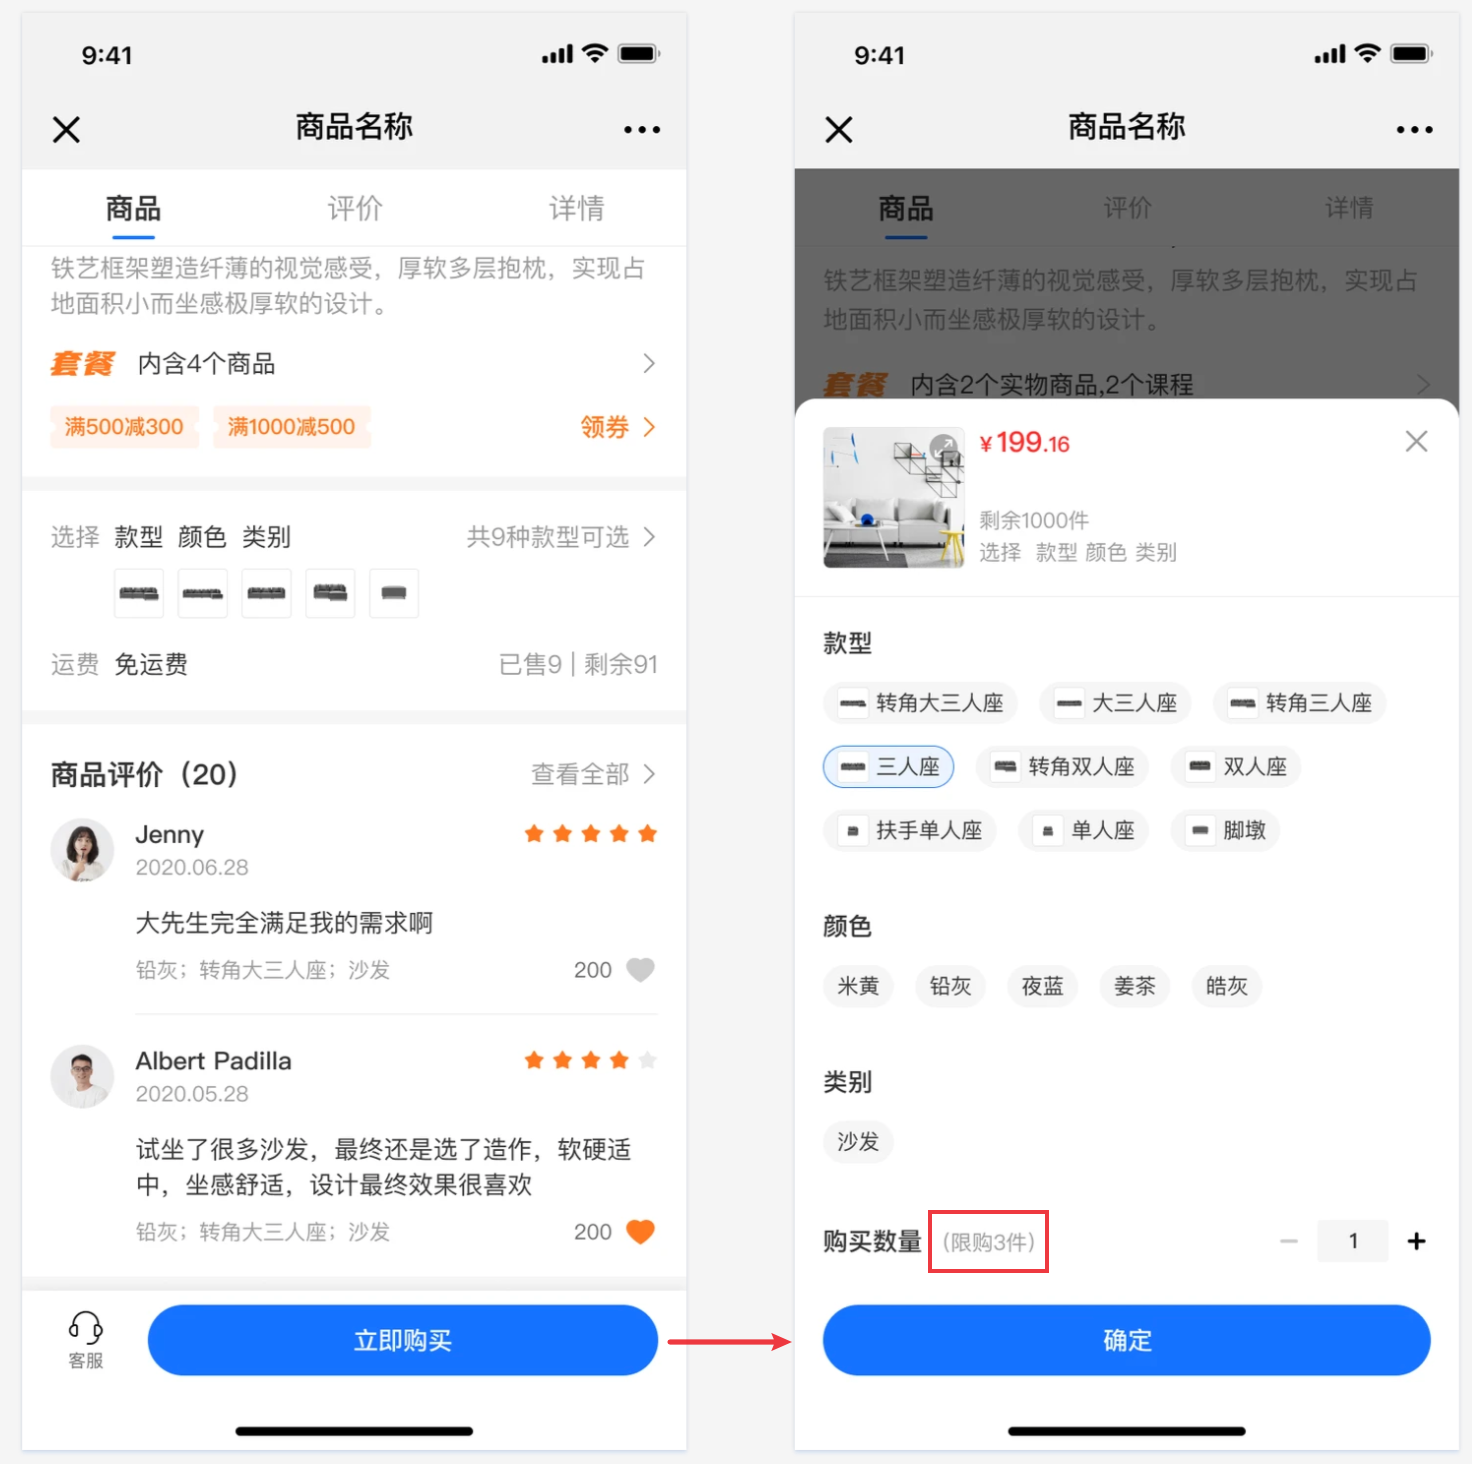
Step 2: Purchase on the student side
1. Physical products/Paid Coupons
2. Product details page of coupons
The number of products that users can purchase can be restricted.
Common Questions about Product Purchase Limits
1. How is the product purchase limit calculated?
A: After setting the start time of the purchase limit, before the end time of the purchase limit, the number of items ordered by the user (per account ID) is counted towards the purchase limit. The number of items purchased by the user before the start of the purchase limit is not counted towards the purchase limit.
2. If an order for a limited - purchase product is placed but not paid (resulting in a pending payment order), can the user make another purchase?
A: If an order for a limited - purchase product is placed but not paid, it will still occupy the purchase limit. If the purchase limit has not been reached, the user can place another order; otherwise, the pending payment order needs to be closed to cancel the occupation of the purchase limit before placing another order.
3. If a user refunds a limited - purchase product after purchase, can they make another purchase?
A: If a user purchases a limited - purchase product and completes the payment, the purchase limit will still be occupied after the refund. If the purchase limit has been reached, the user cannot make another purchase.
4. When a merchant changes the status/quantity of a product's purchase limit, will the system reset the user's available purchase quantity?
A: No. For example, if a merchant sets a purchase limit of 3 items for a product, and a user purchases 2 items during this period, and then the merchant changes the limit to 4 items, the user can still purchase 2 more items.
5. If both product purchase limit and group - buying purchase limit are set, how are they handled?
A: When both are set, the purchase path for initiating a group - buying is subject to the group - buying purchase limit. The specific scenarios are as follows:
① When a product's purchase limit is set to 4 items and there is no group - buying purchase limit, a user can buy a total of 4 items either through single - item purchase or group - buying.
② When a product's purchase limit is set to 4 items and the group - buying purchase limit is set to 2 items, a user can buy a maximum of 4 items through single - item purchase and a maximum of 2 items through group - buying, with a total limit of 4 items.
③ When there is no product purchase limit and the group - buying purchase limit is set to 4 items, a user can buy a maximum of 4 items through group - buying, and there is no limit for single - item purchase.
6. Is the redemption scenario subject to the purchase limit configuration?
A: When a limited - purchase product is added as a product for live commerce (course live commerce, physical product live commerce), it will not be counted towards the product's purchase limit.
When a limited - purchase product is listed in the points mall (points redemption), invitation code, or redemption code, users can redeem the product through these channels without being subject to the purchase limit. That is, the purchase limit function only applies to the paid purchase path for products.
Delivery management
Does it support setting shipping fees?
Hello, you can now set the shipping fees for products, which can be done when creating a product. Currently, two types are supported: [Uniform Shipping Fee] and [Shipping Template].
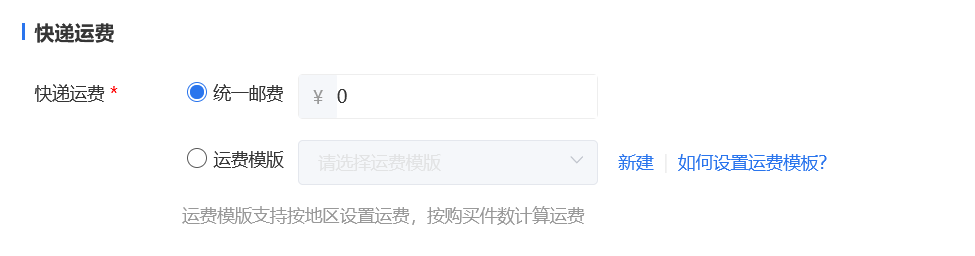
*Click to view the tutorial on using the [Shipping Template].
Tutorial on Using Shipping Fee Templates
I. Function Introduction
The shipping fee template is a shipping fee tool mainly used to solve the problem of sellers having to frequently modify shipping fees after a transaction is completed. Through the shipping fee template, sellers can address the issue of different shipping fees for buyers in different regions when purchasing products.
Core Functions
·Supports setting deliverable regions
·Allows flexible setting of shipping fees for different deliverable regions
·Supports setting shipping fees based on the number of purchased items
·Batch modify product shipping fees. After modifying the shipping fee template, the shipping fees of associated products will be modified accordingly.
II. Purpose of Use
1. Automatically match shipping fees according to the deliverable region, solving the problem of sellers frequently modifying shipping fees.
2. Improve the operational efficiency of merchants in setting shipping fees.
III. Usage Scenarios
Scenario 1: Suitable for all merchants selling physical products. Merchants can independently select deliverable regions, set different shipping fees for different regions, and set additional shipping fees based on the number of product items.
IV. Operation Path
Merchant side: Merchant computer - side management background → Transaction and Order Management → Shipping Fee Template → Create a new shipping fee template
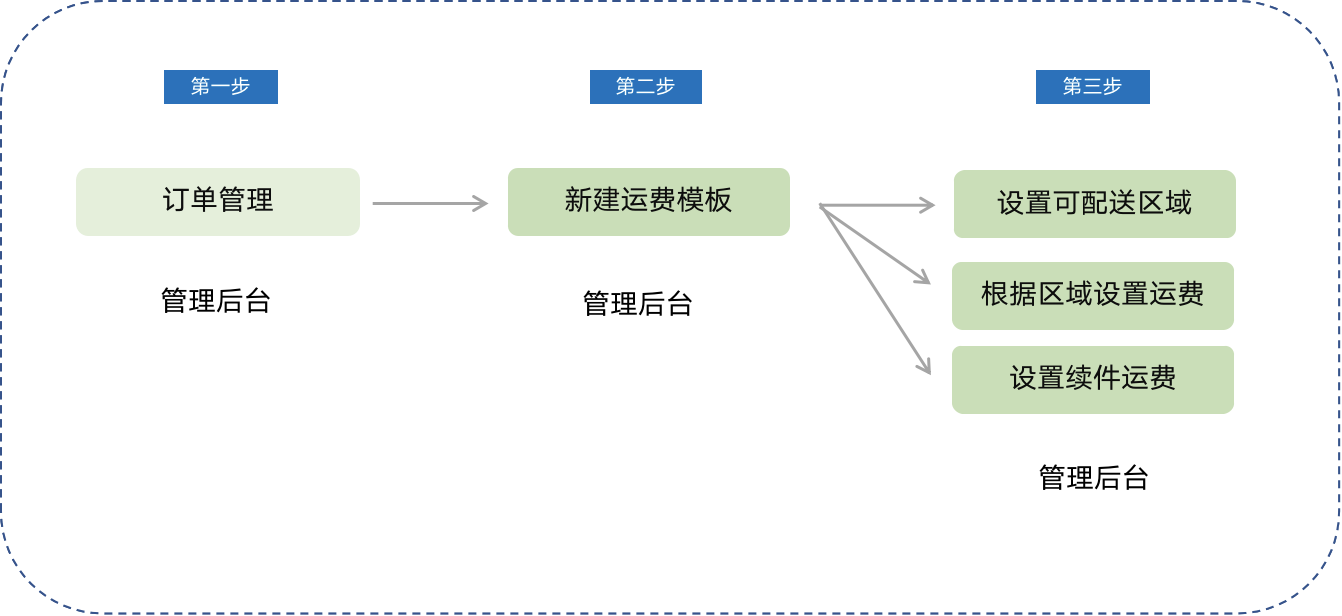
V. Usage Tutorial
Step 1: Create a new shipping fee template
Entry: Transaction → Transaction Settings → Delivery Settings
·On the delivery management list page, you can create a new shipping fee template.
·By default, there are three templates: Free shipping nationwide (except remote areas), No free shipping, and Free shipping in Jiangsu, Zhejiang, and Shanghai. You can 'Edit' and 'Delete' the templates.
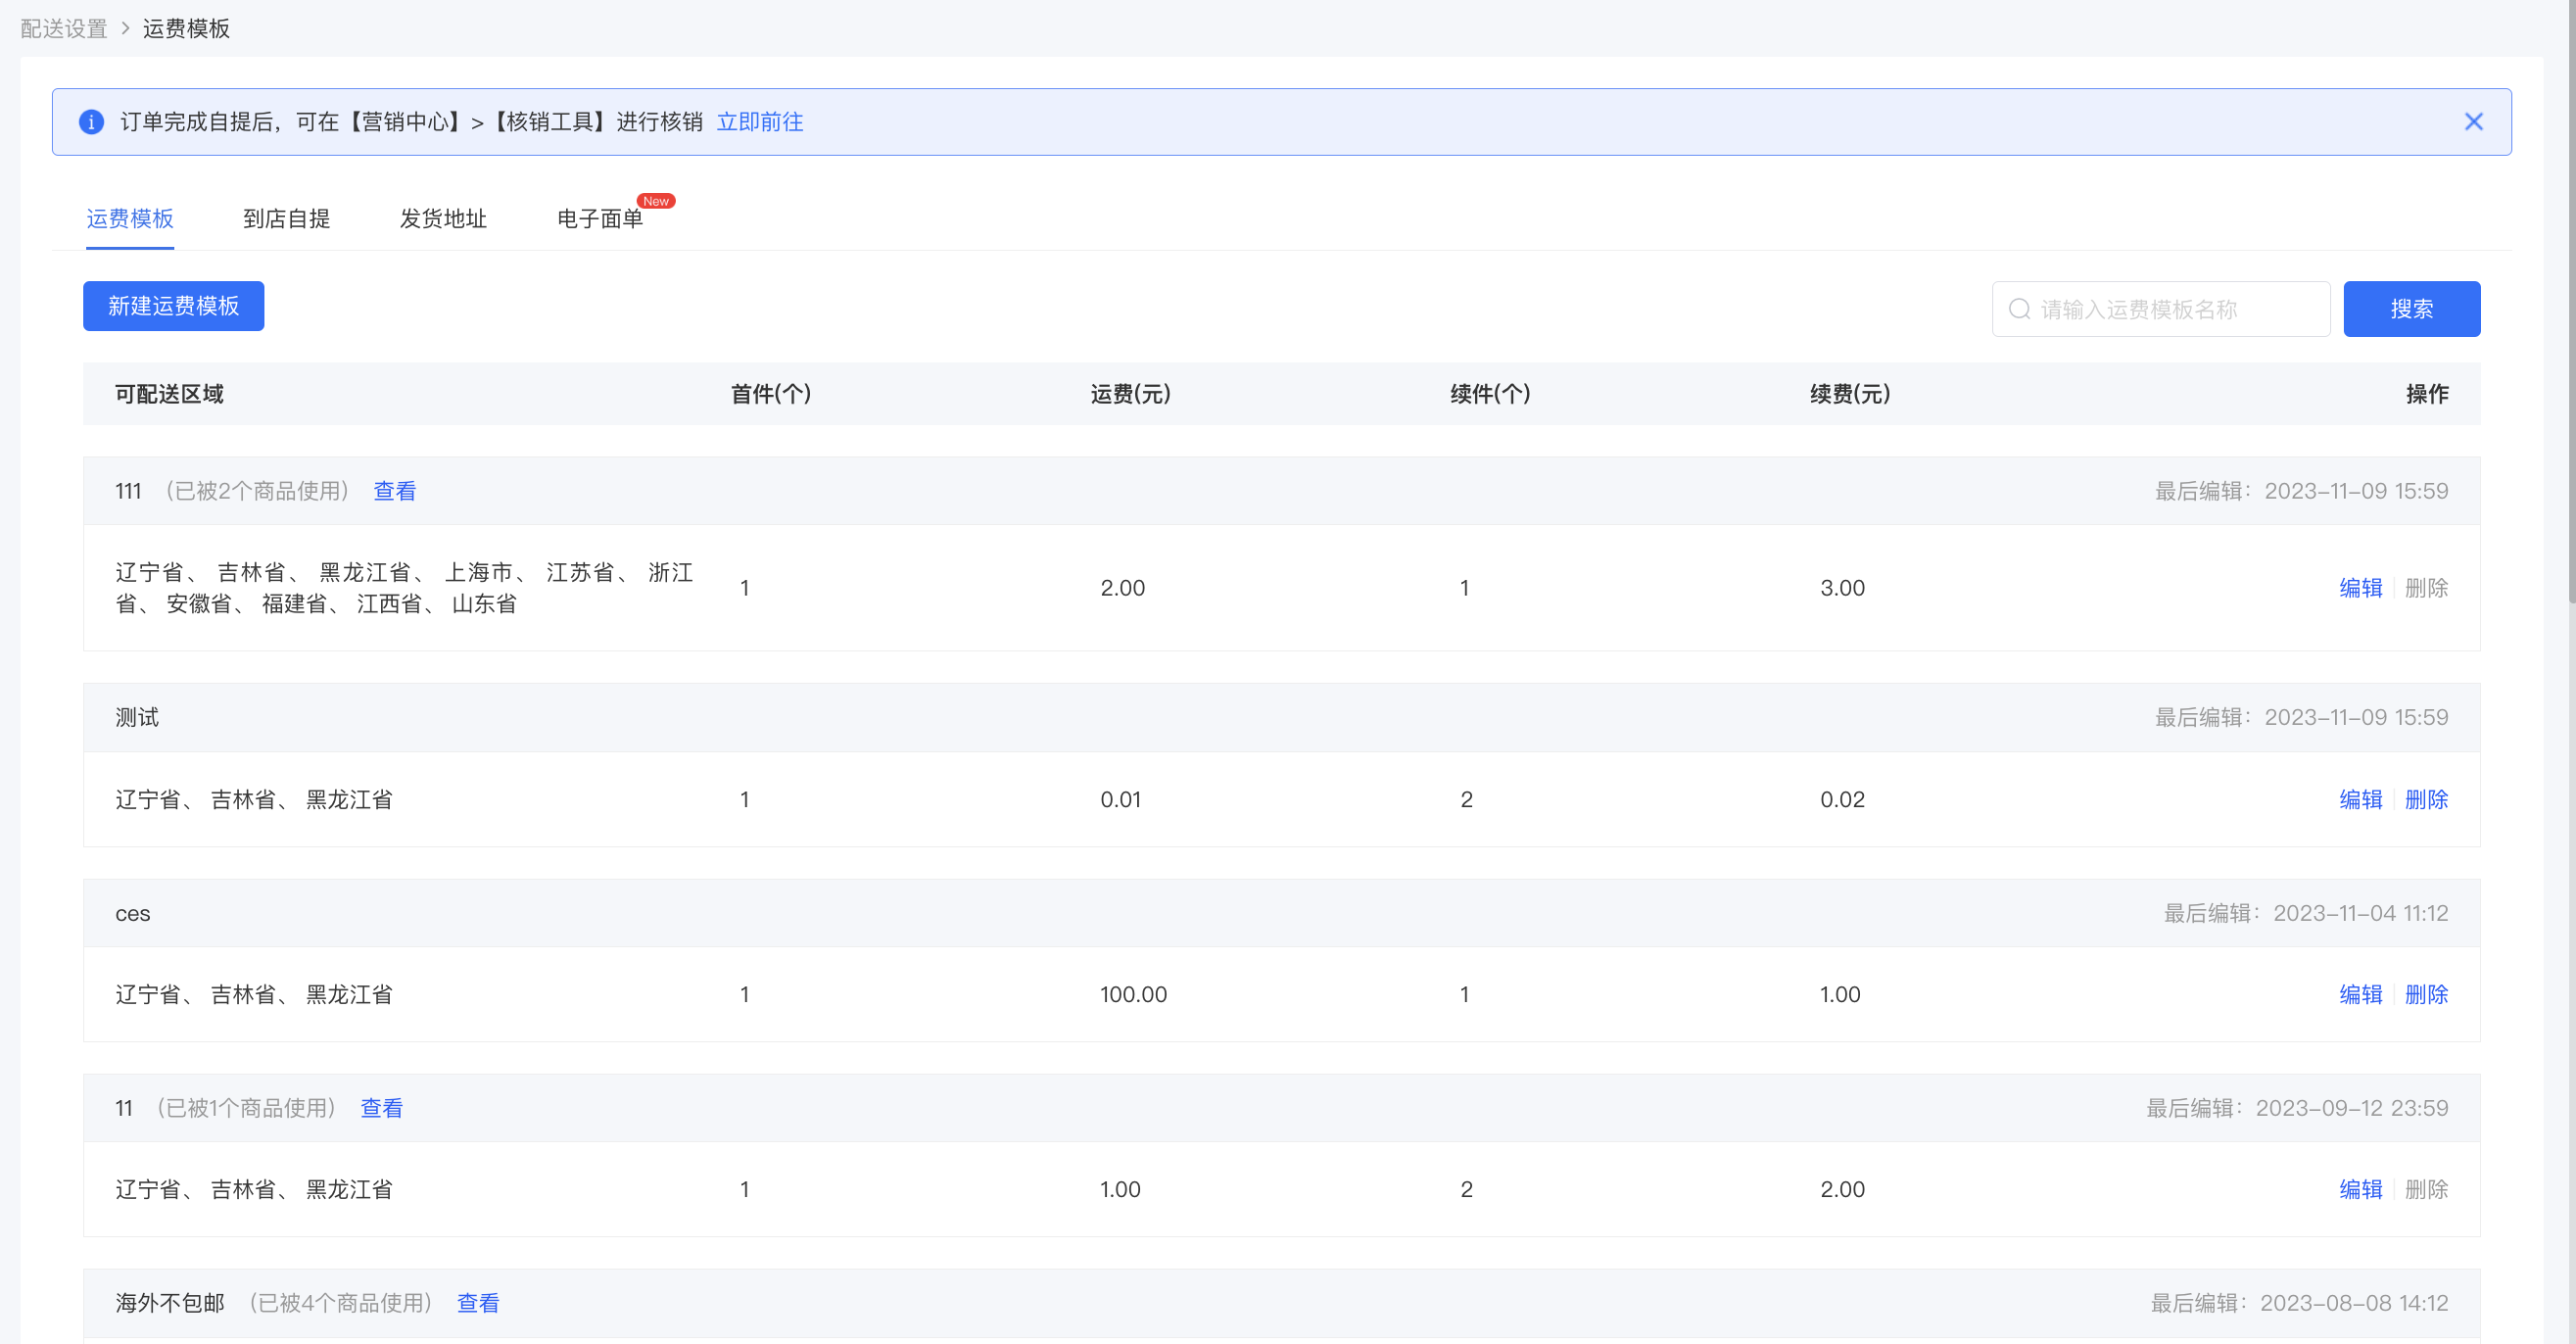
·Shipping fee templates that are in use by products cannot be deleted.

Step 2: Select deliverable regions
·Select deliverable regions. Click 'Cancel' to return to the shipping fee template list page. All content on the page is required. If any content is not filled in or is partially filled, it cannot be saved.
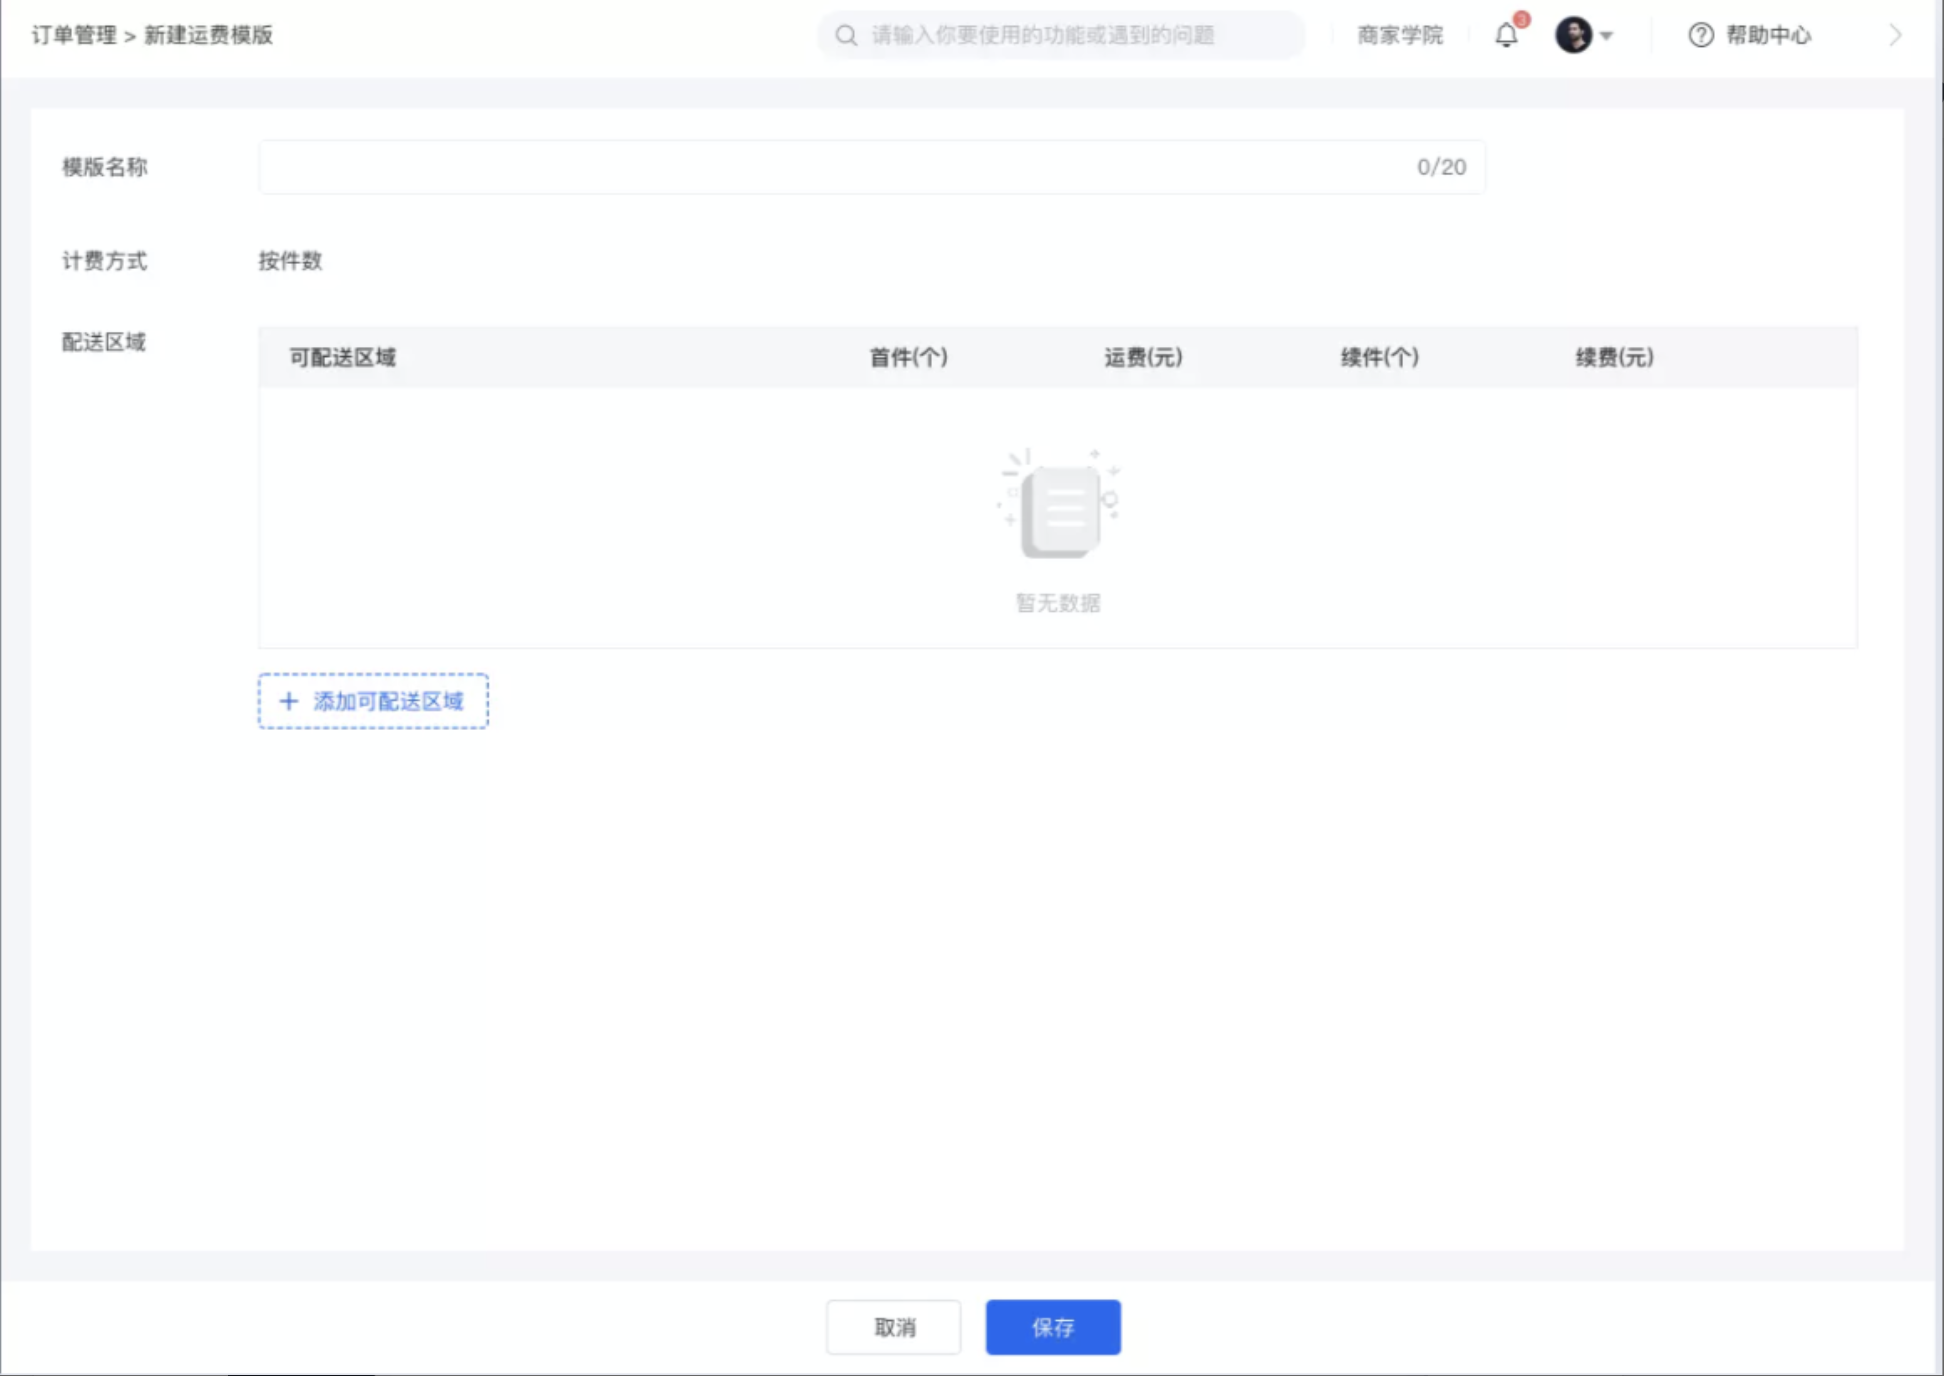
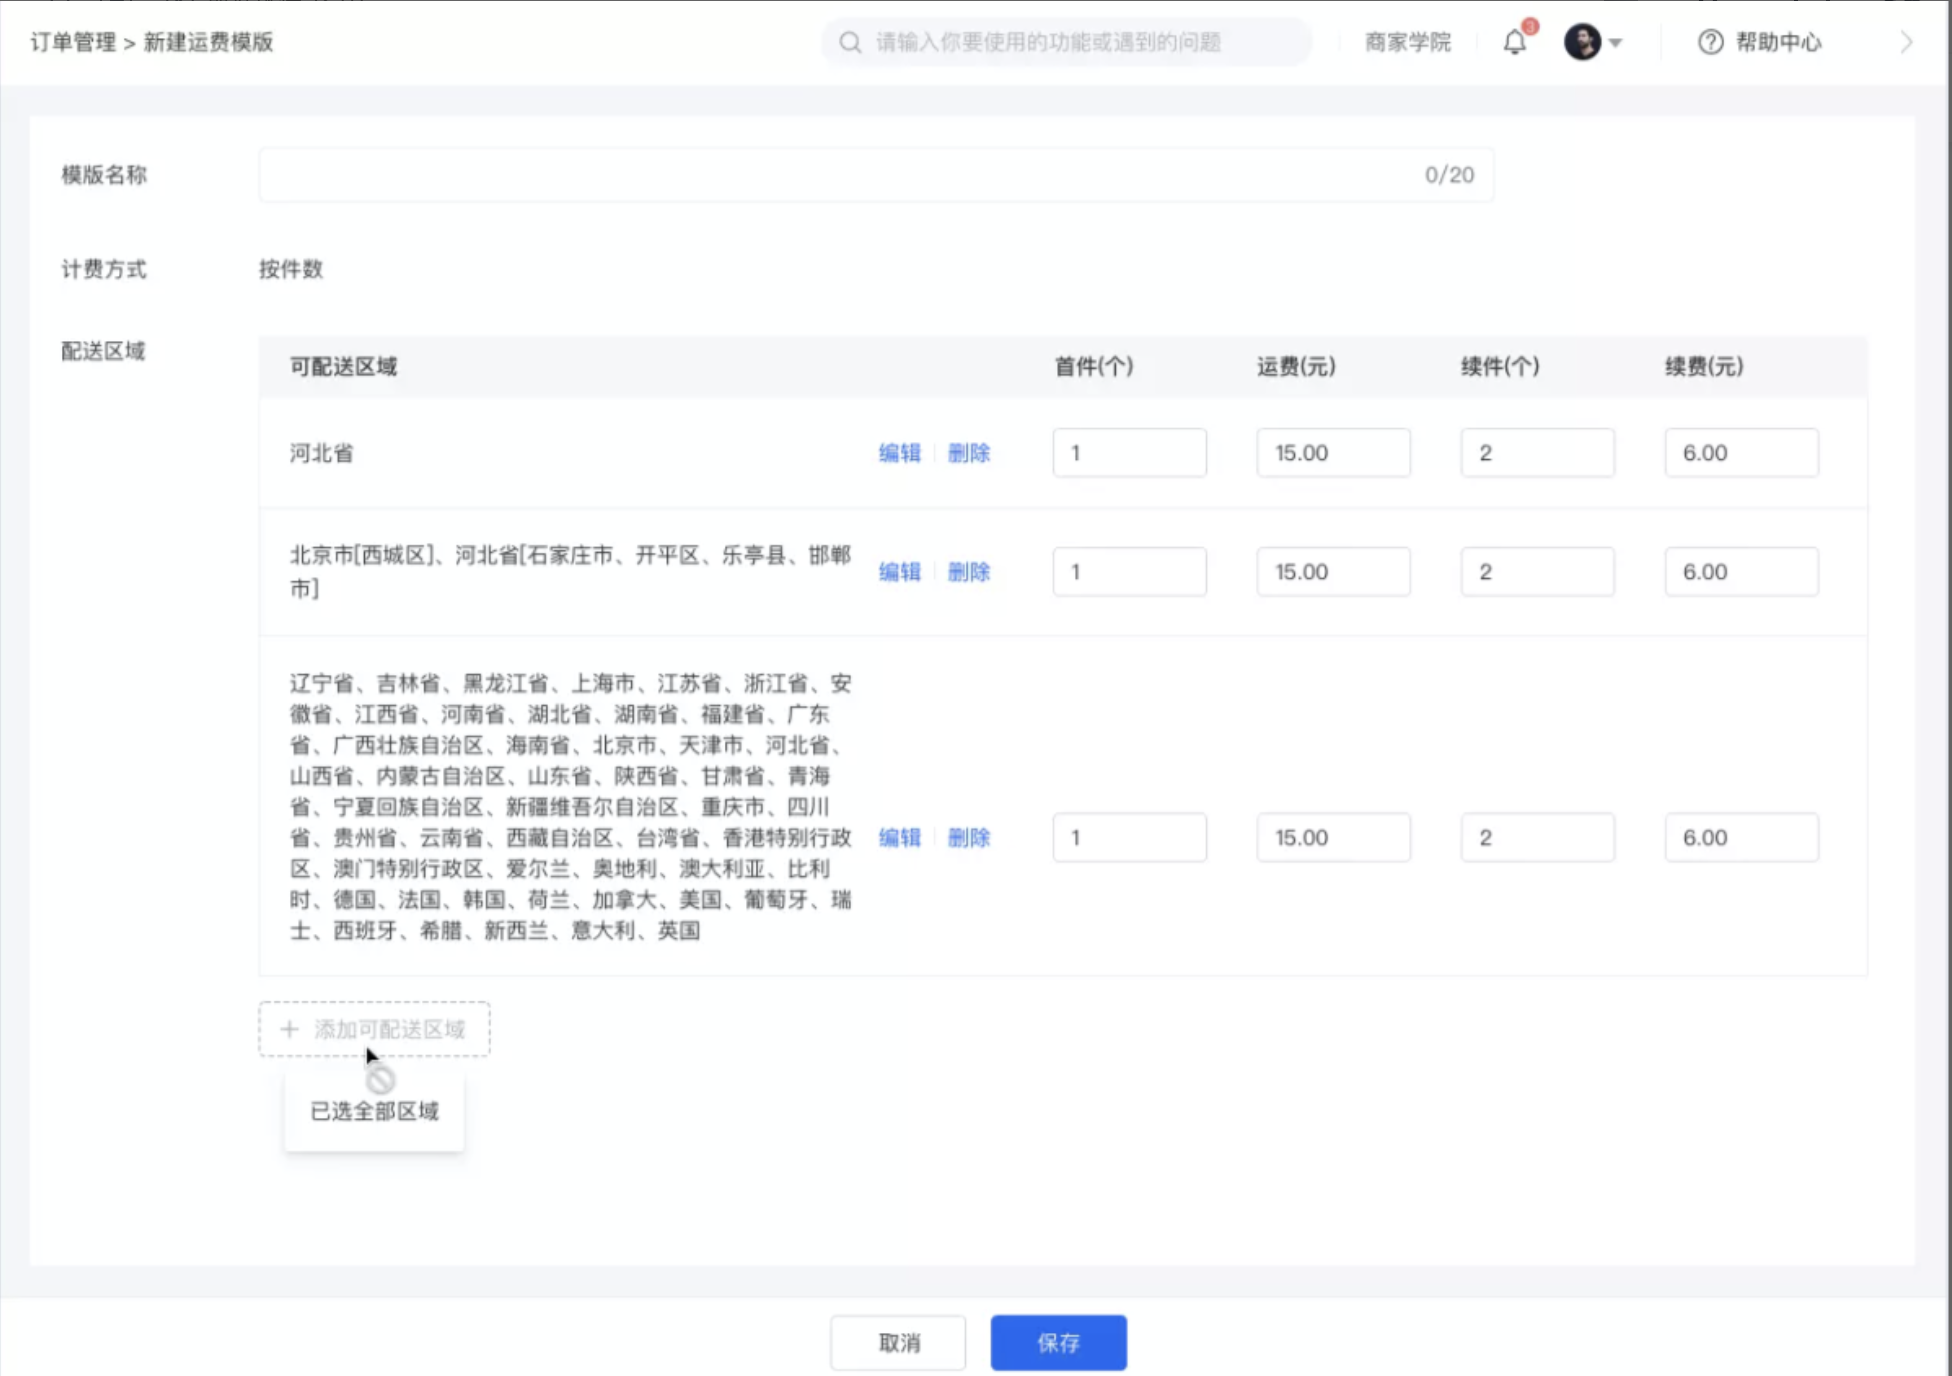
·The delivery regions support full - selection. Selected regions support delivery, and unselected regions do not support delivery.

Step 3: Set shipping fees
·You can flexibly set shipping fees according to different regions. The number of first - piece items should be greater than or equal to 1.
·Shipping fee calculation rule: First - piece shipping fee + Additional fee (Note: If the number is less than the additional - piece quantity, it will be calculated as the additional - piece quantity).
·Click 'Edit' to modify the deliverable region.
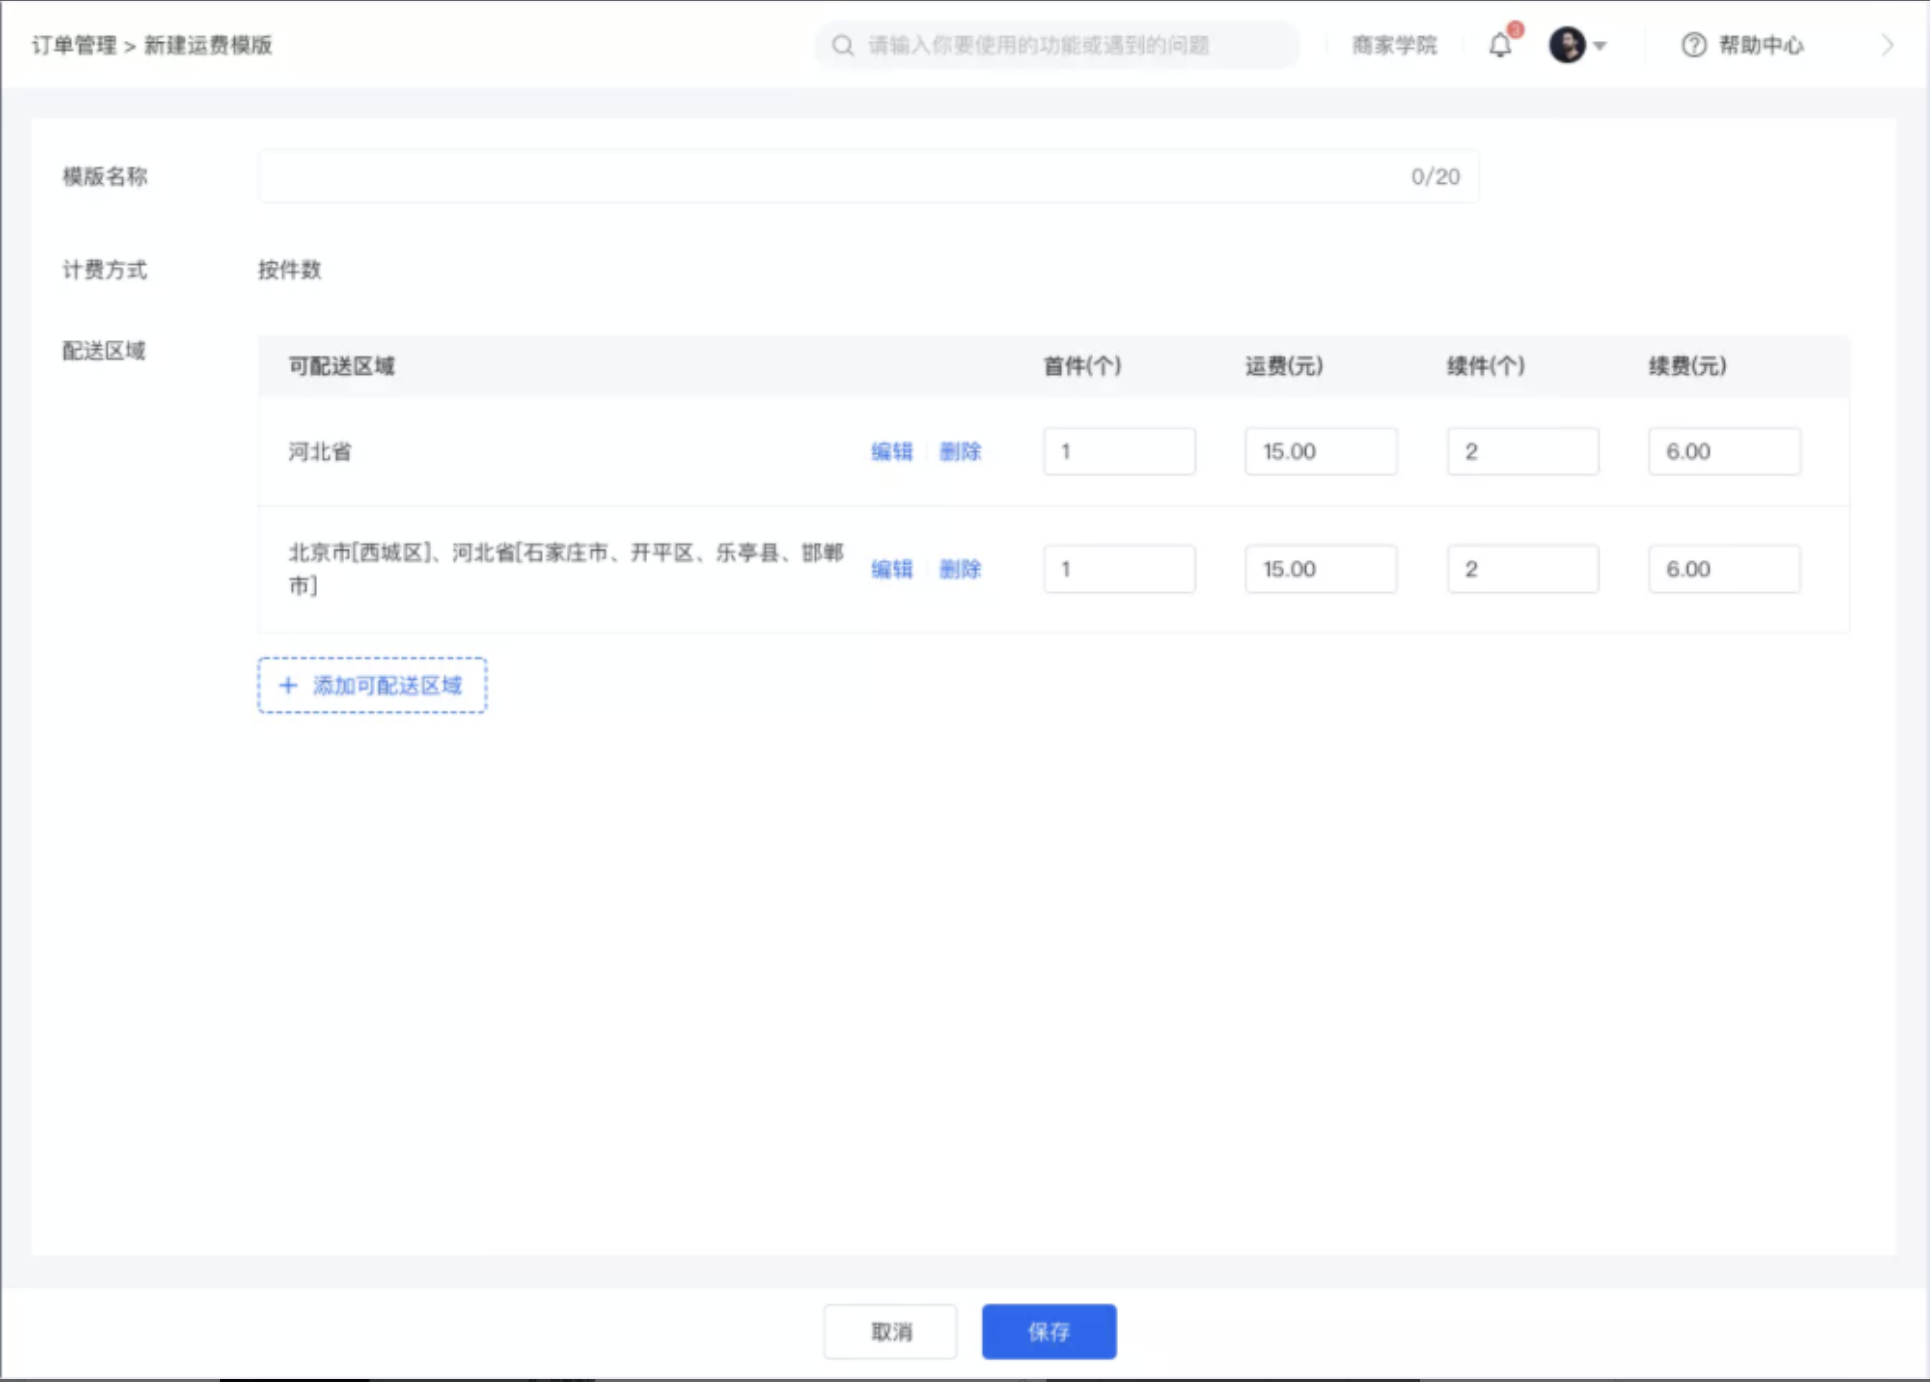
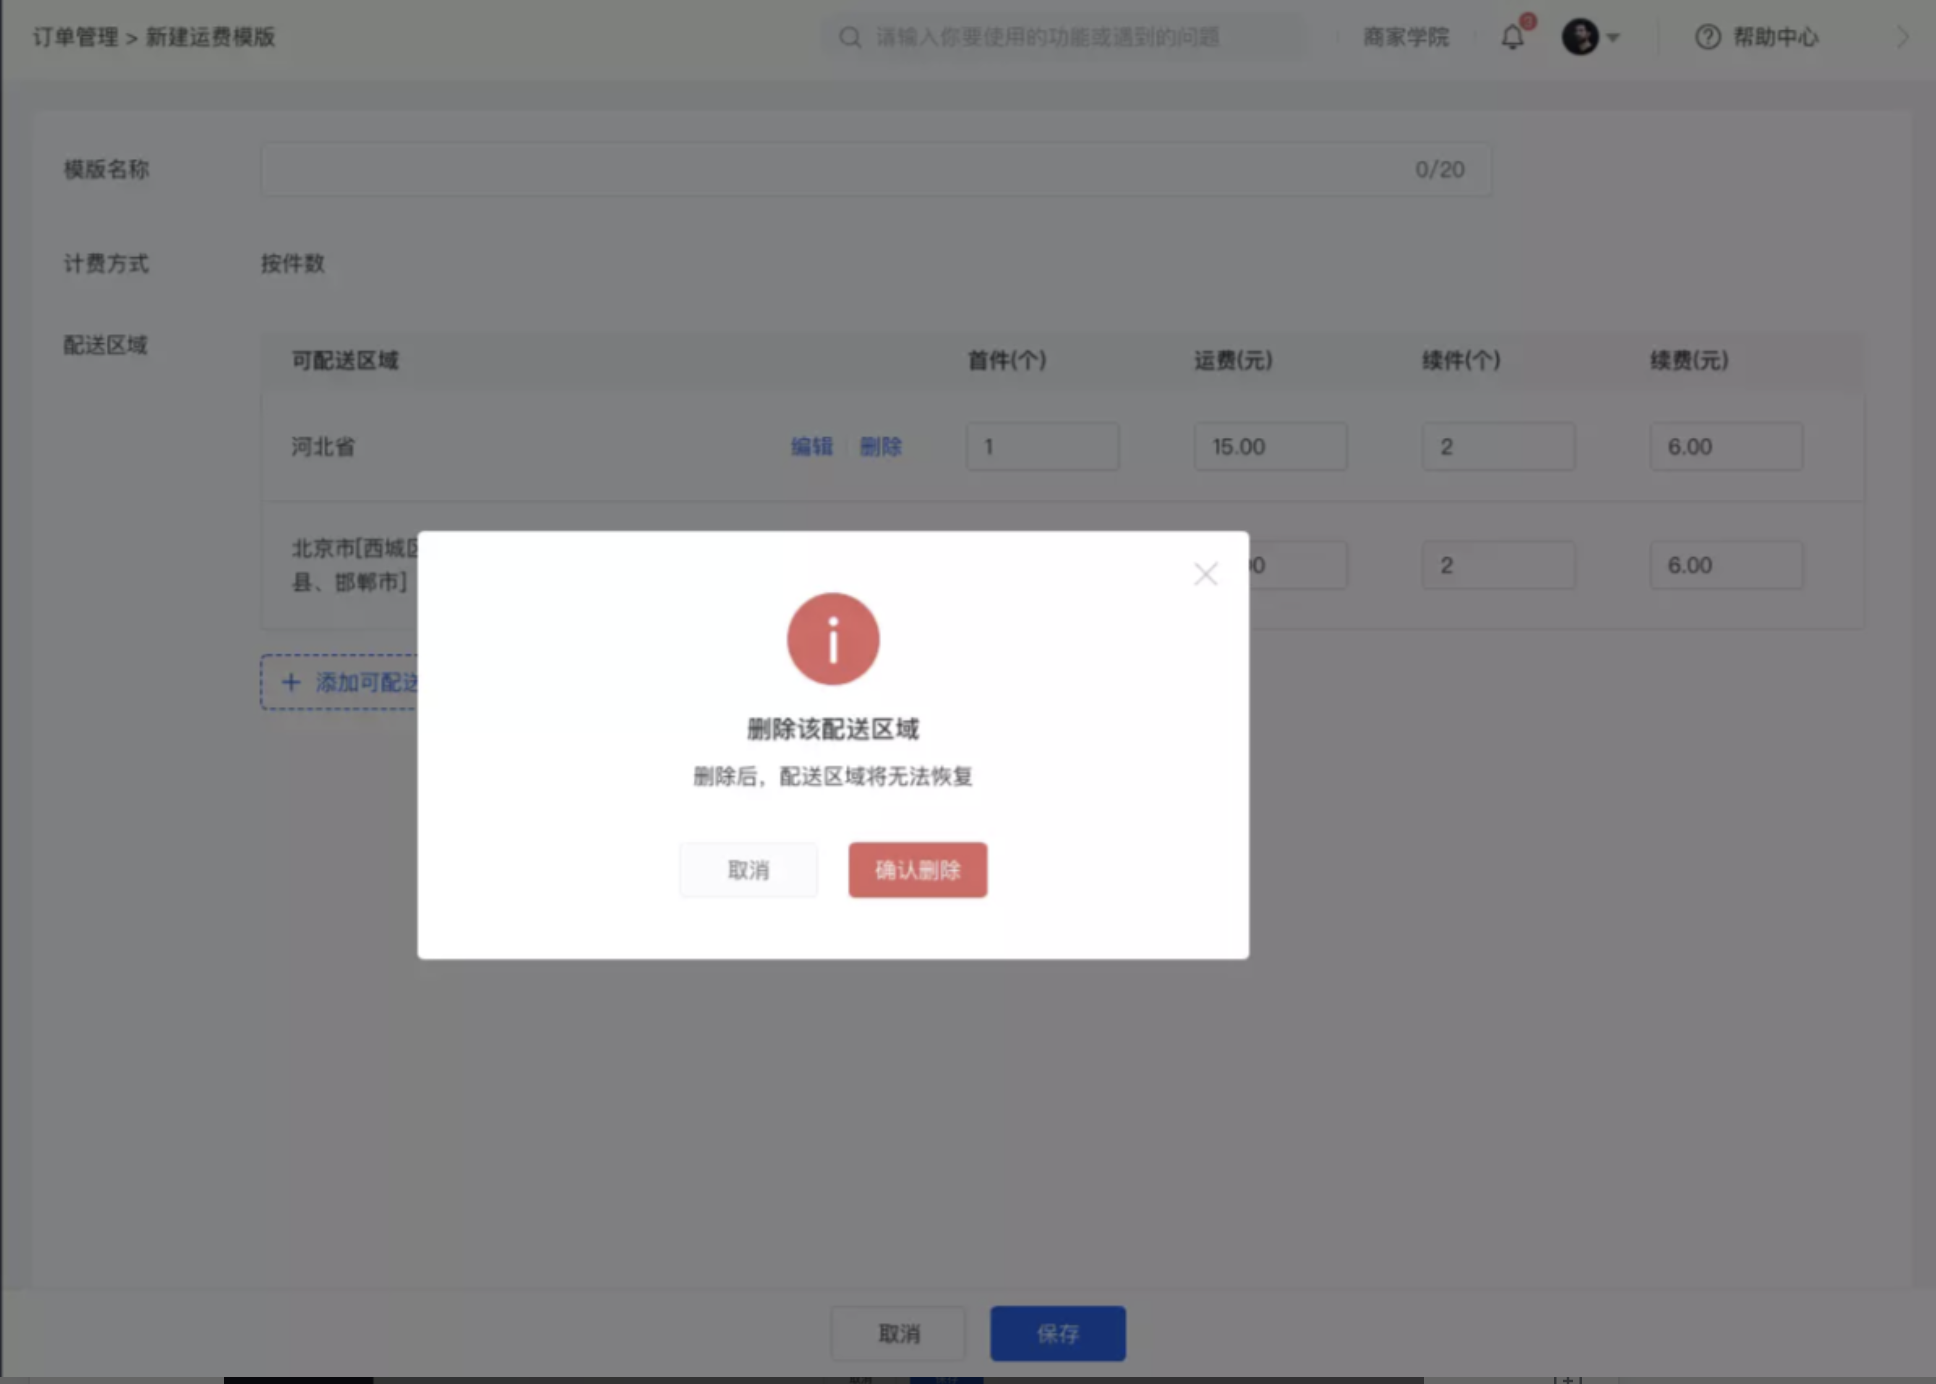
·Click 'Delete' to delete the selected region and the corresponding shipping fee, and it cannot be restored. You need to edit it again.
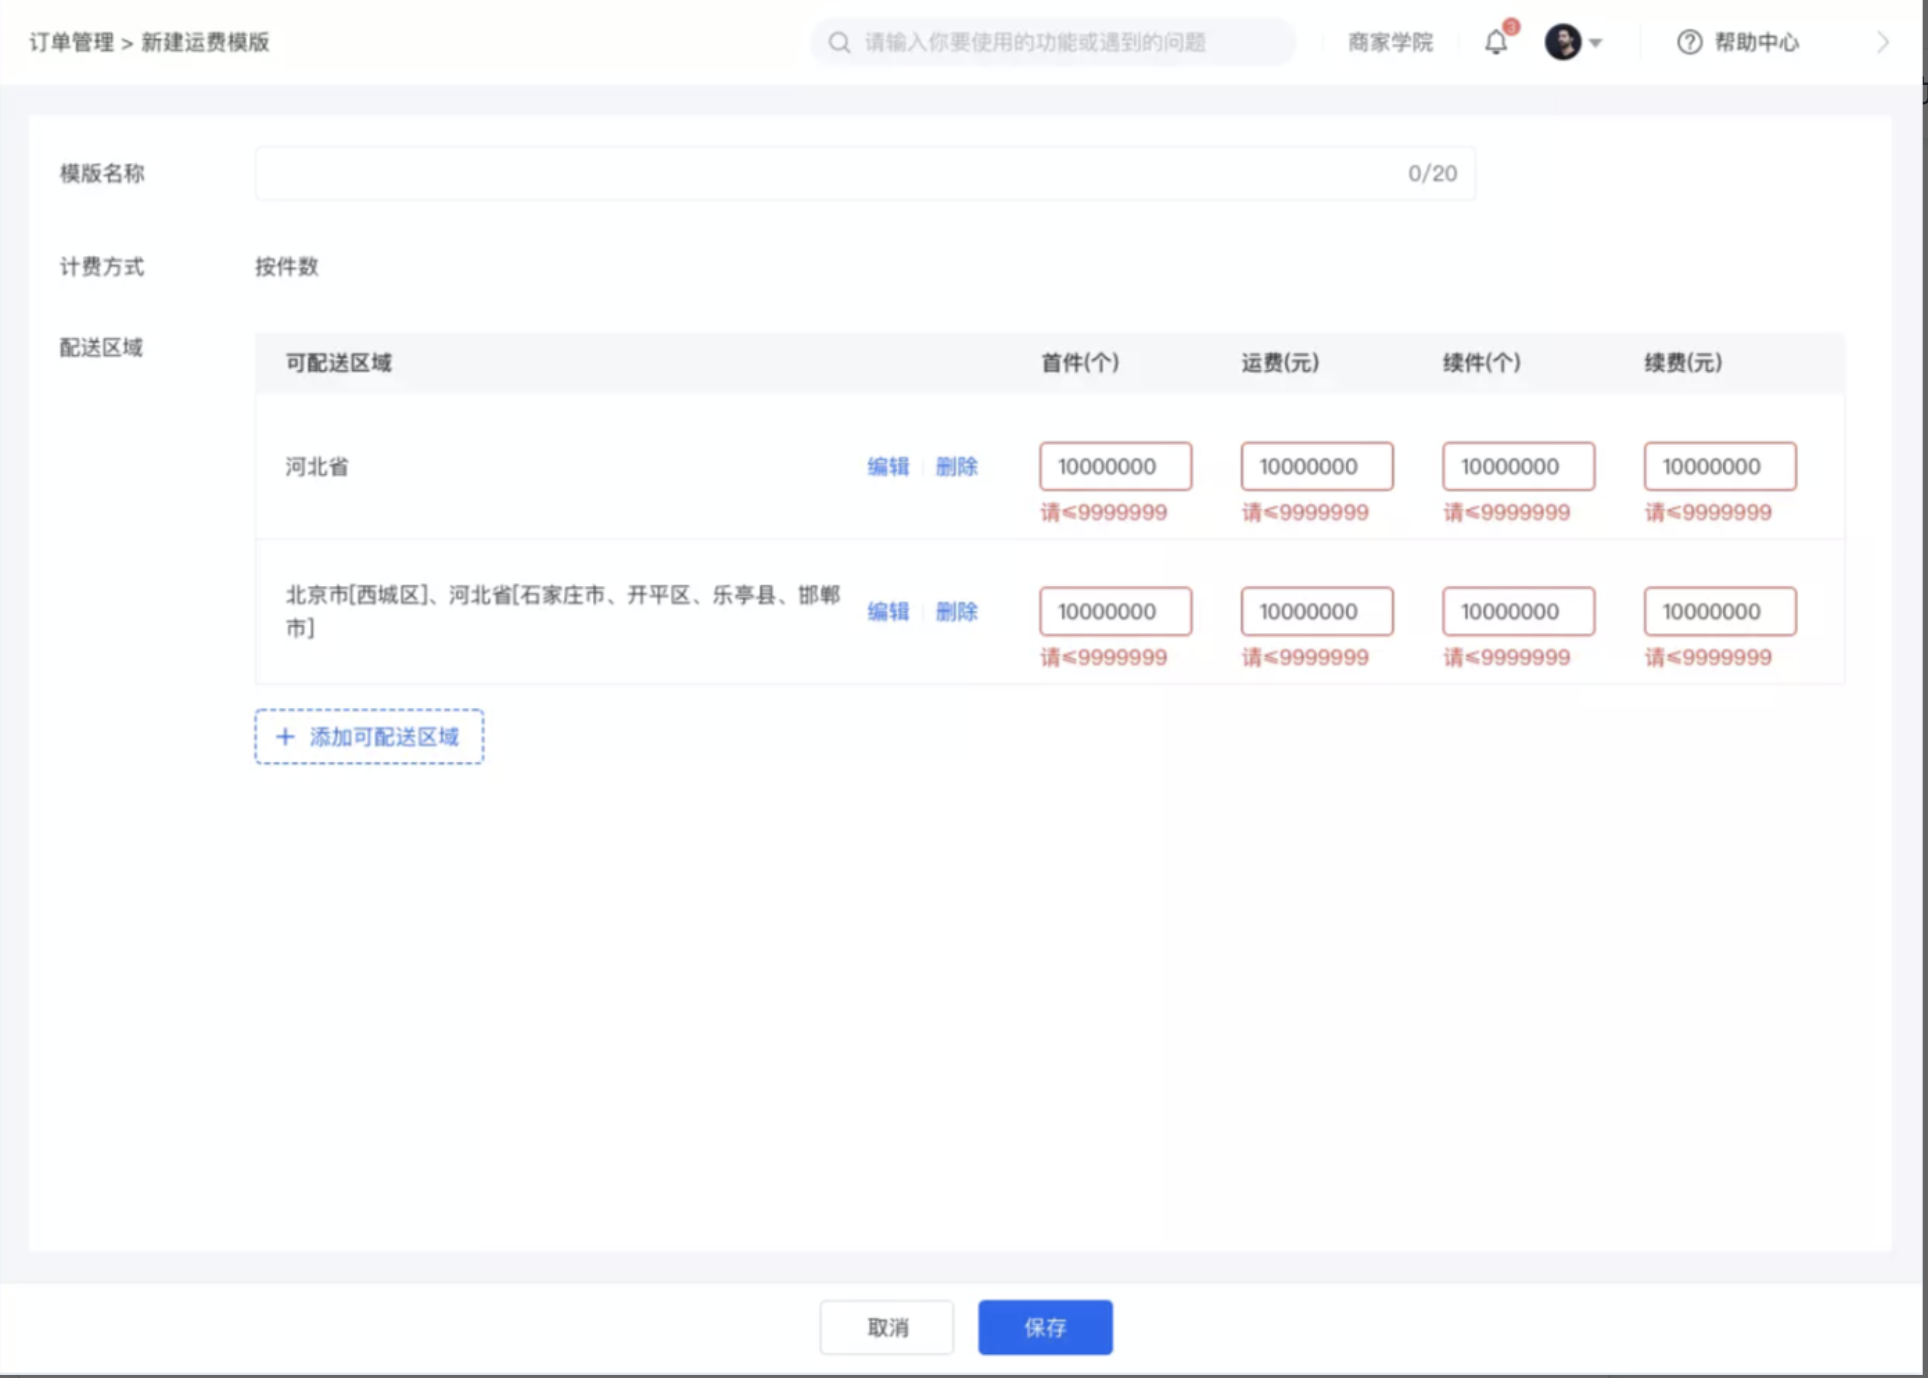
·When the number of shipping fee templates exceeds the limit
·First - piece: The maximum input unit is one million (7 digits: 9999999).
·Shipping fee: The maximum input unit is one million.
·Additional piece: The maximum input unit is one million.
·Additional fee: The maximum input unit is one million.
·Click 'Add deliverable region' to add a new deliverable region. When all deliverable regions are selected, 'Add deliverable region' cannot be clicked.
Step 4: Use the shipping fee template
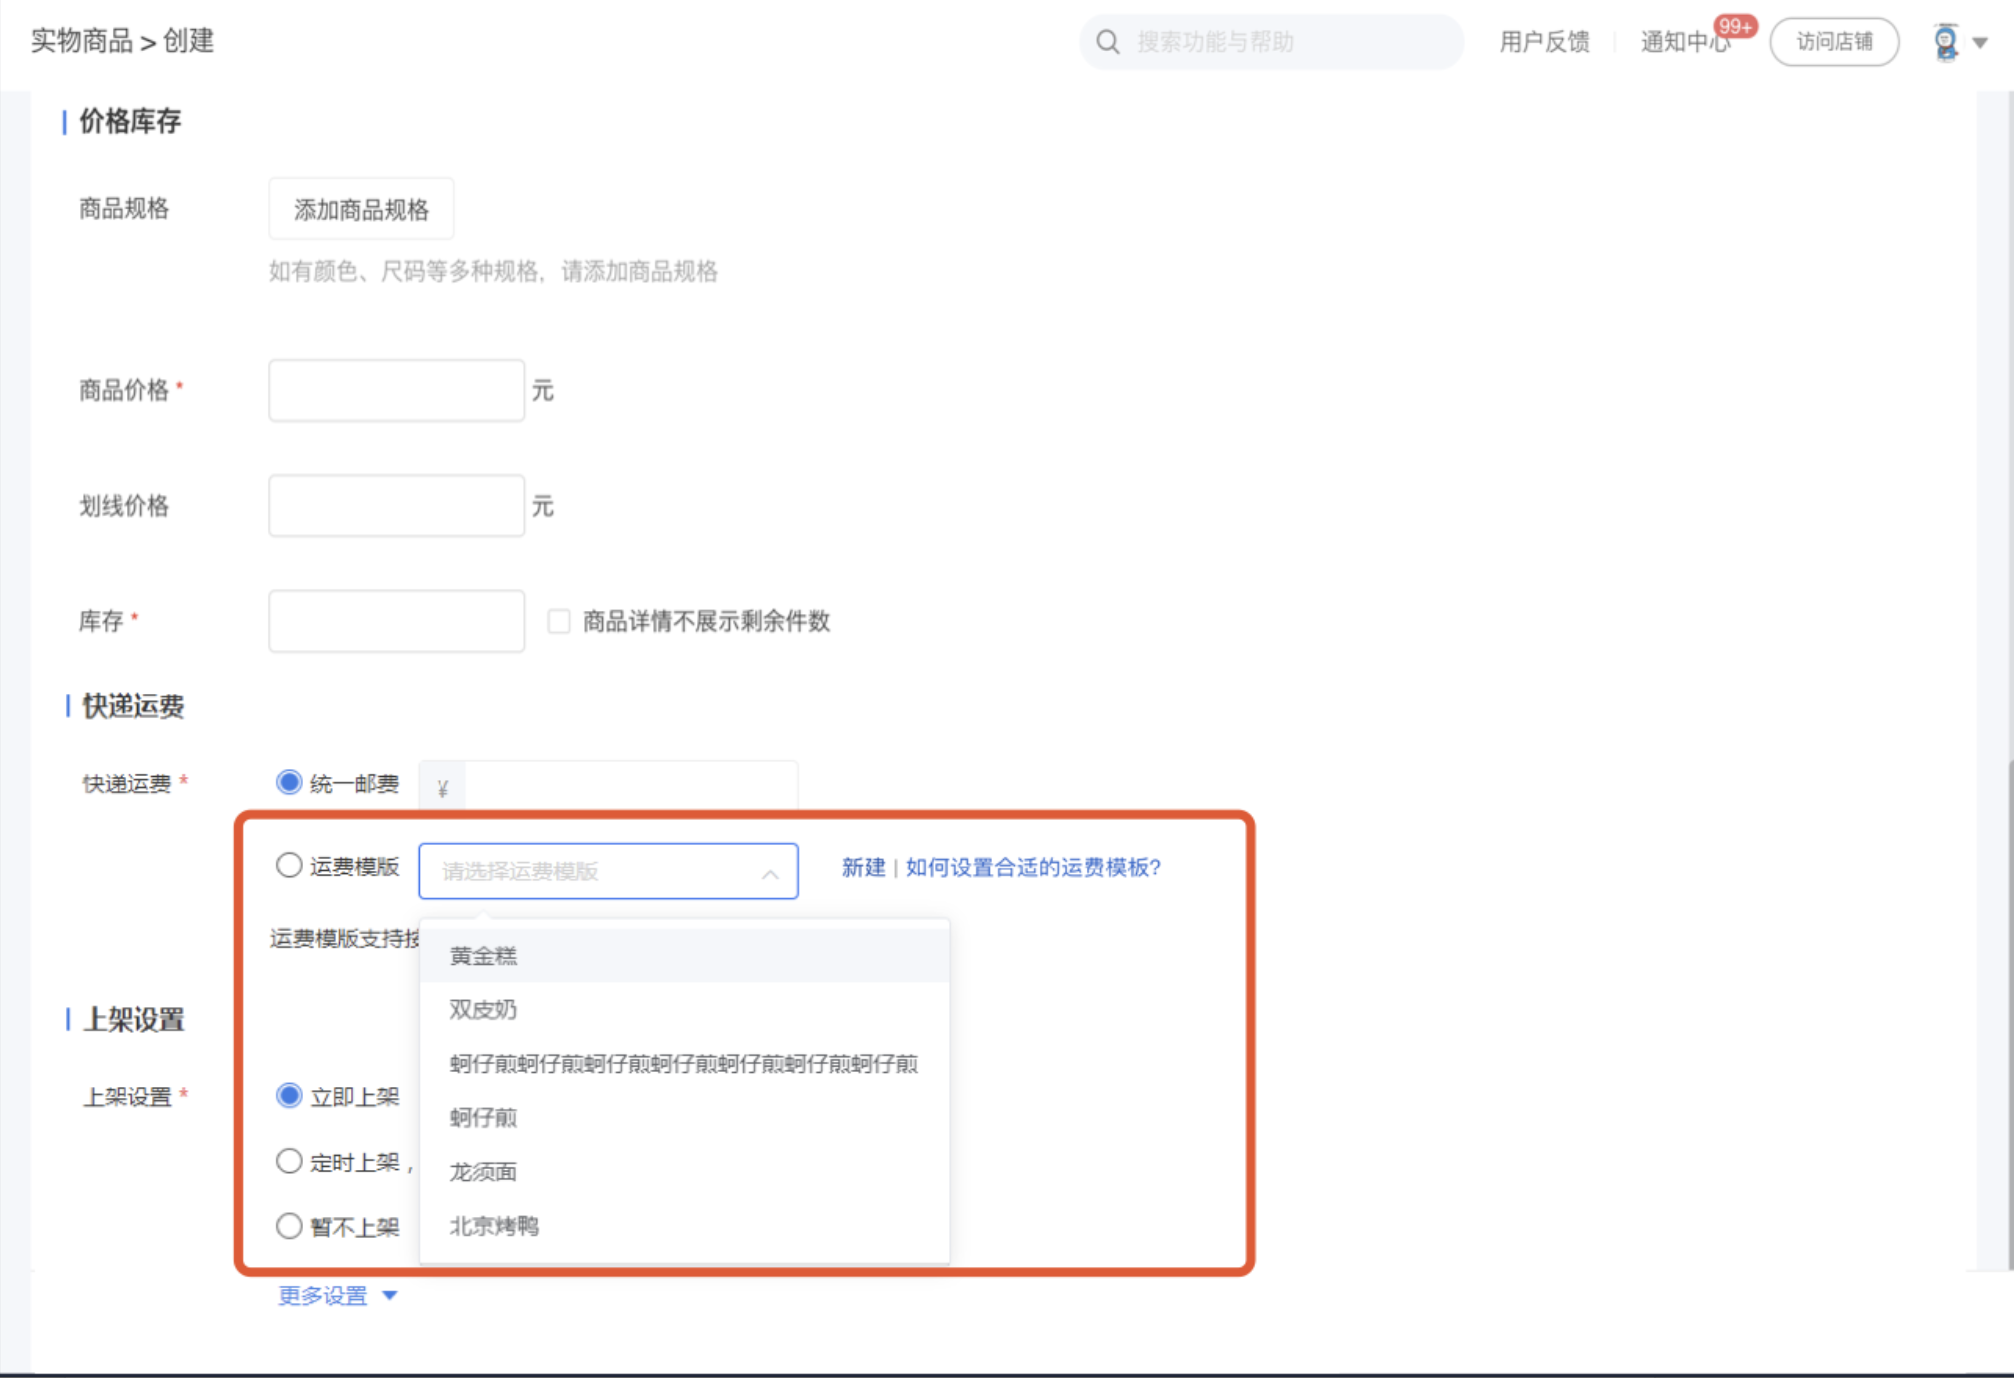
·The shipping fee template is used when creating/editing physical products.
·Click the drop - down list of the shipping fee template and select the shipping fee template you want to set.
·Click 'New' to jump to create a new shipping fee template.
Step 5: Shipping fee display on the C - end
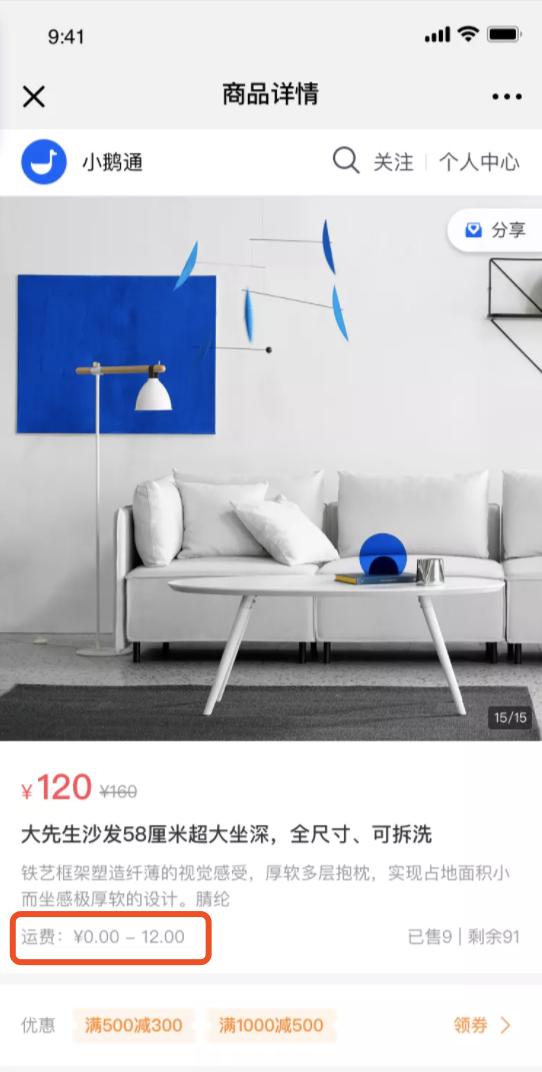
·If the shipping fee template used by a product has multiple shipping fee specifications, the shipping fee range is: First - piece shipping fee (lowest) - First - piece shipping fee (highest).
·If the first - piece shipping fees of the shipping fee template used by a product are the same, it will display: First - piece shipping fee.
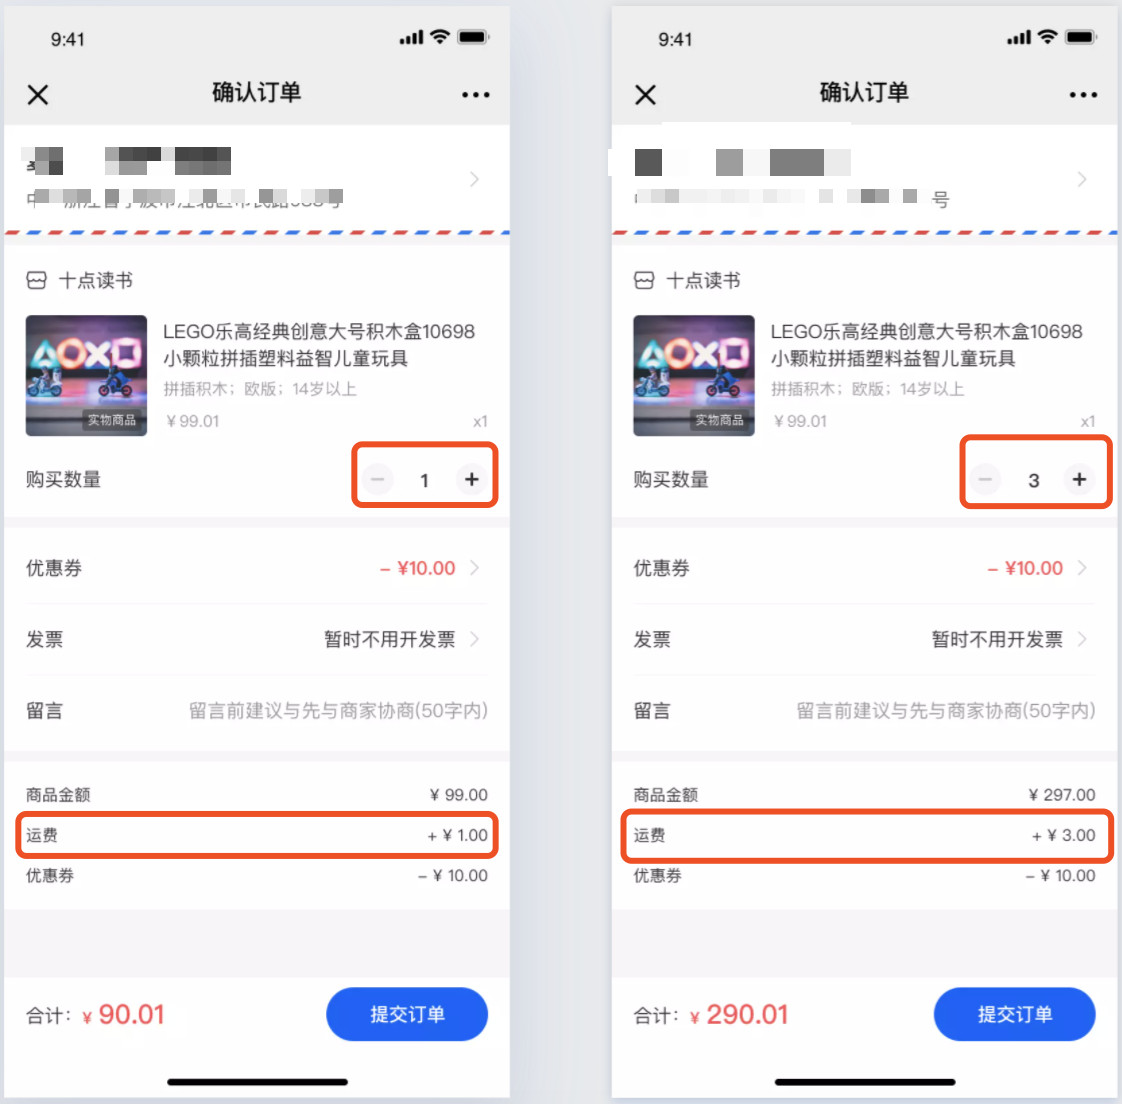
·When purchasing multiple products, the shipping fees will be automatically added up according to the shipping fees set in the shipping fee template.
Step 6: Shipping address
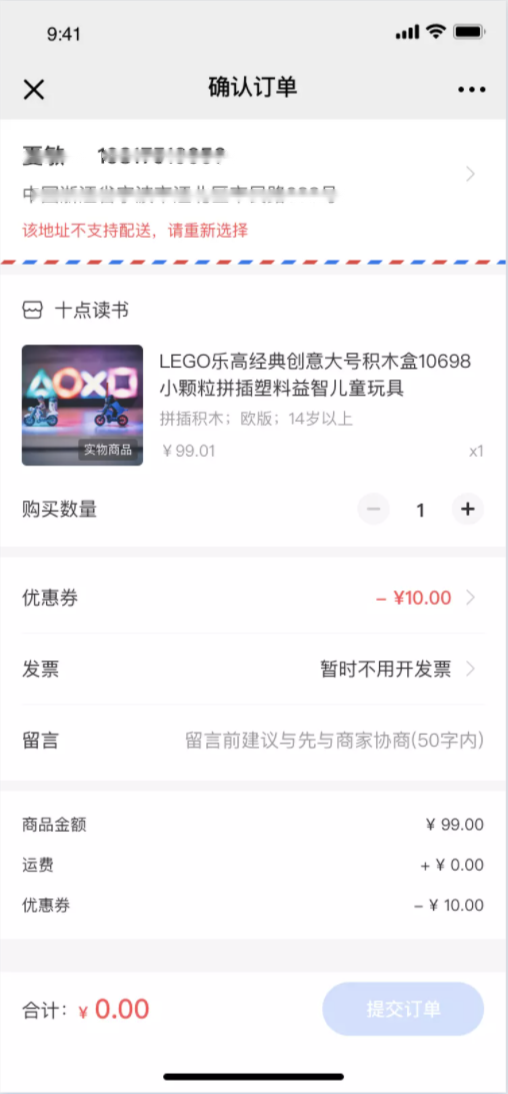
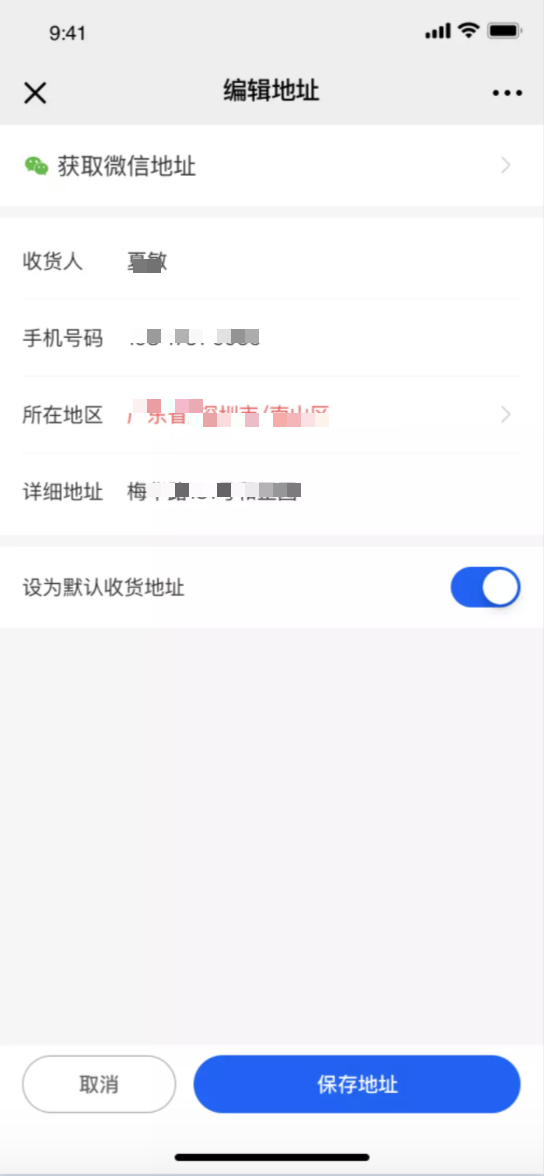
·If the shipping address filled in by the user is not within the merchant's deliverable region, the order cannot be submitted, and the user will be prompted: This address does not support delivery. Please select again.
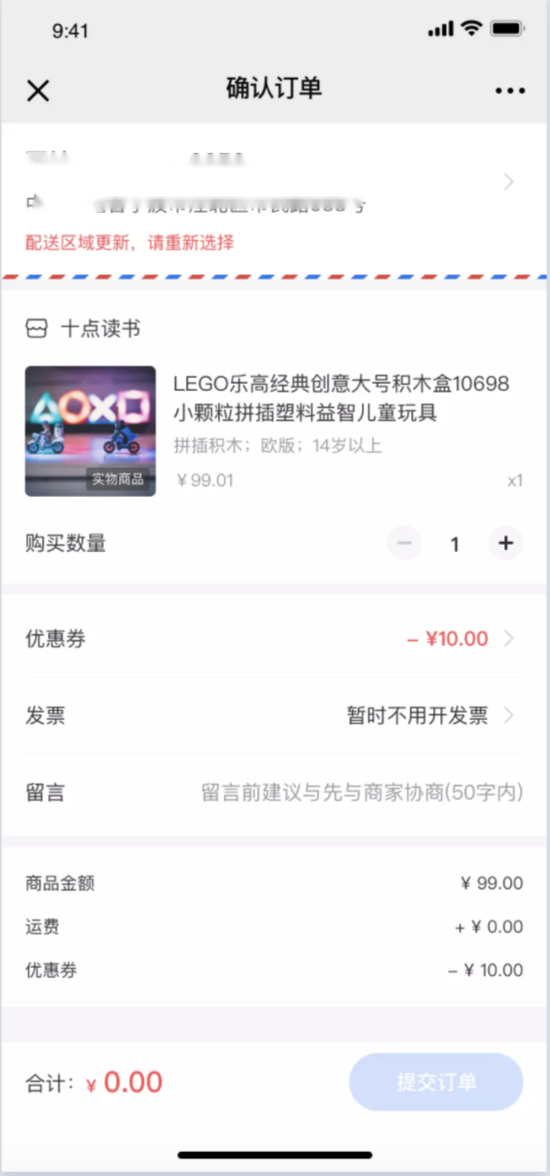
·When the user's old address does not match the address in the current address selector, the order cannot be submitted, and the user will be prompted to edit the address again.
Precautions:
1. Personnel without the 'Order Management - Delivery Management' permission cannot create shipping fee templates and cannot add them when creating physical products. They can use them normally after the permission is enabled.
2. After modifying the shipping fee template used by a product, the modified content will be synchronized to the products using this shipping fee template.
3. Unchecked 'Deliverable regions' do not support delivery.
Combined Order Instructions
1) Merge Orders
a. IfRecipient's Name/Phone Number/Addressare exactly the same, you can manually select and directly merge the orders. Note that you need to select at least two orders to merge. The merged orders will be labeled with 'Merged'.
b.The merged order takes the earliest order placement time(The order list for printing and shipping is sorted in descending order by order placement time)
c. Orders can only be merged once.Merged orders cannot be merged again.
2) Cancel Merge
a. Merged orders support canceling the merge (a secondary confirmation pop - up window will appear). You can select multiple merged orders to cancel the merge at the same time.
3) One - click Merge
a.One - click merge groups the orders that can be merged in the order list for printing and shipping by recipient. Each group corresponds to the same recipient.
b. For the same recipient, you can freely choose to merge the recipient's orders into one or multiple packages. Select the orders to be merged and click [Merge Selected Orders] to complete the merge.
c. If all orders of the same recipient are merged, it will automatically jump to the next group of recipients.
d. NoteOne - click merge excludes the merged orders(because orders can only be merged once)
Instructions for Order Fulfillment and Shipping
I. Project Background
The system does not support combined order shipping and split order shipping, forcing merchants to handle these tasks manually offline, which incurs high costs.
II. Project Value
1. Combined order shipping:When a single user places multiple orders, these orders can be packed into one parcel for shipping, saving the merchant's logistics costs.
2. Split order shipping: When an order includes multiple items, it supports split shipping to flexibly meet the user's needs.
III. Operation Path
New Management Console 2.0: Transactions - Order Management - Print and Ship
Current Management Console: Transactions - Logistics Management - Print and Ship
Old Management Console: Transaction Capabilities - Print and Ship
IV. Usage Instructions
1. Print and Ship List
All [Ship] operations are centralized in the newly added [Print and Ship] list, which only displays physical products.It supports filtering by order number, order placement time, product name, recipient region, and recipient name.
2. Combined Order Shipping
1) Merge Orders
a. Ifthe recipient's name/phone number/addressis exactly the same,you can manually select and directly merge the orders. Note that you need to select at least two orders to merge. The merged orders will be labeled with 'Combined'.
b.The merged order takes the earliest order placement time(The Print and Ship list is sorted in descending order by order placement time).
c. Orders can only be merged once.Merged orders cannot be merged again.
2) Cancel Merge
a. Merged orders support cancellation of the merge (a confirmation pop - up window will appear). You can select multiple merged orders to cancel the merge at the same time.
3) One - Click Merge
a.One - Click Merge groups the orders that can be merged in the Print and Ship list by recipient. Each group corresponds to the same recipient.
b. For the same recipient, you can freely choose to merge the recipient's orders into one or multiple parcels. Select the orders to be merged and click [Merge Selected Orders] to complete the merge successfully.
c. If all orders of the same recipient are merged, it will automatically jump to the next group of recipients.
d. NoteOne - Click Merge excludes merged orders(Because orders can only be merged once).
3. Split Order Shipping
1) Split Parcels
a.When an order contains multiple different products or multiple quantities of the same product, it supports splitting.You need to select at least one order to open the [Split Parcels] pop - up window. Note that if an order contains only one product, splitting is not supported.
b. Group and split according to the selected parcels.
c. Select the products to be split out and click [Split Selected Products for Separate Shipping]. The selected products will be split into a separate parcel for shipping. After successful splitting, the products will disappear from the pop - up window, and you can continue to split. NoteSplit parcels cannot be merged again.
d. If an order is fully split, it will automatically jump to the next group.
e.For products with a purchase quantity greater than 1, they can be further split into single - item parcels after being split out.For example, if you split out 3 durians, they can be further split into 3 separate parcels.
Split order instructions
1) Split packages
a、When an order contains multiple different products or multiple quantities of the same product, splitting is supported.You need to select at least one order to pop up the [Split Package] window. Note that if an order contains only one product, splitting is not supported.
b、Group and split according to the selected packages
c、Select the products to be split out, click [Split the selected products for separate shipment], and the products will be split into a separate package for shipment. After successful splitting, the products will disappear from the pop - up window, and you can continue to split. NoteSplit packages cannot be merged again.
d、If an order is fully split, it will automatically jump to the next group
e、For products with a purchase quantity greater than 1, they can be further split into single - item packages after being split out.For example, if you split out 3 durians, they can be further split into 3 separate packages
I can't find the shipping button on the order list. How come?
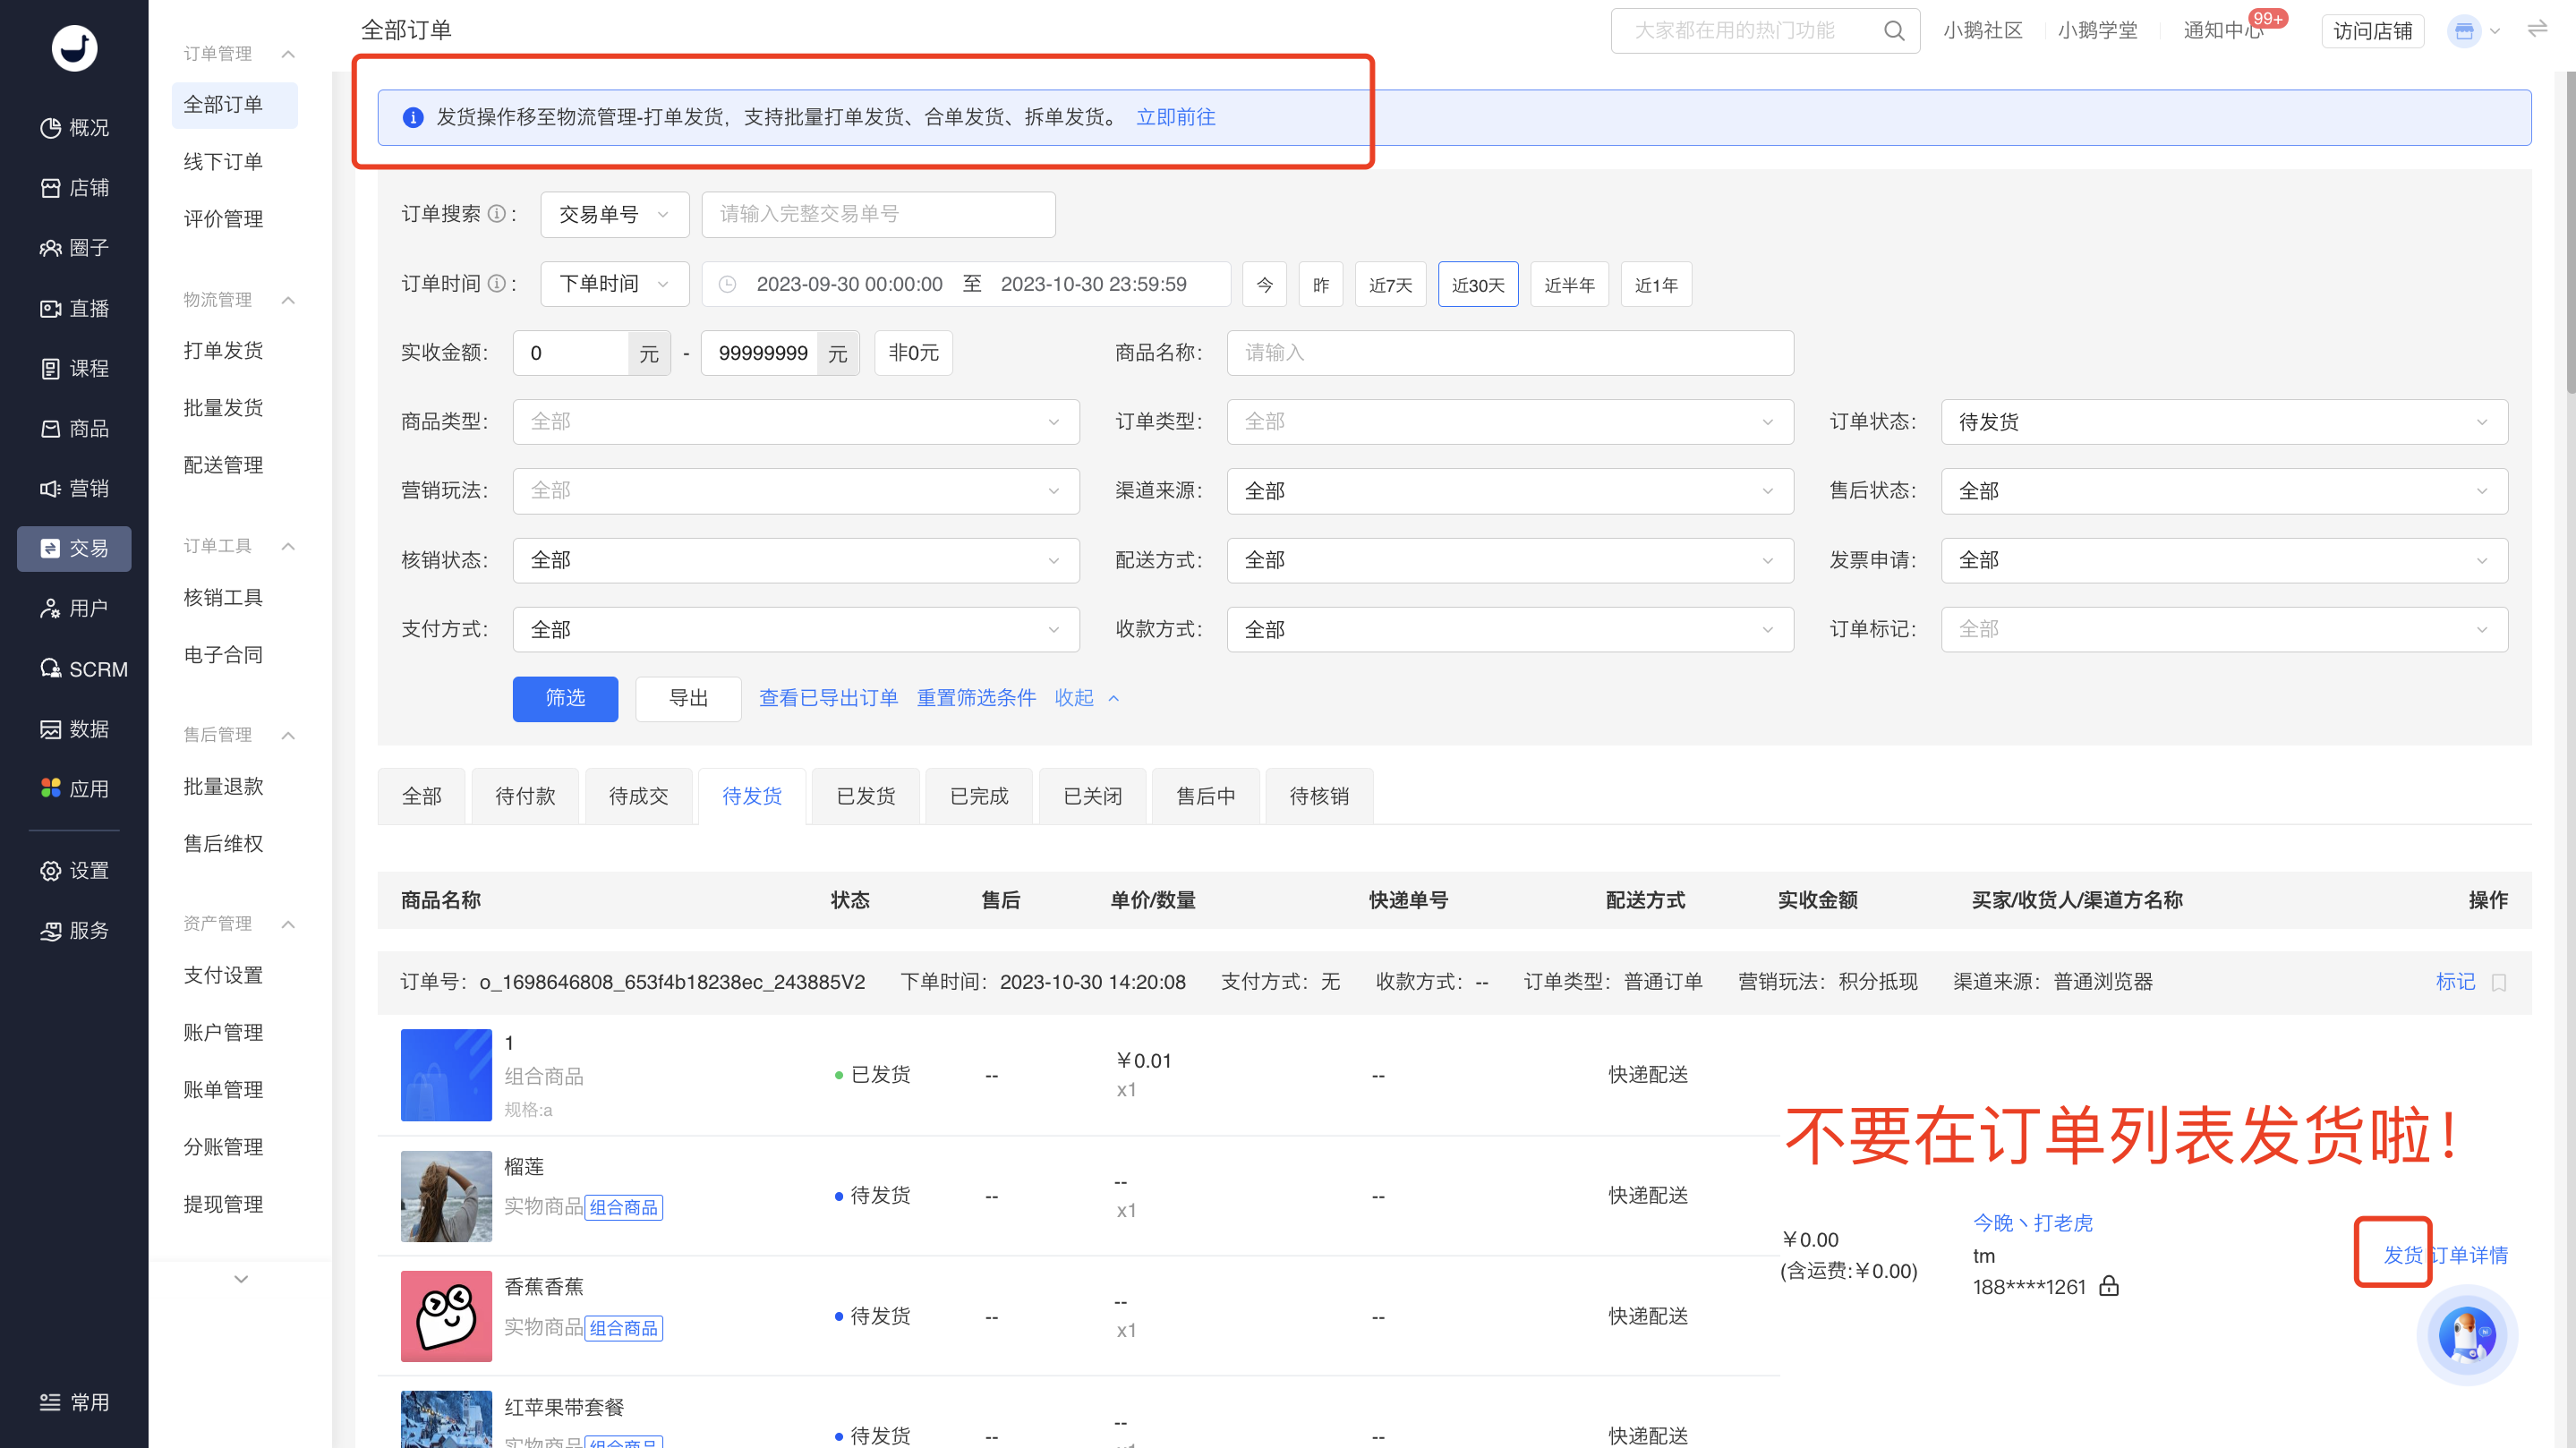
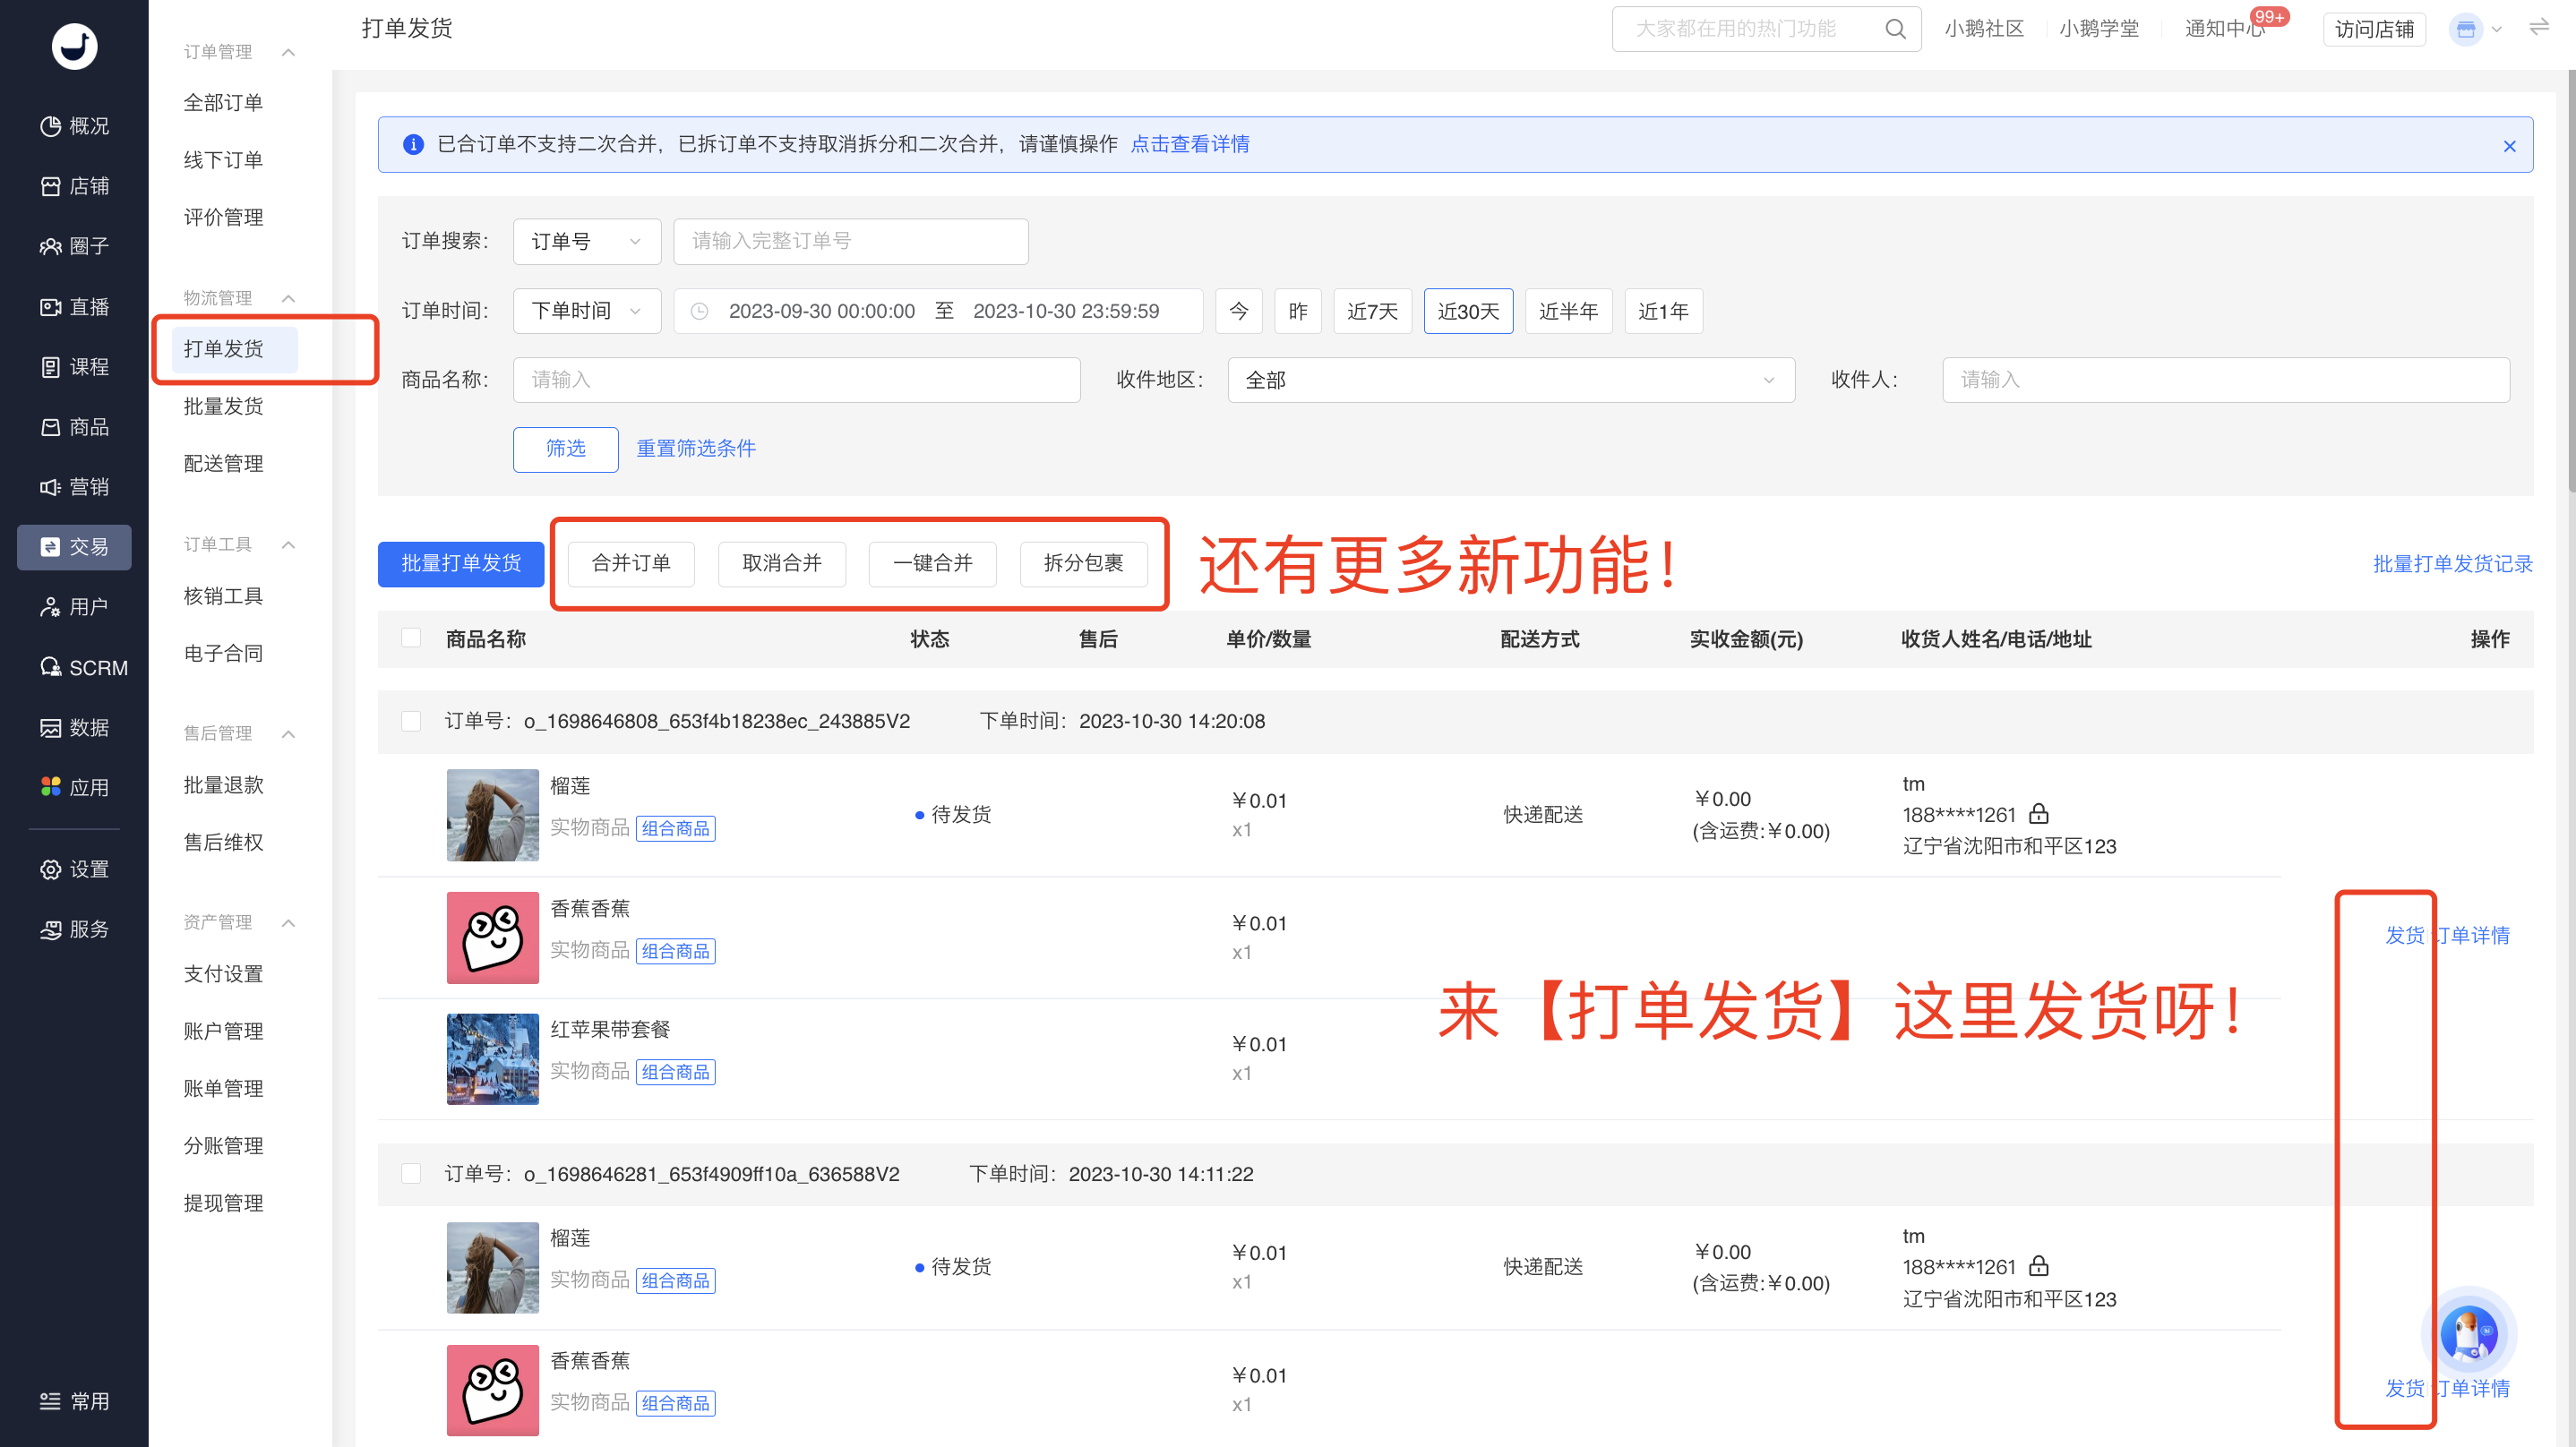
To provide customers with a better experience in order processing and shipping, the shipping operations have been centralized into a new module, and functions for combined order shipping and split order shipping are also provided. The changes are as follows:
The [To be shipped] operation in the original order list has been moved to the [Order Processing and Shipping] module. Subsequently, you can directly perform shipping operations in the [Order Processing and Shipping] list.
(Note: Currently in the transition phase, the shipping button is still retained in the order list. Clicking it will redirect you to the order processing and shipping page. The shipping button in the order list will be removed later.)
Appendix: Instructions for order processing and shipping operations:
https://admin.xiaoe-tech.com/helpCenter/problem?first_id=600&second_id=416&document_id=doc_6538c1231b8ae_tRslw
Users are supported with door-to-door pick-up service for returns
I. Project Background
Currently, when users apply for after-sales returns, they need to contact the courier company on their own and fill in the tracking number, which is very inconvenient.
II. Project Value
Support users to apply for door-to-door pick-up when initiating a return and refund request, reducing the user's operations in the entire after-sales process and improving after-sales efficiency.
III. Operation Path
Consumer End: Personal Center - Orders - After-sales - View Details - Return and Refund Details
IV. Instructions for Use
1. What is Door-to-Door Pick-up?
When a user returns a purchased product, they can choose to have the courier company arrange for a courier to pick up the returned product at their doorstep.
2. Which courier companies support door-to-door pick-up?
Currently, the courier company that supports door-to-door pick-up is JD Logistics.
3. How much does door-to-door pick-up cost?
Users can see the estimated shipping fee when placing an order. The actual shipping fee is subject to the courier's on-site assessment. Users pay the courier directly.
4. How do users operate door-to-door pick-up?
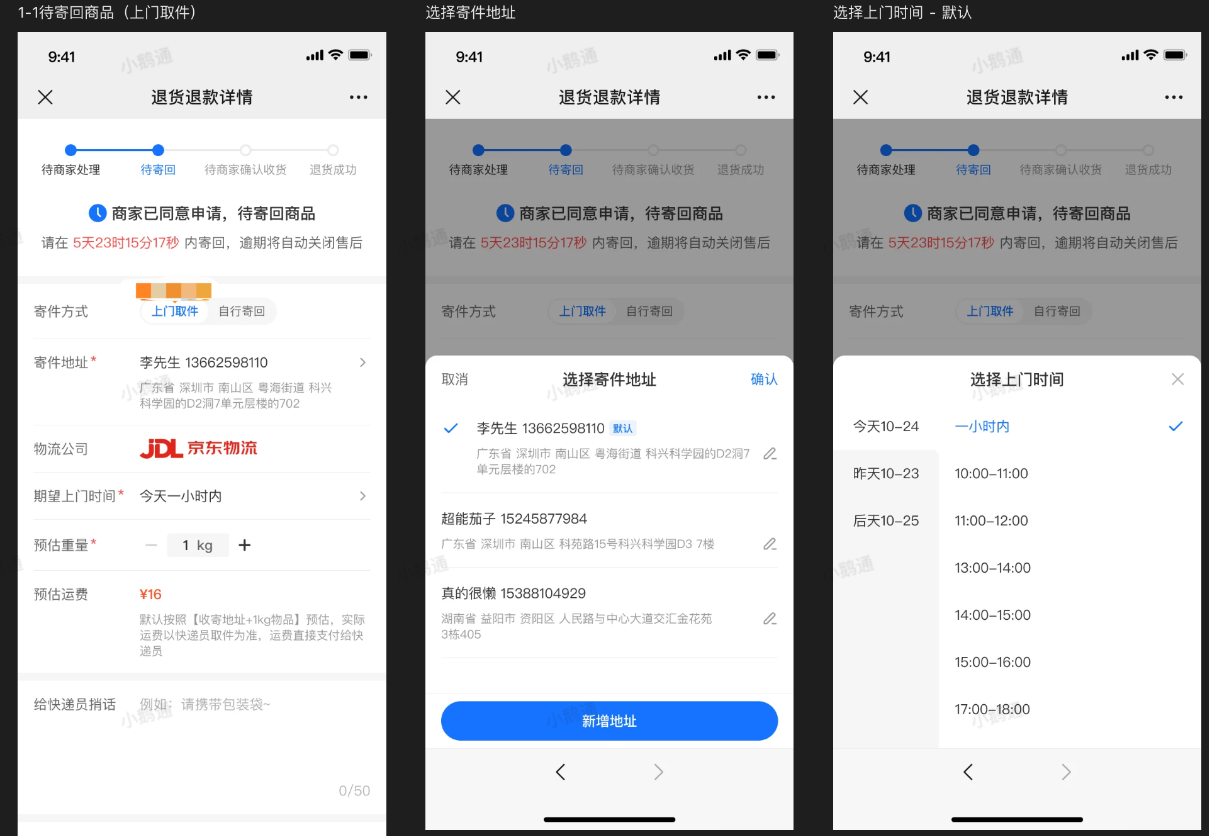
1) Apply for after-sales service for the order, submit a return and refund request, and wait for the merchant to approve the request.
2) After the merchant approves the return and refund or exchange request, the buyer selects the 'Door-to-Door Pick-up' return method.
3) The buyer selects door-to-door pick-up and chooses a time slot for the pick-up. The pick-up address defaults to the delivery address at the time of ordering and can be modified.
4) The courier comes to pick up the product, and the user pays the shipping fee to the courier.
5) The buyer waits for the merchant to confirm receipt of the product.
6) The merchant confirms receipt of the product, and the order refund is successful.
5. Can the door-to-door pick-up order be cancelled?
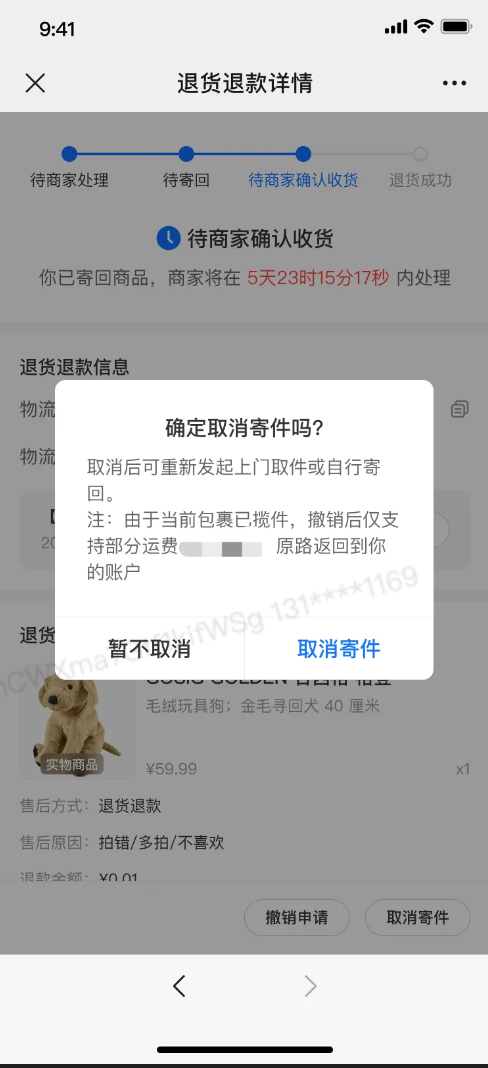
It can be cancelled before the courier arrives for pick-up. After cancellation, the order returns to the 'Pending Return' status, and the user can choose the return method again.
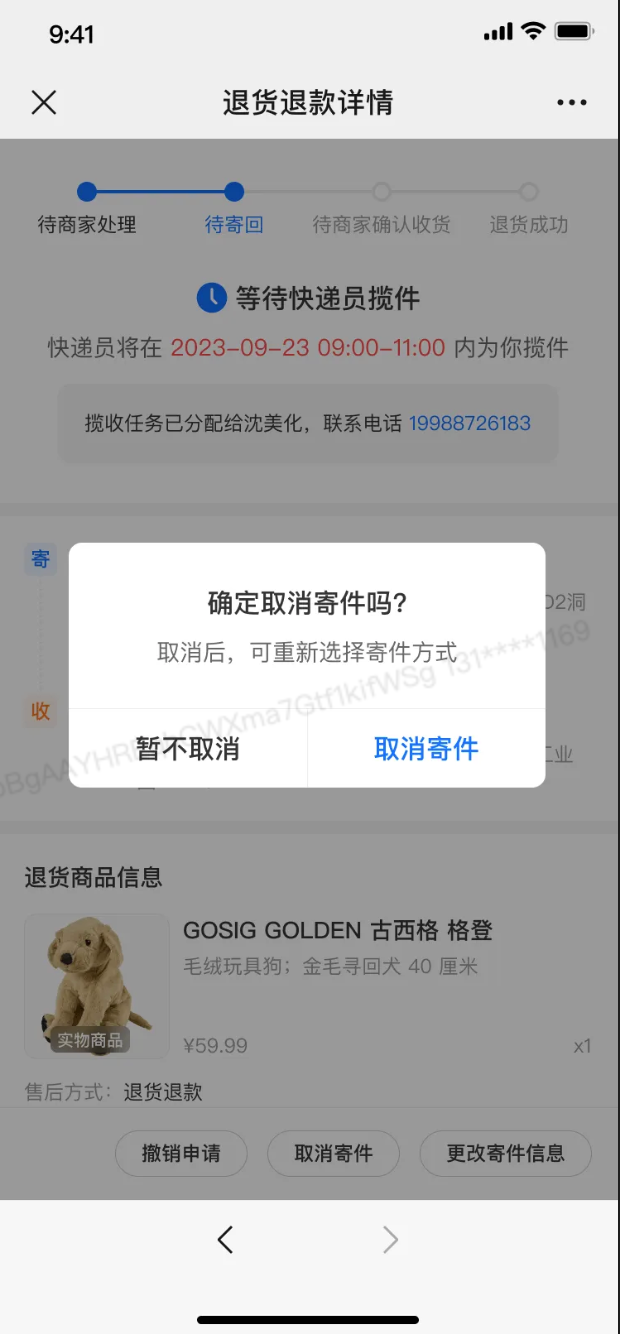
It can also be cancelled after the courier has picked up the product. Since transportation has already occurred at this time, partial shipping fees will be refunded upon cancellation. After cancellation, the order returns to the 'Pending Return' status, and the user can choose the return method again.
Evaluation Management
How many times can students leave reviews after purchasing products?
Each time a learner purchases a product, they can leave a review for that product.
In what order are product reviews displayed?
The display logic of physical product reviews is in reverse chronological order.
How many times can merchants reply to reviews?
Currently, each comment only supports one reply.
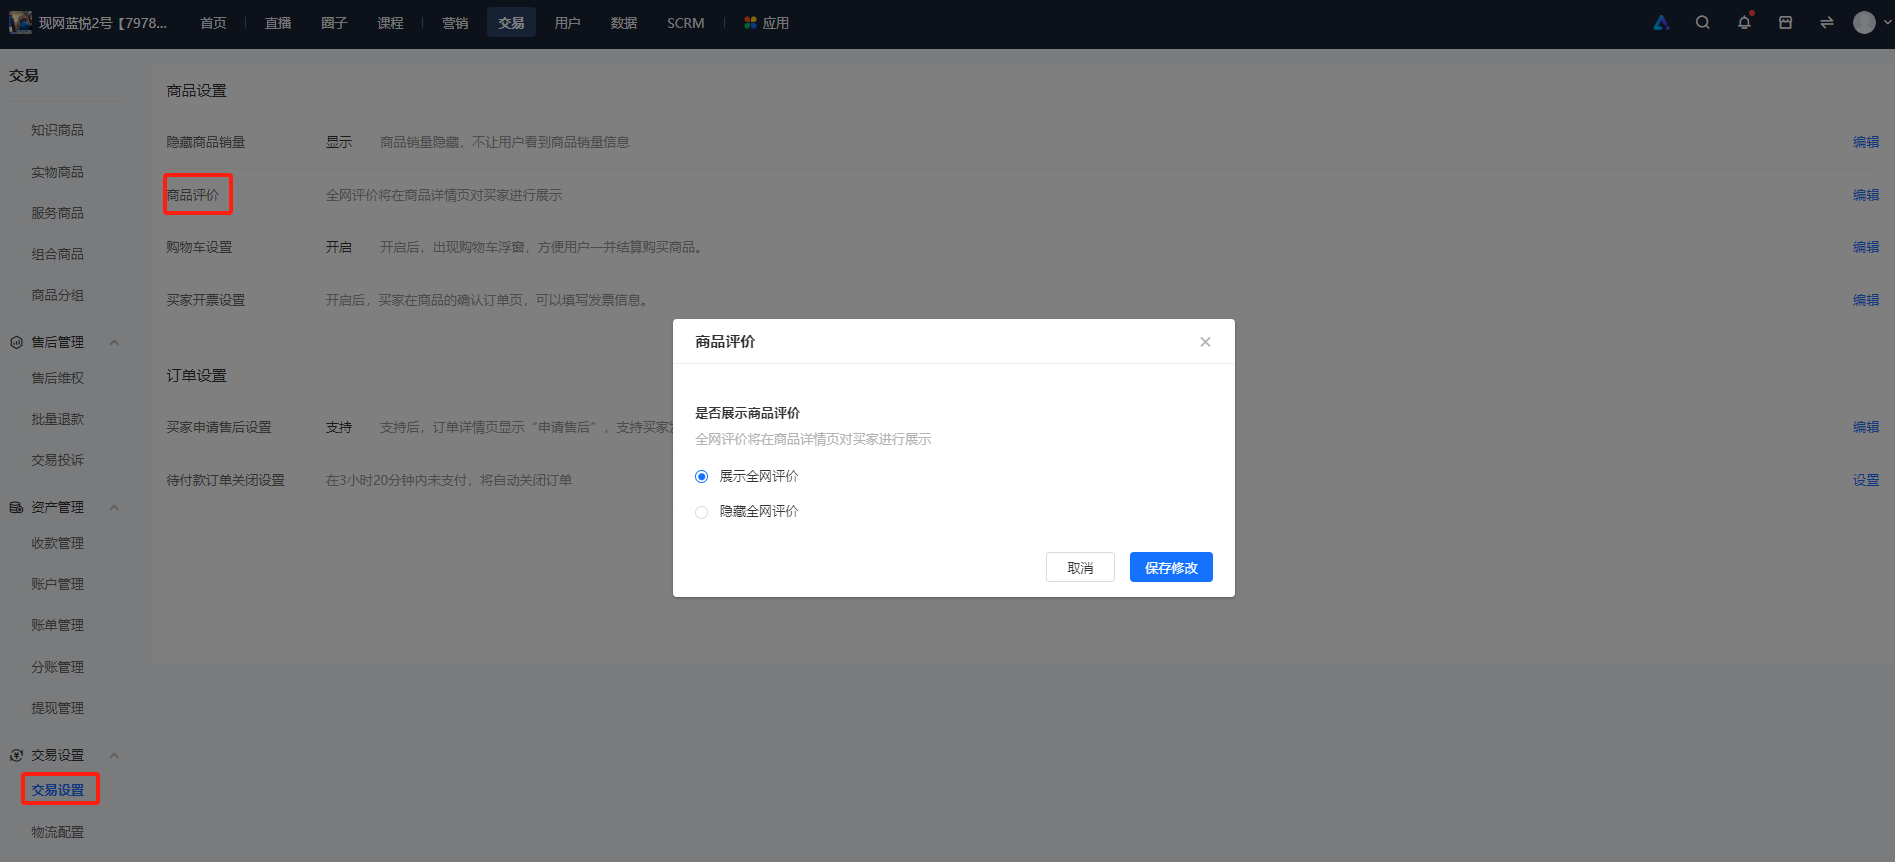
Where can I set the switch for reviews of physical products?
Enter the Online Store management backend, find [Transactions] - [Transaction Settings]. In the [Product Settings] module, find [Product Reviews], click to set it up and enable the display.
Payment Settings
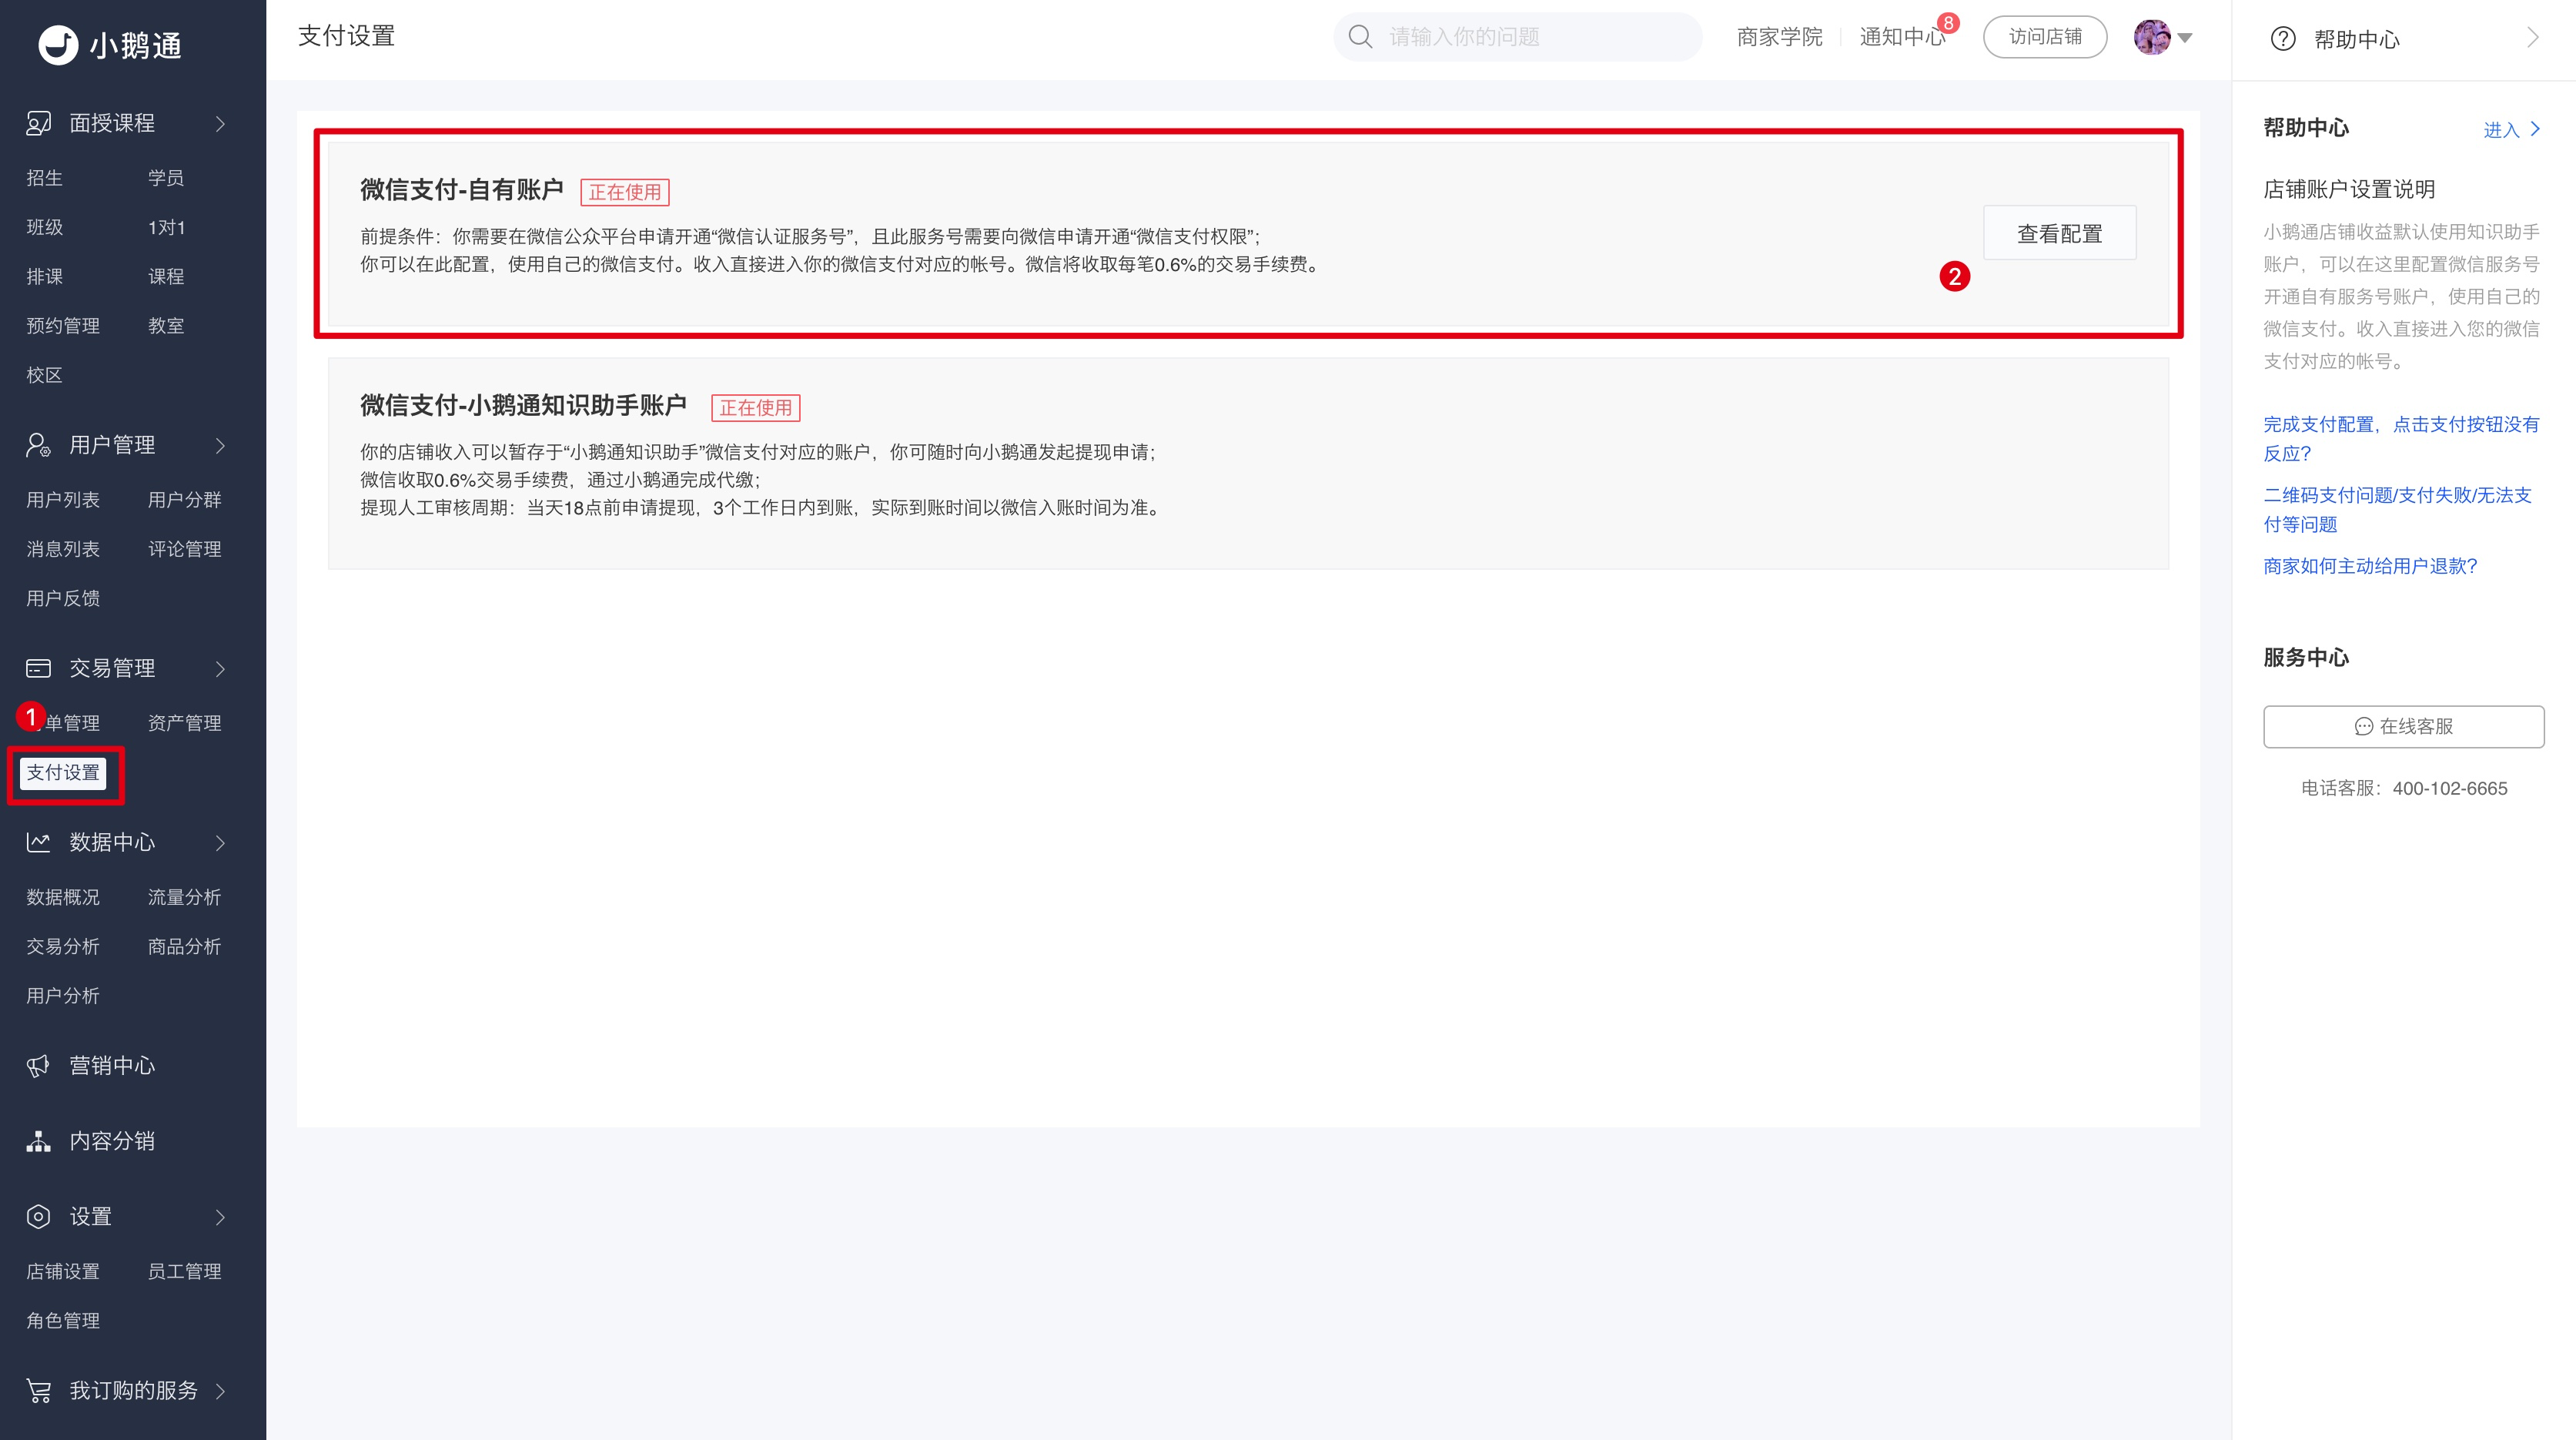
Fill in the payment settings on the elink management console
Step 1: Return to the elink management console and directly fill in the WeChat merchant ID recorded in Step 3 and the WeChat merchant API key recorded in Step 4.
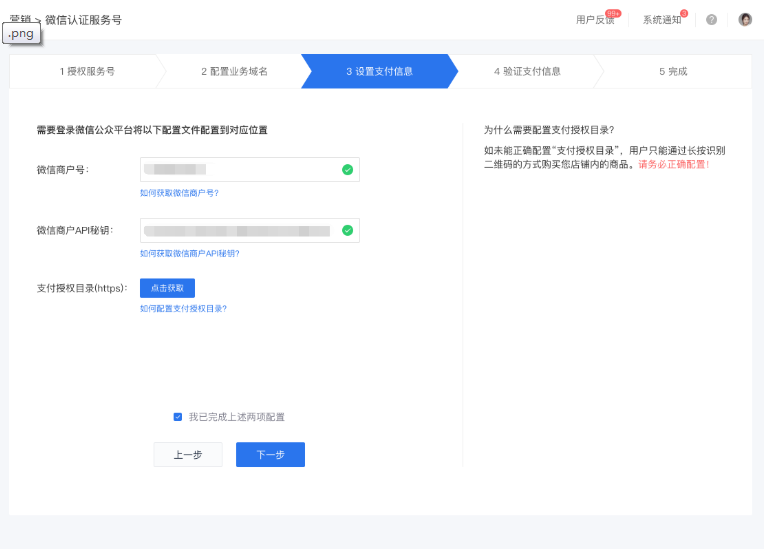
Step 2: In the [Payment authorization directory (https)] field, click the [Copy link] button on the right to copy the payment authorization directory of your elink store in full. Do not close the elink management console page after completing this step.
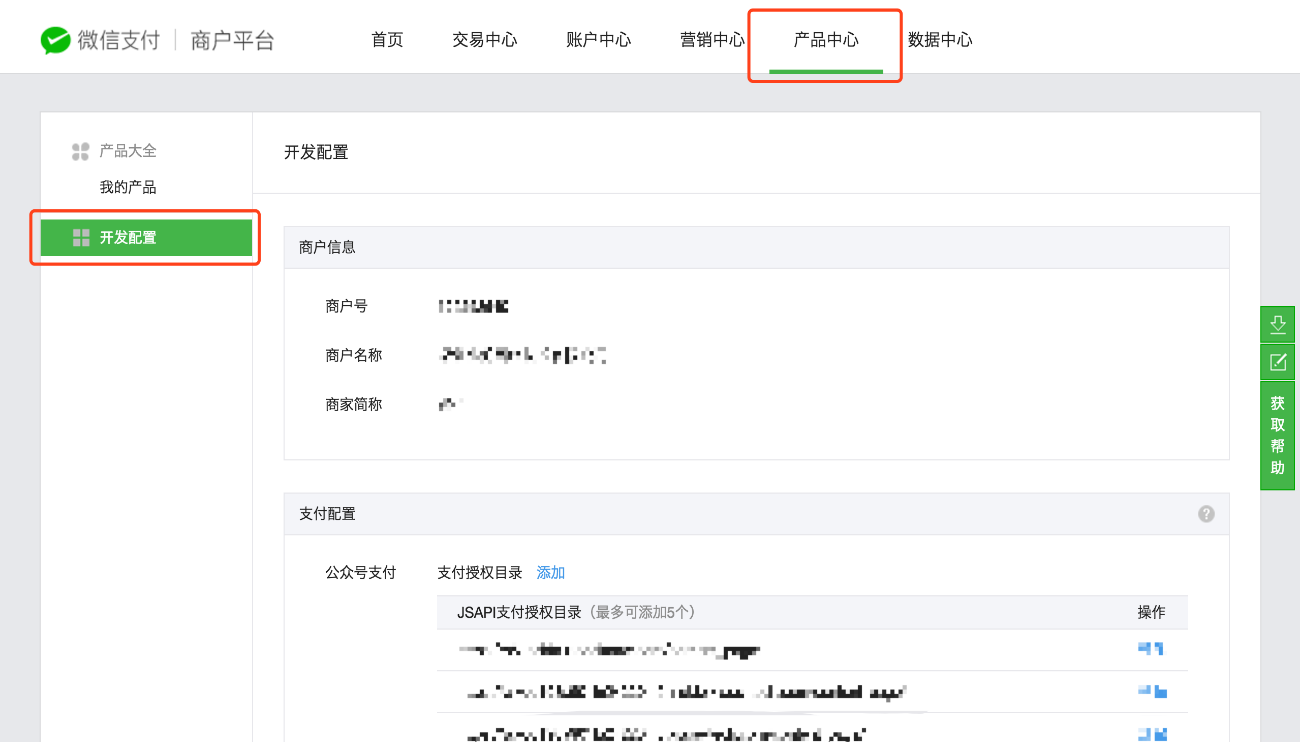
Step 3: Return to your WeChat Pay merchant platform page. Click [Product Center] in the top menu bar, and then click [Development configuration] in the left sidebar.
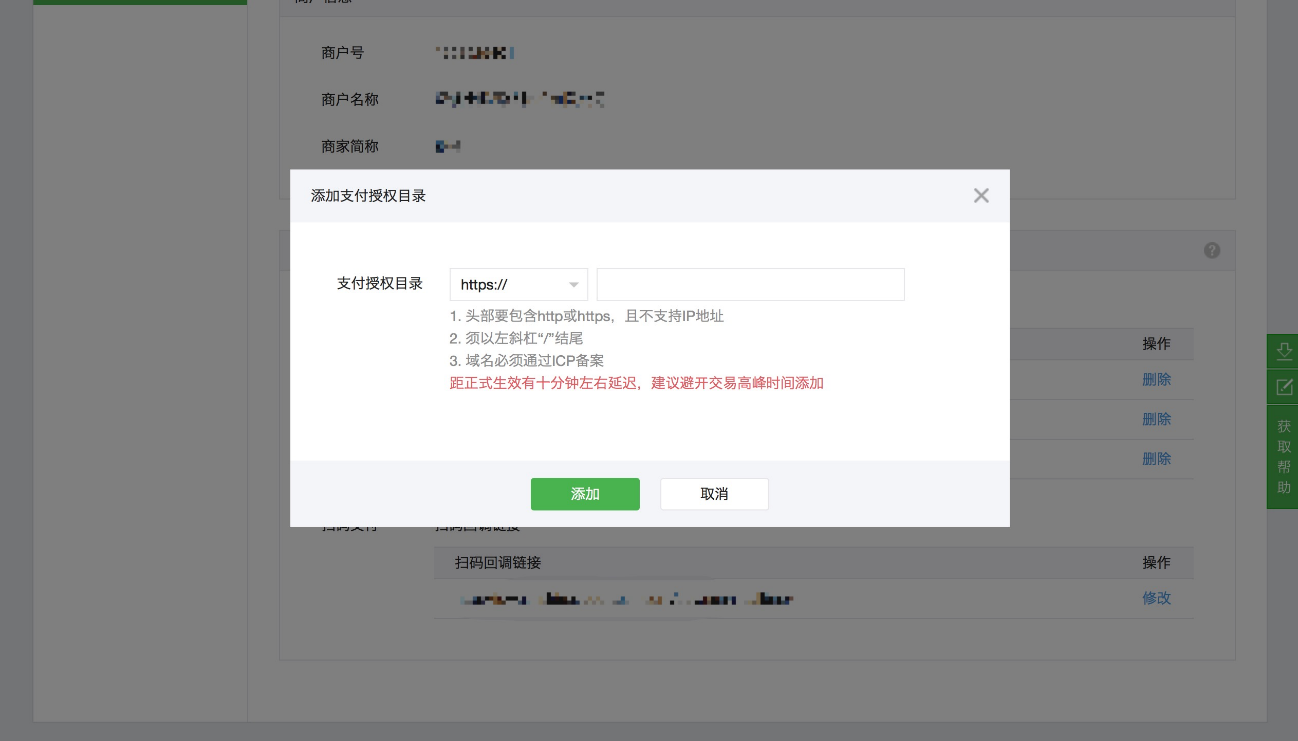
Step 4: In the [Payment configuration] section, click the [Add] button next to [Official Account payment] - [Payment authorization directory]. The browser will automatically pop up an add window. First, be sure to select the https:// type in the drop - down menu at the top of the directory, then paste the payment authorization directory of your elink store that you just copied, and click [Add] to confirm.
Step 5: Click [I have completed the above two configurations] and then click [Next] to complete the payment settings configuration process for your elink store.
Obtain WeChat Merchant ID
In this tutorial, you can obtain your WeChat merchant ID in the following ways:
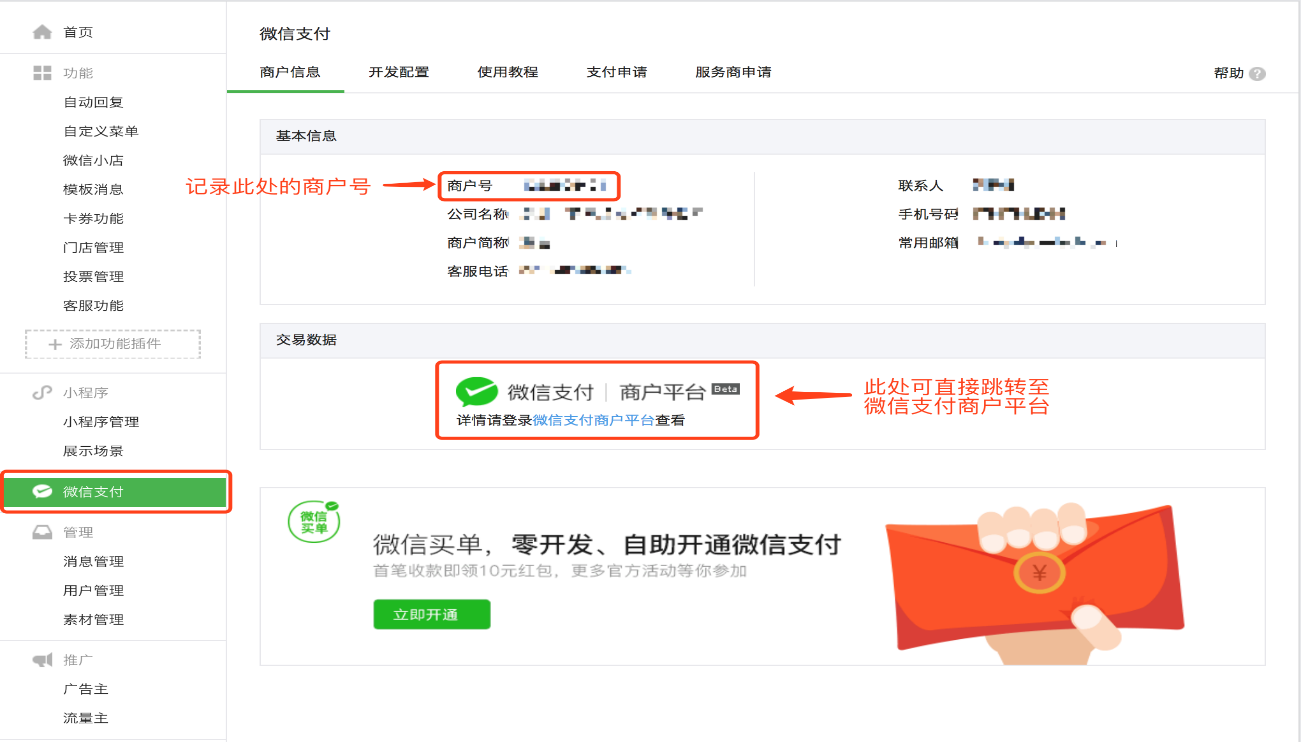
Step 1: After completing the authorization process in the previous step, open a new browser tab and log in to the authorized WeChat Official Account on the WeChat Public Platform (Login URL: https://mp.weixin.qq.com/).
Step 2: Click on [WeChat Pay] in the left sidebar.
● If your Official Account has already enabled the WeChat Pay function, you can view the merchant ID and relevant transaction information.
● If not, you need to apply for activation on this page.
● For users who have just enabled the WeChat Pay function, it takes about 1 day for the merchant information to be generated.
Step 3: Record the merchant ID for future use.
Step 4: Click on [WeChat Pay | Merchant Platform] under [Transaction Data] to navigate to the WeChat Pay Merchant Platform for the next steps.
How to complete real-name authentication on WeChat
When you use the elink personal mode, elink will collect the payment for the content products you sell on your behalf. You can initiate a withdrawal request to transfer your earnings to the bound WeChat account for withdrawal.
According to the official restrictions of WeChat Pay, the daily withdrawal limit for a real - name verified WeChat account is 100,000 yuan. Withdrawals from non - real - name verified WeChat accounts are not supported.
Therefore, before making a withdrawal, you need to check whether your WeChat account is real - name verified on the mobile WeChat client. If it is not verified, you need to complete the real - name verification.
The specific operation steps are as follows:
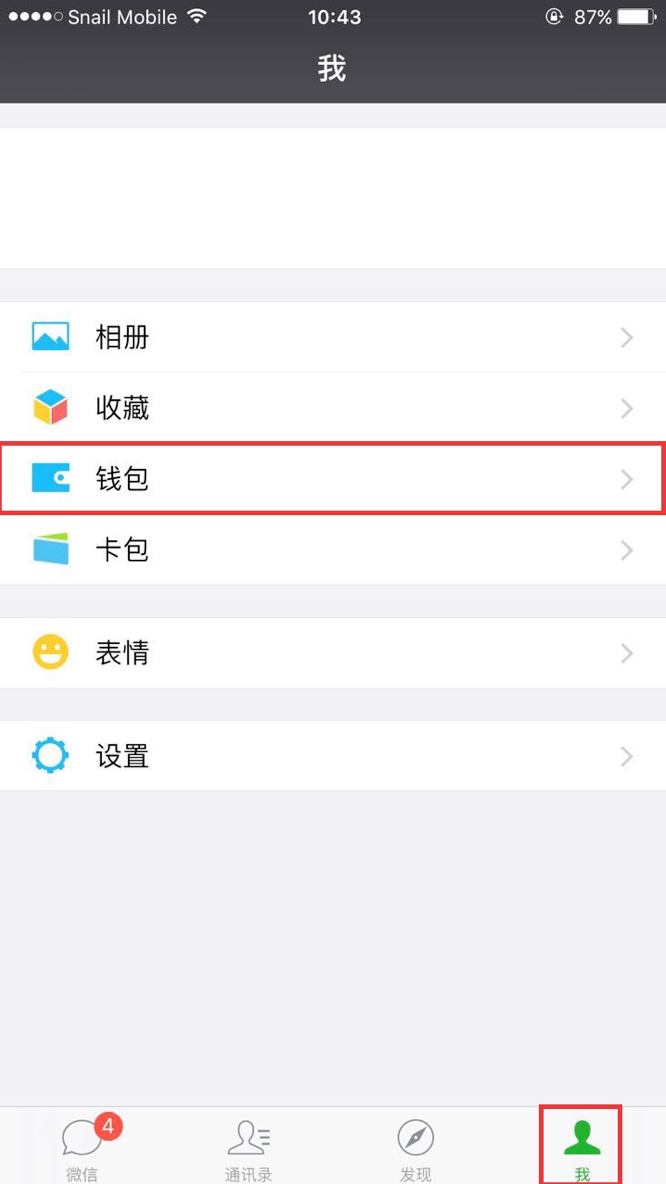
Step1: Log in to yourmobile WeChat client, click on the option “Me” in the bottom menu bar, and find the option “Wallet”.
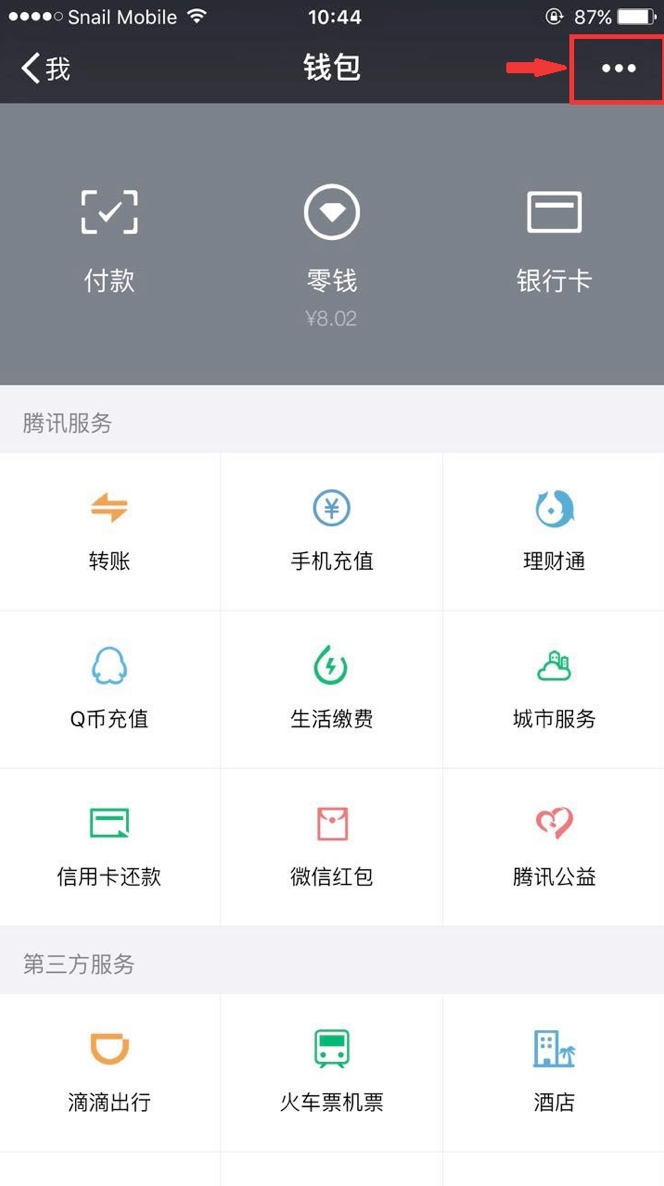
Step2: Click on the “Wallet” option to enter the wallet page, and then click on the “More” option in the upper - right corner (the icon isthree dots).
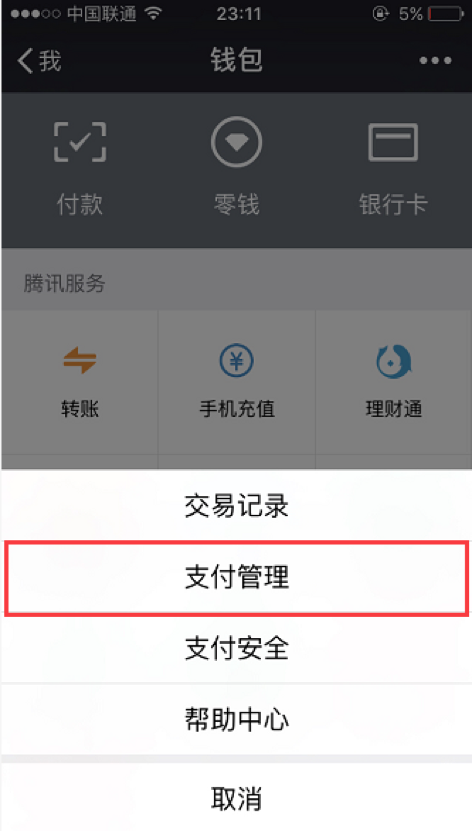
Step3: Click on the “Payment Management” option.
Step4: Check whether your account has been real - name verified on the payment management page.
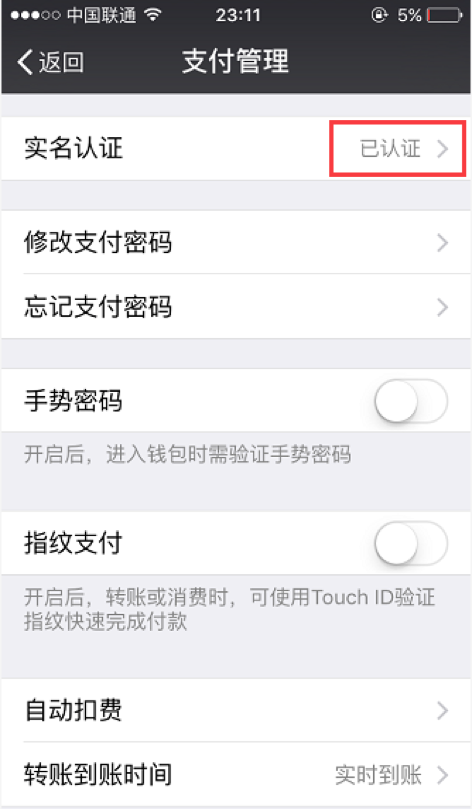
If it shows “Verified” in the “Real - Name Verification” column, you can return to the elink management background and continue with the withdrawal operation.
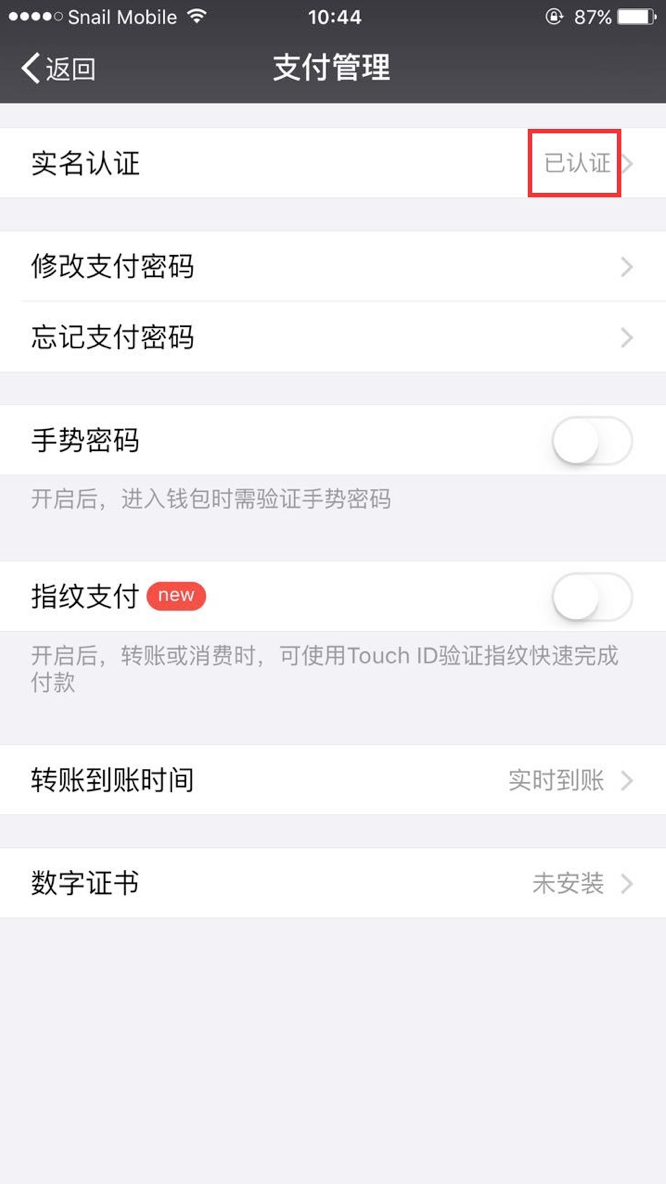
If it shows “Verify Now” in the “Real - Name Verification” column, please refer to Step5.
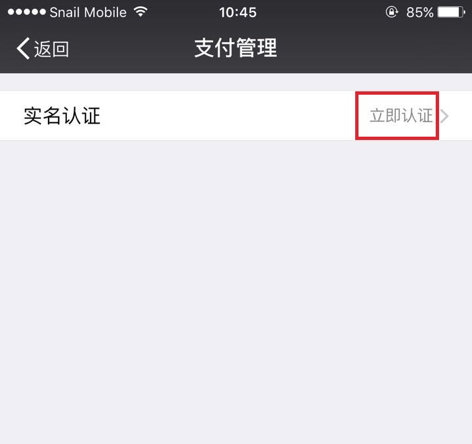
Step5: If it shows “Verify Now” in the “Real - Name Verification” column, it means you haven't completed the real - name verification. Please click on “Verify Now” to start the verification process.
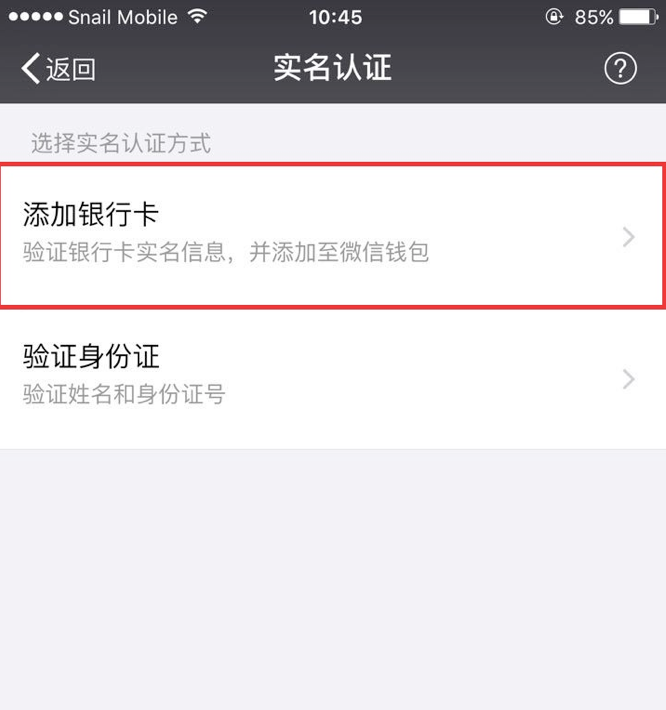
There are two verification methods available. We choose the “Bind Bank Card” method and fill in the relevant verification information.
Step6: After filling in the relevant information, click “Complete”. If you see that the status of “Real - Name Verification” has changed to “Verified”, it means your WeChat real - name verification has been successful.
Now you can return to the elink management background and continue with the withdrawal operation.The daily withdrawal amount for a real - name verified WeChat account cannot exceed 20,000 yuan