Mobile store
- Tutorial on Building the Online Store Homepage
- Tutorial on Configuring and Using the Personal Center
- Tutorial on Using the Mobile Online Store Navigation
- How to set up the online store homepage?
- How to display a new module on the home page?
- How many items can be set at most for the store navigation?
- Why don't the WeChat avatar and nickname of students in the H5 Online Store get updated after they click the synchronization button?
- Tutorial on Using Mobile Micro Pages
Tutorial on Building the Online Store Homepage
I. Function Introduction
The elink Online Store homepage supports various types of components. You can build a personalized store homepage by configuring these components. elink provides 33 types of components, including carousel images, image ads, navigation menus, knowledge products, instructor specials, communities, Q&A sections, live streams, and coupons.
II. Purpose of Use
An excellent store homepage can attract learners and improve the store's activity, conversion rate, and user retention rate.
III. Use Scenarios
Scenario 1: If a merchant has strong store operation capabilities and wants to build a personalized store that showcases their brand, they can combine various components.
IV. Operation Paths
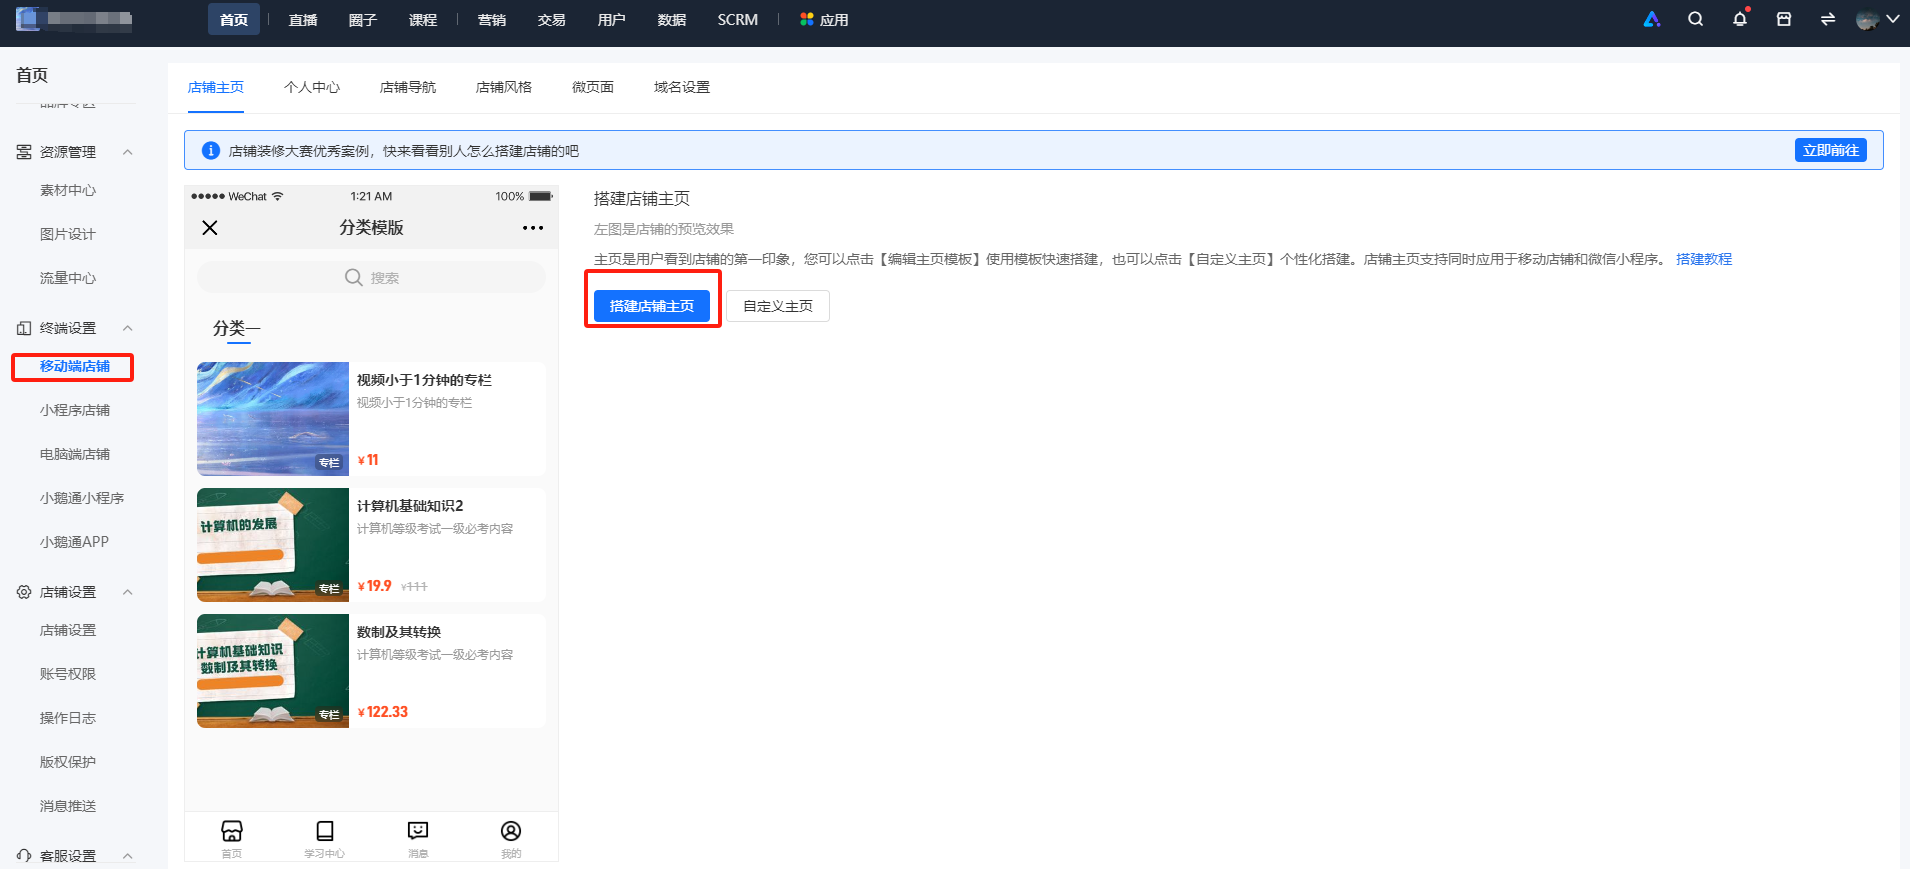
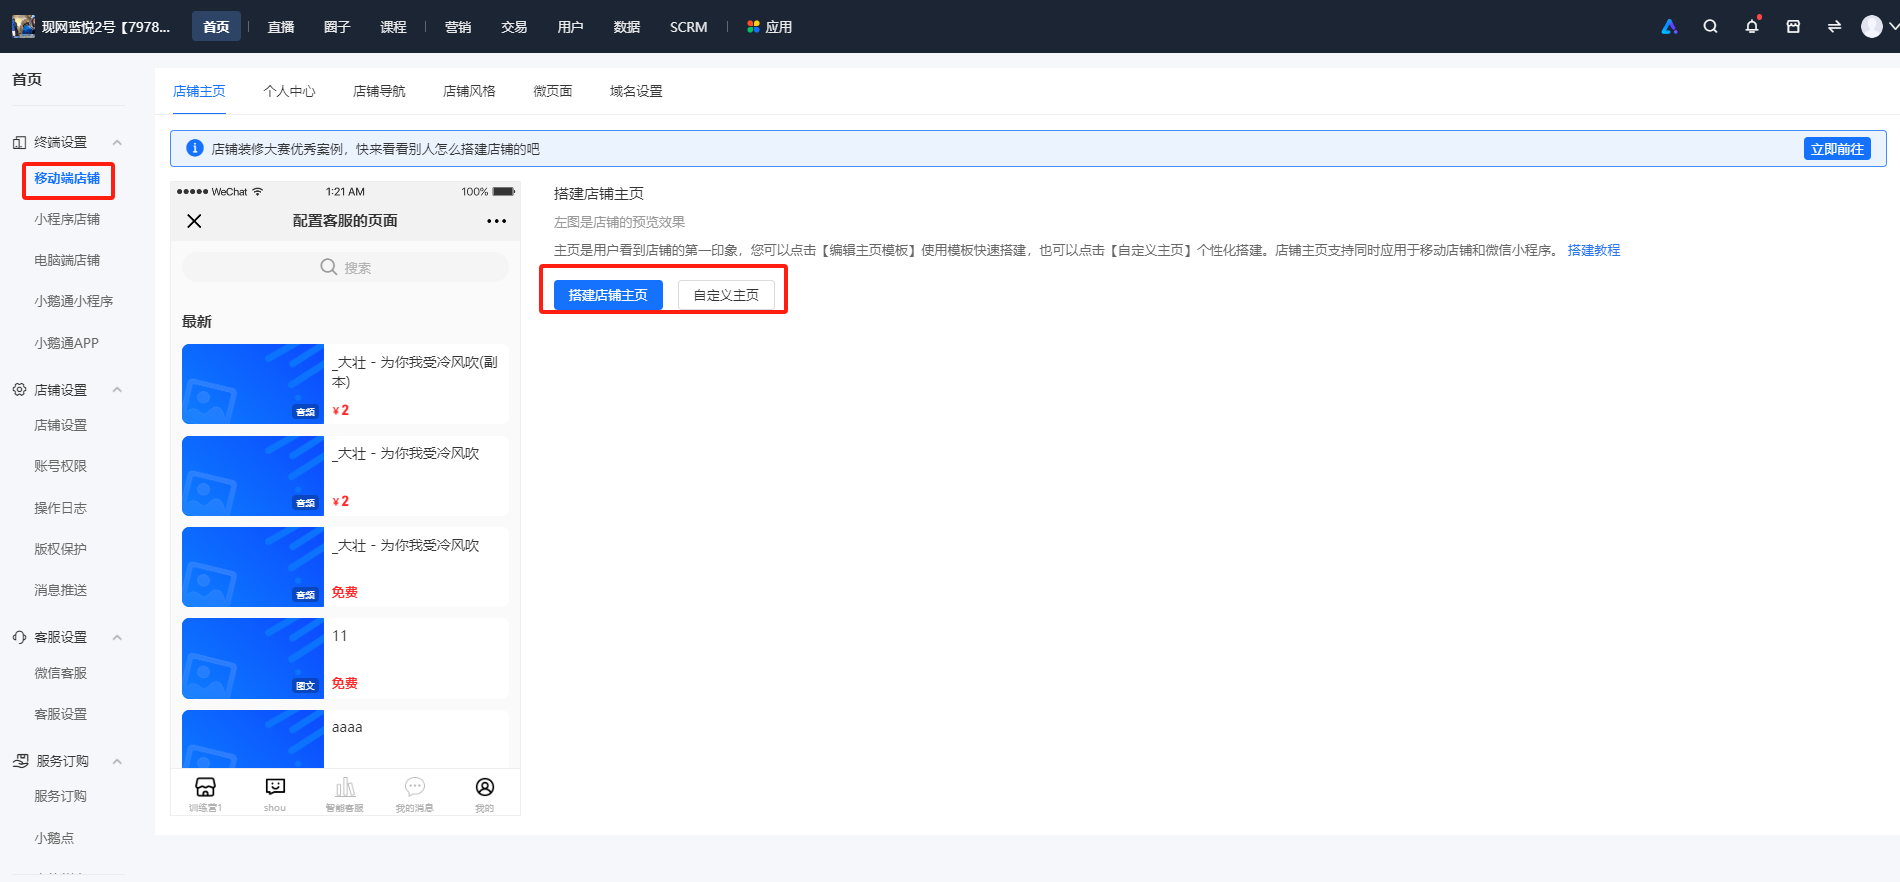
Merchant Terminal 1: Store -> Terminal Settings -> Mobile Store -> Store Homepage -> Build Store Homepage
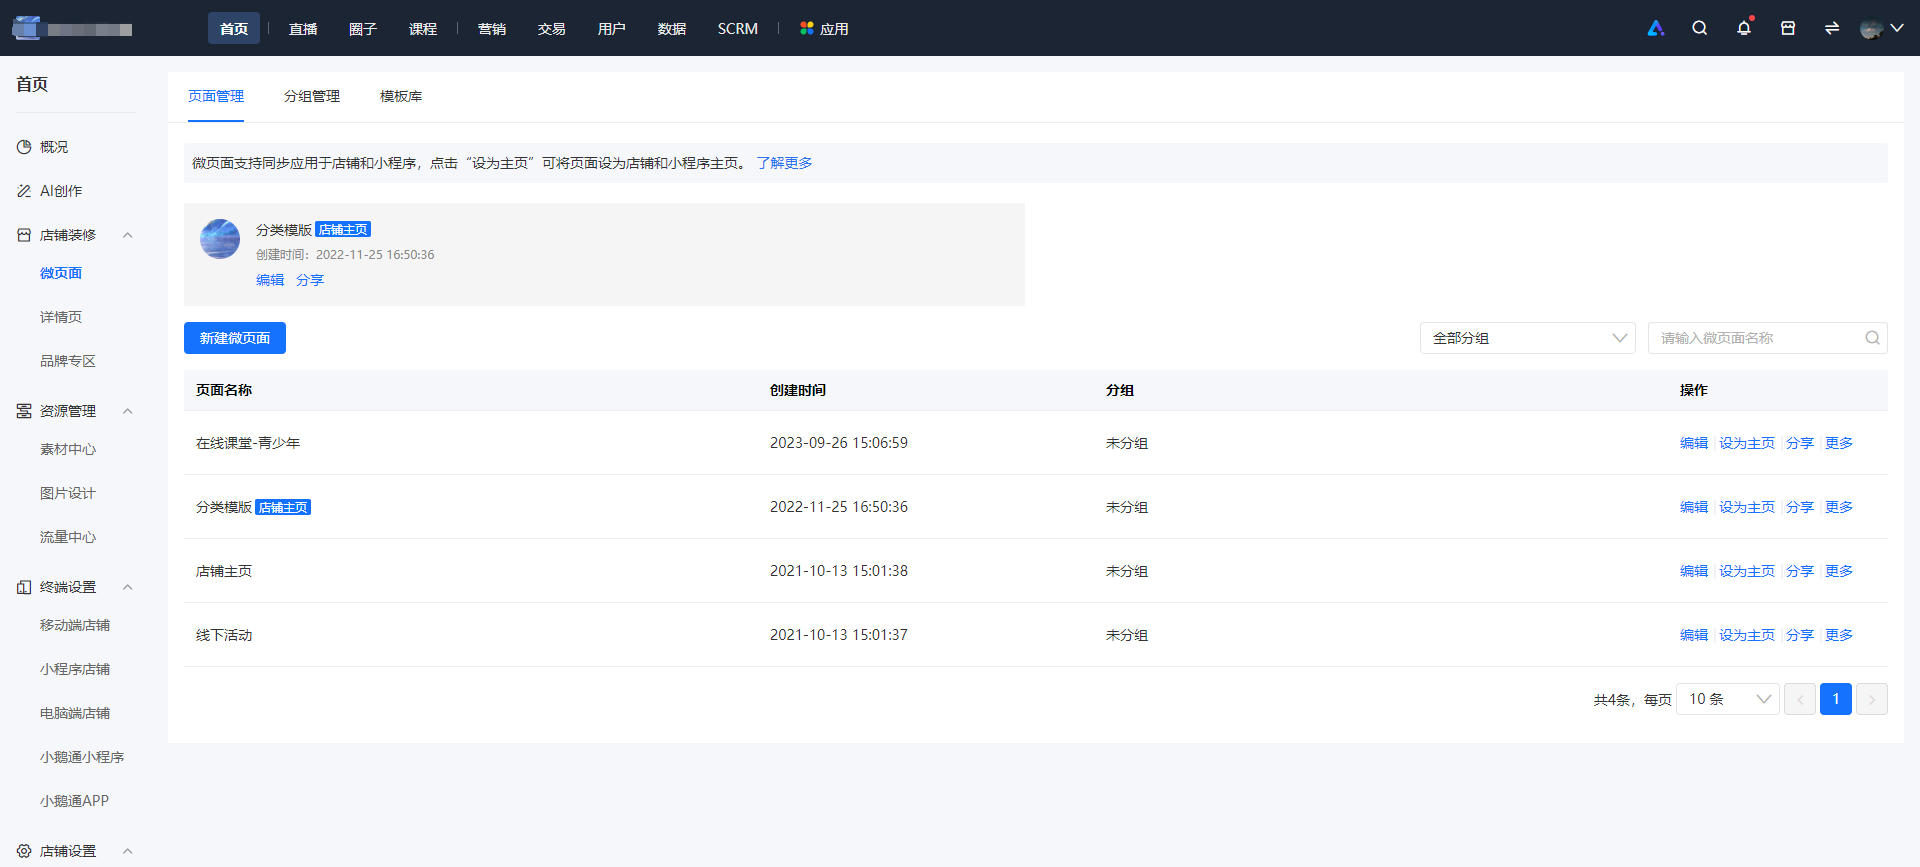
Merchant Terminal 2: Store -> Store Decoration -> Mini Page -> Operation -> Edit
V. Usage Tutorial
Step 1:Build the store homepage/mini page - Operation - Edit (Management Console)
Step 3:Add components (Management Console)
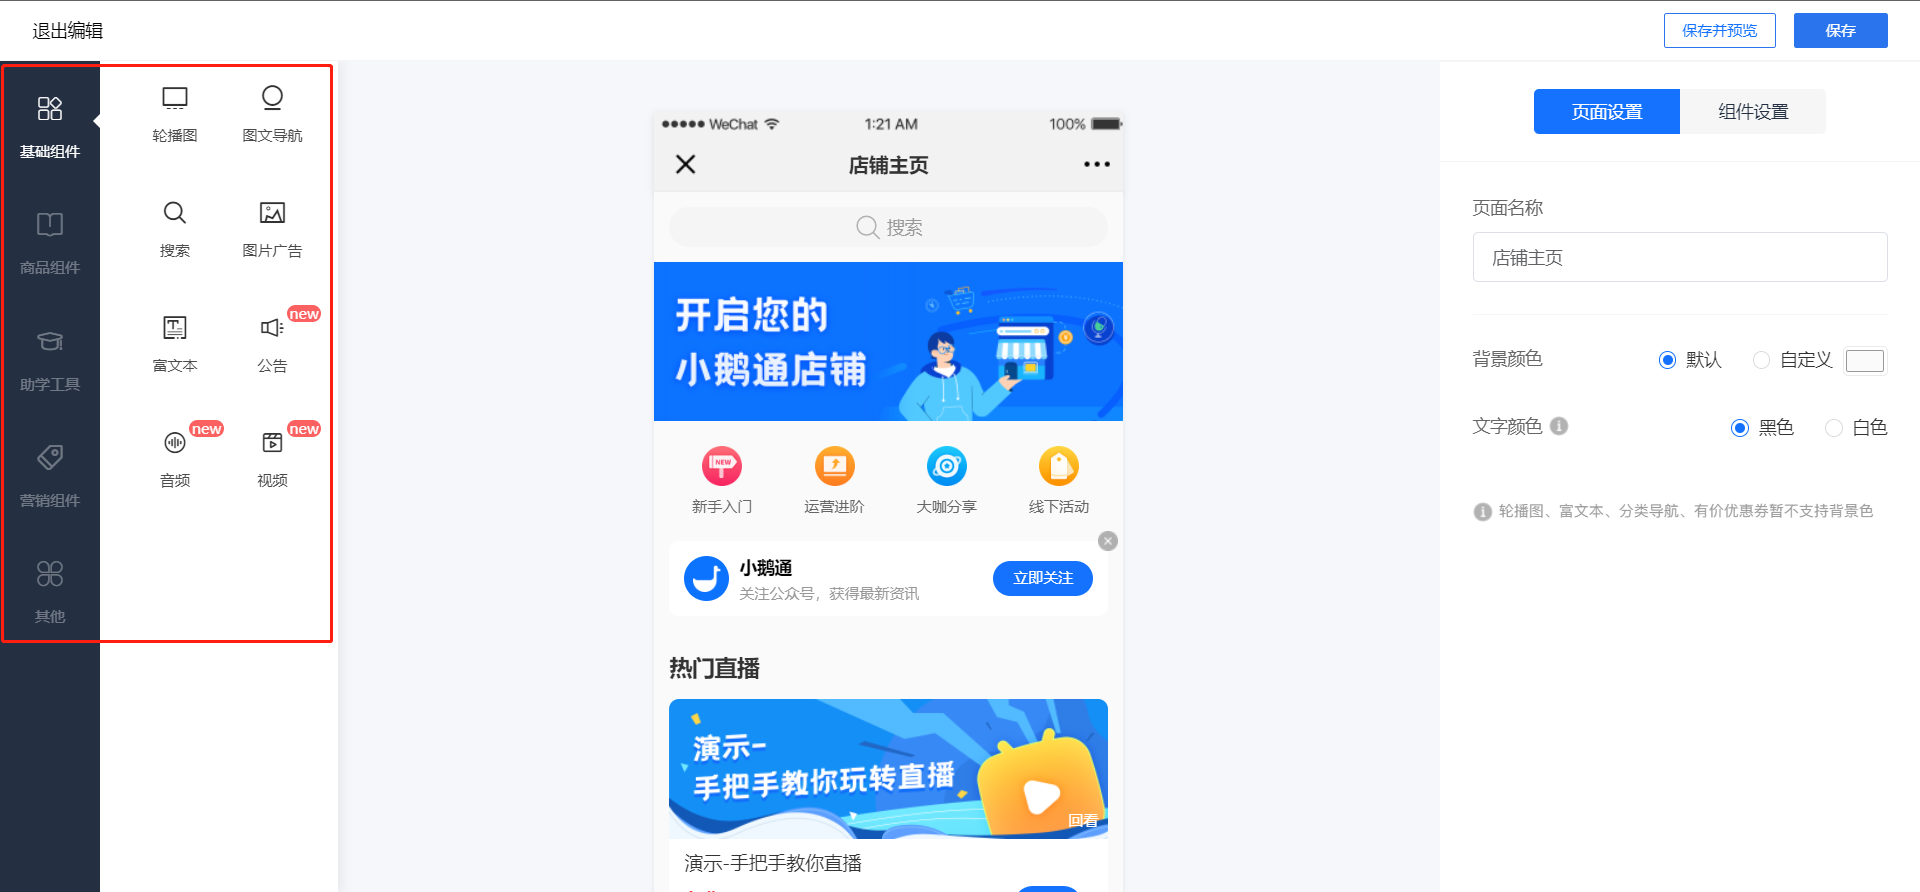
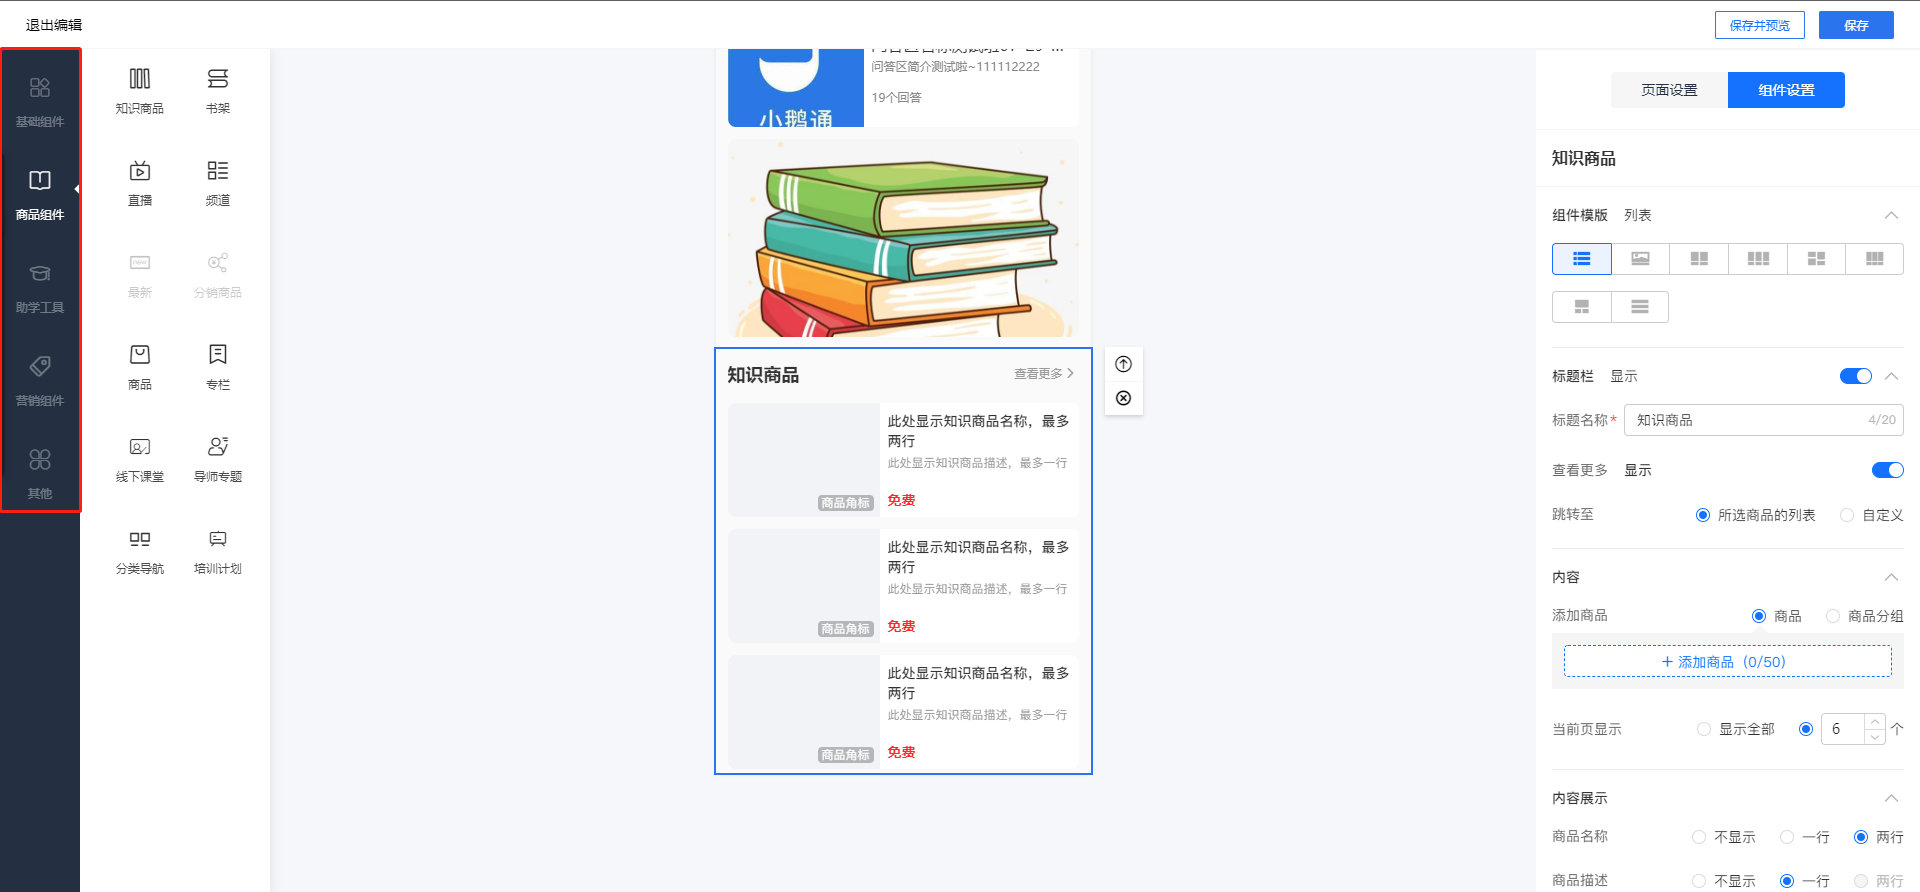
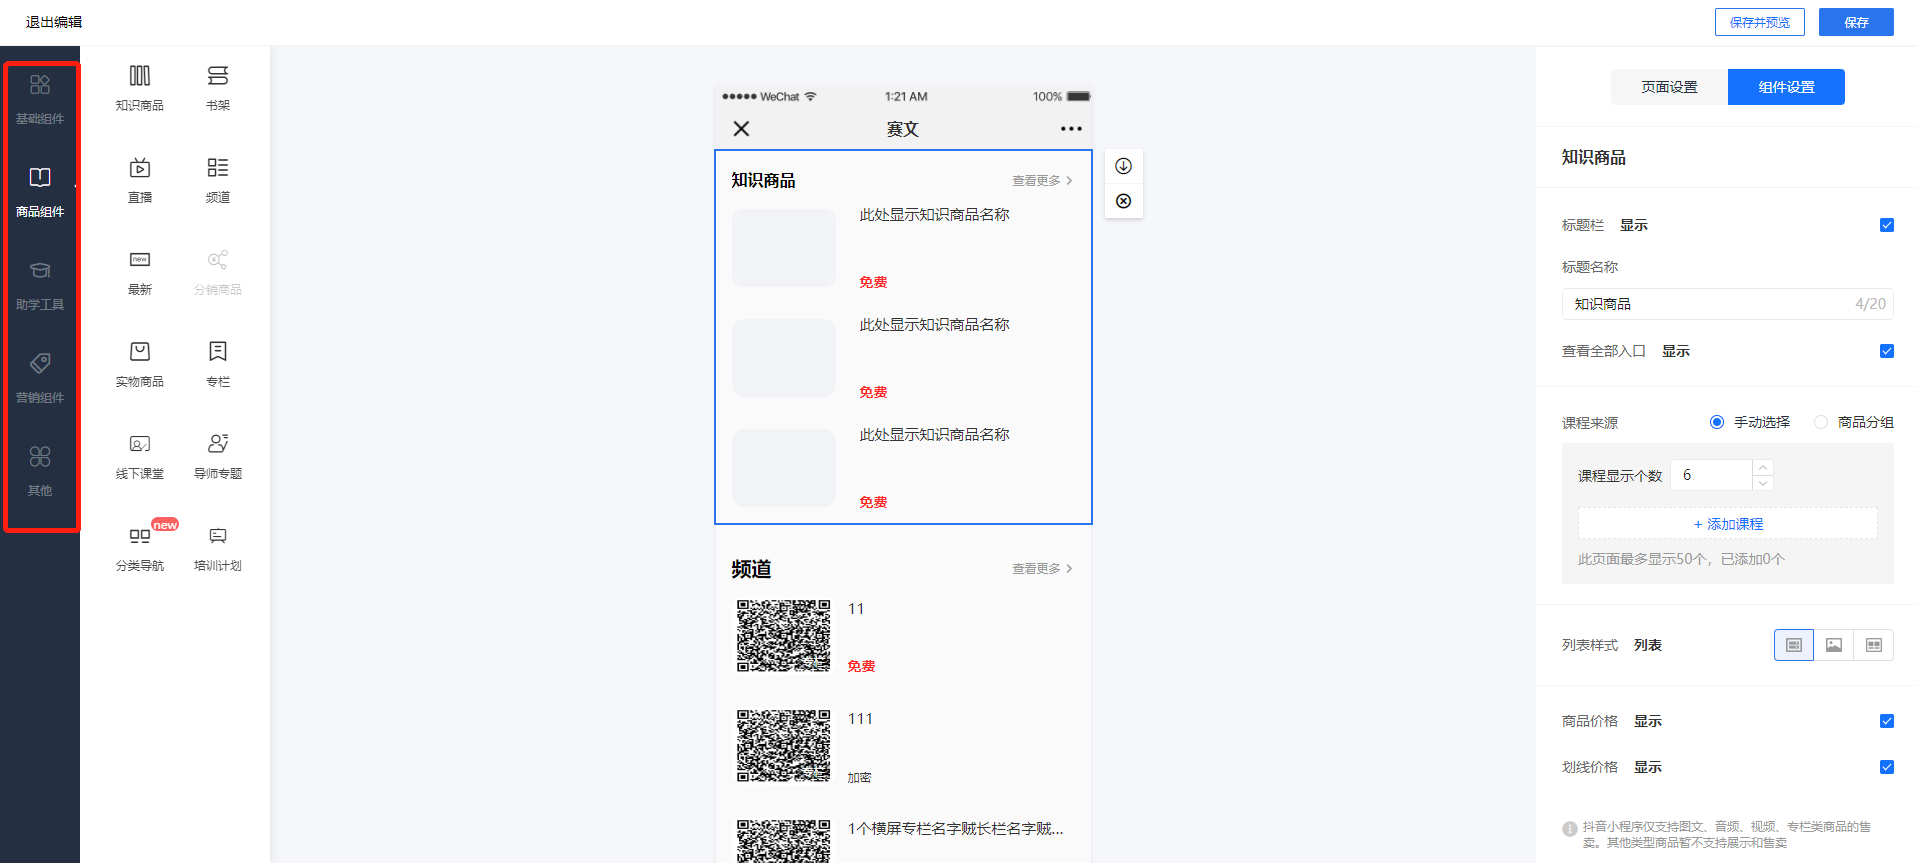
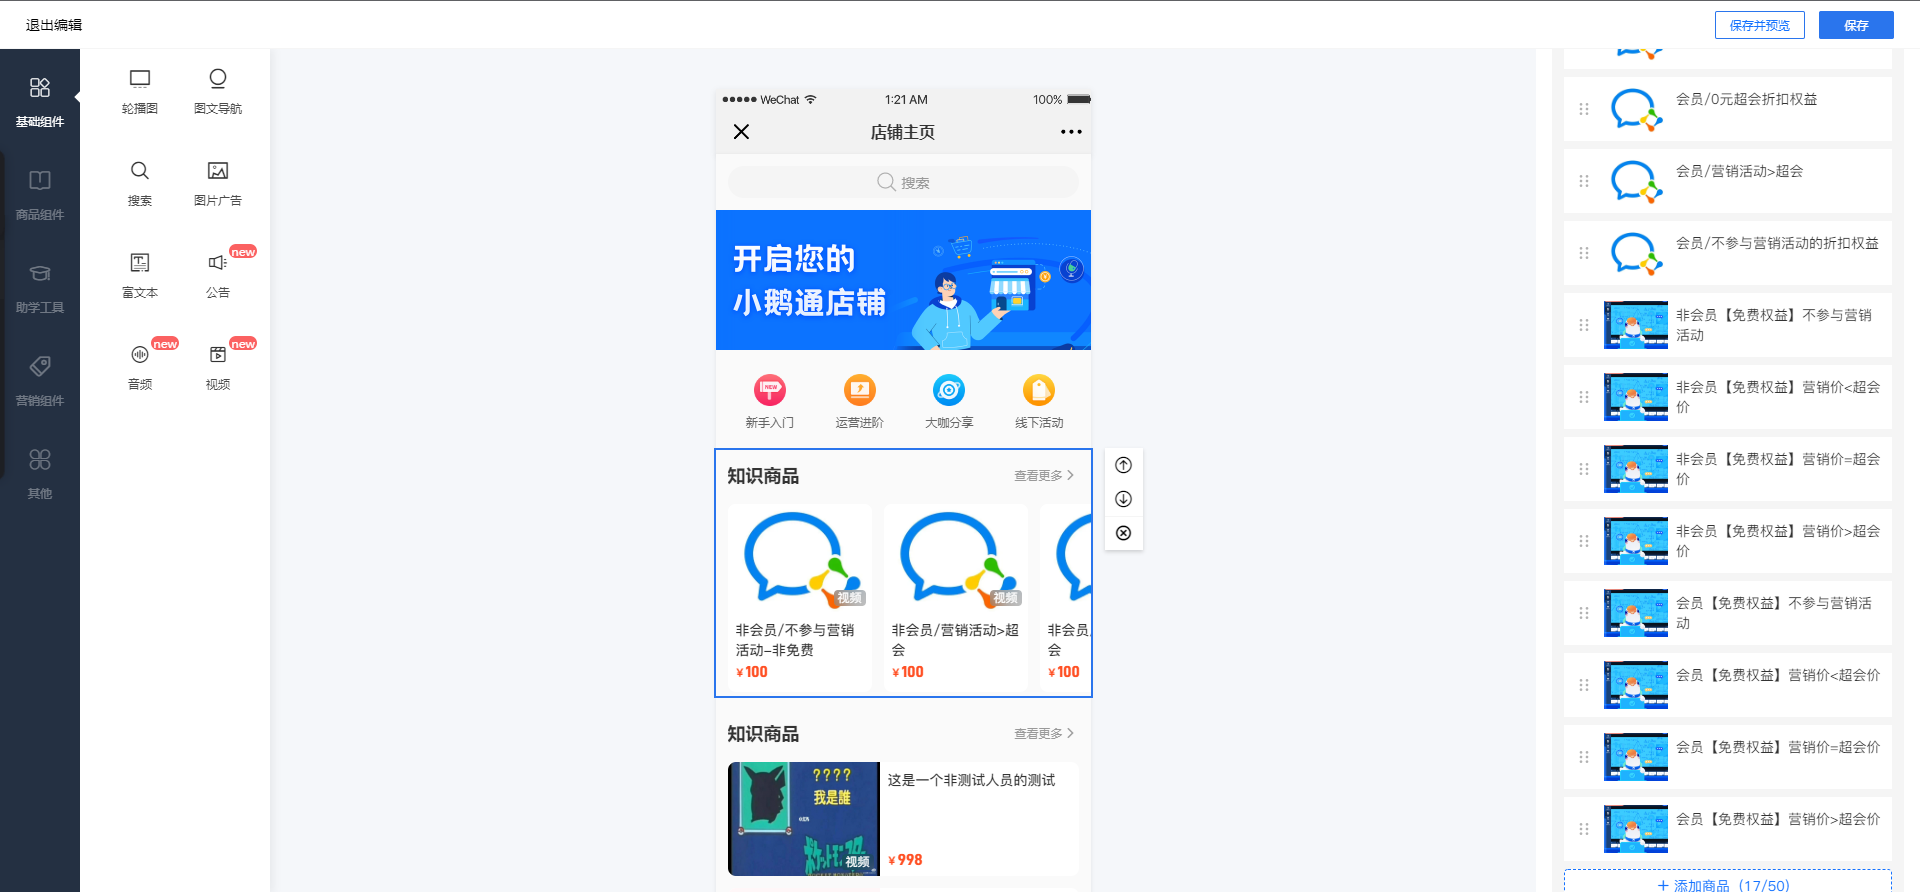
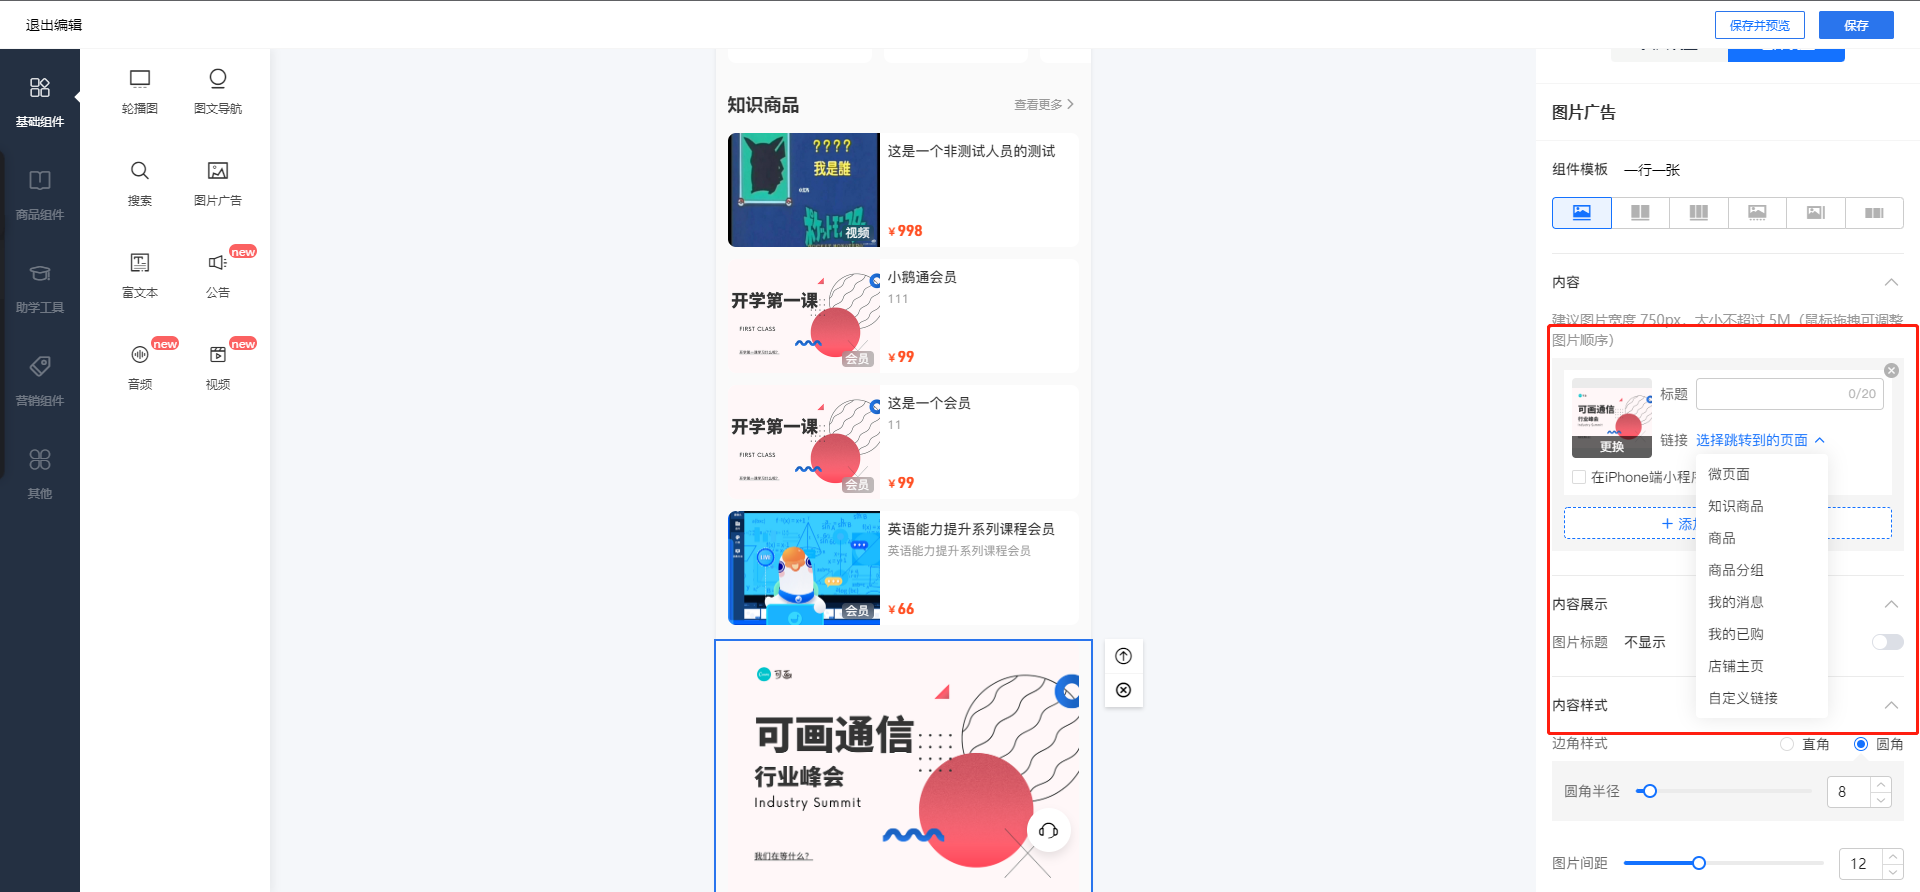
In the 'Component Library' area on the left, drag any component (or click directly) to the middle area for preview. Then, you can set the component's style and add product content in the 'Component Settings' area on the right.
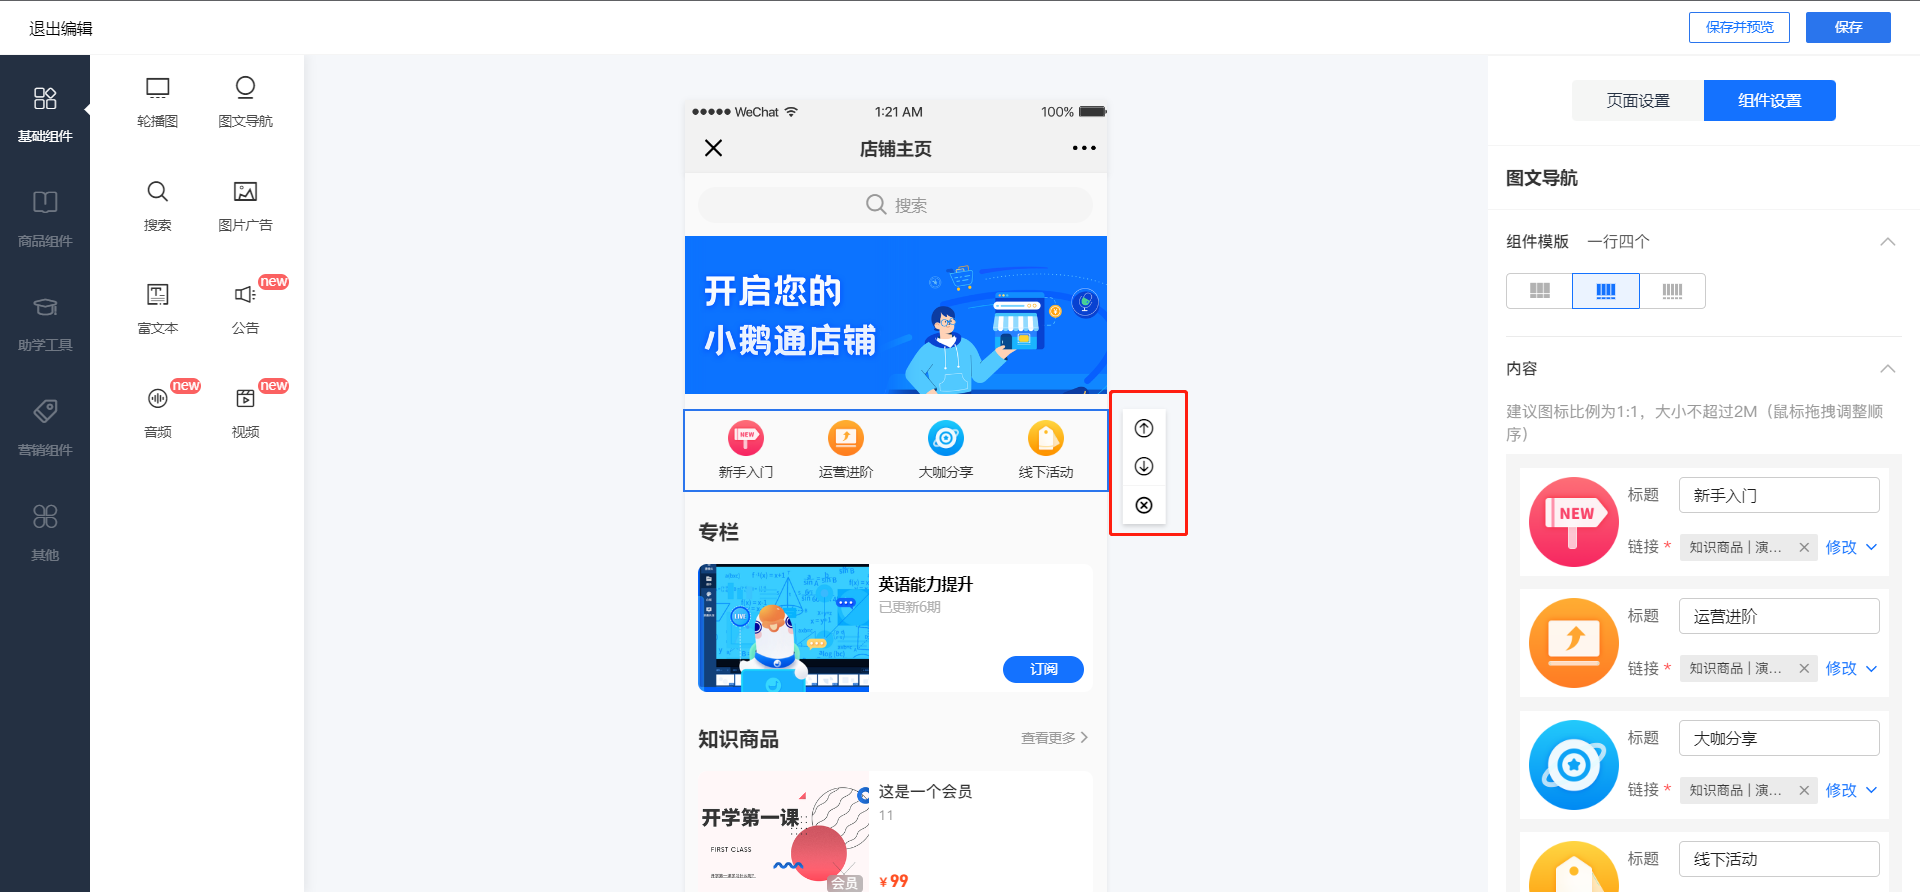
Step 4:Change the order (Management Console)
Click on a specified component and then click the button on the right to adjust the display order of the component on the homepage.
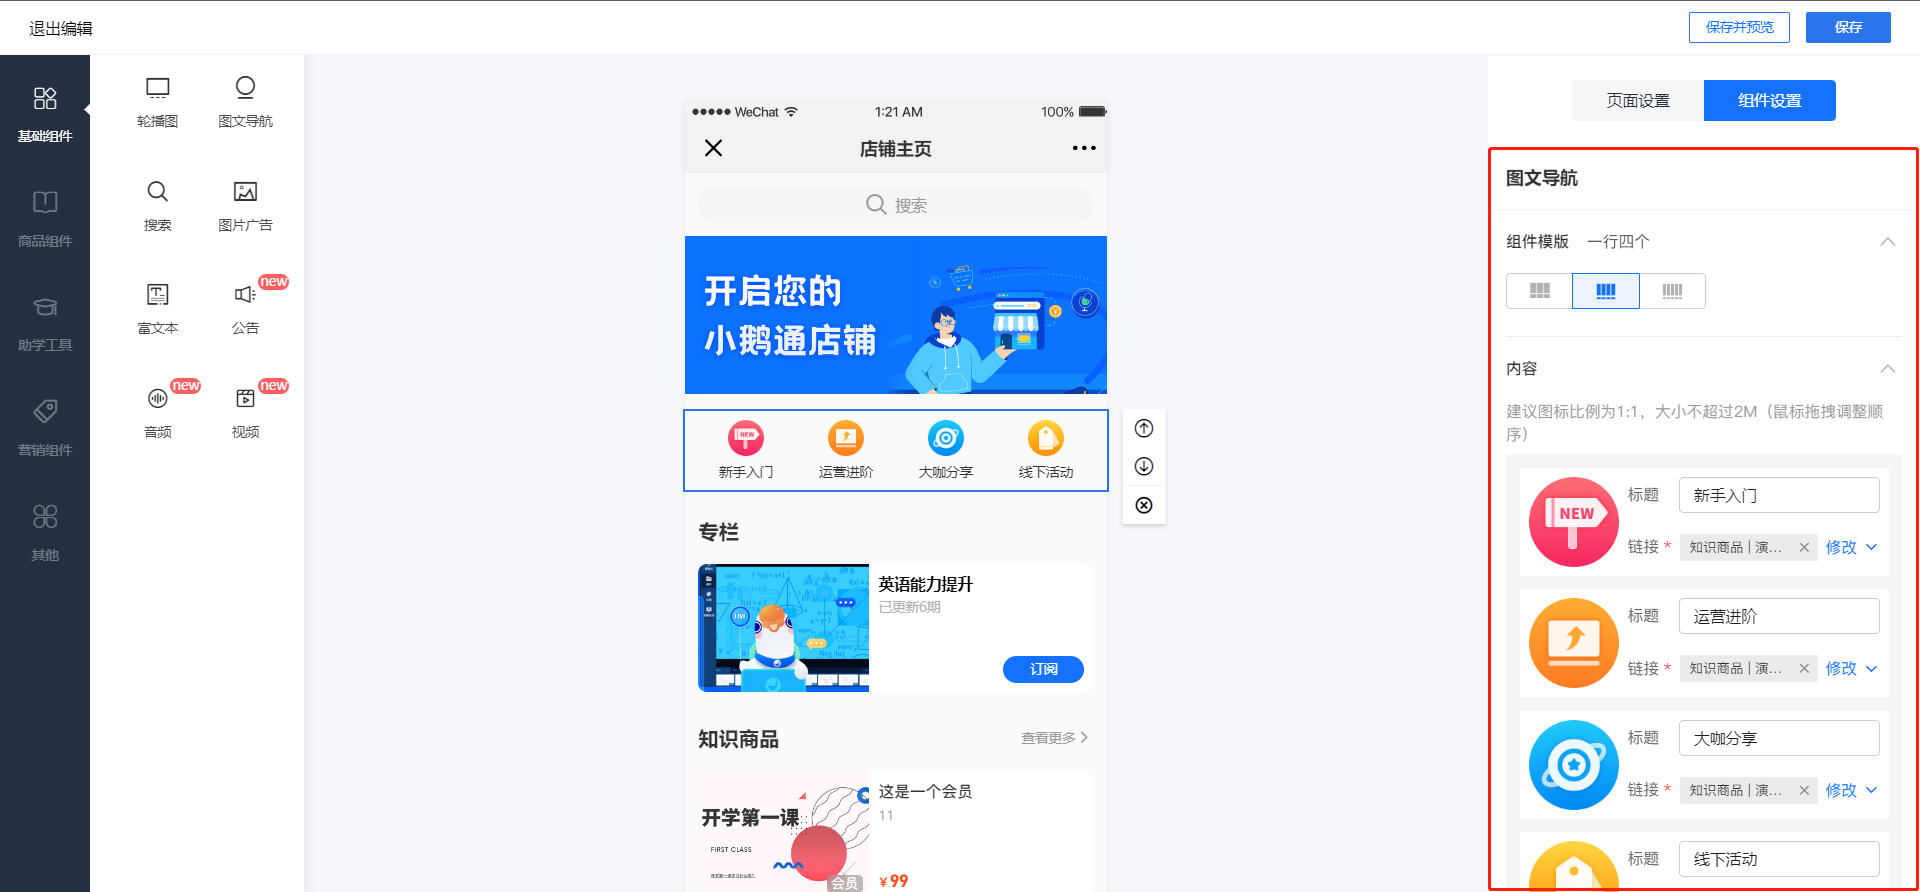
Step 5:Component settings (Management Console)
In the 'Component Settings' area on the right, click on the corresponding add operation area to edit the component's style and display content.
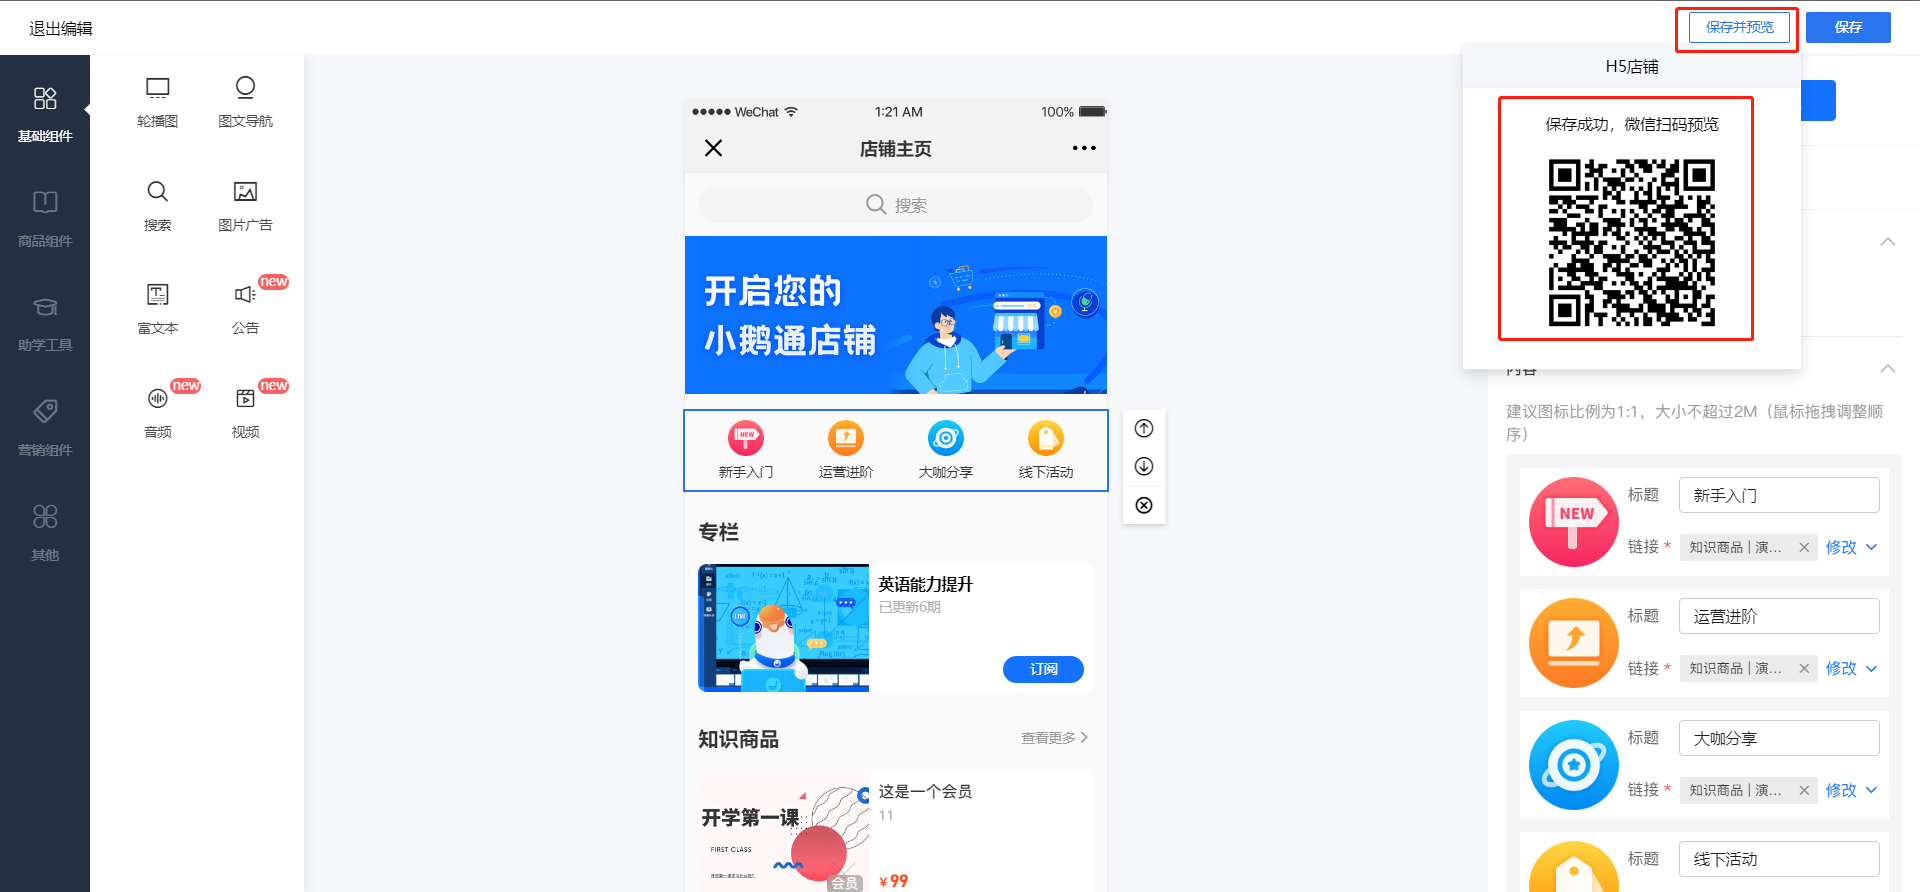
Step 6:Save and preview (Management Console)
Click the 'Save and Preview' button in the upper - right corner to complete the editing and save. You can preview the decorated store.
Click the 'Save' button in the upper - right corner to complete the editing and save the mini page to the mini page list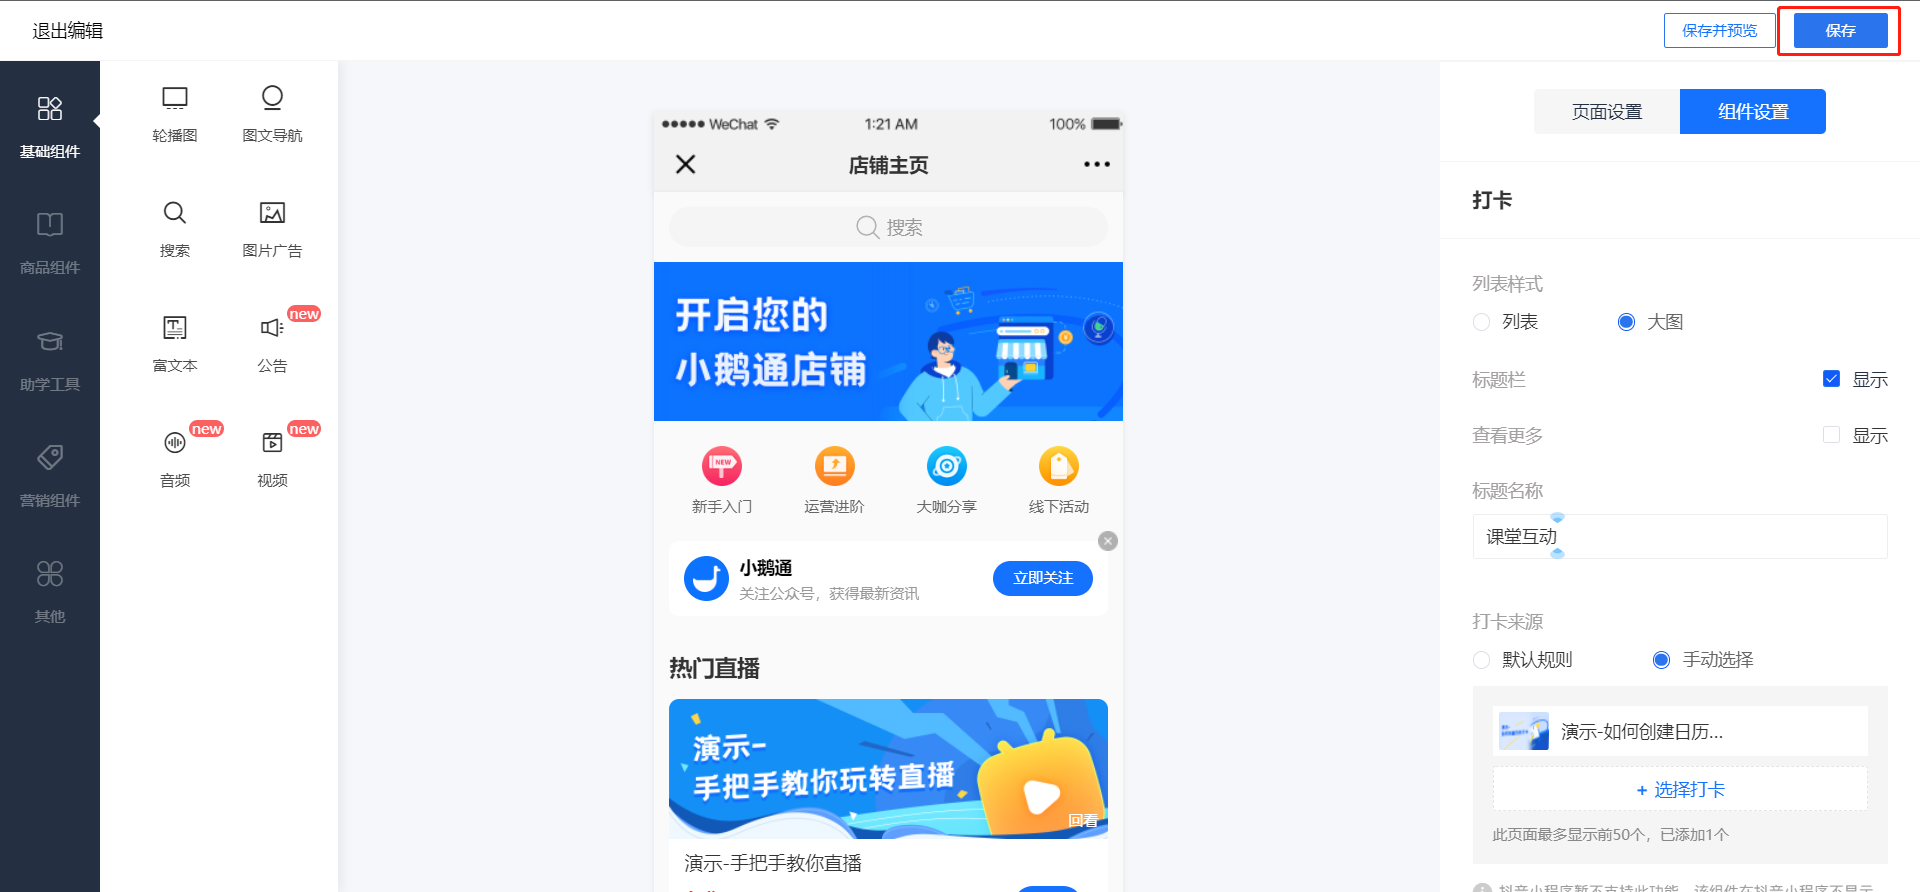
Tutorial on Configuring and Using the Personal Center
I. Feature Introduction
When users visit an elink online store, a 'Personal Center' (including personal information, purchased courses, learning records, etc.) will be set up for their accounts to save information. As a collection page for merchants' marketing and store services, the Personal Center hosts many important feature entrances. To enhance the store's personalization and user experience, we offer a custom setting function for the Personal Center.
II. Purpose of Use
Merchants can customize and configure the features on the Personal Center interface as needed. On the one hand, this can reflect the personalization of the store's features; on the other hand, it can improve the user experience and make it easier for students to find frequently - used feature entrances.
III. Use Scenarios
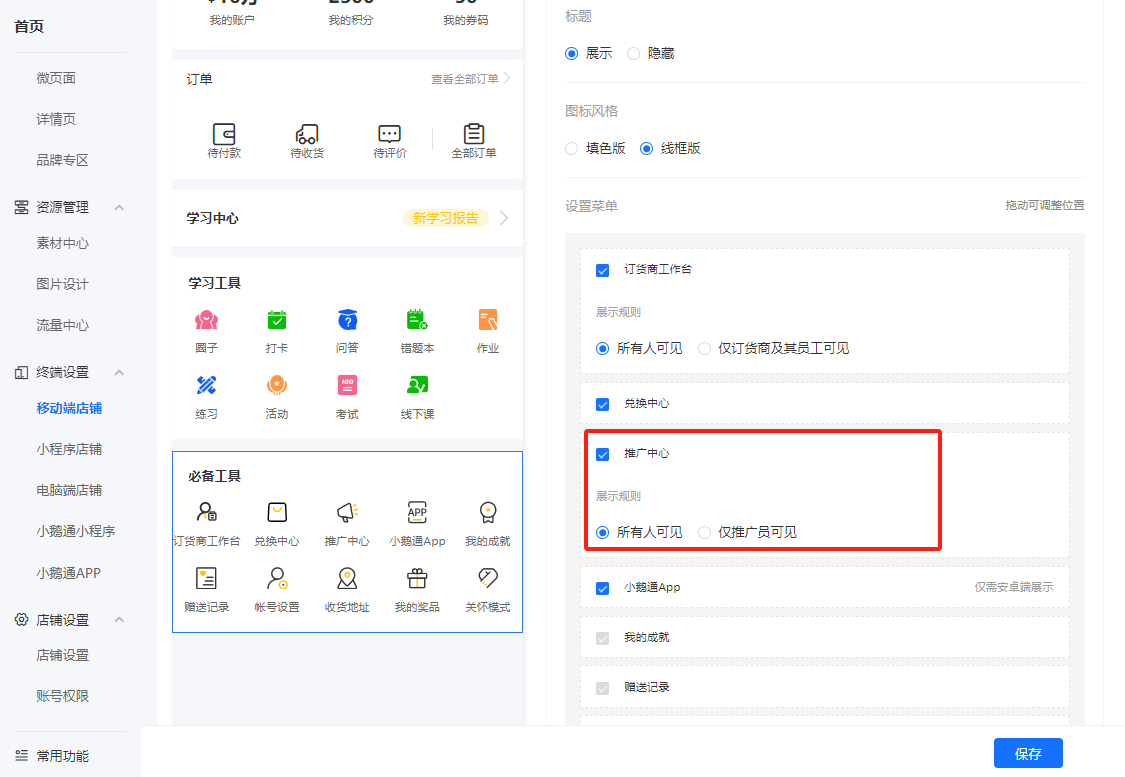
Typical scenario: A merchant wants to attract users in the store to become promoters. They can use the custom setting function of the Personal Center to drag the promoter menu bar to the top of the menu and customize the guiding text to encourage users to become promoters.
IV. Operation Path
Merchant side: Desktop management console → Store→Store management → Mobile end → Personal Center
Student side: WeChat H5 store → Personal Center
V. Usage Tutorial
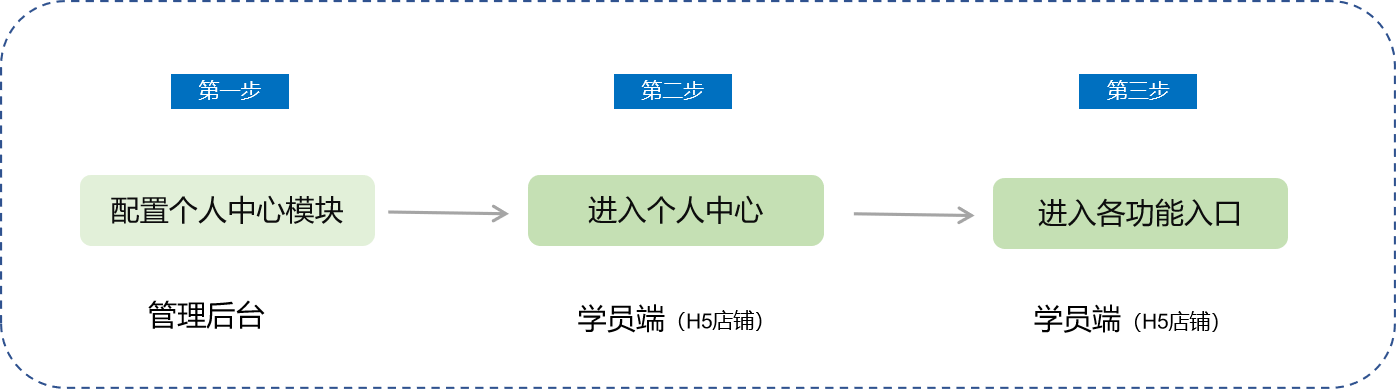
Step 1 Desktop management console
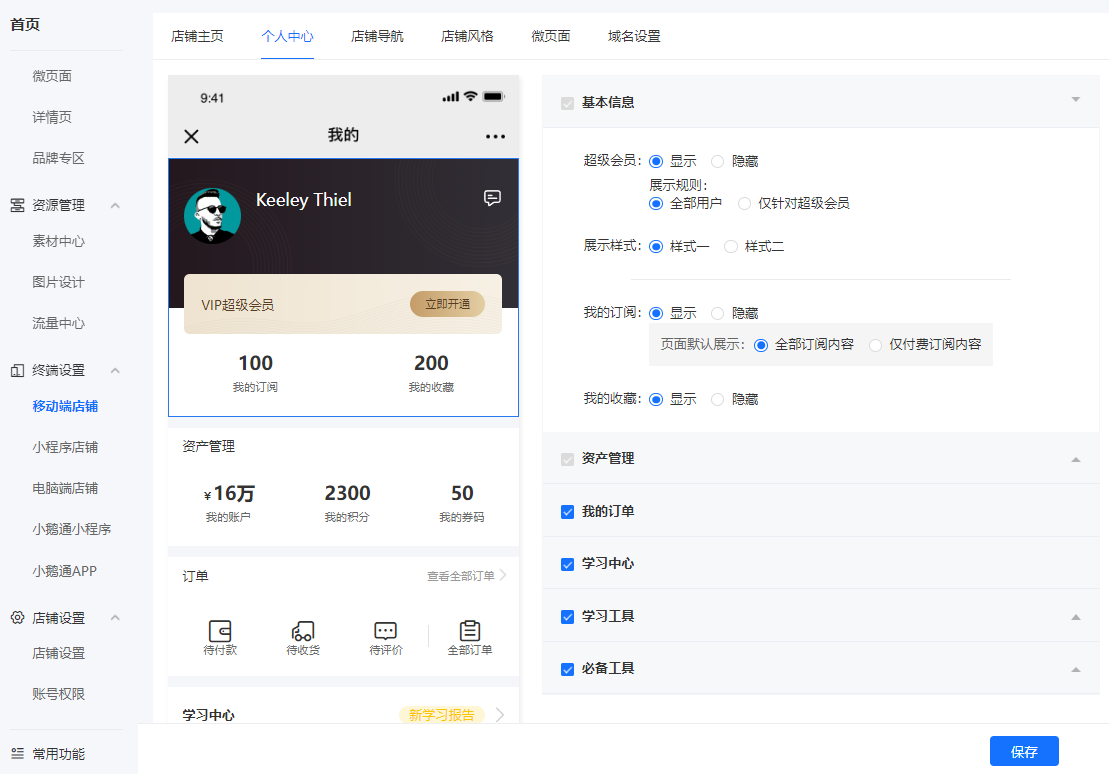
1. When a merchant checks to display a certain menu item, the menu entrance will be shown on the user - side Personal Center page. When the merchant checks not to display a certain menu item, the entrance will not be shown on the user - side Personal Center page.
Note: 'My Achievements' and 'Gift Records' are global entrances and cannot be manually closed.
2. When a merchant configures the promoter function, they need to pay attention to the 'Display Rules' configuration item. When 'Visible only to promoters' is selected, the promotion center entrance will only be shown to promoter users, and ordinary users will not be aware of it.
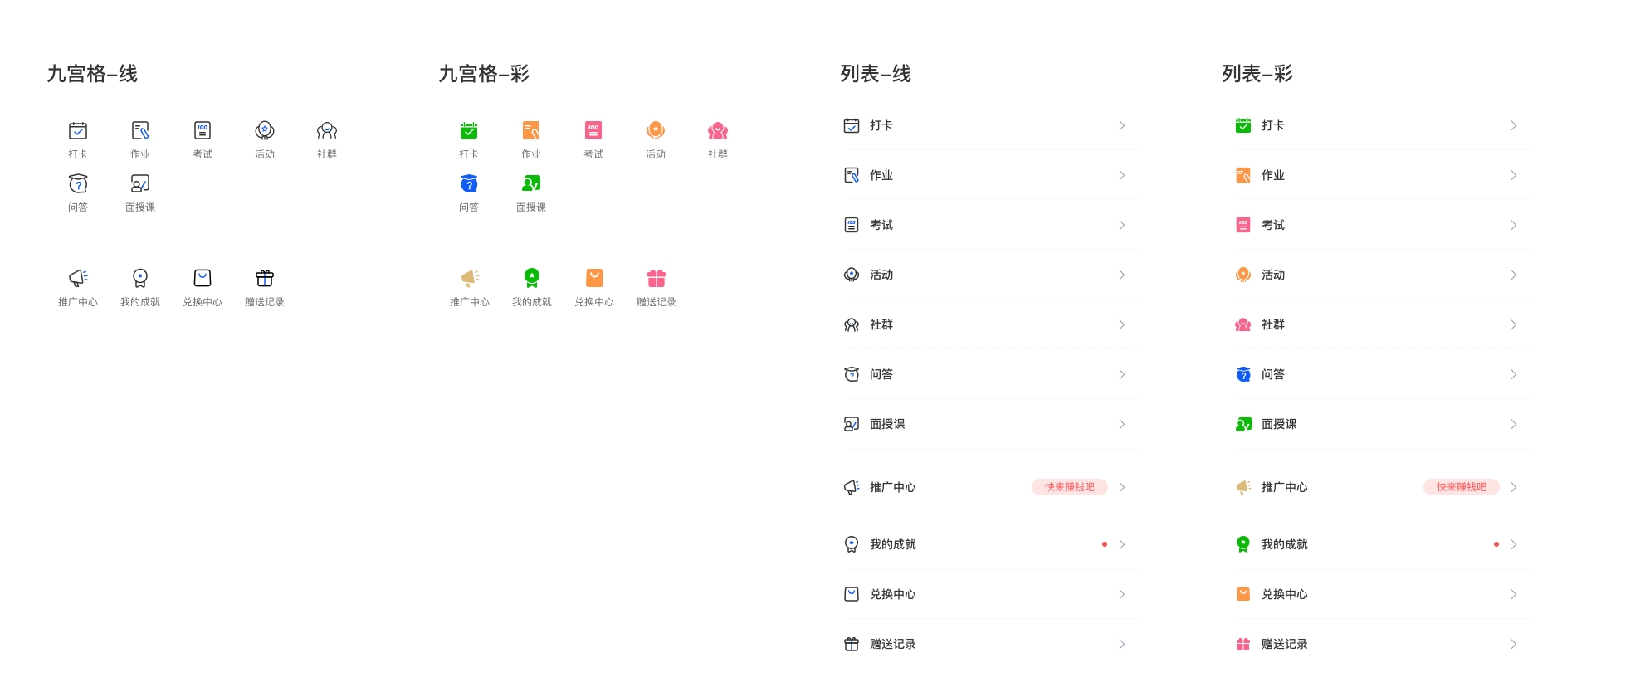
3. Multiple page styles are provided. You can switch between the nine - grid/form styles and also switch between the colored/icon wire - frame versions, giving merchants more freedom in visual style selection.
Note: When the wire - frame version of the icon style is selected, the icon color will follow the theme color.
Step 2 Mobile - end store
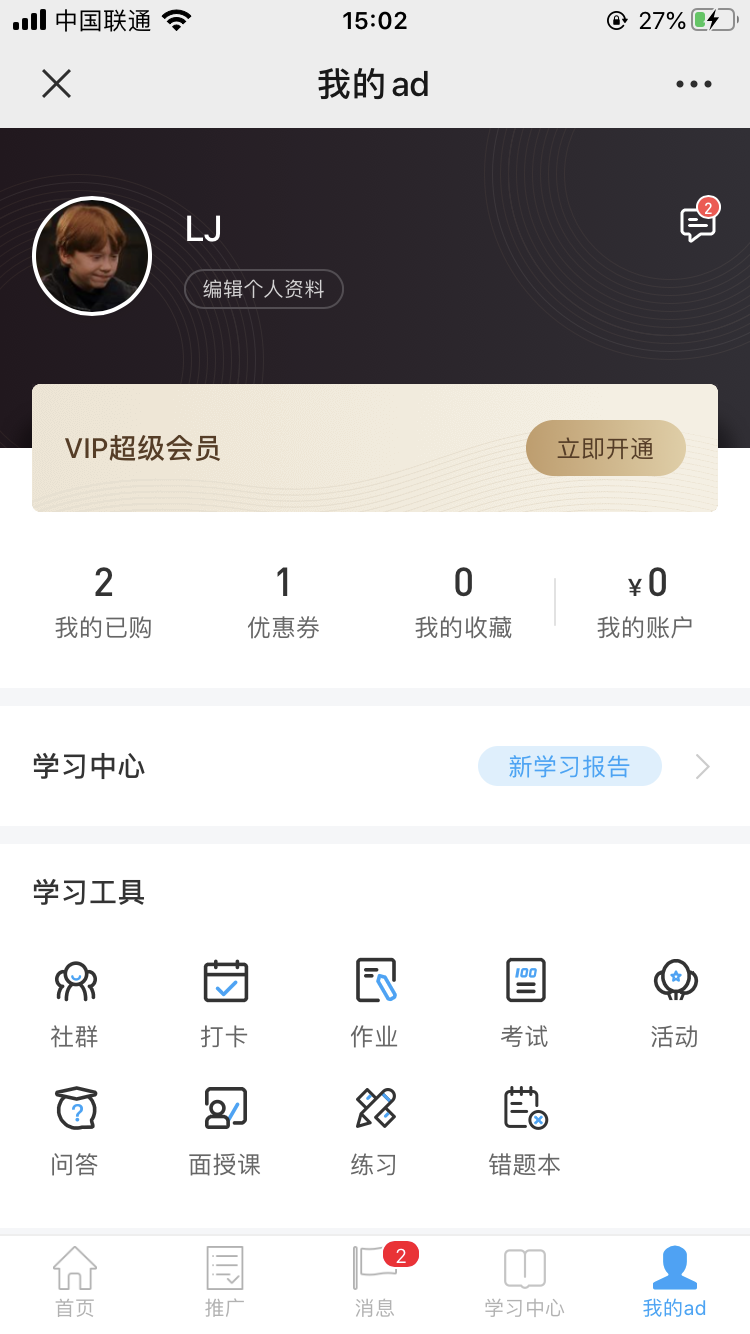
1.Users can intuitively see their assets, coupons, my favorites, learning aids, frequently - used features, etc.
VI. Precautions
1. The main color of the Personal Center is consistent with the store's theme color..
Tutorial on Using the Mobile Online Store Navigation
I. Function Introduction
II. Purpose of Use
Merchants can guide users to quickly find the content they are interested in through personalized navigation settings.
III. Use Scenarios
If your online store has a large number of products and activities, you can use store navigation for page guidance. The store navigation can jump to the micro - homepage/knowledge products/my messages/my purchases/custom links/product groups/learning center. For example, you can set up an event page and a course promotion page. Through the store navigation, users can jump between the homepage/events/promotions/my pages, guiding users to focus on the content you have set up in advance.
IV. Operation Path
Merchant side: Store -> Store Decoration -> Mobile Store -> Store Navigation
V. Usage Tutorial
Step 1: Homepage- Terminal Settings - Mobile Store - Store Navigation(Merchant management background)
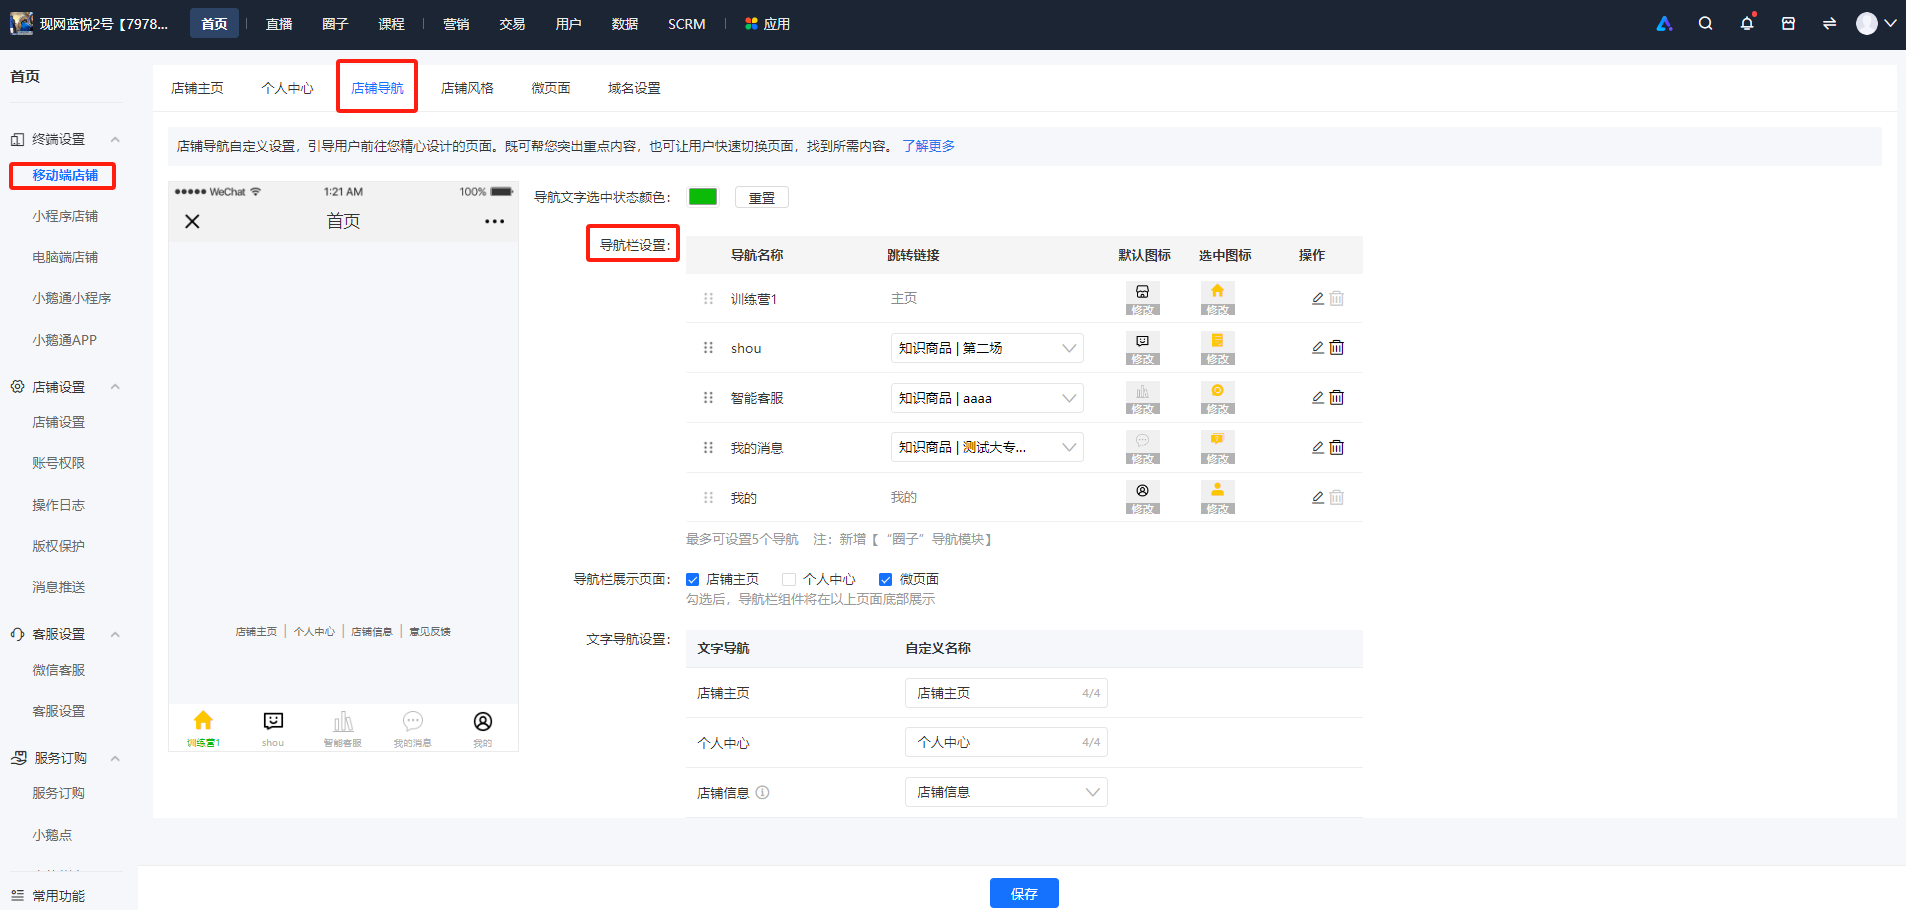
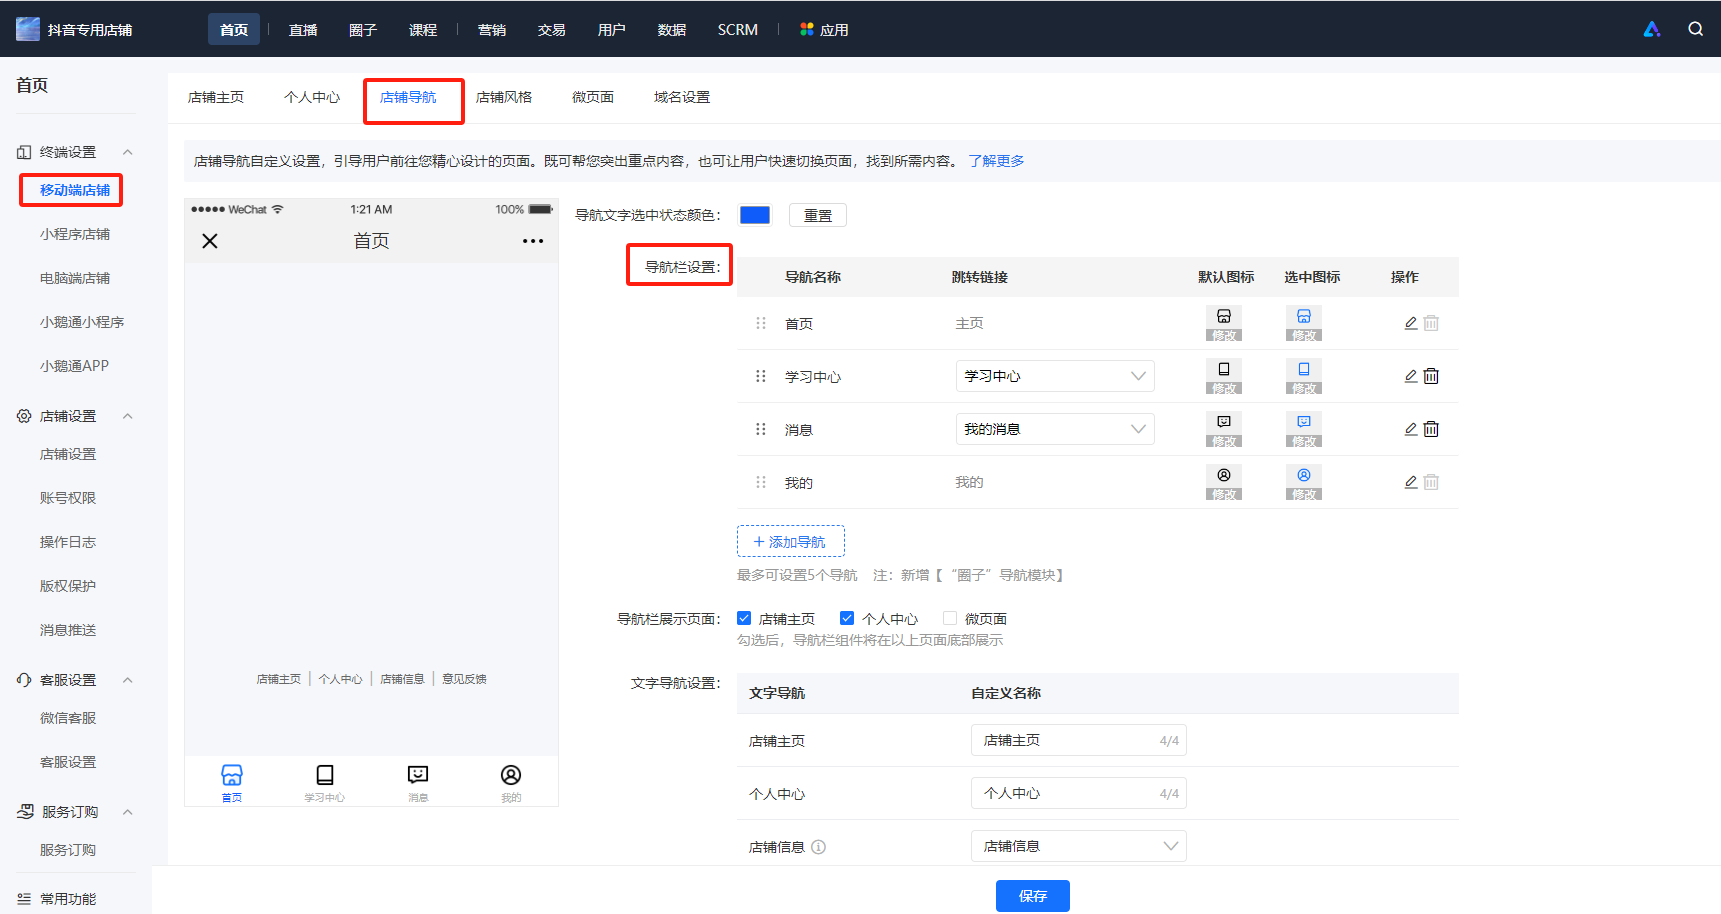
1. Support customizing the navigation name, navigation icon, and the page the navigation jumps to (the jump links of the homepage and 'My' navigation cannot be changed);
2. Support dragging the navigation edit box with the mouse to adjust its order (the positions of the homepage and 'My' navigation cannot be changed). Up to 5 navigation items can be added;
3. Support setting the display page of the navigation bar. By default, [Store Homepage] and [Personal Center] are checked; (if a micro - page is checked, all micro - pages will be displayed by default).
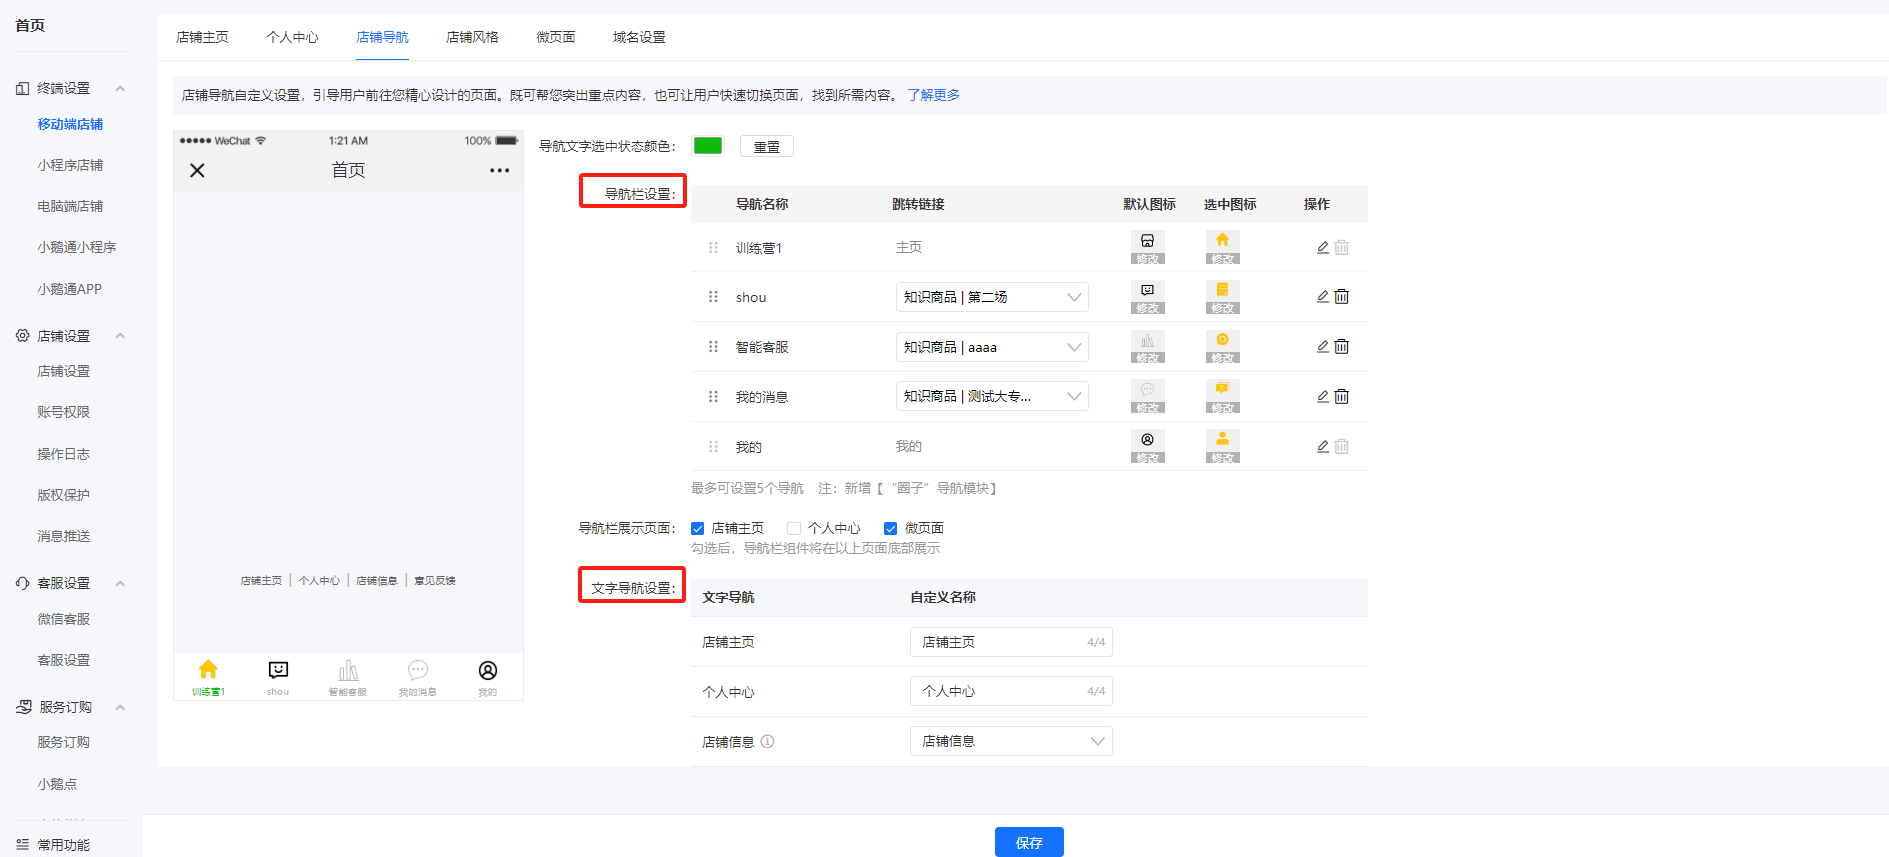
Step 3:Click Save
How to set up the online store homepage?
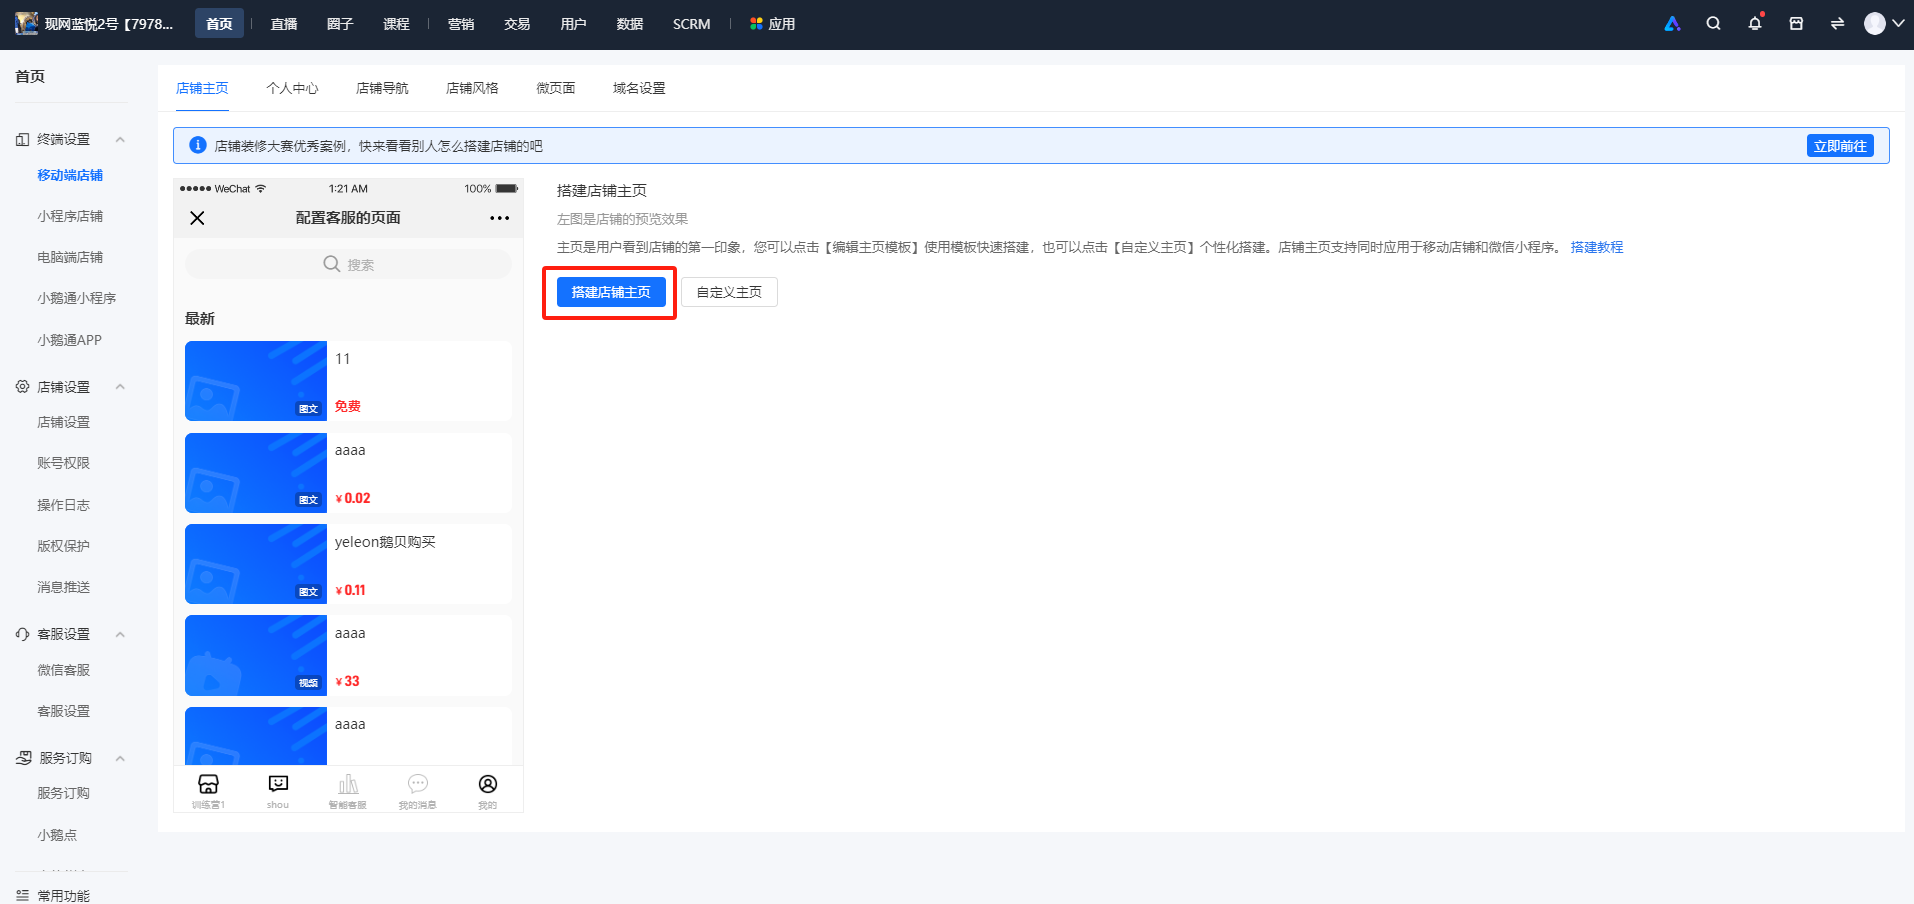
Merchants can access the [Homepage] - [Terminal Settings] - [Mobile Store] - [Build Store Homepage] in the computer - side management console. On the store homepage, with the rich component functions, it supports presenting a wide range of content and products. Components include carousel images, image - text navigation, communities, Q&A, live streams, latest products, events, punch - in, etc. You can build your store homepage in the following ways:
1. Add components:In the "Add Components" area, click on any component to add the corresponding module content of the component.
2. Change the order:Click on the specified component, long - press and drag it to adjust the display order of the component on the homepage.
3. Add knowledge products:In the "Add Components" area, click on "Knowledge Products". In the knowledge product editing area, you can modify the title and select the product source. You can add text - images, audio, videos, live streams, columns, major columns, memberships, affiliate products, etc. to this knowledge product component.
How to display a new module on the home page?
Go to [Homepage] - [Store Decoration] - [Mini Pages], find the homepage or the mini page you need to edit, click the [Edit] button, and select the components you want to add.
How many items can be set at most for the store navigation?
The mobile store can have a maximum of 5 store navigation items (the same limit applies to Mini Programs). The "Store Homepage" and "My" options cannot be deleted.
Operation path: Set the navigation text, icons, jump links, etc. in 【Terminal Settings】 - 【Mobile Store】 - 【Store Navigation】. Save the settings to make them effective.(For the detailed operation tutorial, please clickStore Navigation Usage Tutorial to view.)
Why don't the WeChat avatar and nickname of students in the H5 Online Store get updated after they click the synchronization button?
Due to WeChat restrictions, there is a 5-hour delay after a learner changes their WeChat avatar or nickname. Therefore, within these 5 hours, elink cannot obtain the learner's latest WeChat avatar and nickname (similar to other platforms). In this case, learners are advised to wait for a few hours and try again.
Tutorial on Using Mobile Micro Pages
I. Feature Introduction
Micro Pages allow merchants to independently build personalized pages for their Online Stores. The content and display styles within a Micro Page can be customized by adding components. Multiple pages can be built within an Online Store and linked through the store navigation.
Special Reminder:
If the mobile store and Mini Program of a merchant serve different purposes, different Micro Pages can be set for the H5 store and the Mini Program homepage. (For example, the merchant's mobile store is mainly used for selling courses, while the Mini Program is mainly for User Retention.)
II. Scenario Examples
If your Online Store has a large number of courses and also offers activities such as punch - in and community events, you can use the store - Micro Page feature for personalized display settings. You can also create multiple Micro Pages. For instance, one Micro Page can be dedicated to course promotion activities, and another can be used for circle - related content like test activities and offline events. These two pages can be used as display pages in the store, linked through the store navigation, saving users' time in finding content and providing a better purchasing/browsing experience.
III. Operation Steps
Step 1 Click [Homepage] - [Store Decoration] - [Micro Pages] to enter the store's Micro Pages section.
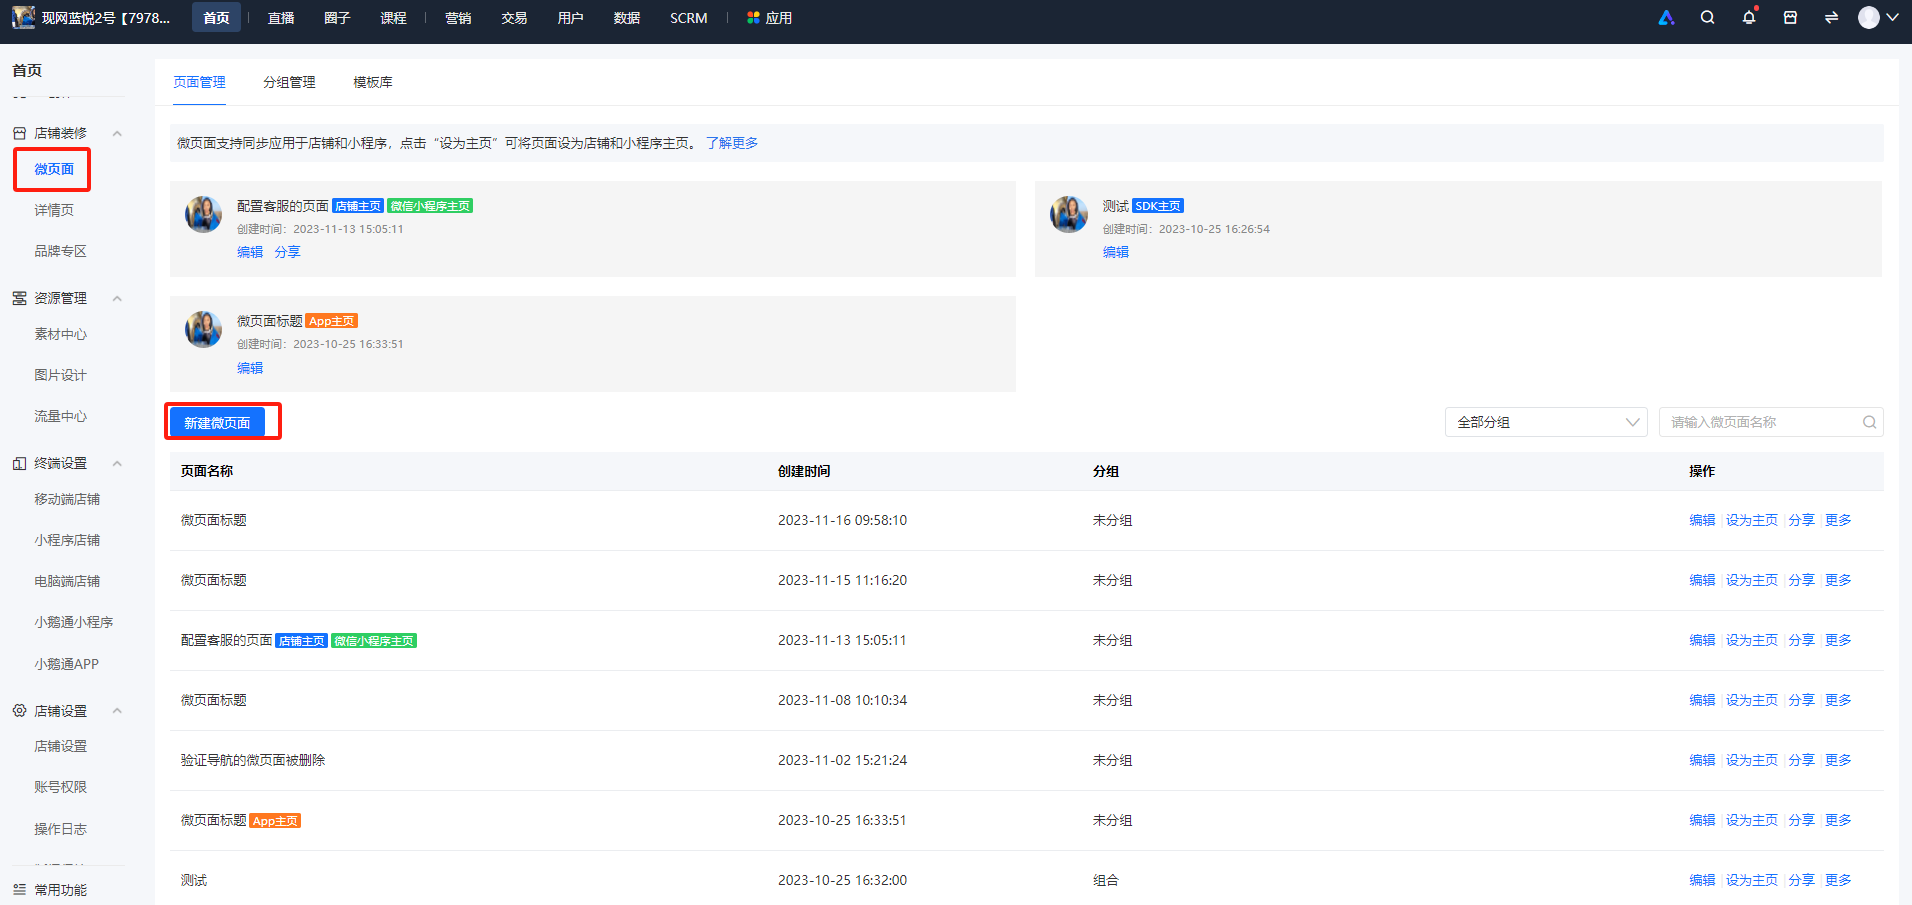
Step 2
There are 37 types of components available in a Micro Page. Click on a component to add and edit it. Click the [Save] button to save the Micro Page.
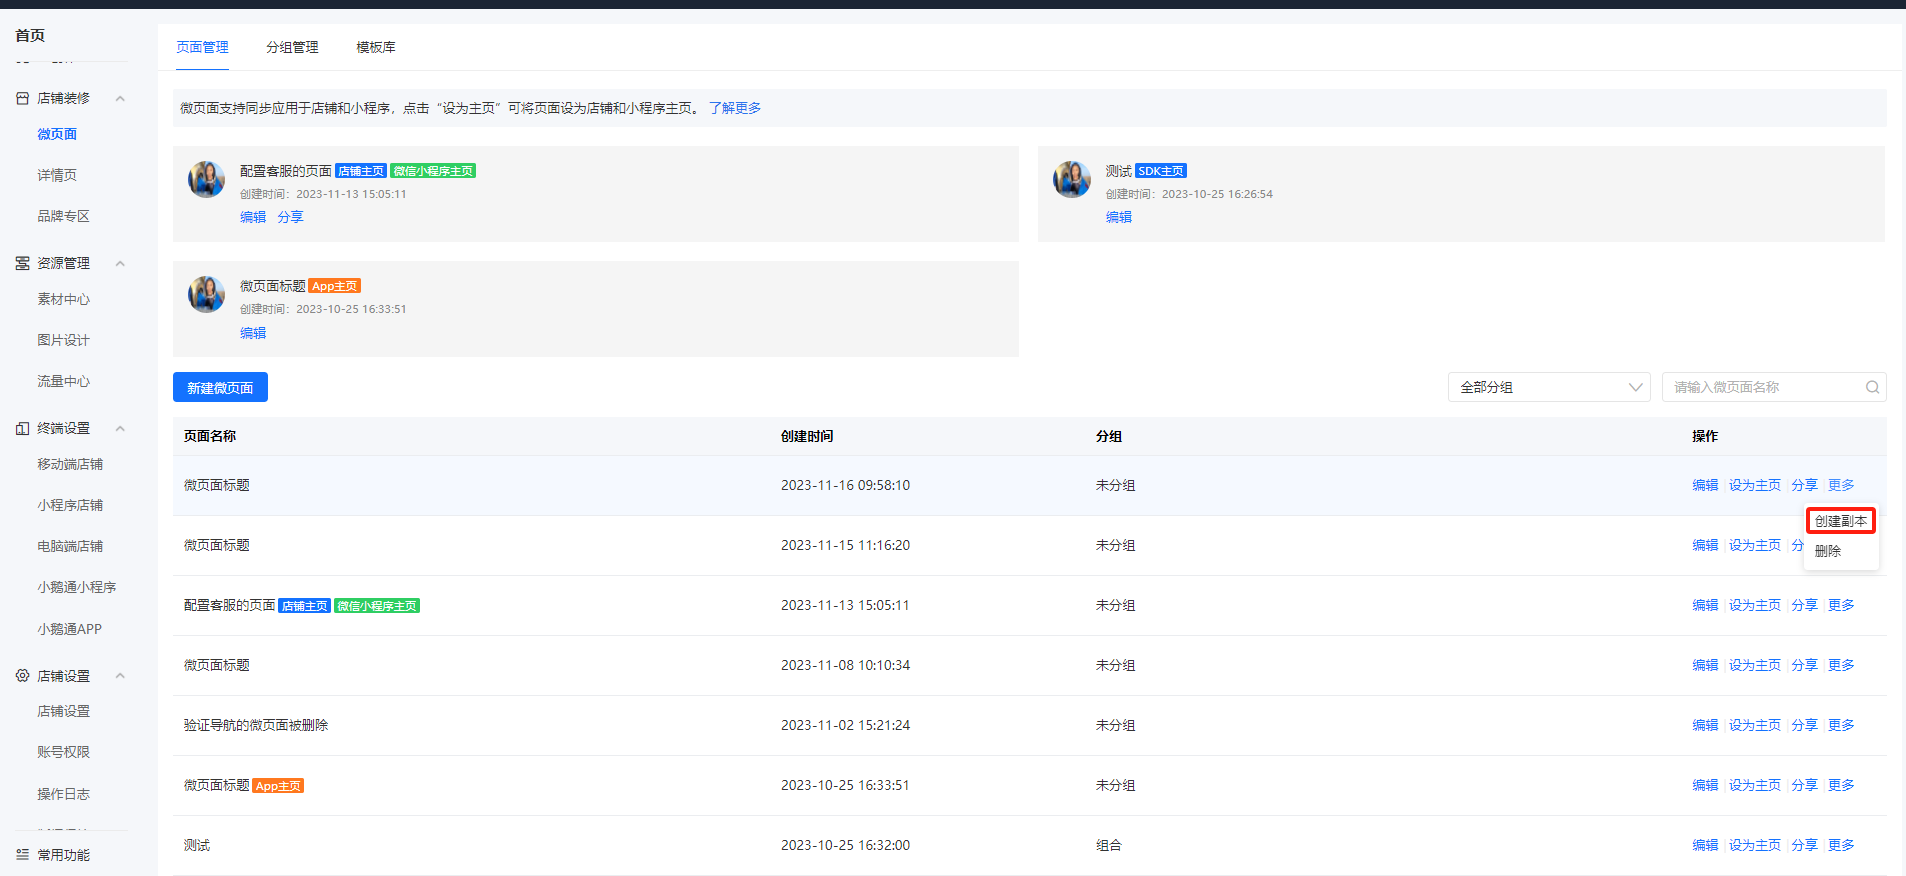
To duplicate an existing Micro Page, find the page and click [More] - [Create Copy] to create an identical Micro Page.
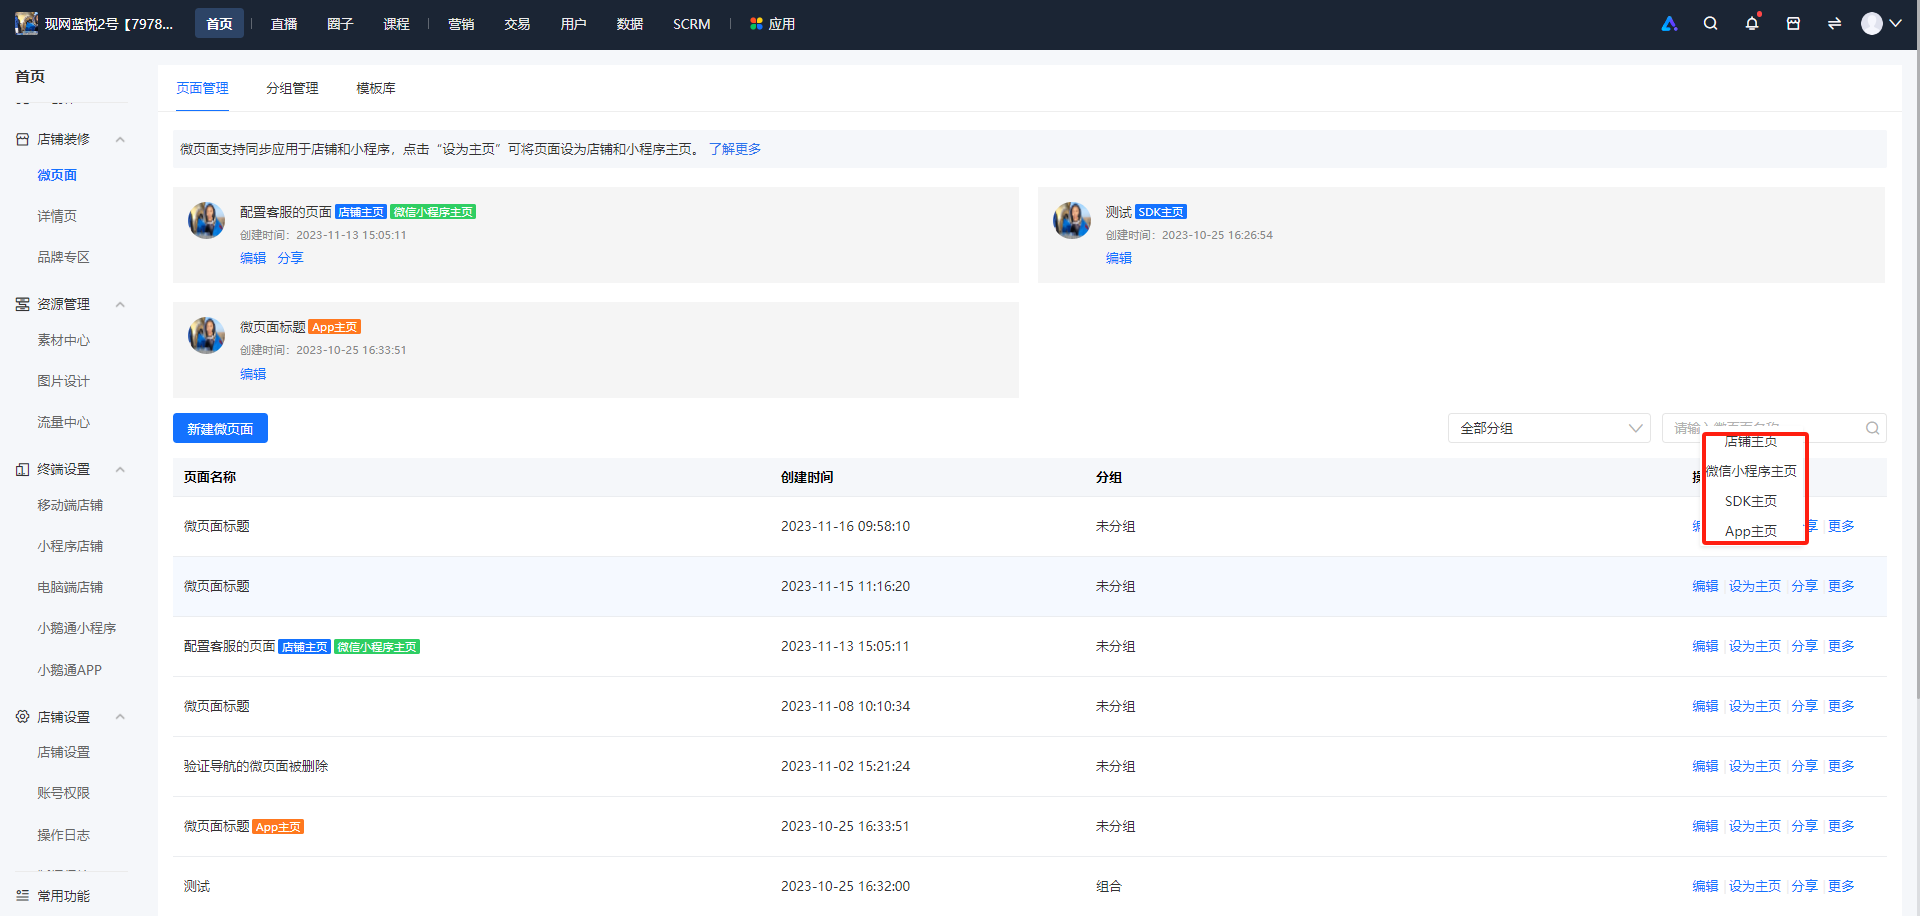
Step 3 The created Micro Page can be set as the store/Mini Program homepage.
Step 4: Apply the Micro Page
Micro Pages can be displayed in the store. When selecting a jump link through the store navigation, Mini Program navigation, or graphic - text navigation component, you can choose to jump to a specific Micro Page.
IV. Final Effect
After setting a Micro Page as the store homepage, users can see the display effect of the Micro Page.