# Material Center

# Will deleting the referenced materials affect the store's users?

<div data-elink-language-switch="1" id="bkmrk-%E4%B8%AD%E6%96%87" style="border:1px solid #d6d9de;border-radius:6px;padding:10px 12px;margin:0 0 18px 0;background:#f8fafc;font-size:14px;">[中文](/books/8f855/page/c8ffe)</div><span style="font-size:14px;"><span style="font-family:'Microsoft YaHei', '微软雅黑';white-space:pre-wrap;background-color:rgb(255,255,255);">There are two scenarios:</span>  
  
<span style="font-family:'Microsoft YaHei', '微软雅黑';white-space:pre-wrap;background-color:rgb(255,255,255);">1. Delete images/e-books: After deletion, the positions where the images/e-books were used can still be displayed normally without any impact.</span>  
<span style="font-family:'Microsoft YaHei', '微软雅黑';white-space:pre-wrap;background-color:rgb(255,255,255);">2. Delete audio/video: After deleting the audio, when users play the audio, they will receive a voice prompt saying 'This audio has been deleted by the merchant'; after deleting the video, when users play the video, they will</span><span style="font-family:'Microsoft YaHei', '微软雅黑';white-space:pre-wrap;background-color:rgb(255,255,255);">see the message 'This video has been deleted by the merchant'.</span><span style="font-family:'Microsoft YaHei', '微软雅黑';white-space:pre-wrap;background-color:rgb(255,255,255);">It is recommended to delete the materials only after confirming that they are useless.</span></span>

# What will happen if you restore the deleted referenced audio/video materials?

<div data-elink-language-switch="1" id="bkmrk-%E4%B8%AD%E6%96%87" style="border:1px solid #d6d9de;border-radius:6px;padding:10px 12px;margin:0 0 18px 0;background:#f8fafc;font-size:14px;">[中文](/books/8f855/page/2f2b2)</div><span style="font-size:14px;"><span style="font-family:'Microsoft YaHei', '微软雅黑';white-space:pre-wrap;background-color:rgb(255,255,255);">Under normal circumstances, the display and playback at the original location where the material was referenced will be restored. However, the restoration will not occur in the following situations:</span>  
<span style="font-family:'Microsoft YaHei', '微软雅黑';white-space:pre-wrap;background-color:rgb(255,255,255);">1. The course or resource that referenced the material has been deleted.</span>  
<span style="font-family:'Microsoft YaHei', '微软雅黑';white-space:pre-wrap;background-color:rgb(255,255,255);">2. The reference location has been replaced with a new material during the restoration.</span></span>

# What will happen if the space usage exceeds the limit and no expansion is made?

<div data-elink-language-switch="1" id="bkmrk-%E4%B8%AD%E6%96%87" style="border:1px solid #d6d9de;border-radius:6px;padding:10px 12px;margin:0 0 18px 0;background:#f8fafc;font-size:14px;">[中文](/books/8f855/page/06eb6)</div><span style="font-size:15px;">1. Functions in the Material Center: \[Upload Material\], \[Create New Group\], and \[Restore from Recycle Bin\].</span>

<span style="font-size:15px;">2. \[Live Replay Video Editing\] function for live broadcasts.</span>

<span style="font-size:15px;">3. \[Replay Usage\] restrictions: Live and class session replay files generated after exceeding the storage limit cannot be used normally. Learners cannot watch the replay videos. The system will cache the replay files for 5 days. To avoid affecting subsequent usage, it is recommended to go to the Material Center to clean up or expand the storage in a timely manner and perform \[Restore Replay\] on the course details page. Replays cannot be restored after the expiration date.</span>

<span style="font-size:15px;">  
</span>

# Tutorial on Using the Material Center

<div data-elink-language-switch="1" id="bkmrk-%E4%B8%AD%E6%96%87" style="border:1px solid #d6d9de;border-radius:6px;padding:10px 12px;margin:0 0 18px 0;background:#f8fafc;font-size:14px;">[中文](/books/8f855/page/e3698)</div><span style="font-size:17px;">**I. Function Introduction**</span>

<span style="font-size:15px;">The Material Center is a place for merchants to manage file resources (images, audio, videos, e-books, and documents). In the Material Center, you can perform batch uploads, moves, deletions, downloads, and custom grouping of various types of resources. You can also edit and crop images online.</span>

<span style="font-size:15px;"></span>

<span style="font-size:17px;">**II. Purpose of Use**</span>

<span style="font-size:15px;">(1) Centralize and efficiently manage file resources.</span>

<span style="font-size:15px;">(2) Quickly select the resources uploaded in the Material Center at the entry where file resources are needed.</span>

<span style="font-size:15px;">(3) Provide a simple image cropping tool to help merchants quickly complete image design.</span>

<span style="font-size:17px;">**III. Usage Scenarios**</span>

<span style="font-size:15px;">When creating content and needing to upload images, audio, videos, e-books, or documents, it supports merchants to quickly upload and select the corresponding resources, reducing the upload waiting time and thus improving the customer's operation efficiency.</span>

<span style="font-size:17px;">**IV. Operation Path**</span>

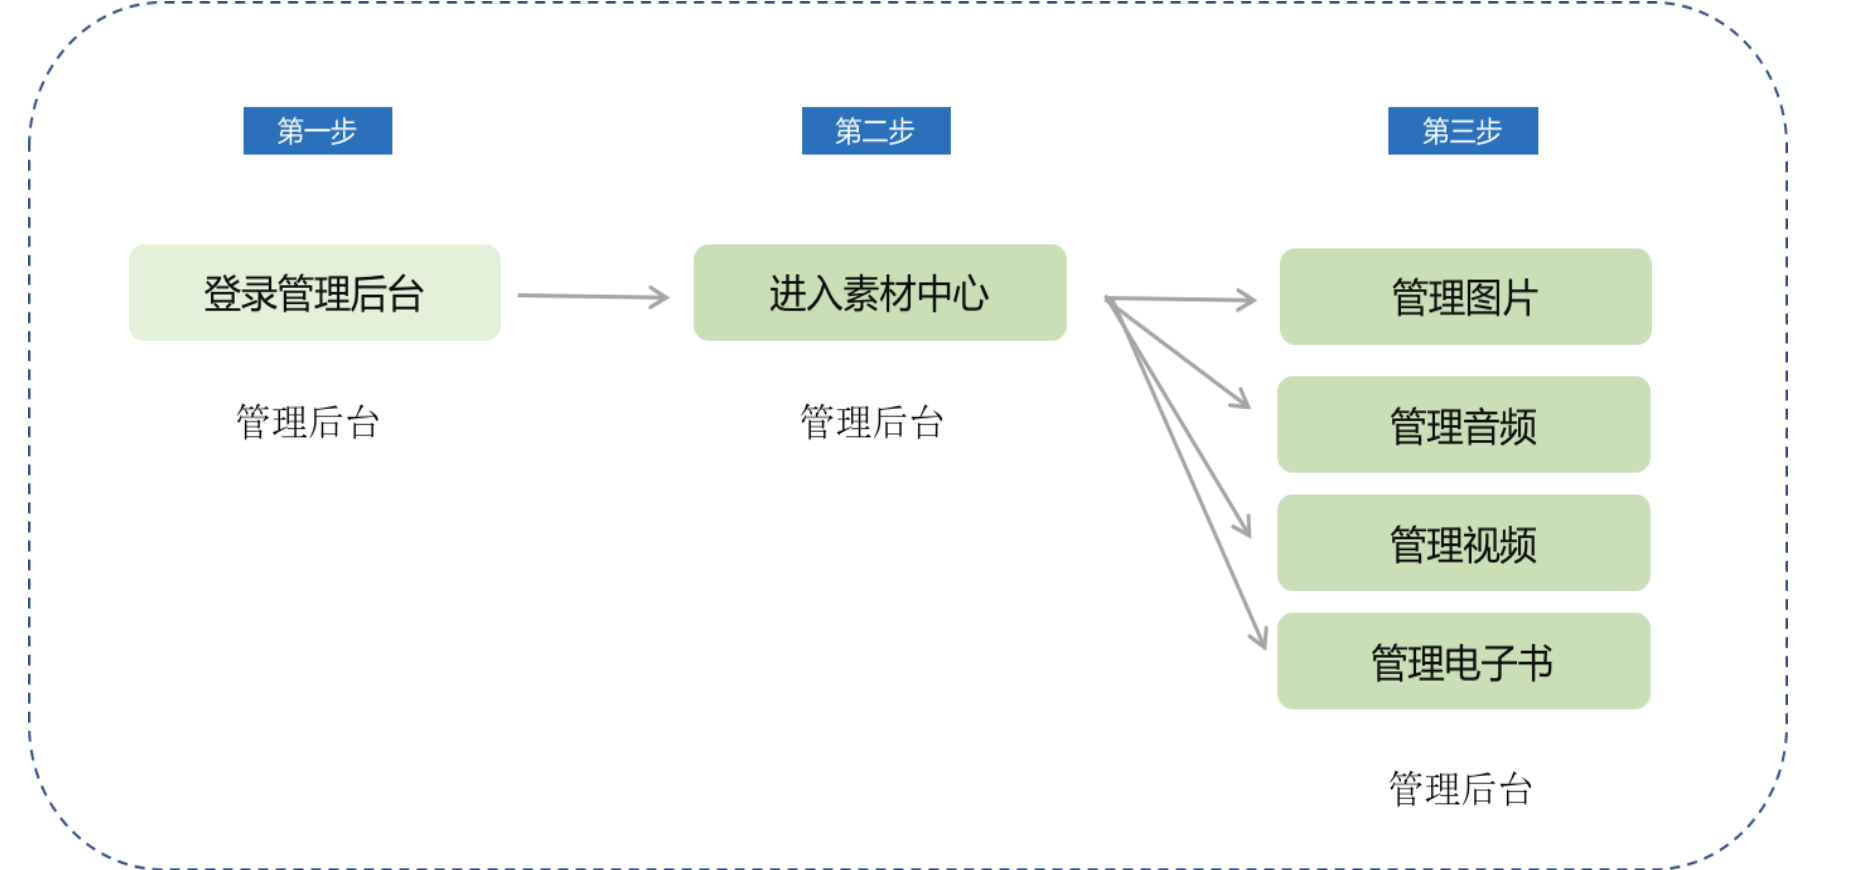
<span style="font-size:15px;">Operation Path: Merchant Management Console → Store → Basic Tools → Material Center</span>

<span style="font-size:15px;">![01.png](https://wechatapppro-1252524126.file.myqcloud.com/help_document/image/ueditor/50831200_1699446201.png ".png")</span>

<span style="font-size:17px;">**V. Usage Tutorial**</span>

**<span style="font-size:15px;">Step 1: Enter the Material Center</span>***<span style="font-size:15px;">(Management Backend)</span>*

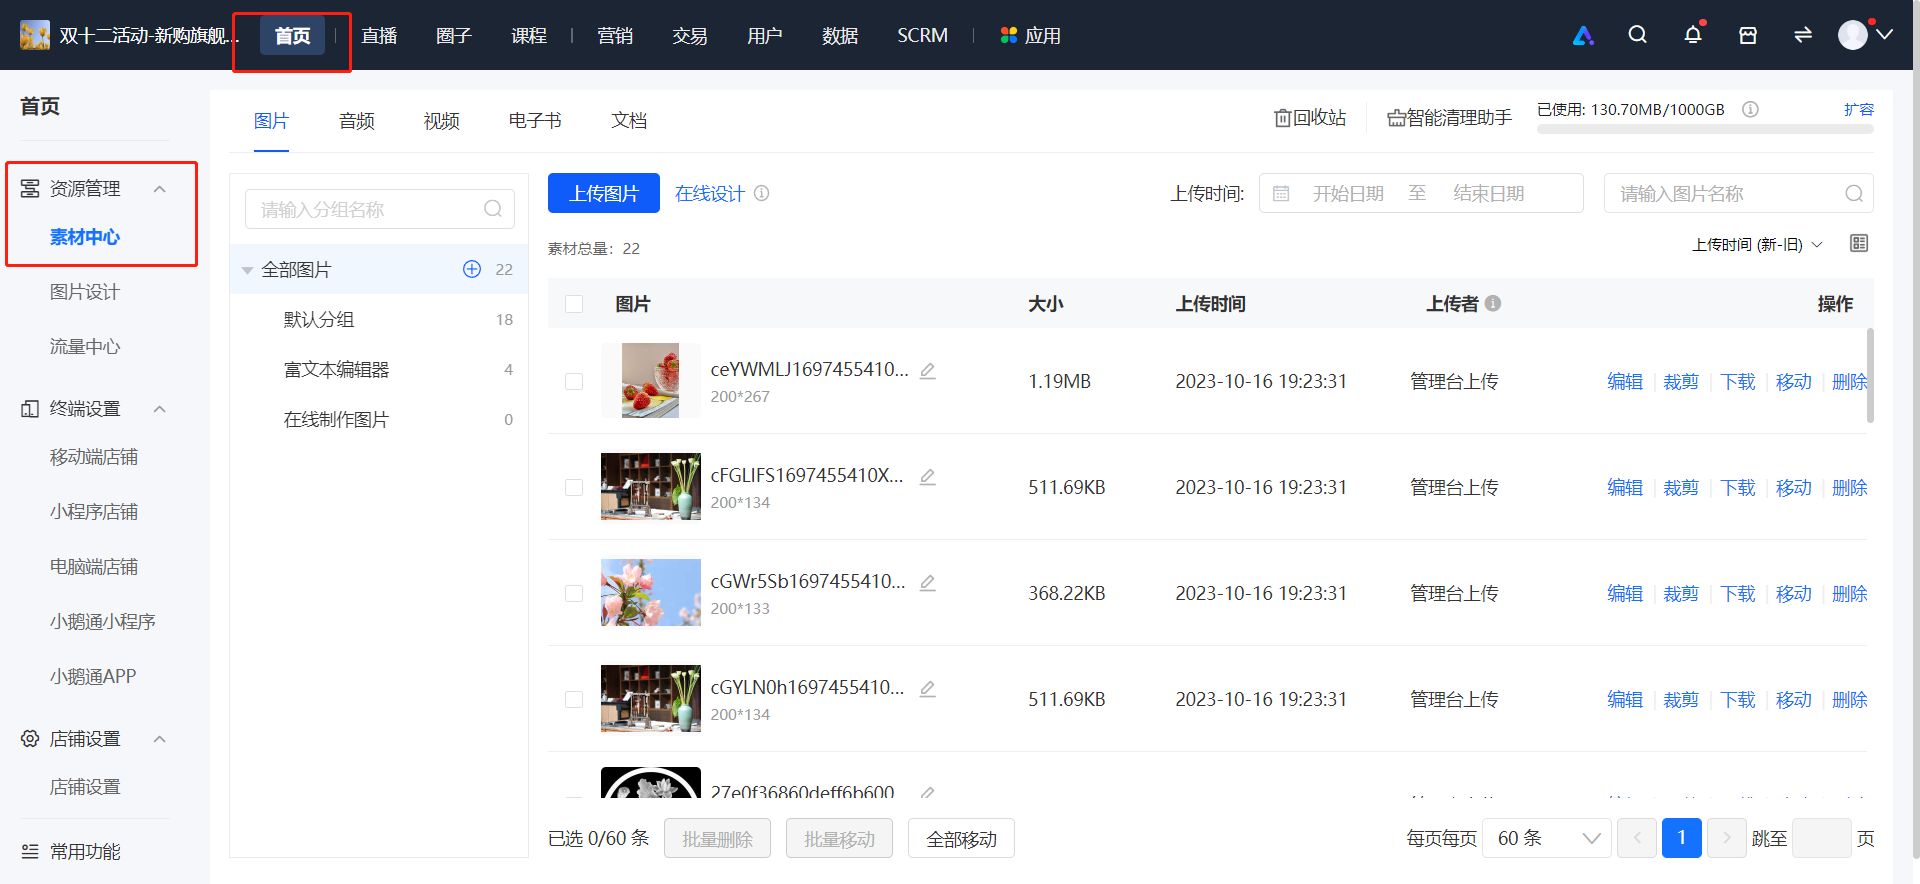
<span style="font-size:15px;">1. Enter the management backend - Store - Basic Tools - Material Center</span>

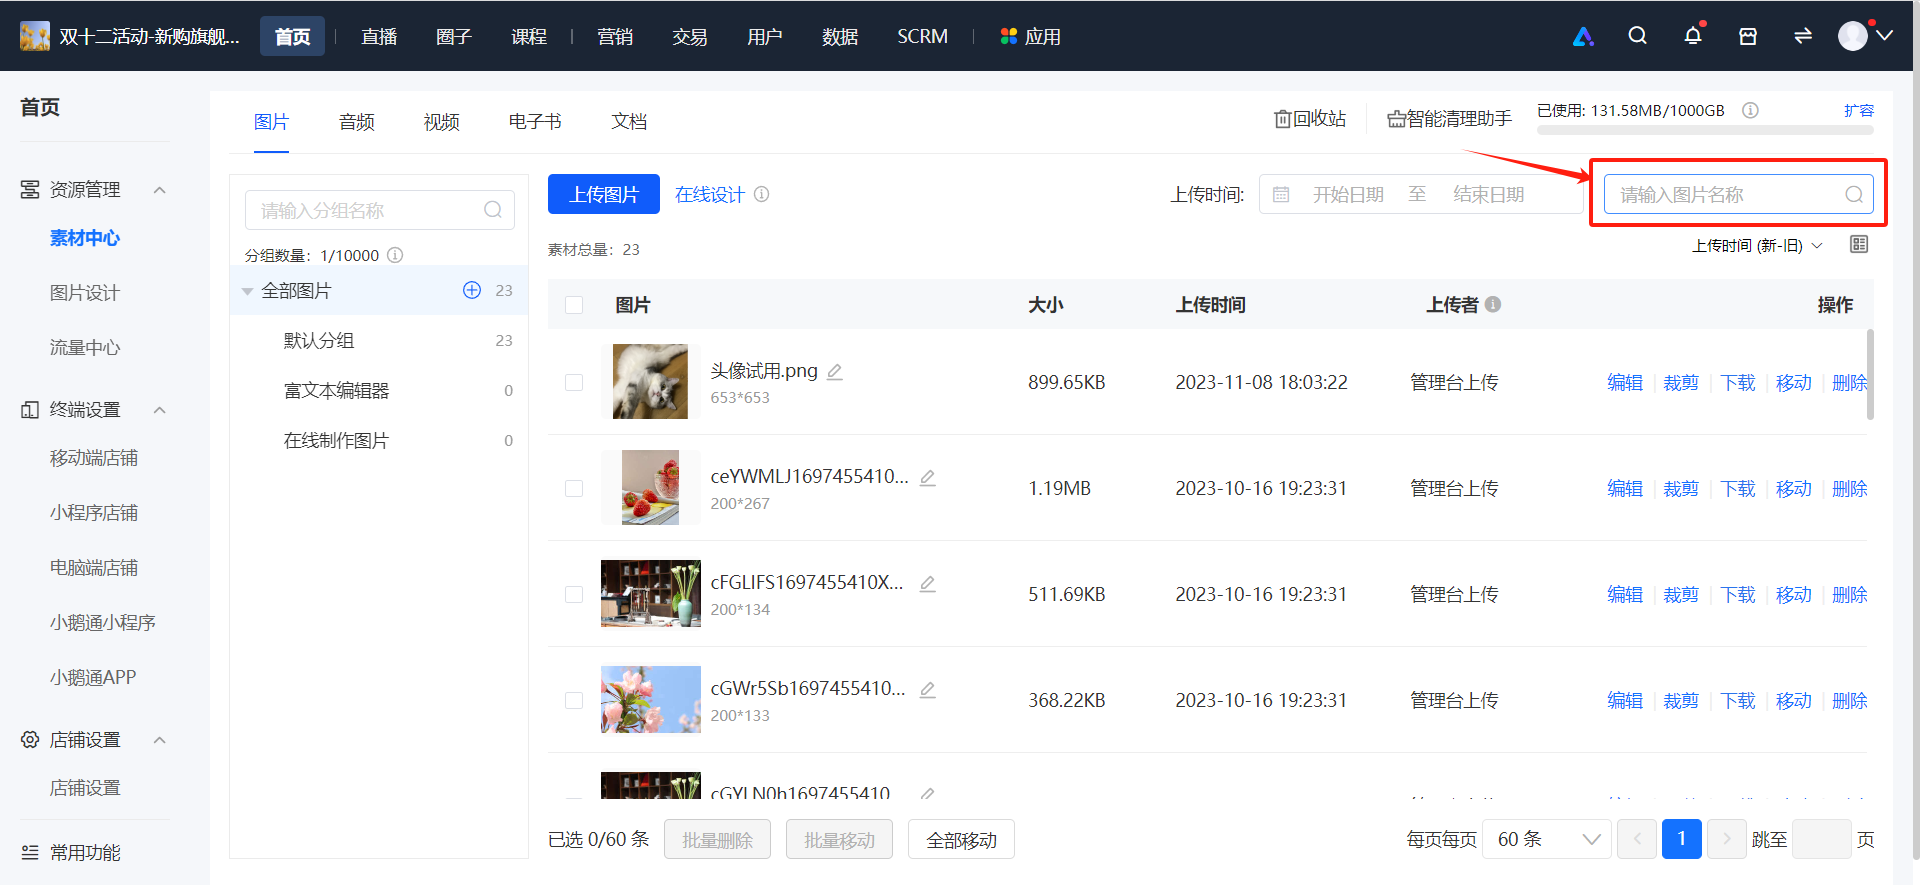
<span style="font-size:15px;">(1) Image List Page</span>

![企业微信截图_16994372243245.png](https://wechatapppro-1252524126.file.myqcloud.com/help_document/image/ueditor/69928400_1699446201.png ".png")

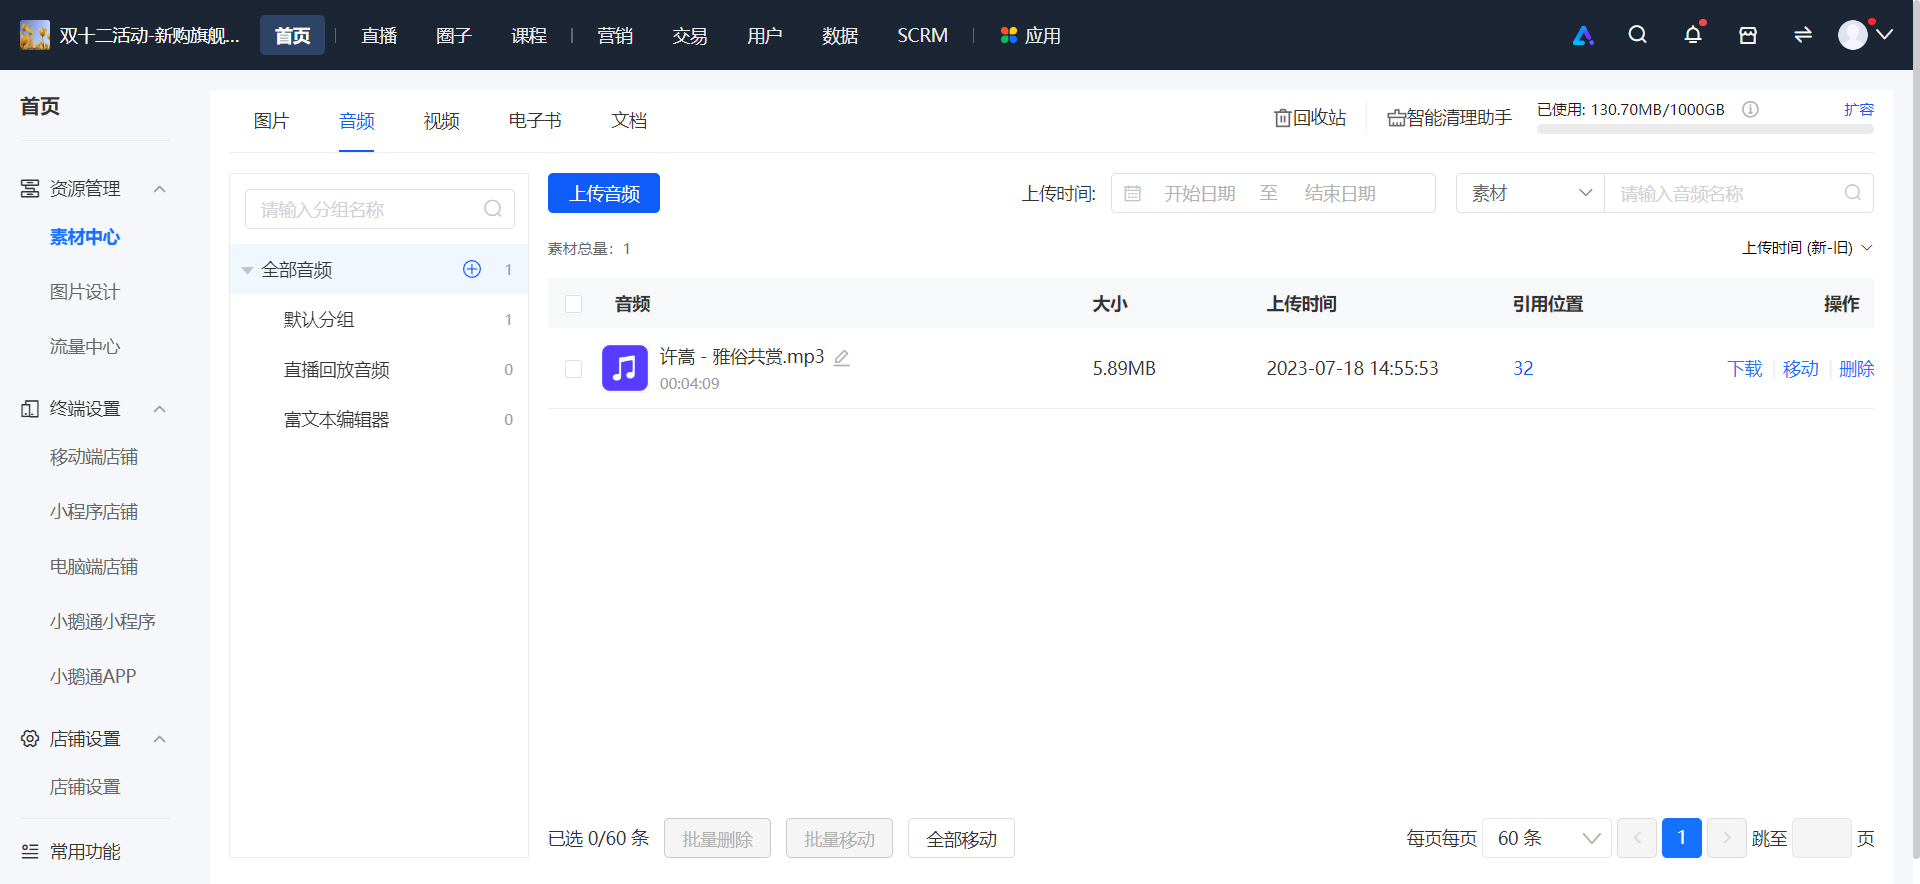
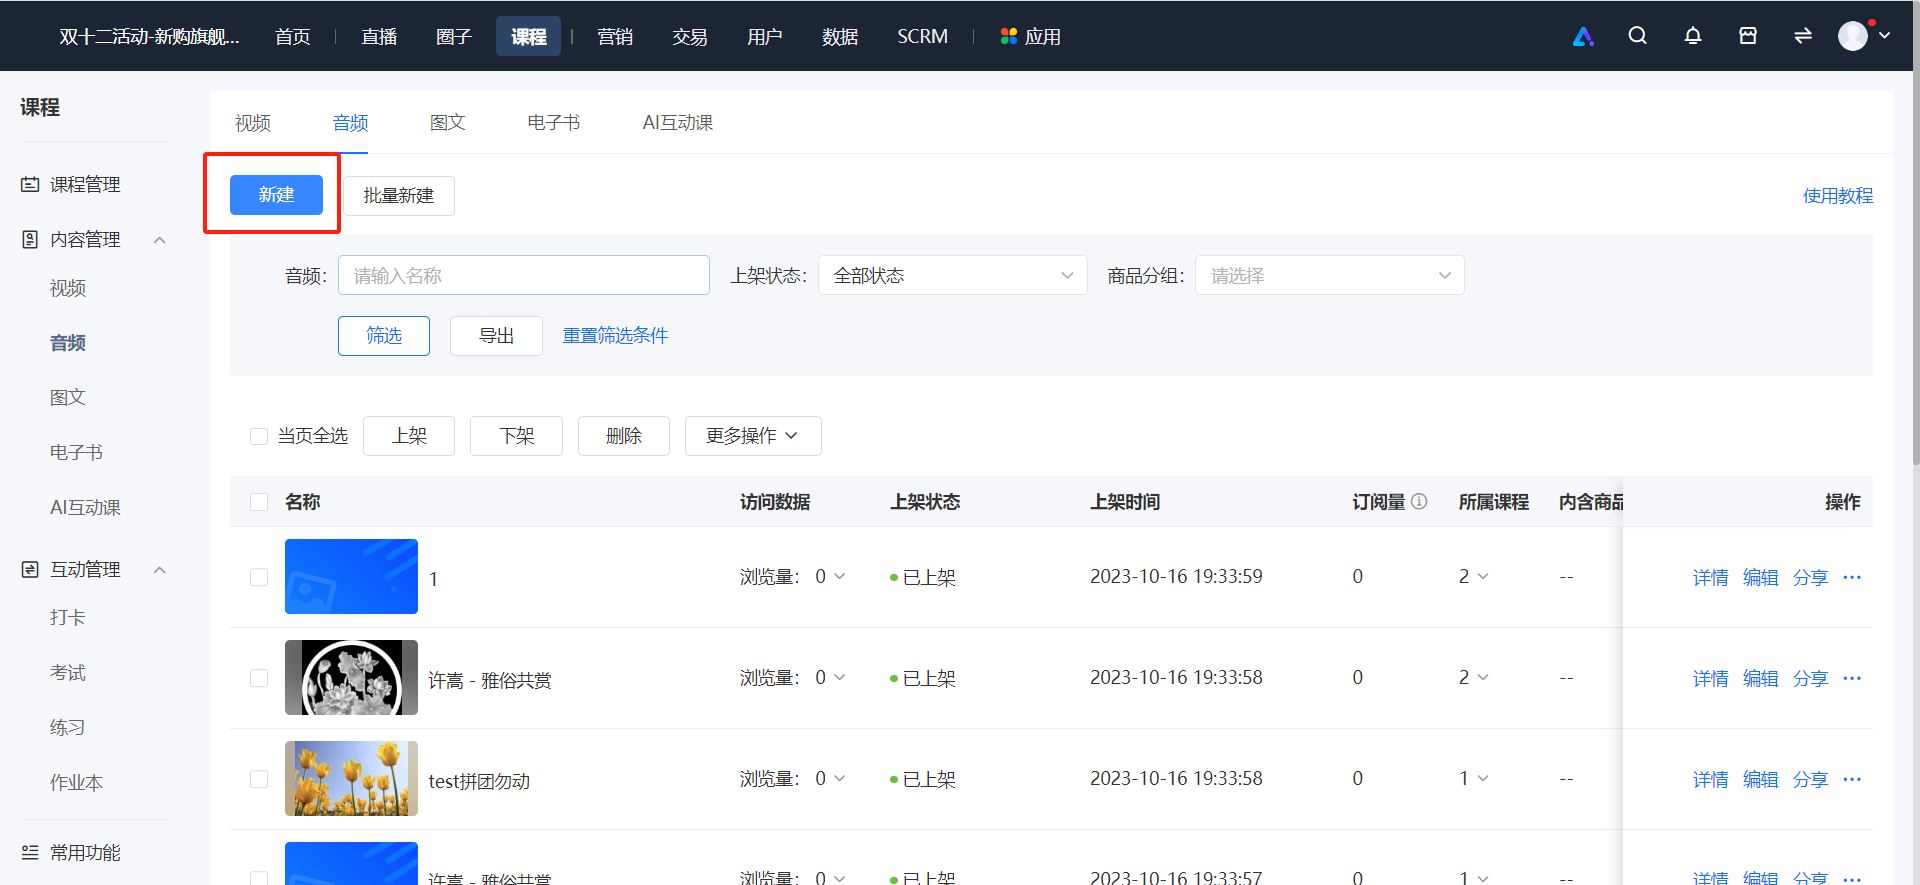
<span style="font-size:15px;">(2) Audio List Page</span>

![企业微信截图_16994372341078.png](https://wechatapppro-1252524126.file.myqcloud.com/help_document/image/ueditor/83645900_1699446201.png ".png")

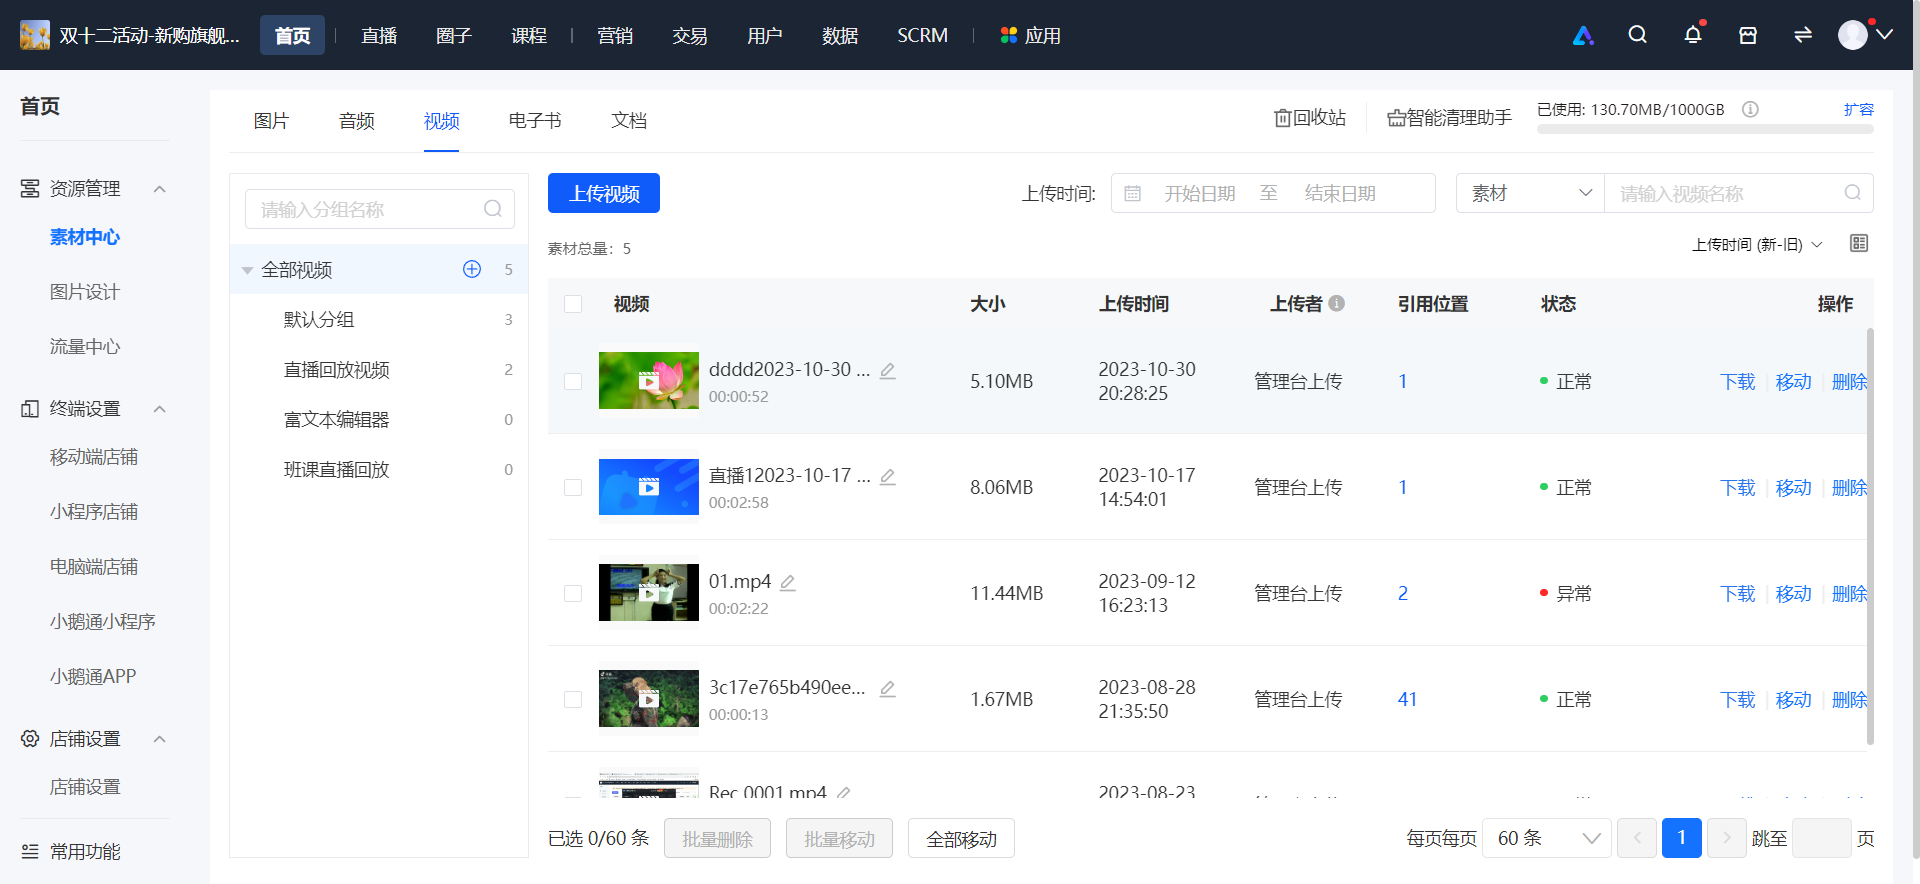
<span style="font-size:15px;">(3) Video List Page</span>

![企业微信截图_16994372454022.png](https://wechatapppro-1252524126.file.myqcloud.com/help_document/image/ueditor/4651200_1699446202.png ".png")

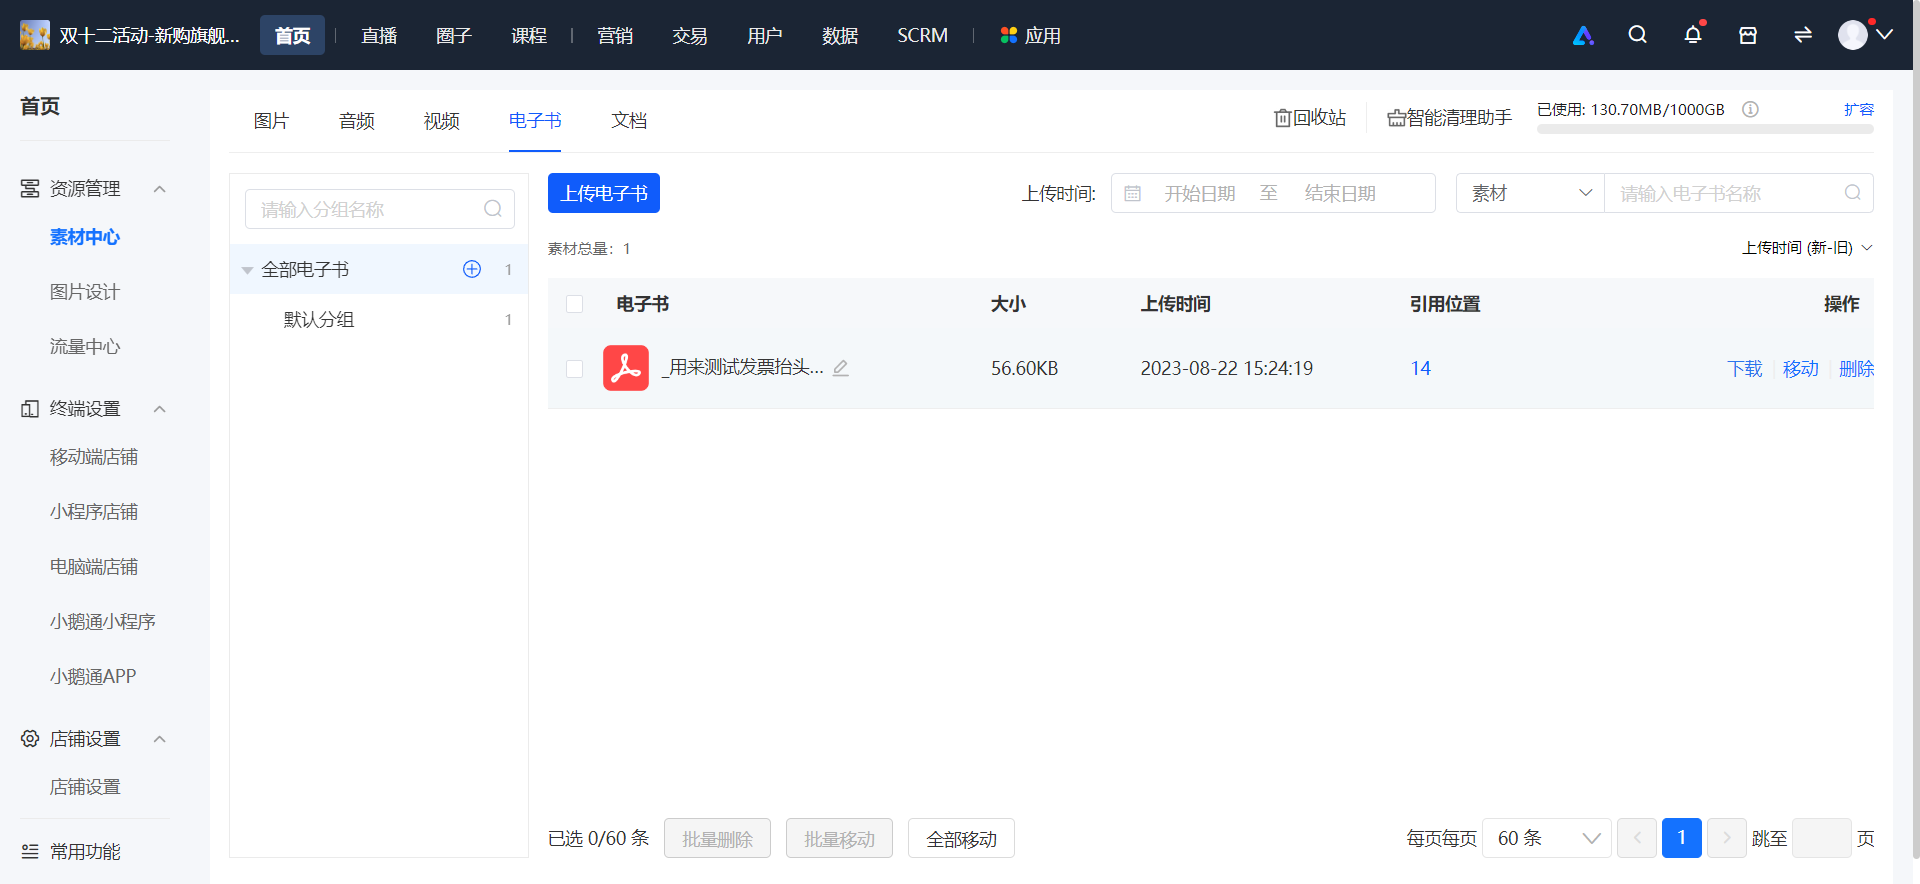
<span style="font-size:15px;">(4) E - book List Page</span>

![企业微信截图_16994372539750.png](https://wechatapppro-1252524126.file.myqcloud.com/help_document/image/ueditor/20629500_1699446202.png ".png")

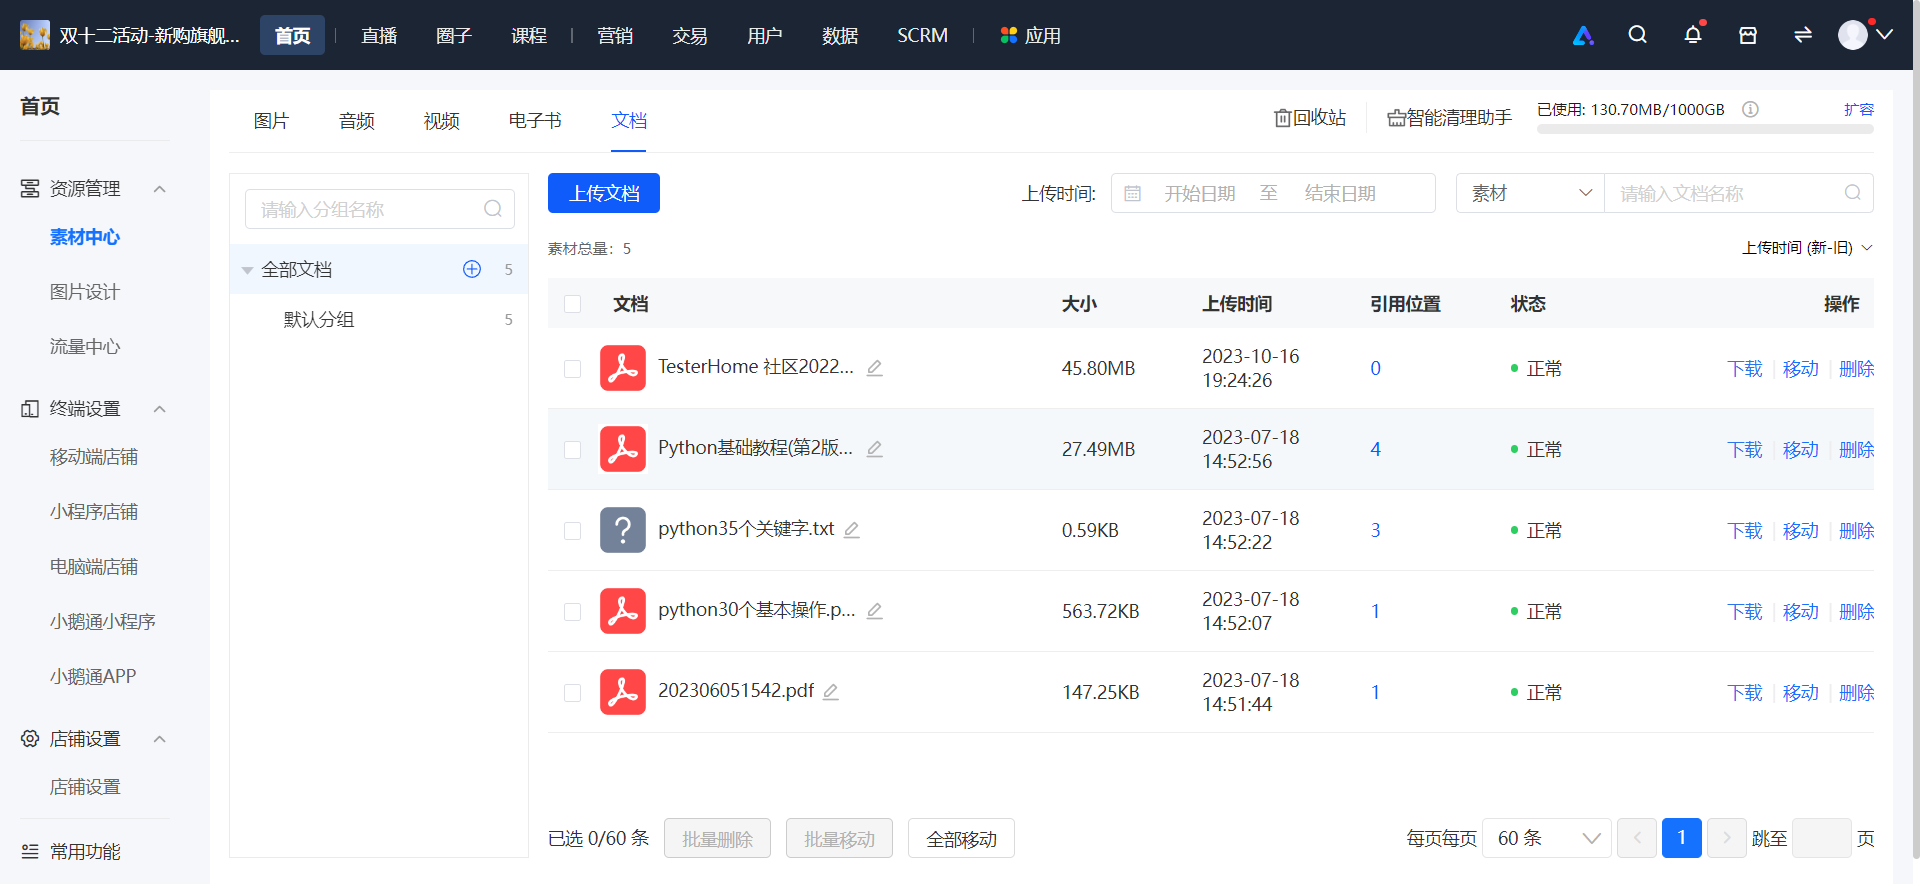
<span style="font-size:15px;">(5) Document List Page</span>

![企业微信截图_16994372594586.png](https://wechatapppro-1252524126.file.myqcloud.com/help_document/image/ueditor/42197200_1699446202.png ".png")

**<span style="font-size:15px;">Step 2: Create a Group (Taking the Creation of an Image Group as an Example)</span>***<span style="font-size:15px;">(Management Backend)</span>*

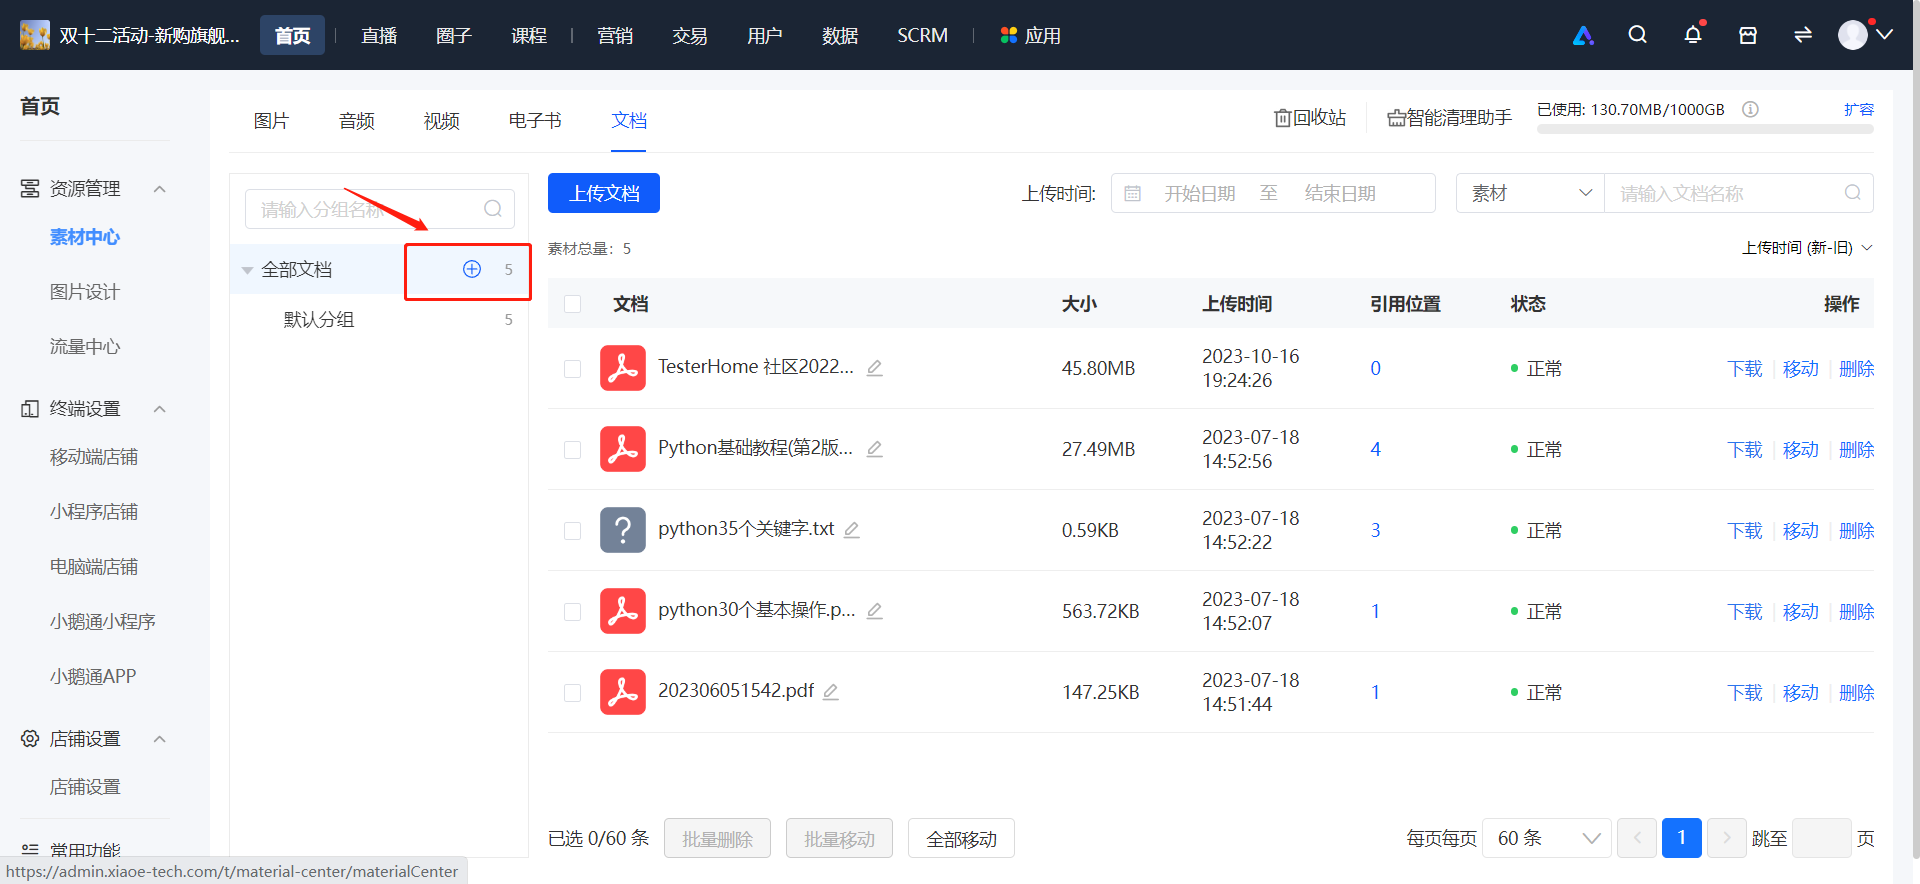
<span style="font-size:15px;">1. Click the "+" button to add a group.</span>

![image.png](https://wechatapppro-1252524126.file.myqcloud.com/help_document/image/ueditor/58313800_1699446202.png ".png")

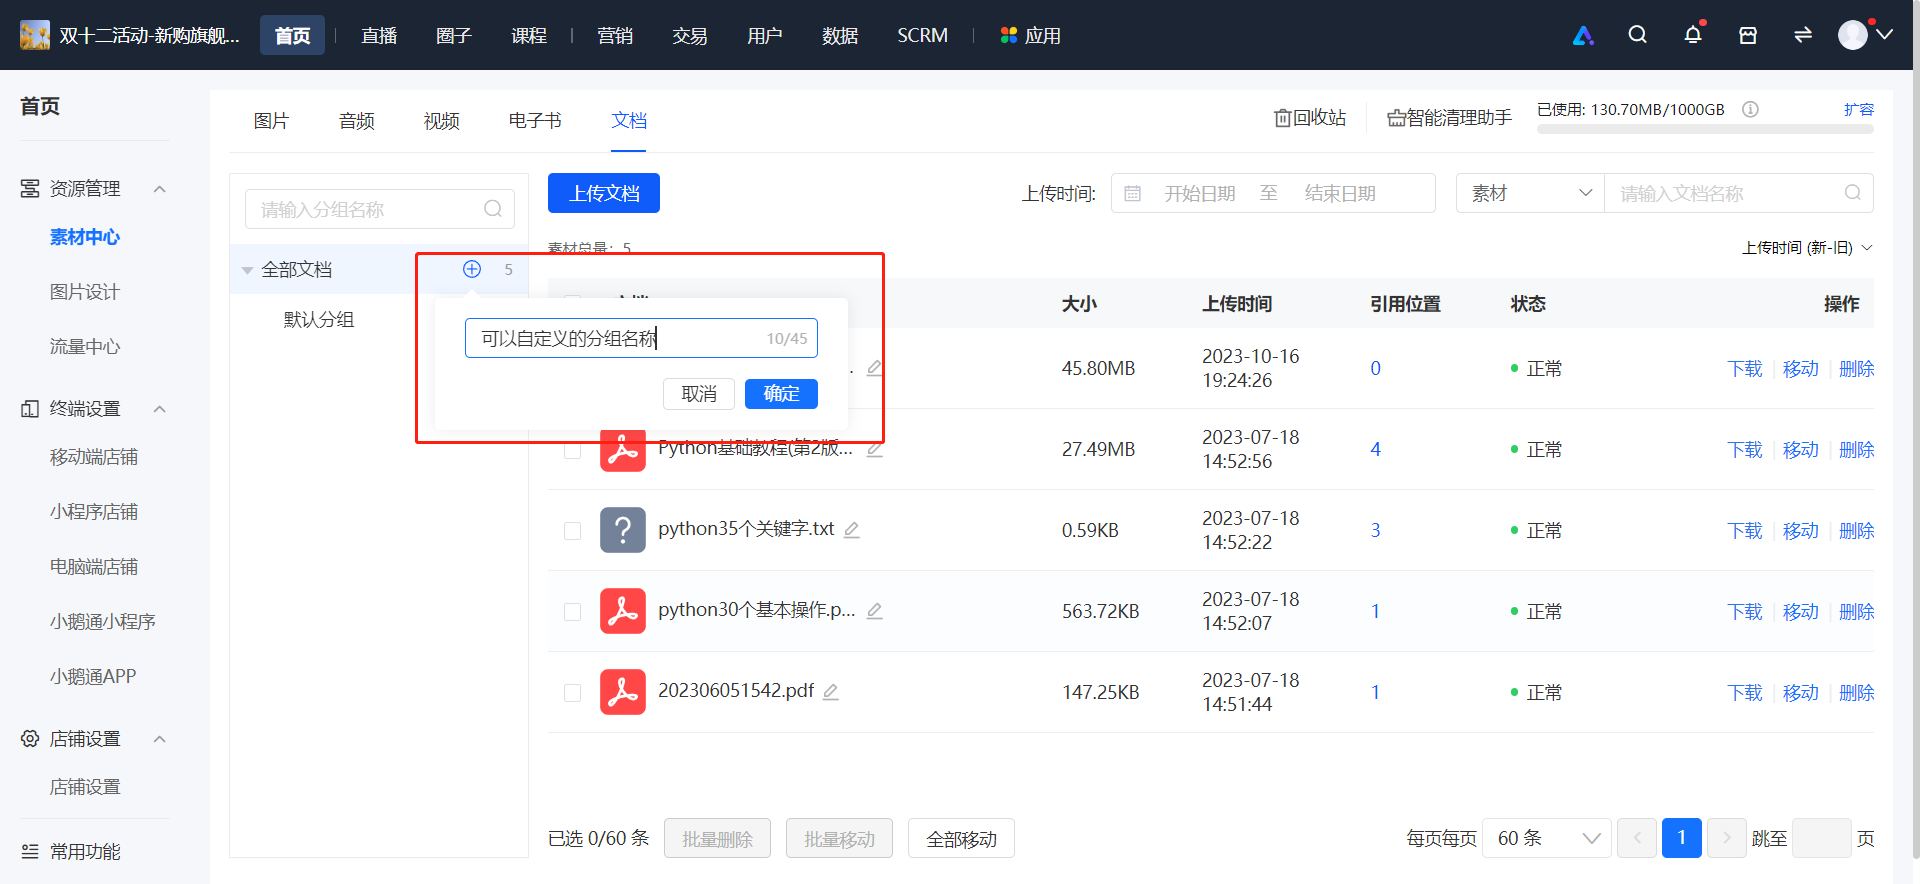
<span style="font-size:15px;">2. Enter the group name and confirm the group.</span>

![image.png](https://wechatapppro-1252524126.file.myqcloud.com/help_document/image/ueditor/74297400_1699446202.png ".png")

**<span style="font-size:15px;">Step 3: Upload (Taking the Upload of Images as an Example)</span>***<span style="font-size:15px;">(Management Backend)</span>*

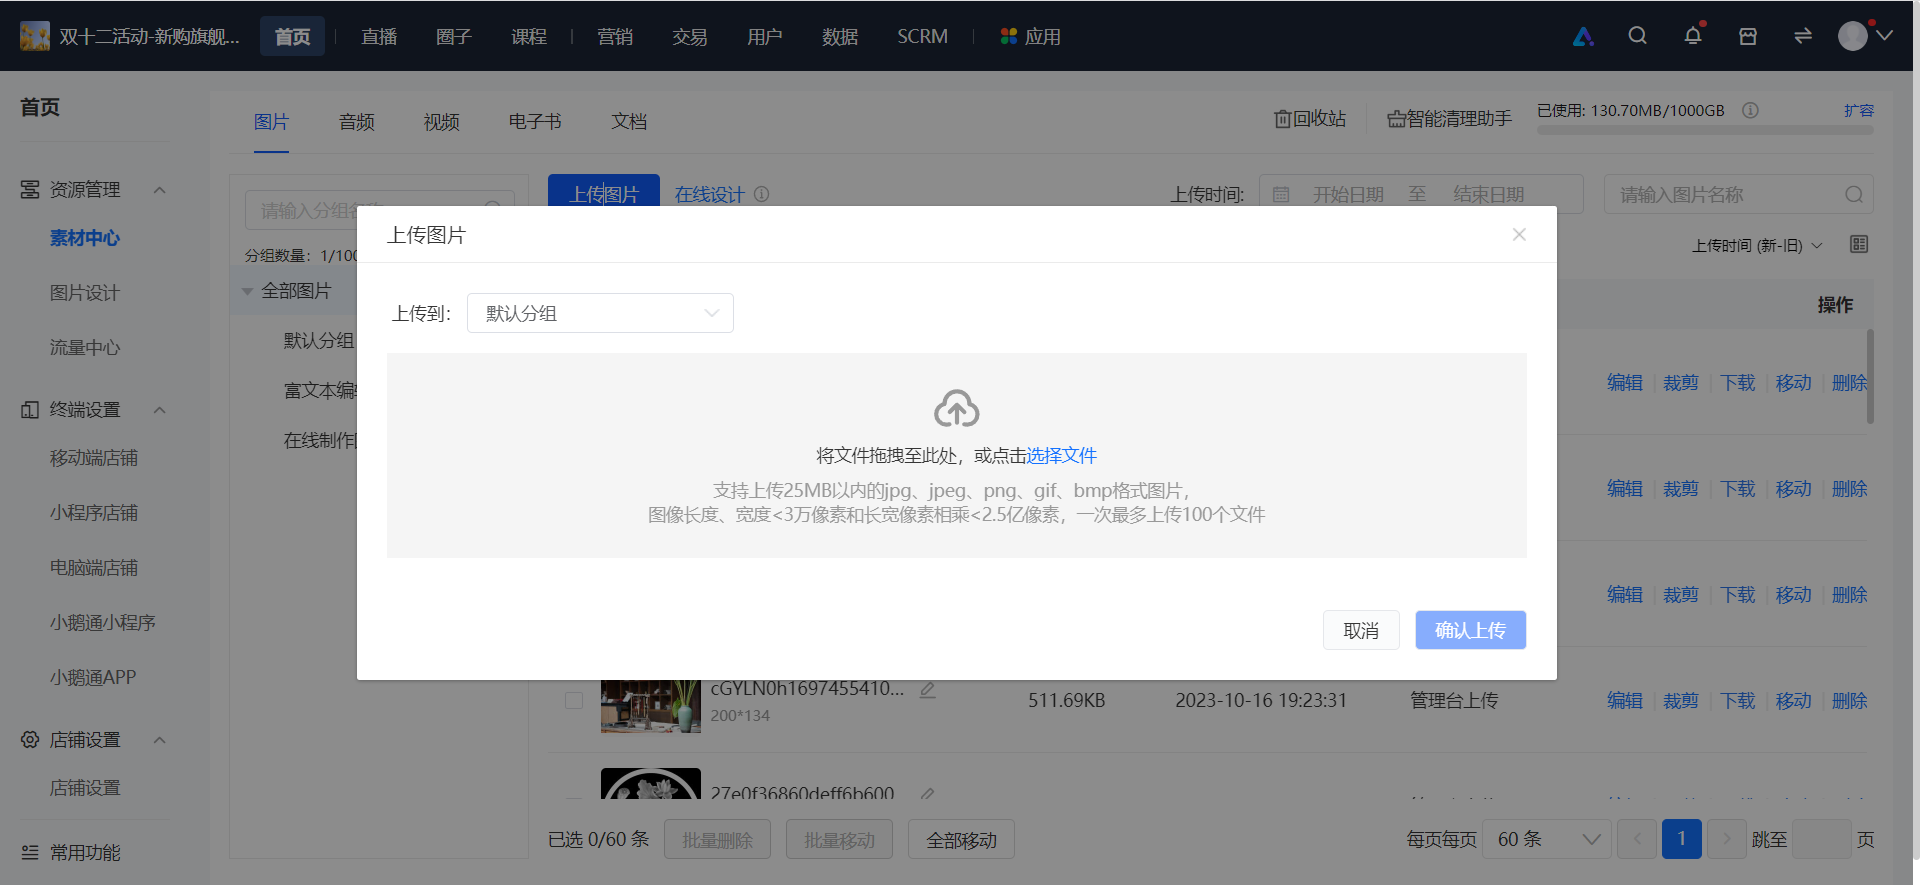
<span style="font-size:15px;">1. Click the \[Upload Images\] button, and a pop - up window for uploading images will appear on the page.</span>

![image.png](https://wechatapppro-1252524126.file.myqcloud.com/help_document/image/ueditor/88998700_1699446202.png ".png")

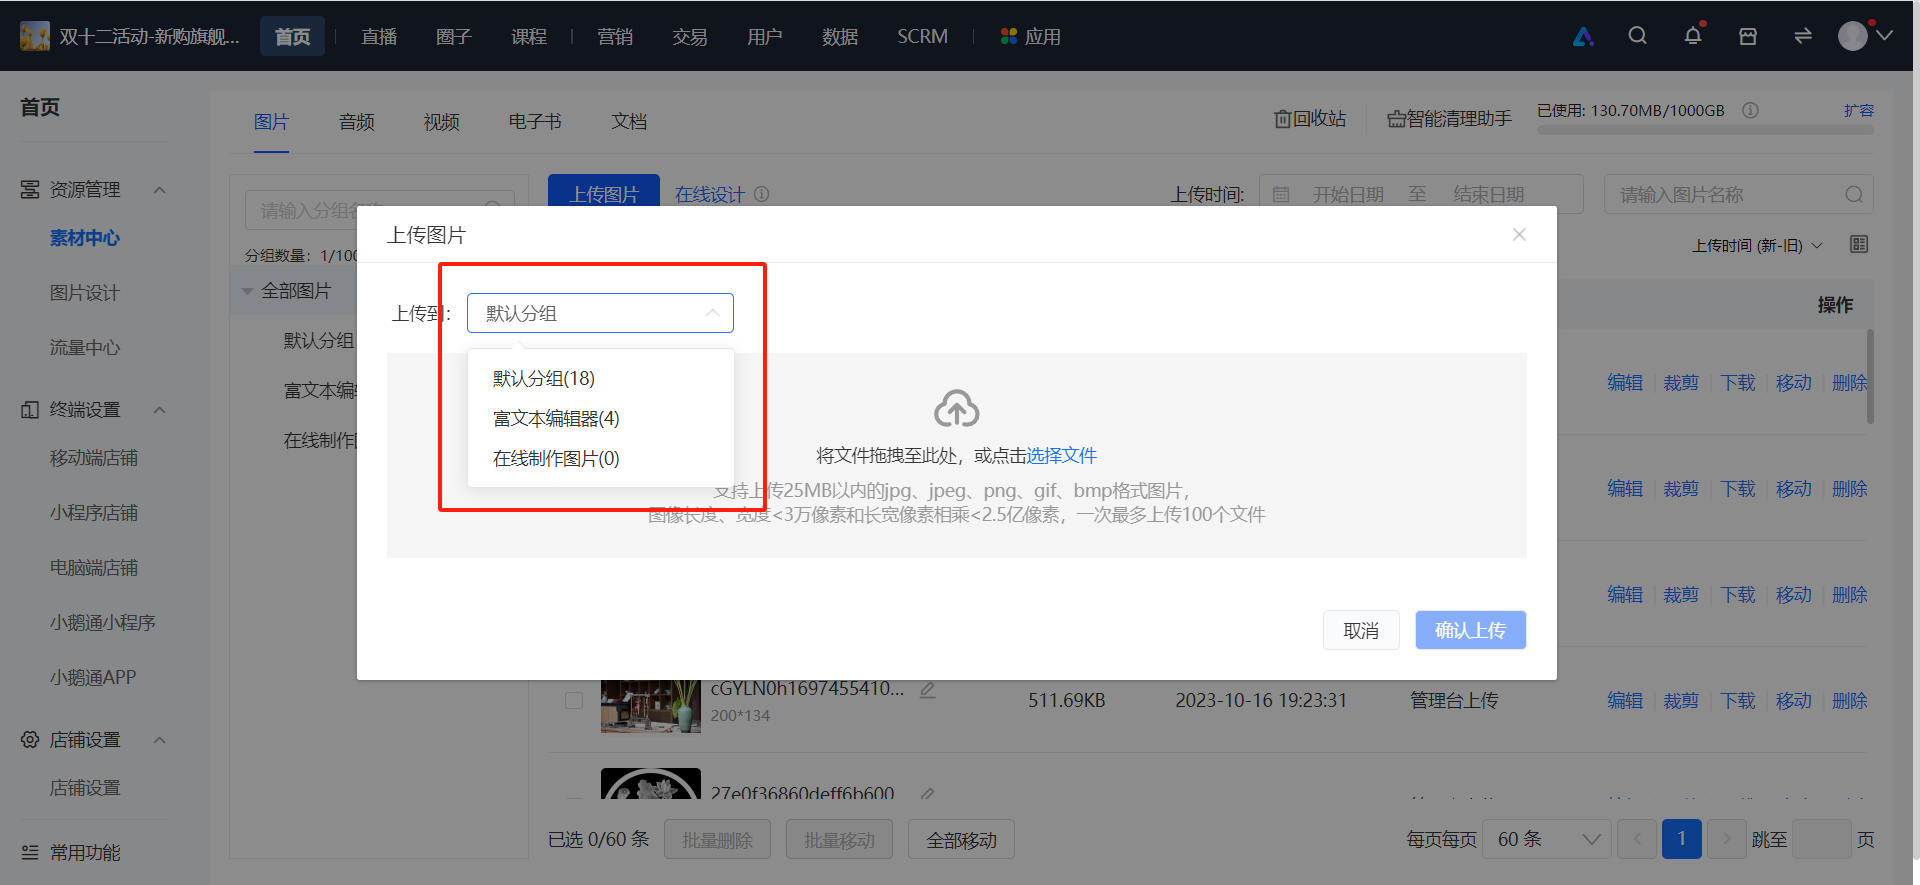
<span style="font-size:15px;">2. Select the group to which the uploaded images belong (the default group if no group has been created, or you can select a group if groups have been created).</span>

![image.png](https://wechatapppro-1252524126.file.myqcloud.com/help_document/image/ueditor/9135400_1699446203.png ".png")

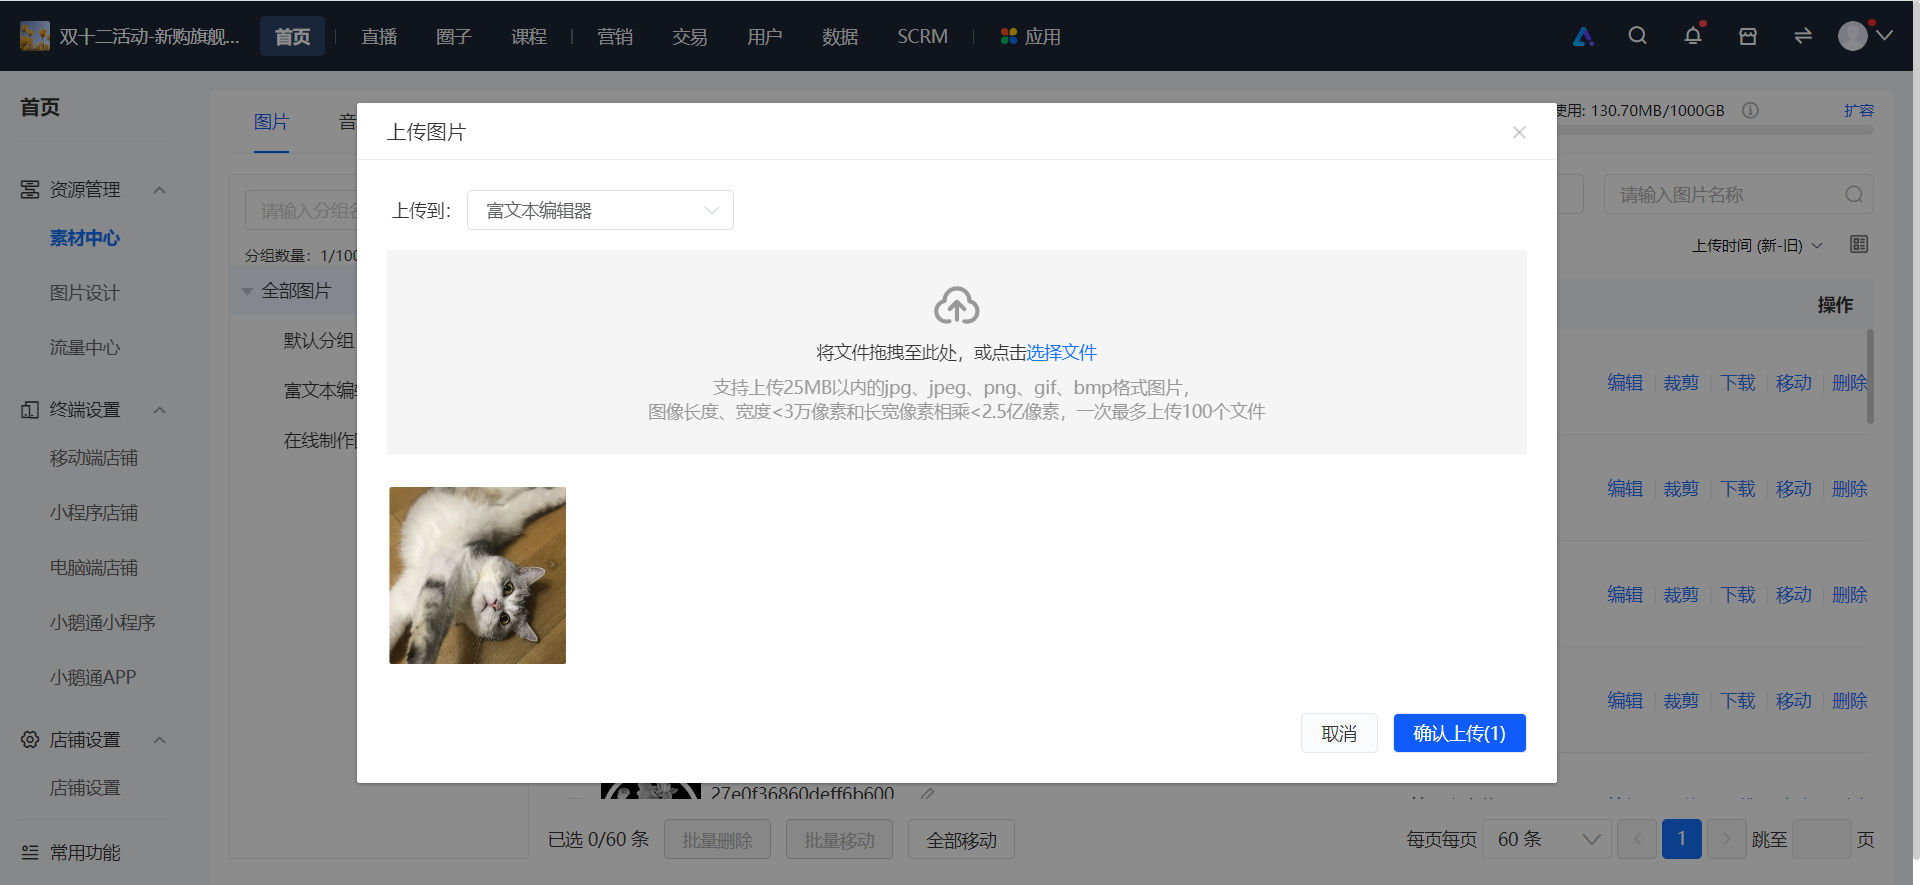
<span style="font-size:15px;">3. Click \[Upload Images\], select the images to be uploaded, and click \[Confirm Upload\].</span>

![image.png](https://wechatapppro-1252524126.file.myqcloud.com/help_document/image/ueditor/28302200_1699446203.png ".png")

**<span style="font-size:15px;">Step 4: Edit</span>***<span style="font-size:15px;">(Management Backend)</span>*

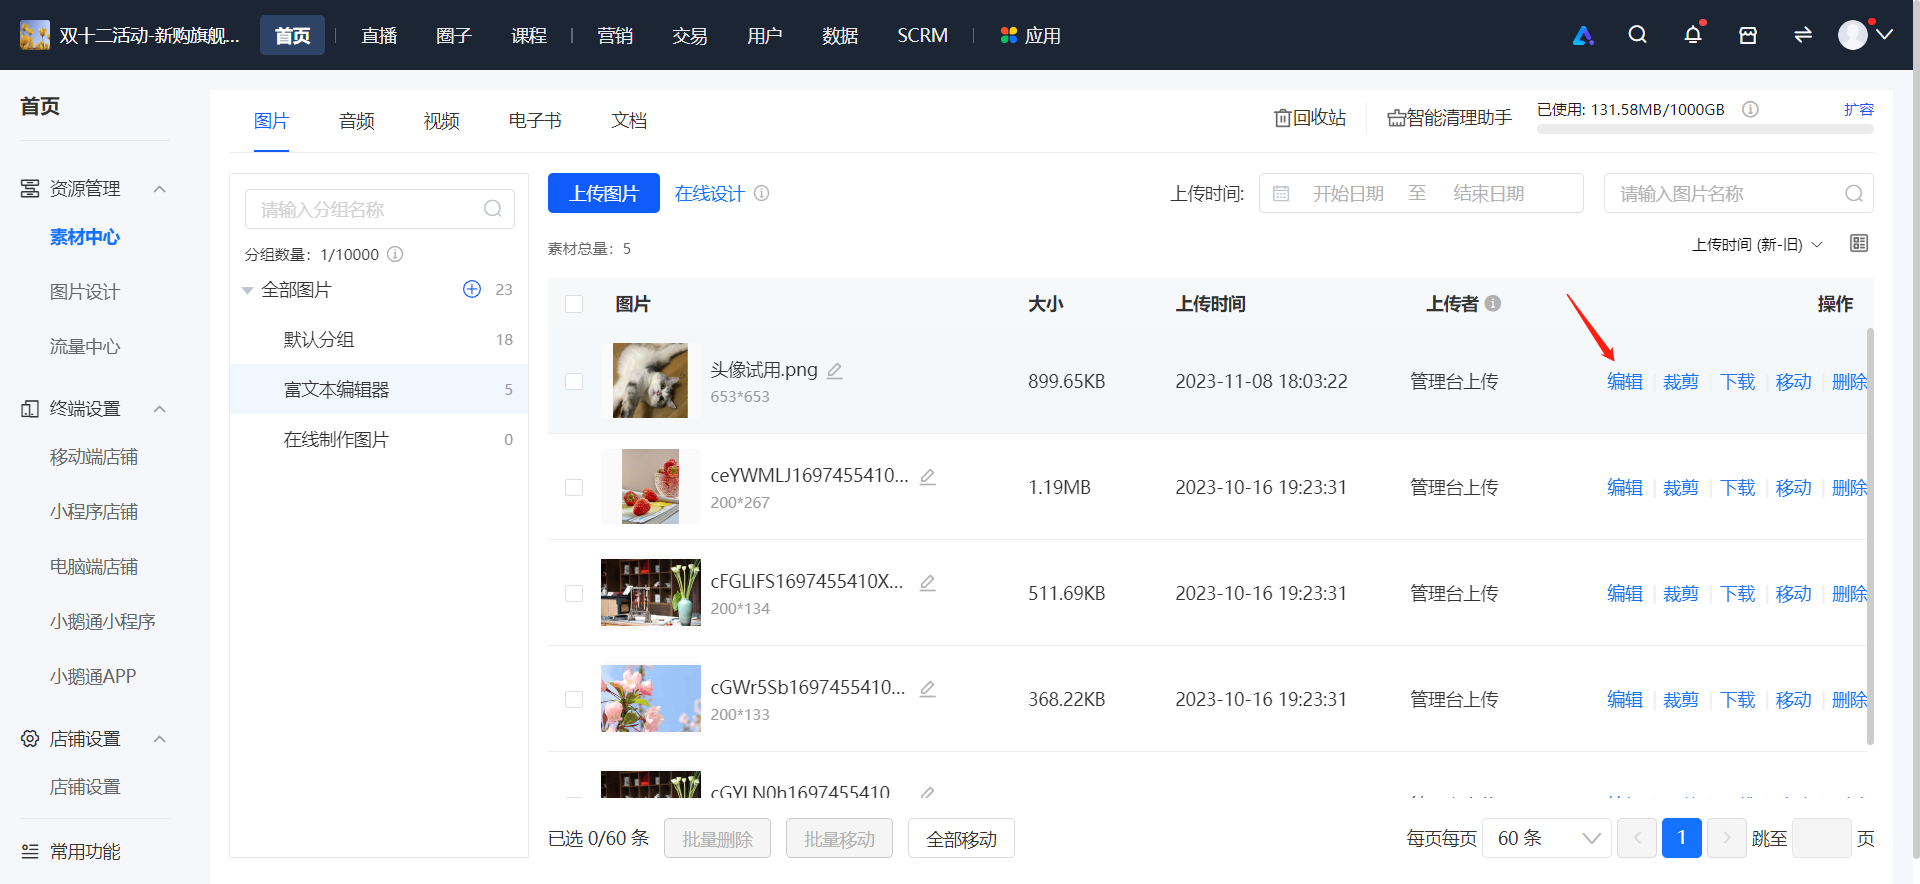
<span style="font-size:15px;">1. Select the image to be edited and click the \[Edit\] button.</span>

![image.png](https://wechatapppro-1252524126.file.myqcloud.com/help_document/image/ueditor/47147600_1699446203.png ".png")

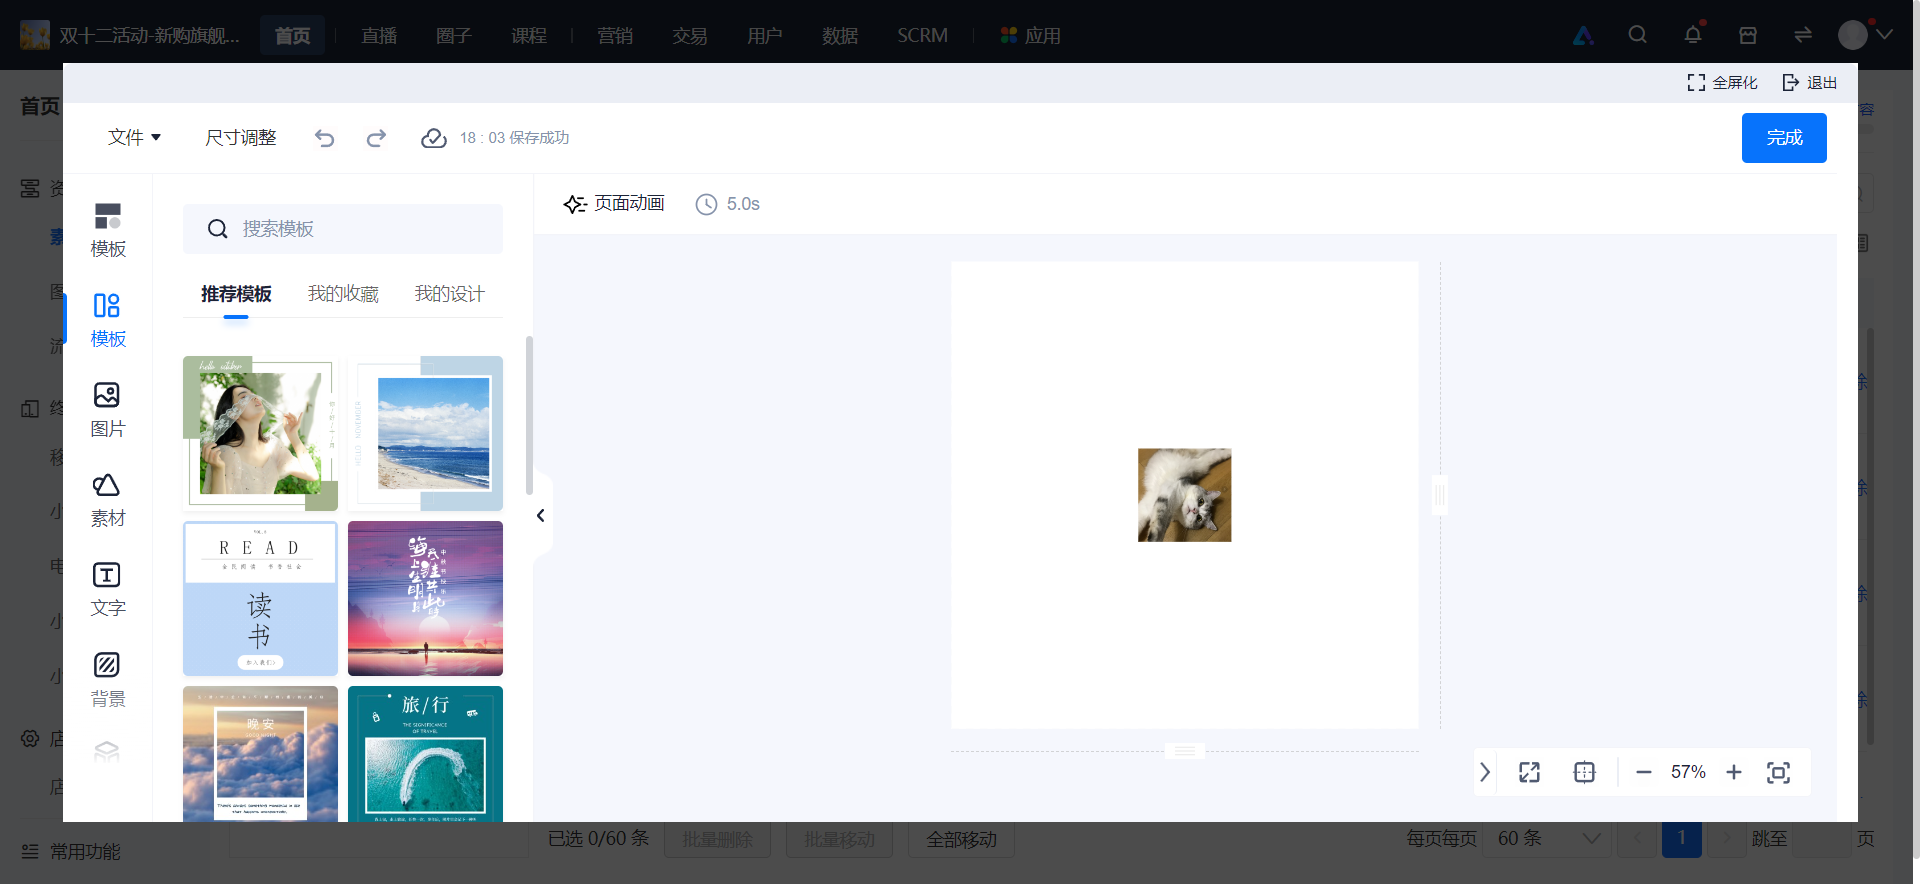
<span style="font-size:15px;">2. Automatically jump to the third - party plugin to edit and design the image style.**(Only supported for the Professional Edition and the Flagship Edition)**</span>

![image.png](https://wechatapppro-1252524126.file.myqcloud.com/help_document/image/ueditor/74026400_1699446203.png ".png")

**<span style="font-size:15px;">Step 5: Crop</span>***<span style="font-size:15px;">(Management Backend)</span>*

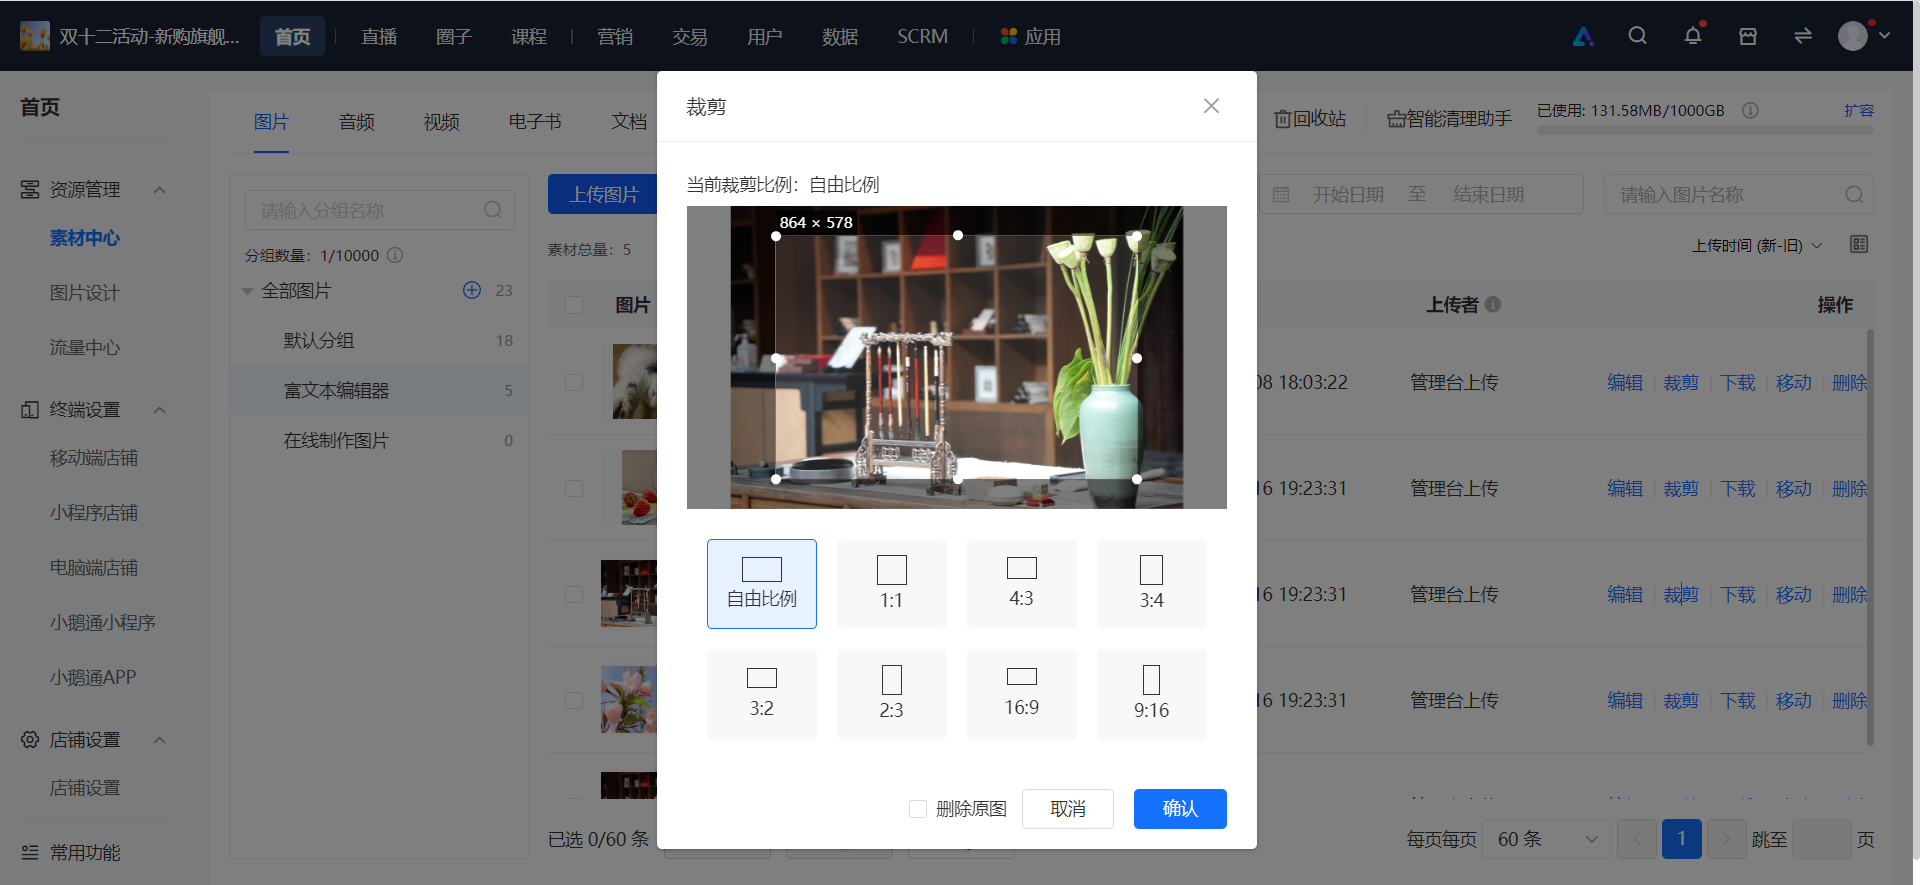
<span style="font-size:15px;">1. Select the image to be cropped and click \[Crop\].</span>

![image.png](https://wechatapppro-1252524126.file.myqcloud.com/help_document/image/ueditor/2773500_1699446204.png ".png")

<span style="font-size:15px;">2. Select the cropping size and click Confirm to complete the cropping. The cropped image will be stored as a new file in the Material Center.</span>

![image.png](https://wechatapppro-1252524126.file.myqcloud.com/help_document/image/ueditor/23385400_1699446204.png ".png")

**<span style="font-size:15px;">Step 6: Download</span>**<span style="font-size:15px;">(Taking the Download of Images as an Example)*(Management Backend)*</span>

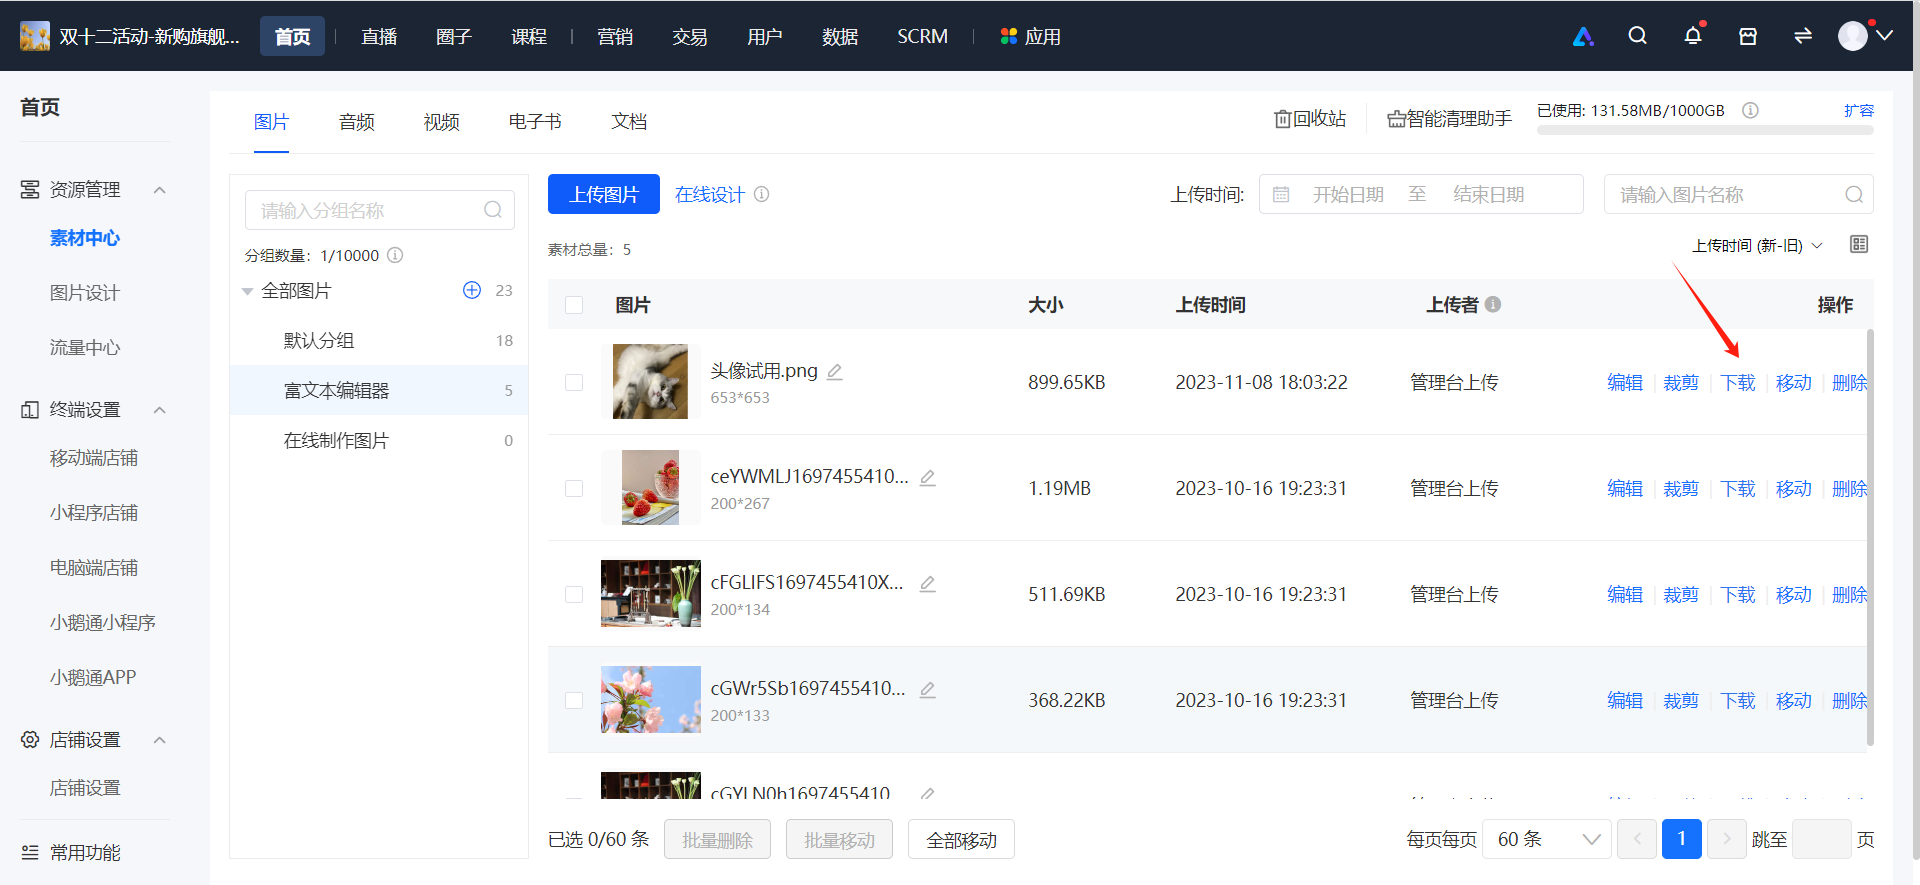
<span style="font-size:15px;">1. Click \[Download\], and the material will be downloaded through the browser.</span>

![image.png](https://wechatapppro-1252524126.file.myqcloud.com/help_document/image/ueditor/48338700_1699446204.png ".png")

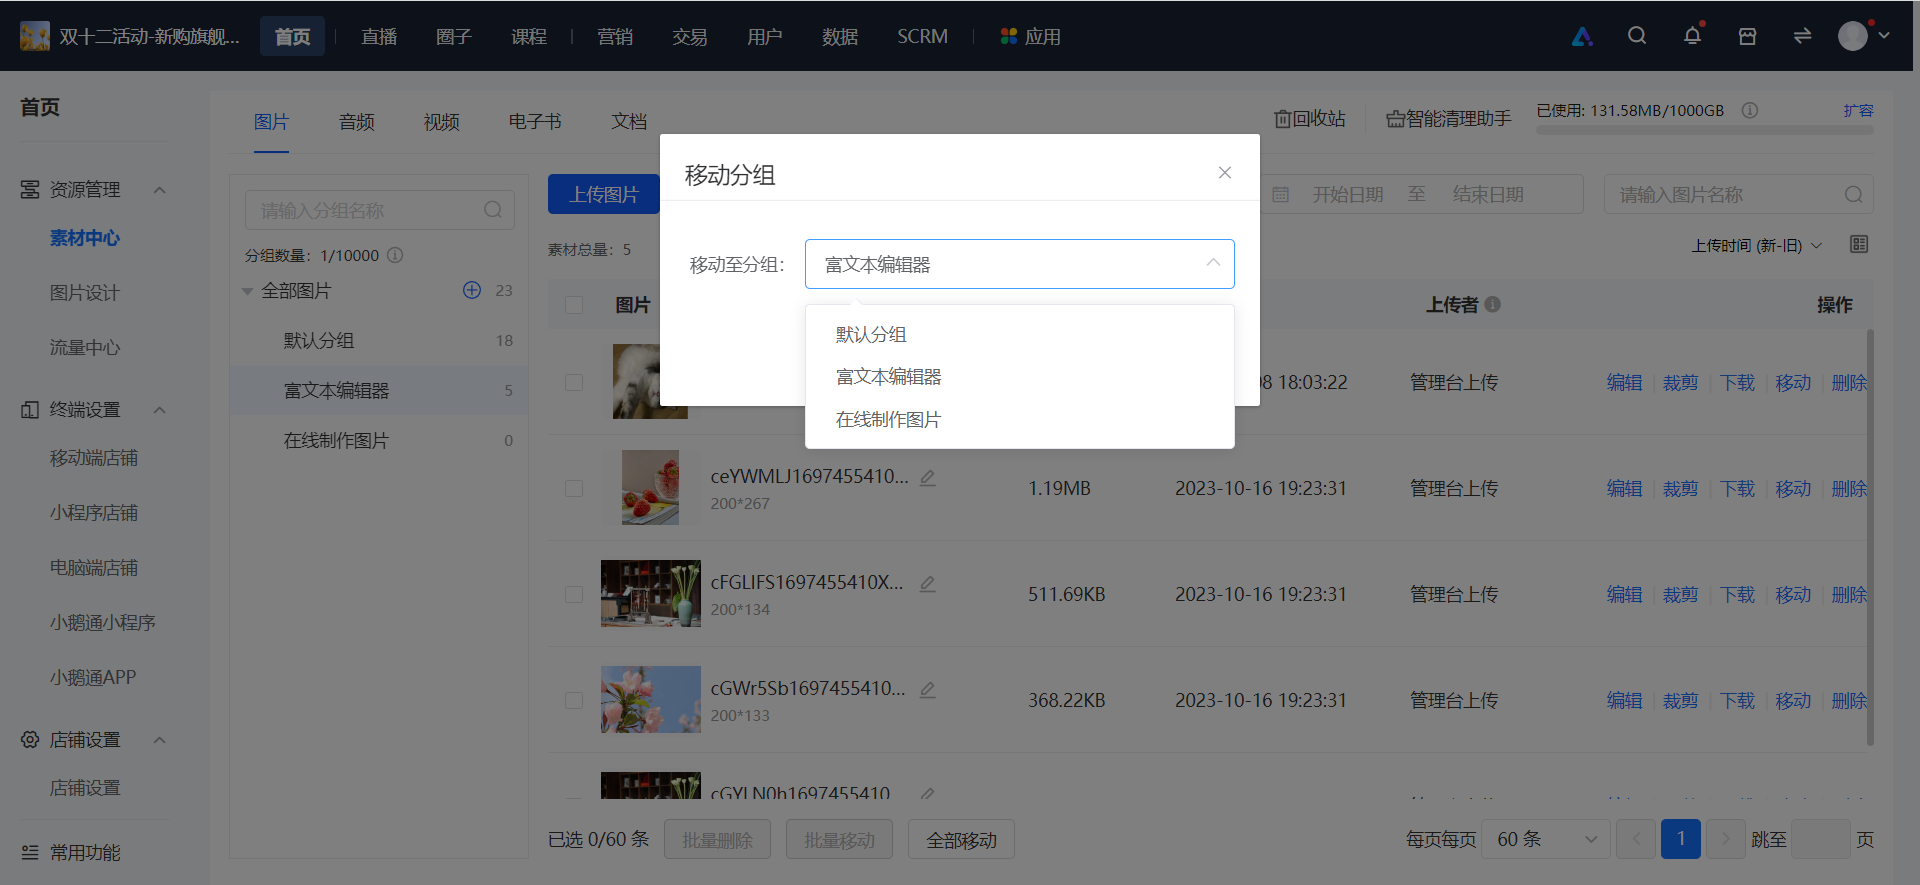
**<span style="font-size:15px;">Step 7: Move Materials</span>**<span style="font-size:15px;">(Taking the Movement of a Single Image as an Example)*(Management Backend)*</span>

<span style="font-size:15px;">1. Select the image to be moved.</span>

<span style="font-size:15px;">![image.png](https://wechatapppro-1252524126.file.myqcloud.com/help_document/image/ueditor/65448200_1699446204.png ".png")</span>

<span style="font-size:15px;">2. Select the group to which you want to move the material and click Confirm.</span>

![image.png](https://wechatapppro-1252524126.file.myqcloud.com/help_document/image/ueditor/88219200_1699446204.png ".png")

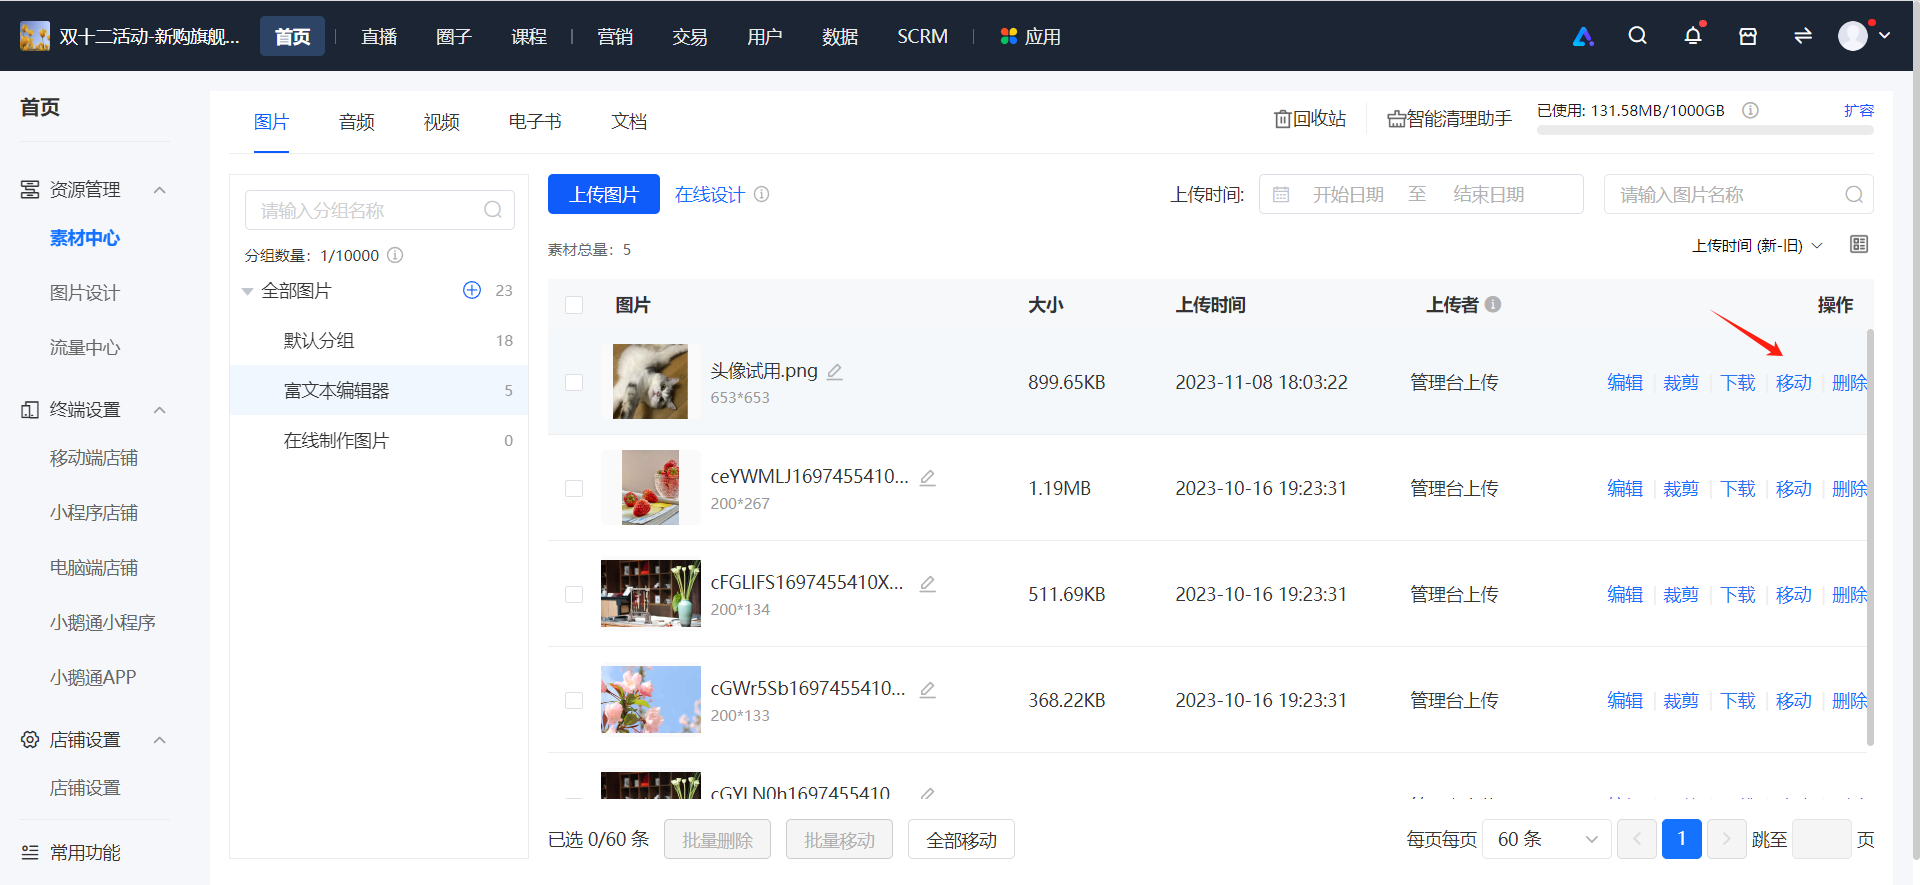
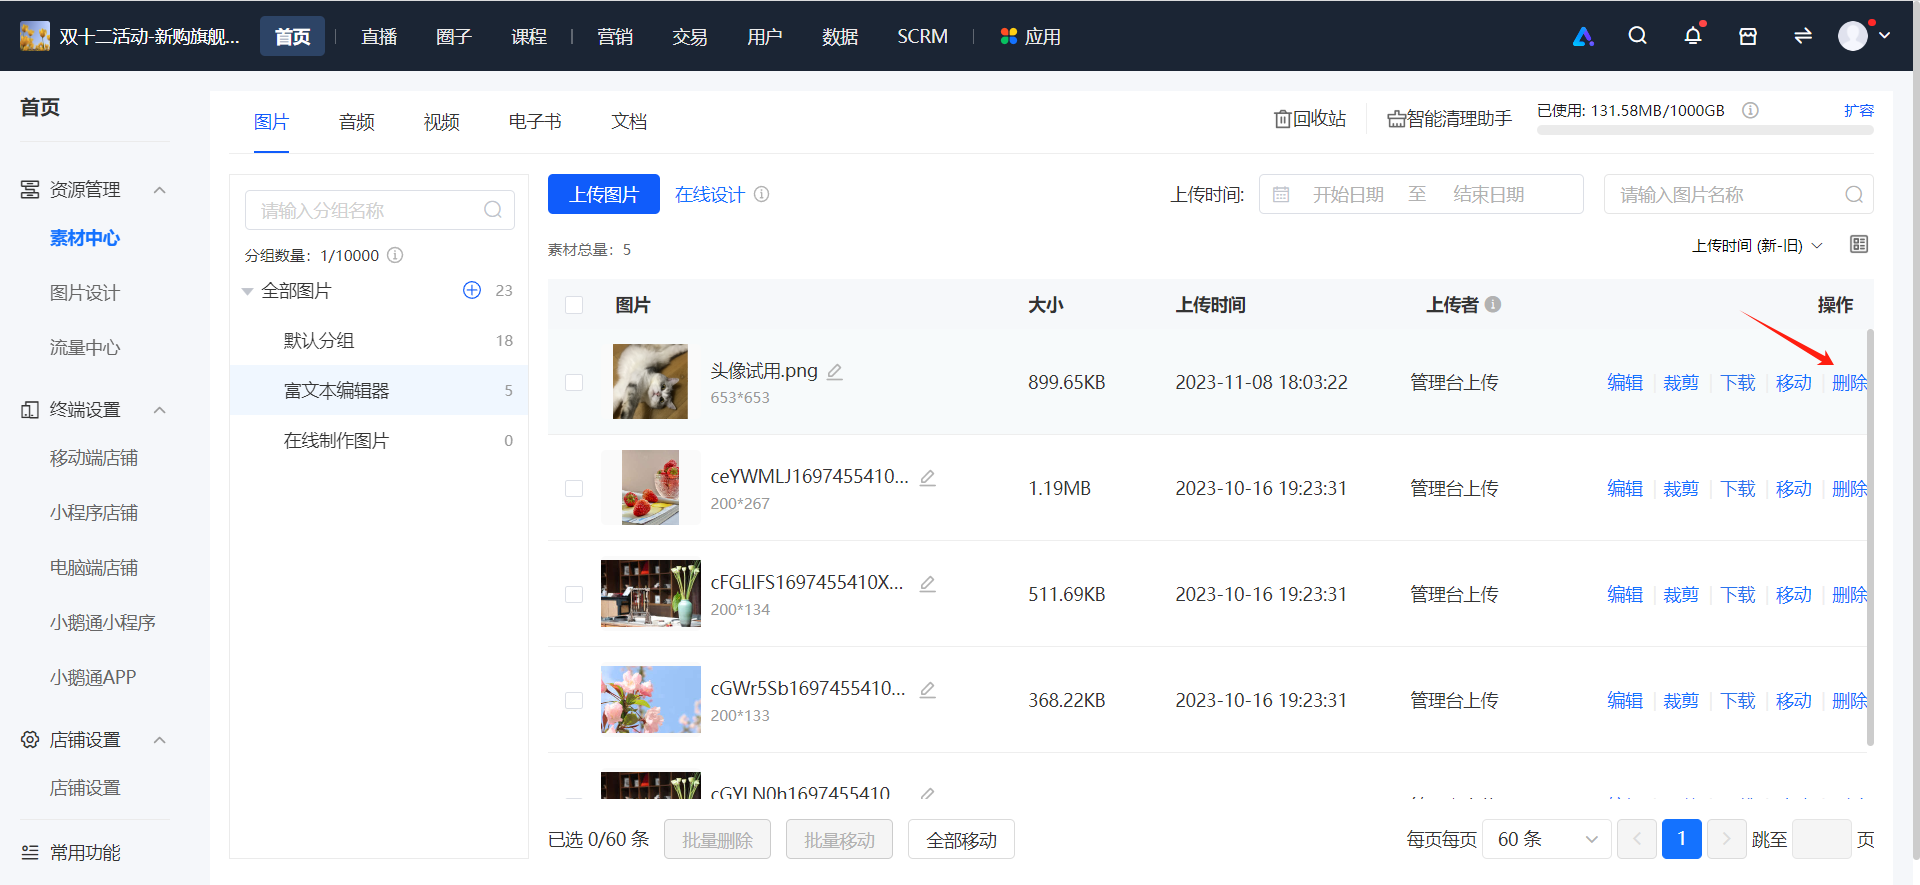
**<span style="font-size:15px;">Step 8: Delete Materials</span>**<span style="font-size:15px;">(Taking the Deletion of a Single Image as an Example)*(Management Backend)*</span>

<span style="font-size:15px;">1. Select the image to be deleted.</span>

![image.png](https://wechatapppro-1252524126.file.myqcloud.com/help_document/image/ueditor/9036700_1699446205.png ".png")

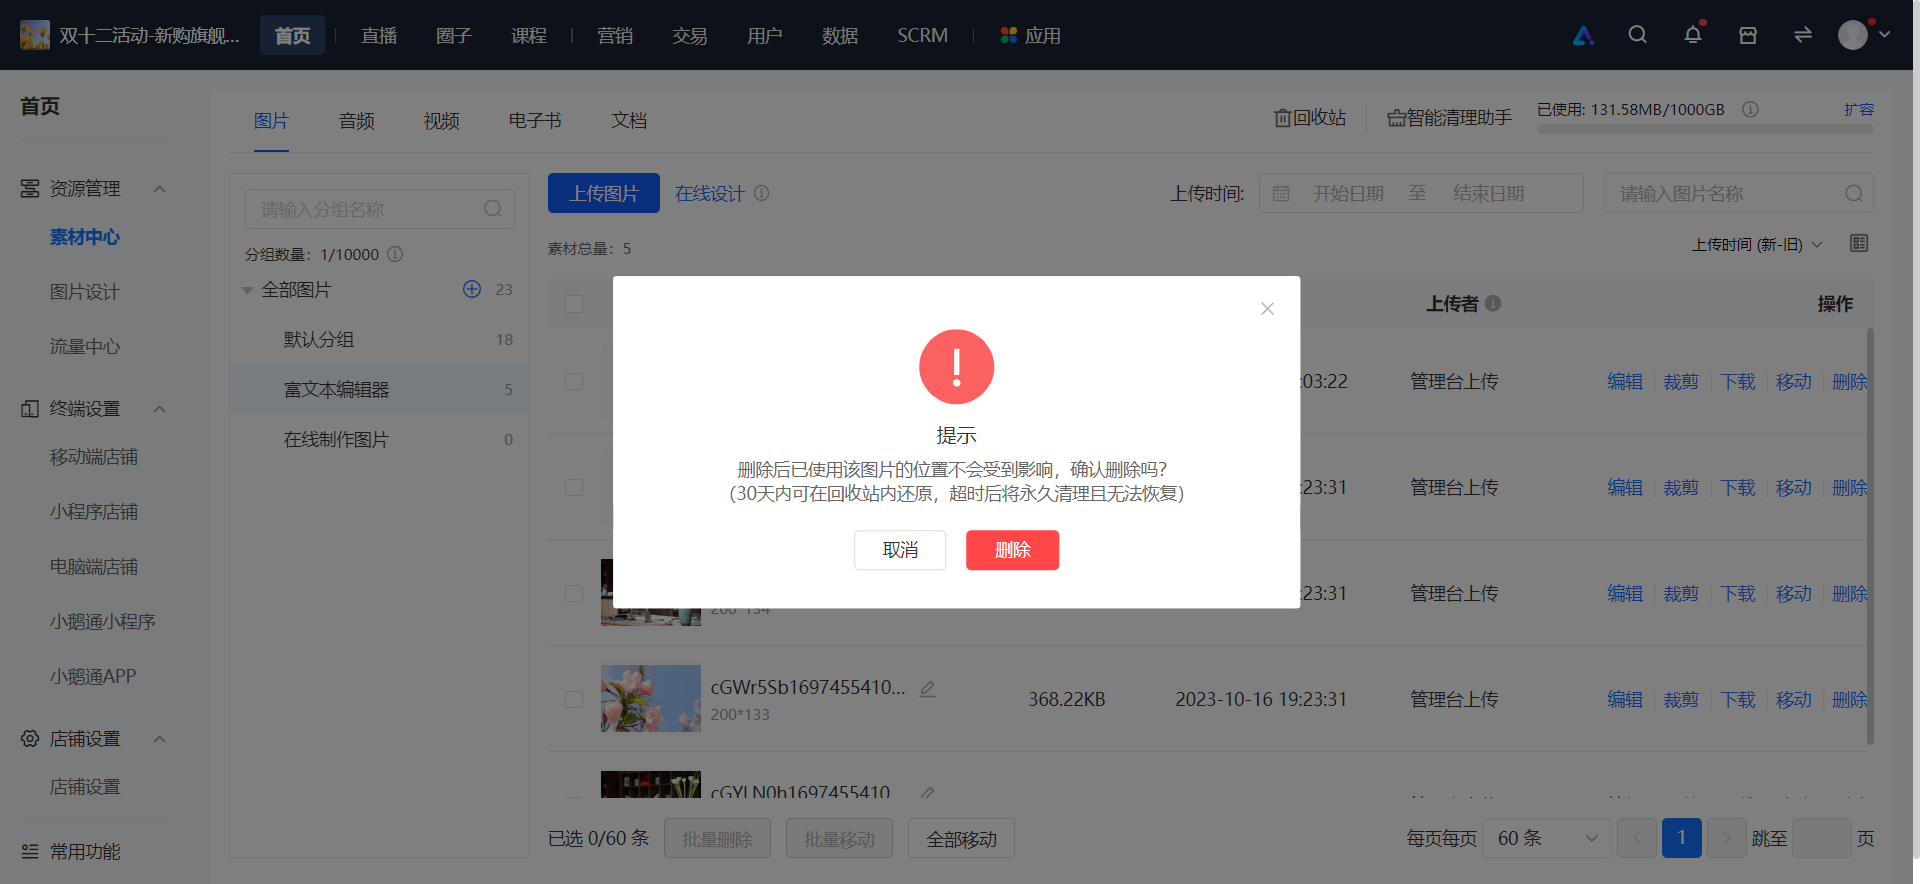
<span style="font-size:15px;">2. Confirm the deletion</span>

<span style="font-size:15px;">![image.png](https://wechatapppro-1252524126.file.myqcloud.com/help_document/image/ueditor/31160600_1699446205.png ".png")</span>

<span style="text-decoration:none;color:rgb(255,0,0);">**<span style="text-decoration:none;font-size:15px;">\*\*Special Note:</span>**</span><span style="font-size:15px;">The deleted materials will be stored in the recycle bin for 30 days. During this period, you can restore the materials in the recycle bin. After 30 days, the system will automatically clear them, and they cannot be recovered.</span>

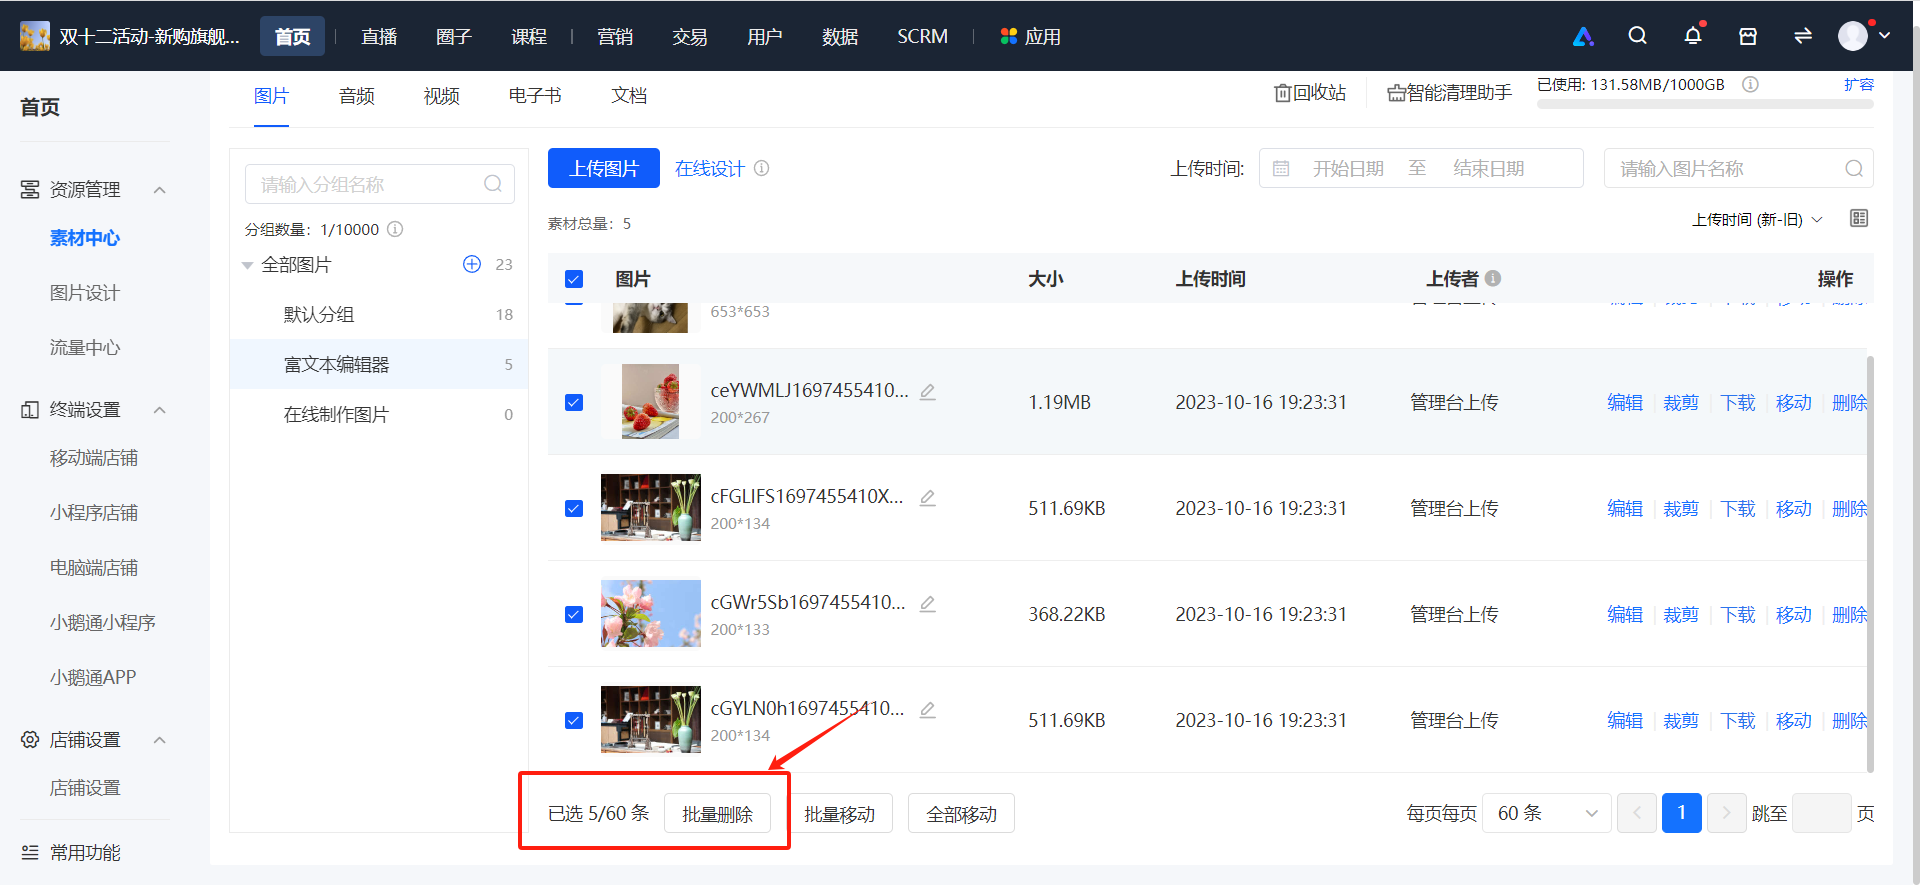
**<span style="font-size:15px;">Step 9: Batch Delete</span>**<span style="font-size:15px;">(Taking batch deletion of pictures as an example)*(Management Backend)*</span>

<span style="font-size:15px;">1. Select the pictures you need to delete.</span>

![image.png](https://wechatapppro-1252524126.file.myqcloud.com/help_document/image/ueditor/48853800_1699446205.png ".png")

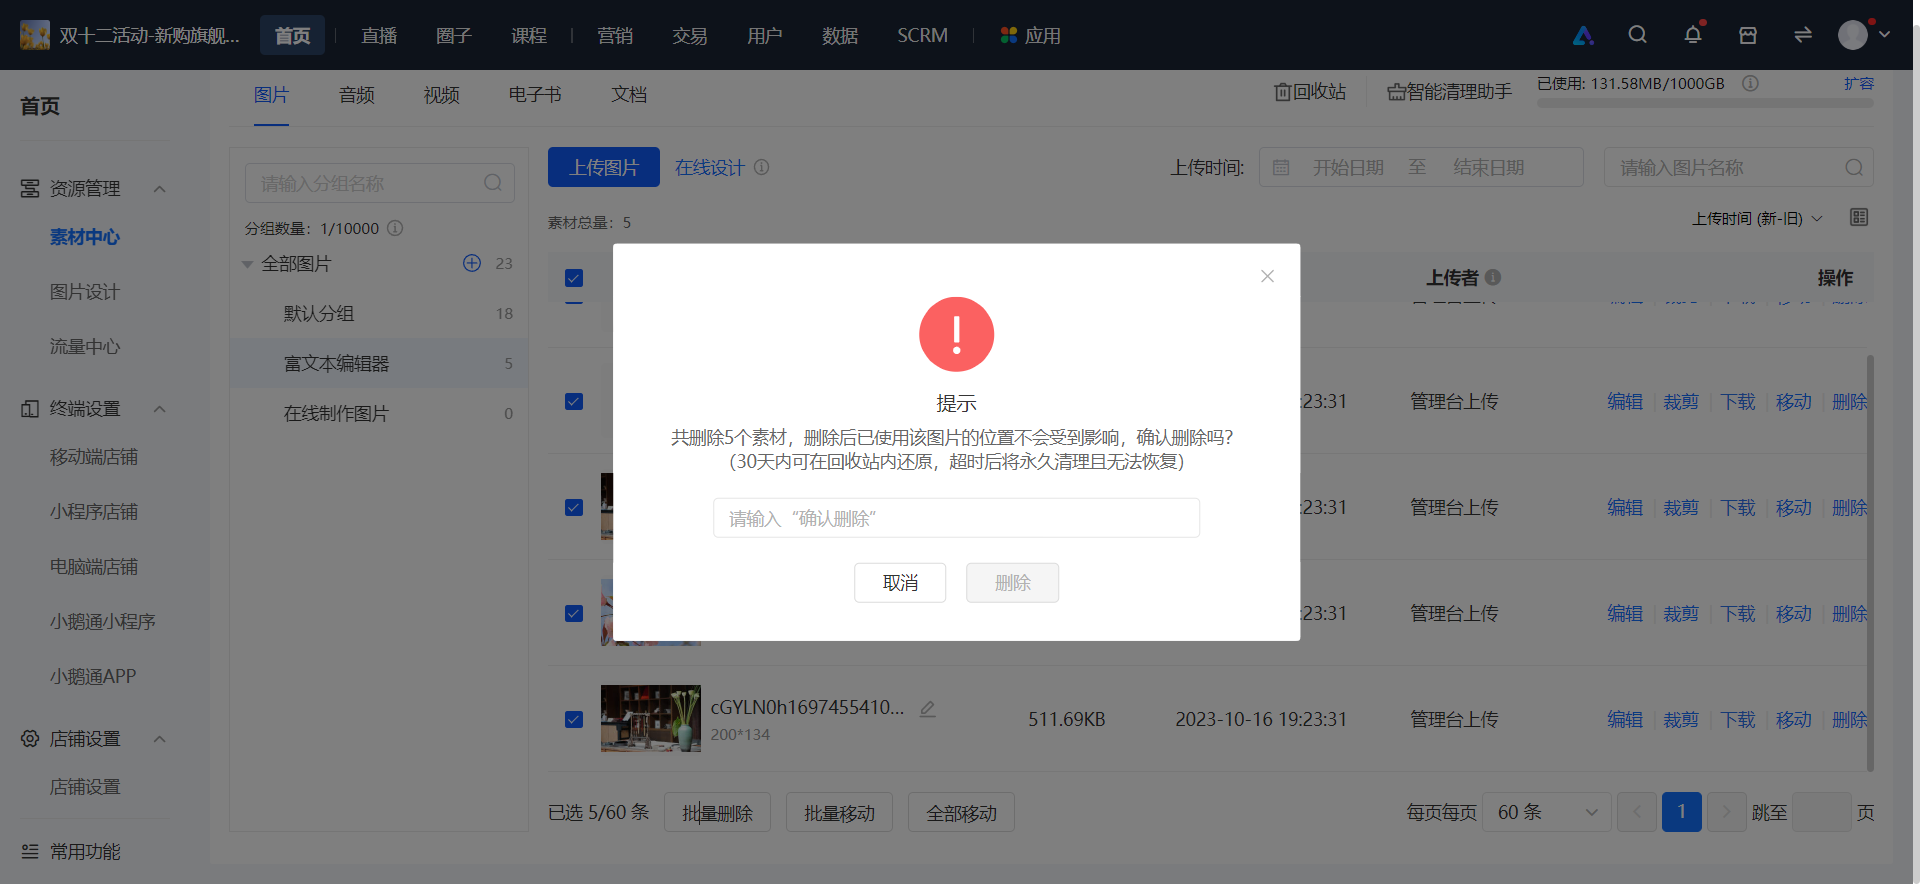
<span style="font-size:15px;">2. Click the \[Batch Delete\] button at the bottom of the page. After confirming the deletion, you can batch delete the selected pictures.</span>

<span style="font-size:15px;">![image.png](https://wechatapppro-1252524126.file.myqcloud.com/help_document/image/ueditor/68429300_1699446205.png ".png")</span>

<span style="color:rgb(255,0,0);">**<span style="font-size:15px;">\*\*Special Note:</span>**</span><span style="font-size:15px;">The materials deleted in batches will be stored in the recycle bin for 30 days. During this period, you can restore the materials in the recycle bin. After 30 days, the system will automatically clear them, and they cannot be recovered.</span>

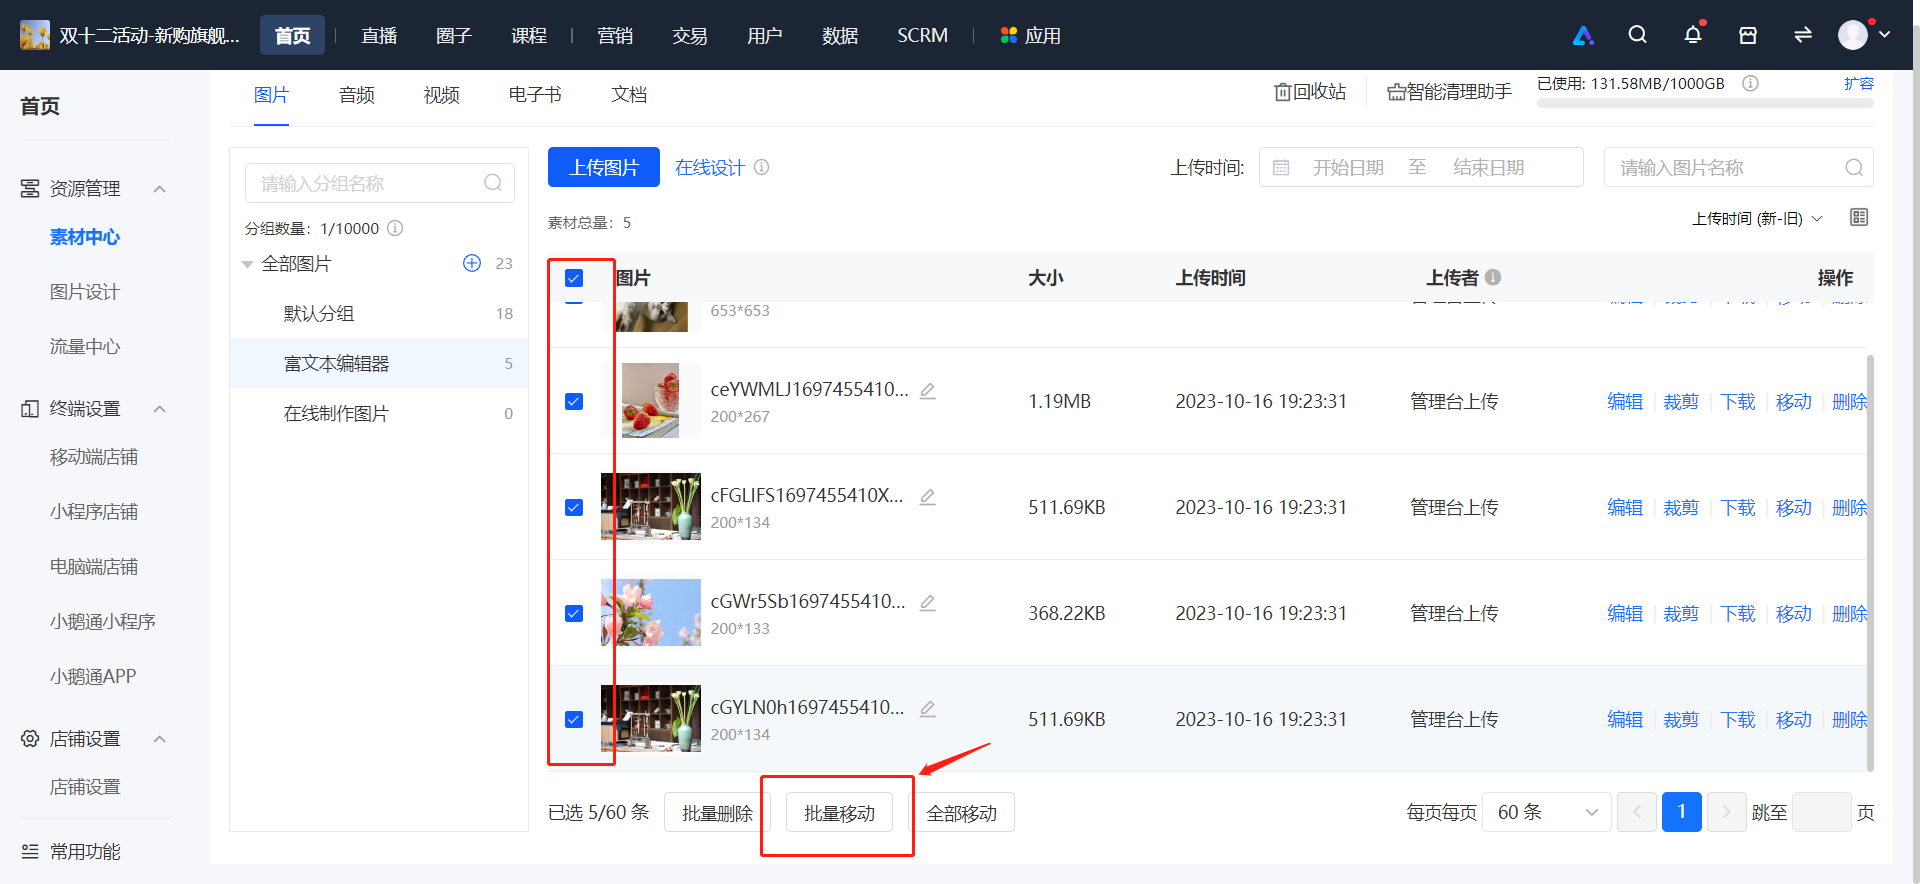
**<span style="font-size:15px;">Step 10: Batch Move</span>**<span style="font-size:15px;">(Taking batch moving of pictures as an example)*(Management Backend)*</span>

<span style="font-size:15px;">1. Select the grouped pictures you need to move in batches.</span>

![image.png](https://wechatapppro-1252524126.file.myqcloud.com/help_document/image/ueditor/86419200_1699446205.png ".png")

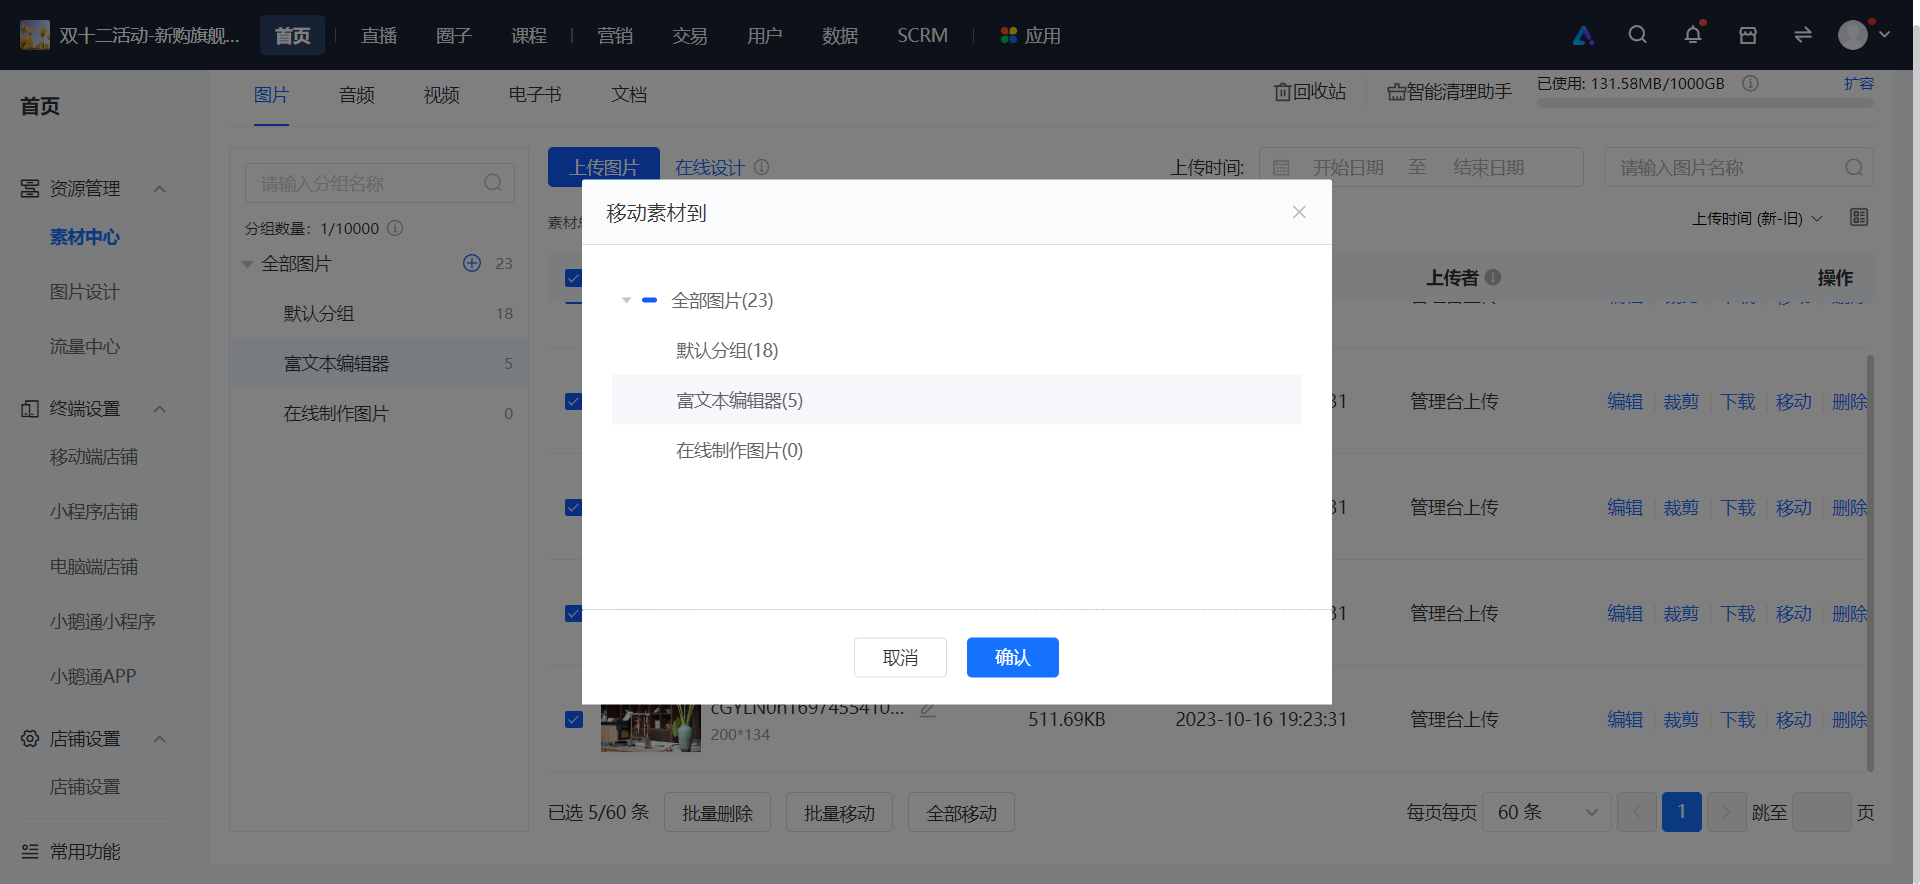
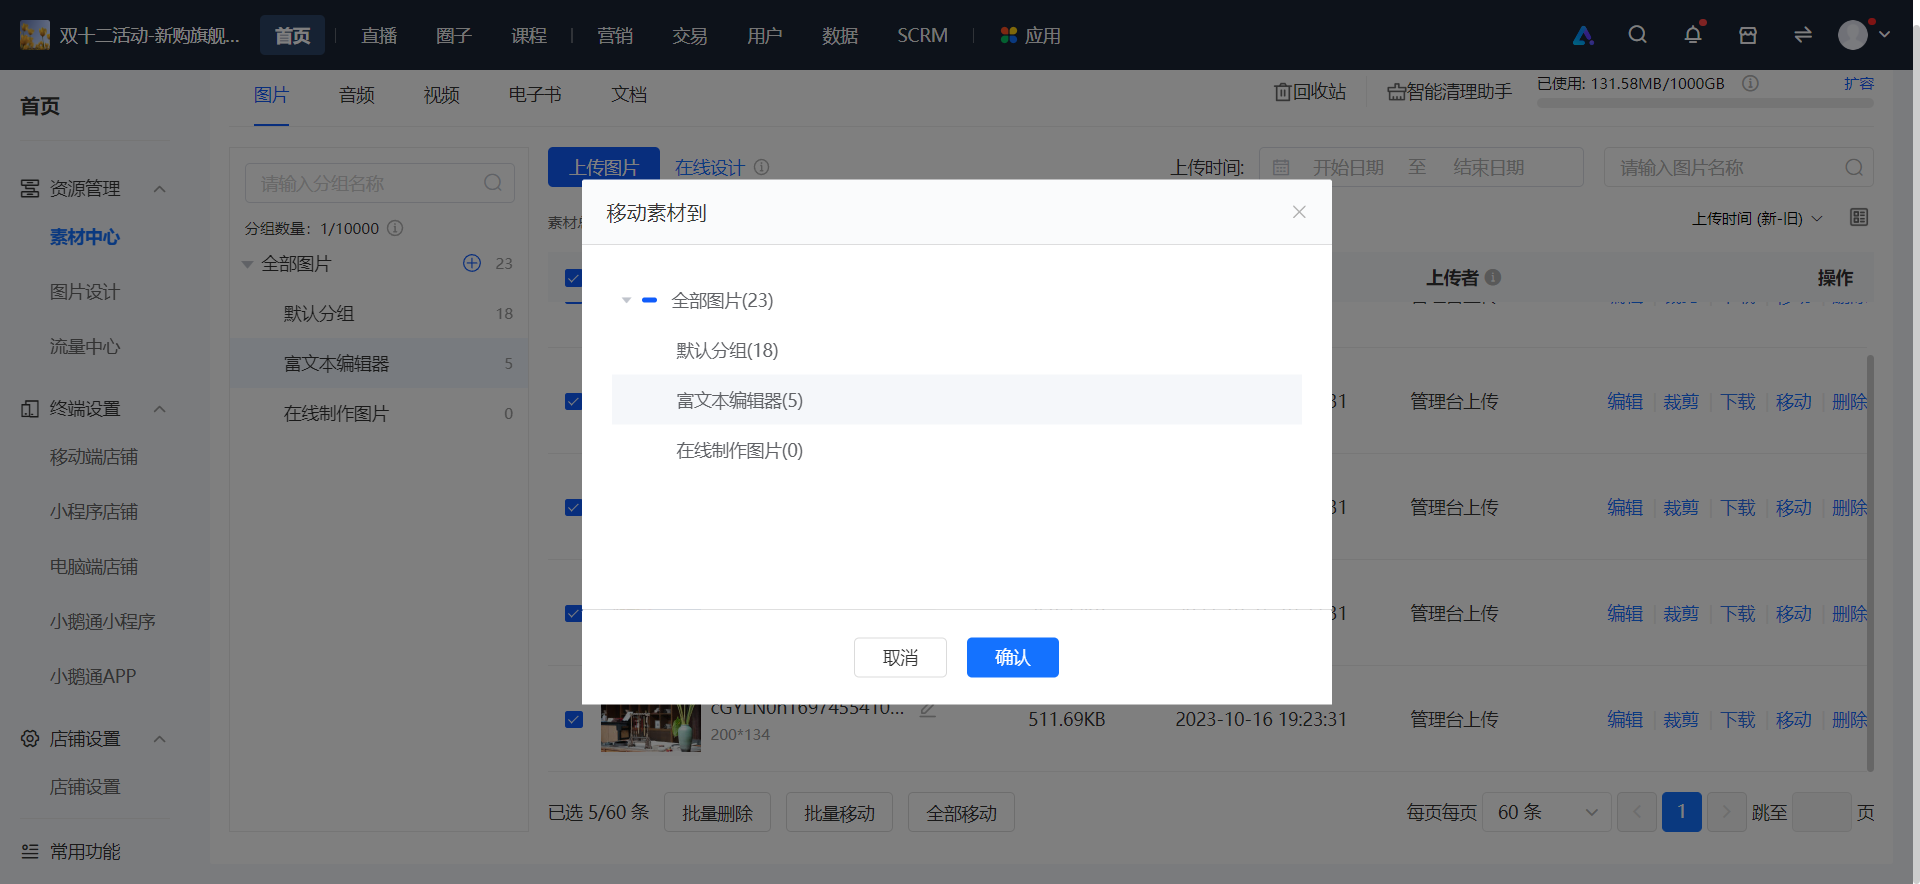
<span style="font-size:15px;">2. Select the name of the group you want to move them to and confirm the move.</span>

![image.png](https://wechatapppro-1252524126.file.myqcloud.com/help_document/image/ueditor/2112000_1699446206.png ".png")

**<span style="font-size:15px;">Step 10: Move All</span>**<span style="font-size:15px;">(Taking moving all pictures as an example)*(Management Backend)*</span>

<span style="font-size:15px;">1. Select the group you want to move all the materials to and click Confirm.</span>

![image.png](https://wechatapppro-1252524126.file.myqcloud.com/help_document/image/ueditor/17830500_1699446206.png ".png")

<span style="font-size:15px;">2. A confirmation prompt will pop up. If you confirm to move all the materials under this group to the target group, click Confirm.</span>

**<span style="font-size:15px;">Step 11: Violated Materials</span>***<span style="font-size:15px;">(Management Backend)</span>*

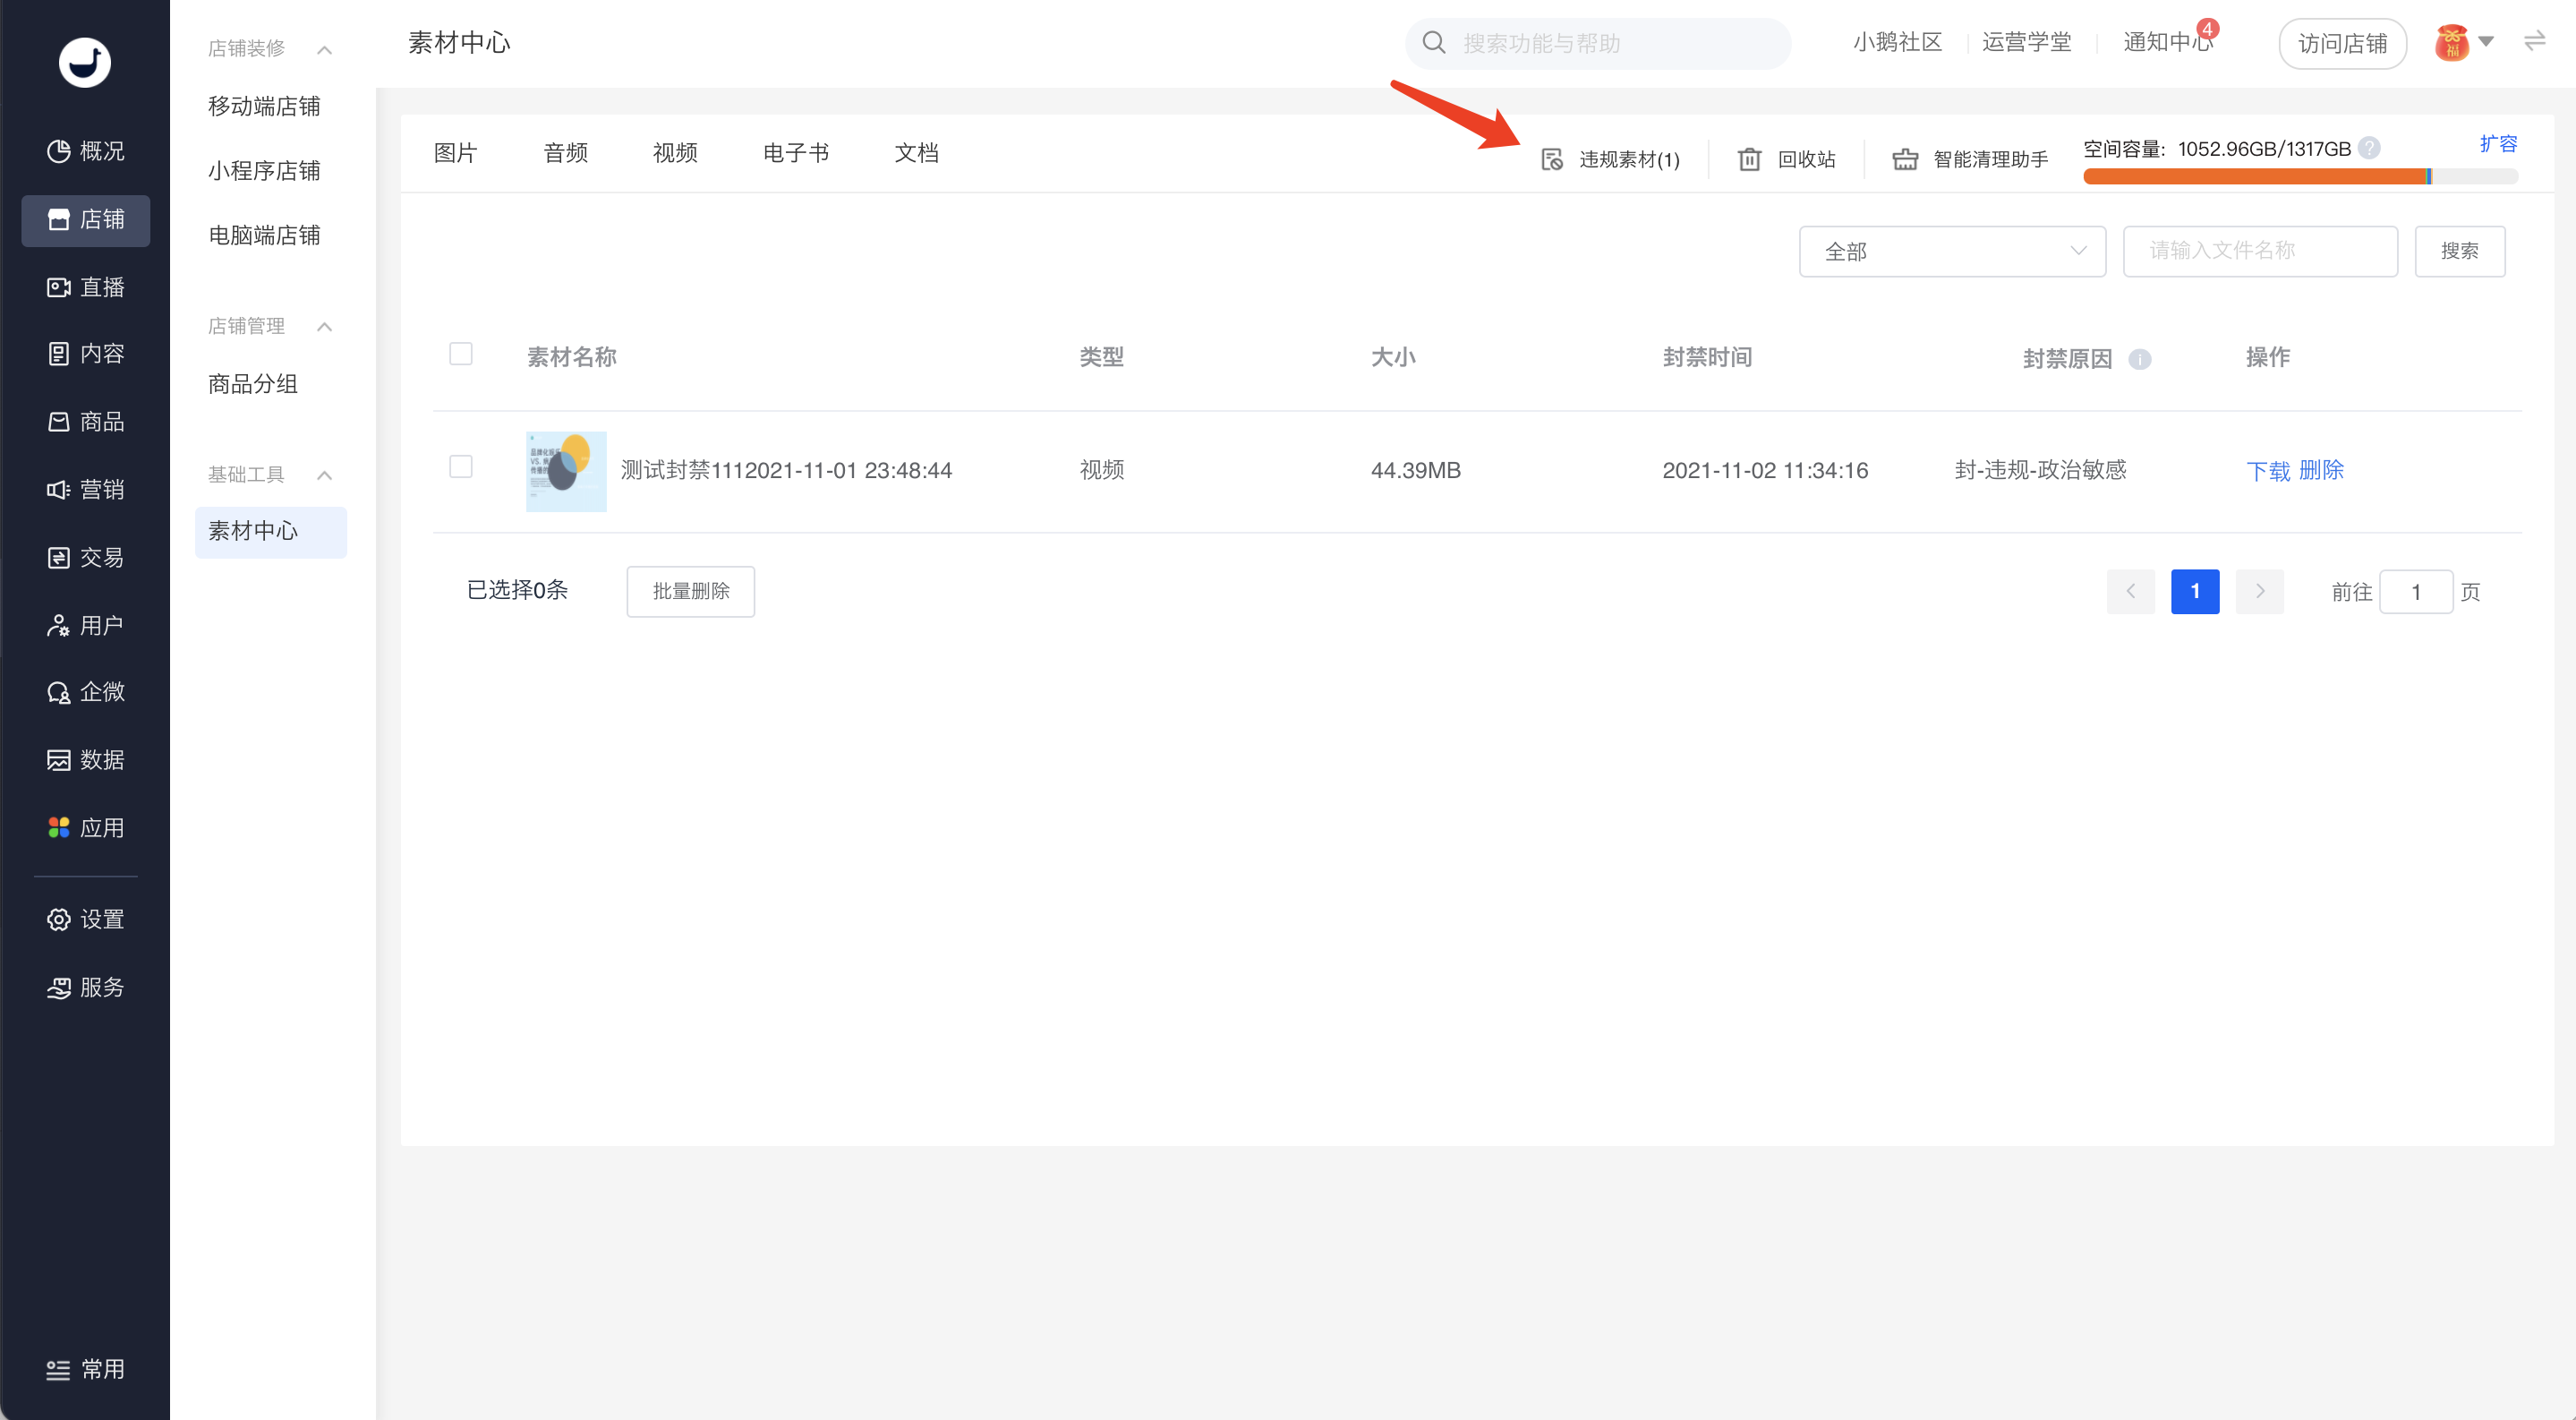
<span style="font-size:15px;">The elink platform will review the materials uploaded and used by merchants. At the same time, it also accepts complaints from C - end users about the materials. If the review fails or the violation is determined to be established, the materials will be banned and moved to the \[Violated Materials\] page.</span>

![image (6).png](https://wechatapppro-1252524126.file.myqcloud.com/help_document/image/ueditor/41656300_1699446206.png ".png")

**<span style="font-size:15px;">\*Note:</span>**<span style="font-size:15px;">If the store violates the rules frequently or the material violations are serious, elink will further hold the store and the person - in - charge accountable according to the actual situation and relevant provisions of the elink service agreement.</span>

**<span style="font-size:15px;">Step 12: Recycle Bin</span>***<span style="font-size:15px;">(Management Backend)</span>*

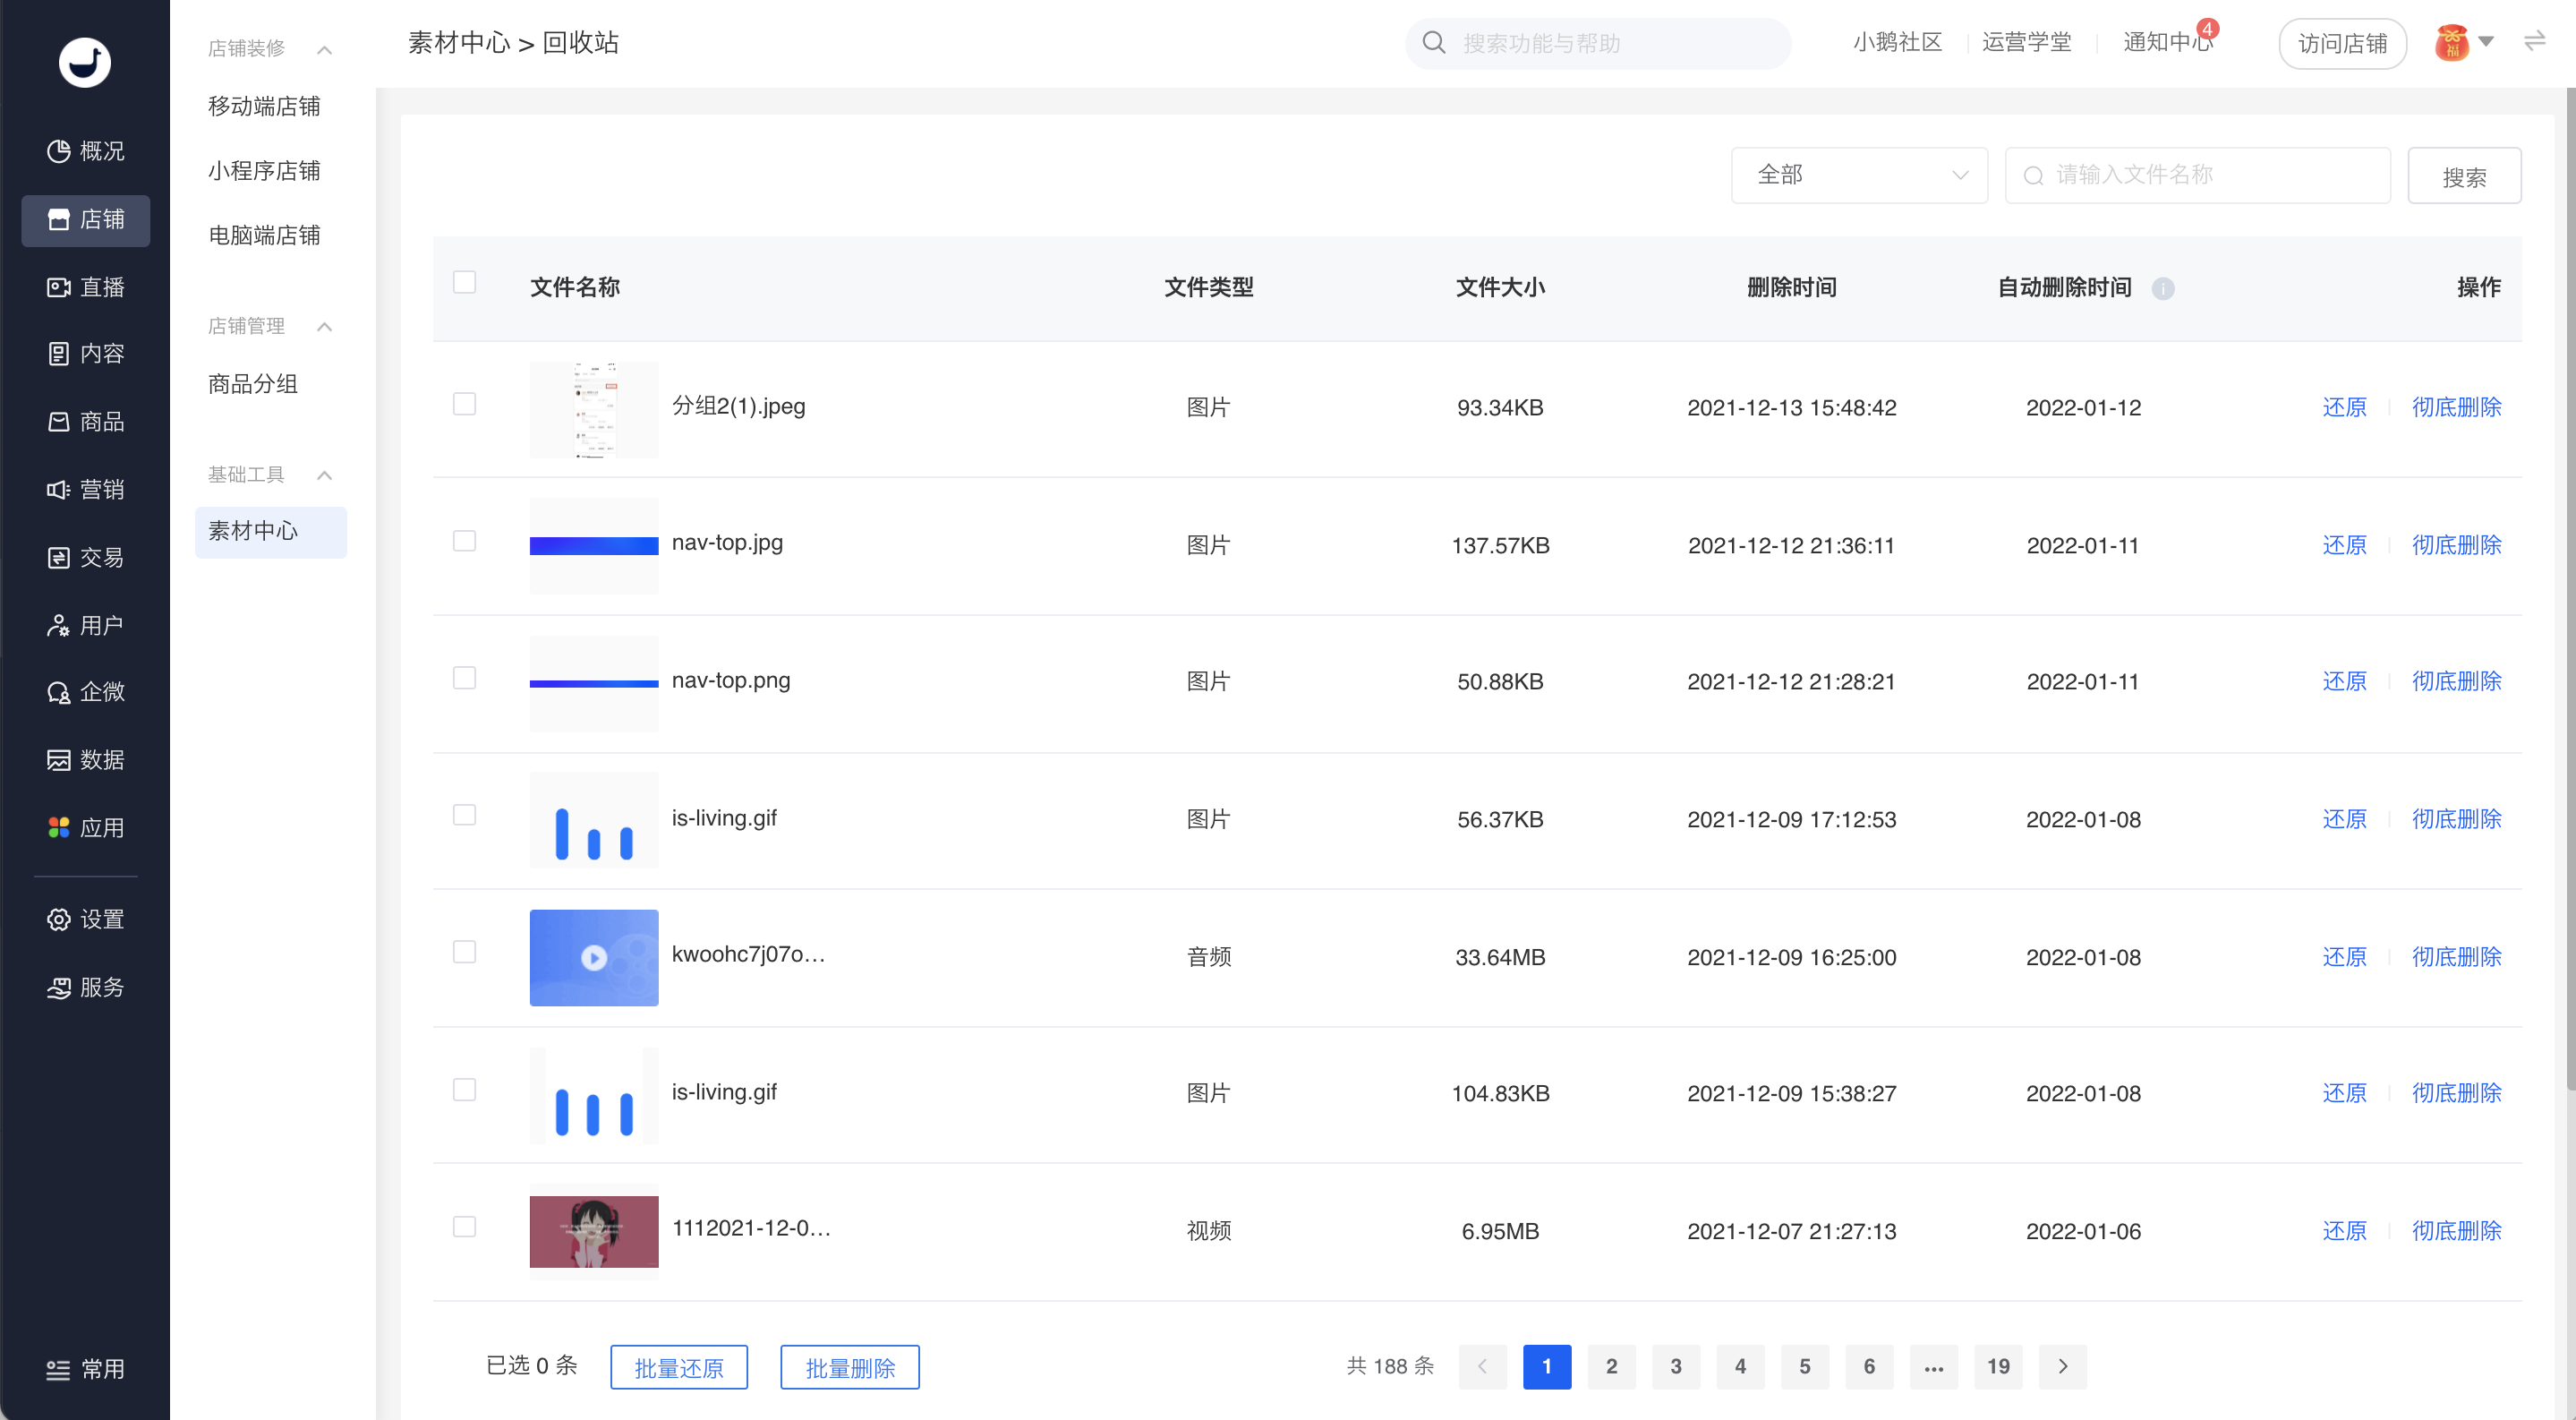
<span style="font-size:15px;">1. You can restore/permanently delete a single resource.</span>

<span style="font-size:15px;">2. You can batch restore/batch delete resources.</span>

![image (7).png](https://wechatapppro-1252524126.file.myqcloud.com/help_document/image/ueditor/64957700_1699446206.png ".png")

**<span style="font-size:15px;">Step 13: Intelligent Cleaning Assistant</span>***<span style="font-size:15px;">(Management Backend)</span>*

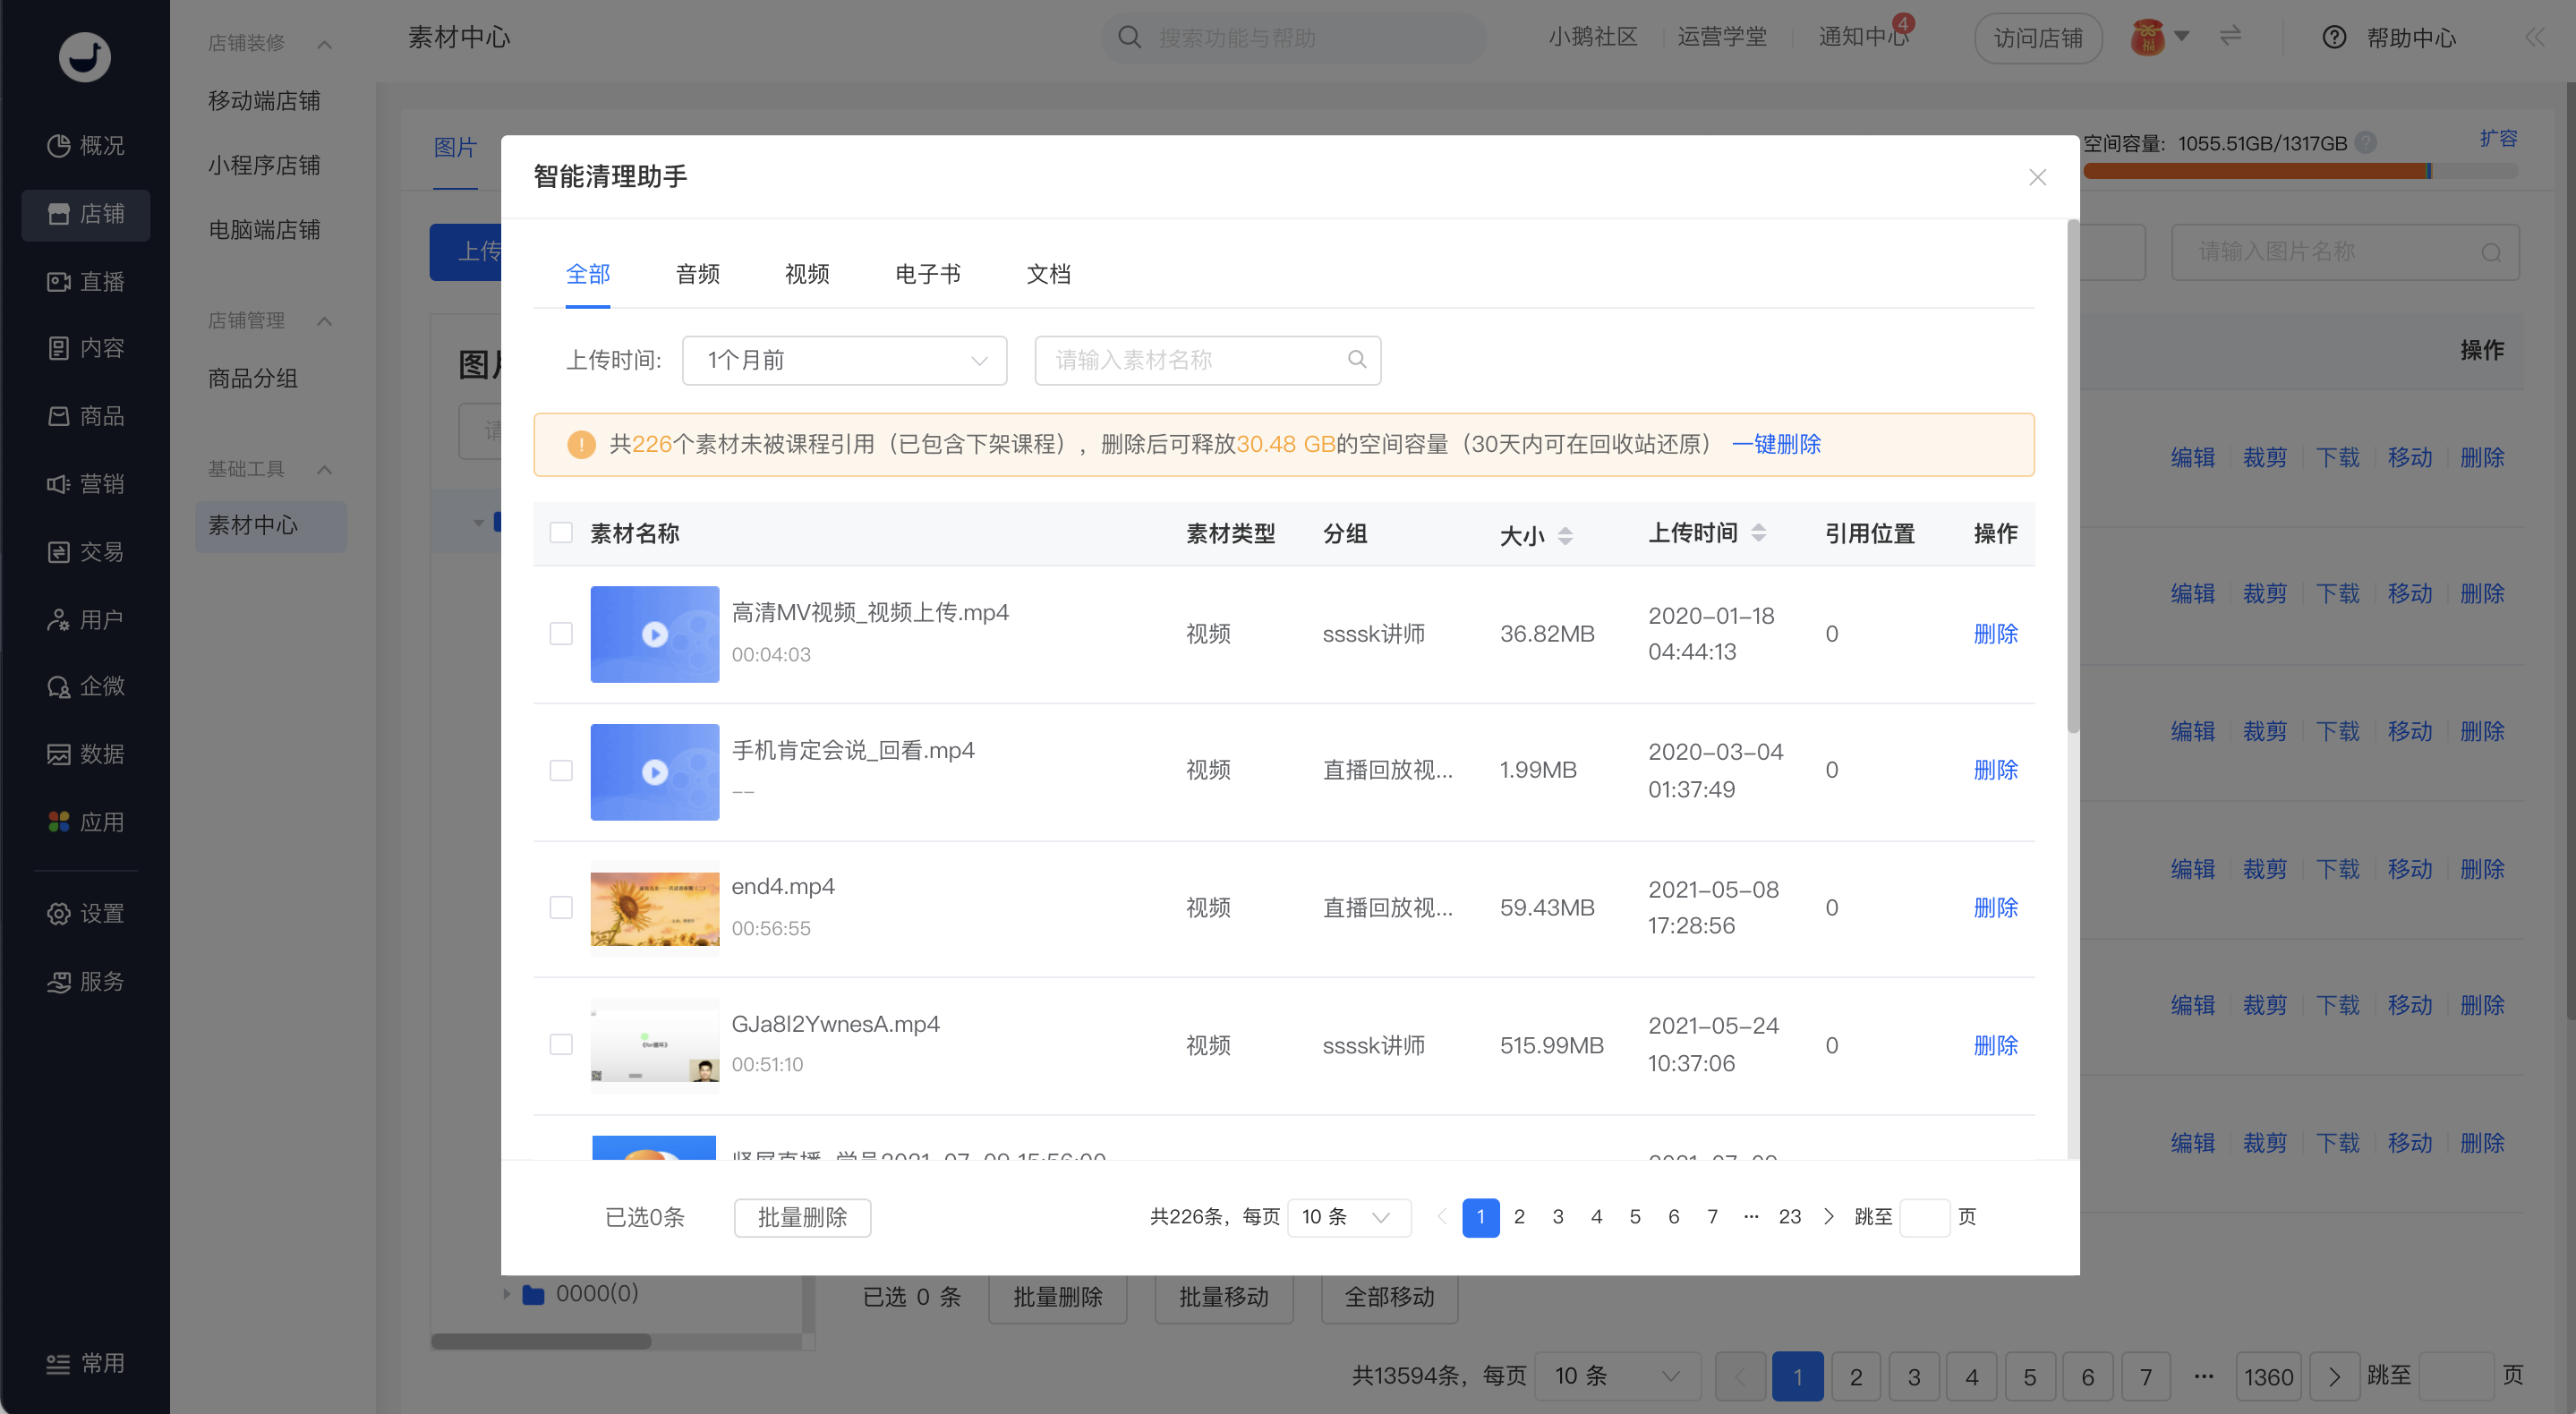
<span style="font-size:15px;">The Intelligent Cleaning Assistant automatically filters materials with a reference count of 0 for audio, video, e - books, and documents, including materials that have been taken off the shelves and have never been referenced. Merchants can perform operations such as single deletion, batch deletion, and one - click deletion of all materials on this page.</span>

![image (9).png](https://wechatapppro-1252524126.file.myqcloud.com/help_document/image/ueditor/94940200_1699446206.png ".png")

**<span style="font-size:15px;">Step 14: Storage Space Expansion</span>***<span style="font-size:15px;">(Management Backend)</span>*

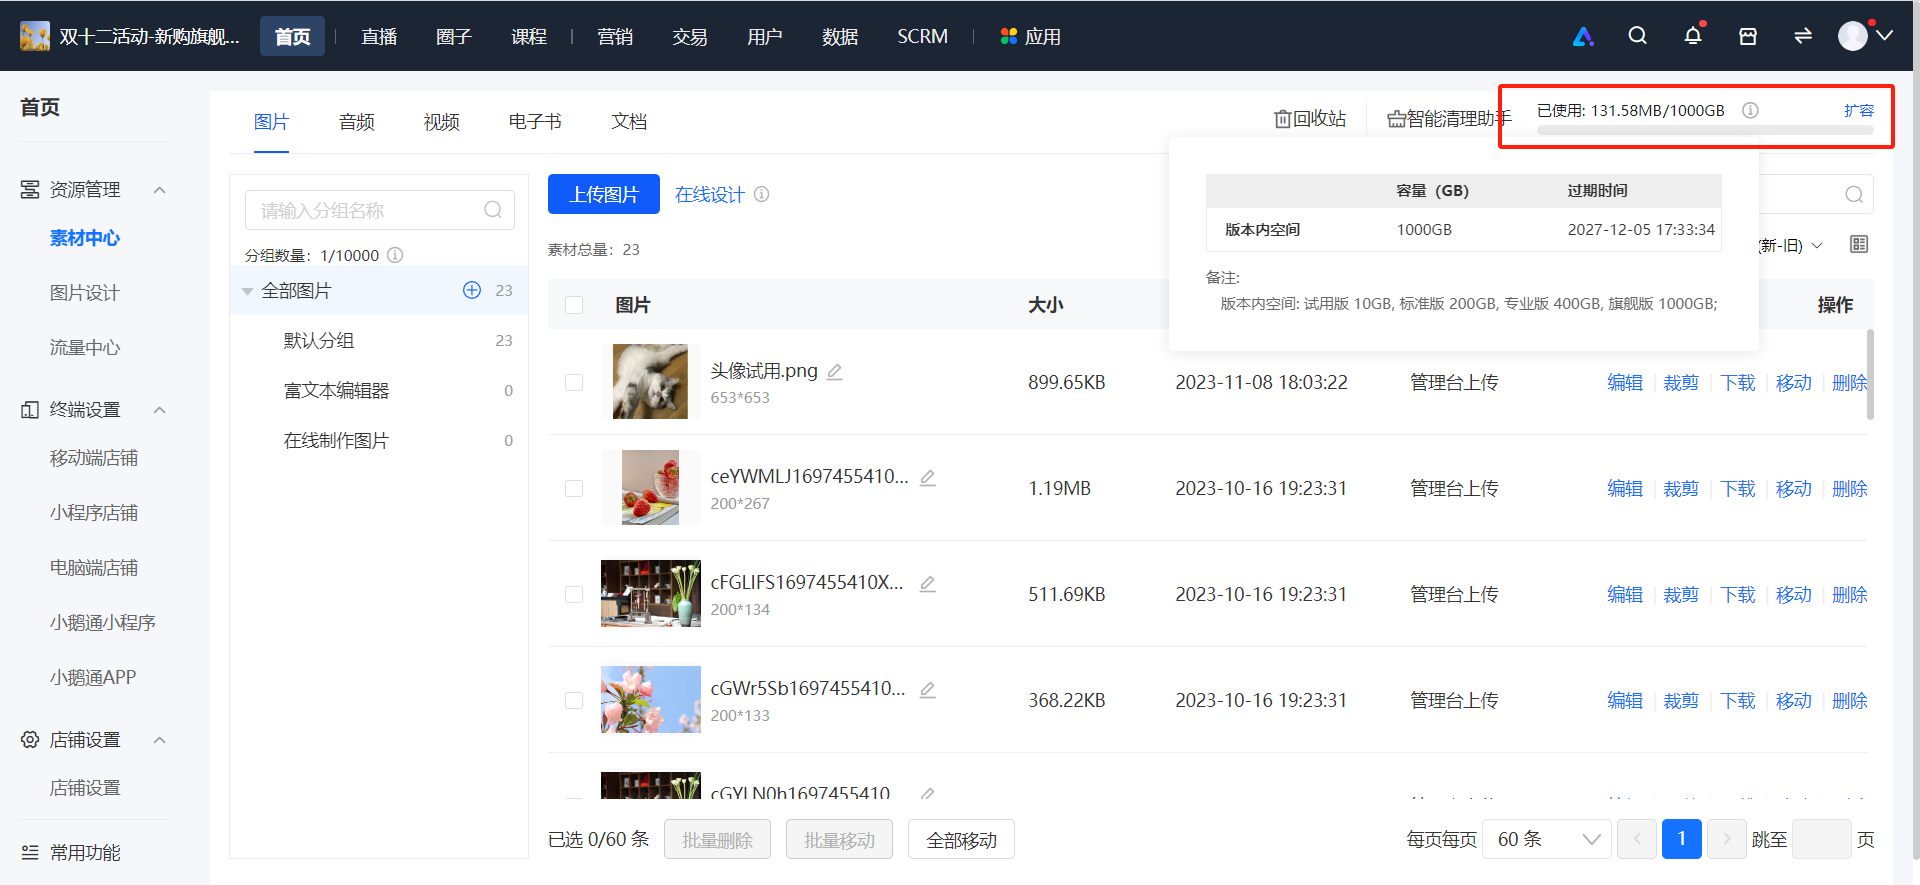
<span style="font-size:15px;">1. When you hover the mouse over the space capacity bar, you can view the detailed usage of the storage space.</span>

<span style="font-size:15px;">![image.png](https://wechatapppro-1252524126.file.myqcloud.com/help_document/image/ueditor/20690600_1699446233.png ".png")</span>

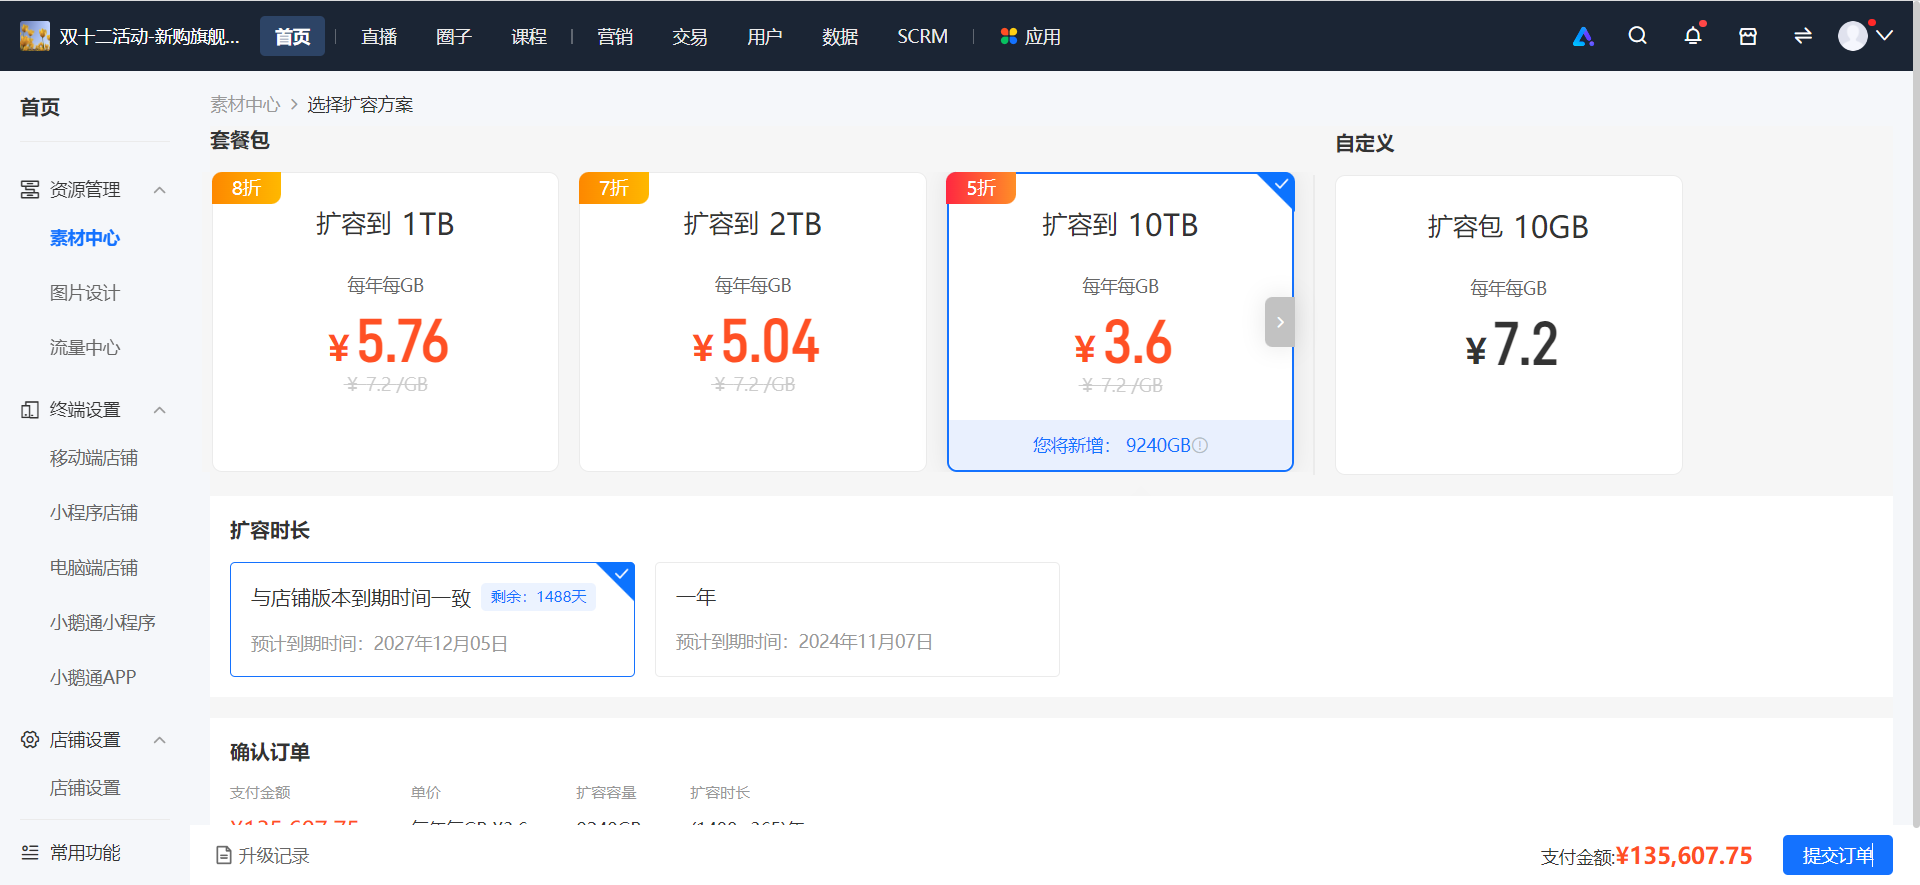
<span style="font-size:15px;">2. You can expand the storage space as needed.</span>

![image.png](https://wechatapppro-1252524126.file.myqcloud.com/help_document/image/ueditor/10261200_1699446263.png ".png")

**<span style="font-size:15px;">Step 15: Material Sorting and Filtering</span>**<span style="font-size:15px;">(Taking picture sorting by file name as an example)*(Management Backend)*</span>

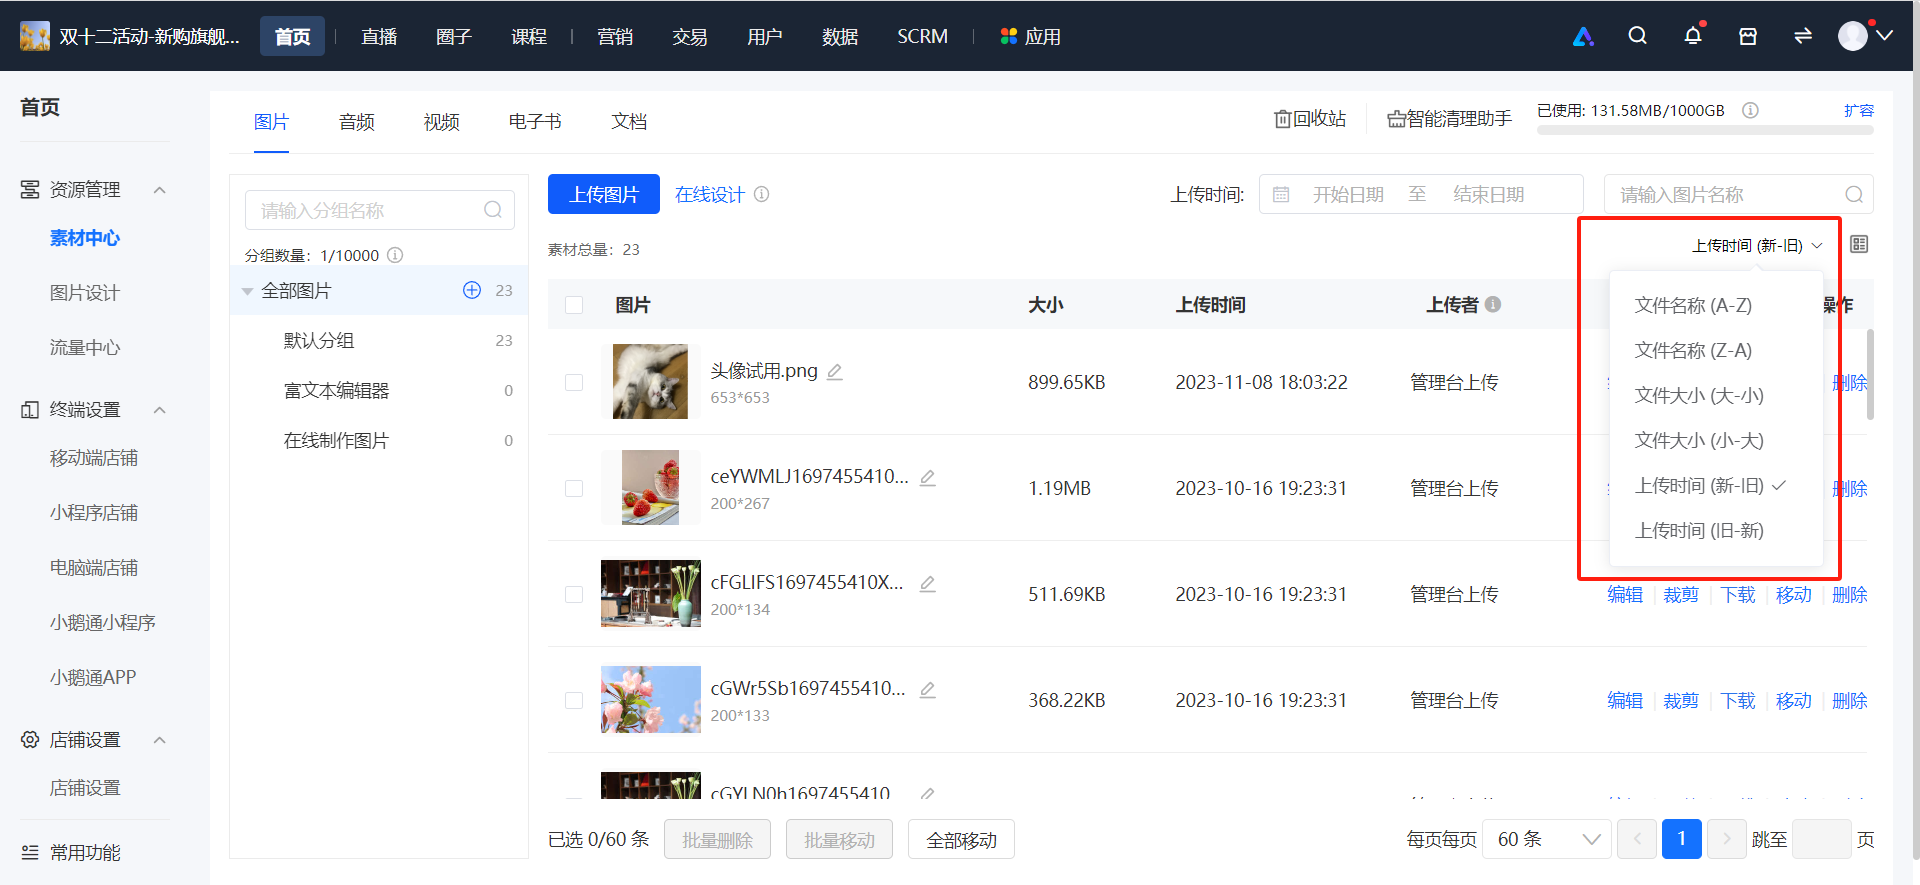
<span style="font-size:15px;">1. Support sorting by file name, file size, and file upload time.</span>

![image.png](https://wechatapppro-1252524126.file.myqcloud.com/help_document/image/ueditor/75276100_1699446275.png ".png")

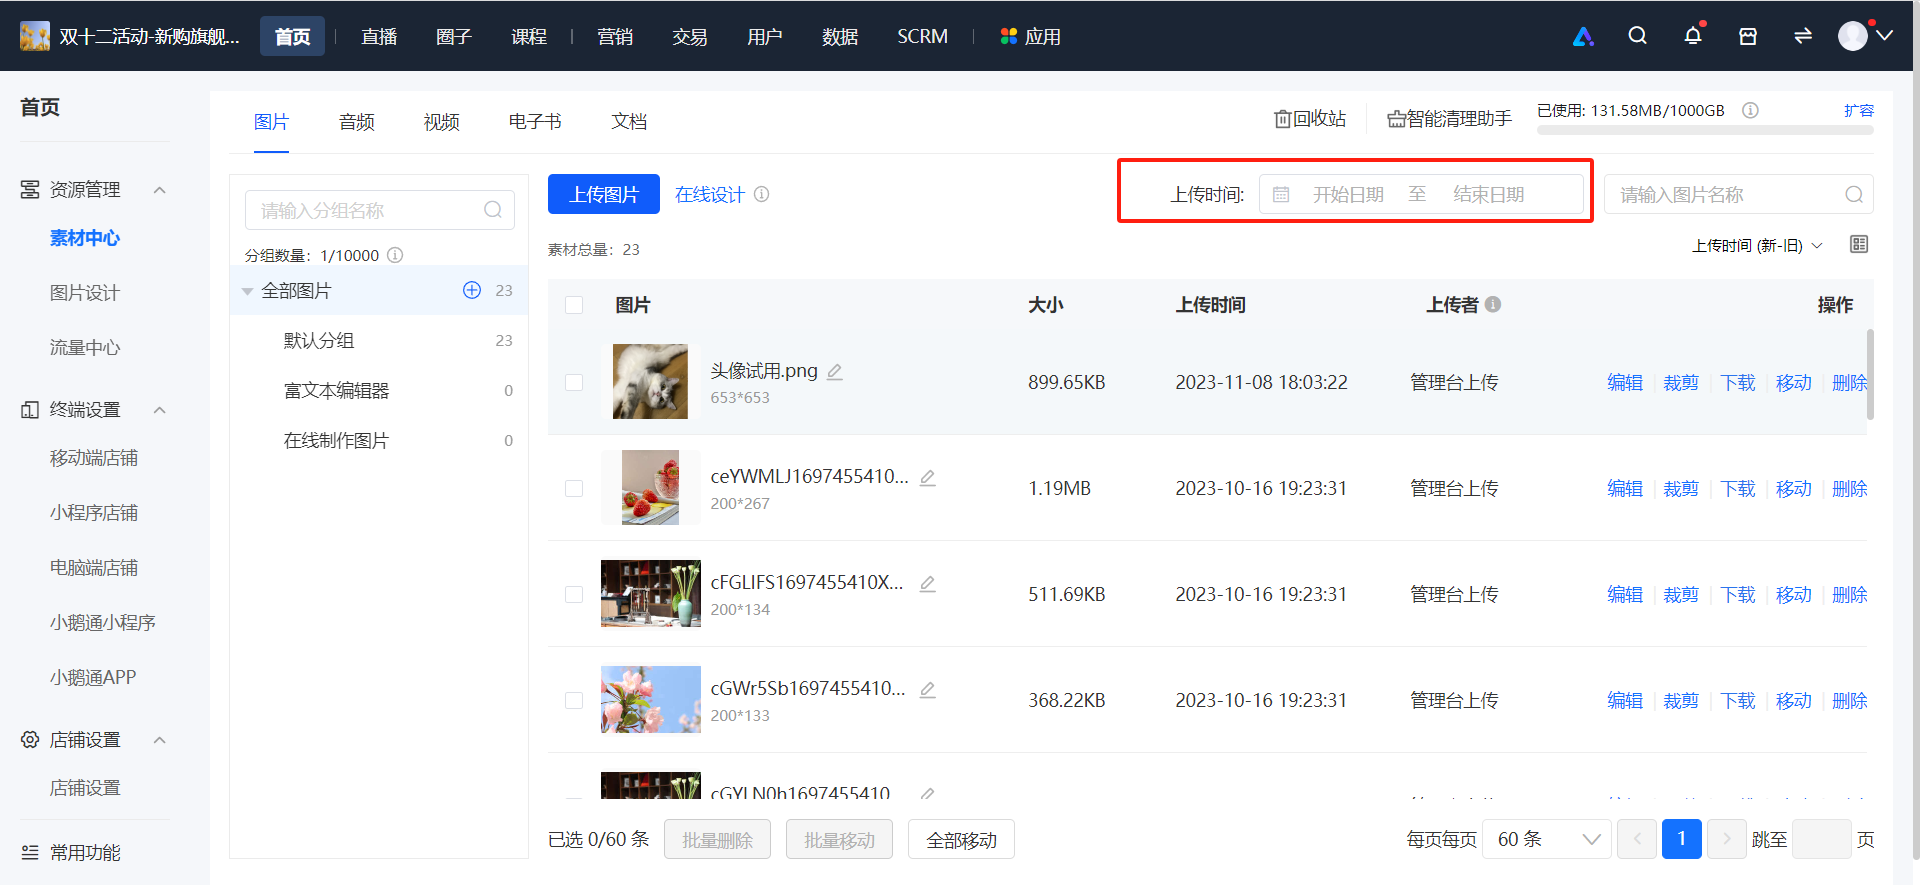
<span style="font-size:15px;">2. Support filtering by material upload time.</span>

![image.png](https://wechatapppro-1252524126.file.myqcloud.com/help_document/image/ueditor/44753300_1699446302.png ".png")

**<span style="font-size:15px;">Step 16: Search</span>**<span style="font-size:15px;">(Taking searching for audio as an example)*(Management Backend)*</span>

<span style="font-size:15px;">1. You can quickly search for materials under the tab bar by material name or by course name (audio, video, documents, e - books).</span>

<span style="font-size:15px;">![image.png](https://wechatapppro-1252524126.file.myqcloud.com/help_document/image/ueditor/15545000_1699446334.png ".png")</span>

**<span style="font-size:15px;">Step 17: Material Reference</span>**<span style="font-size:15px;">(Taking creating an audio course - adding audio as an example)*(Management Backend)*</span>

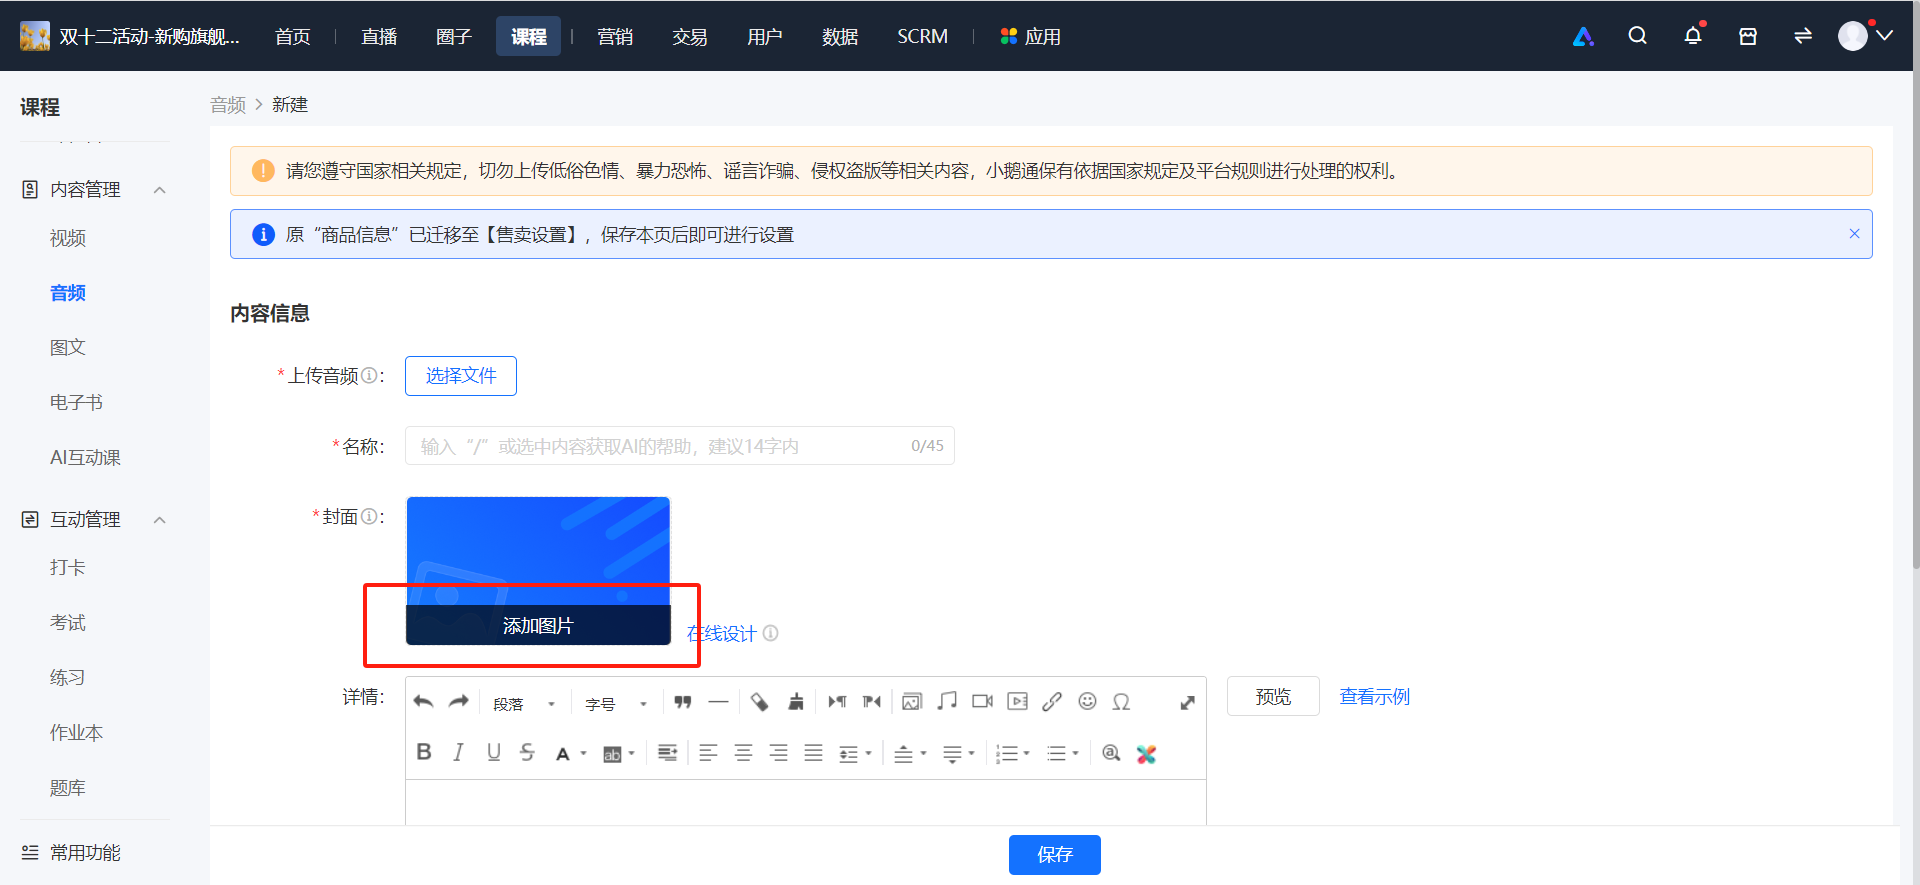
<span style="font-size:15px;">1. Select the course you want to create/edit and enter the content page.</span>

<span style="font-size:15px;">![image.png](https://wechatapppro-1252524126.file.myqcloud.com/help_document/image/ueditor/38611700_1699446358.png ".png")</span>

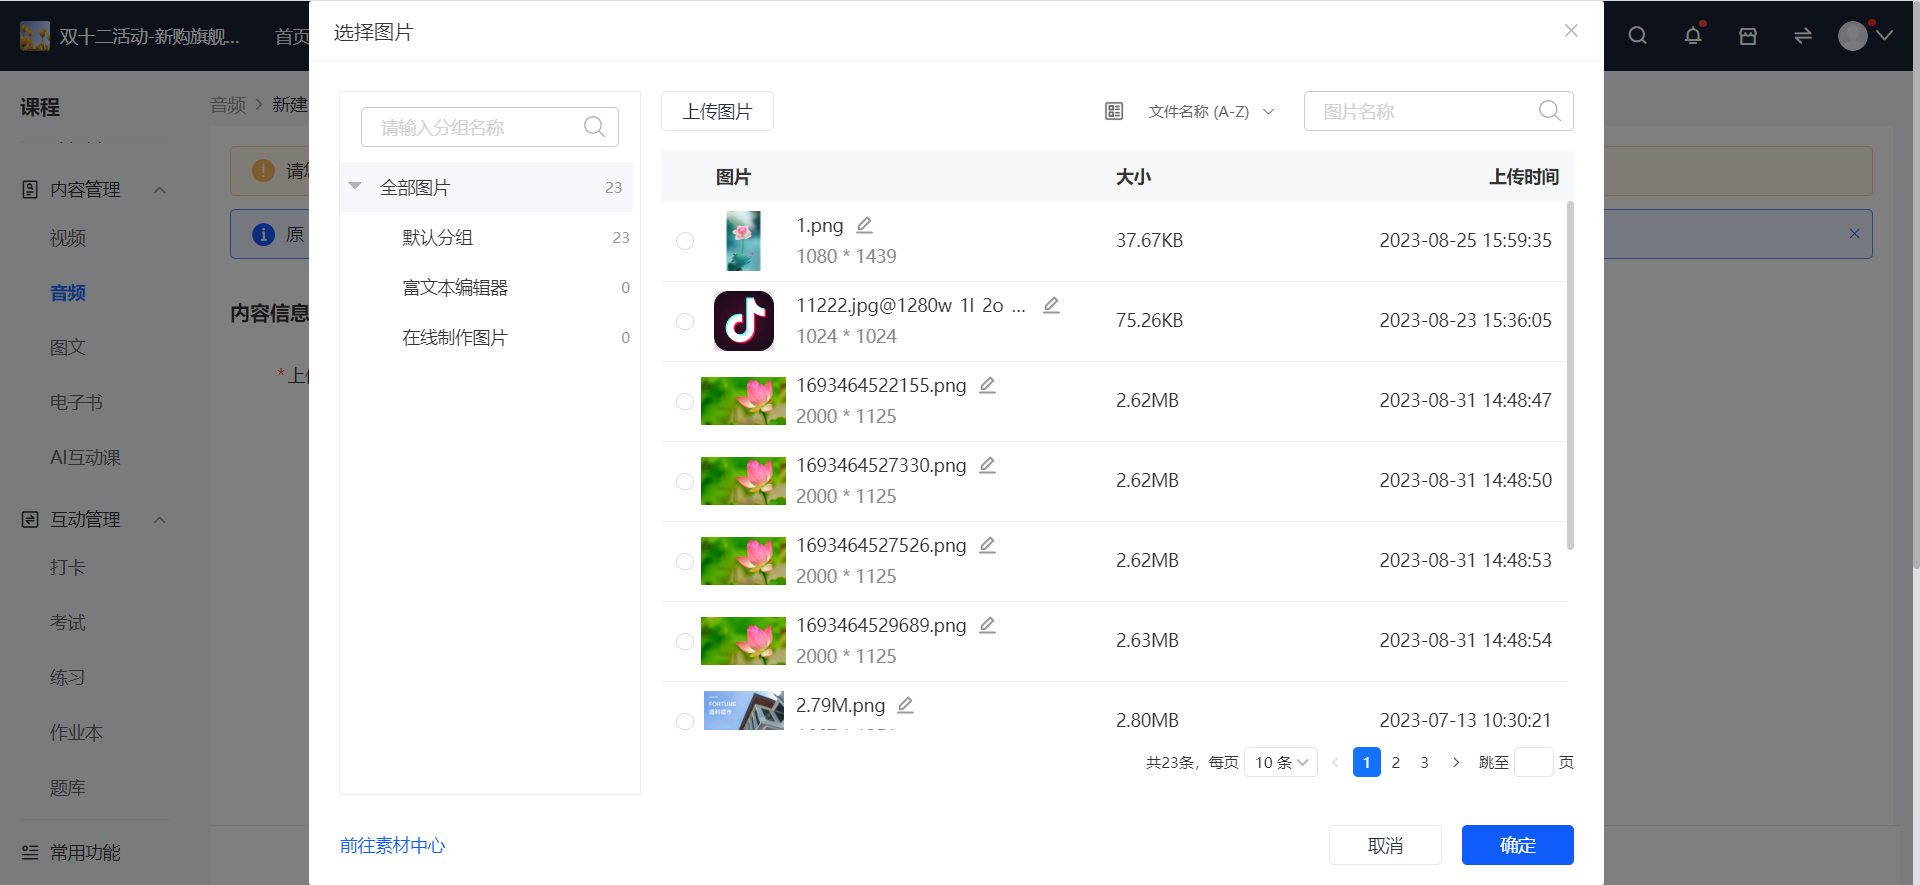
<span style="font-size:15px;">2. Select the materials you want to reference in this course and click \[Save\] to create/save the changes.</span>

<span style="font-size:15px;">![image.png](https://wechatapppro-1252524126.file.myqcloud.com/help_document/image/ueditor/67941400_1699446373.png ".png")</span>

<span style="font-size:15px;">![image.png](https://wechatapppro-1252524126.file.myqcloud.com/help_document/image/ueditor/14258200_1699446413.png ".png")</span>

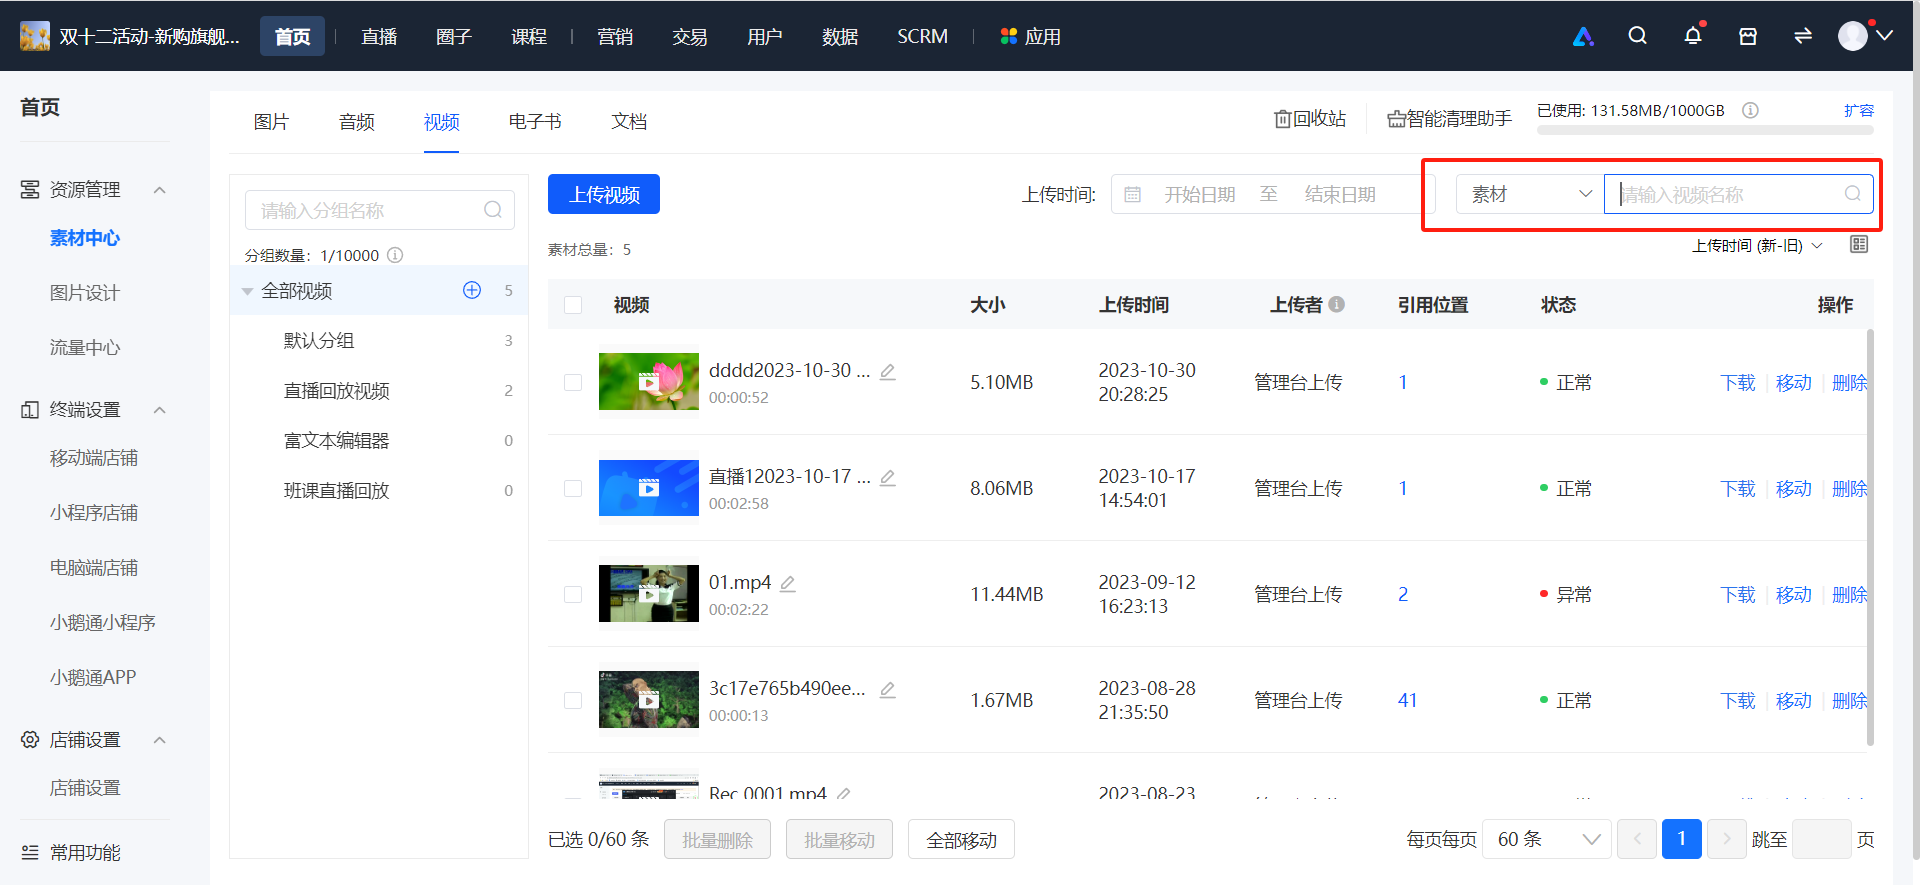
<span style="font-size:15px;">3. Enter the store management - material center page and search by material.</span>

<span style="font-size:15px;">![image.png](https://wechatapppro-1252524126.file.myqcloud.com/help_document/image/ueditor/61815800_1699446438.png ".png")</span>

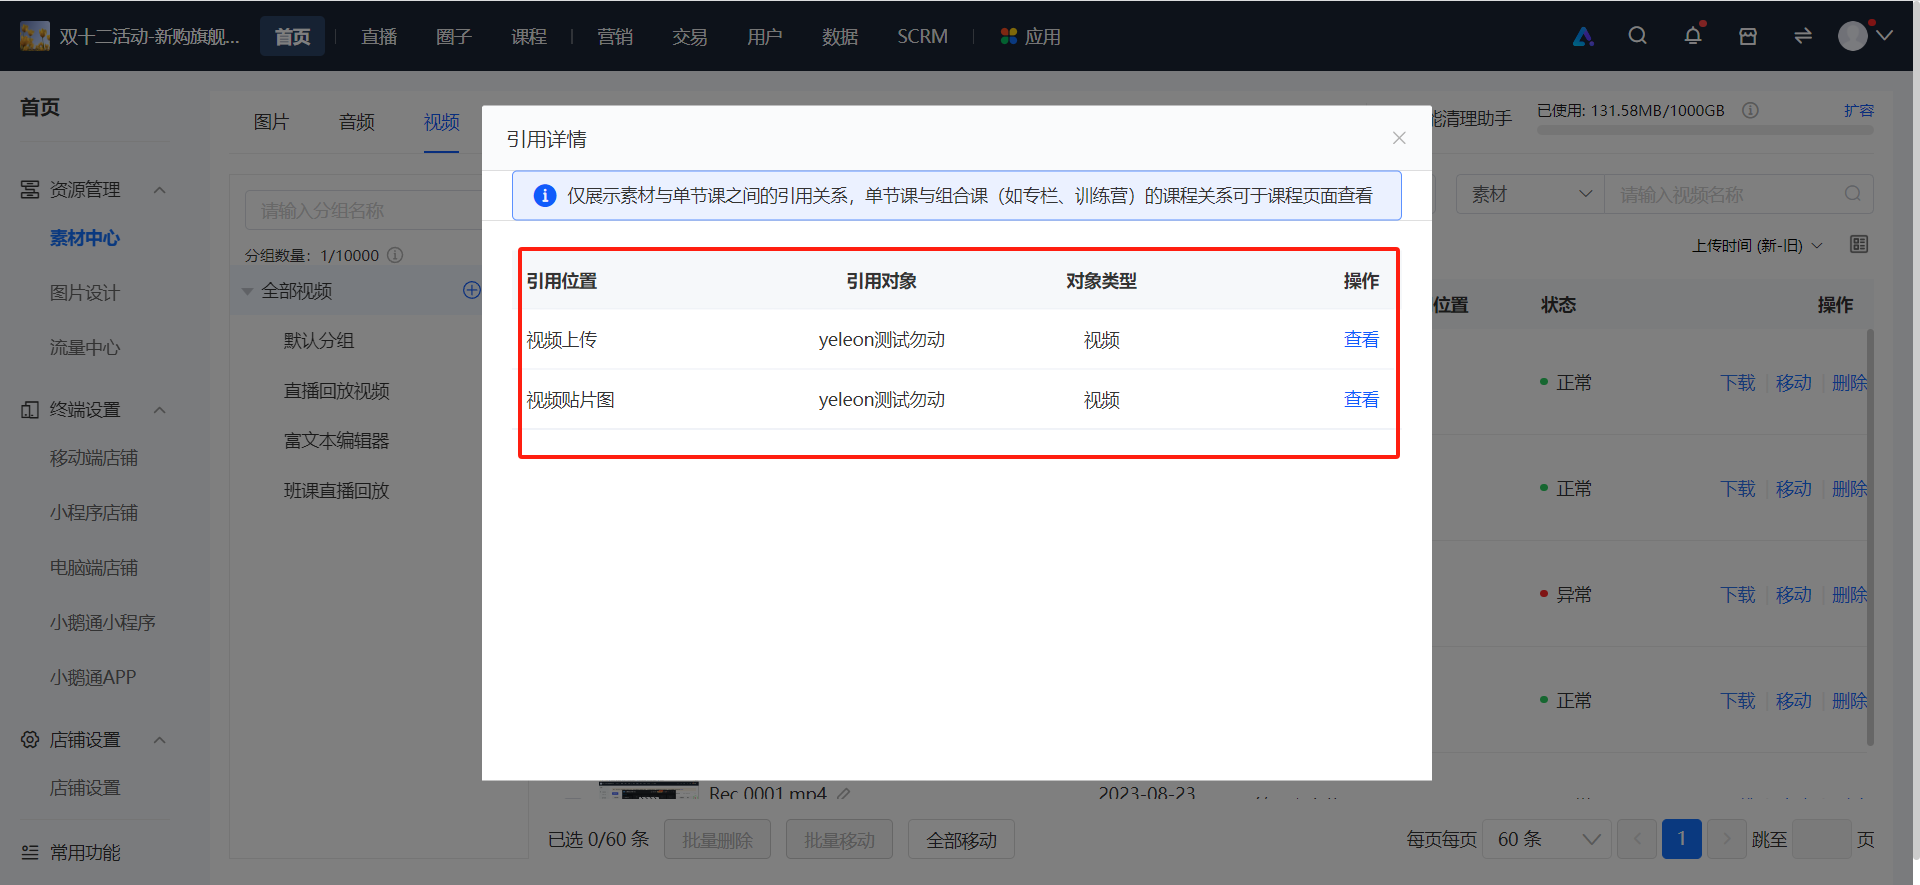
<span style="font-size:15px;">4. Click the number displayed under the reference location to view where this material is referenced.</span>

<span style="font-size:15px;">![image.png](https://wechatapppro-1252524126.file.myqcloud.com/help_document/image/ueditor/39593100_1699446438.png ".png")</span>

# How to quickly identify the materials in the Material Center when they are referenced?

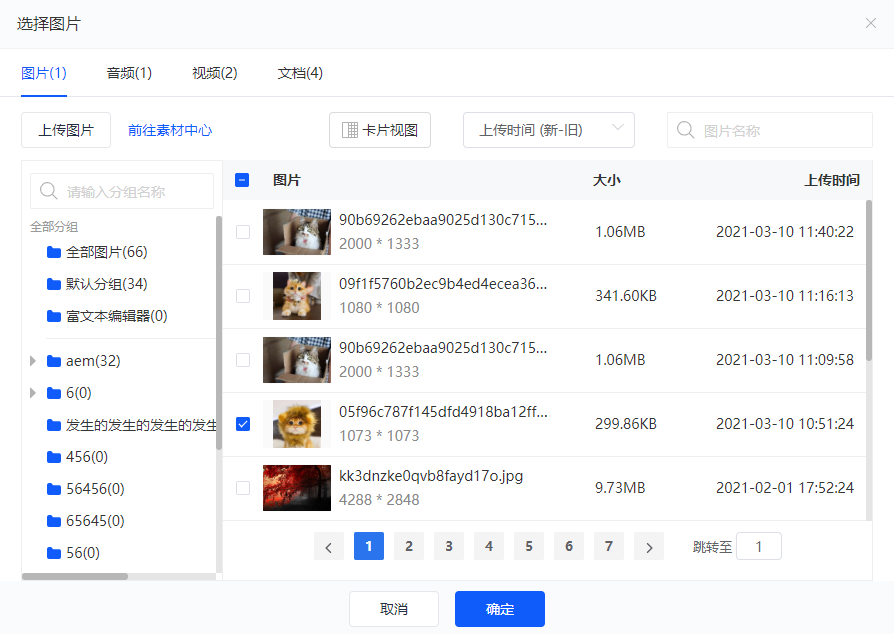
<div data-elink-language-switch="1" id="bkmrk-%E4%B8%AD%E6%96%87" style="border:1px solid #d6d9de;border-radius:6px;padding:10px 12px;margin:0 0 18px 0;background:#f8fafc;font-size:14px;">[中文](/books/8f855/page/7f100)</div><span style="font-size:14px;">To help merchants quickly find the materials they need when referencing materials, we have added a material preview function during the referencing process. You can click on the thumbnail of the material to view the large image, listen to the audio, and preview the video.</span>

<span style="font-size:14px;">Meanwhile, to address the difficulty in identifying image materials with the same content but different sizes, we have added the size display of images when referencing image materials.</span>

<span style="font-size:14px;">  
</span>

<span style="font-size:14px;">The specific operation examples are as follows:</span>

**<span style="font-size:14px;">Step 1:</span>**<span style="font-size:14px;">Enter any scenario where you can reference materials, such as adding a cover and video content to a video course.</span>

<span style="font-size:14px;">![图片1.png](https://wechatapppro-1252524126.file.myqcloud.com/help_document/image/ueditor/52144600_1591598489.png ".png")</span>

<span style="font-size:14px;"></span>

**<span style="font-size:14px;">Step 2:</span>**<span style="font-size:14px;">Click on 'Select File' for video upload and find the video material you want to reference.</span>

<span style="font-size:14px;"></span>![图片2.png](https://wechatapppro-1252524126.file.myqcloud.com/help_document/image/ueditor/74284900_1591598489.png ".png")

**<span style="font-size:14px;">Step 3:</span>**<span style="font-size:14px;">Click on the thumbnail of the video to preview it.</span>

![图片3.png](https://wechatapppro-1252524126.file.myqcloud.com/help_document/image/ueditor/3608800_1591598490.png ".png")

**<span style="font-size:14px;">Step 4:</span>**<span style="font-size:14px;">Click on the 'X' in the upper - right corner to close the preview.</span>

**<span style="font-size:14px;">Step 5:</span>**<span style="font-size:14px;">Select the video in the video list and click the 'OK' button to complete the referencing operation.</span>

![图片4.png](https://wechatapppro-1252524126.file.myqcloud.com/help_document/image/ueditor/30914100_1591598490.png ".png")

**<span style="font-size:14px;">Step 6:</span>**<span style="font-size:14px;">When referencing an image, you can either click on the image thumbnail to view the large image or quickly identify the image through the size displayed below the image name.</span>

![图片5.png](https://wechatapppro-1252524126.file.myqcloud.com/help_document/image/ueditor/28289300_1591598517.png ".png")

# Which members can download the materials in the Material Center?

<div data-elink-language-switch="1" id="bkmrk-%E4%B8%AD%E6%96%87" style="border:1px solid #d6d9de;border-radius:6px;padding:10px 12px;margin:0 0 18px 0;background:#f8fafc;font-size:14px;">[中文](/books/8f855/page/9de6d)</div><span style="font-size:14px;">Since there are risks associated with the open download of materials, only creators and senior administrators have download permissions by default. However, senior administrators are allowed to individually configure material download permissions for employees who need them.</span>

<span style="font-size:14px;">The specific operations for permission configuration are as follows:</span>

**<span style="font-size:14px;">Step 1:</span>**<span style="font-size:14px;">Enter the management backend - Role Management</span>

![图片6.png](https://wechatapppro-1252524126.file.myqcloud.com/help_document/image/ueditor/8346700_1591598600.png ".png")

**<span style="font-size:14px;">Step 2:</span>**<span style="font-size:14px;">Select any role, click the 'View' button, and enter the role permission configuration page</span>

**<span style="font-size:14px;">Step 3:</span>**<span style="font-size:14px;">Select Permission Settings - Store Management - Material Center, and you can check or uncheck the permissions for uploading, deleting, and downloading materials.</span>

![图片7.png](https://wechatapppro-1252524126.file.myqcloud.com/help_document/image/ueditor/85998000_1591598637.png ".png")

# Tutorial on Using Group Management in the Material Center

<div data-elink-language-switch="1" id="bkmrk-%E4%B8%AD%E6%96%87" style="border:1px solid #d6d9de;border-radius:6px;padding:10px 12px;margin:0 0 18px 0;background:#f8fafc;font-size:14px;">[中文](/books/8f855/page/a3f39)</div>**<span style="font-size:17px;">I. Function Introduction</span>**

<span style="font-size:14px;">Since the launch of the Material Center, merchants have uploaded a large number of materials during use. To better classify and manage the materials, we have launched the multi-level grouping function for materials.</span>

<span style="font-size:14px;">Merchants can create up to three levels of groups for materials in the Material Center list and can rename and delete groups to help merchants classify materials as needed. Meanwhile, to meet merchants' needs for reclassifying uploaded materials, we have added a one-click moving function, which allows all materials in a certain group to be moved to another group with one click.</span>

<span style="font-size:14px;"></span>

**<span style="font-size:17px;">II. Use Cases</span>**

<span style="font-size:14px;">The multi-level grouping management function for materials can meet the scenarios where merchants need to classify materials, facilitating search, management, and reference. Taking teaching materials as an example, you can first conduct primary classification by subject, such as mathematics, physics, chemistry, etc.; then, you can establish secondary classification by semester under each subject, such as the first semester of junior high school, the first grade of junior high school</span>

<span style="font-size:14px;">the second semester, etc.</span>

<span style="font-size:14px;"></span>

**<span style="font-size:17px;">III. Operation Steps</span>**

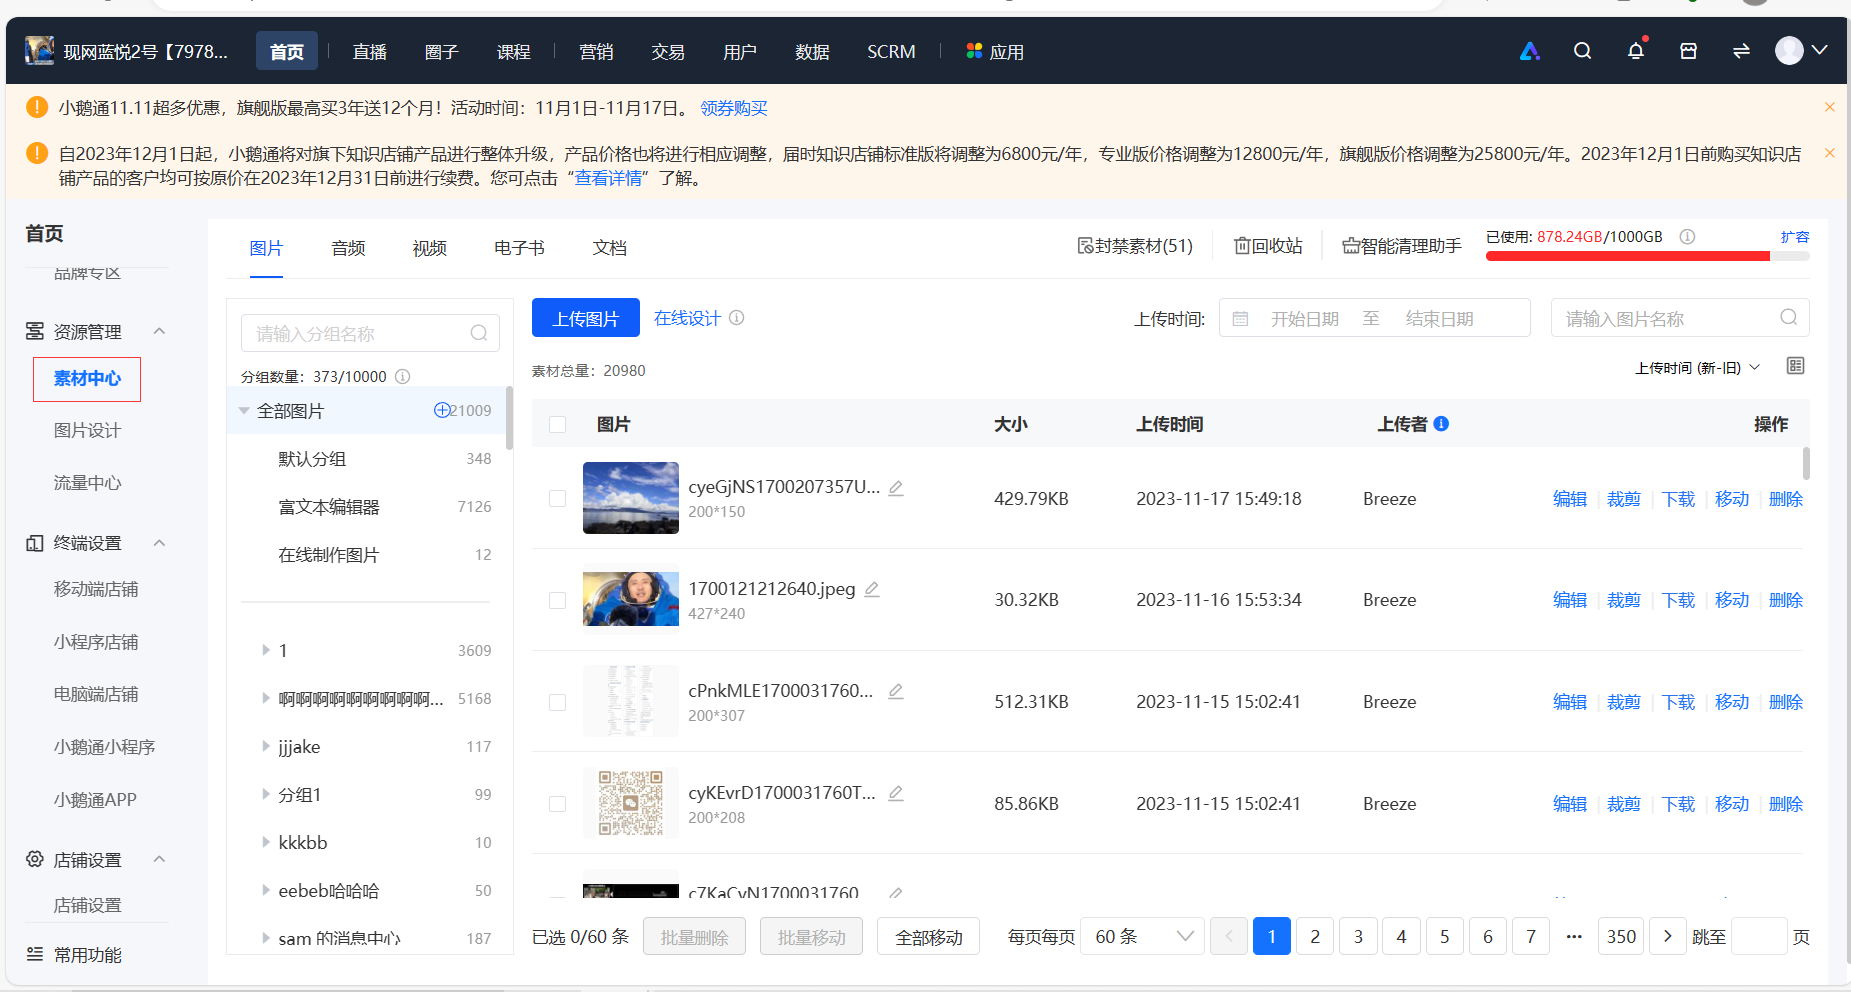
**<span style="font-size:14px;">1.</span>**<span style="font-size:14px;">Enter the homepage - Resource Management - Material Center page</span>

<span style="font-size:14px;">  
</span>

![image.png](https://wechatapppro-1252524126.file.myqcloud.com/help_document/image/ueditor/33905600_1700213977.png ".png")

**<span style="font-size:14px;">  
</span>**

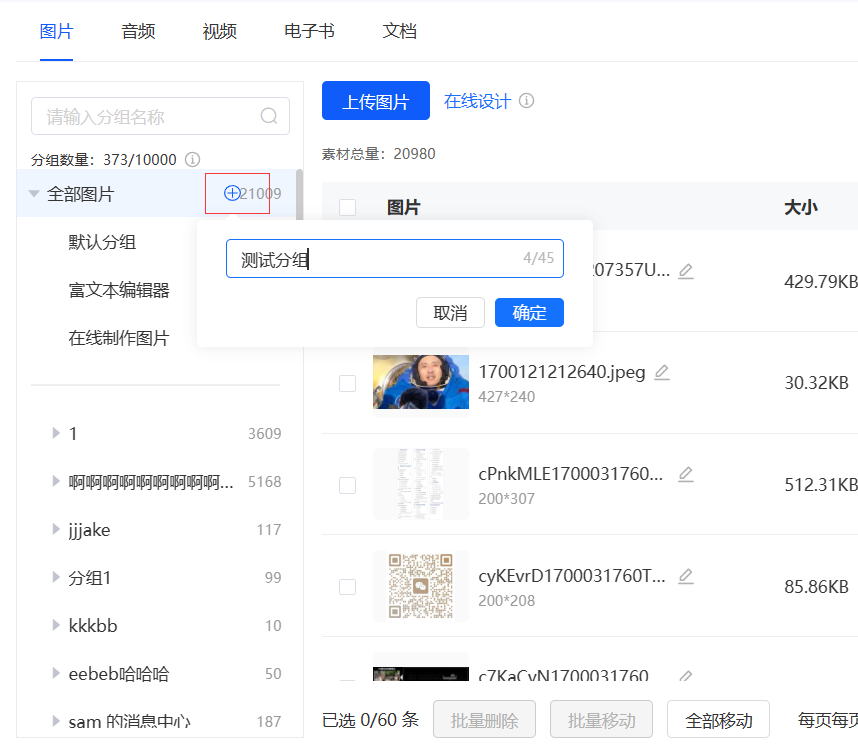
**<span style="font-size:14px;">2.</span>**<span style="font-size:14px;">Click the small plus sign after the title to create a primary group</span>

<span style="font-size:14px;">  
</span>

![image.png](https://wechatapppro-1252524126.file.myqcloud.com/help_document/image/ueditor/26233500_1700213977.png ".png")

**<span style="font-size:14px;">  
</span>**

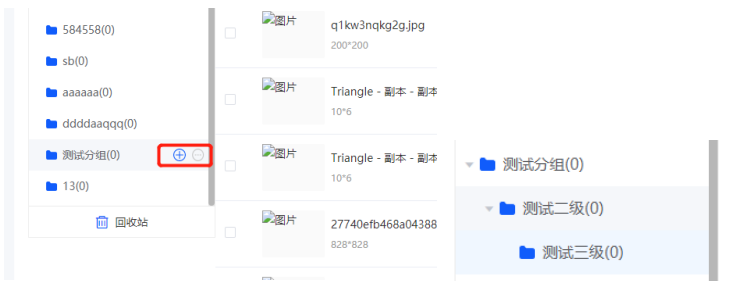
**<span style="font-size:14px;">3.</span>**<span style="font-size:14px;">Move the mouse over any self - created group, a floating button will appear. Click the plus sign to create a sub - group.</span>

*<span style="font-size:14px;">Note:</span>*

*<span style="font-size:14px;">A maximum of three levels of groups can be created.</span>*

*<span style="font-size:14px;">Preset groups such as the default group, live replay videos, and rich text editors cannot have sub - groups created.</span>*

*<span style="font-size:14px;">![微信截图_20200608145949.png](https://wechatapppro-1252524126.file.myqcloud.com/help_document/image/ueditor/28953500_1700213856.png ".png")</span>*

*<span style="font-size:14px;"></span>*

**<span style="font-size:14px;">  
</span>**

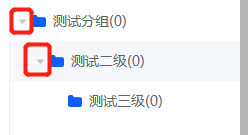
**<span style="font-size:14px;">4.</span>**<span style="font-size:14px;">Click the arrow button in front of the multi - level group to expand or collapse the group level by level.</span>

<span style="font-size:14px;">  
</span>

*<span style="font-size:14px;"></span>*![图片2.png](https://wechatapppro-1252524126.file.myqcloud.com/help_document/image/ueditor/41636900_1700213856.png ".png")

**<span style="font-size:14px;">  
</span>**

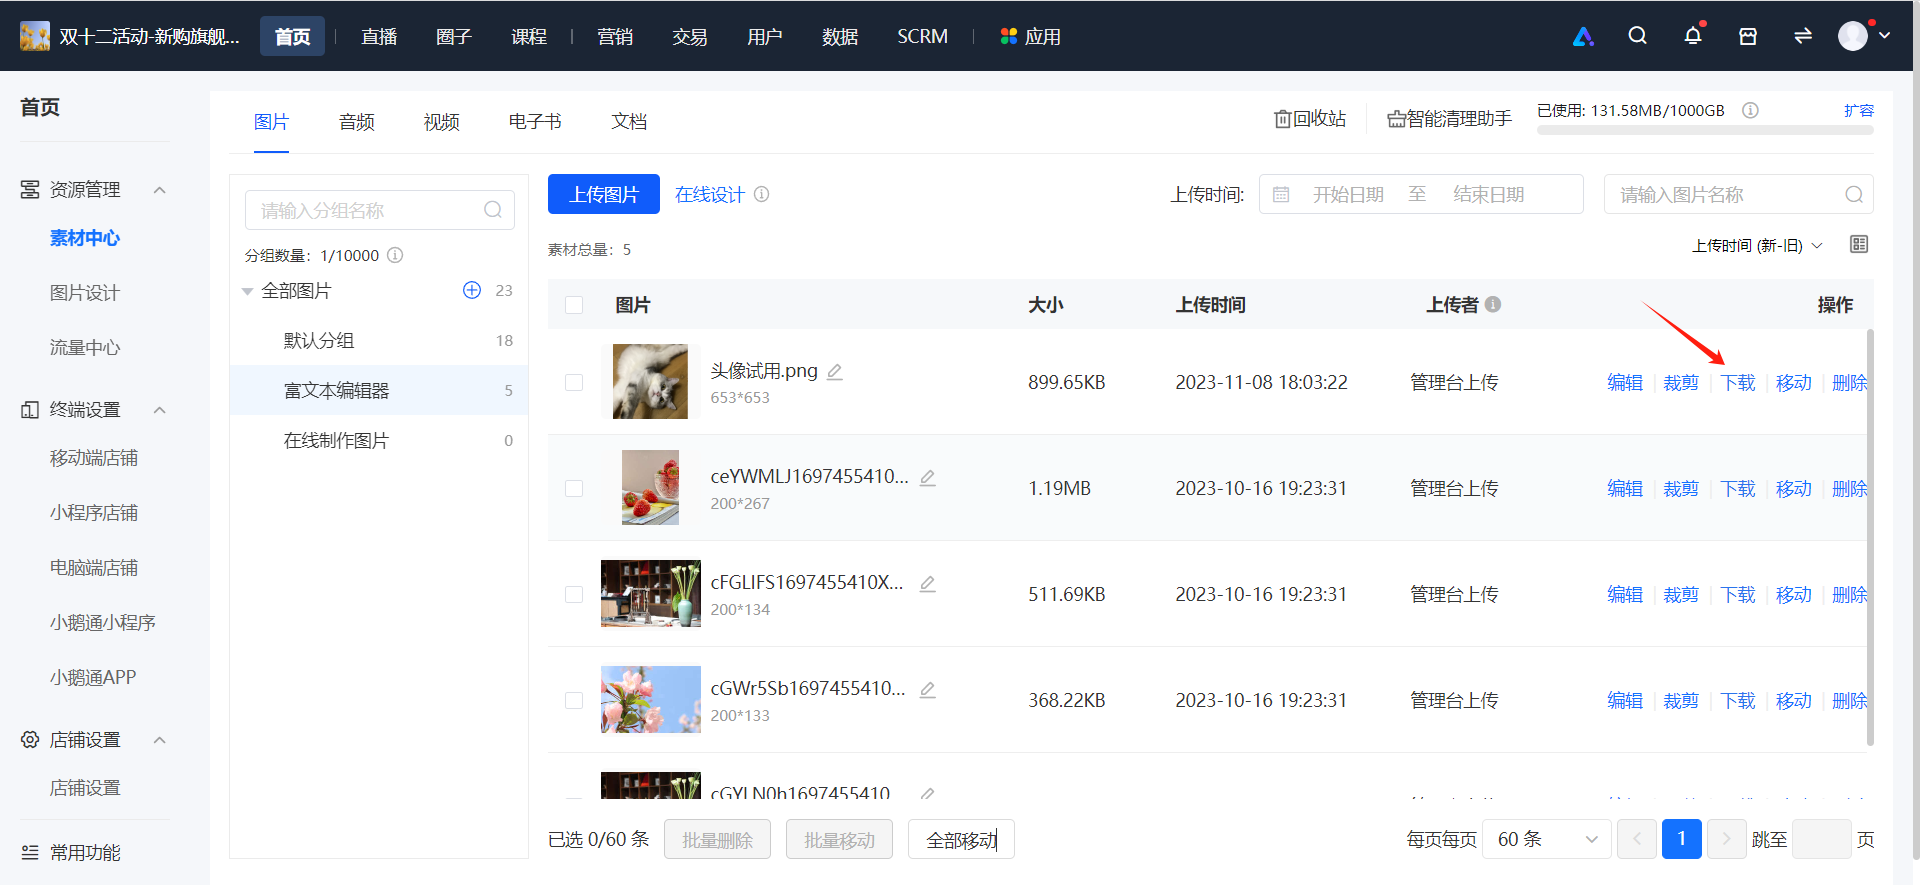
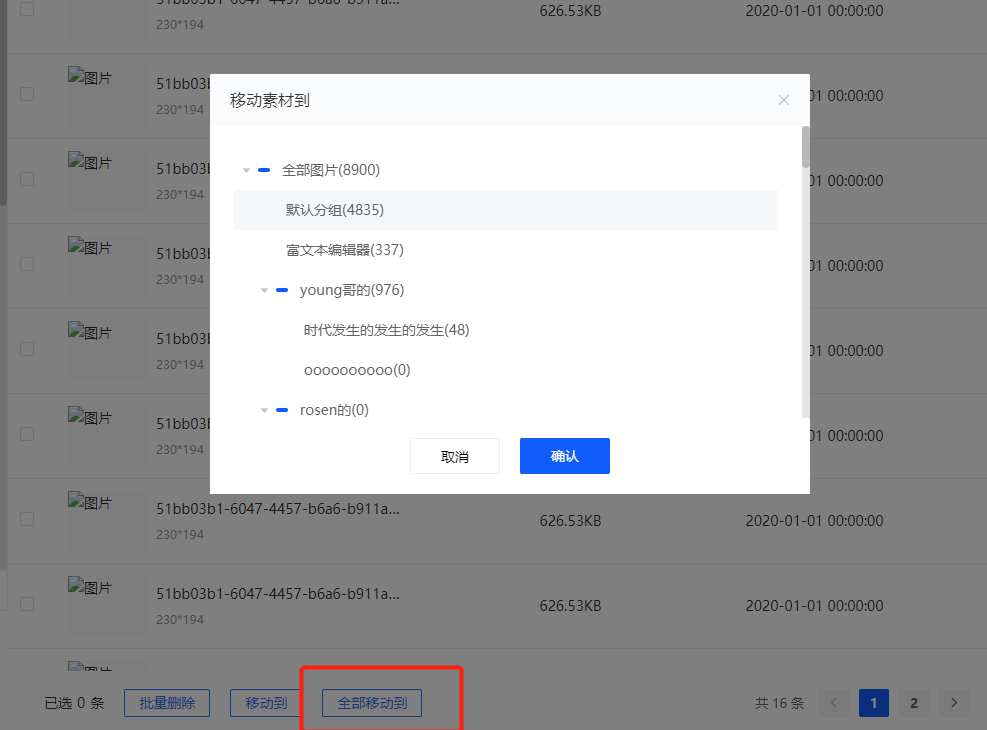
**<span style="font-size:14px;">5.</span>**<span style="font-size:14px;">When moving materials, in addition to the original way of moving by checking, a new all - moving function has been added, which allows all materials in a specified group to be moved to another group with one click.</span>

<span style="font-size:14px;">Select the specified group, click 'Move all to' at the bottom, select the destination in the floating layer, and click OK.</span>

*<span style="font-size:14px;">Note: A maximum of 2000 materials can be moved at a time. For the excess part, you can operate the movement again.</span>*

*<span style="font-size:14px;">  
</span>*

*<span style="font-size:14px;">![图片3.png](https://wechatapppro-1252524126.file.myqcloud.com/help_document/image/ueditor/7901700_1700213857.png ".png")</span>*

*<span style="font-size:14px;"></span>*

**<span style="font-size:14px;">  
</span>**

**<span style="font-size:14px;">6.</span>**<span style="font-size:14px;">When there are too many groups, enter the name of the group in the search box on the group sidebar, click the magnifying glass button or directly press Enter to perform a fuzzy search by keyword.</span>

<span style="font-size:14px;">After the search is completed, click 'Back' to return to the group list.</span>

# How long can the deleted materials be stored in the recycle bin?

<div data-elink-language-switch="1" id="bkmrk-%E4%B8%AD%E6%96%87" style="border:1px solid #d6d9de;border-radius:6px;padding:10px 12px;margin:0 0 18px 0;background:#f8fafc;font-size:14px;">[中文](/books/8f855/page/70c63)</div><span style="font-size:14px;">Deleted materials will be stored in the recycle bin for 30 days. During this period, you can restore the materials from the recycle bin. After 30 days, the system will automatically clear them.</span>

<span style="font-size:14px;">During this period, you can restore/delete a single resource completely, or perform batch restoration/batch deletion of resources.</span>

# Course materials usage tutorial

<div data-elink-language-switch="1" id="bkmrk-%E4%B8%AD%E6%96%87" style="border:1px solid #d6d9de;border-radius:6px;padding:10px 12px;margin:0 0 18px 0;background:#f8fafc;font-size:14px;">[中文](/books/8f855/page/92cc2)</div><span style="font-size:17px;">**I. Function Introduction**</span>

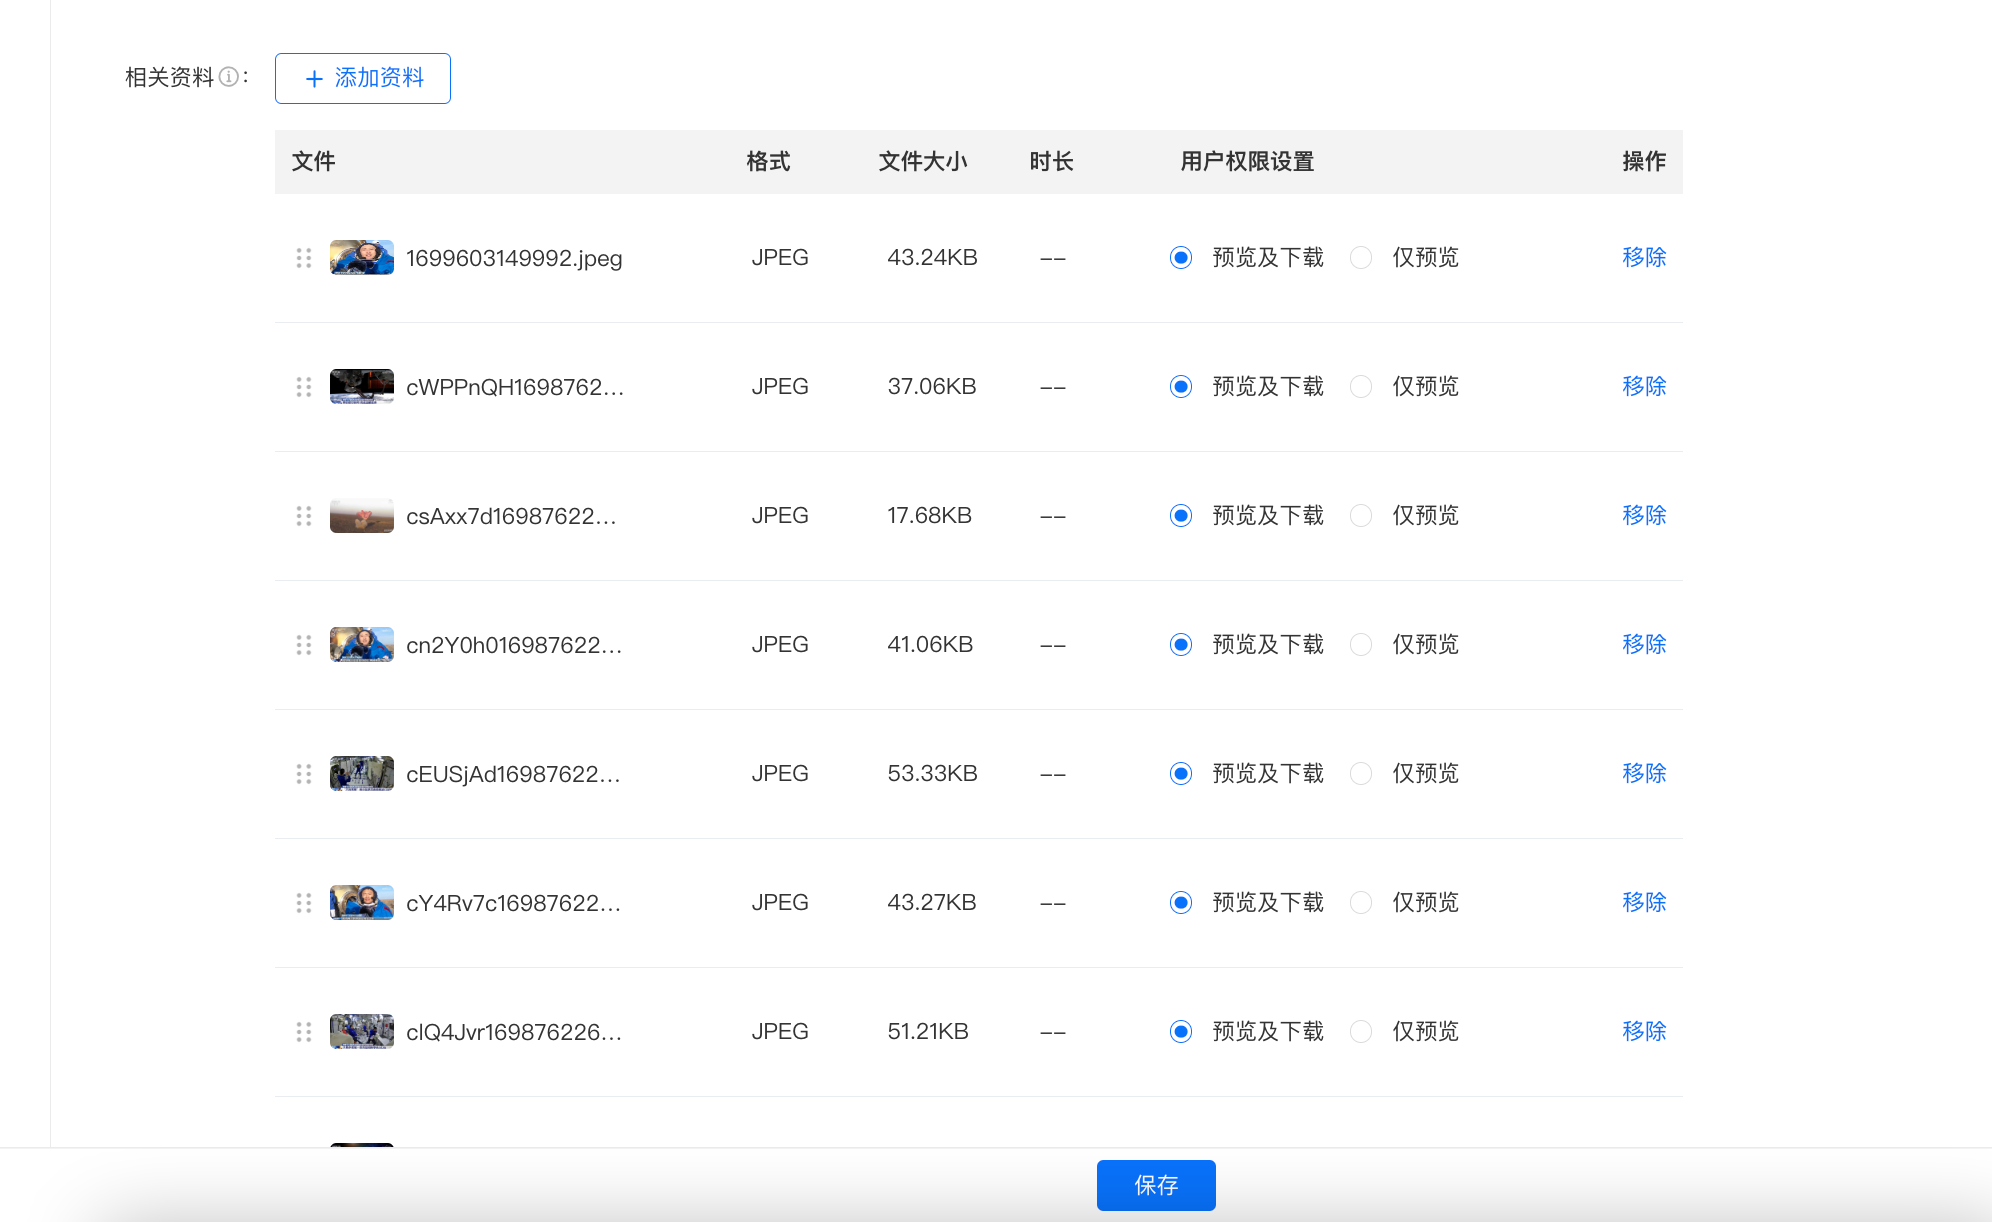
<span style="font-size:14px;">Provide merchants with the ability to set course supplementary materials. Merchants can set relevant materials for courses when creating/editing courses, and learners can download them after purchasing/claiming the courses.</span>

<span style="font-size:17px;">**II. Purpose of Use**</span>

<span style="font-size:14px;">Help merchants quickly set course supplementary materials, making it convenient for learners to claim and download them during the course learning process.</span>

<span style="font-size:17px;">**III. Operation Path**</span>

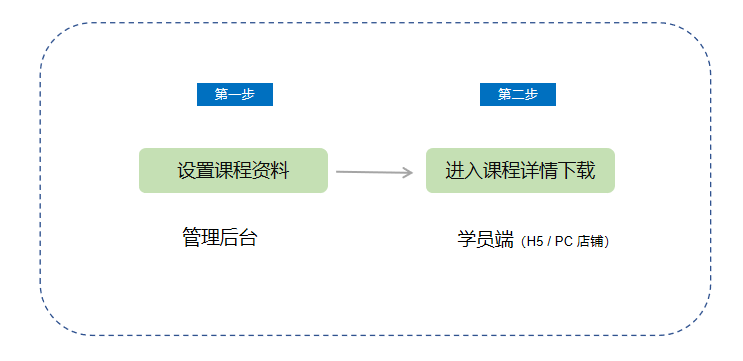
<span style="font-size:14px;">Merchant side: Merchant background → Course management → Create/Edit course → Related materials settings</span>

<span style="font-size:14px;">Learner side: WeChat H5 / PC store → Course details → Download related materials</span>

![11.png](https://wechatapppro-1252524126.file.myqcloud.com/help_document/image/ueditor/45635000_1699609437.png ".png")

<span style="font-size:17px;">**IV. Usage Tutorial**</span>

**<span style="font-size:14px;">Step 1: Set course materials</span>**

<span style="font-size:14px;">1. When creating/editing a course, merchants can set courseware materials in the 'Related materials' section.</span>

<span style="font-size:14px;">● 【For courses】: Text - images, audio, video, e - books, columns/large columns, camps, memberships. (Live streaming and class courses will be supported later).</span>
<span style="font-size:14px;">● 【Supported file formats】: All \[image, audio, video, document\] formats in the material center are supported.</span>

<span style="font-size:14px;">● 【Supported number of files】: A single course supports a maximum of 20 files.</span>

<span style="font-size:14px;">● 【Download conditions】: Learners can download after purchasing/claiming the course.</span>

![image.png](https://wechatapppro-1252524126.file.myqcloud.com/help_document/image/ueditor/44148500_1699609437.png ".png")

<span style="font-size:14px;">![33.png](https://wechatapppro-1252524126.file.myqcloud.com/help_document/image/ueditor/62882700_1699609437.png ".png")</span>

<span style="font-size:14px;"> (Management background) </span>

**<span style="font-size:14px;">Step 2: Learners enter the course details page on the learner side to download courseware materials (H5 / PC store)</span>**

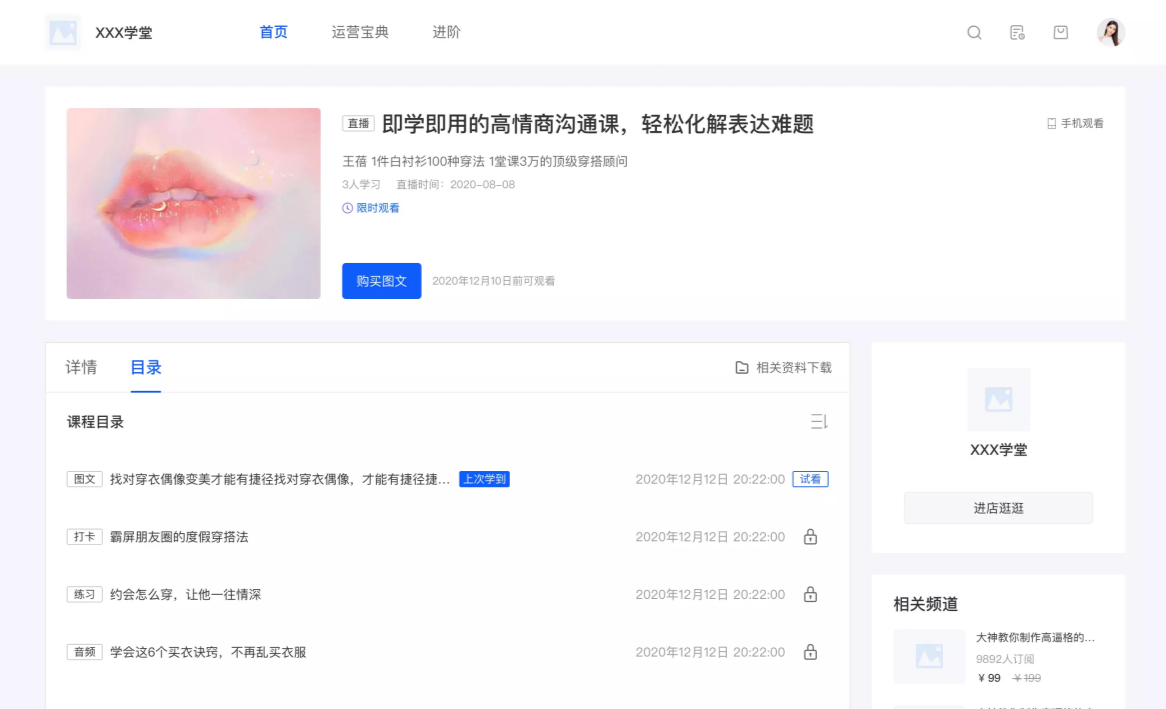
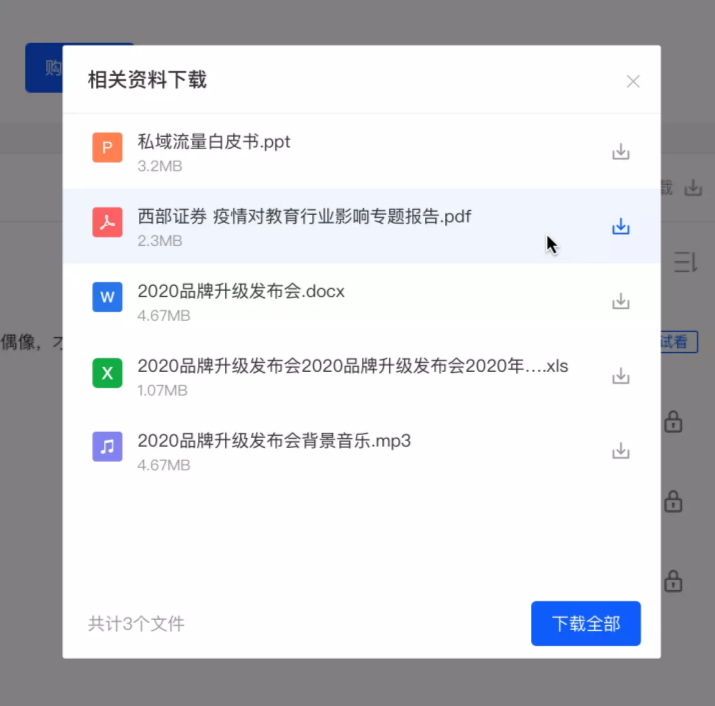
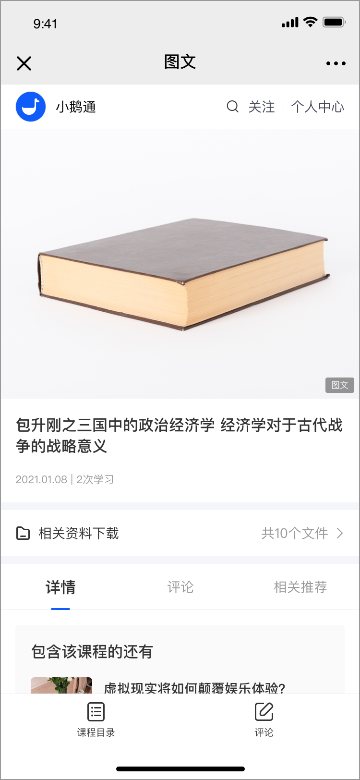
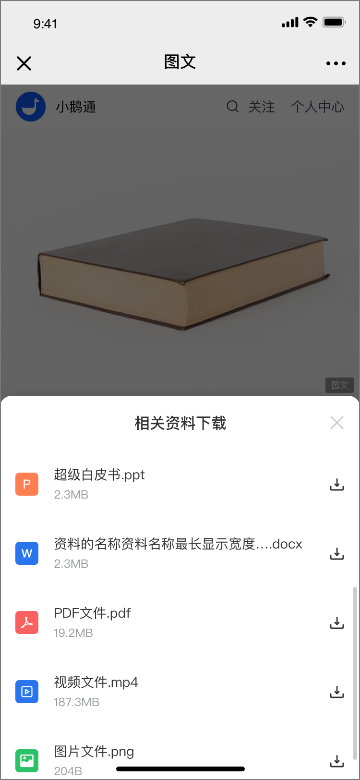
<span style="font-size:14px;">1. 【H5 side】: If merchants have set courseware materials, when learners enter the course details page, the 'Download related materials' entry will be displayed. Learners can download courseware materials after purchasing/claiming the course.</span>

<span style="font-size:14px;">● 【For courses】: Text - images, audio, video, e - books, columns/large columns, camps, memberships.</span>

![44.png](https://wechatapppro-1252524126.file.myqcloud.com/help_document/image/ueditor/86074300_1699609437.png ".png") ![5.png](https://wechatapppro-1252524126.file.myqcloud.com/help_document/image/ueditor/2851600_1699609438.png ".png")

<span style="font-size:14px;"> (H5 course details page) </span>

<span style="font-size:14px;">2. 【PC side】: If merchants have set courseware materials, when learners enter the course details page, the 'Download related materials' entry will be displayed. Learners can download courseware materials after purchasing/claiming the course.</span>

<span style="font-size:14px;">● 【For courses】: Text - images, audio, video, columns/large columns, camps. (E - books and memberships: No PC version).</span>

![6.png](https://wechatapppro-1252524126.file.myqcloud.com/help_document/image/ueditor/23984600_1699609438.png ".png")

![7.png](https://wechatapppro-1252524126.file.myqcloud.com/help_document/image/ueditor/43981800_1699609438.png ".png")

<span style="font-size:17px;">**V. Frequently Asked Questions**</span>

<span style="font-size:14px;">1. Which courses are supported in the courseware library?</span>

<span style="font-size:14px;">A: Text - images, audio, video, e - books, columns/large columns, camps, memberships. (Live streaming and class courses will be supported later).</span>
<span style="font-size:14px;">2. Where do merchants need to set?</span>

<span style="font-size:14px;">A: In the management background, enter the above course modules, click Create/Edit course, and you can set in the 'Related materials' section.</span>

<span style="font-size:14px;">3. Which file formats are supported in the courseware library? Is there a limit on the number of files?</span>

<span style="font-size:14px;">A: All \[image, audio, video, document\] formats in the material center are supported. The limit is 20 files.</span>

<span style="font-size:14px;">4. Which learner terminals are supported for using the courseware library?</span>

<span style="font-size:14px;">A: It is supported to use on H5 and PC browsers. Other terminals will be supported later.</span>

<span style="font-size:14px;">5. What are the conditions for learners to download courseware materials?</span>

<span style="font-size:14px;">A: Learners need to purchase or claim the course before they can download the courseware materials.</span>

# What file formats are supported for course materials? Is there a limit on the number of files?

<div data-elink-language-switch="1" id="bkmrk-%E4%B8%AD%E6%96%87" style="border:1px solid #d6d9de;border-radius:6px;padding:10px 12px;margin:0 0 18px 0;background:#f8fafc;font-size:14px;">[中文](/books/8f855/page/9dcb8)</div><span style="font-size:15px;">The supported formats for course materials are synchronized with the Material Center, namely \[Images, Audio, Videos, Documents\]. The upload limit is 100 items.</span>

# Which courses are supported by the course materials?

<div data-elink-language-switch="1" id="bkmrk-%E4%B8%AD%E6%96%87" style="border:1px solid #d6d9de;border-radius:6px;padding:10px 12px;margin:0 0 18px 0;background:#f8fafc;font-size:14px;">[中文](/books/8f855/page/57aee)</div>Currently, course materials support images and texts, audio, video, e-books, columns/large columns, camps, and memberships. (Live commerce and class courses will be supported later).

# On which platforms can students access the course materials?

<div data-elink-language-switch="1" id="bkmrk-%E4%B8%AD%E6%96%87" style="border:1px solid #d6d9de;border-radius:6px;padding:10px 12px;margin:0 0 18px 0;background:#f8fafc;font-size:14px;">[中文](/books/8f855/page/ec895)</div><span style="font-size:15px;">Currently, it supports learners to use on H5, WeChat Mini Program, elink APP, and computer browser.</span>

# What conditions are required for students to download courseware materials?

<div data-elink-language-switch="1" id="bkmrk-%E4%B8%AD%E6%96%87" style="border:1px solid #d6d9de;border-radius:6px;padding:10px 12px;margin:0 0 18px 0;background:#f8fafc;font-size:14px;">[中文](/books/8f855/page/0266e)</div>Students need to purchase or claim a course before they can download the courseware materials.

# What impact does exceeding the material center capacity have on live replay videos?

<div data-elink-language-switch="1" id="bkmrk-%E4%B8%AD%E6%96%87" style="border:1px solid #d6d9de;border-radius:6px;padding:10px 12px;margin:0 0 18px 0;background:#f8fafc;font-size:14px;">[中文](/books/8f855/page/eddea)</div><span style="font-size:15px;">1. The store cannot use the \[Cut Live Replay Video\] feature for live broadcasts.</span>

<span style="font-size:15px;">2. \[Replay Usage\] restrictions: Live broadcast and class session replay files generated after exceeding the storage limit cannot be used normally. Learners cannot watch the replay videos. The system will cache the replay files for 5 days. To avoid affecting subsequent usage, it is recommended to go to the Material Center to clean up or expand the storage capacity in a timely manner and perform \[Restore Replay\] on the course details page. Replays cannot be restored after the deadline.</span>

# Reminder for Space Capacity Attention in [Material Center]

<div data-elink-language-switch="1" id="bkmrk-%E4%B8%AD%E6%96%87" style="border:1px solid #d6d9de;border-radius:6px;padding:10px 12px;margin:0 0 18px 0;background:#f8fafc;font-size:14px;">[中文](/books/8f855/page/b7b16)</div><span style="font-size:15px;">Reminder for Space Capacity in \[Material Center\]</span>

<span style="font-size:15px;">Release Date: June 01, 2021</span>

<span style="font-size:15px;">To further standardize the platform usage rules, starting from June 29, 2021, when the space capacity of the Material Center exceeds the limit, the usage of \[Material Center - Upload\], \[Recycle Bin - Restore\], \[Live Replay - Edit\], and \[Replay Usage\] will be affected. Please keep an eye on the remaining space capacity and regularly clean up useless materials or expand the capacity.</span>

<span style="font-size:15px;">elink Team</span>

<span style="font-size:15px;">June 01, 2021</span>

# How to download live replay videos using the [m3u8 Downloader]?

<div data-elink-language-switch="1" id="bkmrk-%E4%B8%AD%E6%96%87" style="border:1px solid #d6d9de;border-radius:6px;padding:10px 12px;margin:0 0 18px 0;background:#f8fafc;font-size:14px;">[中文](/books/8f855/page/m3u8)</div><span style="font-size:17px;">**<span style="color:rgb(26,26,26);letter-spacing:0pt;">I. Feature Introduction</span>**</span><span style="font-size:15px;">**<span style="color:rgb(26,26,26);letter-spacing:0pt;"></span><span style="color:rgb(26,26,26);letter-spacing:0pt;"></span><span style="color:rgb(26,26,26);letter-spacing:0pt;"></span>**</span>

<span style="color:rgb(51,51,51);background-image:initial;background-position:initial;background-size:initial;background-repeat:initial;background-attachment:initial;letter-spacing:0pt;vertical-align:baseline;font-size:15px;">To prevent merchants from waiting too long for video transcoding or encountering transcoding failures, install the 'm3u8 Downloader' to immediately download live replay videos.</span>

<span style="color:rgb(51,51,51);background-image:initial;background-position:initial;background-size:initial;background-repeat:initial;background-attachment:initial;letter-spacing:0pt;vertical-align:baseline;font-size:15px;">  
</span>

<span style="font-size:17px;">**<span style="color:rgb(26,26,26);letter-spacing:0pt;">II. Use Scenarios</span>**</span><span style="font-size:15px;">**<span style="font-size:16px;color:rgb(26,26,26);letter-spacing:0pt;"></span><span style="font-size:16px;color:rgb(26,26,26);letter-spacing:0pt;"></span>**</span>

<span style="color:rgb(51,51,51);background-image:initial;background-position:initial;background-size:initial;background-repeat:initial;background-attachment:initial;letter-spacing:0pt;vertical-align:baseline;font-size:15px;">Scenario 1: Live Management - Live Details - Replay Settings - Download Live Replay Video;</span>

<span style="color:rgb(51,51,51);background-image:initial;background-position:initial;background-size:initial;background-repeat:initial;background-attachment:initial;letter-spacing:0pt;vertical-align:baseline;font-size:15px;">Scenario 2: Material Center - Videos - Download Live Replay Video;</span>

<span style="color:rgb(51,51,51);background-image:initial;background-position:initial;background-size:initial;background-repeat:initial;background-attachment:initial;letter-spacing:0pt;vertical-align:baseline;font-size:15px;">  
</span>

<span style="font-size:17px;">**<span style="color:rgb(26,26,26);letter-spacing:0pt;">III. Operation Path</span>**</span><span style="font-size:15px;">**<span style="font-size:16px;color:rgb(26,26,26);letter-spacing:0pt;"></span><span style="font-size:16px;color:rgb(26,26,26);letter-spacing:0pt;"></span>**</span>

<span style="color:rgb(51,51,51);background-image:initial;background-position:initial;background-size:initial;background-repeat:initial;background-attachment:initial;letter-spacing:0pt;vertical-align:baseline;font-size:15px;">Merchant Side:</span>

<span style="font-size:15px;"><span style="font-size:15px;background-image:initial;background-position:initial;background-size:initial;background-repeat:initial;background-attachment:initial;letter-spacing:0pt;vertical-align:baseline;">1. Management Console -**Live Management - Live Details - Replay Settings**- Download Live Replay Video - A pop - up window appears - Install</span><span style="font-size:15px;color:rgb(0,0,0);background-image:initial;background-position:initial;background-size:initial;background-repeat:initial;background-attachment:initial;letter-spacing:0pt;vertical-align:baseline;">"</span><span style="font-size:15px;background-image:initial;background-position:initial;background-size:initial;background-repeat:initial;background-attachment:initial;letter-spacing:0pt;vertical-align:baseline;">m3u8 Downloader</span><span style="font-size:15px;color:rgb(0,0,0);background-image:initial;background-position:initial;background-size:initial;background-repeat:initial;background-attachment:initial;letter-spacing:0pt;vertical-align:baseline;">" - Copy the video link - Paste the link into the "</span><span style="font-size:15px;background-image:initial;background-position:initial;background-size:initial;background-repeat:initial;background-attachment:initial;letter-spacing:0pt;vertical-align:baseline;">m3u8 Downloader</span><span style="font-size:15px;color:rgb(0,0,0);background-image:initial;background-position:initial;background-size:initial;background-repeat:initial;background-attachment:initial;letter-spacing:0pt;vertical-align:baseline;">" --</span><span style="font-size:15px;background-image:initial;background-position:initial;background-size:initial;background-repeat:initial;background-attachment:initial;letter-spacing:0pt;vertical-align:baseline;">Select the file save path - Click</span><span style="font-size:15px;color:rgb(0,0,0);background-image:initial;background-position:initial;background-size:initial;background-repeat:initial;background-attachment:initial;letter-spacing:0pt;vertical-align:baseline;">"</span><span style="font-size:15px;background-image:initial;background-position:initial;background-size:initial;background-repeat:initial;background-attachment:initial;letter-spacing:0pt;vertical-align:baseline;">m3u8 Downloader</span><span style="font-size:15px;color:rgb(0,0,0);background-image:initial;background-position:initial;background-size:initial;background-repeat:initial;background-attachment:initial;letter-spacing:0pt;vertical-align:baseline;">" \[Download\]</span><span style="font-size:15px;background-image:initial;background-position:initial;background-size:initial;background-repeat:initial;background-attachment:initial;letter-spacing:0pt;vertical-align:baseline;">button - Start downloading the video;</span></span>

<span style="font-size:15px;"><span style="font-size:15px;background-image:initial;background-position:initial;background-size:initial;background-repeat:initial;background-attachment:initial;letter-spacing:0pt;vertical-align:baseline;">2. Management Console -**Material Center - Videos - Download Live Replay Video**- Download Live Replay Video - A pop - up window appears - Install</span><span style="font-size:15px;color:rgb(0,0,0);background-image:initial;background-position:initial;background-size:initial;background-repeat:initial;background-attachment:initial;letter-spacing:0pt;vertical-align:baseline;">"</span><span style="font-size:15px;background-image:initial;background-position:initial;background-size:initial;background-repeat:initial;background-attachment:initial;letter-spacing:0pt;vertical-align:baseline;">m3u8 Downloader</span><span style="font-size:15px;color:rgb(0,0,0);background-image:initial;background-position:initial;background-size:initial;background-repeat:initial;background-attachment:initial;letter-spacing:0pt;vertical-align:baseline;">" - Copy the video link - Paste the link into the "</span><span style="font-size:15px;background-image:initial;background-position:initial;background-size:initial;background-repeat:initial;background-attachment:initial;letter-spacing:0pt;vertical-align:baseline;">m3u8 Downloader</span><span style="font-size:15px;color:rgb(0,0,0);background-image:initial;background-position:initial;background-size:initial;background-repeat:initial;background-attachment:initial;letter-spacing:0pt;vertical-align:baseline;">" --</span><span style="font-size:15px;background-image:initial;background-position:initial;background-size:initial;background-repeat:initial;background-attachment:initial;letter-spacing:0pt;vertical-align:baseline;">Select the file save path - Click</span><span style="font-size:15px;color:rgb(0,0,0);background-image:initial;background-position:initial;background-size:initial;background-repeat:initial;background-attachment:initial;letter-spacing:0pt;vertical-align:baseline;">"</span><span style="font-size:15px;background-image:initial;background-position:initial;background-size:initial;background-repeat:initial;background-attachment:initial;letter-spacing:0pt;vertical-align:baseline;">m3u8 Downloader</span><span style="font-size:15px;color:rgb(0,0,0);background-image:initial;background-position:initial;background-size:initial;background-repeat:initial;background-attachment:initial;letter-spacing:0pt;vertical-align:baseline;">" \[Download\]</span><span style="font-size:15px;background-image:initial;background-position:initial;background-size:initial;background-repeat:initial;background-attachment:initial;letter-spacing:0pt;vertical-align:baseline;">button - Start downloading the video;</span></span>

<span style="background-image:initial;background-position:initial;background-size:initial;background-repeat:initial;background-attachment:initial;letter-spacing:0pt;vertical-align:baseline;font-size:15px;">![image.png](https://wechatapppro-1252524126.file.myqcloud.com/help_document/image/ueditor/1225700_1640005423.png ".png")</span>

<span style="font-size:17px;">**IV. Usage Tutorial**</span><span style="font-size:15px;"></span>

<span style="font-size:15px;">**Step 1: Click the \[Download\] button for the live replay video on the management console - A pop - up window appears**</span>

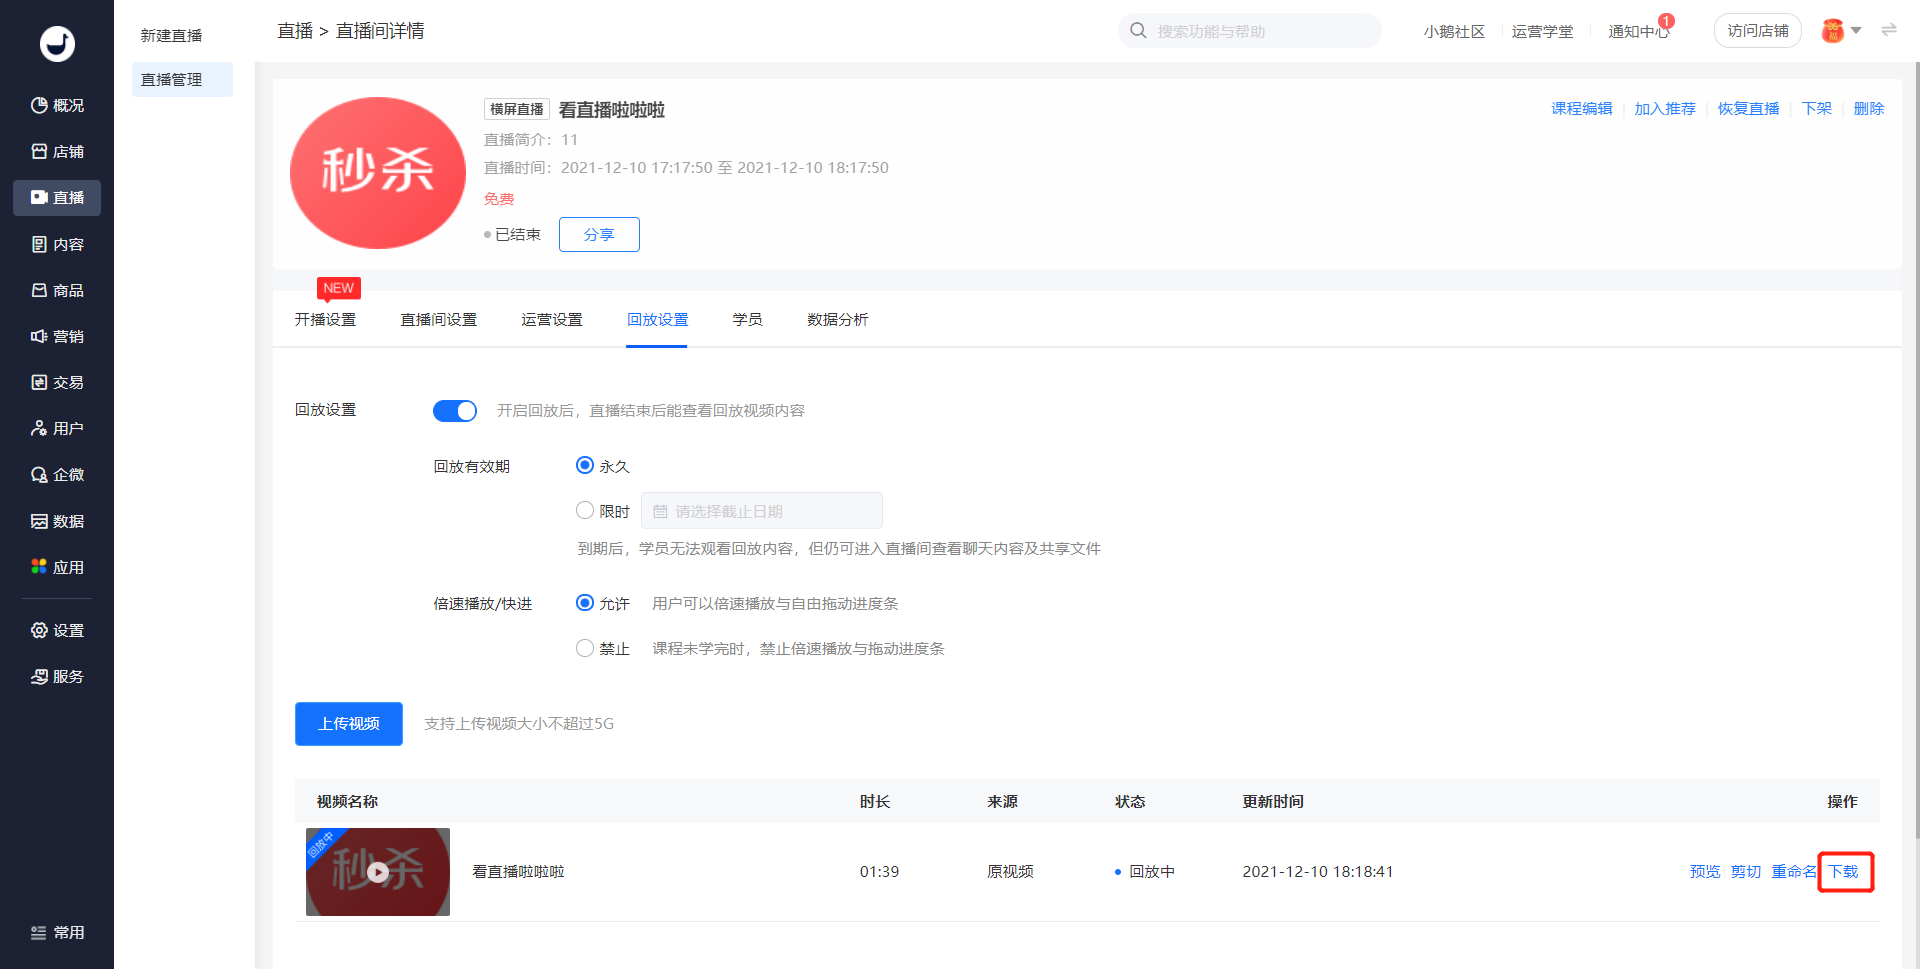
<span style="font-size:15px;">1. Enter the management console - Live Management - Live Details - Replay Settings - Click \[Download\];</span>

![image (1).png](https://wechatapppro-1252524126.file.myqcloud.com/help_document/image/ueditor/51546100_1640005423.png ".png")

<span style="font-size:15px;">Or enter the management console - Material Center - Videos - Live Replay Video - Click \[Download\];</span>

![image (2).png](https://wechatapppro-1252524126.file.myqcloud.com/help_document/image/ueditor/17004500_1640005424.png ".png")

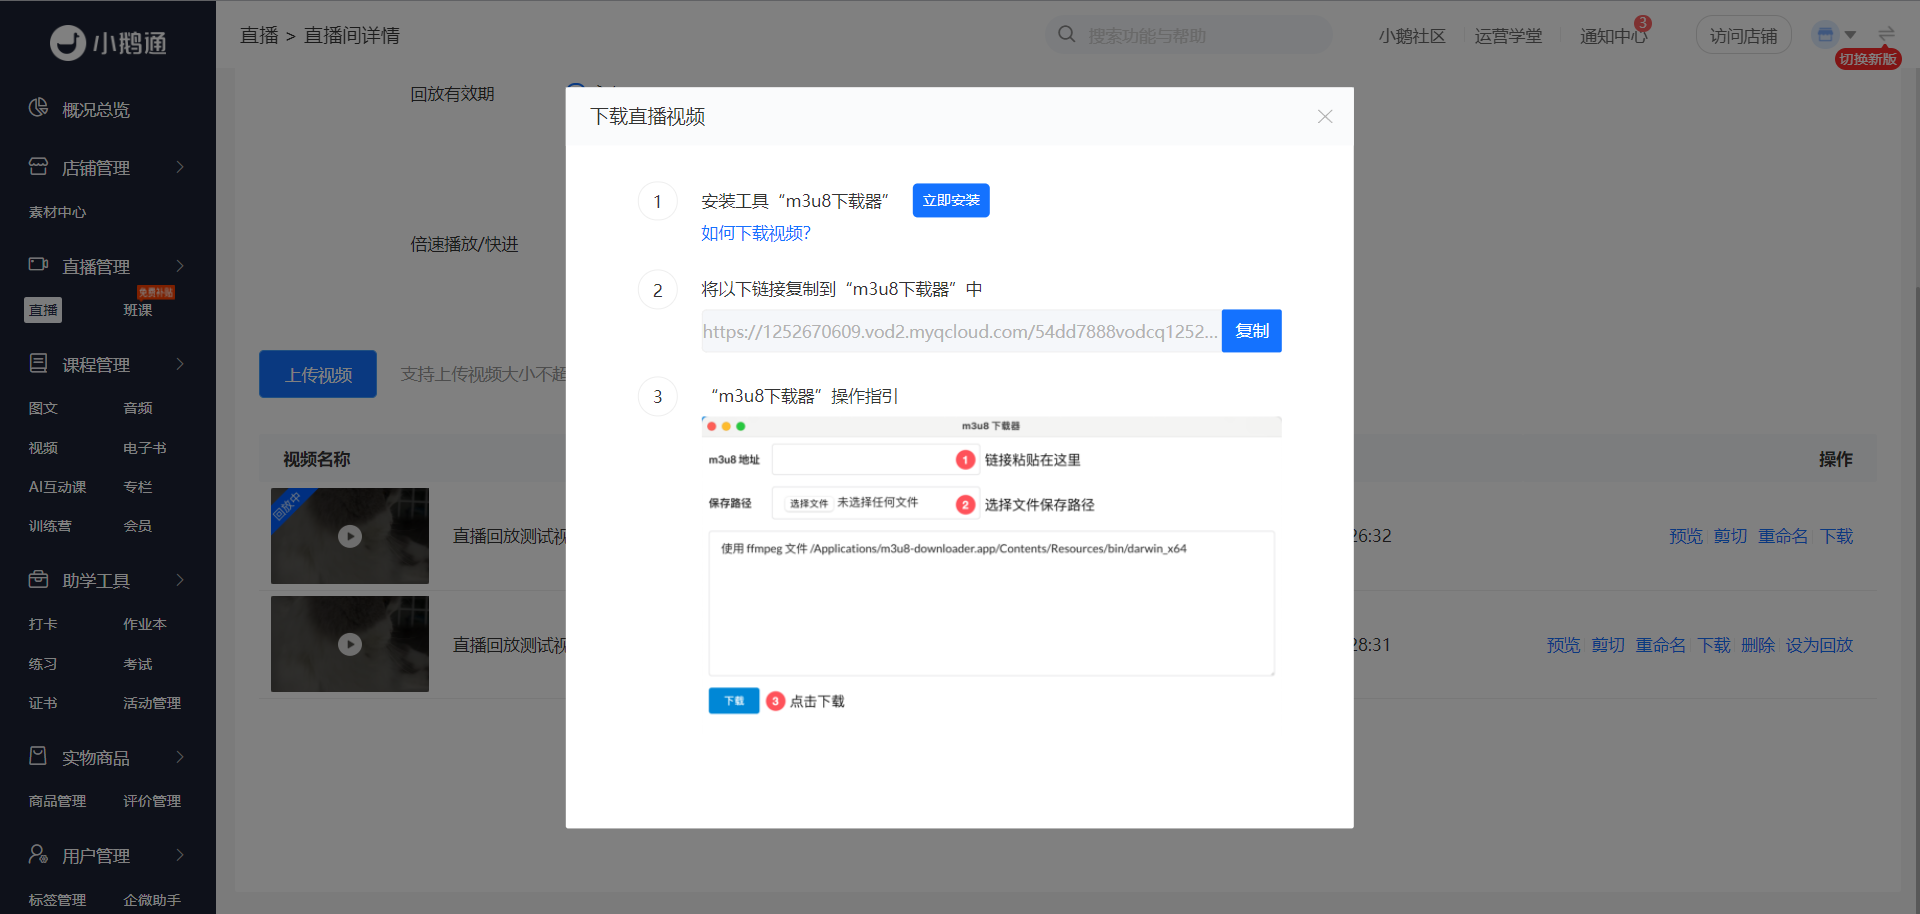
<span style="font-size:15px;">2. A pop - up window guiding you to download the live video appears</span>

![image (3).png](https://wechatapppro-1252524126.file.myqcloud.com/help_document/image/ueditor/90418100_1640005424.png ".png")

<span style="font-size:15px;">**Step 2: Download the 'm3u8 Downloader' installation package**</span>

<span style="font-size:15px;">Click \[Install Immediately\] in the pop - up window - Start downloading the 'm3u8 Downloader' installation package;  
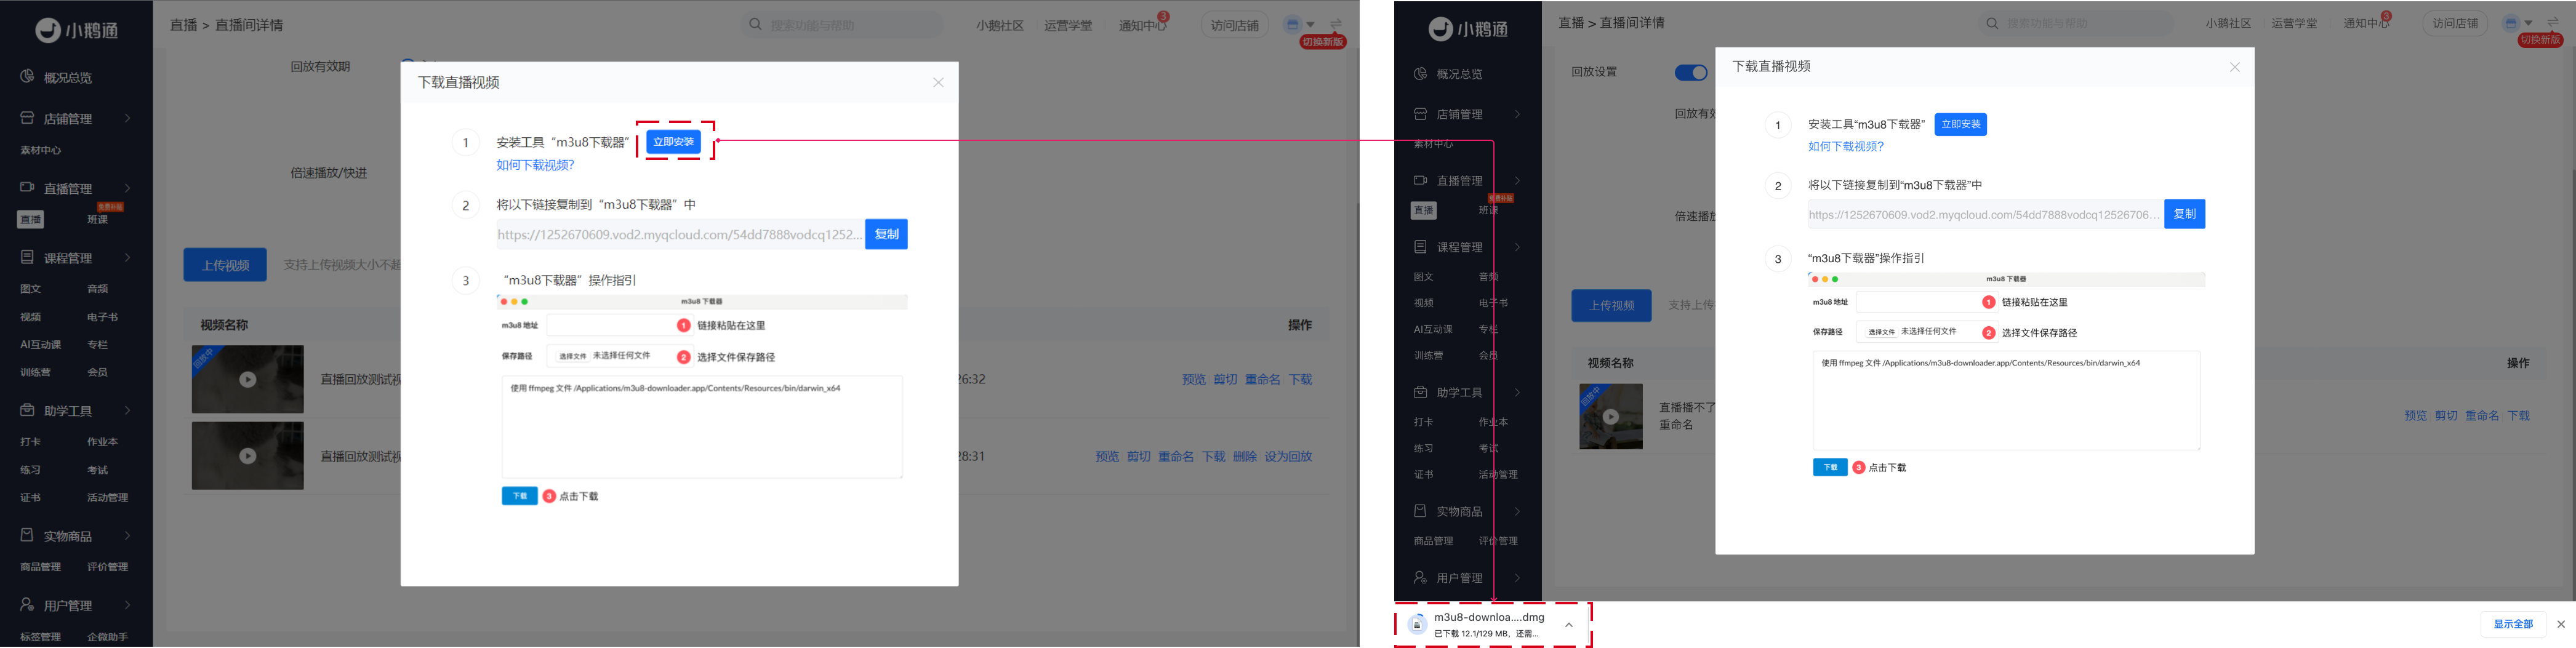
</span>

![image (4).png](https://wechatapppro-1252524126.file.myqcloud.com/help_document/image/ueditor/51546100_1640005425.png ".png")

<span style="font-size:15px;">Or click the following URLs to download the 'm3u8 Downloader' installation package</span>

<span style="font-size:15px;">● Windows installation package:[https://xiaoetong - 1252524126.cdn.xiaoeknow.com/m3u8 - downloader.exe](https://xiaoetong-1252524126.cdn.xiaoeknow.com/m3u8-downloader.exe)</span>

<span style="font-size:15px;">● macOS installation package:[https://xiaoetong - 1252524126.cdn.xiaoeknow.com/m3u8 - downloader.dmg](https://xiaoetong-1252524126.cdn.xiaoeknow.com/m3u8-downloader.dmg)</span>

<span style="font-size:15px;">**Step 3: Install the 'm3u8 Downloader'**</span>

<span style="text-decoration:underline;font-size:15px;">1. Installation for macOS system users</span>

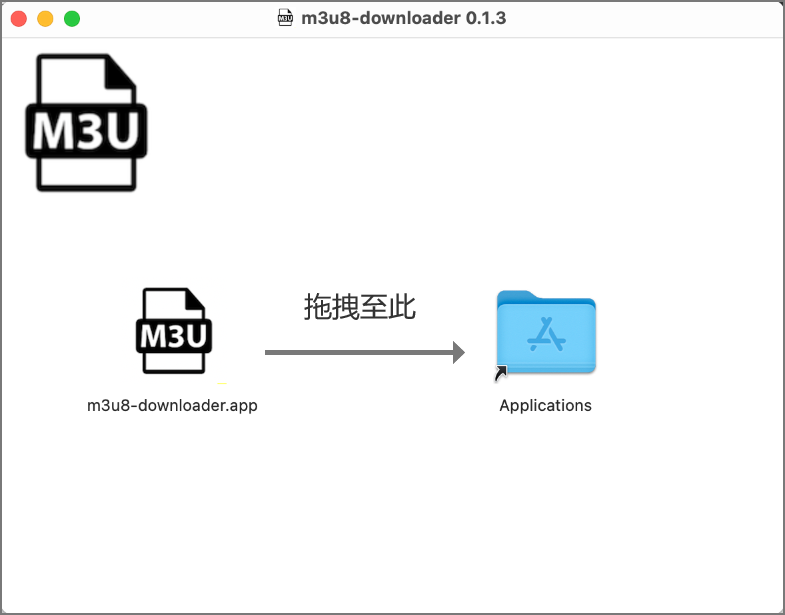
<span style="font-size:15px;">(1) Drag the 'm3u8 Downloader' file to the 'Applications' folder;</span>

![image (5).png](https://wechatapppro-1252524126.file.myqcloud.com/help_document/image/ueditor/6226700_1640005426.png ".png")

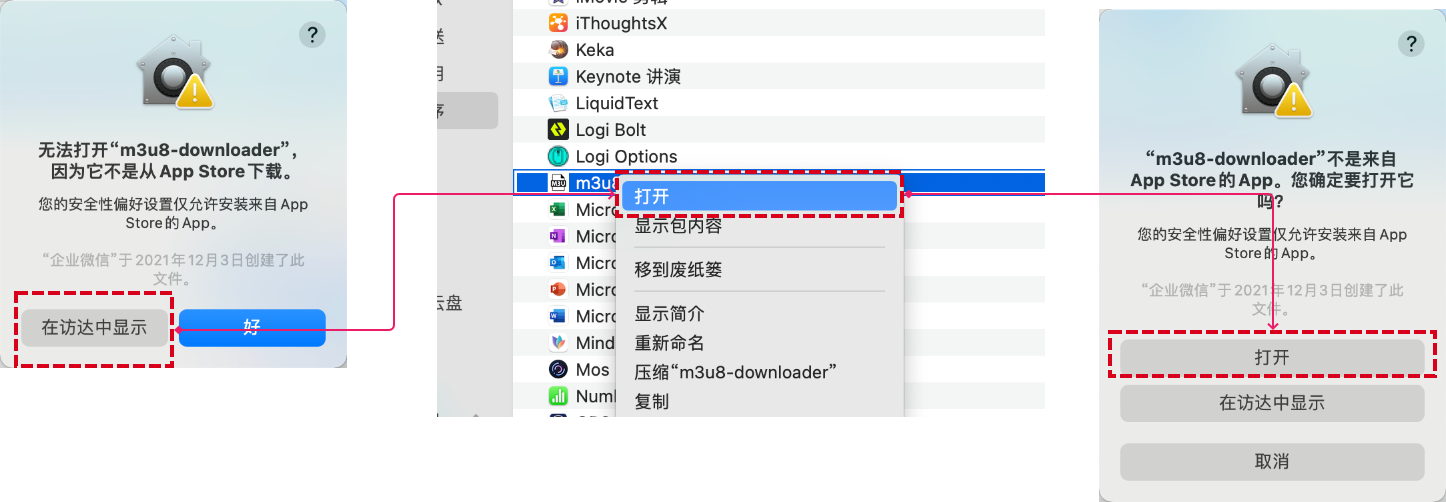
<span style="font-size:15px;">(2) When opening the software for the first time, click \[Show in Finder\]. After clicking, the Finder window will pop up. Find the m3u8 Downloader, right - click to open it, and click \[Open\] in the confirmation pop - up window;</span>

![image (6).png](https://wechatapppro-1252524126.file.myqcloud.com/help_document/image/ueditor/95135900_1640005426.png ".png")

<span style="font-size:15px;">(3) Open the 'm3u8 Downloader'</span>

![image (7).png](https://wechatapppro-1252524126.file.myqcloud.com/help_document/image/ueditor/64835600_1640005427.png ".png")

<span style="text-decoration:underline;font-size:15px;">2. Installation for Windows system users</span>

<span style="font-size:15px;">(1) Open the \[Installation Package\] and start the installation;</span>

![image (8).png](https://wechatapppro-1252524126.file.myqcloud.com/help_document/image/ueditor/58956200_1640005428.png ".png")

<span style="font-size:15px;">(2) After the installation is complete, open the 'm3u8 Downloader';</span>

![image (9).png](https://wechatapppro-1252524126.file.myqcloud.com/help_document/image/ueditor/10788100_1640005429.png ".png")

<span style="font-size:15px;">**Step 4: Download the video**</span>

<span style="font-size:15px;">1. Copy the video link: Management Console - Download Live Video Pop - up Window - Click the \[Copy\] button;  
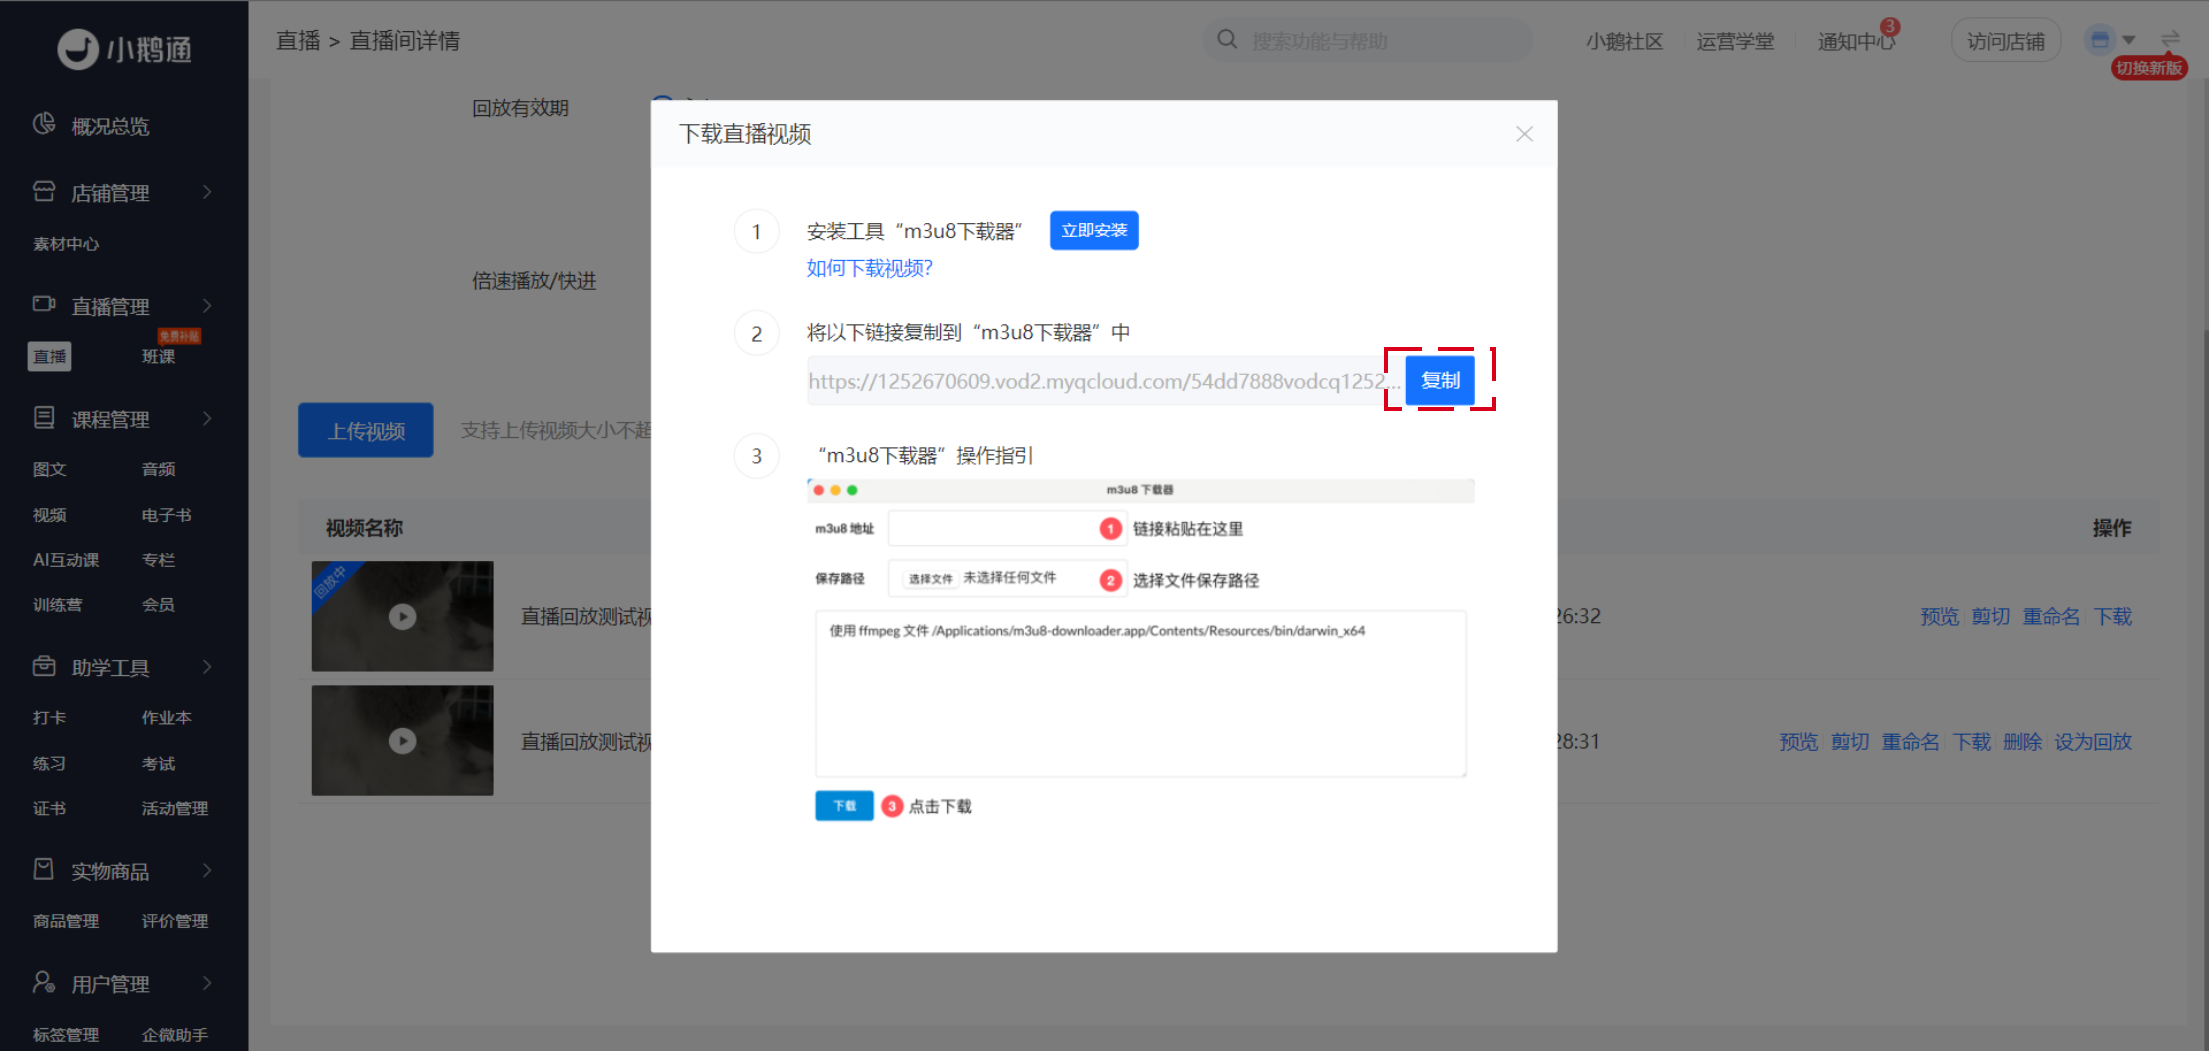
</span>

![image.png](https://wechatapppro-1252524126.file.myqcloud.com/help_document/image/ueditor/69585800_1640005429.png ".png")

<span style="font-size:15px;">2. Open the 'm3u8 Downloader' and paste the video link into the downloader;</span>

![image (1).png](https://wechatapppro-1252524126.file.myqcloud.com/help_document/image/ueditor/44955600_1640005430.png ".png")

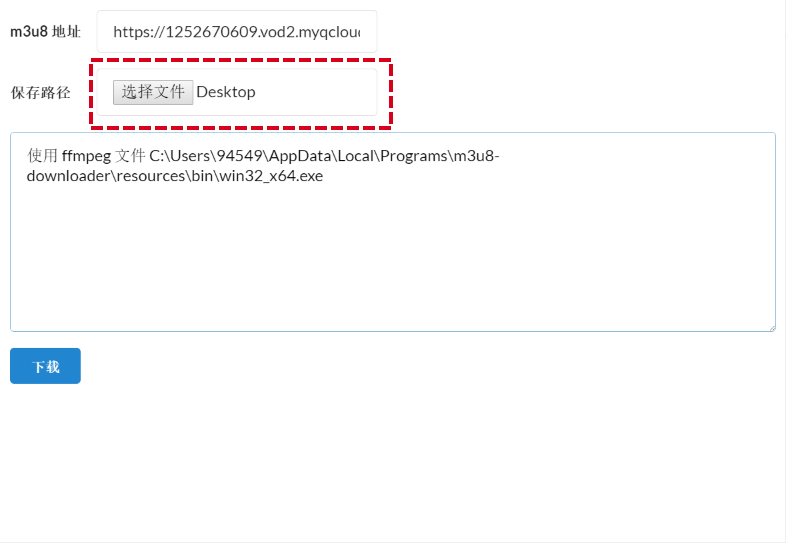
<span style="font-size:15px;">3. Select the file save path;</span>

![image (2).png](https://wechatapppro-1252524126.file.myqcloud.com/help_document/image/ueditor/84902000_1640005430.png ".png")

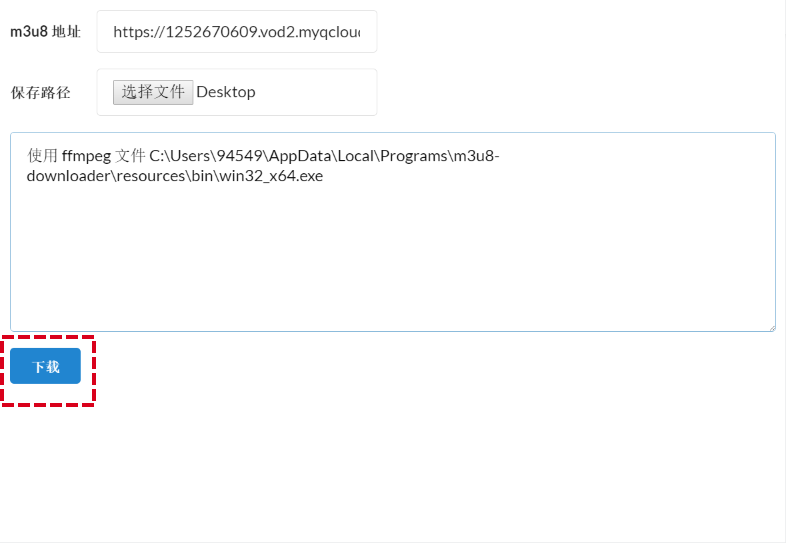
<span style="font-size:15px;">4. Click \[Download\] - Start downloading the video;</span>

![image (3).png](https://wechatapppro-1252524126.file.myqcloud.com/help_document/image/ueditor/41129000_1640005431.png ".png")

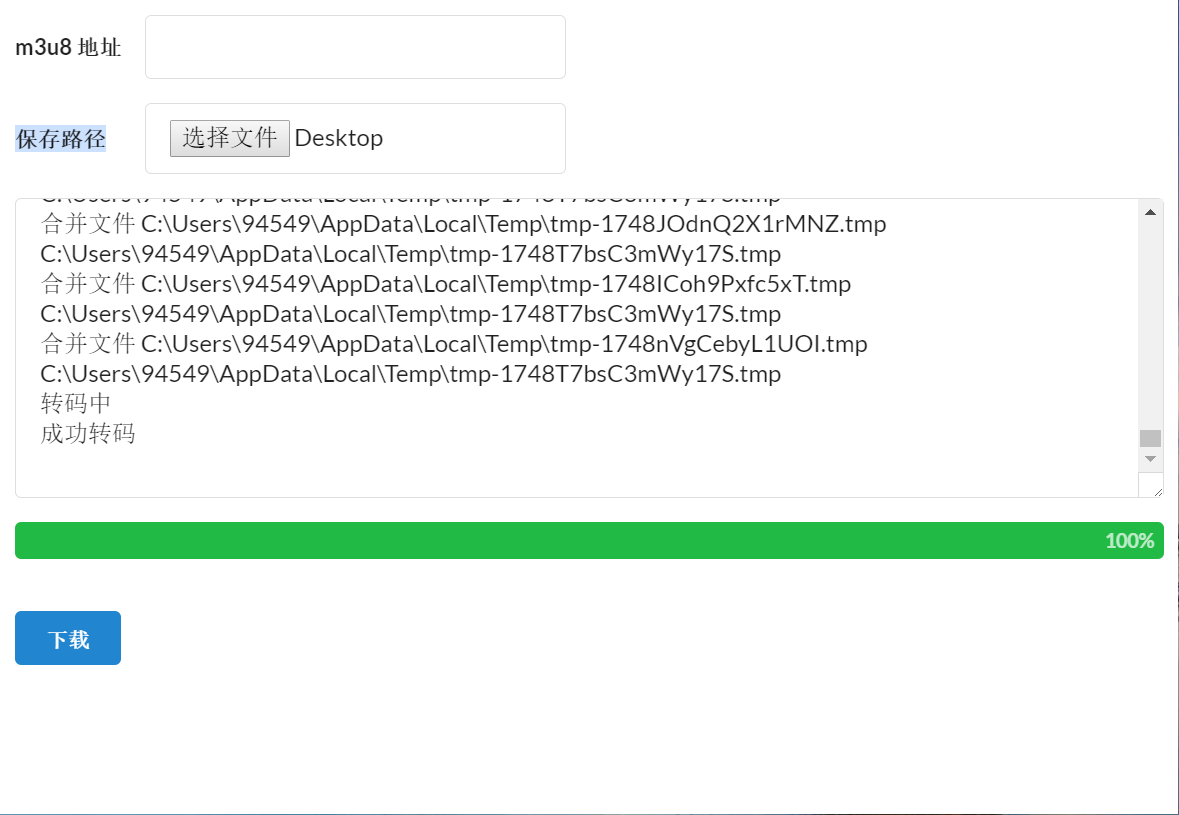
![image (4).png](https://wechatapppro-1252524126.file.myqcloud.com/help_document/image/ueditor/87969300_1640005431.png ".png")

<span style="font-size:15px;">5. The download is complete.</span>

![image (5).png](https://wechatapppro-1252524126.file.myqcloud.com/help_document/image/ueditor/42575600_1640005432.png ".png")

# How to convert videos with mismatched encoding to the H264 encoding format?

<div data-elink-language-switch="1" id="bkmrk-%E4%B8%AD%E6%96%87" style="border:1px solid #d6d9de;border-radius:6px;padding:10px 12px;margin:0 0 18px 0;background:#f8fafc;font-size:14px;">[中文](/books/8f855/page/h264)</div><span style="font-size:15px;">Due to browser compatibility issues with different video encodings, the elink platform only supports videos in H264 encoding format. After uploading non-H264 encoded videos to the material center page, the video status will be displayed in an orange reminder state (as shown in the figure below). The video files cannot be previewed on the B-side management console, but it does not affect the viewing experience of C-side learners.</span>

<span style="font-size:15px;">![image.png](https://wechatapppro-1252524126.file.myqcloud.com/help_document/image/ueditor/60090300_1640351881.png ".png")</span>

<span style="font-size:15px;">  
</span>

<span style="font-size:15px;">For such video files with encoding mismatches, merchants can use third-party video format conversion tools to convert the video encoding. The following provides two tool examples and operation processes for Windows and Mac systems:</span>

**<span style="font-size:15px;">1. Windows system: It is recommended to use the 'Format Factory' software.</span>**

<span style="font-size:15px;">1. Download the 'Format Factory' client software, enter the 'Format Factory' page, and select the video format you want to export.</span>

![image (1).png](https://wechatapppro-1252524126.file.myqcloud.com/help_document/image/ueditor/87995800_1640351940.png ".png")

<span style="font-size:15px;">2. Enter the format conversion page and click \[Add Files\].</span>

![image (2).png](https://wechatapppro-1252524126.file.myqcloud.com/help_document/image/ueditor/60484900_1640351977.png ".png")

<span style="font-size:15px;">3. Select the files you want to convert. Multiple files are supported. Click \[Open\].</span>

![image (3).png](https://wechatapppro-1252524126.file.myqcloud.com/help_document/image/ueditor/24614000_1640352027.png ".png")

<span style="font-size:15px;">4. Click \[Output Configuration\], and a configuration pop-up window will appear.</span>

![image (4).png](https://wechatapppro-1252524126.file.myqcloud.com/help_document/image/ueditor/25754300_1640352040.png ".png")

<span style="font-size:15px;">5. Select \[Video Encoding: AVC (H264)\] and click \[OK\].</span>

![image (5).png](https://wechatapppro-1252524126.file.myqcloud.com/help_document/image/ueditor/96280700_1640352055.png ".png")

<span style="font-size:15px;">6. Click \[OK\].</span>

![image (6).png](https://wechatapppro-1252524126.file.myqcloud.com/help_document/image/ueditor/4469700_1640352069.png ".png")

<span style="font-size:15px;">7. Click \[Start\], and the video will start transcoding.</span>

![image (7).png](https://wechatapppro-1252524126.file.myqcloud.com/help_document/image/ueditor/43069100_1640352082.png ".png")

<span style="font-size:15px;">8. After the transcoding is completed, click \[Folder\] to view the storage location of the transcoded video.</span>

![image (8).png](https://wechatapppro-1252524126.file.myqcloud.com/help_document/image/ueditor/32586700_1640352090.png ".png")

![image (9).png](https://wechatapppro-1252524126.file.myqcloud.com/help_document/image/ueditor/81393800_1640352120.png ".png")

**<span style="font-size:15px;">2. Mac system: It is recommended to use the 'Jianying Pro' client software.</span>**

<span style="font-size:15px;">Reminder: Currently, Jianying only supports transcoding MP4 and MOV video files to H264 encoding.</span>

<span style="font-size:15px;">1. Download the 'Jianying Pro' client software, enter the 'Jianying Pro' page, and click \[Start Production\].</span>

![image (10).png](https://wechatapppro-1252524126.file.myqcloud.com/help_document/image/ueditor/228800_1640352199.png ".png")

<span style="font-size:15px;">2. Enter the production page and click \[Import\].</span>

![image (11).png](https://wechatapppro-1252524126.file.myqcloud.com/help_document/image/ueditor/27038800_1640352206.png ".png")

<span style="font-size:15px;">3. Select the files you want to convert the format of. Multiple video files are supported. Click \[Open\] to import the files.</span>

![image (12).png](https://wechatapppro-1252524126.file.myqcloud.com/help_document/image/ueditor/10925200_1640352213.png ".png")

<span style="font-size:15px;">4. Drag one of the files to the editing area. Currently, Jianying only supports transcoding a single file. Multiple files need to be operated multiple times.</span>

![image (13).png](https://wechatapppro-1252524126.file.myqcloud.com/help_document/image/ueditor/68193700_1640352257.png ".png")

<span style="font-size:15px;">5. Click \[Export\], and a configuration window will pop up.</span>

![image (14).png](https://wechatapppro-1252524126.file.myqcloud.com/help_document/image/ueditor/35601100_1640352287.png ".png")

<span style="font-size:15px;">6. Select \[Encoding Format: H264\] and click \[Export\].</span>

![image (15).png](https://wechatapppro-1252524126.file.myqcloud.com/help_document/image/ueditor/36335100_1640352296.png ".png")

<span style="font-size:15px;">7. After the upload is completed, click \[Open Folder\] to view the storage location of the transcoded video.</span>

<span style="font-size:15px;">![image (16).png](https://wechatapppro-1252524126.file.myqcloud.com/help_document/image/ueditor/51067300_1640352307.png ".png")</span>

<span style="font-size:15px;">  
</span>

# How to download live replay videos using [Online browser download]

<div data-elink-language-switch="1" id="bkmrk-%E4%B8%AD%E6%96%87" style="border:1px solid #d6d9de;border-radius:6px;padding:10px 12px;margin:0 0 18px 0;background:#f8fafc;font-size:14px;">[中文](/books/8f855/page/3c778)</div><span style="font-size:17px;">**I. Function Introduction**</span>

<span style="font-size:15px;">After the live stream ends, use a browser to download the live replay video online.</span>

<span style="font-size:17px;">**II. Use Scenarios**</span>

<span style="font-size:15px;">Scenario 1: Live Stream Management - Live Stream Details - Replay Settings - Download Live Stream Replay Video</span>

<span style="font-size:15px;">Scenario 2: Media Center - Videos - Download Live Stream Replay Video</span>

<span style="font-size:17px;">**III. Operation Path**</span>

<span style="font-size:15px;">Merchant Side:</span>

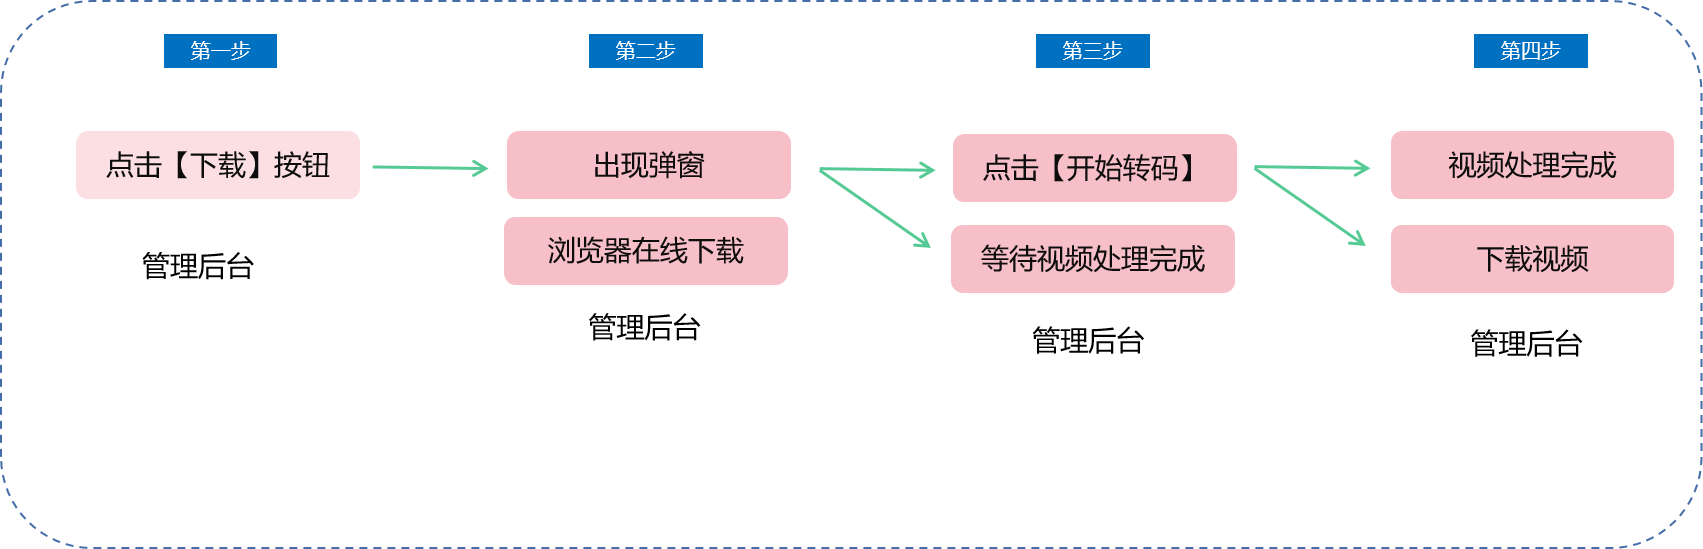
<span style="font-size:15px;">1. Management Console - Live Stream Management - Live Stream Details - Replay Settings - Download Live Stream Replay Video - A pop - up window appears - Download online via browser - Start transcoding - Download the video</span>

<span style="font-size:15px;">2. Management Console - Media Center - Videos - Download Live Stream Replay Video - Download Live Stream Replay Video - A pop - up window appears - Download online via browser - Start transcoding - Download the video</span>

![11.png](https://wechatapppro-1252524126.file.myqcloud.com/help_document/image/ueditor/22902800_1699435527.png ".png")

<span style="font-size:17px;">**IV. Usage Tutorial**</span>

**<span style="font-size:15px;">Step 1:</span>**<span style="font-size:15px;">Click the 'Download' button for the live stream replay video on the management console - A pop - up window appears.</span>

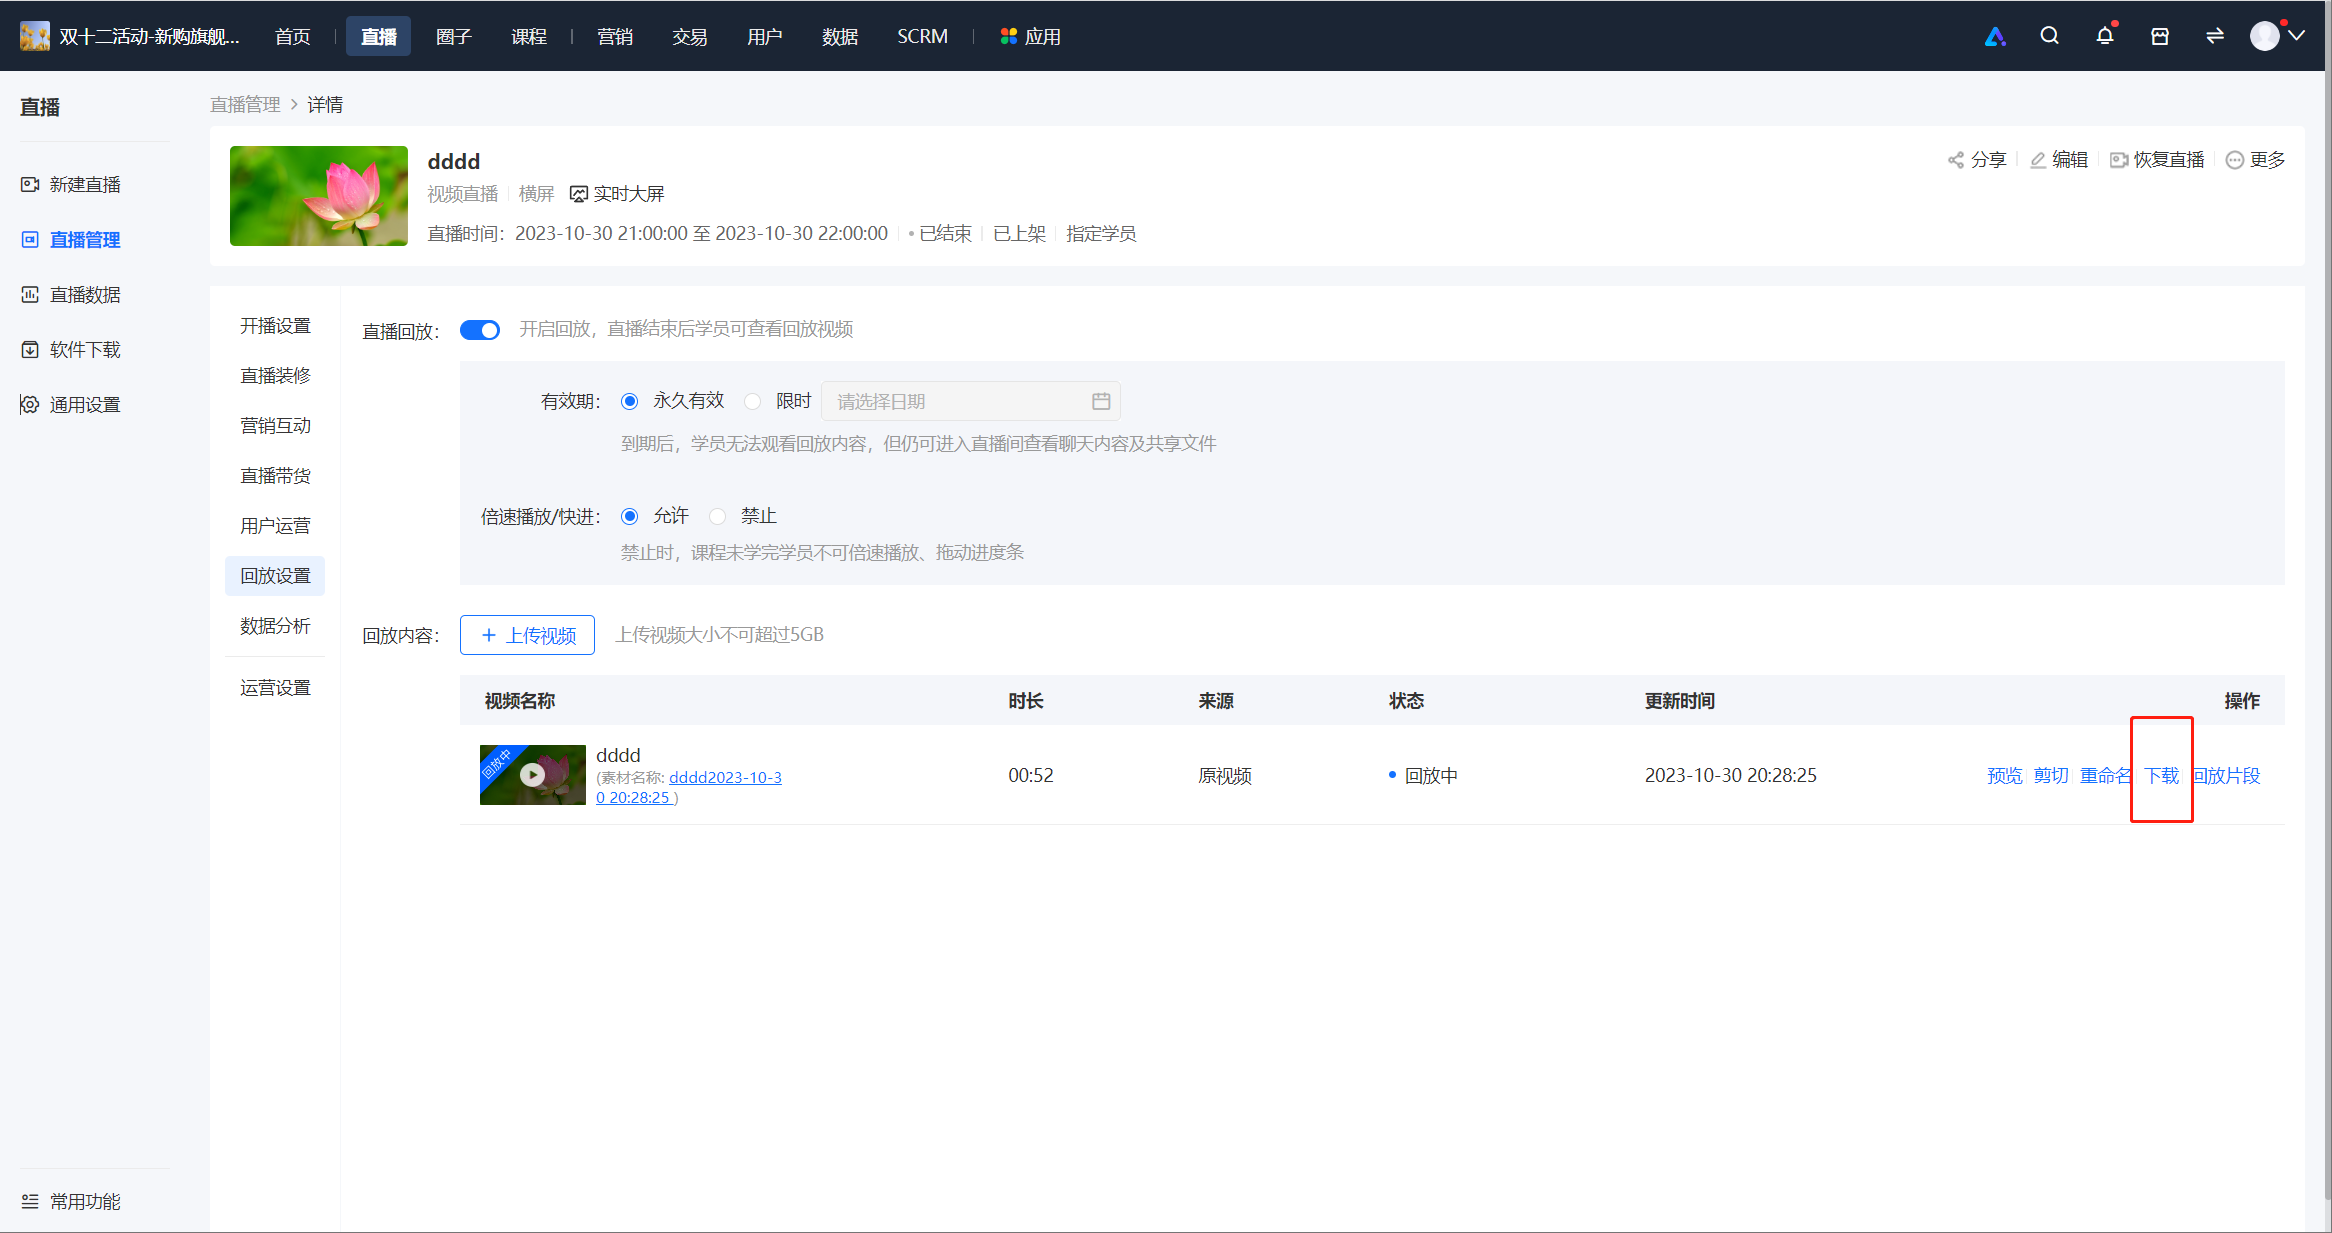
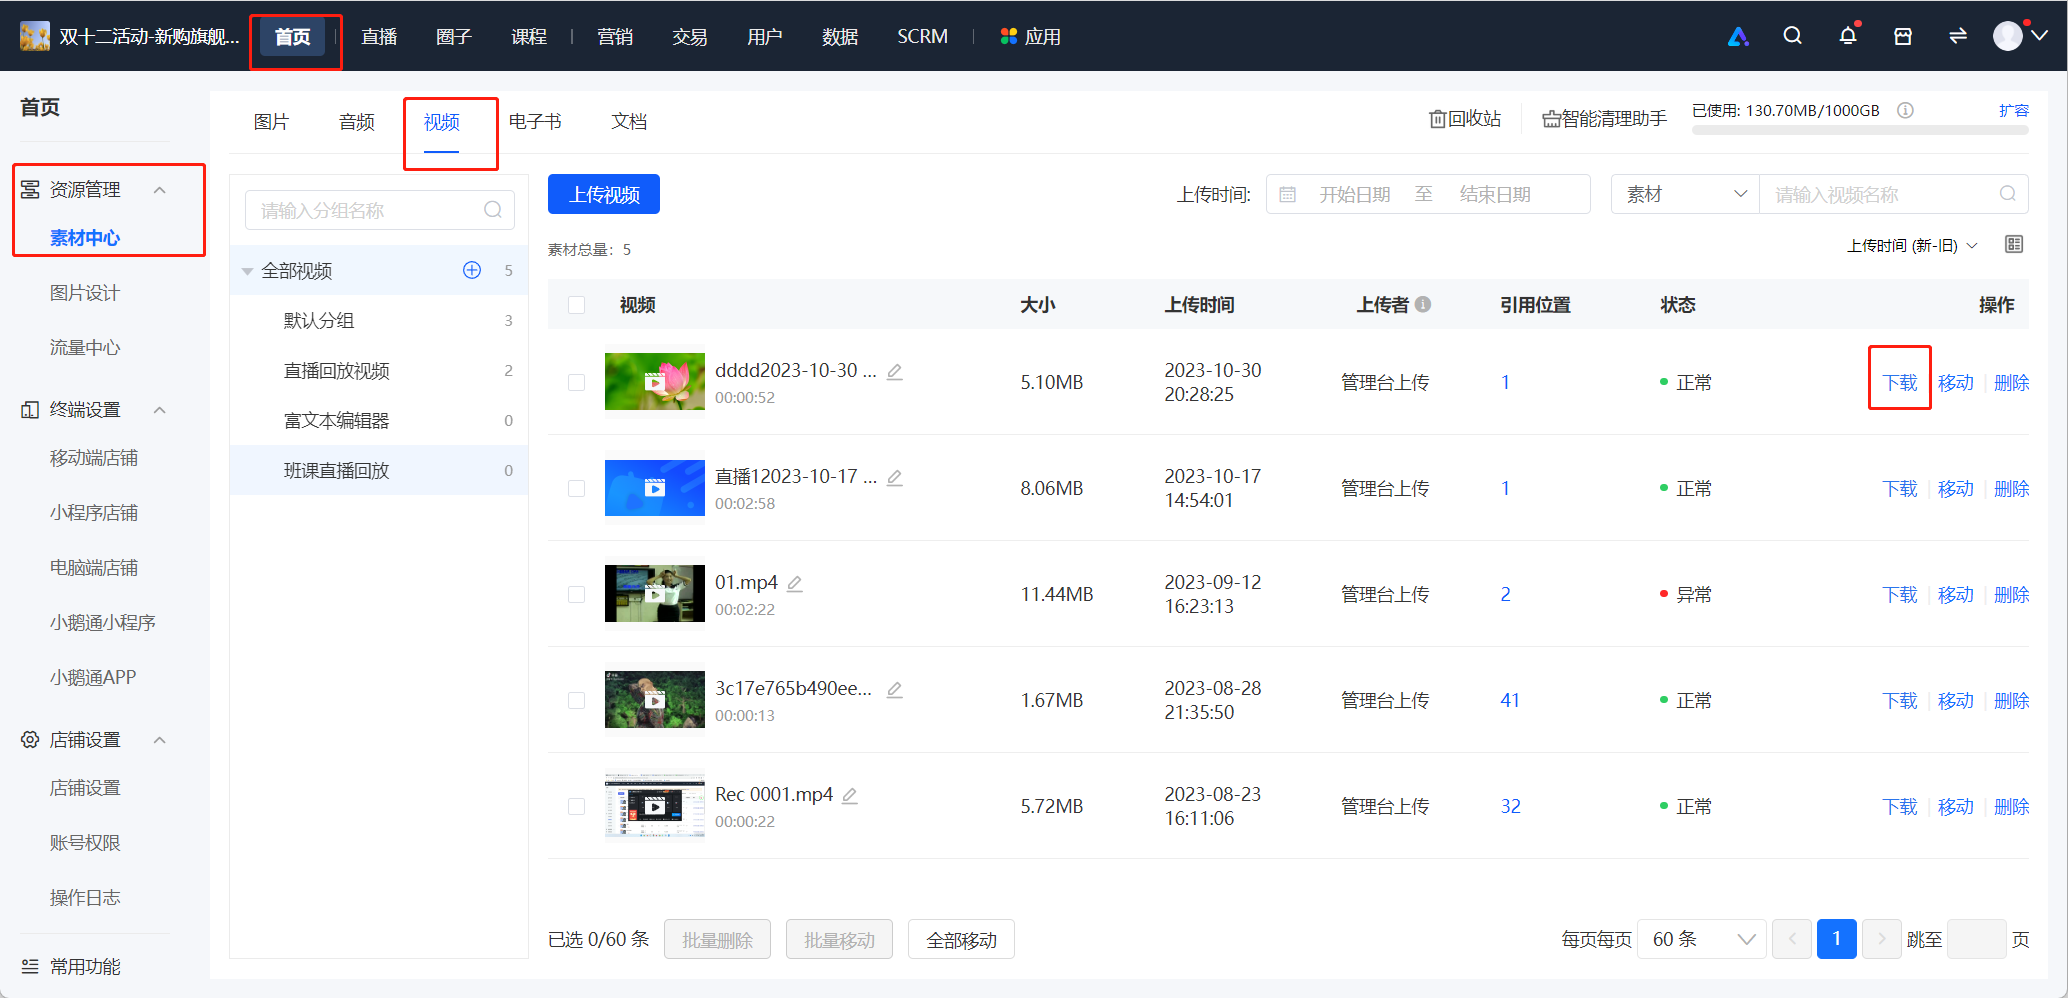
<span style="font-size:15px;">1. Management Console - Live Stream Management - Live Stream Details - Replay Settings - Click 'Download'</span>

<span style="font-size:15px;">Management Console - Media Center - Videos - Live Stream Replay Video - Click 'Download'</span>

![企业微信截图_16994336502283.png](https://wechatapppro-1252524126.file.myqcloud.com/help_document/image/ueditor/33235500_1699435544.png ".png")

![企业微信截图_16994351683216.png](https://wechatapppro-1252524126.file.myqcloud.com/help_document/image/ueditor/35666500_1699435553.png ".png")

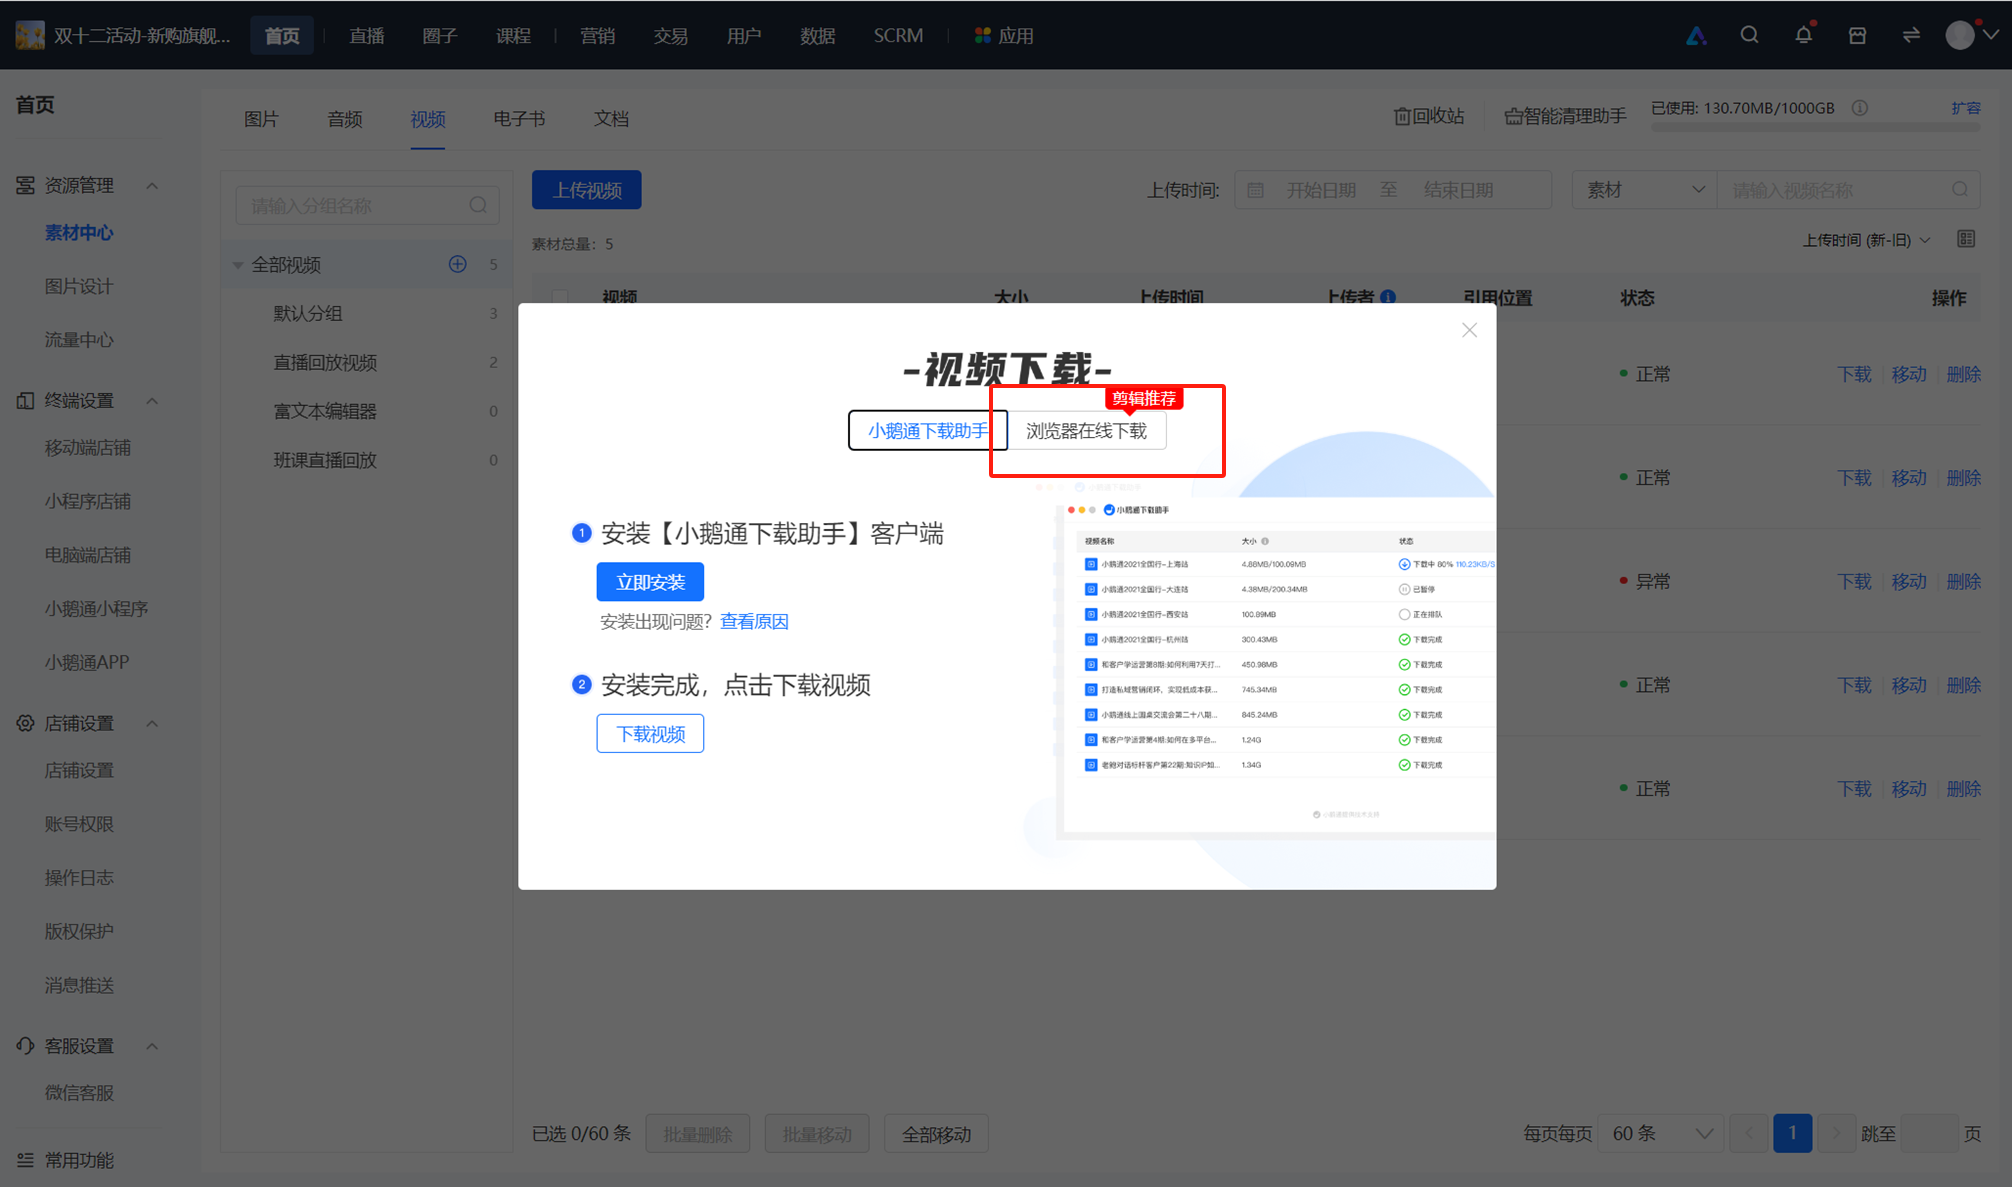
<span style="font-size:15px;">2. A pop - up window guiding you to download the live stream video appears.</span>

<span style="font-size:15px;">![image.png](https://wechatapppro-1252524126.file.myqcloud.com/help_document/image/ueditor/1517900_1699436101.png ".png")</span>

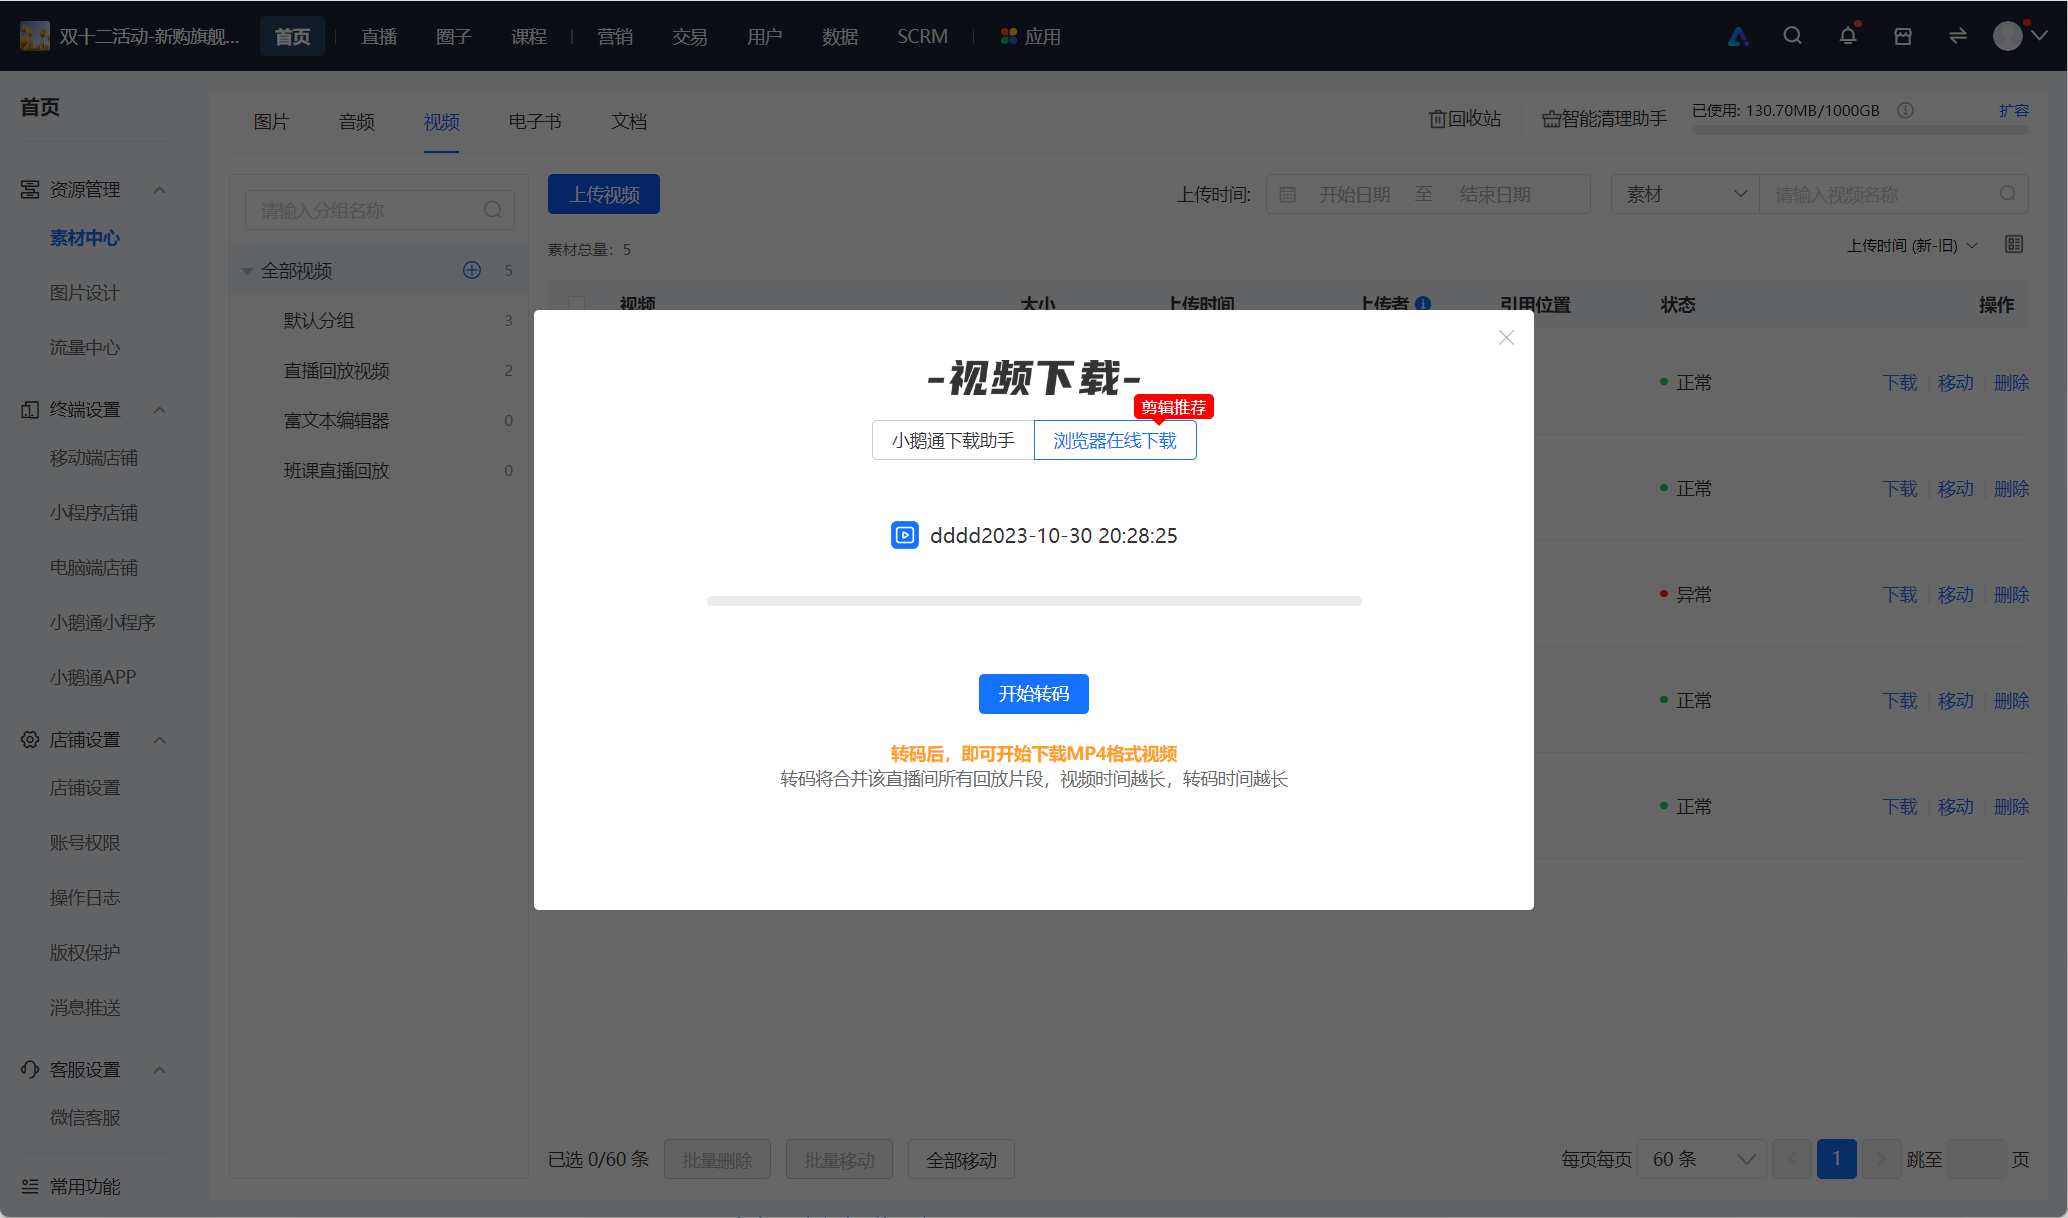
<span style="font-size:15px;">3. Click 'Download online via browser';</span>

<span style="font-size:15px;">![企业微信截图_16994352299694.png](https://wechatapppro-1252524126.file.myqcloud.com/help_document/image/ueditor/98774700_1699435605.png ".png")</span>

**<span style="font-size:15px;">Step 2:</span>**<span style="font-size:15px;">Transcode the video</span>

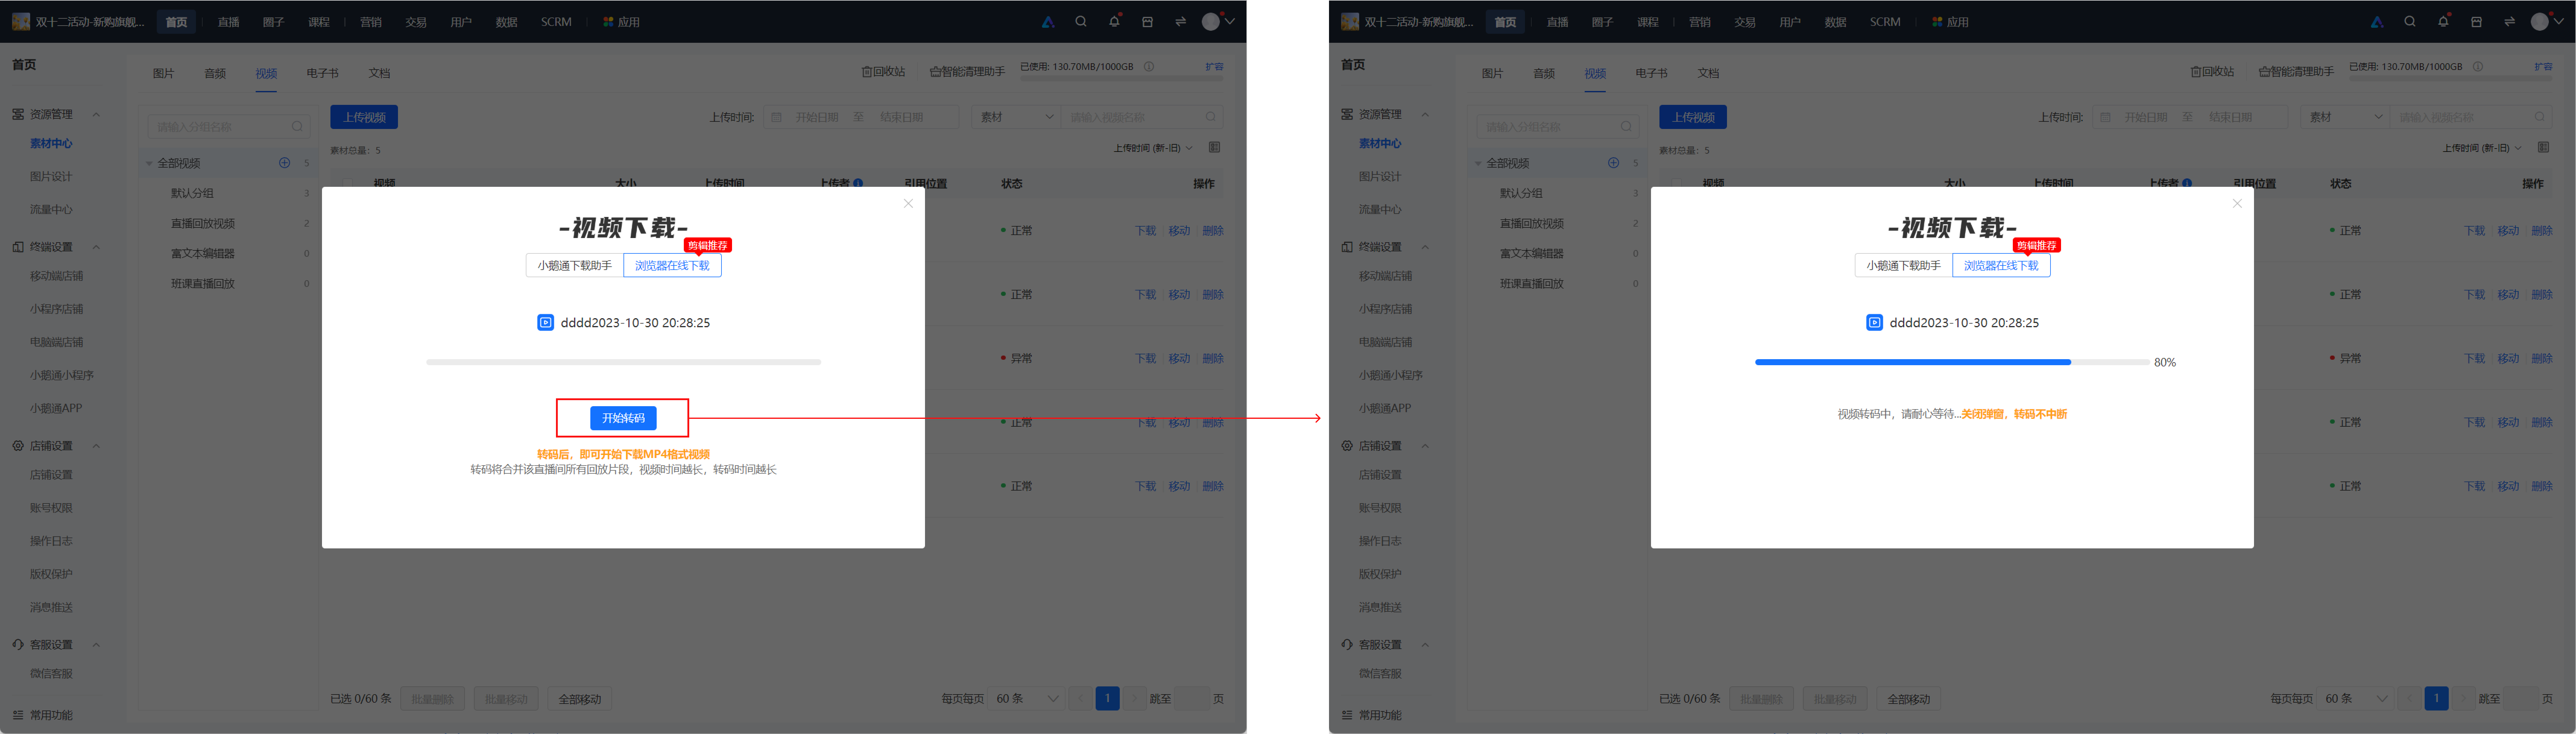
<span style="font-size:15px;">Click 'Start transcoding' in the pop - up window - The background starts processing the video - Wait for the transcoding to succeed;</span>

<span style="font-size:15px;">![image.png](https://wechatapppro-1252524126.file.myqcloud.com/help_document/image/ueditor/76230000_1699436205.png ".png")</span>

**<span style="font-size:15px;">Step 3:</span>**<span style="font-size:15px;">Download the video</span>

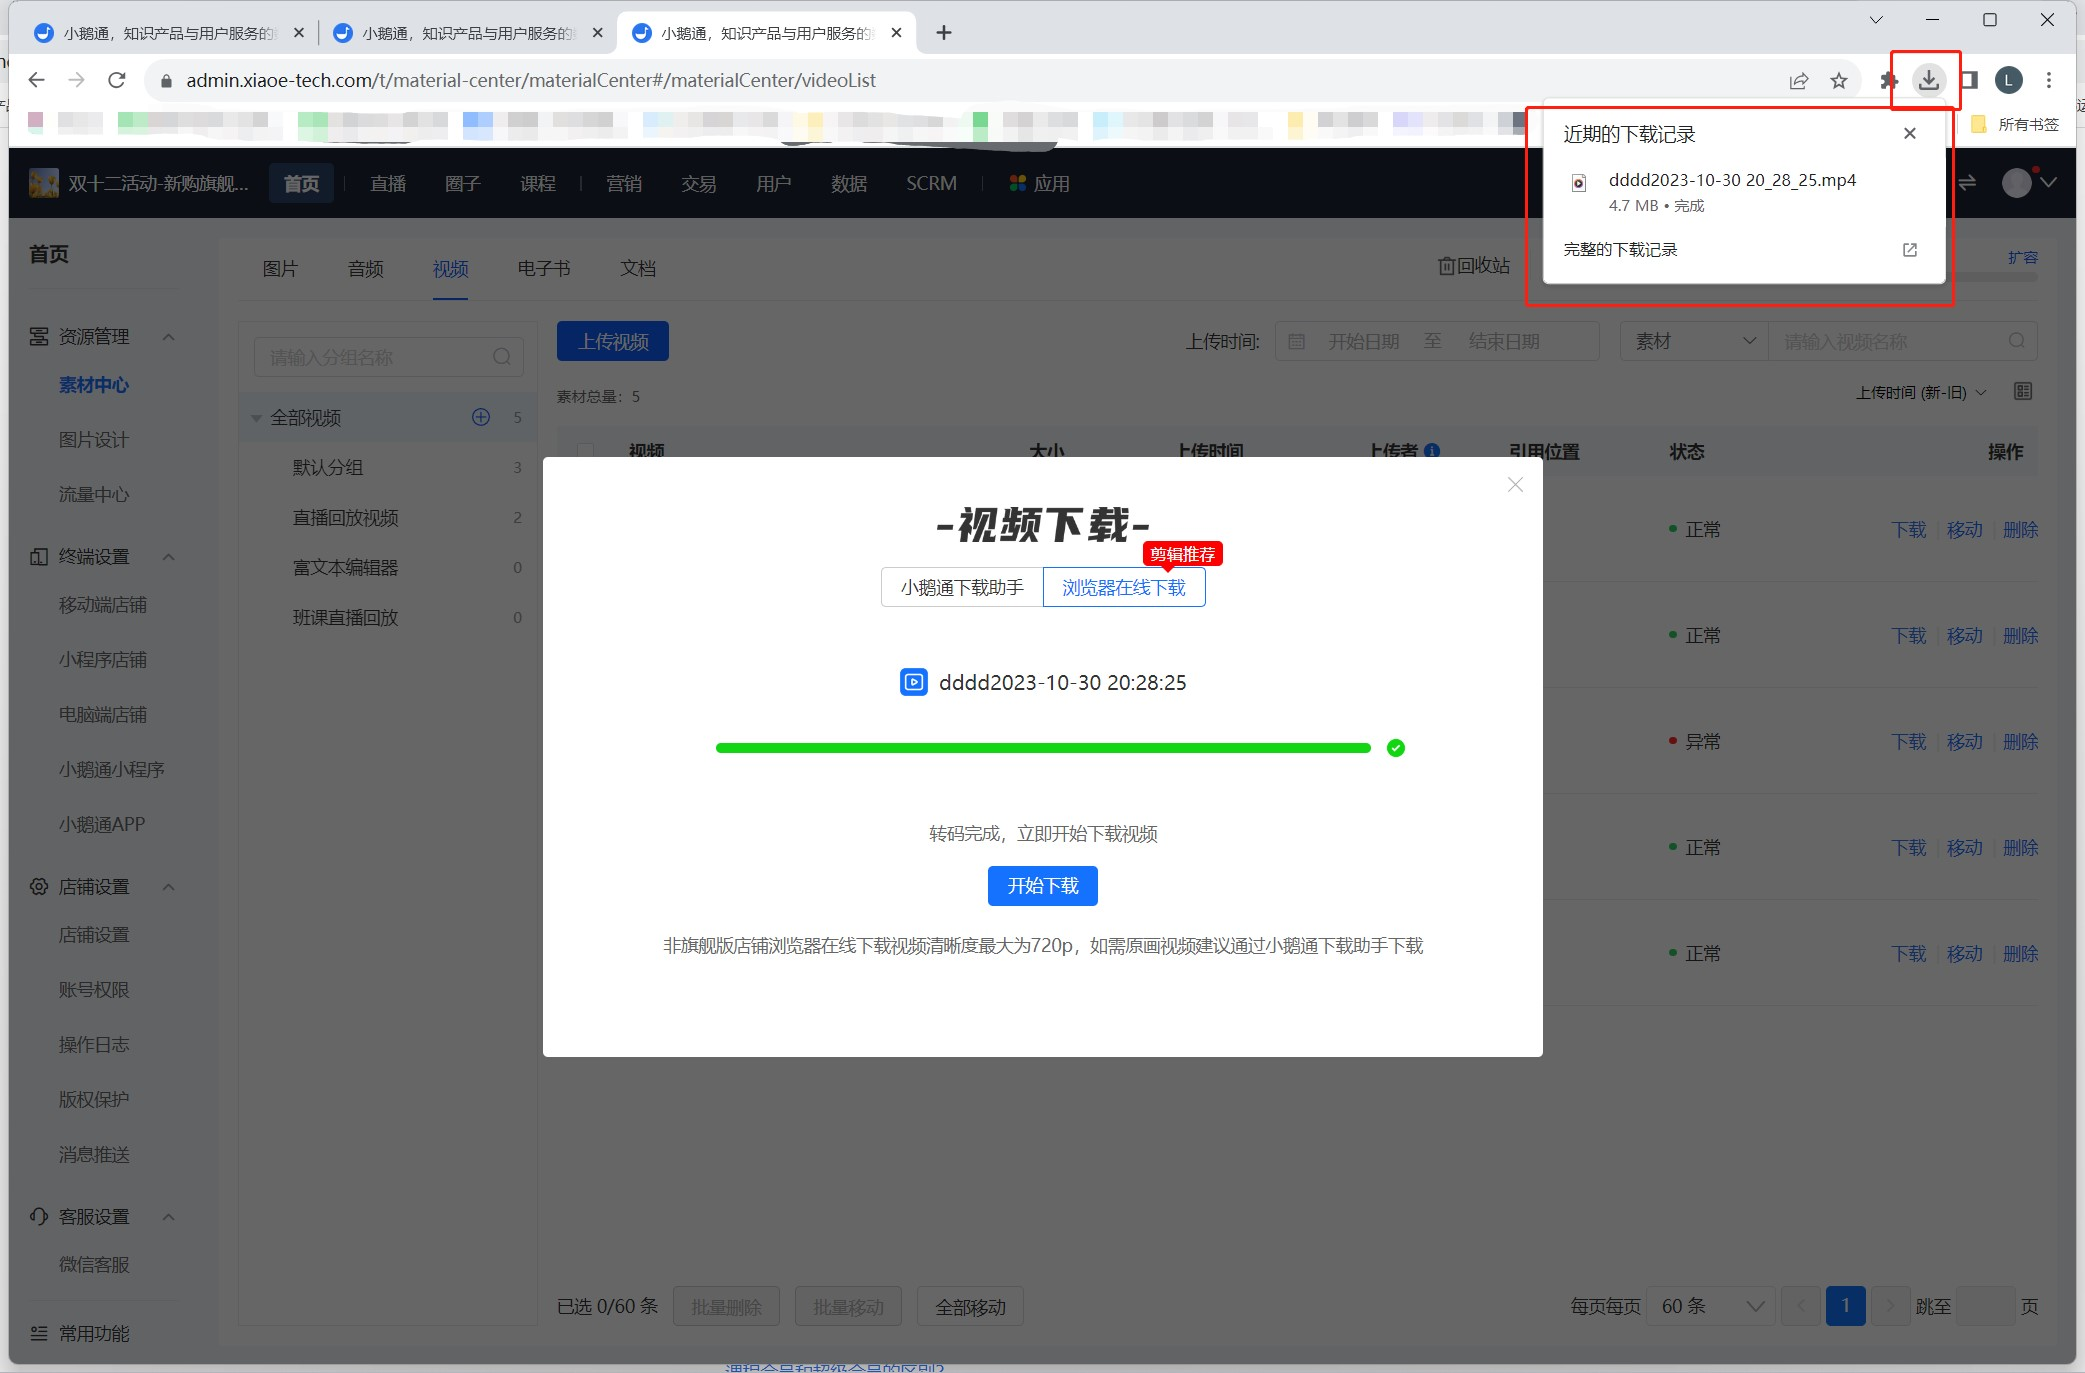
<span style="font-size:15px;">After the transcoding is successful, click 'Download now' in the pop - up window - The browser starts downloading the replay video.</span>

<span style="font-size:15px;">![image.png](https://wechatapppro-1252524126.file.myqcloud.com/help_document/image/ueditor/19890000_1699436205.png ".png")</span>