Computer-based store
- Tutorial on using the store navigation on the desktop
- Newcomer's Guide to PC Online Store
- Tutorial on using the footer settings
- Tutorial on Using the Rich Text Component
- Tutorial on Using the Tutor Special Topic
- Tutorial on Navigating Settings for the Online Store on Desktop
- Tutorial on Using the Micro Page on the Desktop
- Can users pay to purchase courses in the PC version of the Online Store?
- Can the footer of the PC version of the online store be customized?
- What interactive tools are supported in the online store on the desktop version?
- Can users send voice messages when watching live courses in the PC version of the Online Store?
- What scenarios are the store navigation of the PC version of the online store applicable to?
- Tutorial on Using the Online Store Navigation
- Tutorial on Using Micro Pages
Tutorial on using the store navigation on the desktop
I. Function Introduction
II. Purpose of Use
By setting up store navigation, merchants can categorize pages and guide users to browse pages on different topics.
III. Scenario Examples
Scenario 1: If a merchant's Online Store has a large number of products and activities, they can use store navigation to guide users through the pages. The store navigation can lead to the mini - homepage, course themes, or the latest content.
Scenario 2: Merchants can set up an event page and a course promotion page. Through store navigation, users can jump between the homepage, events, promotions, and their personal pages, guiding them to focus on the pre - set content.
IV. Operation Path
Merchant side: Desktop management console → Store→ Store decoration → Desktop store → Store navigation
V. Usage Tutorial
Step 1:Click [Store management - Desktop - Store navigation] to enter the store navigation editing page.
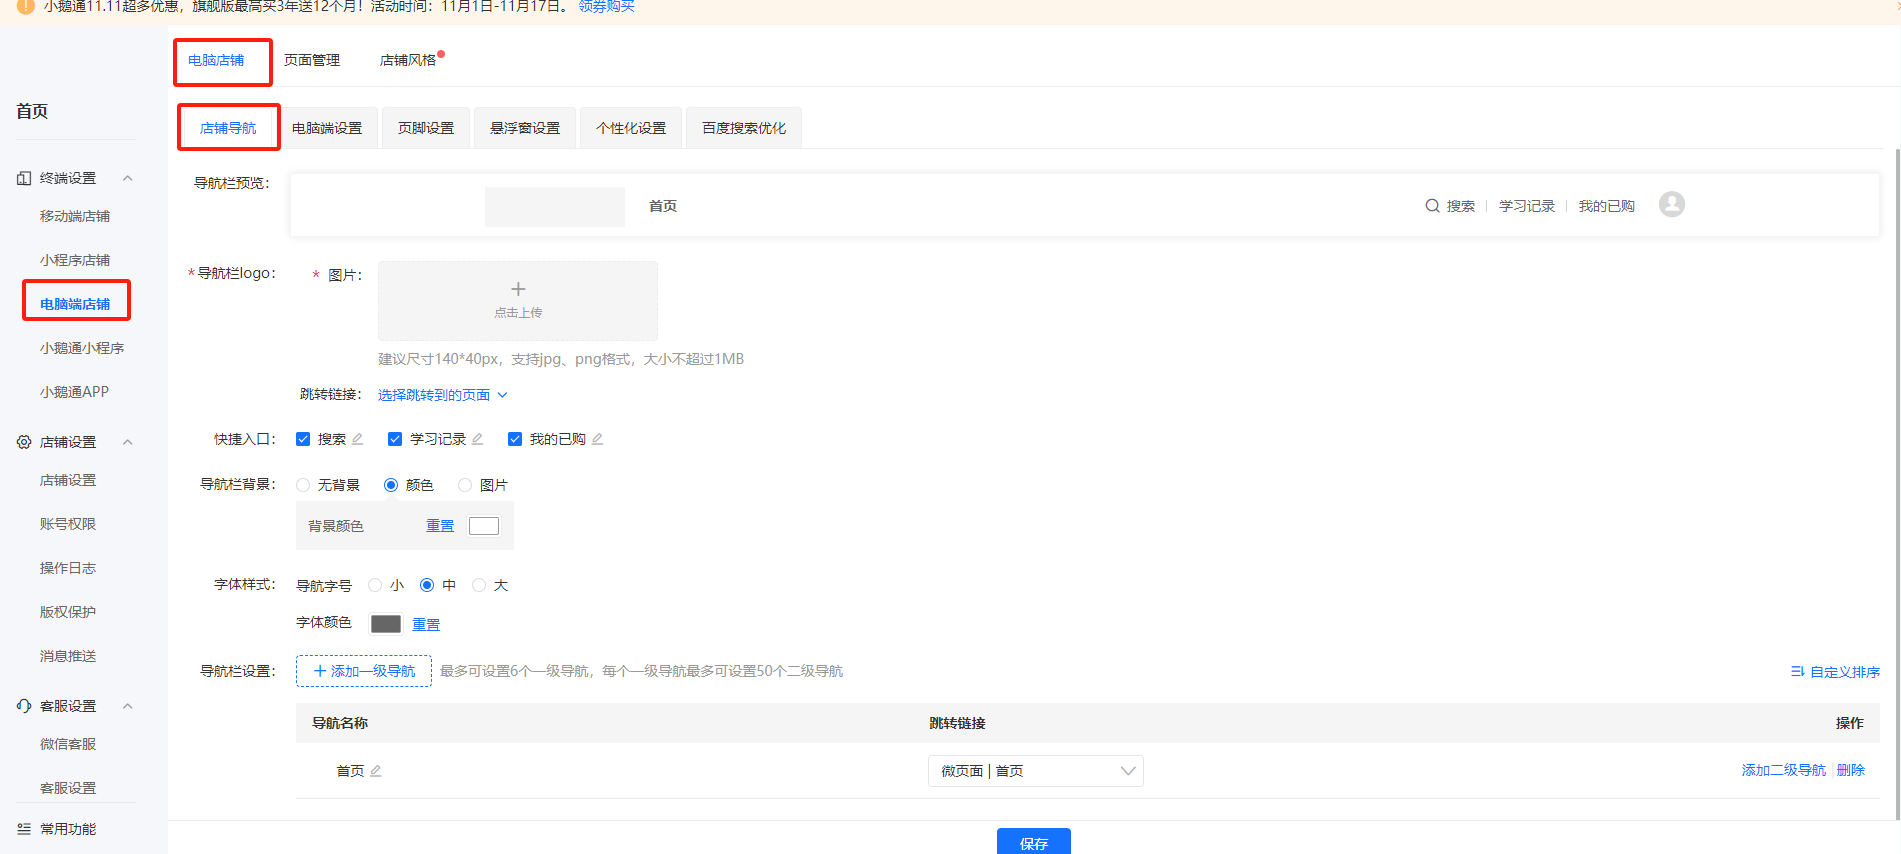
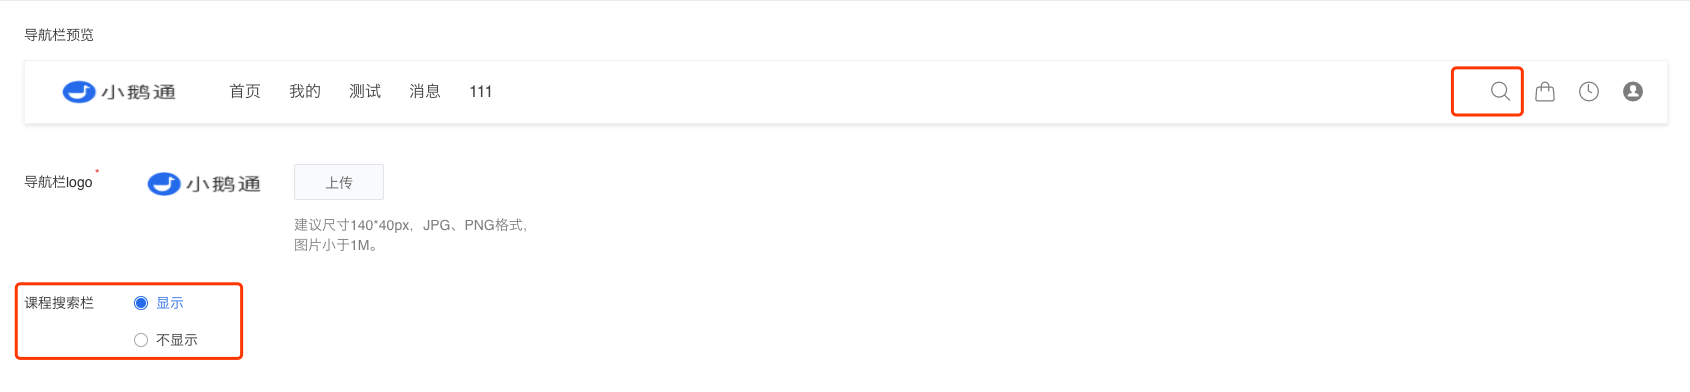
Step 2:You can upload a navigation logo and view the effect above.

Step 3:You can customize whether to display the course search bar. If it is displayed, you can view the effect in the preview area.
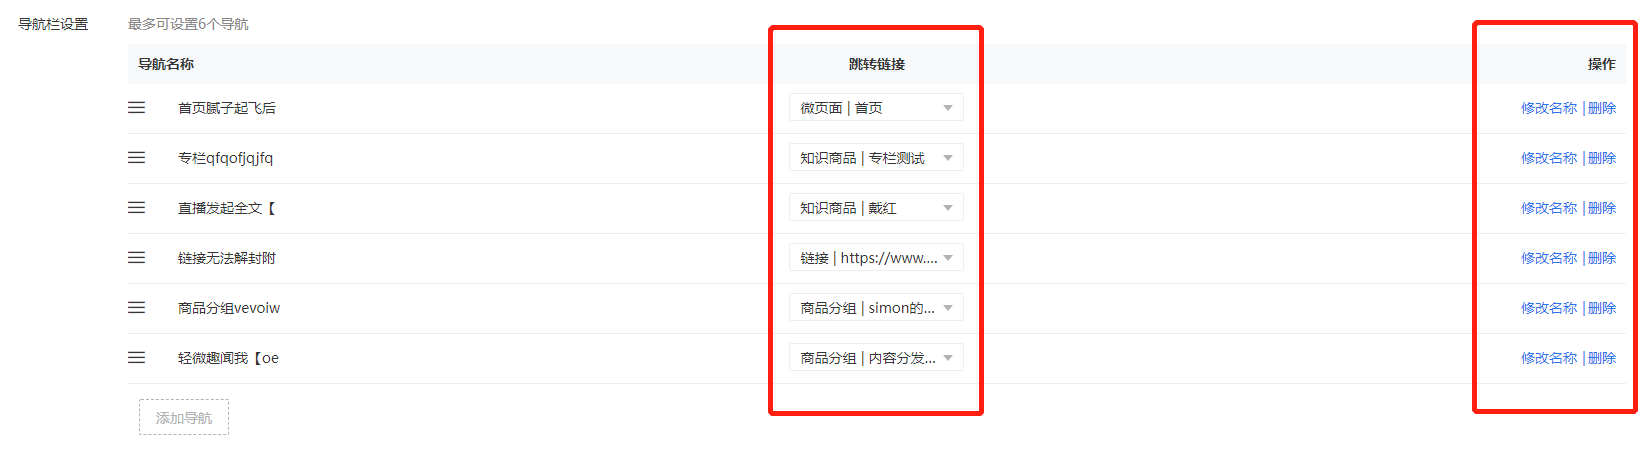
Step 4:You can customize the navigation names and the pages they link to. You can also drag the navigation editing boxes with the mouse to adjust their order. You can add up to 6 navigation items.
Newcomer's Guide to PC Online Store
Step 1:Register a Online Store: https://admin.xiaoe-tech.com/helpCenter/problem?first_id=38&second_id=133&document_id=doc_5a100547a8b71_qai4S
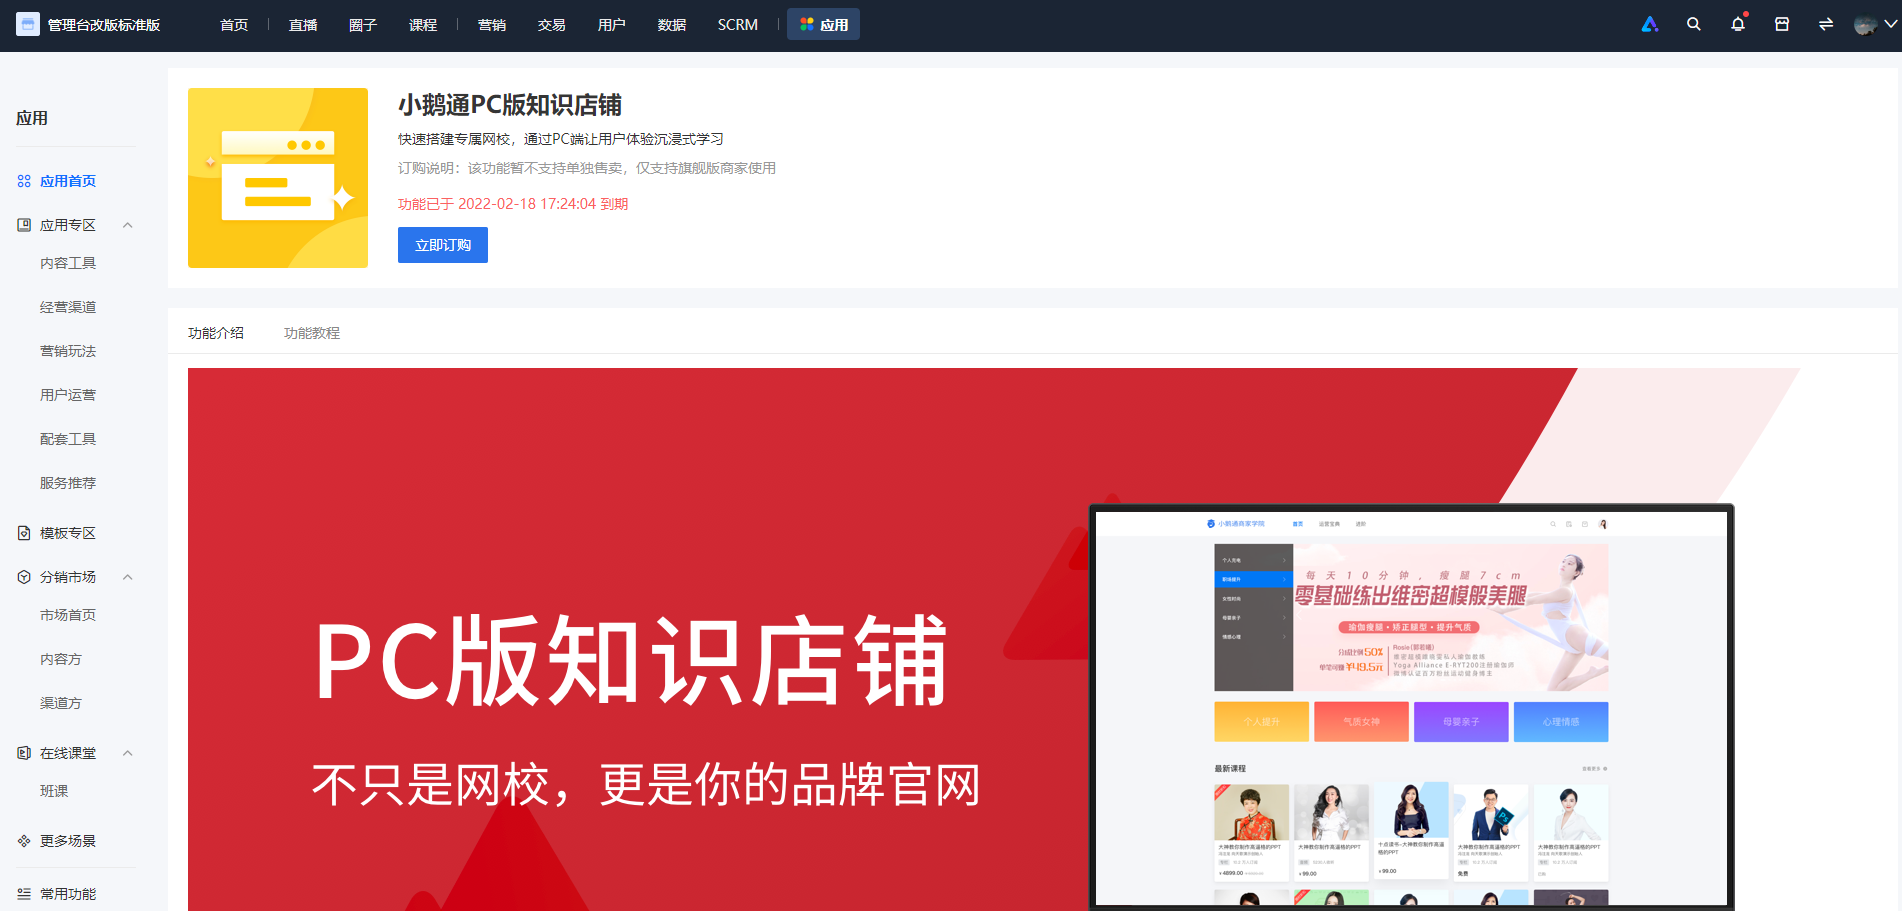
Step 2:To activate the standalone PC website, you must first subscribe/renew the Premium Edition. Navigate to Terminal Settings > PC Store to activate the PC e-learning platform.
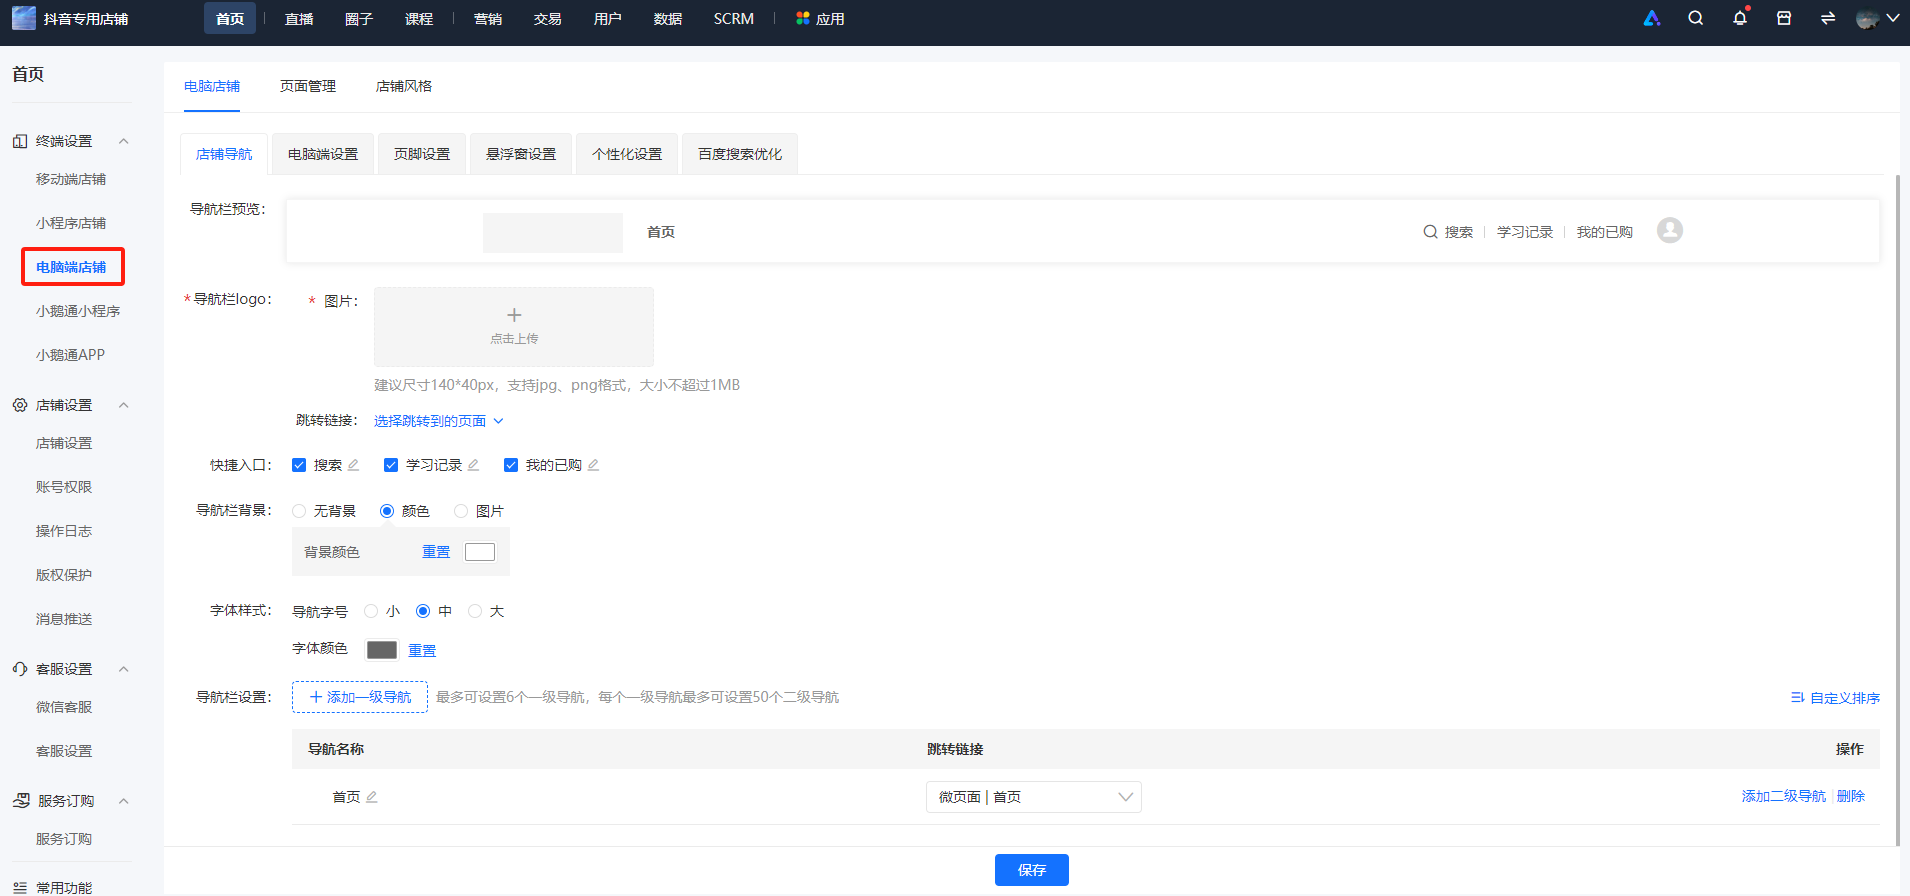
Step 3:Terminal Settings > PC Store, and configure the Mini Page, Store Navigation, PC Settings, and Footer Settings respectively.
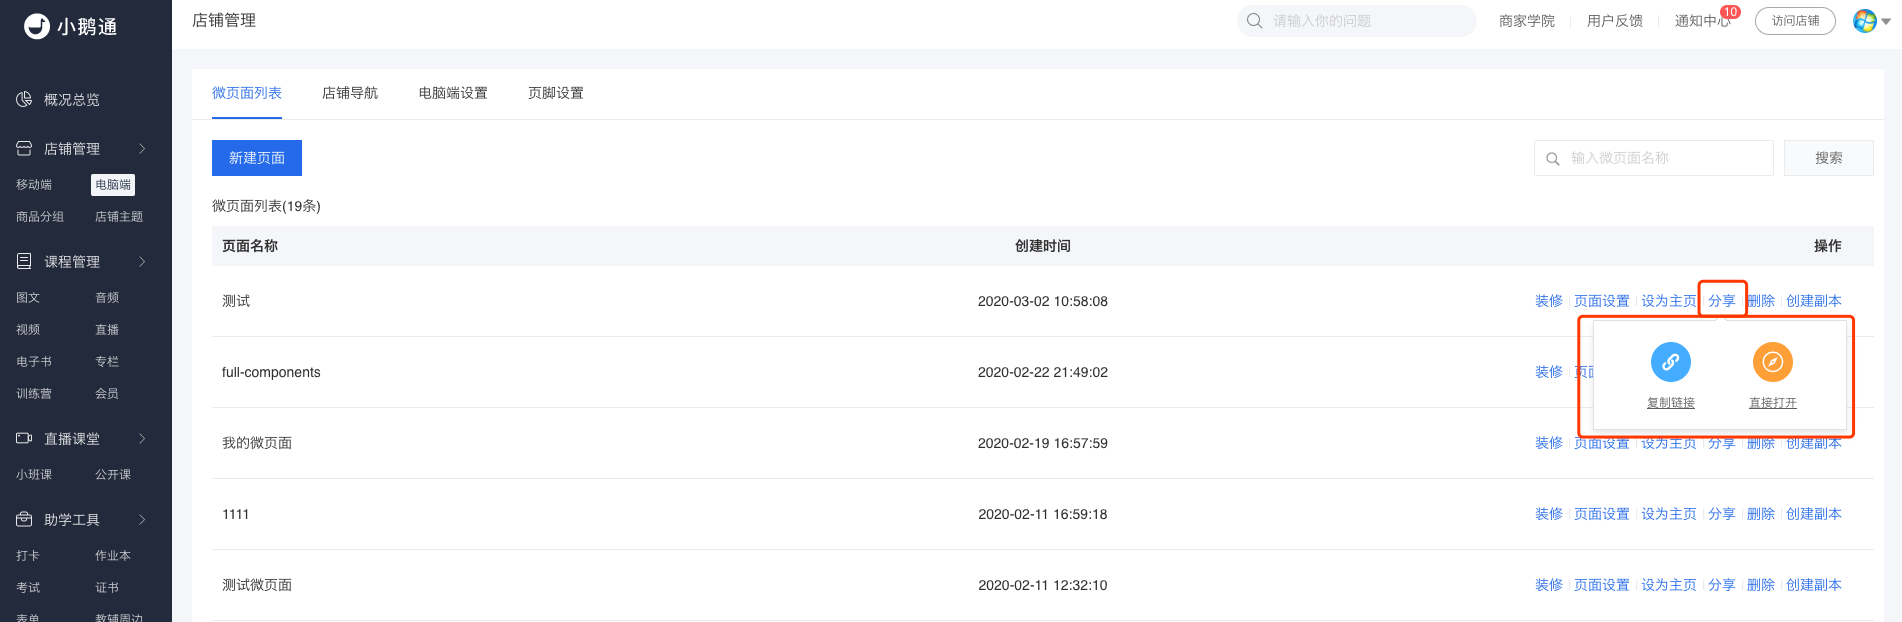
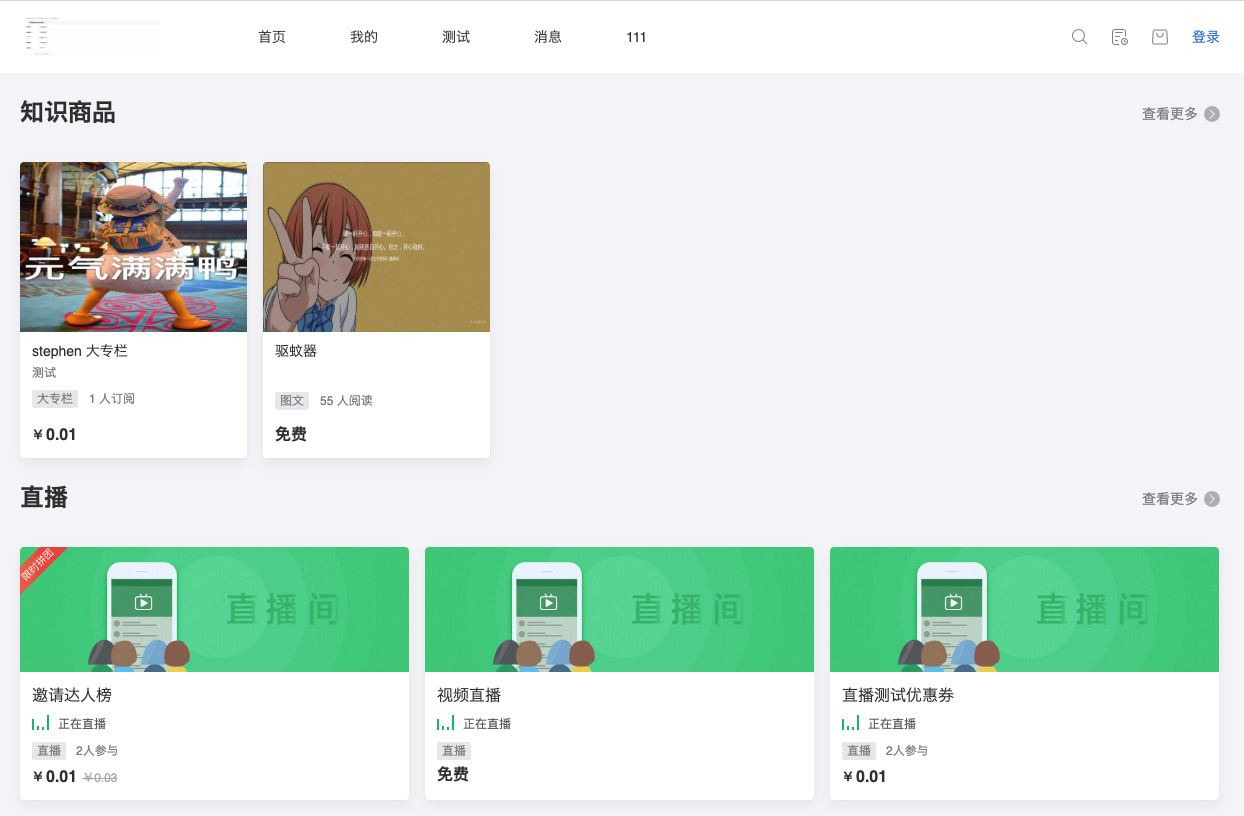
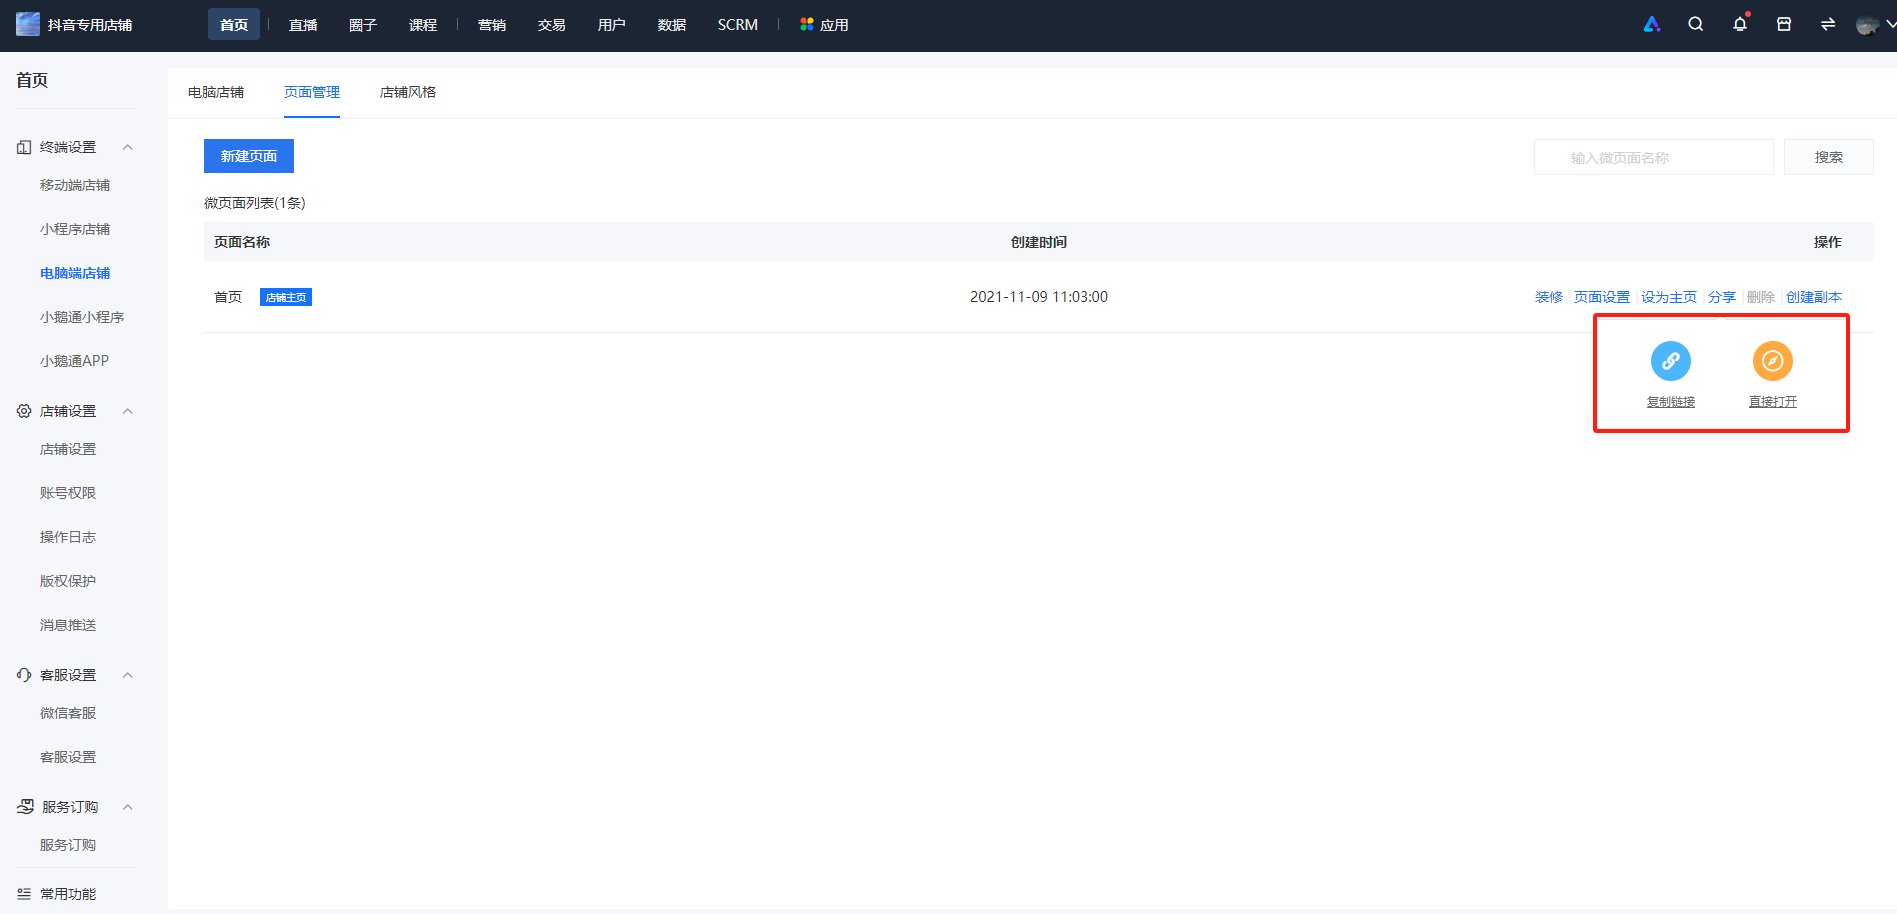
Step 4:After configuration, click [Share] on the Mini Page and choose to copy the link to the PC e-learning platform or directly open the web address.
Tutorial on using the footer settings
Step 1:Go to [Homepage] - [Terminal Settings] - [Desktop Store], and click [Footer Settings].
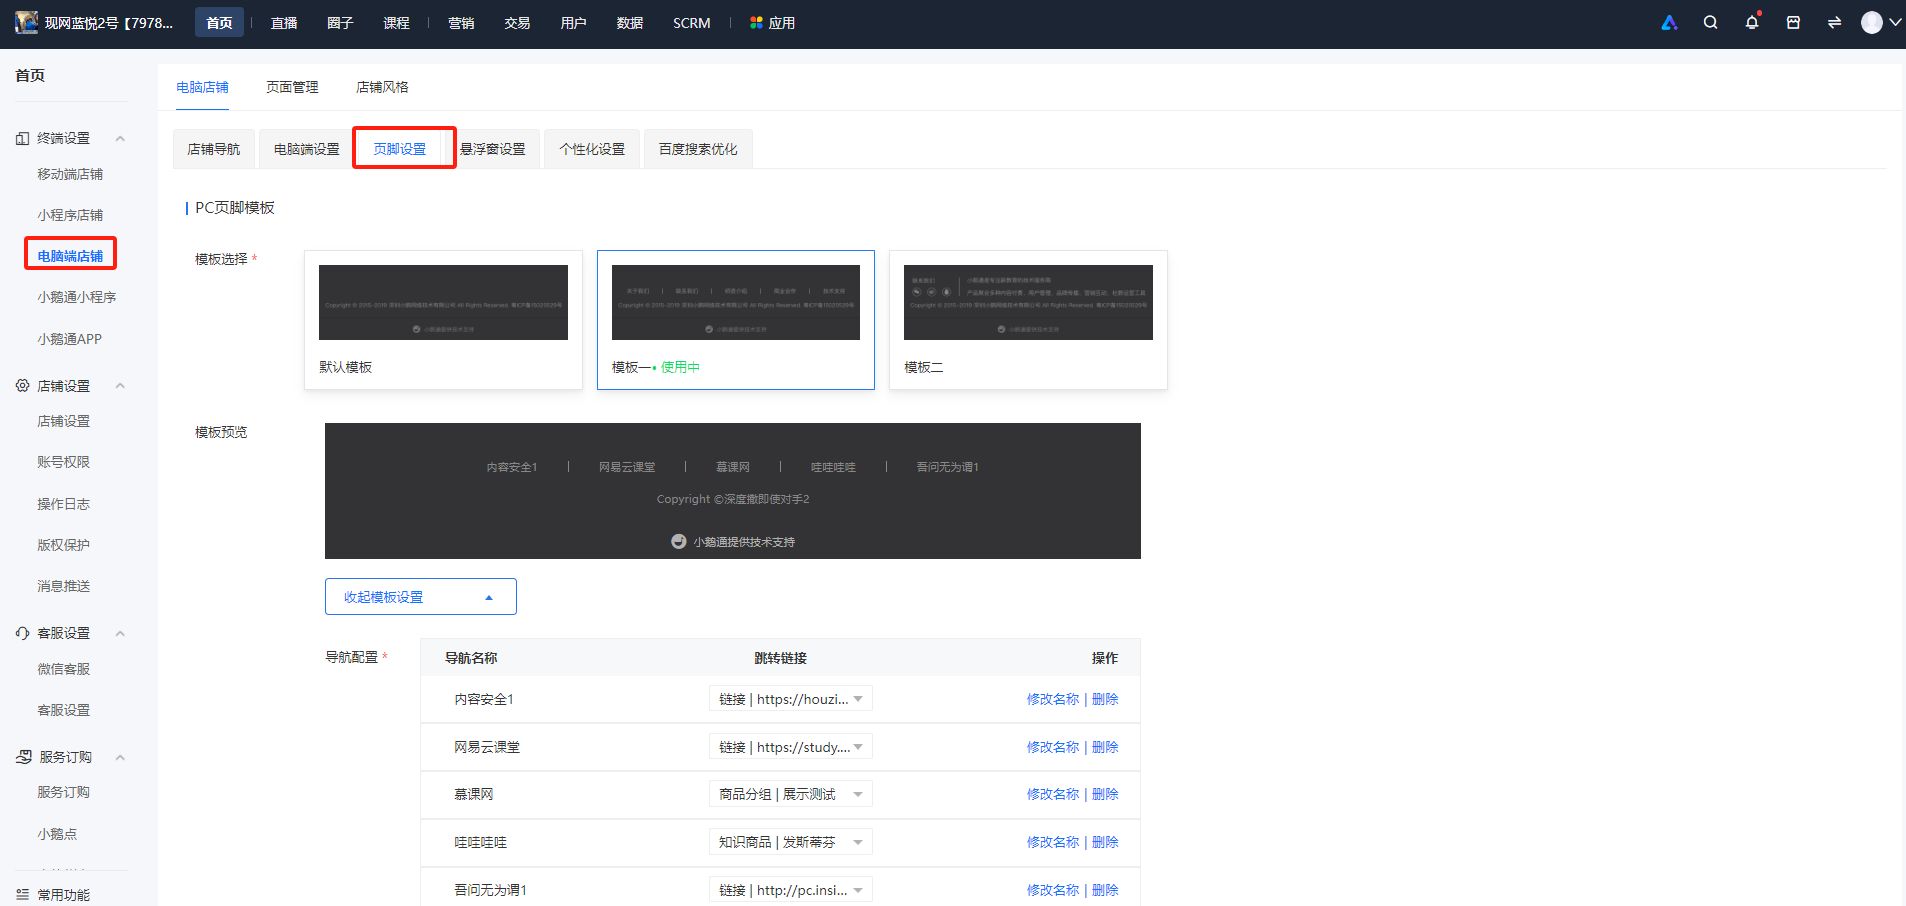
Step 2:Select an appropriate template and edit the template content.
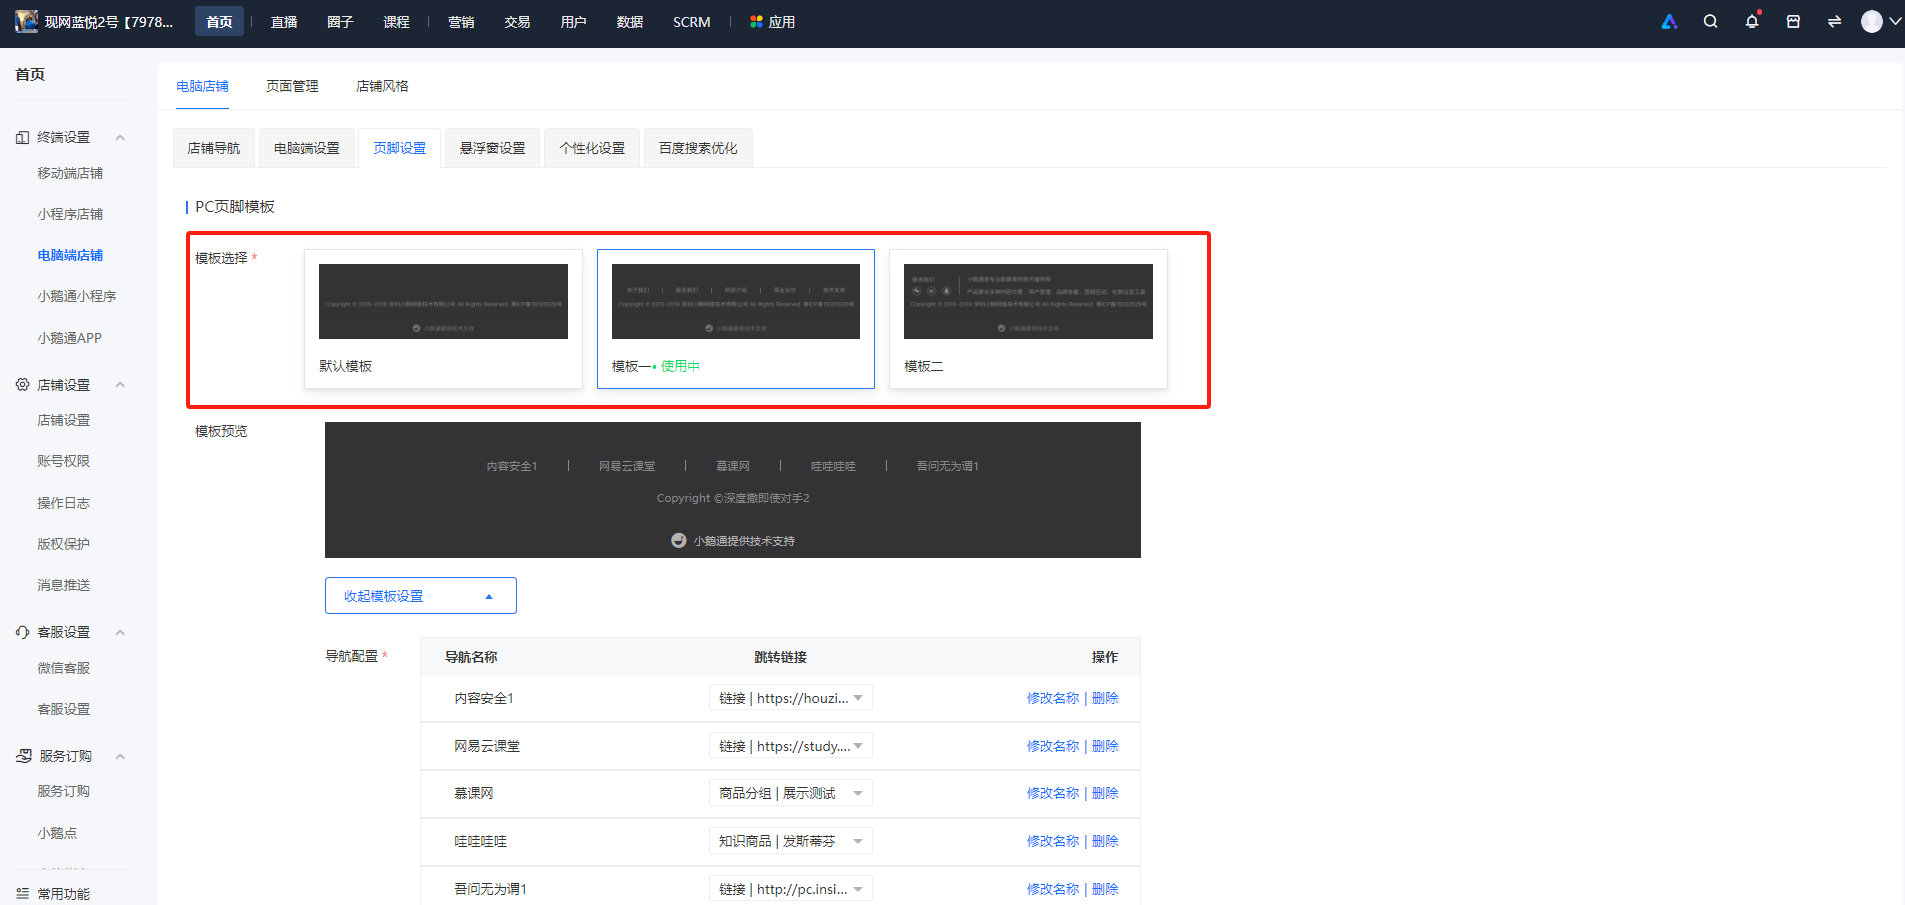
Step 3:Click Save and Enable.The template will be successfully enabled.

Tutorial on Using the Rich Text Component
You can use rich text to achieve personalized and flexible page decoration. For example, you can create posters and event pages. There's no limit to what you can imagine, and nothing is beyond its capabilities.


Tutorial on Using the Tutor Special Topic
The tutor special topic component offers two styles: horizontal and vertical. Each style supports four background colors and allows a maximum of 10 teachers to be added.
● Style 1:

● Style 2:

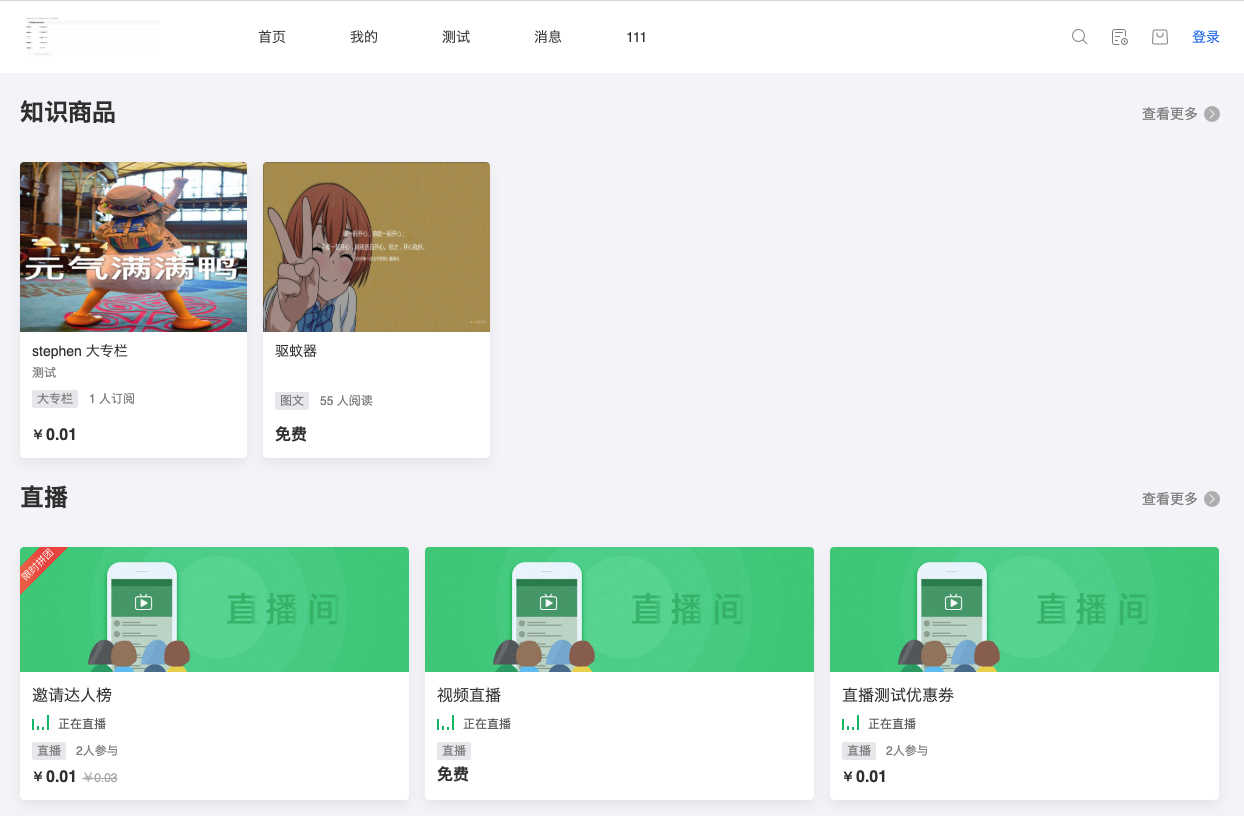
The display effect on the PC website is as shown in the following figure:


Tutorial on Navigating Settings for the Online Store on Desktop
I. Function Introduction
II. Purpose of Use
By setting the store navigation, merchants can categorize the pages and guide users to browse pages of different themes.
III. Scenario Examples
Scenario 1: If a merchant has a large number of products and activities in their online store, they can use the store navigation to guide users through the pages. The store navigation can lead to the mini homepage, course themes, or the latest content.
Scenario 2: Merchants can set up an event page and a course promotion page. Through the store navigation, users can jump between the homepage, events, promotions, and their personal pages, guiding them to focus on the pre - set content.
IV. Operation Path
Merchant side: Merchant backend → Terminal settings → PC store → Store navigation
V. Usage Tutorial
Step 1:Click [Store - PC store - Store navigation] to enter the store navigation editing page;
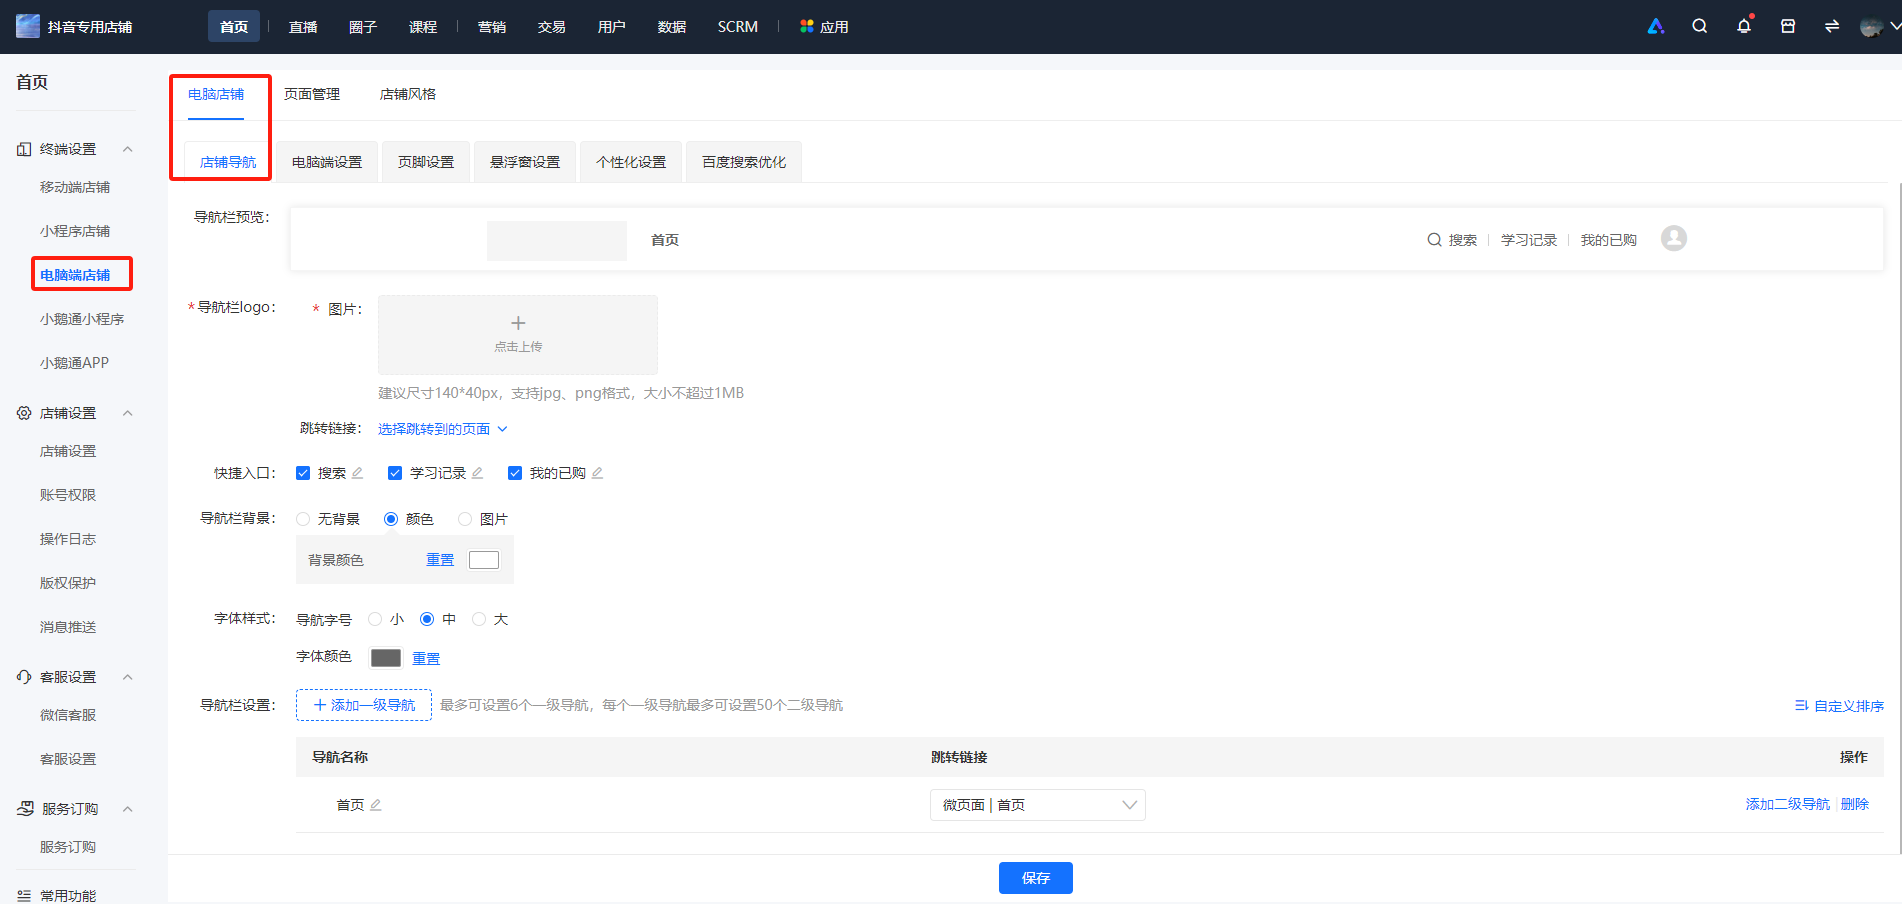
Step 2:You can upload the navigation logo and view the effect above.

Step 3:You can customize whether to display the course search bar. If it is displayed, you can view the effect in the preview area.
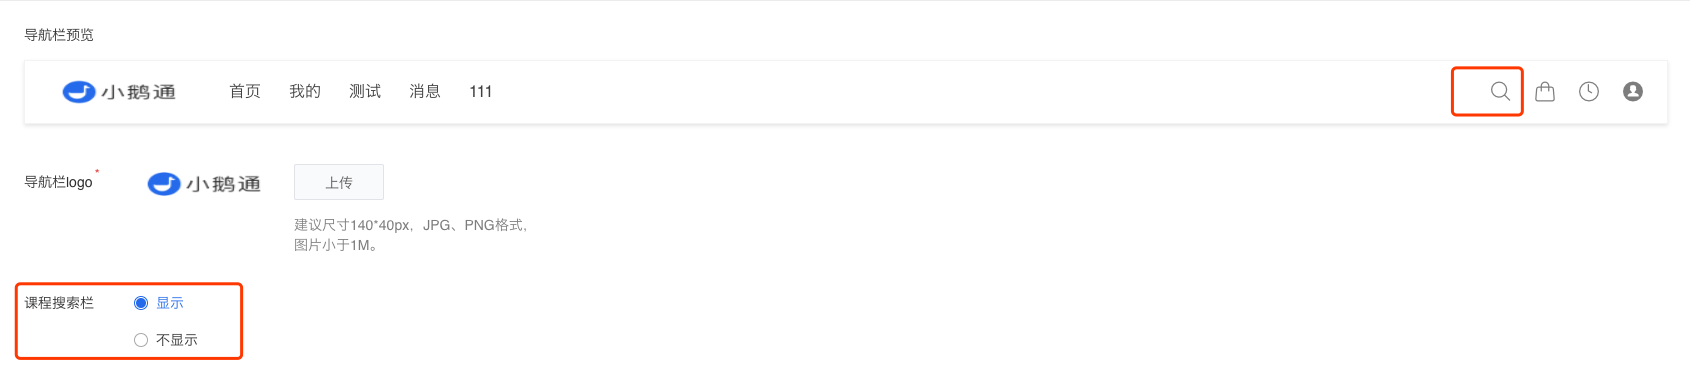
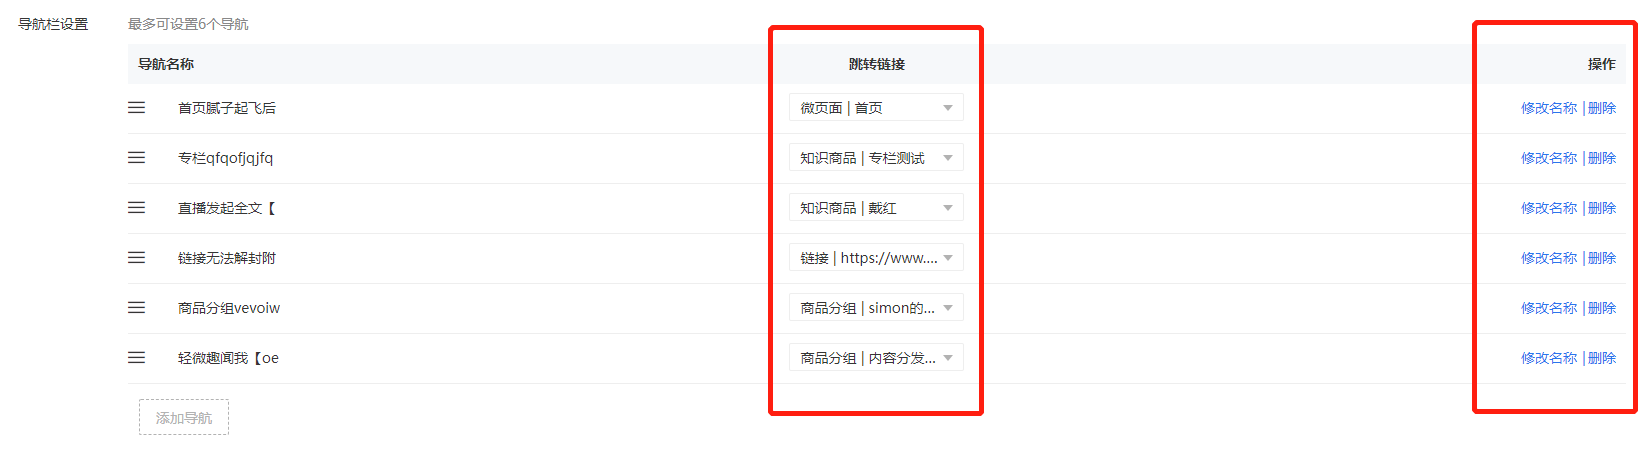
Step 4:You can customize the navigation names and the pages they link to. You can also click and drag the navigation editing boxes with the mouse to adjust their order. A maximum of 6 navigation items can be added.
Tutorial on Using the Micro Page on the Desktop
I. Feature Introduction
Micro Pages are a feature that allows merchants to independently build personalized pages for their Online Stores. The content and display styles within Micro Pages can be customized by adding components. Multiple pages can be built within an Online Store, and navigation can be set up to enable page jumps.
II. Purpose of Use
Merchants can manage Micro Pages, including creating new pages, setting page parameters, decorating pages, sharing pages, deleting pages, and creating page copies.
III. Scenario Examples
Scenario 1: If a merchant has a large number of courses in their Online Store, they can use the [Store - Micro Pages] feature to customize the display settings.
Scenario 2: If a merchant's Micro Pages are quite similar, they can create copies of existing Micro Pages for quick duplication, saving time on repetitive operations.
Scenario 3: Multiple Micro Pages can be created. For example, one Micro Page can be dedicated to hosting course promotions, and another can be used to showcase the latest course content. Content can be categorized by theme, and multiple pages with different themes can be displayed in the store, enabling page jumps and saving users' time in searching for content, thus providing a better purchasing/browsing experience.
IV. Operation Path
Merchant side: Terminal Settings → Desktop Store→ Page Management
V. Usage Tutorial
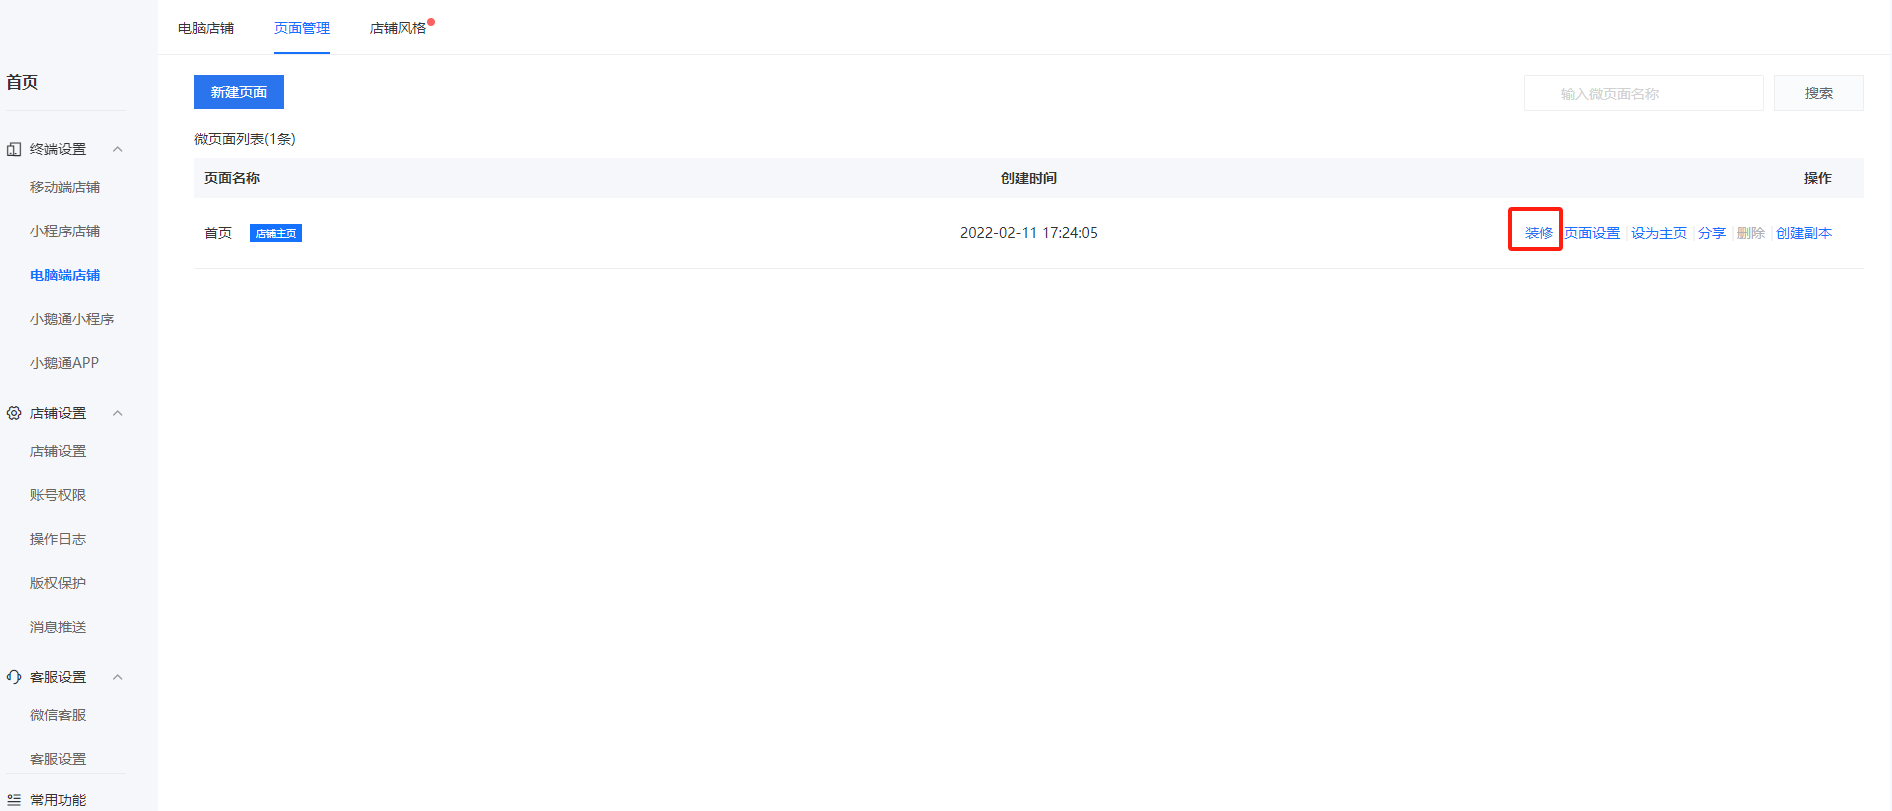
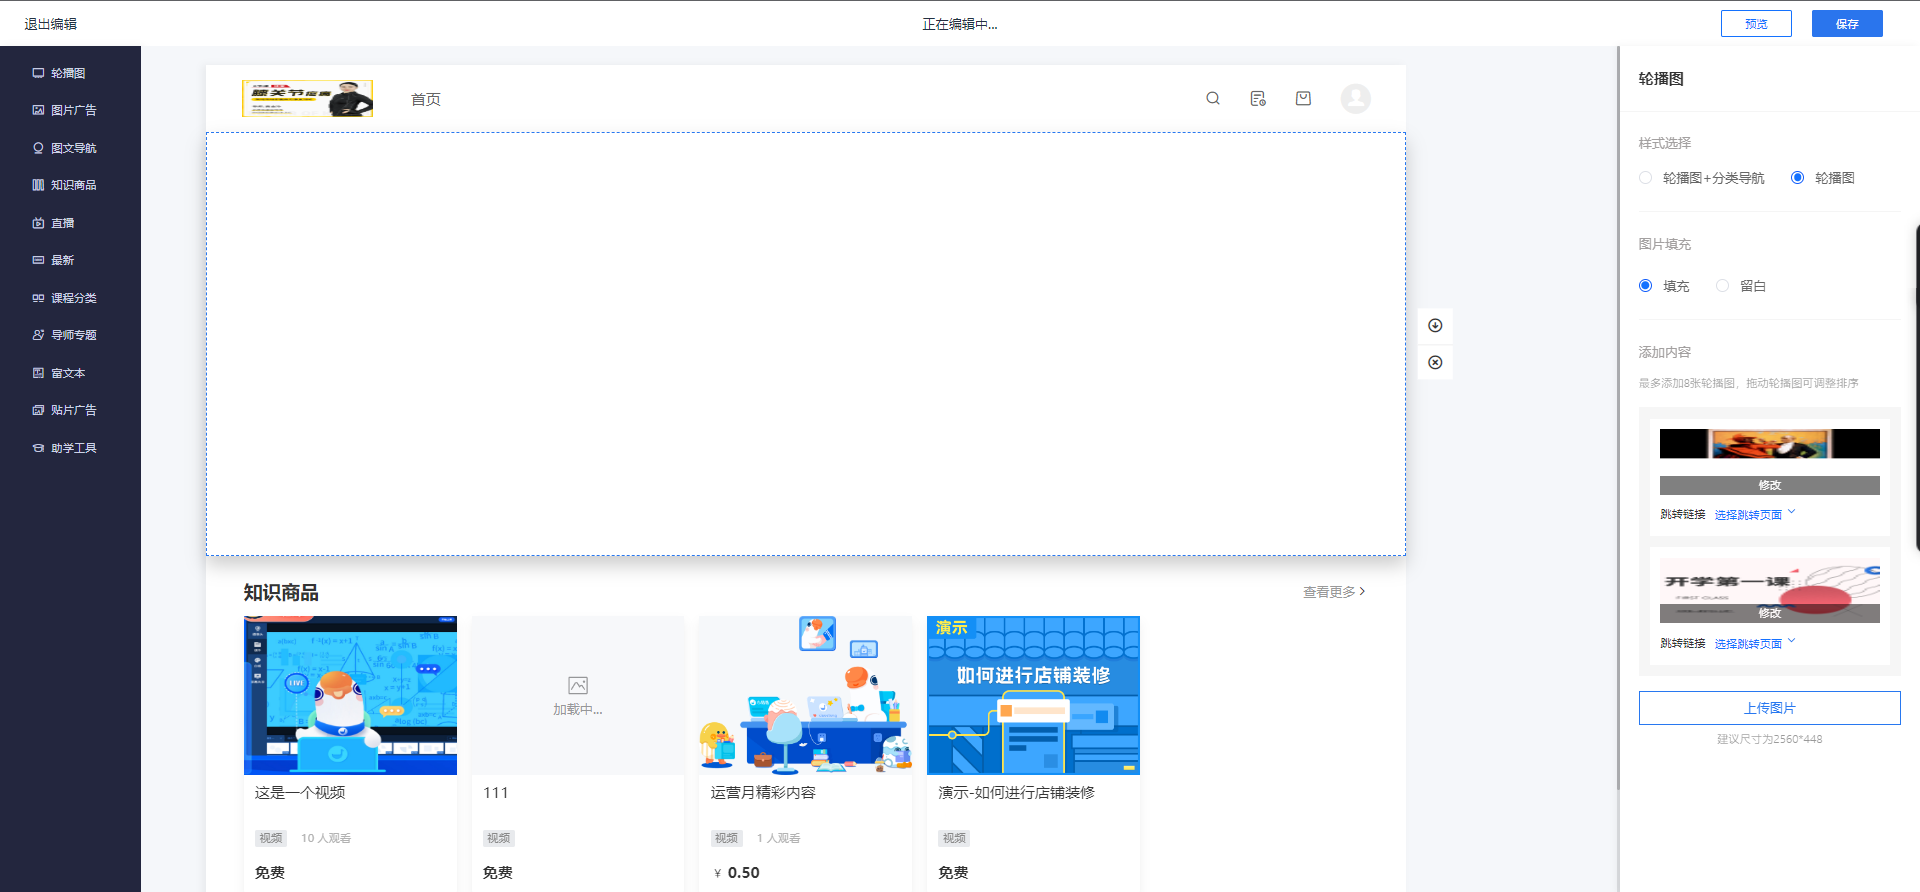
Step 2:Click the 'Decorate' option to enter the store decoration page. There are various components to choose from. Click on a component to add and edit it. Click the [Save] button to save the Micro Page.
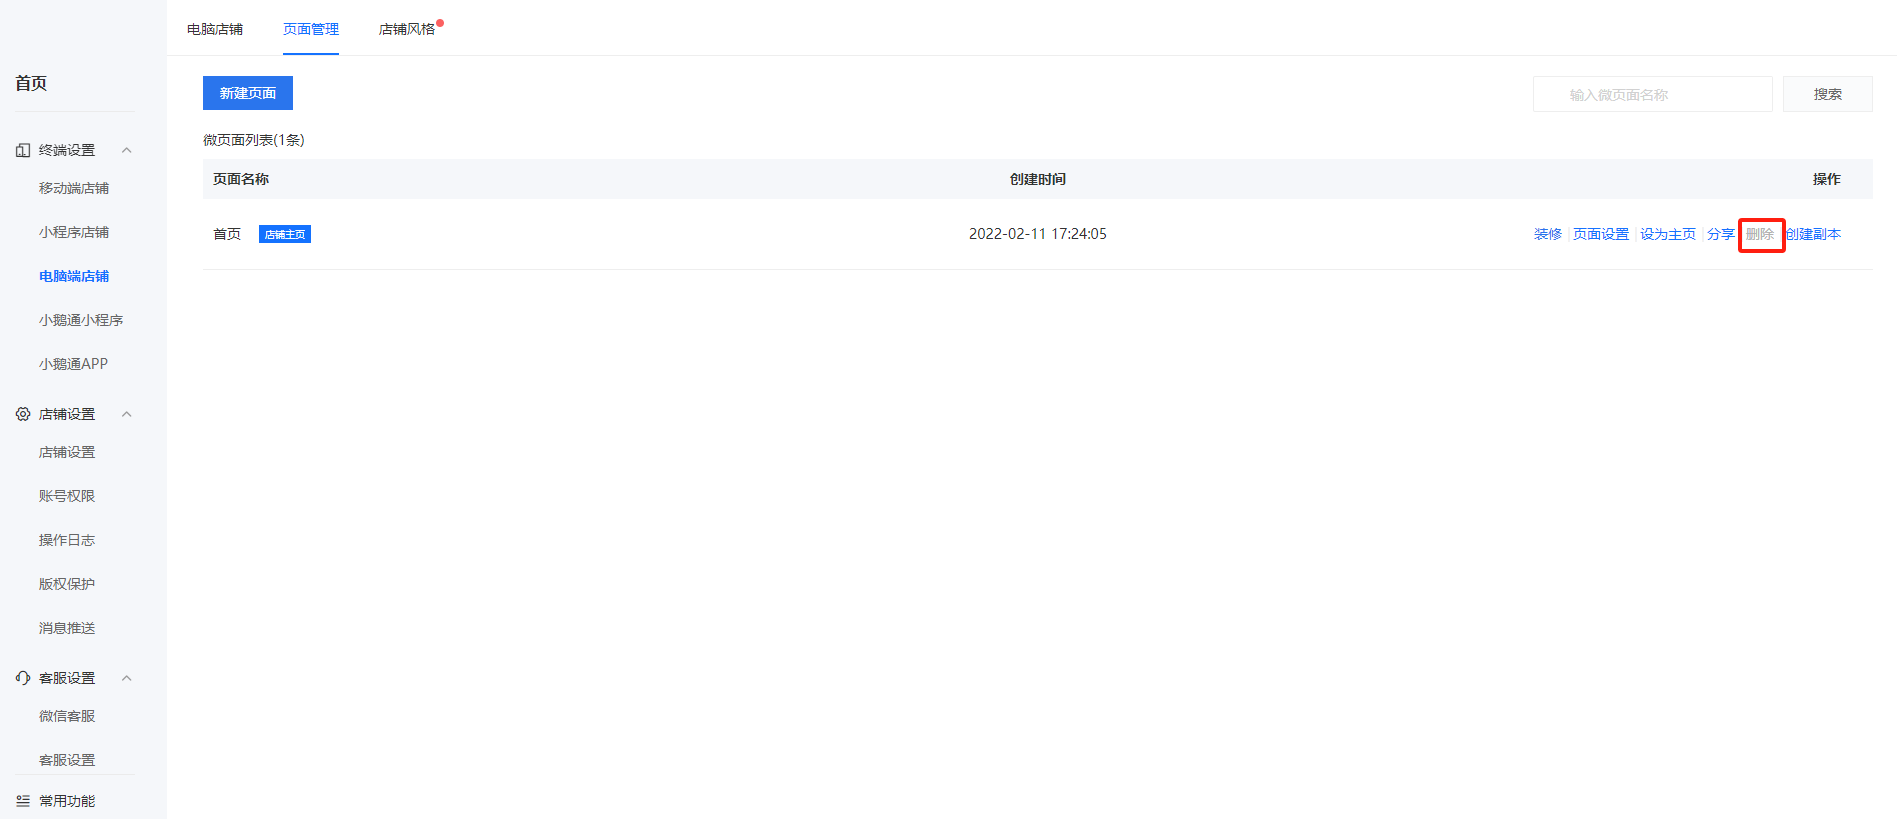
To duplicate an existing Micro Page, find the page and click the 'Create Copy' option to create an identical Micro Page. If there are too many copies or a page is no longer needed, click the 'Delete' option to remove the Micro Page.
Note: The default store homepage cannot be deleted.
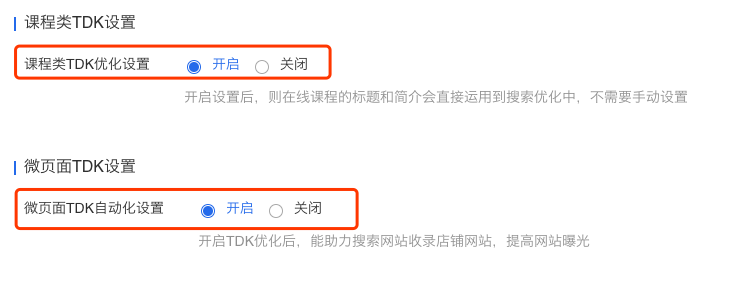
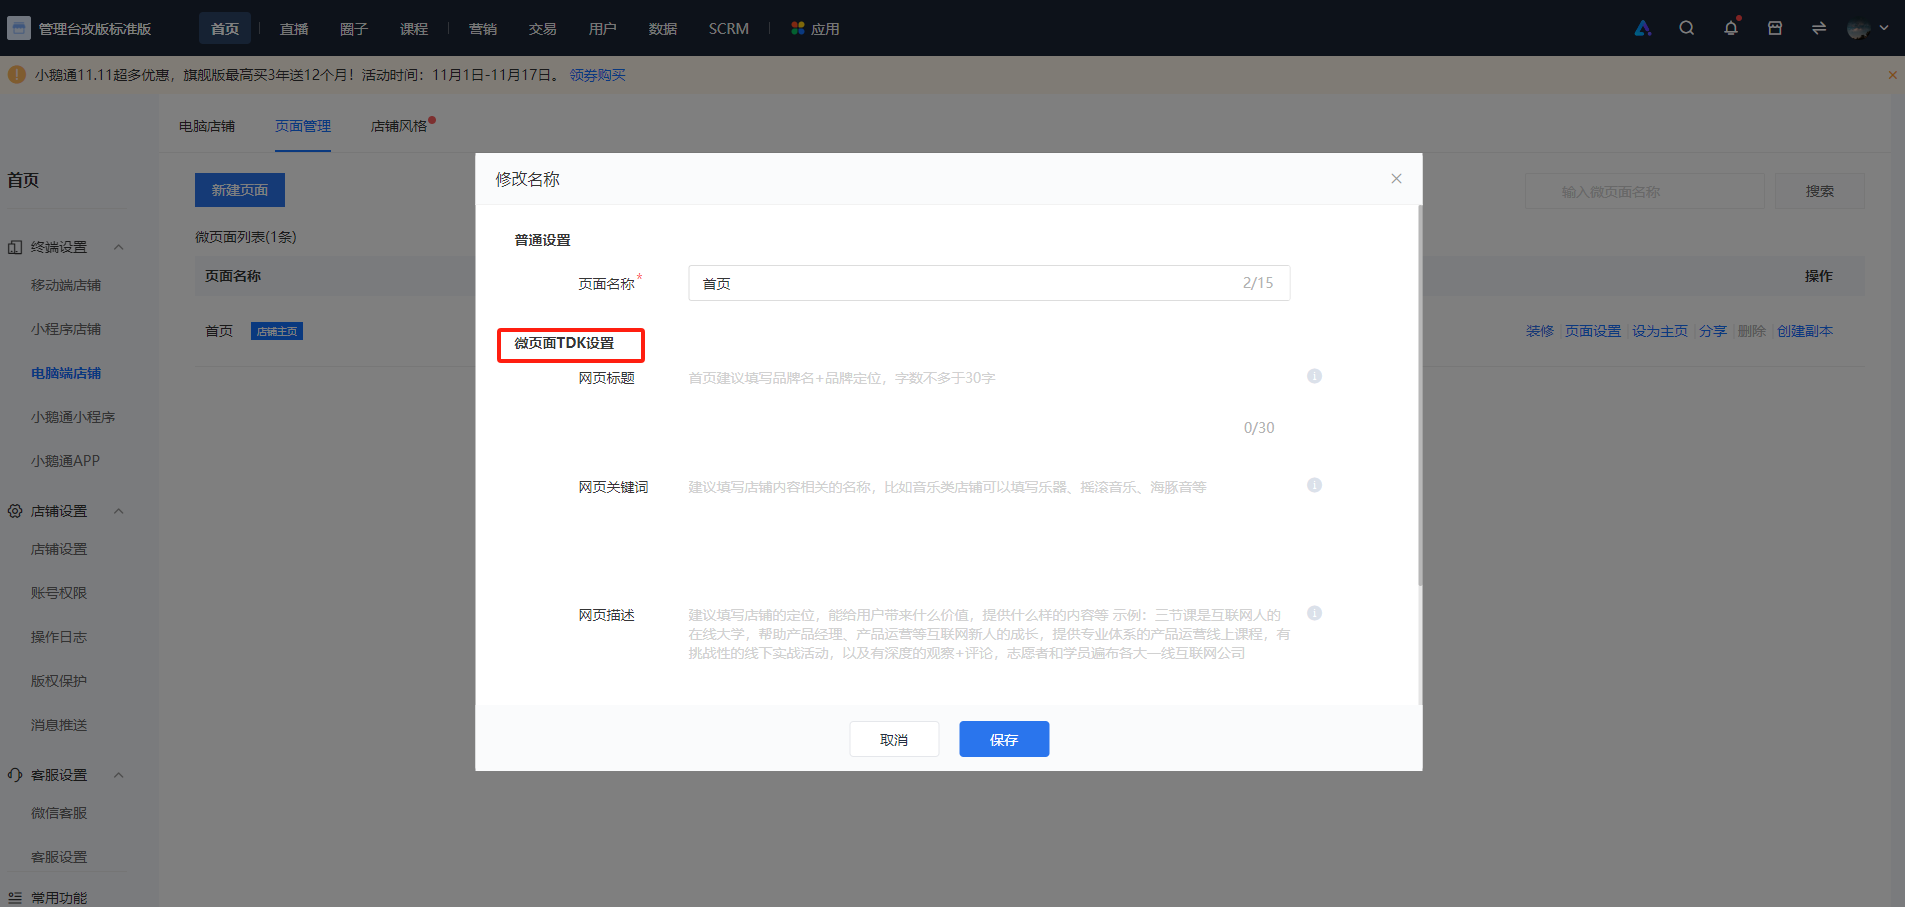
Step 3:For created Micro Pages, the page name can be modified, and TDK settings can be adjusted. Good TDK settings can increase website clicks and rankings, making it more attractive to users with immediate needs.
Prerequisite for TDK settings: The TDK settings for courses and Micro Pages must be enabled in the desktop settings. If disabled, TDK settings cannot be made.
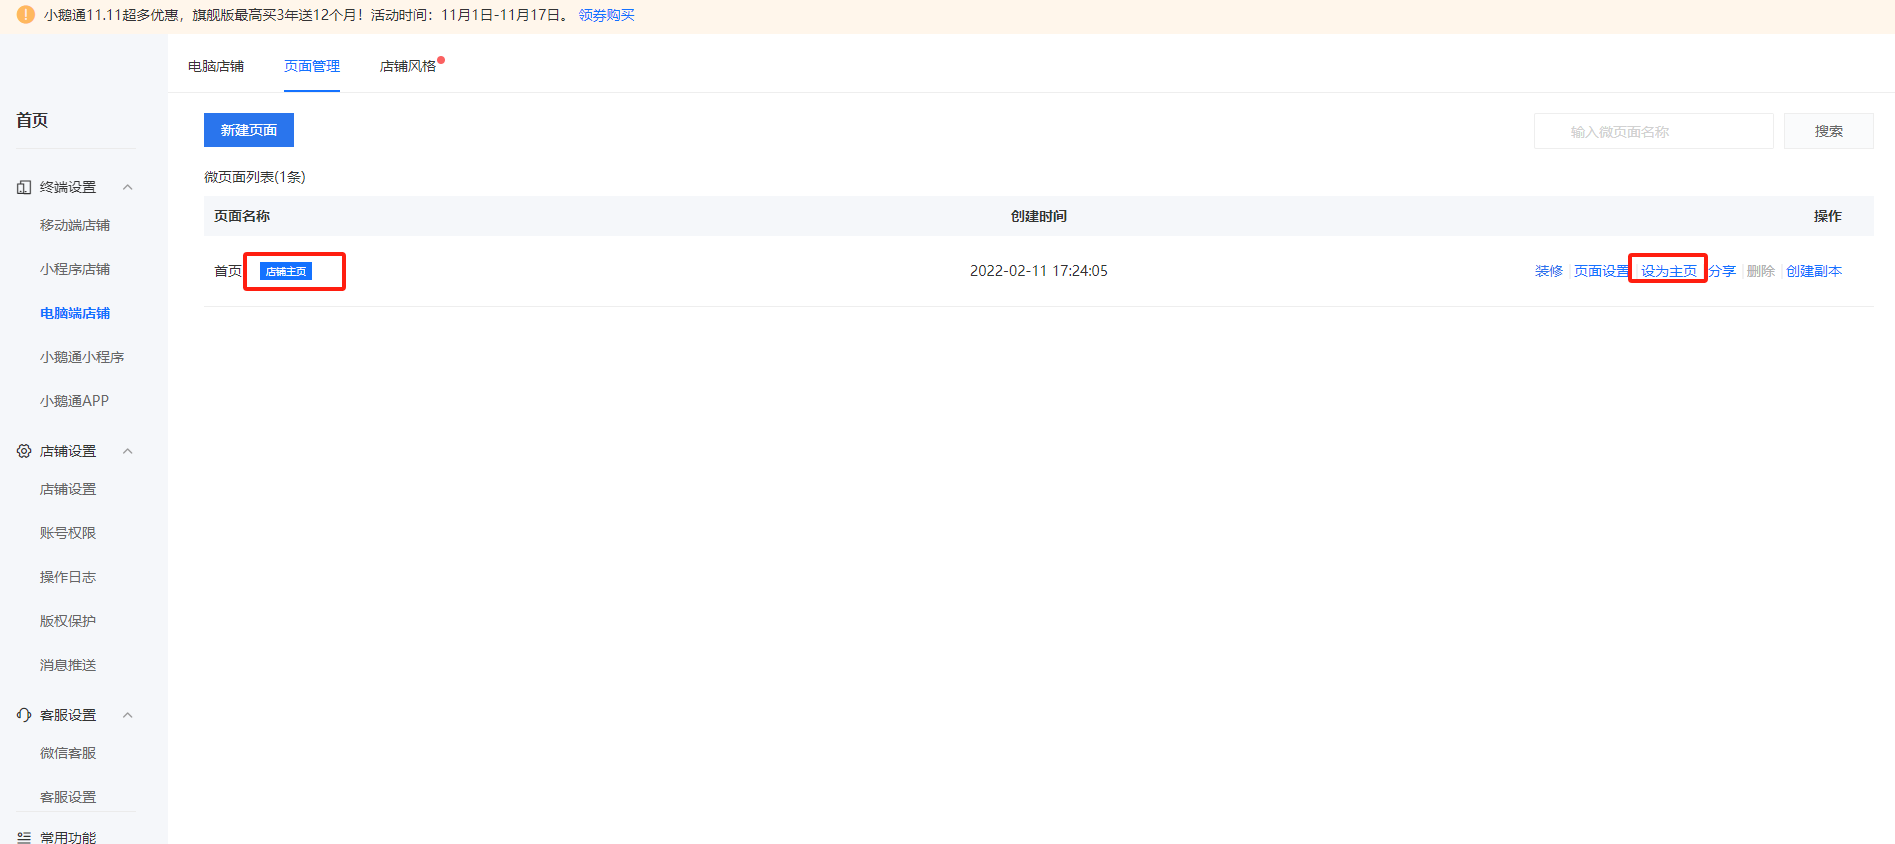
Step 4:For created Micro Pages, the default homepage can be selected as the main page, or other pages can be set as the main page.
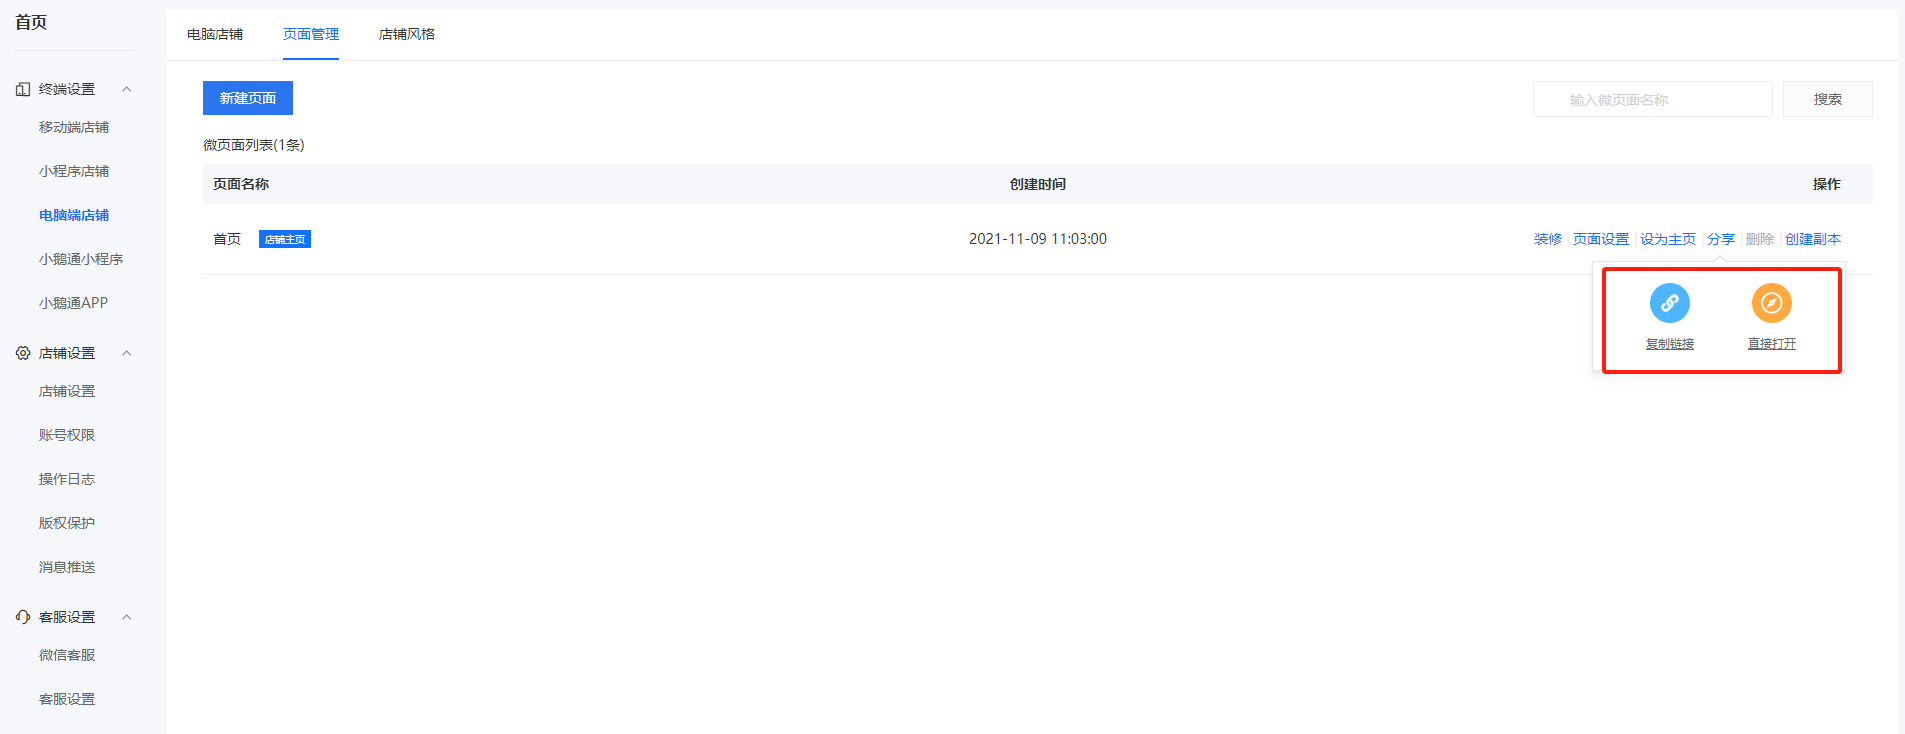
Step 5:The created pages can be shared to view the effects.
Can users pay to purchase courses in the PC version of the Online Store?
After accessing a paid course on a computer browser, when you click the purchase button, a QR code will pop up to guide you to scan it with your mobile WeChat. After scanning, you will enter the course page on the WeChat mobile app to complete the payment. Currently, only mobile WeChat payment is supported. Payment via the PC is not available for now. Moreover, the only supported payment method is WeChat Pay. Alipay or bank card payments are not supported.
Can the footer of the PC version of the online store be customized?
What interactive tools are supported in the online store on the desktop version?
Currently, the interactive tools available in the PC version of the Online Store include: Workbooks, Exams, Forms, Check-ins, Certificates, Interactive Tests, Exercises, Paid Q&A, Event Management, and Communities.
Note: Currently, all these features are supported in the form of H5.
Can users send voice messages when watching live courses in the PC version of the Online Store?
The instructor has enabled the [User Voice Chat] function for the live course. Users watching the live course via a desktop browser can also send voice messages to participate in discussions.
What scenarios are the store navigation of the PC version of the online store applicable to?
If there are many products and activities in the Online Store, you can use the store navigation to guide users to relevant pages. The store navigation can direct users to Mini Pages, knowledge products, product groups, or custom links.
Tutorial on Using the Online Store Navigation
I. Function Introduction
II. Scenario Examples
If your online store has a large number of products and activities, you can use the store navigation to guide users through the pages. The store navigation can direct users to the mini homepage, course themes, or the latest content.
For example, you can set up an event page and a course promotion page. With the store navigation, users can switch between the homepage, events, promotions, and their personal pages, guiding them to focus on the pre - set content.
III. Operation Steps
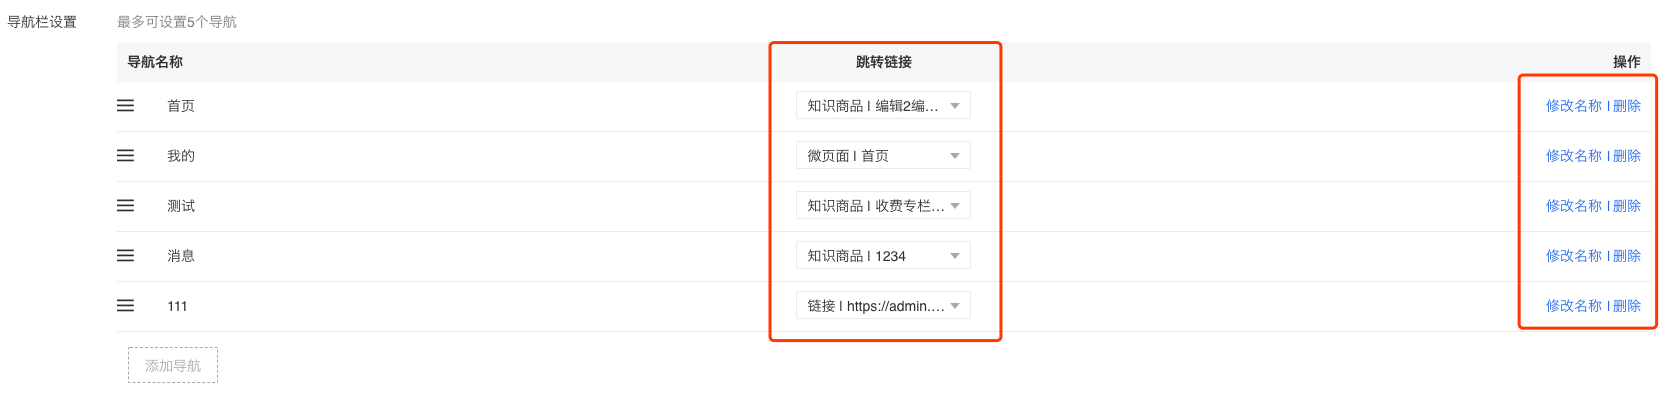
Step 1: Click 'Store Management' - 'Desktop' - 'Store Navigation' to enter the store navigation editing page.
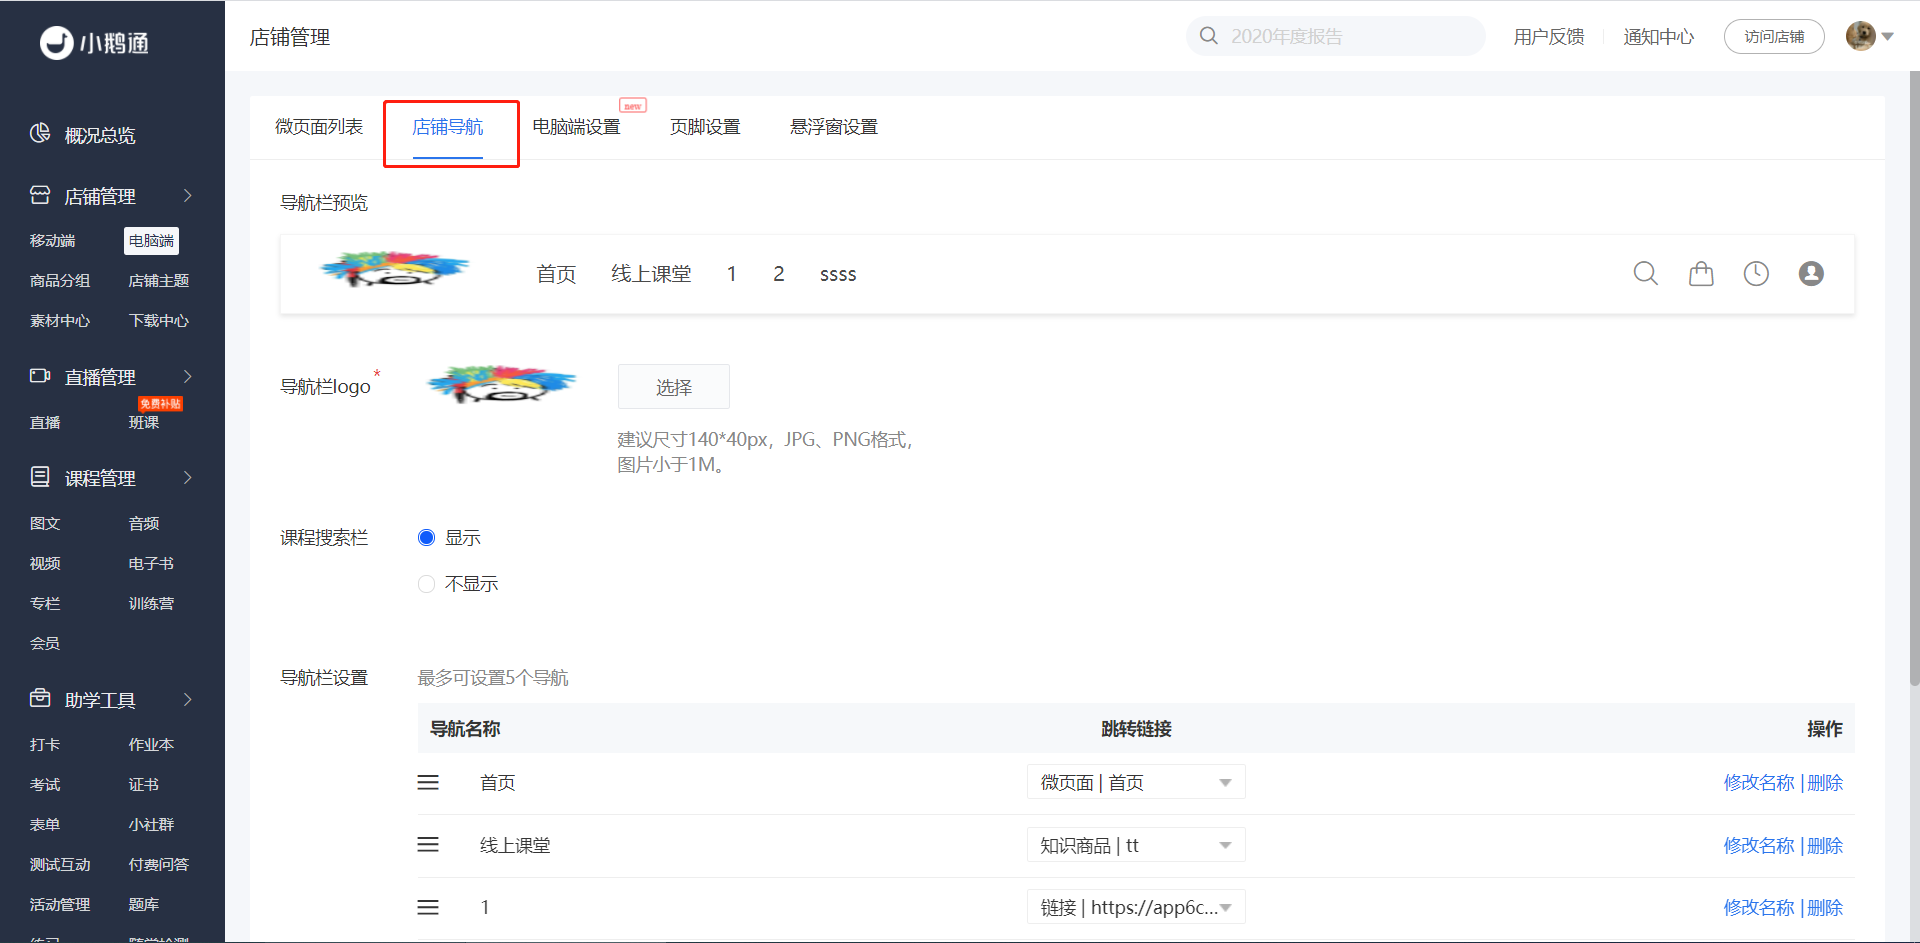
Step 2: Upload the navigation logo and view the effect above.
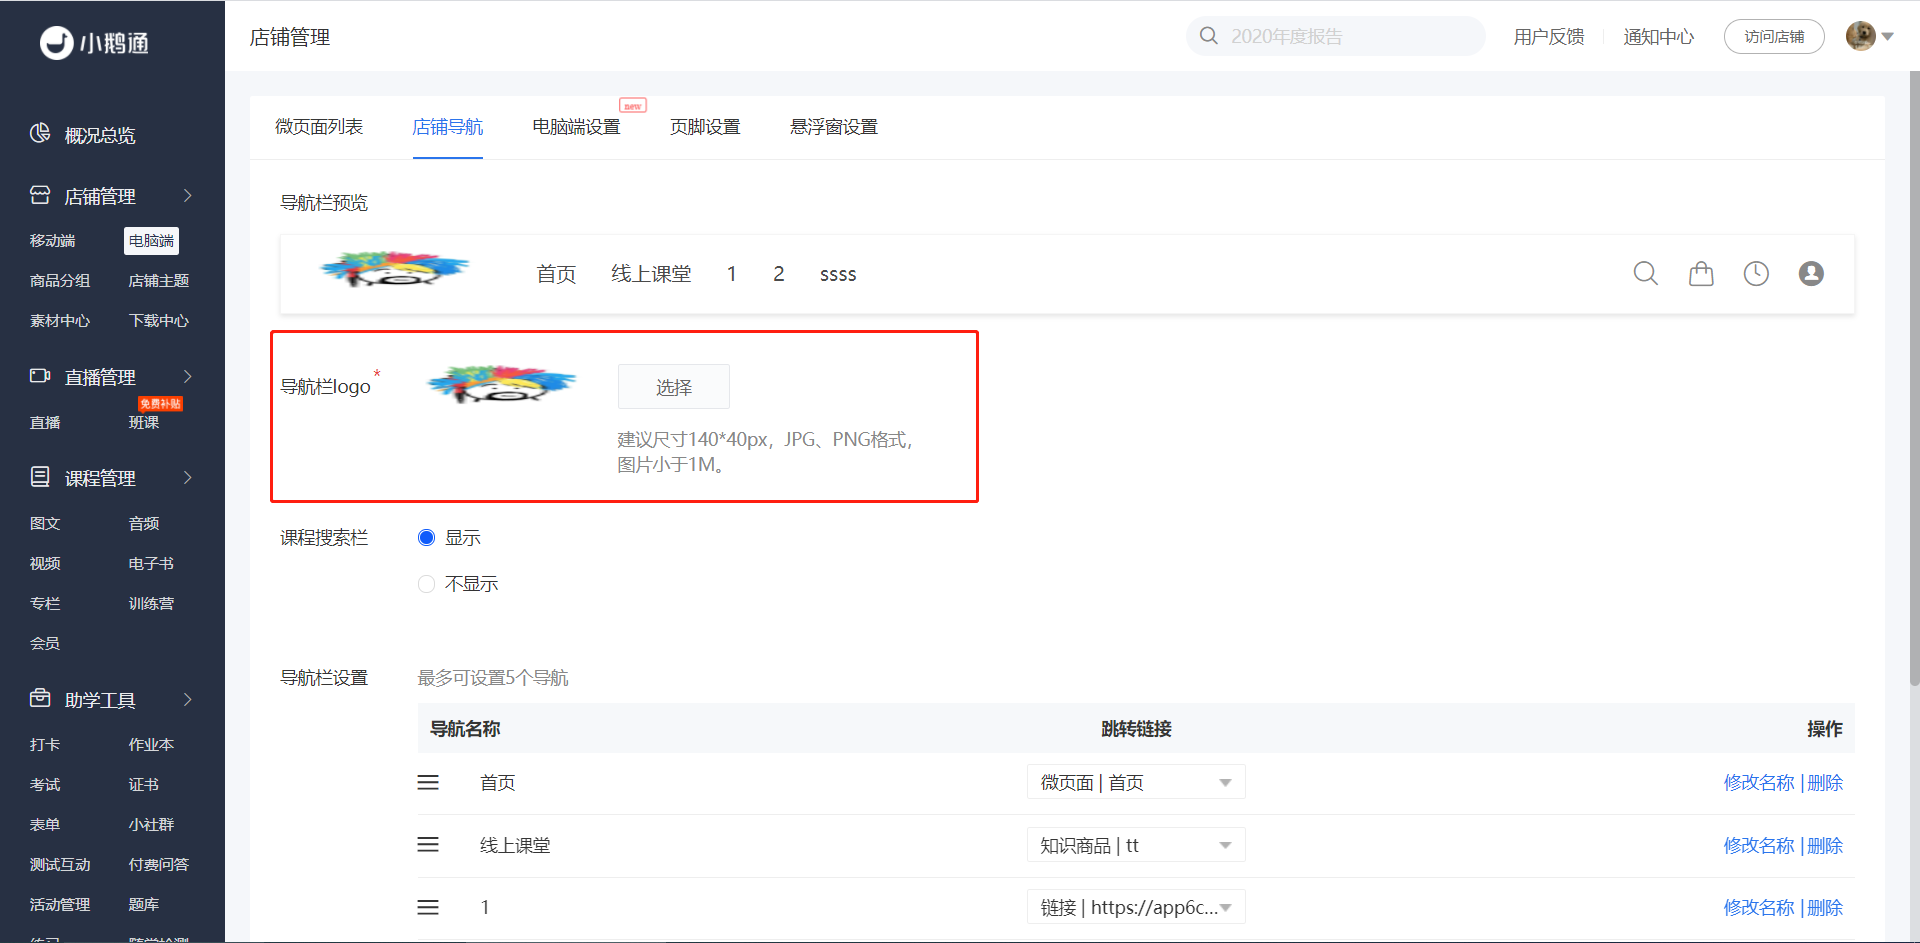
Step 3: You can customize whether to display the course search bar. If it's set to display, you can view the effect in the preview section.
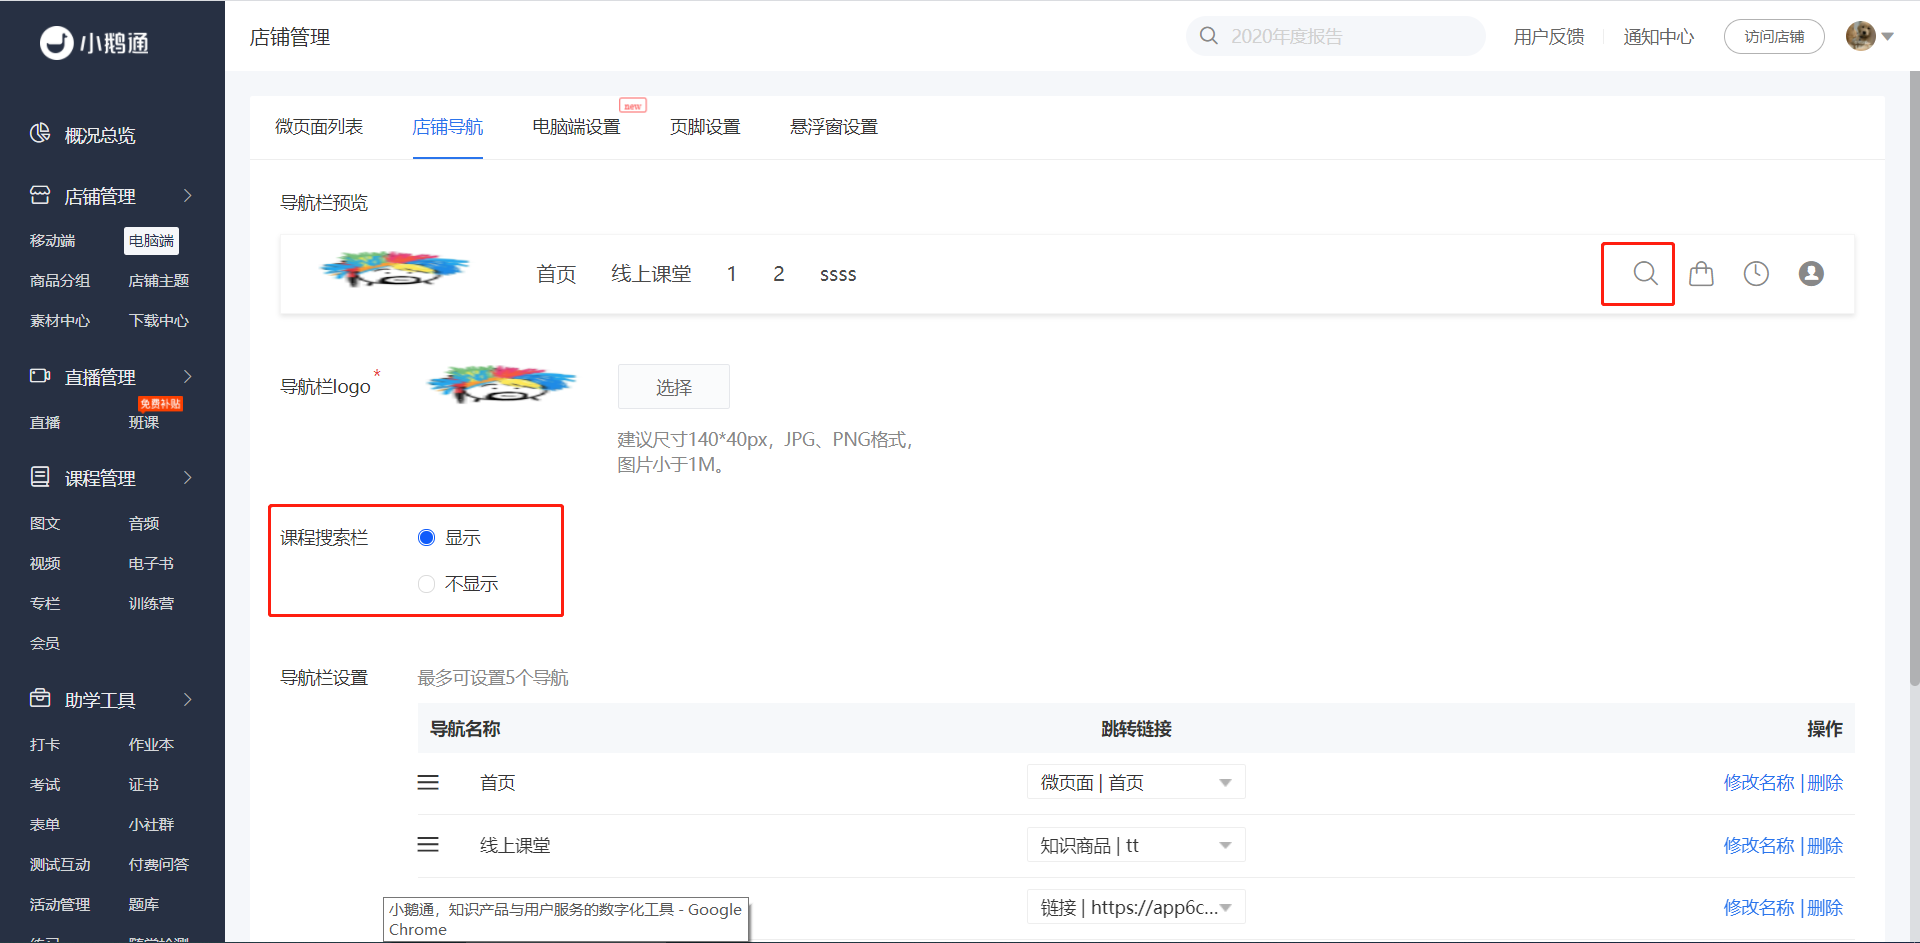
Step 4: You can customize the navigation names and the pages they link to. You can also drag the navigation editing boxes with the mouse to adjust their order. You can add up to 5 navigations.
Tutorial on Using Micro Pages
I. Function Introduction
Mini Pages are a feature that allows merchants to independently build personalized pages for their Online Stores. The content and display styles within Mini Pages can be customized by adding components. Multiple pages can be built within an Online Store, and navigation can be set up to enable page jumps.
II. Purpose of Use
Merchants can manage Mini Pages, including creating new pages, setting page parameters, decorating pages, sharing pages, deleting pages, and creating page copies.
III. Scenario Examples
Scenario 1: If a merchant has a large number of courses in their Online Store, they can use the [Store - Mini Pages] feature to customize the display settings.
Scenario 2: If a merchant's Mini Pages are quite similar, they can create copies of Mini Pages for quick duplication, saving time on repetitive operations.
Scenario 3: Multiple Mini Pages can be created. For example, one Mini Page can be dedicated to hosting course promotions, and another can be used to showcase the latest course content. Content can be categorized by theme, and multiple pages with different themes can be displayed in the store, enabling page jumps and saving users' time in finding content, thus providing users with a better purchasing/browsing experience.
IV. Operation Path
Merchant side: Merchant backend → Store management → Desktop version → Mini Page list
V. Usage Tutorial
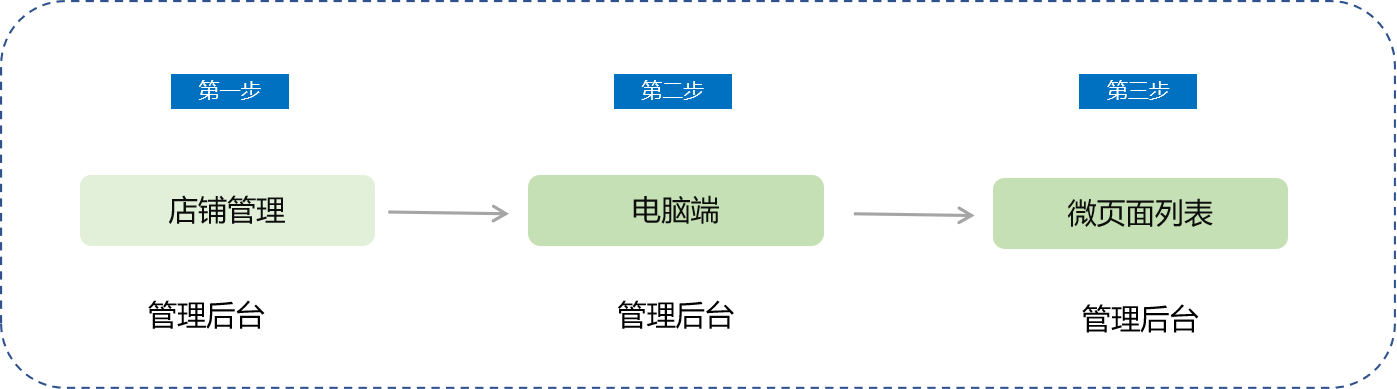
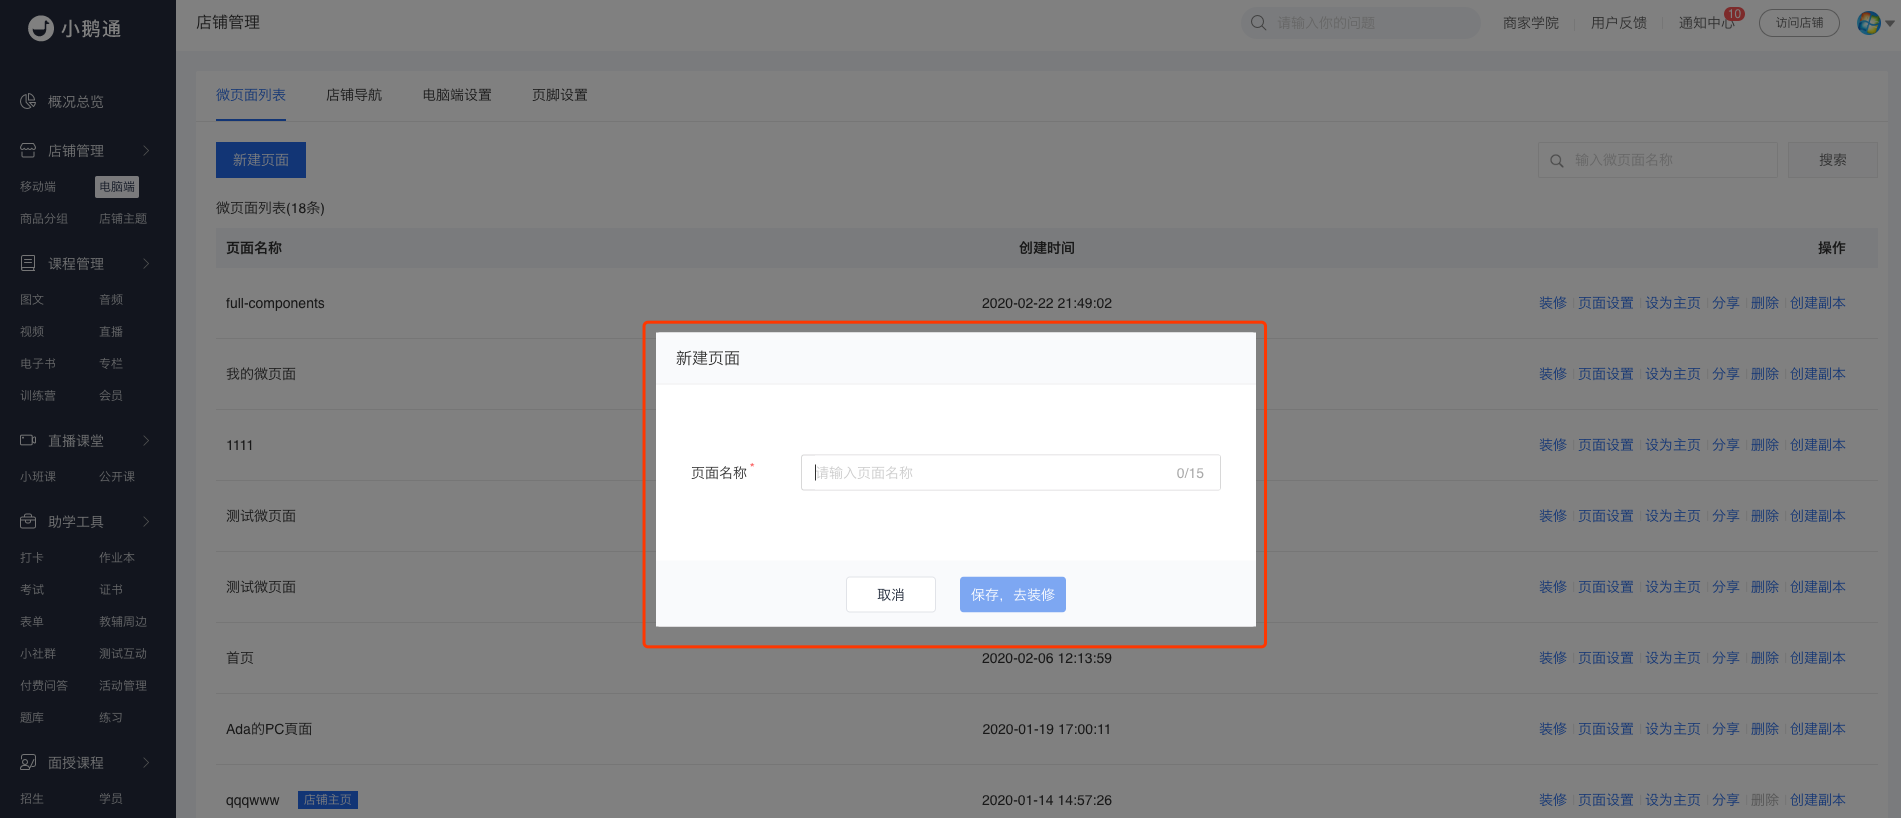
Step 1:Click [Store management - Desktop version - Mini Page list] to enter the store's Mini Page section. There is a default store homepage. Click the 'Decorate' option to enter the decoration and editing page, or you can create a new page to enter the decoration and editing page.

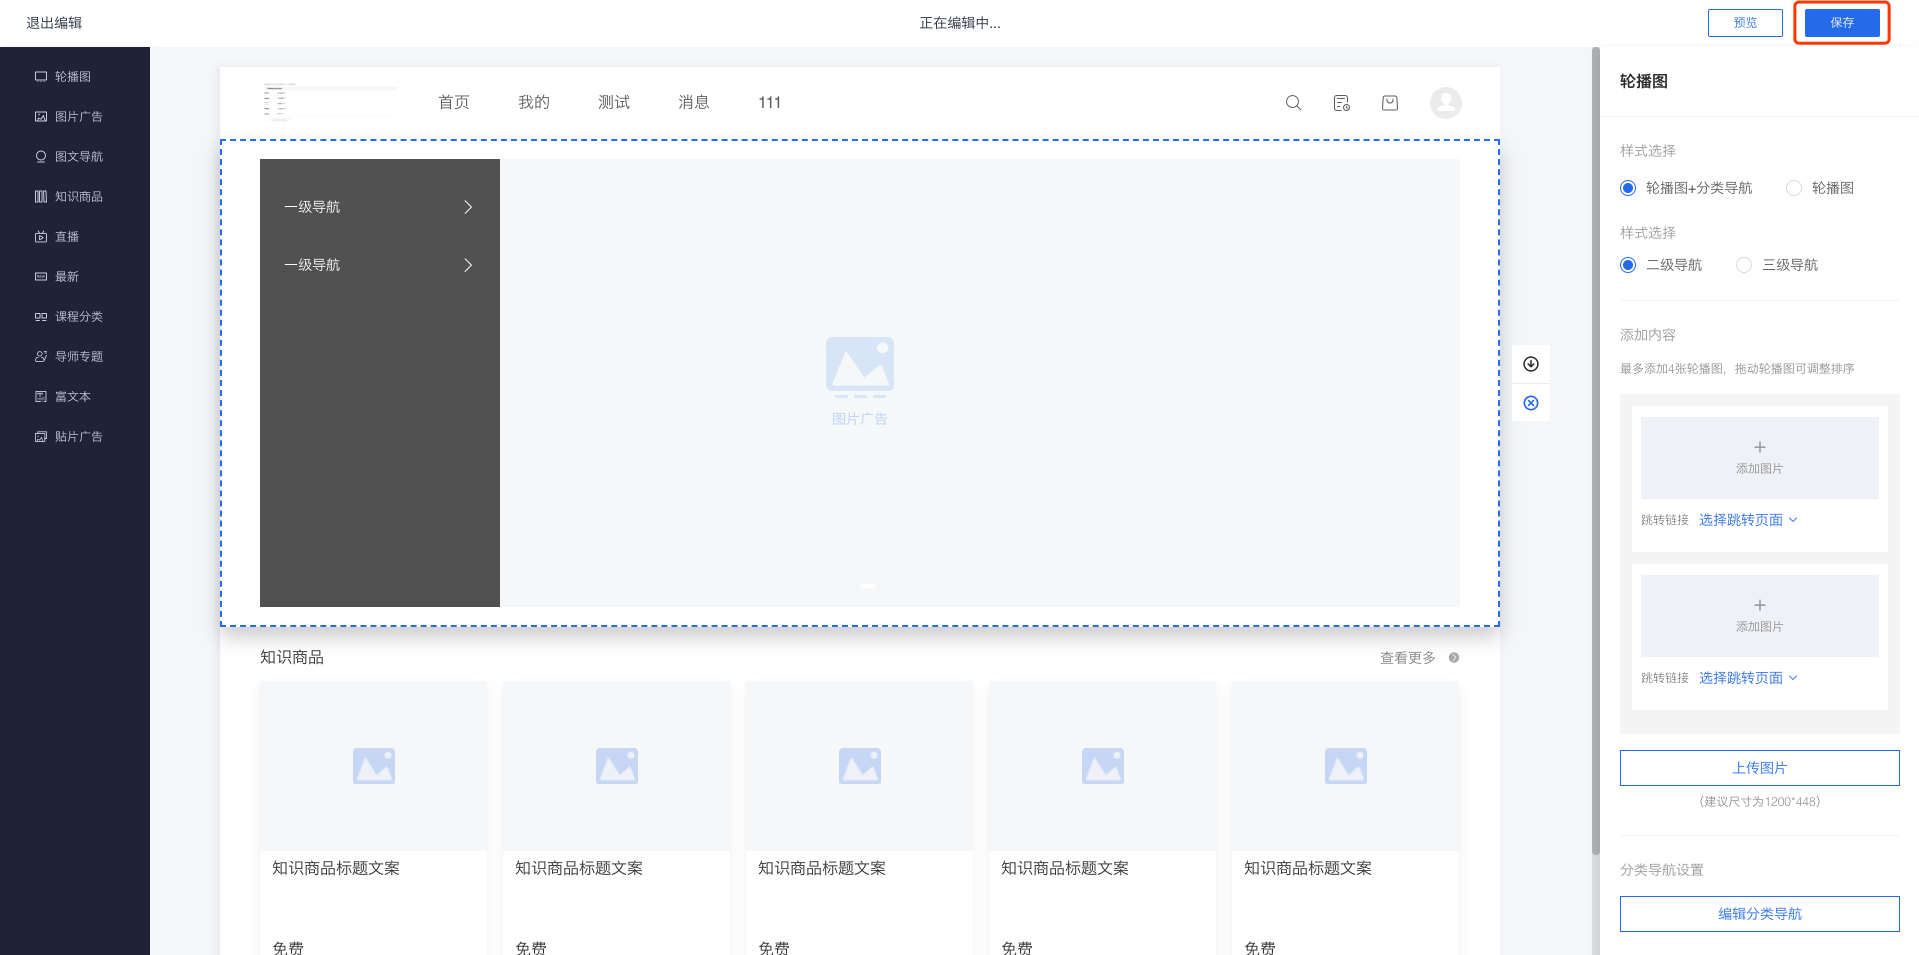
Step 2:Click the 'Decorate' option to enter the store decoration page. There are various components to choose from. Click on a component to add it and edit it. Click the [Save] button to save the Mini Page.
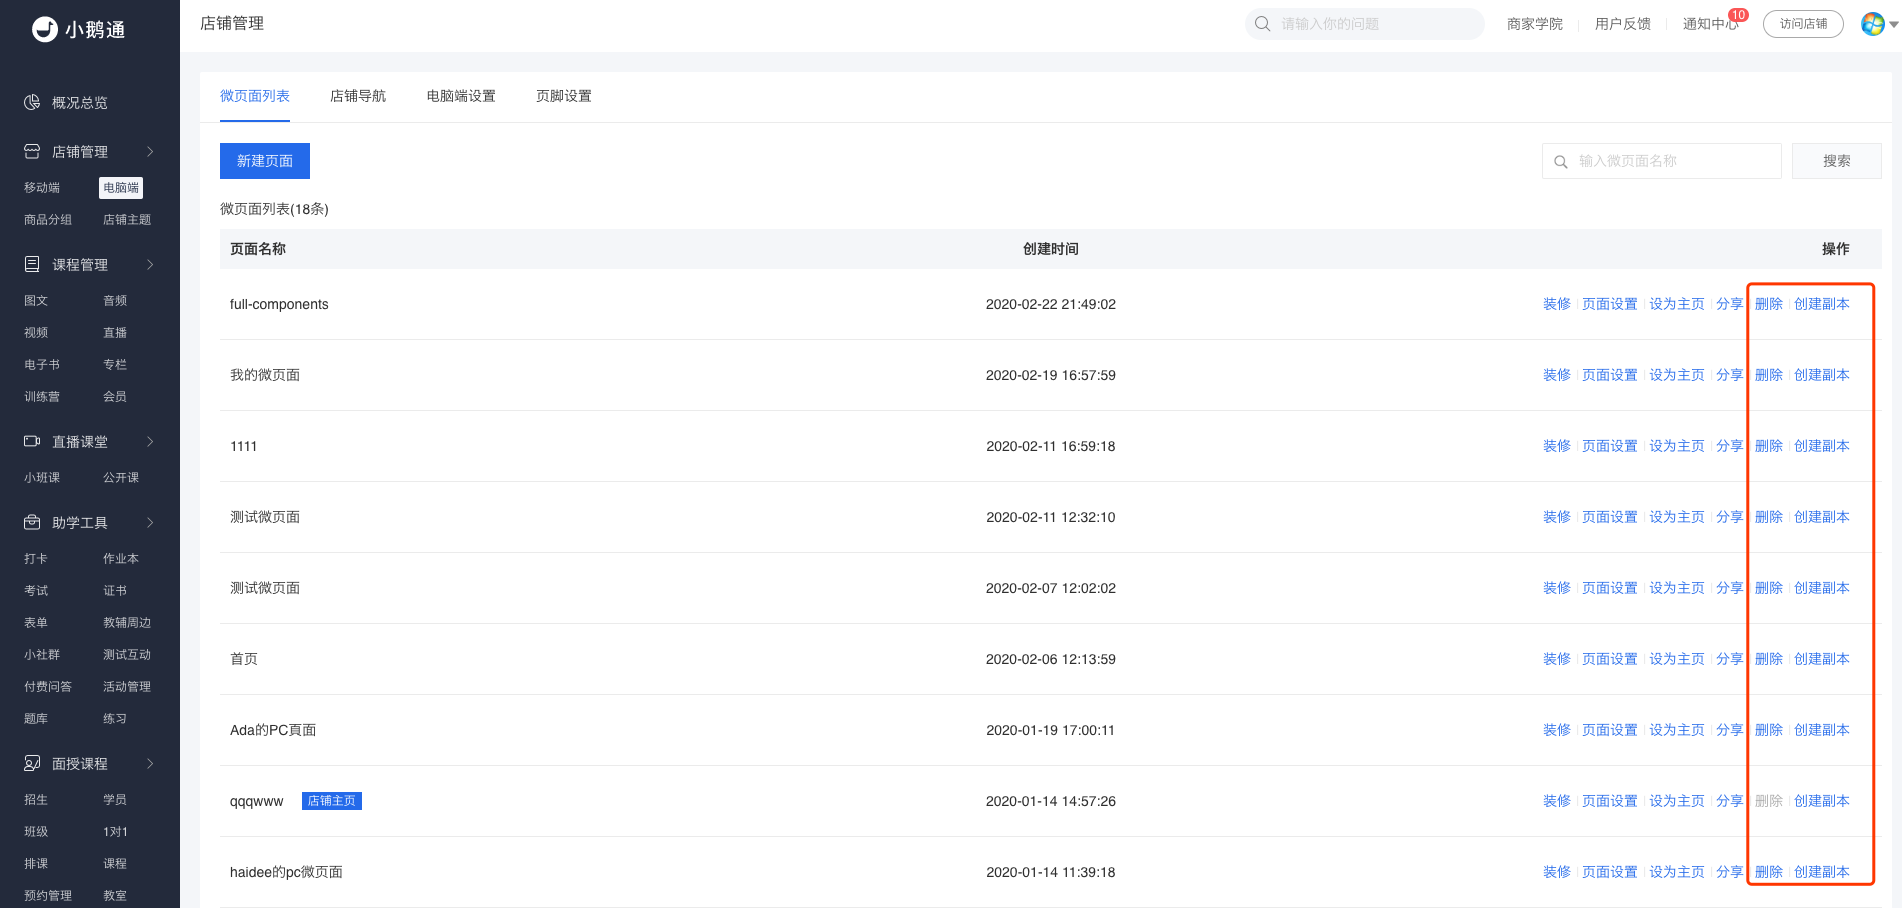
If you want to copy an existing Mini Page, find the page and click the 'Create copy' option to duplicate an identical Mini Page. If you have created too many copies or no longer need a page, click the 'Delete' option to remove the Mini Page.
Note: The default store homepage cannot be deleted.
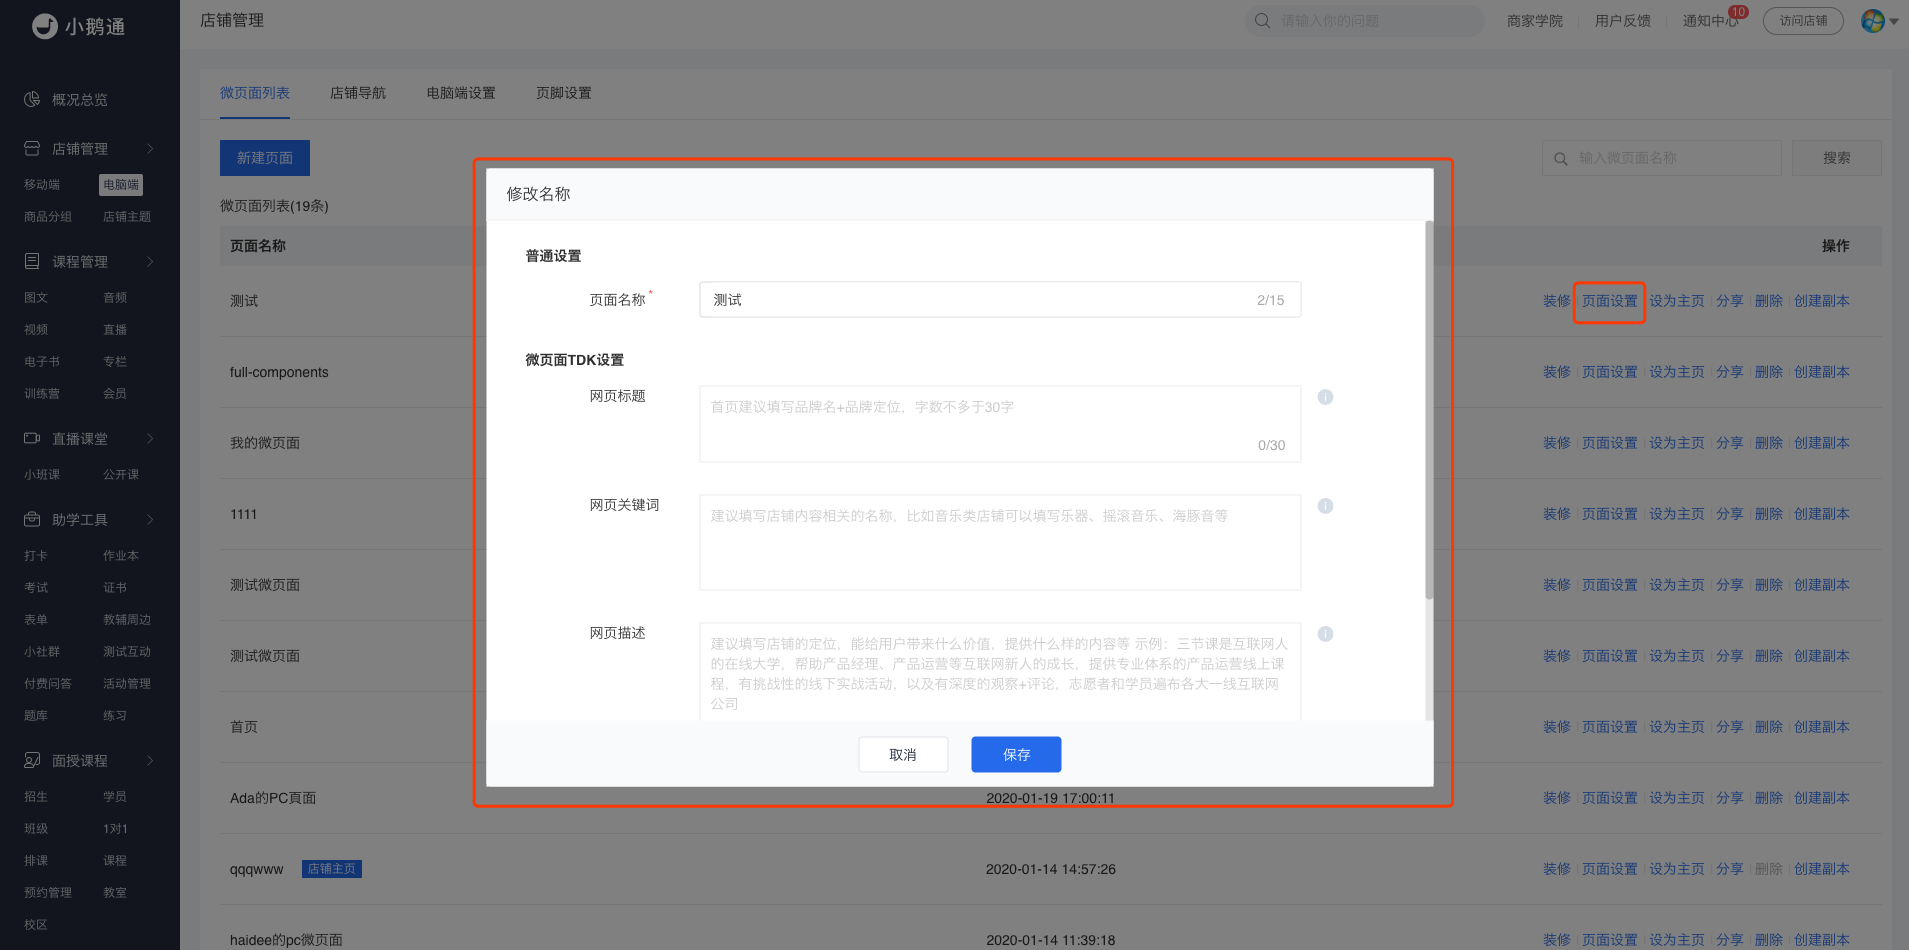
Step 3:For created Mini Pages, you can modify the page name and set TDK. A good TDK setting can increase website clicks and rankings, and attract users with immediate needs to visit the website.
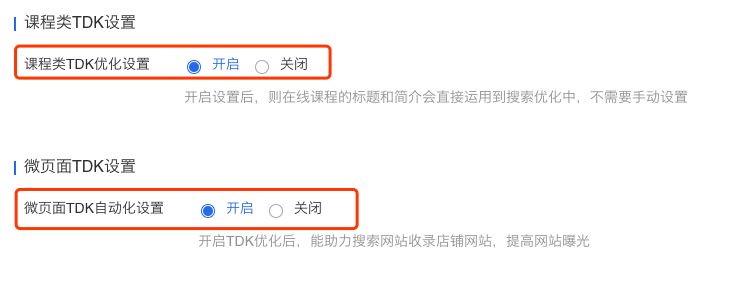
Prerequisite for setting TDK: You must enable the TDK settings for courses and Mini Pages in the desktop - side settings. If it is disabled, you cannot set TDK.
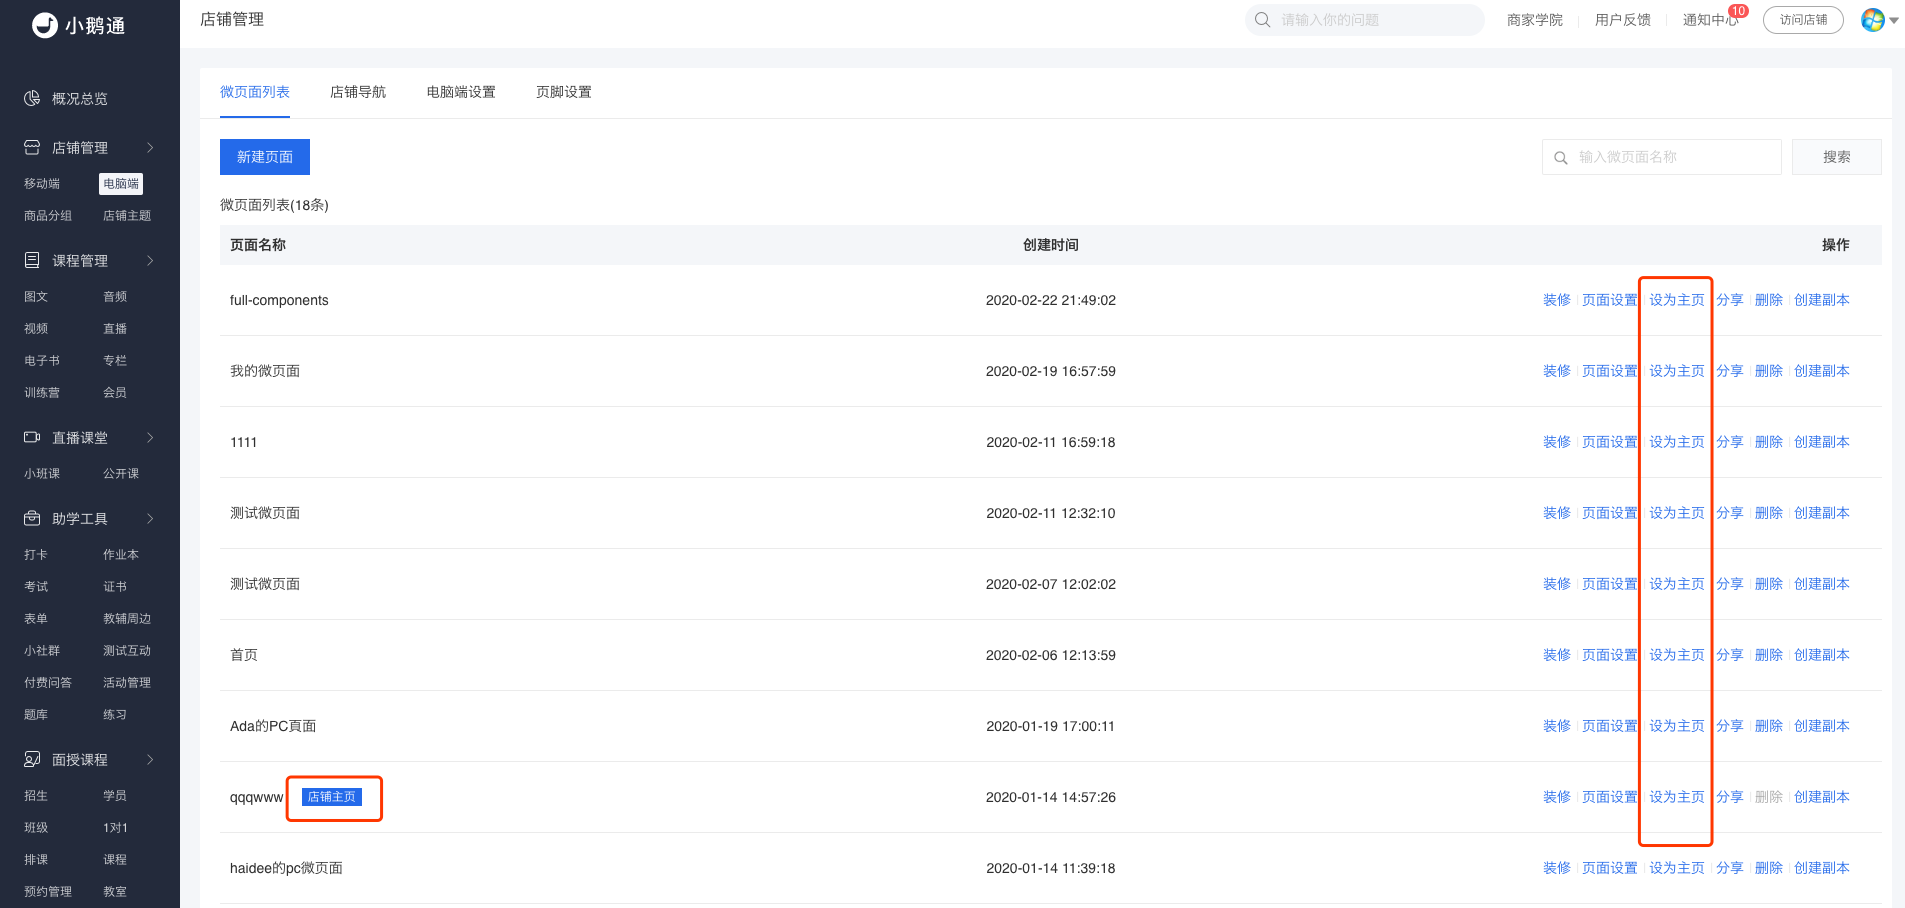
Step 4:For the created Mini Pages, you can select the default homepage as the main page or set other pages as the main page.
Step 5:After creating a page, you can share it to view the effect.