Online Classroom - Class Course
- Billing rules
- Class Course Terminal
- What are the computer configuration requirements for downloading the client?
- What should I do if I can't find the desktop icon after installing the client?
- What should I do if the client login page shows a white screen or a dotted frame?
- How can instructors start a class on the client side?
- How does the client test the device?
- What should the instructor do if they accidentally click the end class button during a class on the client side?
- How to play animated PPTs during classes using the client?
- How to delay the end of the class?
- The client cannot enter the live streaming room all the time and frequently prompts 'timeout'?
- Class creation
- How to customize the skin of the live streaming room for courses?
- How to invite learners to enroll in courses?
- How to customize the live streaming room skin?
- How to enable automatic student take the stage?
- How to add course session access for learners?
- After parents purchase and enroll in a course, how can children log in to attend classes?
- How can students attend classes using the elink Assistant PC client?
Billing rules
Class billing rules
The free traffic subsidy policy for the class course function will be terminated at 0:00 (GMT+8) on January 8, 2022, and the official charging will resume.
The following are the latest charging rules:
The class course traffic fee is charged according to the class type:
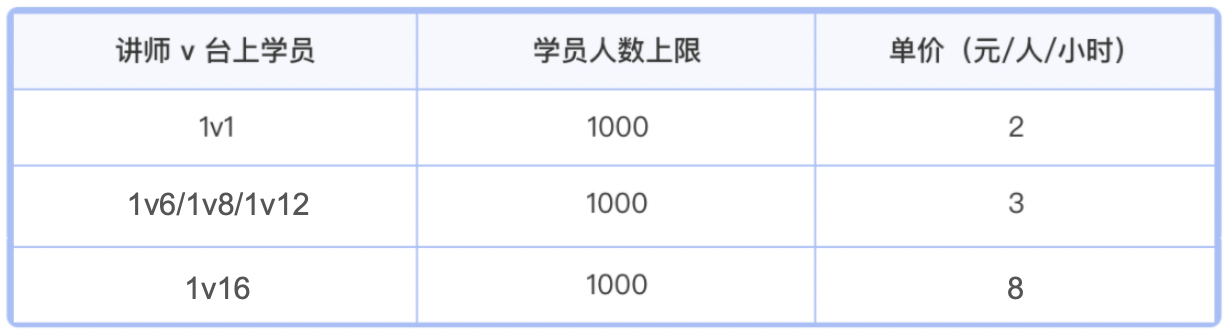
1. Billing rules:
The fee for a single class = the total actual class duration x the unit price of the class type
For example, if there are 20 students in a class, the class type is 1v6, and the class duration is 30 minutes, i.e., 0.5 hours
The total actual class duration = 20 x 0.5 = 10 hours
The fee for this class = 10 x 3 = 30 yuan
2. Special benefits:
The fee for a single class is capped at 200 students. The part exceeding 200 students will not be charged!
* Notes:
1. The fee is charged according to the actual learning duration of students. No fee will be charged if the class has not started or the student has not entered the classroom;
2. All students in the classroom need to be charged regardless of whether they are on stage or not;
3. The consumption record of each class will be generated after the class ends. Merchants can view the details on the account page of the management background;
4. If the class ends late, the fee will be charged according to the actual class duration;
5. Teaching assistants who enter the classroom will also consume a certain amount of traffic fees, and their billing rules are the same as those of students.
Class Course Terminal
What are the computer configuration requirements for downloading the client?
Recommended configuration:
● Windows
CPU: i5-8250U or higher
Memory: 8GB or more
System: Windows 7 or later (XP system is not supported)
● Mac
Memory: 8GB or more
System: 10.13 or later
What should I do if I can't find the desktop icon after installing the client?
Locate the executable program in the installation directory and right-click to set up a shortcut.
What should I do if the client login page shows a white screen or a dotted frame?
Display of white screen issues:

Display of dashed frame issues:

Operation:
Right-click the elink icon, select Properties, and then open it in compatibility mode. It is recommended to use the Windows Vista (Service Pack 1) mode to open it under Windows 7.

How can instructors start a class on the client side?
After the instructor enters the classroom, click the "Start Class" button in the upper right corner to begin the class:
Class time requirements:
1. Classes can be started within 30 minutes before the scheduled start time.
2. If the class has not started after the set end time, the course time needs to be readjusted on the management console before starting the class.
How does the client test the device?
Click on the device detection in the settings in the upper right corner to test the speakers, camera, and microphone.

(1) Speakers
Click to test the speakers. If you can hear sound, it means the speakers are working properly. If you can't hear sound, you can switch the speaker device and test again.

(2) Camera
After selecting the camera device, if you can see the video image, it means the camera is working properly.

(3) Microphone
After selecting the microphone device and speaking, if you can see the volume fluctuate, it means the microphone is working properly.

What should the instructor do if they accidentally click the end class button during a class on the client side?
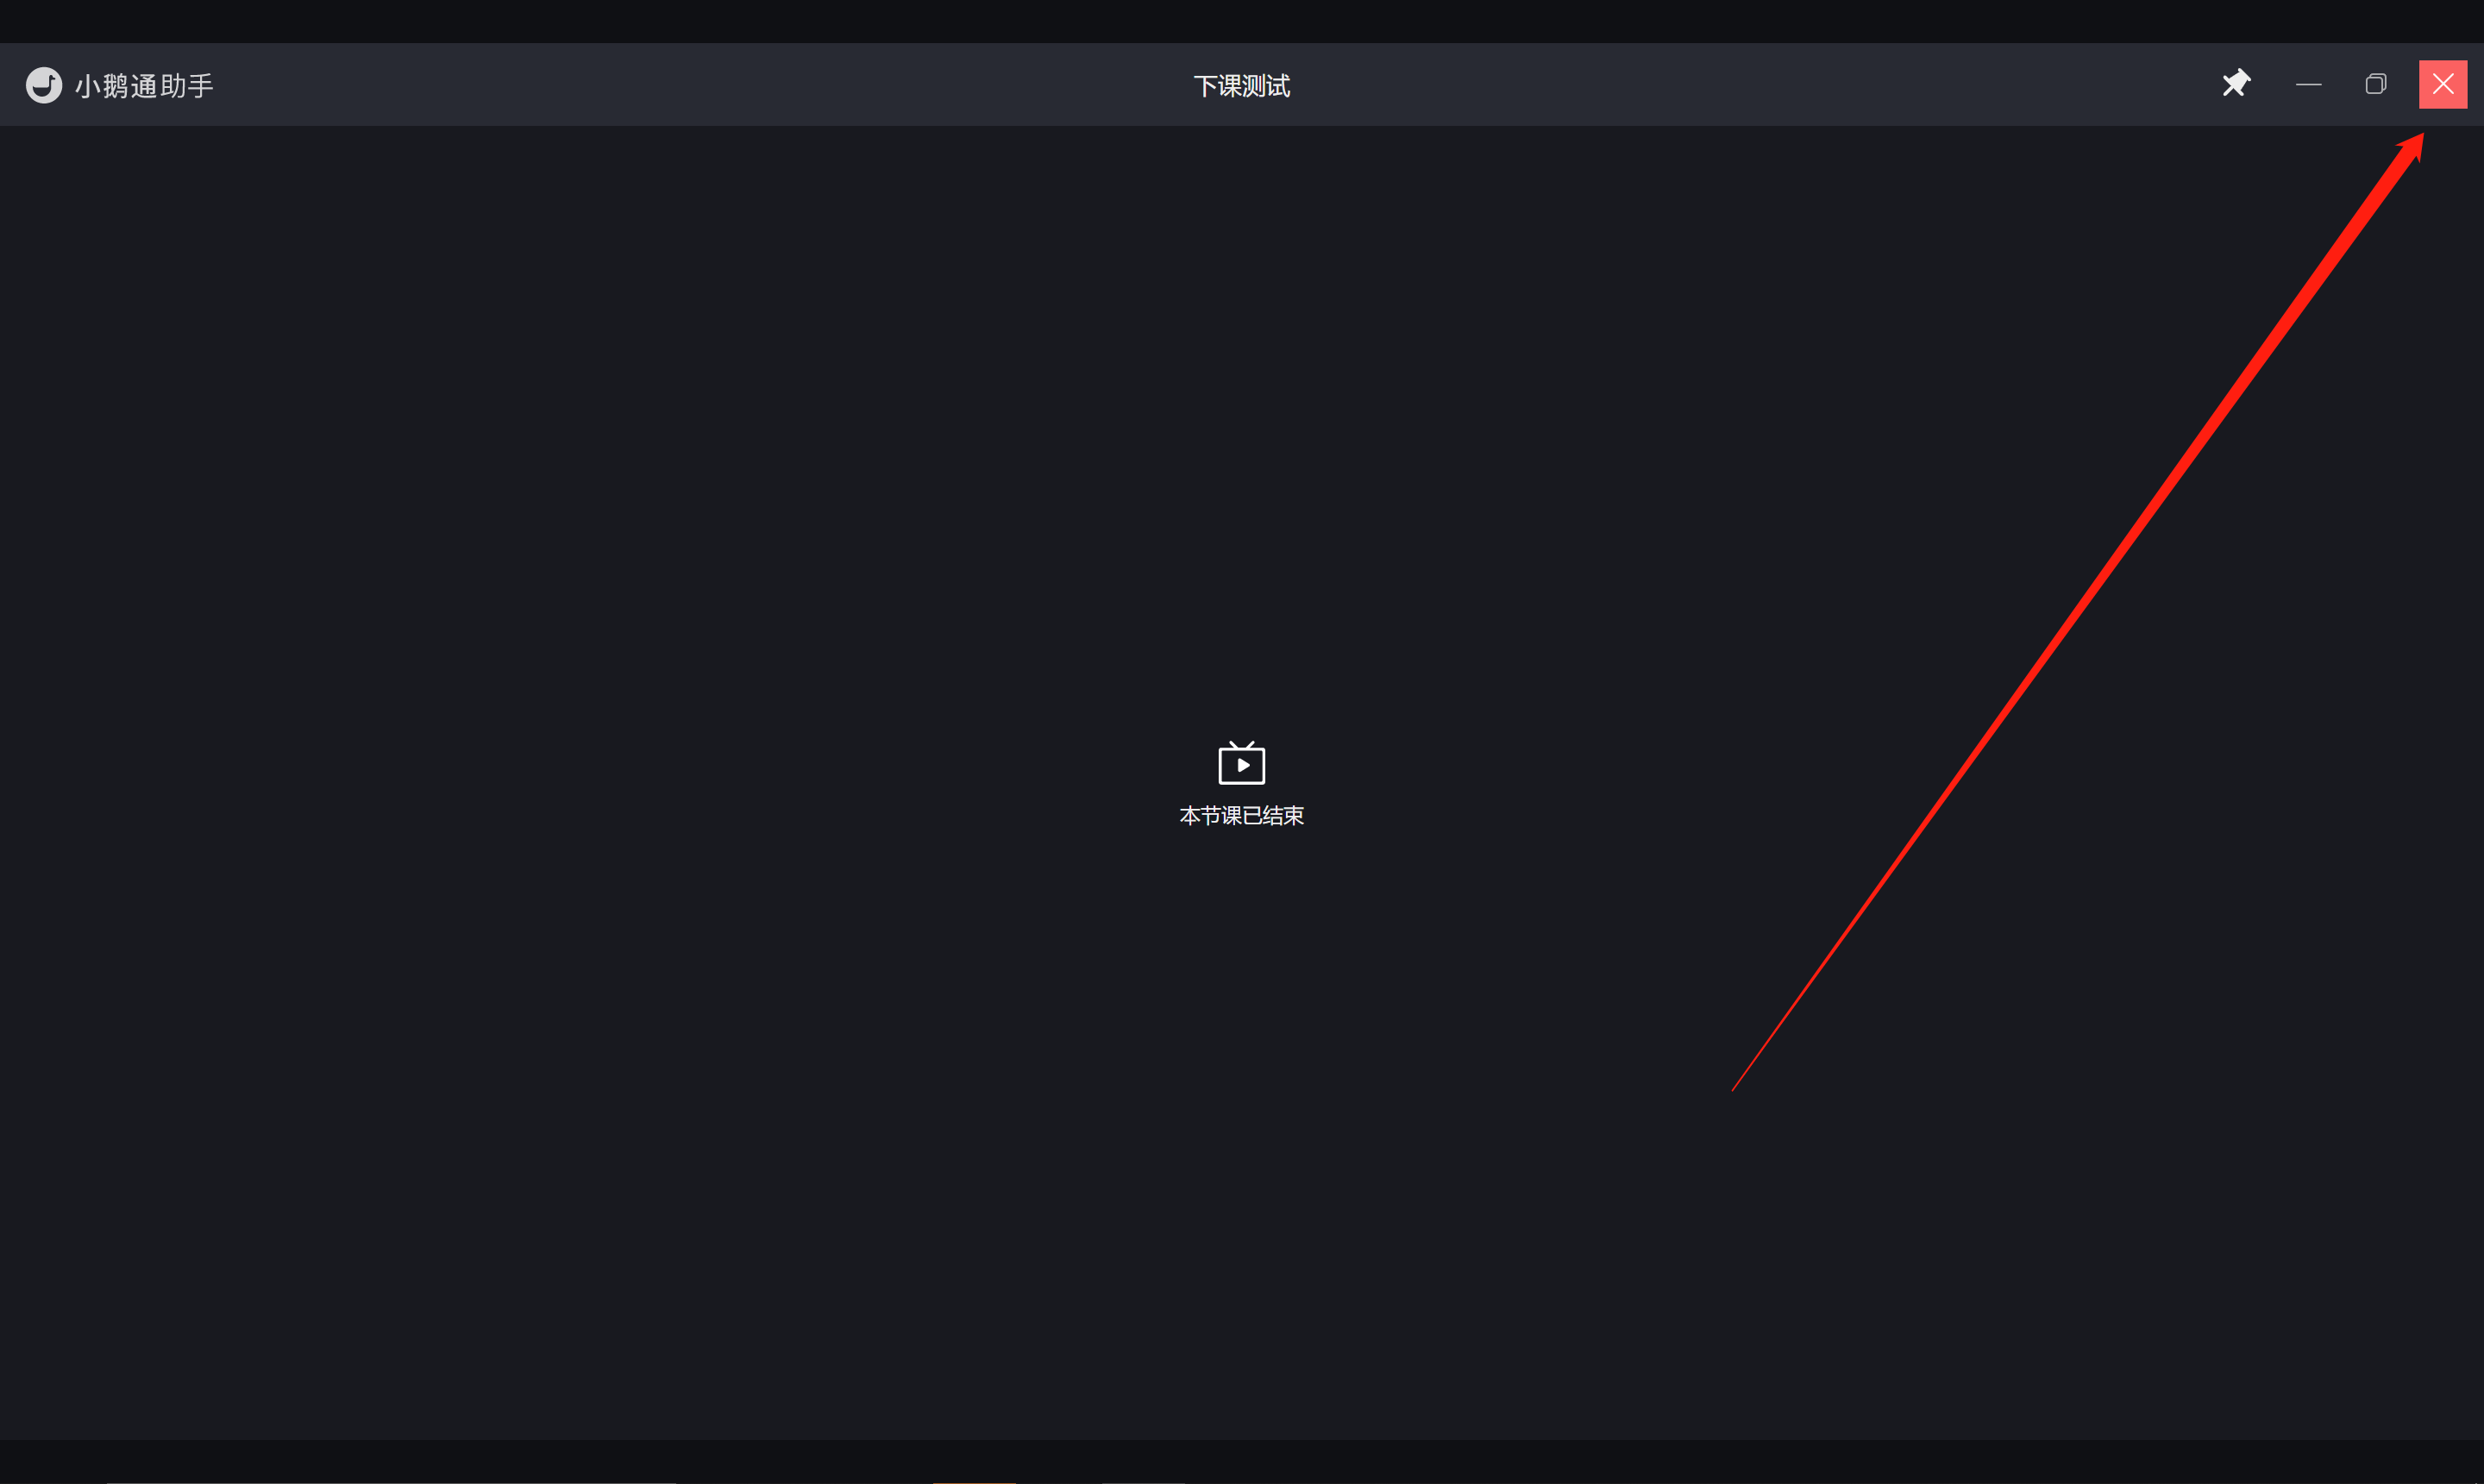
After the instructor clicks the "End Class" button during the class,A pop-up window will appear:
1. Click "Take a Break" to return to the course list page. The course will not end and you can enter it again.
2. The "End Class" button will have a 5-second countdown to prevent accidental course termination.
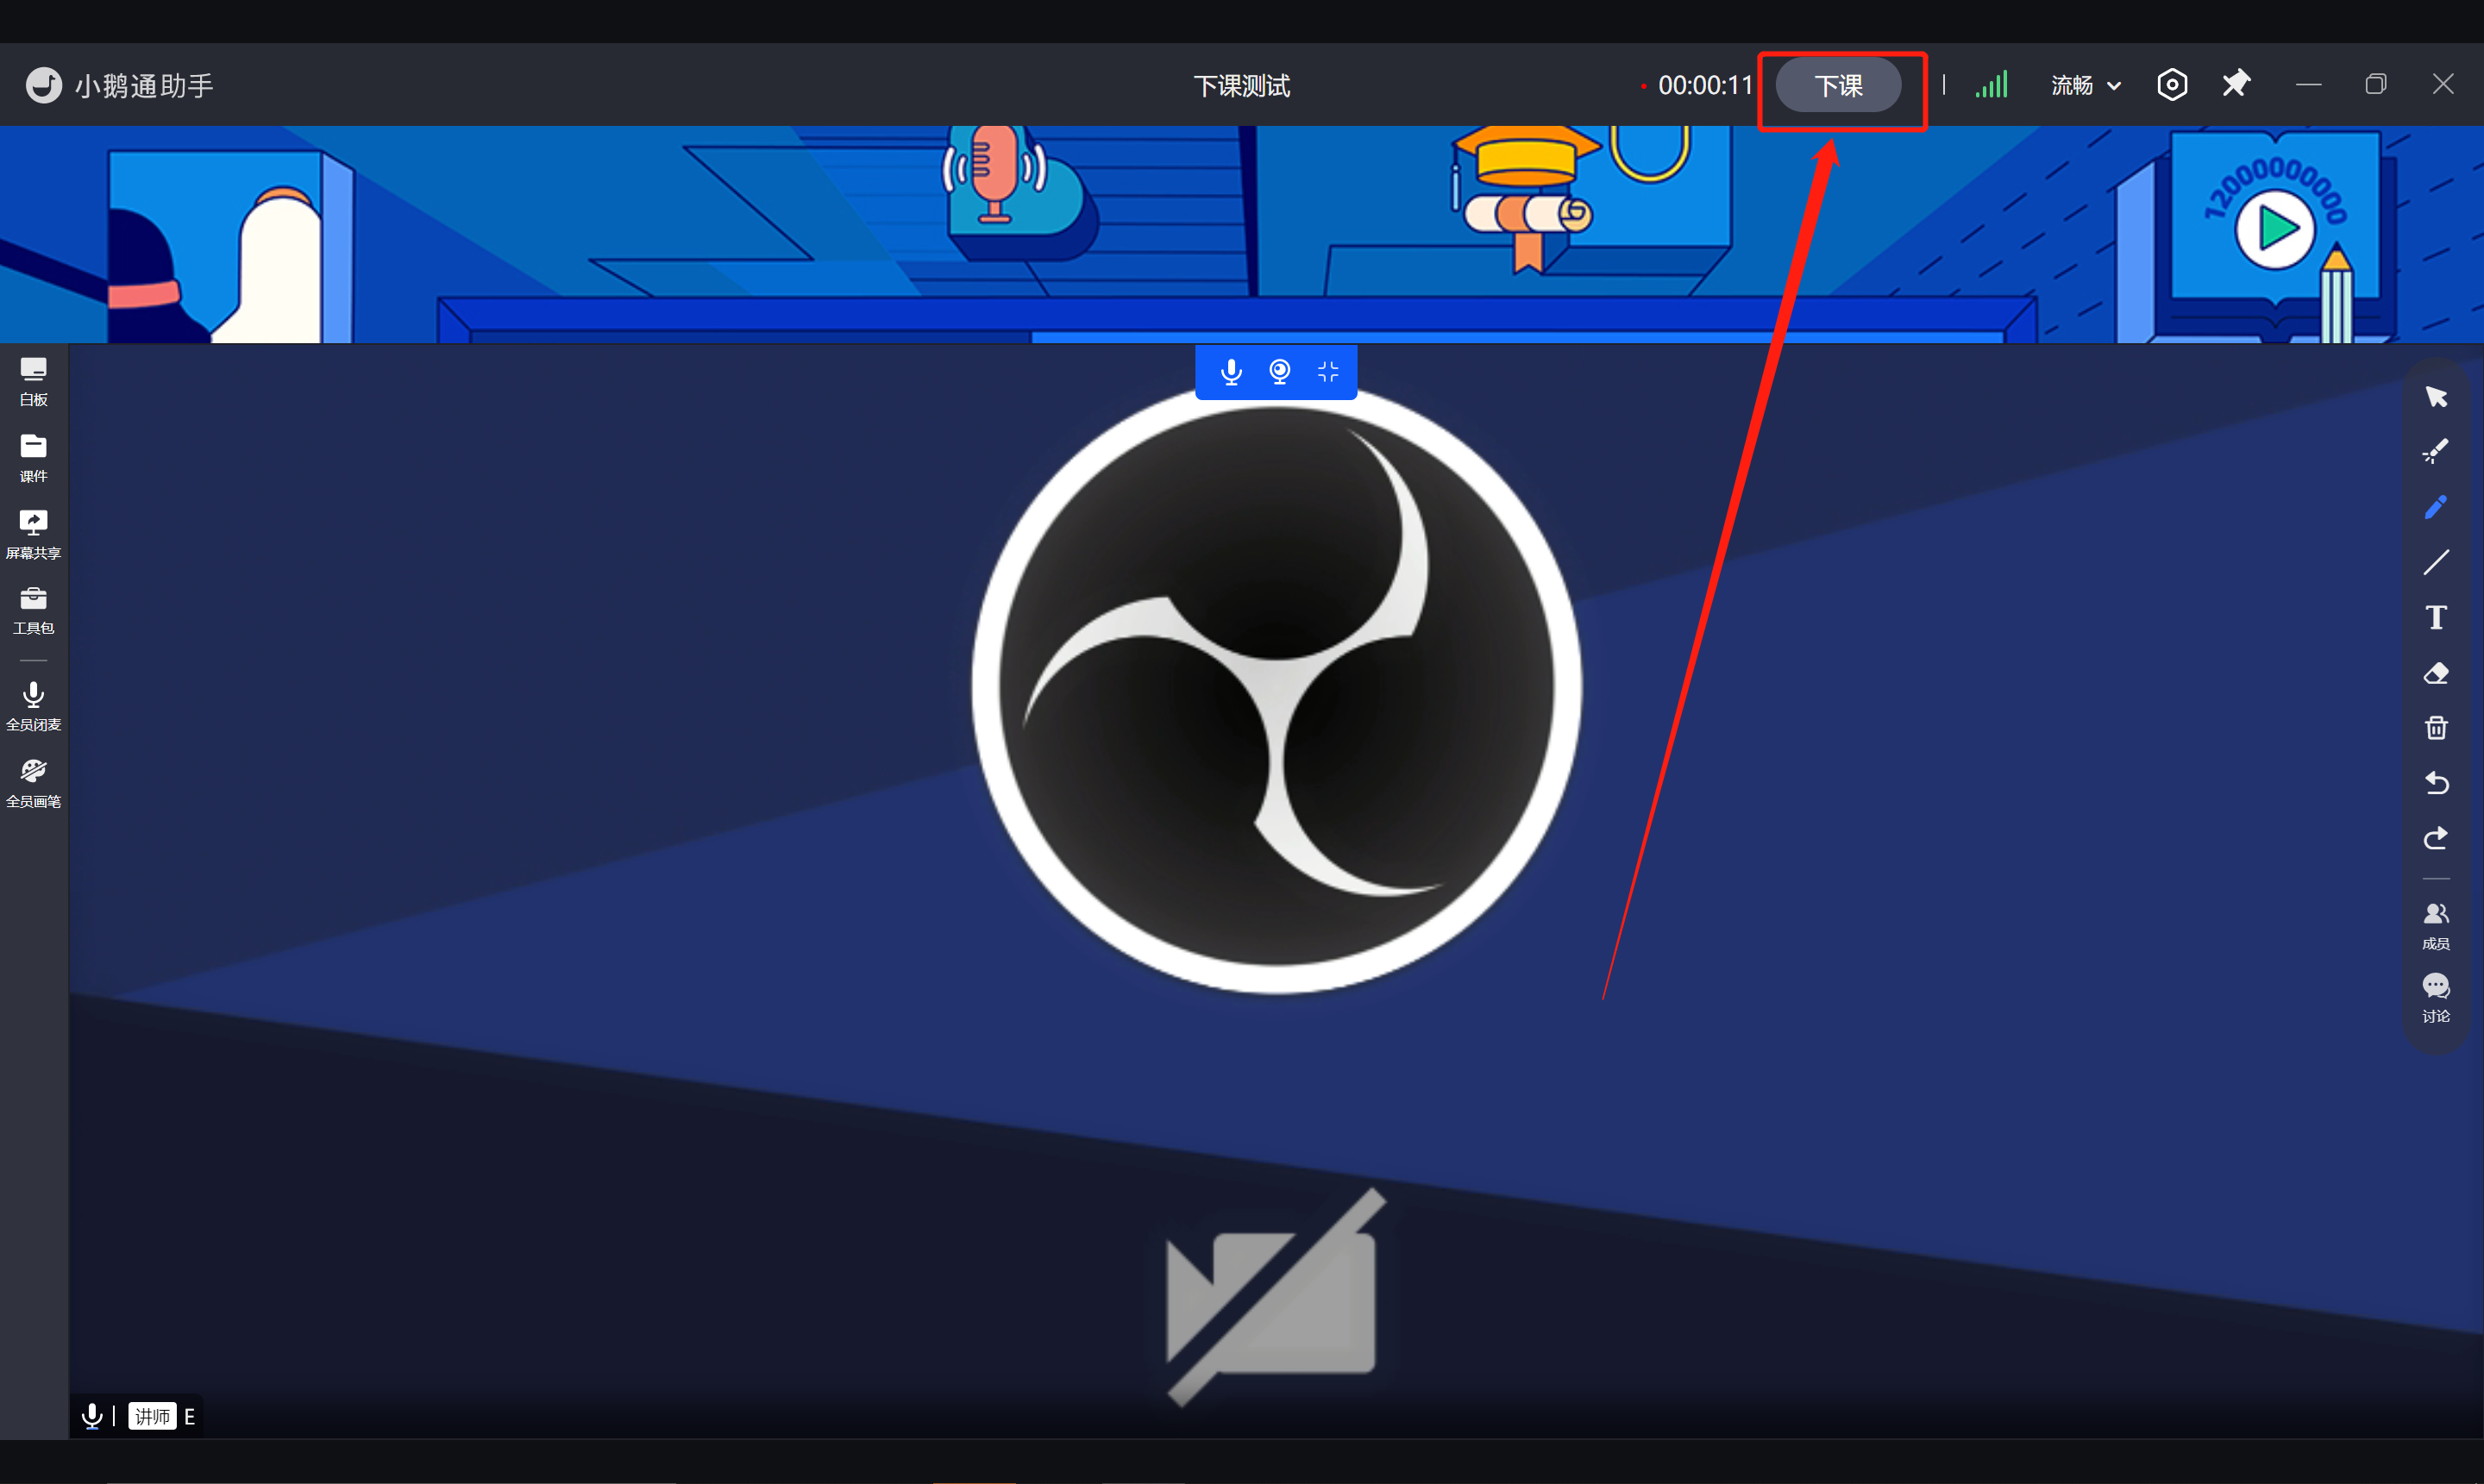
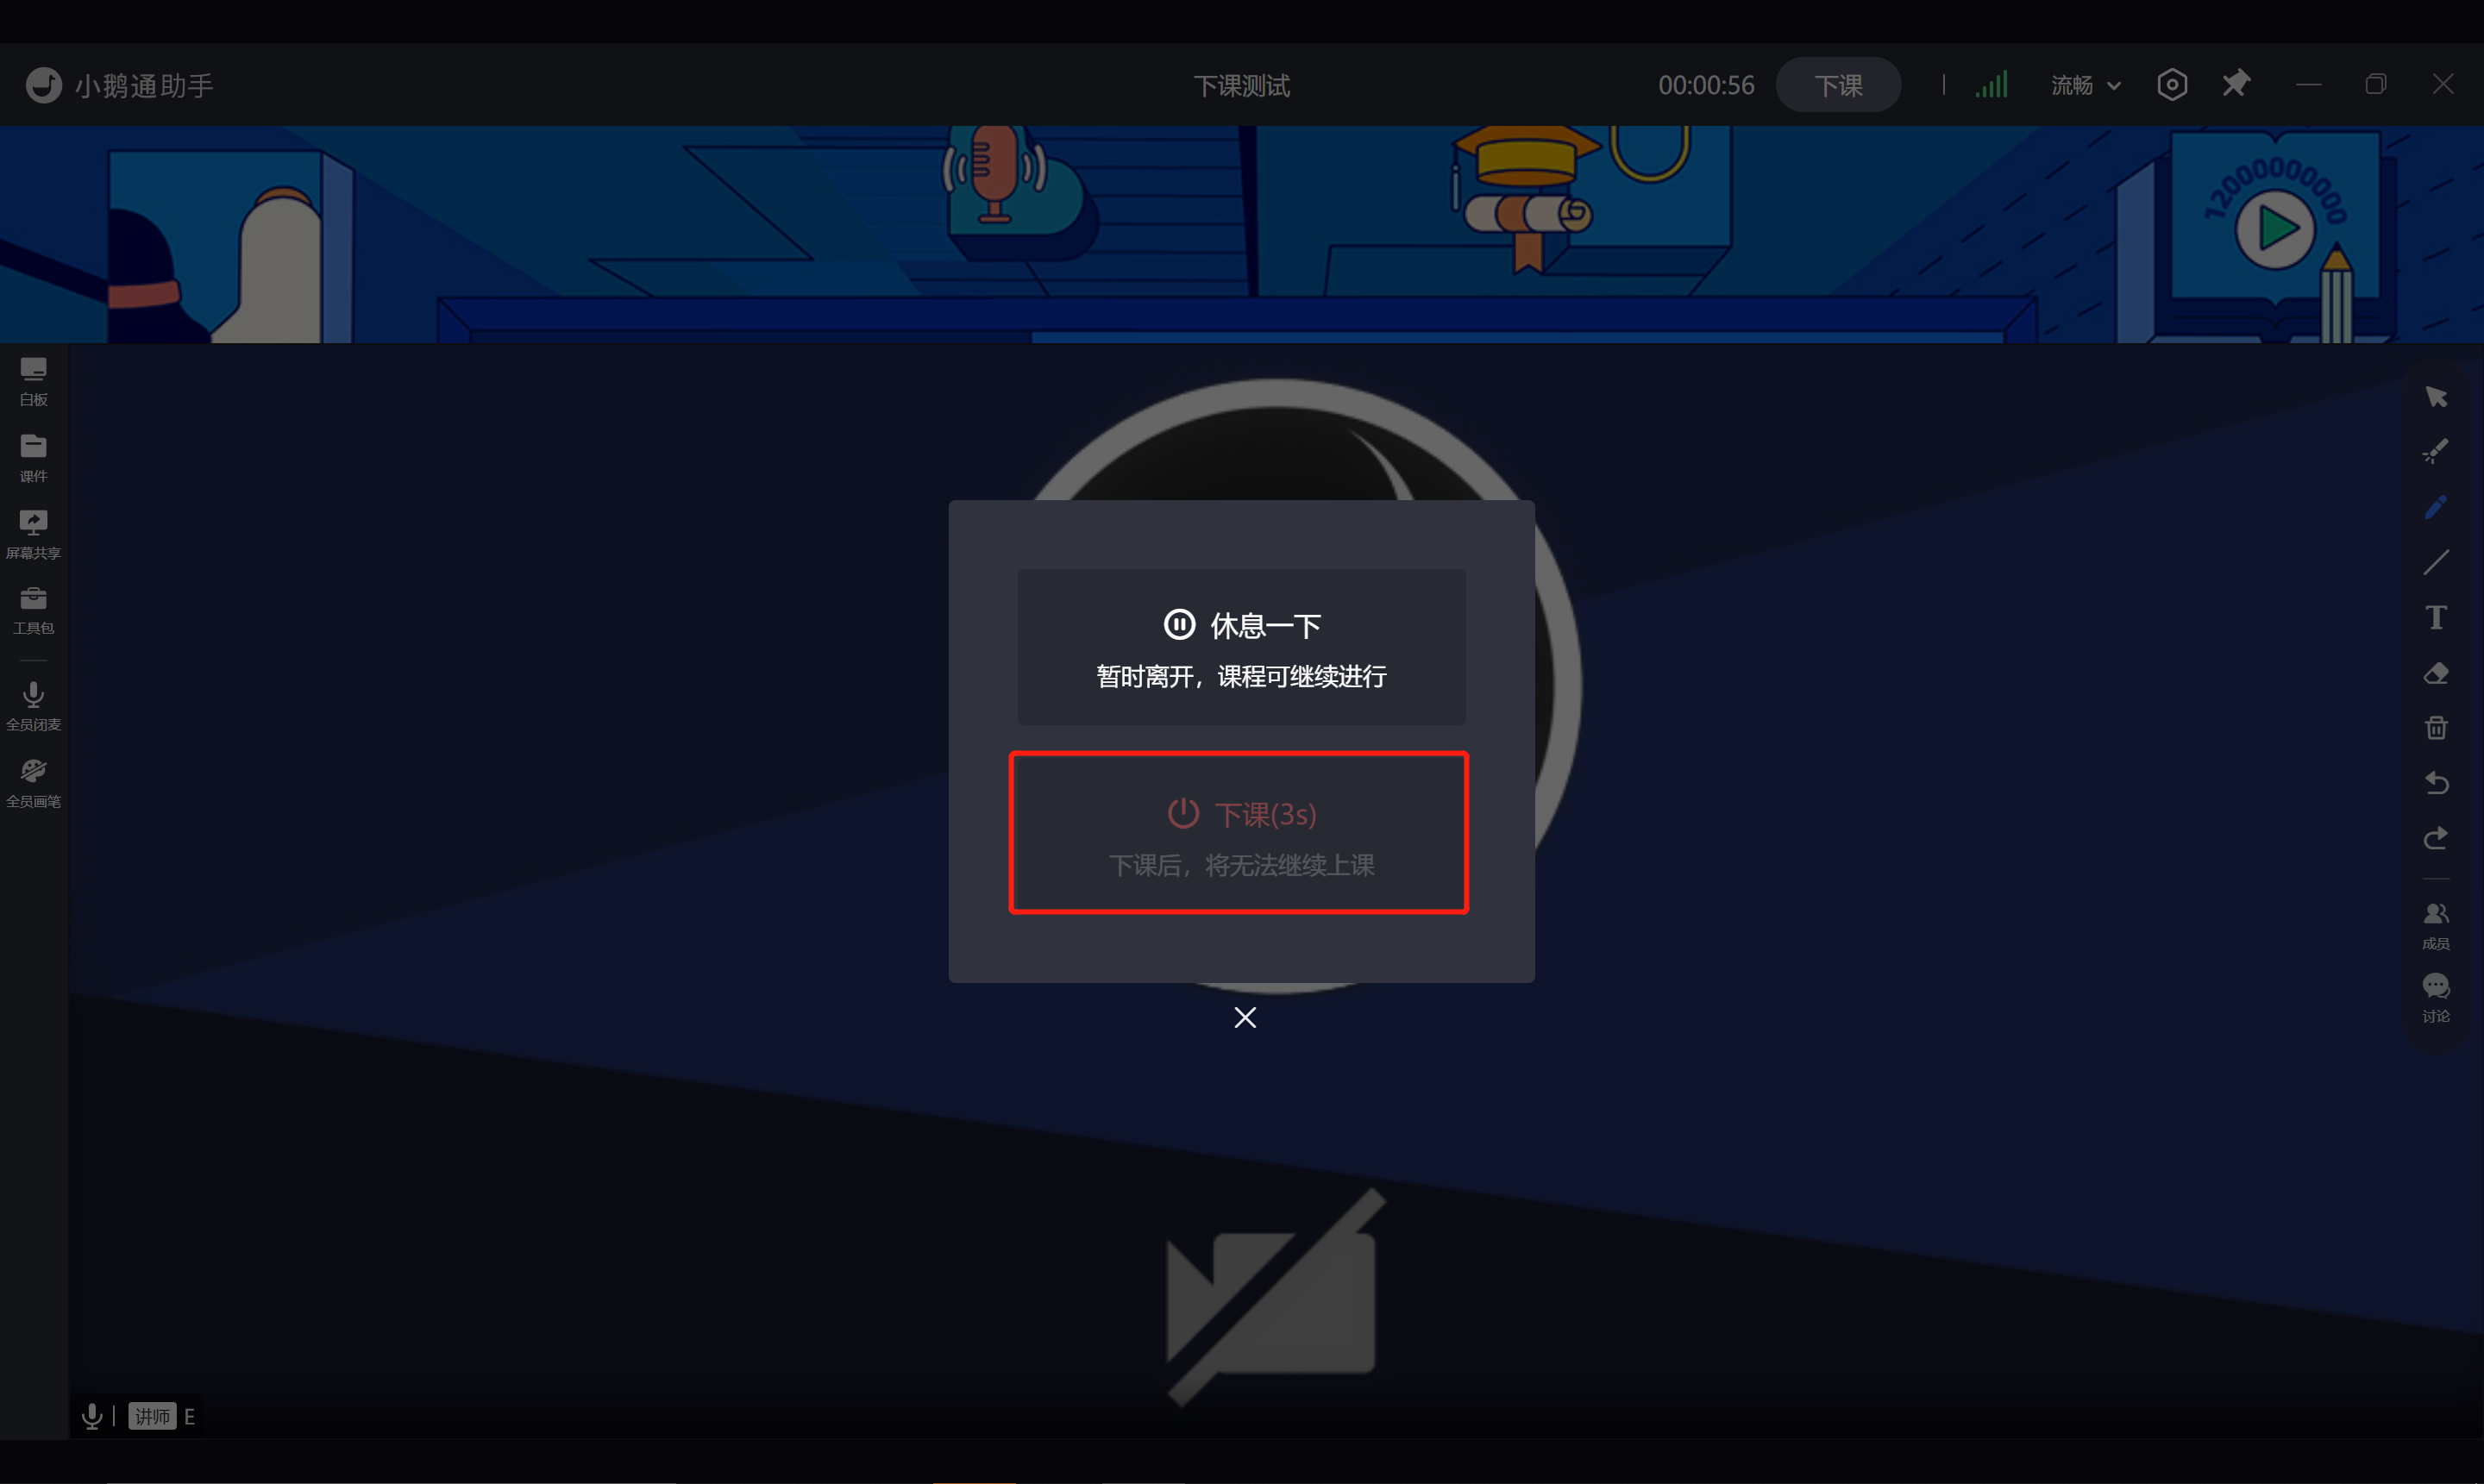
After the countdown ends, the "End Class" button will light up and can be clicked.
At this time, clicking "End Class" will end the class session and you cannot start it again.
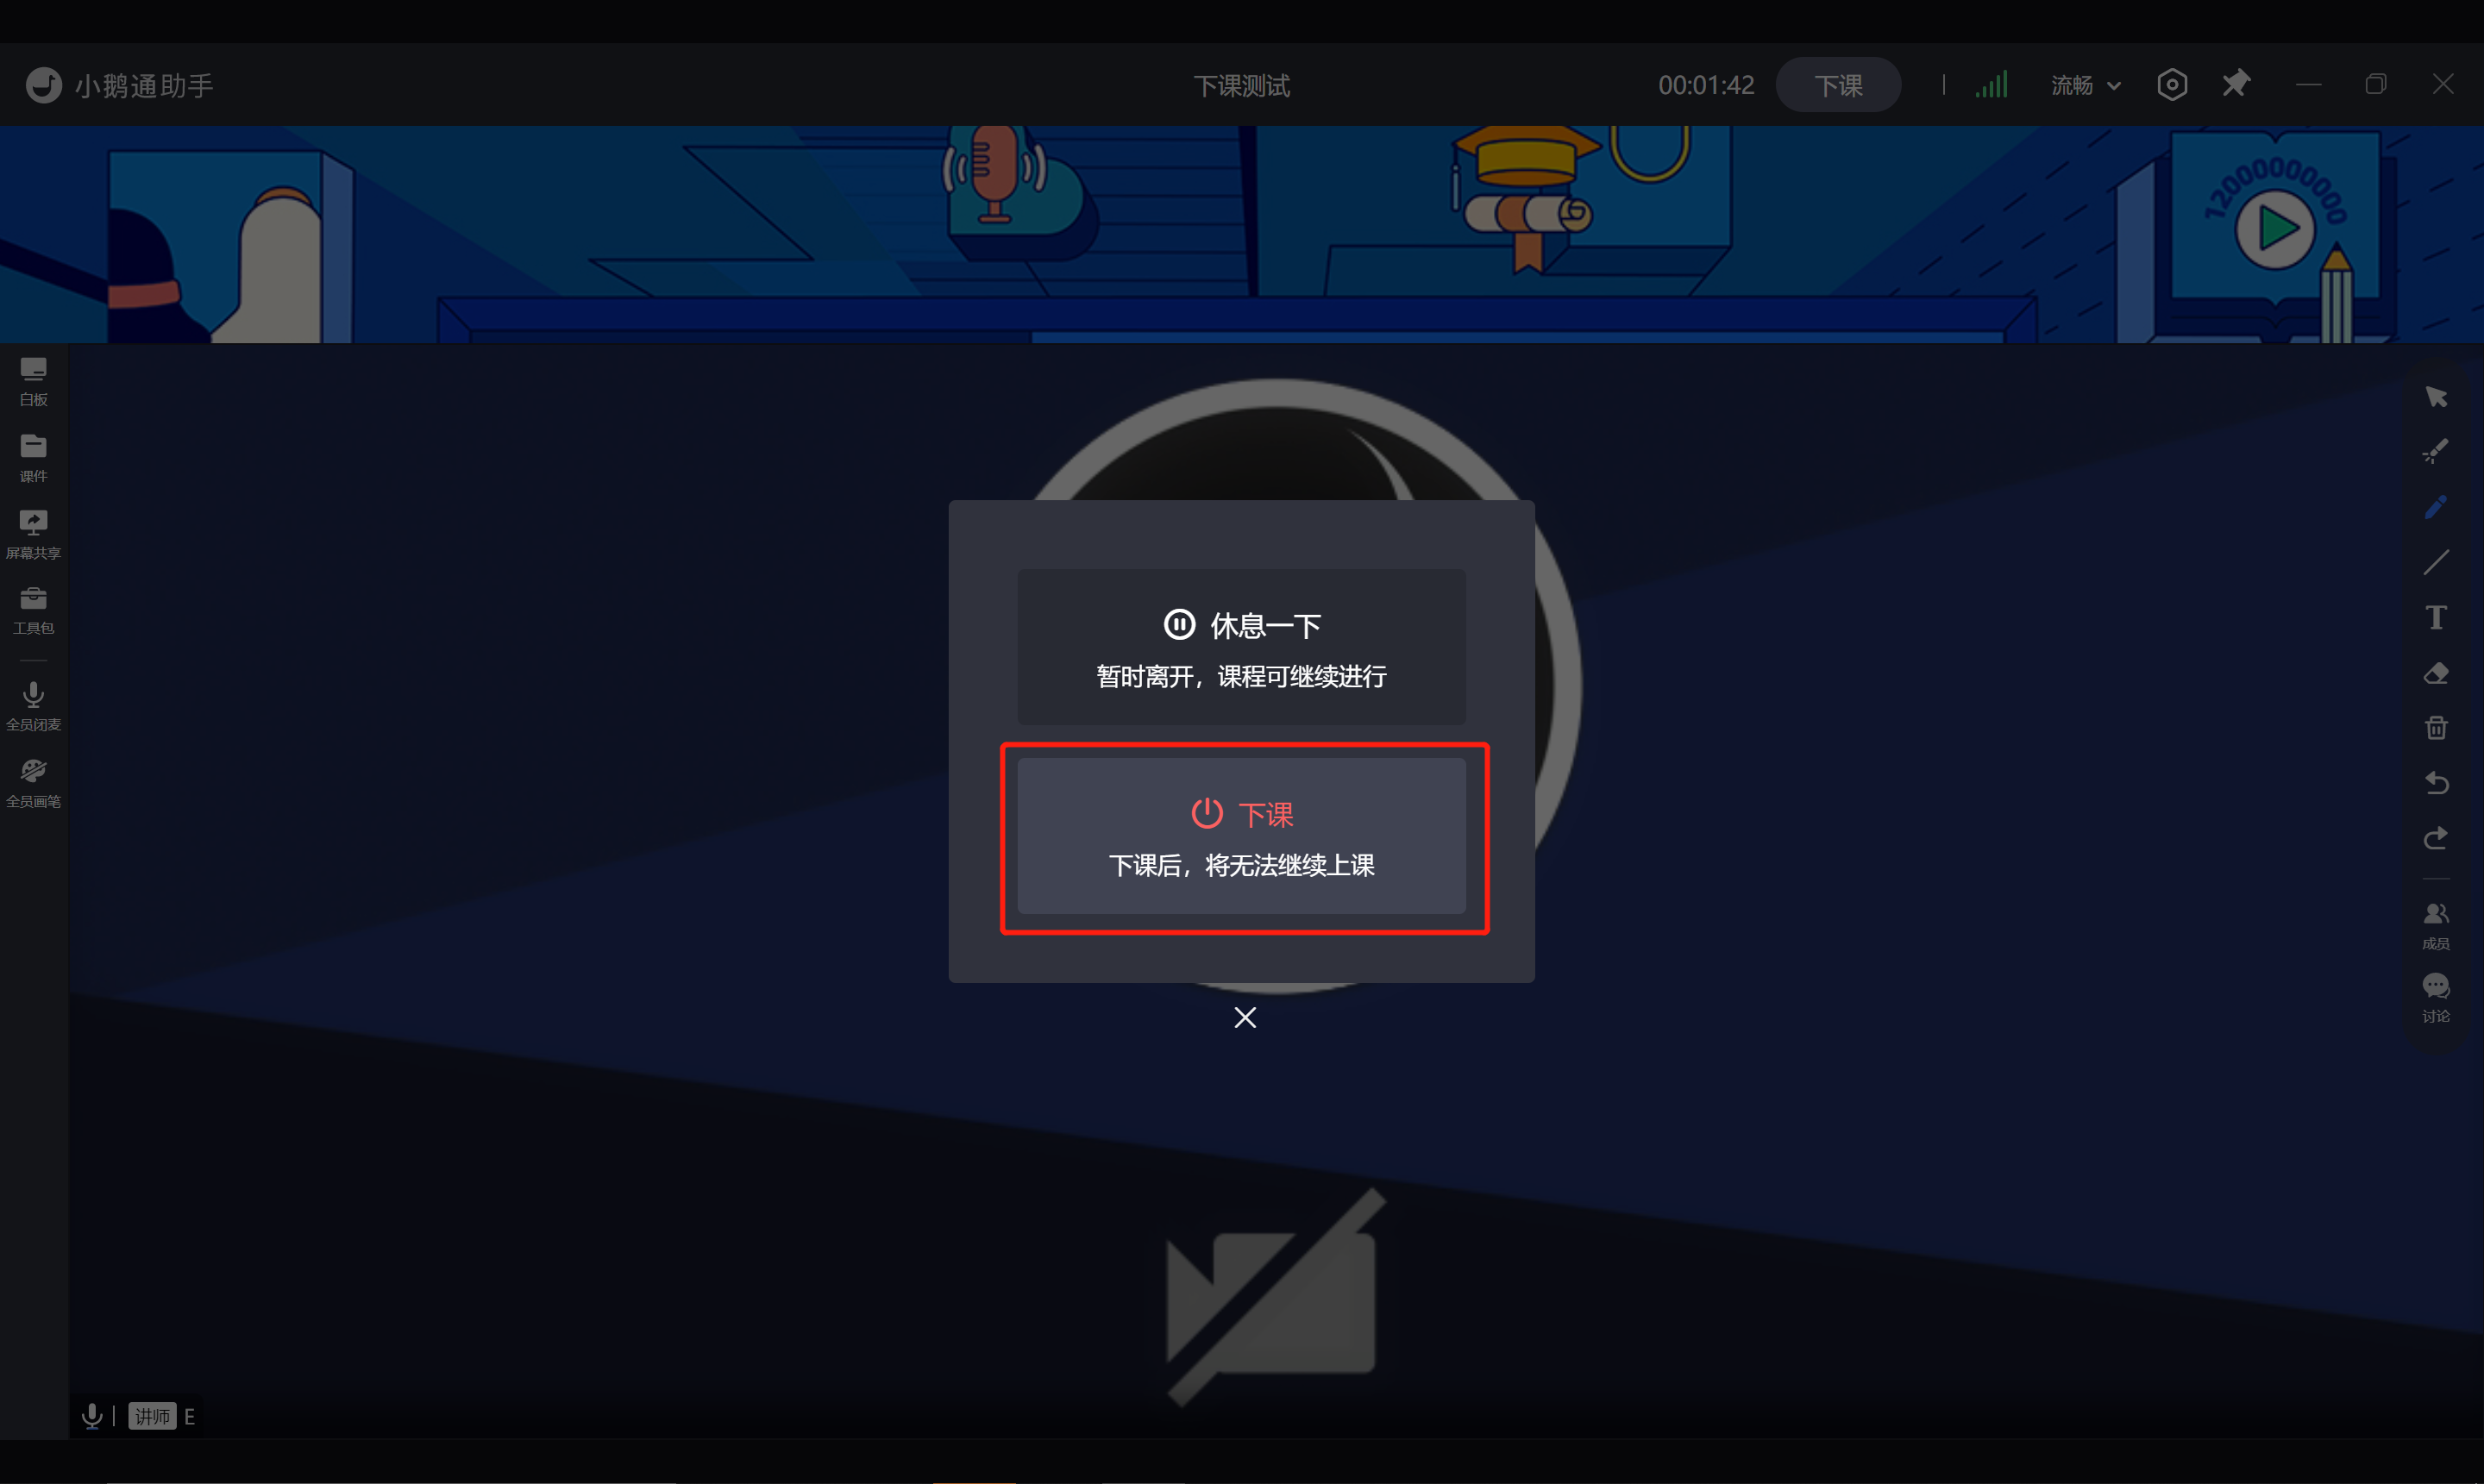
Click the top right corner to close the interface and return to the course calendar list page.
How to play animated PPTs during classes using the client?
When using courseware, click the button in the figure or use the left and right arrow keys on the keyboard to play the courseware animations.

How to delay the end of the class?
When there are 5 minutes left in the course, the instructor will be prompted to decide whether to extend the class. Click the 'Extend for 30 minutes' button to delay the end of the class. Each class can be extended twice.

The client cannot enter the live streaming room all the time and frequently prompts 'timeout'?
When a 'timeout' prompt appears, it indicates that the current network is poor. Check if your mobile network is stable or connect to a Wi-Fi network with a stable internet speed, and then enter the live streaming room again.
Class creation
How to customize the skin of the live streaming room for courses?
Step 1: The administrator clicks on 'Courses' in the management backend and selects the 'General Settings' menu.
Step 2: Click on 'Add Classroom Skin' to enter the custom skin settings page.
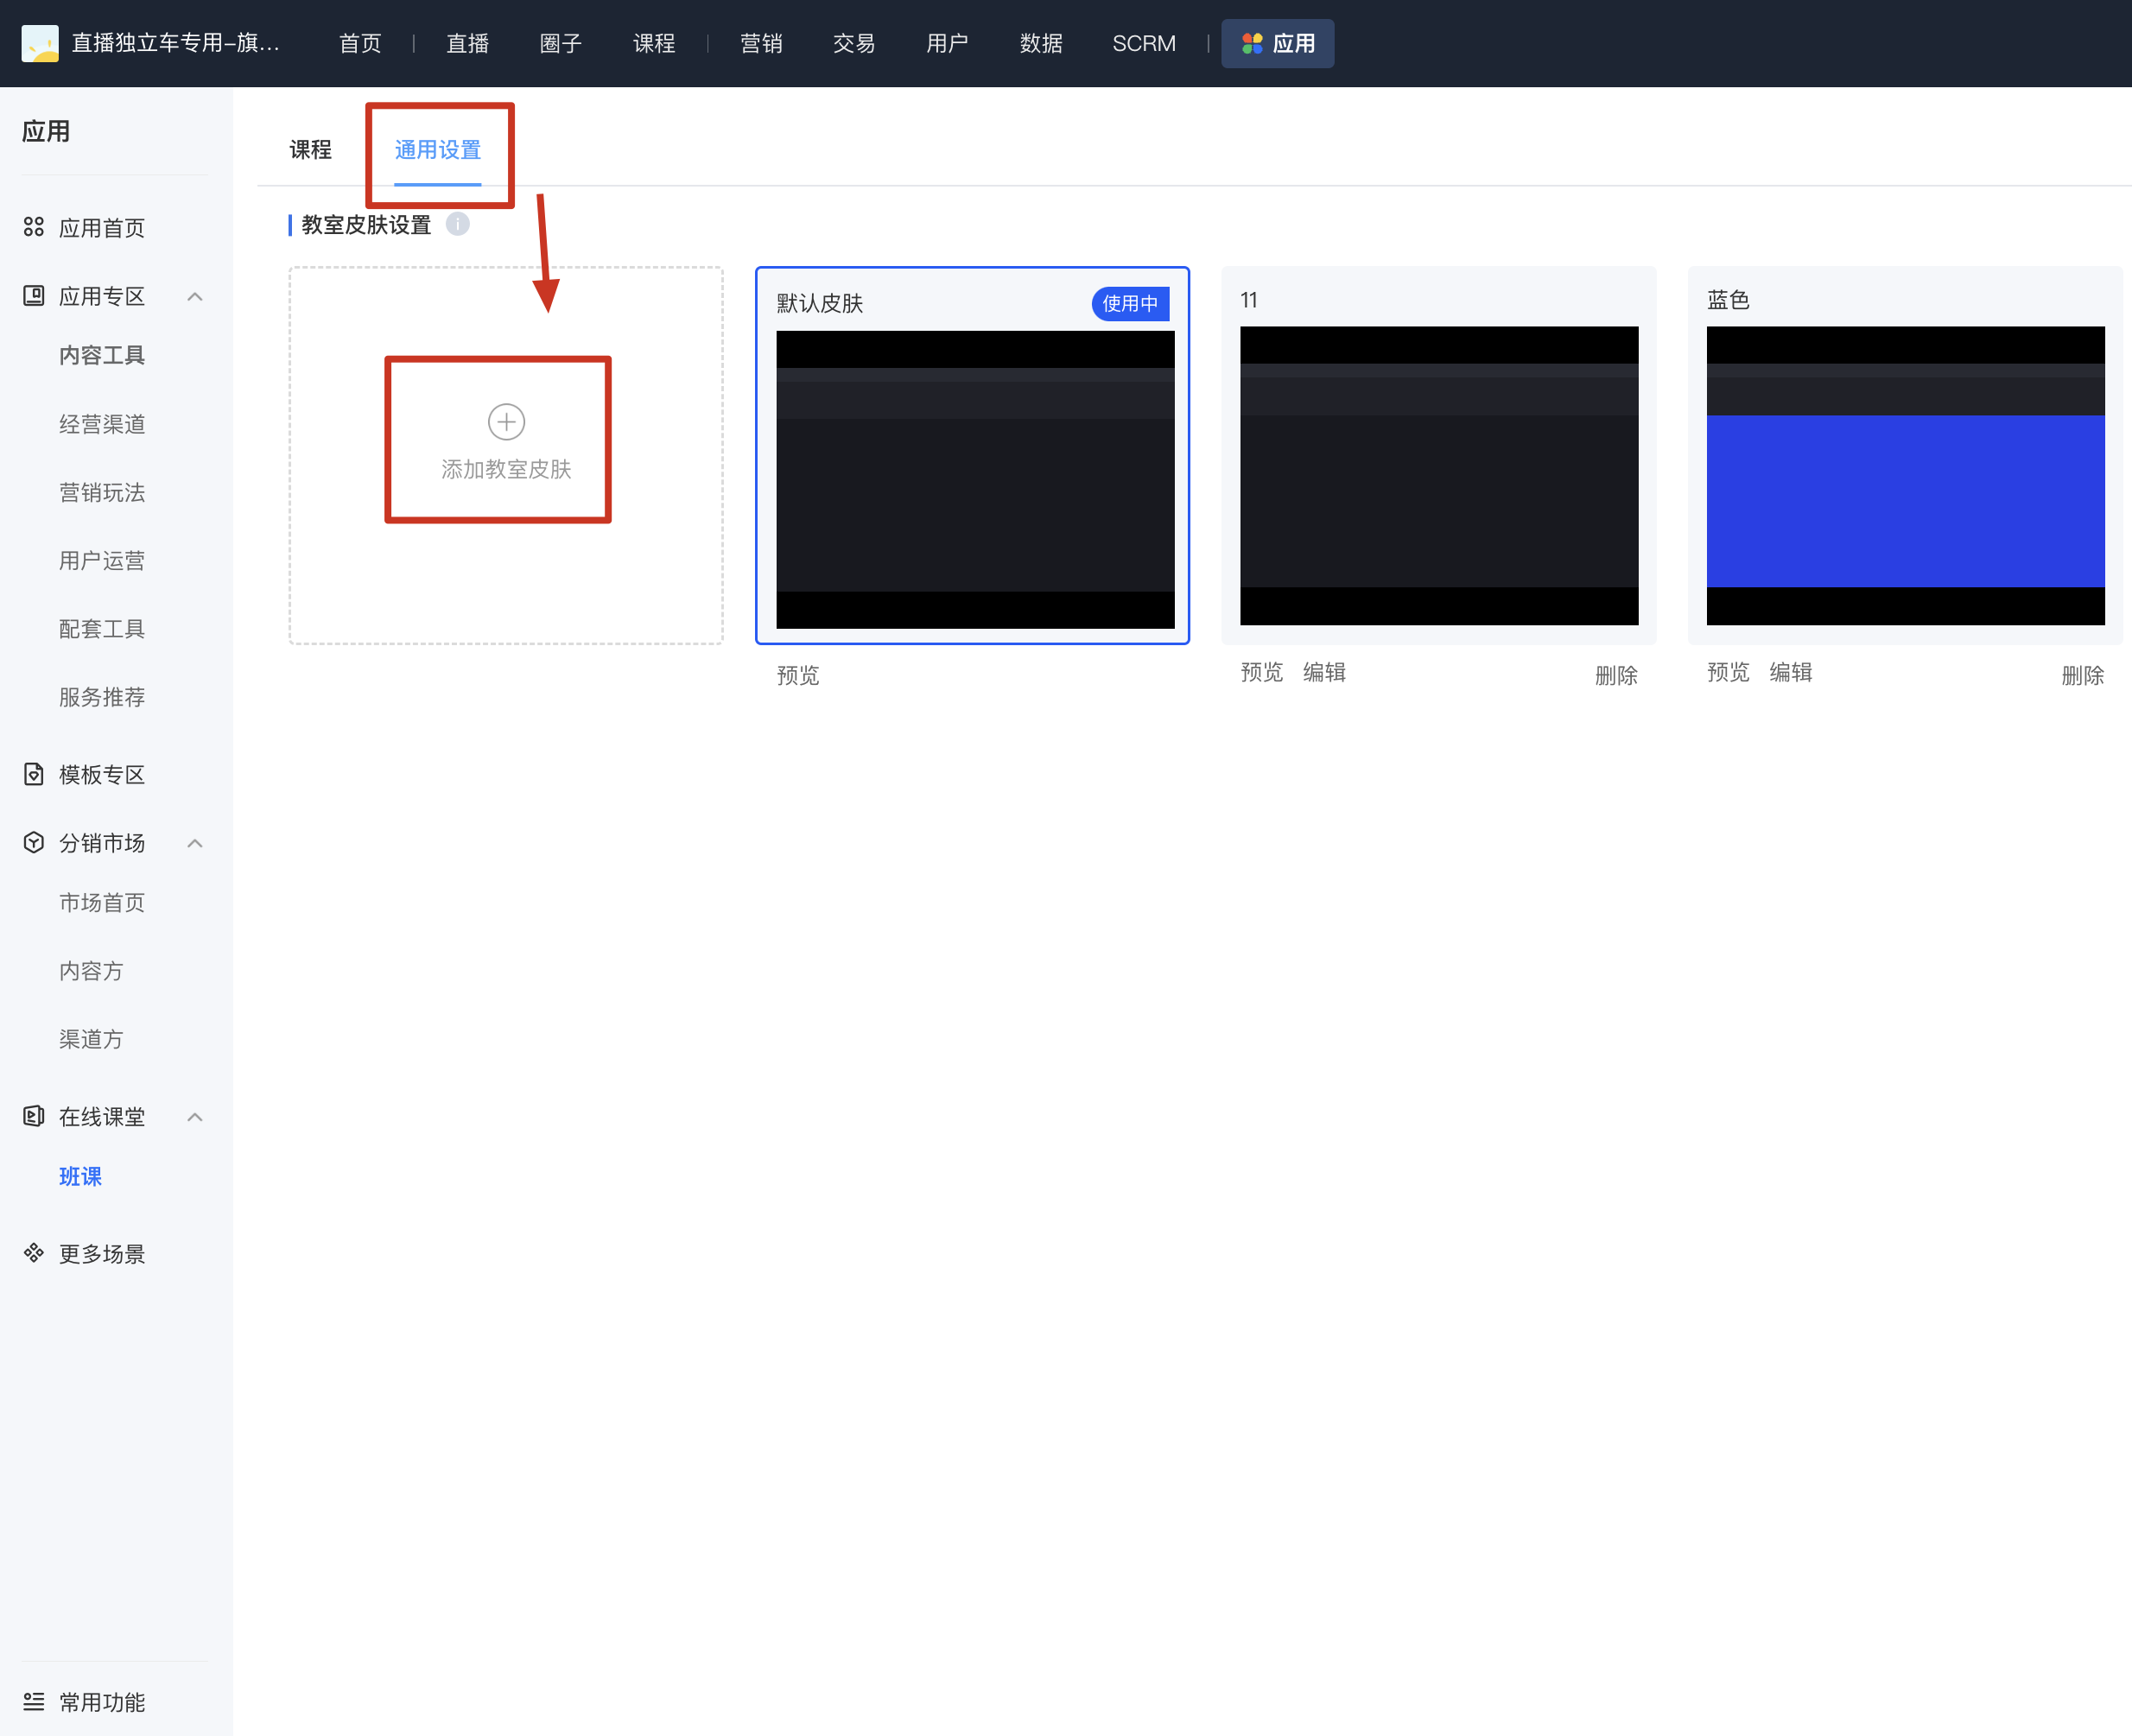
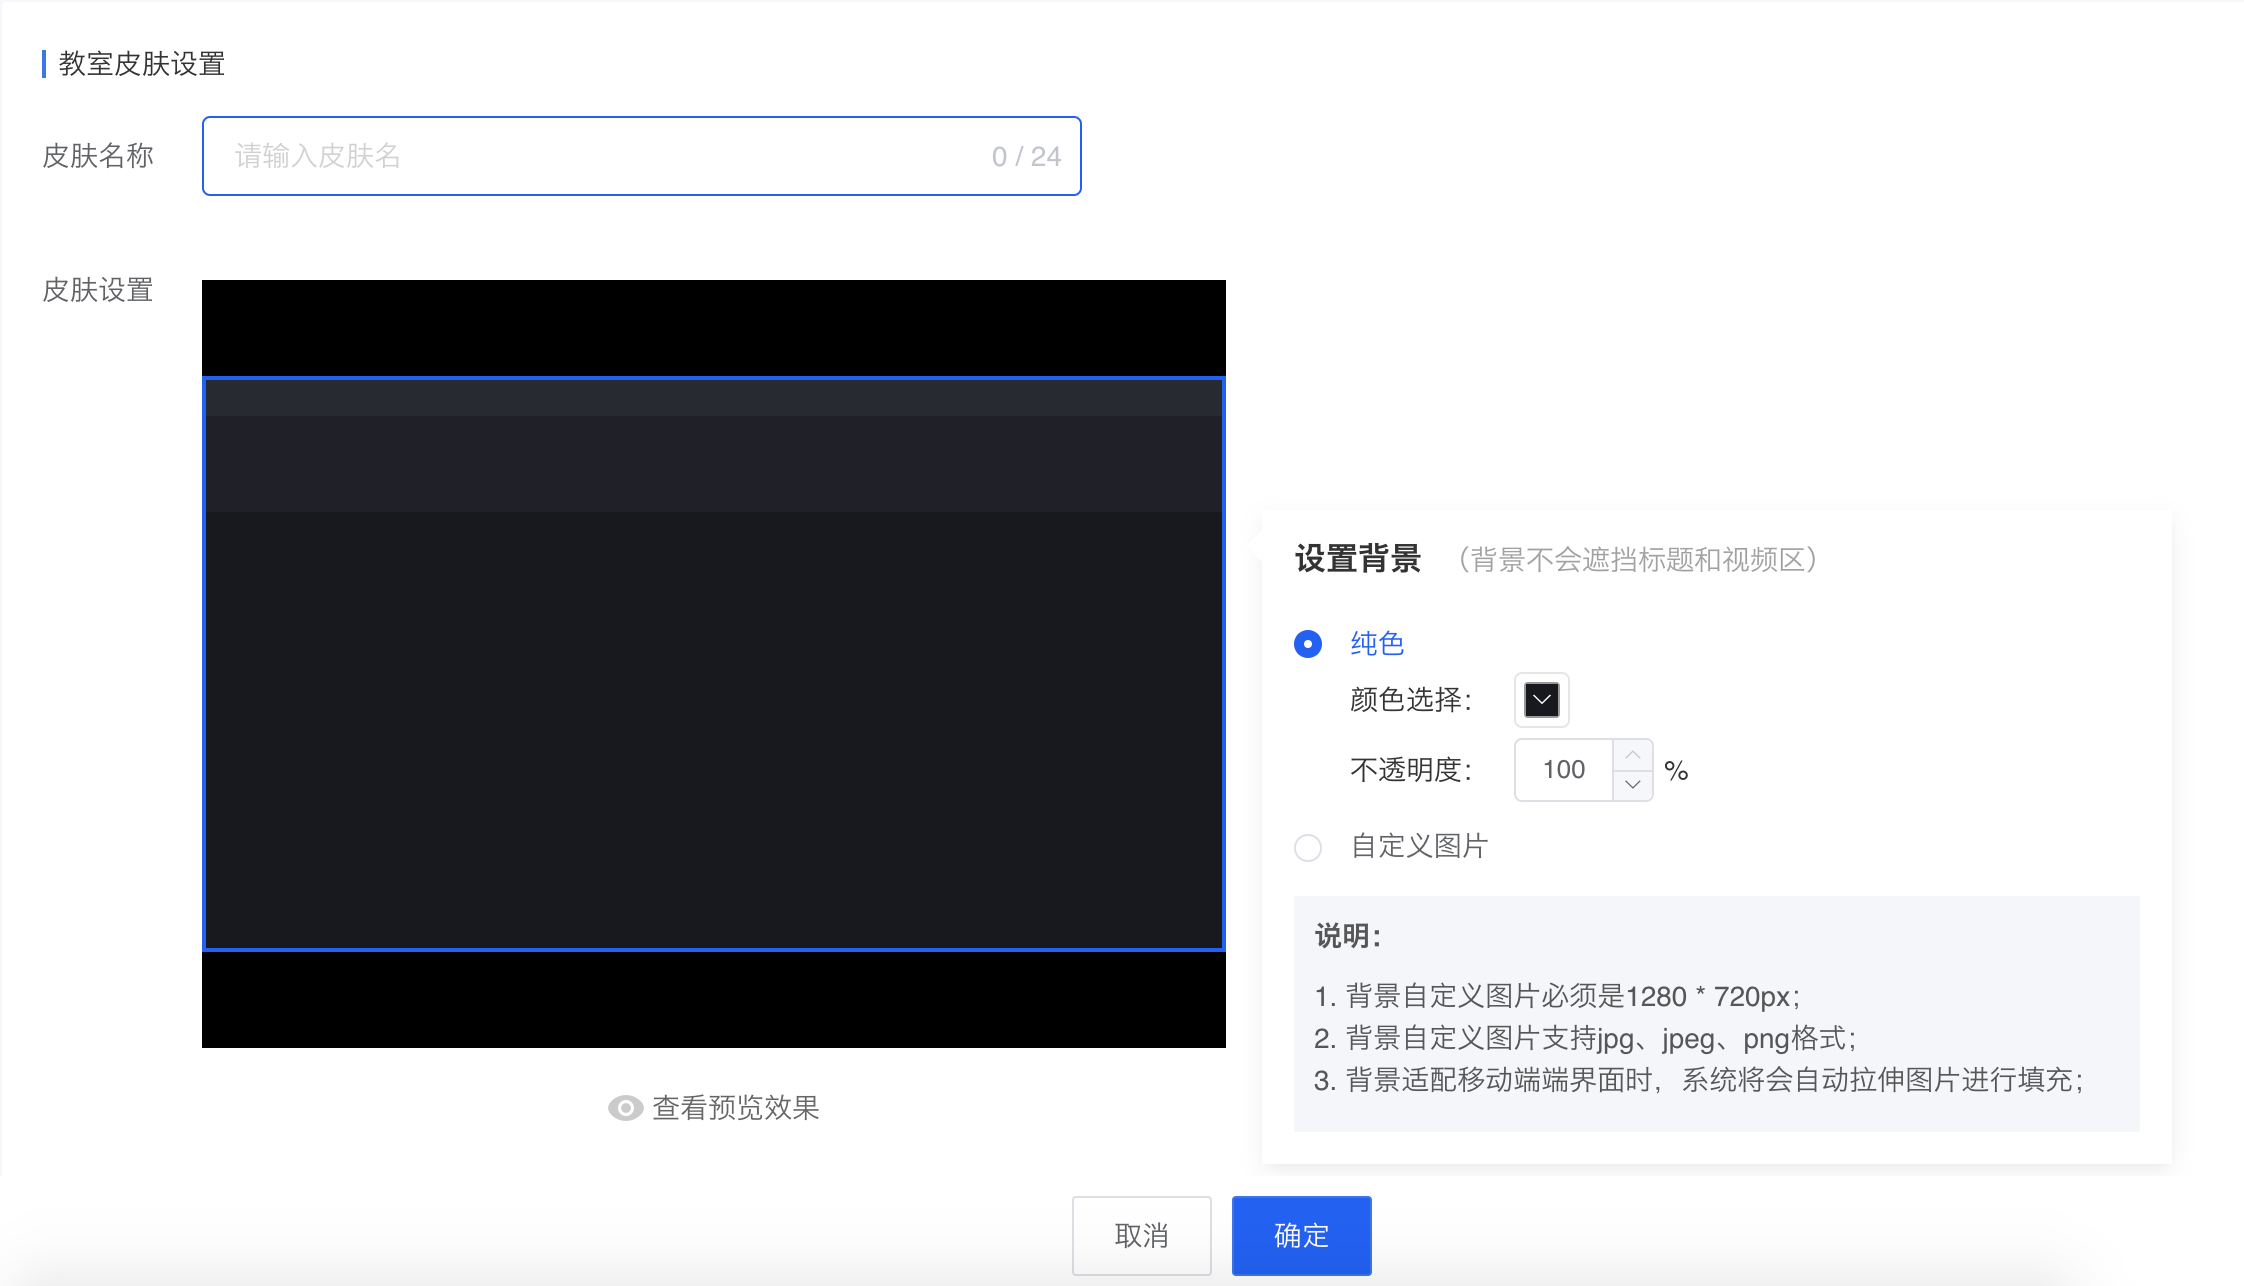
Step 3: Enter the name of the custom skin, set the colors and backgrounds of the corresponding areas (supports adding images), and click the 'OK' button to complete the creation of the custom skin.
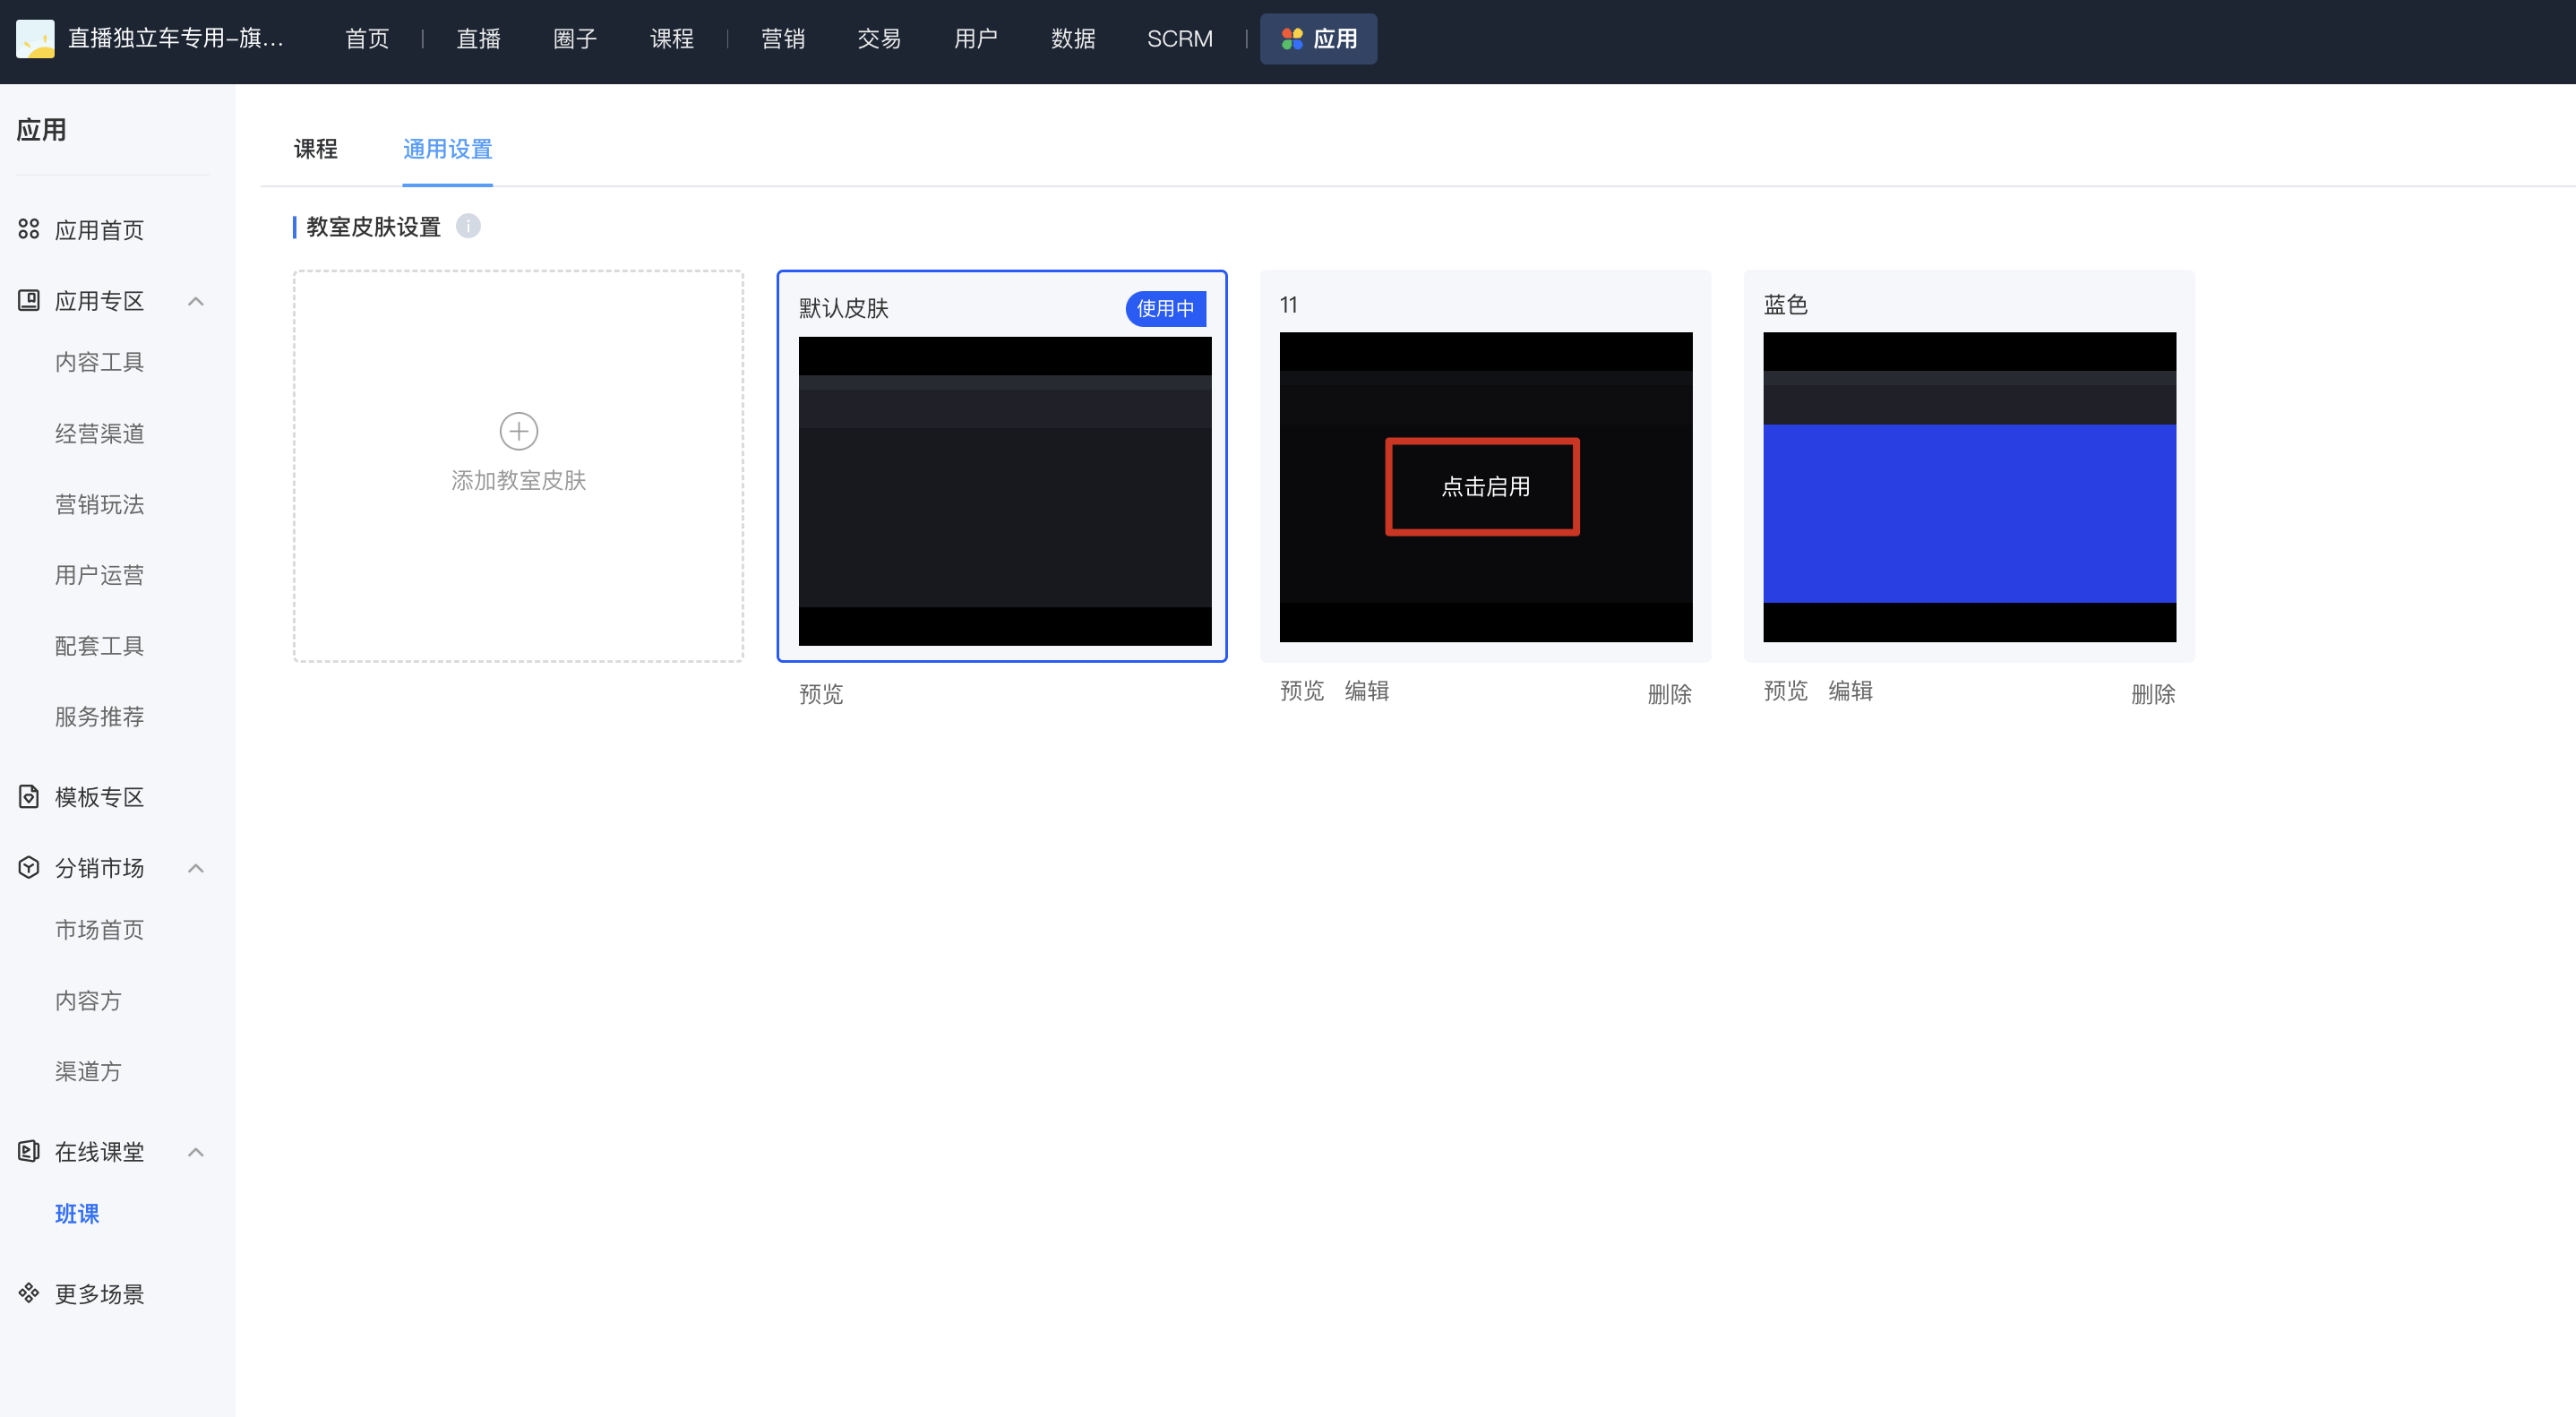
Step 4: Select the skin, click 'Activate', and re - enter the live streaming room for the changes to take effect.
How to invite learners to enroll in courses?
Step 1:On the class list page, click the "Share" button.

Step 2:In the sharing pop-up window, you can share the course with students for purchase by copying the link, using the QR code, or sharing the course poster.

How to customize the live streaming room skin?
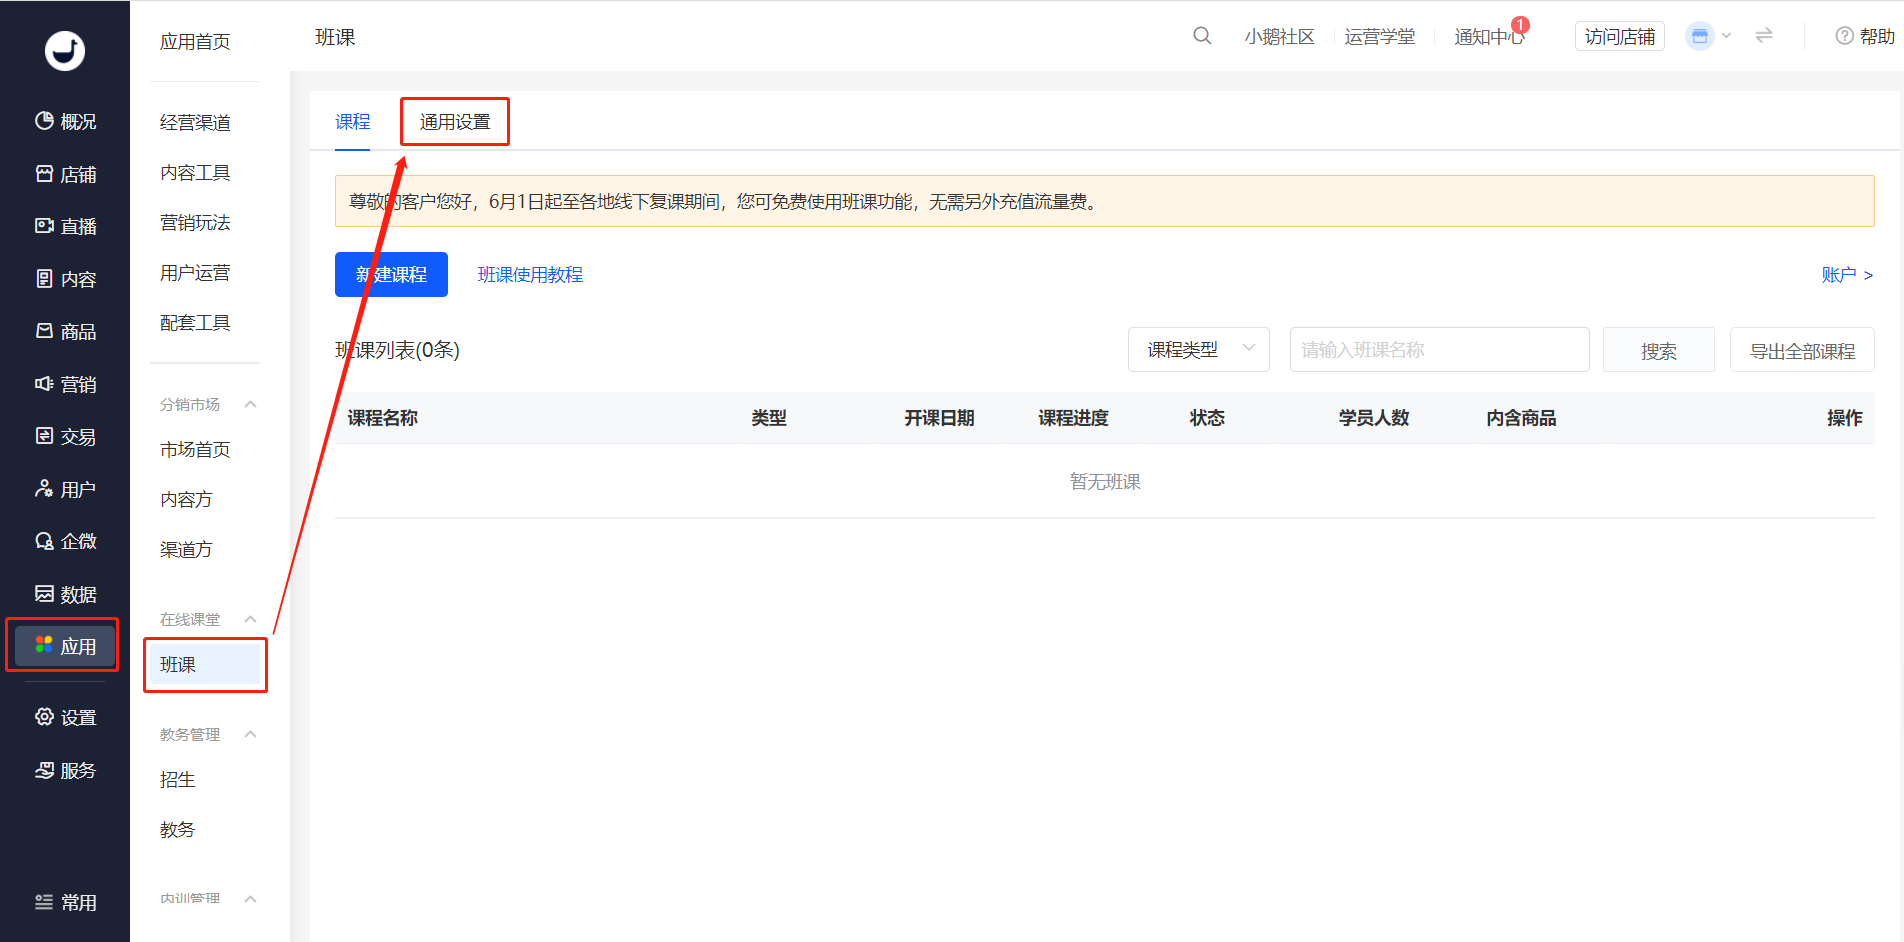
Step 1
The administrator goes to [Desktop Management Console - Applications - Online Classroom], clicks on "Class Sessions" and selects the "General Settings" menu bar;
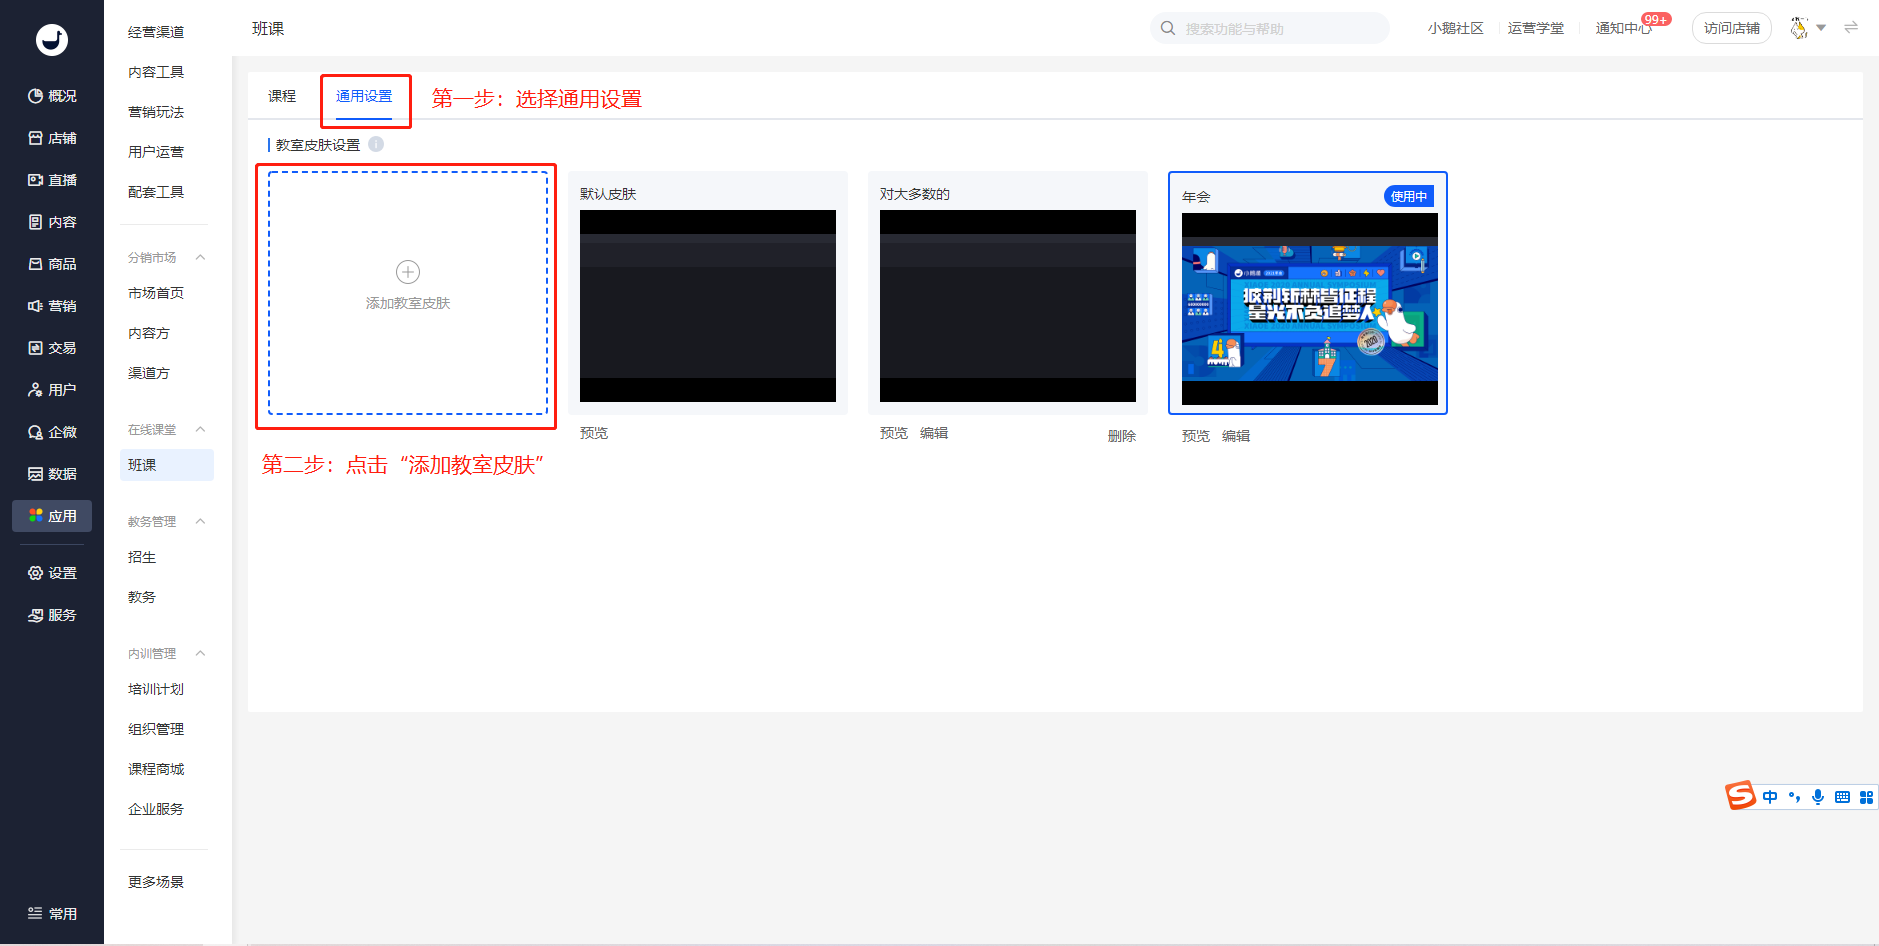
Step 2
Clicks on "Add Classroom Skin" to enter the custom skin settings page;
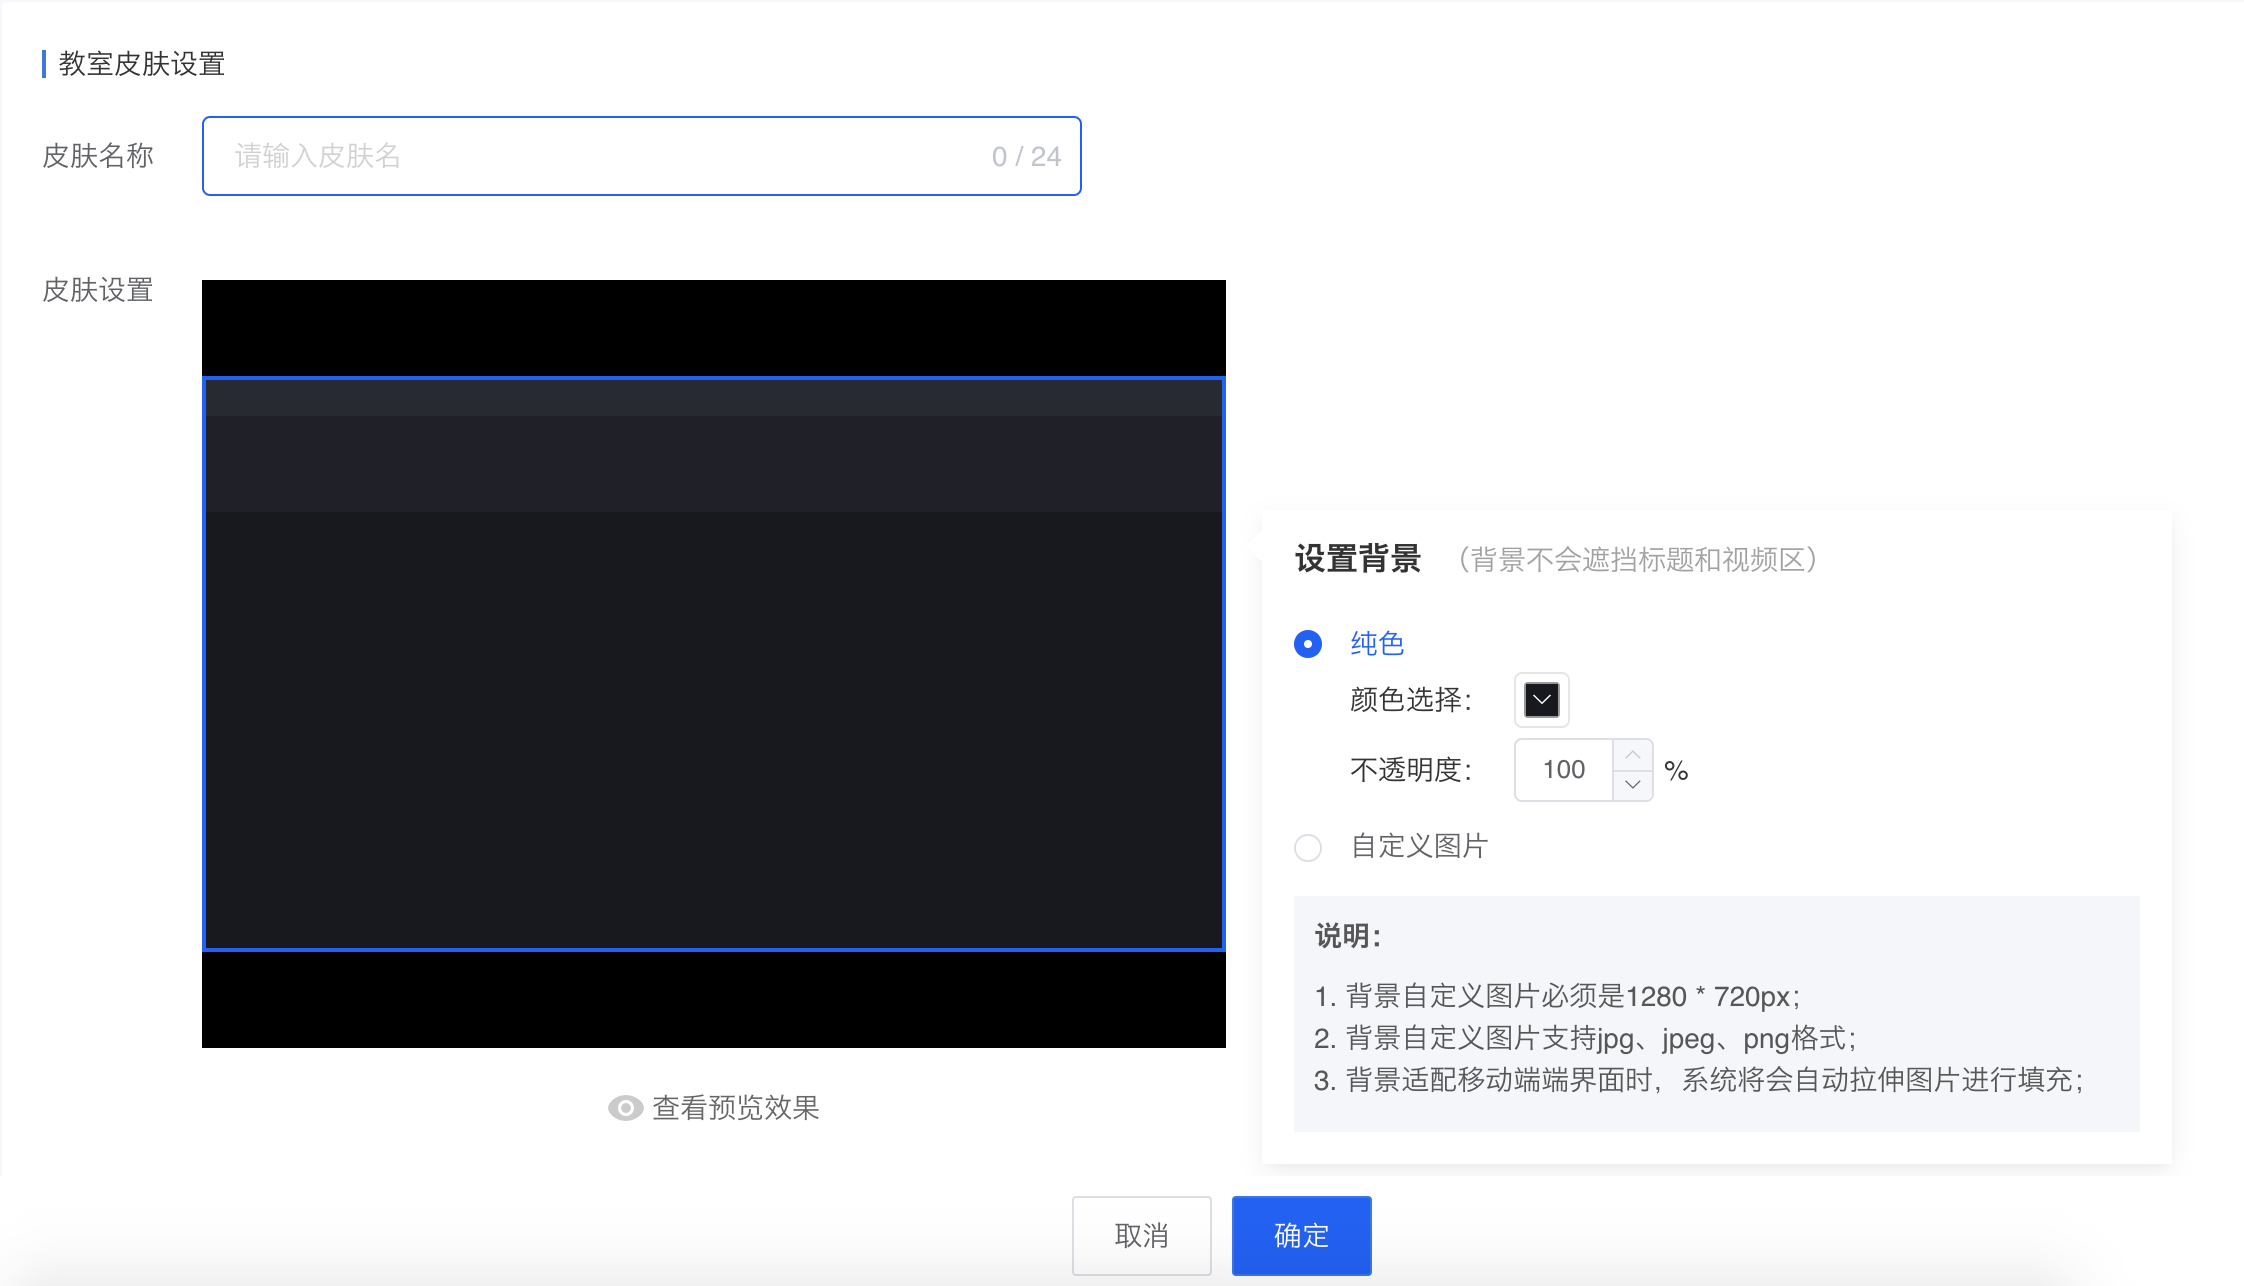
Step 3
Enters the name of the custom skin, sets the color and background of the corresponding area (supports adding pictures), and clicks the "OK" button to complete the creation of the custom skin;
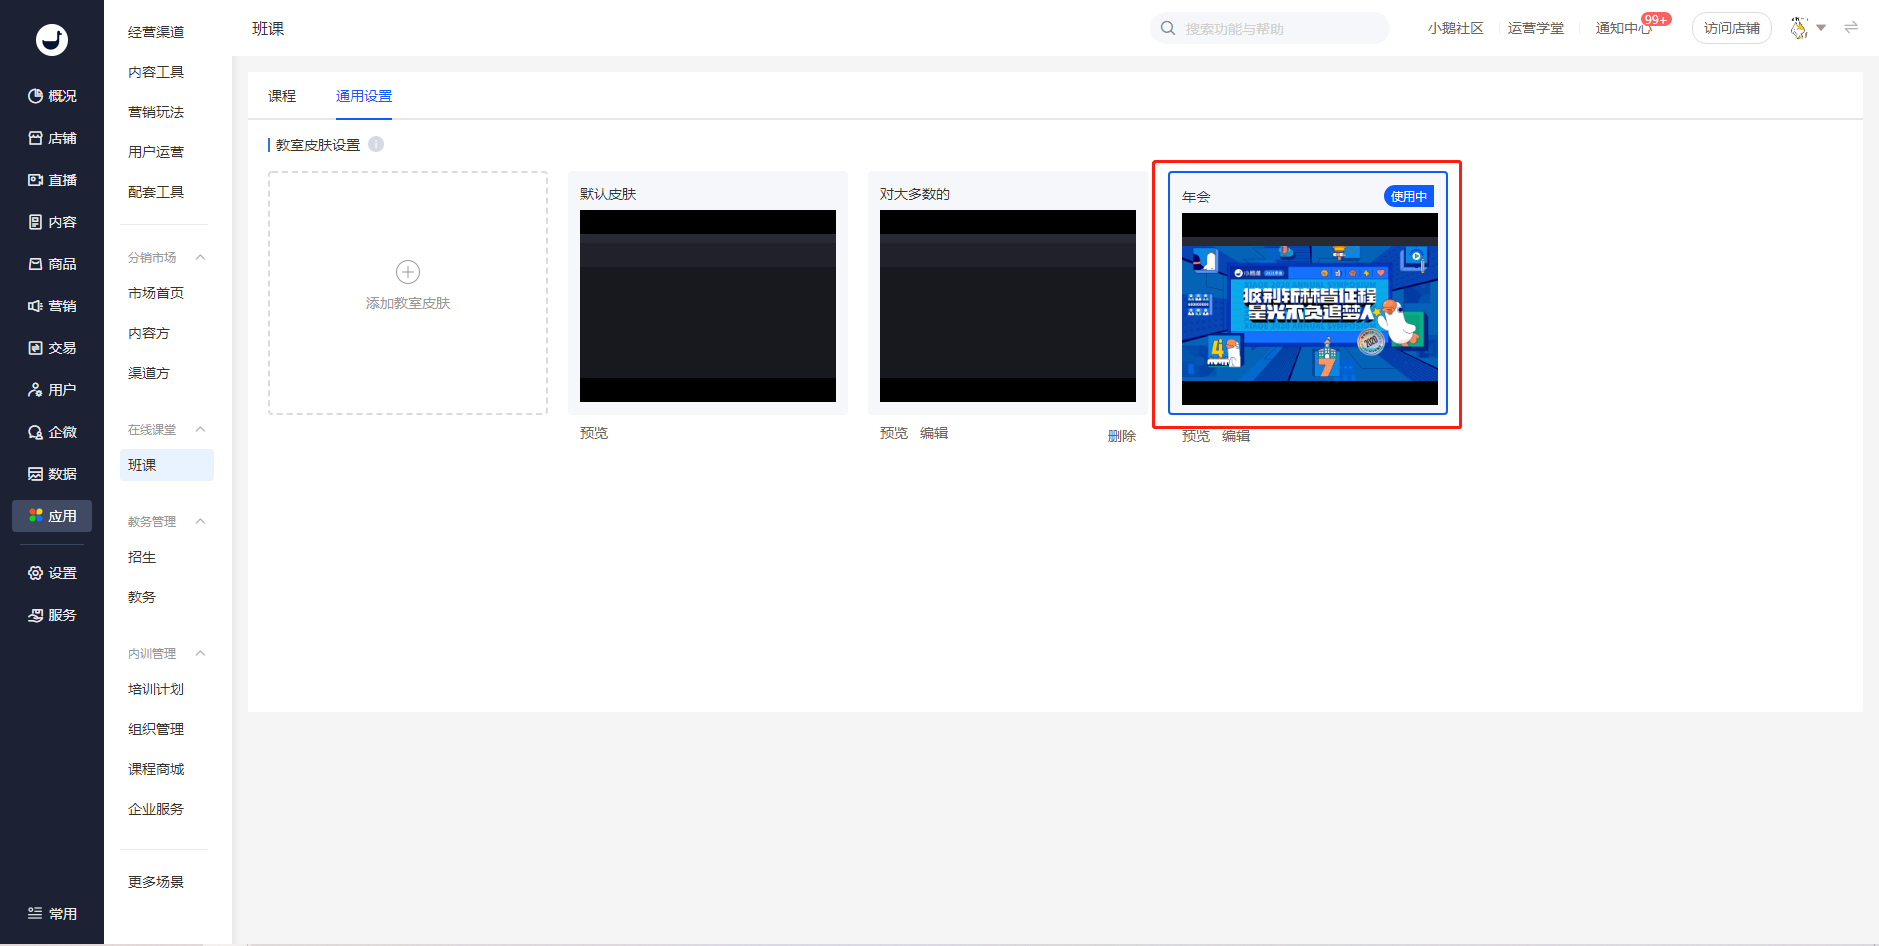
Step 4
Selects the skin, clicks on "Activate". The changes will take effect after re - entering the live - streaming room.
How to enable automatic student take the stage?
On the management console - New Course page, check the box for "Automatically allow students to take the stage when they enter."

How to add course session access for learners?
Step 1:Log in to the desktop management console, click [Applications - Online Classroom - Class Courses], find the corresponding course, and click [Details].

Step 2:Click [Students] - [Add Students].

There are currently three methods for adding students:Single addition,Bulk import,Organization import;

Single addition
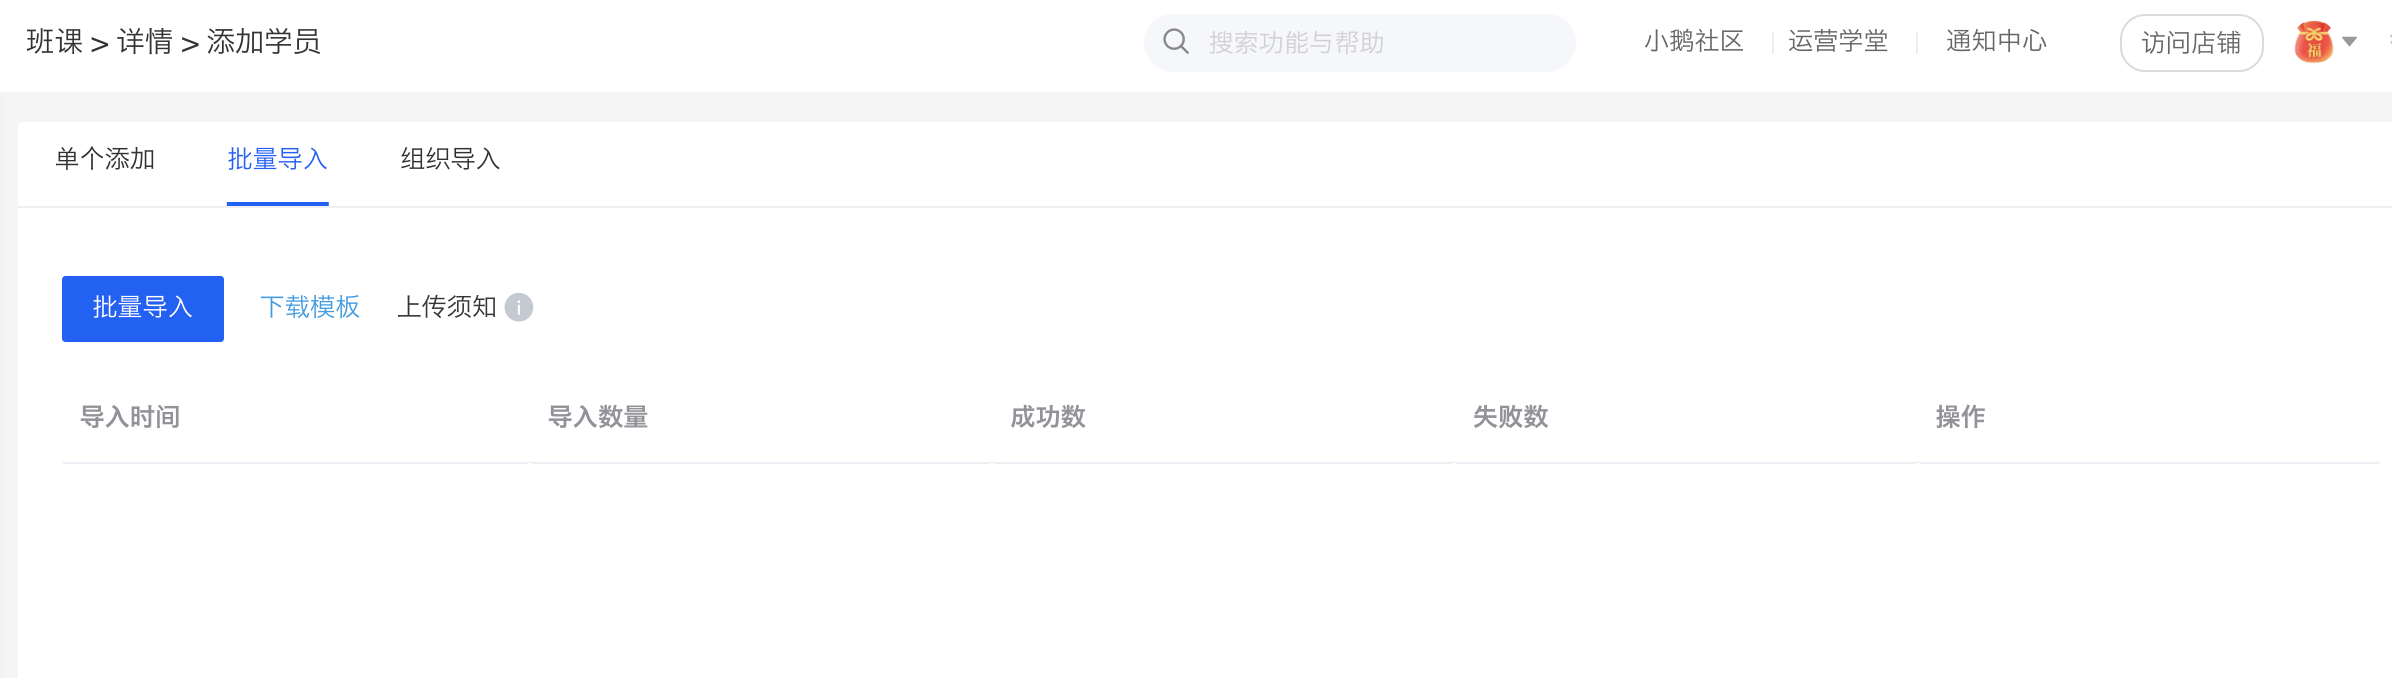
Bulk import
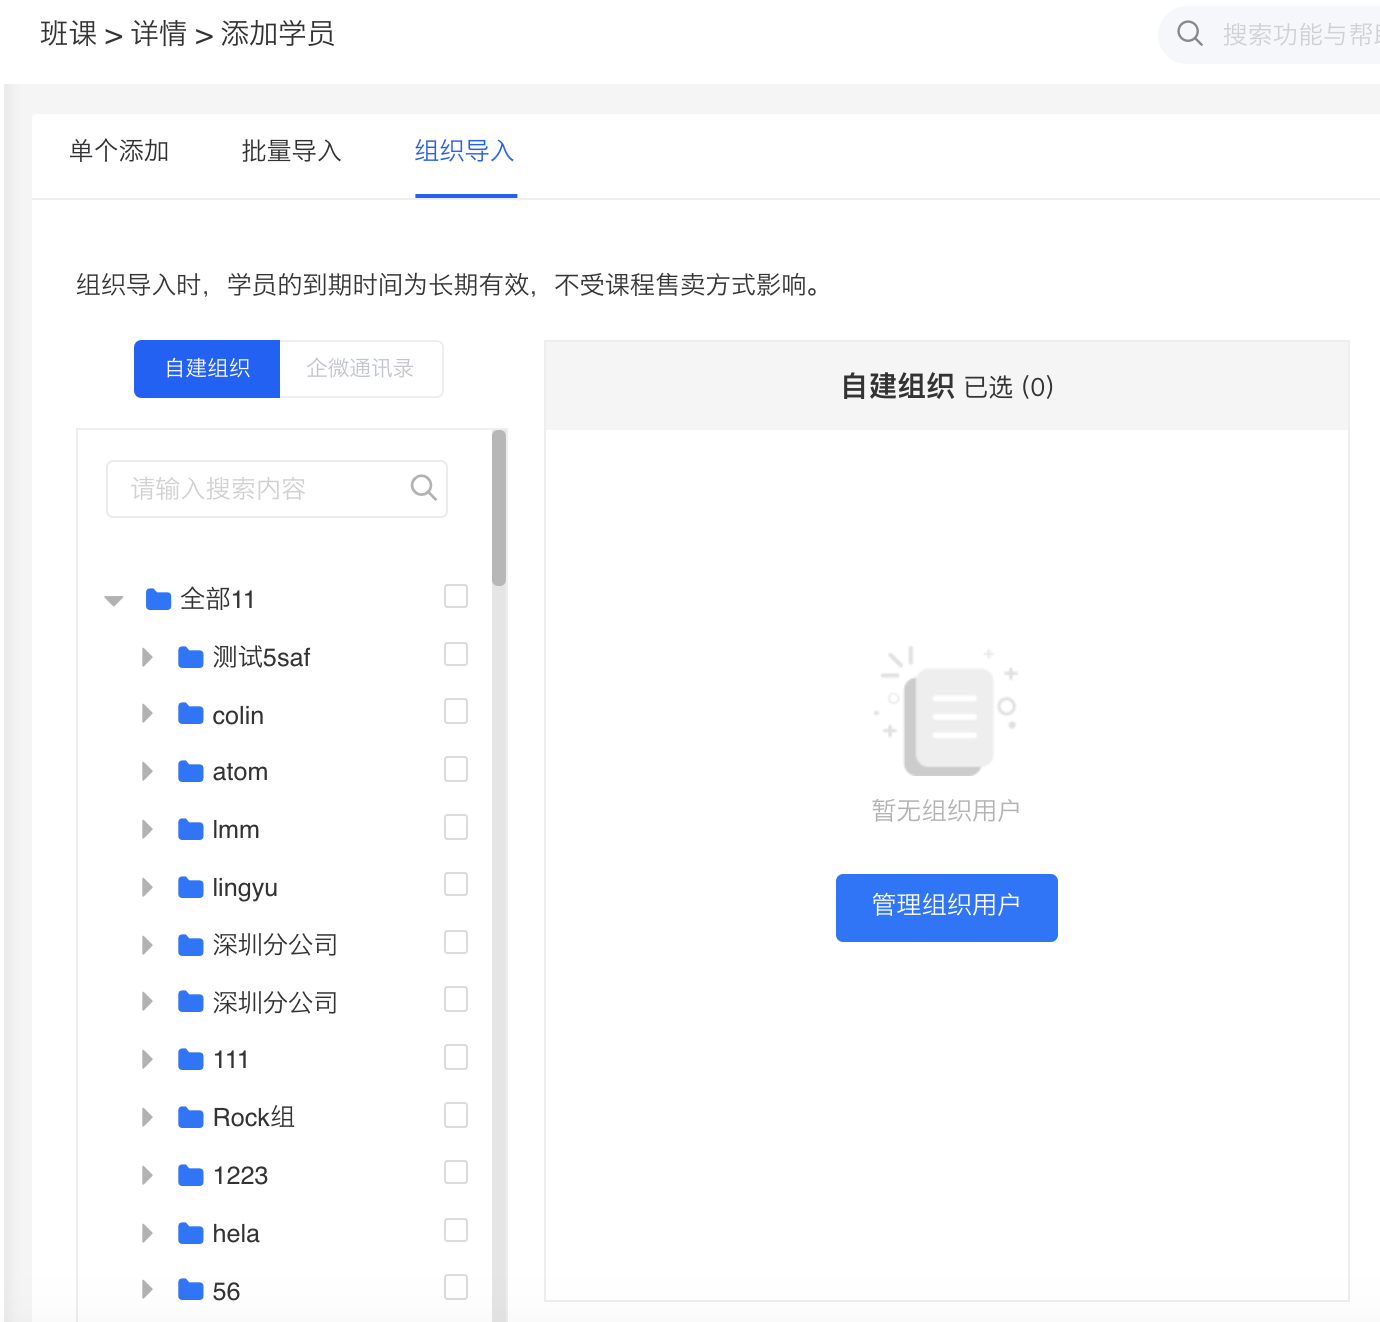
Organization import
**Notes:
1. Imported students can directly log in to theelinkAPPandelink Assistant Desktop Clientfor classes using their mobile phone numbers and verification codes.
2. If the imported students are existing users of the store, you can choose to enter the user ID or the user's mobile phone number (the mobile phone number bound to the account).
3. If the imported students are new users (who have never visited the store), please enter their mobile phone numbers. After successful import, the backend will create new accounts based on the entered mobile phone numbers. The entered mobile phone numbers will automatically be used as the mobile phone numbers bound to the user accounts.Students need to be guided to go to [Personal Center] - [Account Settings] in the store to bind their mobile phone numbers and synchronize course permissions.

After parents purchase and enroll in a course, how can children log in to attend classes?
After parents sign up via WeChat, they can log in to the APP or PC client using WeChat. They can then bind their mobile phone number and set a password in the personal information section. After setting, they can give the mobile phone number and password to their children for login and learning.


How can students attend classes using the elink Assistant PC client?
This article will introduce the usage methods from the following four different scenarios:

Scenario 1: Quickly access today's courses
Step 1: After launching the elink Assistant client, select 'Class Courses'.
Step 2: Select the corresponding course and enter the classroom to start the class.
Note:
(1) Instructors can enter the classroom at any time.
(2) Students can enter the classroom 30 minutes before the class starts. For example, if the class time is from 20:00 to 21:00, students can enter the classroom after 19:30.

Scenario 2: View courses on other dates
Select the date you want to view in the calendar selection area, and the course schedule for that date will be displayed on the right.

Scenario 3: View registered courses
1. Course list
Select the top tab 'All Class Courses' to view all registered courses, including single - session courses and series courses.

2. Search
If there are many courses, you can use the search function to quickly find courses by keywords.
Step 1: Click on the search box.
Step 2: Select the search result and enter the course details page.
Note: Course sessions can be filtered by status.

Scenario 4: View course schedules and details
Under the 'All Class Courses' tab, click on the course card to view all course sessions and course details of the course.
[Series courses] have two modules, 'Course Schedule' and 'Details', and you can switch tabs to view. In the course schedule, all course sessions of the course are displayed in three different modules: 'In - progress', 'Upcoming', and 'Completed'.
[Single - session courses] do not have a course schedule. The details page and the button to enter the classroom are directly displayed.
