Live broadcast terminal
- 【OBS】 Black screen appears when using monitor capture?
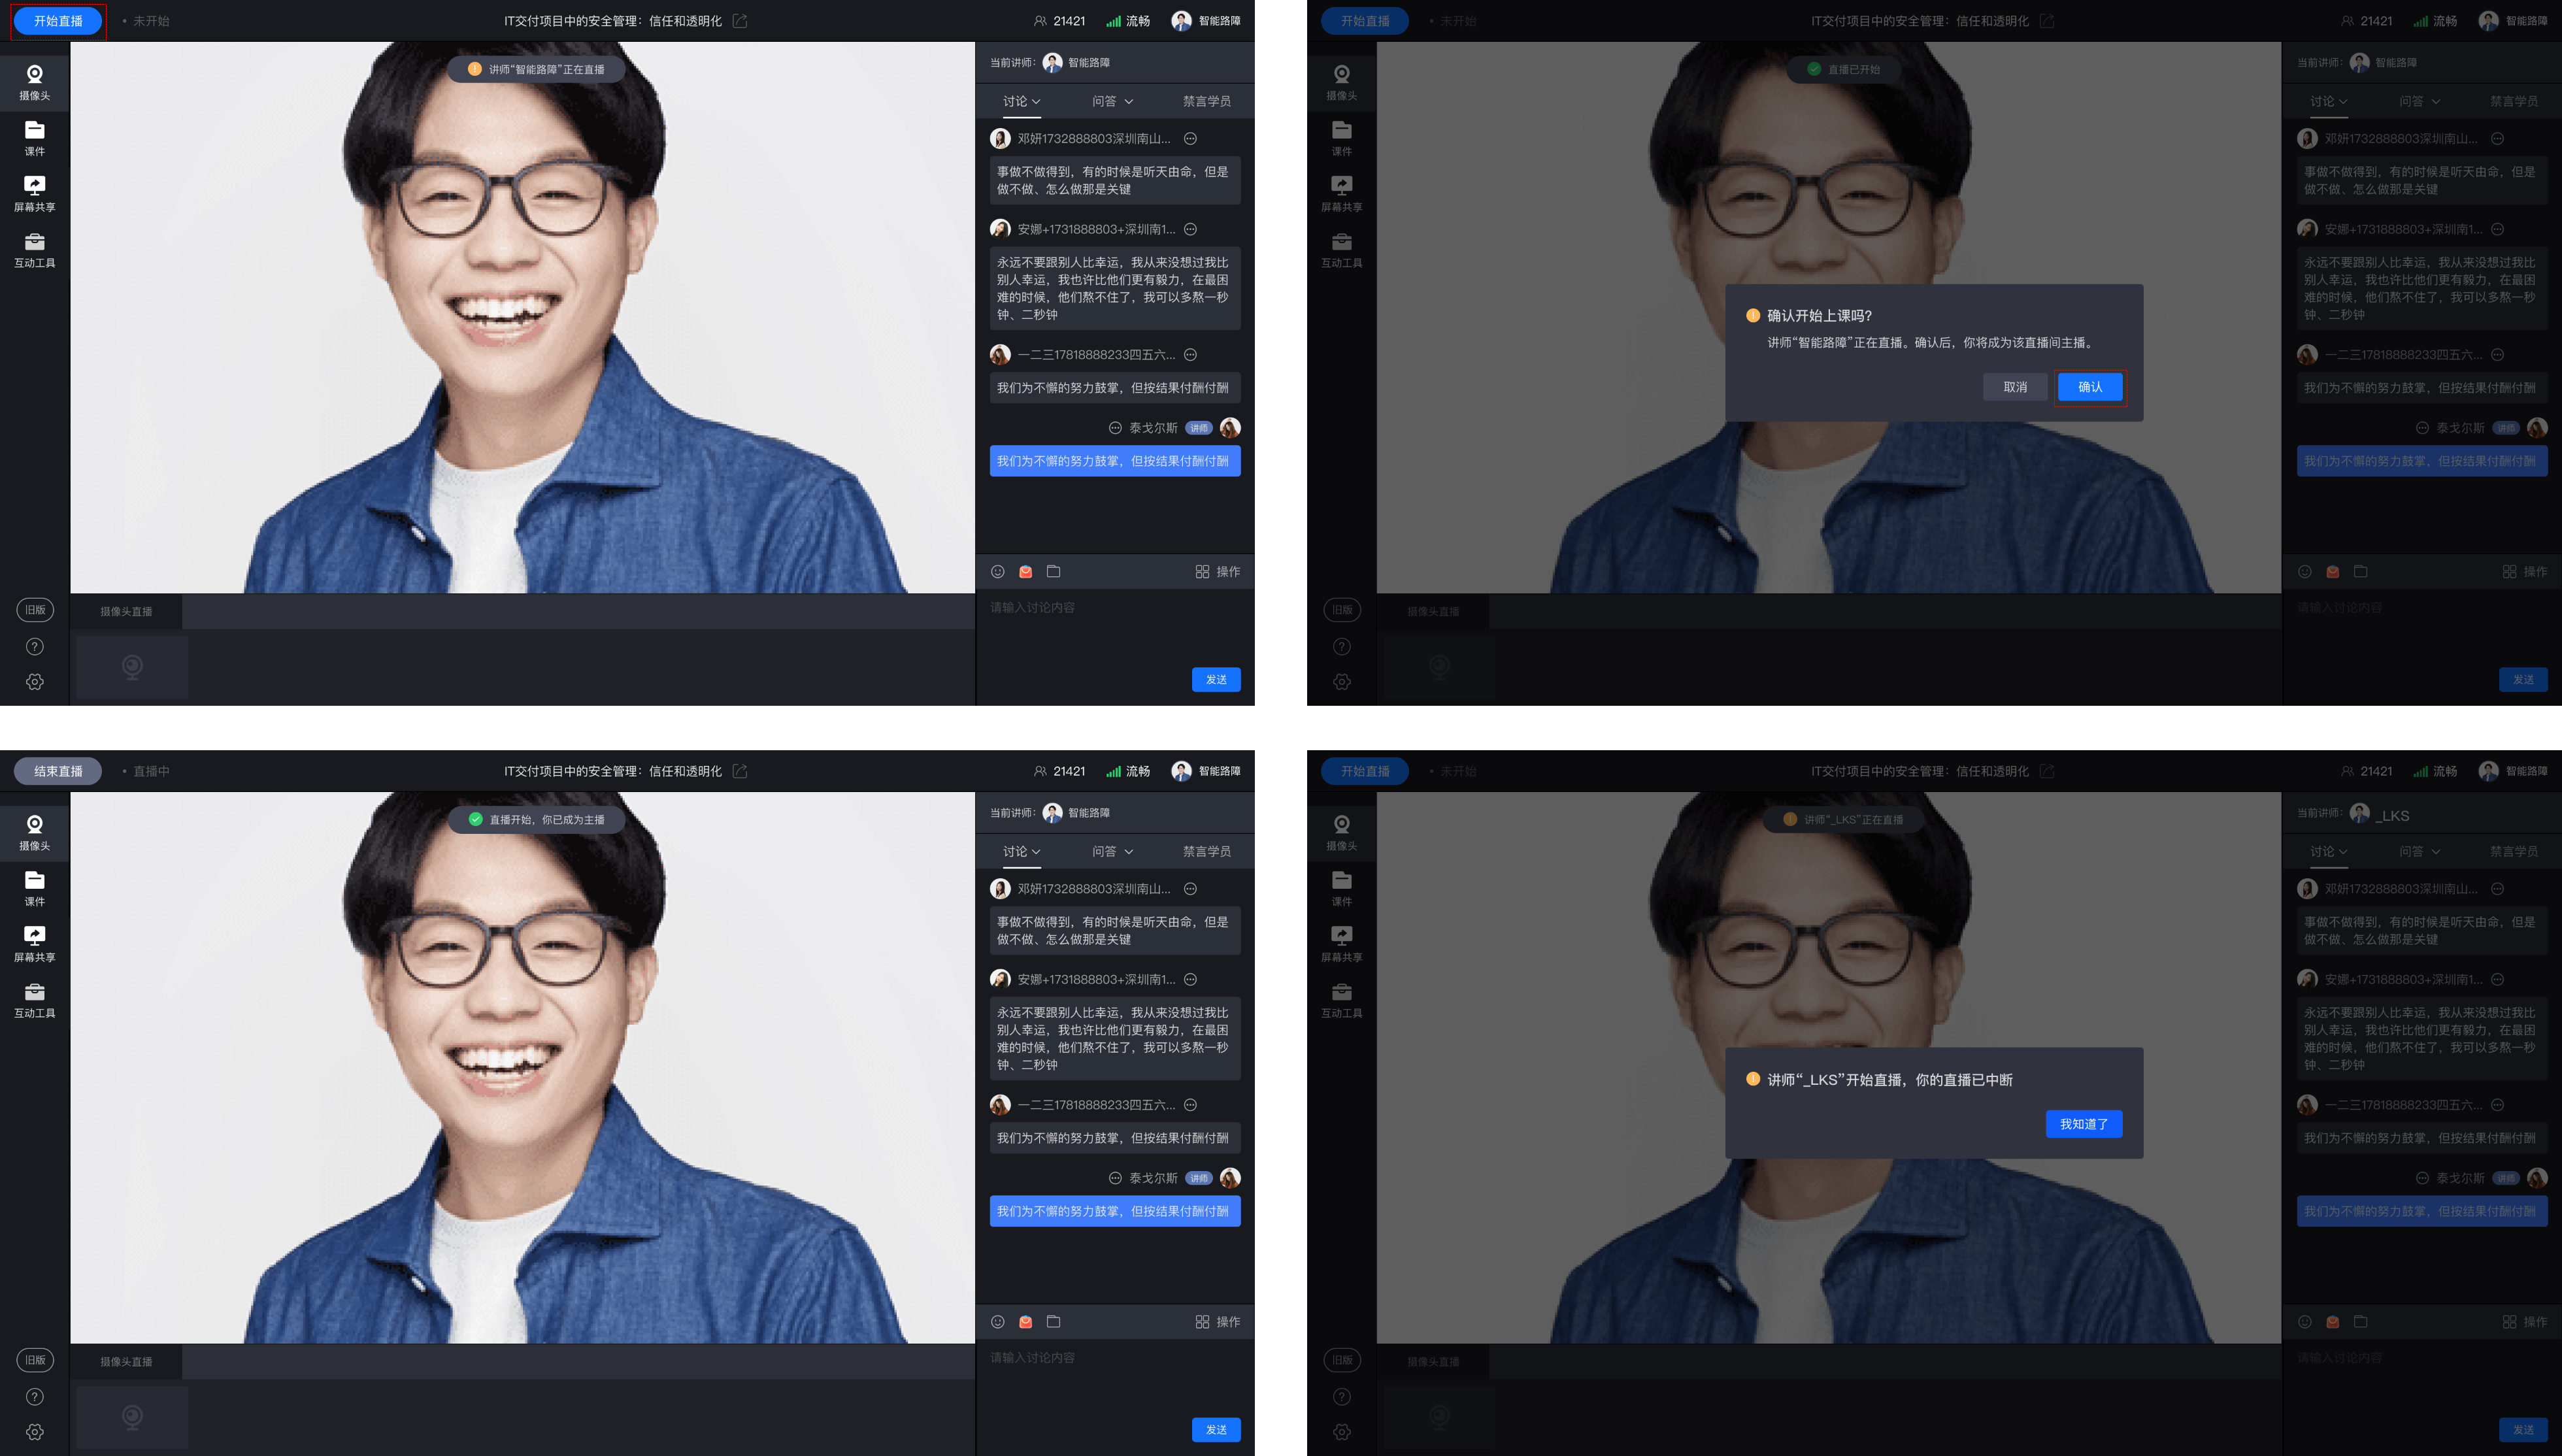
- A lecturer is currently live streaming. What will happen if another lecturer enters the live streaming room and starts a live stream?
- How to modify the bitrate value?
- Is the live content viewed in the live stream room blurry?
- 【OBS】Tutorial on Capturing Desktop Audio without Affecting Speaker Output (for MAC Computers)
- Usage tutorial for instructors to grab live streaming slots
- 【OBS】 Keeps prompting that the connection has been disconnected?
- 【OBS】How to monitor the quality of live streaming?
【OBS】 Black screen appears when using monitor capture?
I. Problem Examples:

II. Solutions
The first method: Switch the default graphics card.


If the user's computer uses an NVIDIA graphics card: Right - click on the blank area of the desktop and select 'NVIDIA Control Panel'.


If the user's computer uses an AMD graphics card: Right - click on the desktop and select 'Configure Switchable Graphics'.


Step 1: Open Settings -> Display -> Graphics settings;

Step 2: Click 'Browse', find the installation location of OBS, and add OBS;


Step 3: Click 'Options', select 'Power saving mode', save the settings, and restart OBS.


A lecturer is currently live streaming. What will happen if another lecturer enters the live streaming room and starts a live stream?
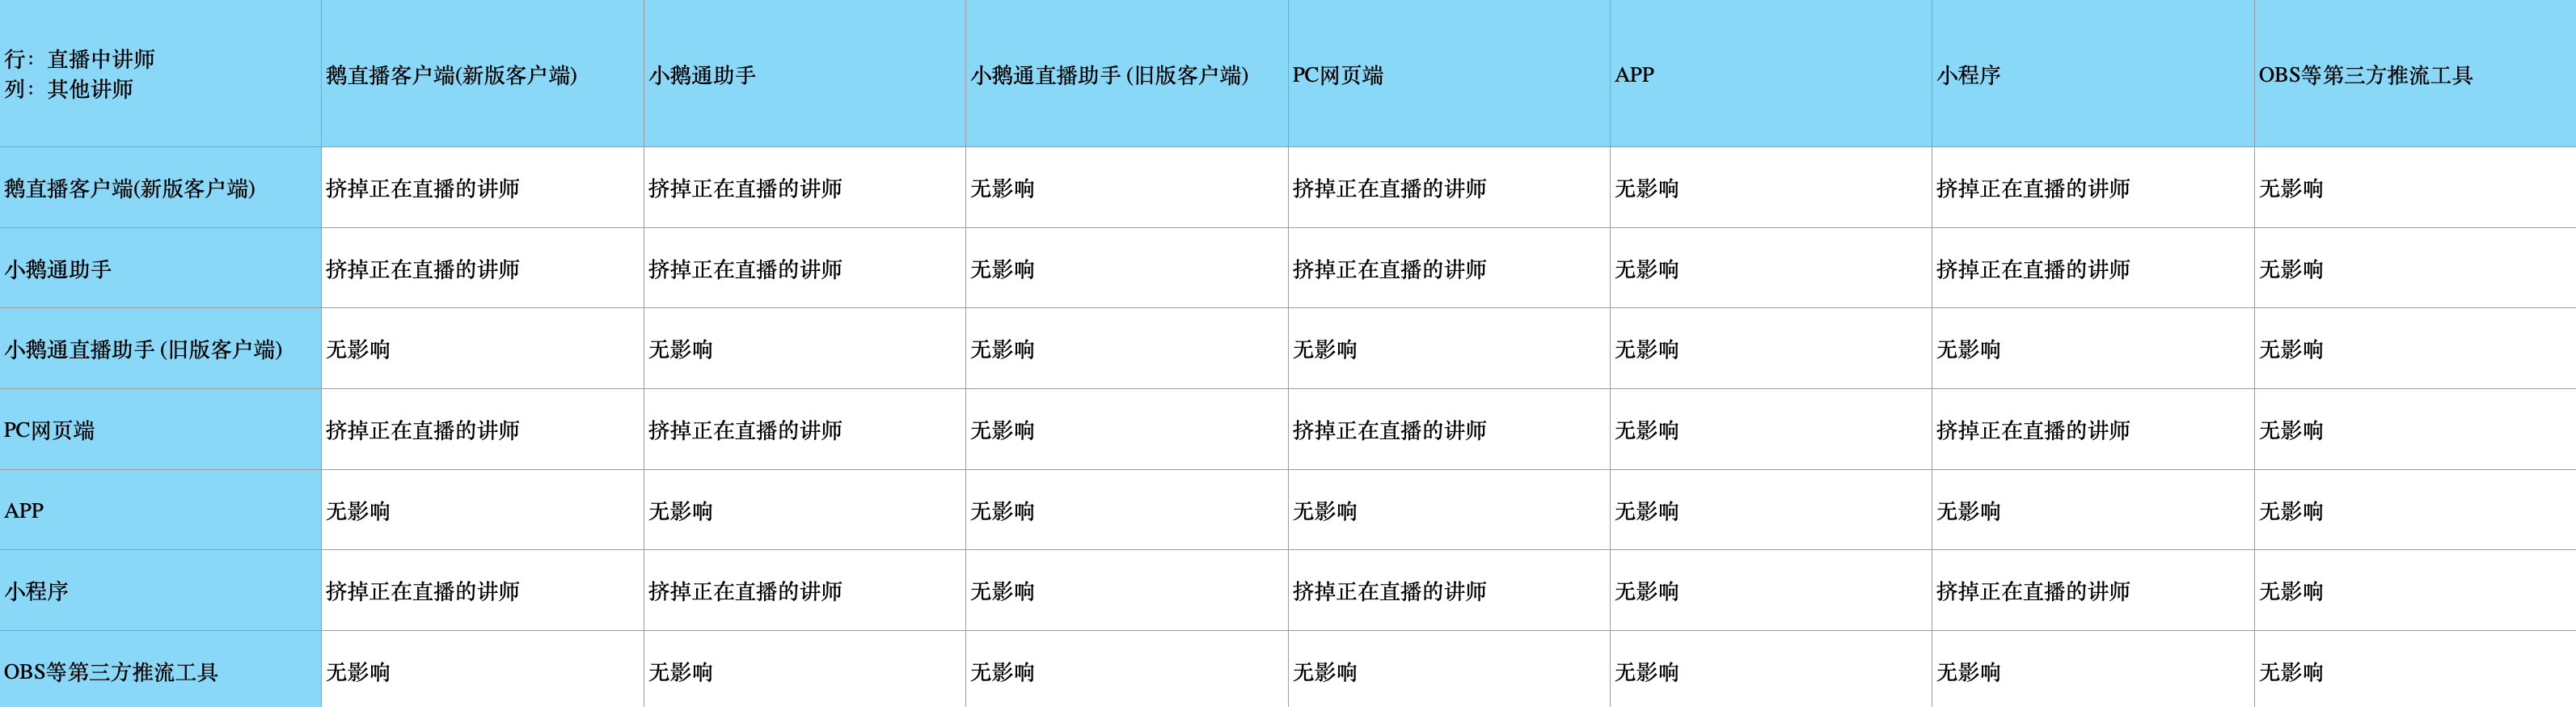
PS: If there are any discrepancies between your actual operations and the table, please contact the service steward for assistance.
How to modify the bitrate value?
On the main interface of OBS, click [Settings] in the operation bar to open the settings page. Select [Output] in the left sidebar and change the video bitrate.


Is the live content viewed in the live stream room blurry?
The output resolutions of various live streaming terminals are inconsistent. The following is the detailed content:
1. APP: The resolution is automatically adjusted according to the network speed. If it is not clear enough, it is recommended to switch to a faster and more stable network.
2. Client: The default resolution is 720p, and there are several options for you to adjust manually.
3. Web: The camera resolution is 480p, and it is 720p when sharing the screen.
4. OBS: The output resolution is not restricted for now. It is recommended to set it below 720p and the bitrate below 1000 kbps to ensure smooth live streaming.
【OBS】Tutorial on Capturing Desktop Audio without Affecting Speaker Output (for MAC Computers)
Step 1: Download the software (skip this step if you already have the software)
Download and install OBS and blackhole software (it is recommended to install the latest version of OBS. Version 27.0.1 has been tested and works normally)
1. OBS download
Official website:https://obsproject.com/
Quick download address:https://xiaoetong-1252524126.file.myqcloud.com/plugins/obs-mac-27.0.1.dmg
2. blackhole download
Official website:https://existential.audio/blackhole/
Quick download address:https://xiaoetong-1252524126.cdn.xiaoeknow.com/XEDownloader/BlackHole2ch.v0.4.0.pkg
Step 2: Configure MIDI
1. Open the audio MIDI settings on your Mac system

2. Create a new multi-output device

3. Then select and check both the MacBook Pro speakers and BlackHole 16ch in the multi-output device

Step 3: Set the system audio output
Open System Preferences -> Sound -> Output, and select the multi-output device

Step 4: Configure OBS
1. Open OBS -> Settings -> AudioModify the Desktop Audio configuration. Select the option: BlackHole 16ch, and then click OK

2. Next, open any music player on your desktop and check if there is a volume fluctuation in the desktop audio. A normal fluctuation indicates successful configuration.

Step 5: Capture an application
1. If you need to use OBS to capture individual applications for live streaming, such as Tencent Meeting, you need to add a new window capture in OBS and then select the Tencent Meeting software window.
First, click the + sign and select Window Capture

2. Then click OK

3. Then select Tencent Meeting in the opened window, and then click OK.


Usage tutorial for instructors to grab live streaming slots
I. Function Introduction
The "Live Broadcast Grab" feature is a common capability for instructors. When another instructor is currently live, it provides an entry for subsequent instructors entering the same live room to independently grab the live broadcast, thereby enhancing the live broadcast experience for instructors and the viewing experience for students. (Currently, only live broadcasts created on the computer management console are supported.)
II. Purpose of Use
1. When multiple instructors are allowed to start live broadcasts simultaneously in the same live room, subsequent instructors can independently grab the live broadcast to take over from the previous instructor and start the live broadcast.
2. When multiple instructors are vying for the live broadcast, the student - end can seamlessly switch the live - broadcast screen within seconds, reducing the student churn rate.
III. Usage Scenarios
A merchant needs multiple instructors to appear on camera in sequence during a live broadcast, and only one instructor needs to appear on camera at a time. After the first instructor finishes the presentation, there is no need to pause the live broadcast. The second instructor only needs to directly click "Start Live Broadcast" on their own live - broadcast port to achieve a "seamless switch of the live - broadcast screen".
IV. Operation Path
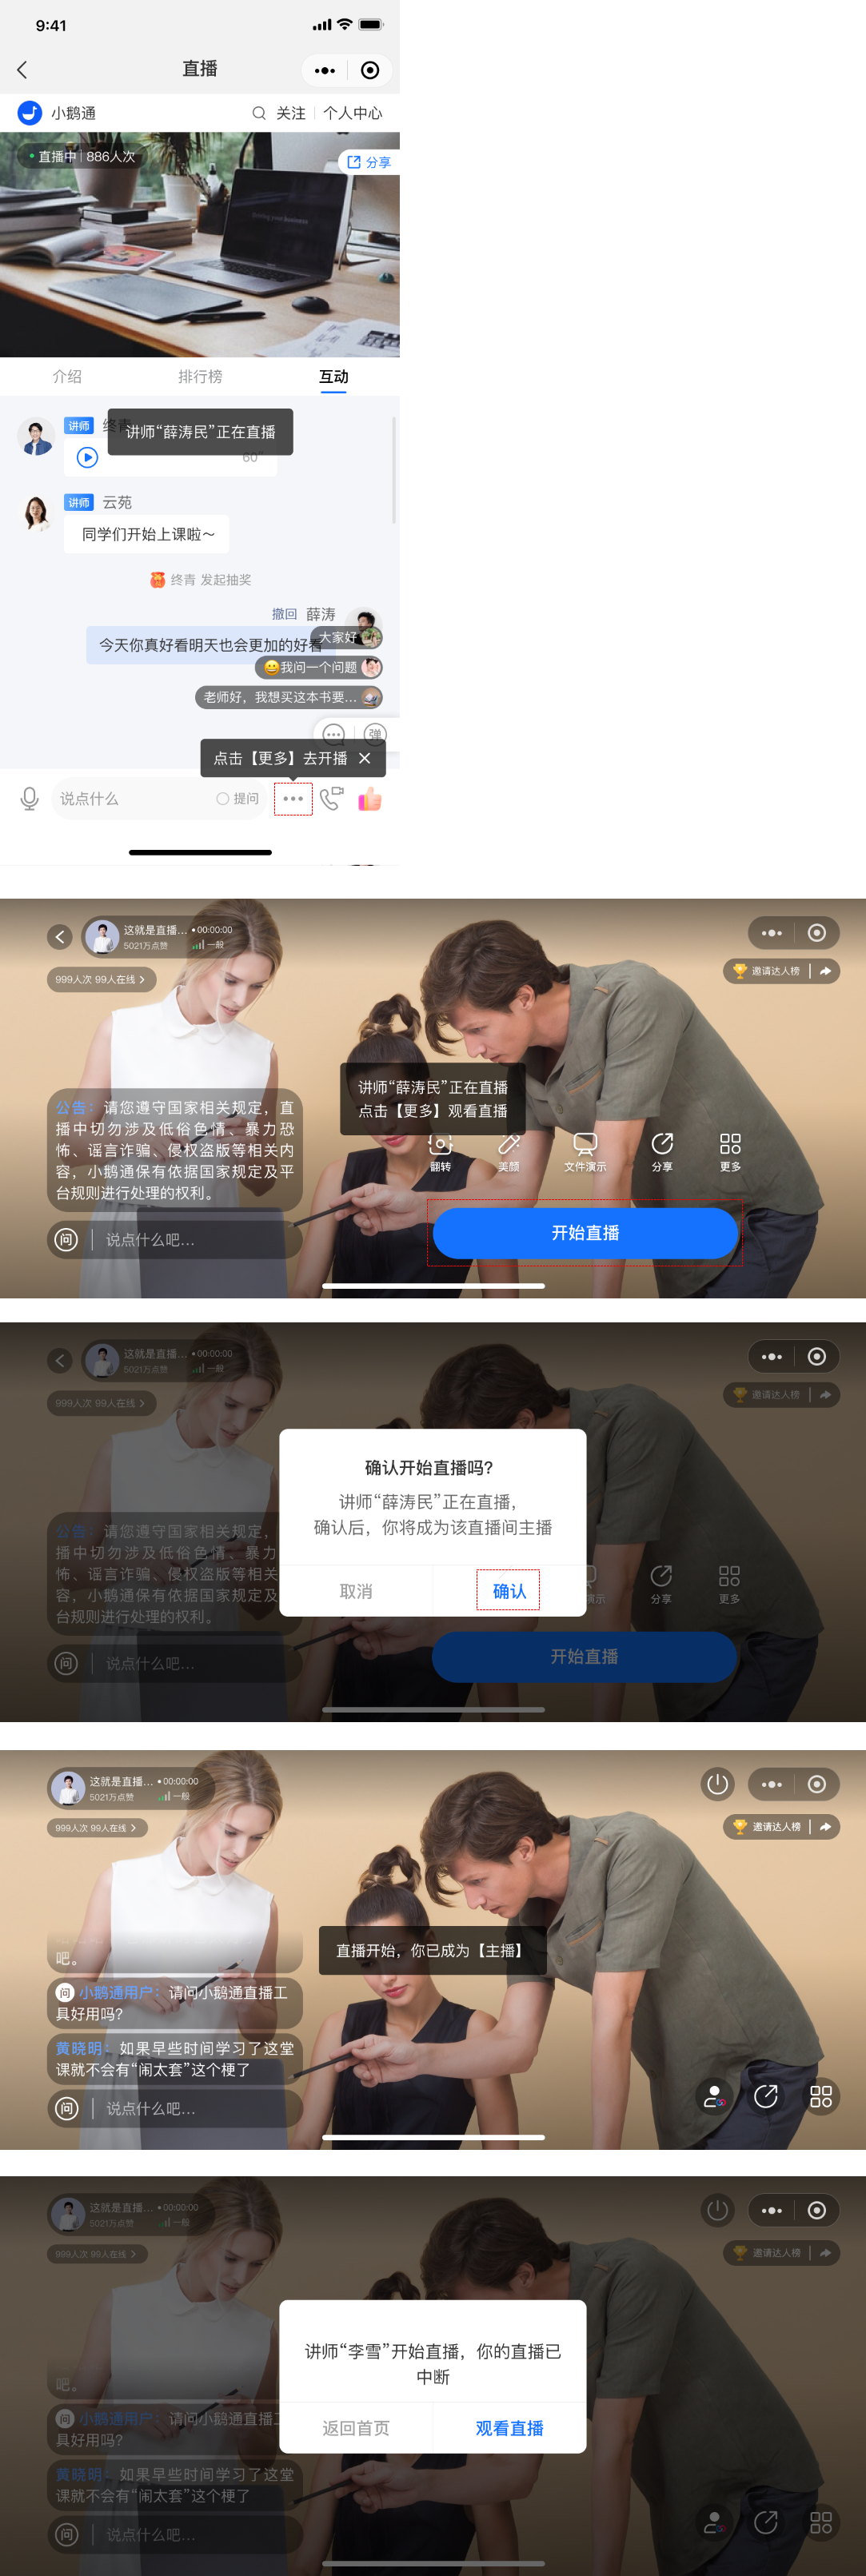
Instructor - end: Enter the live room(eLive Mini Program)> When another instructor is currently live, it will default to the viewing perspective. > Click "...". > Click "Go Live". > Click "Confirm" in the secondary confirmation pop - up window. > Successfully grab the live broadcast and start the live broadcast. (The instructor whose live broadcast is grabbed will be prompted with a pop - up window to end the live broadcast.)
Instructor - end: Enter the live room(eLive, eLink Assistant, Web version)> When another instructor is currently live, a prompt bar will appear at the top/right side. > Click "Start Live Broadcast/Start Class". > Click "Confirm" in the secondary confirmation pop - up window. > Successfully grab the live broadcast and start the live broadcast. (The instructor whose live broadcast is grabbed will be prompted with a pop - up window to end the live broadcast.)
V. Usage Tutorial
(1) eLive Mini Program
When another instructor is currently live, it will default to the viewing perspective. > Click "...". > Click "Go Live". > Click "Confirm" in the secondary confirmation pop - up window. > Successfully grab the live broadcast and start the live broadcast. (The instructor whose live broadcast is grabbed will be prompted with a pop - up window to end the live broadcast.)
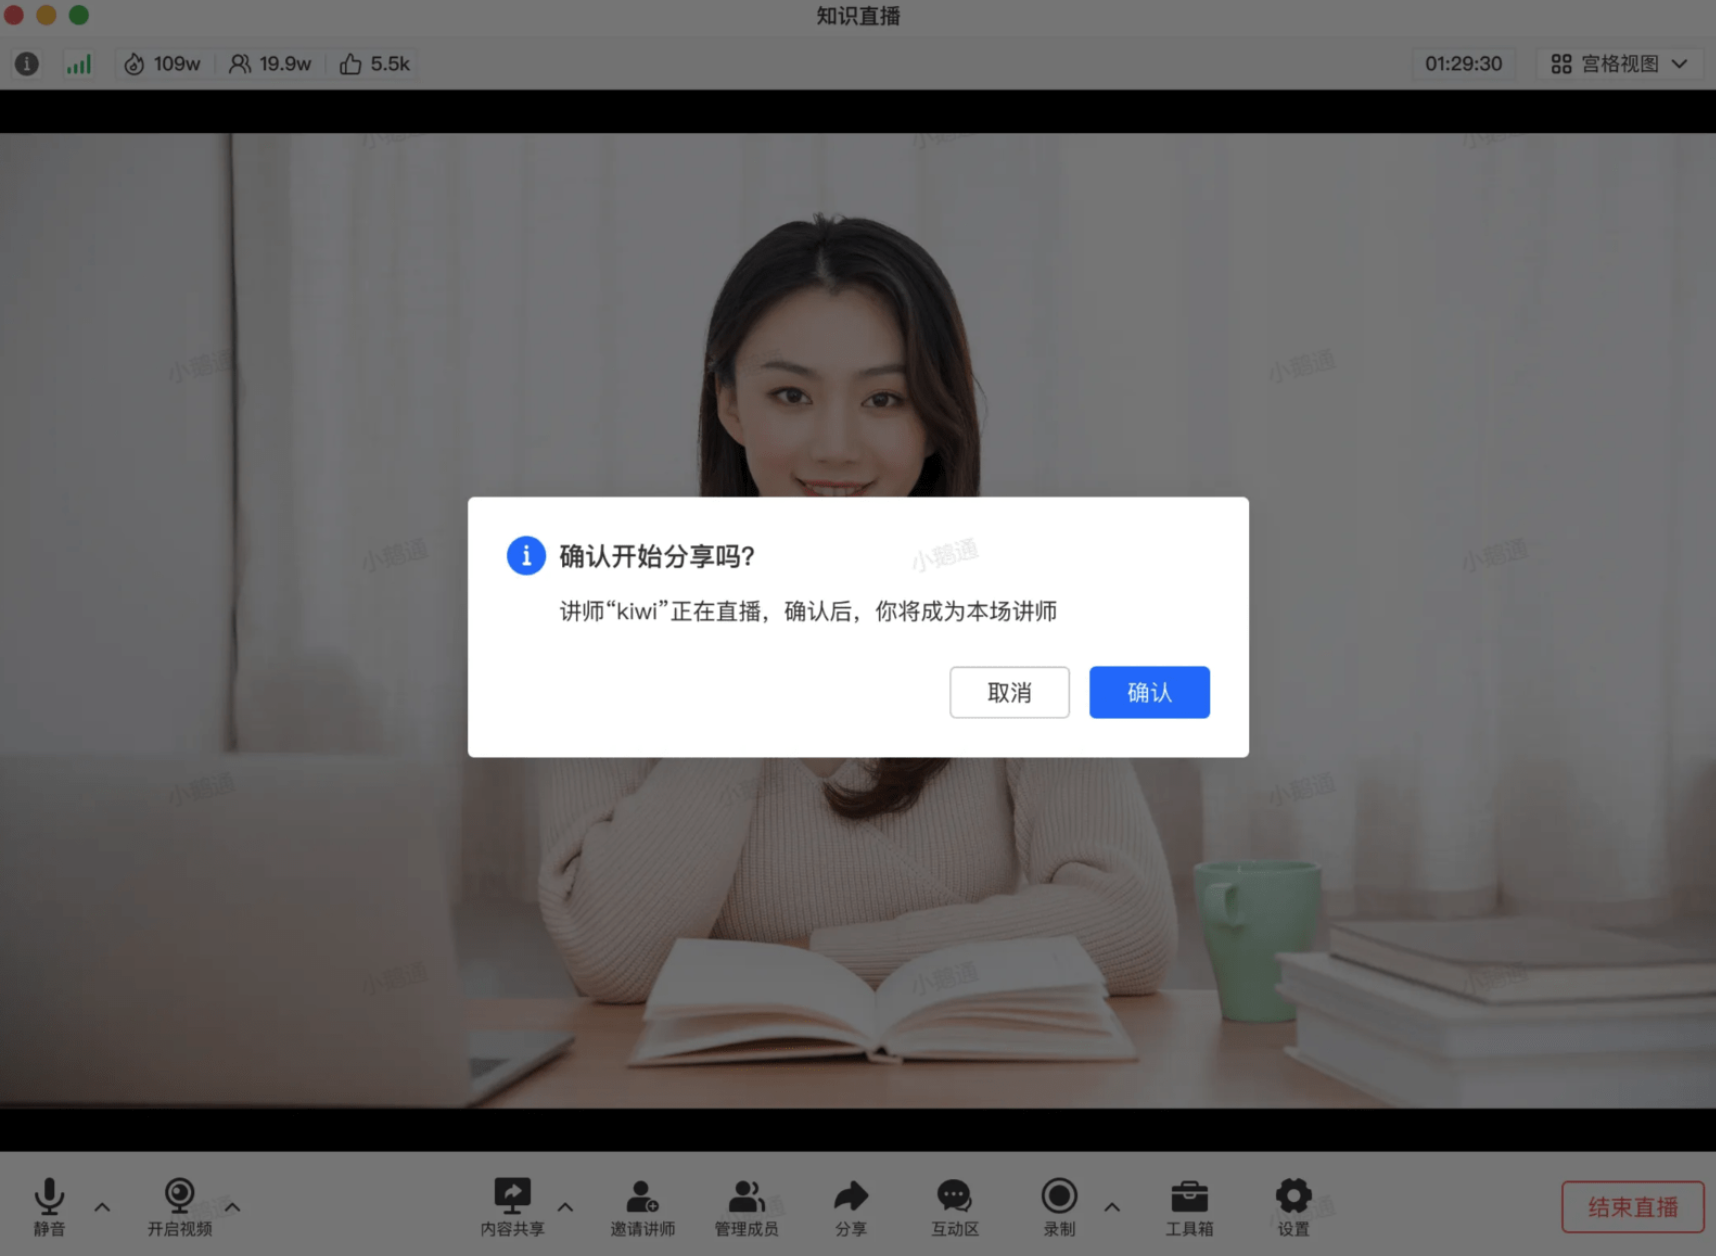
(2) eLive Client
When Instructor A is currently live, if Instructor B clicks "Start Live Broadcast" or "Present Courseware Content", a pop - up window will prompt whether to take over the live broadcast. If Instructor B confirms, it will be considered that Instructor B has successfully taken over the live broadcast. The live - broadcast screen will be based on Instructor B. At this time, Instructor A will be considered in an off - air state. According to this rule, Instructor C or Instructor A can also take over the live broadcast again.
(3) eLink Assistant
When another instructor is currently live, a prompt bar will appear at the top. > Click "Start Class". > Click "Confirm" in the secondary confirmation pop - up window. > Successfully grab the live broadcast and start the live broadcast. (The instructor whose live broadcast is grabbed will be prompted with a pop - up window to end the live broadcast.)
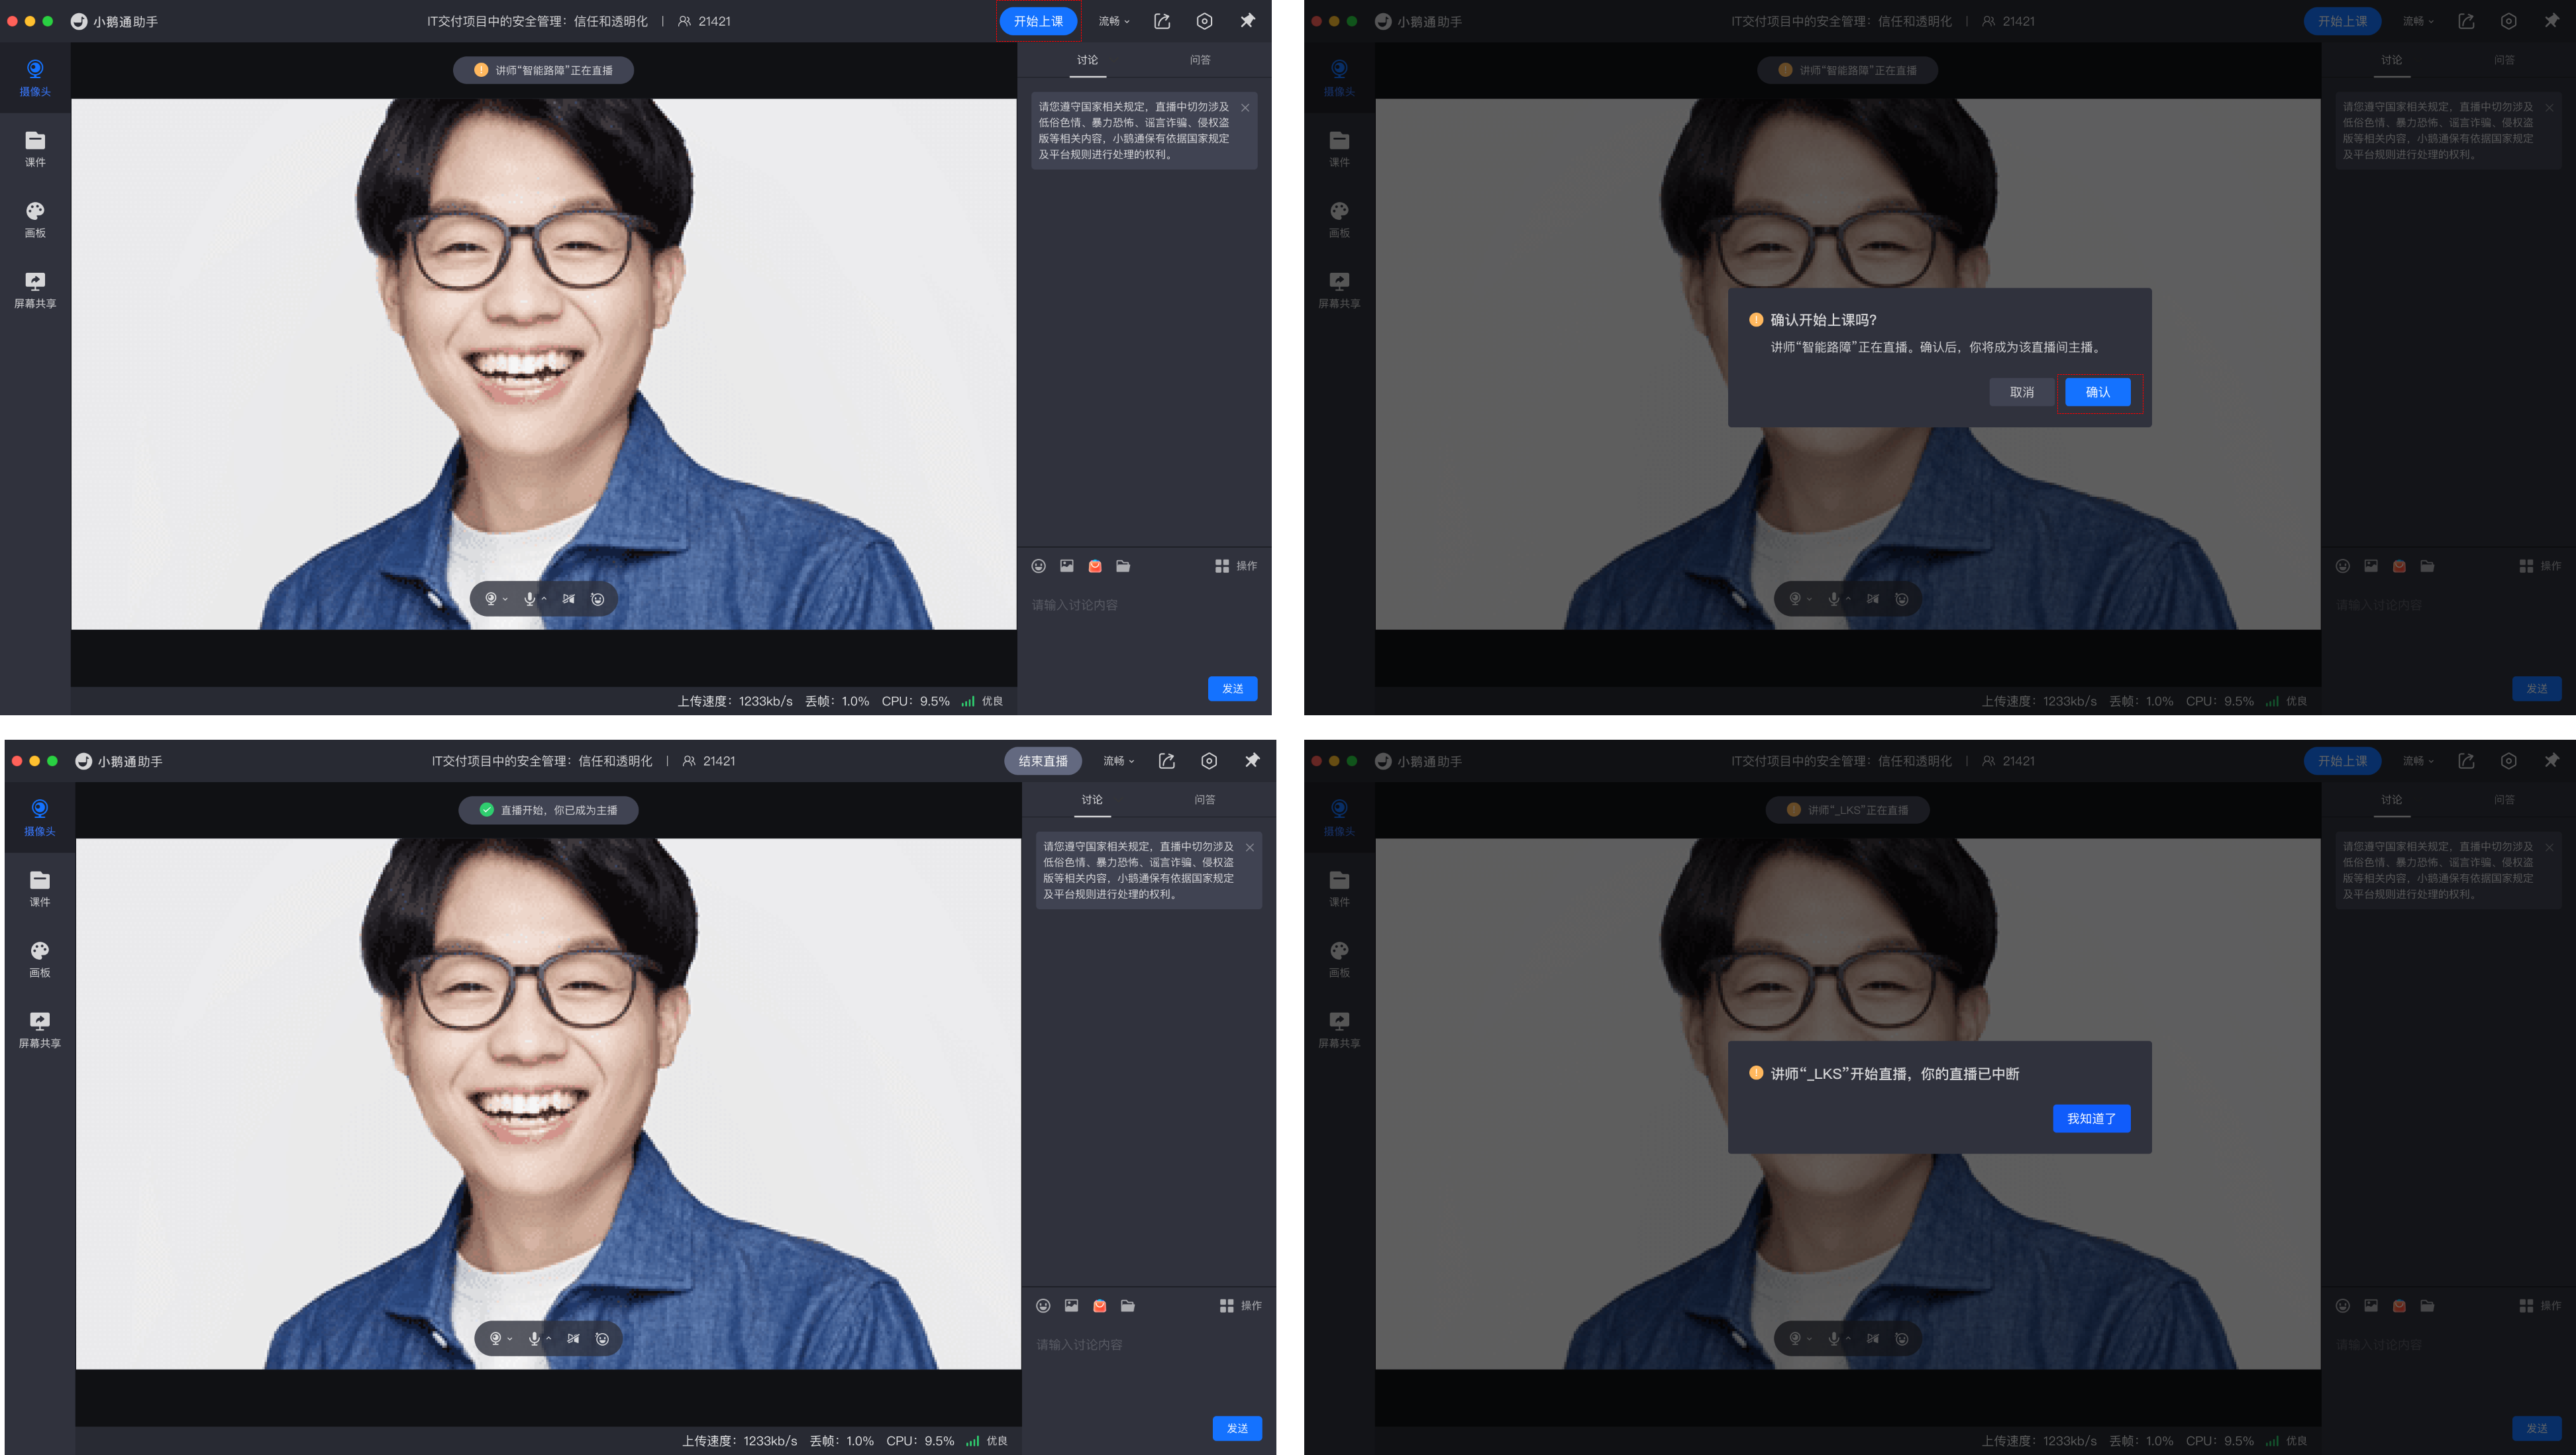
(4) Web version
When another instructor is currently live, a prompt bar will appear on the right side. > Click "Start Live Broadcast". > Click "Confirm" in the secondary confirmation pop - up window. > Successfully grab the live broadcast and start the live broadcast. (The instructor whose live broadcast is grabbed will be prompted with a pop - up window to end the live broadcast.)
VI. Frequently Asked Questions
1. Does pushing live - stream content using third - party live - broadcast tools such as OBS support the "Live Broadcast Grab" feature?
Answer: No. OBS is a third - party live - stream pushing tool without business attributes. Therefore, when an instructor is using the OBS terminal for live broadcasting, the eLink live - broadcast tool cannot grab the live broadcast. It can only start pushing the live - stream after the OBS live - stream pushing ends.
2. After having their live broadcast grabbed, can the instructor whose live broadcast was grabbed take it back?
Answer: Yes. The "Live Broadcast Grab" is a common capability. As long as an instructor has the permission to start a live broadcast, they will automatically be granted the "right to grab the live broadcast".
【OBS】 Keeps prompting that the connection has been disconnected?
1. Confirm whether the server and streaming key in the streaming settings are filled in correctly:
2. Confirm whether the corresponding live streaming room has ended:
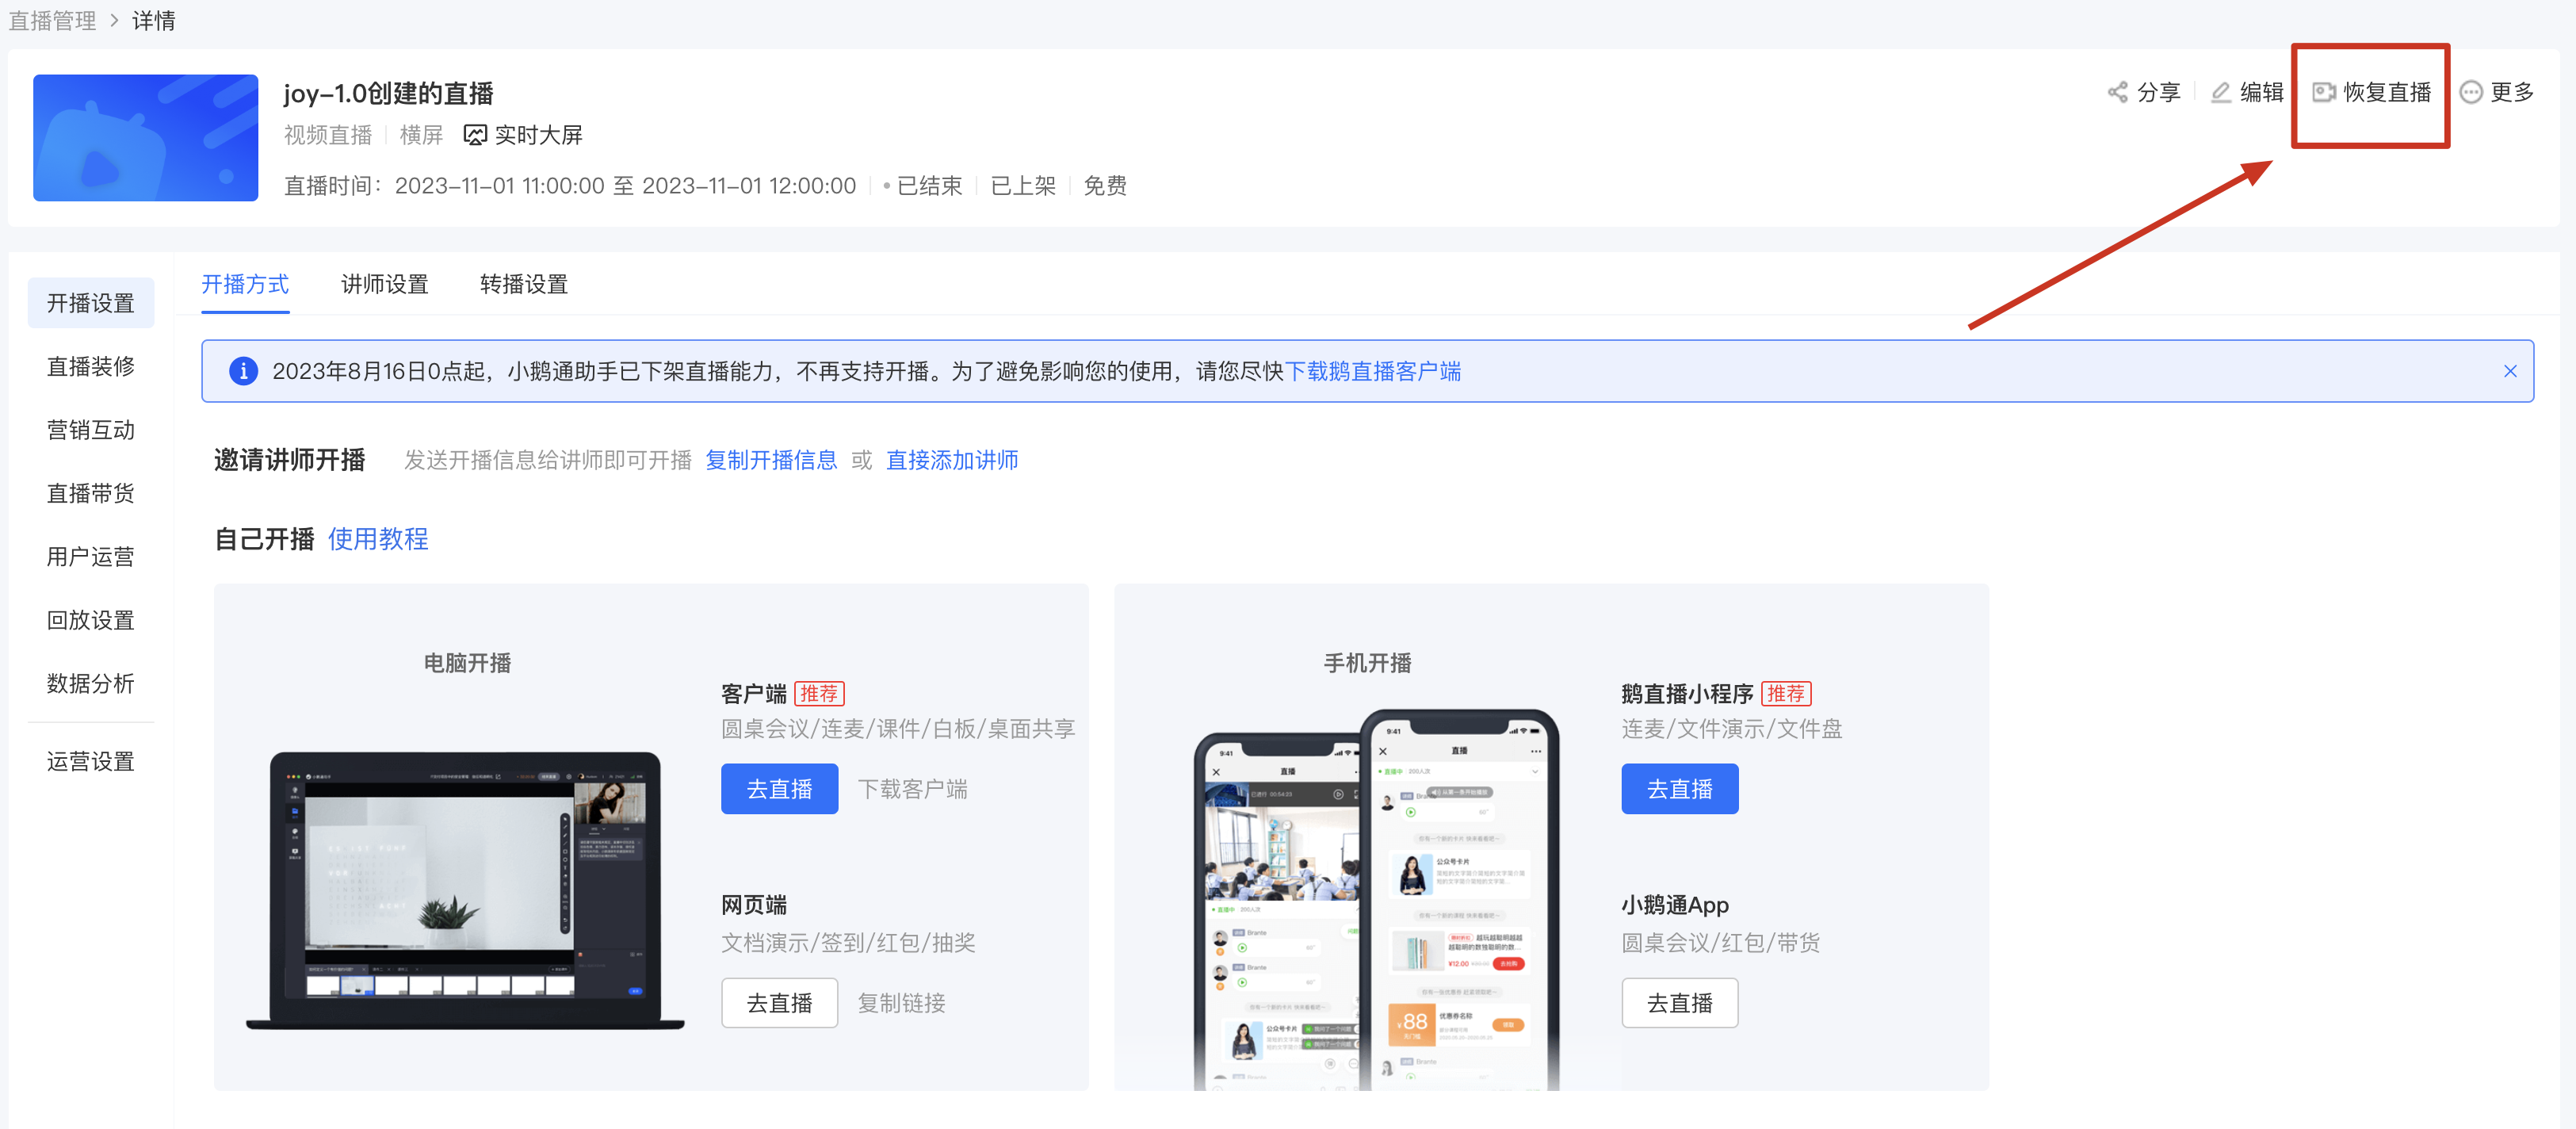
The ended live streaming room will be prohibited from streaming. You need toresume the live streambefore you can stream again.
【OBS】How to monitor the quality of live streaming?
I.Enable local recording function to back up live streaming content:
Enable recording during the live stream to back up the live content locally, preventing the generated replay from not meeting expectations due to exceptions during the live stream. 
II. Explanation of parameters affecting streaming quality:
Explanation of each parameter in the following figure:
CPU: The CPU usage rate of the machine occupied by OBS. A higher value indicates a higher load, which may lead to abnormal audio - video encoding. During the live stream, the picture may appear frozen, and the audio and video may be out of sync.
Small square: An indicator of the network status. Green represents excellent, yellow represents average, and red represents a poor current network. This may cause the live stream to freeze.
Actual streaming bitrate: The actual network upload during the live stream. When this value is less than the preset streaming bitrate, it may result in insufficient upload frame rate and bitrate. During the live stream, the picture may appear frozen, and the audio and video may be out of sync.

III. How to monitor streaming quality during a live stream:
Click 'View' in the OBS menu and select 'Statistics' to monitor the streaming quality in real - time:
1. High CPU usage:

Reducethe video bitrate (excessive reduction may affect picture clarity) or switch the encoder to the hardware encoding mode. Refer to the following figure:

Reduce the video resolution (excessive reduction may affect picture clarity) orreduce the frame rate (excessive reduction may affect picture smoothness) 
2. High values of frames missed due to rendering delay and frames missed due to encoding delay 
If the encoder selected in 'Settings' -> 'Output' is software:

Check if the CPU load of the machine is too high:
Mac (Activity Monitor):

Windows(Task Manager):

Try toreduce the video bitrate, change the encoder to hardware, and reduce the video resolutionand see if it recovers
If the encoder selected in 'Settings' -> 'Output' is hardware: 
Check if the CPU load of the machine is too high:
Mac (Activity Monitor):

Windows(Task Manager):

Try toreduce the video bitrate, change the encoder to hardware, and reduce the video resolutionand see if it recovers
If the encoder was changed from software encoding to hardware encoding due to an exception, it means that neither the CPU nor the GPU of the machine meets the current live - streaming scenario. You can try to further reduce the video bitrate and resolution or use a device with better performance for live streaming.
High value of dropped frames (network)
There is a network problem. Check if the network fluctuates. It is recommended to use a wired Ethernet cable to connect the device for live streaming.
