Common Questions about Live Streaming
- What should I do if there is an error when exporting a video?
- Can the courseware be downloaded?
- Can I export the leaderboard?
- Can live streaming be implemented in a WeChat group?
- How to apply for the restoration of a deleted live stream?
- The preset end time of the live stream has passed, but the instructor is still in the live room. Will it affect the students' viewing of the replay?
- Will the audio or video uploaded to the live streaming room play automatically? Or do users need to click manually to play?
- What should I do if there is a harsh noise or the microphone howls during a live stream?
- How to solve issues such as live streaming freezing and long latency?
- Can I watch the replay and download the live stream after it ends?
- Can the live stream continue after the scheduled time?
- If I exit my live streaming room before the scheduled end time, will the live stream end and become available for replay?
- Can the avatar of the elink assistant in the live streaming room be changed?
- Can the live stream be resumed after manually ending it?
- Does the live replay support playback speed adjustment?
- During the live stream, the live broadcast area shows a black screen, and the live stream footage cannot be displayed properly
- How to handle the issue of low audio volume in live streaming content?
- What will happen and what impacts will there be if you start pushing the stream before the live streaming has begun?
- Multi-segment editing of live replay videos
- Tutorial on Using the Playback Validity Period Function
- How can live course students download course materials?
- Tutorial on Manual Transcoding for Live Streaming
- English version live streaming room usage tutorial
- 【OBS】 Frequently Asked Questions
- How to authorize the microphone on a Mac computer?
- How to authorize the microphone?
- How to authorize the camera on a Mac computer?
- How to authorize the camera?
- How to check if the microphone permission is occupied?
- How to reduce the CPU usage of a computer?
- How to check if the camera permission is occupied?
- How to check if the current microphone is working properly?
- How to check if the current camera is working properly?
- Common Questions about Kuaishou Relay
- How to reduce live streaming traffic consumption
- Black borders or incomplete display in the live streaming video
- Video clarity of each live streaming push terminal
- Problems and Solutions for Abnormal Live Room Access
- Common issues and solutions for audio-video out-of-sync in live streaming
- Suggestions for live streaming equipment and parameter settings
- Common Questions about Live Learning Data
- How to edit the recorded playback of live streams?
What should I do if there is an error when exporting a video?
Currently, the export uses the MP4 format, which may have some compatibility issues. If you encounter an export failure, you can contact our customer service, and we will assist you with the export.
Can the courseware be downloaded?
Currently, courseware cannot be directly downloaded by students.
If instructors need to allow students to download courseware, they can click on the material library in the PC live streaming room/H5 live streaming room to upload the courseware they want students to download in advance (currently, only word, ppt, excel, and pdf file types are supported for upload).After uploading, the corresponding courseware can be sent to the discussion area for students to download. Students can also find the file in the shared files for download.
Can I export the leaderboard?
Yes, it's possible.
You can enter the live streaming list page, select the corresponding live stream, click [Details > Data Analysis] to enter the data statistics page, and thenyou can export the user data of the Top 100 Influencers Invited in the Live Stream Ranking.
Can live streaming be implemented in a WeChat group?
After creating the live streaming room, share the link to the live streaming room in the WeChat Community. When students click on the link, they will be redirected to your live streaming room.
How to apply for the restoration of a deleted live stream?
Within 30 days after deleting a live stream, you can find the corresponding log record in [Settings] - [Operation Logs] and click [Restore Course].
The preset end time of the live stream has passed, but the instructor is still in the live room. Will it affect the students' viewing of the replay?
If the instructor continues to stream after the scheduled live streaming time has ended, the live stream will not end until the instructor leaves the live streaming room and stops the stream.
Will the audio or video uploaded to the live streaming room play automatically? Or do users need to click manually to play?
The audio and video uploaded in the explanation area of the live streaming room will not play automatically. Users need to click manually to start playback.
Note: The uploaded video recordings in the voice live streaming need to wait until the live stream starts to play automatically.
What should I do if there is a harsh noise or the microphone howls during a live stream?
There are numerous reasons for squealing. Please check the following causes one by one: faulty microphone, excessive current, problematic motherboard sound card, or interference from nearby electronic devices.
You can refer to the solutions mentioned in this article.Article link
1. Try replacing the microphone to rule out device issues.
2. Keep the microphone away from external speakers and other audio - output devices to avoid interference.
How to solve issues such as live streaming freezing and long latency?
If the Live Streaming Assistant encounters issues such as lag or high latency, you can troubleshoot using the following methods.:
1. Check if the current network upload speed is too low. It is recommended that the network upload speed be above 10M. It is advisable to use an Ethernet cable for live streaming.
2. Enter the software - click on the top - right corner - Video Settings, and reduce the output resolution, bitrate, and frame rate. (The elink Assistant does not support video settings operations for the time being.)
3. Check if the current computer configuration is too low. Recommended network configuration: Recommended computer configuration.The computer has certain requirements for the CPU. It is not recommended to use ultra - thin laptops (because the CPU performance will be reduced, such as the macbook air).:
CPU:The CPU should be i5 - 9300H or higher (corresponding to non - ultra - thin laptops priced above 5000 on JD.com).
Graphics card: GTX1050 or higher (1050Ti).
If you are not recording games, you can directly use the integrated graphics of the CPU and ignore this item.
Memory: 8G or higher (16G).
Monitor: 1080.
Note: Precautions before live streaming: Before the official live stream, create a live streaming room for a pre - live test to avoid live streaming lag issues caused by poor network conditions.
Note: If there is still no improvement after troubleshooting in this way, it is recommended to use OBS for live streaming. You can set parameters to reduce latency and alleviate lag. The specific settings are as follows:
OBS: 1. Check if the current network upload speed is too low. It is recommended that the network upload speed be above 10M. It is advisable to use an Ethernet cable for live streaming.
2. The bitrate setting in the OBS software is too high. Recommended bitrate value: 500 - 1000. Solution: Please reduce the bitrate value or increase the current network speed.
3. The resolution or FPS set by the instructor in the OBS software is too high. Solution: Please reduce the resolution or the FPS value. Recommended resolution: 1280×720. Recommended FPS value: 30.
3. Check if the current computer configuration is too low. Recommended network configuration: Recommended computer configuration:
CPU: i5 - 6400 or higher (i5 - 6500).
Graphics card: GTX1050 or higher (1050Ti).
If you are not recording games, you can directly use the integrated graphics of the CPU and ignore this item.
Memory: 8G or higher (16G).
Monitor: 1080
Can I watch the replay and download the live stream after it ends?
Video live streaming: After the live stream ends, merchants can enable the playback in [Live Stream List - Details - Playback Settings], or set to enable the playback when editing the live stream details page. Then, after the live stream ends, students can watch the replay. Merchants can download and edit the replay video in the background [Live Stream List - Details - Playback Settings].
Audio live streaming: There is no need to set up the playback for audio live streaming. The playback will be automatically available after the live stream ends. Merchants can download and export the live stream audio by clicking [Export Audio] in the upper right corner of the background [Live Stream List - Details].
Can the live stream continue after the scheduled time?
If the set end time for the video live stream has arrived, but the instructor has not exited the live streaming room, the instructor can continue the live stream as long as the live stream remains stable. There is no impact on the voice live stream, and the instructor can still send voice messages in the live streaming room.
Note: If the instructor's lecture time in the video live stream has exceeded the current end time of the live stream, to ensure that the instructor can continue smoothly, it is recommended to appropriately extend the live stream time before the scheduled end time to guarantee the smooth progress of the live stream.
If I exit my live streaming room before the scheduled end time, will the live stream end and become available for replay?
During the live stream, if the instructor exits the live room (not due to accidental manual termination of the live stream), the students will see a prompt indicating that the instructor has left the live room, but the live stream will not end. If the instructor is not in the live room when the scheduled end time of the live stream arrives, the live stream will automatically end.
Can the avatar of the elink assistant in the live streaming room be changed?
It can be replaced.
You can make unified settings for all live stream announcements, replace the assistant avatar, and change the live stream announcements in [Live Streaming > General Settings > Live Stream Announcements]. This setting will take effect for all live streams that have not had their announcements set individually (there may be a certain delay before the modified announcements take effect).
You can also set the announcement for a single live stream in [Live Stream Details - Live Stream Decoration - Live Stream Information - Live Stream Announcement], which will only take effect for this particular live stream.
Can the live stream be resumed after manually ending it?
Manually ended live streams can be restored. You can perform the restoration operation through [Management Console - Live Stream List - More - Restore Live Stream].
Does the live replay support playback speed adjustment?
Instructions on live streaming playback speed adjustment:
1. Live streaming type: Video live streaming supports the playback speed adjustment function. (Not supported during the live stream)
2. Store terminals: Supported on both H5, Mini Programs, and PC clients
3. Mobile phone models: Supported on both iOS and Android devices
During the live stream, the live broadcast area shows a black screen, and the live stream footage cannot be displayed properly
If the user refuses the Flash request to use the camera and microphone, the live streaming area will go black. You can re-enter the live streaming room.
Step 1: Click the "lock" on the left side of the URL and select "Site settings".
Step 2: In the "Privacy and security settings", check the usage permissions for Flash, camera, and microphone as "Allow".
How to handle the issue of low audio volume in live streaming content?
This may be caused by the instructor being too far away from the microphone. When you need to conduct a live stream away from the device, it is recommended to use an external portable microphone device.
*Adding a pop filter or a sponge cover to the microphone will yield better results.
eLive Client
Select “Settings”. After entering the settings page, select “Audio” and find the voice enhancement function. When the microphone volume is low or you are far from the microphone, it is recommended to turn on the voice enhancement.
Select “Settings”. After entering the settings page, select “Audio” and find the option to increase the speaker or microphone volume.

What will happen and what impacts will there be if you start pushing the stream before the live streaming has begun?
The live streaming status is updated from 'Not started' to 'In progress', and other operational functions remain unaffected.
Multi-segment editing of live replay videos
Step 1: Enter the live stream details page
Click [Live Stream Management] - [Live Streams]. Find the live stream you need to edit in the live stream list, and click [Details] of this live stream to enter the live stream details page.
Step 2: Enter the video replay settings page
On the live stream details page, click [Replay Settings] to find all replay videos of this live stream. Find the segment you need to edit and click to edit it.
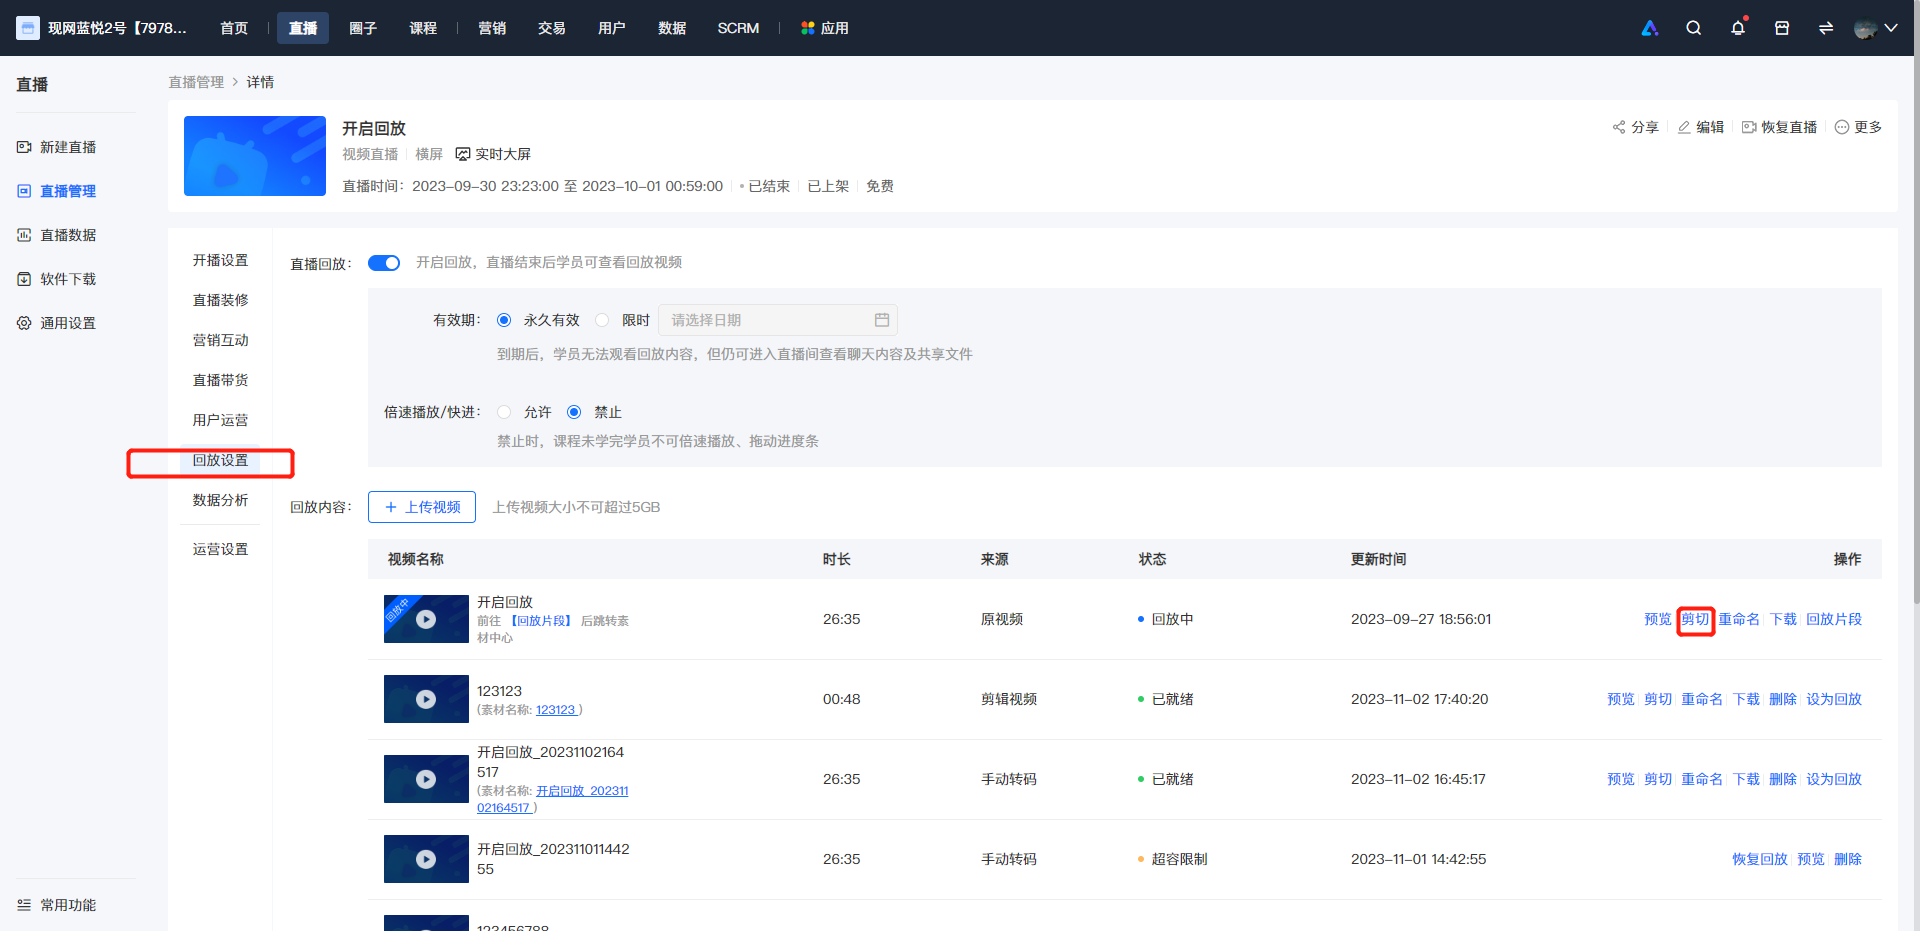
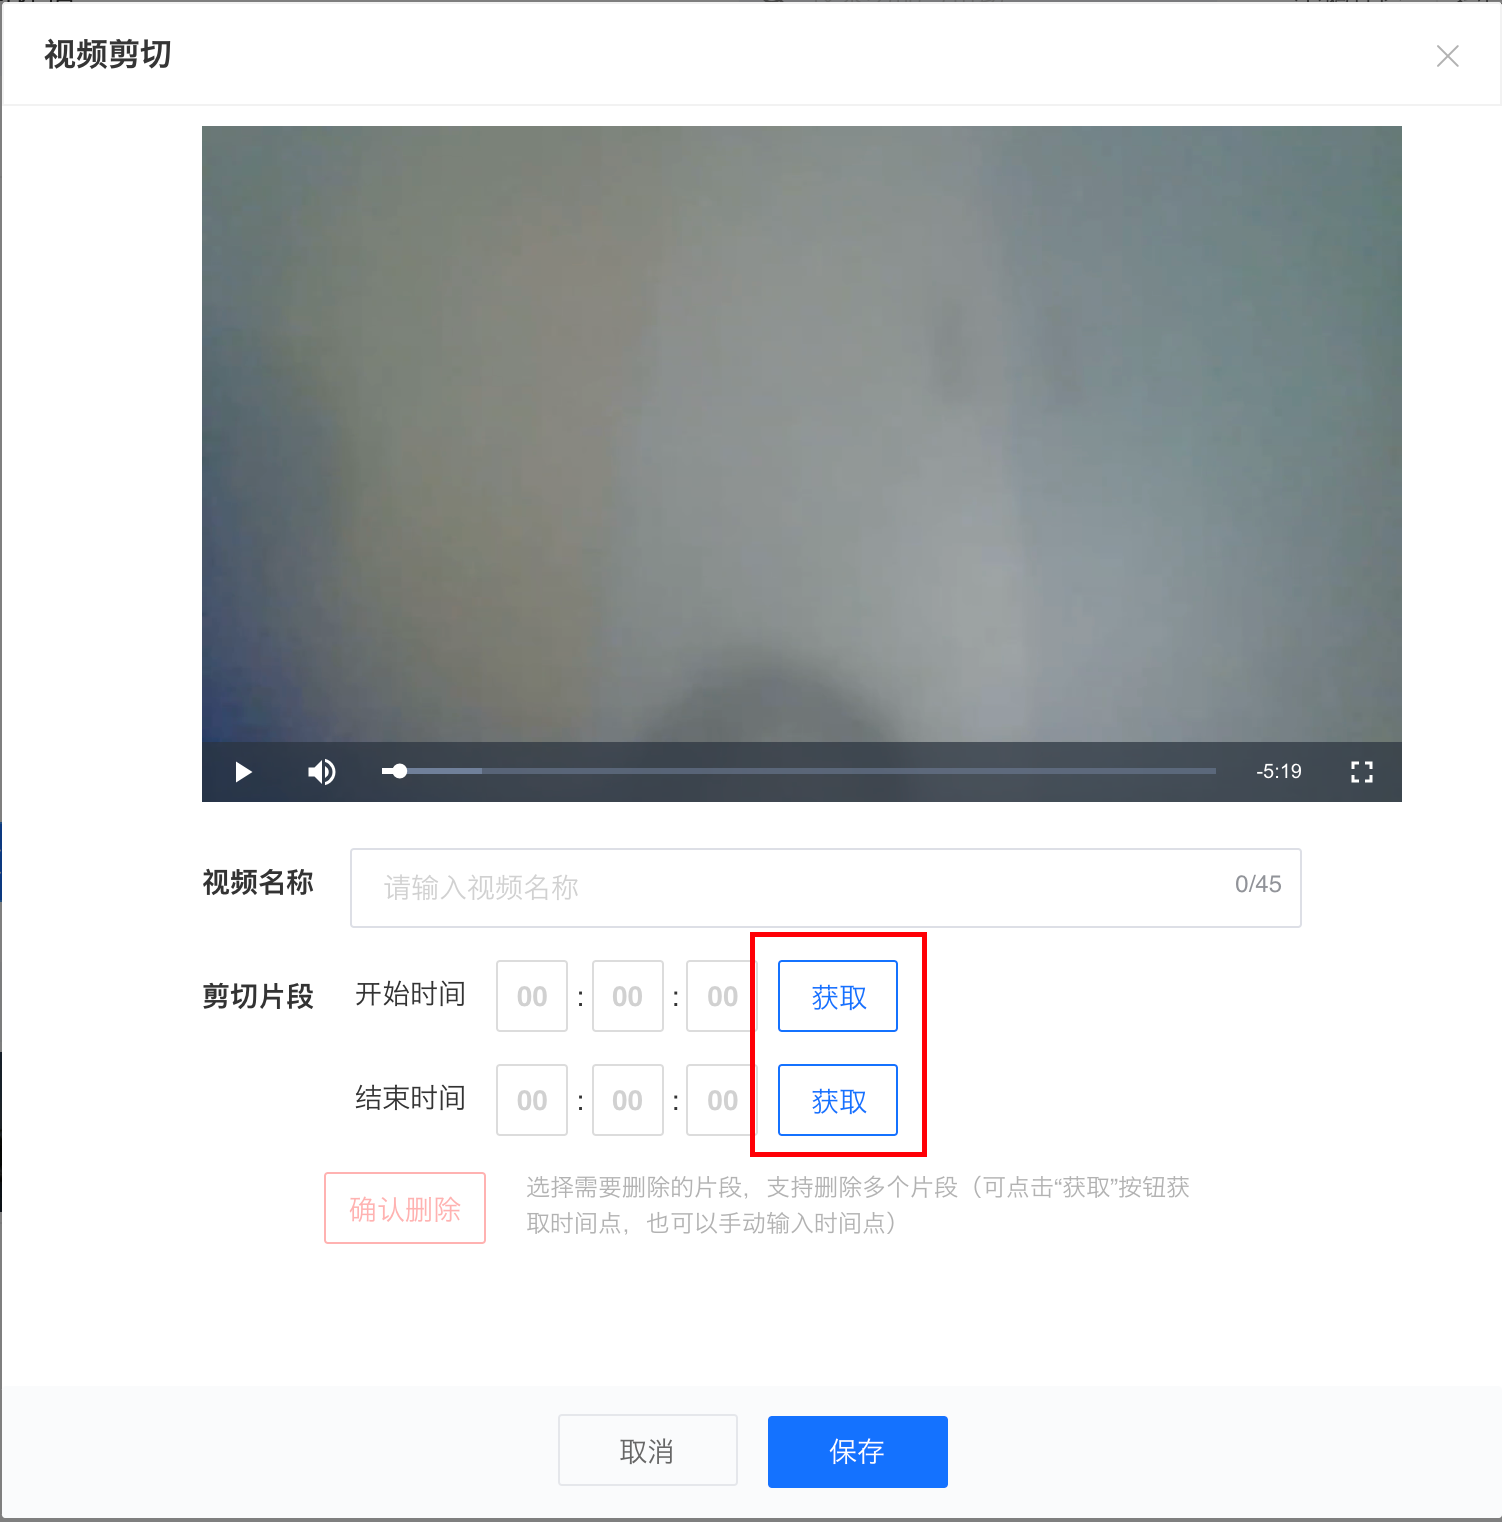
Step 3: Select the start - end time of the segment to be deleted
Click 'Get' to obtain the current video playback time point
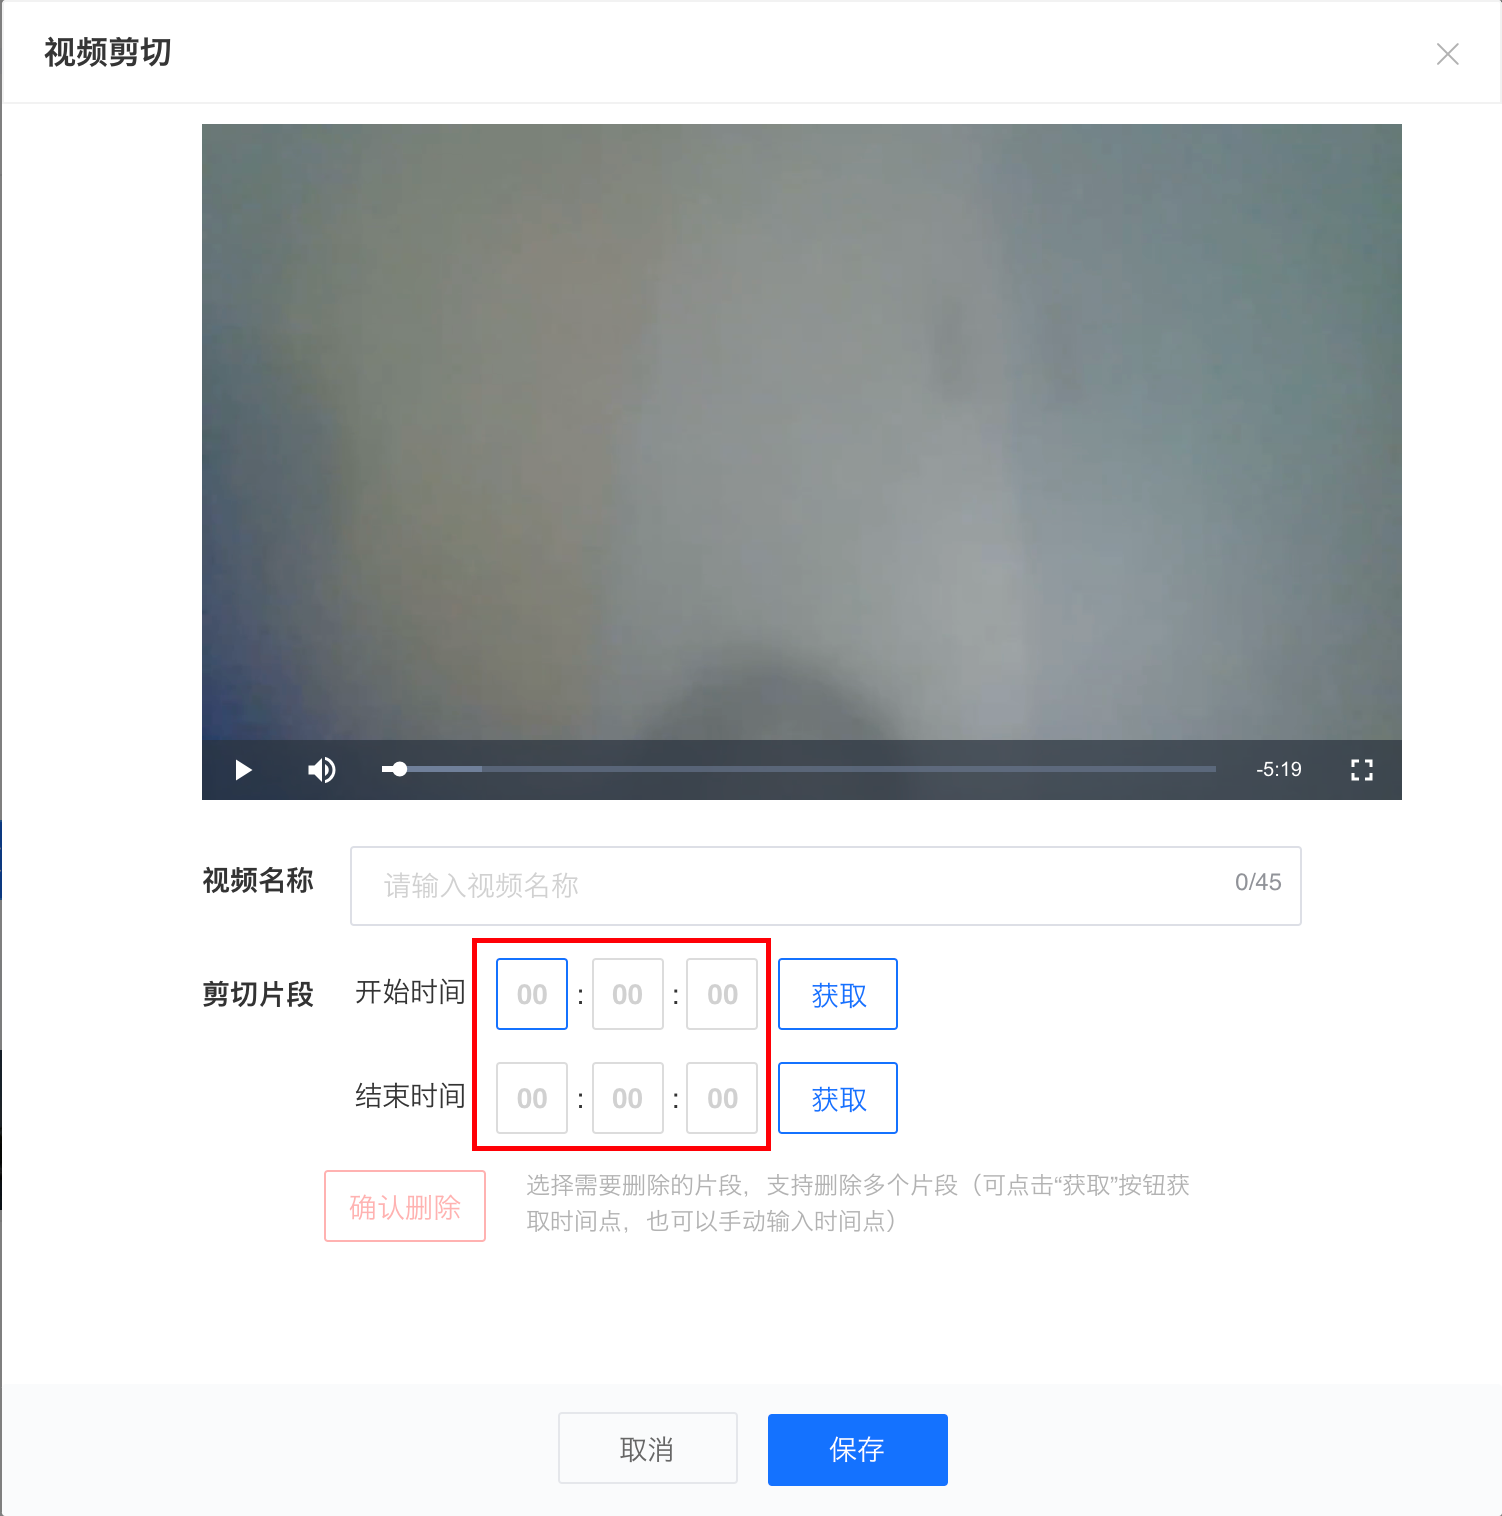
You can also manually enter 'hours - minutes - seconds' to select the time point (simply enter manually without clicking the 'Get' button again)
Step 4: Delete the segment
After selecting the start and end deletion time points, click 'Delete Segment' to delete the corresponding video segment
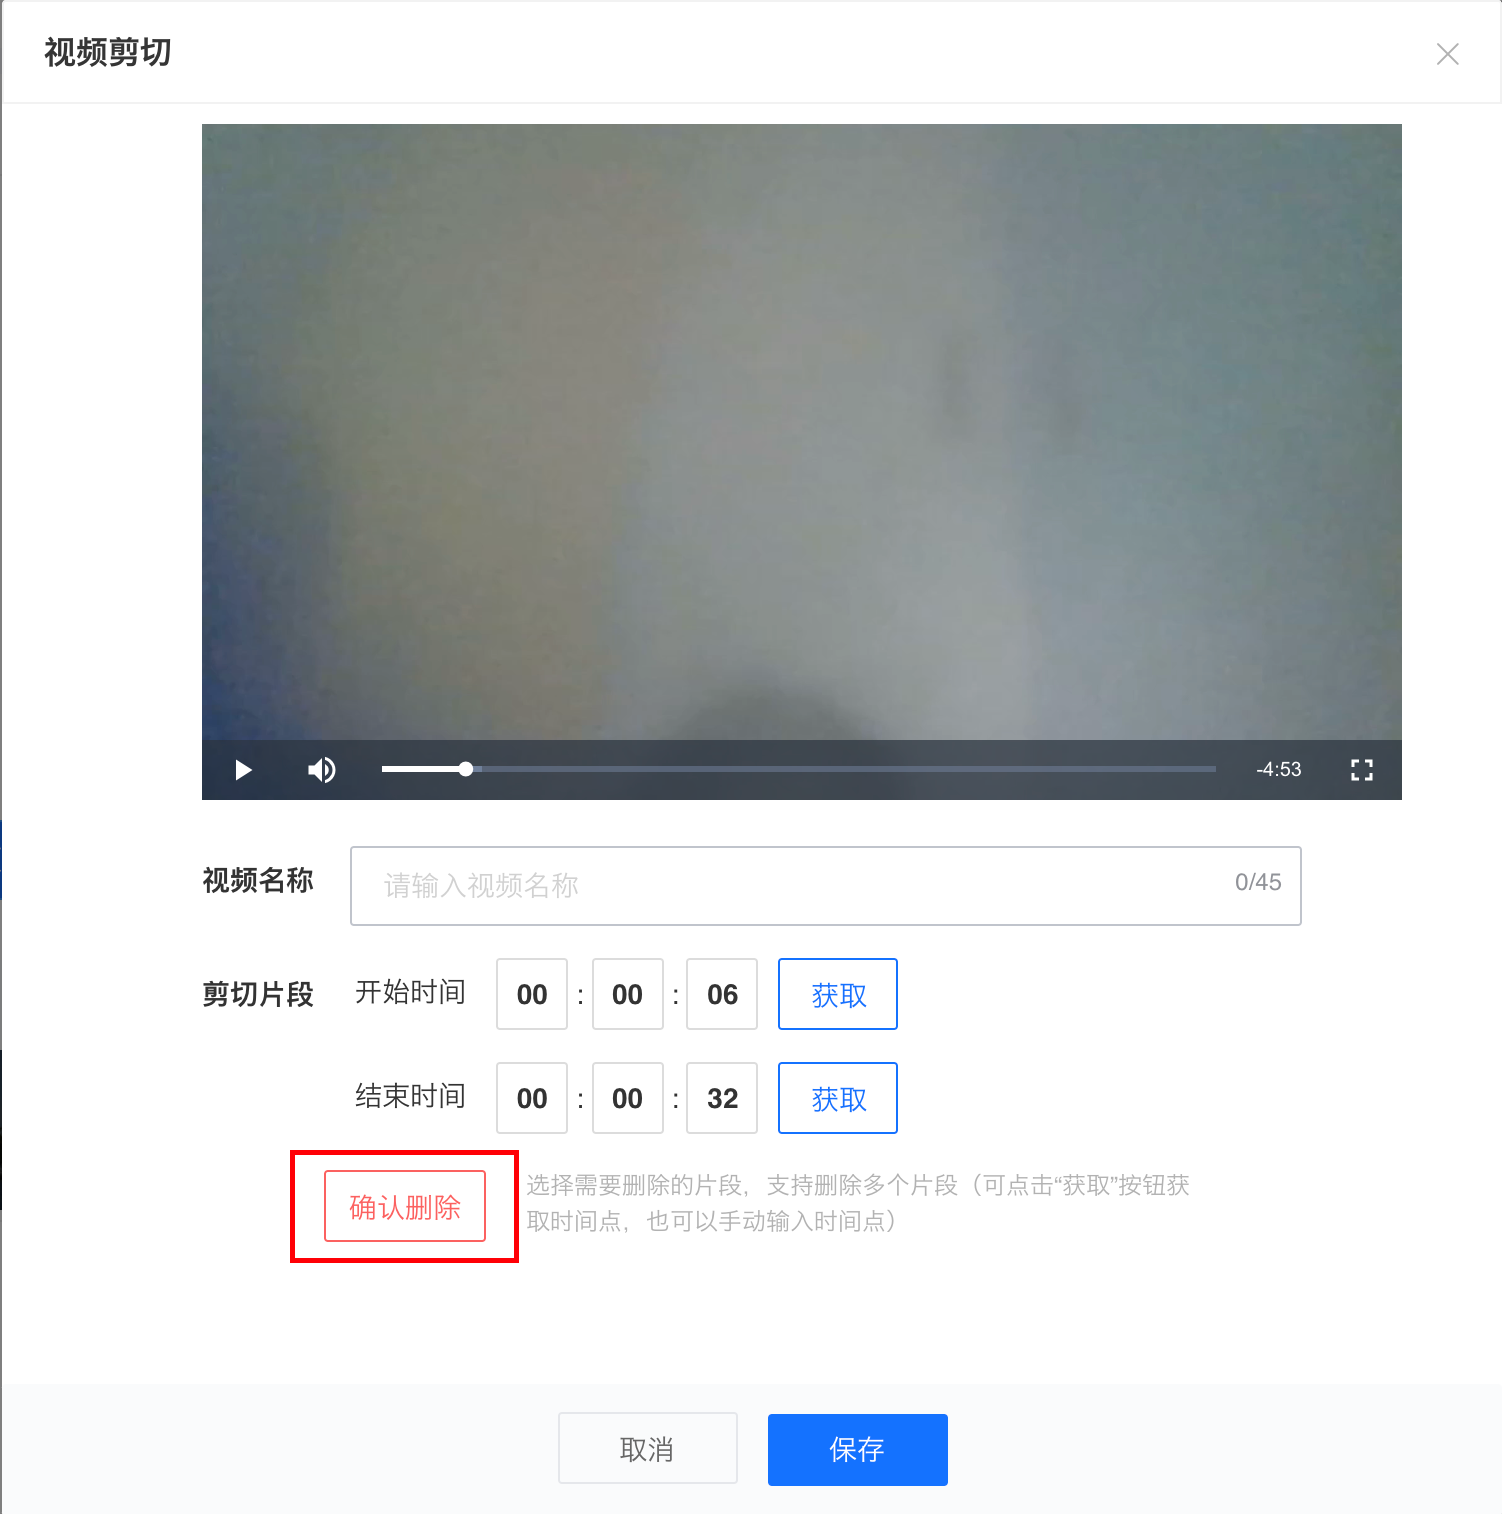
After confirming the deletion, the progress bar of the deleted video segment will be marked in red.
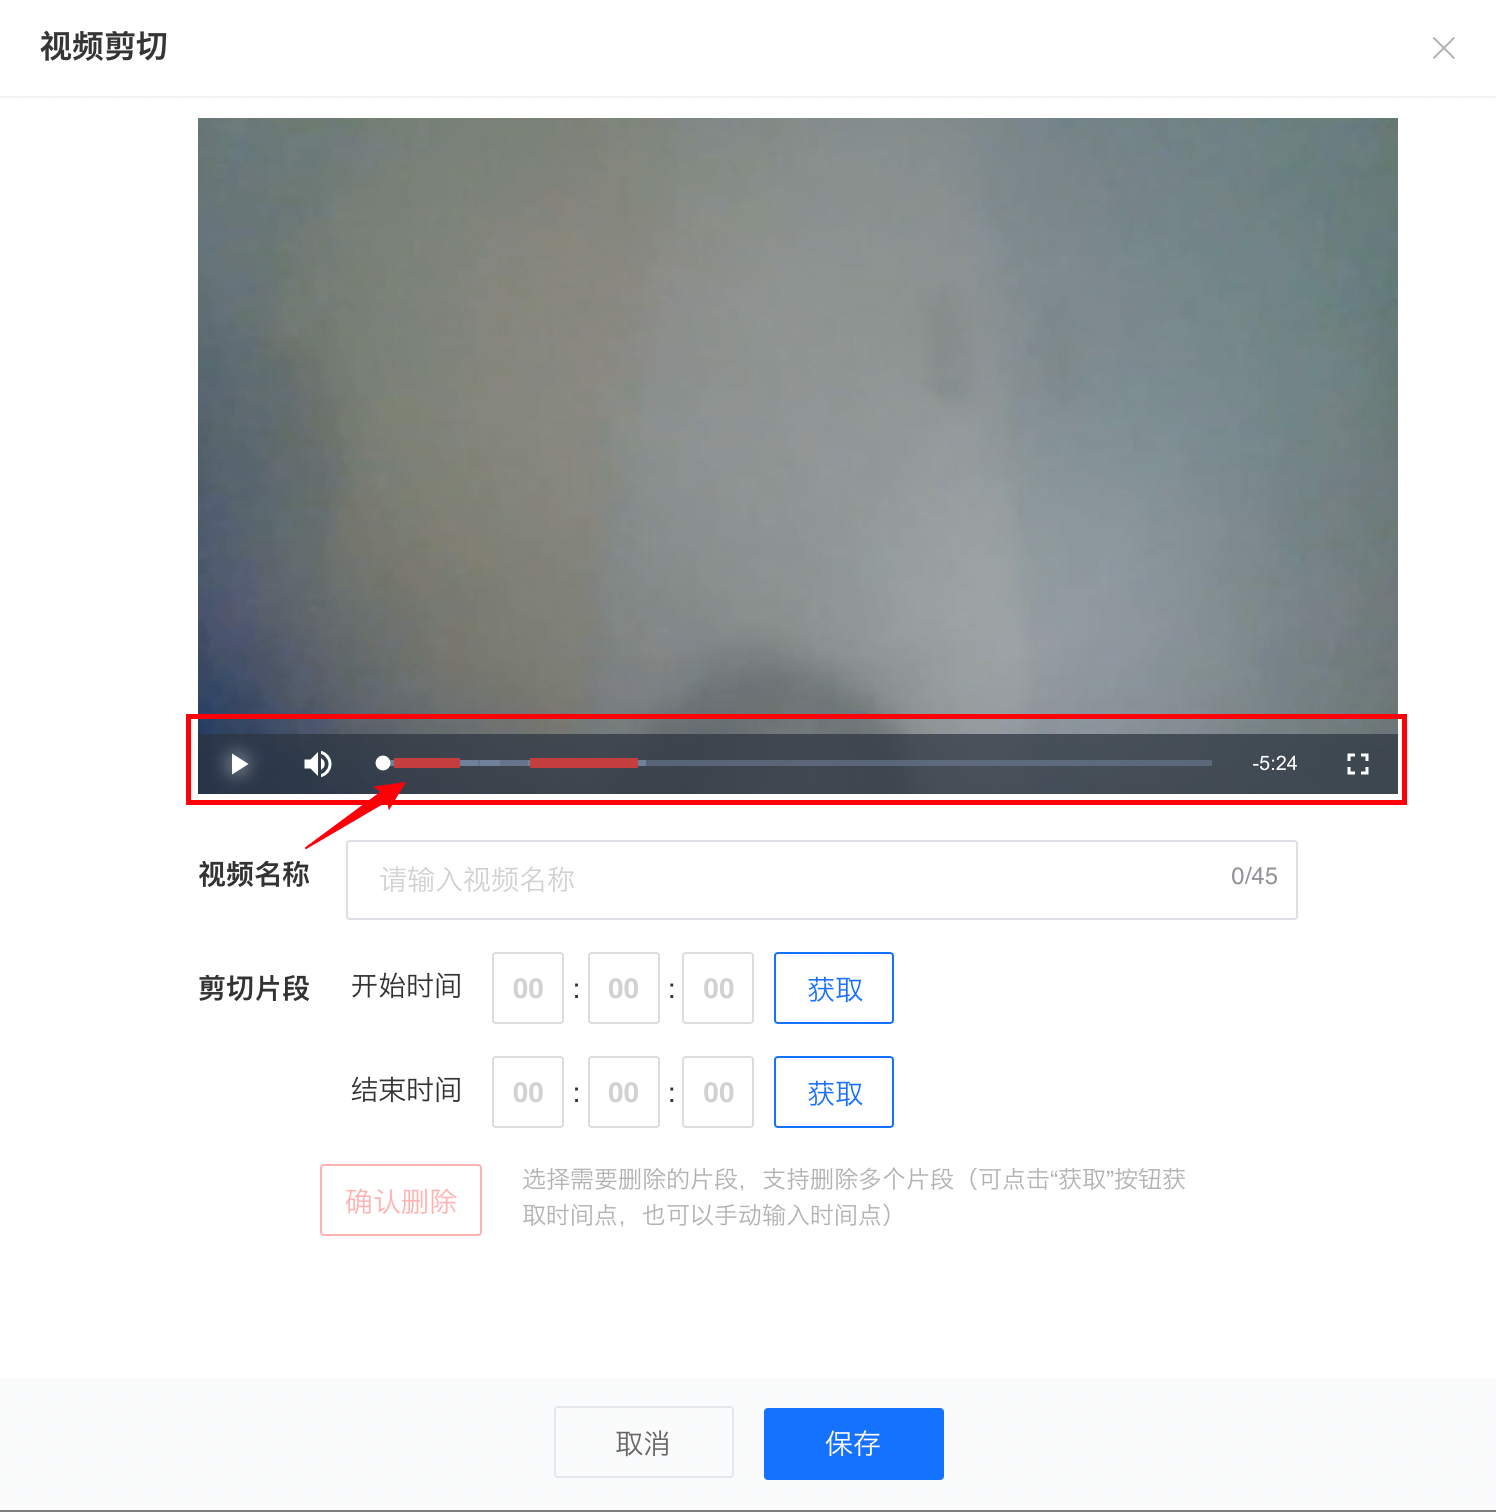
Repeat the above steps to delete multiple segments.
Step 5: Enter the video name
Click on the video name area to enter the video name
Step 6: Save the video
Click 'Save Video'. The segments marked in red will be deleted, and the remaining segments will be spliced together to form a new edited video.
If you need to set the edited video as a live stream replay, after saving, you need to wait for the video transcoding to succeed, and then click to set it as the replay video.
Tutorial on Using the Playback Validity Period Function
I. Feature Introduction
Merchants can set the validity period of the replay. They can control the viewing duration of students by selecting the [Limited Time] option on the replay settings interface or the live course editing page and specifying the expiration date of the replay.
II. Purpose of Use
To meet the merchants' needs to encourage students to watch the content promptly and improve the viewing rate.
III. Usage Scenarios
Merchants notice that students are lazy and lack motivation in learning. They hope to urge students to study the purchased courses by setting a validity period for the replay.
IV. Operation Path
Merchant side: Merchant backend
Student side: Live room details page → Enter the live broadcast
V. Usage Tutorial
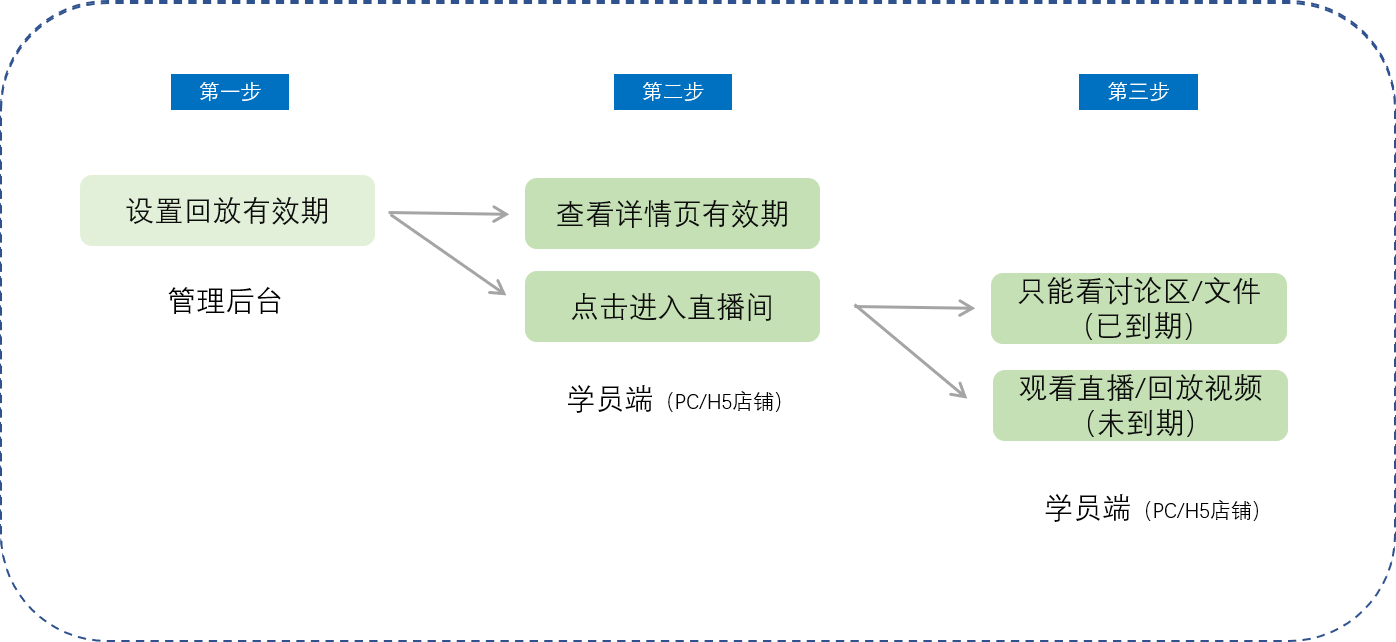
Step 1: Set the replay validity period (Management backend)
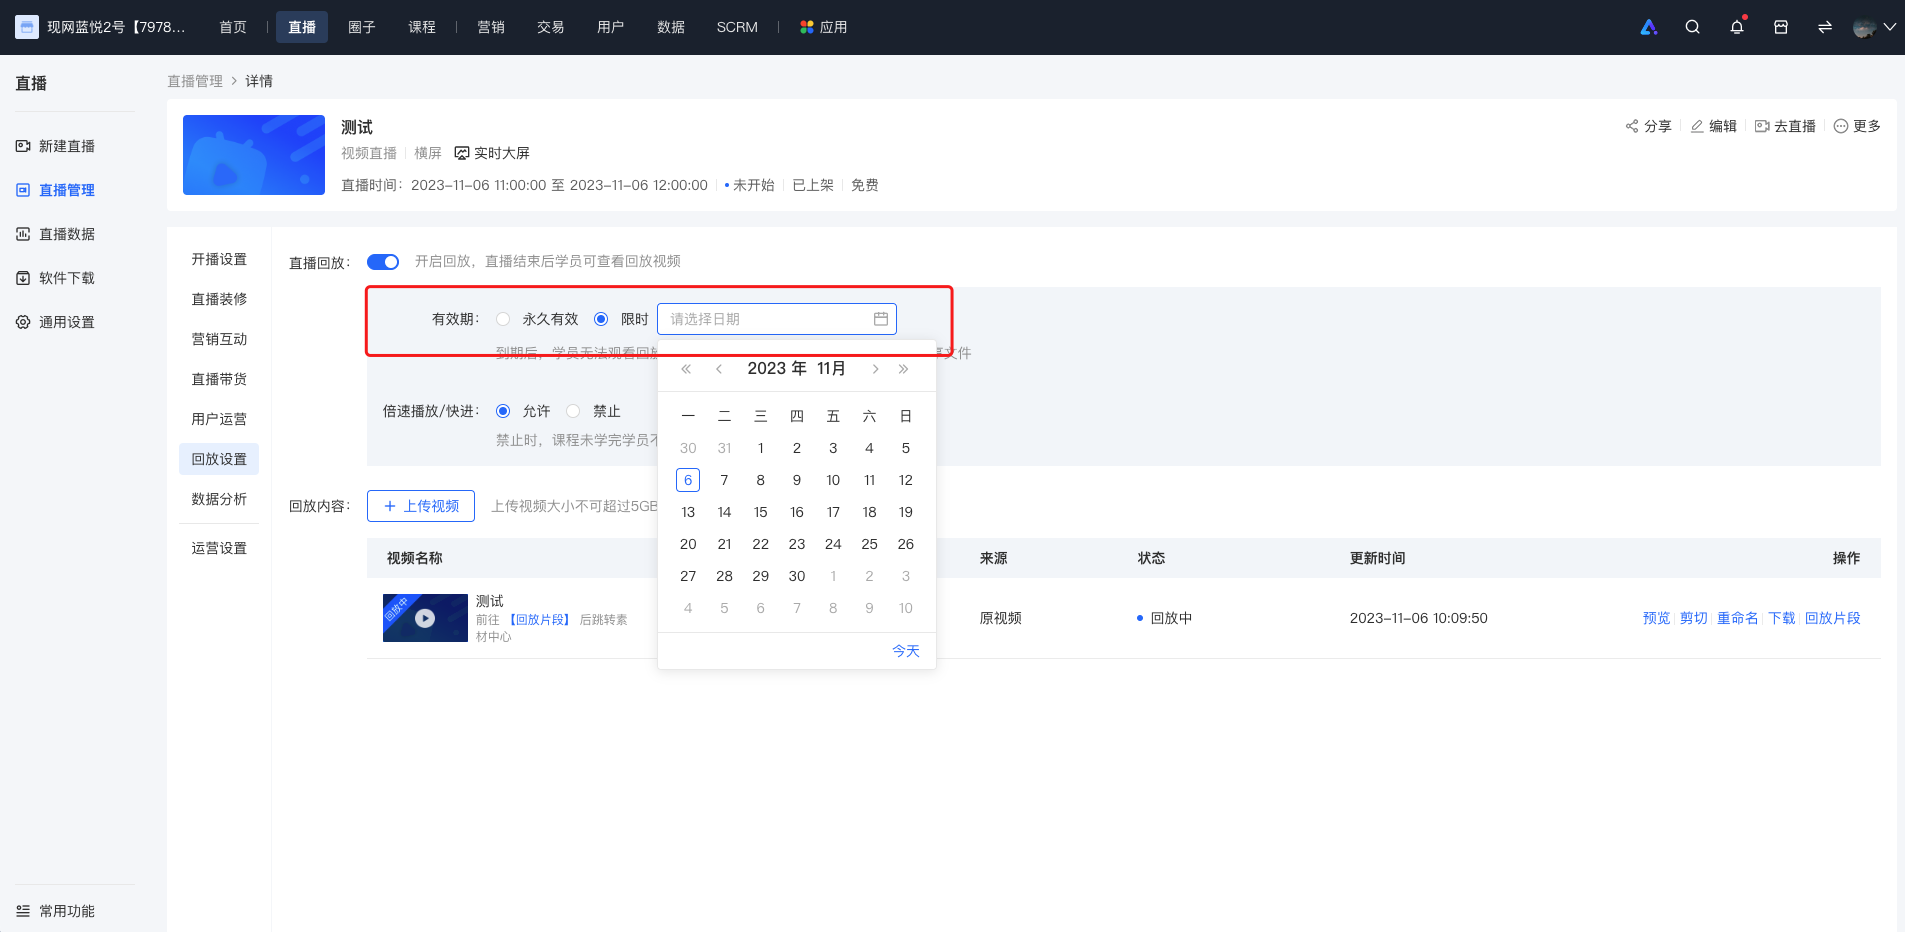
Step 2: Check the validity period on the details page (Student PC/H5 store)
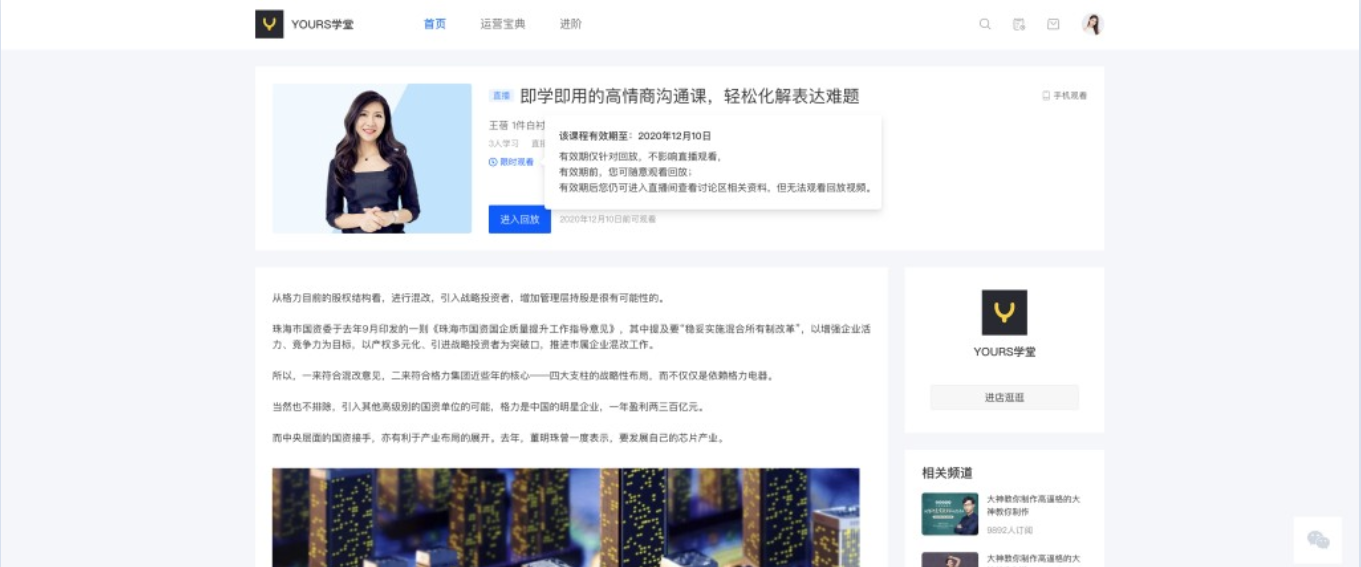
PC student store
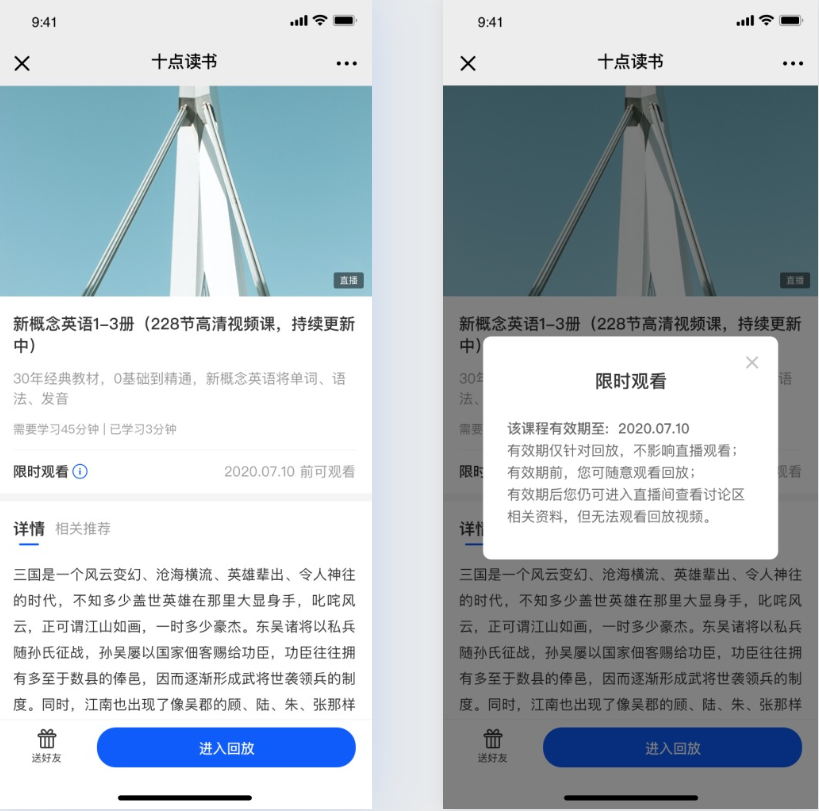
H5 student store
Step 3: Enter the live room (Student PC/H5 store)
When the replay is still within the validity period, students can watch the replay video normally without any issues.
When the replay has expired and students enter the live room:
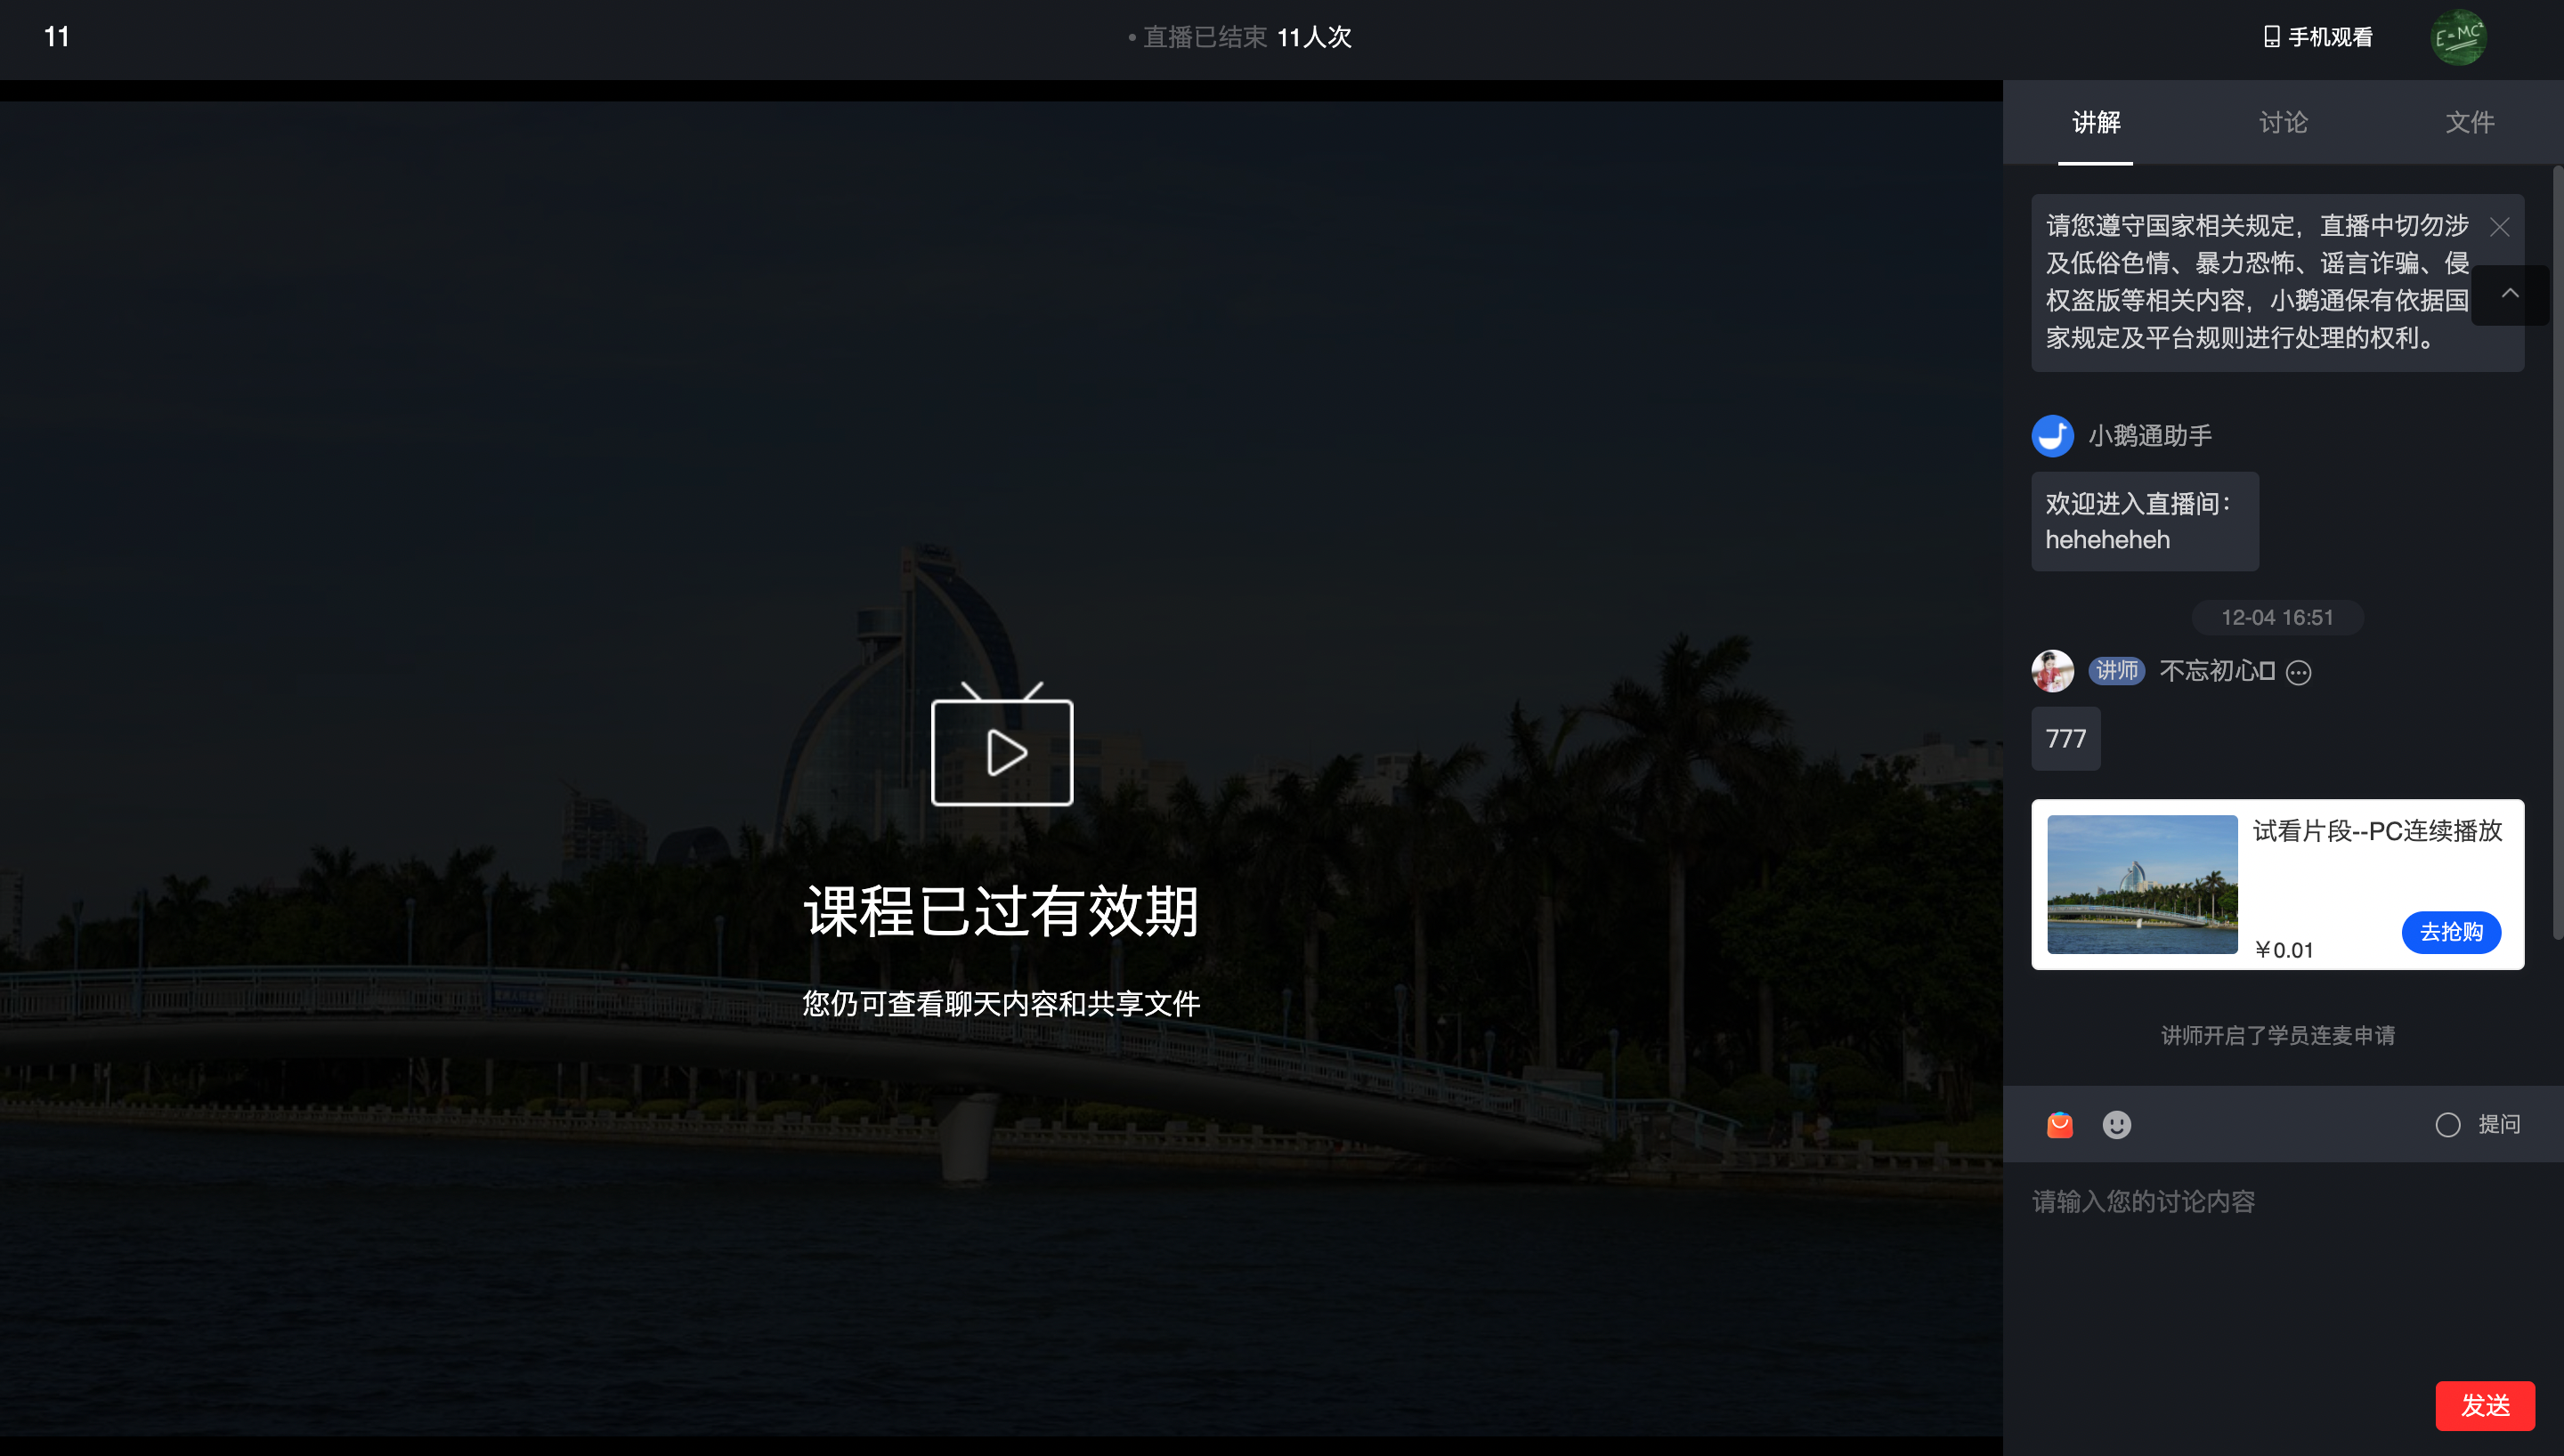
PC student store
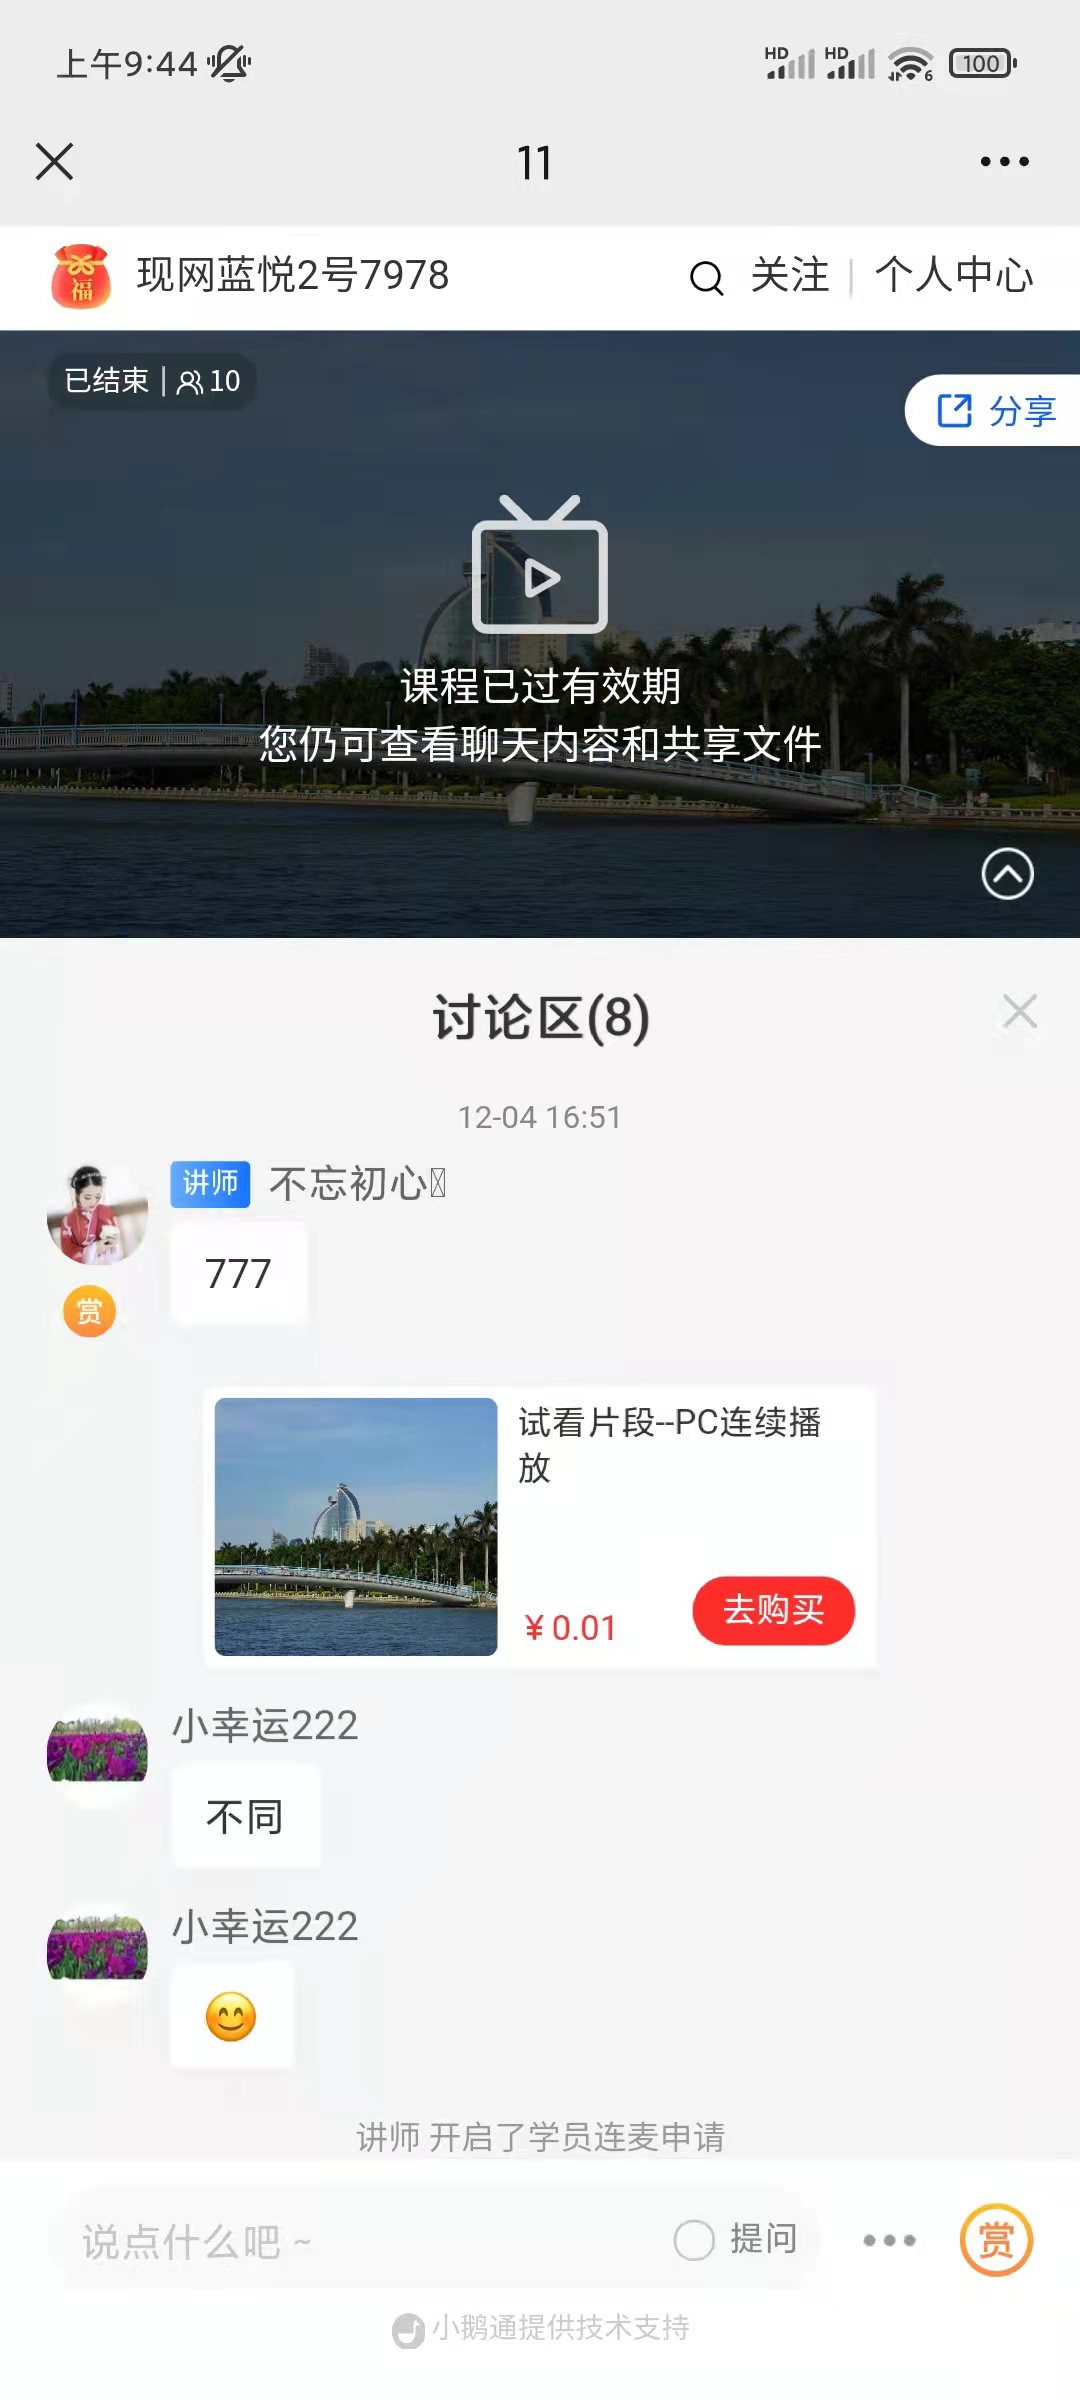
H5 student store
How can live course students download course materials?
I. Feature Introduction
Merchants can upload relevant courseware on the instructor's end, and then students can download the relevant courseware on their mobile phones and computers, which improves the students' review effect after class.
II. Purpose of Use
By downloading the courseware, students can study the live - streamed courses repeatedly in combination with the live replay content, thus enhancing the learning effect. They can also achieve this by repeatedly studying the courseware.
III. Use Scenarios
Teacher Zhang San conducts training for the sales staff in the company via live streaming. However, the sales staff usually face high work pressure and rarely have time for online review outside of class hours, resulting in less - than - satisfactory learning results. So, Teacher Zhang San shares the courseware with his students through elink live streaming. After downloading the courseware, the students watch and study it repeatedly during their free time, and both their learning effect and performance have improved significantly!
IV. Operation Path
Merchant's End:elinkAssistantClient/Web Version/WeChatH5 Instructor's End → Share Courseware
Student's End:WeChat H5/Web Version→ Live Room → Shared Courseware → Download Courseware
V. Usage Tutorial
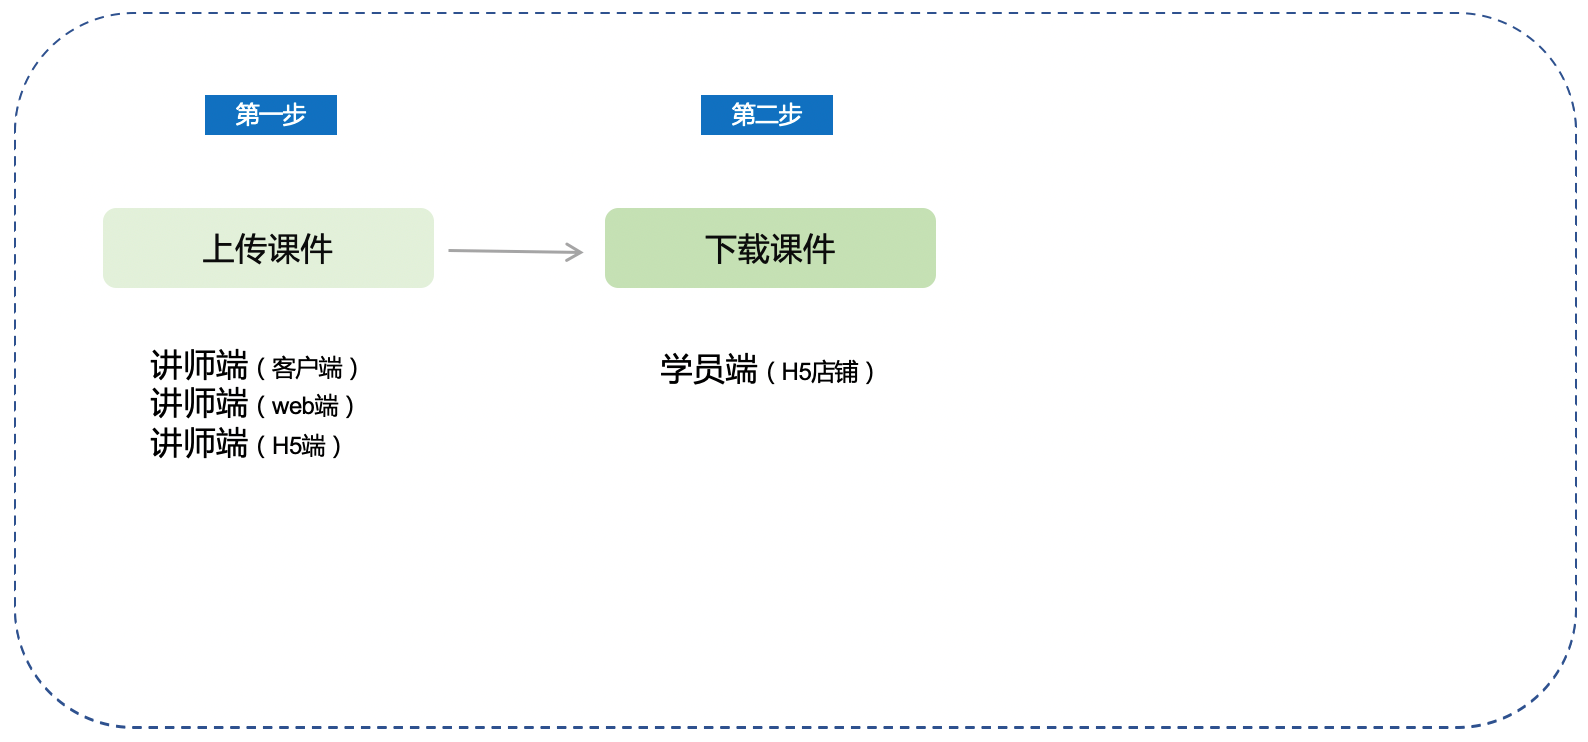
Step 1: Instructors Upload Courseware (e - Live Client/elink Assistant Client/Web Version/H5 Instructor's End)
1. Instructors enter the e - Live client and open [Presentation Courseware - Upload Courseware].
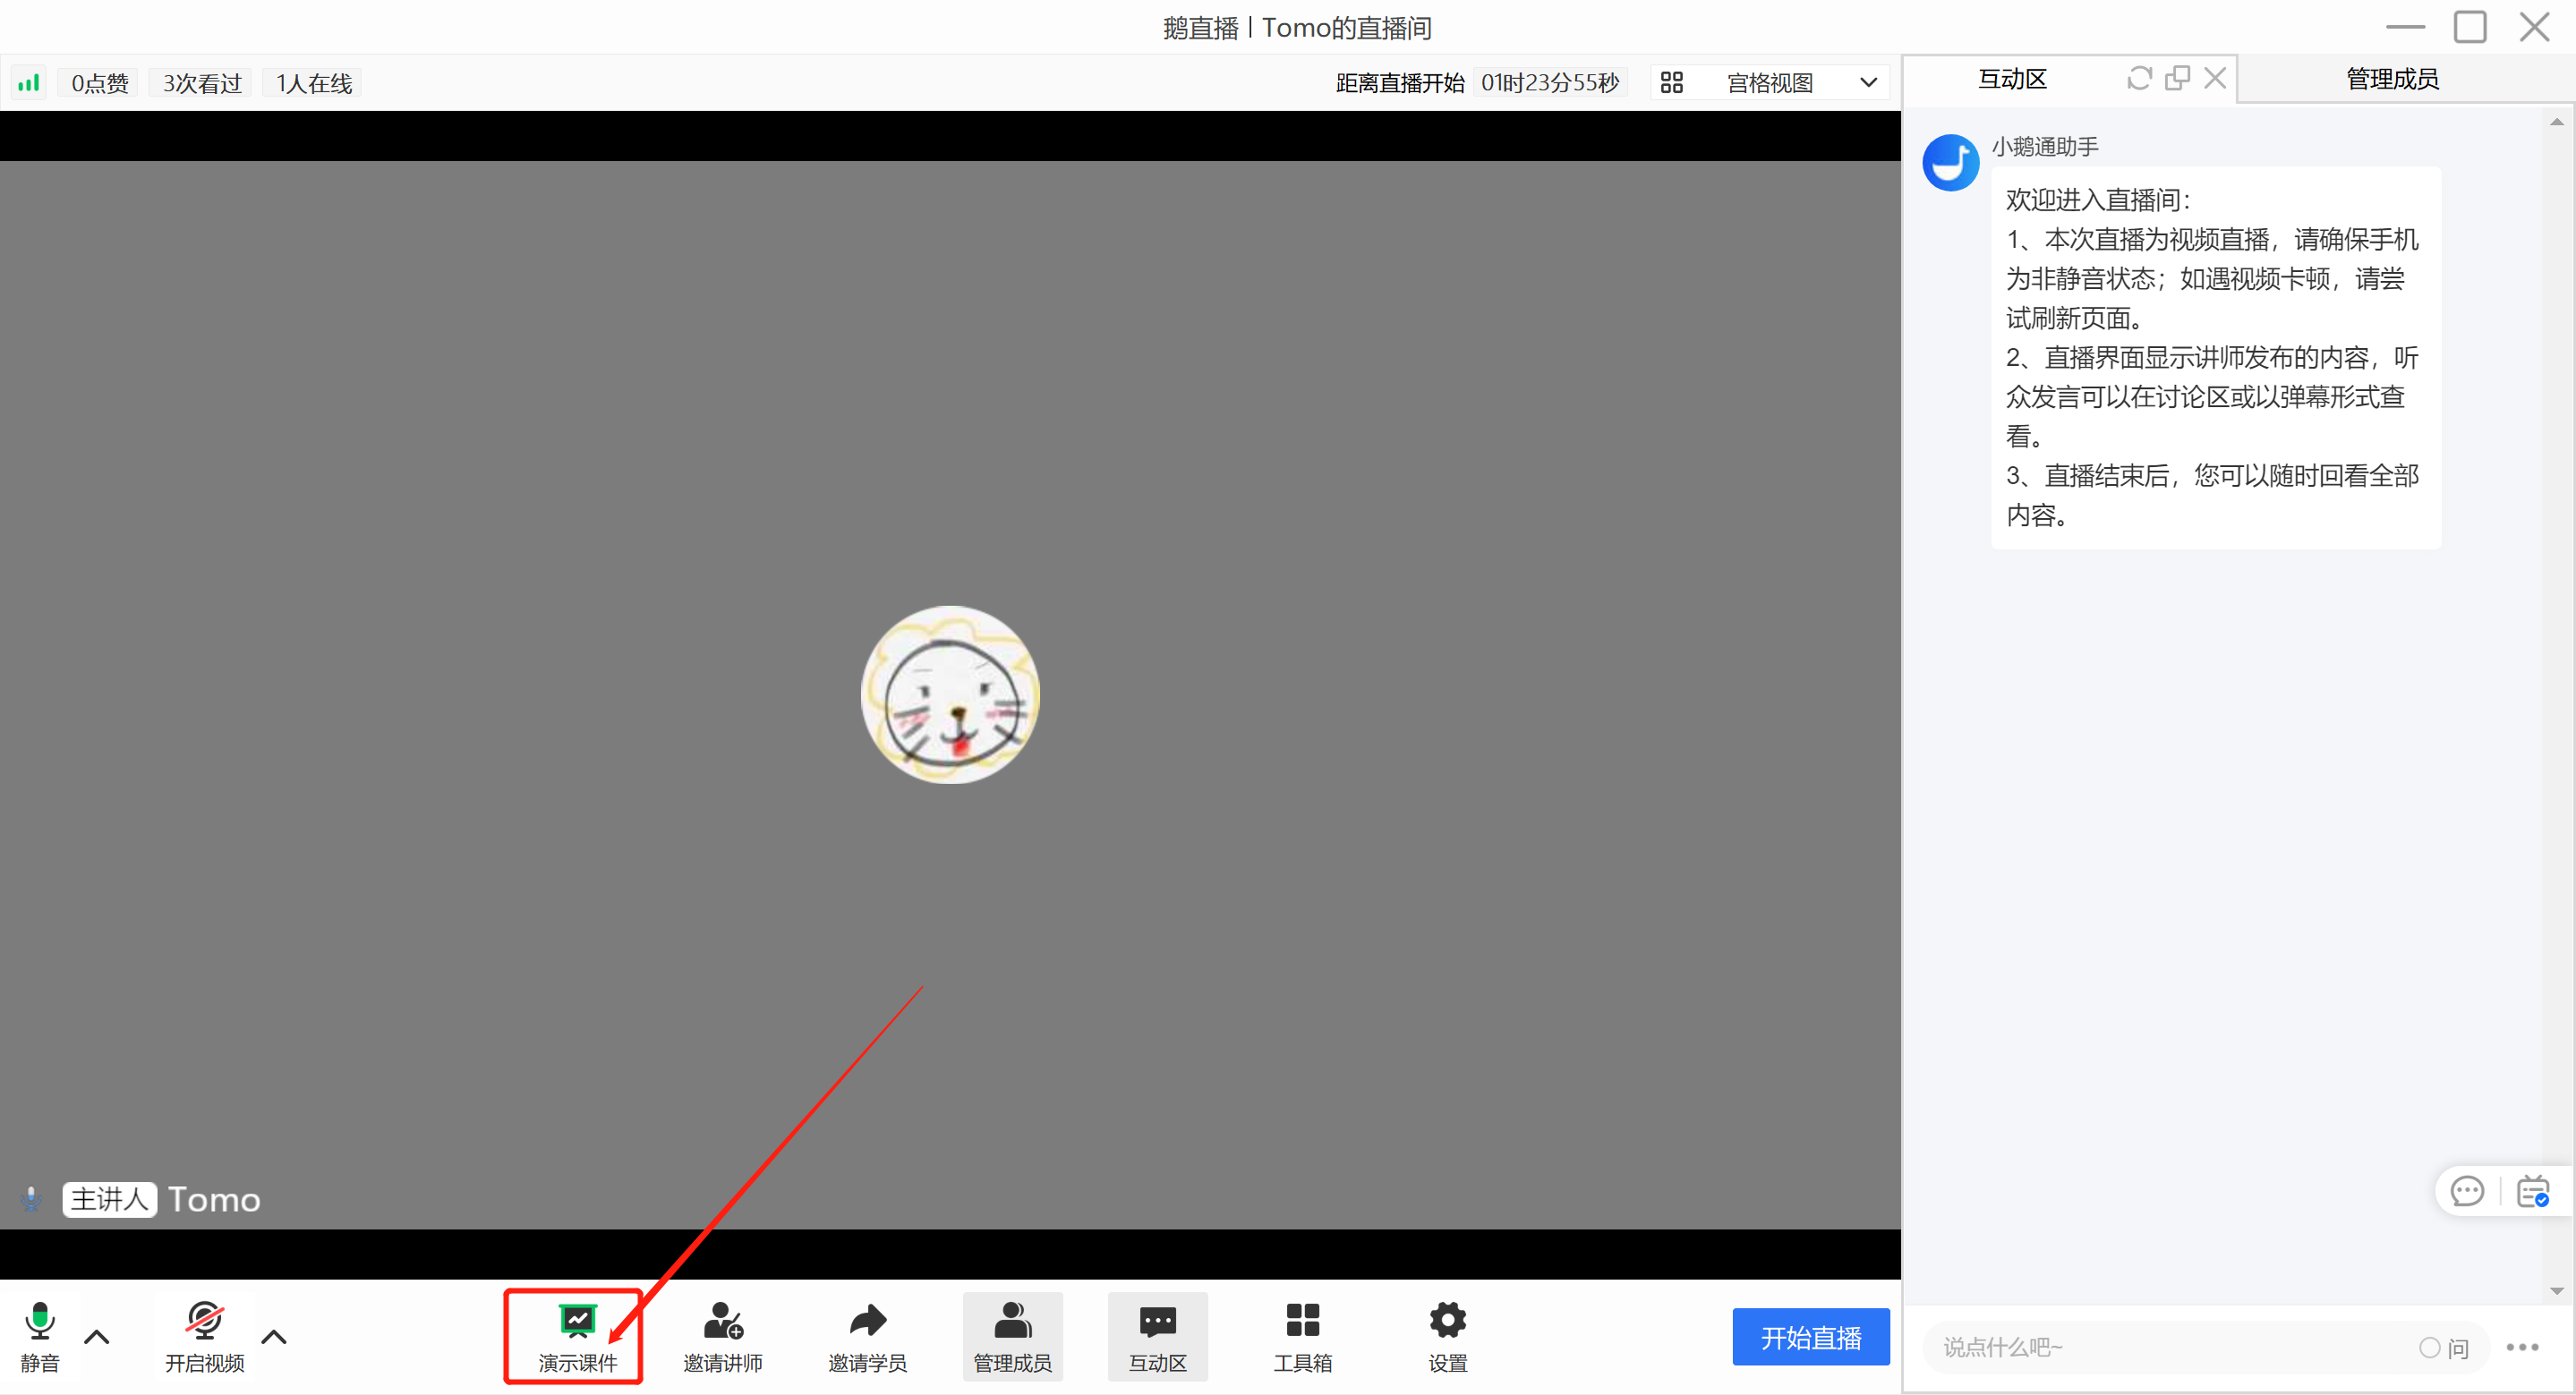
(e - Live Client Instructor's End)
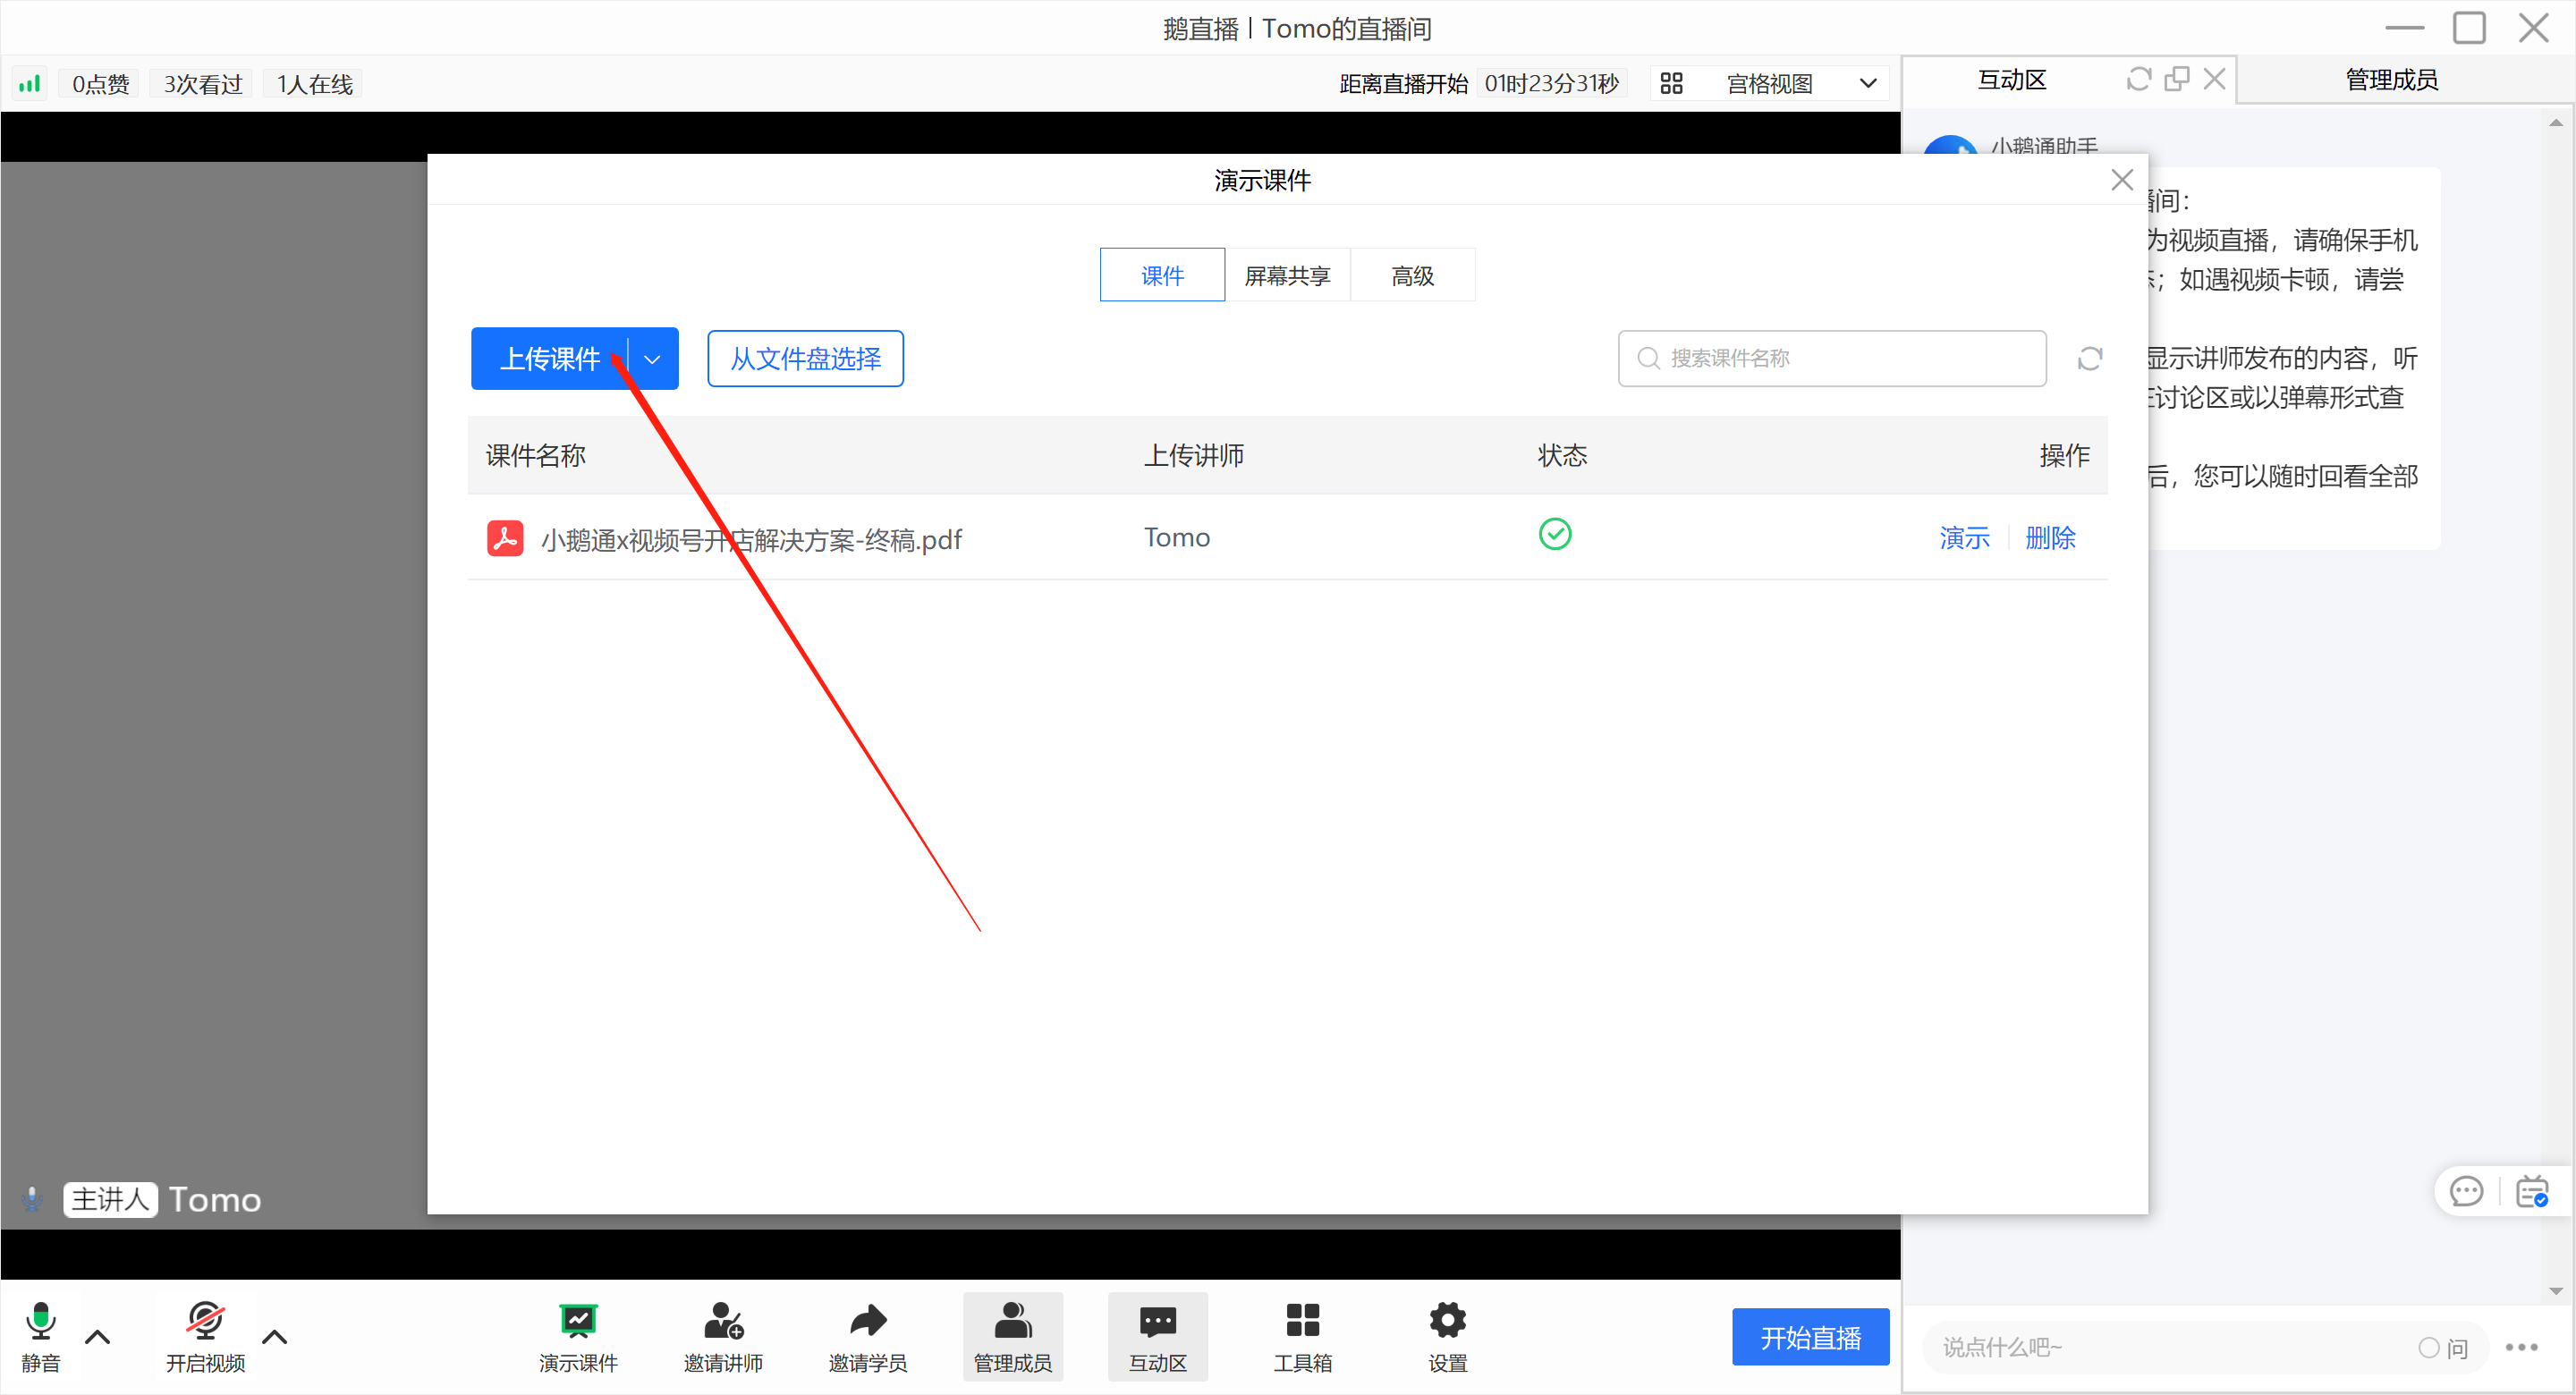
(e - Live ClientInstructor's End)
2. Instructors enter the elink client and open the material library to upload courseware.
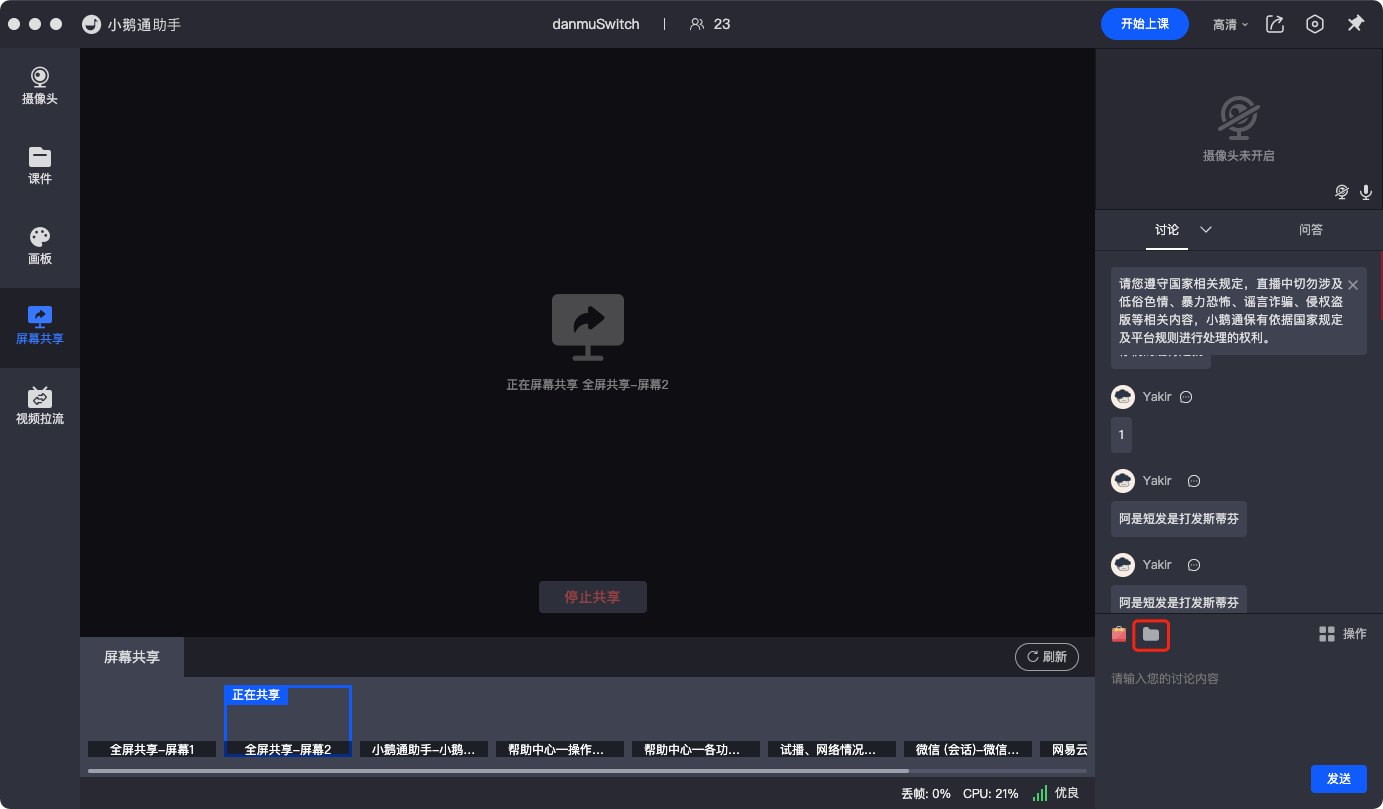
(elink Assistant Client Instructor's End)
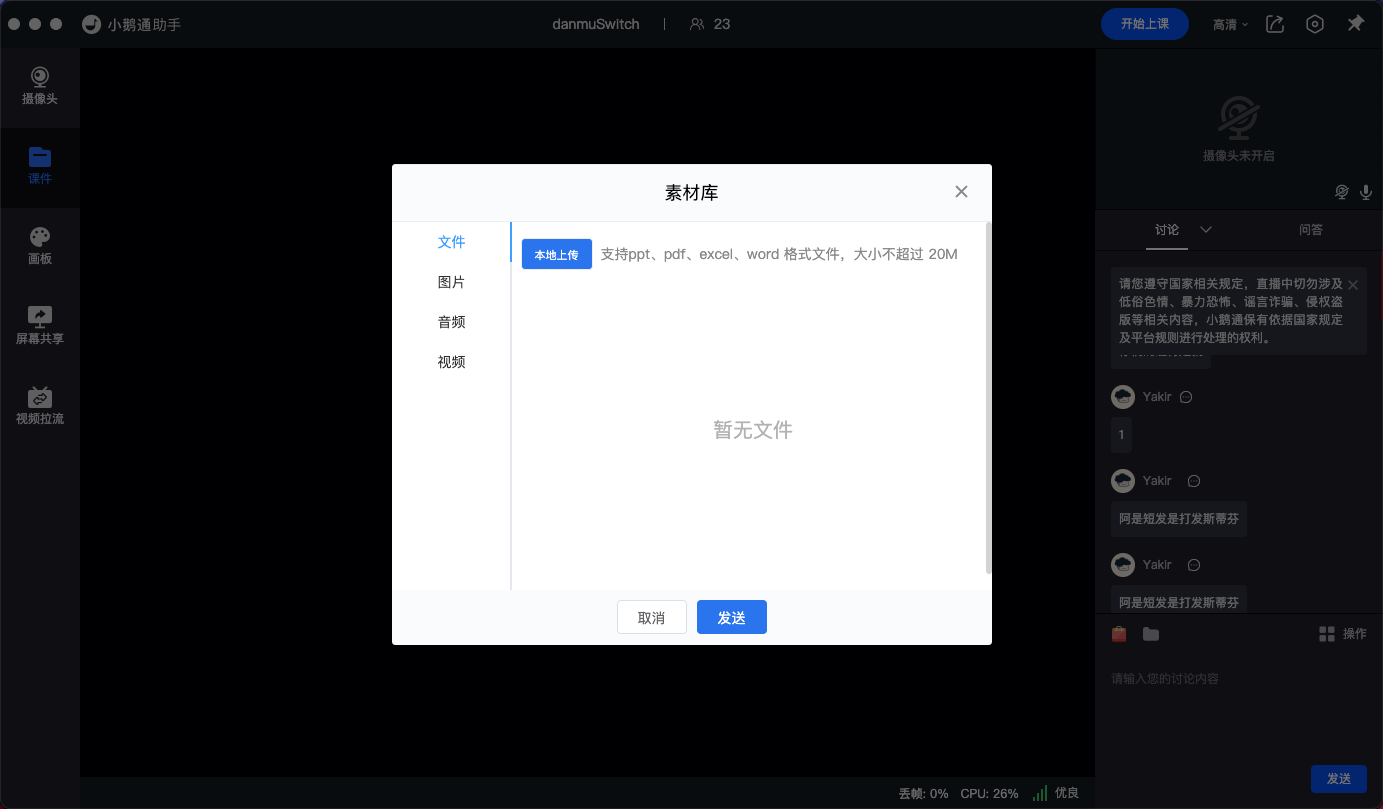
(elink Assistant Client Instructor's End)
3. Instructors enter the web - based instructor's end and open the material library to upload courseware.
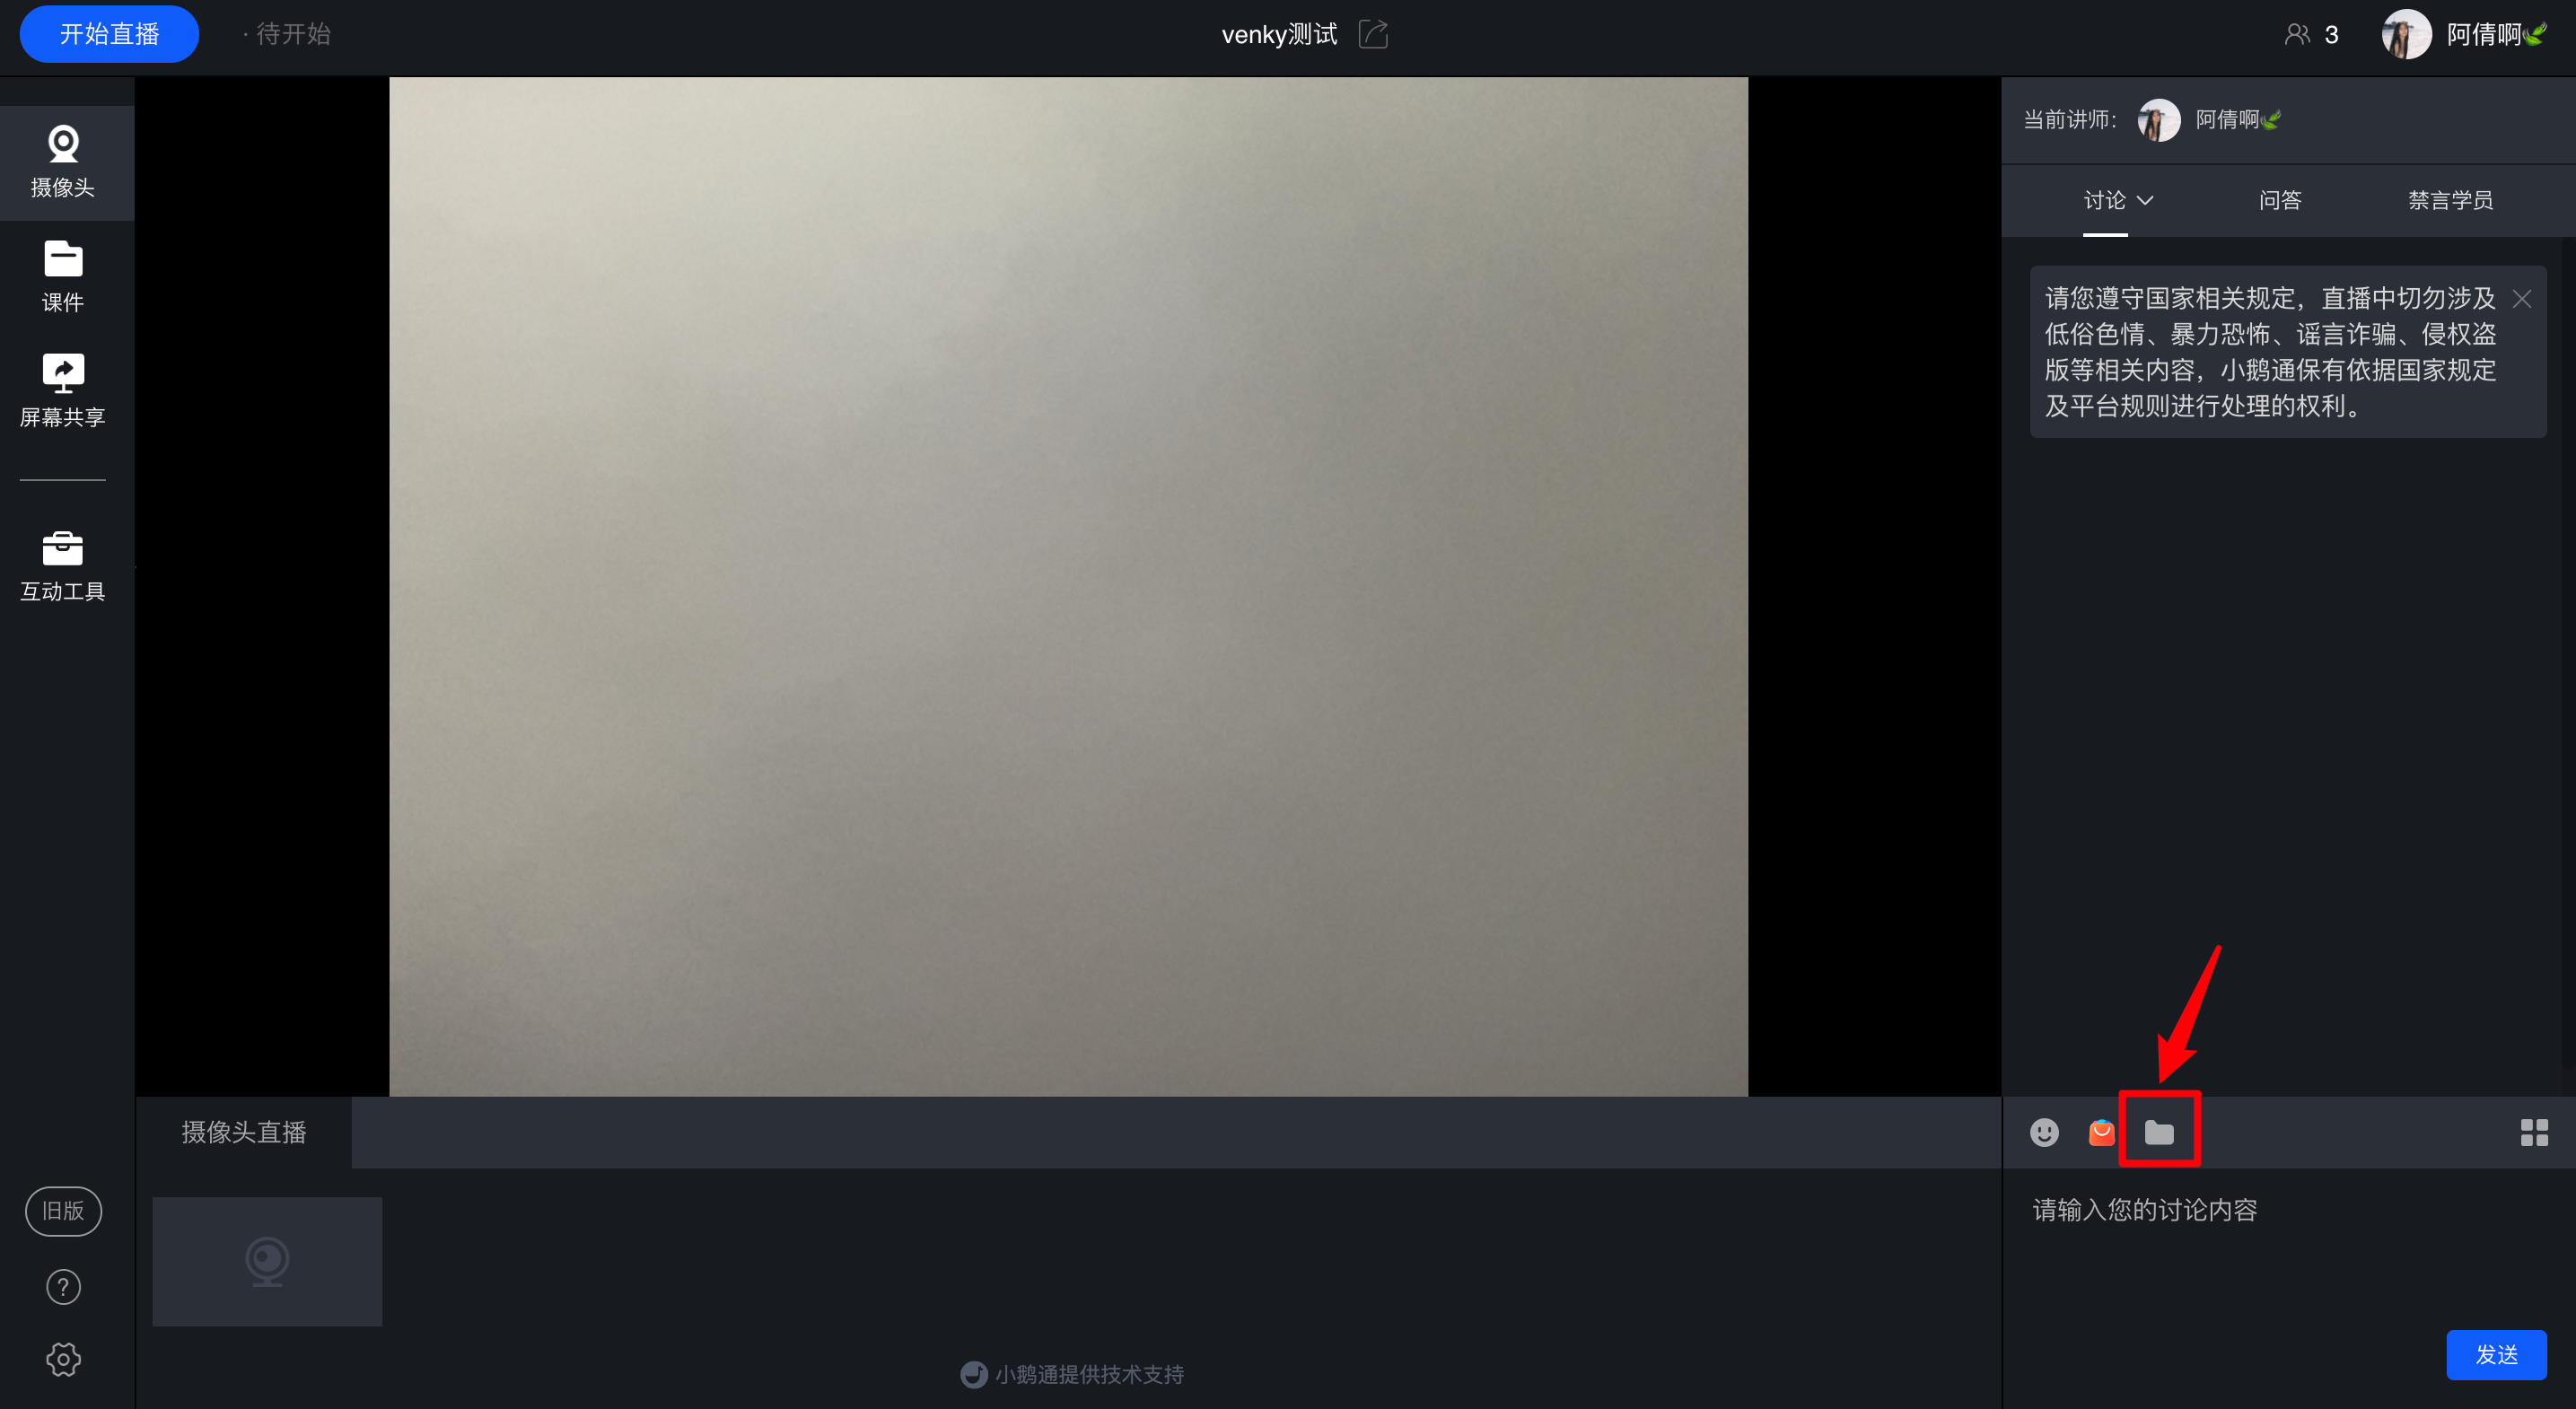
(Web - based Instructor's End)
4. Instructors enter the H5 instructor's end and open the material library to upload courseware (only Android phones are supported for courseware upload).
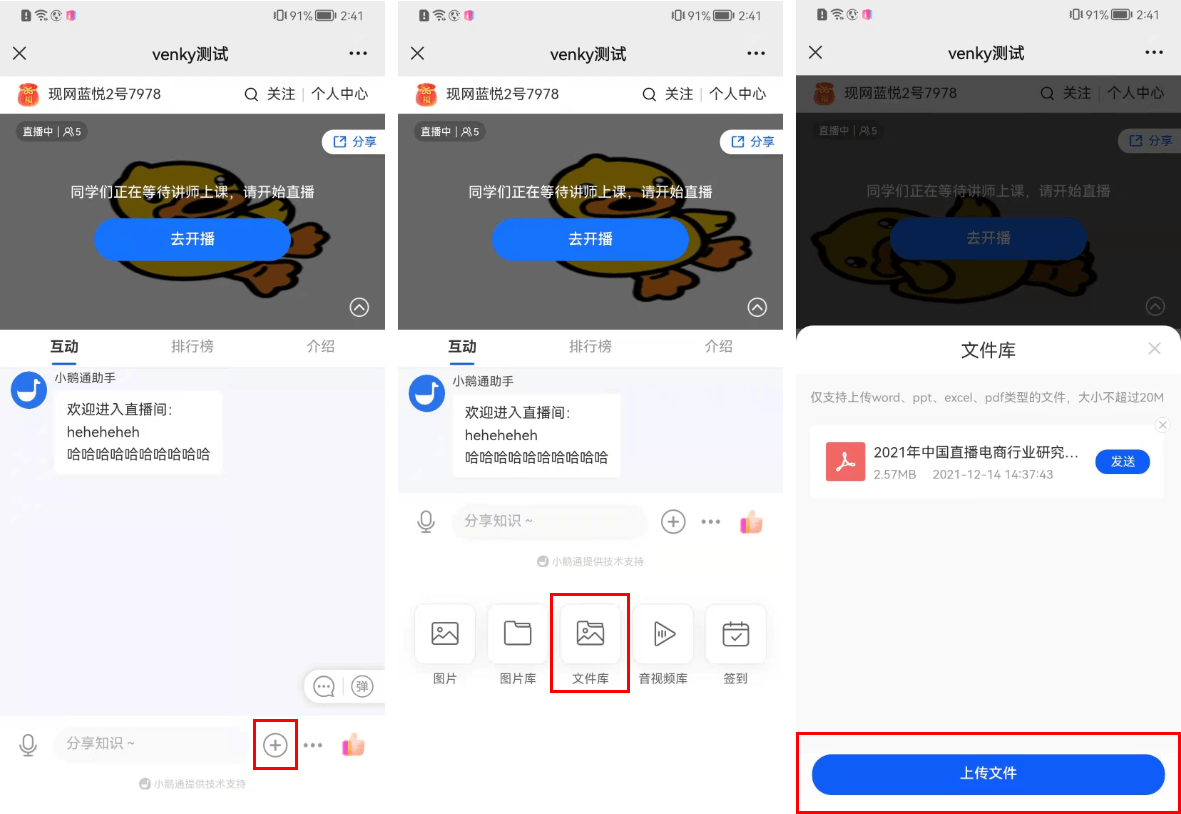
(H5 Instructor's End)
Step 2: Students Download Courseware (Web Version/H5 Student's End)
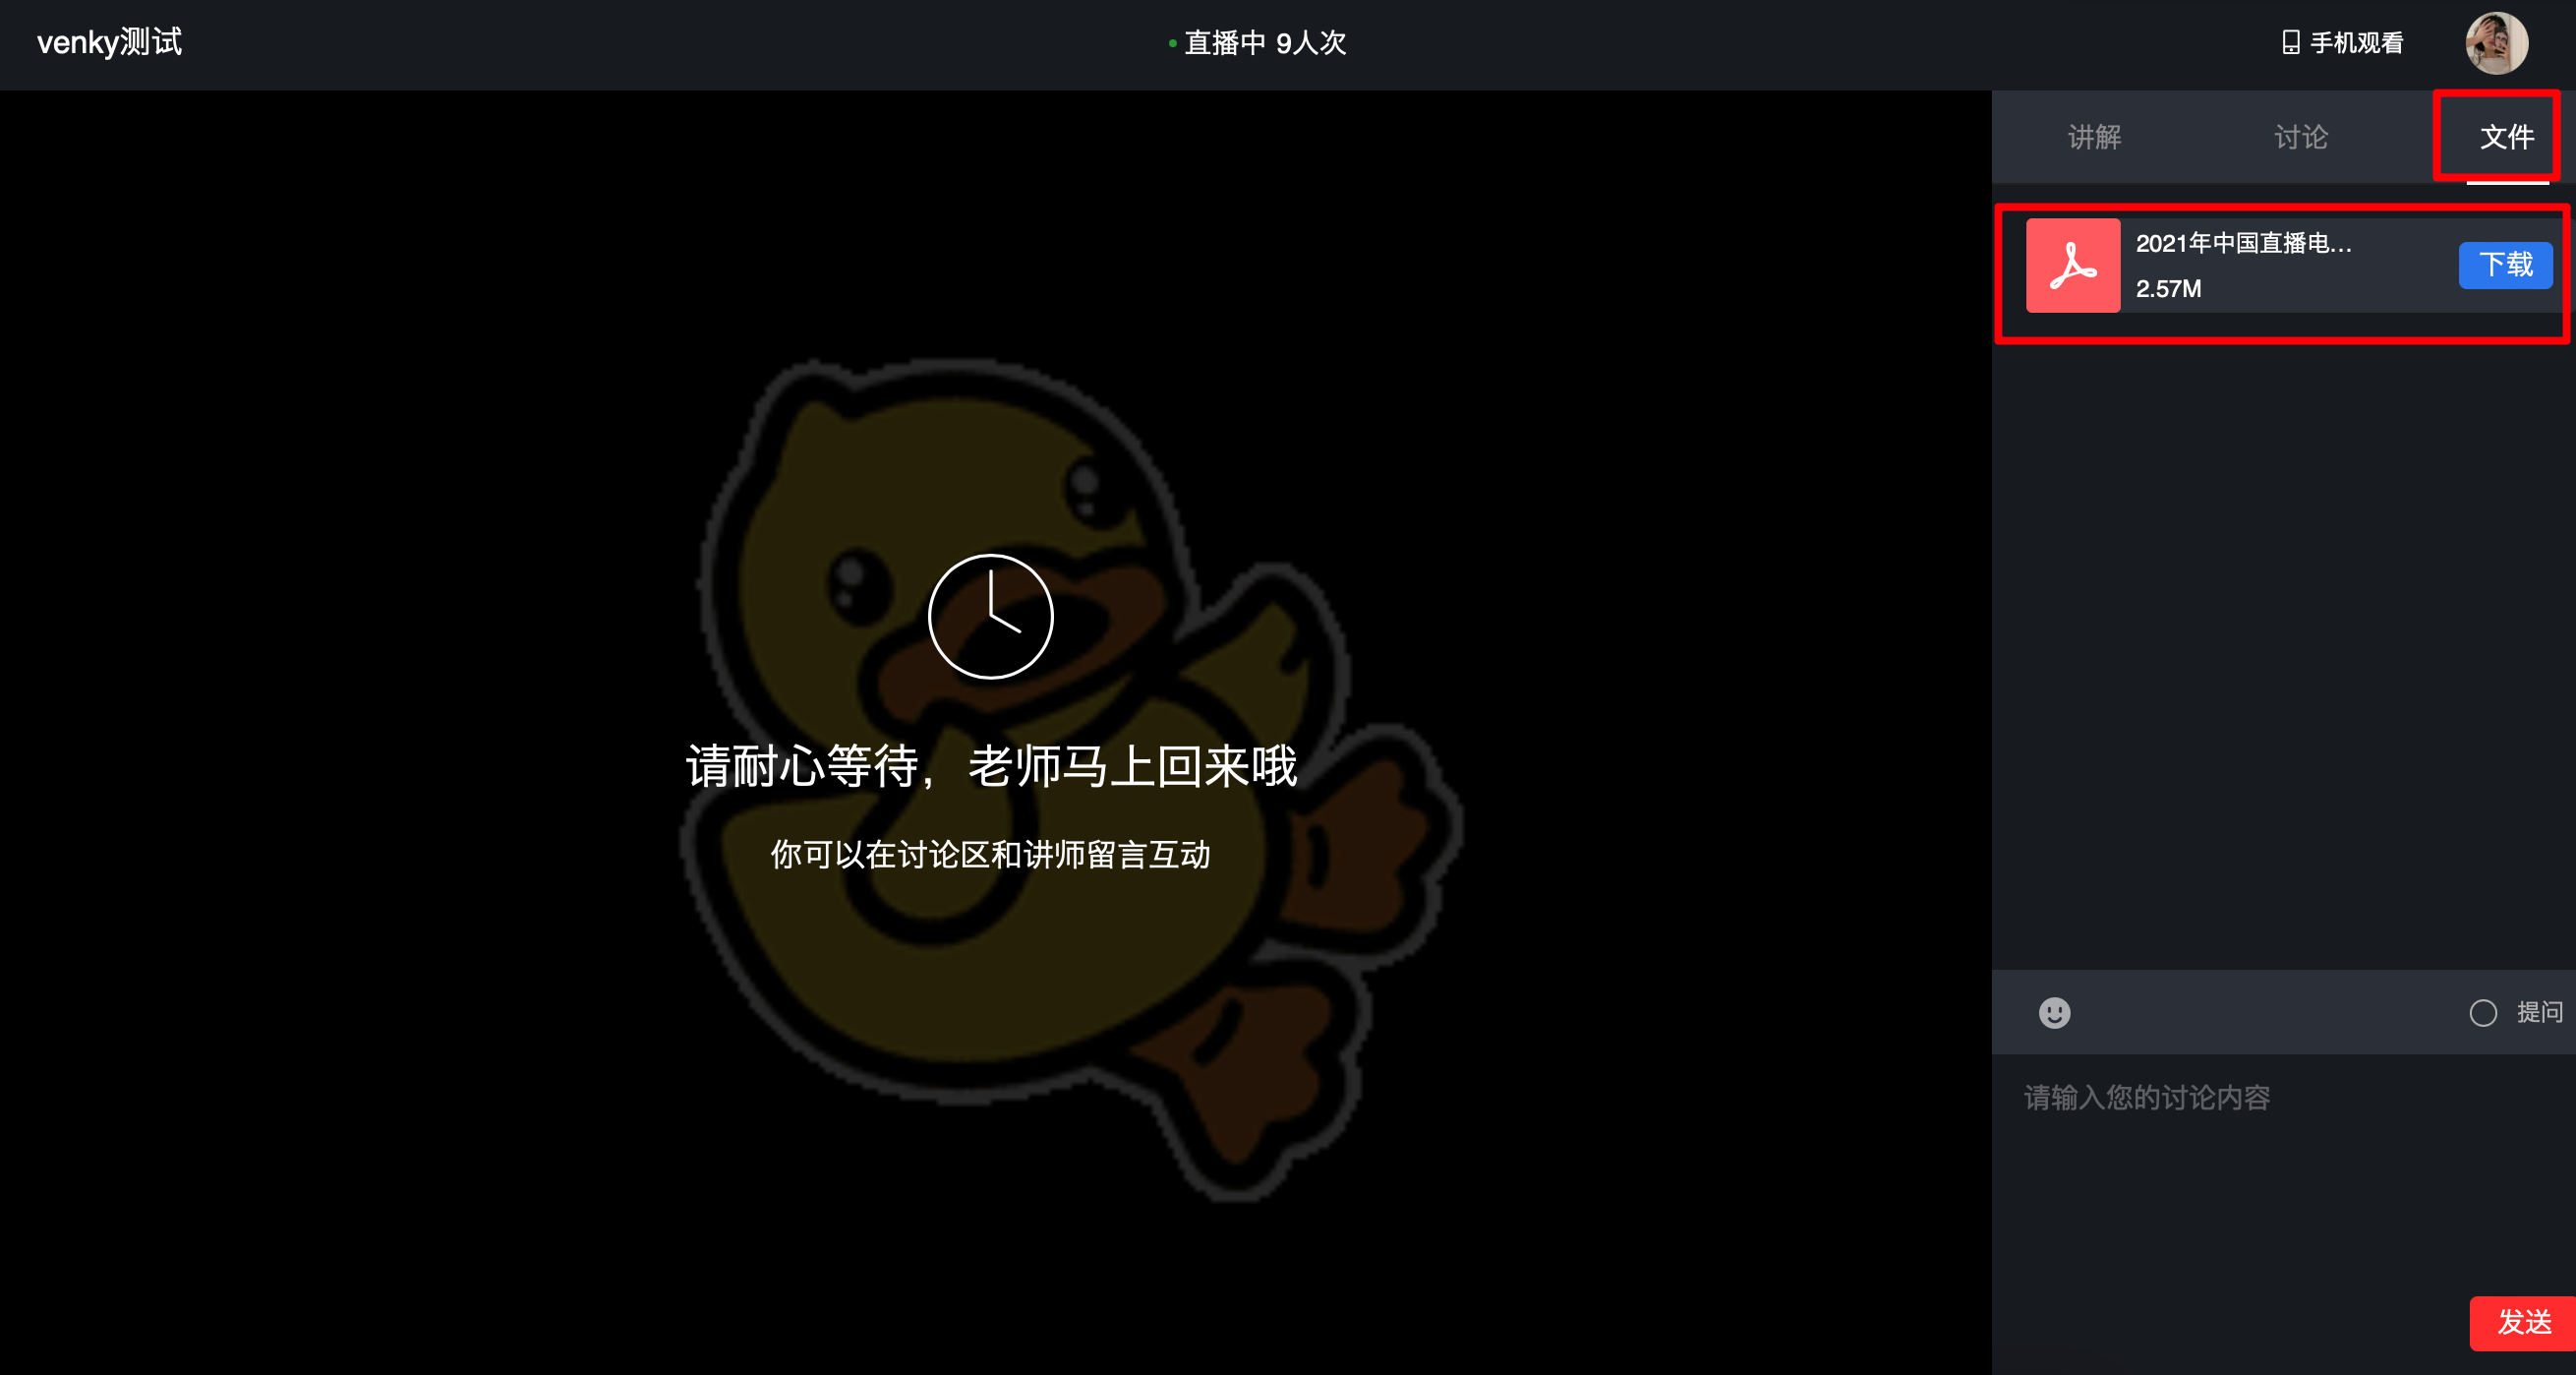
1. Download courseware on the H5 student's end:Find the shared files in the live room, enter the shared file page, click to download. You can preview the current courseware content. Copy the link and open it in the browser on your phone or computer to directly download the courseware.
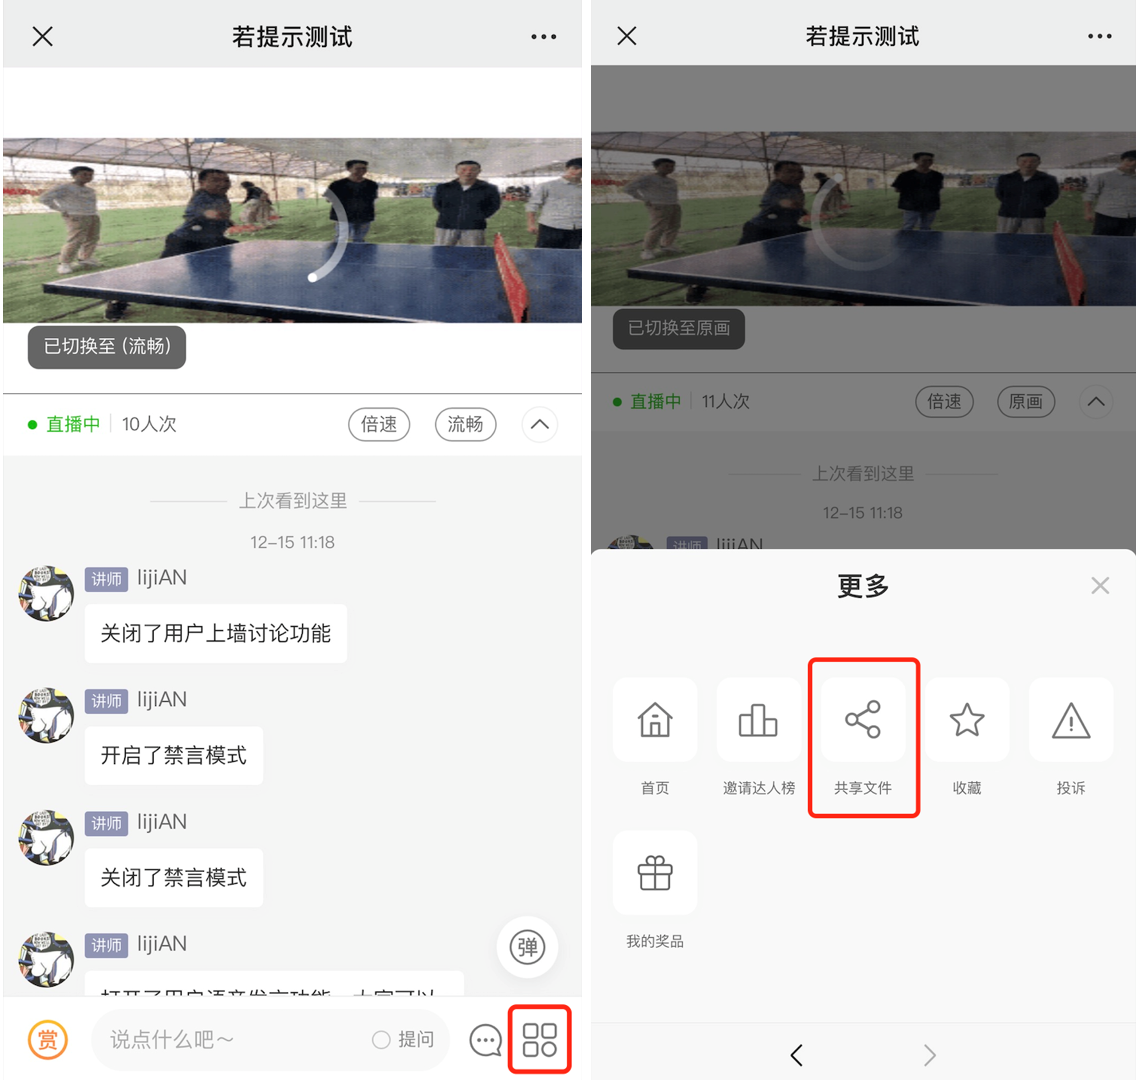
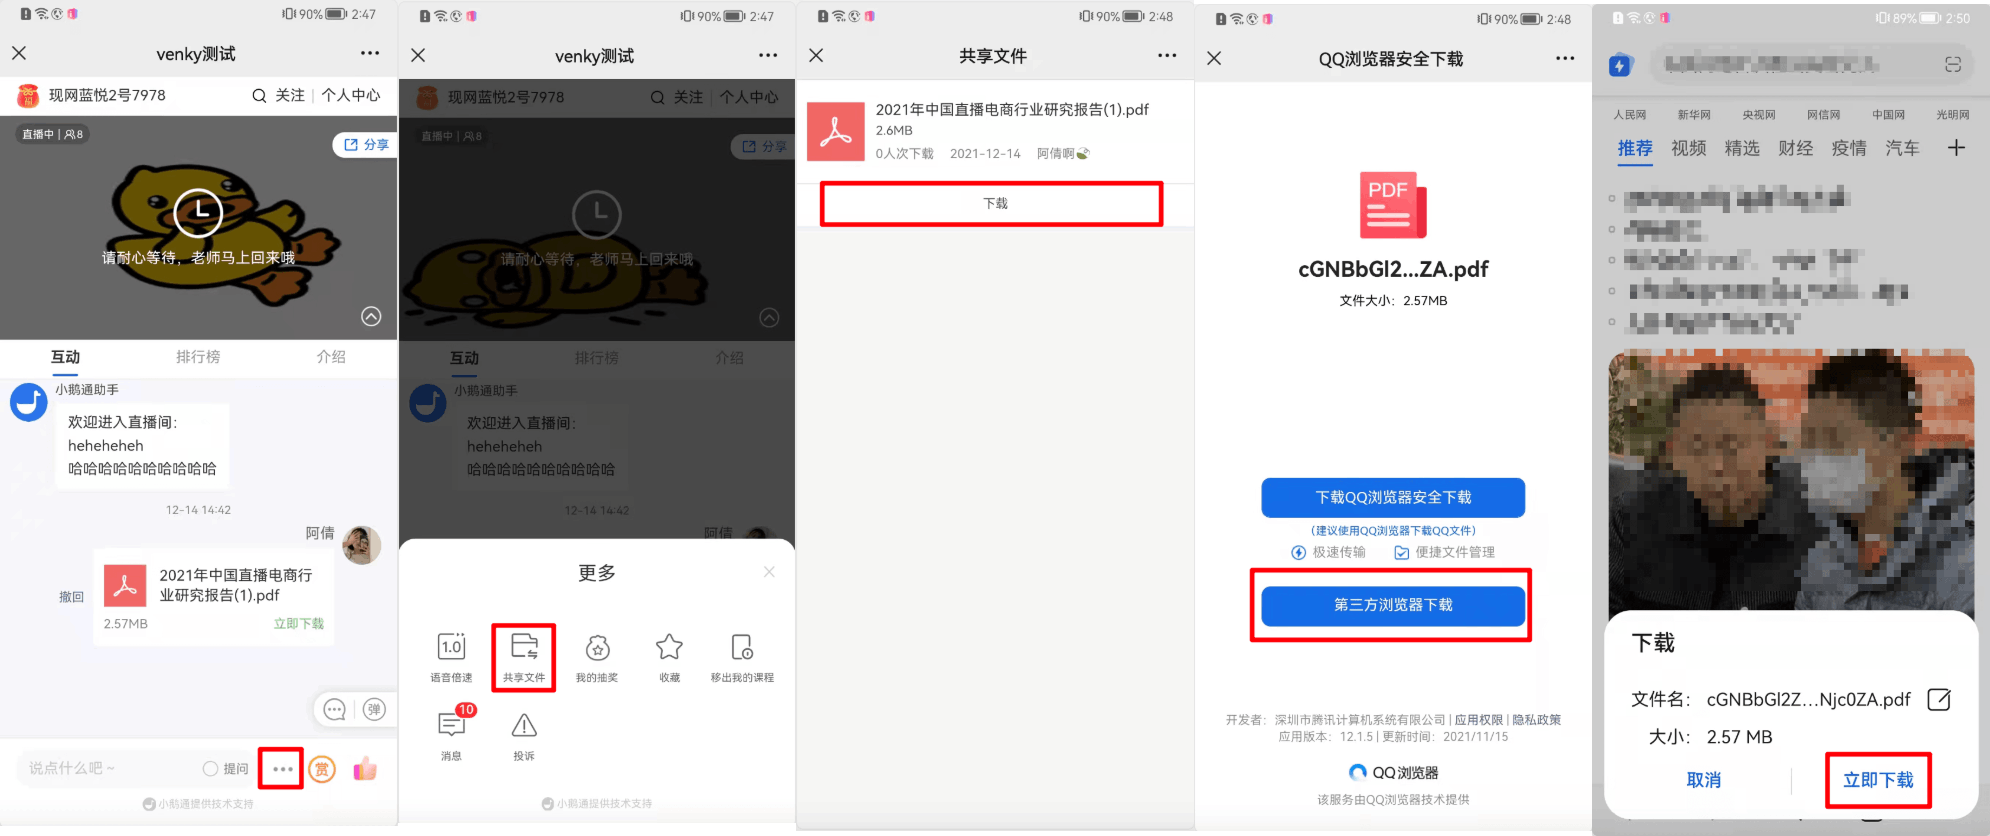
(H5 Student's End - Shared Files)
2. Download courseware on the web - based student's end:Find the shared file area on the web - based student's end, locate the file you want to download, and click to download the corresponding courseware.
Tutorial on Manual Transcoding for Live Streaming
I. Feature Introduction
The manual transcoding feature is specifically designed forSingle - session cumulativeLive streaming scenarios where the duration exceeds five hours.For such scenarios, merchants can not only significantly improve the transcoding success rate and reduce transcoding time through manual transcoding but also more easily manage and edit long - term and multiple live replay videos.
II. Purpose of Use
Significantly improve the transcoding success rate and reduce the transcoding time, saving a great deal of time for merchants.
III. Usage Scenarios
After a user finishes a live stream that lasts more than five hours or the cumulative duration of a live stream exceeds five hours, they may encounter problems such as excessively long transcoding time and possible transcoding failures. After the live stream ends, users can enter the management console's replay management, select the replay file that needs to be transcoded, and perform manual transcoding. This can significantly improve the transcoding success rate and reduce the time consumed compared to automatic transcoding.
IV. Operation Path
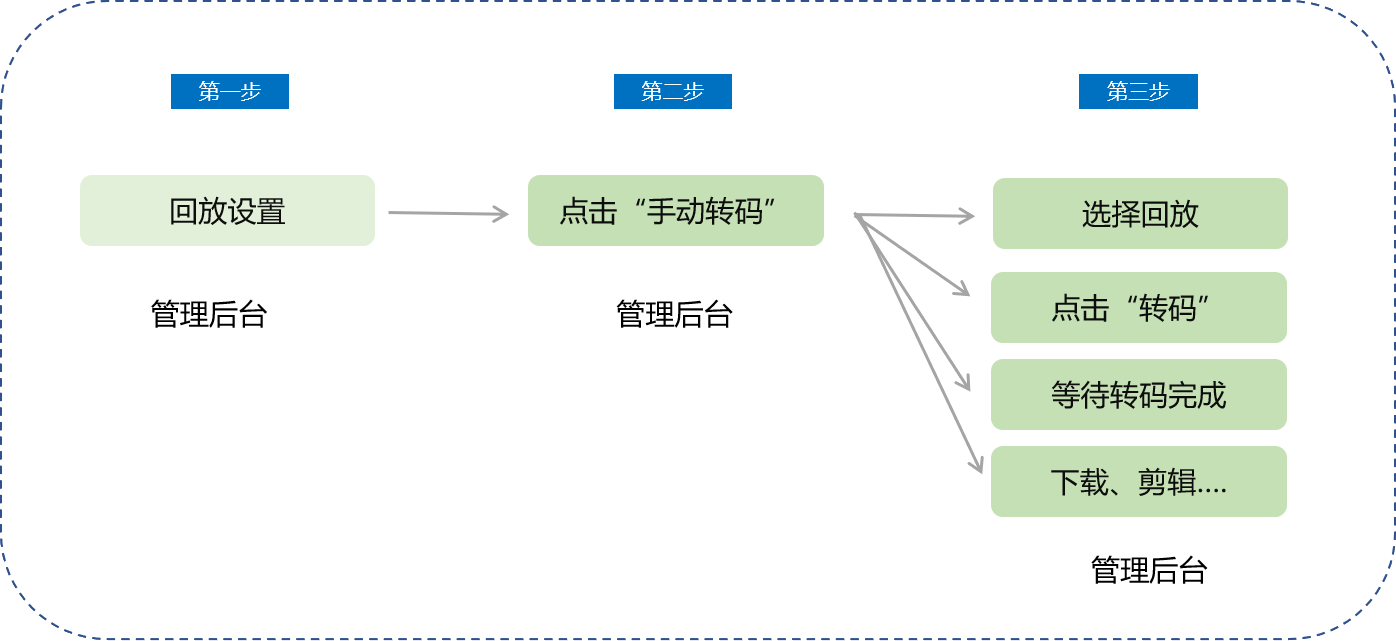
Merchant side: Merchant background → Live streaming → Select the live - streaming room → Replay settings → Manual transcoding
V. Usage Tutorial
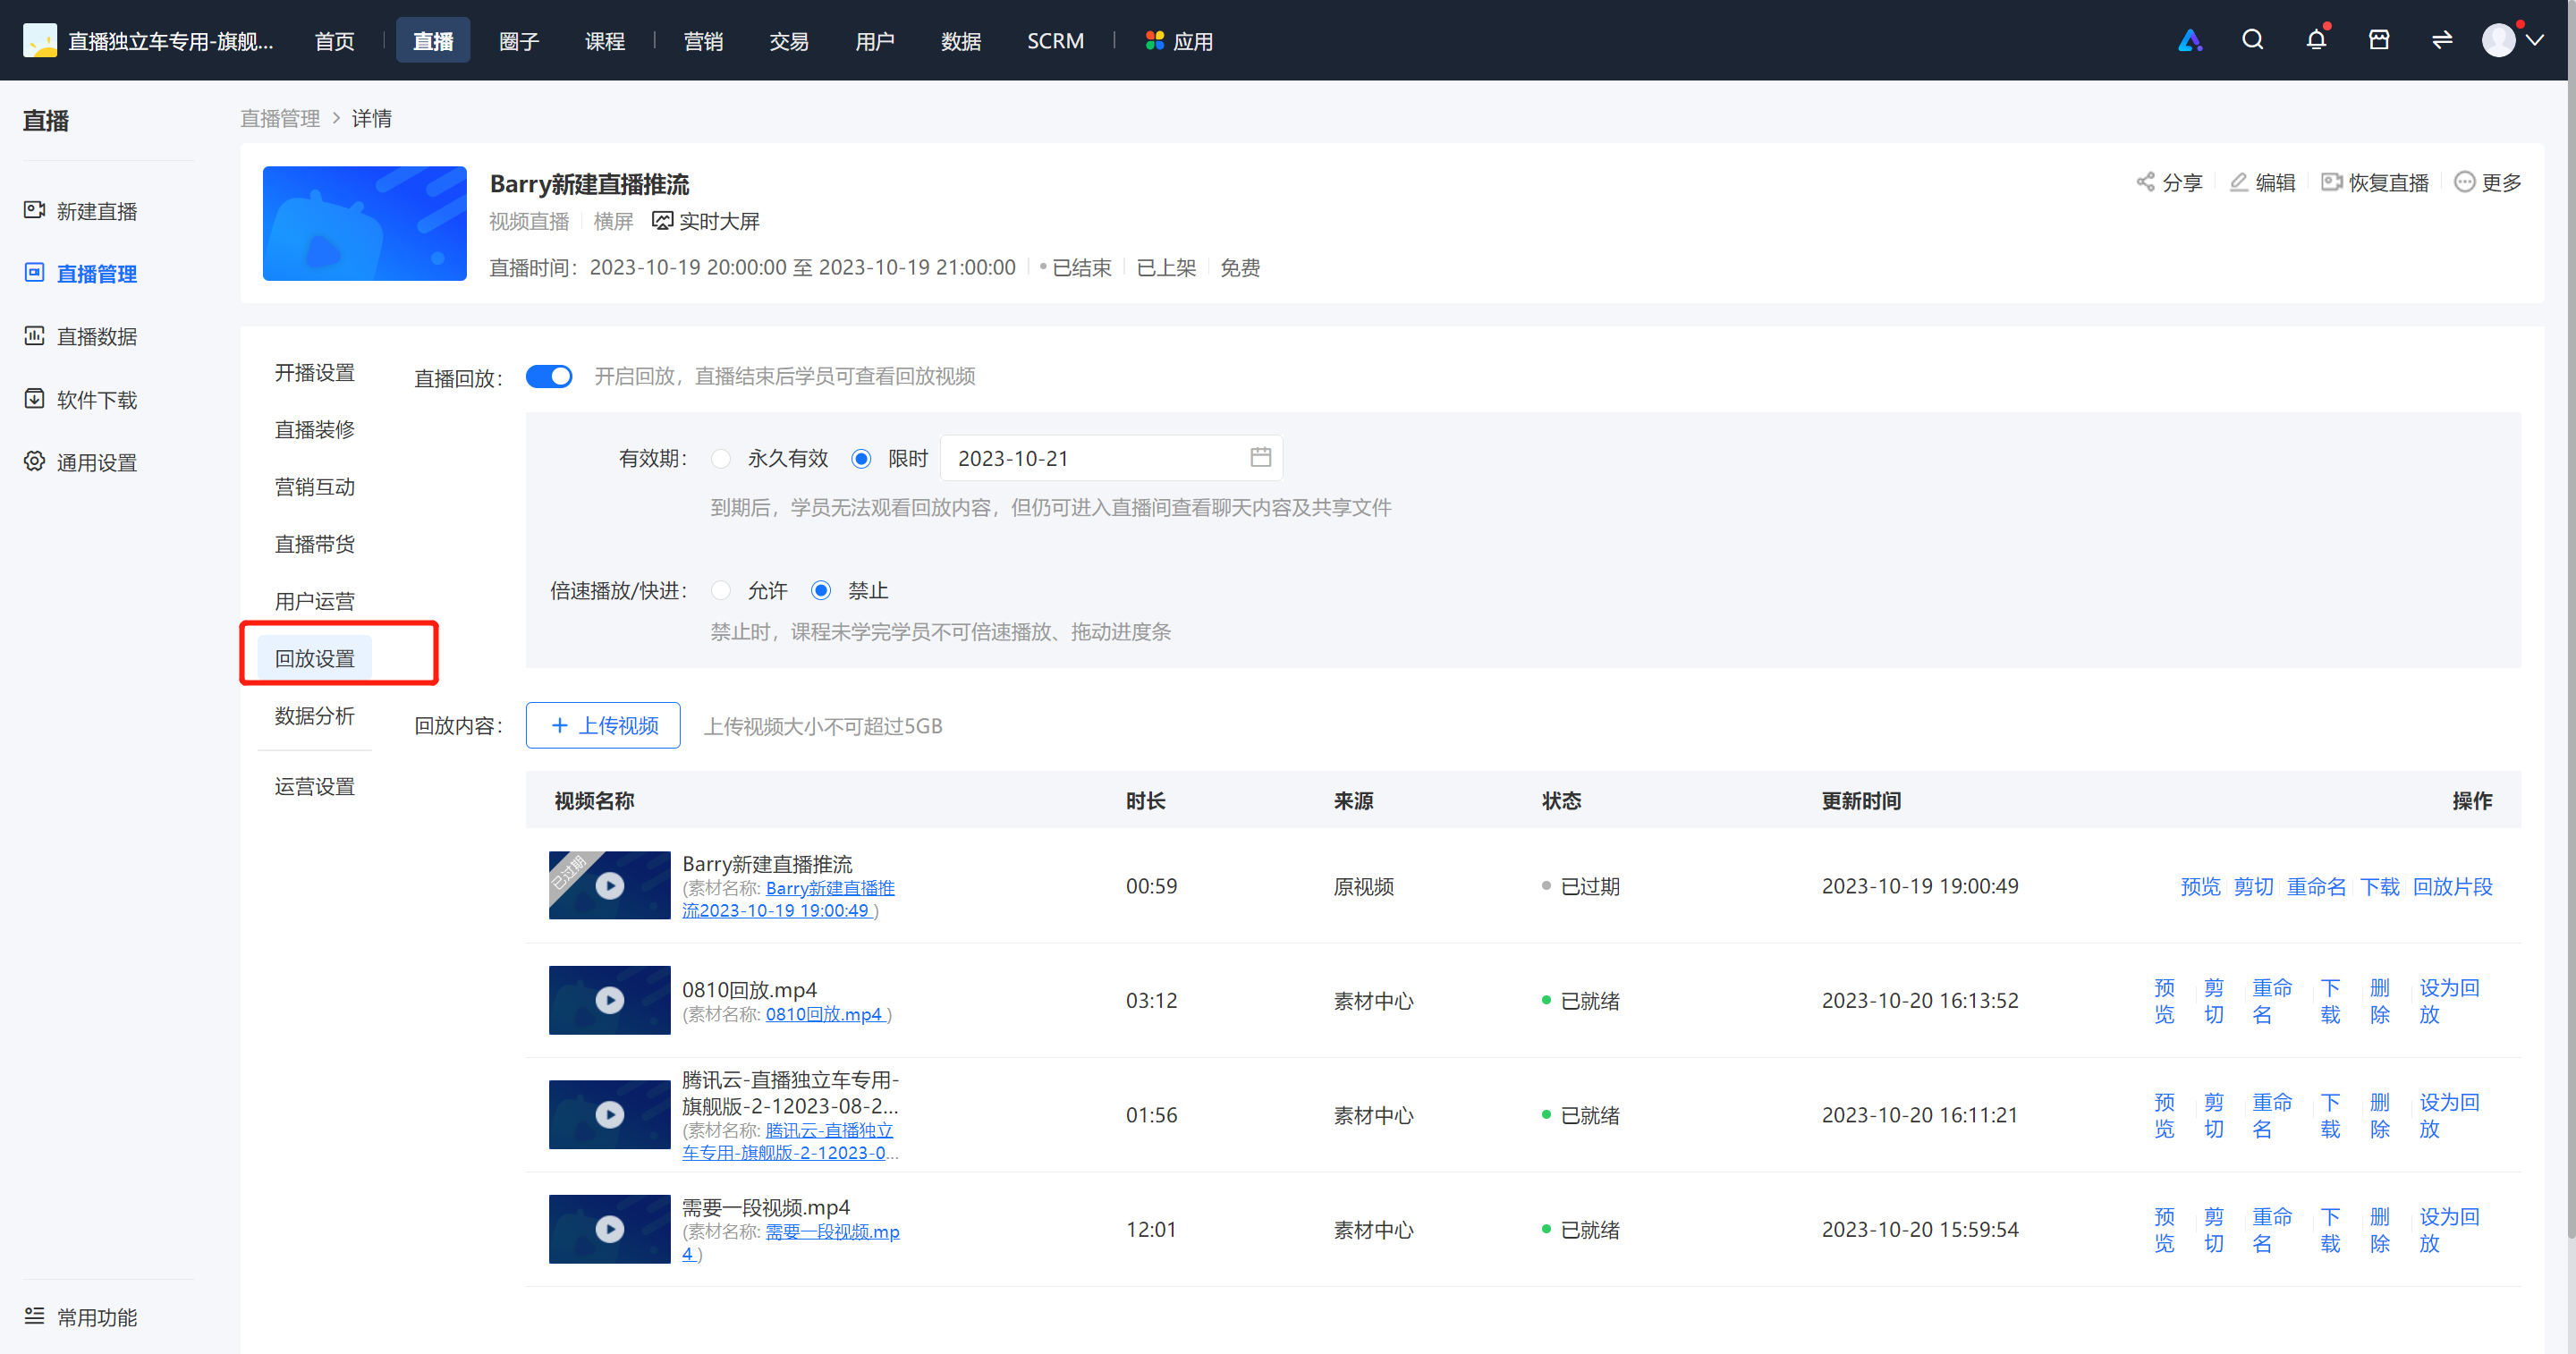
Step 1: Replay settings (Management background)
Enter the merchant management background, click to enter the live - streaming section, find the corresponding live stream, and click [Details] - [Replay settings].
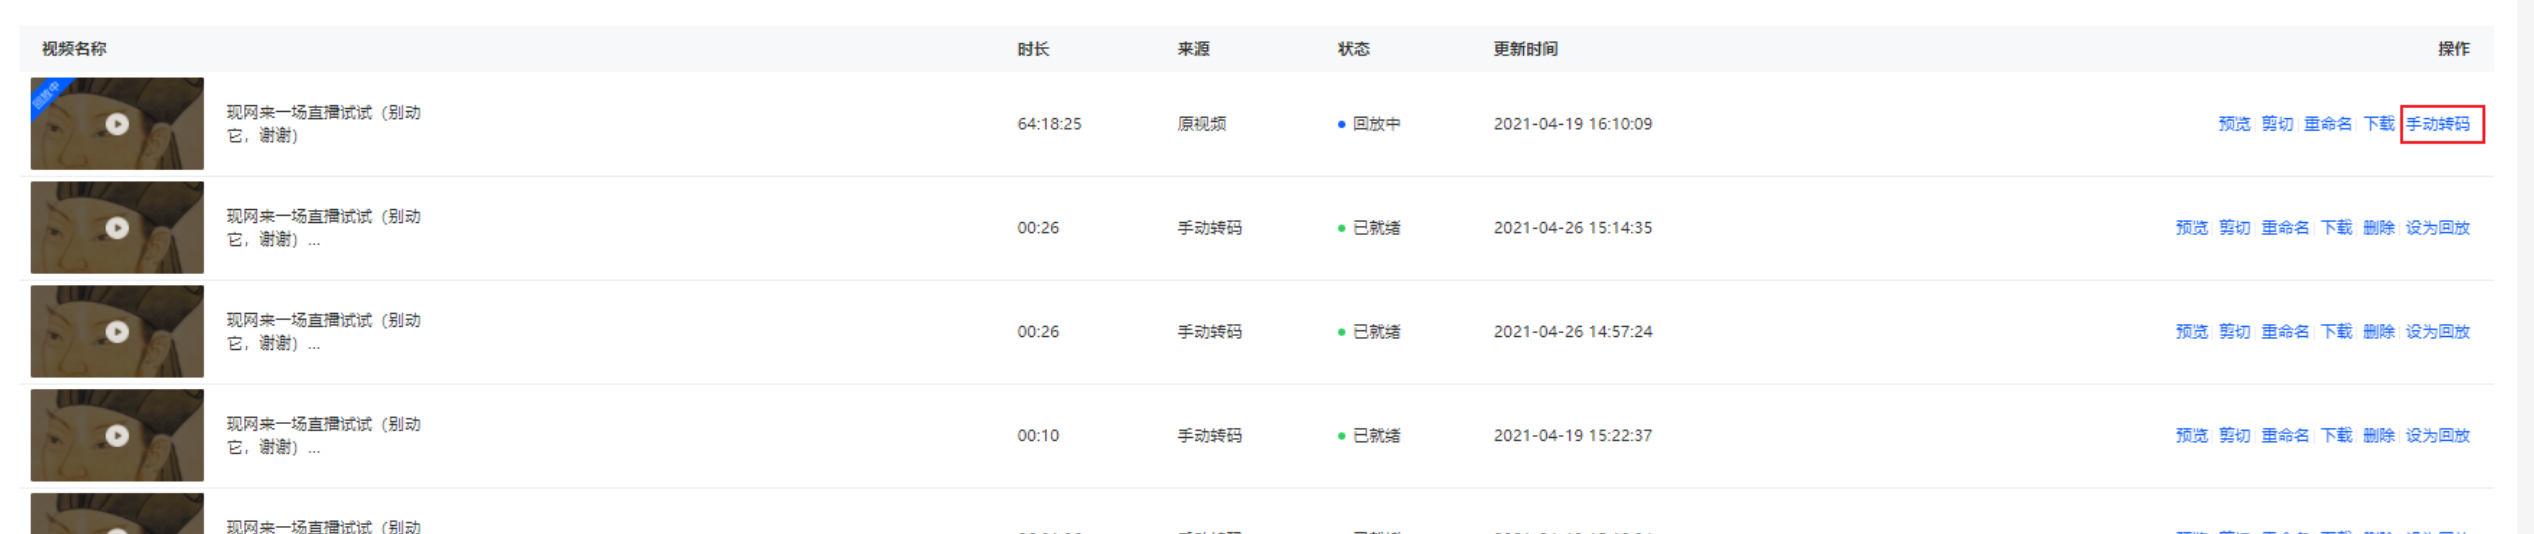
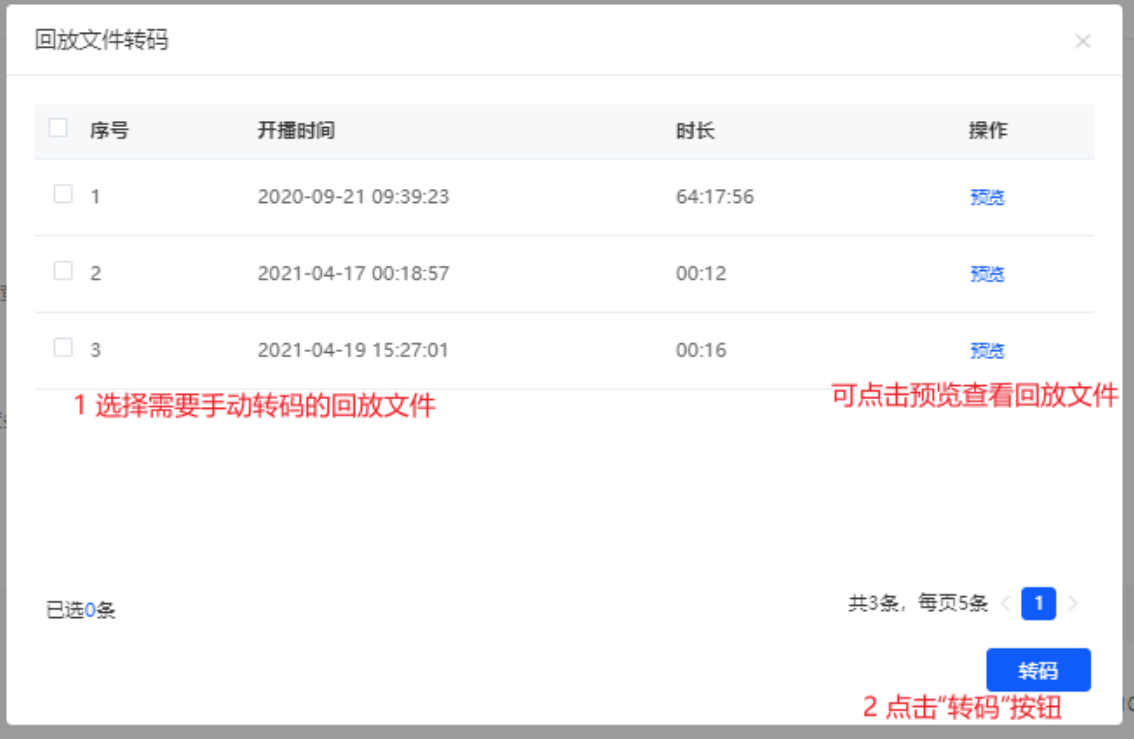
Step 2: Click Manual TranscodingSelect the file that needs to be transcoded and click [Transcode].(Management background)
**Note:The [Manual Transcoding] button will only be displayed when the cumulative duration of this live stream exceeds 5 hours.
Step 3: Select the replay
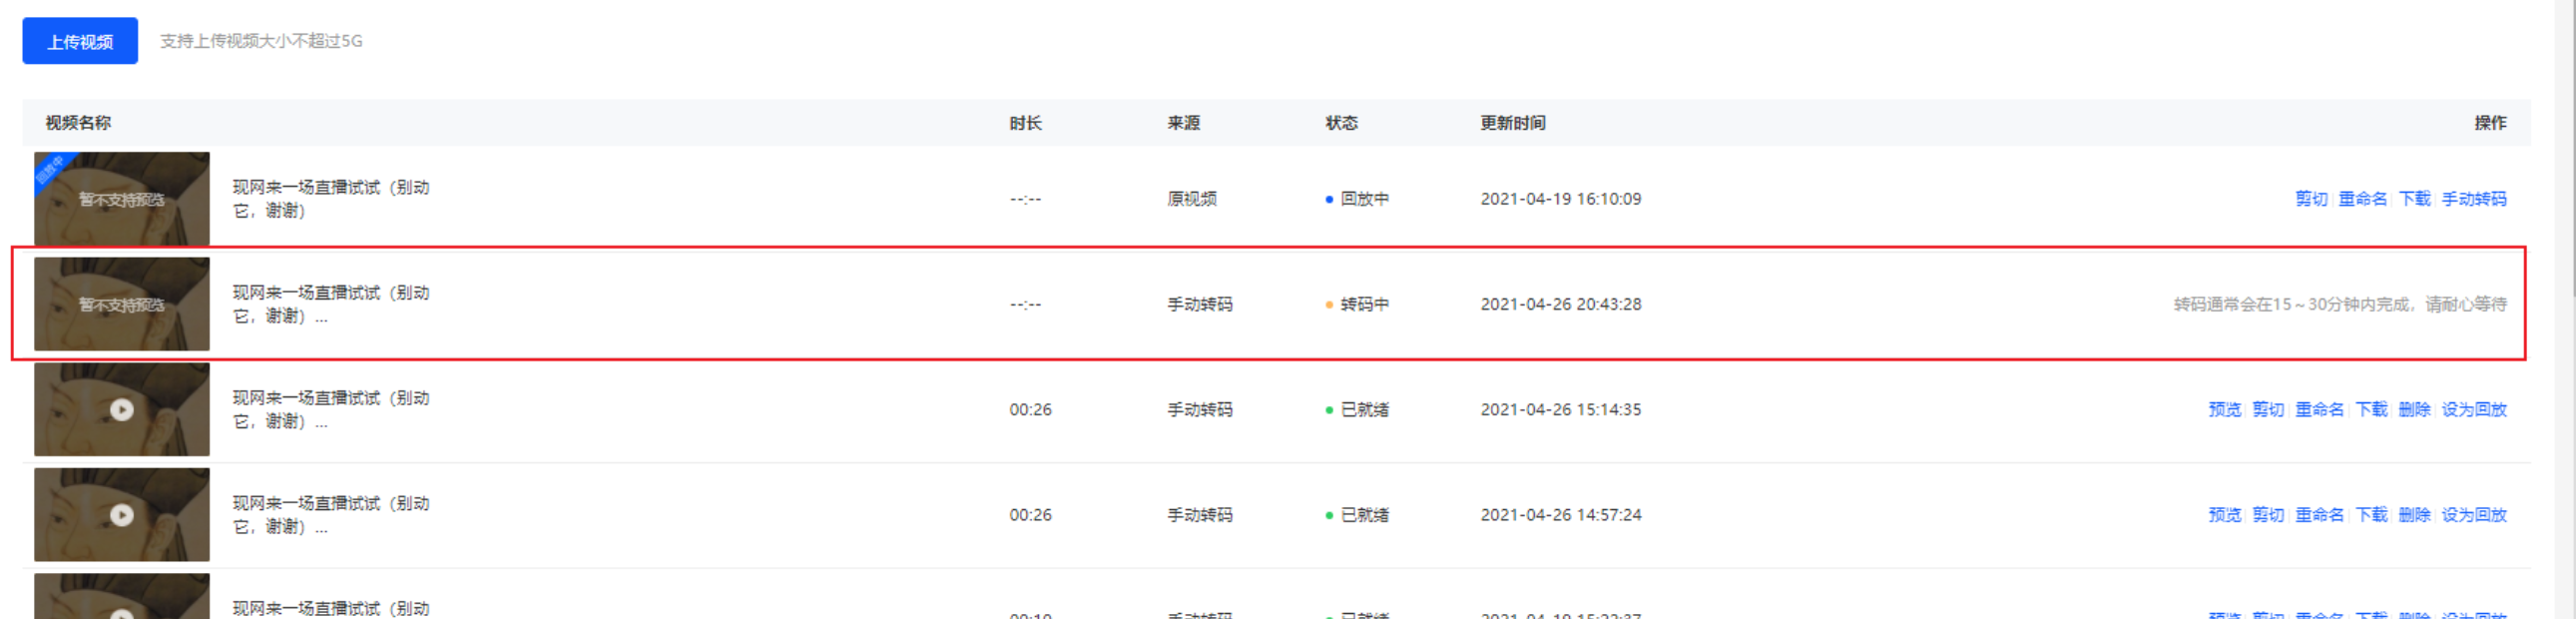
A new transcoding record will be added to the replay video list. After the transcoding is successful, a series of operations such as editing can be performed.
English version live streaming room usage tutorial
I. Function Introduction
To enhance the live streaming and viewing experience for overseas instructors and students, the live streaming room supports switching to the English version. After overseas instructors start a live stream in English on the client, they can interact with students in the live streaming room without language barriers. Overseas instructors who haven't downloaded the client can also directly start a live stream using the English version of the web page. Overseas students can choose to watch the live stream in English on the H5 and web platforms.
II. Purpose of Use
To meet the live streaming needs of overseas instructors and students.
III. Use Scenarios
Scenario 1: After overseas instructors start a live stream in English on the client, the English version can help them enhance interaction with students in the live streaming room.
Scenario 2: Overseas instructors can experience starting a live stream using the English version of the web page without downloading the client.
Scenario 3: Overseas students can watch the live stream in English on the web and H5 platforms.
IV. Operation Path
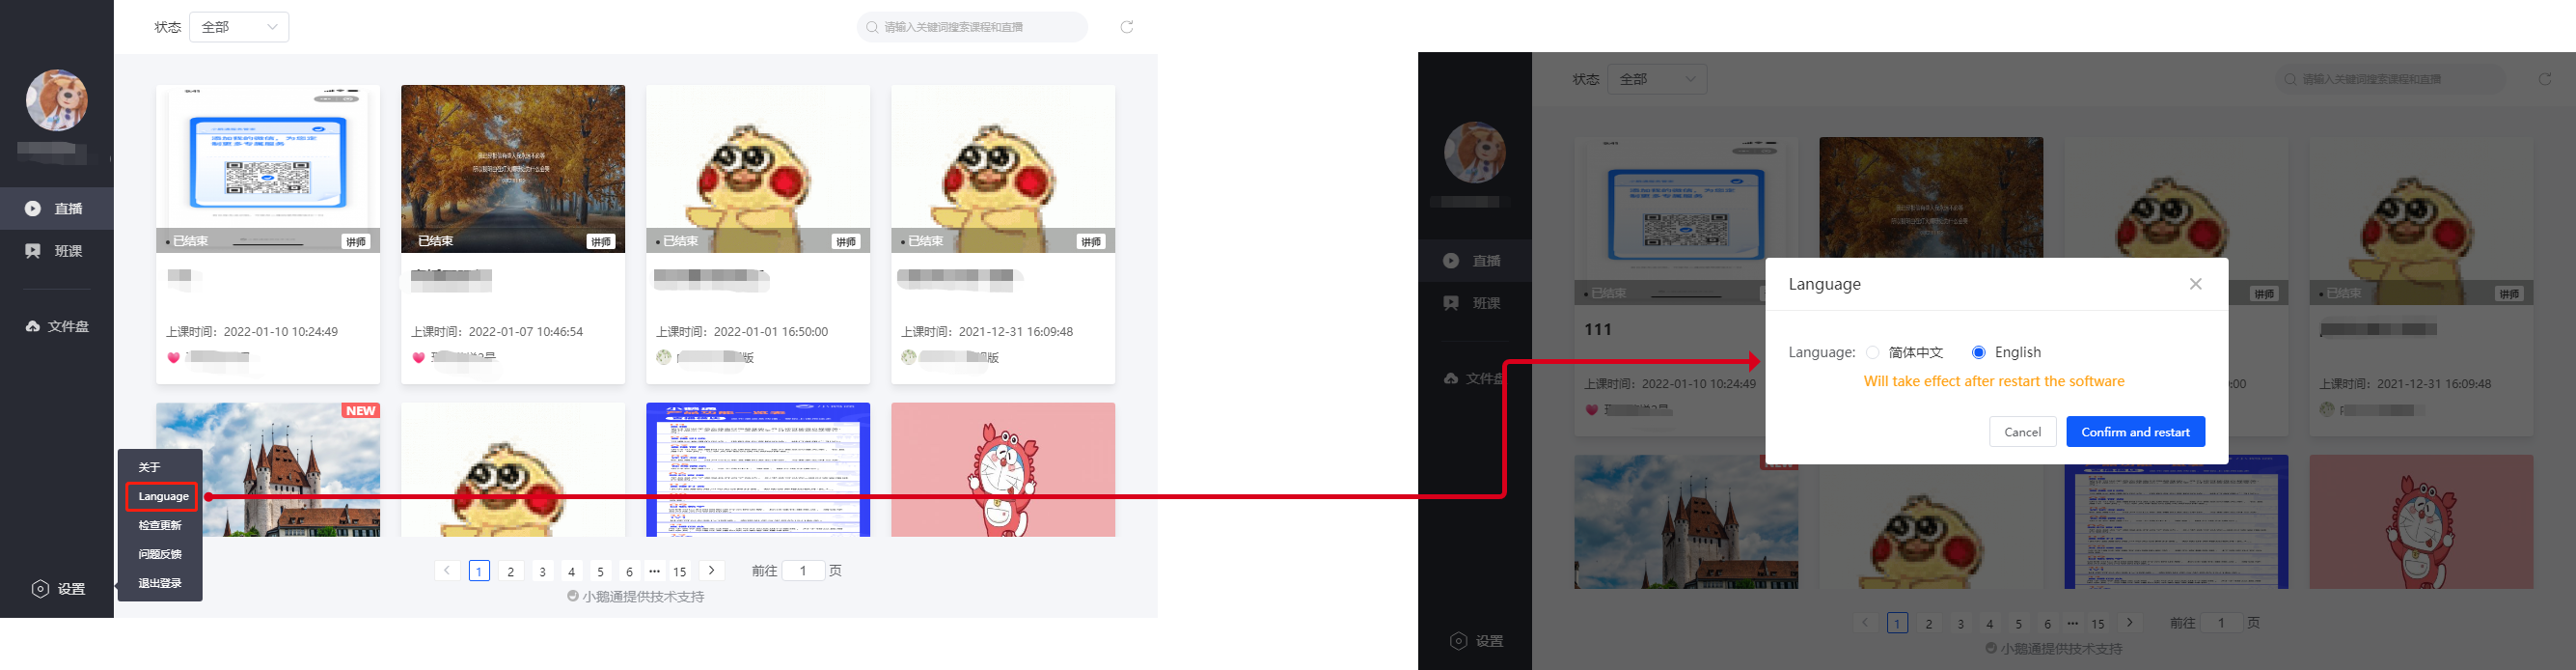
elink Assistant Client (Instructor): Settings → Switch Language → language → English
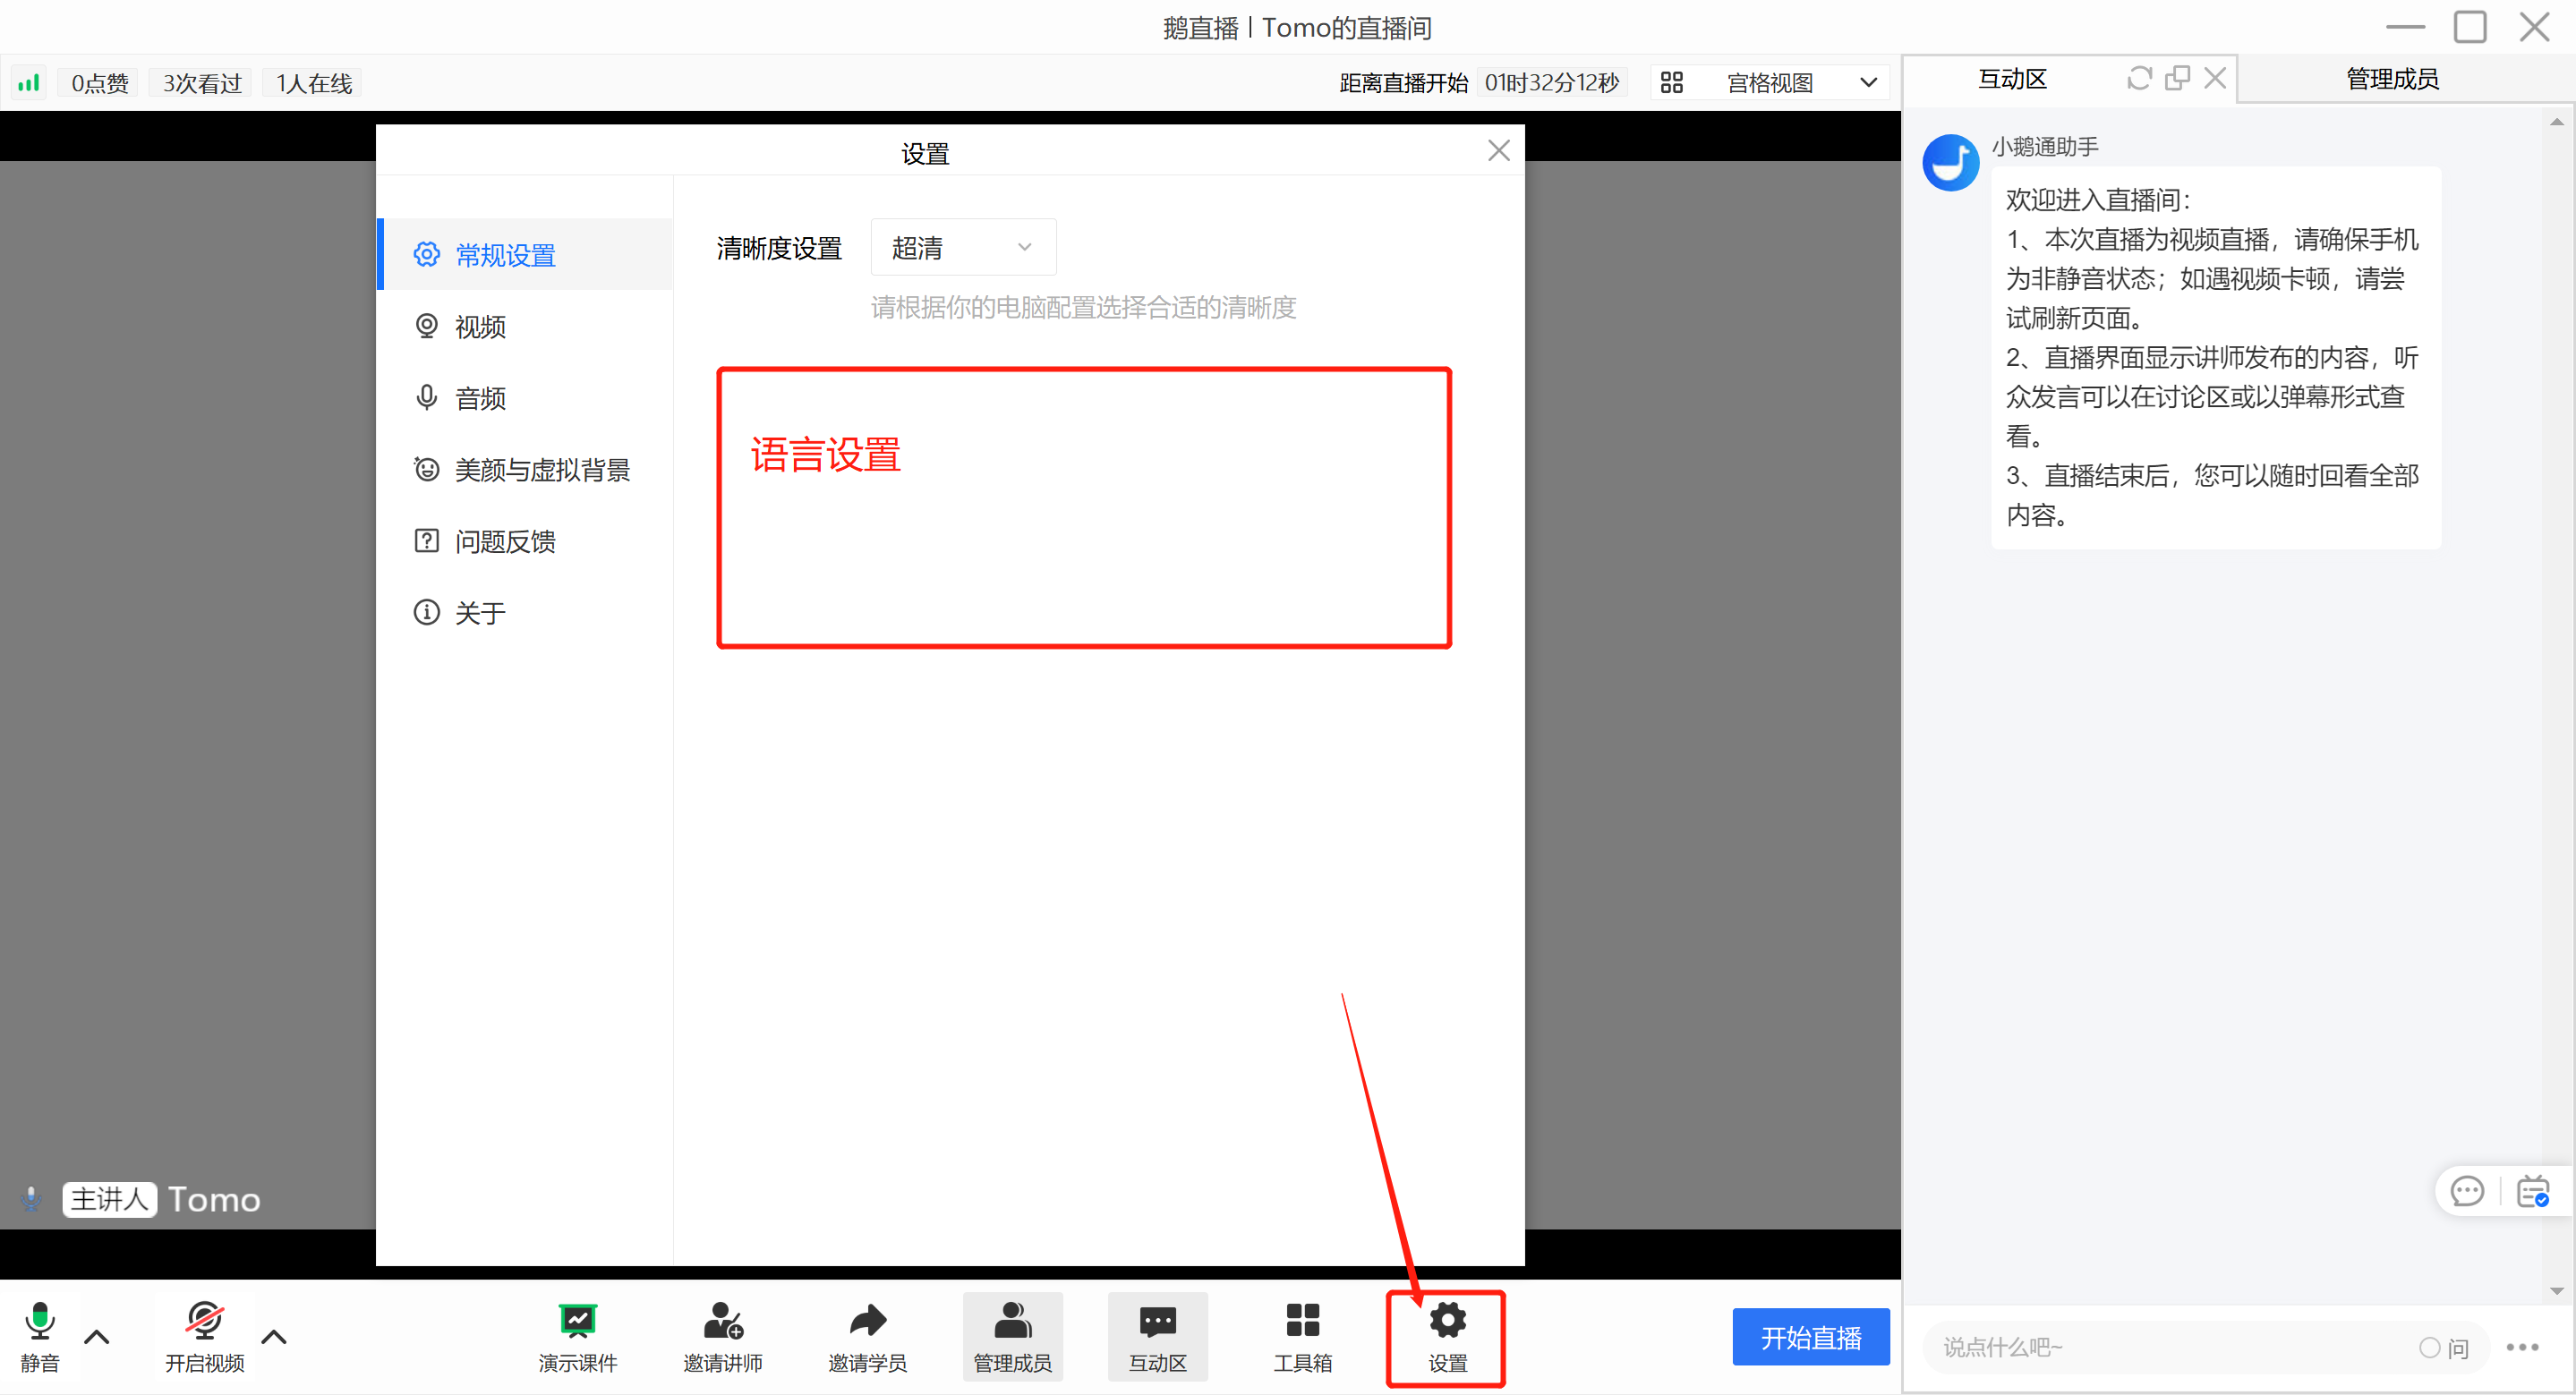
elink Live Streaming Client (Instructor): Settings → General Settings→ Switch Language → language → English
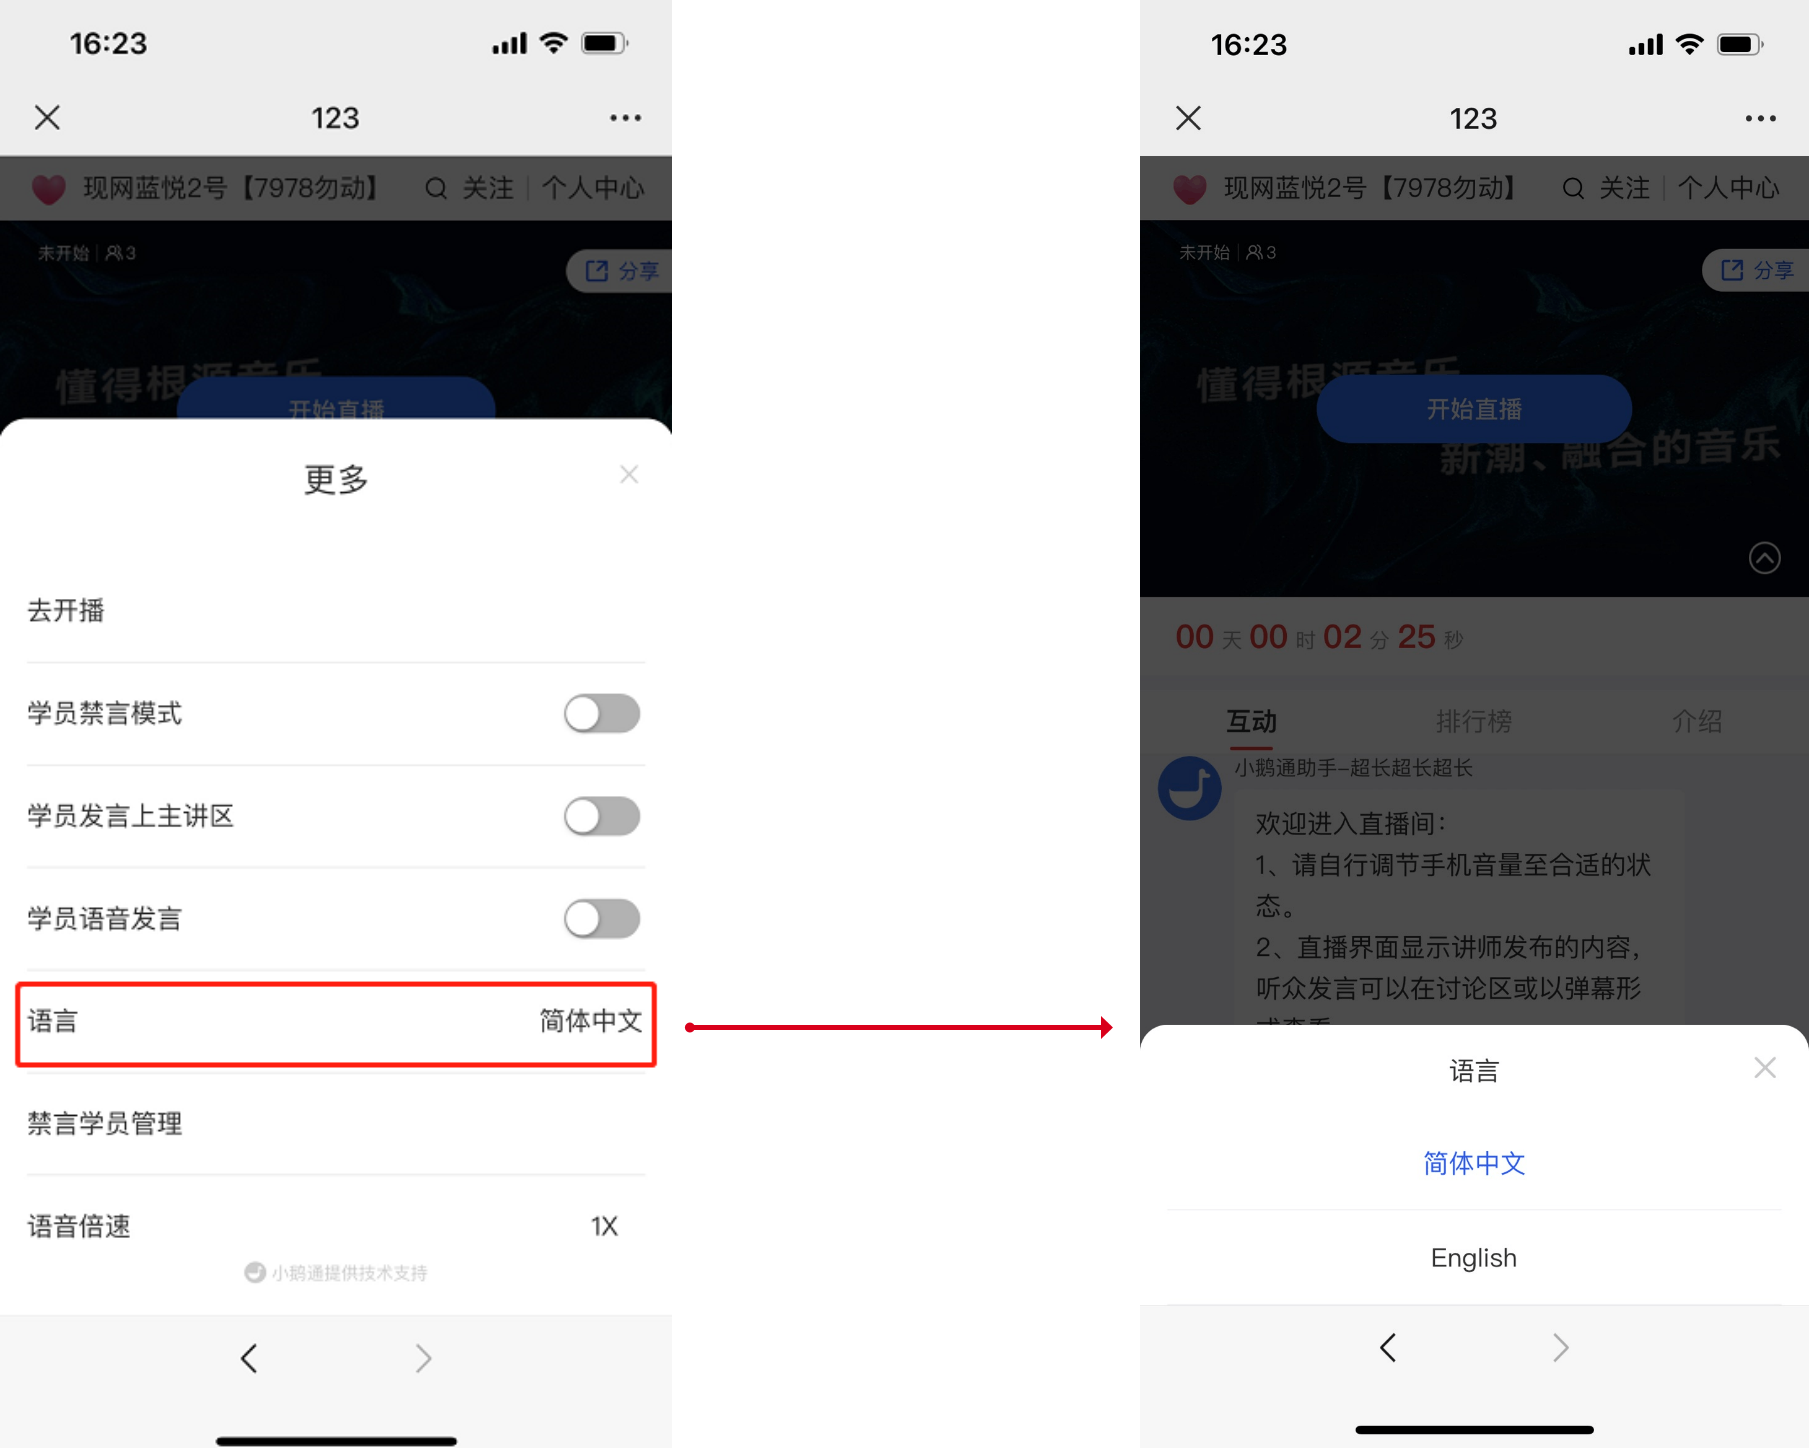
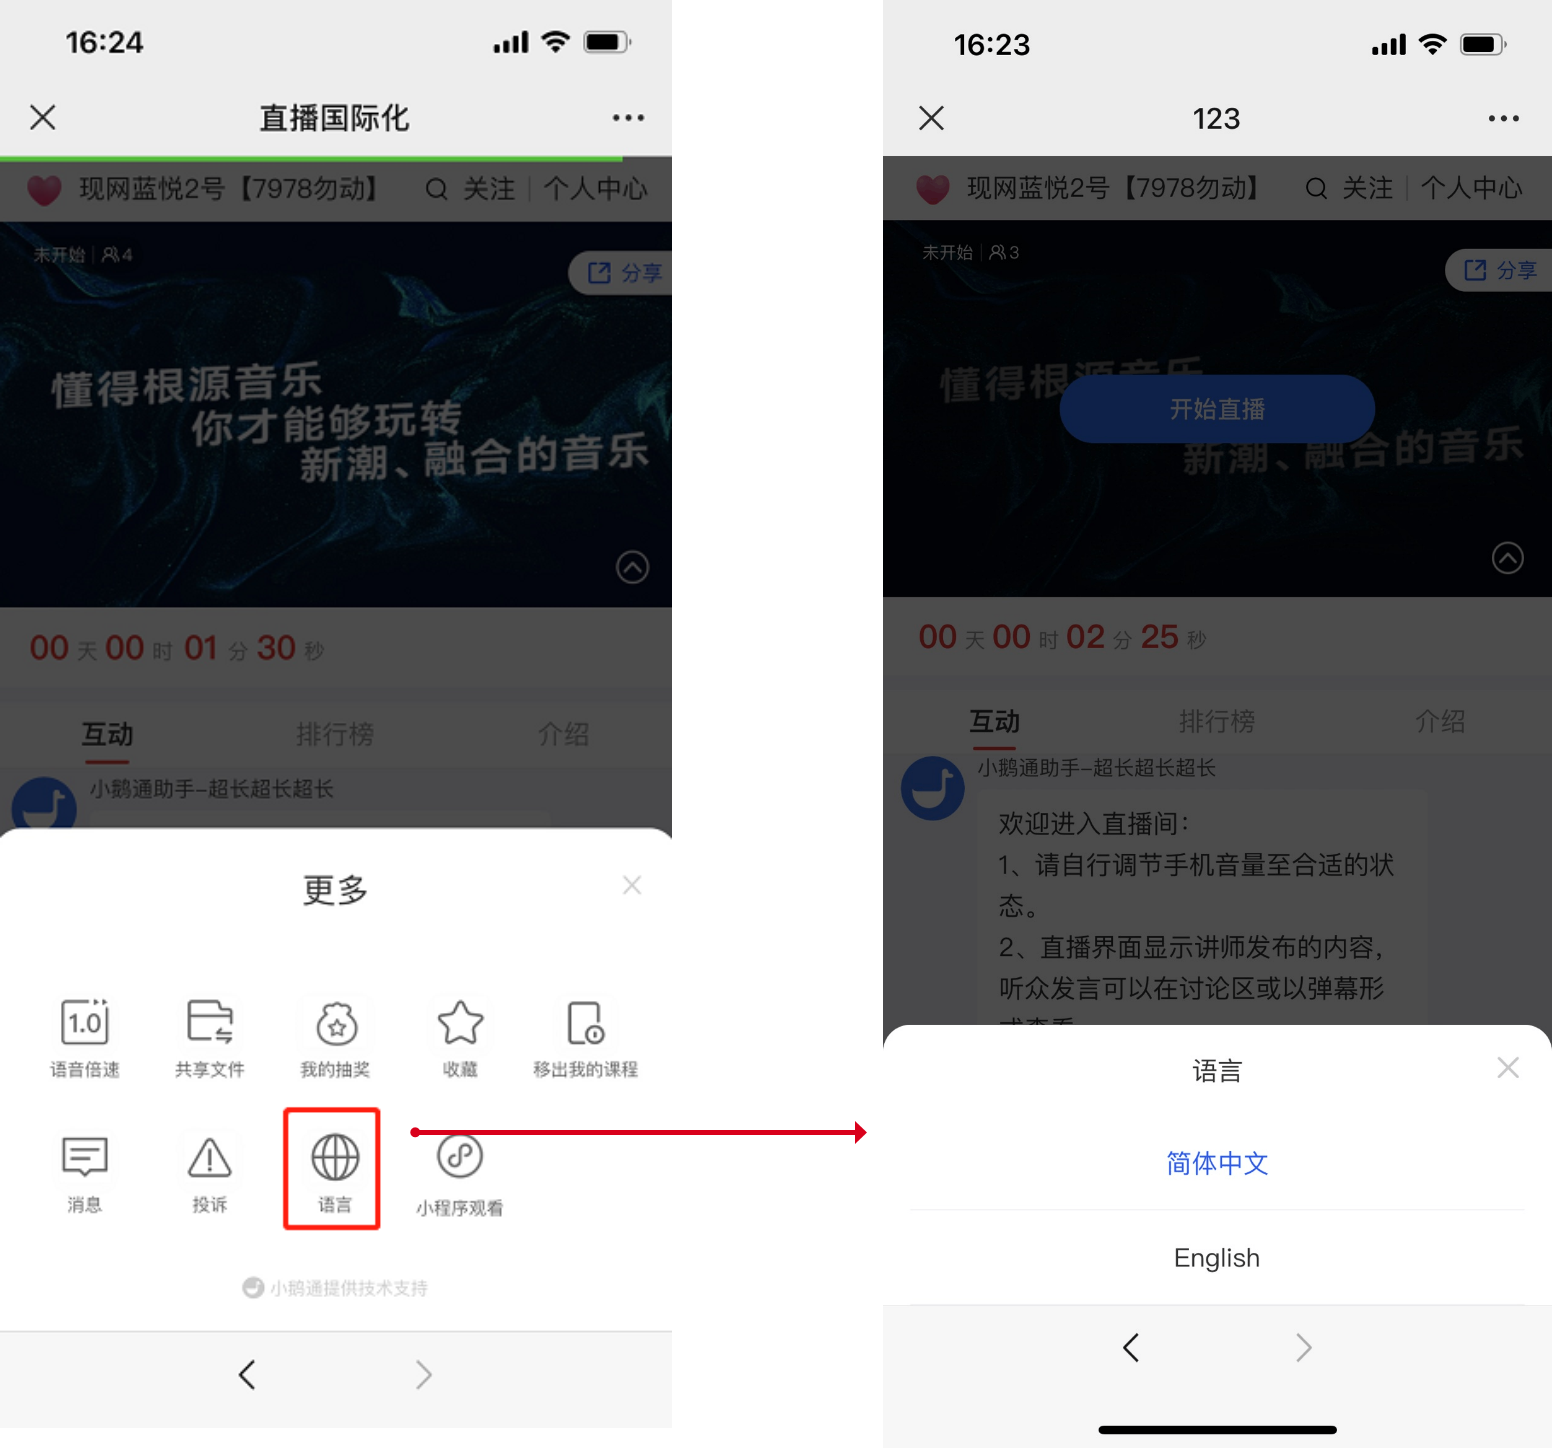
H5 Platform (Instructor/Student): H5 Live Streaming Room → More → Language → English
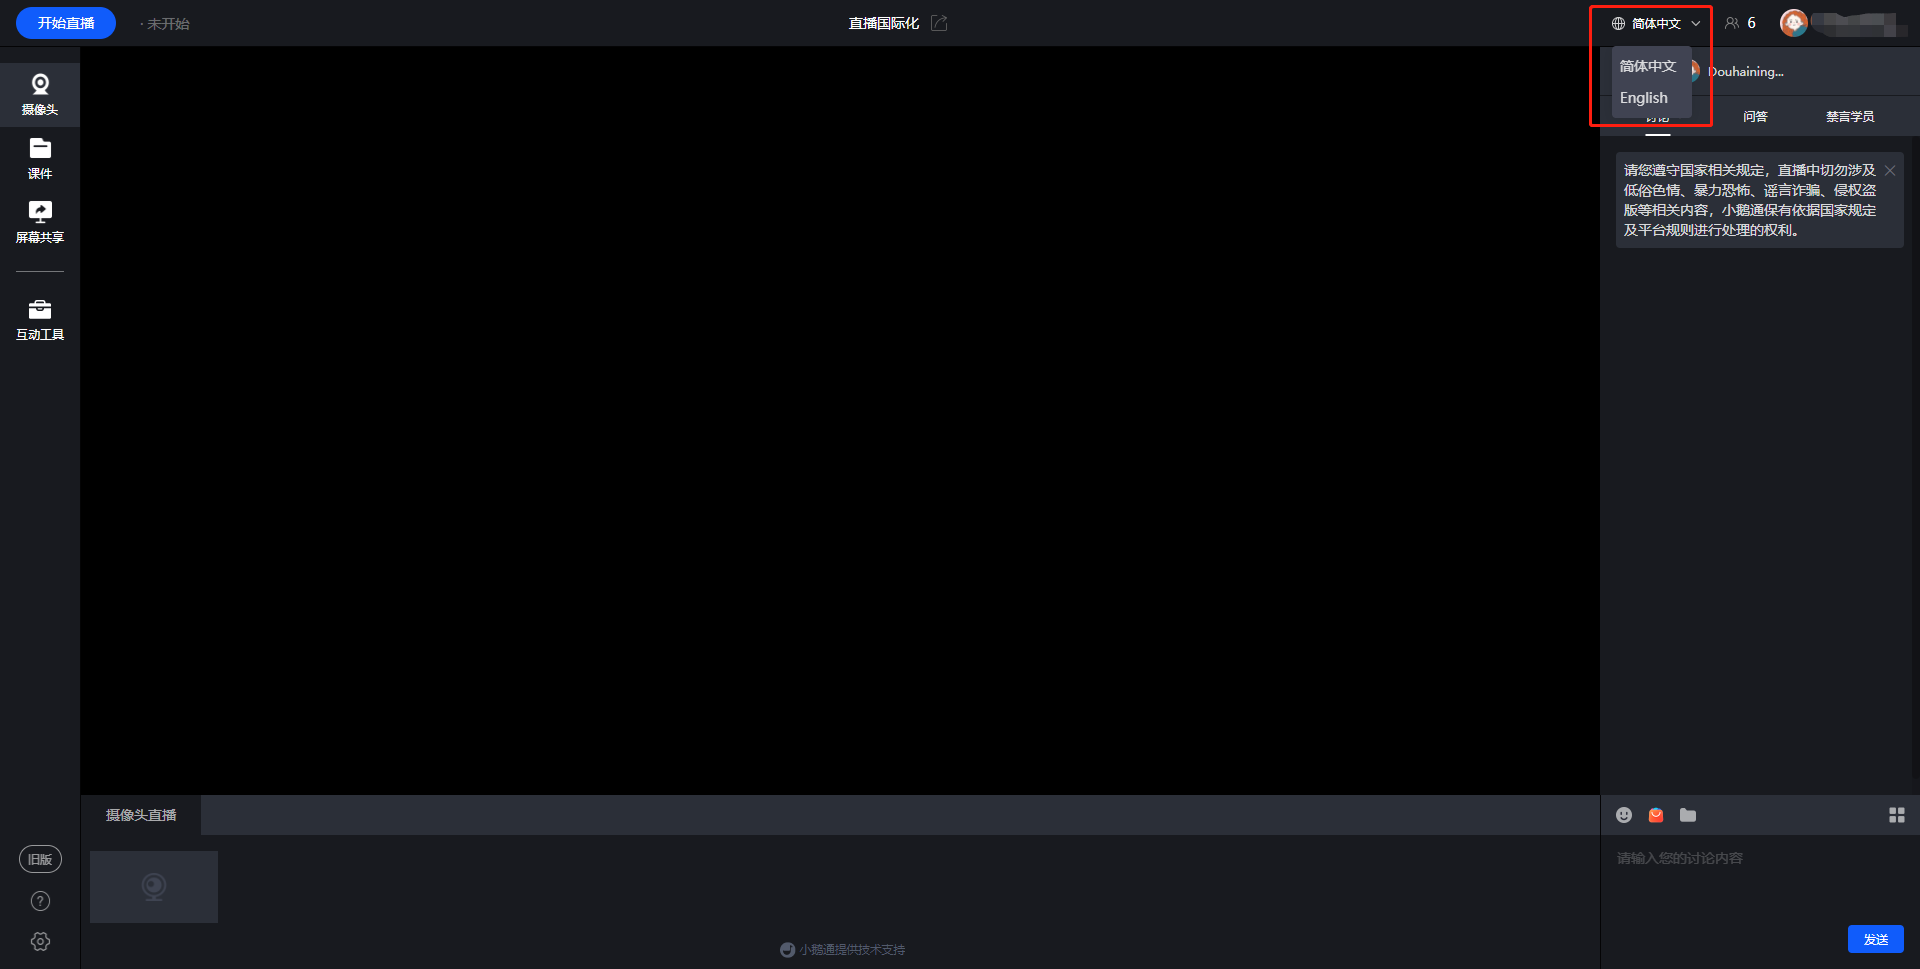
Web Platform (Instructor/Student): Switch the language in the upper - right corner of the page
V. Usage Tutorial
● Instructor Side - elink Assistant
● Instructor Side - elink Live Streaming Client (Expected to be supported in August 2023)
Select 'Settings'. After entering the settings page, select 'General Settings'. You can find 'Select Language' at the bottom of this page. Select the corresponding language to take effect.
● Instructor Side - H5 Live Streaming Room
● Student Side - H5 Live Streaming Room
●Instructor/Student Side - Web Platform
PS: The English version only takes effect in the live streaming room.
【OBS】 Frequently Asked Questions
I. Basic Operations
1. Where can I download [OBS]?
2. Tutorial on using the [OBS] client
3. Recommended live streaming settings for [OBS]
4. How to download the video streamed by [OBS]?
5. How to monitor the streaming quality of [OBS]?
6. How to adjust the size of the instructor's picture in [OBS]?
7. How to use vertical screen live streaming in [OBS]?
8. How to use beauty filters in [OBS]?
9. How to use green screen keying in [OBS]?
10. Combine the elink Assistant with [OBS] to achieve green screen keying
II. Live Streaming Screen
1.Is the streaming screen in [OBS] inconsistent with the actual screen?
2. How to handle abnormal or out - of - sync audio and video during [OBS] live streaming?
3. Is the [OBS] live streaming screen blurry?
4.Is there any lag during [OBS] live streaming?
5. How to solve the problem of live streaming delay in [OBS]?
6. Tutorial on capturing desktop audio without affecting speaker output in [OBS] (MAC computers)
7. Does the screen go black when using display capture in [OBS]?
III. Error Reporting
1. [OBS] shows that there is no connection to the server (due to restrictions of some office networks)
2. Does [OBS] keep prompting that the connection has been disconnected?
How to authorize the microphone on a Mac computer?
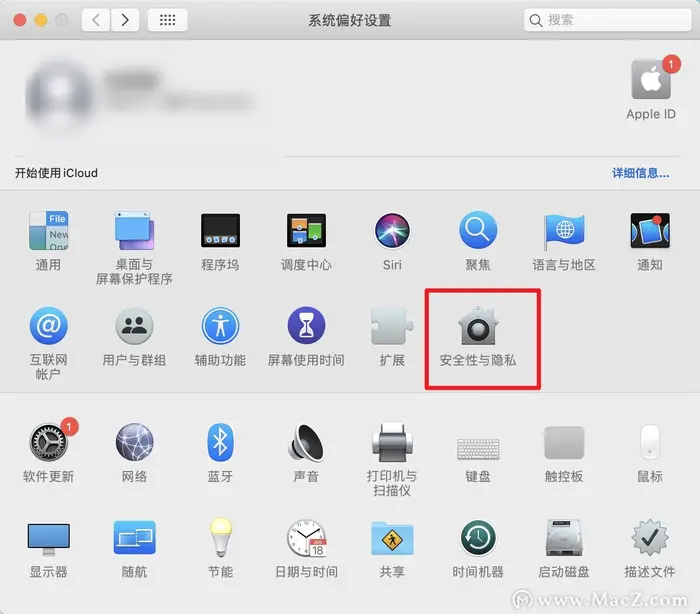
1. On your computer, click the Apple icon and then click System Preferences.
2. Click Security & Privacy.
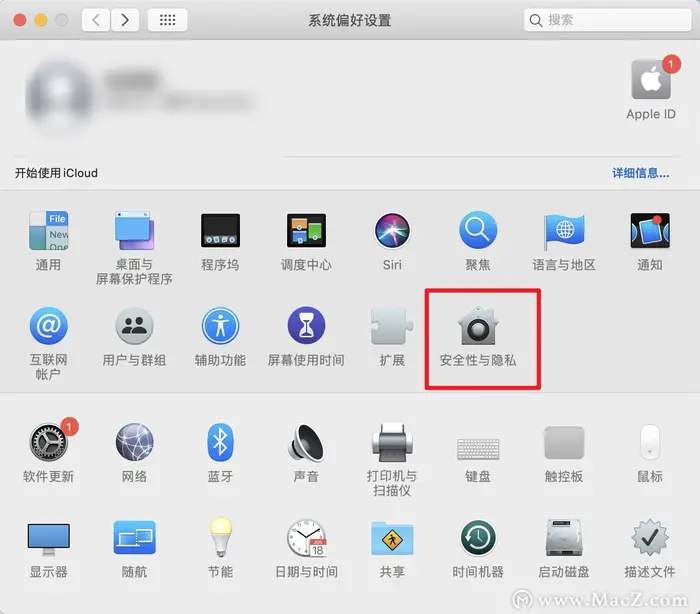
3. Click Privacy, find Microphone on the left side, and click the small lock icon in the lower - left corner.
4. Enter your password to allow changes, and then select the program you want to use the microphone with (here, select the eLink Live app or eLink Assistant).
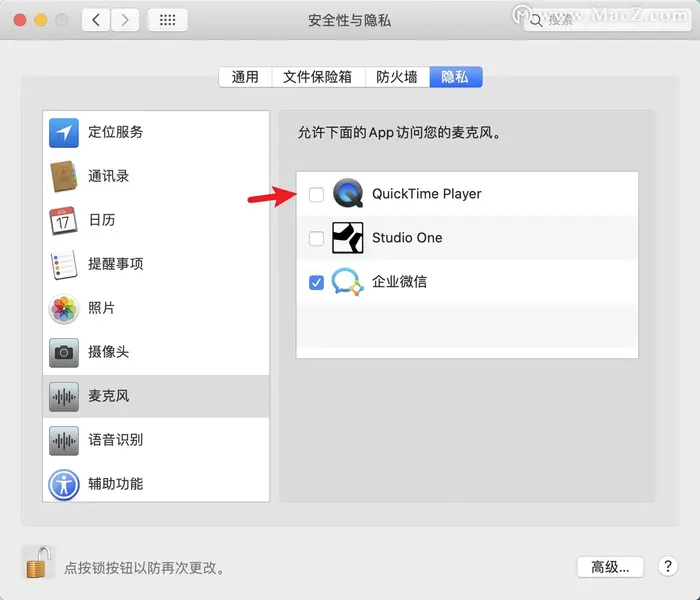
How to authorize the microphone?
For Windows 10 computers, please clickhttps://jingyan.baidu.com/article/f0e83a2590c6f863e59101d9.html
For Windows 11 computers, please clickhttps://jingyan.baidu.com/article/4853e1e555da485808f72612.html
For Mac computers, please clickhttps://helpcenter.xiaoe-tech.com/#/problem/detail?document_id=doc_63fc4e7a40d64_0EAUW
How to authorize the camera on a Mac computer?
1. On your computer, click the Apple icon and then click System Preferences.
2. Click Security & Privacy.
3. Click Privacy, find Camera on the left side, and click the small lock icon at the bottom left.
4. Enter your password to allow changes, and then select the program you want to use the camera with (here, select the eLink Live app or eLink Assistant).
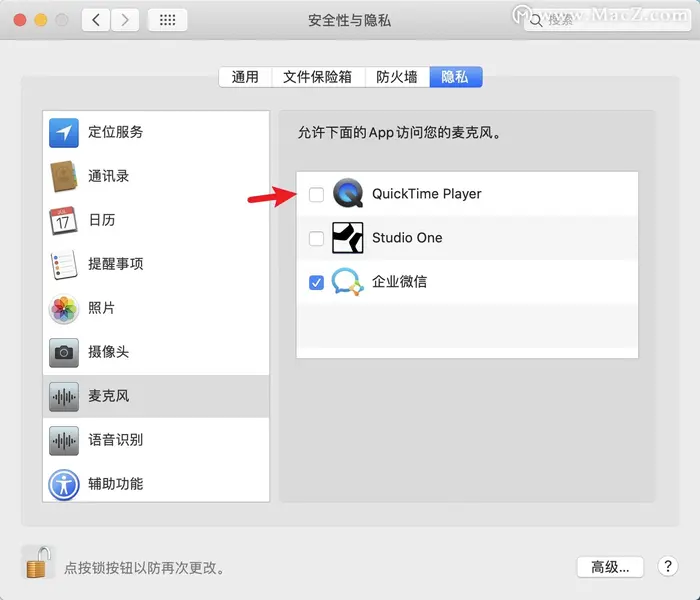
How to authorize the camera?
For Windows 10 computers, please clickhttps://jingyan.baidu.com/article/0eb457e5d9738242f1a905f7.html
For Windows 11 computers, please clickhttps://jingyan.baidu.com/article/7908e85cb3861aee491ad264.html
For Mac computers, please clickhttps://helpcenter.xiaoe-tech.com/#/problem/detail?document_id=doc_63fc5152bf8d5_BTsGD
How to check if the microphone permission is occupied?
How to check if the microphone permission is occupied?
1. Click on Privacy and Security
Press Win + I to open Settings and search for Microphone Privacy Settings.
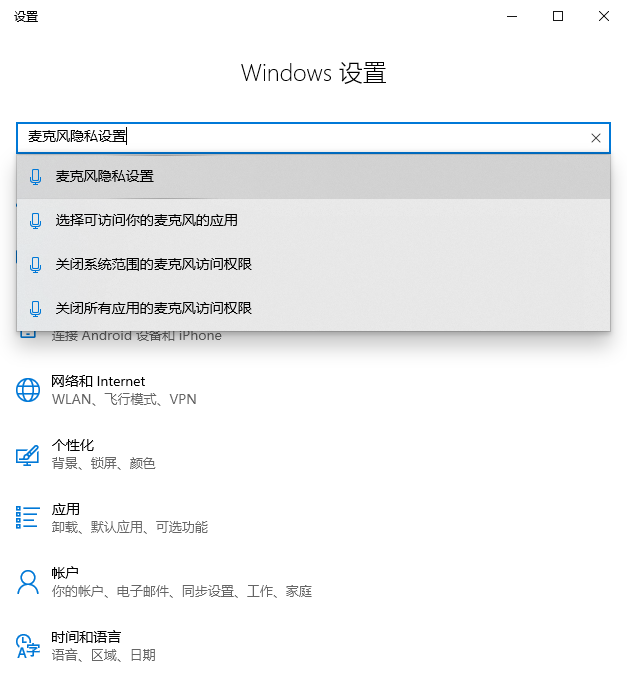
2. Check if there is an app with the "Currently in use" indicator in "Allow desktop apps to access your microphone" and quit that app.
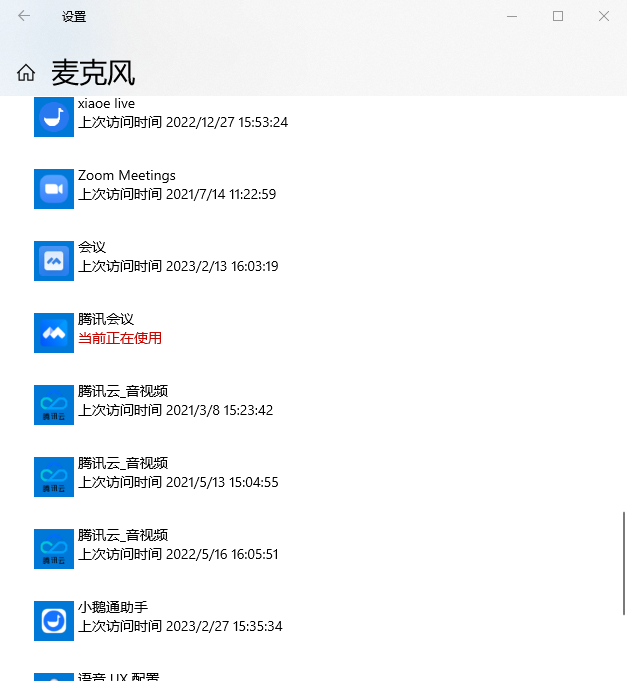
3. Reopen the elink Assistant client and check if you can use the microphone normally.
How to reduce the CPU usage of a computer?
How to reduce the CPU usage of a computer?
I. Reduce CPU usage by closing unnecessary programs (taking Windows 10 as an example)
1. Directly enter the Windows 10 Task Manager by pressing shift + ctrl + esc, as shown in the following figure:
2. Find some running processes that we don't need in the Task Manager, and click to select them. As shown in the following figure:
3. Then click 'End Task' in the lower right corner to close the task.
II. Clean up computer junk: Check the Control Panel - Programs - Uninstall - to see if there are any unnecessary or similar software installed. If there are multiple antivirus or optimization software, you can uninstall them and keep only one.
III. Computer configuration is also very important. If your computer has a relatively low configuration, it will cause lag. It is not recommended to use ultra - thin laptops. It is recommended to have a CPU of i5 - 9300H or higher.
How to check if the camera permission is occupied?
How to check if the camera permission is occupied?
1. Click on Privacy and Security
Press Win + I to open Settings and search for Camera privacy settings.
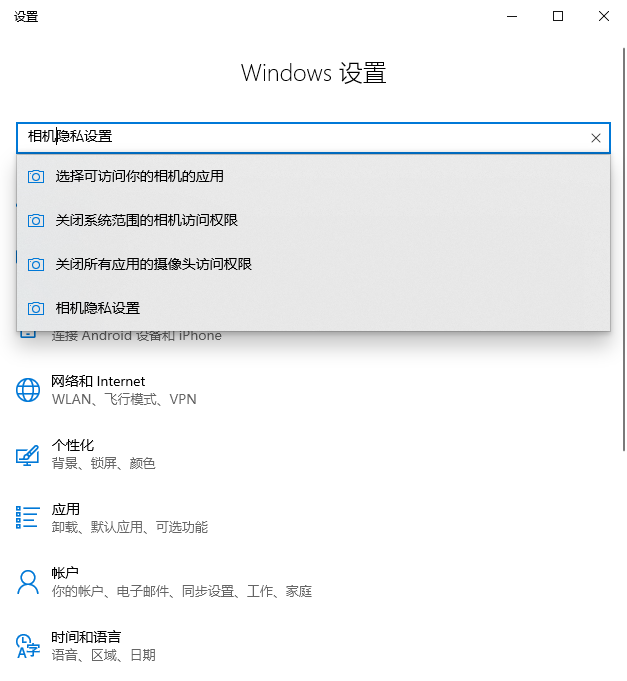
2. Check if there is an app with the 'Currently in use' indicator in 'Allow desktop apps to access your camera', and close that app.
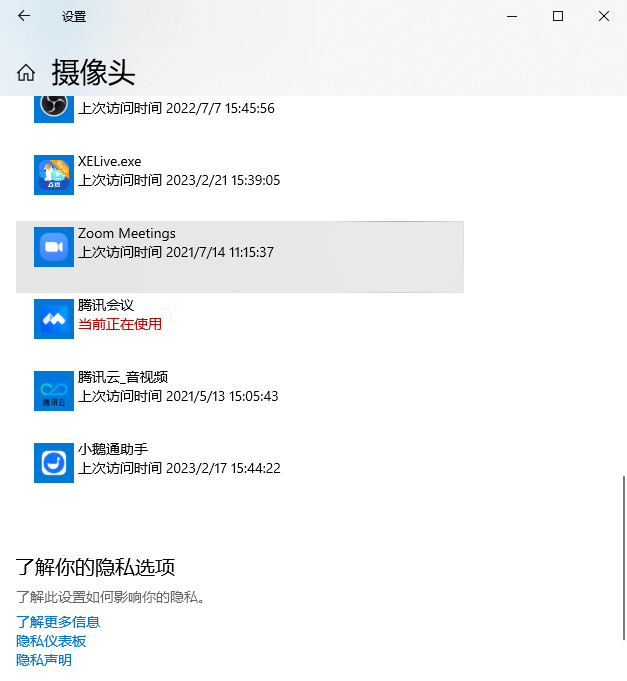
3. Reopen the elink Assistant client and check if the camera can be used normally.
How to check if the current microphone is working properly?
How to check if the current microphone is working properly?
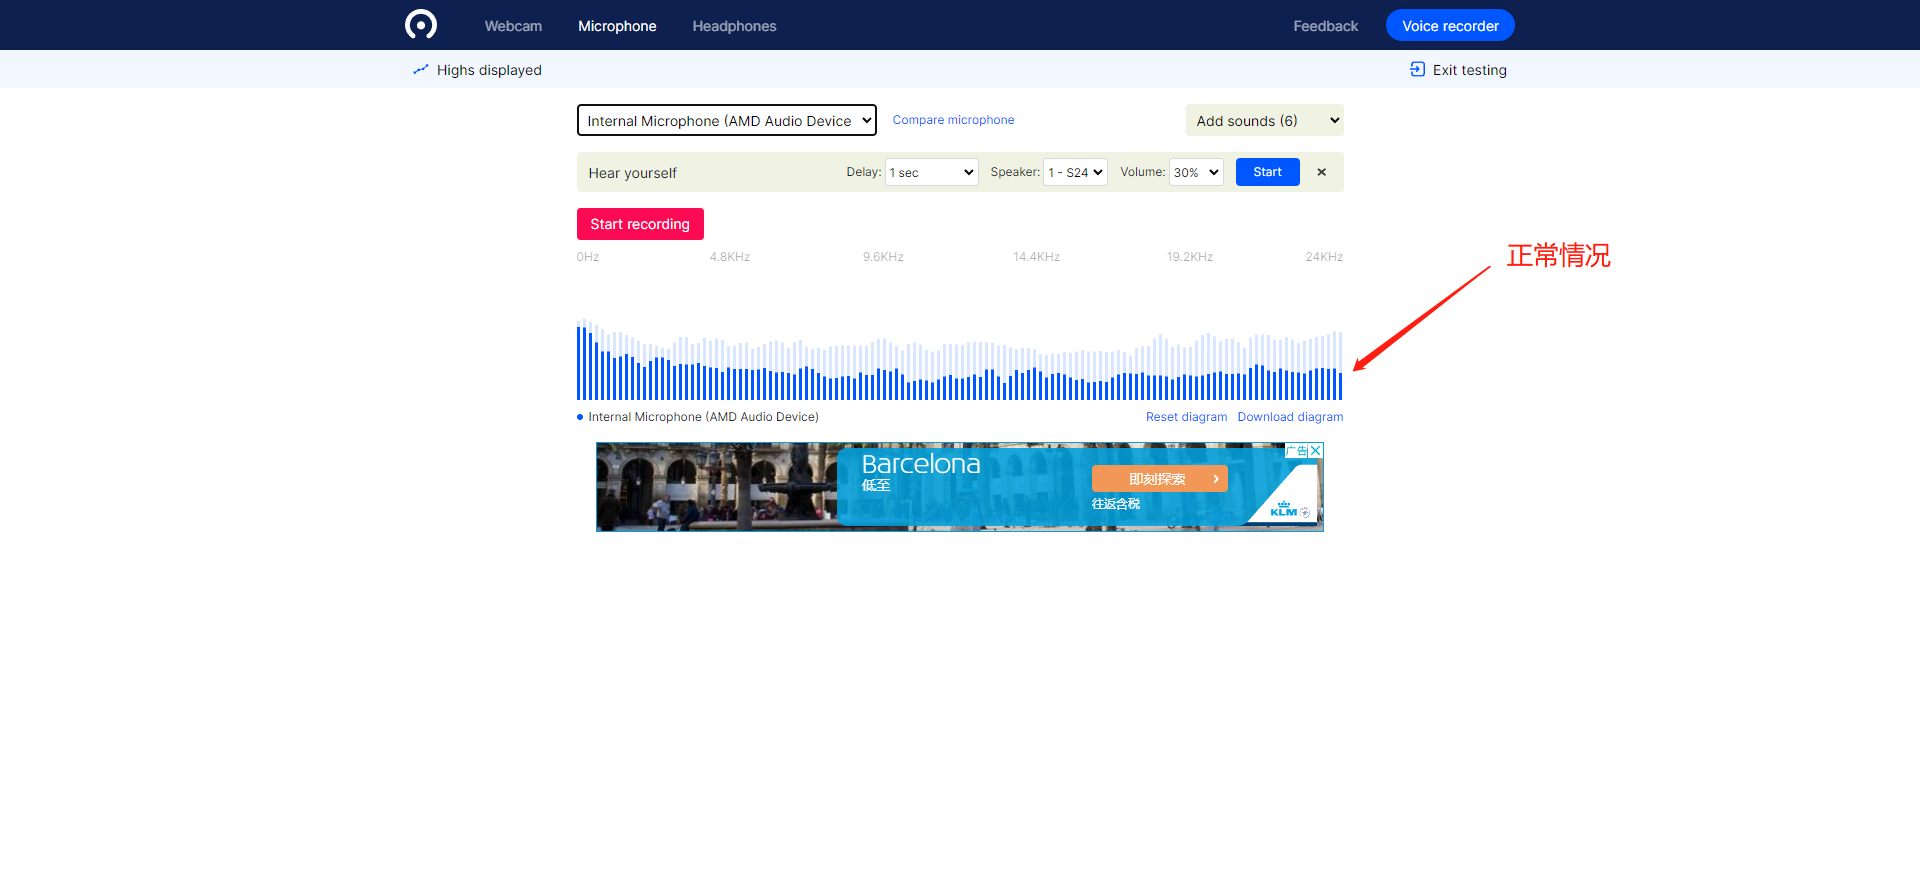
1. Click the following URL to test:https://webcammictest.com/check-mic.html
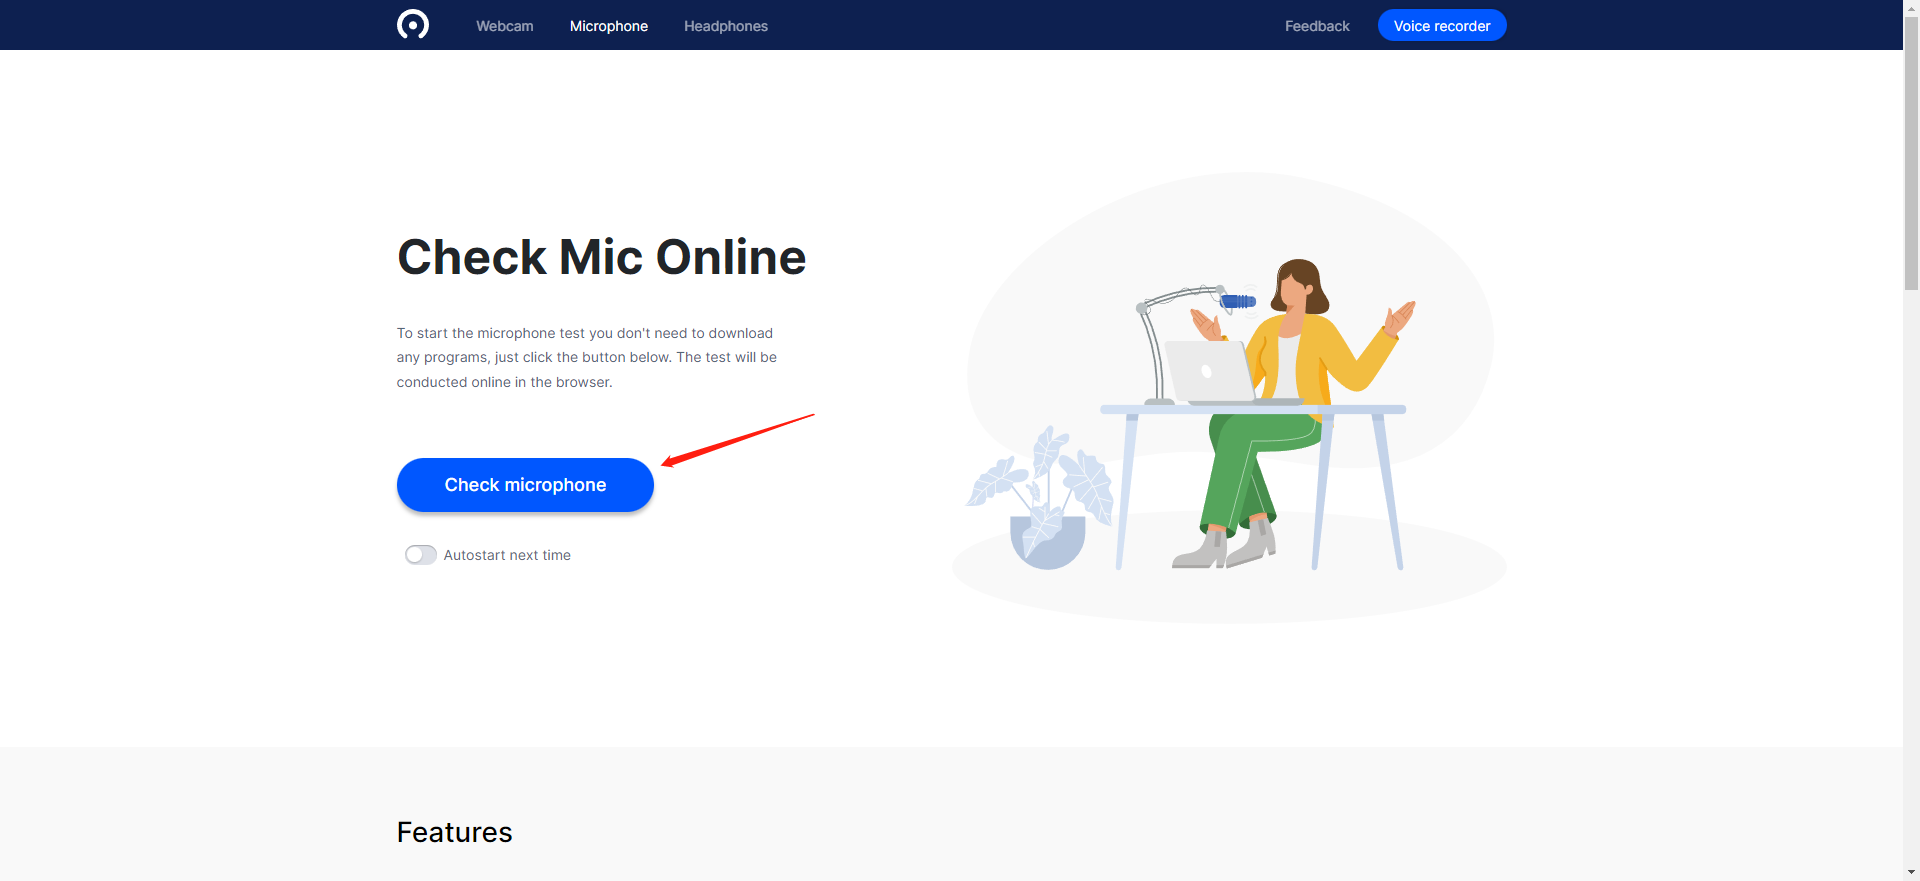
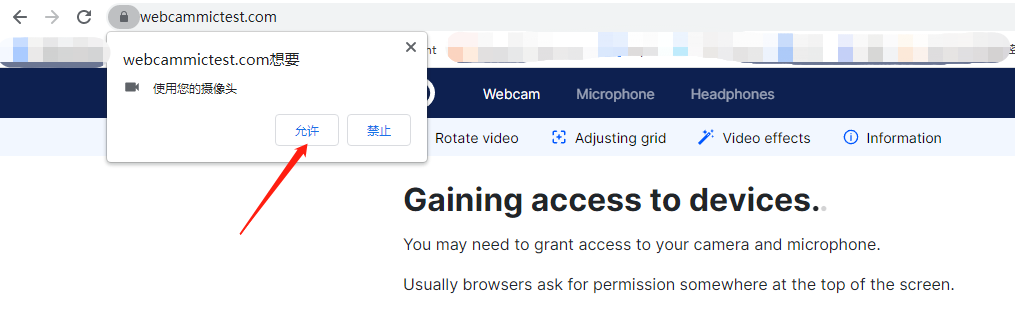
3. If the detected microphone volume is abnormal or there are no available devices in the device list, you need to check if the microphone device is malfunctioning or replace the microphone.
How to check if the current camera is working properly?
How to check if the current camera is working properly?
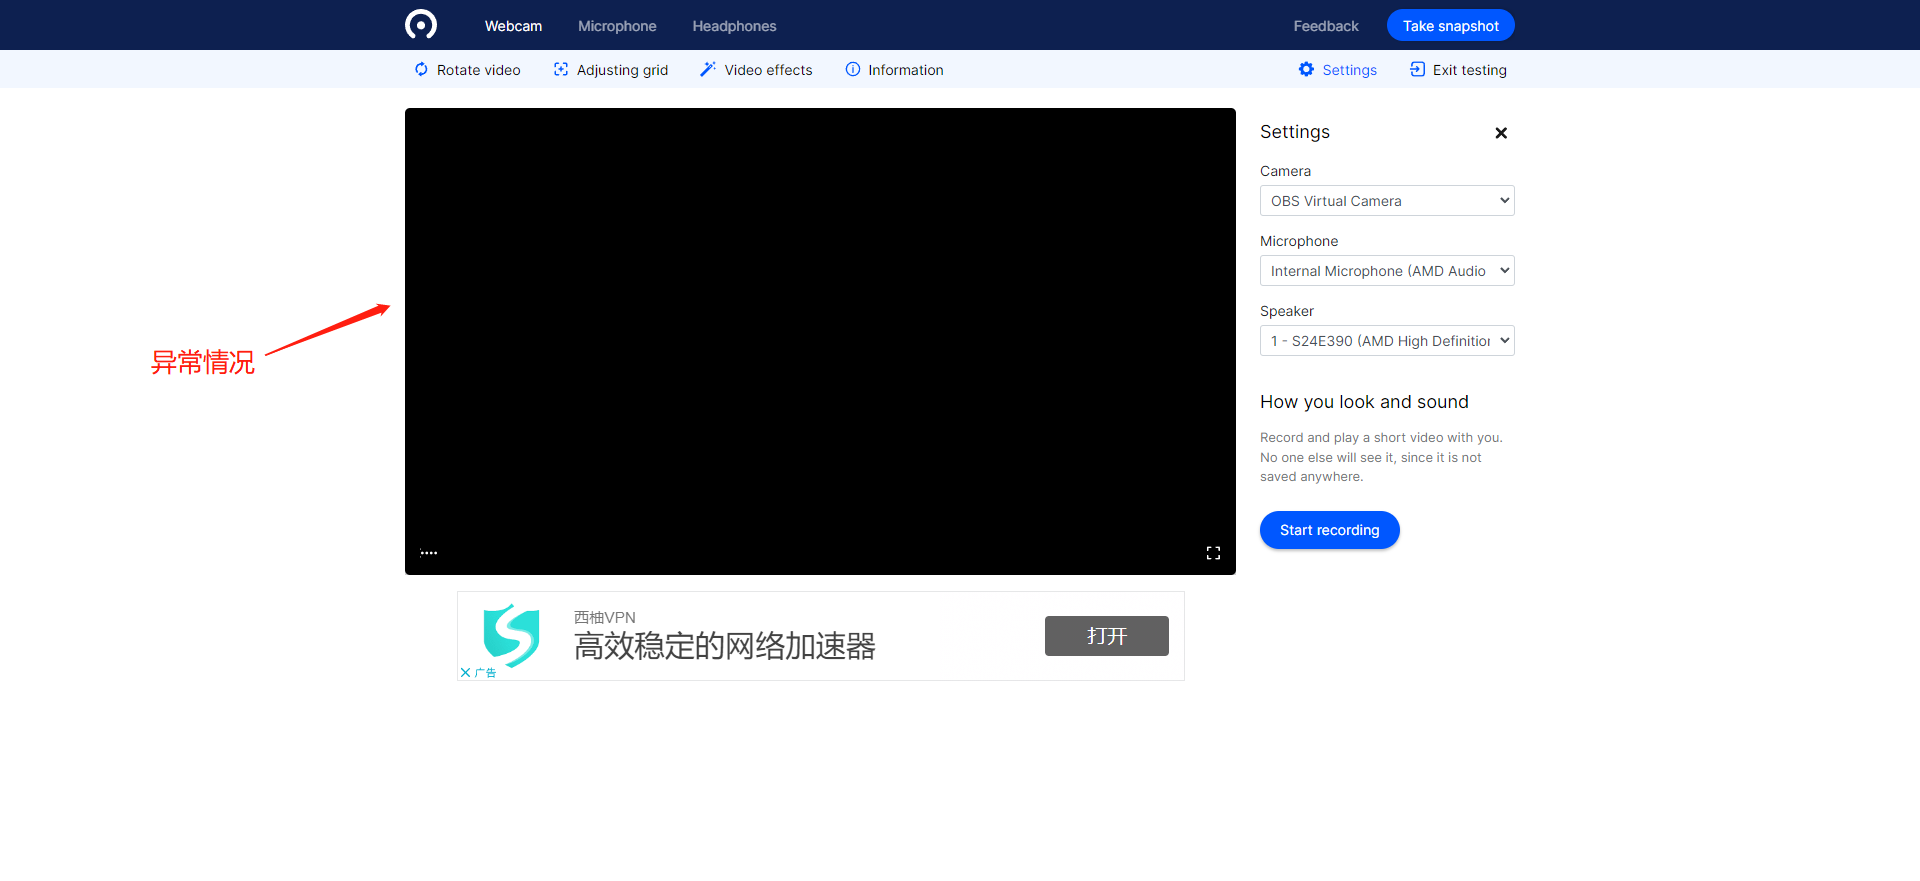
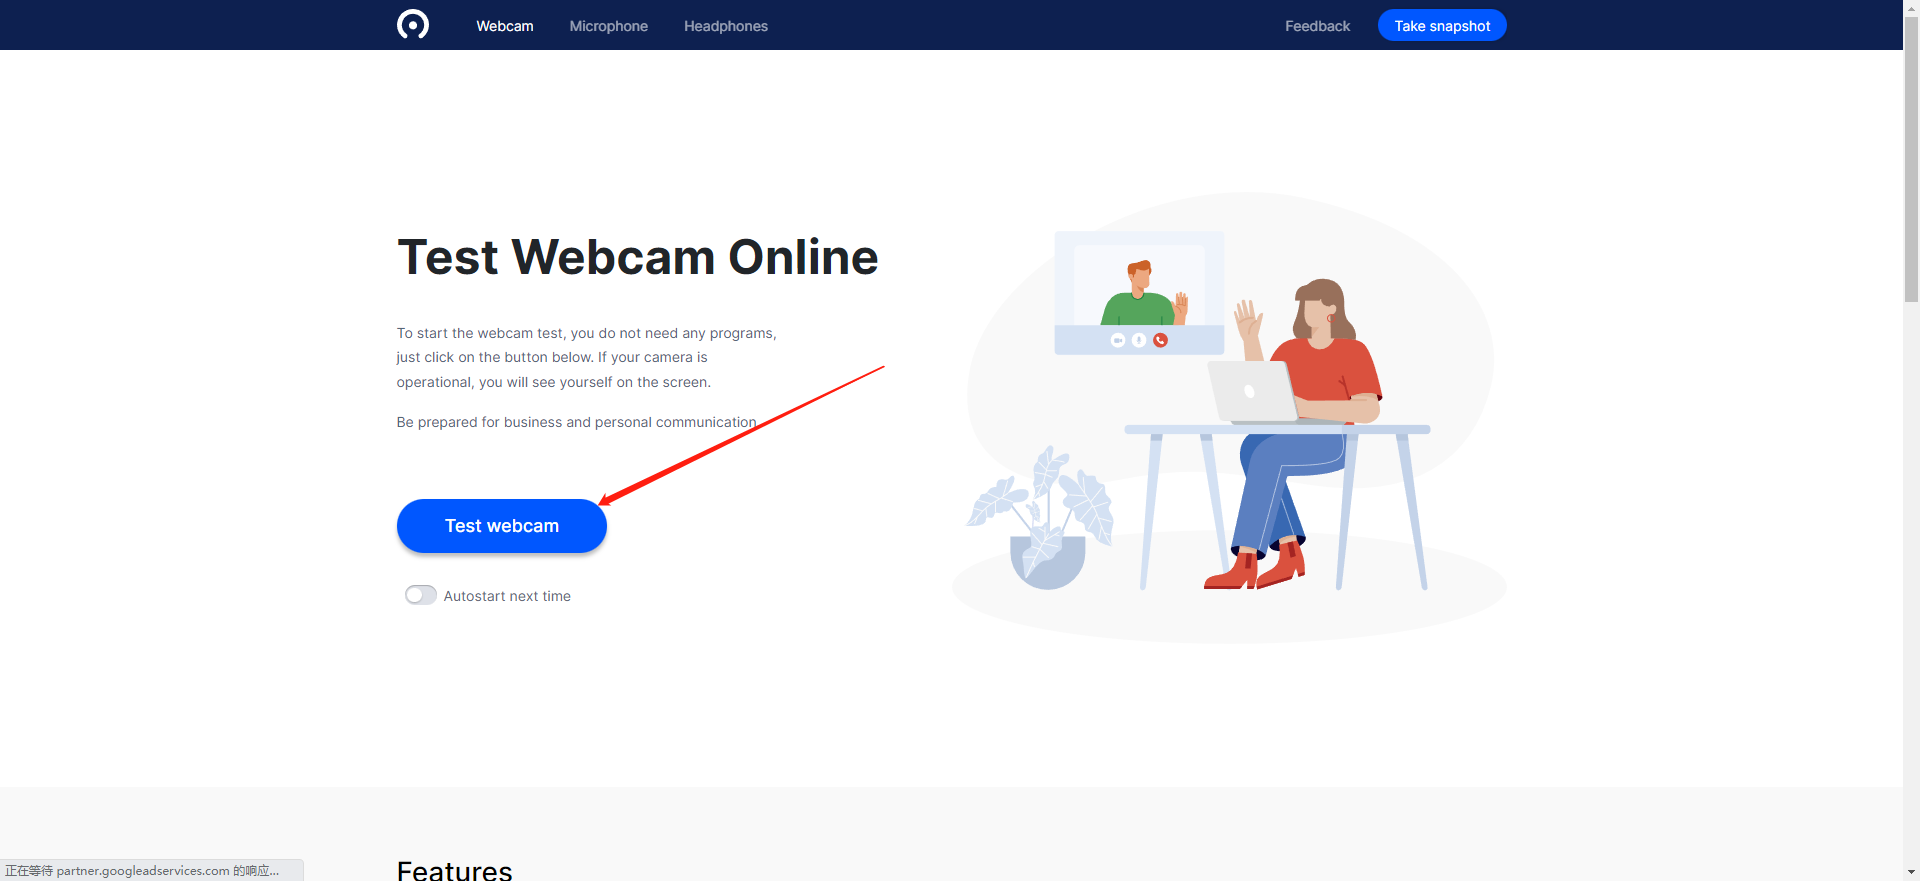
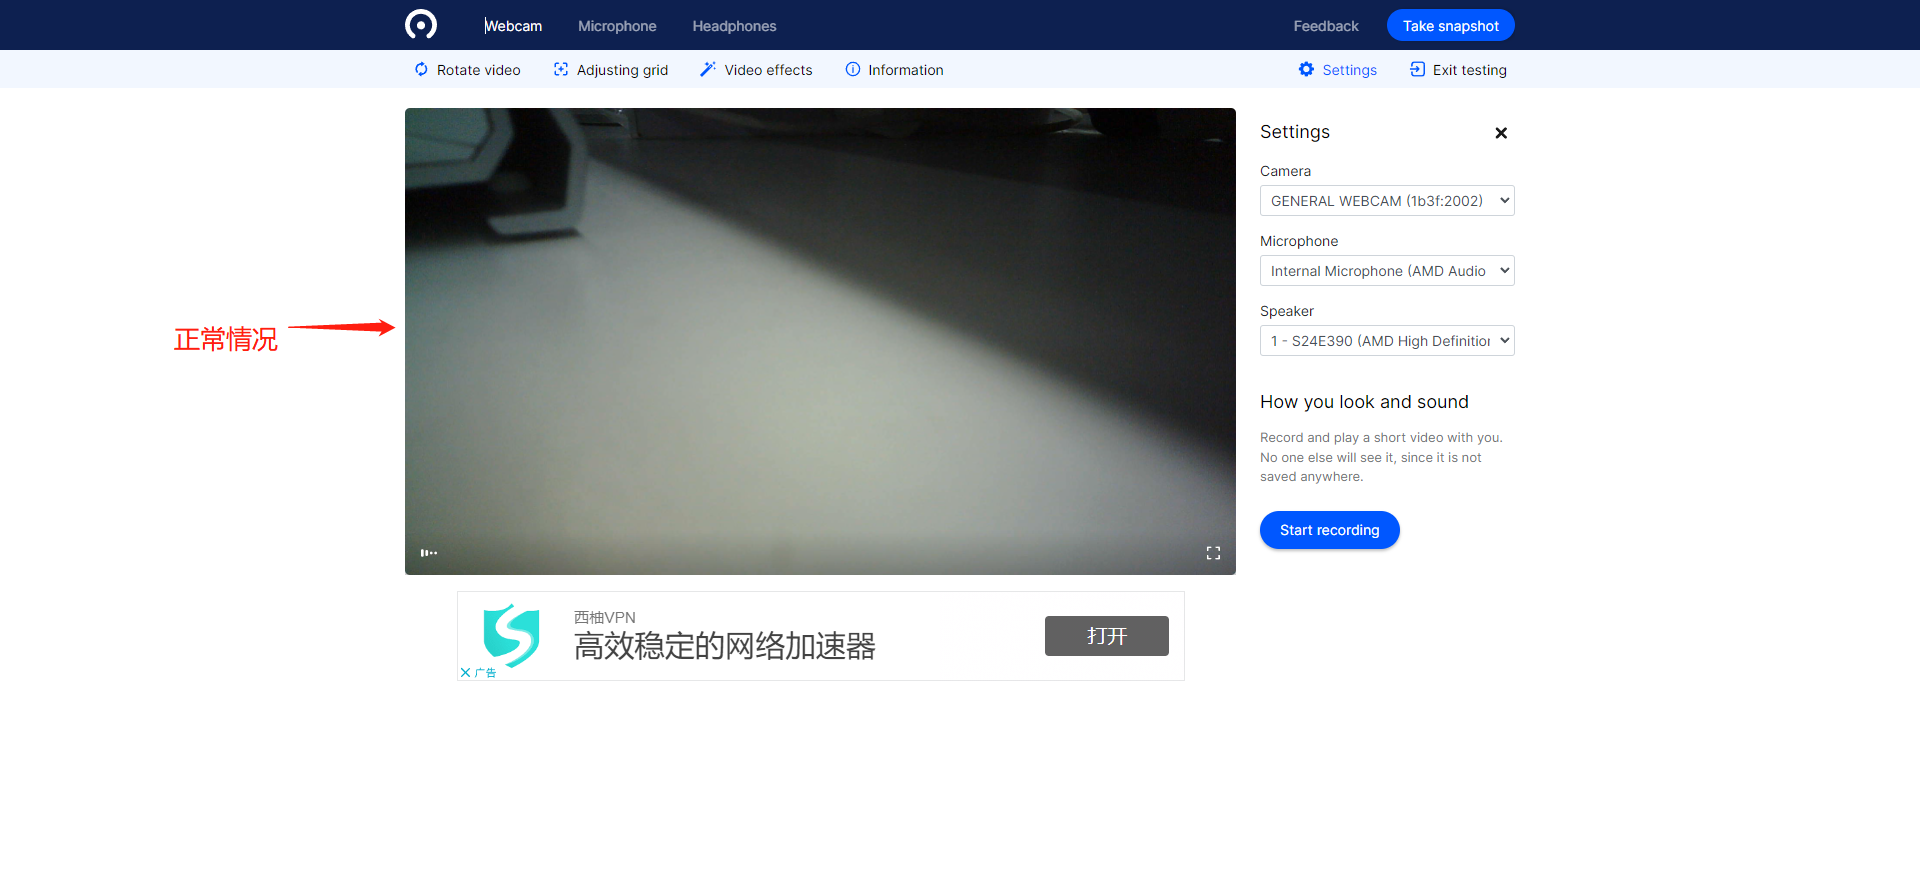
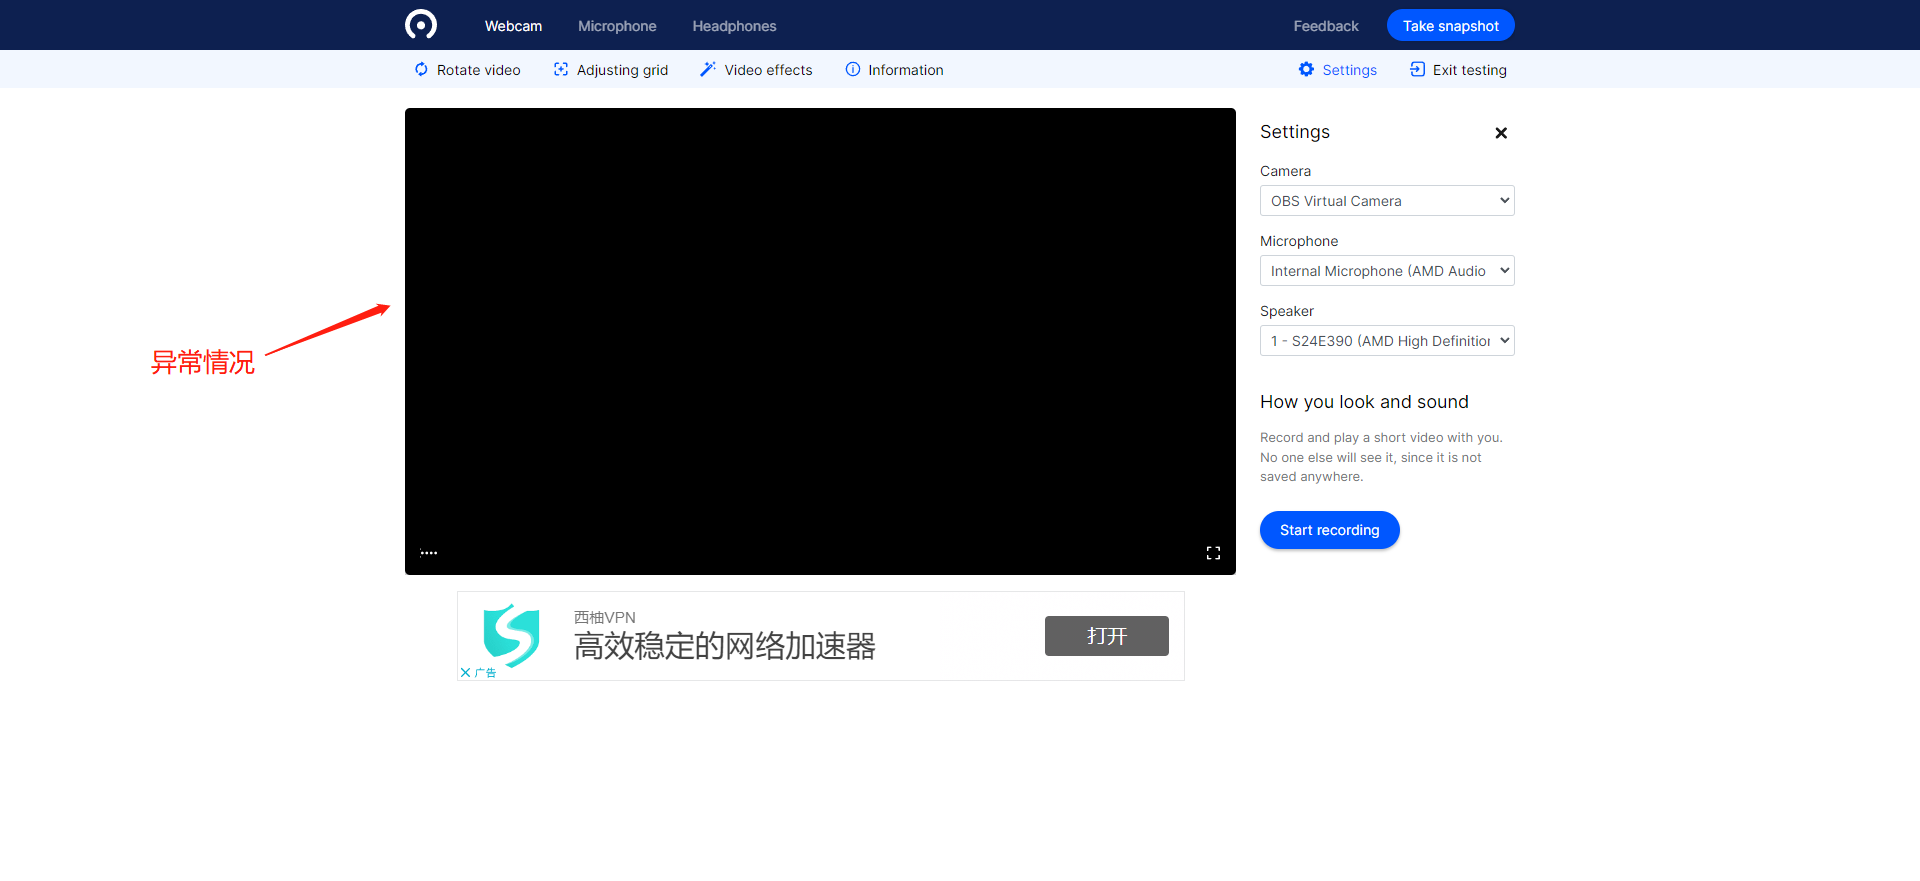
1. Click the following URL to test:https://webcammictest.com/
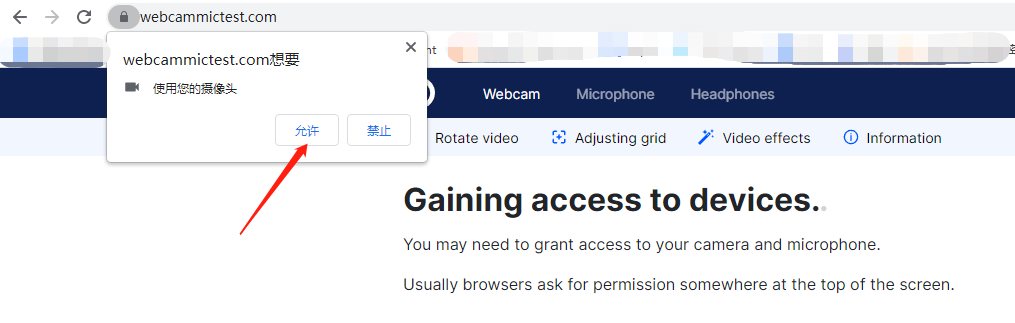
3. If the detected image is abnormal or there are no available devices in the device list, you need to check if the camera device is malfunctioning or replace the camera.
Common Questions about Kuaishou Relay
Q: For a live stream rebroadcast to Kuaishou, do I need to click 'Start Live' on Kuaishou after the live stream starts?
A: No need if you use the one - click rebroadcast to Kuaishou. If you use the Kuaishou streaming address to rebroadcast to Kuaishou, you need to click 'Start Live' on Kuaishou.
Q: Can I view the replay of a live stream rebroadcast to Kuaishou on Kuaishou?
A: Kuaishou has a replay function. You can turn on the replay switch for the rebroadcast live stream on Kuaishou.
Q: When elink rebroadcasts a live stream to Kuaishou, will the Kuaishou live stream end automatically after the elink live stream ends?
A: No. After the elink live stream stops pushing, you need to manually end the Kuaishou live stream.
Q: Does the live stream of a trial - version online store support rebroadcasting to Kuaishou?
A: Yes, it does.
Q: How many elink live streams can a single Kuaishou account receive for rebroadcast at the same time?
A: A single Kuaishou account can receive at most one elink live stream for rebroadcast at the same time. If there is an overlap in the rebroadcast time using the same Kuaishou account, the new live stream will overwrite the old one.
Q: Do I need to reset every time I create a new Kuaishou rebroadcast?
A: If you have previously bound a Kuaishou account, when creating a new live stream, it will automatically bind the account and cover image of the previous live stream that was in the 'ended' state and was rebroadcast using a Kuaishou account. You can modify them.
Q: When users watch a live stream rebroadcast to Kuaishou, can they synchronously participate in the relevant interactions of the elink live stream, such as co - hosting?
A: Rebroadcasting to Kuaishou is limited to the rebroadcast of the live - stream picture. Other interactive capabilities will not be synchronized. Co - hosting, live commerce, etc. initiated in the elink live stream can only be participated in the elink live - stream room and cannot be participated in the Kuaishou live - stream room.
Q: Can I use the method of filling in the Kuaishou streaming address for rebroadcast?
A: Yes. You can obtain the Kuaishou streaming address and use the third - party rebroadcast function. For the specific tutorial, clickhttps://helpcenter.xiaoe - tech.com/#/problem/detail?document_id=doc_5f6c4d59a1a00_Cu4yM. Note: After starting the live stream, you need to click 'Start Live' in the Kuaishou live - stream room.
How to reduce live streaming traffic consumption
I. How to reduce live streaming traffic consumption when using the elink Live client or elink Live Mini Program for live streaming with push streaming
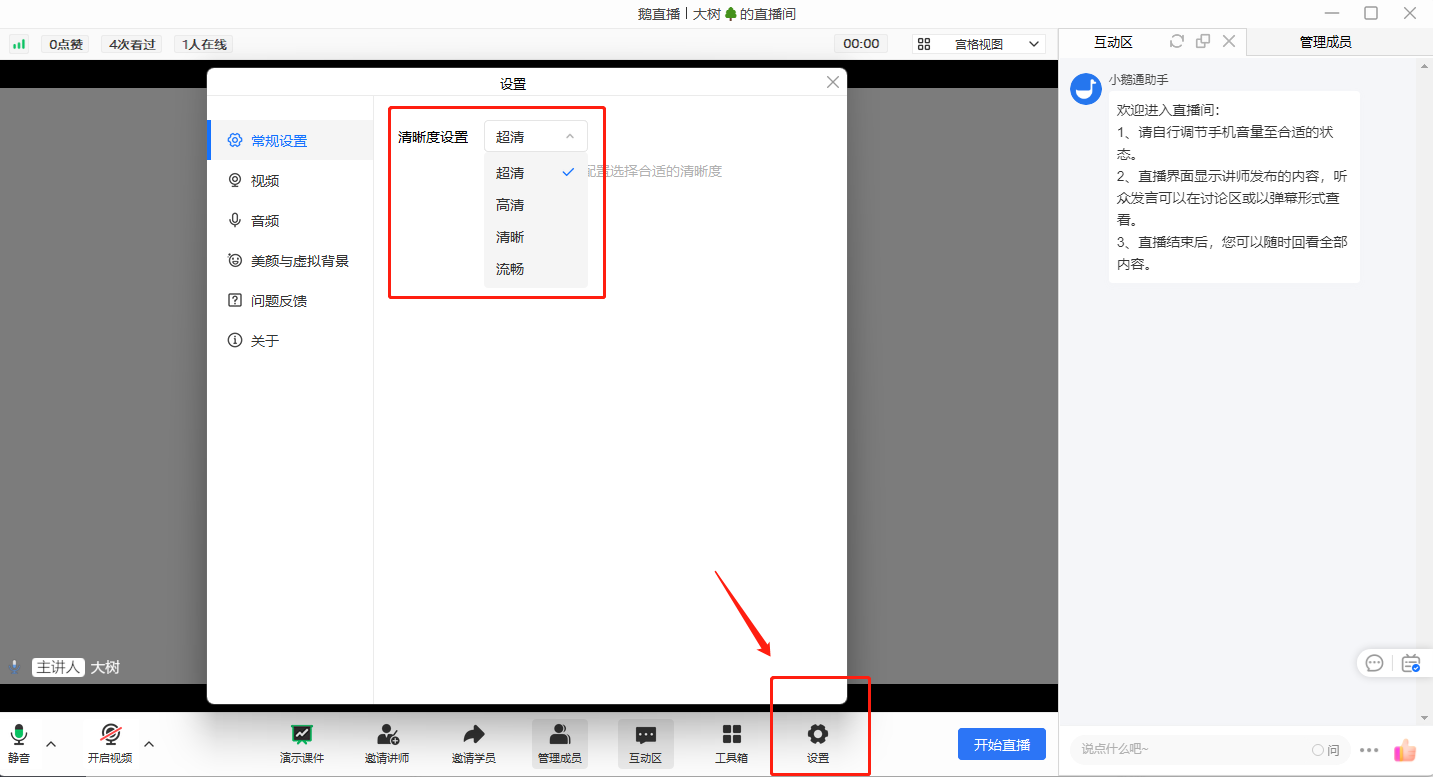
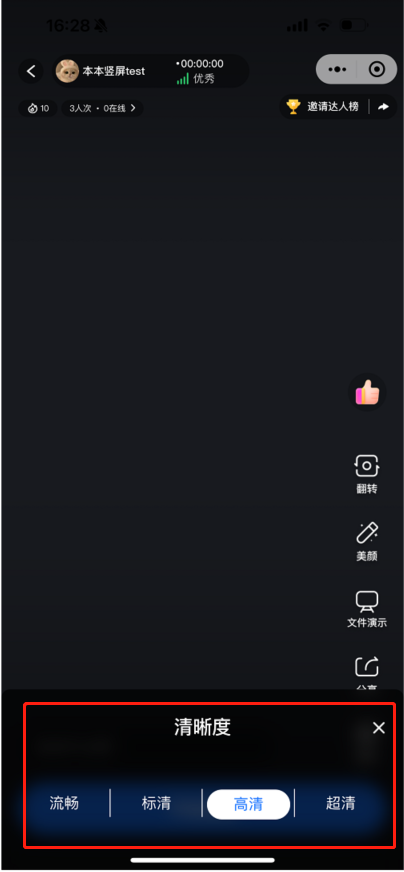
1. elink Live client: Find [Settings] - [General Settings] in the live streaming room. By lowering the clarity level, you can reduce the live streaming traffic consumption after push streaming. (Note: Lower clarity may affect the live streaming image quality.)
2. elink Live Mini Program: Find [Live Streaming Settings] - [Clarity] in the live streaming room.By lowering the clarity level, you can reduce the live streaming traffic consumption after push streaming. (Note: Lower clarity may affect the live streaming image quality.)
II. How to reduce live streaming traffic consumption when using OBS for live streaming with push streaming
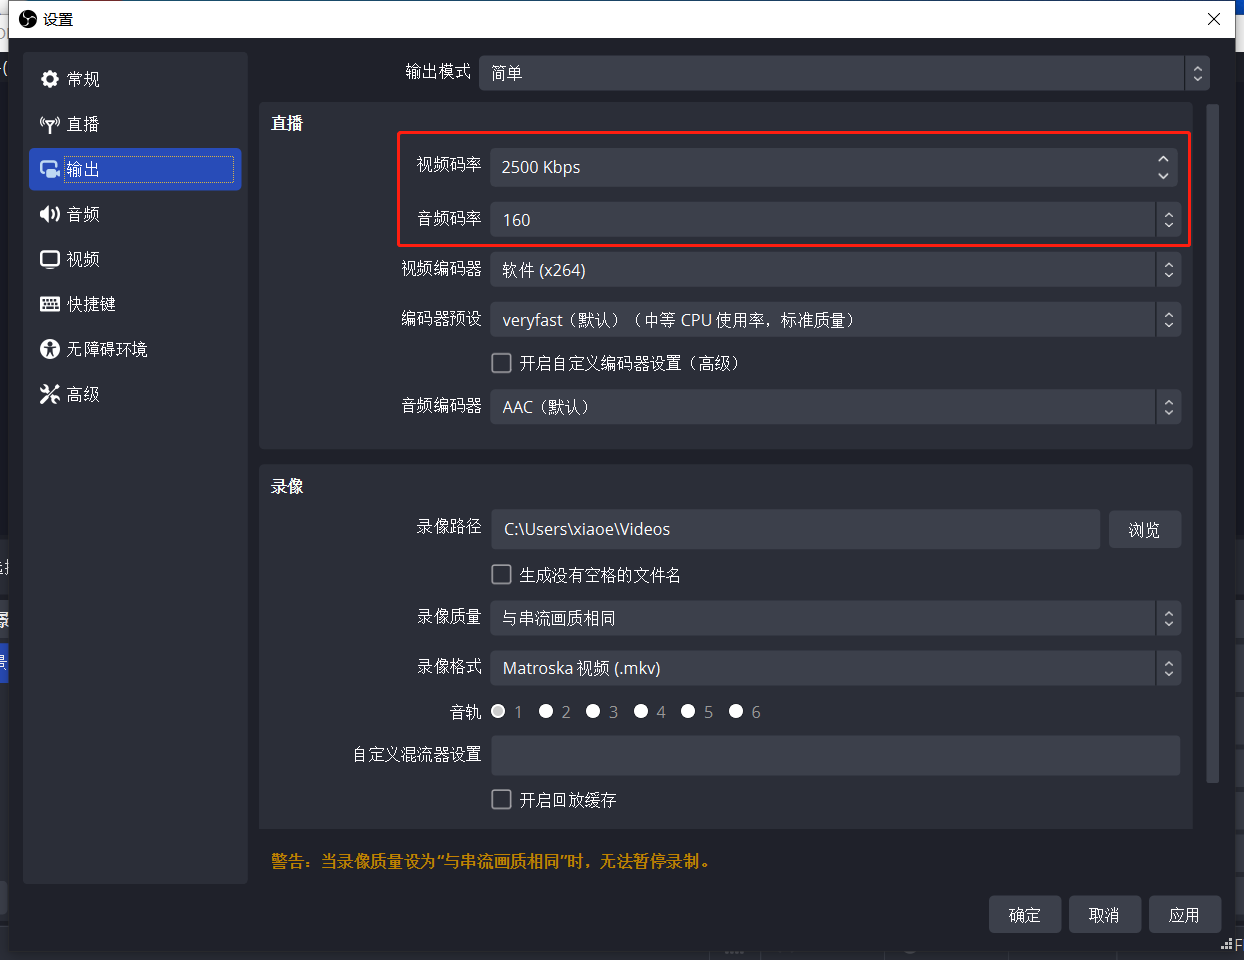
Click [Settings]. In the [Output] settings, lower the values of the video bitrate and audio bitrate. The lower the values, the lower the live streaming traffic consumption after push streaming. (Note: Extremely low video and audio bitrates may affect the live streaming image quality.)
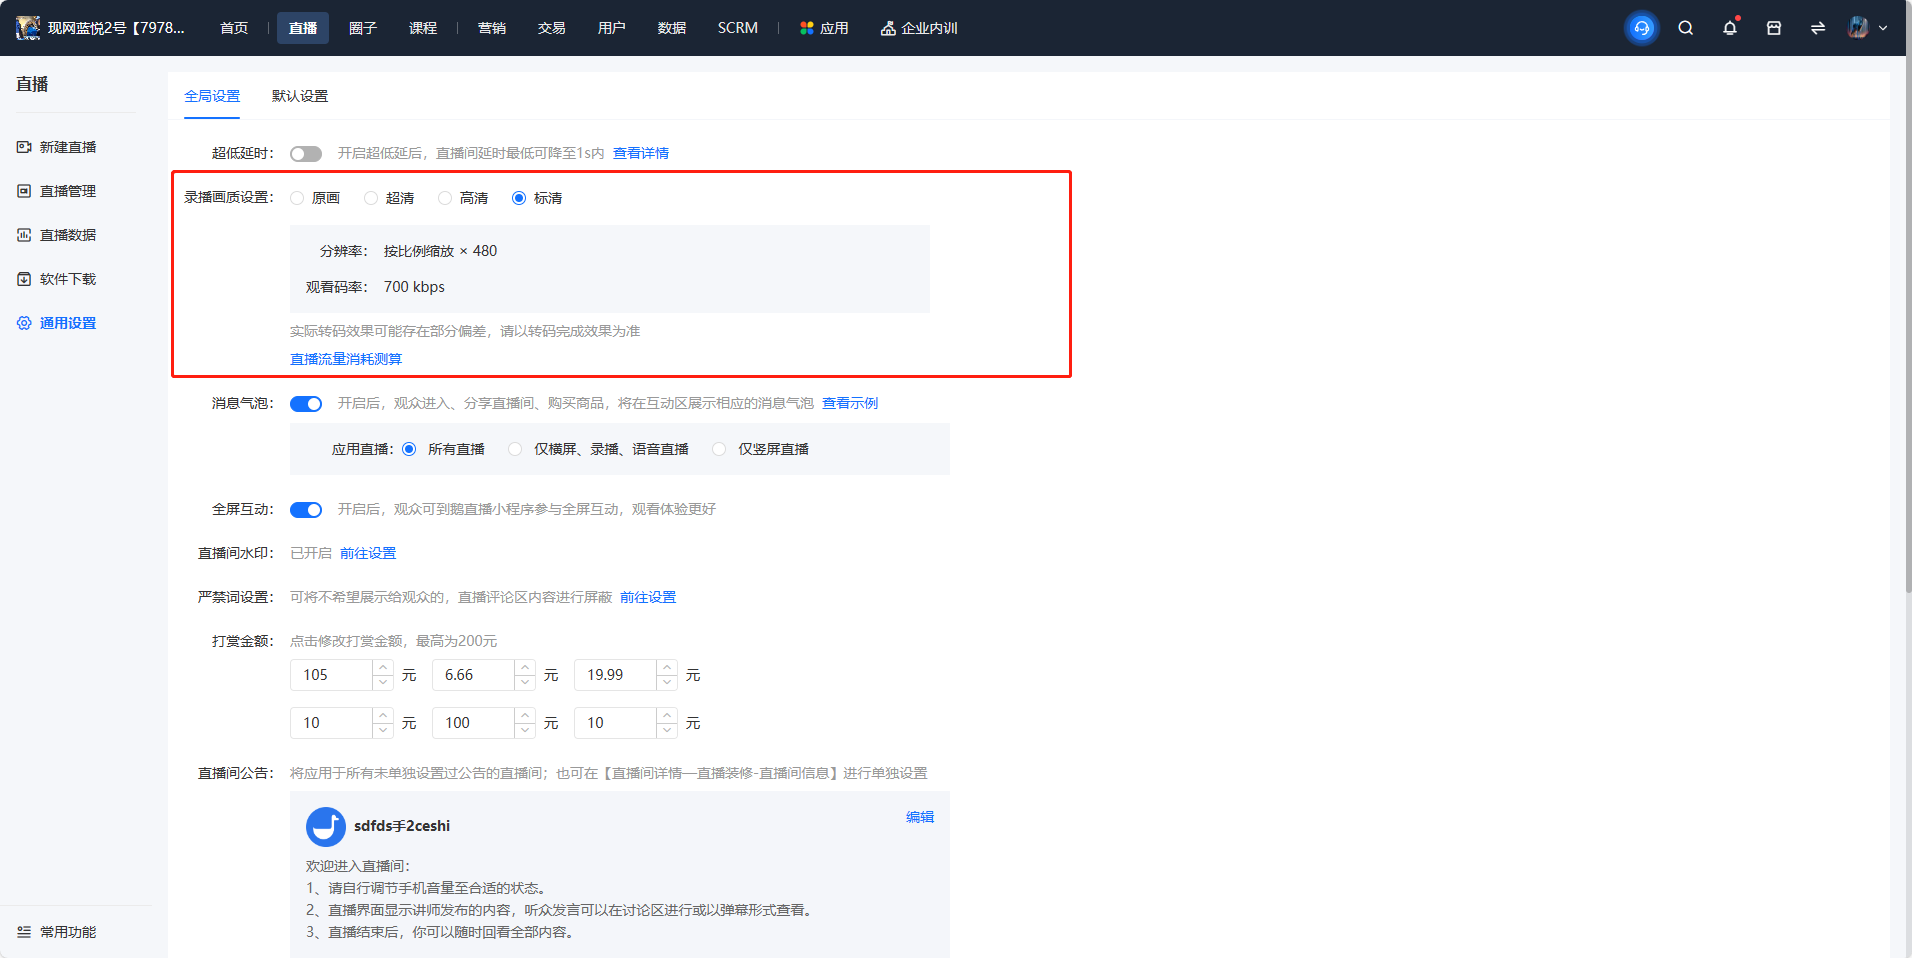
III. How to reduce live streaming traffic consumption when usingrecorded live streaming
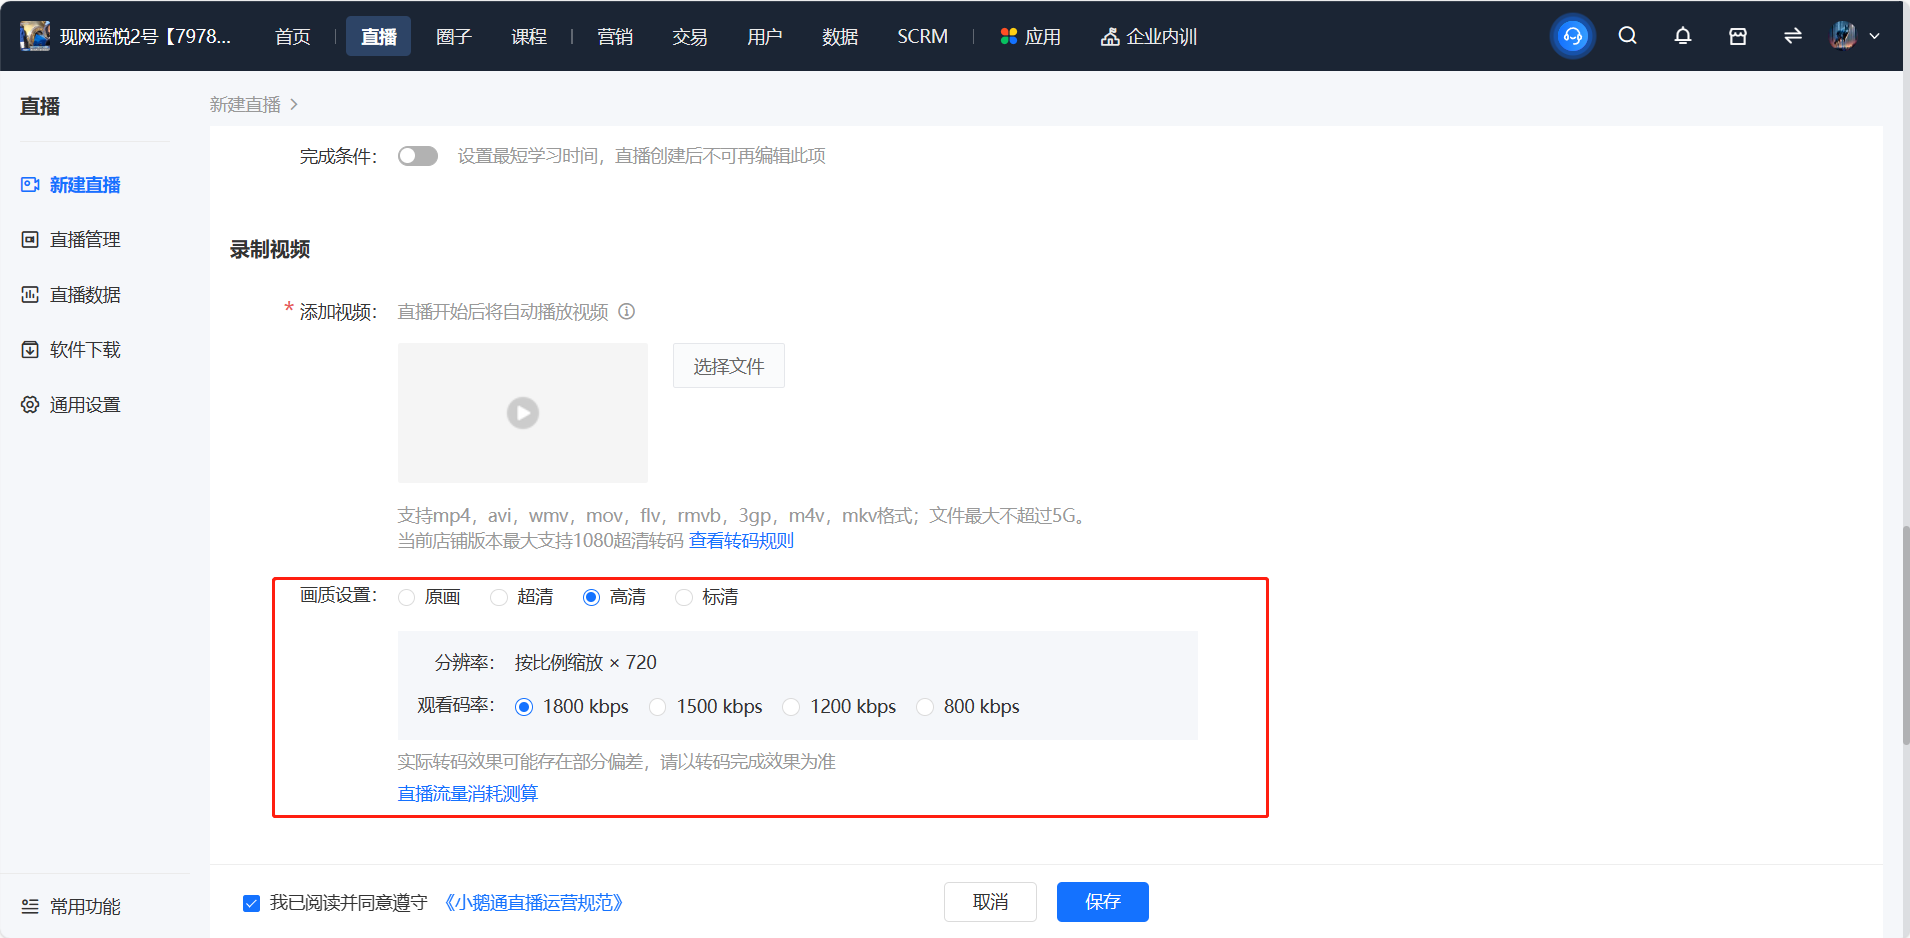
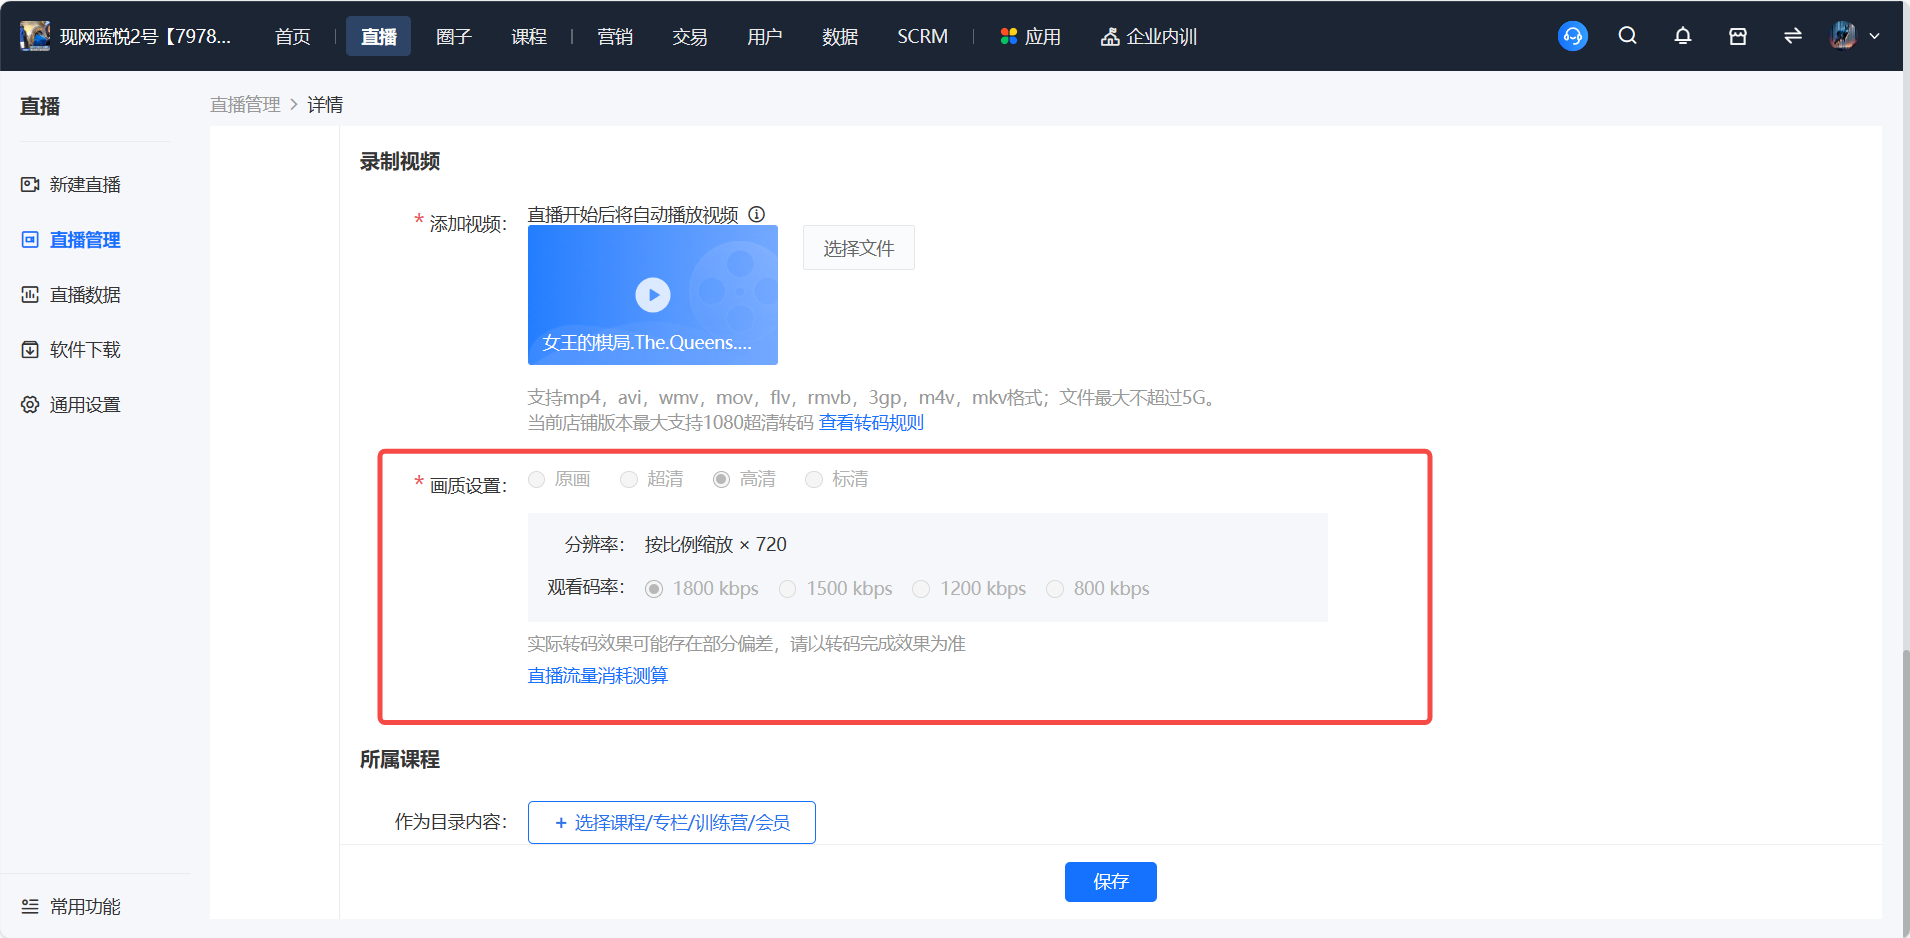
You can reduce the live streaming traffic consumption by lowering the clarity level settings or selecting a lower bitrate.
Operation path 1: New live streaming - Recorded video - Image quality settings
Operation path 2: Live streaming management - Management - Recorded video - Image quality settings
Operation path 3: General settings - Global settings - Recorded live streaming image quality settings
Black borders or incomplete display in the live streaming video
I. Black borders on the screen
● Scenario 1: Black borders appear during screen sharing
○ Example: Sharing the desktop
○ Reason 1: The screen sharing resolution of the computer desktop is not 16:9, which is common on Mac and Huawei computers. The resolution of Mac computers is usually 16:10.
○ Suggestion 1:
■ Step 1: It is recommended to check the screen resolution and adjust it to 16:9 if possible. The adjustment method is as shown in the following figure:
【Adjusting the screen resolution on a Mac computer】
【Screen resolution on a Windows computer】
■ Step 2: If there is no such resolution (e.g., on a Mac computer), it is recommended that the instructor share the window and ensure that the ratio of the shared window is 16:9 to avoid black borders. (Note: If some videos have built - in black borders, there will also be black borders when sharing these videos through window sharing.)
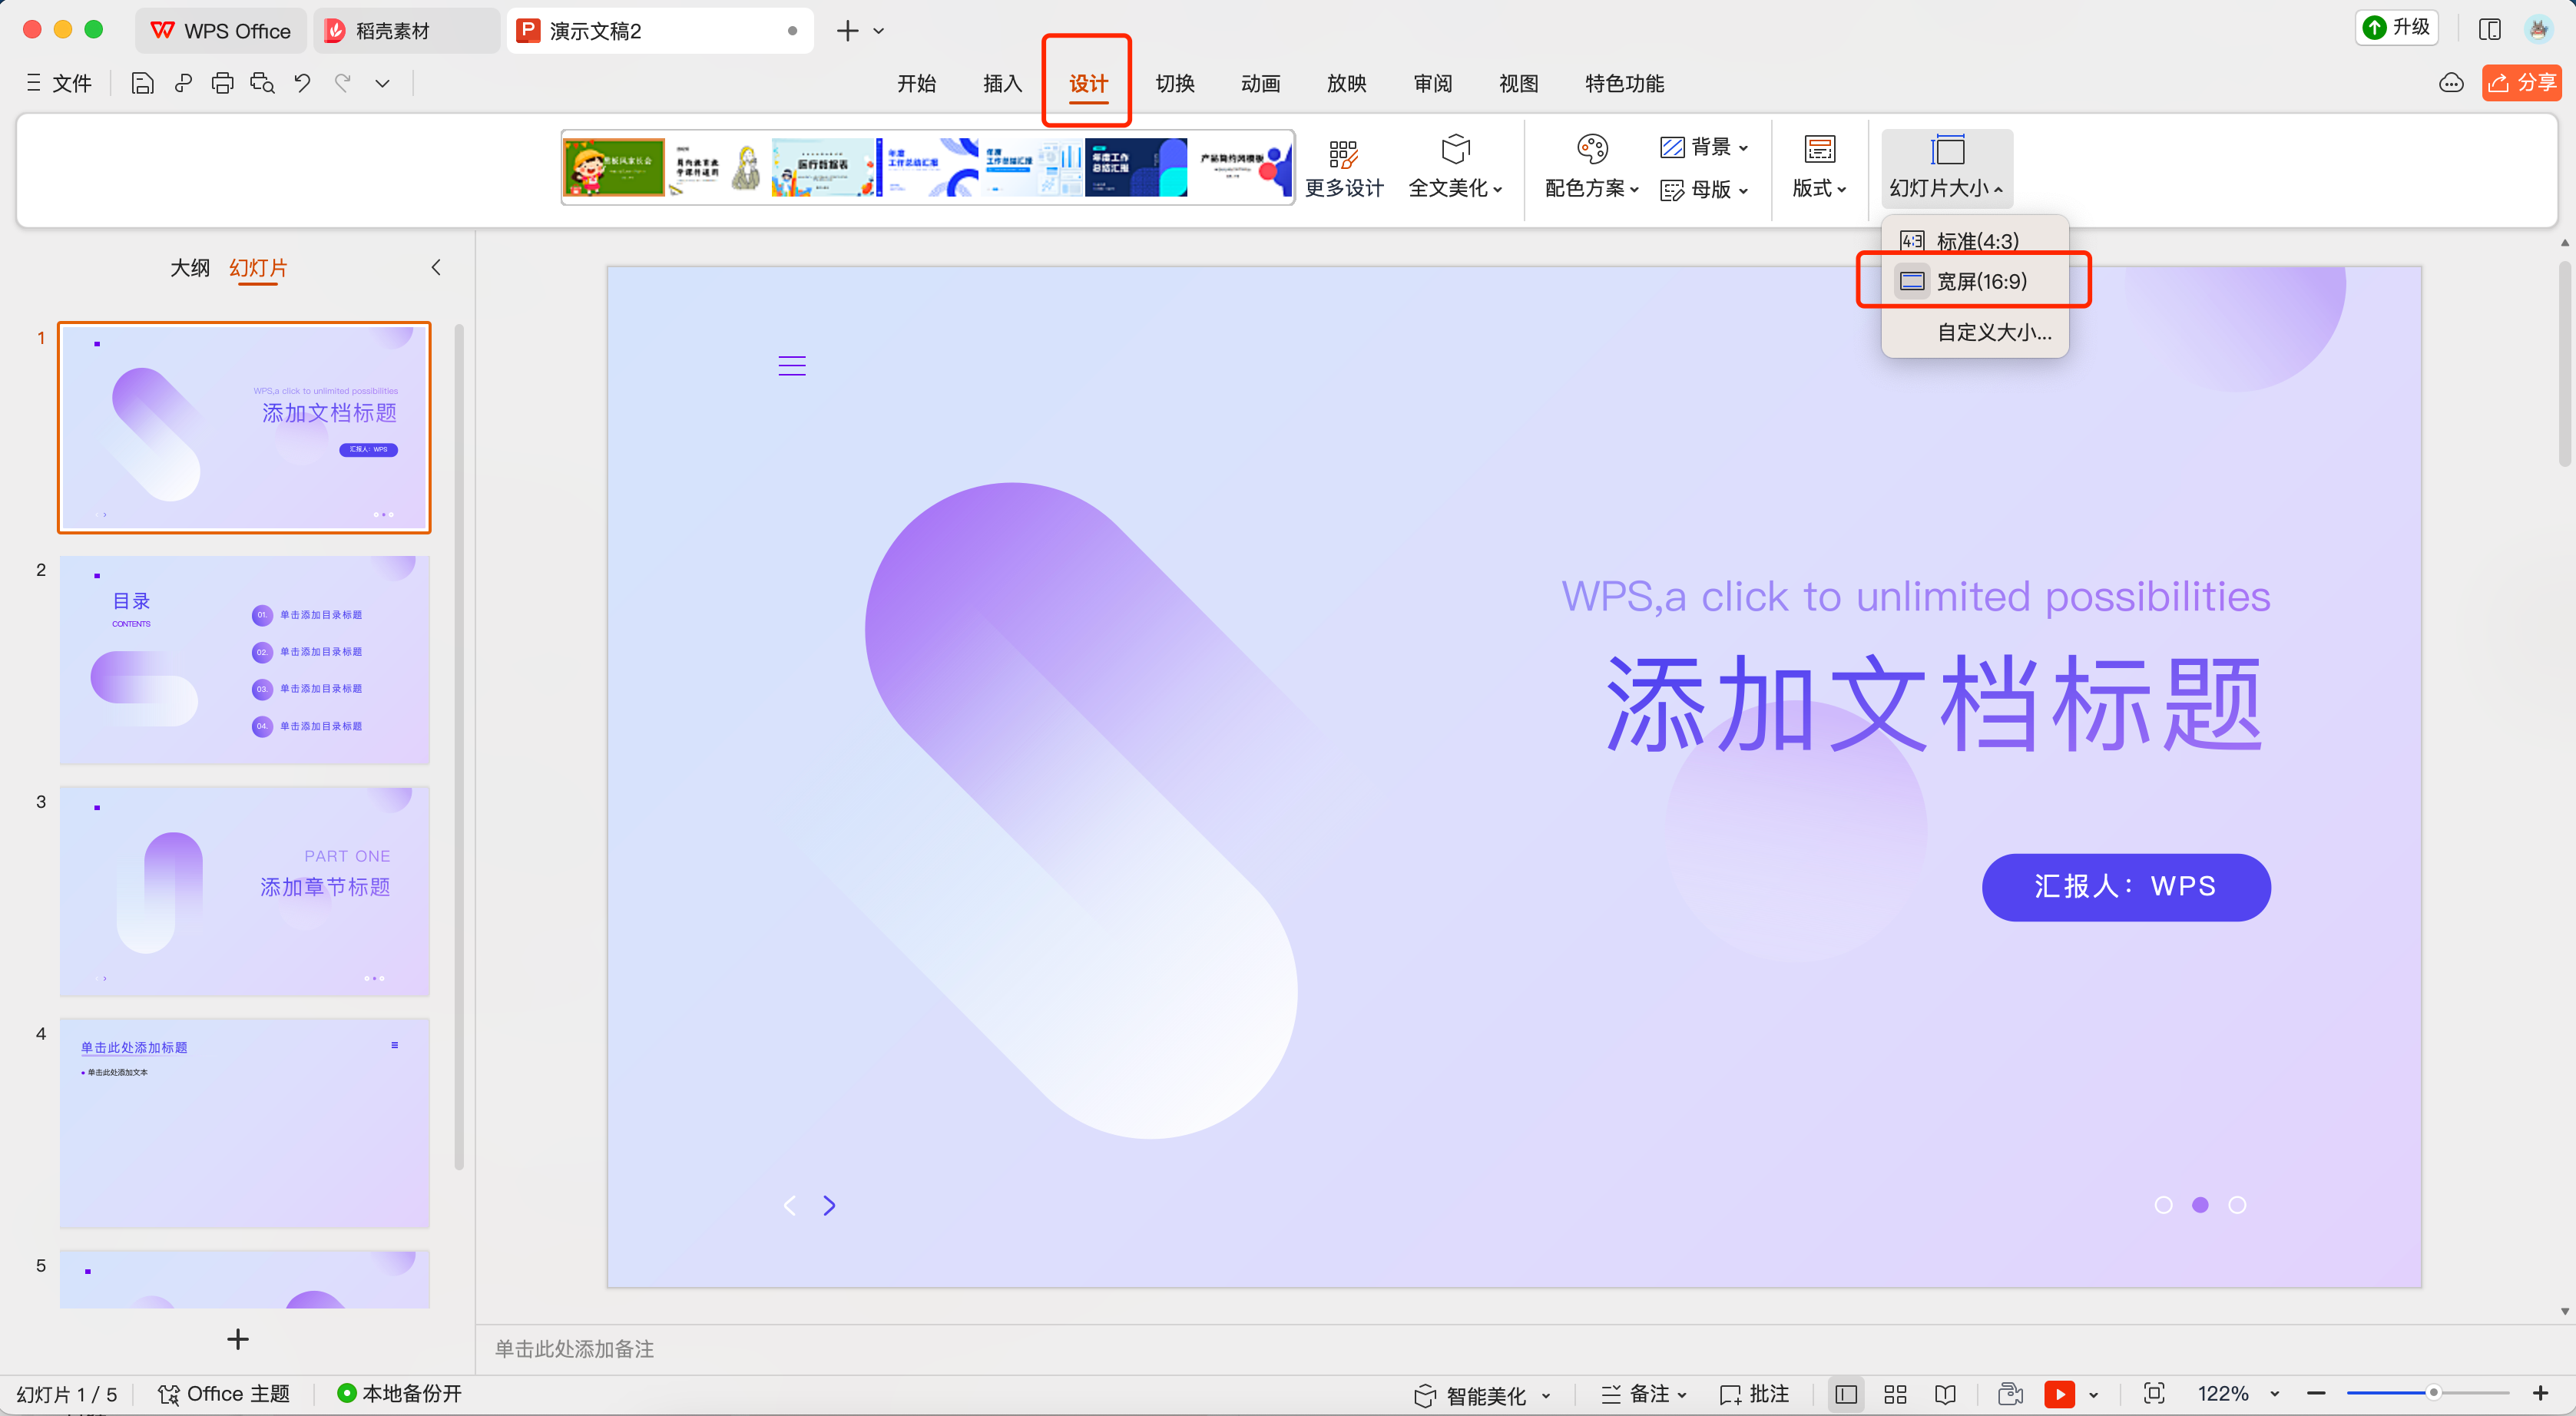
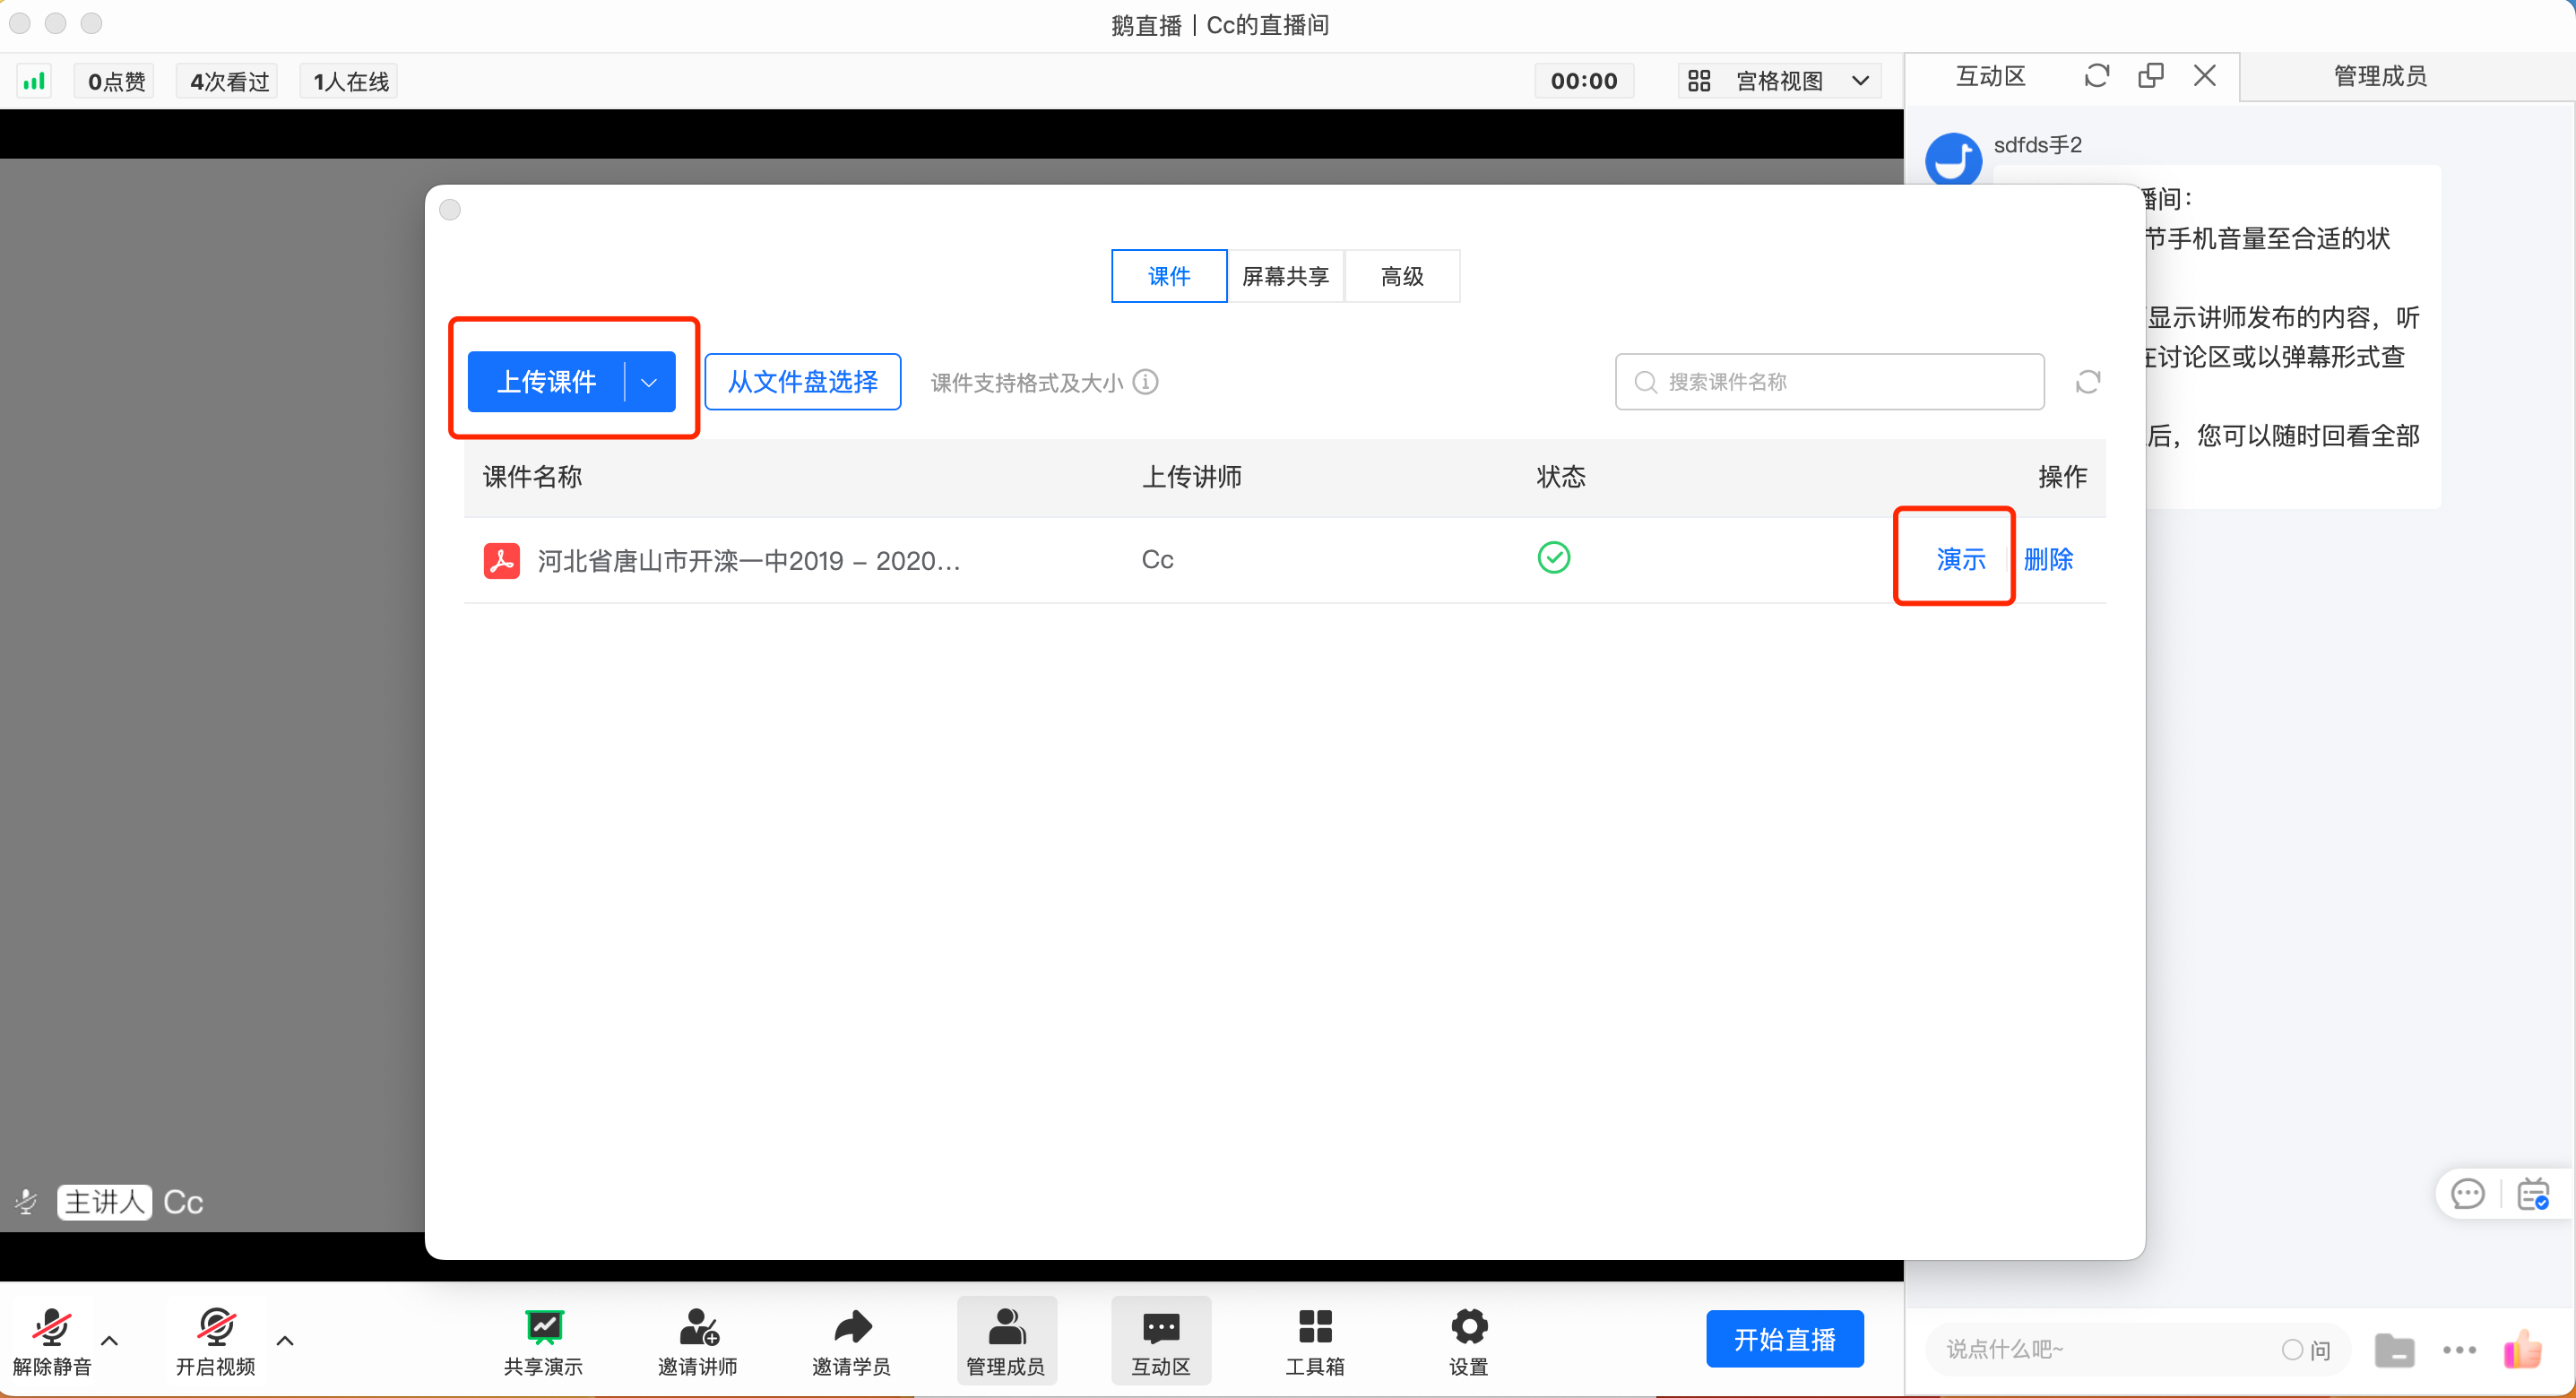
■ Step 3: If you cannot confirm the size of the shared window; if you are sharing courseware, it is recommended to upload the courseware to the live - streaming room for demonstration. Note that before uploading the courseware, you can adjust the size of the courseware to “Wide screen (16:9)” locally. The specific operation is as shown in the following figure:
◆ Step 1: Adjust the slide size in the design
◆ Step 2: Upload the courseware to the live - streaming room/file storage and select “Presentation”
If you are sharing a video, it is recommended to adjust the size of the local player. Taking Tencent Video as an example, if it is not in the compact mode, first enter the compact mode in the upper - right corner. If there are still black borders at this time, you can stretch the playback interface to adjust until you are satisfied.
■ Step 1: Open Tencent Video
■ Step 2: Click the compact mode
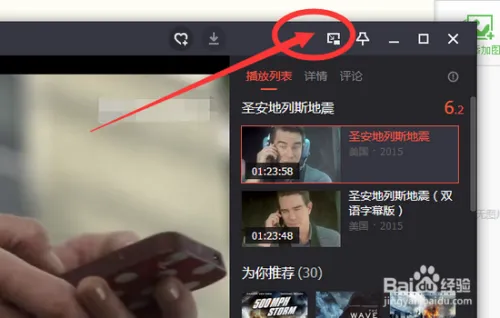
■ Step 3: After clicking the 【Compact mode】 icon, it will automatically enter the 【Compact mode】 for playback. At this time, you can also adjust the size of the video playback window with the mouse.
○ Reason 3: Since the viewing devices of some students are not 16:9, no matter how the instructor adjusts, there will still be black borders on some viewing devices.
● Scenario 2: Black borders appear in the round - table mode
○ Example:
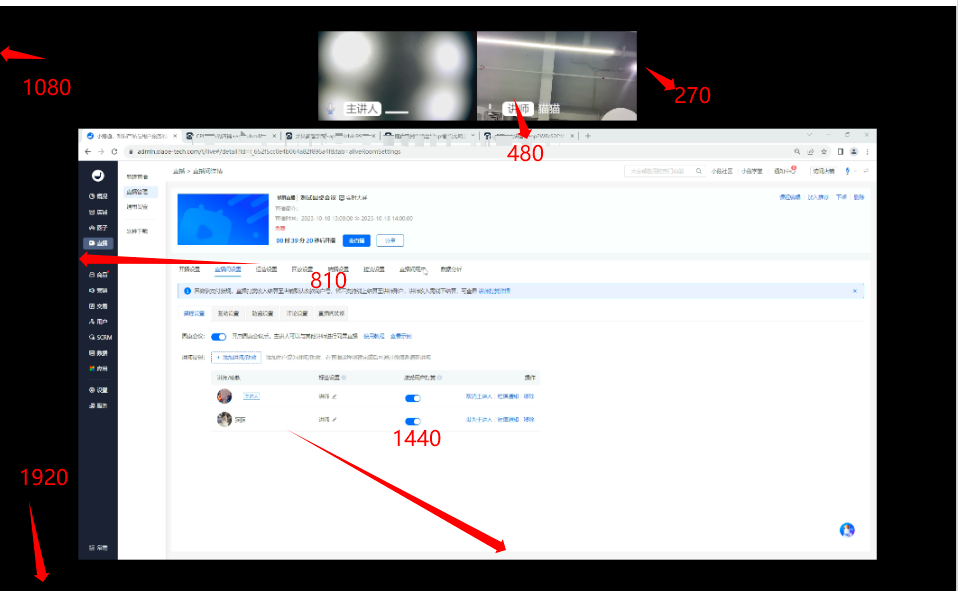
○ Reason: In the round - table meeting mode, the camera ratio is fixed at 16:9, and the content sharing ratio mode is 16:9. There will definitely be black borders in the empty part of the camera and around the content sharing. If the ratio of the shared window content itself is not 16:9, there will be two layers of black borders.
○ Suggestion: Adjust the ratio of the content - sharing window to 16:9 and set the background image of the video area to fill the black borders.
II. Incomplete screen display
● Scenario 1: In the vertical screen live - streaming mode, the viewing end cannot see the full screen
○ Reason: This situation is mainly related to the instructor's mobile device for streaming. The system defaults to streaming the entire screen of the instructor's mobile phone, while the screen ratios of each viewer's mobile phone model are different. Therefore, some models may have incomplete screen display.
○ Suggestion: When the instructor is doing vertical screen live - streaming, they can use another mobile phone to test the effect and leave a safe distance when making the background image. If using OBS for live - streaming and pushing, it is recommended to adjust the output ratio to 9:16.
● Scenario 2: In the horizontal screen live - streaming mode, the output image of the camera is inconsistent with the image captured by the external camera
○ Reason: Currently, the output image of the camera is 16:9, while the image captured by the external camera has a different ratio, so part of the image will be cropped.
○ Suggestion: It is recommended to check the output effect in the camera preview screen and adjust the ratio of the image captured by the external camera to 16:9.
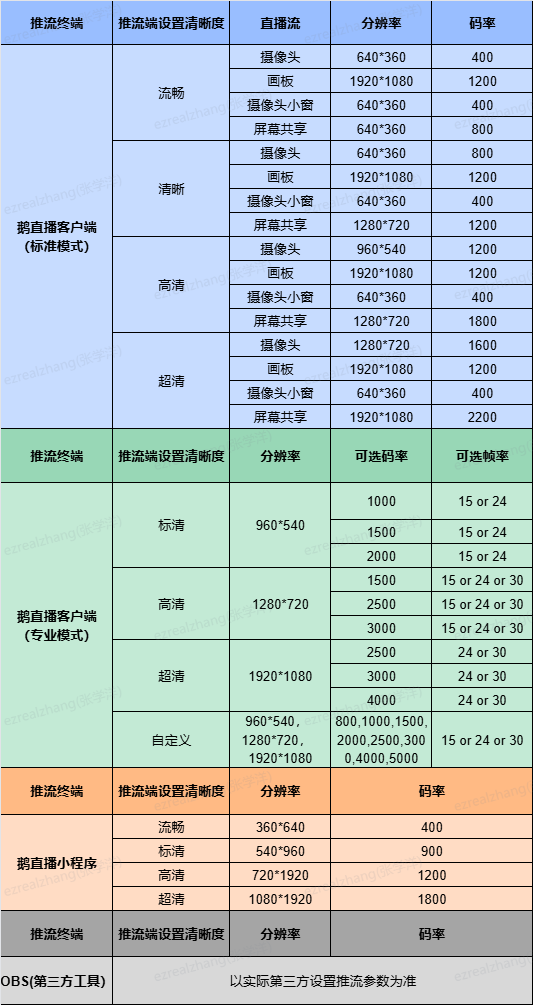
Video clarity of each live streaming push terminal
Problems and Solutions for Abnormal Live Room Access
When users encounter issues accessing the live streaming room, they can match the information on the pageand handle it with the corresponding solutions
1. Failed to enter the live streaming room due to network issues
● Scenario 1: Network issues
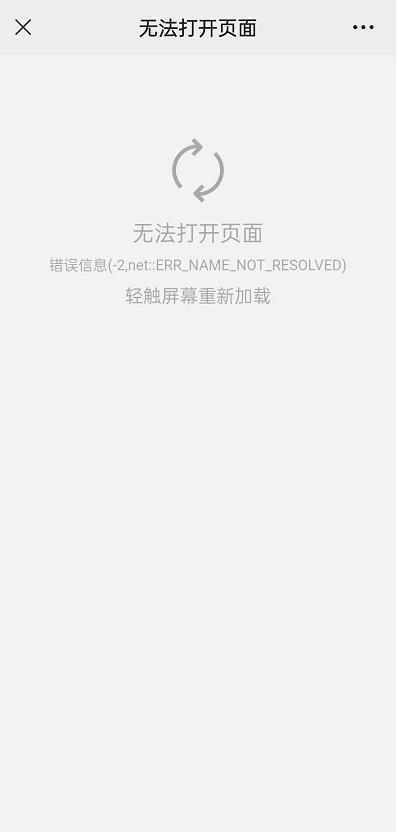
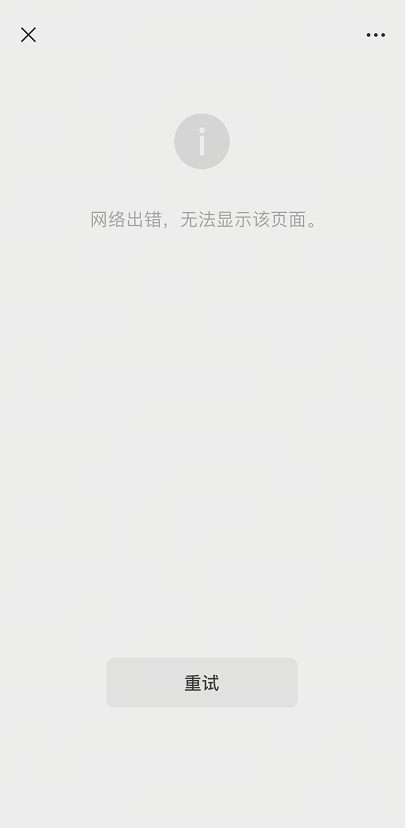
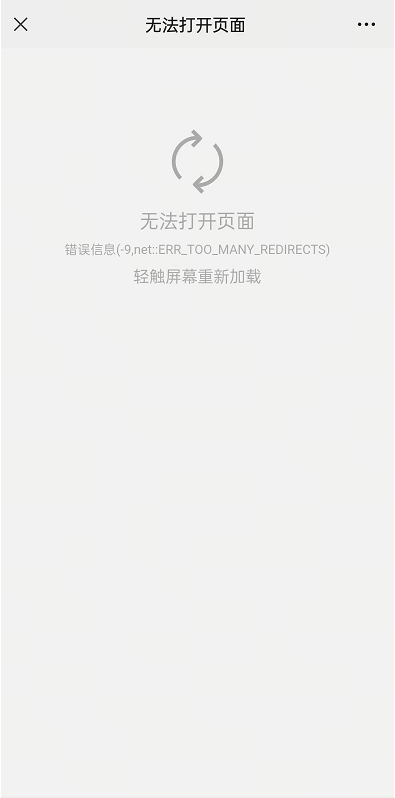
When you see the above page while accessing the live streaming room, you can follow the steps below to check if your network connection is normal:
1. Check the Wi-Fi connection: First, make sure that the Wi-Fi function of your device is turned on
a. Check if you are connected to an available Wi-Fi network
b. If you are connected to Wi-Fi but there is an exclamation mark next to the network icon, it means the network is unavailable. You can try disconnecting and reconnecting to Wi-Fi or restarting your device
2. Check the mobile data connection: If Wi-Fi is unavailable or the signal is weak, you can try using mobile data
a. Make sure that the mobile data function on your device is turned on
b. Check if the signal bar on your device shows a mobile data signal (e.g., 4G/5G)
3. Check the VPN settings: If you have used a VPN (Virtual Private Network) before, it may affect your network connection
a. You can go to the 'Settings' menu on your device and find the 'VPN' option
b. If the VPN is enabled, it is recommended to turn it off and then try to connect to the network again
4. Set the device DNS: The DNS settings of your device may affect the network connection
a. Go to the 'Settings' menu and find the 'Wi-Fi' option
b. Select the Wi-Fi network you are currently connected to and click on 'Modify Network' or a similar option
c. In the 'IP settings' or 'Advanced options', find the DNS settings and try changing the DNS address to 114.114.114.114
d. After the change, save the settings and reconnect to the Wi-Fi network
After following the steps above, most network connection issues should be resolved. If the problem persists, it is recommended that you contact your network service provider or device manufacturer for further assistance.
Common issues and solutions for audio-video out-of-sync in live streaming
WhenAudio and video are out of sync during the live stream, affecting the viewing experience, you can match the corresponding solution according to the live streaming tool and scenario for processing
1 OBSStreaming tool
Problem | Scenario | ProblemCause | SolutionMethod |
1 | OBSStreaming + Network frame loss | Streaming deviceNetworkPacket loss,resulting in frame loss or skipping in the input picture of the stream/Frame skipping | It is recommendedCheck the OBS monitor andadjust the network by yourself:【OBS】How to monitor the streaming quality? |
OBS | Streaming + Ultra - high bitrateStreaming | Configuring an ultra - high bitrate requires a high network bandwidth. When the bandwidthis not sufficient, frame loss occursBandwidthIt is recommended | to set the bitrate according to therecommendedbitrate value:【OBS】Recommended live streaming settings |
OBS streaming + Beauty filter plugin | The camera uses | YY Beautyand otherplugins, causing a delay in the camera picture output and resulting in audio - video out - of - sync● | If the beautypluginis enabled,it is recommendedto turn off the beautyplugin and try● If a voice - tuning software is enabled,it is recommendedto turn off the voice - tuning software and try● If the sound card has a built - in voice - tuning console,it is recommendedto set it back to thedefaultconfiguration and try4OBSStreaming + Device performance |
The CPU usage of the streaming device is high, resulting in audio - video out - of - sync | It is recommended to check the OBS monitor. If the device performance is poor, consider replacing thedevice: | 【OBS】How to monitor the streaming quality?5 | OBS streaming + Non - network and non - device performance scenarioIf it is confirmed that the network and CPU of the streaming device are normal, |
1. You can try | to adjust the audio synchronization offset and manually correct the audio and video | 2. If the previous steps have no effect, try restarting OBS2 | elink Live streaming clientProblemScenario Problem |
CauseSolution
Method | 1 | Network jitterNetwork jitter causes packet loss and frame loss in the audio and video upload | When the clientshows a poor network prompt, |
it is recommended | to switch to a stable network | 2 | Device performance (mainly CPU)When the CPU load is high, the frame rate of audio and video picture capture fluctuatesIt is recommendedto close unused software or replace the device with better performance3 |
External microphone malfunction | The input delay of the external microphone causes audio - video out - of - sync | 1. It is recommended to test whether there is a delay when using this peripheral in other software | 2. If it malfunctions in all software, it is recommended to replace the problematic peripheral4 |
Custom beauty filter | Users use a custom beauty filter, which consumes performance and | affects audio and video encoding and decoding | It is recommended to temporarily turn off the beauty effect |
or replace the device with better performance | 5 | Virtual camera input delayUsers use virtual cameras such as YY and OBS, but input delay occurs, resulting in audio - video out - of - sync | Third - party virtual cameras are currently uncontrollable. It is recommended to try turning off the virtual camera for debugging and observe whether there is a delay in the pictureTemporarily turn off the beauty effectOr replace with a device with better performance |
5 | Input delay of the virtual camera | The user is using virtual cameras such as YY or OBS, but input delay occurs, resulting in out-of-sync audio and video | Currently, third-party virtual cameras cannot be controlled. It is recommended to try turning off the virtual camera for debugging and observe if there is any delay in the picture |
Suggestions for live streaming equipment and parameter settings
I. Live Streaming via eLink Live Client
1. Live Streaming Device
CPU: Intel i5 - 9300
Graphics Card: NVIDIA GTX 1060 3GB
Memory: Over 8GB
2. Live Streaming Network
Stable upload speed of 3000KB/S;
3. Camera
Logitech C920 or C930e, or other HD cameras capable of supporting 1080P (resolution should support at least 1280*720);
Camera Resolution: 1920*1080 or 1280*720;
4. Beautification Software
It is recommended to use the beautification tool built - in the eLink Live Client;
5. Live Streaming Parameters
Clarity Settings:
Ultra - HD: Bitrate around 3200, Frame Rate 24, 1080P
HD: Bitrate around 2400, Frame Rate 15, 1080P
SD: Bitrate around 1600, Frame Rate 15, 1080P
Clear: Bitrate around 1000, Frame Rate 15, 1080P
II. Live Streaming via eLink Live Mini Program
1. eLink Live Mini Program - Streaming Instructor
Ultra - HD: Bitrate around 3200, Frame Rate 30, 1080P
HD: Bitrate around 2400, Frame Rate 24, 1080P
Clear: Bitrate around 1600, Frame Rate 24, 1080P
Smooth: Bitrate around 1000, Frame Rate 24, 1080P
2. eLink Live Mini Program (Multi - person) - Students/Guests
No Selection: Bitrate 400, Frame Rate 15, 540P
III. Live Streaming via eLink Live APP
Clarity Settings:
Ultra - HD: Bitrate around 3200, Frame Rate 30, 1080P
HD: Bitrate around 2400, Frame Rate 24, 720P
SD: Bitrate around 1600, Frame Rate 24, 540P
Smooth: Bitrate around 1000, Frame Rate 24, 360P
IV. Live Streaming via eLink Assistant
1. Live Streaming Device
CPU: Inteli5 - 9300
Graphics Card: NVIDIA GTX 1060 3GB
Memory: Over 8GB
2. Live Streaming Network
Stable upload speed of 3000KB/S;
3. Camera
Logitech C920 or C930e, or other HD cameras capable of supporting 1080P (resolution should support at least 1280*720);
Camera Resolution: 1920*1080 or 1280*720;
4. Beautification Software
It is recommended to use the beautification tool built - in the eLink Assistant;
5. Live Streaming Parameters
Clarity Settings:
Ultra - HD: Bitrate around 3200, Frame Rate 24, 1080P
HD: Bitrate around 2400, Frame Rate 15, 1080P
Clear: Bitrate around 1600, Frame Rate 15, 1080P
Smooth: Bitrate around 1000, Frame Rate 15, 1080P
V. Live Streaming via PC Web
1. Live Streaming Device
CPU: Intel i5 - 9300
Graphics Card: NVIDIA GTX 1060 3GB
Memory: Over 8GB
2. Live Streaming Network
Stable upload speed of 3000KB/S;
3. Camera
Logitech C920 or C930e, or other HD cameras capable of supporting 1080P (resolution should support at least 1280*720);
Camera Resolution: 1920*1080 or 1280*720;
4. Live Streaming Parameters
Clarity Settings(No Selection):
Main Stream (Camera): Bitrate around 900, Frame Rate 15, 720P
Secondary Stream (Screen Sharing): Bitrate around 2000, Frame Rate 15, 720P
VI. Third - Party Streaming (OBS)
1. Live Streaming Parameters
Bitrate: The recommended bitrate is 1500 - 3000, which can be selected according to the network speed and computer equipment as needed.
Frame Rate: The higher the frame rate, the smoother the picture. It is recommended to set the common FPS value to 30;
Smooth: 1000
SD: 1600
HD: 2400
Ultra - HD: 3200
And so on...
2. OBS Usage Tutorial
You can refer to the following link :
https://helpcenter.xiaoe - tech.com/#/problem/detail?document_id=doc_5eb50e26e1f6e_fcnIf
Or search in the Help Center:【OBS】Client Usage Tutorial
Common Questions about Live Learning Data
Scenario 1:
Question: Why do users enter the live - streaming room to claim coupons, sign in, or participate in lucky draws, but their live - streaming viewing time is 0?
Answer: Only when the live - streaming room player is in the playing state will it be regarded as valid learning for reporting. There is no necessary relationship between the actions of claiming coupons, signing in, or participating in lucky draws and the viewing time. It's possible that users only participated in the interaction but did not actually play the live - stream.
Scenario 2:
Question: Why do users who have entered the live - streaming room have a viewing time of 0?
Answer: If users stay in the live - stream for less than 10 seconds, their viewing time will be recorded as 0 seconds.
Scenario 3:
Question: Users use the campus network and enter multiple live - streaming rooms to watch, but their viewing time is 0?
Answer: Some campus networks have restrictions, which prevent the learning data from being reported normally. It is recommended to try switching the network for viewing.
Scenario 4:
Question: Will the learning time be accumulated if users switch between different devices/ports during the live - stream viewing?
Answer: Yes, it will be accumulated.
How to edit the recorded playback of live streams?
【Scenario 1】Recorded live streaming rooms created on or after May 22, 2024
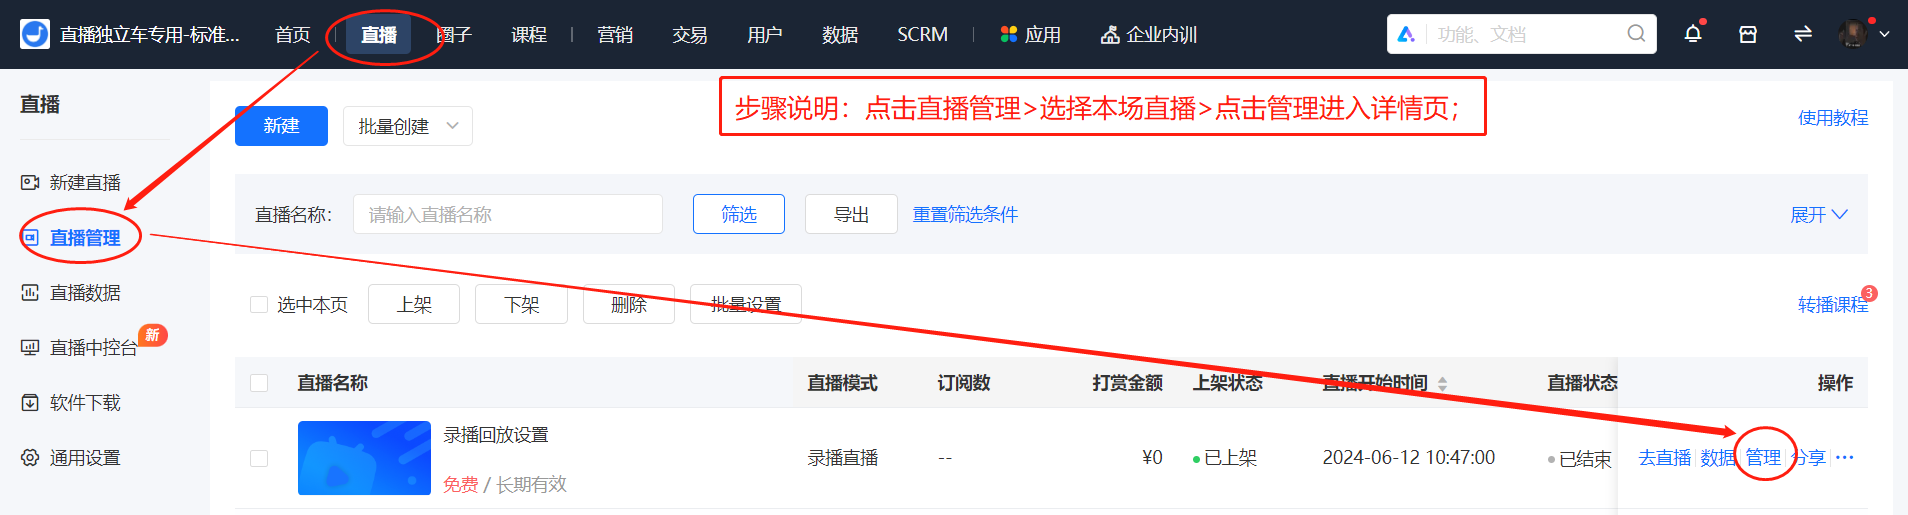
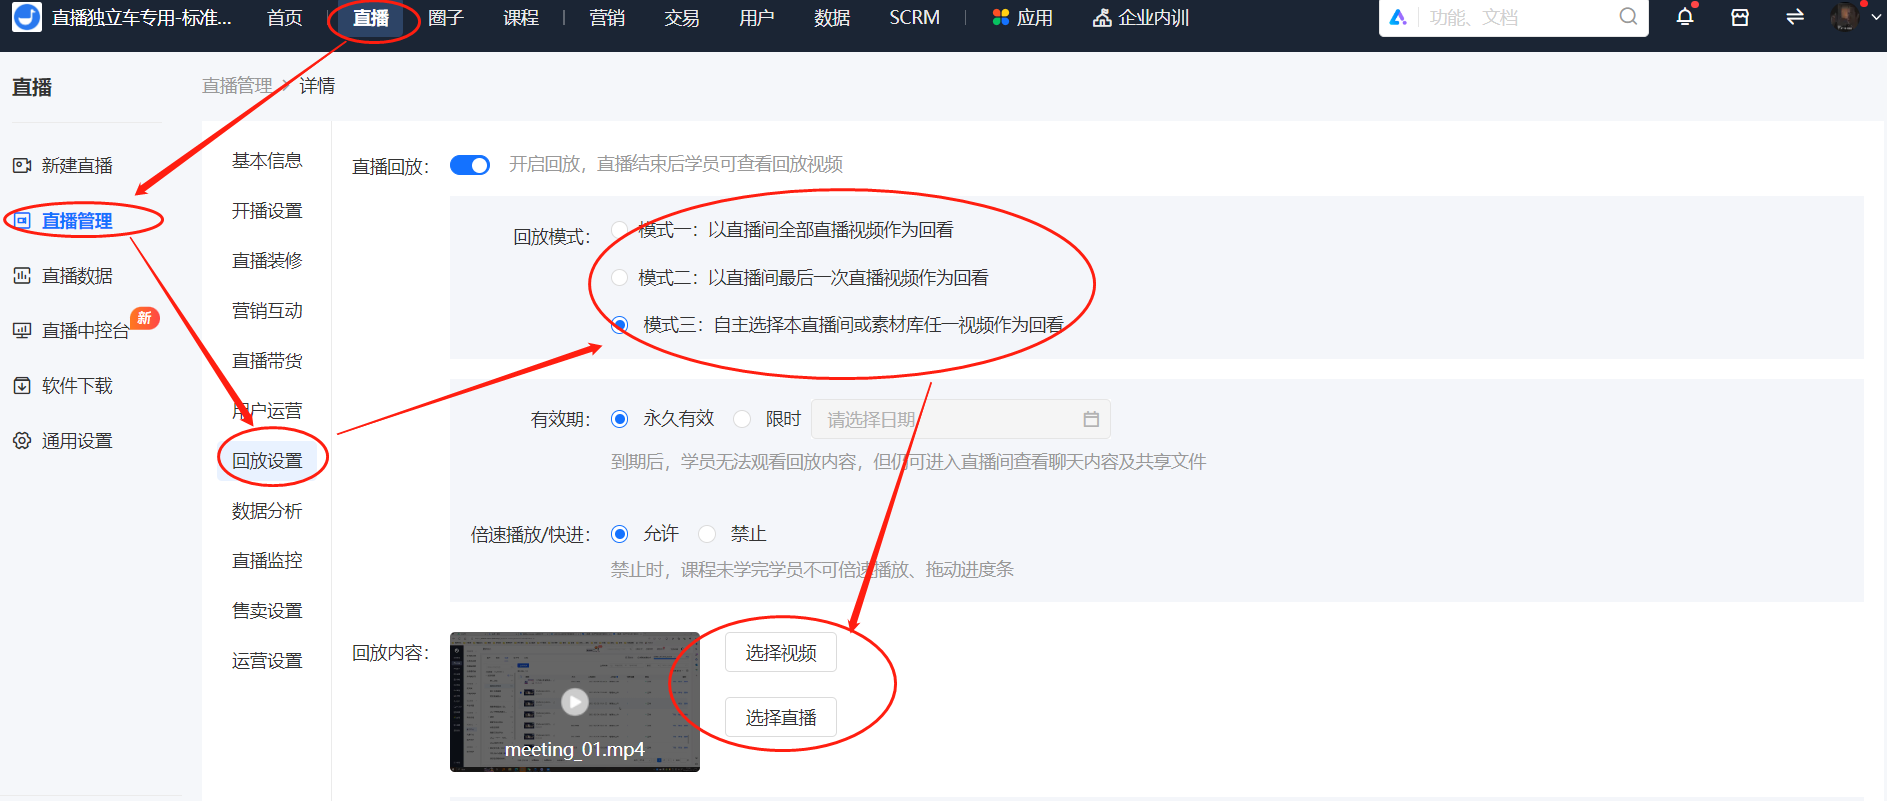
If your current recorded live streaming room was created on or after May 22, 2024, you can enter the playback settings via Live Streaming Management > and select from three modes. If you need to replace the previous live streaming playback video, you can select 【Mode 3】 and choose a video or a previously streamed live broadcast to replace the playback video. You can refer to the above guidance.
(If your live streaming room is a "Streamed Live Streaming Room" and was created after May 22, 2024, you can also modify the playback video using this method.)
Kind reminder: If you choose to reference a historical live broadcast, currently only live broadcasts created after June 1, 2024 are supported.
【Scenario 2】Recorded live streaming rooms created before May 22, 2024
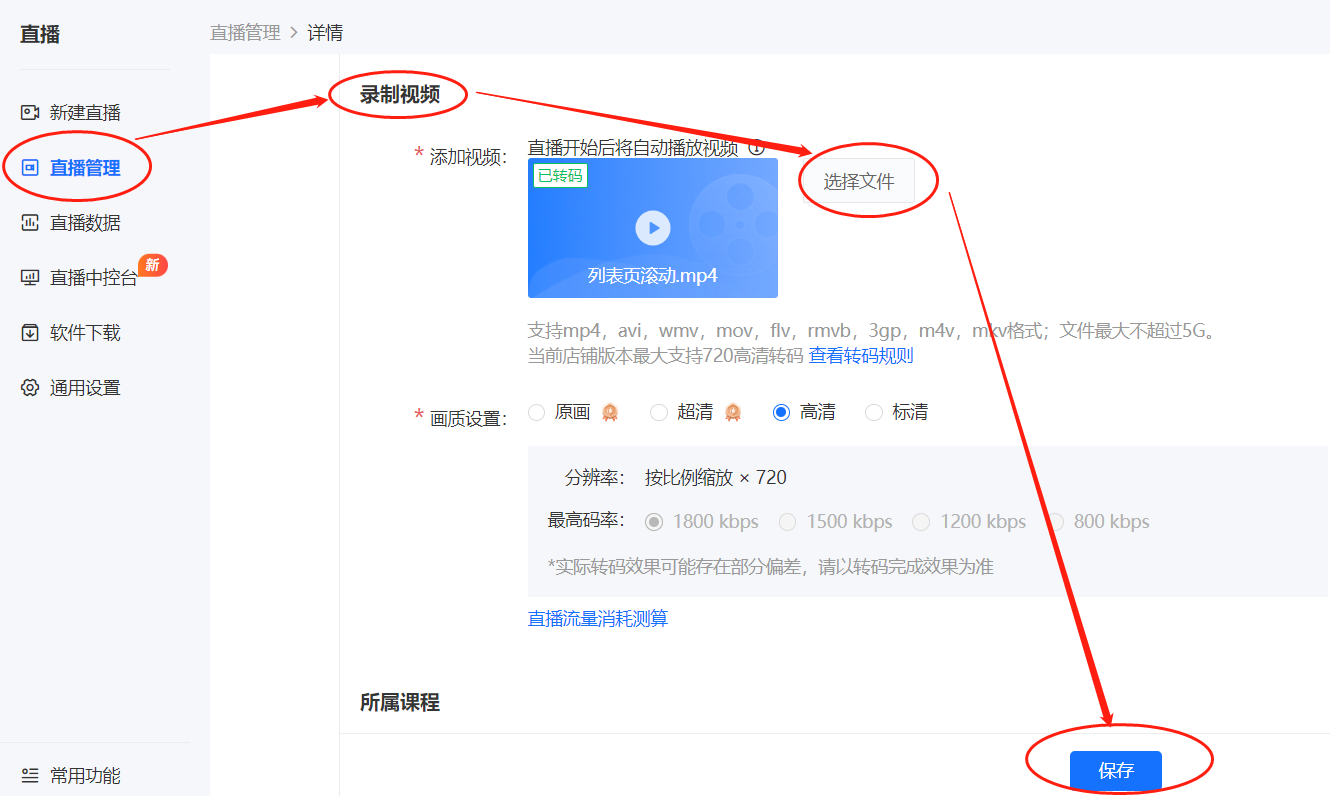
If your current recorded live streaming room was created before May 22, 2024, and you need to replace the playback video, you can click "Select File" on the live streaming details editing page, choose the video you want to replace, and after successful saving, once the transcoding is completed, the playback video that users watch in the live streaming room will be the newly replaced video. You can refer to the above guidance.