# Home Page

# Information hiding

# How to hide the number of course update periods?

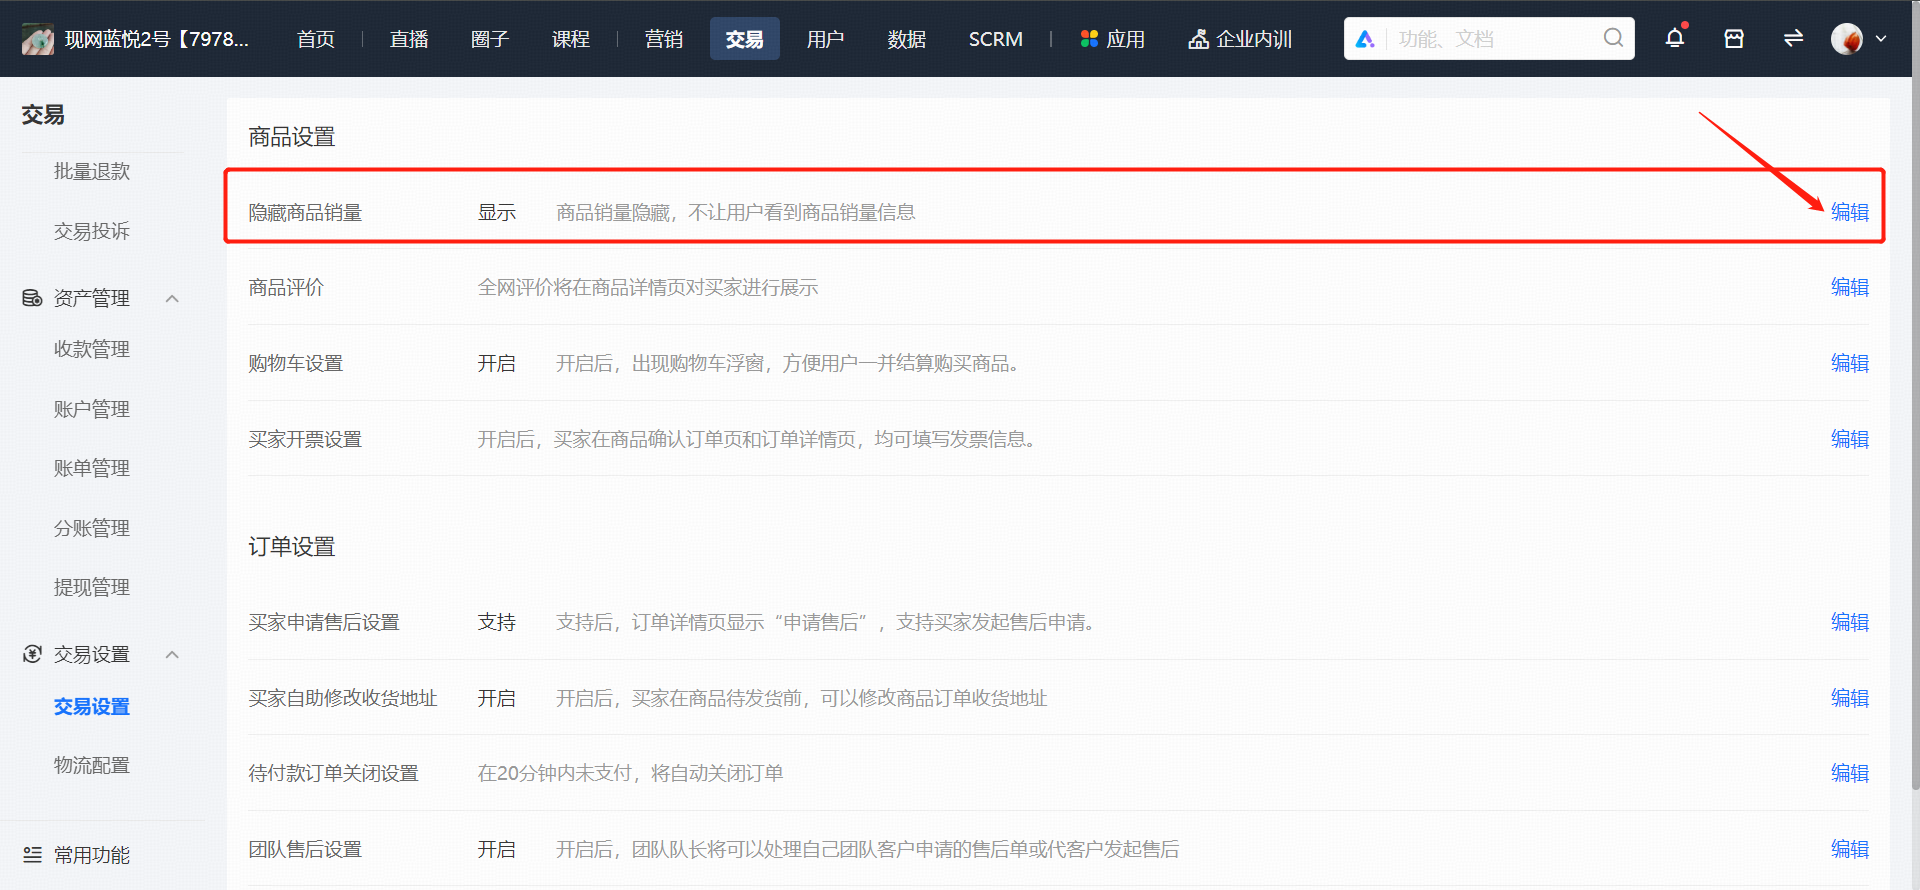
<div data-elink-language-switch="1" id="bkmrk-%E4%B8%AD%E6%96%87" style="border:1px solid #d6d9de;border-radius:6px;padding:10px 12px;margin:0 0 18px 0;background:#f8fafc;font-size:14px;">[中文](/books/877a9/page/f7184)</div><span style="color:rgb(43,43,43);font-size:15px;">Log in to the store management backend. In \[Settings\] → \[Store Settings\], set to hide the update periods. After selecting to hide, the update periods of products will no longer be displayed on the mobile store.</span>

![0.png](https://wechatapppro-1252524126.file.myqcloud.com/help_document/image/ueditor/82297800_1640665099.png ".png")

![1.png](https://wechatapppro-1252524126.file.myqcloud.com/help_document/image/ueditor/27900700_1640665136.png ".png")

# Why can the number of participants still be seen in the live stream even after setting the [Hide Views] option?

<div data-elink-language-switch="1" id="bkmrk-%E4%B8%AD%E6%96%87" style="border:1px solid #d6d9de;border-radius:6px;padding:10px 12px;margin:0 0 18px 0;background:#f8fafc;font-size:14px;">[中文](/books/877a9/page/45c48)</div><span style="white-space:pre-wrap;background-color:rgb(255,255,255);font-size:15px;">To hide the number of visitors to the live streaming room, you also need to set the number of participants to \[Visible only to the instructor\] in \[More\] - \[Live streaming room information\] of the live streaming product.</span>

# What data does the information hiding feature support hiding?

<div data-elink-language-switch="1" id="bkmrk-%E4%B8%AD%E6%96%87" style="border:1px solid #d6d9de;border-radius:6px;padding:10px 12px;margin:0 0 18px 0;background:#f8fafc;font-size:14px;">[中文](/books/877a9/page/ffd52)</div><span style="font-size:15px;">Information hiding supports hiding product sales/subscription numbers, the number of updates for columns/membership courses, course views/visits, the number of visitors in the live - streaming room, and reward reminders (reward amount reminders).</span>

# Tutorial on Information Hiding

<div data-elink-language-switch="1" id="bkmrk-%E4%B8%AD%E6%96%87" style="border:1px solid #d6d9de;border-radius:6px;padding:10px 12px;margin:0 0 18px 0;background:#f8fafc;font-size:14px;">[中文](/books/877a9/page/816b1)</div>**I. Function Introduction**

Information hiding, customizable hiding<span style="white-space:pre-line;background-color:rgb(255,255,255);">Product sales volume</span>, number of updates, views/visits.

**II. Purpose of Use**

For merchants in the initial stage of operation, to avoid affecting the conversion rate of course subscriptions due to insufficient course subscriptions.

**III. Usage Scenarios**

<span style="color:rgb(53,53,53);background:rgb(255,255,255);letter-spacing:0pt;vertical-align:baseline;font-size:15px;">A merchant is in the initial stage of operation. It is a very successful educational institution offline and wants to develop online education. However, in the initial stage of operation, there are temporarily no students subscribing to the courses. Therefore, it is necessary to hide the number of course subscriptions and views/visits, and then make them visible after students start subscribing one after another.</span>

**IV. Operation Path**

Merchant side

Path 1: Merchant backend →<span style="white-space:pre-line;background-color:rgb(250,250,250);">Settings → Function configuration</span>

**V. Usage Tutorial**

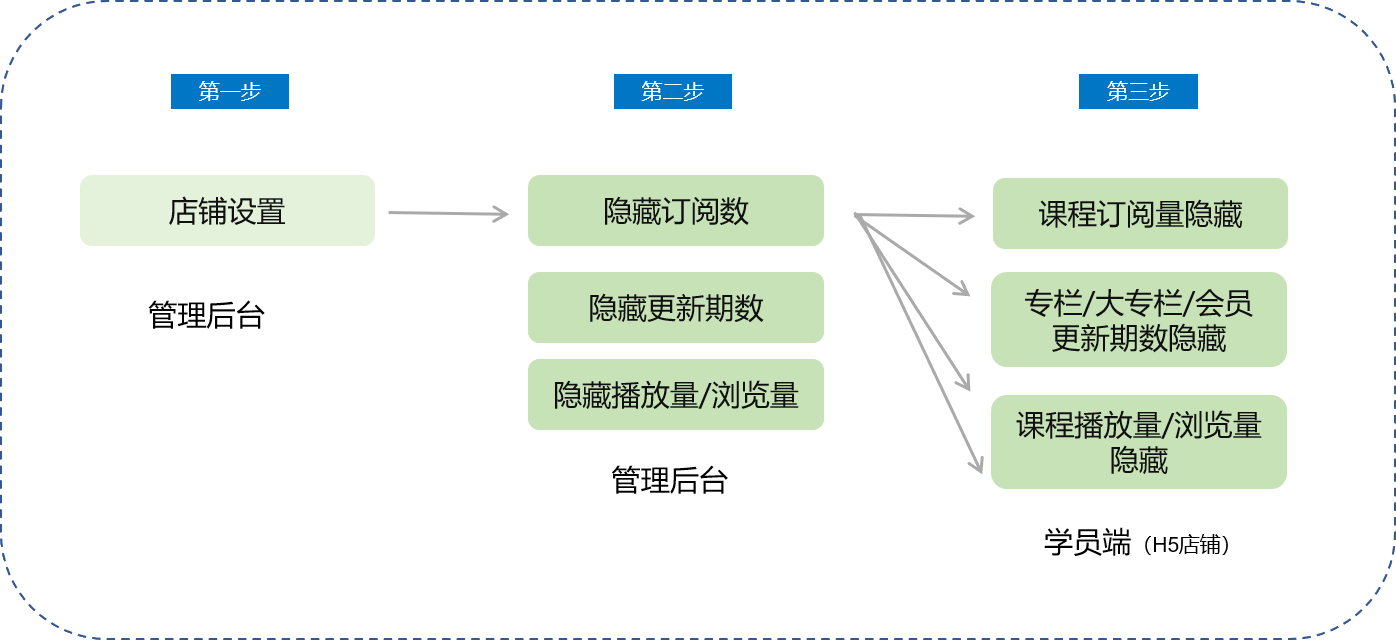
![44713100_1640152460.jpg](https://wechatapppro-1252524126.file.myqcloud.com/help_document/image/ueditor/44713100_1640152460.jpg)

**Step 1Set hiding<span style="white-space:pre-line;background-color:rgb(250,250,250);">Product sales volume</span>**

<span style="white-space:pre-line;background-color:rgb(250,250,250);">1. Click \[Settings\] - \[Store settings\], and find the setting item for hiding product sales volume in the function configuration module.  
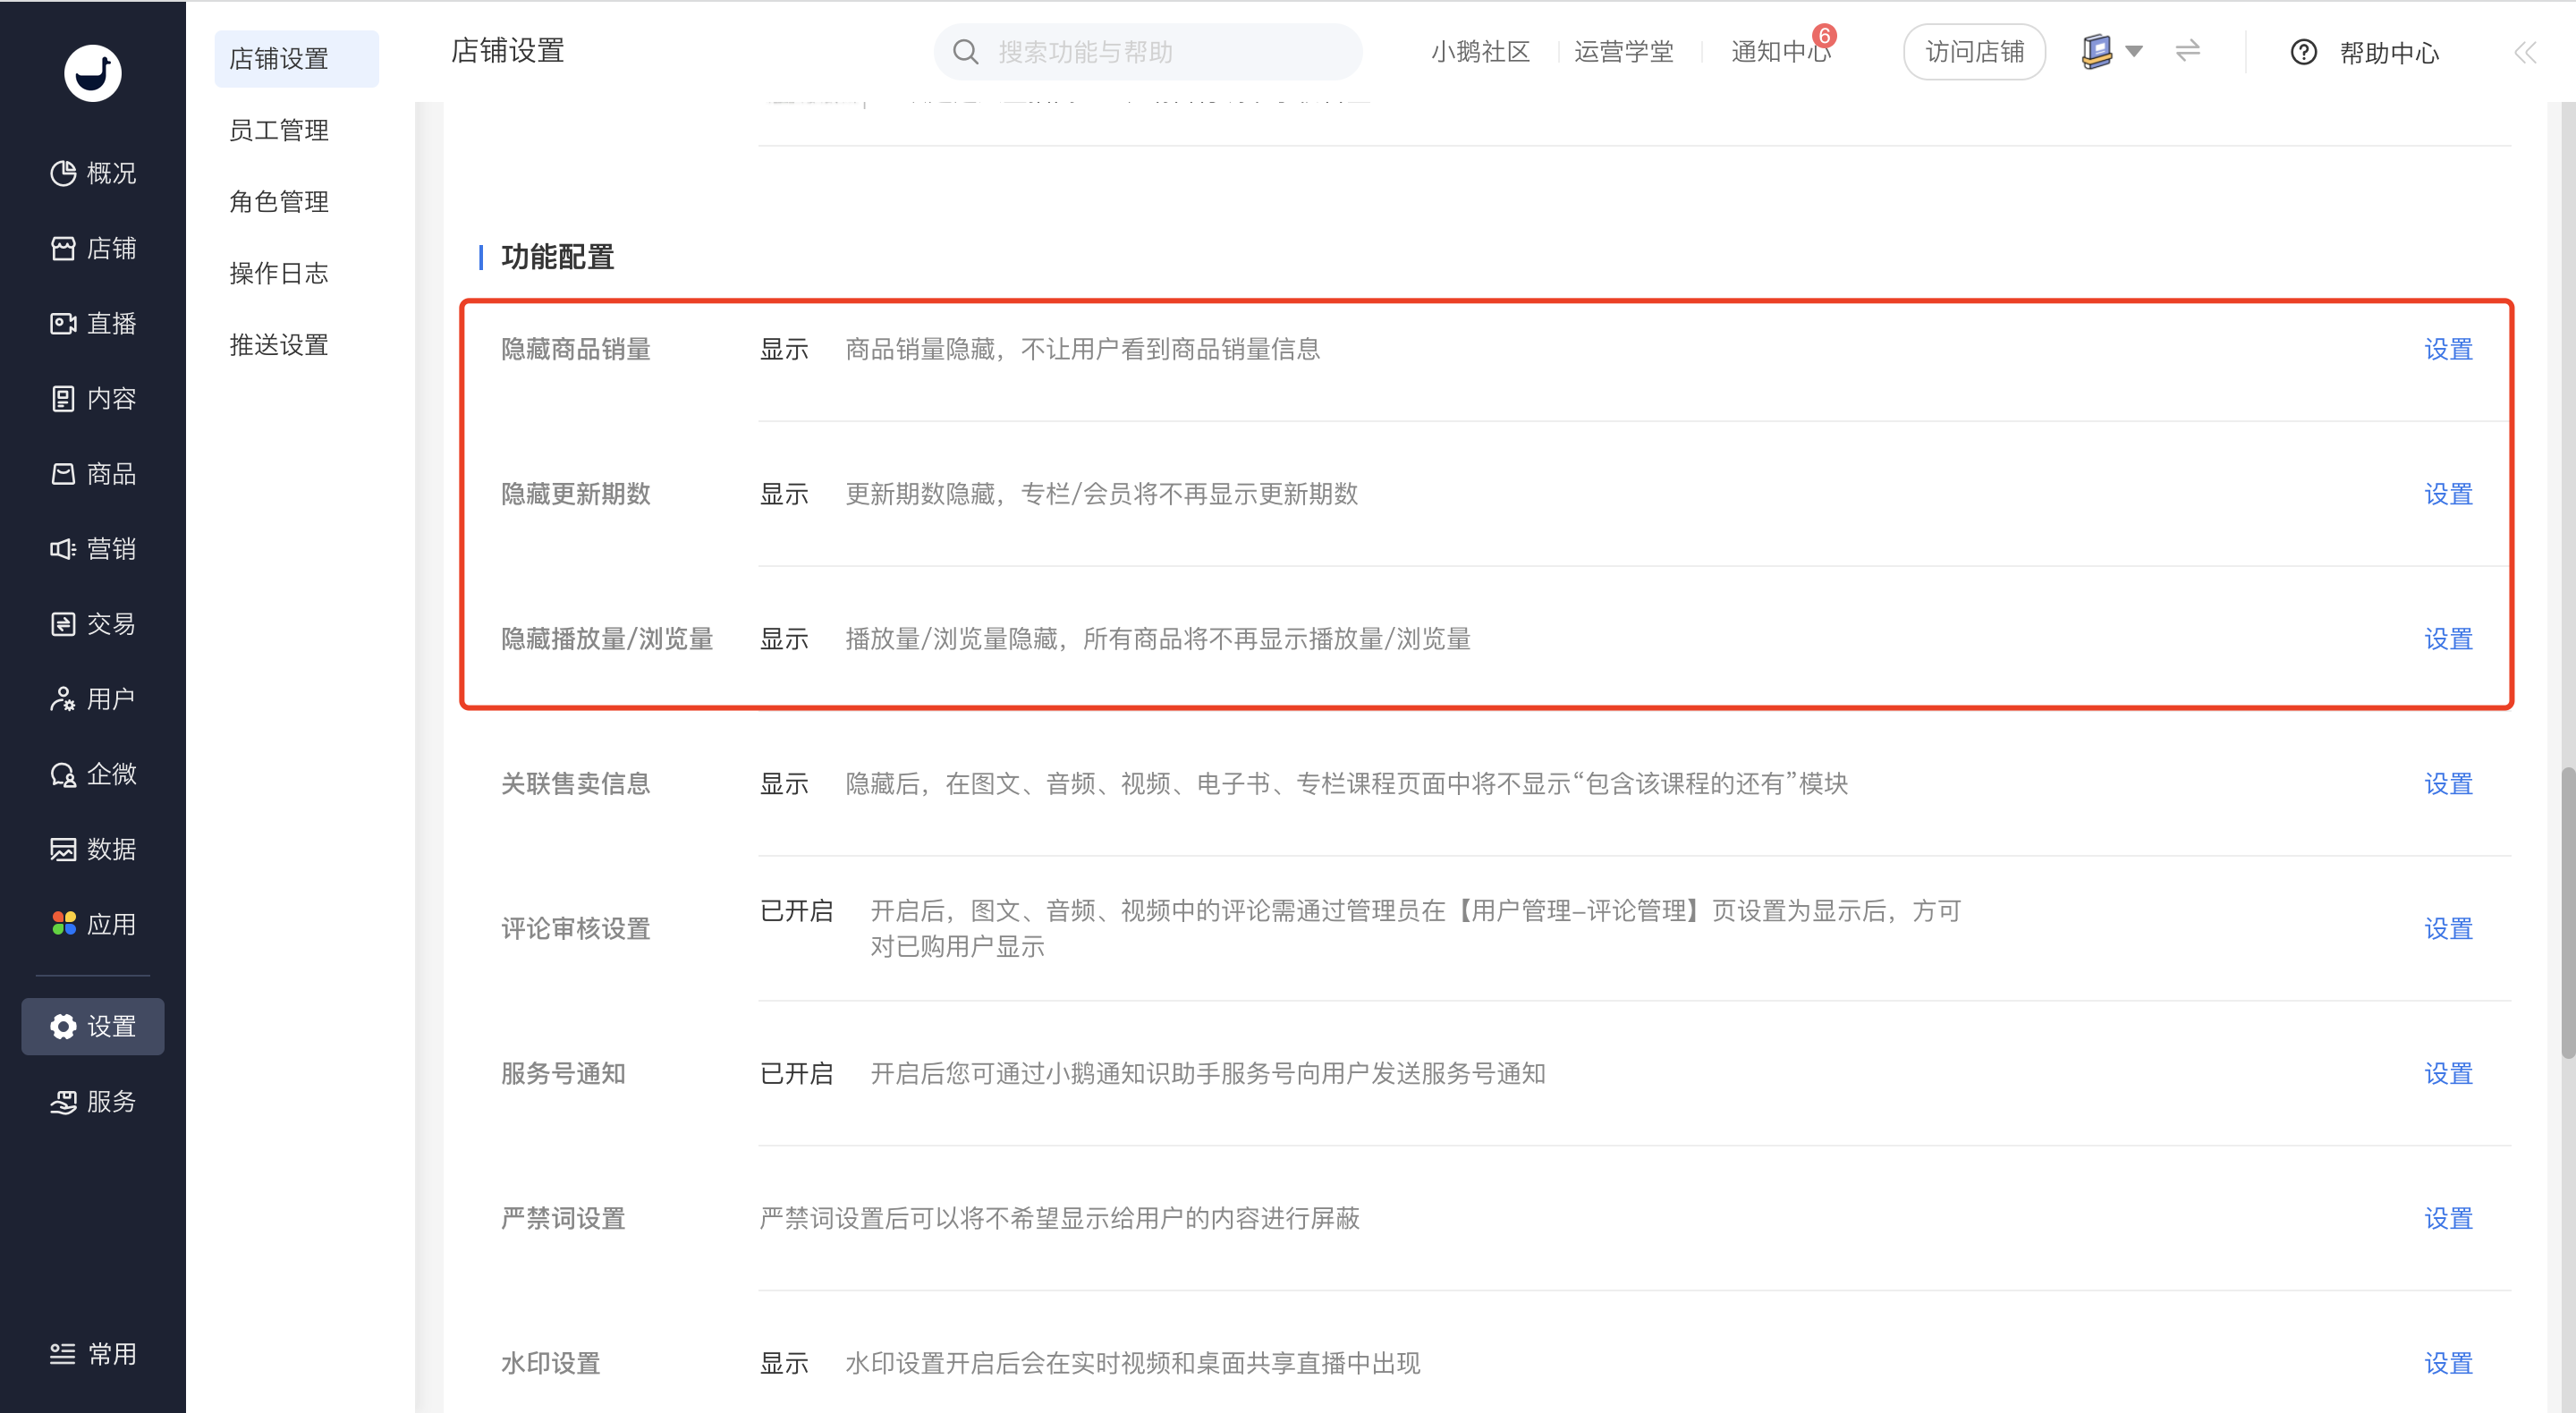
</span>

![1.png](https://wechatapppro-1252524126.file.myqcloud.com/help_document/image/ueditor/146300_1640152461.png ".png")

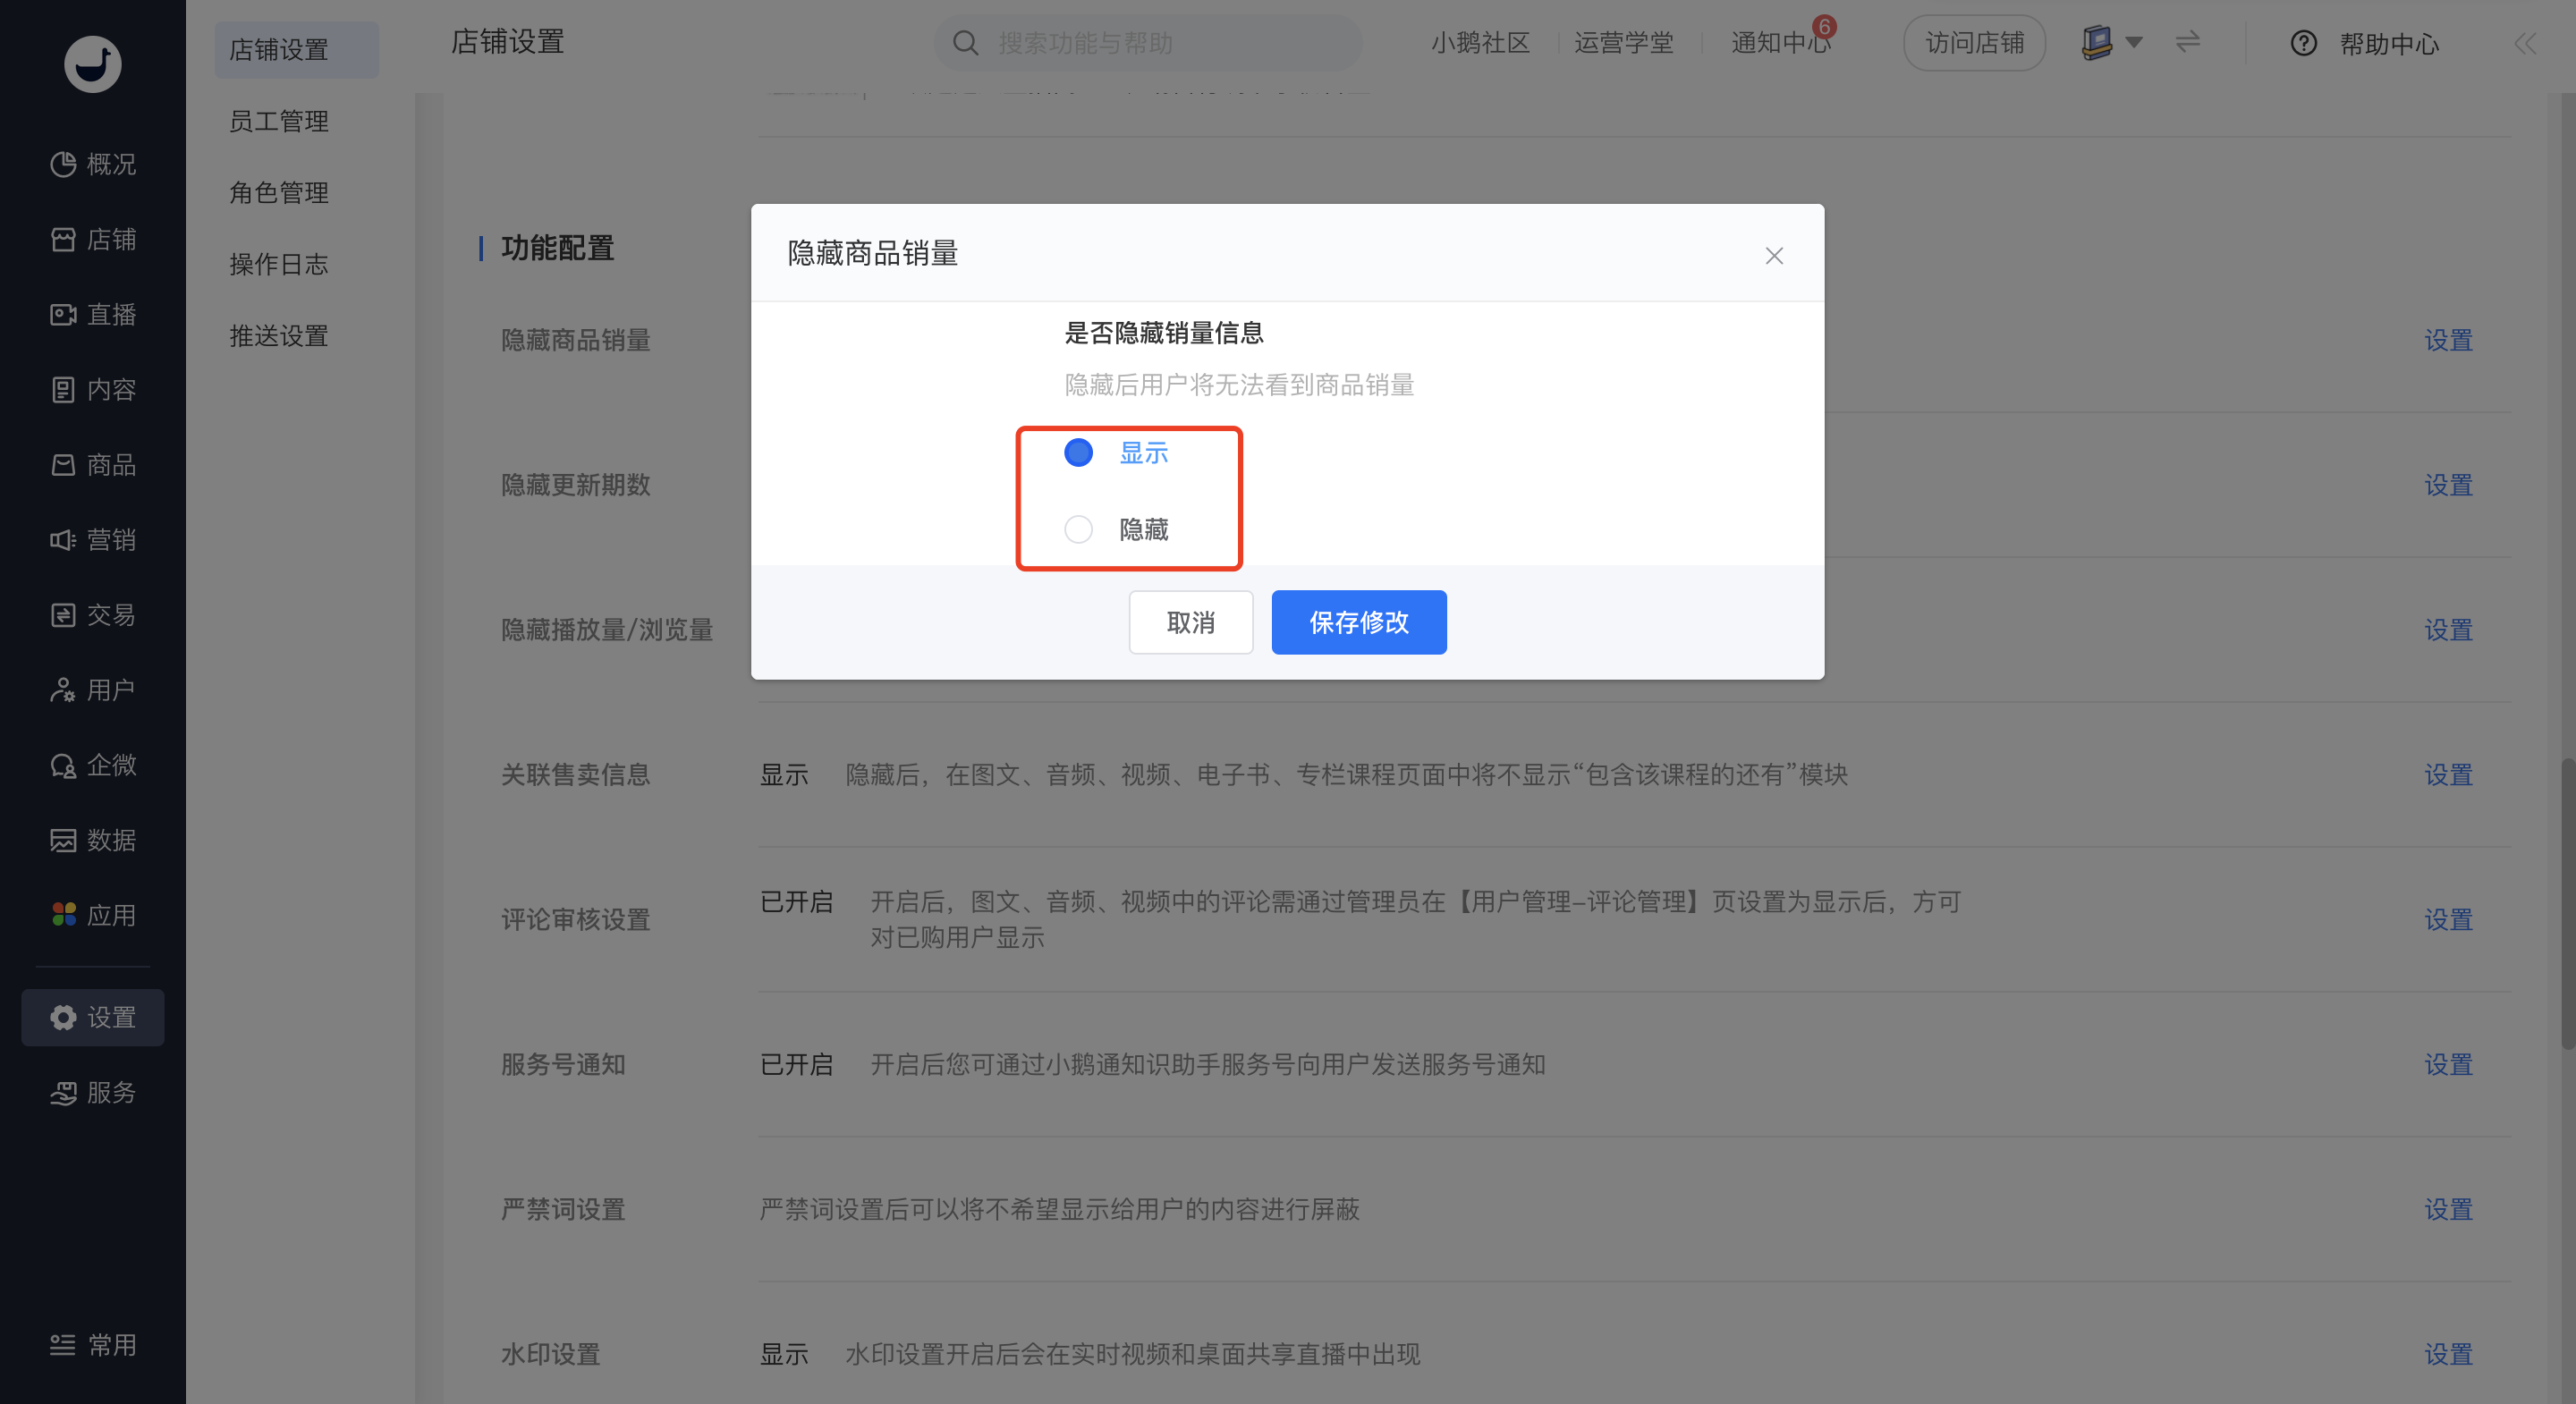
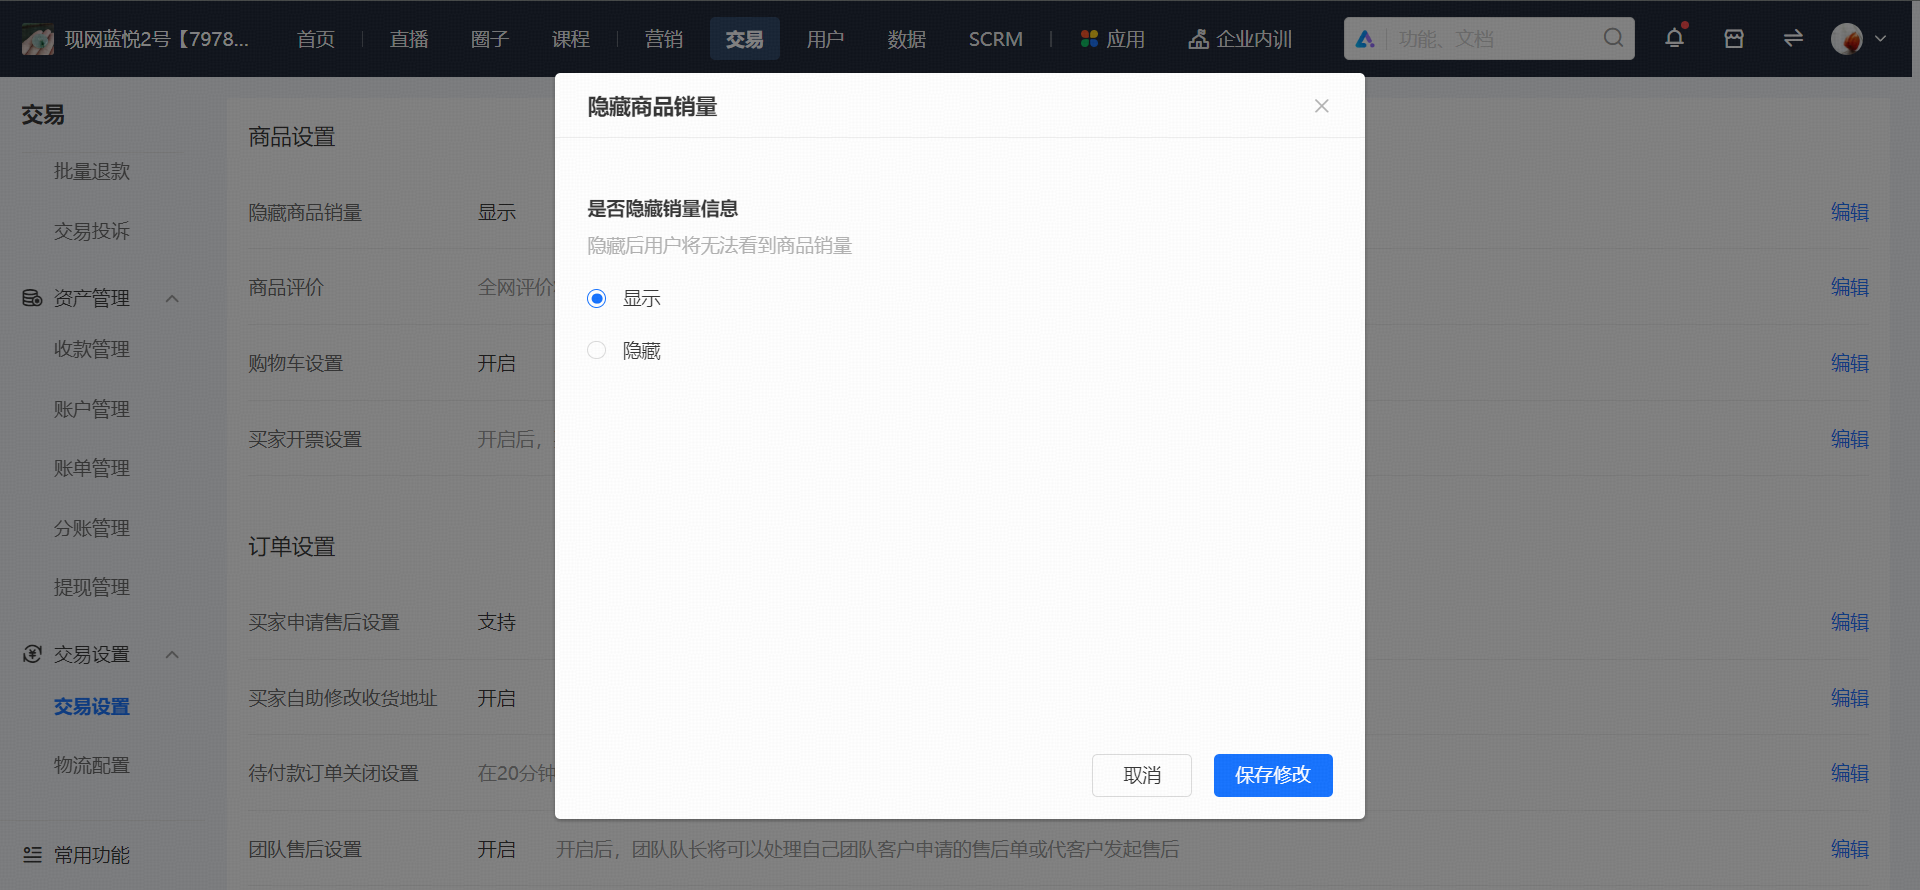
2\. Click \[Show\] or \[Hide\], and the sales volume information of the corresponding products on the user side will be shown or hidden.<span style="white-space:pre-line;background-color:rgb(250,250,250);">The sales volume information will be shown or hidden.</span><span style="color:rgb(53,53,53);"></span>

![2.png](https://wechatapppro-1252524126.file.myqcloud.com/help_document/image/ueditor/81062000_1640152461.png ".png")

**Step 2Set the number of store updates**

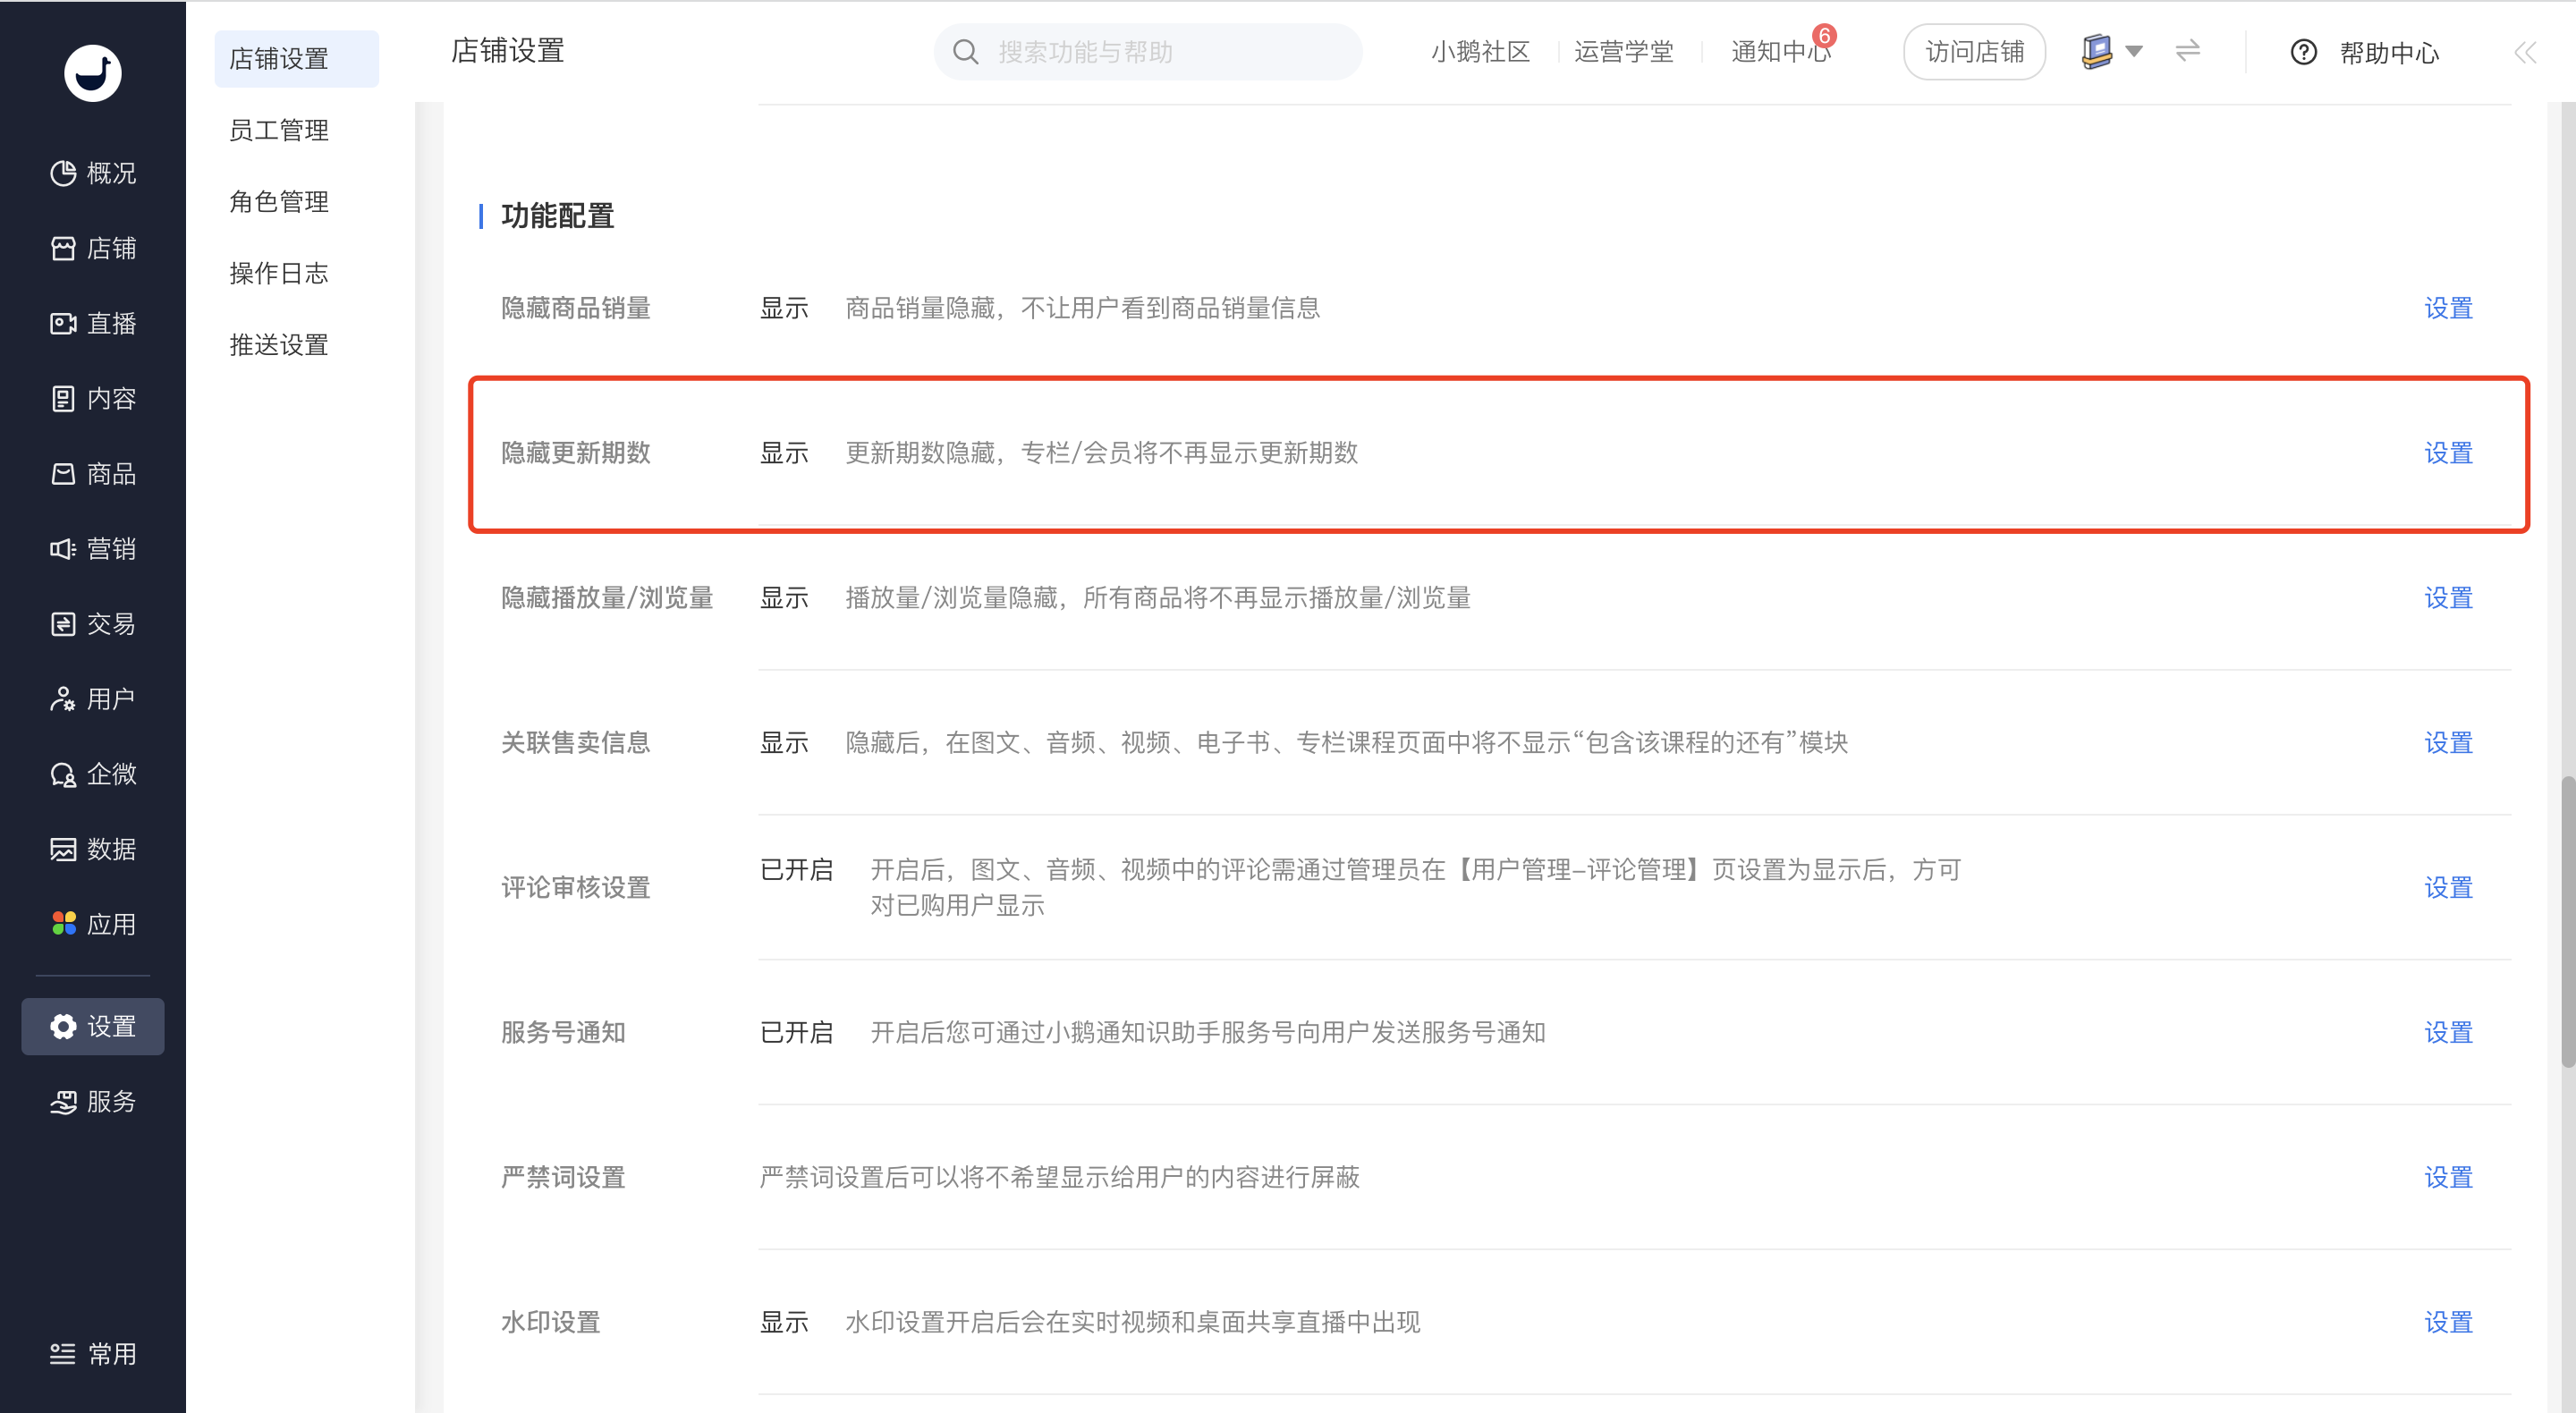
1.<span style="white-space:pre-line;background-color:rgb(255,255,255);">Click \[Settings\] - \[Store settings\], and find the setting item for hiding the number of updates in the function configuration module.</span>

![3.png](https://wechatapppro-1252524126.file.myqcloud.com/help_document/image/ueditor/55976500_1640152462.png ".png")

2\. Click \[Show\] or \[Hide\]. If hidden, the number of updates will no longer be shown for columns/memberships.
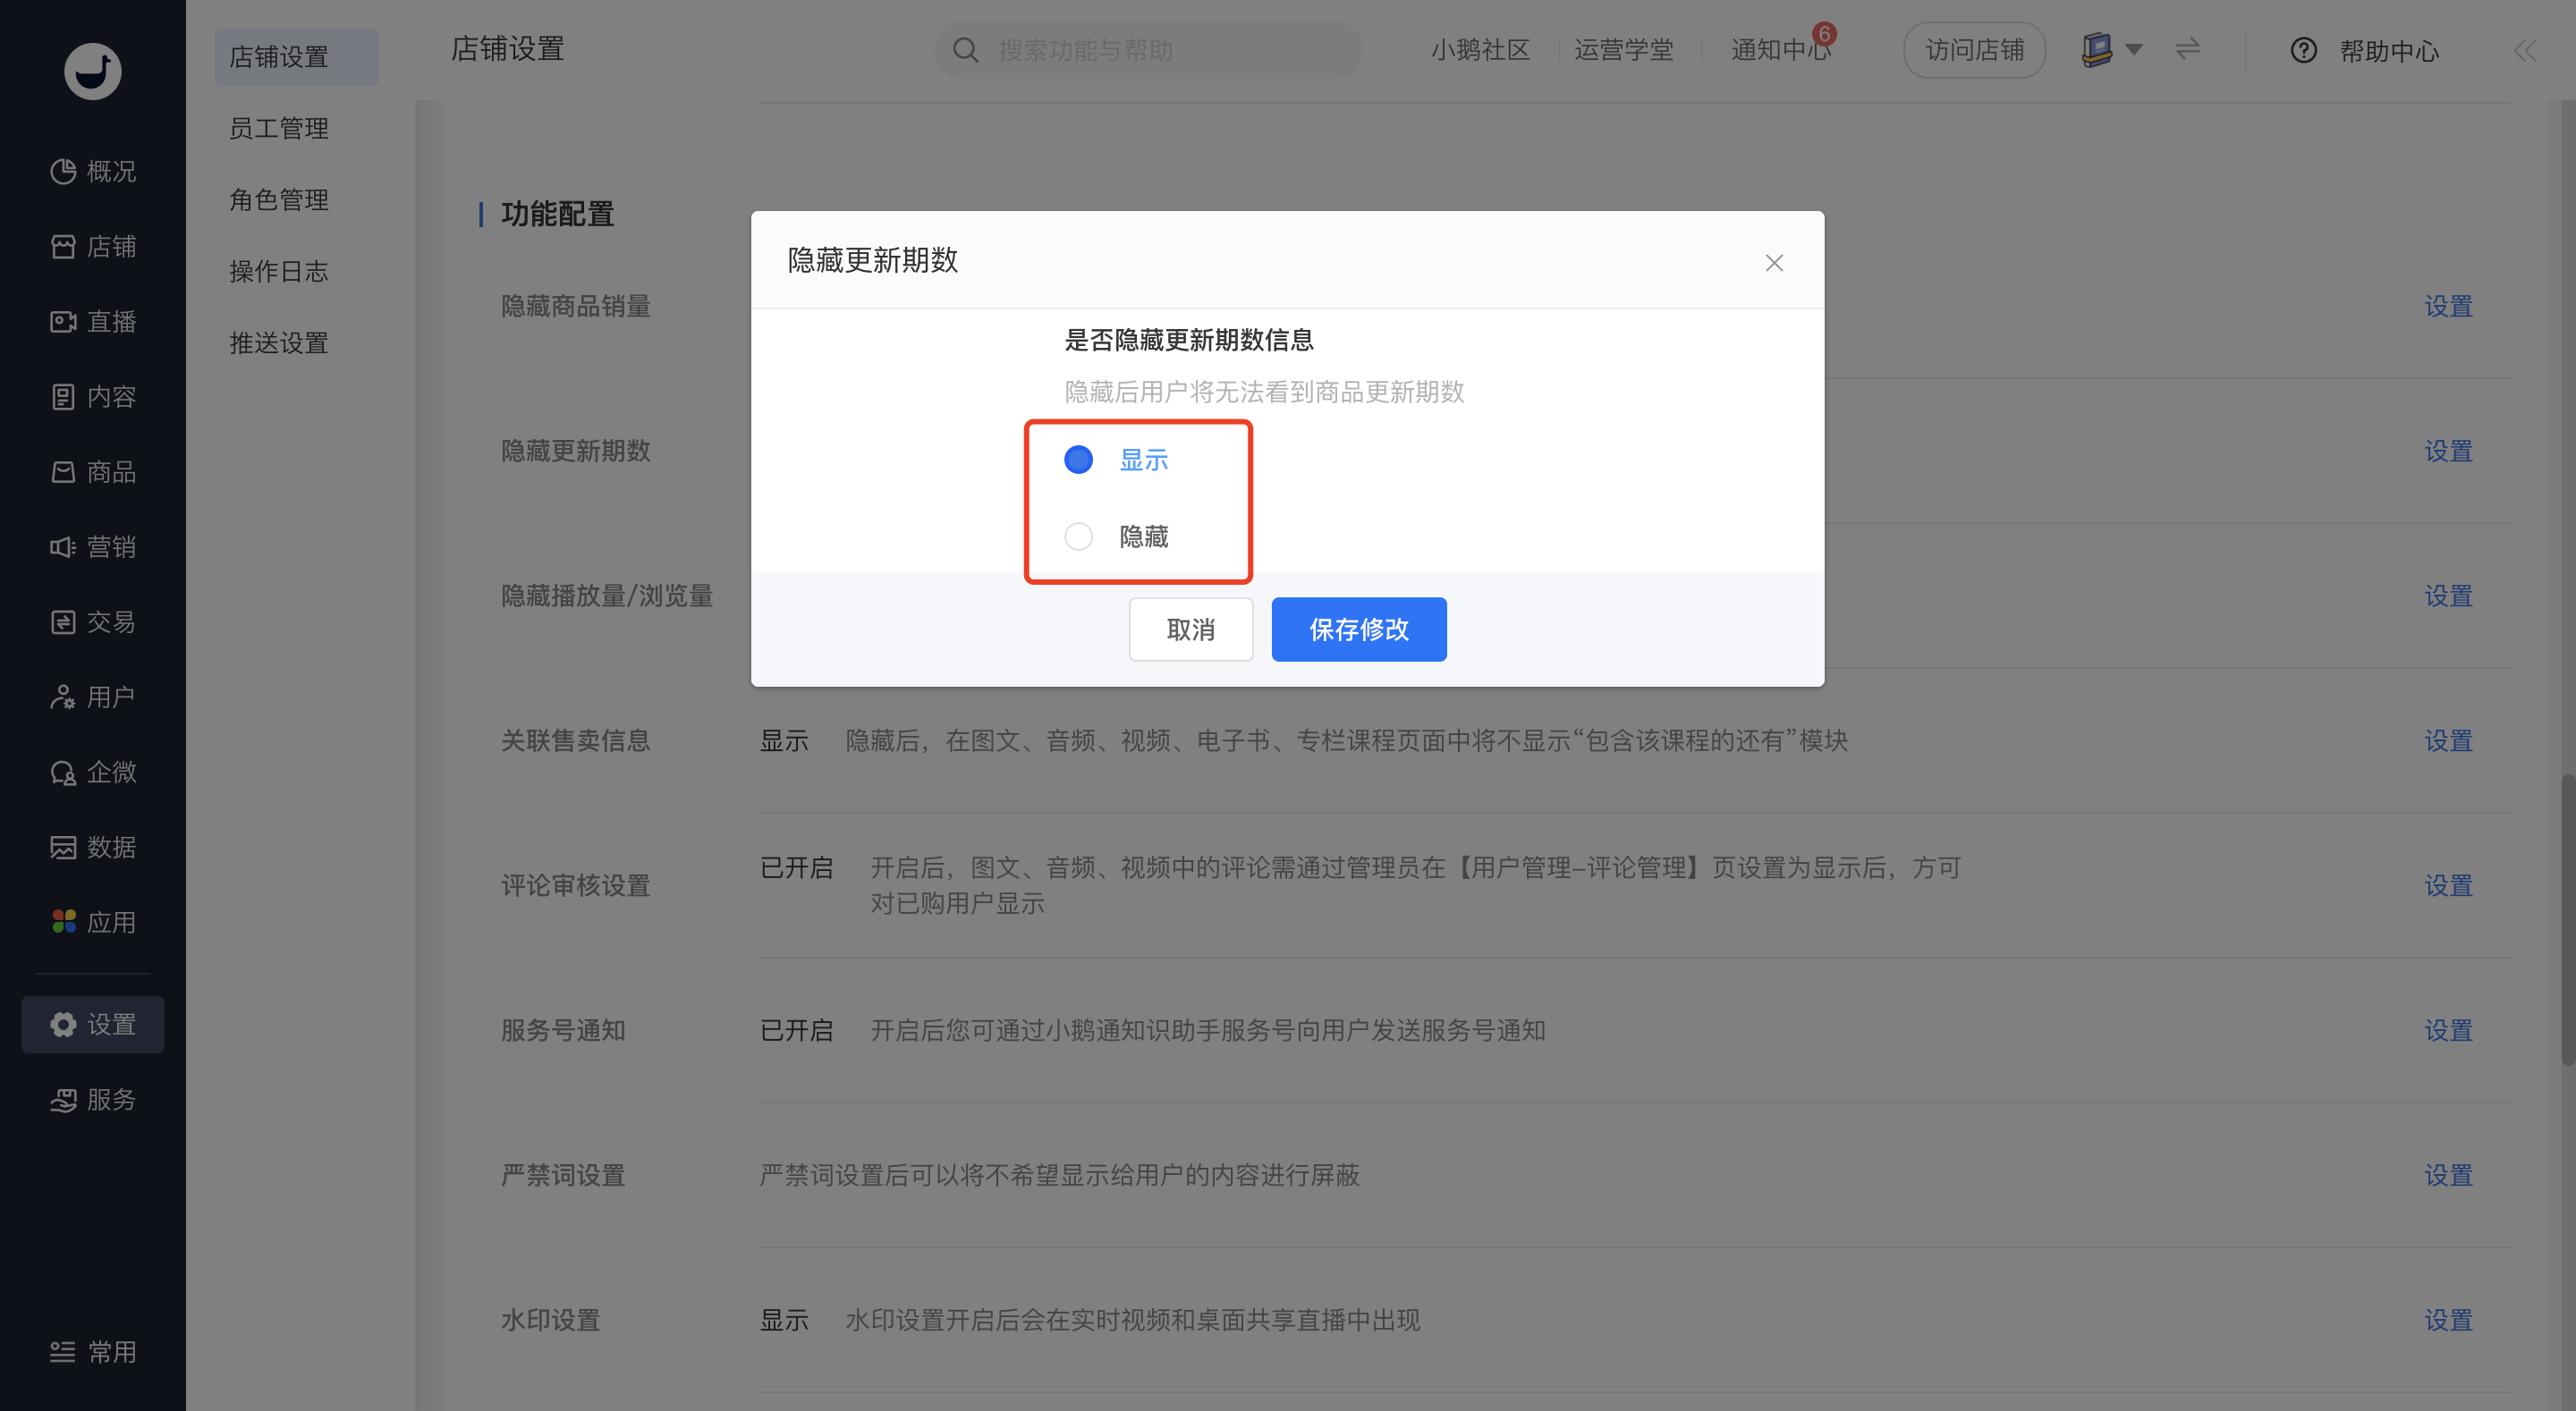
![4.png](https://wechatapppro-1252524126.file.myqcloud.com/help_document/image/ueditor/21766900_1640152463.png ".png")

<span style="color:rgb(53,53,53);background:rgb(255,255,255);">  
</span>

**<span style="color:rgb(53,53,53);background:rgb(255,255,255);"></span>Step 3Hide views/visits**

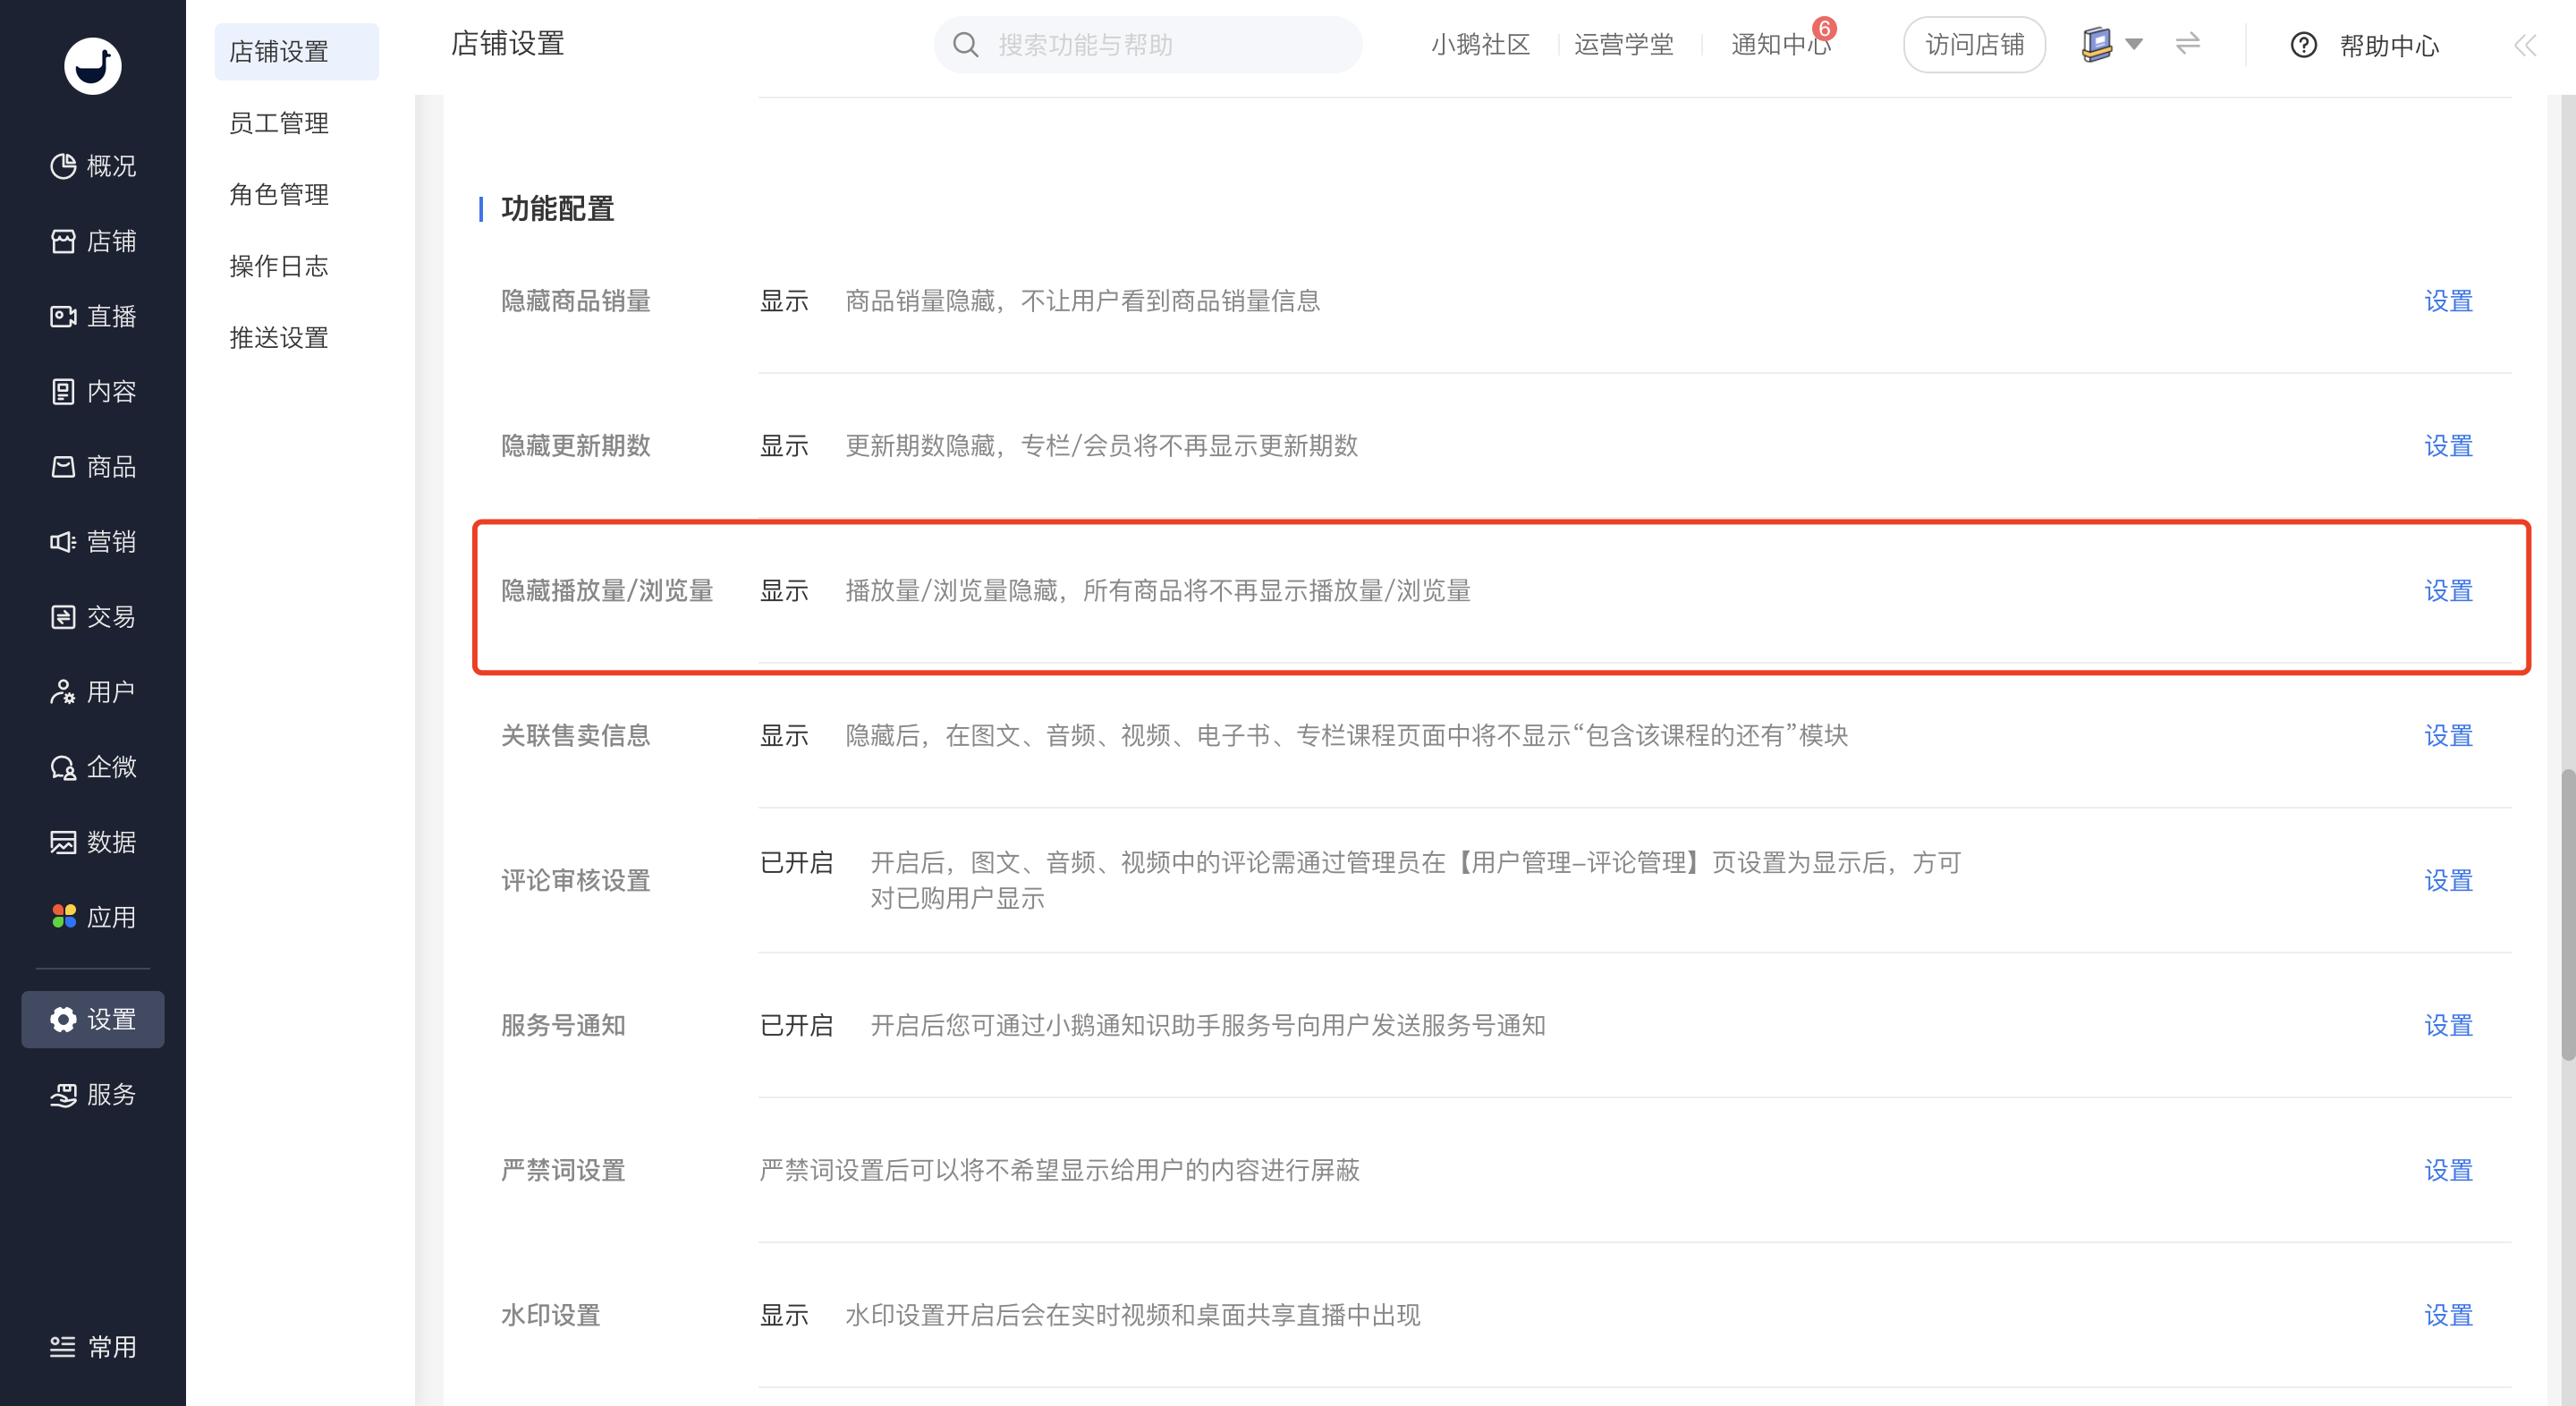
<span style="color:rgb(53,53,53);"><span style="color:rgb(53,53,53);background:rgb(255,255,255);"></span>1.<span style="color:rgb(53,53,53);white-space:pre-line;background-color:rgb(250,250,250);">Click \[Settings\] - \[Store settings\], and find the setting item for hiding views/visits in the function configuration module.</span><span style="color:rgb(53,53,53);background:rgb(255,255,255);"></span></span>

![5.png](https://wechatapppro-1252524126.file.myqcloud.com/help_document/image/ueditor/1289700_1640152464.png ".png")

2\. Click \[Show\] or \[Hide\]. If hidden, views/visits will no longer be shown for all products.
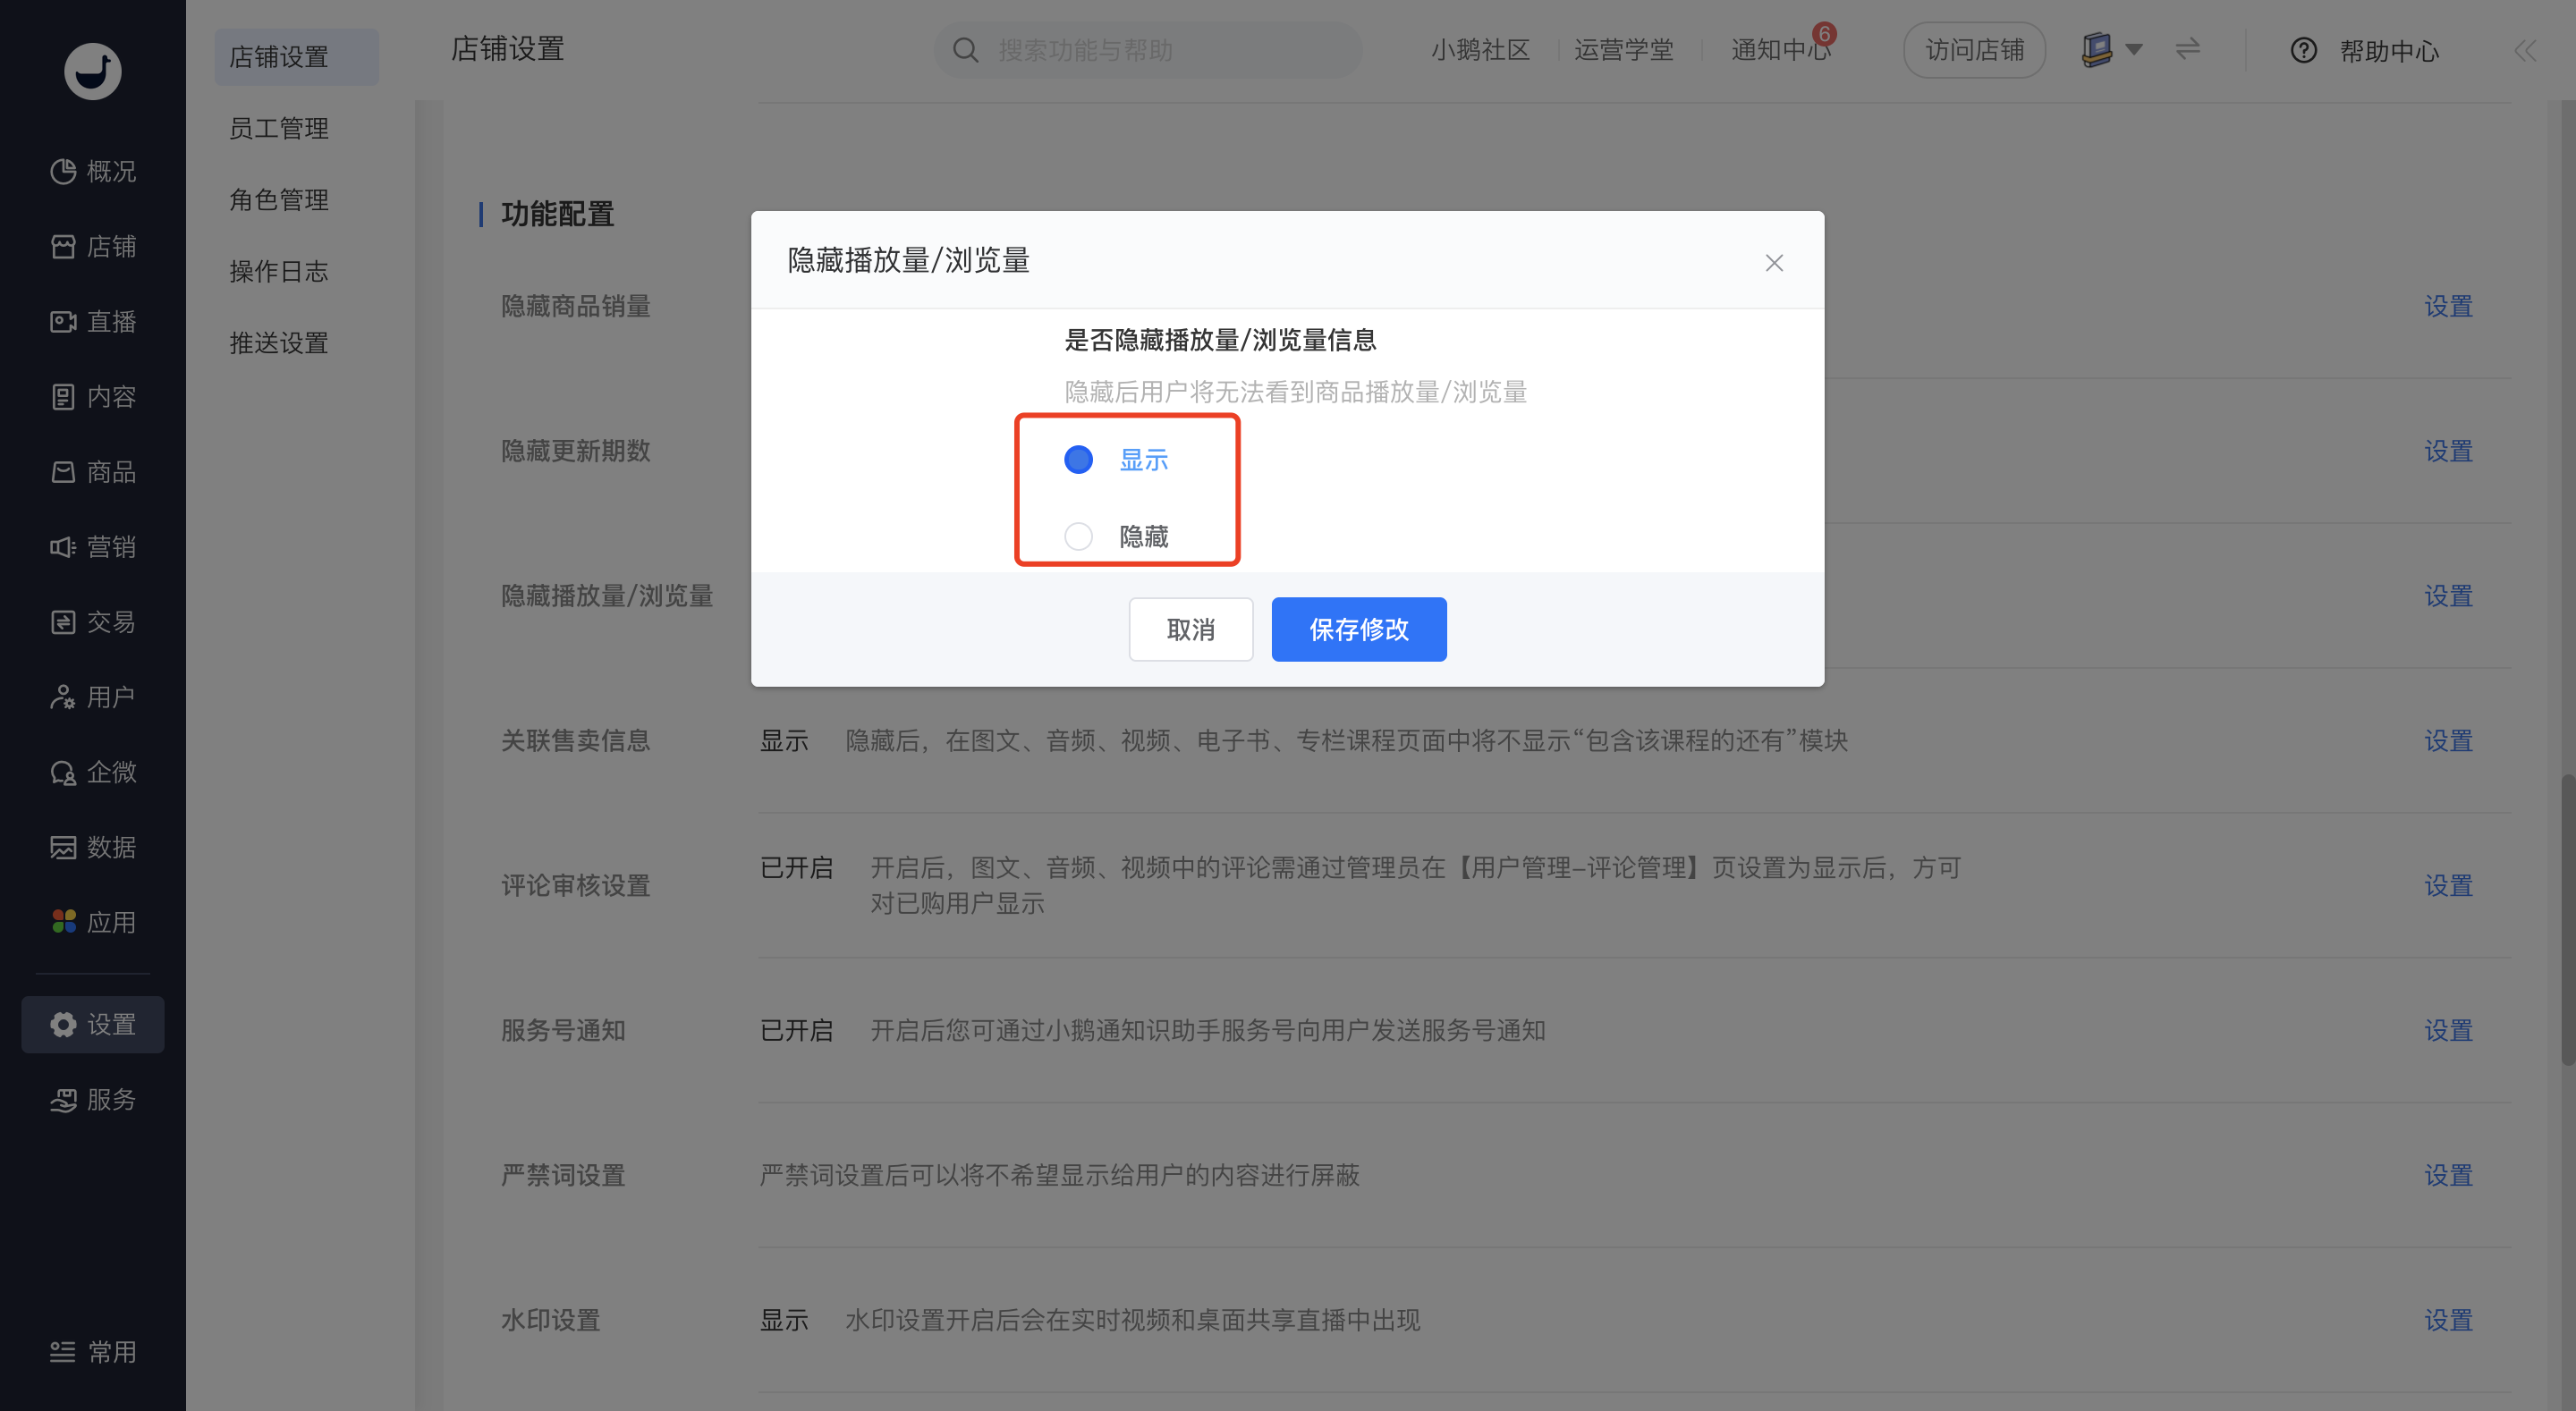
![6.png](https://wechatapppro-1252524126.file.myqcloud.com/help_document/image/ueditor/71129400_1640152464.png ".png")

# How to set the subscription count of hidden products?

<div data-elink-language-switch="1" id="bkmrk-%E4%B8%AD%E6%96%87" style="border:1px solid #d6d9de;border-radius:6px;padding:10px 12px;margin:0 0 18px 0;background:#f8fafc;font-size:14px;">[中文](/books/877a9/page/05049)</div><span style="color:rgb(43,43,43);font-size:14px;">Log in to the Online Store management backend. In \[Transactions\] → \[Store Transaction Settings\], find the \[Product Settings\] module and locate the setting to hide product sales volume. After selecting to hide, the product sales volume will not be displayed on the mobile app.</span>

![image.png](https://wechatapppro-1252524126.file.myqcloud.com/help_document/image/ueditor/27820100_1722237231.png ".png")

![image.png](https://wechatapppro-1252524126.file.myqcloud.com/help_document/image/ueditor/16035200_1722237231.png ".png")

# Store settings

# Tutorial on Store Account and Operator Settings

<div data-elink-language-switch="1" id="bkmrk-%E4%B8%AD%E6%96%87" style="border:1px solid #d6d9de;border-radius:6px;padding:10px 12px;margin:0 0 18px 0;background:#f8fafc;font-size:14px;">[中文](/books/877a9/page/6da37)</div><span style="color:rgb(53,53,53);font-size:15px;">elink supports creating multiple stores under one account, unified account settings, and adding operators.</span>

<span style="color:rgb(53,53,53);font-size:14px;">  
</span>

<span style="font-size:17px;">**<span style="color:rgb(53,53,53);">I. Account Settings</span>**</span>

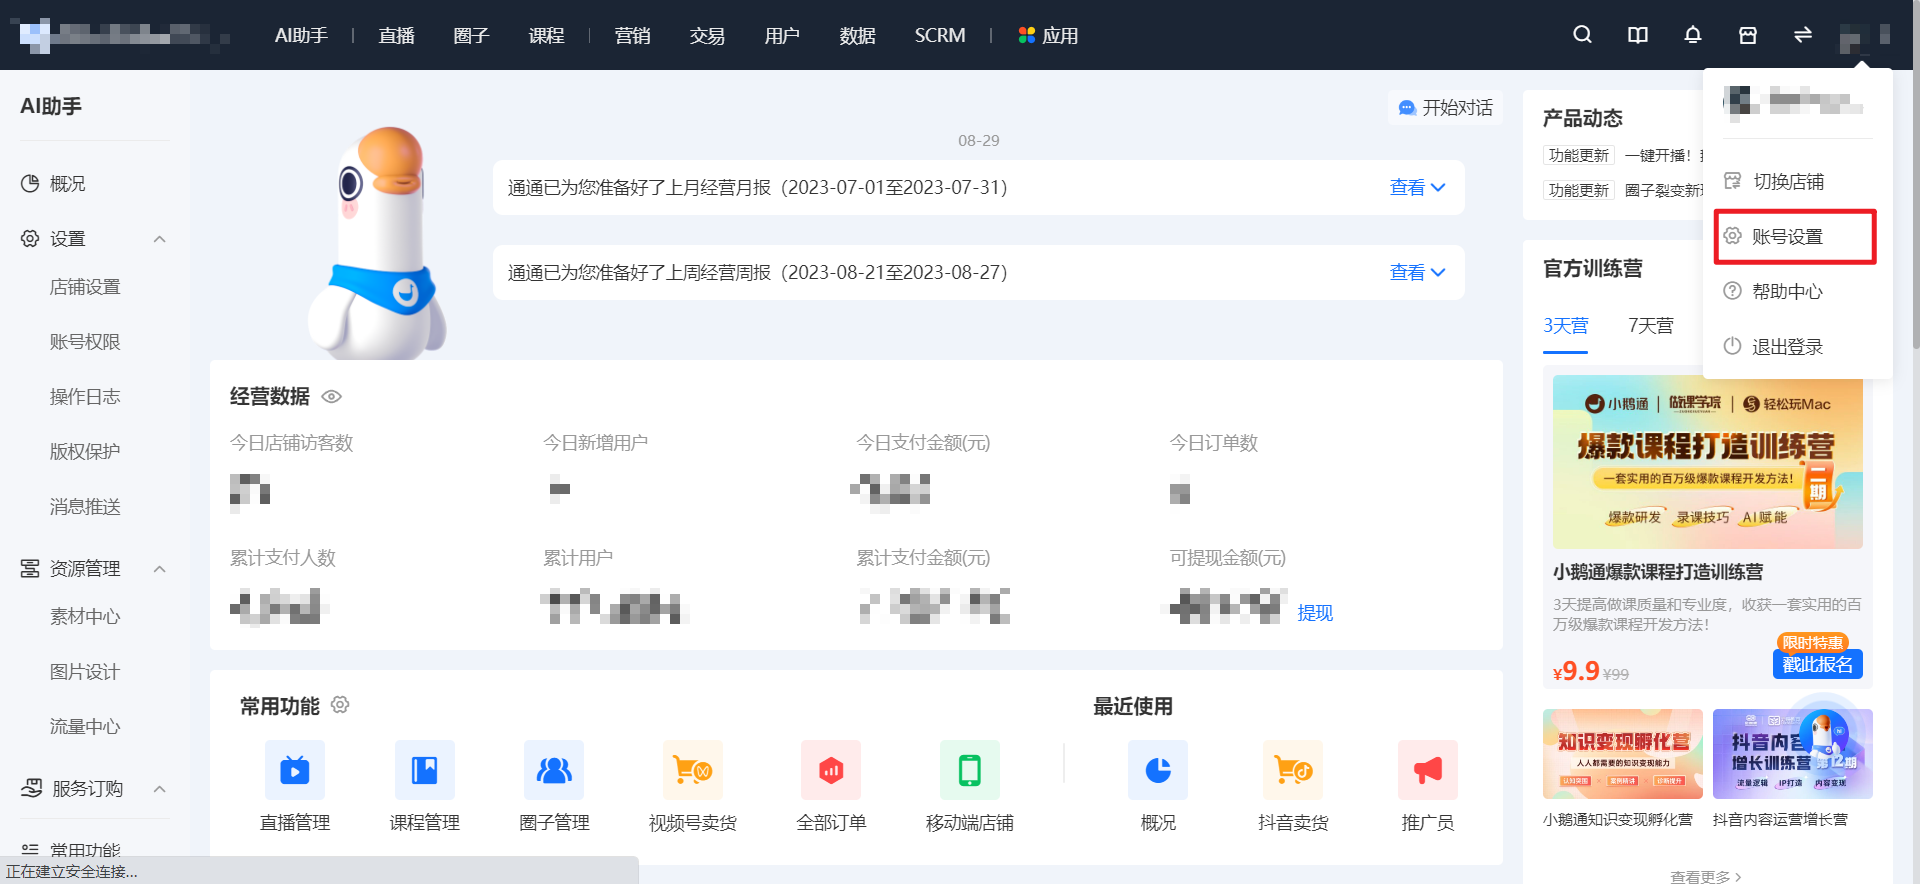
<span style="font-size:15px;">**Step 1:**Enter the store management console, click on the personal account avatar in the top - right corner, and select \[Account Settings\].</span>

![image.png](https://wechatapppro-1252524126.file.myqcloud.com/help_document/image/ueditor/19042500_1695029340.png ".png")

<span style="color:rgb(53,53,53);font-size:14px;">  
</span>

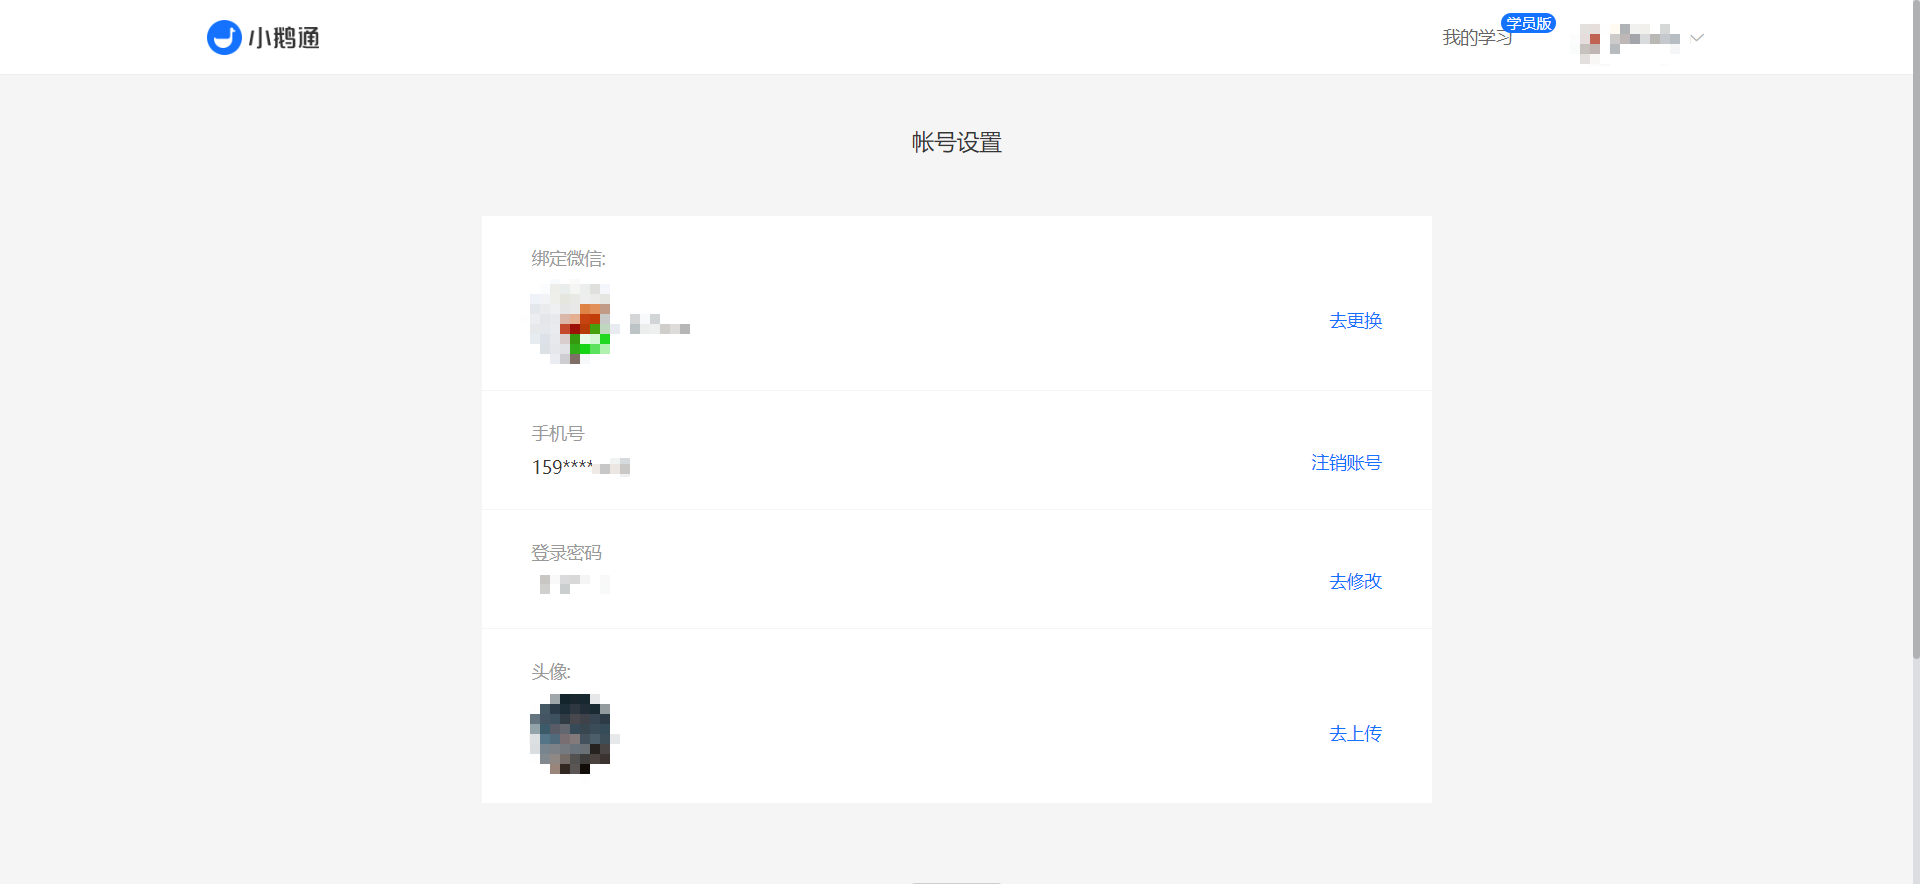
<span style="font-size:15px;">**<span style="color:rgb(0,0,0);">Step 2:</span>**<span style="color:rgb(0,0,0);">Modify the login password, the bound WeChat account, and the avatar.</span></span>

![image.png](https://wechatapppro-1252524126.file.myqcloud.com/help_document/image/ueditor/11470300_1695029424.png ".png")

<span style="color:rgb(53,53,53);font-size:14px;">  
</span>

<span style="font-size:17px;">**<span style="color:rgb(53,53,53);">II. Operator Settings</span>**</span>

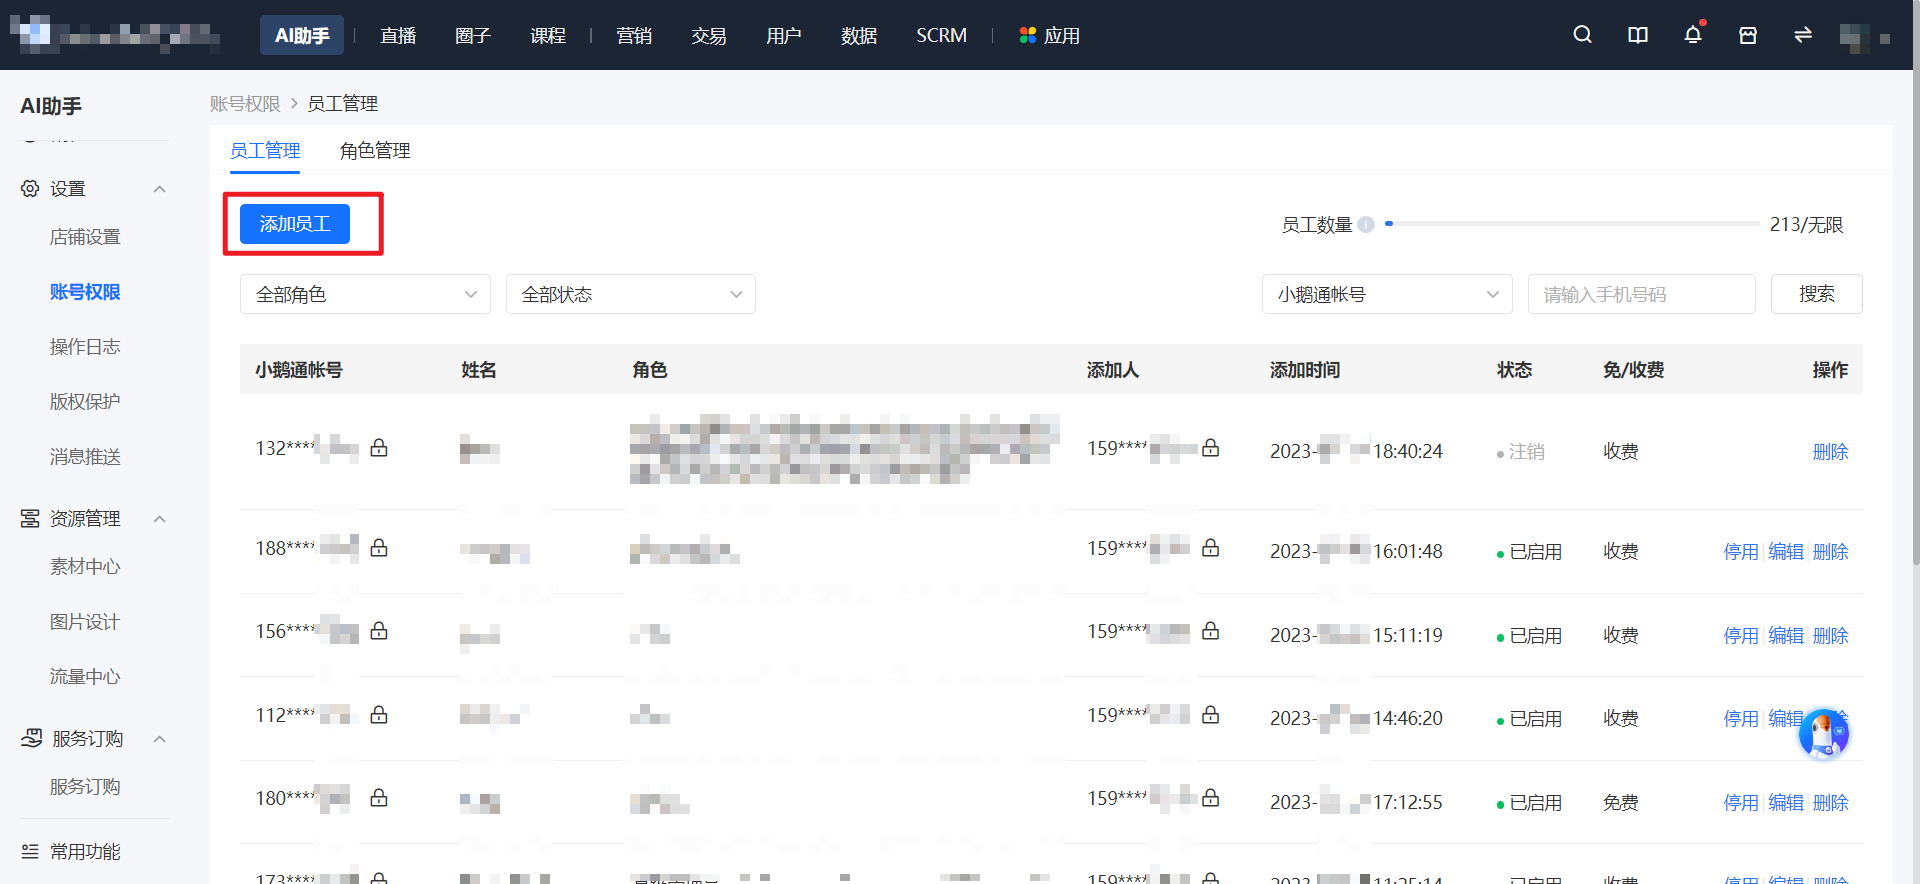
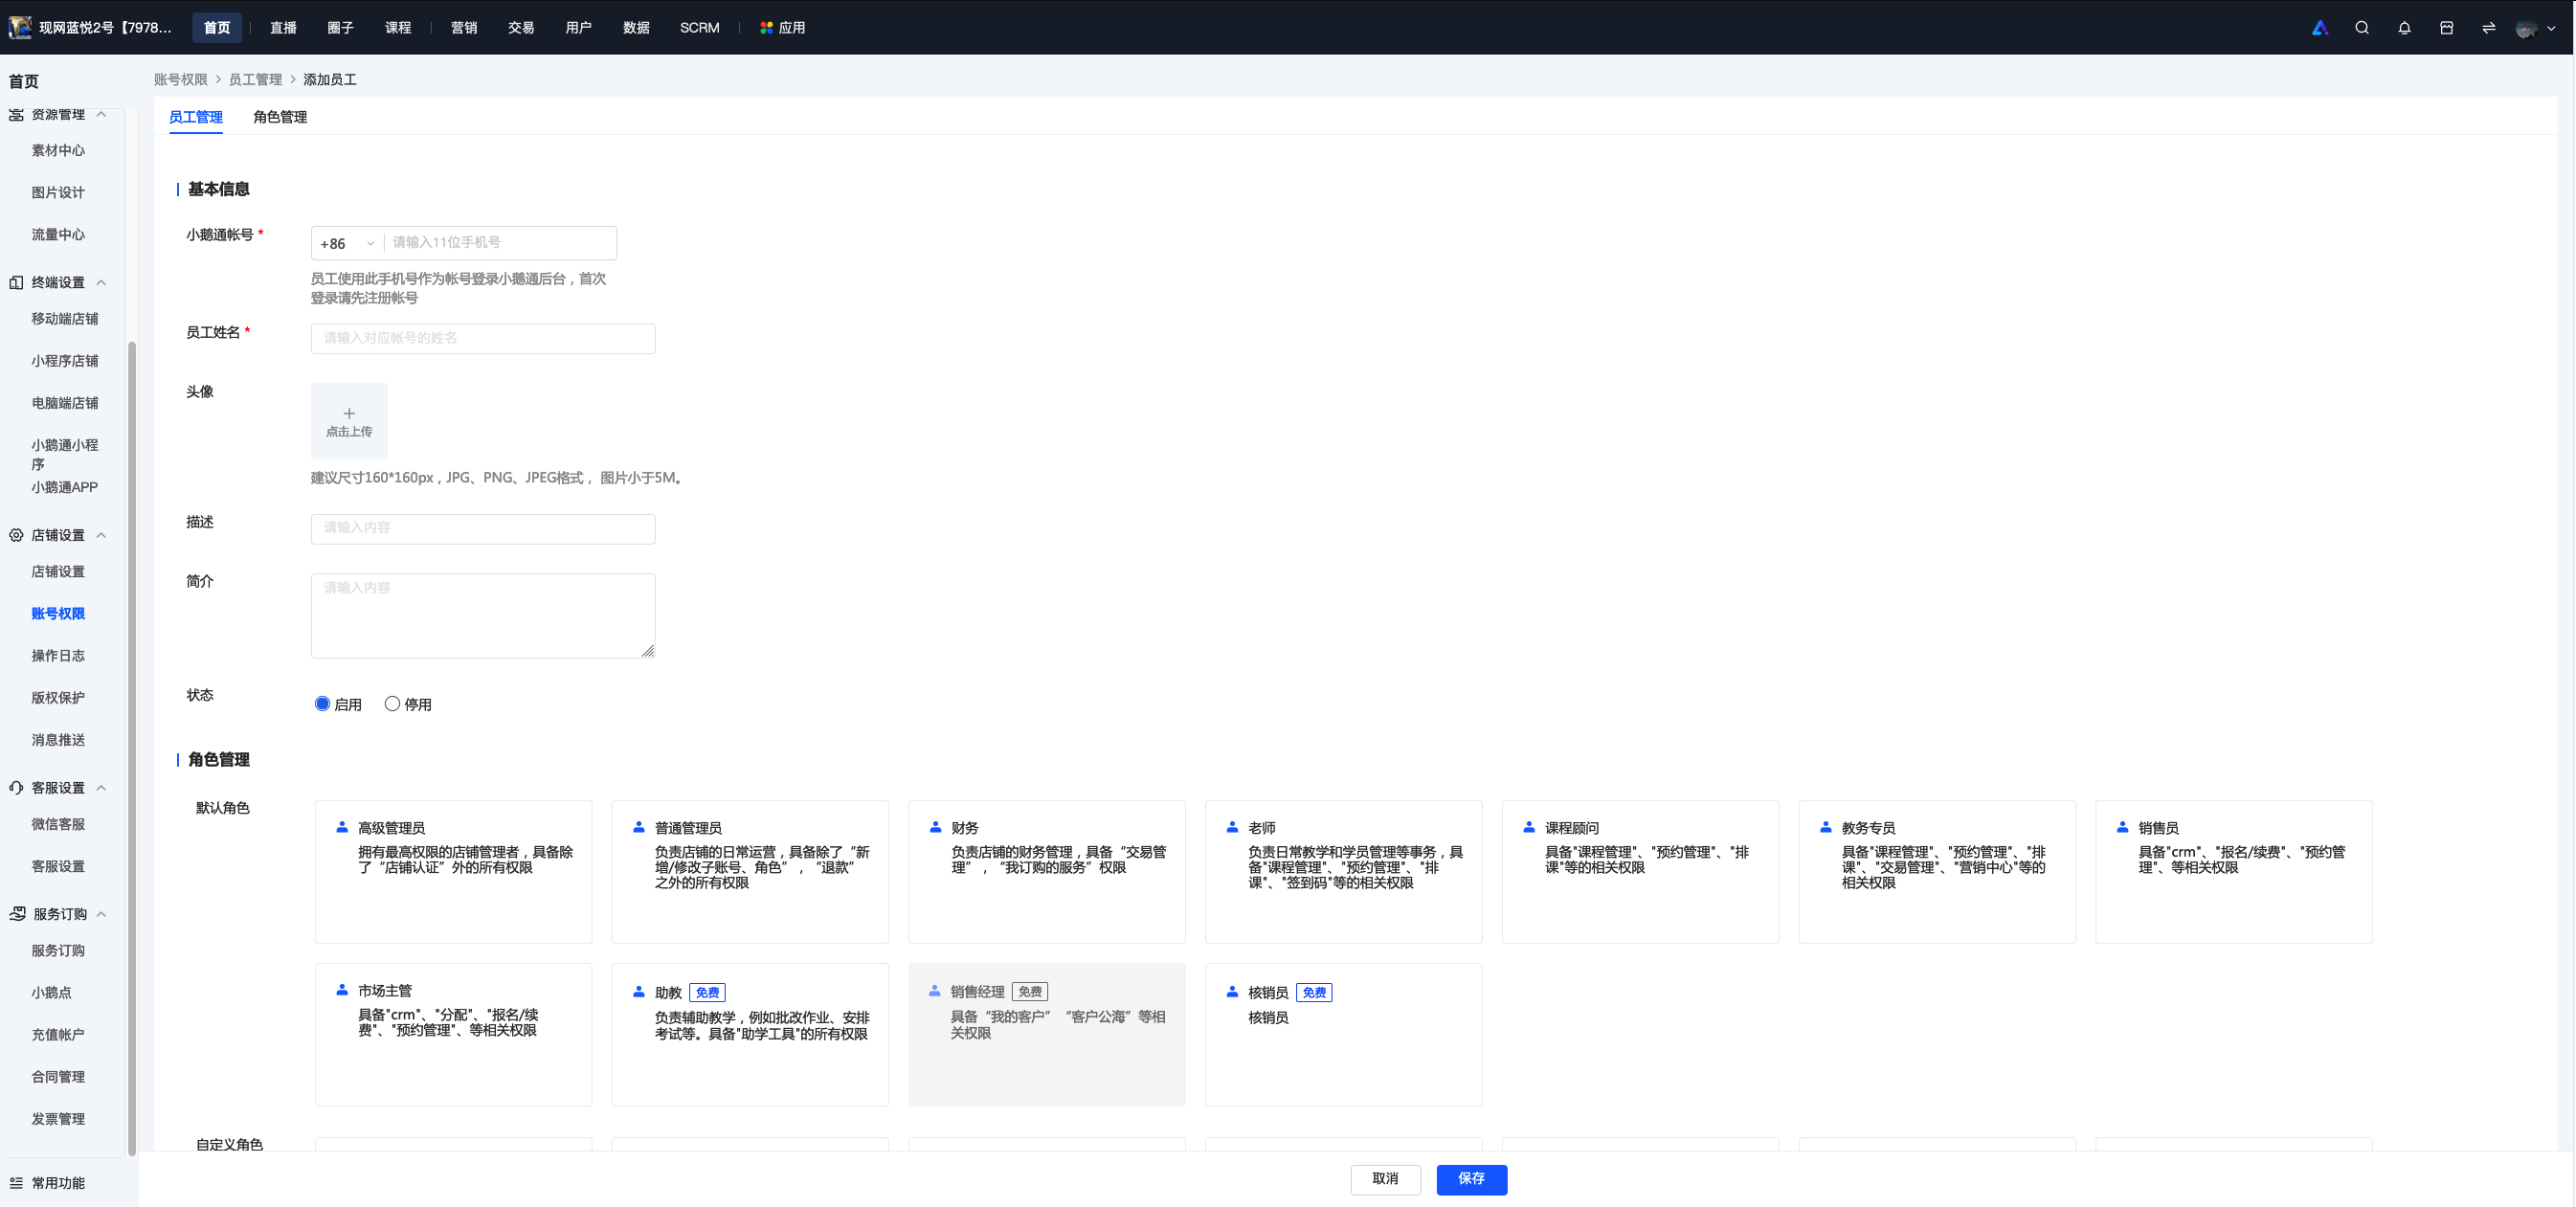
<span style="font-size:15px;">**<span style="color:rgb(53,53,53);">Step 1:</span>**<span style="color:rgb(53,53,53);">Open the store backend. In \[AI Assistant - Settings - Account Permissions - Employee Management\], click \[Add Employee\].</span></span>

![image.png](https://wechatapppro-1252524126.file.myqcloud.com/help_document/image/ueditor/44183300_1695029567.png ".png")

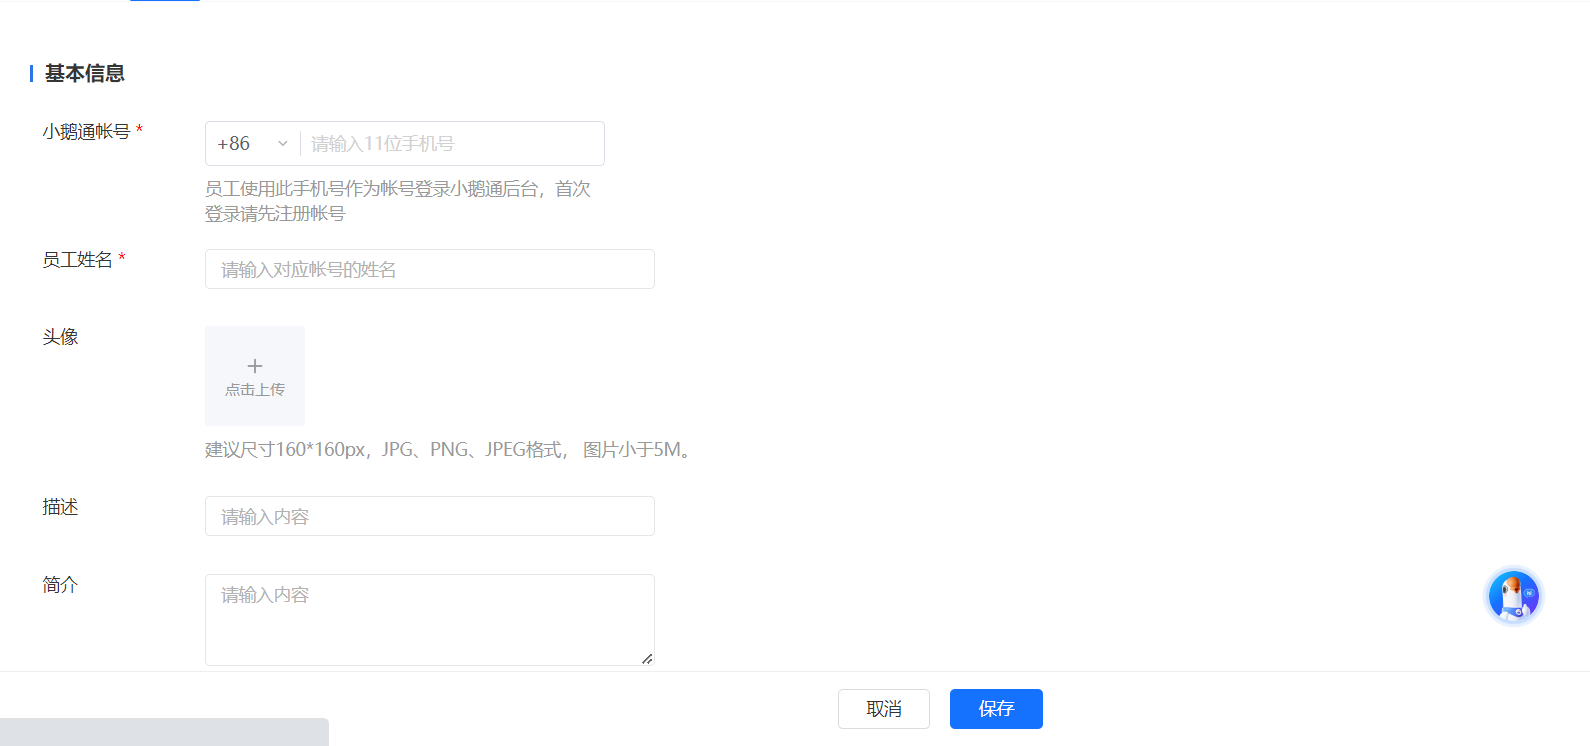
<span style="font-size:15px;">**<span style="color:rgb(53,53,53);">Step 2:</span>**<span style="color:rgb(53,53,53);">Fill in the employee's basic information.</span></span>

<span style="color:rgb(53,53,53);font-size:15px;">If the added operator is already a registered elink user, the permissions will be automatically bound. If the operator has not registered for elink, you can actively send an invitation SMS to invite the user to become a store operator.</span>

**<span style="color:rgb(53,53,53);font-size:15px;">\*\*Note:</span>**<span style="color:rgb(53,53,53);font-size:15px;">If it is</span><span style="color:rgb(53,53,53);font-size:15px;text-decoration:underline;">before December 29, 2019</span><span style="color:rgb(53,53,53);font-size:15px;">the bound operators can still log in with their original account passwords.</span>

![image.png](https://wechatapppro-1252524126.file.myqcloud.com/help_document/image/ueditor/72498700_1695030974.png ".png")

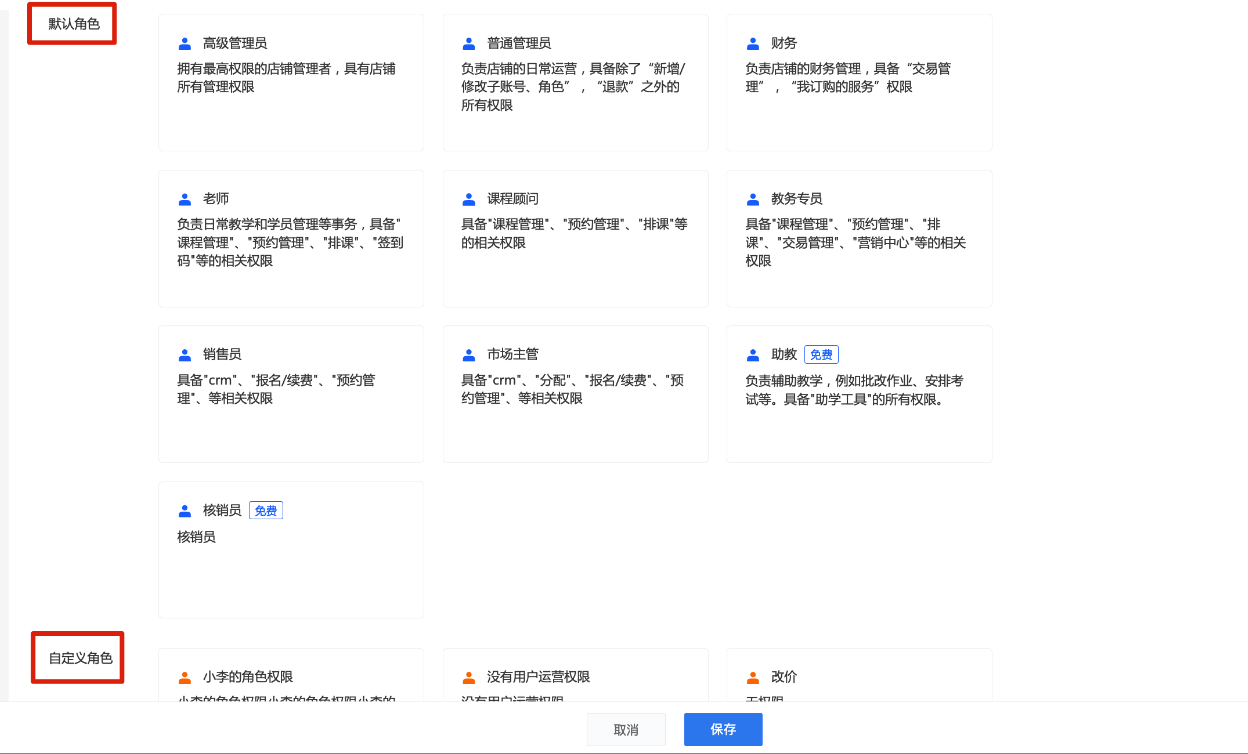
<span style="font-size:15px;">**Step 3:**Fill in the role management. You can select the default role or customize a role.</span>

![image.png](https://wechatapppro-1252524126.file.myqcloud.com/help_document/image/ueditor/55785900_1695030089.png ".png")

<span style="font-size:15px;">**Step 4:**Finally, confirm the employee's permissions and save to complete the settings.</span>

# How to get the store name/link?

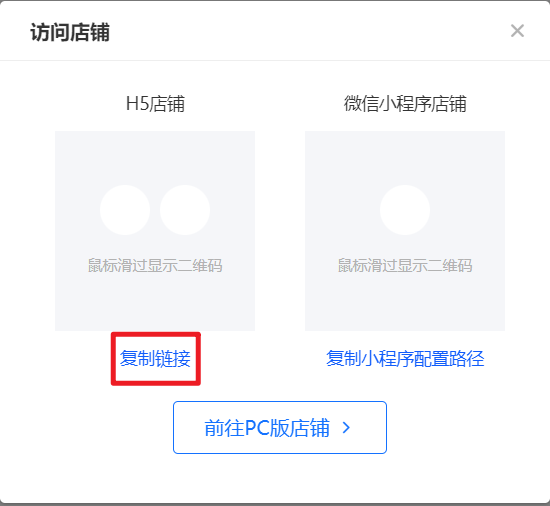
<div data-elink-language-switch="1" id="bkmrk-%E4%B8%AD%E6%96%87" style="border:1px solid #d6d9de;border-radius:6px;padding:10px 12px;margin:0 0 18px 0;background:#f8fafc;font-size:14px;">[中文](/books/877a9/page/cd006)</div><span style="font-size:15px;">After registering and opening an elink Online Store, merchants can obtain it through the following two channels:</span>

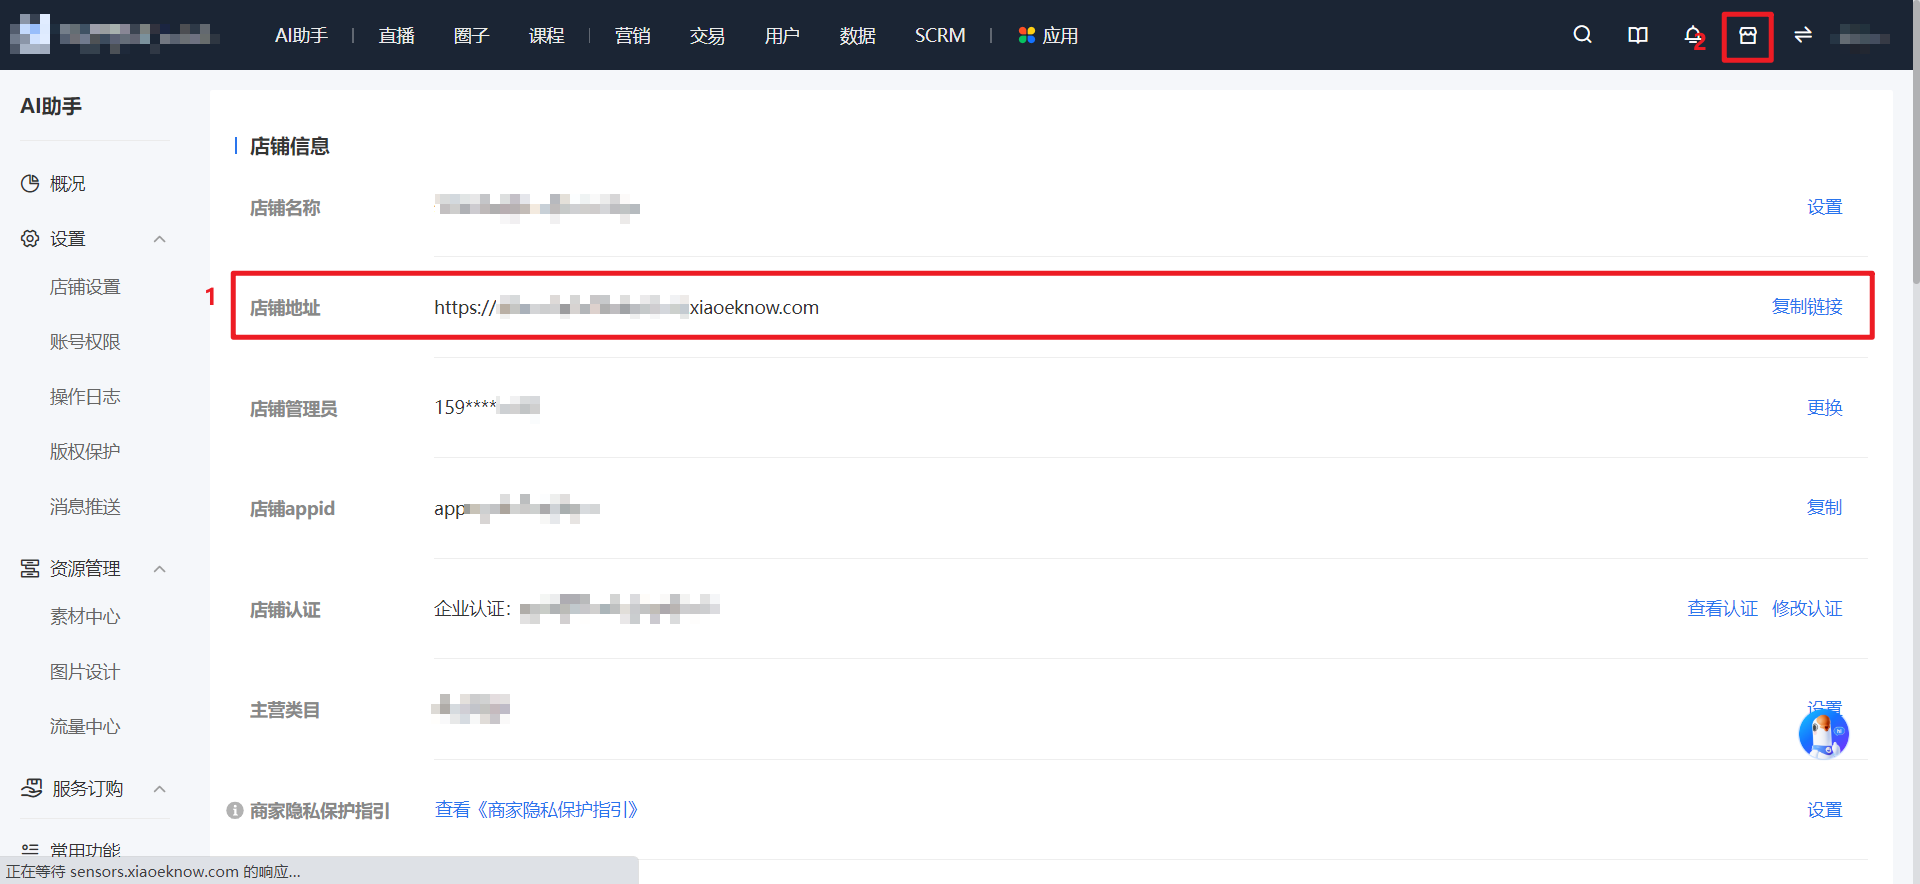
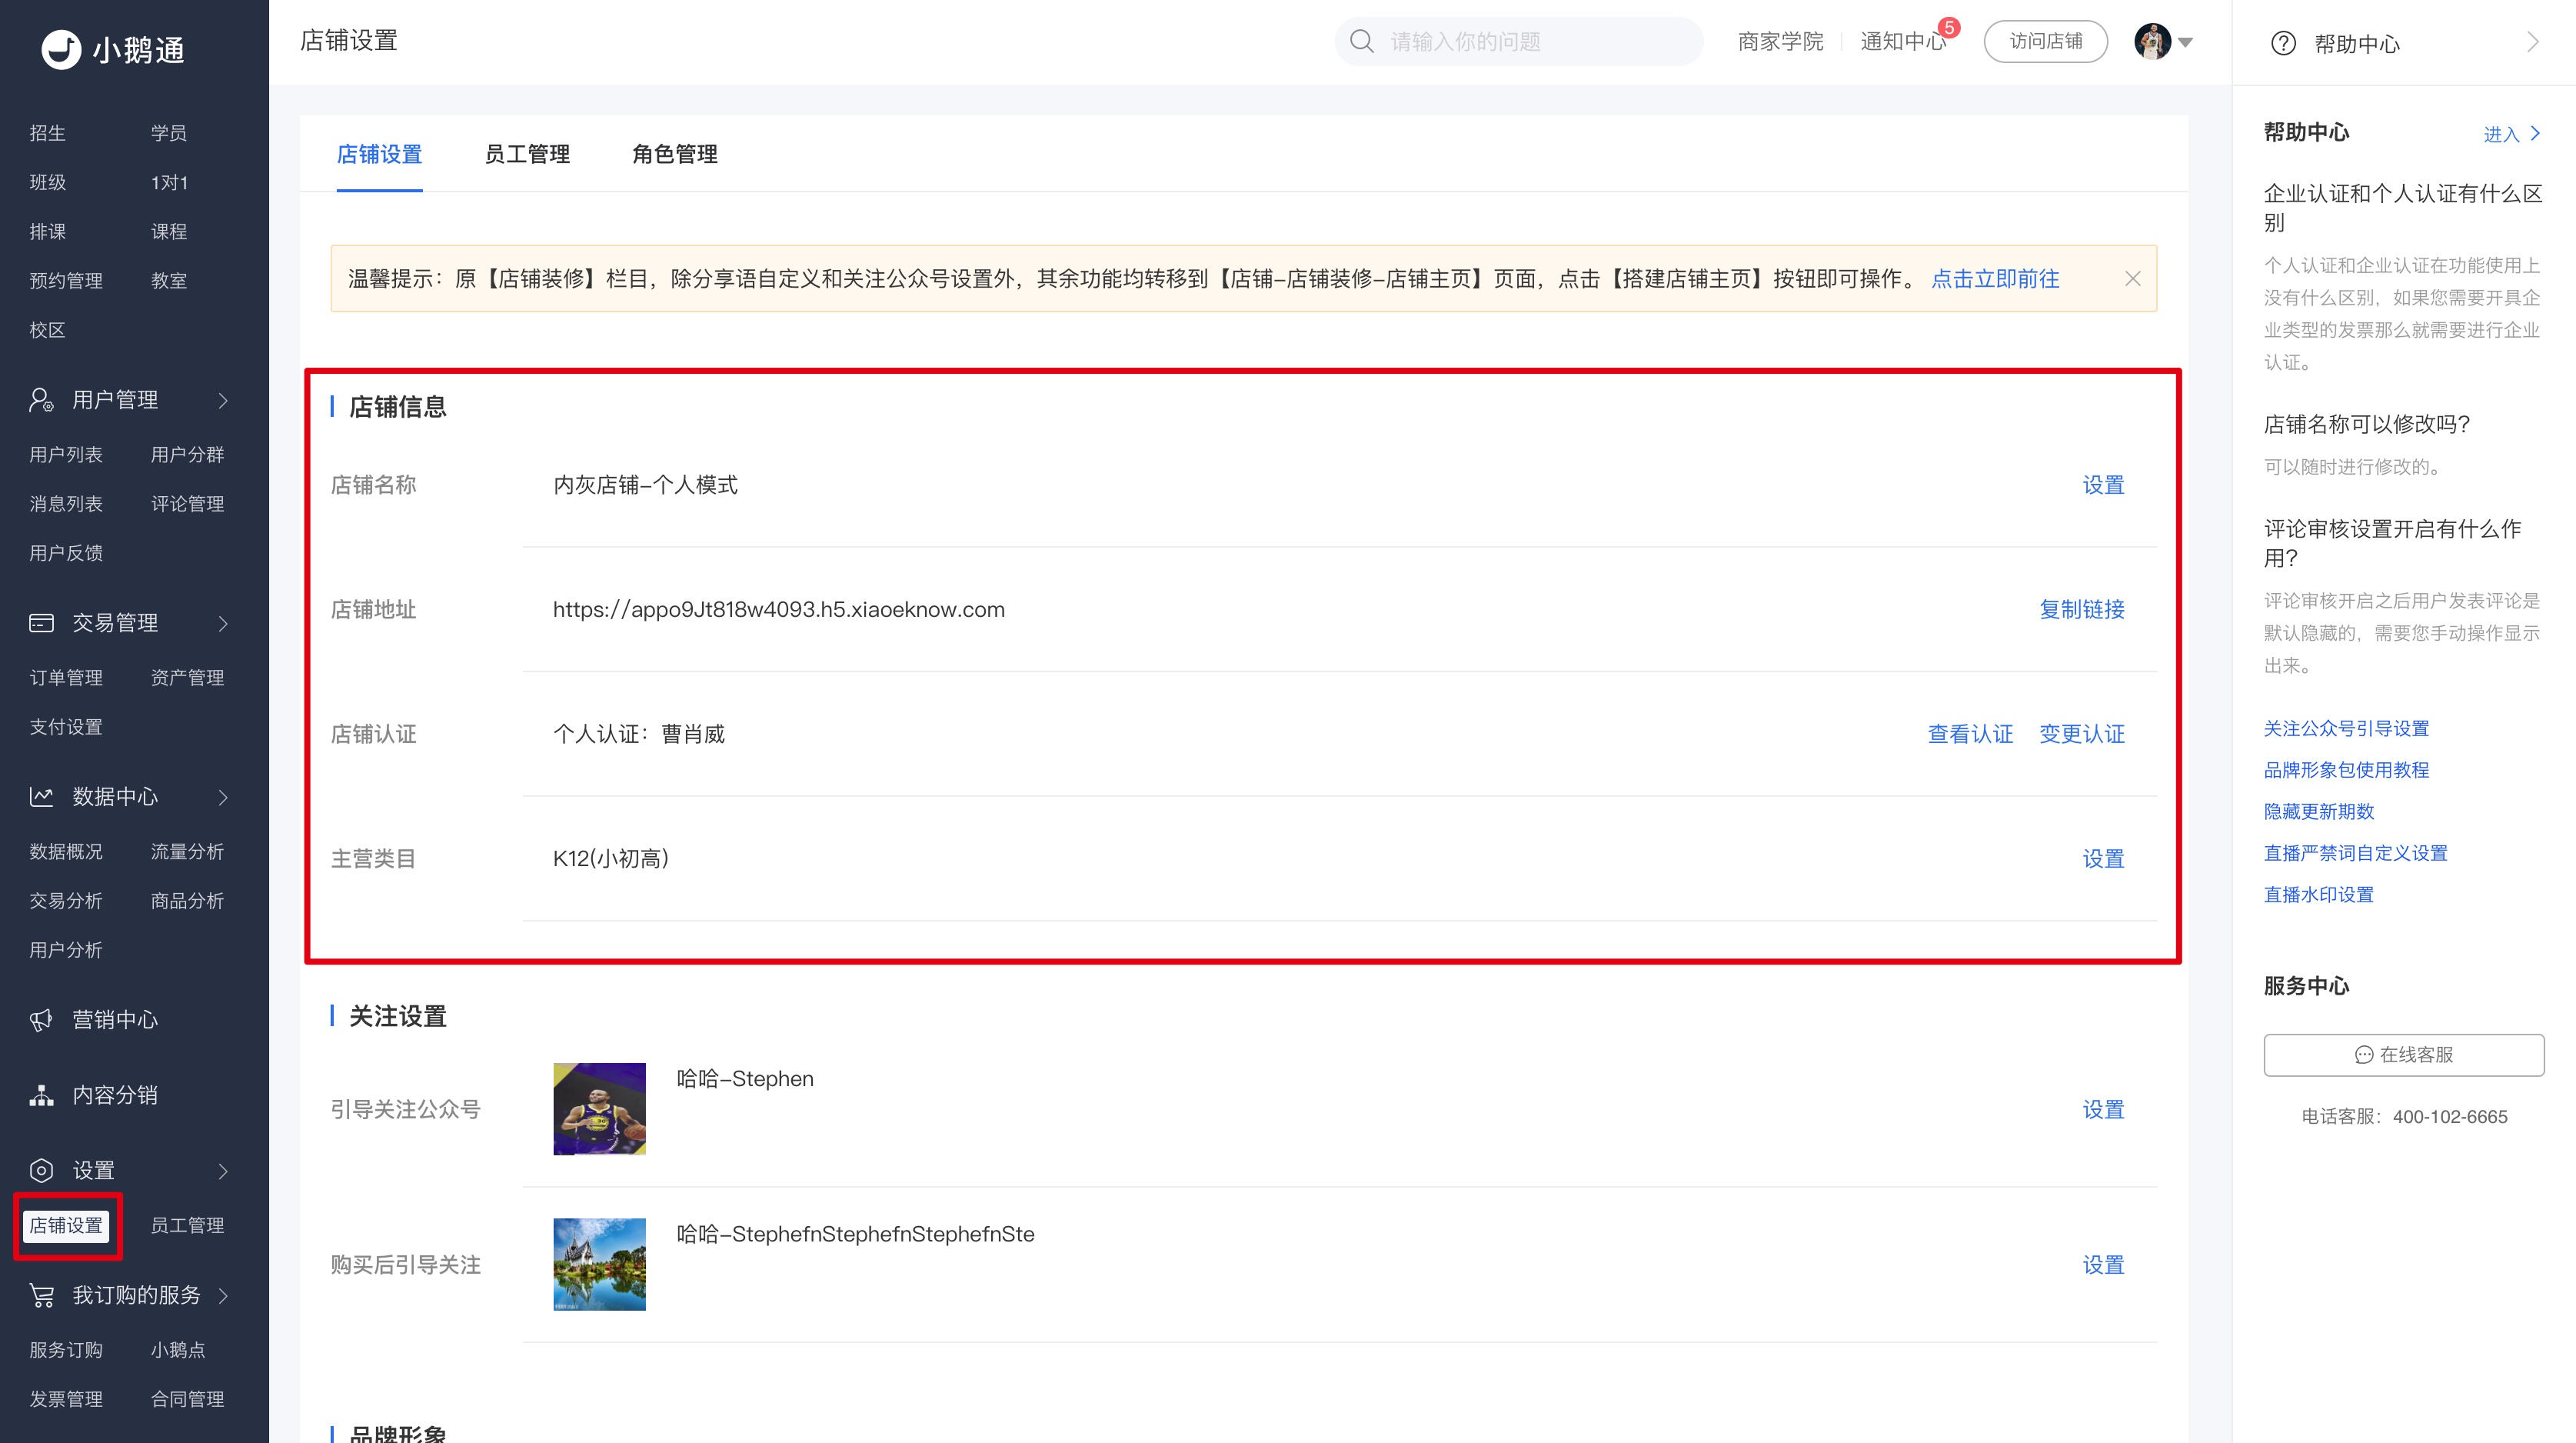
<span style="font-size:15px;">Option 1: Click \[AI Assistant - Settings - Store Settings\] and copy the link in \[Store Information\] to get the store address.</span>

<span style="font-size:15px;">Option 2: After entering the store management console, click the \[Visit Store\] icon in the upper right corner and obtain it from the pop - up window for visiting the store.</span>

![image.png](https://wechatapppro-1252524126.file.myqcloud.com/help_document/image/ueditor/22560700_1695028881.png ".png")

![image.png](https://wechatapppro-1252524126.file.myqcloud.com/help_document/image/ueditor/11727700_1695028911.png ".png")

# How to view store information/store link/modify store name?

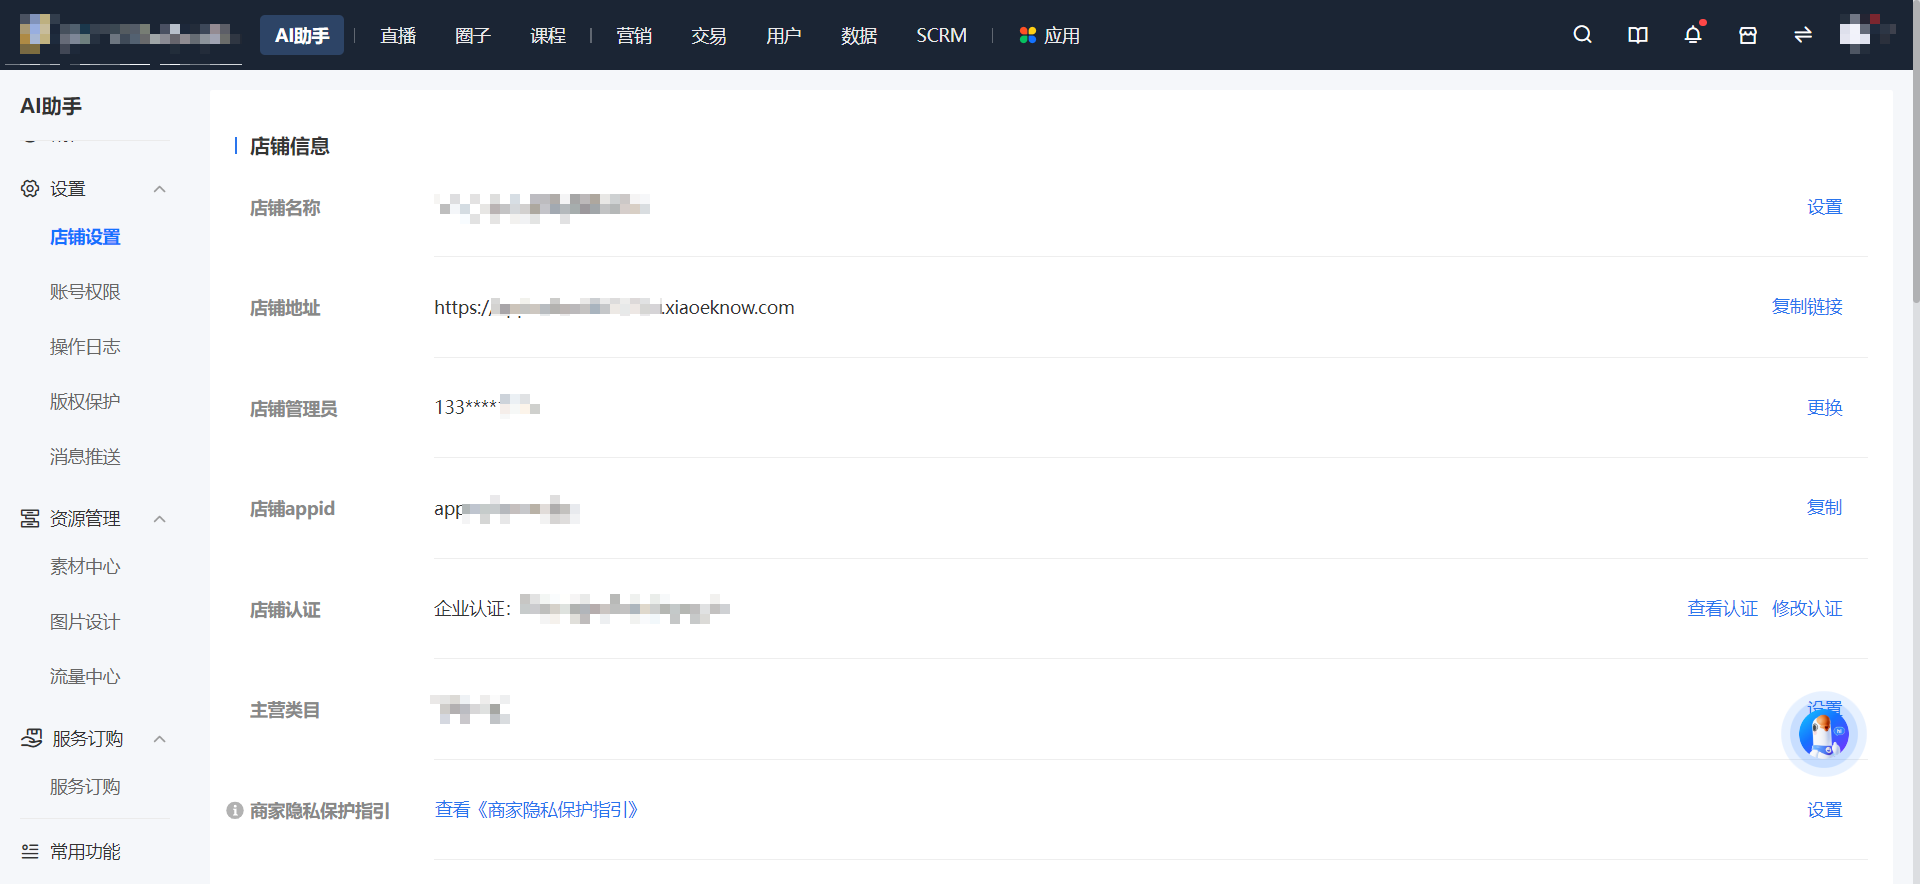
<div data-elink-language-switch="1" id="bkmrk-%E4%B8%AD%E6%96%87" style="border:1px solid #d6d9de;border-radius:6px;padding:10px 12px;margin:0 0 18px 0;background:#f8fafc;font-size:14px;">[中文](/books/877a9/page/e3796)</div><span style="font-size:15px;"><span style="color:rgb(53,53,53);background:rgb(255,255,255);letter-spacing:0pt;vertical-align:baseline;">Operation path: Log in to the desktop management console, click \[AI Assistant - Settings - Store Settings\] to enter the store settings details page, and find \[Store Name\] to make modifications.</span><span style="color:rgb(51,51,51);background-image:initial;background-position:initial;background-size:initial;background-repeat:initial;background-attachment:initial;letter-spacing:0pt;vertical-align:baseline;"></span></span>

<span style="color:rgb(53,53,53);background:rgb(255,255,255);letter-spacing:0pt;vertical-align:baseline;font-size:15px;">In the \[Store Information\] module, you can view the store name, store address, store administrator,<span style="color:rgb(53,53,53);font-size:15px;background-color:rgb(255,255,255);">Store</span>appid, store verification, and main business categories.</span>

<span style="color:rgb(53,53,53);background:rgb(255,255,255);letter-spacing:0pt;vertical-align:baseline;font-size:15px;">Click \[Copy Link\] to get the store address, then embed the link in the menu bar of the Official Account, or send it via WeChat in private chats, Communities, or Moments.</span>

![image.png](https://wechatapppro-1252524126.file.myqcloud.com/help_document/image/ueditor/49270900_1695031433.png ".png")

# Can operation records in the operation log be deleted?

<div data-elink-language-switch="1" id="bkmrk-%E4%B8%AD%E6%96%87" style="border:1px solid #d6d9de;border-radius:6px;padding:10px 12px;margin:0 0 18px 0;background:#f8fafc;font-size:14px;">[中文](/books/877a9/page/642e9)</div><span style="font-size:14px;">Once the operation is successful, it will be permanently saved in the operation log and cannot be deleted.</span>

# Operation Log Usage Tutorial

<div data-elink-language-switch="1" id="bkmrk-%E4%B8%AD%E6%96%87" style="border:1px solid #d6d9de;border-radius:6px;padding:10px 12px;margin:0 0 18px 0;background:#f8fafc;font-size:14px;">[中文](/books/877a9/page/4f6ff)</div><span style="font-size:17px;">**I. Feature Introduction**</span>

<span style="font-size:15px;">To help merchants better manage store staff and determine responsibilities, the \[Operation Log\] module has been newly launched. Merchants can query sensitive operations performed by store staff on the management console at any time.</span>

<span style="text-decoration:underline;">**<span style="text-decoration:underline;font-size:15px;">\*\*Note:</span>**</span><span style="font-size:15px;">Currently, the elink management console<span style="font-size:15px;">only records some important and sensitive operations.</span>It does not provide records of all functional operations. If you have new requirements, you can report the sensitive operations you expect to be recorded through the service steward. We will regularly update and maintain this function.</span>

<span style="font-size:17px;">**II. Operation Path**</span>

<span style="font-size:15px;">elink Management Console - AI Assistant - Settings - Operation Log</span>

<span style="font-size:17px;">**III. Usage Tutorial**</span>

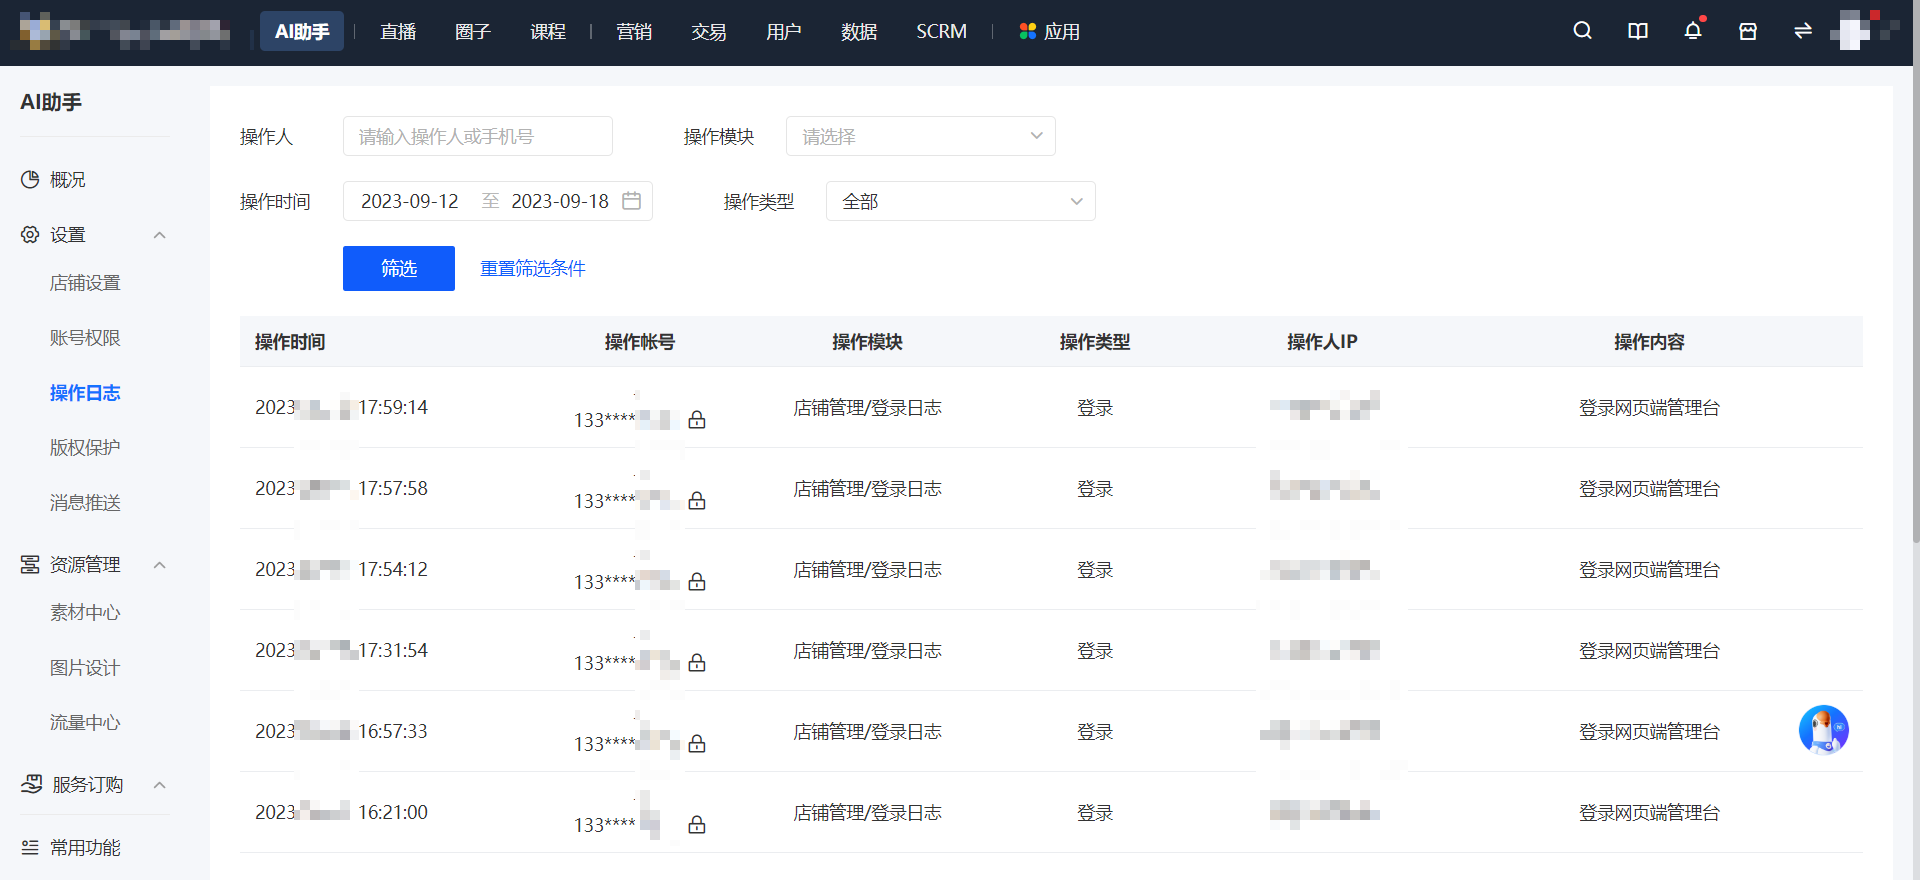
<span style="font-size:15px;">1. By default, the operation records recently executed in the current store are provided. If there are too many records, merchants can narrow the query scope and obtain more accurate operation records by filtering by operator, operation module, operation type, and operation time.</span>

<span style="font-size:15px;">2. Courses and physical products can be restored with one click within 30 days after deletion.</span>

<span style="font-size:15px;">3. By default, the \[Operation Log\] permission is assigned to senior administrators and ordinary administrators. Administrators can independently configure permissions for other roles.</span>

<span style="font-size:15px;">![image.png](https://wechatapppro-1252524126.file.myqcloud.com/help_document/image/ueditor/25469500_1695031313.png ".png")</span>

# Can the operation records in the operation log be exported?

<div data-elink-language-switch="1" id="bkmrk-%E4%B8%AD%E6%96%87" style="border:1px solid #d6d9de;border-radius:6px;padding:10px 12px;margin:0 0 18px 0;background:#f8fafc;font-size:14px;">[中文](/books/877a9/page/c52f1)</div><span style="font-size:10.5pt;font-family:'Microsoft YaHei', '微软雅黑', Roboto, '-apple-system', 'Helvetica Neue', Helvetica, 'PingFang SC', 'Microsoft YaHei', 'Source Han Sans SC', 'Noto Sans CJK SC', 'WenQuanYi Micro Hei', sans-serif;background:rgb(255,255,255);letter-spacing:0pt;vertical-align:baseline;">Operation records can be viewed on the management console and are not currently supported for export.</span><span style="font-size:10.5pt;font-family:'Microsoft YaHei', '微软雅黑', Roboto, '-apple-system', 'Helvetica Neue', Helvetica, 'PingFang SC', 'Microsoft YaHei', 'Source Han Sans SC', 'Noto Sans CJK SC', 'WenQuanYi Micro Hei', sans-serif;background:rgb(255,255,255);letter-spacing:0pt;vertical-align:baseline;"></span>

# When will the operation records in the store backend be synchronized in the operation log?

<div data-elink-language-switch="1" id="bkmrk-%E4%B8%AD%E6%96%87" style="border:1px solid #d6d9de;border-radius:6px;padding:10px 12px;margin:0 0 18px 0;background:#f8fafc;font-size:14px;">[中文](/books/877a9/page/182be)</div><span style="font-size:10.5pt;font-family:'Microsoft YaHei', '微软雅黑', Roboto, '-apple-system', 'Helvetica Neue', Helvetica, 'PingFang SC', 'Microsoft YaHei', 'Source Han Sans SC', 'Noto Sans CJK SC', 'WenQuanYi Micro Hei', sans-serif;background:rgb(255,255,255);letter-spacing:0pt;vertical-align:baseline;">The operation records on the management console are synchronized in real-time.</span>

# Tutorial on Changing the Store Administrator

<div data-elink-language-switch="1" id="bkmrk-%E4%B8%AD%E6%96%87" style="border:1px solid #d6d9de;border-radius:6px;padding:10px 12px;margin:0 0 18px 0;background:#f8fafc;font-size:14px;">[中文](/books/877a9/page/06905)</div><span style="font-size:17px;">**I. Feature Introduction**</span>

<span style="font-size:15px;">During the operation of an online store, there may be changes in the administrator (person - in - charge). In the past, it was necessary to contact customer service to go through the process. Now, you can change the store administrator self - service.</span>

<span style="font-size:17px;">**II. Purpose of Use**</span>

<span style="font-size:15px;">When an online store needs to change its administrator, you can change it self - service, which is safe and efficient.</span>

<span style="font-size:17px;">**III. Operation Path**</span>

<span style="font-size:15px;">Merchant side: Merchant backend AI Assistant<span style="font-size:15px;"> → Settings </span>→ Store Settings → Store Administrator</span>

<span style="font-size:15px;">![image (4).png](https://wechatapppro-1252524126.file.myqcloud.com/help_document/image/ueditor/21520800_1644373566.png ".png")</span>

<span style="font-size:17px;">**IV. Usage Tutorial**</span>

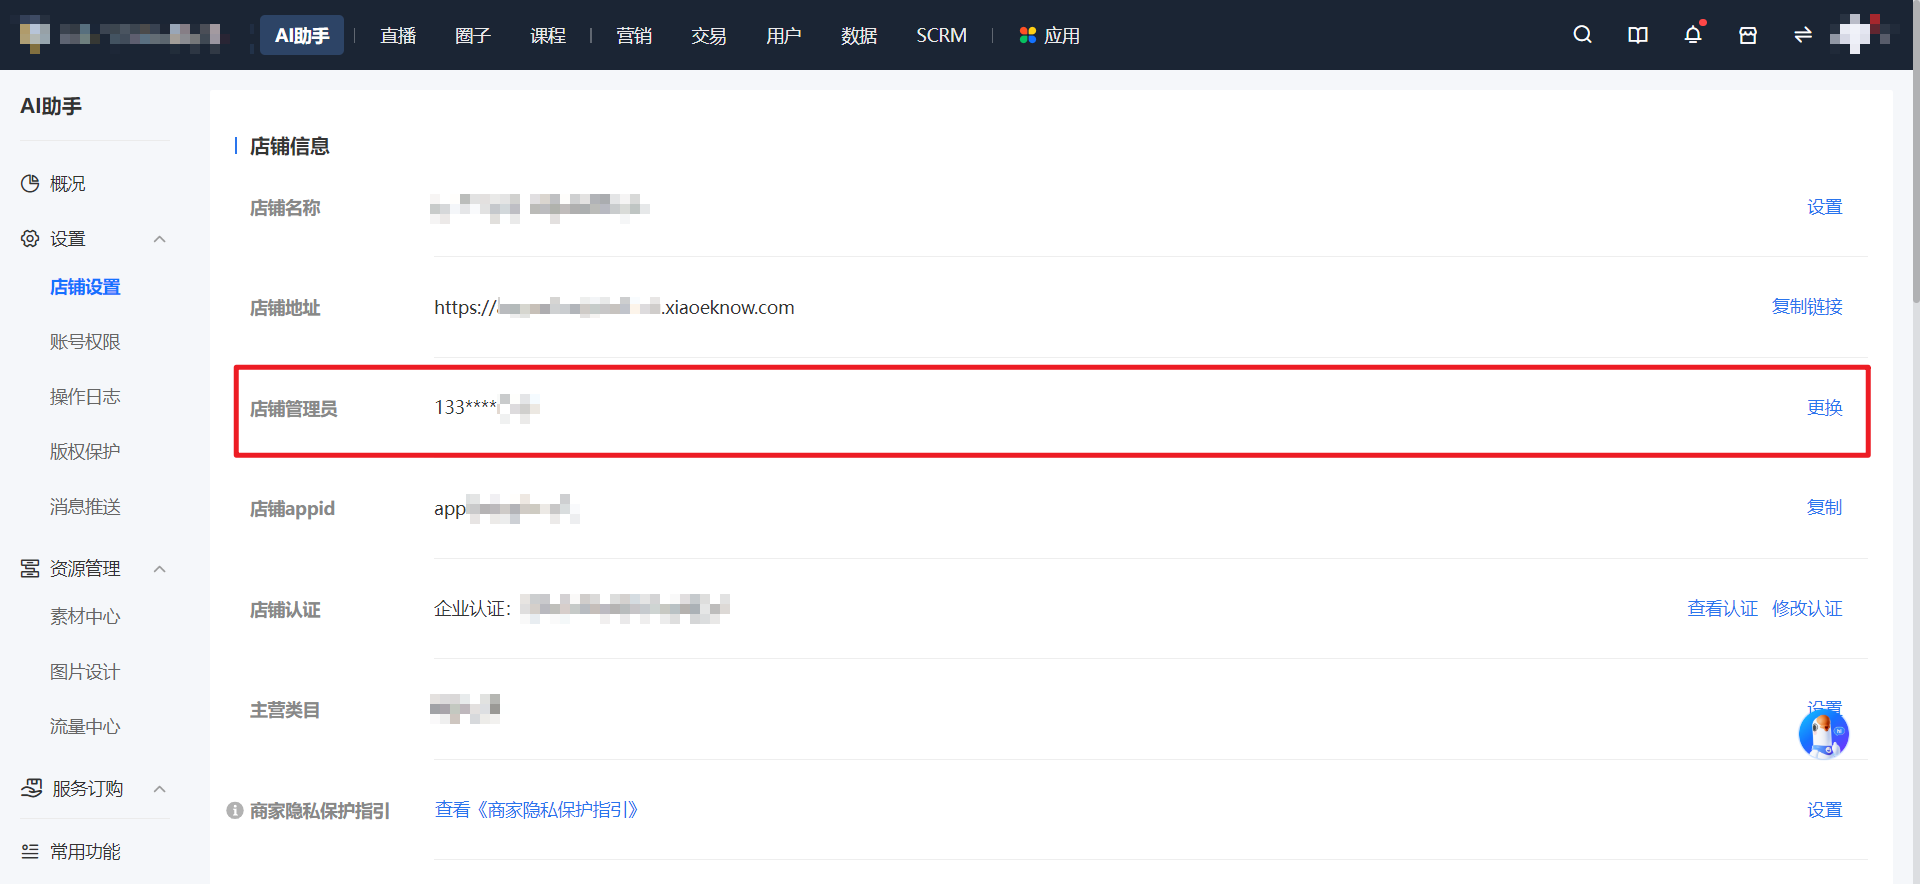
**<span style="font-size:15px;">Step 1:</span><span style="font-size:15px;">Click the 'Change' button on the store settings page</span>**<span style="font-size:15px;">*(Management backend)*</span>

<span style="font-size:15px;">On the store settings page, find the store administrator and click the \[Change\] button.</span>

**<span style="font-size:15px;">\*\*Special attention:</span>**

<span style="font-size:15px;">1. The change is only allowed after the verification of the original store administrator.</span>

<span style="font-size:15px;">2. Only one change is allowed within 30 days.</span>

<span style="font-size:15px;">3. For old accounts, there will be a pop - up window prompting that the account needs to be upgraded before the change can be made.</span>

![image.png](https://wechatapppro-1252524126.file.myqcloud.com/help_document/image/ueditor/54159700_1695031118.png ".png")

**<span style="font-size:15px;">Step 2: Administrator identity verification</span>**<span style="font-size:15px;">*(H5 store)*</span>

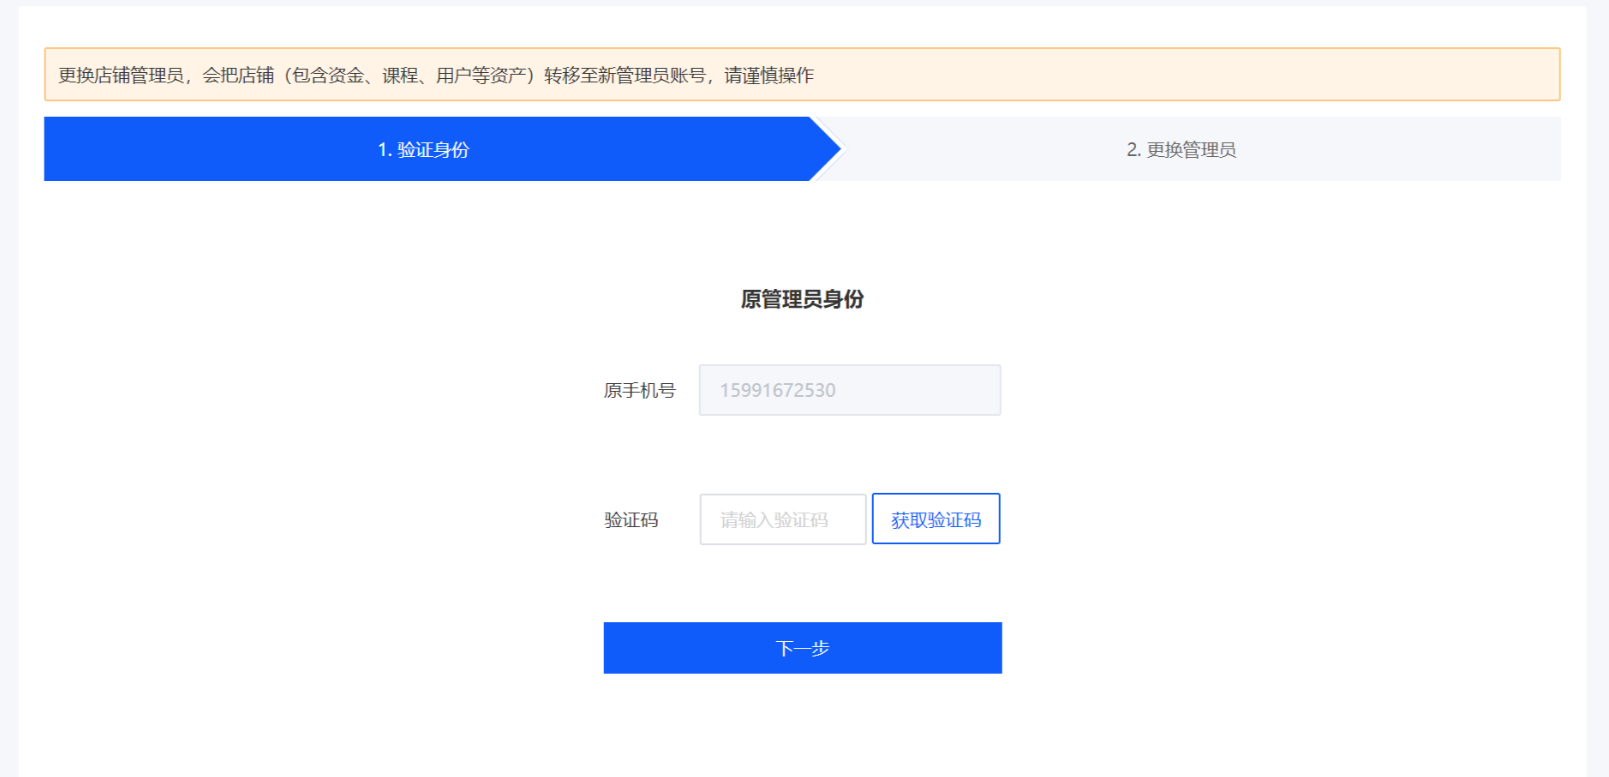
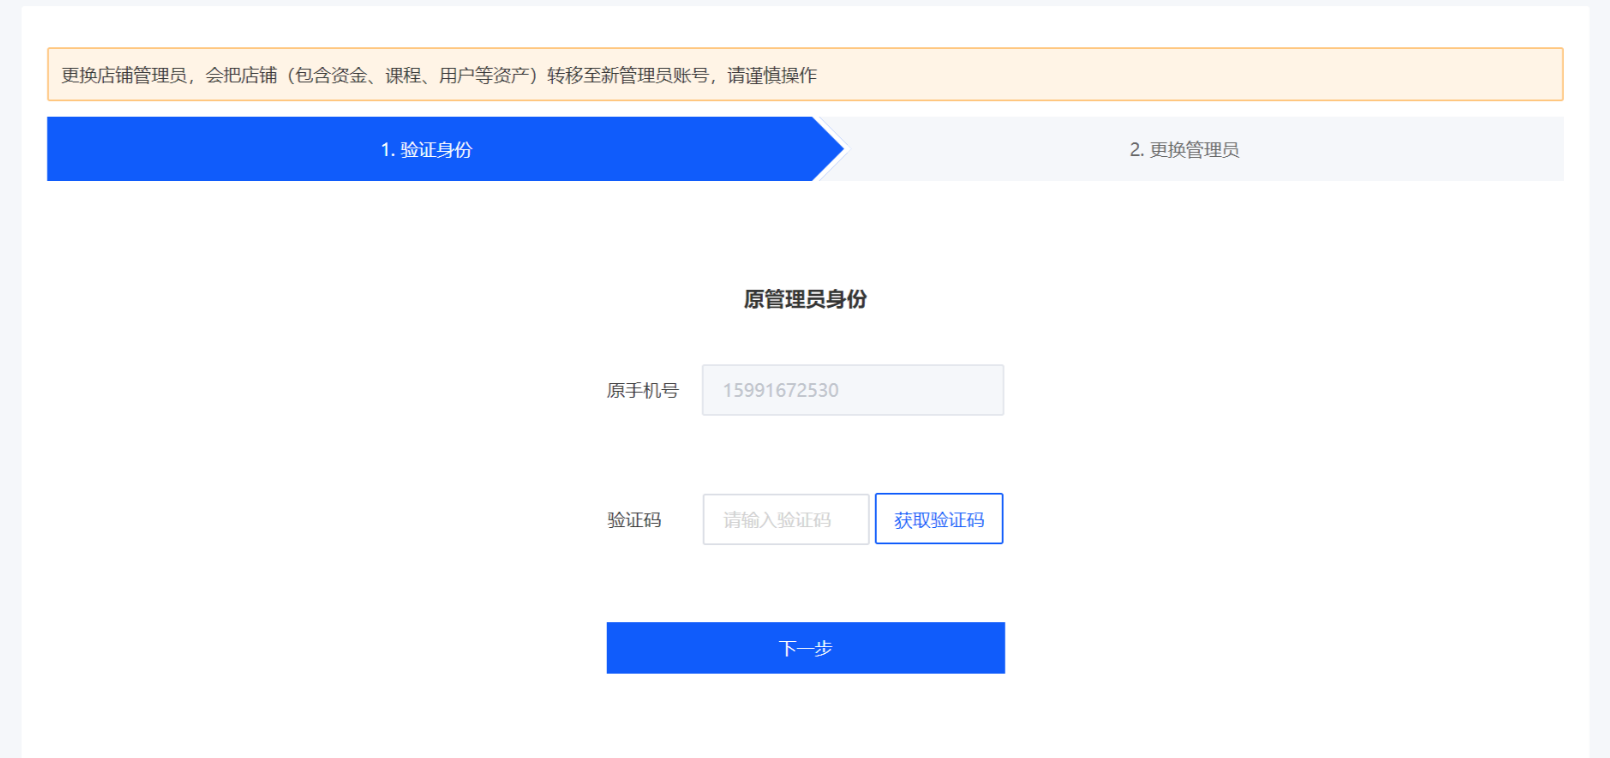
<span style="font-size:15px;">1. For the identity verification of the original store administrator, you need to enter the SMS verification code.</span>

![image.png](https://wechatapppro-1252524126.file.myqcloud.com/help_document/image/ueditor/31679400_1695031151.png ".png")

<span style="font-size:15px;"> (Identity verification step) </span>

<span style="font-size:15px;">2. For the identity verification of the new store administrator, you need to enter the SMS verification code.</span>

**<span style="font-size:15px;">\*\*Special attention:</span>**<span style="font-size:15px;">The mobile phone number of the new store administrator must be registered on elink. If not, please register in advance.</span>

![image.png](https://wechatapppro-1252524126.file.myqcloud.com/help_document/image/ueditor/10952100_1695031180.png ".png")

<span style="font-size:15px;"> (Change step) </span>

**<span style="font-size:15px;">Step 3: The name should be consistent with that in the flow chart</span>***<span style="font-size:15px;">(H5 store)</span>*

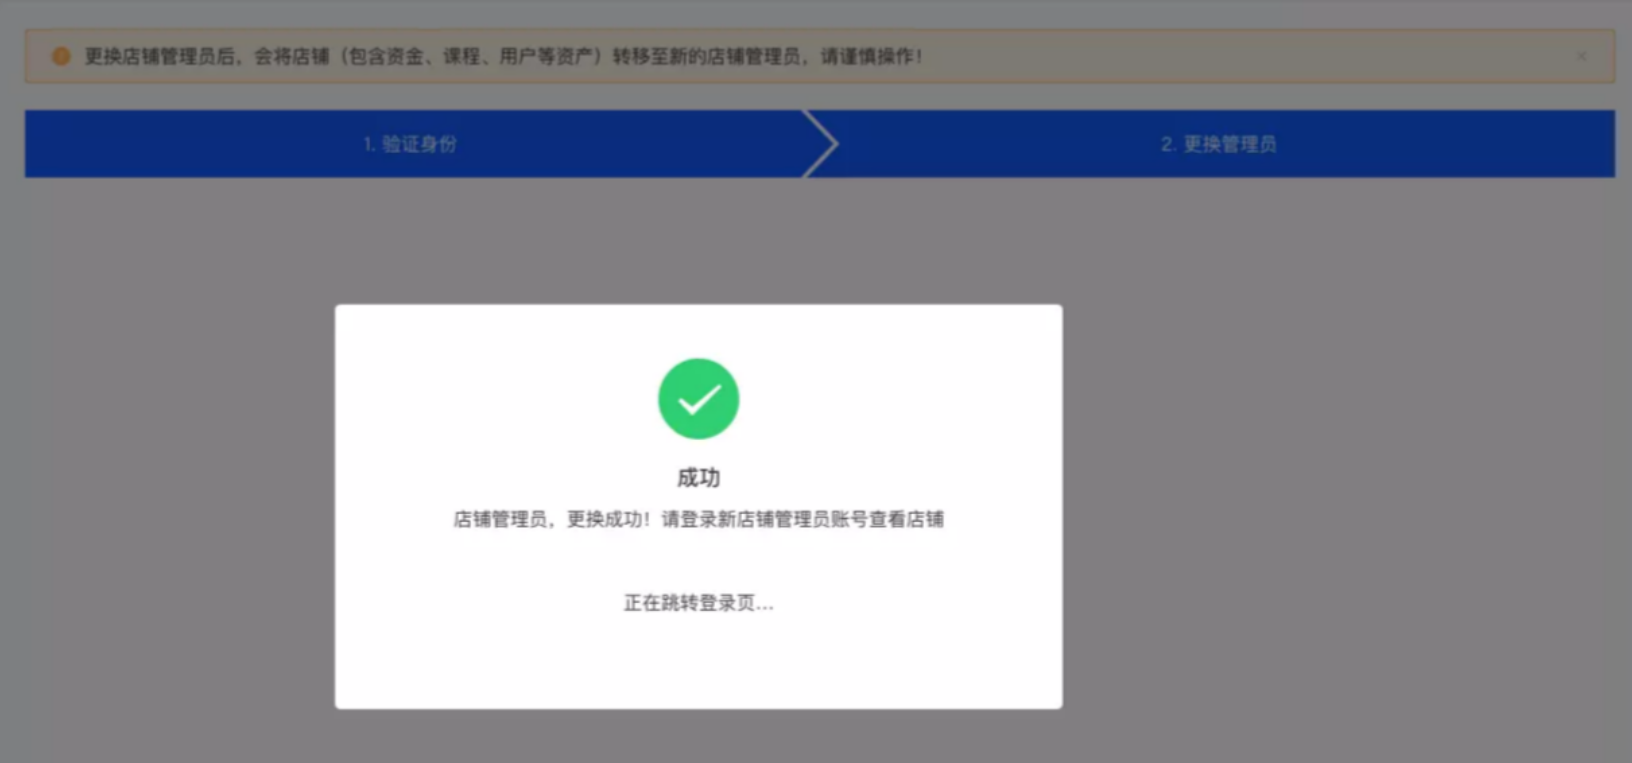
<span style="font-size:15px;">After the change is successful, the system will automatically jump to the login page. At this time, you can log in with the new store administrator account to view the store;</span>

![image.png](https://wechatapppro-1252524126.file.myqcloud.com/help_document/image/ueditor/67482100_1695031213.png ".png")

<span style="font-size:15px;"> (Pop - up window for successful change)</span>

# Tutorial on the restricted use of login devices

<div data-elink-language-switch="1" id="bkmrk-%E4%B8%AD%E6%96%87" style="border:1px solid #d6d9de;border-radius:6px;padding:10px 12px;margin:0 0 18px 0;background:#f8fafc;font-size:14px;">[中文](/books/877a9/page/8cb22)</div><span style="font-size:17px;">**I. Feature Introduction**</span>

<span style="font-size:15px;">Restrict students from logging in to the same account simultaneously on different browsers at the same time. The restriction applies to channels opened via browsers on PC and mobile devices.</span>

<span style="font-size:17px;">**II. Purpose of Use**</span>

<span style="font-size:15px;">Merchants can independently control the number of devices that students can log in to simultaneously, preventing phenomena such as malicious account sharing, selling course accounts, and course viewing fraud by students, thus protecting the interests of merchants.</span>

<span style="font-size:17px;">**III. Use Scenarios**</span>

<span style="font-size:15px;">This feature is used in scenarios where merchants need to prevent students from sharing accounts or engaging in course viewing fraud.</span>

<span style="font-size:17px;">**IV. Operation Path**</span>

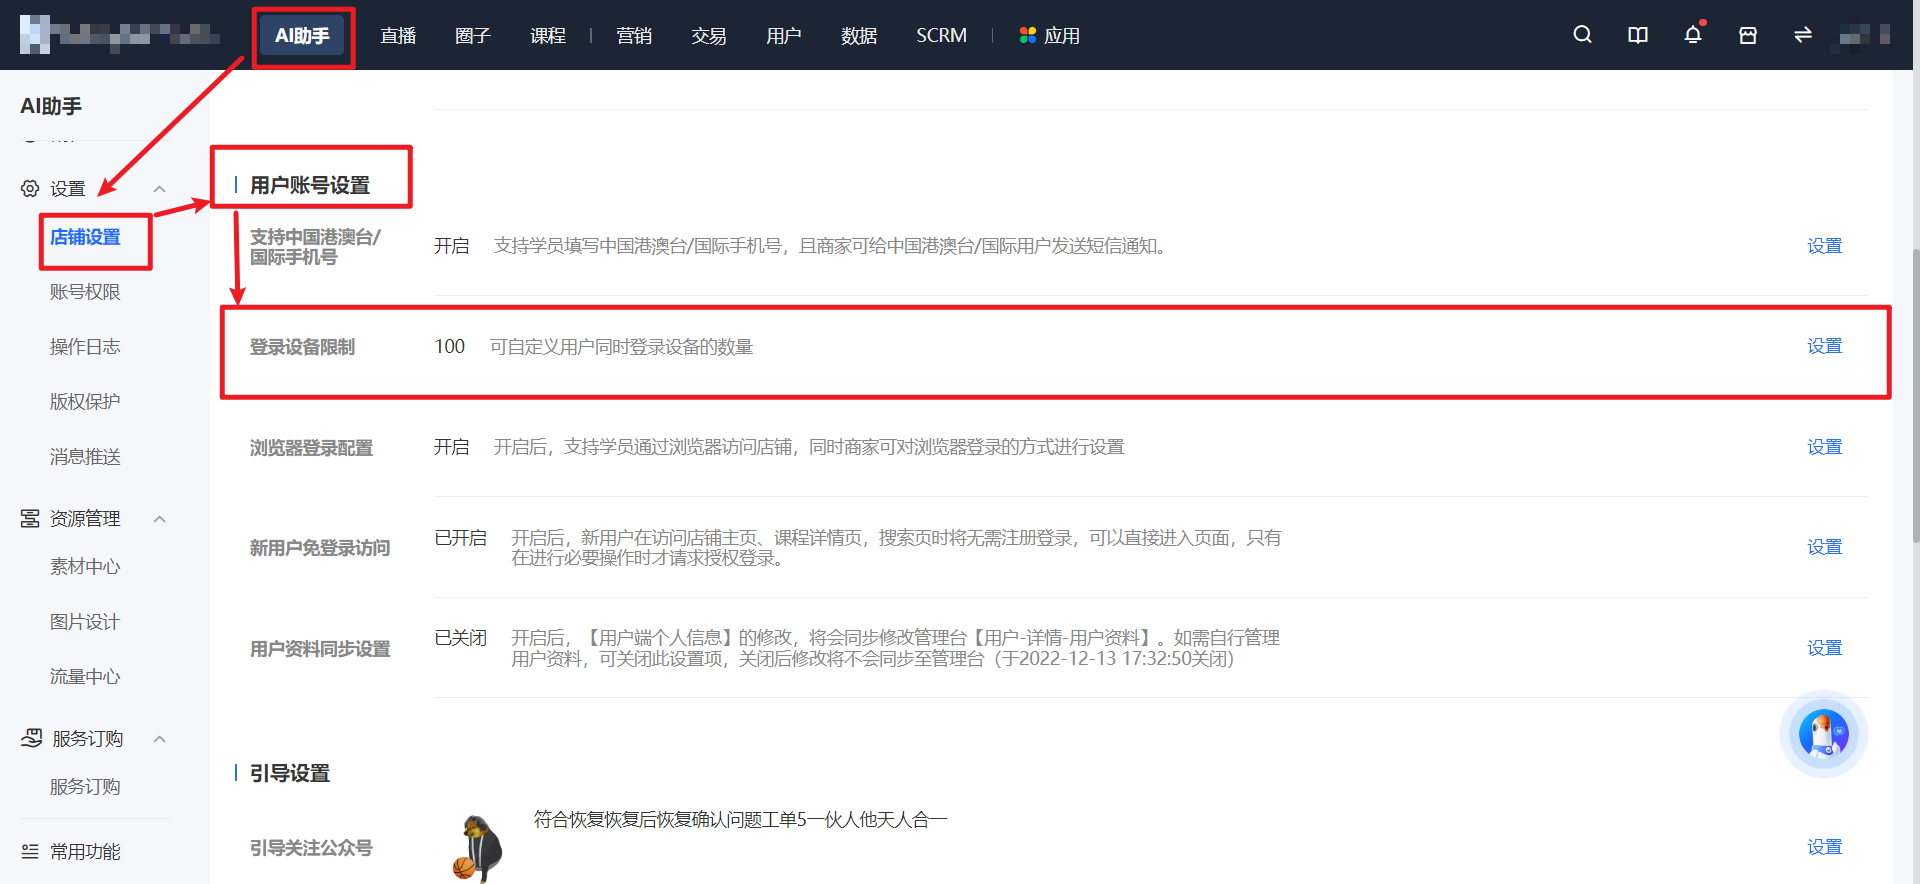
<span style="font-size:15px;">Merchant side: AI Assistant - Settings - Store Settings - User Account Settings - Login Device Restrictions</span>

![image.png](https://wechatapppro-1252524126.file.myqcloud.com/help_document/image/ueditor/81399200_1644316054.png ".png")

<span style="font-size:15px;"></span>

<span style="font-size:17px;">**V. Usage Tutorial**</span>

**<span style="font-size:15px;">Step 1: Store Settings</span>***<span style="font-size:15px;">(Management Backend)</span>*

<span style="font-size:15px;">Enter the merchant management backend, click \[Store Settings\], find \[Login Device Restrictions\], and click \[Settings\].</span>

![image.png](https://wechatapppro-1252524126.file.myqcloud.com/help_document/image/ueditor/11353300_1695028211.png ".png")

**<span style="font-size:15px;">Step 2: Set the Restriction Quantity</span>***<span style="font-size:15px;">(Management Backend)</span>*

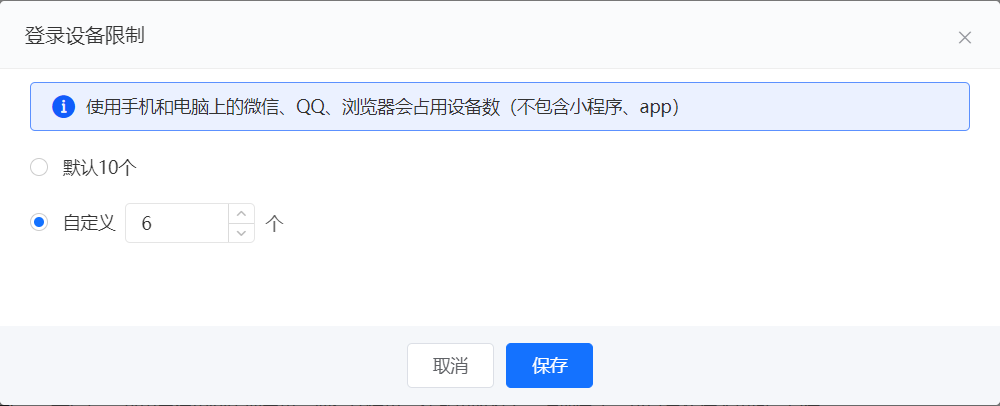
<span style="font-size:15px;">The default limit for login devices is 10, and the custom range is from 1 to 10.</span>

![image.png](https://wechatapppro-1252524126.file.myqcloud.com/help_document/image/ueditor/97866200_1695028236.png ".png")

# View store information/store link/Modify store name

<div data-elink-language-switch="1" id="bkmrk-%E4%B8%AD%E6%96%87" style="border:1px solid #d6d9de;border-radius:6px;padding:10px 12px;margin:0 0 18px 0;background:#f8fafc;font-size:14px;">[中文](/books/877a9/page/41ae3)</div><span style="color:rgb(0,0,0);"><span style="font-size:16px;background-color:rgb(255,255,255);">Click 'Settings' and then 'Store Settings' in the left sidebar to enter the store settings details page.</span>.</span><span class="author-17741">The 'Store Information' includes the store name and store address. You can customize the store name to facilitate user identification.</span>

<span class="author-17741">  
</span>

<span class="author-17741">Click 'Copy Link' to get the store address. Then, embed the link in the menu bar of the Official Account, or send it via WeChat in private chats, communities, or on Moments.</span>

<span class="author-17741">  
</span>

![image.png](https://wechatapppro-1252524126.file.myqcloud.com/help_document/image/ueditor/68602100_1566915056.png ".png")

<span class="author-17741 upload-image img-xHNZq12e9ZaZnuD2 image-width-1920 image-height-1200" style="display:block;width:613px;min-height:60px;border:1px solid transparent;text-align:inherit;">  
</span>

# Employee management

# How to add new roles/employees for management?

<div data-elink-language-switch="1" id="bkmrk-%E4%B8%AD%E6%96%87" style="border:1px solid #d6d9de;border-radius:6px;padding:10px 12px;margin:0 0 18px 0;background:#f8fafc;font-size:14px;">[中文](/books/877a9/page/0aa18)</div><span style="font-size:17px;">**I. Function Introduction**</span>

<span style="font-size:15px;">Merchants' employee accounts are divided into two types: free accounts and paid accounts. Each time a paid account is added, it will occupy a paid quota. When the quotas are insufficient, you need to purchase more paid account quotas. You can purchase them in the form of a feature package, namely the 'Store Employees' feature package. You can choose the number of quotas, and each quota costs 1 yuan per day.</span>

<span style="font-size:17px;">**II. The number of paid account quotas given away for different store versions is as follows:**</span>

<span style="font-size:15px;">Basic Edition: 1 quota</span>

<span style="font-size:15px;">Professional Edition: 3 quotas</span>

<span style="font-size:15px;">Flagship Edition: 10 quotas</span>

<span style="font-size:15px;">Note: The above quotas do not include the creator's account.</span>

<span style="font-size:17px;">**III. Free/Paid Roles**</span>

<span style="font-size:15px;">Free Role: Teaching Assistant</span>

<span style="font-size:15px;">Paid Roles: Senior Administrator, General Administrator, Finance Staff, Teacher, Course Consultant, Academic Affairs Specialist, Salesperson, Marketing Supervisor</span>

<span style="font-size:17px;">**IV. Concept Explanation**</span>

<span style="font-size:17px;">**![image.png](https://wechatapppro-1252524126.file.myqcloud.com/help_document/image/ueditor/85288400_1699844553.png ".png")**</span>

<span style="font-size:15px;"></span>

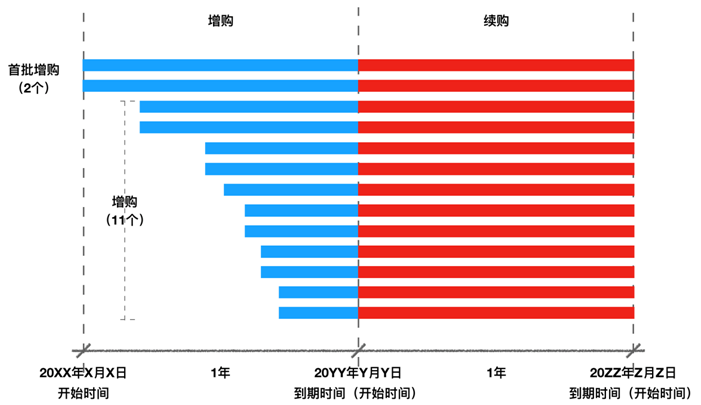
<span style="font-size:15px;">1. Additional Purchase:</span>

<span style="font-size:15px;">① It is divided into the first - batch additional purchase and non - first - batch additional purchase. The quota period for the first - batch additional purchase is 365 days and cannot be changed. The expiration time of the non - first - batch additional purchase must be aligned with that of the first - batch additional purchase, and the fees are calculated on a daily basis. Example: On March 1, 2019, 3 paid employee quotas were additionally purchased in the first batch (for 365 days), and the settlement amount is 3 \* 365 = 1095 yuan. On June 1, 2019, another 3 paid employee quotas were additionally purchased, and the settlement amount is 3 \* (365 - 92) = 819 yuan.</span>

<span style="font-size:15px;">② The number of additionally purchased quotas is limited to within 1000.</span>

<span style="font-size:15px;">2. Renewal:</span>

<span style="font-size:15px;">① When renewing employee quotas, you can choose the number of quotas to renew. The renewal period is 365 days and cannot be changed.</span>

<span style="font-size:15px;">② The start time of the renewal validity period is the expiration time of the first - batch additionally purchased quotas.</span>

<span style="font-size:15px;">③ When the number of renewed employees is less than the number of previously additionally purchased employees, some employees may be disabled after expiration, except for the store creator. Therefore, please disable or delete the accounts of these employees in advance. In the employee list, the employees at the bottom are more likely to be disabled.</span>

<span style="font-size:15px;">④ If the previously additionally purchased quotas are not renewed before they expire uniformly, after expiration, the paid employee quotas will return to the initial state, and you need to make an additional purchase before you can renew.</span>

<span style="font-size:15px;">3. Handling of Old Accounts:</span>

<span style="font-size:15px;">For those employee accounts added before the launch of the 'Store Employees' feature package, if they are paid accounts, their expiration time is consistent with the store's expiration time. However, if you need to add new paid employee accounts, you still need to additionally purchase paid employee quotas, and the expiration time will still be consistent with the store's expiration time.</span>

<span style="font-size:15px;">4. Others:</span>

<span style="font-size:15px;">① Disabling or deleting a paid employee account will release the paid employee quota.</span>

<span style="font-size:15px;">② Changing the paid role selected for an employee account to a free role will release the paid employee quota.</span>

<span style="font-size:17px;">**V. Operation Process**</span>

<span style="font-size:15px;">\[Additional Purchase/Renewal\]</span>

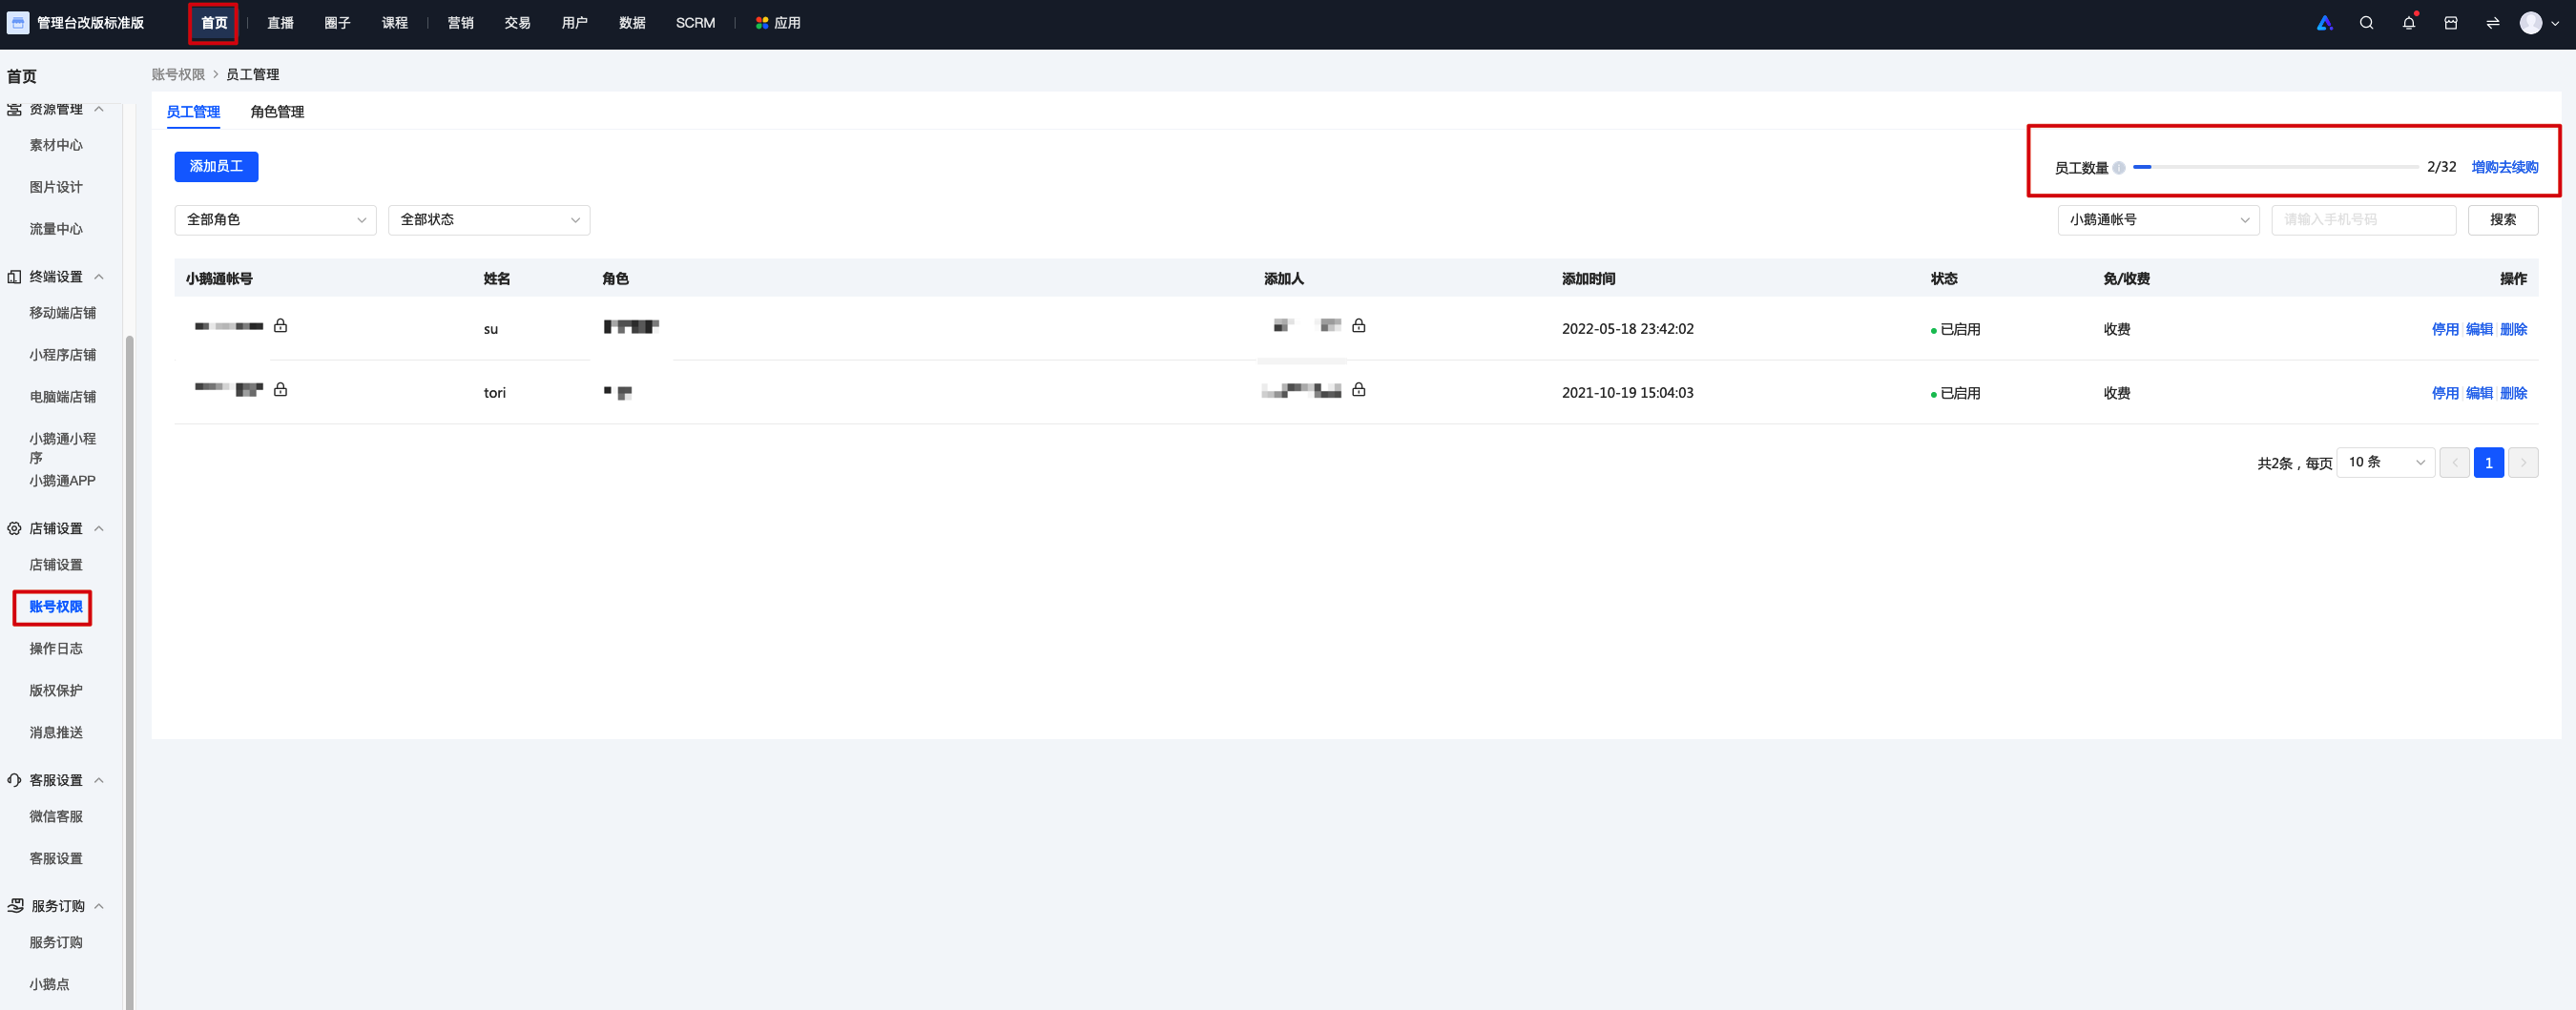
<span style="font-size:15px;">Operation path: Log in to the elink backend - \[Settings - Employee Management - Additional Purchase\];</span>

<span style="font-size:15px;">![图片.png](https://wechatapppro-1252524126.file.myqcloud.com/help_document/image/ueditor/91189000_1699844752.png ".png")</span>

<span style="font-size:15px;">  
</span>

<span style="font-size:15px;">In the Employee Management\_Employee Account List, you can directly make an additional purchase or renewal.</span>

![图片.png](https://wechatapppro-1252524126.file.myqcloud.com/help_document/image/ueditor/66598600_1699844752.png ".png")

# Store staff instructions

<div data-elink-language-switch="1" id="bkmrk-%E4%B8%AD%E6%96%87" style="border:1px solid #d6d9de;border-radius:6px;padding:10px 12px;margin:0 0 18px 0;background:#f8fafc;font-size:14px;">[中文](/books/877a9/page/26657)</div><span style="font-size:17px;">**I. Feature Introduction**</span>

<span style="font-size:15px;">Employee Management: Merchants can add accounts for their team members and assign corresponding roles for logging in and managing the store.</span>

<span style="font-size:15px;">Role Management: Merchants can customize different roles according to the actual division of labor in work, assign different management permissions, and manage them centrally.</span>

<span style="font-size:17px;">**II. Scenario Examples**</span>

<span style="font-size:15px;">Currently, there is a team of about a dozen people jointly operating an elink store, with each person having their own responsibilities, including the merchant owner, operator, accountant, designer, course administrator, etc. By setting up role/employee management (for example, the merchant owner can perform all operations and view all core data, and the accountant can perform all operations related to the financial module), the team can better divide labor and collaborate while ensuring the security of core data.</span>

<span style="font-size:17px;">**III. Feature Operations**</span>

<span style="font-size:15px;">1. Role Management</span>

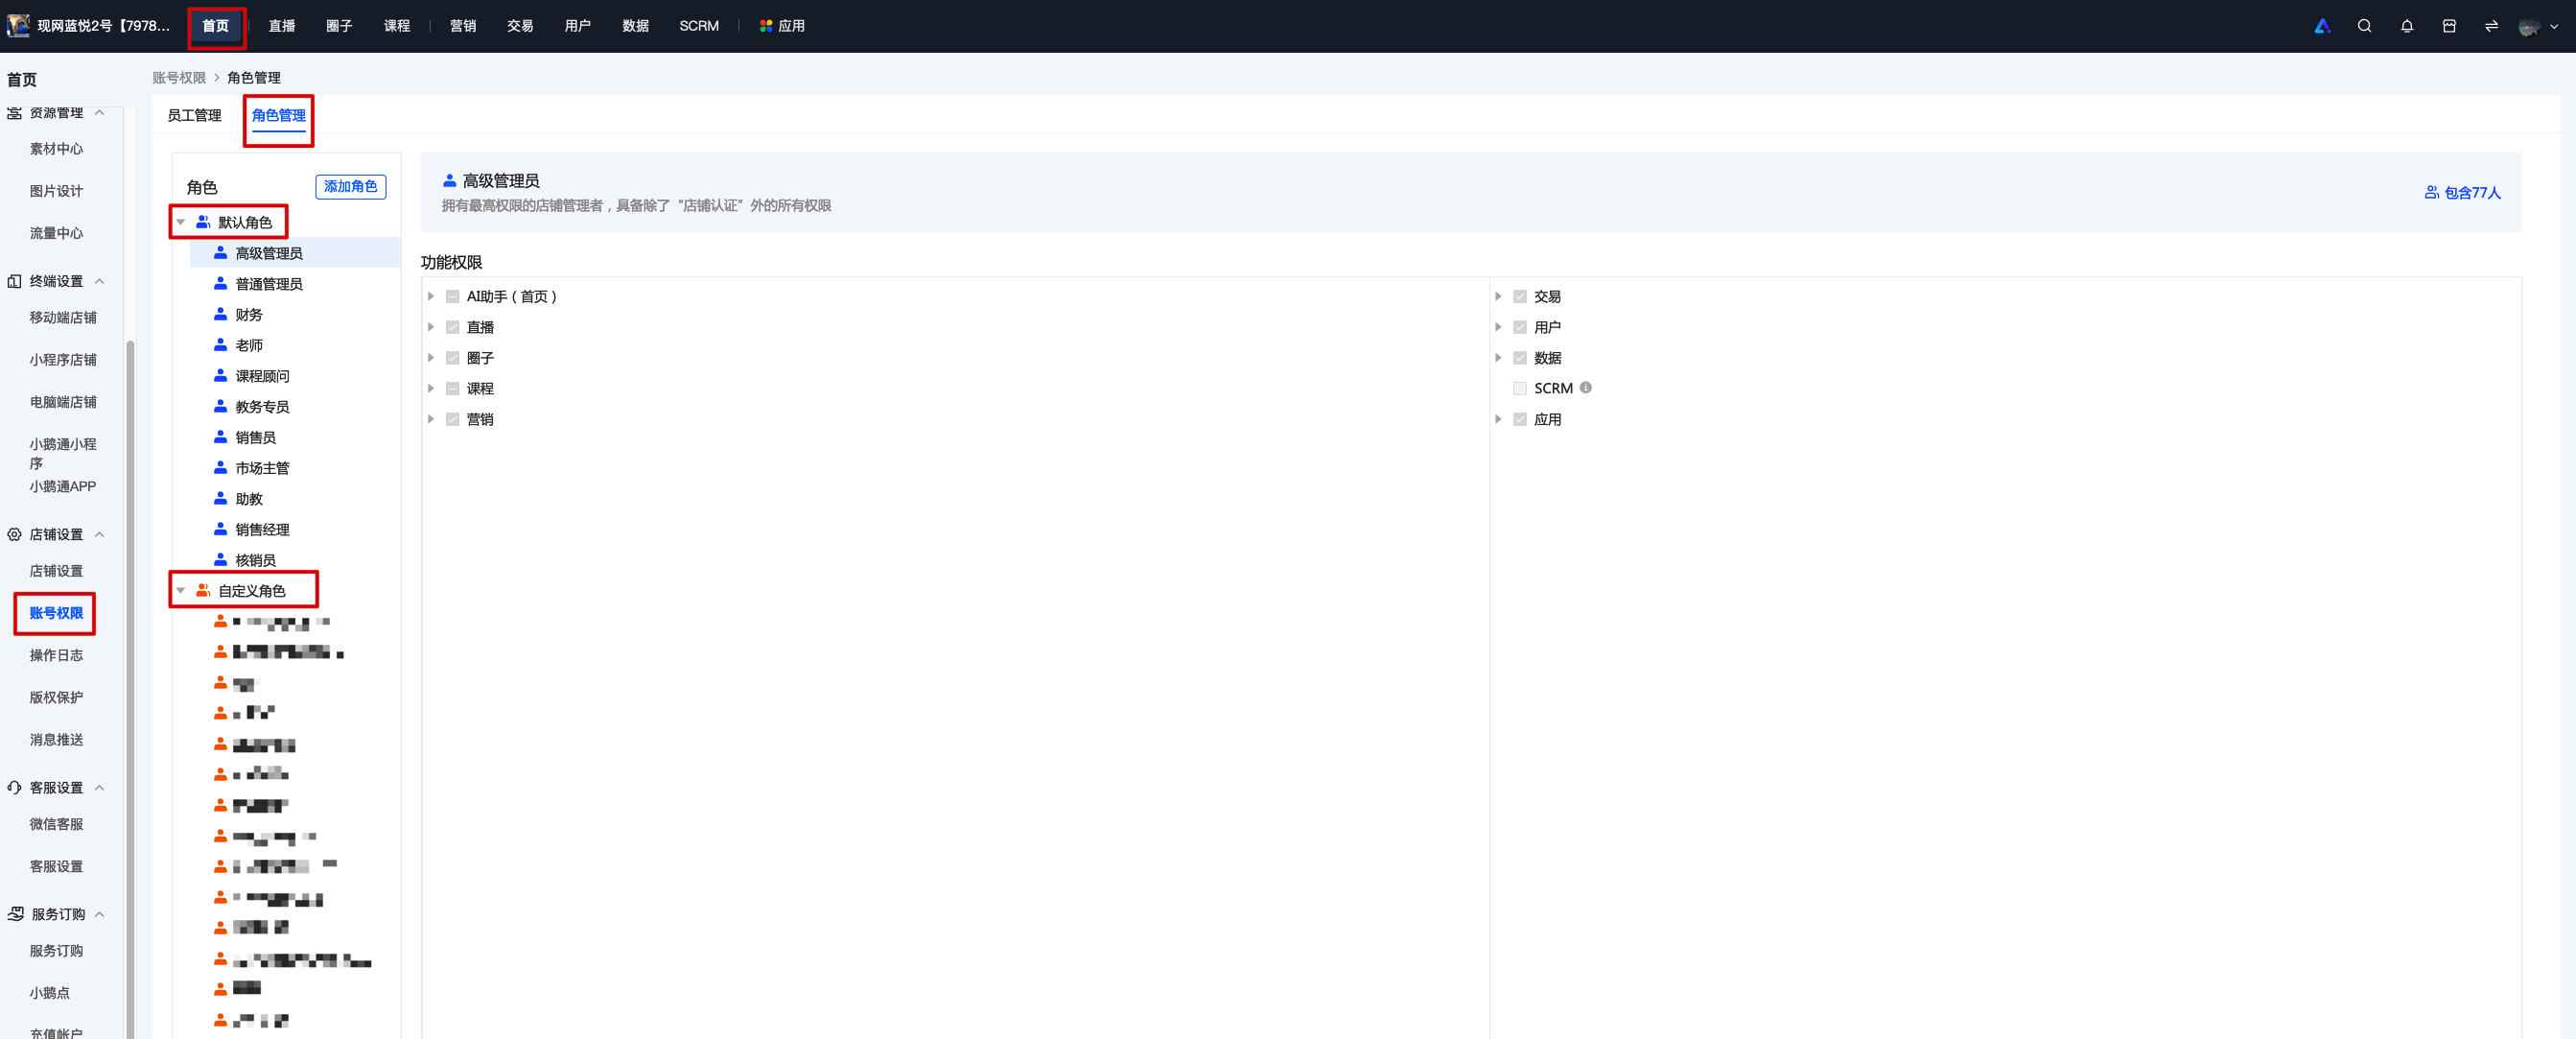
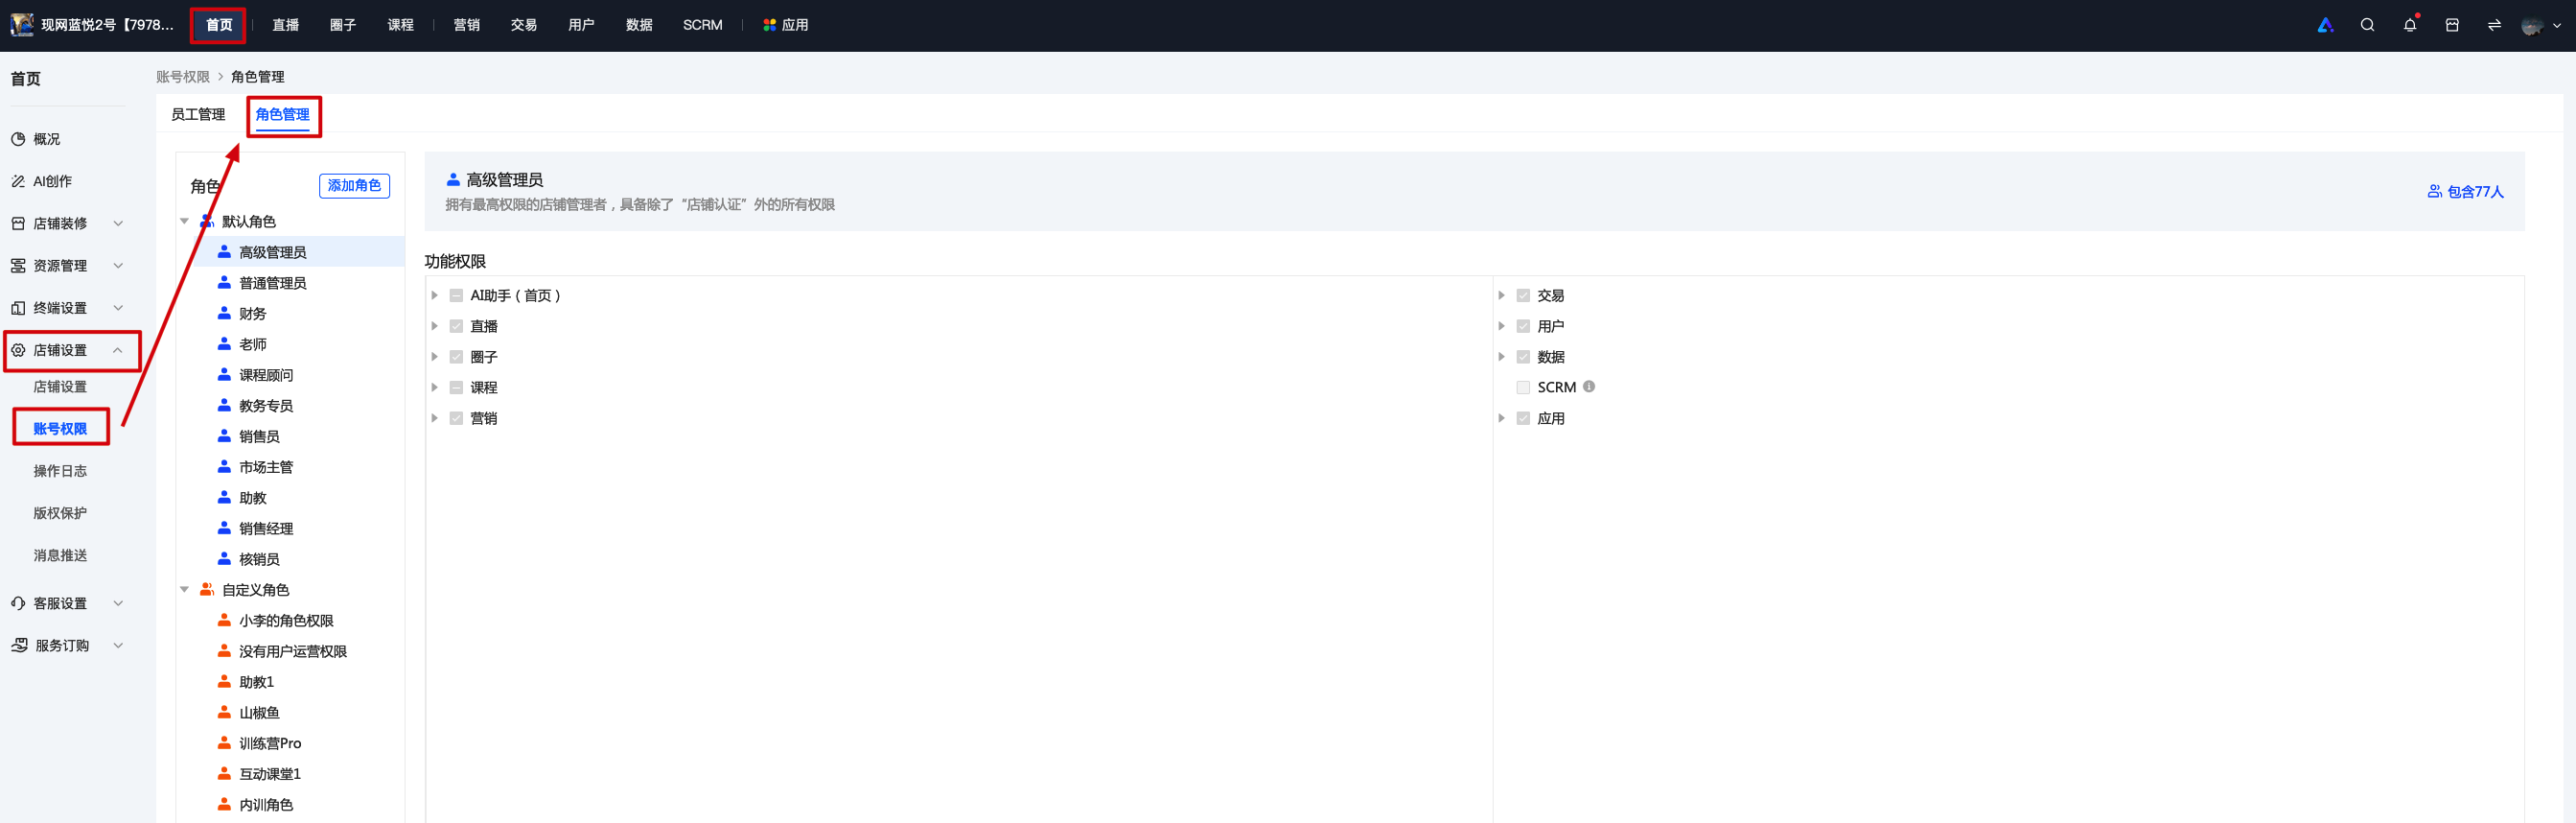
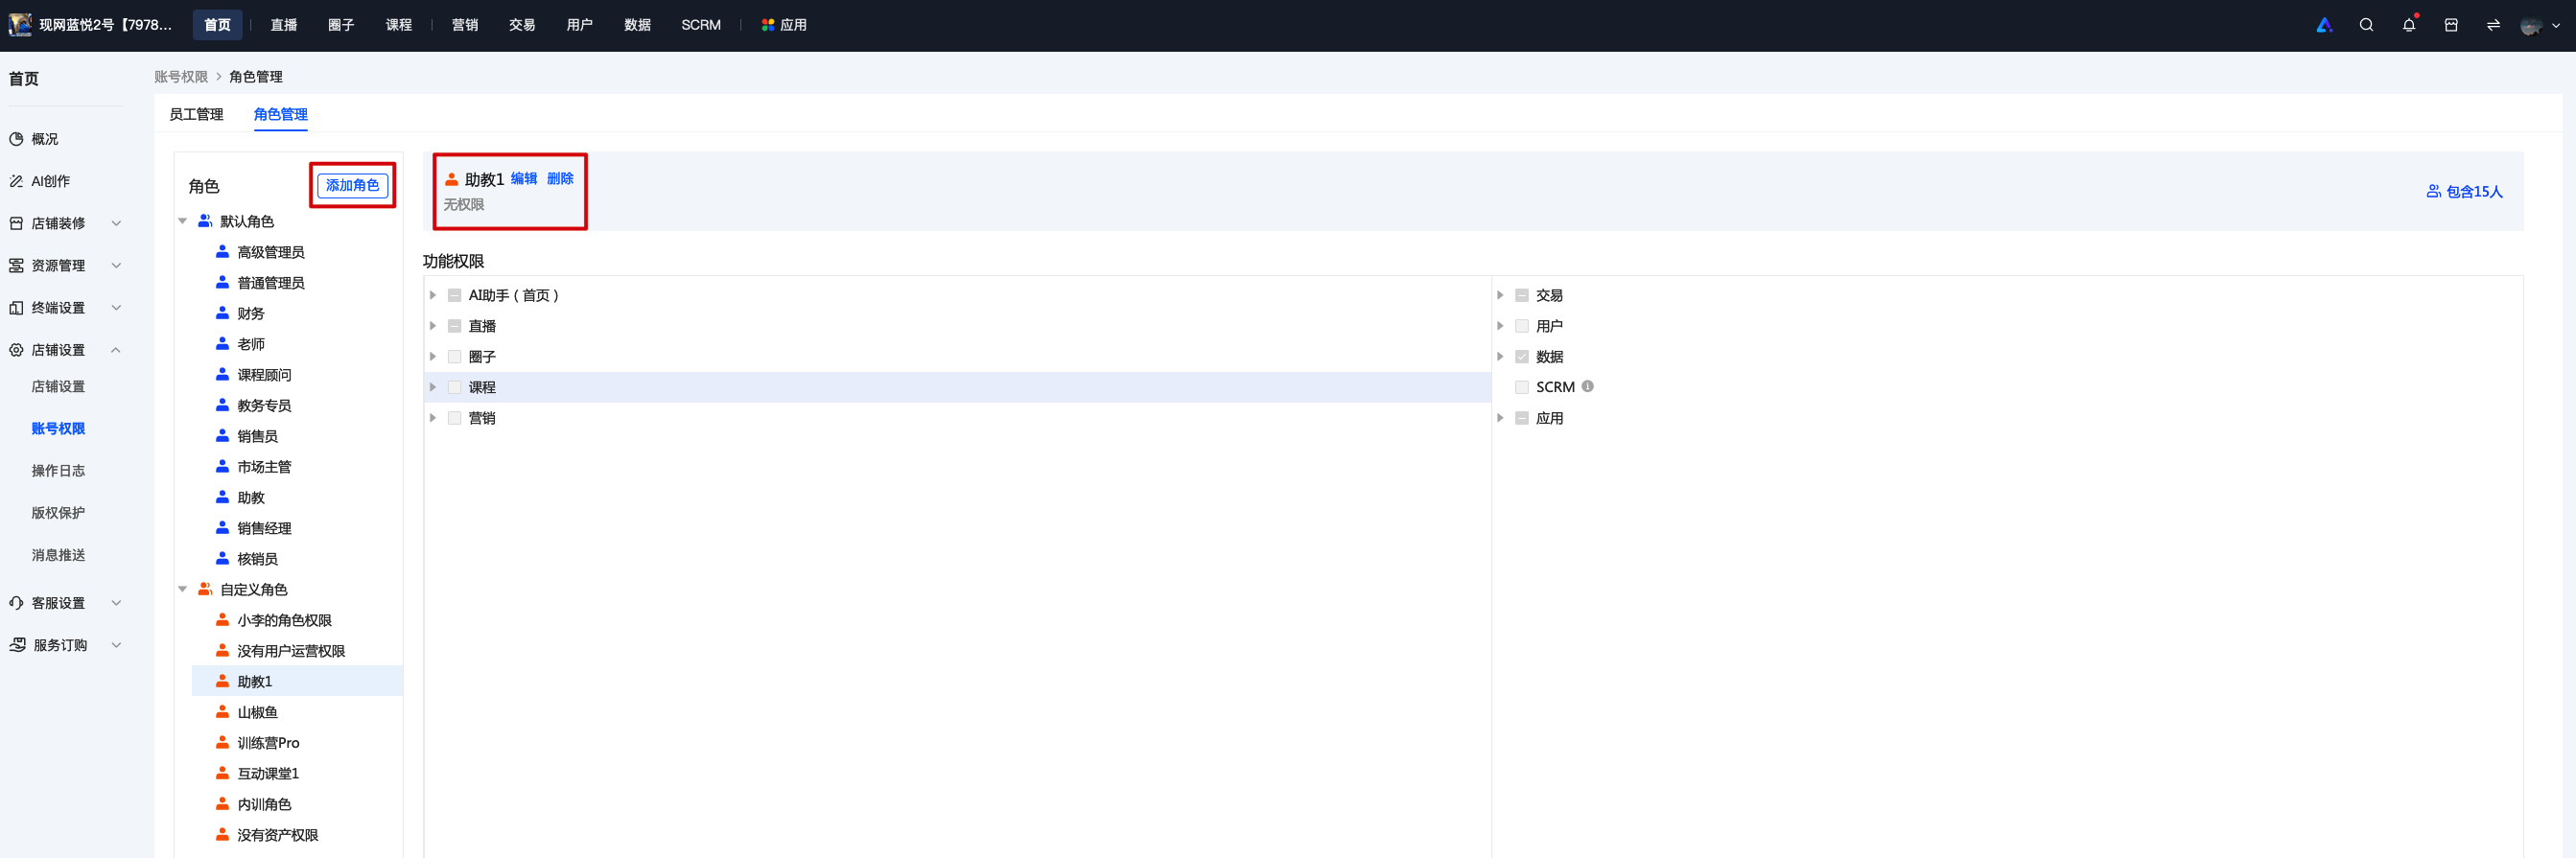
<span style="font-size:15px;">Operation Path: Log in to the merchant management background - \[Homepage - Account Permissions - Role Management\]. You can view all roles and their corresponding permissions and modify role permissions. In addition to the system default roles, you can also create and customize roles according to actual scenarios (currently, each store can create a maximum of 20 custom roles).</span>

<span style="font-size:15px;">![图片.png](https://wechatapppro-1252524126.file.myqcloud.com/help_document/image/ueditor/75759900_1699522085.png ".png")</span>

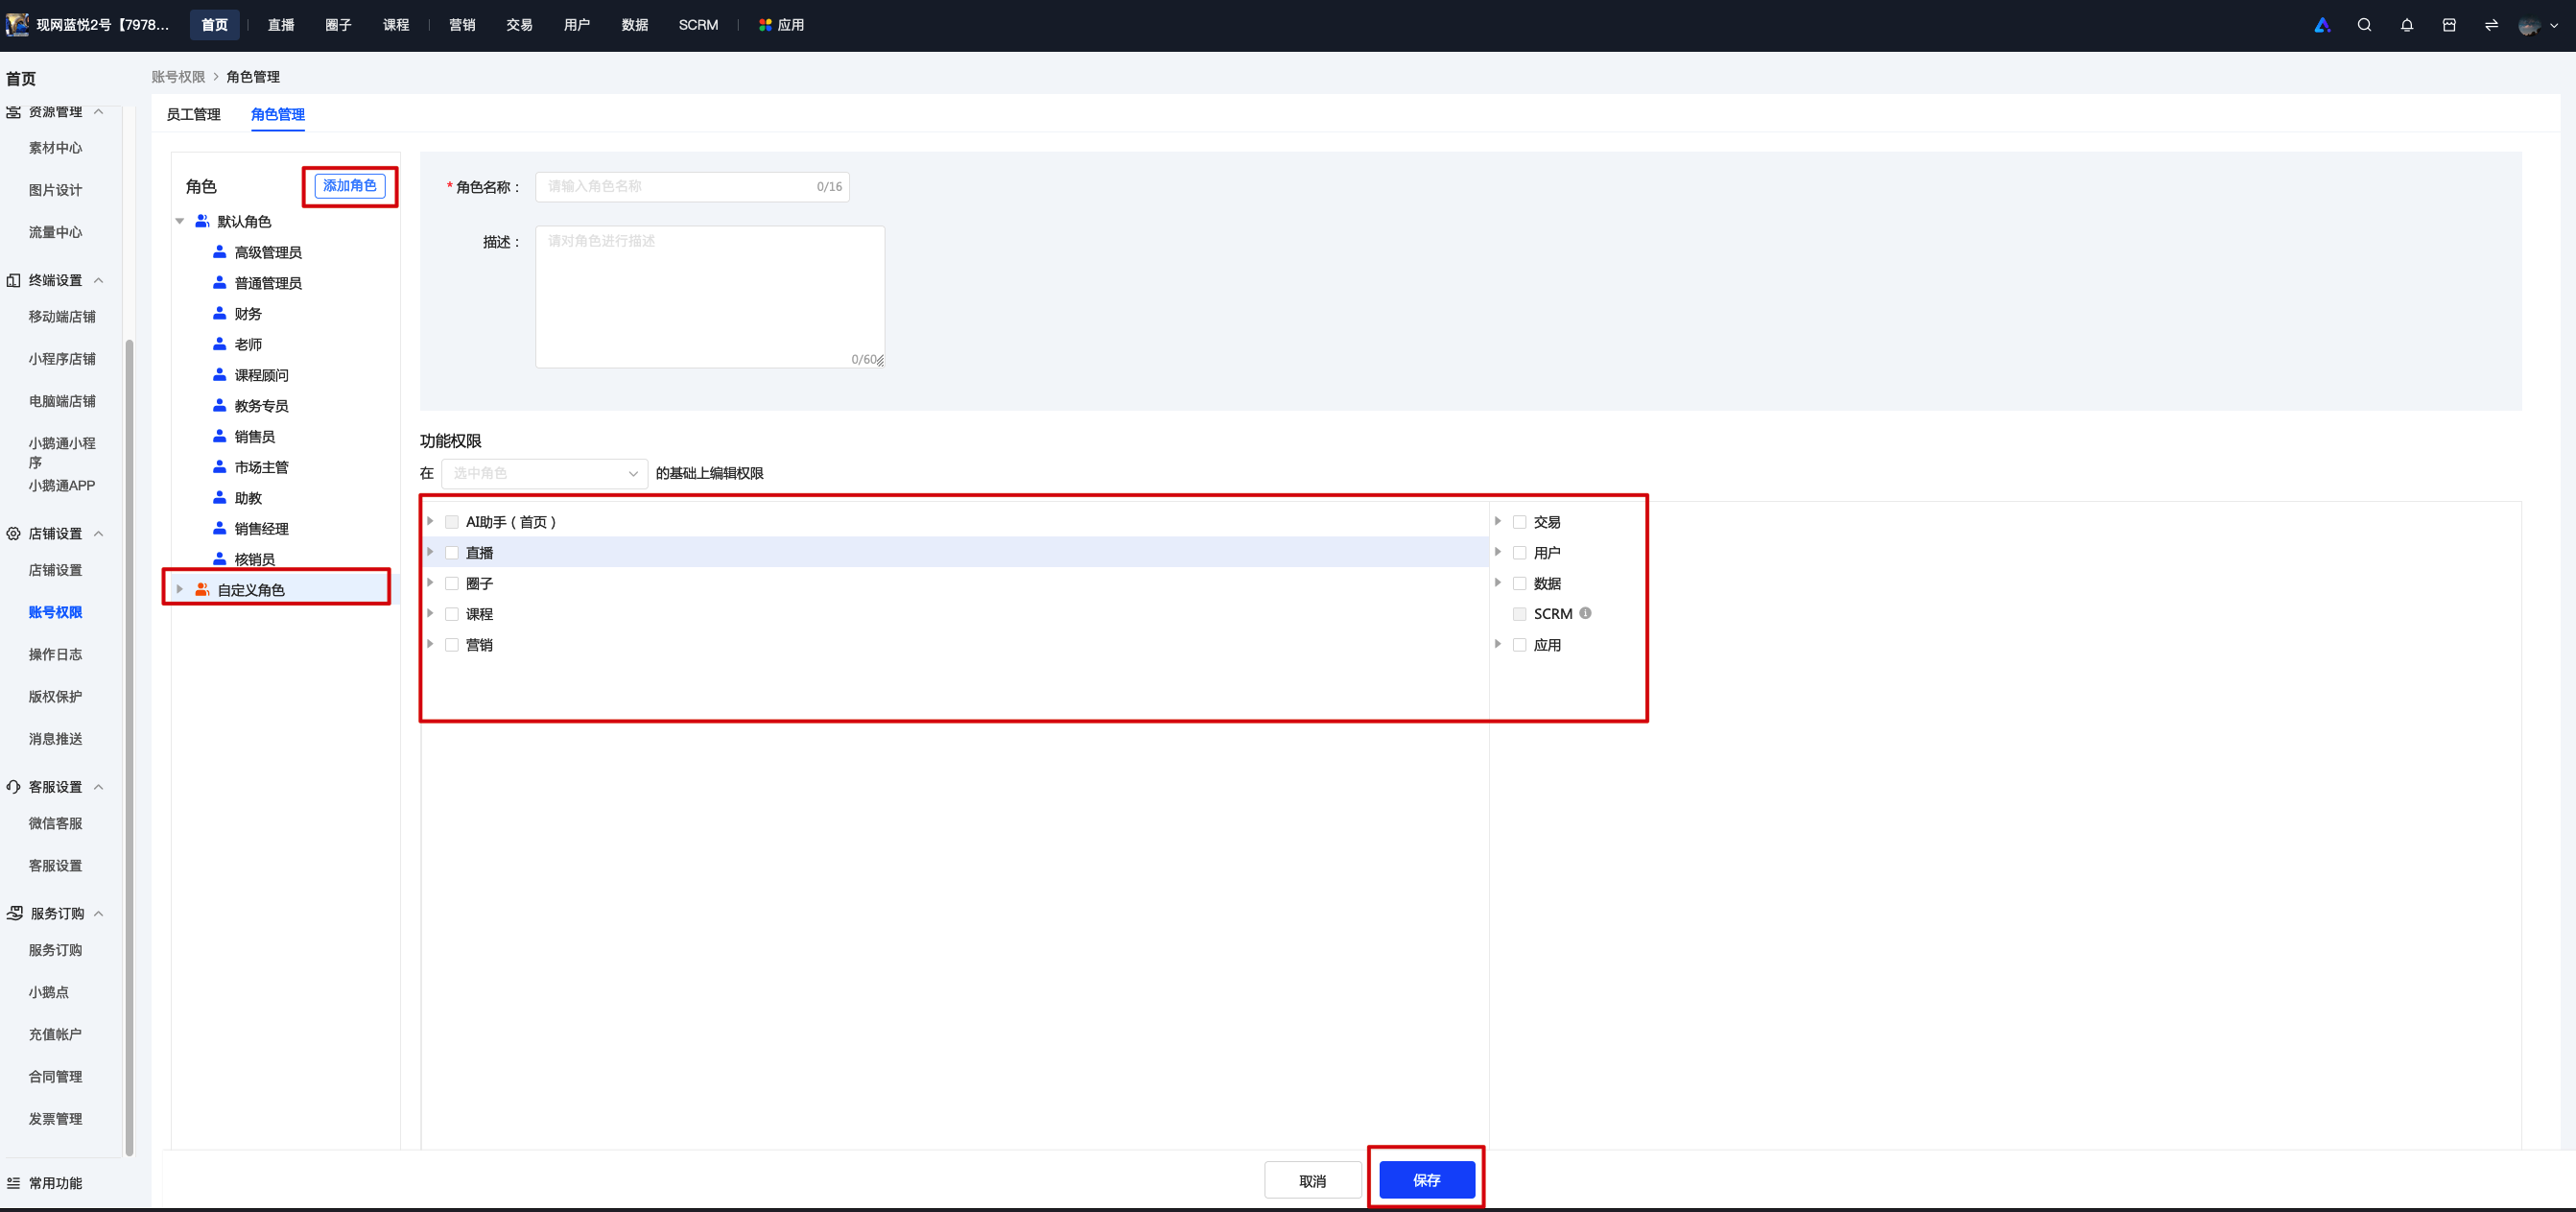
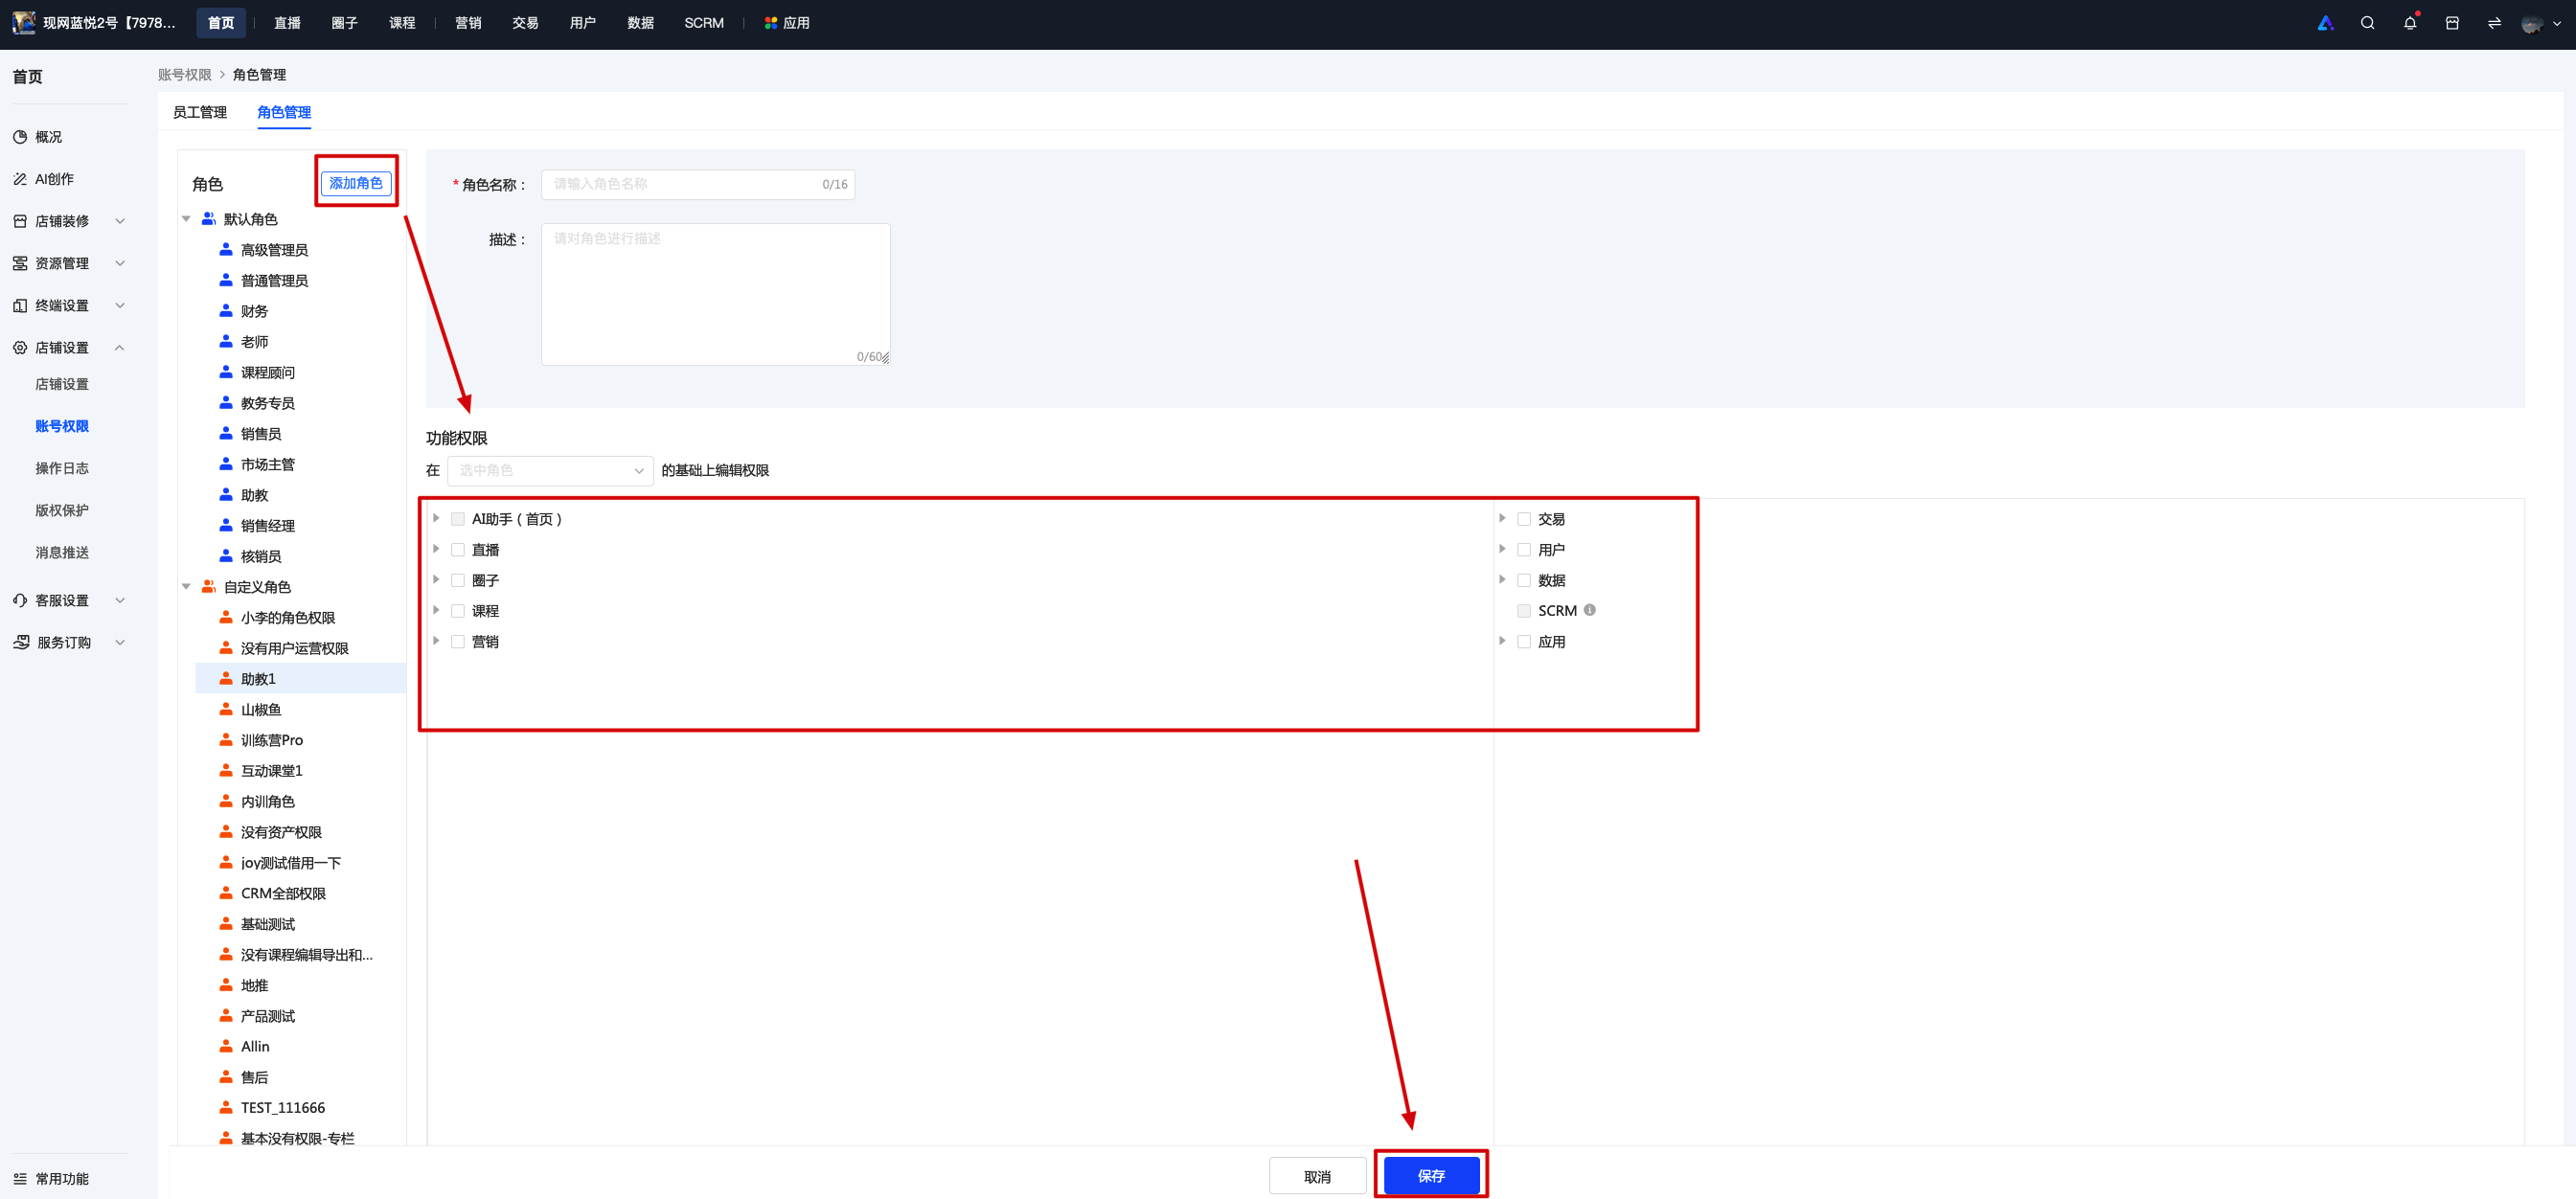
<span style="font-size:15px;">2. Create a New Role</span>

<span style="font-size:15px;">When creating a new custom role, you can select the permissions for this role according to the actual scenario. For unselected permissions, if they are navigation - related, the navigation items seen by this role will be grayed out, and the corresponding pages cannot be accessed; if they are function - related, this role will not be able to operate the corresponding functions.</span>

<span style="font-size:15px;"></span>

<span style="font-size:15px;"> ![图片.png](https://wechatapppro-1252524126.file.myqcloud.com/help_document/image/ueditor/49943100_1699522149.png ".png")</span>

<span style="font-size:15px;">3. Employee Management</span>

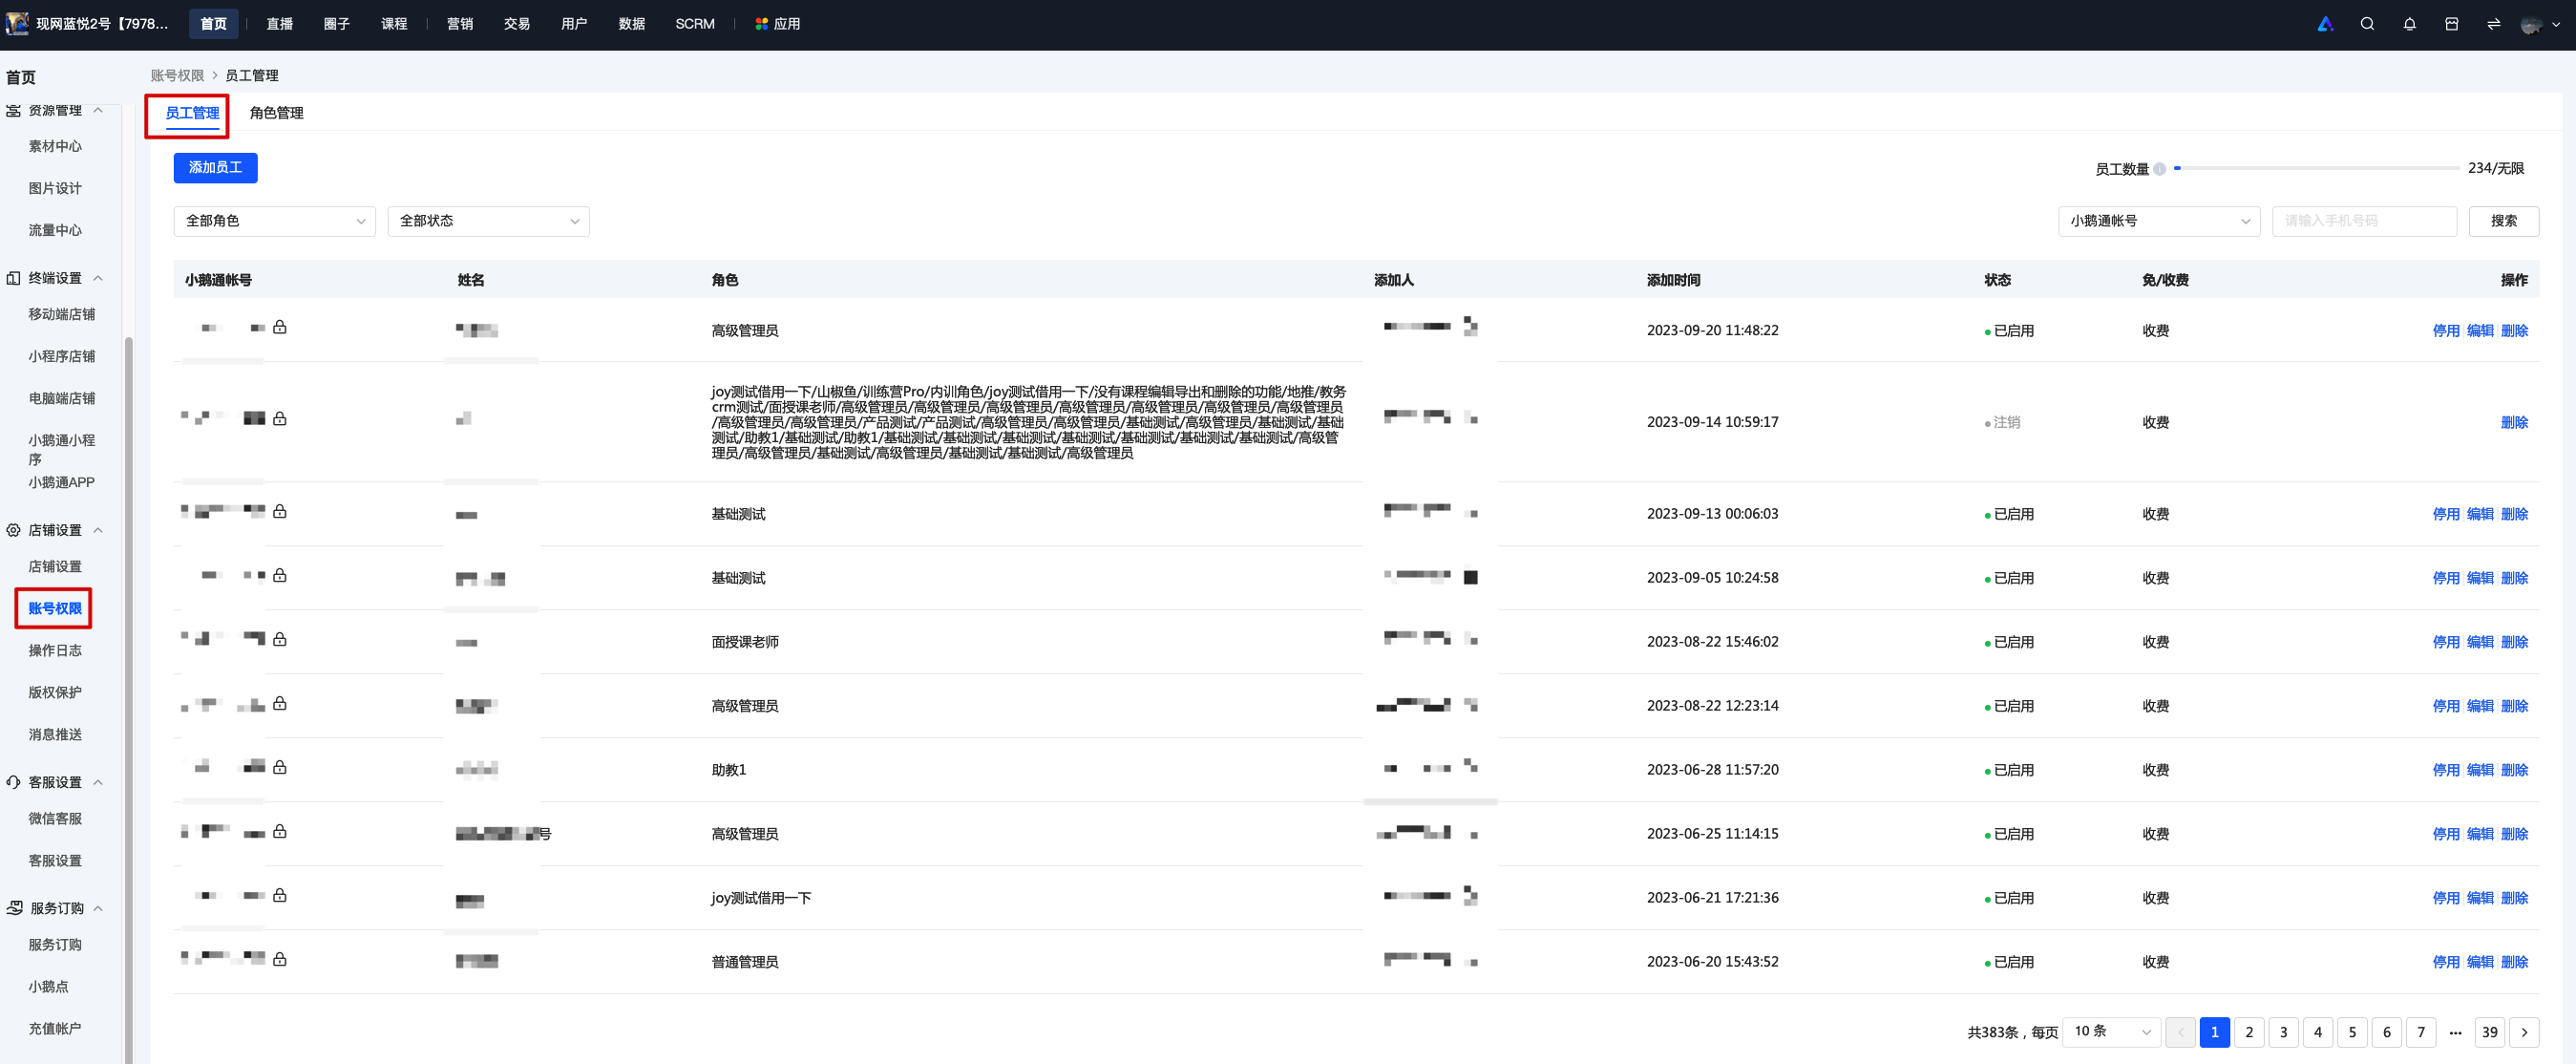
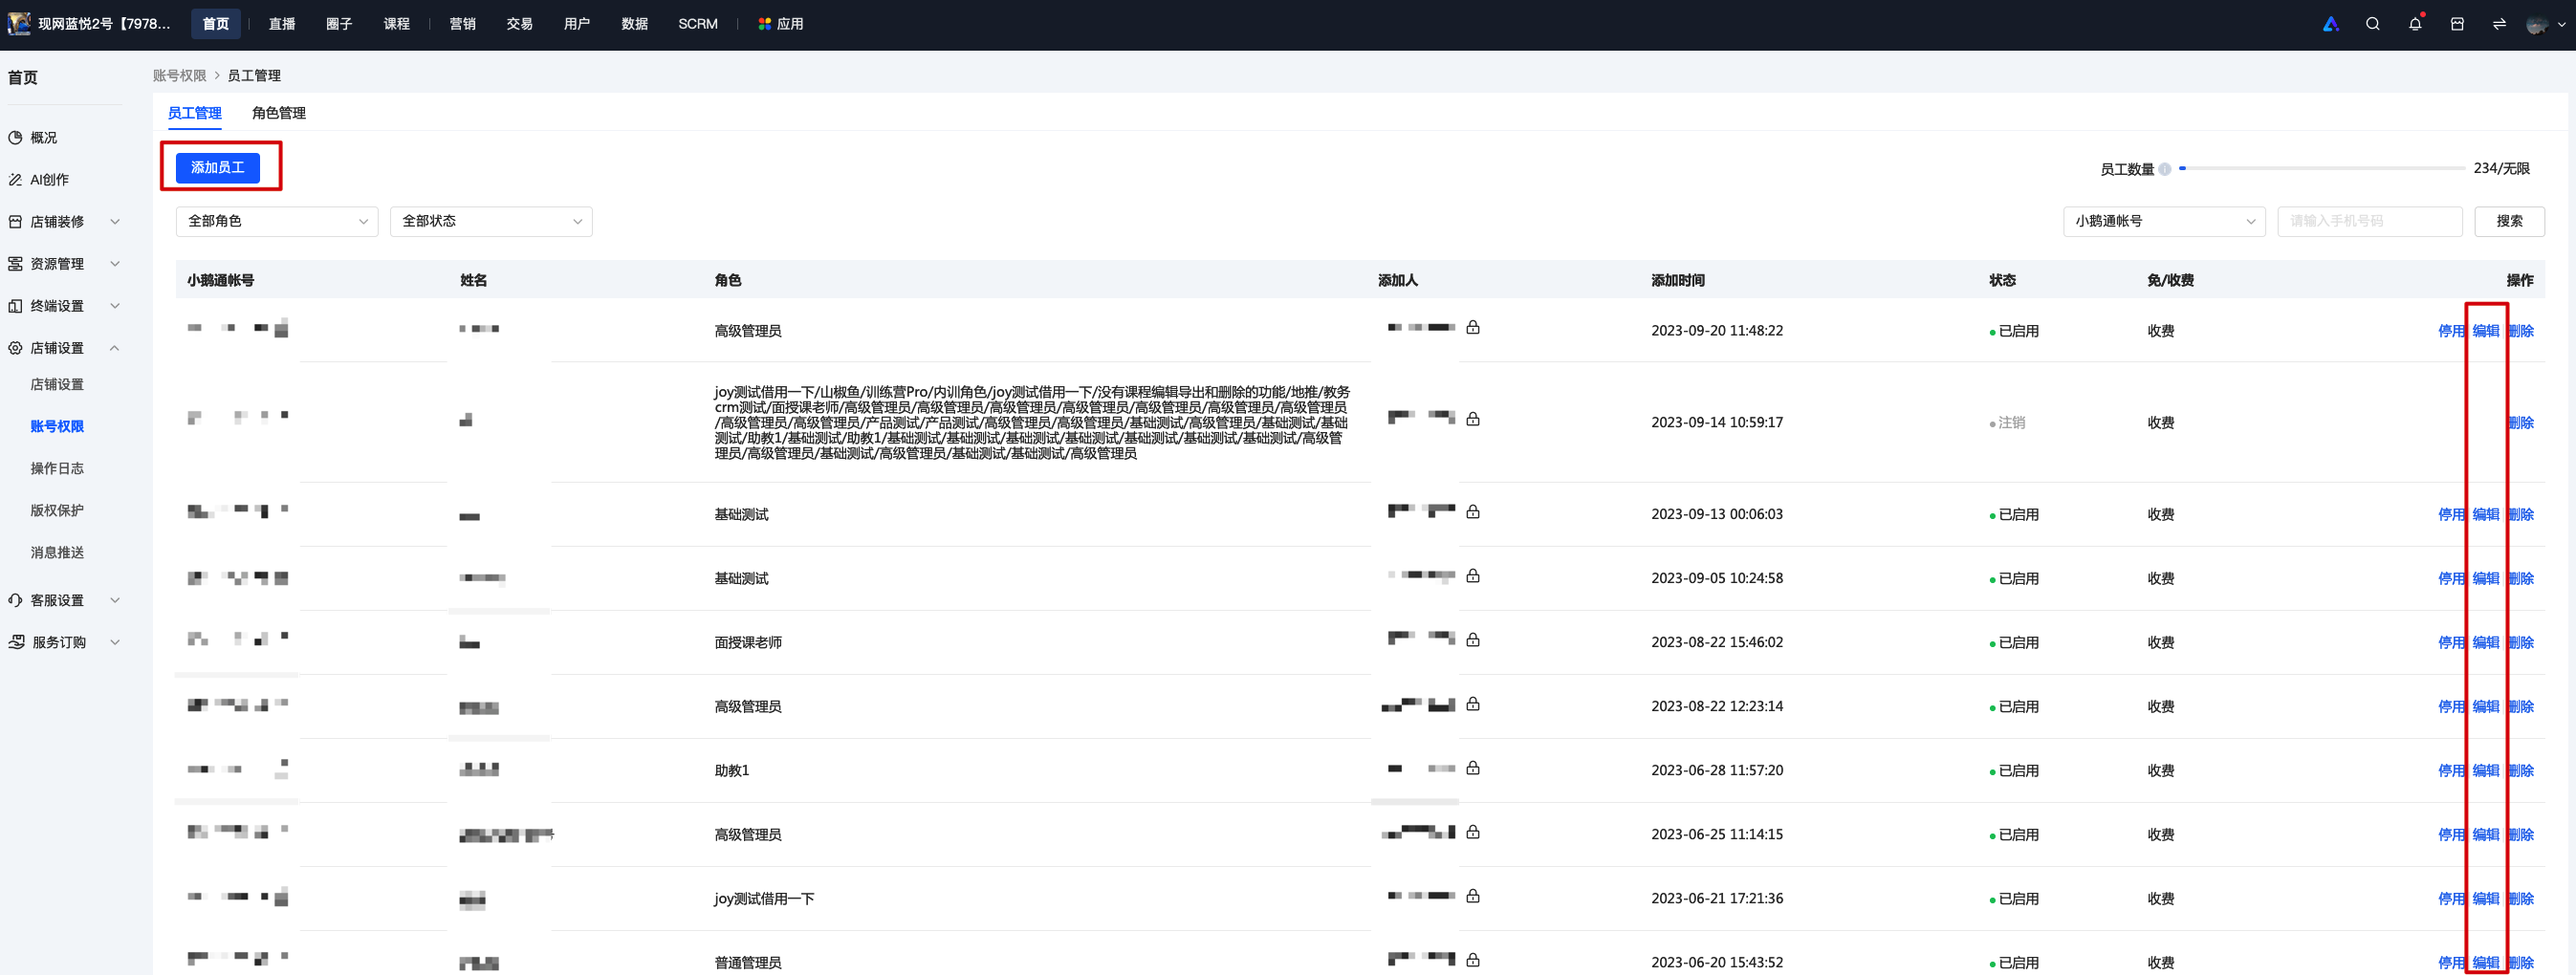
<span style="font-size:15px;">After creating roles, you can add and manage employees in the employee management module.</span>

<span style="font-size:15px;">![图片.png](https://wechatapppro-1252524126.file.myqcloud.com/help_document/image/ueditor/7629700_1699522190.png ".png")</span>

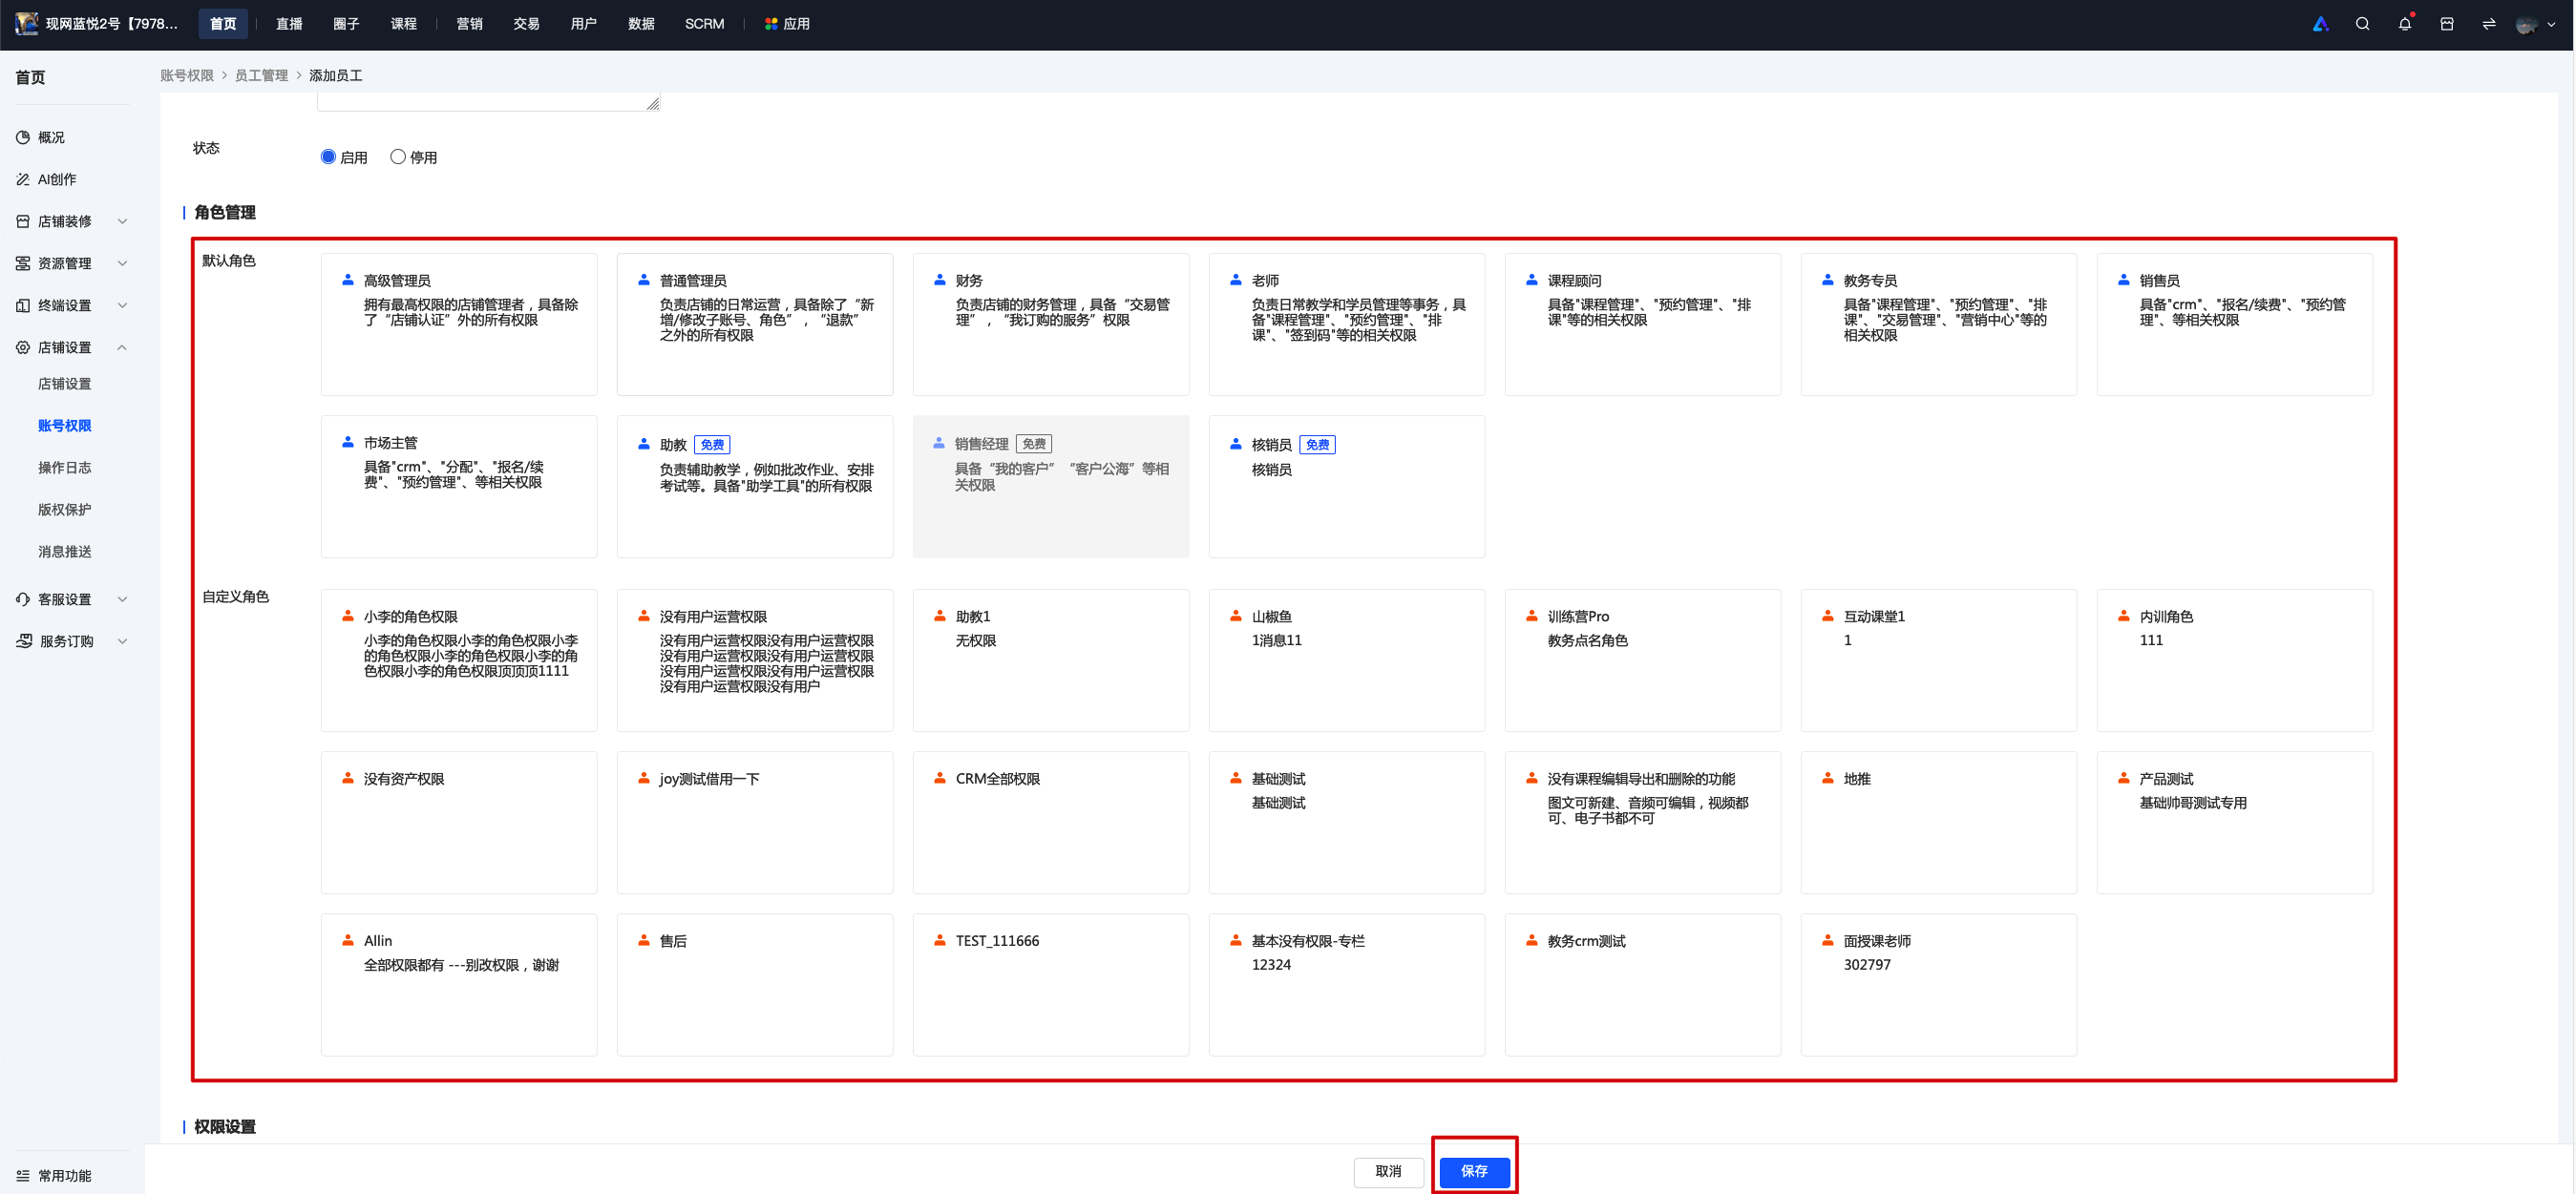
<span style="font-size:15px;">4. Add Employees</span>

<span style="font-size:15px;">By adding employees, other team members can log in to the store background and manage the modules they are responsible for.</span>

<span style="font-size:15px;">![图片.png](https://wechatapppro-1252524126.file.myqcloud.com/help_document/image/ueditor/11826800_1699522190.png ".png")</span>

<span style="font-size:15px;">  
</span>

<span style="font-size:15px;">  
</span>

<span style="font-size:15px;"></span>

![spacer.gif](https://super.xiaoe-tech.com/ueditor/themes/default/images/spacer.gif "正在上传...")

# Relationship between Role Management and Employee Management

<div data-elink-language-switch="1" id="bkmrk-%E4%B8%AD%E6%96%87" style="border:1px solid #d6d9de;border-radius:6px;padding:10px 12px;margin:0 0 18px 0;background:#f8fafc;font-size:14px;">[中文](/books/877a9/page/084b6)</div># <span style="font-size:32px;color:rgb(26,26,26);letter-spacing:0;vertical-align:baseline;">Relationship between Role Management and Employee Management</span>

<span style="font-size:15px;letter-spacing:0;vertical-align:baseline;">Role Management defines the scope of permissions and seat requirements. Employee Management authorizes employee accounts to use corresponding functions by assigning roles.</span>

# Brand image

# Where can I set the store logo?

<div data-elink-language-switch="1" id="bkmrk-%E4%B8%AD%E6%96%87" style="border:1px solid #d6d9de;border-radius:6px;padding:10px 12px;margin:0 0 18px 0;background:#f8fafc;font-size:14px;">[中文](/books/877a9/page/logo)</div><span style="white-space:pre-wrap;background-color:rgb(255,255,255);"></span>

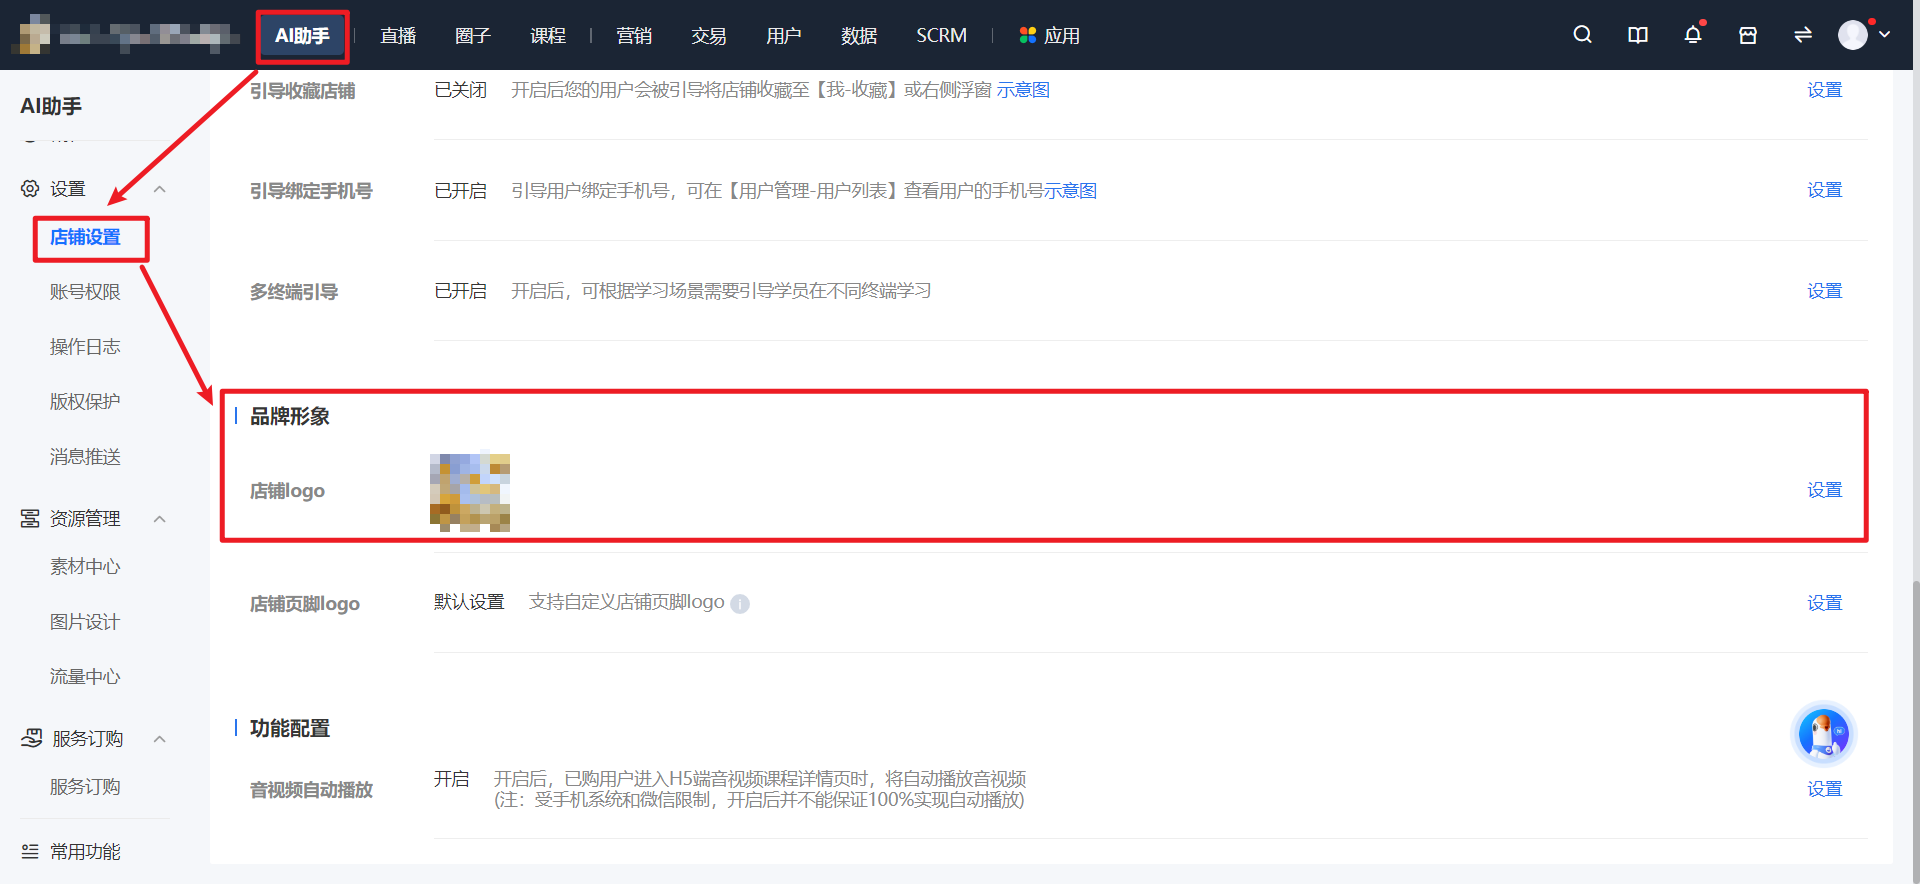
<span style="color:rgb(53,53,53);background:rgb(255,255,255);letter-spacing:0pt;vertical-align:baseline;font-size:15px;">After clicking on \[AI Assistant\] at the top of the management console, click \[Settings\] - \[Store Settings\] - \[Brand Image\] - \[Store Logo\] on the left to make the settings.</span>

<span style="white-space:pre-wrap;background-color:rgb(255,255,255);">![image.png](https://wechatapppro-1252524126.file.myqcloud.com/help_document/image/ueditor/14074700_1695008223.png ".png")</span>

# Role management

# Tutorial on Role Management Usage

<div data-elink-language-switch="1" id="bkmrk-%E4%B8%AD%E6%96%87" style="border:1px solid #d6d9de;border-radius:6px;padding:10px 12px;margin:0 0 18px 0;background:#f8fafc;font-size:14px;">[中文](/books/877a9/page/85d8c)</div><span style="font-size:17px;">**I. Function Introduction**</span>

<span style="font-size:15px;">The role management function allows merchants to manage the roles of store employees and customize function permission sets. For example, the permissions of modules such as 'Course Mall, Purchased Courses, and Service Orders' can be combined and named 'Purchaser'. Once the merchant assigns the 'Purchaser' role to an employee, this employee can operate the functions of the above - mentioned modules in the backend.</span>

<span style="font-size:17px;">**II. Purpose of Use**</span>

<span style="font-size:15px;">To conveniently manage employee roles, assign specific tasks to specific people, and improve the operational efficiency and security of the store.</span>

<span style="font-size:17px;">**III. Usage Scenarios**</span>

<span style="font-size:15px;">A merchant wants Employee A of the company to operate marketing functions in their elink store but does not want Employee A to interfere with the store's financial matters. In this case, the merchant can create a 'Marketing Specialist' role with only marketing - related function permissions and assign Employee A to this role.</span>

<span style="font-size:17px;">**IV. Operation Path**</span>

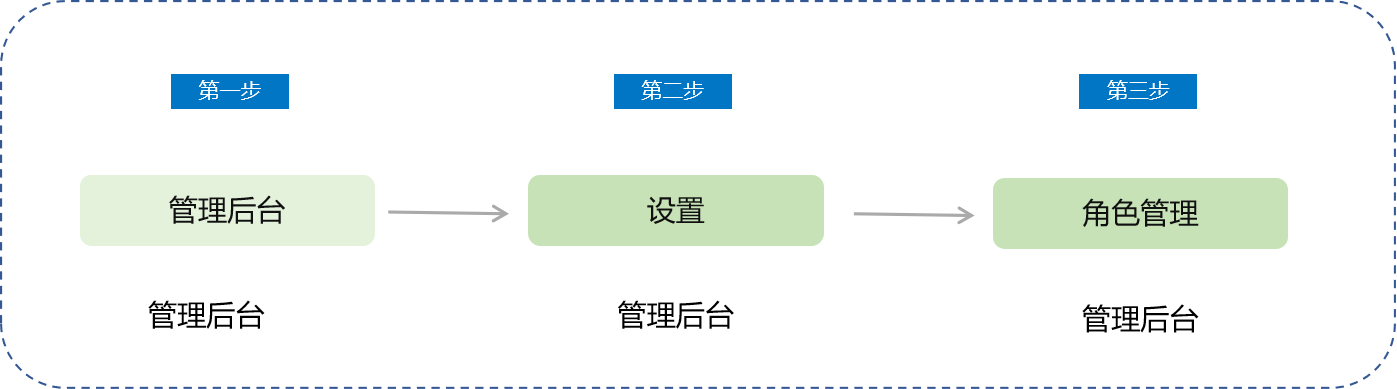
<span style="font-size:15px;">Merchant side: Merchant backend → Settings → Role Management</span>

<span style="font-size:15px;">![image.png](https://wechatapppro-1252524126.file.myqcloud.com/help_document/image/ueditor/60681300_1699611198.png ".png")</span>

<span style="font-size:17px;">**V. Usage Tutorial**</span>

**<span style="font-size:15px;">Step 1:</span>**<span style="font-size:15px;">Log in to the management backend and find \[Settings\] - \[</span><span style="font-size:15px;">Role Management\];</span>

<span style="font-size:15px;">![图片.png](https://wechatapppro-1252524126.file.myqcloud.com/help_document/image/ueditor/31462900_1699611286.png ".png")</span>

**<span style="font-size:15px;">Step 2:</span>**<span style="font-size:15px;">Management backend - Role management permission configuration</span>

![图片.png](https://wechatapppro-1252524126.file.myqcloud.com/help_document/image/ueditor/31661000_1699611353.png ".png")

**<span style="font-size:15px;">Step 3:</span>**<span style="font-size:15px;">Management backend - Add a role</span>

<span style="font-size:15px;">1. Click 'Add Role' on the role management list page to enter the add - role page;</span>

<span style="font-size:15px;">  
</span>

![图片.png](https://wechatapppro-1252524126.file.myqcloud.com/help_document/image/ueditor/24543700_1699611414.png ".png")

<span style="font-size:15px;">2. After setting is completed, click 'Save' to successfully create the role. Subsequently, you can bind the employee accounts you want to associate with this role;</span>

<span style="font-size:15px;">![图片.png](https://wechatapppro-1252524126.file.myqcloud.com/help_document/image/ueditor/70246100_1699611462.png ".png")</span>

![图片.png](https://wechatapppro-1252524126.file.myqcloud.com/help_document/image/ueditor/17391600_1699611463.png ".png")

<span style="font-size:17px;">**VI. Notes**</span>

<span style="font-size:15px;">1. The employee account must be filled with a mobile phone number, and this mobile phone number must be registered with elink;</span>

<span style="font-size:15px;">2. If you encounter sensitive permissions when adding an account role &amp; account, the mobile phone number verification of the store administrator will be triggered. After successful verification, you can use it normally.</span>

# Can you add employees without selecting role permissions?

<div data-elink-language-switch="1" id="bkmrk-%E4%B8%AD%E6%96%87" style="border:1px solid #d6d9de;border-radius:6px;padding:10px 12px;margin:0 0 18px 0;background:#f8fafc;font-size:14px;">[中文](/books/877a9/page/7f100)</div><span style="font-size:14px;">No, you must select a \[Role\]. It is recommended that you create a role first and then add it.</span>

# What is the relationship between role management and employee management?

<div data-elink-language-switch="1" id="bkmrk-%E4%B8%AD%E6%96%87" style="border:1px solid #d6d9de;border-radius:6px;padding:10px 12px;margin:0 0 18px 0;background:#f8fafc;font-size:14px;">[中文](/books/877a9/page/34ed0)</div><span style="font-size:14px;">You can create relevant job roles and set permissions in the role settings. When adding employees, you can directly select the relevant role names for authorization.</span>

# Can the permissions of default roles be modified?

<div data-elink-language-switch="1" id="bkmrk-%E4%B8%AD%E6%96%87" style="border:1px solid #d6d9de;border-radius:6px;padding:10px 12px;margin:0 0 18px 0;background:#f8fafc;font-size:14px;">[中文](/books/877a9/page/42a0e)</div><span style="font-size:15px;">The purpose of setting default roles is to help merchants quickly get started. After merchants become familiar with the functions of the elink management backend, they can configure custom roles to set more flexible permission controls. Therefore, the permissions of default roles cannot be modified or deleted.</span>

<span style="font-size:15px;">**\*\*Note:**The 'Senior Administrator' is the store manager with the highest level of permissions, having all permissions except for 'Store Verification'. It is recommended that the top - level operations personnel use this role.</span>

<span style="font-size:14px;">  
</span>

# Message Push

# Tutorial on Using Message Push

<div data-elink-language-switch="1" id="bkmrk-%E4%B8%AD%E6%96%87" style="border:1px solid #d6d9de;border-radius:6px;padding:10px 12px;margin:0 0 18px 0;background:#f8fafc;font-size:14px;">[中文](/books/877a9/page/25ddc)</div><span style="font-size:17px;">**I. Feature Introduction**</span>

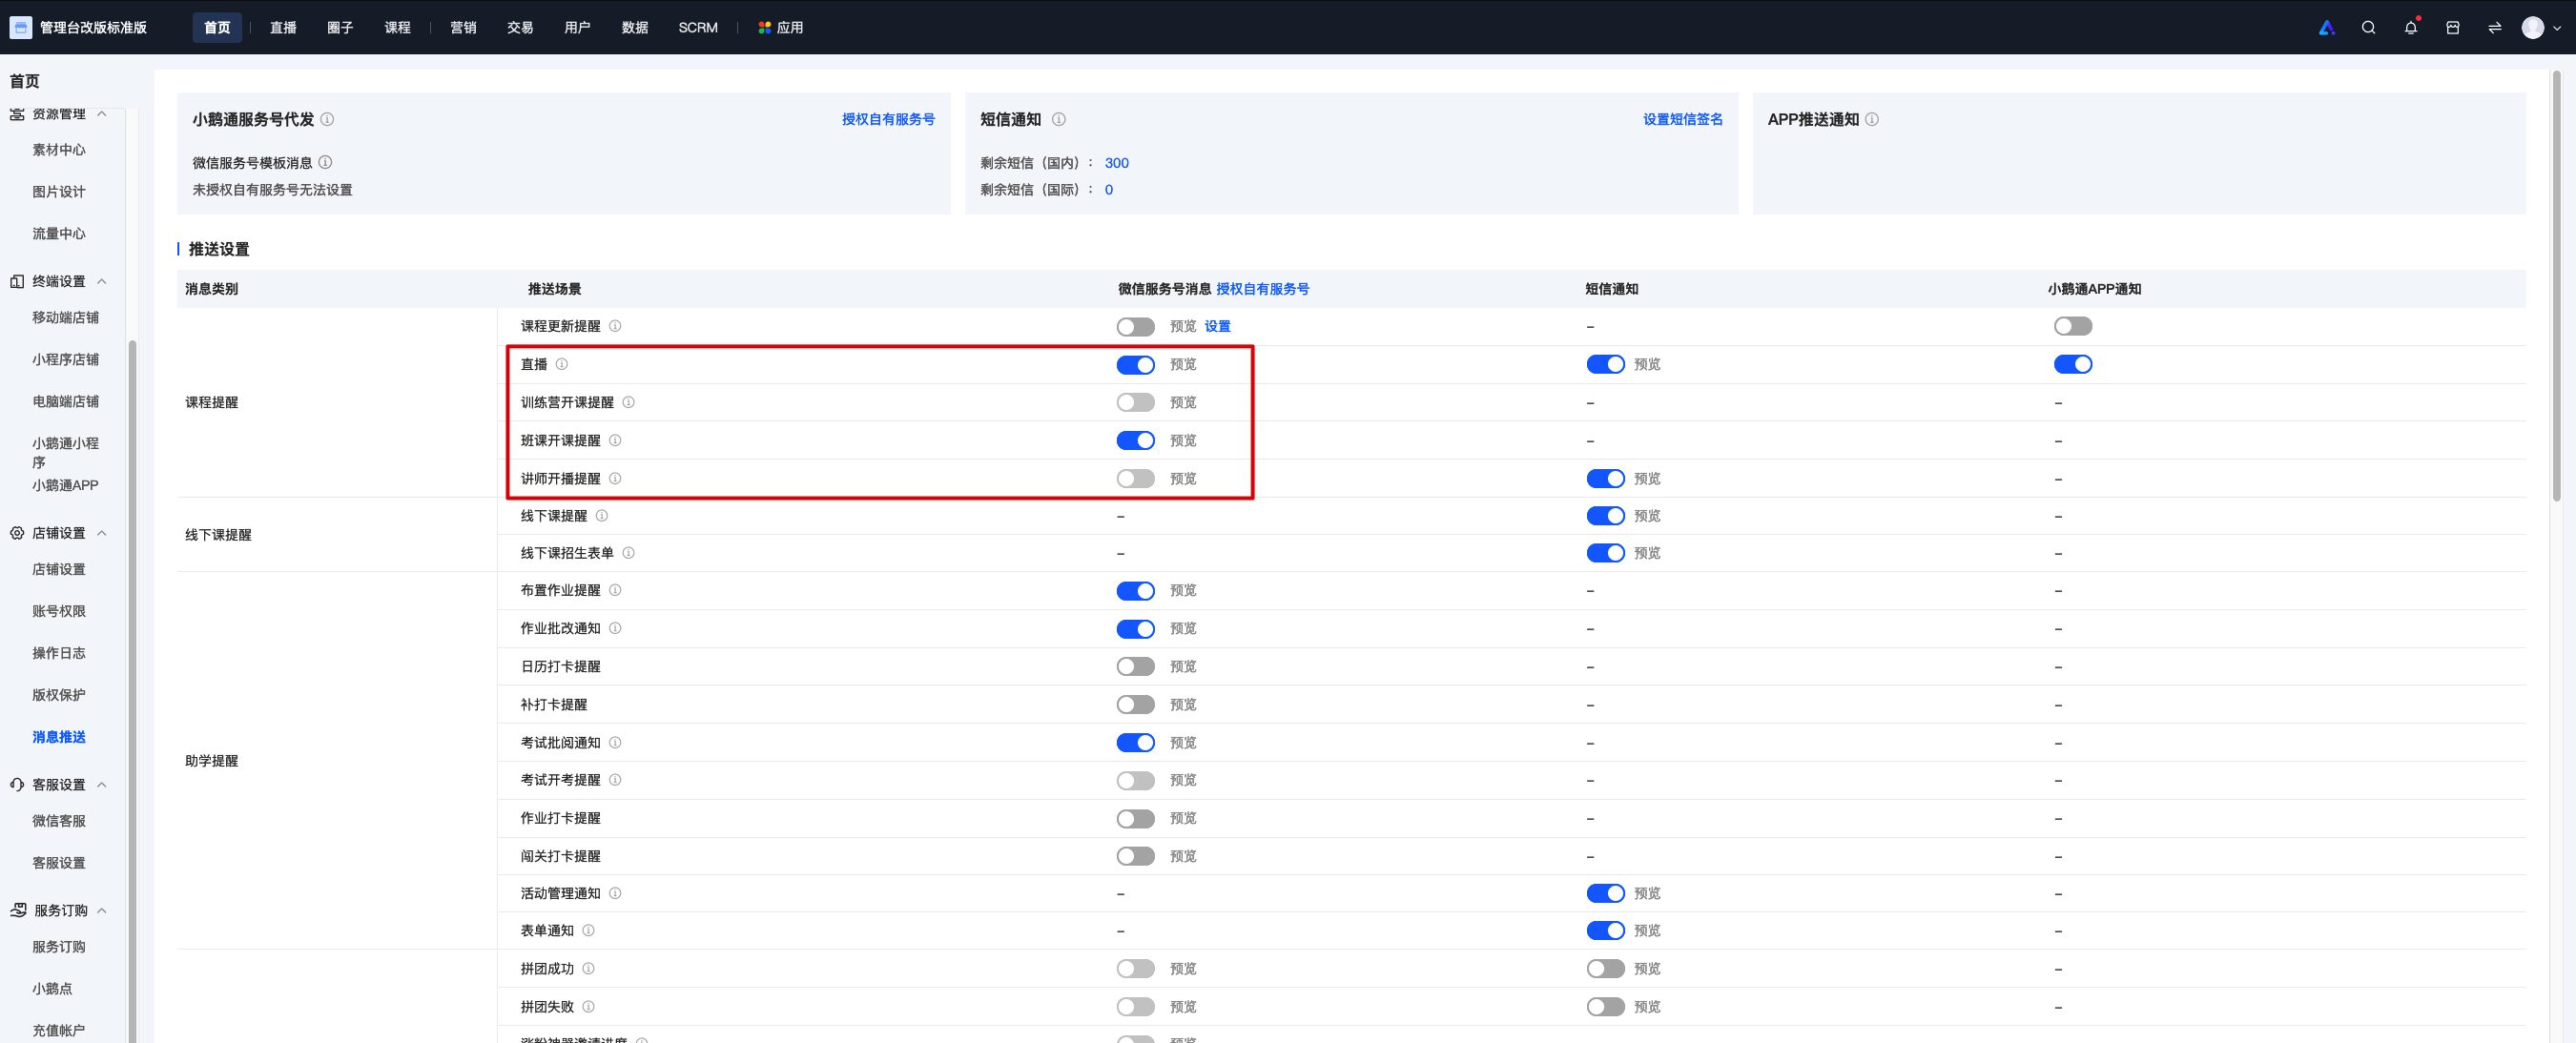
<span style="font-size:15px;">Merchants can set the messages sent from the store to users on the "Message Push" page. They can set the push methods (WeChat template messages, SMS) for different scenarios according to usage.</span>

<span style="font-size:15px;"></span>

<span style="font-size:17px;">**II. Purpose of Use**</span>

<span style="font-size:15px;">Merchants can use different push methods to re - engage users based on scenario characteristics, thereby increasing user activity.</span>

<span style="font-size:15px;"></span>

<span style="font-size:17px;">**III. Usage Scenarios**</span>

<span style="font-size:15px;">For example: After a user successfully participates in a group - buying activity, the store can send a WeChat template message to notify the user. The user can directly enter the group - buying course by clicking on the message.</span>

<span style="font-size:15px;">For users who have not followed the merchant's service official account, the merchant can enable SMS notifications, and users will receive an SMS reminder of successful group - buying.</span>

<span style="font-size:15px;"></span>

<span style="font-size:17px;">**IV. Operation Path**</span>

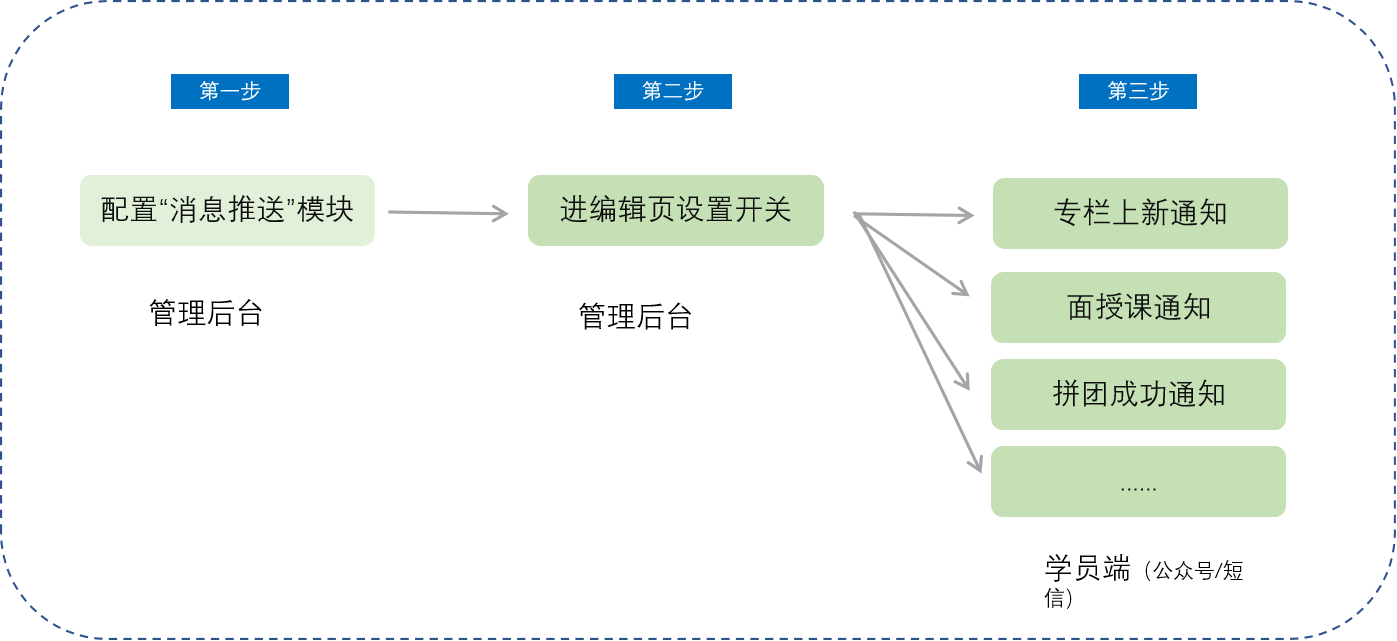
<span style="font-size:15px;">Merchant side: Settings -- Message Push -- Edit settings page (for some scenarios, e.g., live - class start reminder)</span>

<span style="font-size:15px;">Student side: Actively click to subscribe (for some scenarios) -- Receive messages via WeChat service official account/SMS</span>

<span style="font-size:15px;">![image.png](https://wechatapppro-1252524126.file.myqcloud.com/help_document/image/ueditor/38042500_1699867767.png ".png")</span>

<span style="font-size:15px;"></span>

<span style="font-size:17px;">**V. Usage Tutorial**</span>

**<span style="font-size:15px;">Step 1: Configure the "Message Push" module</span>**

<span style="font-size:15px;">Enter the "Settings - Message Push" module and set the push methods for different scenarios according to usage requirements.</span>

<span style="font-size:15px;">![图片.png](https://wechatapppro-1252524126.file.myqcloud.com/help_document/image/ueditor/89056000_1699868129.png ".png")</span>

<span style="font-size:15px;"> (Settings - Message Push)</span>

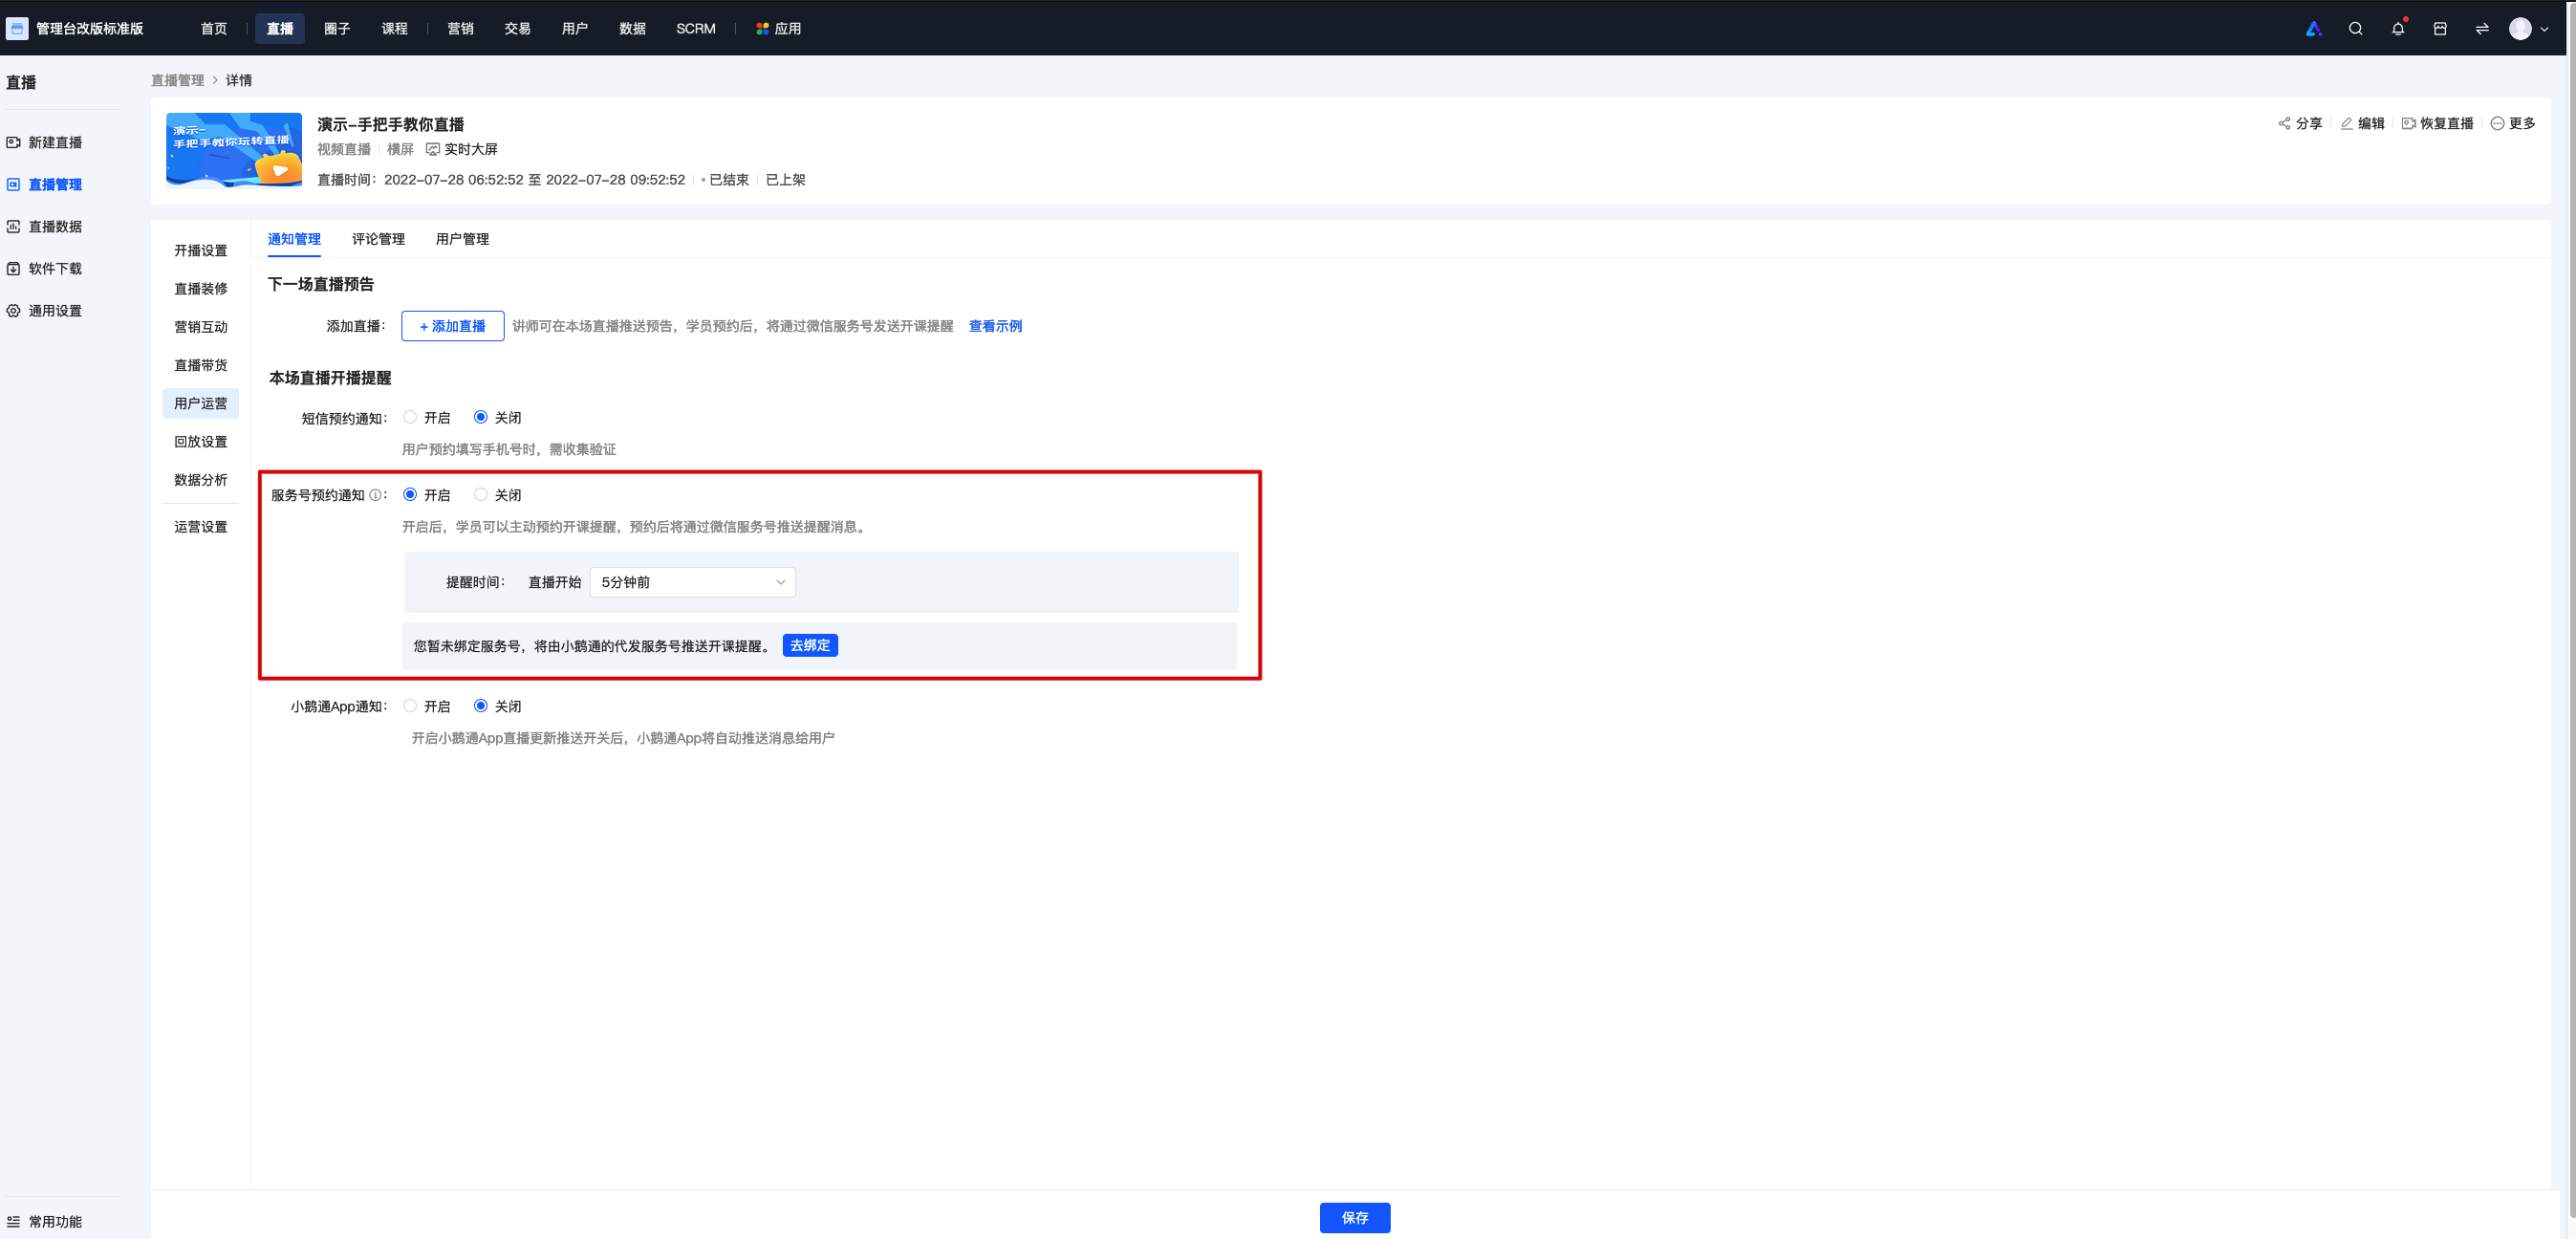
**<span style="font-size:15px;">Step 2: Enter the editing page for settings</span>**

<span style="font-size:15px;">Enter the editing page and set the push method</span>

<span style="font-size:15px;">![图片.png](https://wechatapppro-1252524126.file.myqcloud.com/help_document/image/ueditor/83460300_1699868129.png ".png")</span>

<span style="font-size:15px;"> (Live - room details - Operation settings) </span>

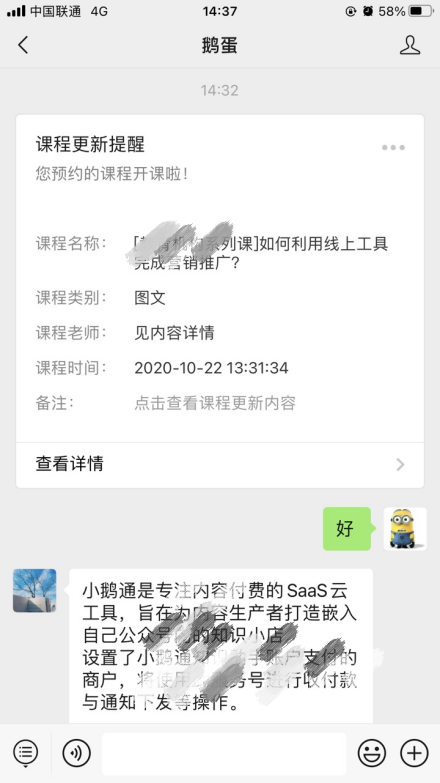
**<span style="font-size:15px;">Step 3: Students receive notifications</span>**

<span style="font-size:15px;">Students receive notifications via service official account template messages and SMS</span>

<span style="font-size:15px;">![image (3).png](https://wechatapppro-1252524126.file.myqcloud.com/help_document/image/ueditor/75116600_1699867767.png ".png")</span>

<span style="font-size:15px;"> (Service official account template messages) </span>
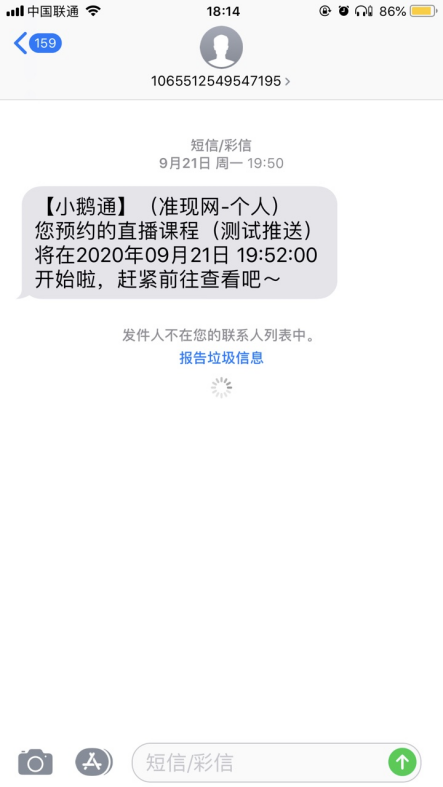
<span style="font-size:15px;">  
</span>

<span style="font-size:15px;">![image (4).png](https://wechatapppro-1252524126.file.myqcloud.com/help_document/image/ueditor/97768200_1699867767.png ".png")</span>

<span style="font-size:15px;"> (SMS)</span>

<span style="font-size:17px;">**VI. Summary of Message Push Scenarios**</span>

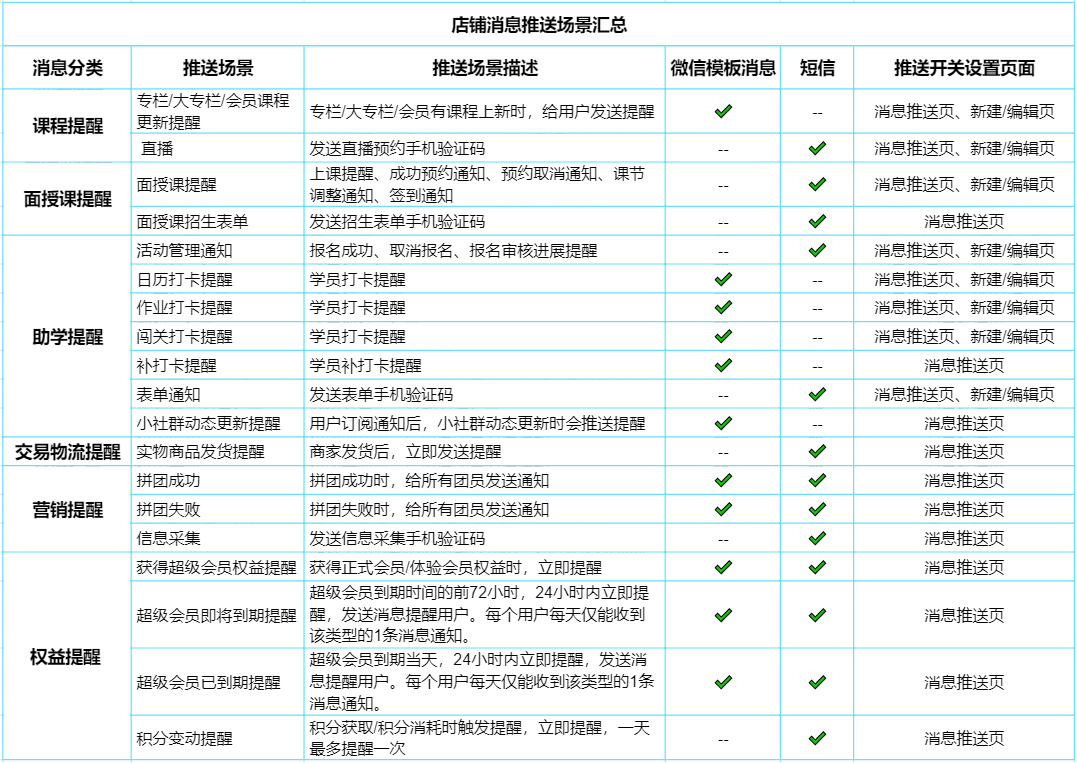
<span style="font-size:15px;">The configurable message pushes are as shown in the following figure:</span>

<span style="font-size:15px;">![image (5).png](https://wechatapppro-1252524126.file.myqcloud.com/help_document/image/ueditor/14080000_1699867768.png ".png")</span>

<span style="font-size:15px;">  
</span>

# Overview

# Tutorial on Using the Overview

<div data-elink-language-switch="1" id="bkmrk-%E4%B8%AD%E6%96%87" style="border:1px solid #d6d9de;border-radius:6px;padding:10px 12px;margin:0 0 18px 0;background:#f8fafc;font-size:14px;">[中文](/books/877a9/page/65b9e)</div><span style="font-family:PingFangSC, 'Microsoft Yahei', Helvetica, Tahoma, Arial, 'Hiragino Sans GB', 'Hiragino Sans GB W3', STXihei, STHeiti, Heiti, SimSun, 'Helvetica Neue', Helvetica, 'PingFang SC', 'Microsoft YaHei', 'Source Han Sans SC', 'Noto Sans CJK SC', 'WenQuanYi Micro Hei', sans-serif;color:rgb(51,51,51);background:rgb(255,255,255);letter-spacing:0pt;vertical-align:baseline;font-size:15px;">The AI Assistant - Overview page is the first page you see after entering the management console. It provides an overview of the overall store's business operations. Next, we'll introduce the main modules of the overview page:</span><span style="font-size:11pt;font-family:'Helvetica Neue', Helvetica, 'PingFang SC', 'Microsoft YaHei', 'Source Han Sans SC', 'Noto Sans CJK SC', 'WenQuanYi Micro Hei', sans-serif;color:rgb(51,51,51);background-image:initial;background-position:initial;background-size:initial;background-repeat:initial;background-attachment:initial;letter-spacing:0pt;vertical-align:baseline;"></span>

<span style="font-size:12.75pt;font-family:PingFangSC, 'Microsoft Yahei', Helvetica, Tahoma, Arial, 'Hiragino Sans GB', 'Hiragino Sans GB W3', STXihei, STHeiti, Heiti, SimSun, 'Helvetica Neue', Helvetica, 'PingFang SC', 'Microsoft YaHei', 'Source Han Sans SC', 'Noto Sans CJK SC', 'WenQuanYi Micro Hei', sans-serif;font-weight:700;color:rgb(51,51,51);background:rgb(255,255,255);letter-spacing:0pt;vertical-align:baseline;">I. AI Assistant</span><span style="font-size:11pt;font-family:'Helvetica Neue', Helvetica, 'PingFang SC', 'Microsoft YaHei', 'Source Han Sans SC', 'Noto Sans CJK SC', 'WenQuanYi Micro Hei', sans-serif;color:rgb(51,51,51);background-image:initial;background-position:initial;background-size:initial;background-repeat:initial;background-attachment:initial;letter-spacing:0pt;vertical-align:baseline;"></span>

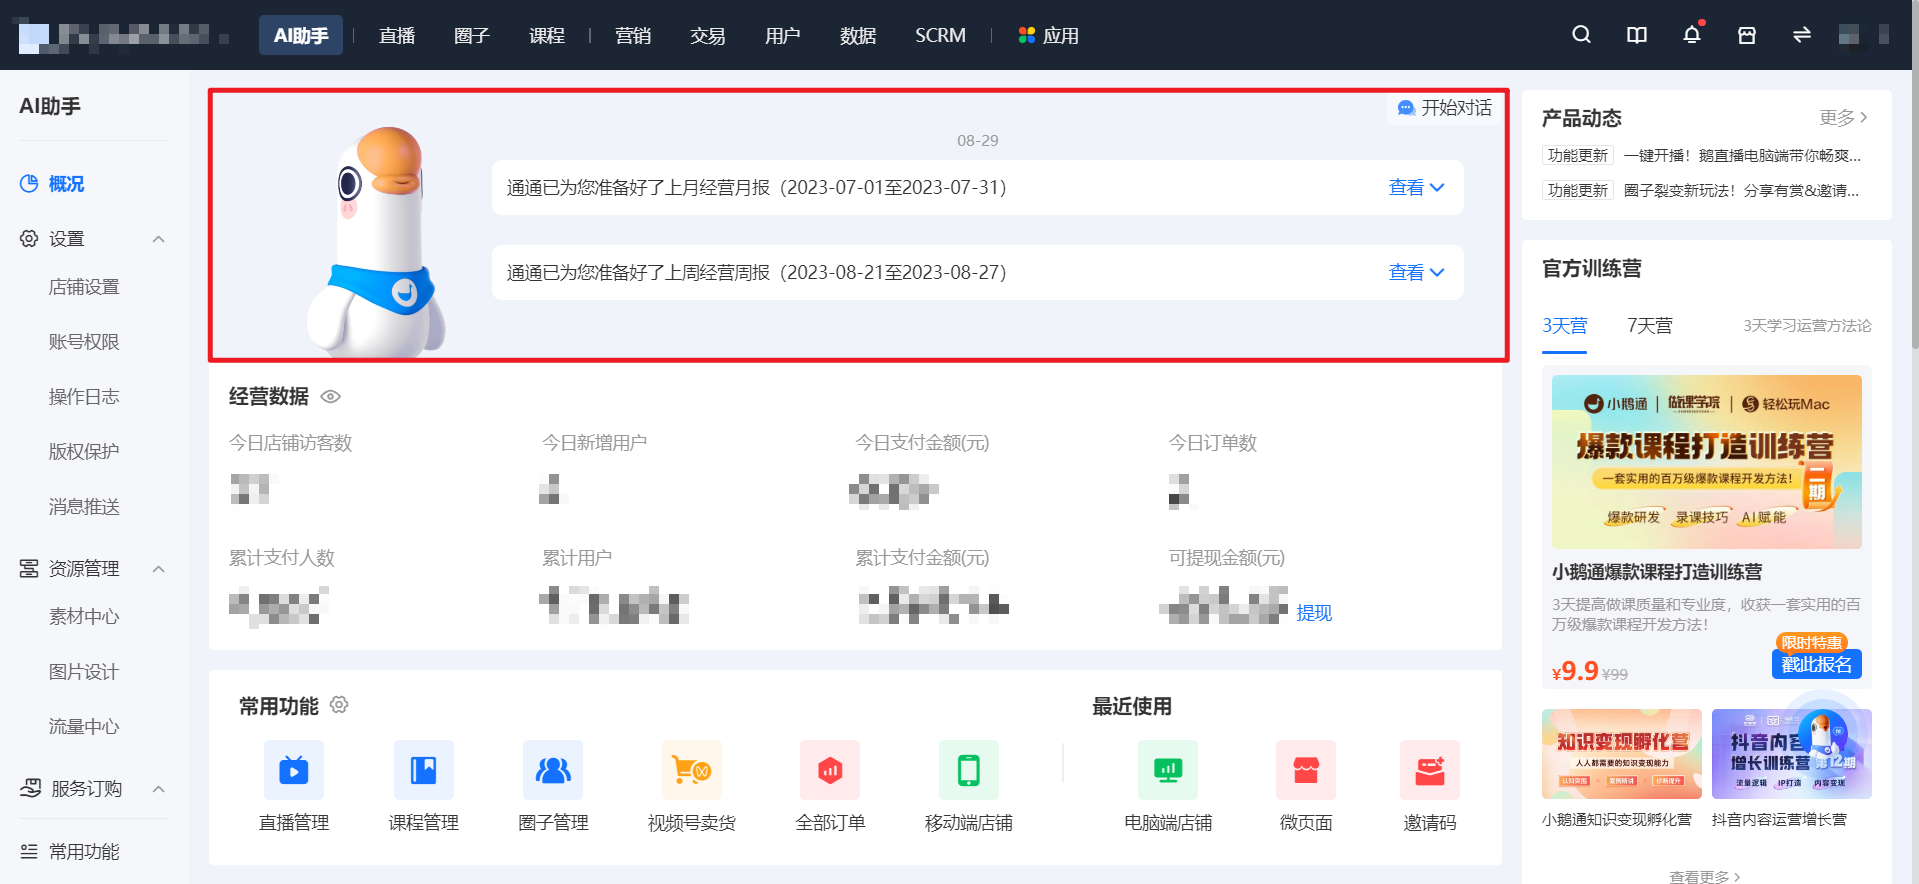
<span style="font-size:11.25pt;font-family:PingFangSC, 'Microsoft Yahei', Helvetica, Tahoma, Arial, 'Hiragino Sans GB', 'Hiragino Sans GB W3', STXihei, STHeiti, Heiti, SimSun, 'Helvetica Neue', Helvetica, 'PingFang SC', 'Microsoft YaHei', 'Source Han Sans SC', 'Noto Sans CJK SC', 'WenQuanYi Micro Hei', sans-serif;color:rgb(51,51,51);background:rgb(255,255,255);letter-spacing:0pt;vertical-align:baseline;">The AI assistant displays the latest AI notification content. Click on this section to start a conversation with the AI assistant and inquire about solutions to various problems.</span>

![image.png](https://wechatapppro-1252524126.file.myqcloud.com/help_document/image/ueditor/40555700_1695023182.png ".png")

<span style="font-size:12.75pt;font-family:PingFangSC, 'Microsoft Yahei', Helvetica, Tahoma, Arial, 'Hiragino Sans GB', 'Hiragino Sans GB W3', STXihei, STHeiti, Heiti, SimSun, 'Helvetica Neue', Helvetica, 'PingFang SC', 'Microsoft YaHei', 'Source Han Sans SC', 'Noto Sans CJK SC', 'WenQuanYi Micro Hei', sans-serif;font-weight:700;color:rgb(51,51,51);background:rgb(255,255,255);letter-spacing:0pt;vertical-align:baseline;">II. Business Data</span><span style="font-size:11pt;font-family:'Helvetica Neue', Helvetica, 'PingFang SC', 'Microsoft YaHei', 'Source Han Sans SC', 'Noto Sans CJK SC', 'WenQuanYi Micro Hei', sans-serif;color:rgb(51,51,51);background-image:initial;background-position:initial;background-size:initial;background-repeat:initial;background-attachment:initial;letter-spacing:0pt;vertical-align:baseline;"></span>

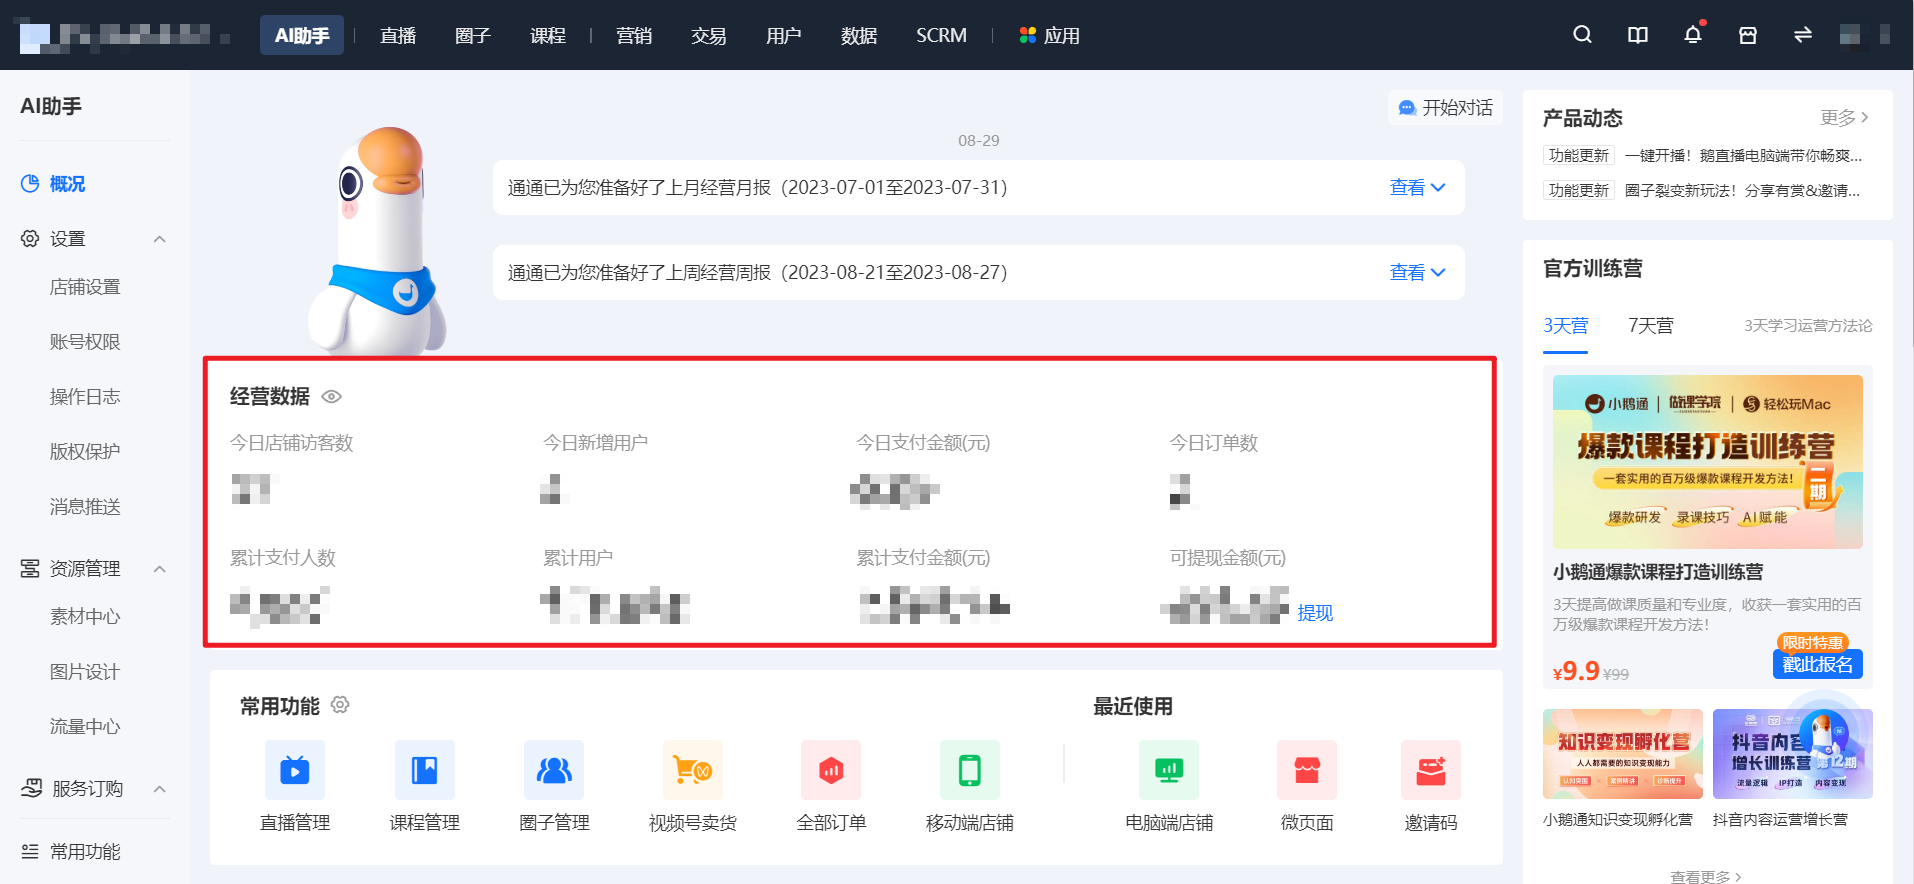
<span style="font-size:11.25pt;font-family:PingFangSC, 'Microsoft Yahei', Helvetica, Tahoma, Arial, 'Hiragino Sans GB', 'Hiragino Sans GB W3', STXihei, STHeiti, Heiti, SimSun, 'Helvetica Neue', Helvetica, 'PingFang SC', 'Microsoft YaHei', 'Source Han Sans SC', 'Noto Sans CJK SC', 'WenQuanYi Micro Hei', sans-serif;color:rgb(51,51,51);background:rgb(255,255,255);letter-spacing:0pt;vertical-align:baseline;">The core of the business data section shows 8 data points, which are real - time data. Click on a data indicator to quickly jump to the corresponding page; click on the eye icon to hide the data display.</span><span style="font-size:11pt;font-family:'Helvetica Neue', Helvetica, 'PingFang SC', 'Microsoft YaHei', 'Source Han Sans SC', 'Noto Sans CJK SC', 'WenQuanYi Micro Hei', sans-serif;color:rgb(51,51,51);background-image:initial;background-position:initial;background-size:initial;background-repeat:initial;background-attachment:initial;letter-spacing:0pt;vertical-align:baseline;"></span>

<span style="font-size:11.25pt;font-family:PingFangSC, 'Microsoft Yahei', Helvetica, Tahoma, Arial, 'Hiragino Sans GB', 'Hiragino Sans GB W3', STXihei, STHeiti, Heiti, SimSun, 'Helvetica Neue', Helvetica, 'PingFang SC', 'Microsoft YaHei', 'Source Han Sans SC', 'Noto Sans CJK SC', 'WenQuanYi Micro Hei', sans-serif;color:rgb(51,51,51);background:rgb(255,255,255);letter-spacing:0pt;vertical-align:baseline;">![image.png](https://wechatapppro-1252524126.file.myqcloud.com/help_document/image/ueditor/35885900_1695023072.png ".png")</span>

<span style="font-size:12.75pt;font-family:PingFangSC, 'Microsoft Yahei', Helvetica, Tahoma, Arial, 'Hiragino Sans GB', 'Hiragino Sans GB W3', STXihei, STHeiti, Heiti, SimSun, 'Helvetica Neue', Helvetica, 'PingFang SC', 'Microsoft YaHei', 'Source Han Sans SC', 'Noto Sans CJK SC', 'WenQuanYi Micro Hei', sans-serif;font-weight:700;color:rgb(51,51,51);background-image:initial;background-position:initial;background-size:initial;background-repeat:initial;background-attachment:initial;letter-spacing:0pt;vertical-align:baseline;"><span style="background-color:rgb(255,255,255);">III. Quick Access to Commonly/Recently Used Functions  
</span></span>

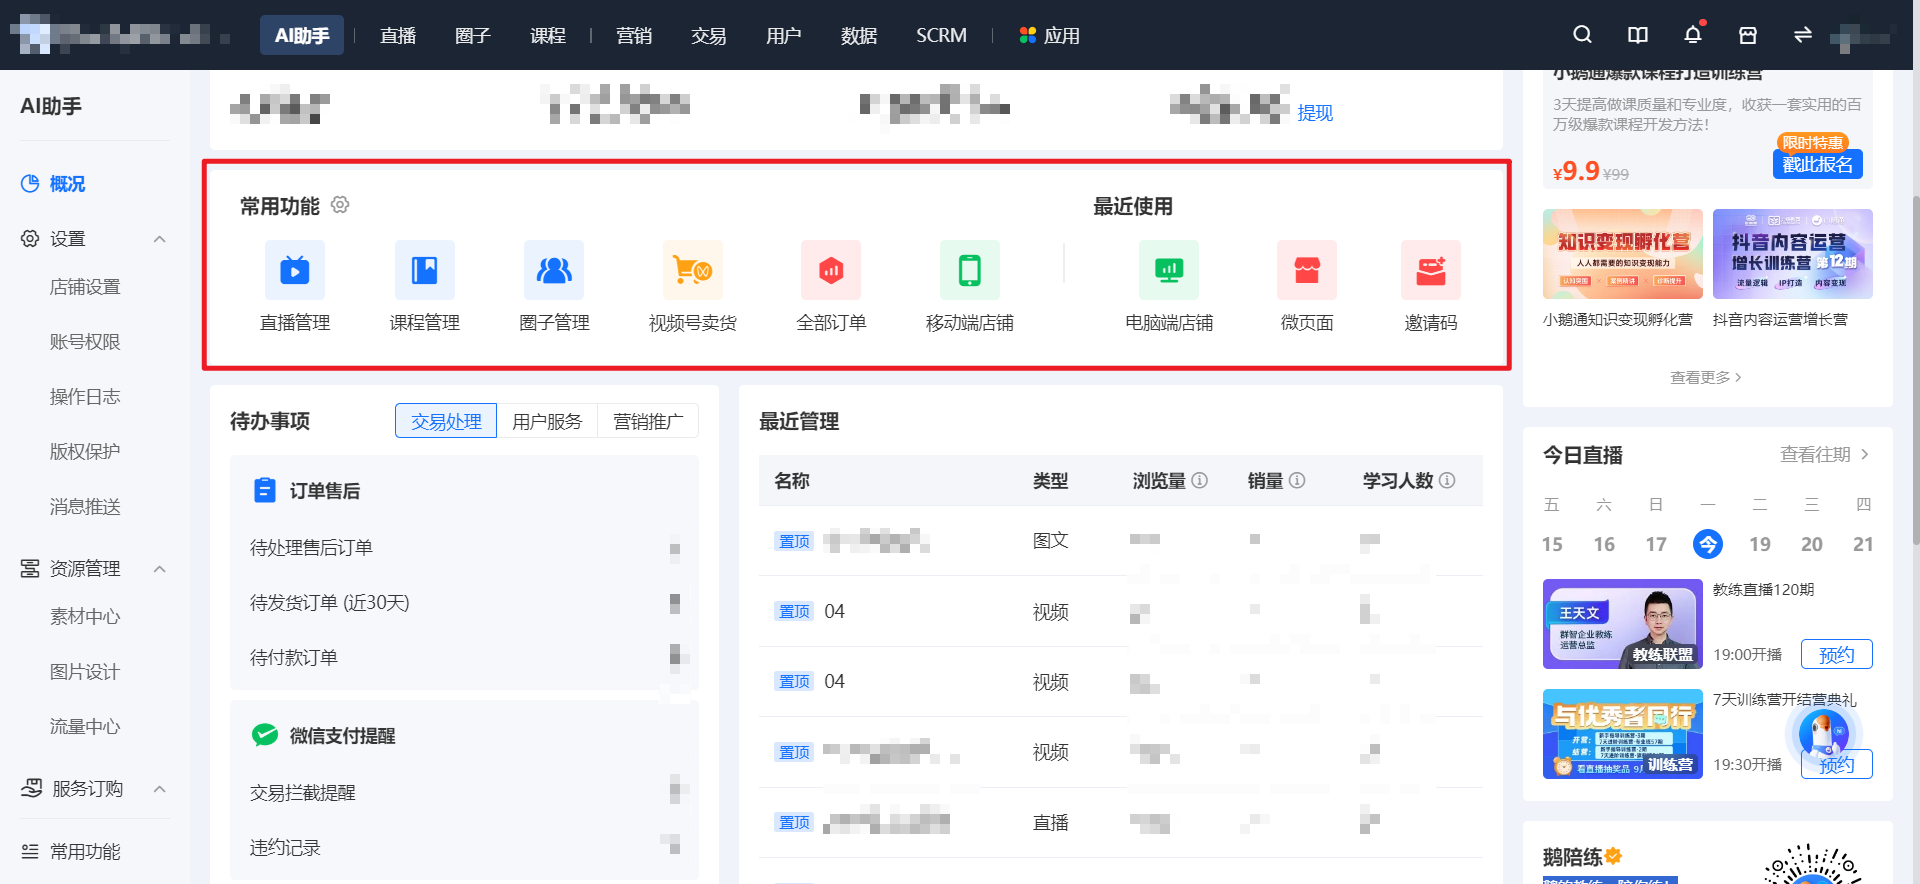
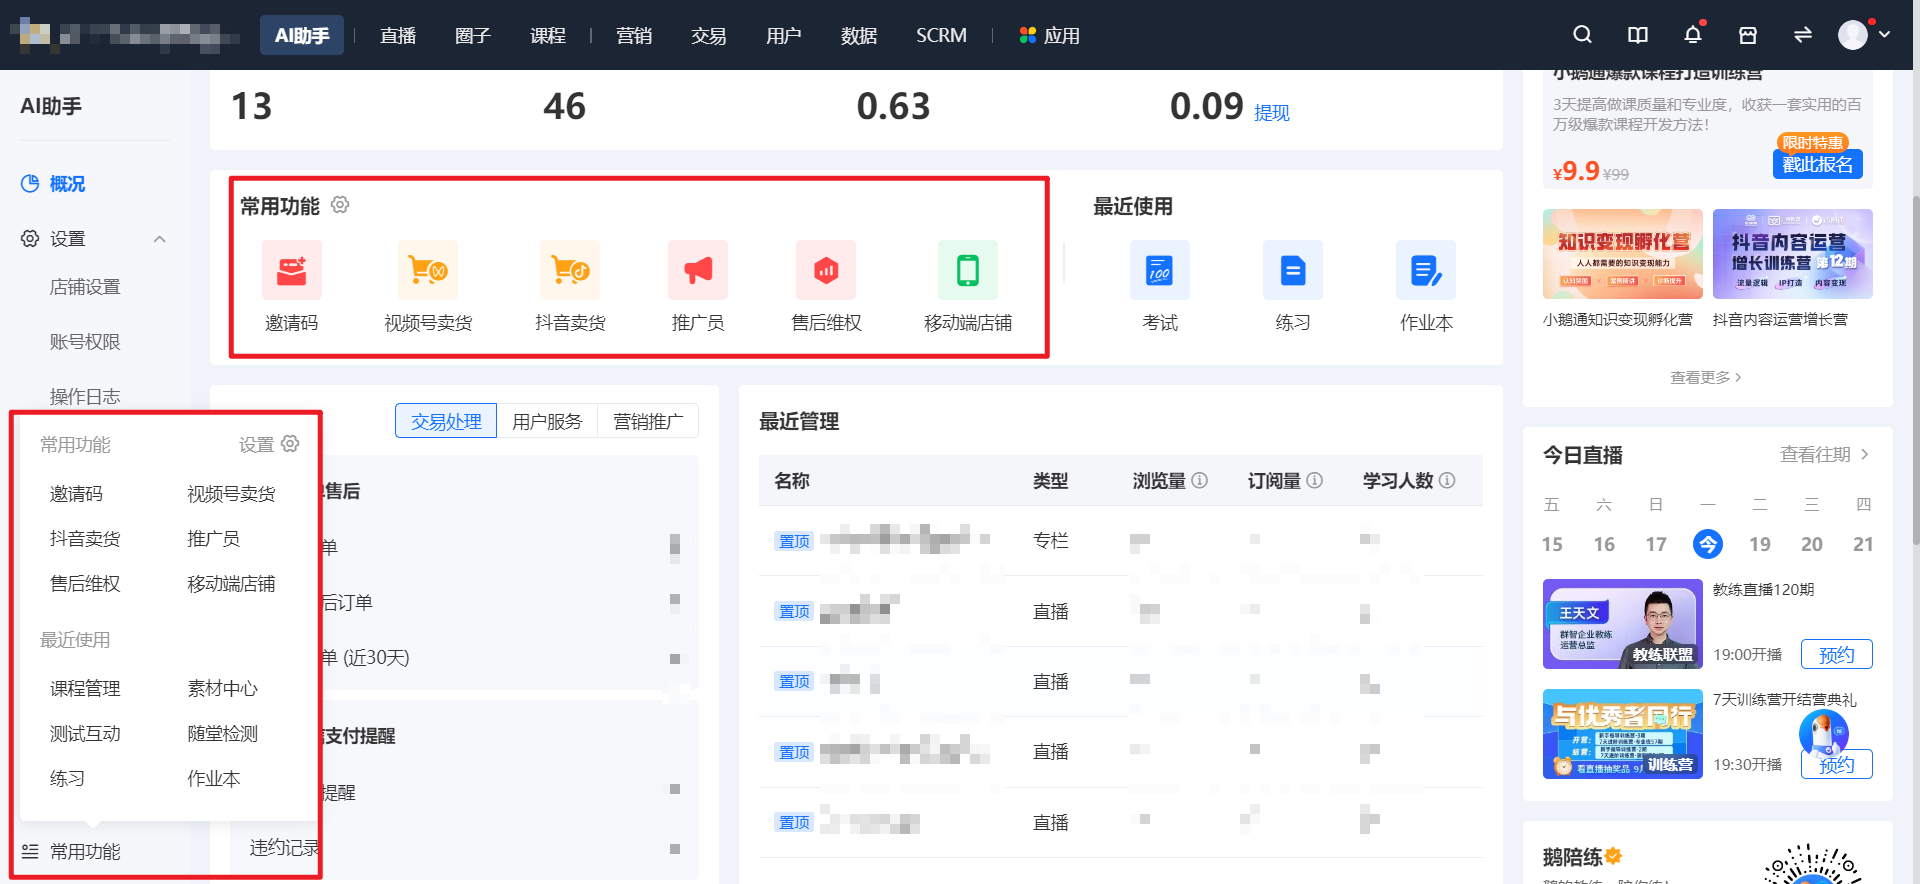
Displays quick access to custom commonly used functions and recently used functions.<span style="color:rgb(51,51,51);font-family:PingFangSC, 'Microsoft Yahei', Helvetica, Tahoma, Arial, 'Hiragino Sans GB', 'Hiragino Sans GB W3', STXihei, STHeiti, Heiti, SimSun, 'Helvetica Neue', Helvetica, 'PingFang SC', 'Microsoft YaHei', 'Source Han Sans SC', 'Noto Sans CJK SC', 'WenQuanYi Micro Hei', sans-serif;font-size:15px;background-color:rgb(255,255,255);">Click to quickly jump to the corresponding module for processing; click on the settings button next to the commonly used functions to open the custom settings pop - up window for commonly used functions.</span>

![image.png](https://wechatapppro-1252524126.file.myqcloud.com/help_document/image/ueditor/25938400_1695027731.png ".png")

<span style="font-size:12.75pt;font-family:PingFangSC, 'Microsoft Yahei', Helvetica, Tahoma, Arial, 'Hiragino Sans GB', 'Hiragino Sans GB W3', STXihei, STHeiti, Heiti, SimSun, 'Helvetica Neue', Helvetica, 'PingFang SC', 'Microsoft YaHei', 'Source Han Sans SC', 'Noto Sans CJK SC', 'WenQuanYi Micro Hei', sans-serif;font-weight:700;color:rgb(51,51,51);background:rgb(255,255,255);letter-spacing:0pt;vertical-align:baseline;"></span>

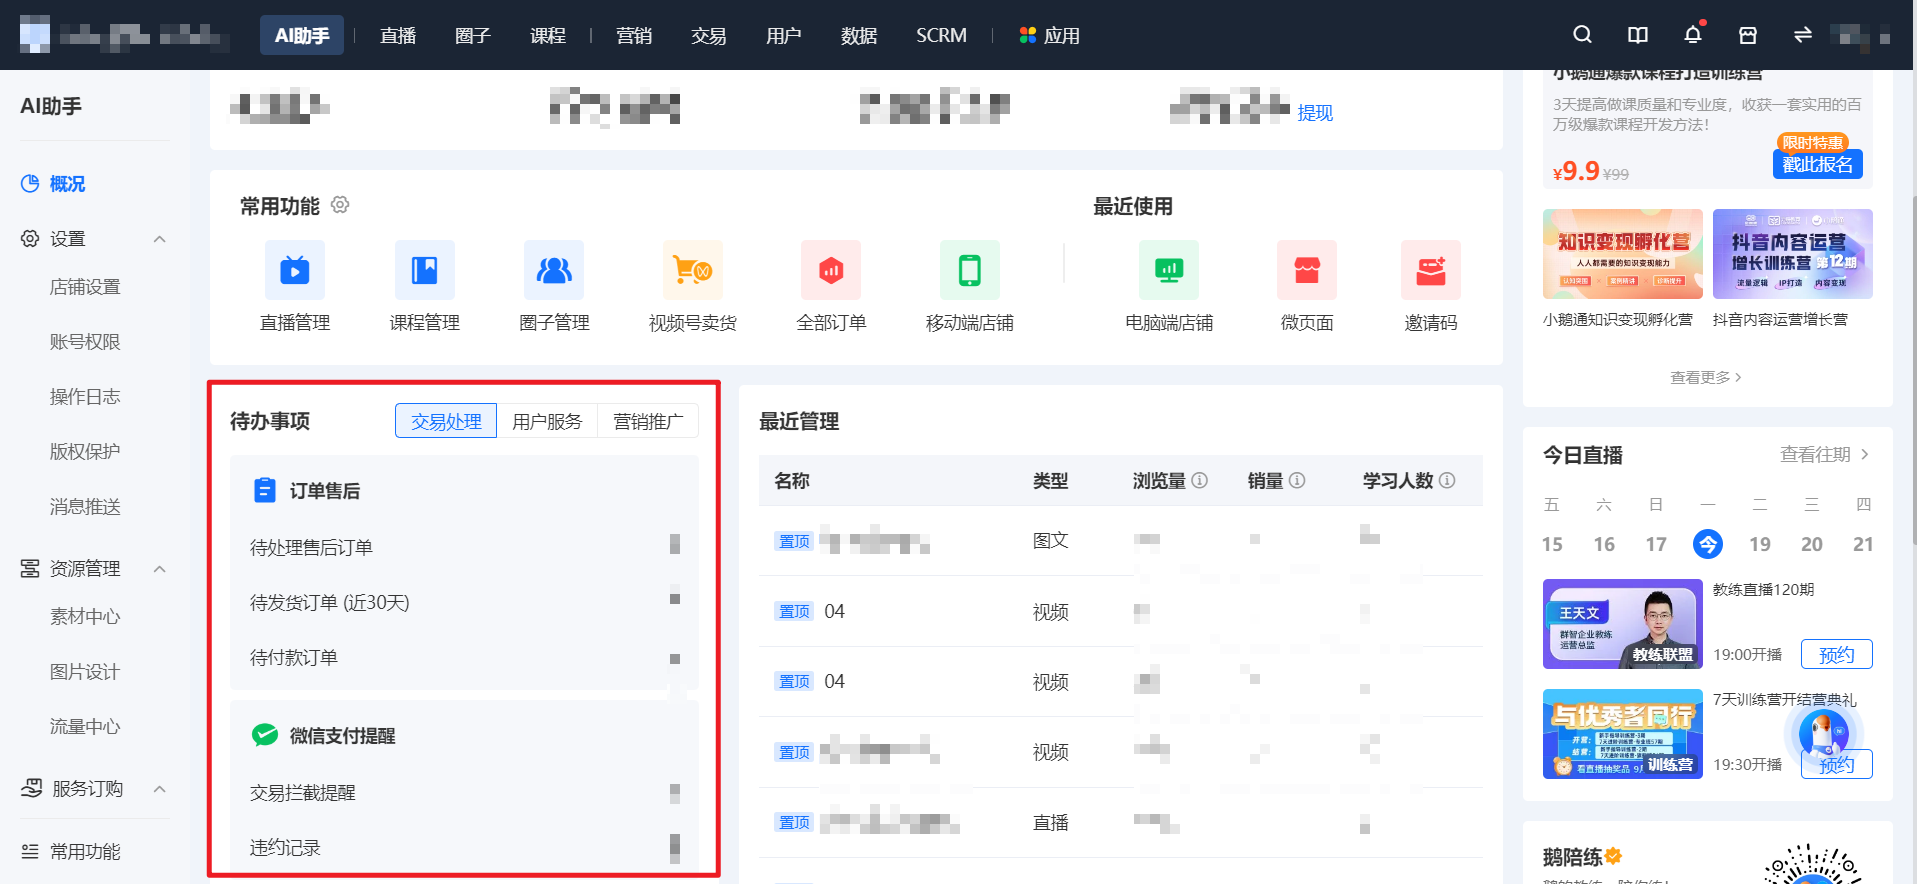
<span style="font-size:11.25pt;font-family:PingFangSC, 'Microsoft Yahei', Helvetica, Tahoma, Arial, 'Hiragino Sans GB', 'Hiragino Sans GB W3', STXihei, STHeiti, Heiti, SimSun, 'Helvetica Neue', Helvetica, 'PingFang SC', 'Microsoft YaHei', 'Source Han Sans SC', 'Noto Sans CJK SC', 'WenQuanYi Micro Hei', sans-serif;color:rgb(51,51,51);background:rgb(255,255,255);letter-spacing:0pt;vertical-align:baseline;"><span style="font-size:17px;font-weight:700;">IV. To - Do Items</span></span>

<span style="font-size:11.25pt;font-family:PingFangSC, 'Microsoft Yahei', Helvetica, Tahoma, Arial, 'Hiragino Sans GB', 'Hiragino Sans GB W3', STXihei, STHeiti, Heiti, SimSun, 'Helvetica Neue', Helvetica, 'PingFang SC', 'Microsoft YaHei', 'Source Han Sans SC', 'Noto Sans CJK SC', 'WenQuanYi Micro Hei', sans-serif;color:rgb(51,51,51);background:rgb(255,255,255);letter-spacing:0pt;vertical-align:baseline;">Displays the store's current to - do items related to business operations. Click to quickly jump to the corresponding module for processing.</span>

<span style="font-size:12.75pt;font-family:PingFangSC, 'Microsoft Yahei', Helvetica, Tahoma, Arial, 'Hiragino Sans GB', 'Hiragino Sans GB W3', STXihei, STHeiti, Heiti, SimSun, 'Helvetica Neue', Helvetica, 'PingFang SC', 'Microsoft YaHei', 'Source Han Sans SC', 'Noto Sans CJK SC', 'WenQuanYi Micro Hei', sans-serif;font-weight:700;color:rgb(51,51,51);background:rgb(255,255,255);letter-spacing:0pt;vertical-align:baseline;"><span style="color:rgb(51,51,51);font-family:'Helvetica Neue', Helvetica, 'PingFang SC', 'Microsoft YaHei', 'Source Han Sans SC', 'Noto Sans CJK SC', 'WenQuanYi Micro Hei', sans-serif;font-size:14.6667px;"><span style="color:rgb(51,51,51);font-family:'Helvetica Neue', Helvetica, 'PingFang SC', 'Microsoft YaHei', 'Source Han Sans SC', 'Noto Sans CJK SC', 'WenQuanYi Micro Hei', sans-serif;font-size:14.6667px;background-color:rgb(255,255,255);">![image.png](https://wechatapppro-1252524126.file.myqcloud.com/help_document/image/ueditor/14284900_1695023709.png ".png")</span></span></span>

<span style="font-size:12.75pt;font-family:PingFangSC, 'Microsoft Yahei', Helvetica, Tahoma, Arial, 'Hiragino Sans GB', 'Hiragino Sans GB W3', STXihei, STHeiti, Heiti, SimSun, 'Helvetica Neue', Helvetica, 'PingFang SC', 'Microsoft YaHei', 'Source Han Sans SC', 'Noto Sans CJK SC', 'WenQuanYi Micro Hei', sans-serif;font-weight:700;color:rgb(51,51,51);background:rgb(255,255,255);letter-spacing:0pt;vertical-align:baseline;"><span style="color:rgb(51,51,51);font-family:'Helvetica Neue', Helvetica, 'PingFang SC', 'Microsoft YaHei', 'Source Han Sans SC', 'Noto Sans CJK SC', 'WenQuanYi Micro Hei', sans-serif;font-size:14.6667px;"><span style="color:rgb(51,51,51);font-family:'Helvetica Neue', Helvetica, 'PingFang SC', 'Microsoft YaHei', 'Source Han Sans SC', 'Noto Sans CJK SC', 'WenQuanYi Micro Hei', sans-serif;font-size:14.6667px;background-color:rgb(255,255,255);">  
</span></span></span>

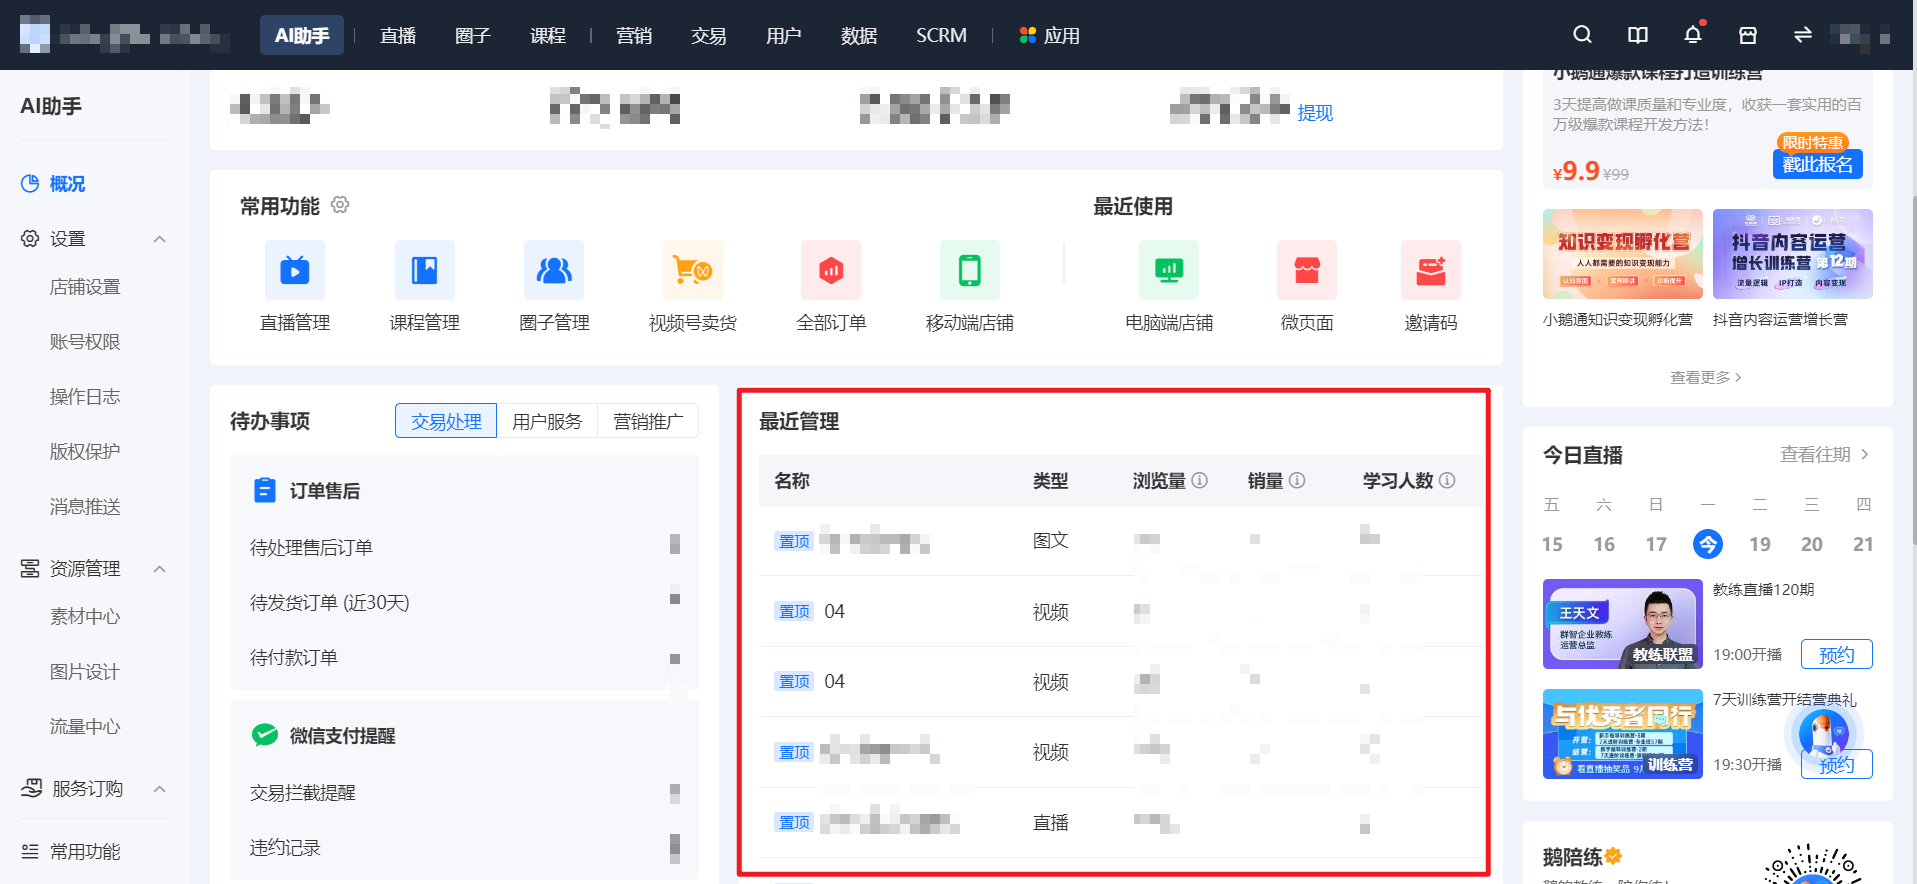
<span style="font-size:12.75pt;font-family:PingFangSC, 'Microsoft Yahei', Helvetica, Tahoma, Arial, 'Hiragino Sans GB', 'Hiragino Sans GB W3', STXihei, STHeiti, Heiti, SimSun, 'Helvetica Neue', Helvetica, 'PingFang SC', 'Microsoft YaHei', 'Source Han Sans SC', 'Noto Sans CJK SC', 'WenQuanYi Micro Hei', sans-serif;font-weight:700;color:rgb(51,51,51);background:rgb(255,255,255);letter-spacing:0pt;vertical-align:baseline;">V. Recent Management</span><span style="font-size:11pt;font-family:'Helvetica Neue', Helvetica, 'PingFang SC', 'Microsoft YaHei', 'Source Han Sans SC', 'Noto Sans CJK SC', 'WenQuanYi Micro Hei', sans-serif;color:rgb(51,51,51);background-image:initial;background-position:initial;background-size:initial;background-repeat:initial;background-attachment:initial;letter-spacing:0pt;vertical-align:baseline;"></span>

<span style="font-size:11.25pt;font-family:PingFangSC, 'Microsoft Yahei', Helvetica, Tahoma, Arial, 'Hiragino Sans GB', 'Hiragino Sans GB W3', STXihei, STHeiti, Heiti, SimSun, 'Helvetica Neue', Helvetica, 'PingFang SC', 'Microsoft YaHei', 'Source Han Sans SC', 'Noto Sans CJK SC', 'WenQuanYi Micro Hei', sans-serif;color:rgb(51,51,51);background:rgb(255,255,255);letter-spacing:0pt;vertical-align:baseline;">By default, it shows the recently created/edited management courses/live streams, etc. You can quickly view the views, sales volume, and the number of learners. It supports pinning for quick access to the courses/live streams you're interested in.<span style="color:rgb(51,51,51);font-family:PingFangSC, 'Microsoft Yahei', Helvetica, Tahoma, Arial, 'Hiragino Sans GB', 'Hiragino Sans GB W3', STXihei, STHeiti, Heiti, SimSun, 'Helvetica Neue', Helvetica, 'PingFang SC', 'Microsoft YaHei', 'Source Han Sans SC', 'Noto Sans CJK SC', 'WenQuanYi Micro Hei', sans-serif;font-size:15px;background-color:rgb(255,255,255);">/Live Streams</span>access status;</span>

<span style="font-size:11.25pt;font-family:PingFangSC, 'Microsoft Yahei', Helvetica, Tahoma, Arial, 'Hiragino Sans GB', 'Hiragino Sans GB W3', STXihei, STHeiti, Heiti, SimSun, 'Helvetica Neue', Helvetica, 'PingFang SC', 'Microsoft YaHei', 'Source Han Sans SC', 'Noto Sans CJK SC', 'WenQuanYi Micro Hei', sans-serif;color:rgb(51,51,51);background:rgb(255,255,255);letter-spacing:0pt;vertical-align:baseline;">![image.png](https://wechatapppro-1252524126.file.myqcloud.com/help_document/image/ueditor/79728100_1695023722.png ".png")</span>

<span style="font-size:12.75pt;font-family:PingFangSC, 'Microsoft Yahei', Helvetica, Tahoma, Arial, 'Hiragino Sans GB', 'Hiragino Sans GB W3', STXihei, STHeiti, Heiti, SimSun, 'Helvetica Neue', Helvetica, 'PingFang SC', 'Microsoft YaHei', 'Source Han Sans SC', 'Noto Sans CJK SC', 'WenQuanYi Micro Hei', sans-serif;font-weight:700;color:rgb(51,51,51);background:rgb(255,255,255);letter-spacing:0pt;vertical-align:baseline;">VI. Top Bar</span><span style="font-size:12.75pt;font-family:PingFangSC, 'Microsoft Yahei', Helvetica, Tahoma, Arial, 'Hiragino Sans GB', 'Hiragino Sans GB W3', STXihei, STHeiti, Heiti, SimSun, 'Helvetica Neue', Helvetica, 'PingFang SC', 'Microsoft YaHei', 'Source Han Sans SC', 'Noto Sans CJK SC', 'WenQuanYi Micro Hei', sans-serif;font-weight:700;color:rgb(51,51,51);background:rgb(255,255,255);letter-spacing:0pt;vertical-align:baseline;"></span>

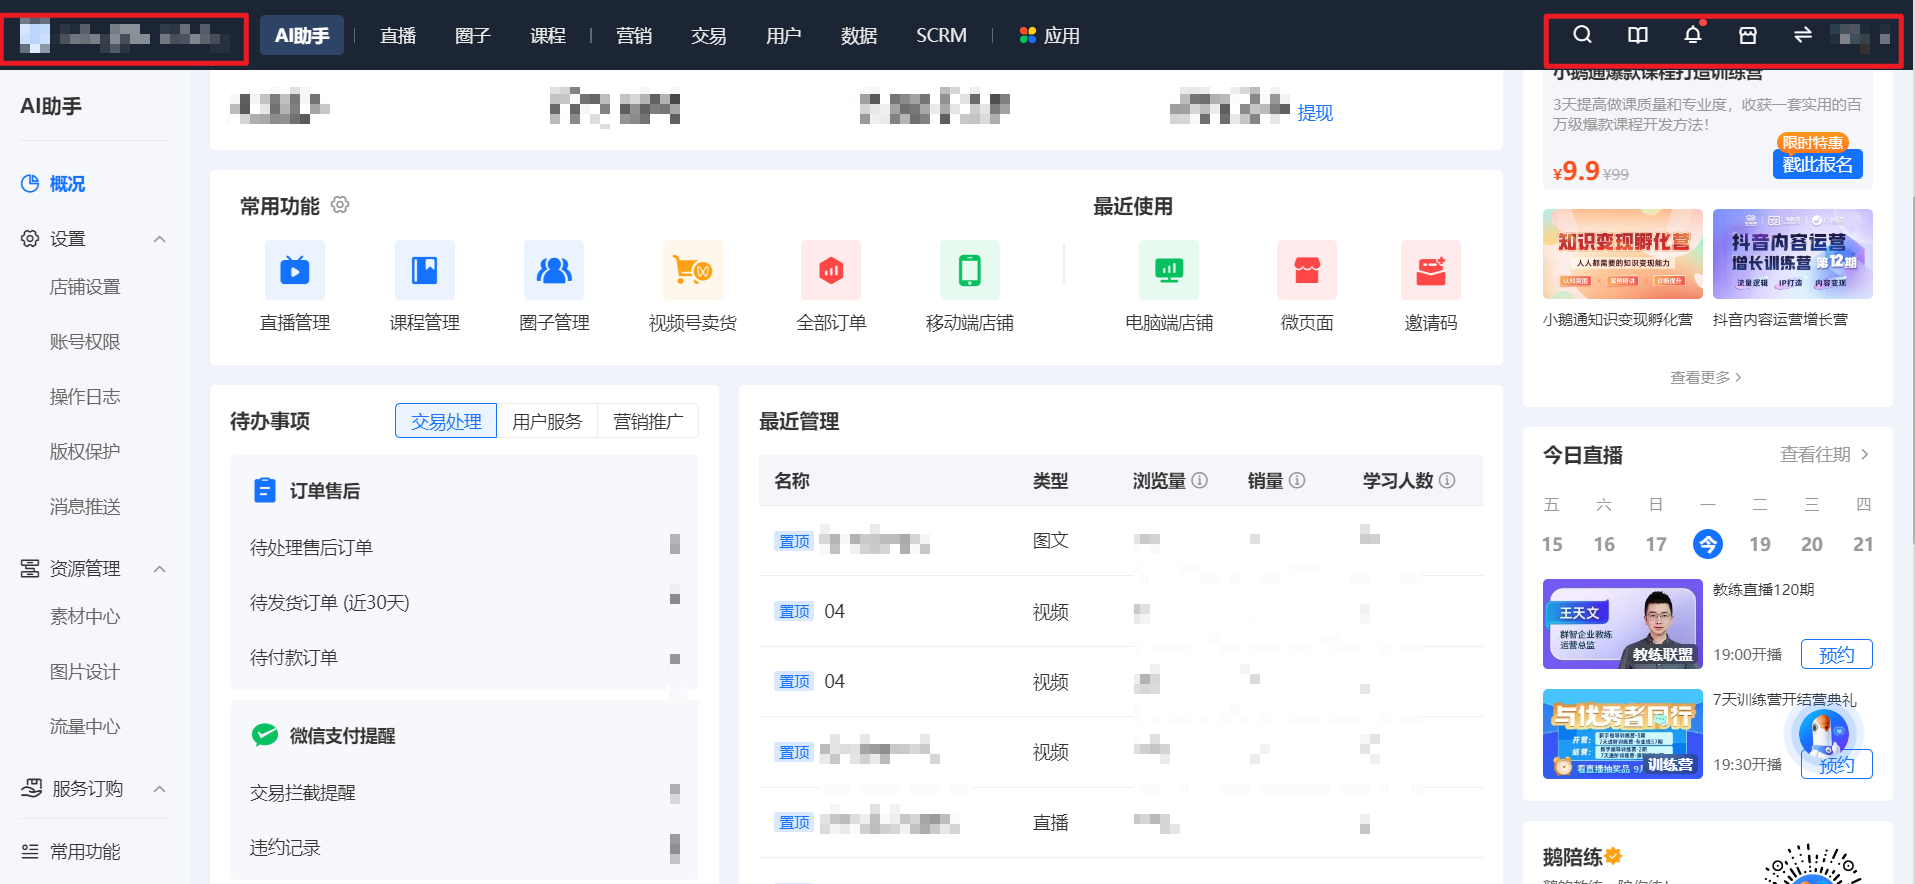
<span style="font-size:11pt;font-family:'Helvetica Neue', Helvetica, 'PingFang SC', 'Microsoft YaHei', 'Source Han Sans SC', 'Noto Sans CJK SC', 'WenQuanYi Micro Hei', sans-serif;color:rgb(51,51,51);background-image:initial;background-position:initial;background-size:initial;background-repeat:initial;background-attachment:initial;letter-spacing:0pt;vertical-align:baseline;">Store Information: Displays the current store's logo and name; hover to show more store information, including the version, expiration time, material space, traffic account, etc. Click to jump to the overview page.</span>

<span style="font-size:11pt;font-family:'Helvetica Neue', Helvetica, 'PingFang SC', 'Microsoft YaHei', 'Source Han Sans SC', 'Noto Sans CJK SC', 'WenQuanYi Micro Hei', sans-serif;color:rgb(51,51,51);background-image:initial;background-position:initial;background-size:initial;background-repeat:initial;background-attachment:initial;letter-spacing:0pt;vertical-align:baseline;">Search: Search for functions, help content, and merchant cases.</span>

<span style="background-color:rgb(255,255,255);color:rgb(51,51,51);font-family:PingFangSC, 'Microsoft Yahei', Helvetica, Tahoma, Arial, 'Hiragino Sans GB', 'Hiragino Sans GB W3', STXihei, STHeiti, Heiti, SimSun, 'Helvetica Neue', Helvetica, 'PingFang SC', 'Microsoft YaHei', 'Source Han Sans SC', 'Noto Sans CJK SC', 'WenQuanYi Micro Hei', sans-serif;font-size:11.25pt;letter-spacing:0pt;">elink Academy: Learn about function details, operation cases, etc., to help merchants grow quickly.</span>

<span style="background-color:rgb(255,255,255);color:rgb(51,51,51);font-family:PingFangSC, 'Microsoft Yahei', Helvetica, Tahoma, Arial, 'Hiragino Sans GB', 'Hiragino Sans GB W3', STXihei, STHeiti, Heiti, SimSun, 'Helvetica Neue', Helvetica, 'PingFang SC', 'Microsoft YaHei', 'Source Han Sans SC', 'Noto Sans CJK SC', 'WenQuanYi Micro Hei', sans-serif;font-size:11.25pt;letter-spacing:0pt;">Notification Center: View in - store notification content.</span>

<span style="font-size:11pt;font-family:'Helvetica Neue', Helvetica, 'PingFang SC', 'Microsoft YaHei', 'Source Han Sans SC', 'Noto Sans CJK SC', 'WenQuanYi Micro Hei', sans-serif;color:rgb(51,51,51);background-image:initial;background-position:initial;background-size:initial;background-repeat:initial;background-attachment:initial;letter-spacing:0pt;vertical-align:baseline;"></span>

<span style="font-size:11.25pt;font-family:PingFangSC, 'Microsoft Yahei', Helvetica, Tahoma, Arial, 'Hiragino Sans GB', 'Hiragino Sans GB W3', STXihei, STHeiti, Heiti, SimSun, 'Helvetica Neue', Helvetica, 'PingFang SC', 'Microsoft YaHei', 'Source Han Sans SC', 'Noto Sans CJK SC', 'WenQuanYi Micro Hei', sans-serif;color:rgb(51,51,51);background:rgb(255,255,255);letter-spacing:0pt;vertical-align:baseline;">Access Store: Click to quickly view the QR code and link for accessing the store.</span><span style="font-size:11.25pt;font-family:PingFangSC, 'Microsoft Yahei', Helvetica, Tahoma, Arial, 'Hiragino Sans GB', 'Hiragino Sans GB W3', STXihei, STHeiti, Heiti, SimSun, 'Helvetica Neue', Helvetica, 'PingFang SC', 'Microsoft YaHei', 'Source Han Sans SC', 'Noto Sans CJK SC', 'WenQuanYi Micro Hei', sans-serif;color:rgb(51,51,51);background:rgb(255,255,255);letter-spacing:0pt;vertical-align:baseline;"></span>

Personal Account: Click to view information about the currently logged - in B - end personal account and access functions such as switching stores, help center, and logging out.

Switch Version: Switch to the old - version management console.
![image.png](https://wechatapppro-1252524126.file.myqcloud.com/help_document/image/ueditor/91288000_1695027149.png ".png")

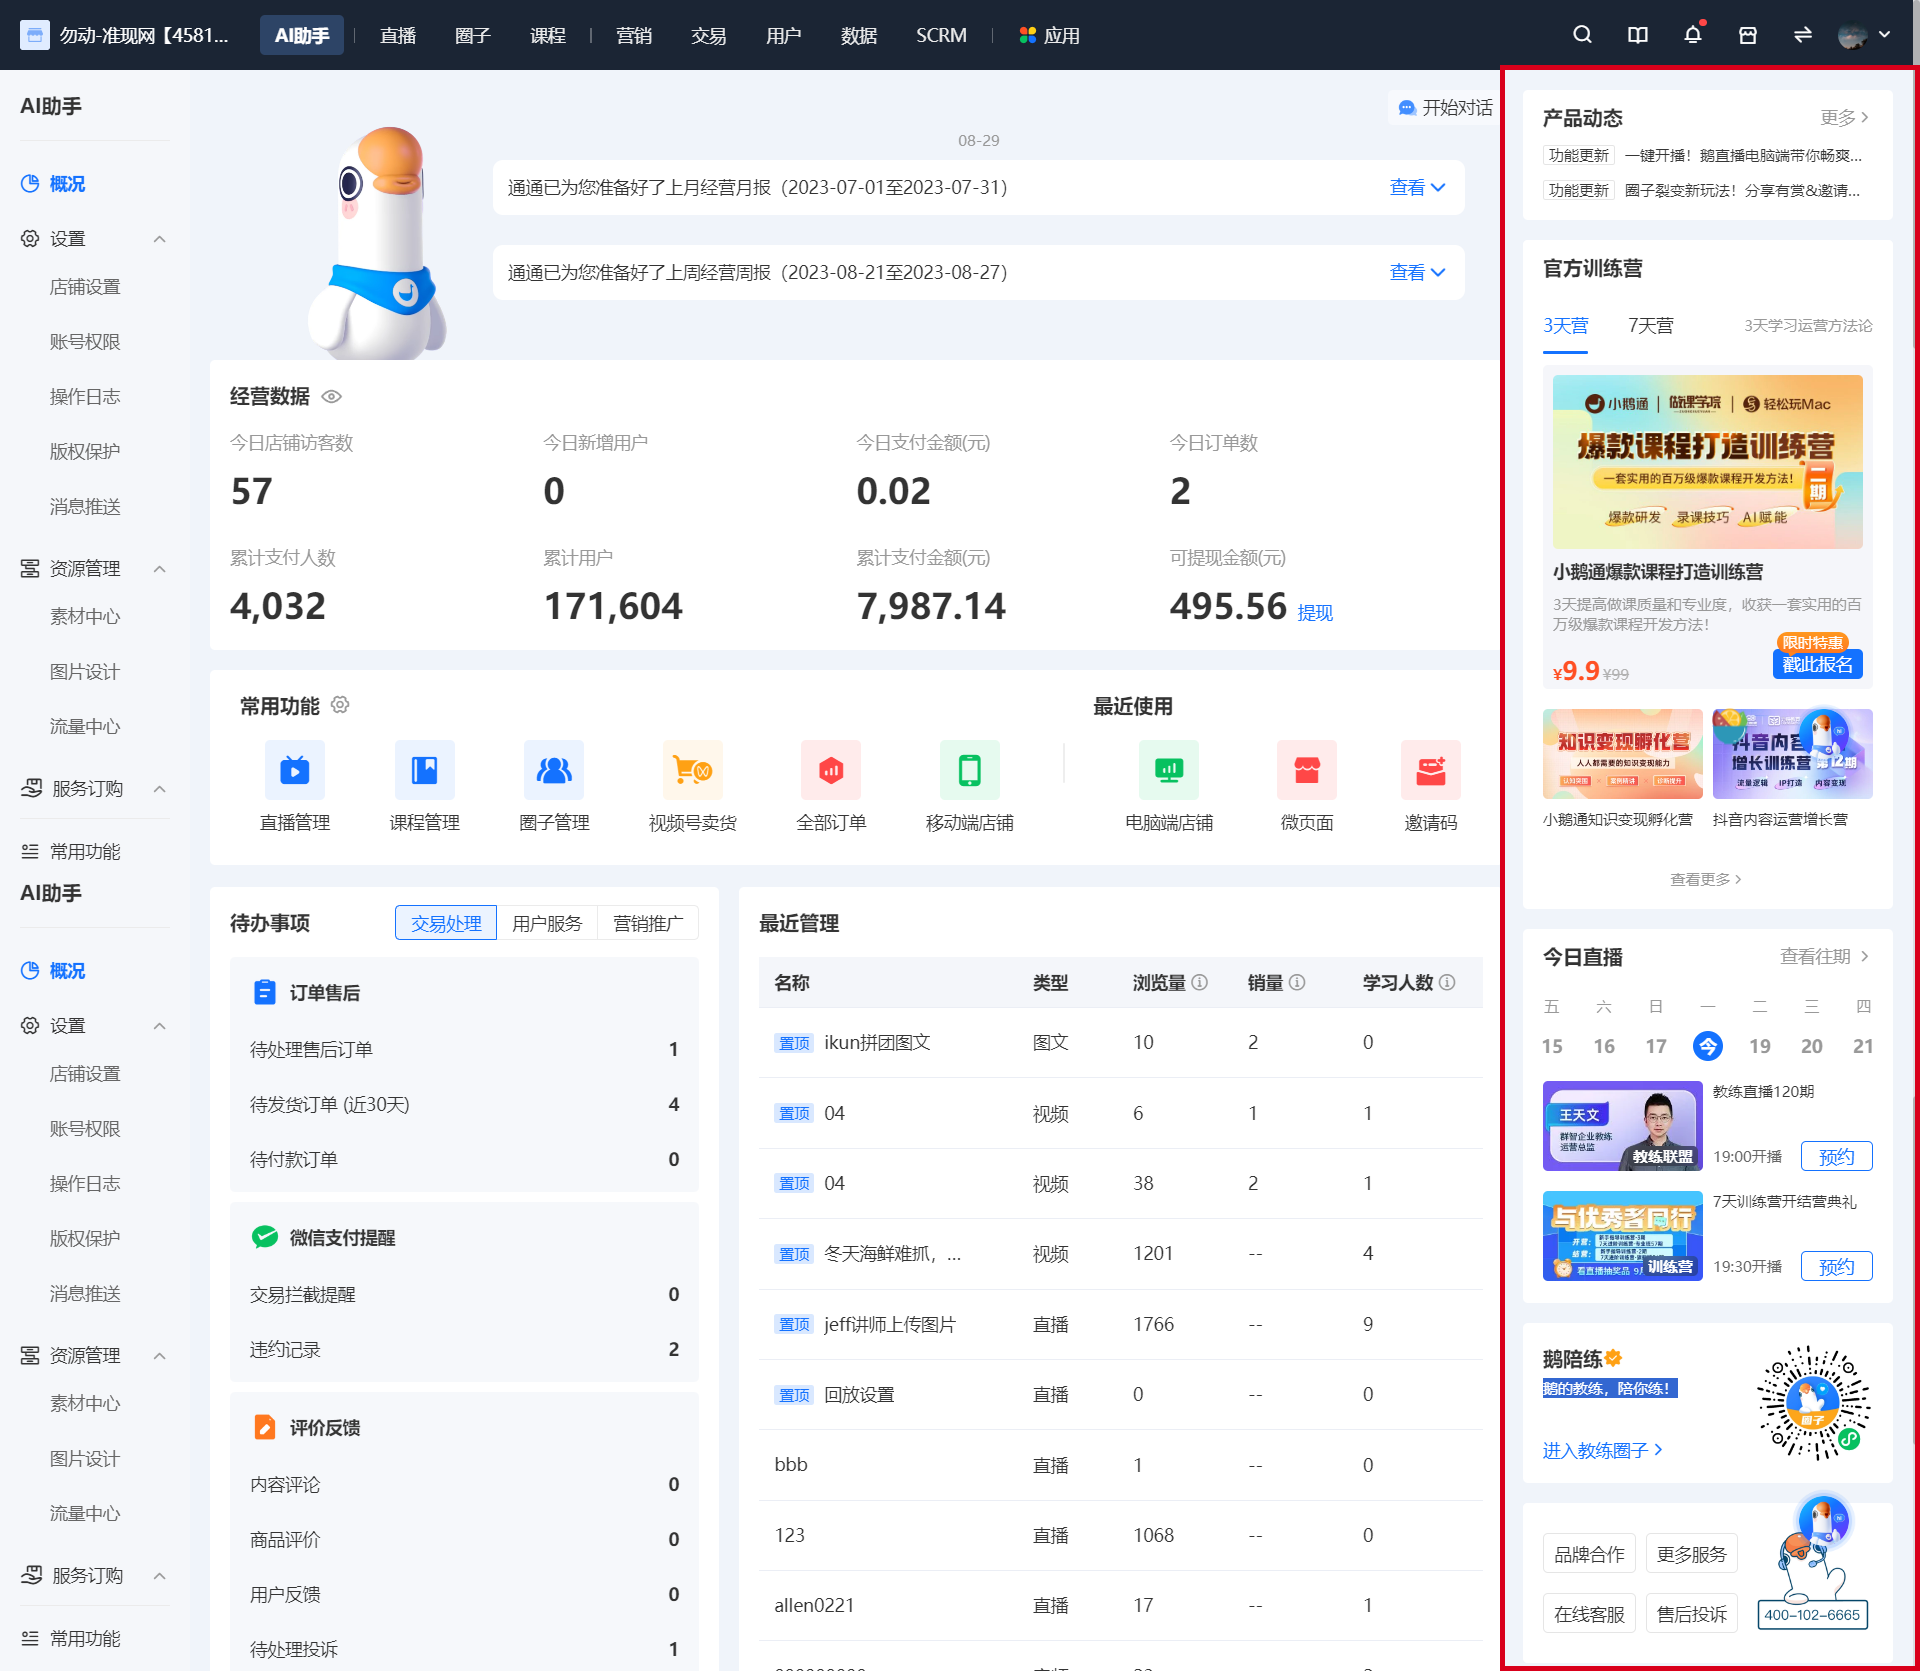
<span style="background-color:rgb(255,255,255);color:rgb(51,51,51);font-family:PingFangSC, 'Microsoft Yahei', Helvetica, Tahoma, Arial, 'Hiragino Sans GB', 'Hiragino Sans GB W3', STXihei, STHeiti, Heiti, SimSun, 'Helvetica Neue', Helvetica, 'PingFang SC', 'Microsoft YaHei', 'Source Han Sans SC', 'Noto Sans CJK SC', 'WenQuanYi Micro Hei', sans-serif;font-size:12.75pt;font-weight:700;letter-spacing:0pt;">VII. elink Latest News</span>

<span style="font-size:11pt;font-family:'Helvetica Neue', Helvetica, 'PingFang SC', 'Microsoft YaHei', 'Source Han Sans SC', 'Noto Sans CJK SC', 'WenQuanYi Micro Hei', sans-serif;color:rgb(51,51,51);background-image:initial;background-position:initial;background-size:initial;background-repeat:initial;background-attachment:initial;letter-spacing:0pt;vertical-align:baseline;">Product Updates: elink's latest platform announcements or feature updates. Click to view details.</span><span style="font-size:11pt;font-family:'Helvetica Neue', Helvetica, 'PingFang SC', 'Microsoft YaHei', 'Source Han Sans SC', 'Noto Sans CJK SC', 'WenQuanYi Micro Hei', sans-serif;color:rgb(51,51,51);background-image:initial;background-position:initial;background-size:initial;background-repeat:initial;background-attachment:initial;letter-spacing:0pt;vertical-align:baseline;"></span>

<span style="font-size:11pt;font-family:'Helvetica Neue', Helvetica, 'PingFang SC', 'Microsoft YaHei', 'Source Han Sans SC', 'Noto Sans CJK SC', 'WenQuanYi Micro Hei', sans-serif;color:rgb(51,51,51);background-image:initial;background-position:initial;background-size:initial;background-repeat:initial;background-attachment:initial;letter-spacing:0pt;vertical-align:baseline;">Official Camps:<span style="color:rgb(51,51,51);font-family:'Helvetica Neue', Helvetica, 'PingFang SC', 'Microsoft YaHei', 'Source Han Sans SC', 'Noto Sans CJK SC', 'WenQuanYi Micro Hei', sans-serif;font-size:14.6667px;">Brings you the latest information about elink's official camps</span>;</span><span style="font-size:11pt;font-family:'Helvetica Neue', Helvetica, 'PingFang SC', 'Microsoft YaHei', 'Source Han Sans SC', 'Noto Sans CJK SC', 'WenQuanYi Micro Hei', sans-serif;color:rgb(51,51,51);background-image:initial;background-position:initial;background-size:initial;background-repeat:initial;background-attachment:initial;letter-spacing:0pt;vertical-align:baseline;"></span>

<span style="font-size:11pt;font-family:'Helvetica Neue', Helvetica, 'PingFang SC', 'Microsoft YaHei', 'Source Han Sans SC', 'Noto Sans CJK SC', 'WenQuanYi Micro Hei', sans-serif;color:rgb(51,51,51);background-image:initial;background-position:initial;background-size:initial;background-repeat:initial;background-attachment:initial;letter-spacing:0pt;vertical-align:baseline;">Today's Live Streams:<span style="color:rgb(51,51,51);font-family:'Helvetica Neue', Helvetica, 'PingFang SC', 'Microsoft YaHei', 'Source Han Sans SC', 'Noto Sans CJK SC', 'WenQuanYi Micro Hei', sans-serif;font-size:14.6667px;">Brings you the latest information about elink's official live streams;</span></span>

<span style="font-size:11pt;font-family:'Helvetica Neue', Helvetica, 'PingFang SC', 'Microsoft YaHei', 'Source Han Sans SC', 'Noto Sans CJK SC', 'WenQuanYi Micro Hei', sans-serif;color:rgb(51,51,51);background-image:initial;background-position:initial;background-size:initial;background-repeat:initial;background-attachment:initial;letter-spacing:0pt;vertical-align:baseline;">elink Coaching Alliance: Access to the elink coach training alliance community;</span>

<span style="font-size:11pt;font-family:'Helvetica Neue', Helvetica, 'PingFang SC', 'Microsoft YaHei', 'Source Han Sans SC', 'Noto Sans CJK SC', 'WenQuanYi Micro Hei', sans-serif;color:rgb(51,51,51);background-image:initial;background-position:initial;background-size:initial;background-repeat:initial;background-attachment:initial;letter-spacing:0pt;vertical-align:baseline;">Pre - sales/After - sales Service: Contact information for elink service staff.</span>

<span style="font-size:11pt;font-family:'Helvetica Neue', Helvetica, 'PingFang SC', 'Microsoft YaHei', 'Source Han Sans SC', 'Noto Sans CJK SC', 'WenQuanYi Micro Hei', sans-serif;color:rgb(51,51,51);background-image:initial;background-position:initial;background-size:initial;background-repeat:initial;background-attachment:initial;letter-spacing:0pt;vertical-align:baseline;">![image.png](https://wechatapppro-1252524126.file.myqcloud.com/help_document/image/ueditor/10579600_1695027650.png ".png")</span>

# Usage tutorial for [Common Features] on the Overview Page

<div data-elink-language-switch="1" id="bkmrk-%E4%B8%AD%E6%96%87" style="border:1px solid #d6d9de;border-radius:6px;padding:10px 12px;margin:0 0 18px 0;background:#f8fafc;font-size:14px;">[中文](/books/877a9/page/bd4c9)</div><span style="font-size:17px;">**I. Function Introduction**</span>

<span style="font-size:15px;">1. Freely pin the recently used functions as quick access entries. You can directly access the functions with a single click, which helps merchants improve the efficiency of using the management console. This function is supported on both the new and old versions of the management console, but the customized data is not interoperable.</span>

<span style="font-size:17px;">**II. Purpose of Use**</span>

<span style="font-size:15px;">Pin the quick access entries that merchants use frequently to help them access quickly.</span>

<span style="font-size:17px;">**III. Usage Scenarios**</span>

<span style="font-size:15px;">Merchants often need to access the \[Order Management\] function to ship products to users who have purchased goods. Merchants can pin the \[Order Management\] function to the frequently used functions and open it with a single click, which improves the efficiency of merchants using the management console.</span>

<span style="font-size:17px;">**IV. Operation Path**</span>

<span style="font-size:17px;">****<span style="font-size:15px;">\[New Version of Management Console\]:</span>****</span>

<span style="font-size:15px;">1. Left navigation bar - Frequently Used Functions</span>

<span style="font-size:15px;">2. AI Assistant - Overview Page - Frequently Used Functions</span>

<span style="font-size:15px;">**<span style="font-size:15px;">\[Old Version of Management Console\]:</span>**</span>

<span style="font-size:15px;">Navigation bar - Frequently Used</span>

<span style="font-size:15px;">![image (3).png](https://wechatapppro-1252524126.file.myqcloud.com/help_document/image/ueditor/93755800_1638843588.png ".png")</span>

<span style="font-size:17px;">**V. Usage Tutorial**</span>

<span style="font-size:17px;">**<span style="font-size:15px;">\[New Version of Management Console\]:</span>**</span>

<span style="font-size:15px;">(1) Step 1: Open Frequently Used</span>

![image.png](https://wechatapppro-1252524126.file.myqcloud.com/help_document/image/ueditor/68487300_1695018405.png ".png")

<span style="font-size:15px;">(2) Step 2: Add/Delete Frequently Used Functions</span>

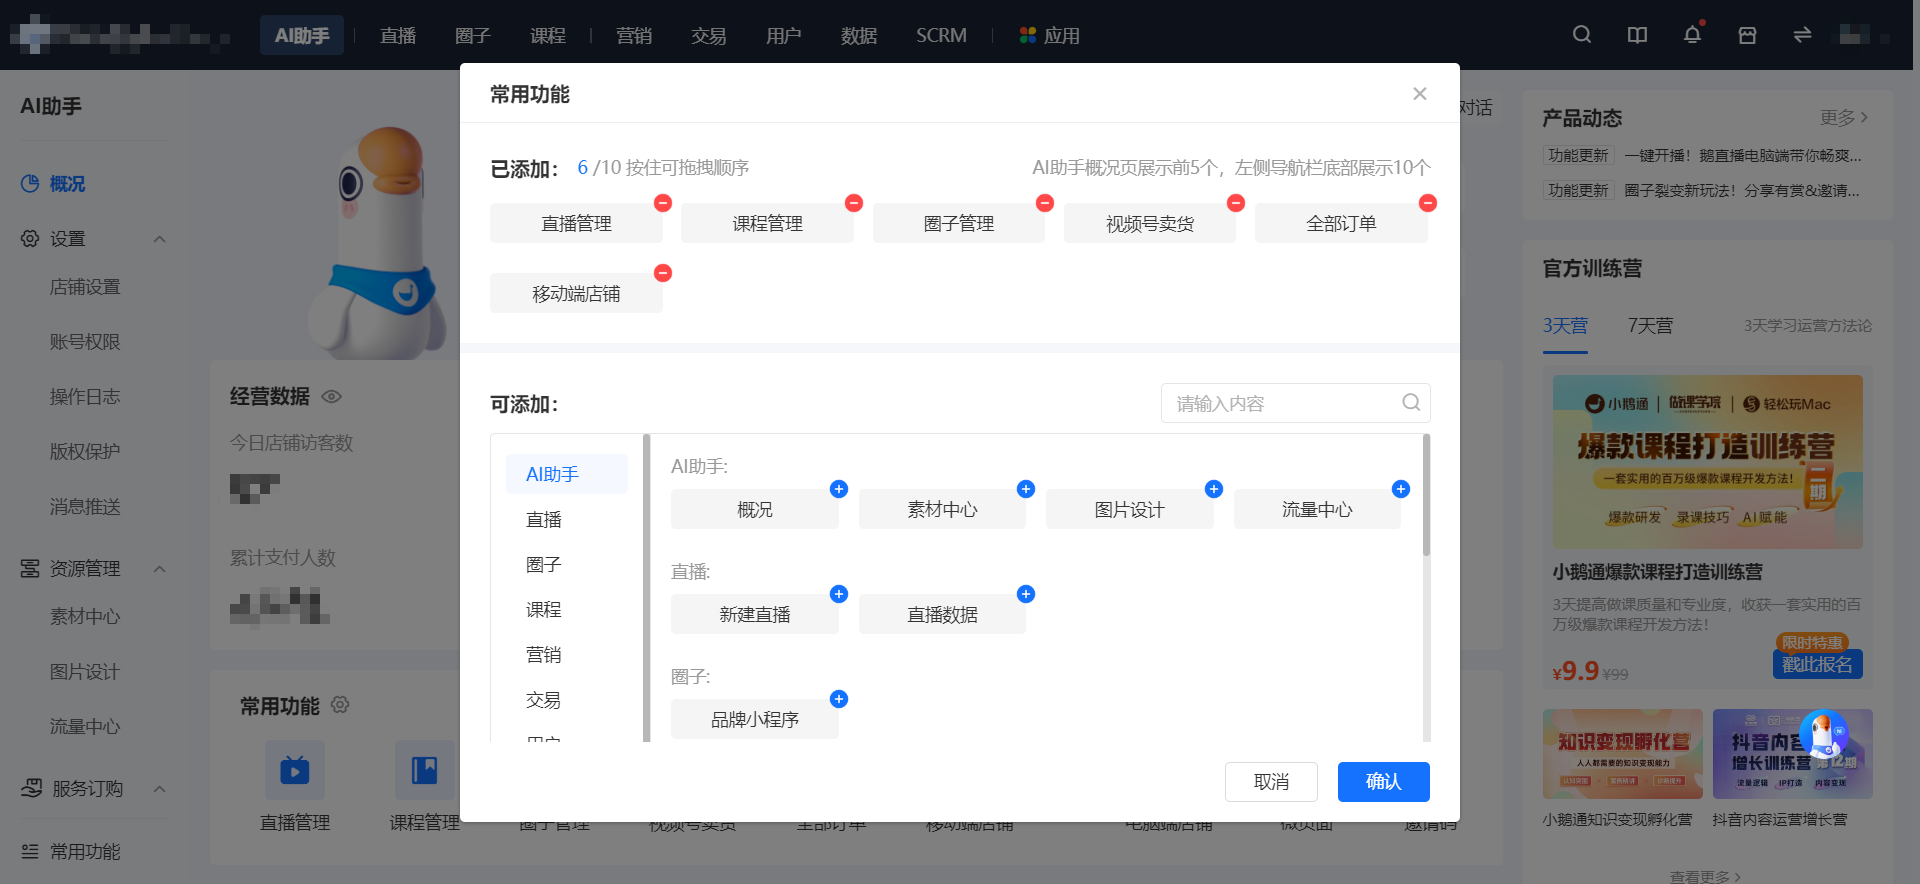
<span style="font-size:15px;">Click the settings button. In the settings pop - up window,<span style="font-size:15px;">Add/delete frequently used functions. You can quickly locate the frequently used functions of a certain section or search for the specific name of the frequently used function in the pop - up window.</span></span>

<span style="font-size:15px;"><span style="font-size:15px;">![image.png](https://wechatapppro-1252524126.file.myqcloud.com/help_document/image/ueditor/68715600_1695019697.png ".png")</span></span>

<span style="font-size:15px;">  
</span>

**<span style="font-size:15px;">\[Old Version of Management Console\]:</span>**

<span style="font-size:15px;"><span style="font-size:15px;">(1) Step 1: Open Frequently Used</span></span>

<span style="font-size:15px;"><span style="font-size:15px;">![65062700_1638843604.png](https://wechatapppro-1252524126.file.myqcloud.com/help_document/image/ueditor/65062700_1638843604.png)</span></span>

<span style="font-size:15px;"><span style="font-size:15px;"><span style="font-size:15px;">(2) Step 2: Add/Delete Frequently Used Functions</span></span></span>

<span style="font-size:15px;">① Add: In the recently used section, the six functions that have been recently clicked are displayed. Move the mouse over the function entry and click \[+\] to add the function to the frequently used functions. You can add up to 10 functions. Click the function to jump to the function page.</span>

<span style="font-size:15px;">![image (5).png](https://wechatapppro-1252524126.file.myqcloud.com/help_document/image/ueditor/26620400_1638843649.png ".png")</span>

<span style="font-size:15px;">② Delete: Move the mouse over the function entry and click \[-\] to delete the added function.</span>

<span style="font-size:15px;">![image (8).png](https://wechatapppro-1252524126.file.myqcloud.com/help_document/image/ueditor/89695800_1638843707.png ".png")</span>