Store settings
- Tutorial on Store Account and Operator Settings
- How to get the store name/link?
- How to view store information/store link/modify store name?
- Can operation records in the operation log be deleted?
- Operation Log Usage Tutorial
- Can the operation records in the operation log be exported?
- When will the operation records in the store backend be synchronized in the operation log?
- Tutorial on Changing the Store Administrator
- Tutorial on the restricted use of login devices
- View store information/store link/Modify store name
Tutorial on Store Account and Operator Settings
elink supports creating multiple stores under one account, unified account settings, and adding operators.
I. Account Settings
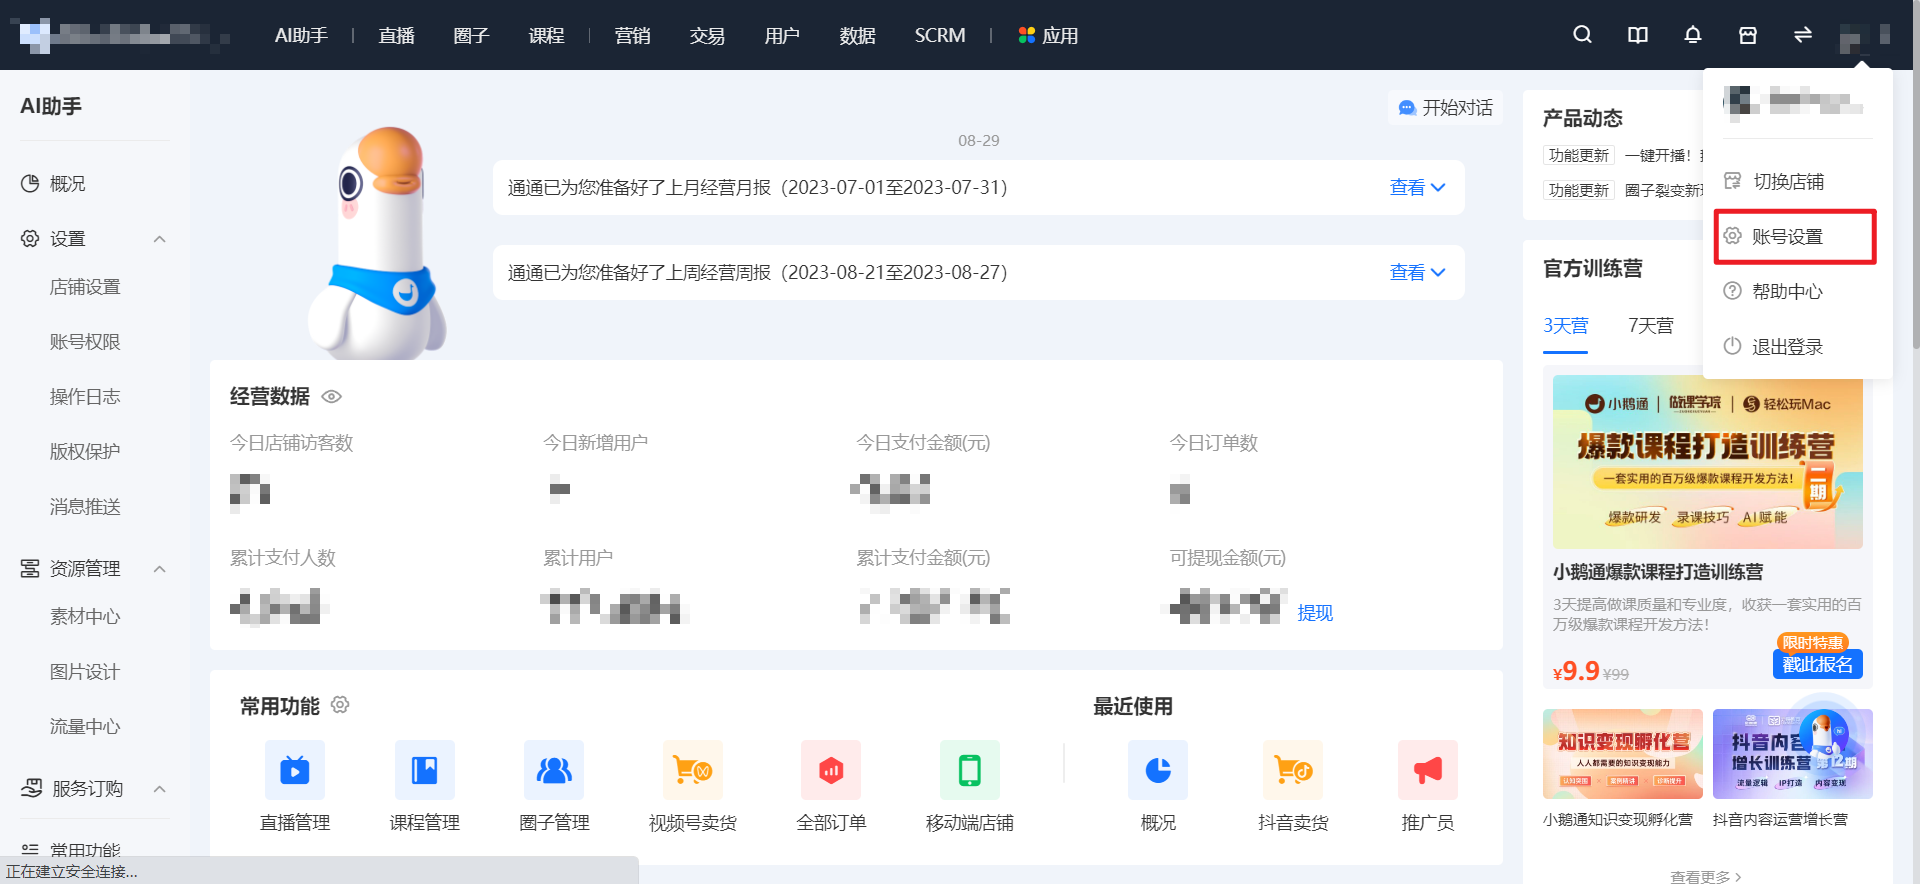
Step 1:Enter the store management console, click on the personal account avatar in the top - right corner, and select [Account Settings].
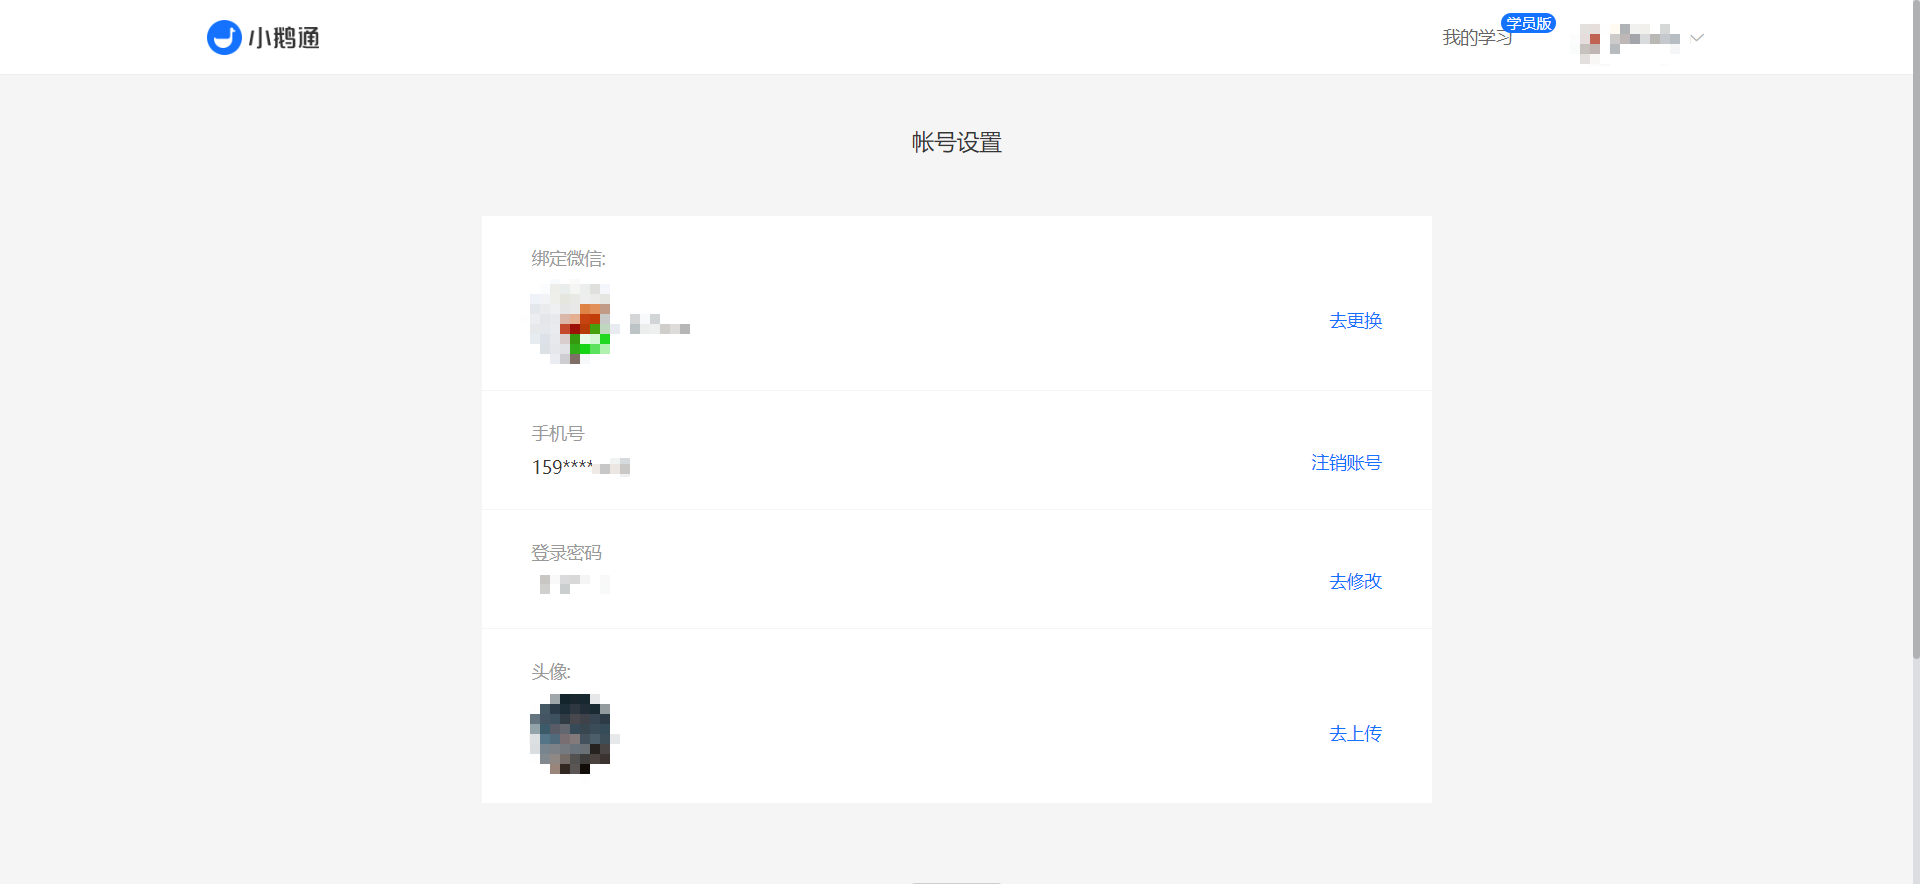
Step 2:Modify the login password, the bound WeChat account, and the avatar.
II. Operator Settings
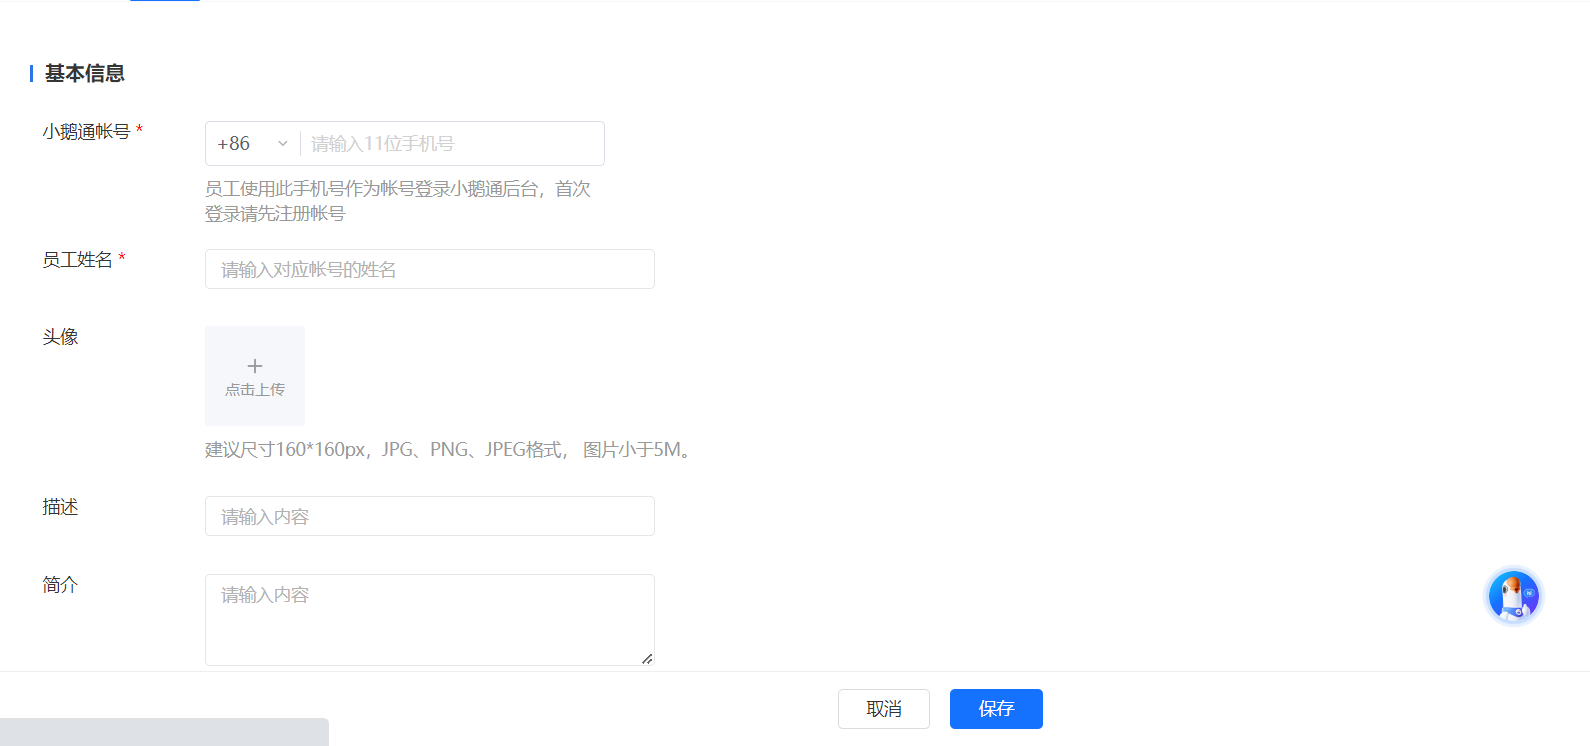
Step 1:Open the store backend. In [AI Assistant - Settings - Account Permissions - Employee Management], click [Add Employee].
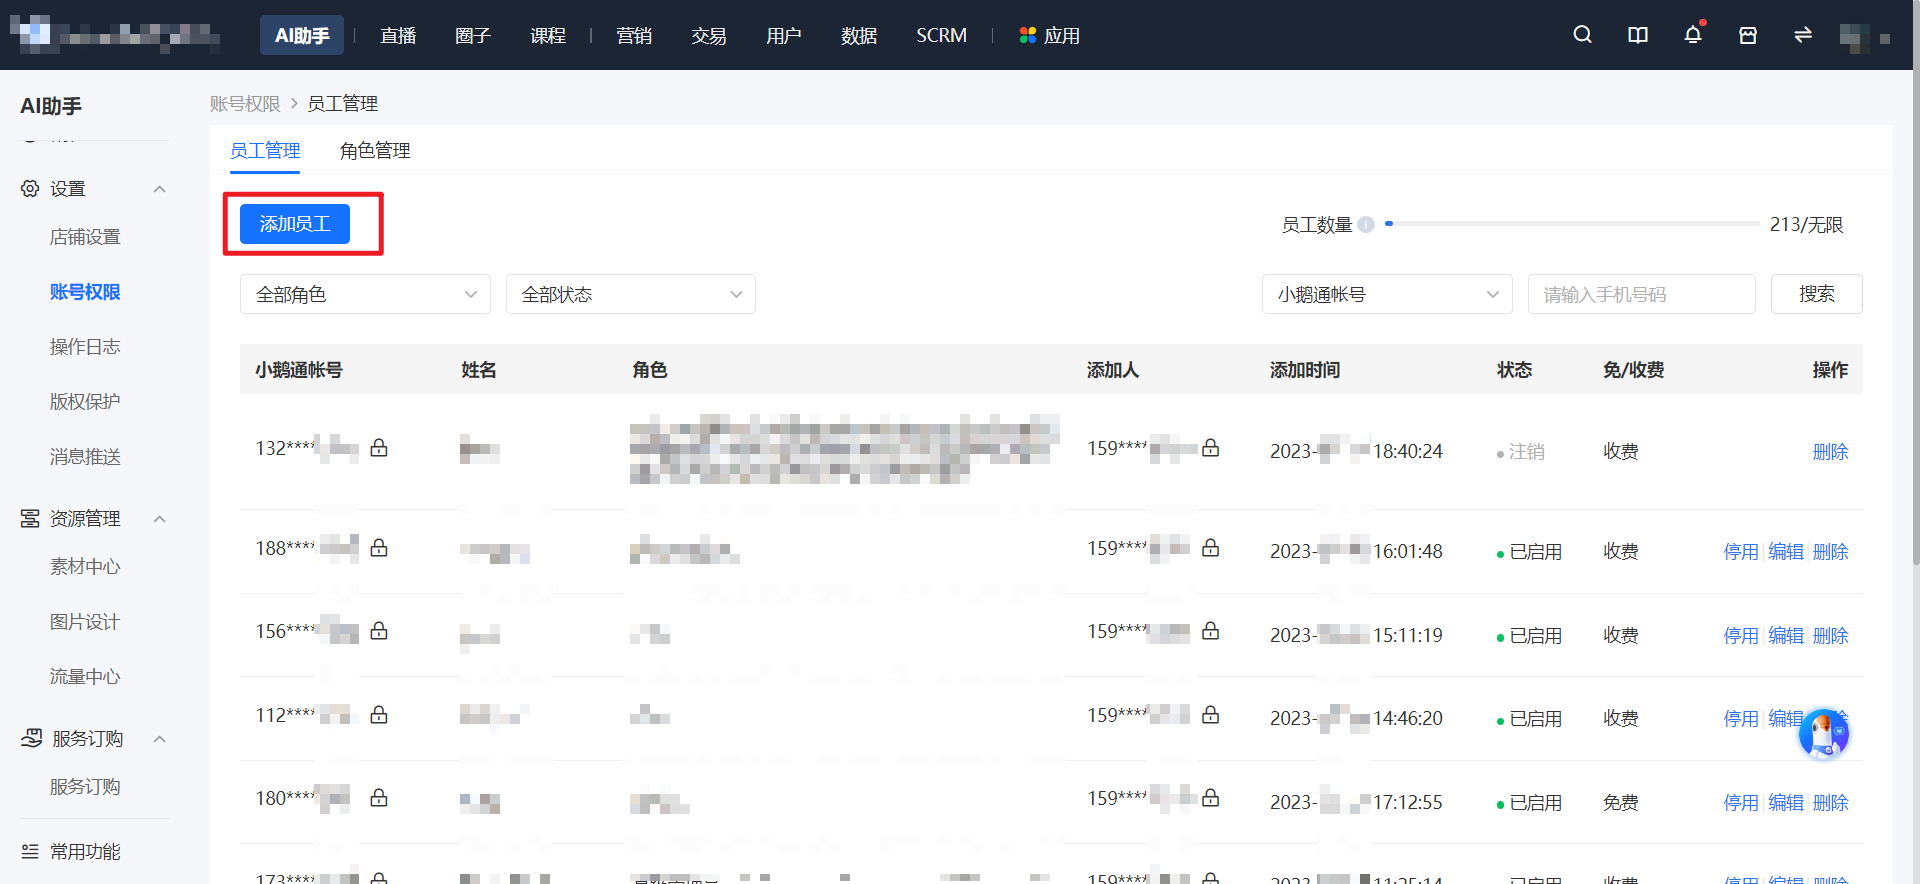
Step 2:Fill in the employee's basic information.
If the added operator is already a registered elink user, the permissions will be automatically bound. If the operator has not registered for elink, you can actively send an invitation SMS to invite the user to become a store operator.
**Note:If it isbefore December 29, 2019the bound operators can still log in with their original account passwords.
Step 3:Fill in the role management. You can select the default role or customize a role.
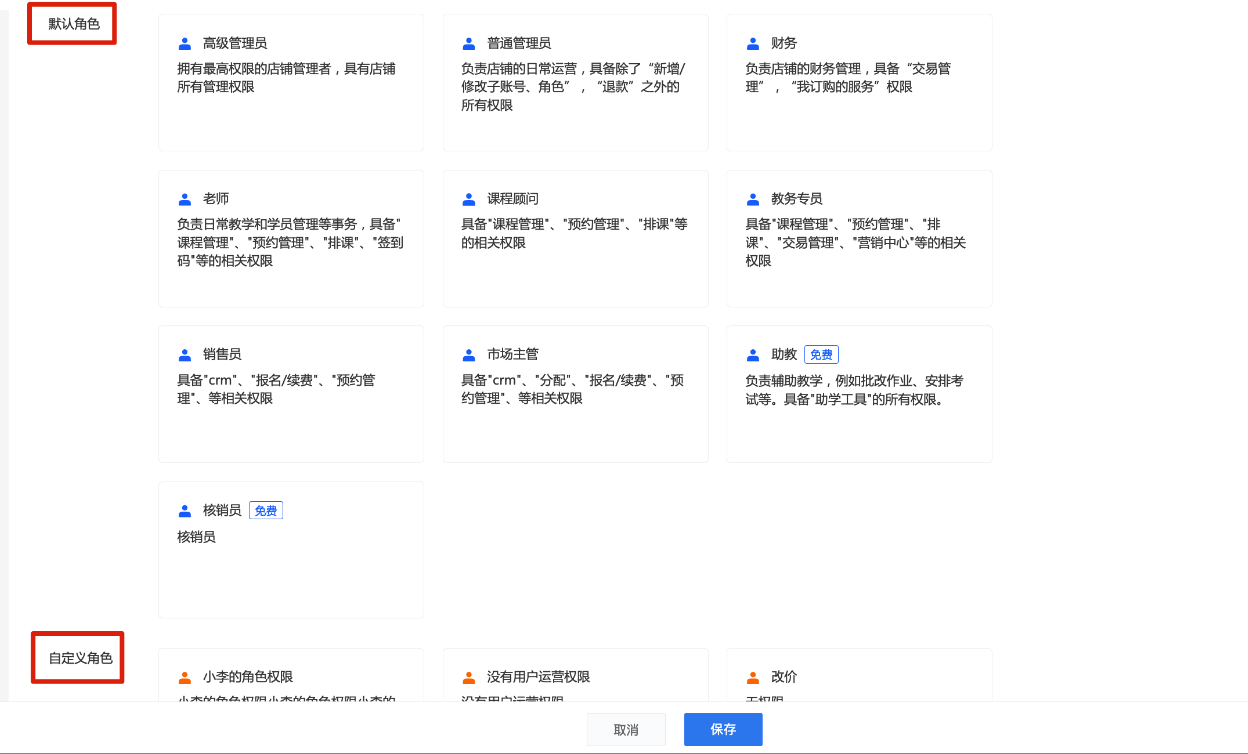
Step 4:Finally, confirm the employee's permissions and save to complete the settings.
How to get the store name/link?
After registering and opening an elink Online Store, merchants can obtain it through the following two channels:
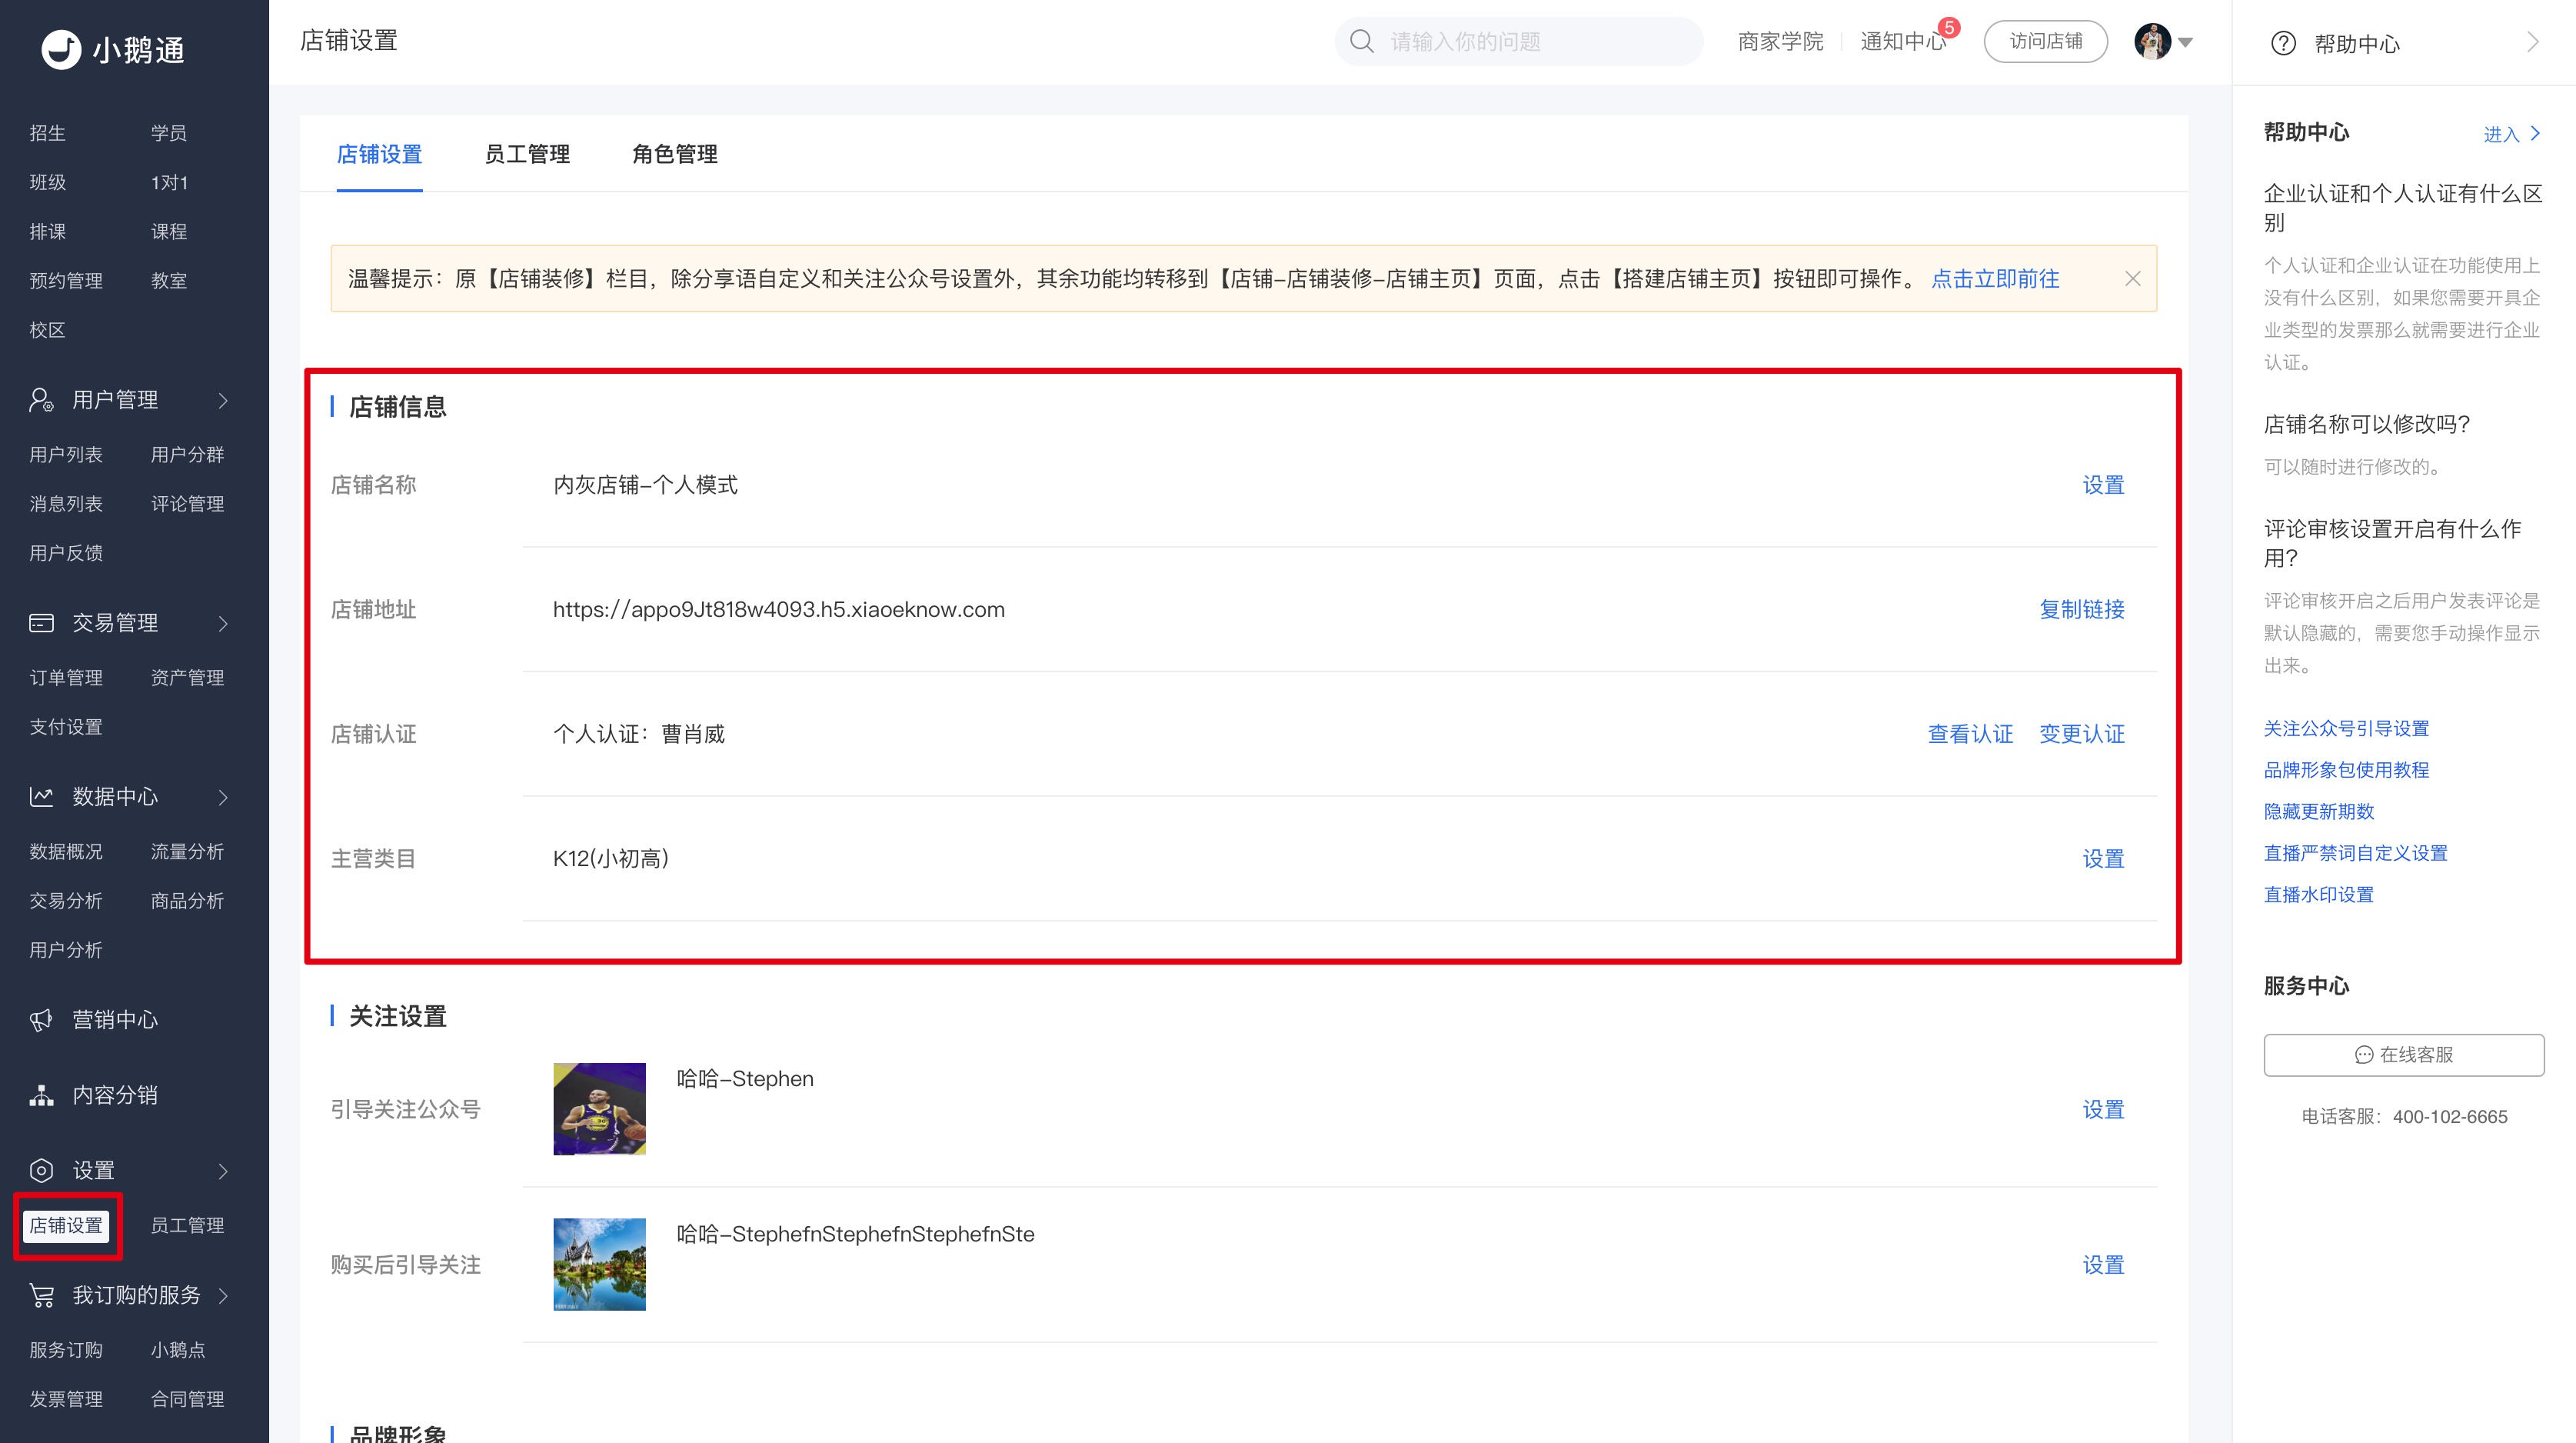
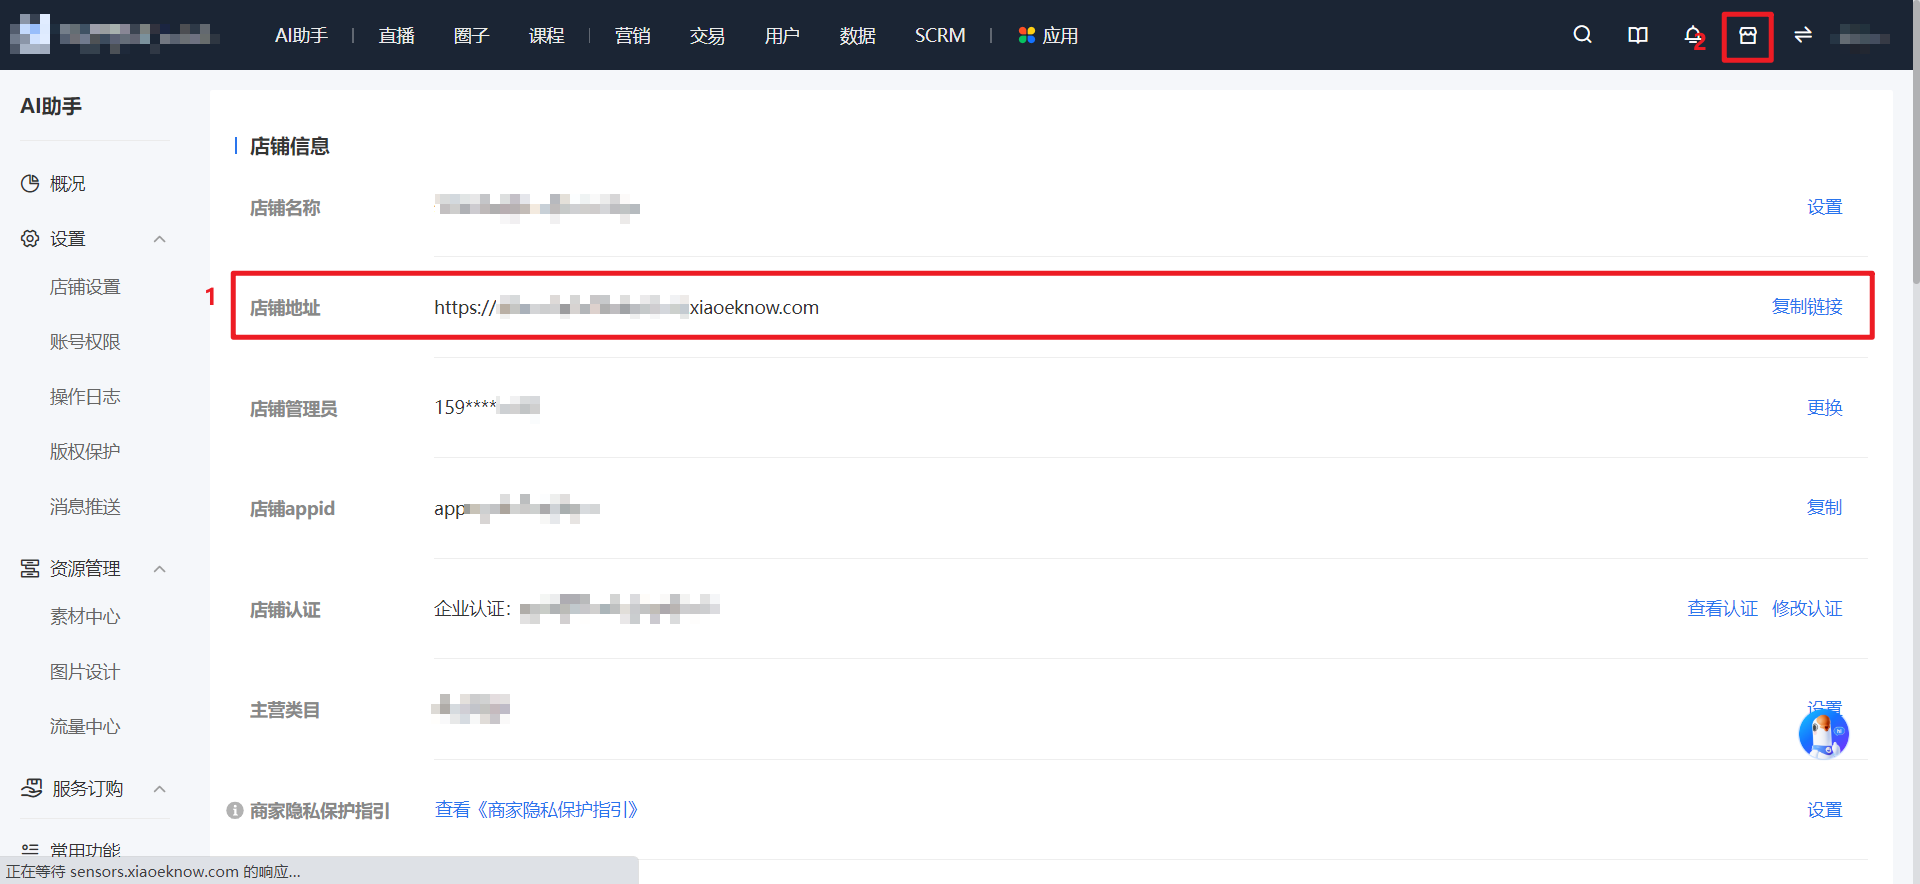
Option 1: Click [AI Assistant - Settings - Store Settings] and copy the link in [Store Information] to get the store address.
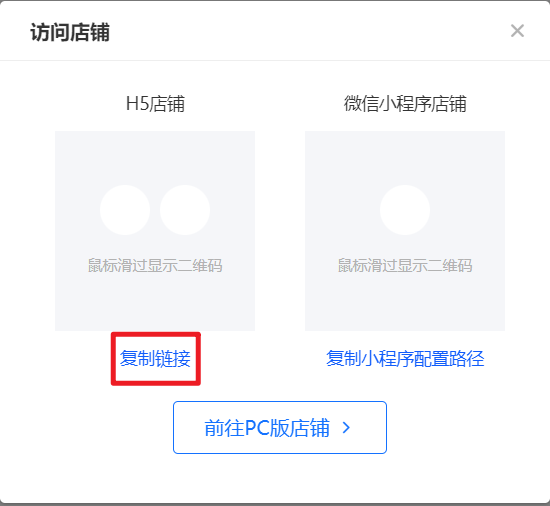
Option 2: After entering the store management console, click the [Visit Store] icon in the upper right corner and obtain it from the pop - up window for visiting the store.
How to view store information/store link/modify store name?
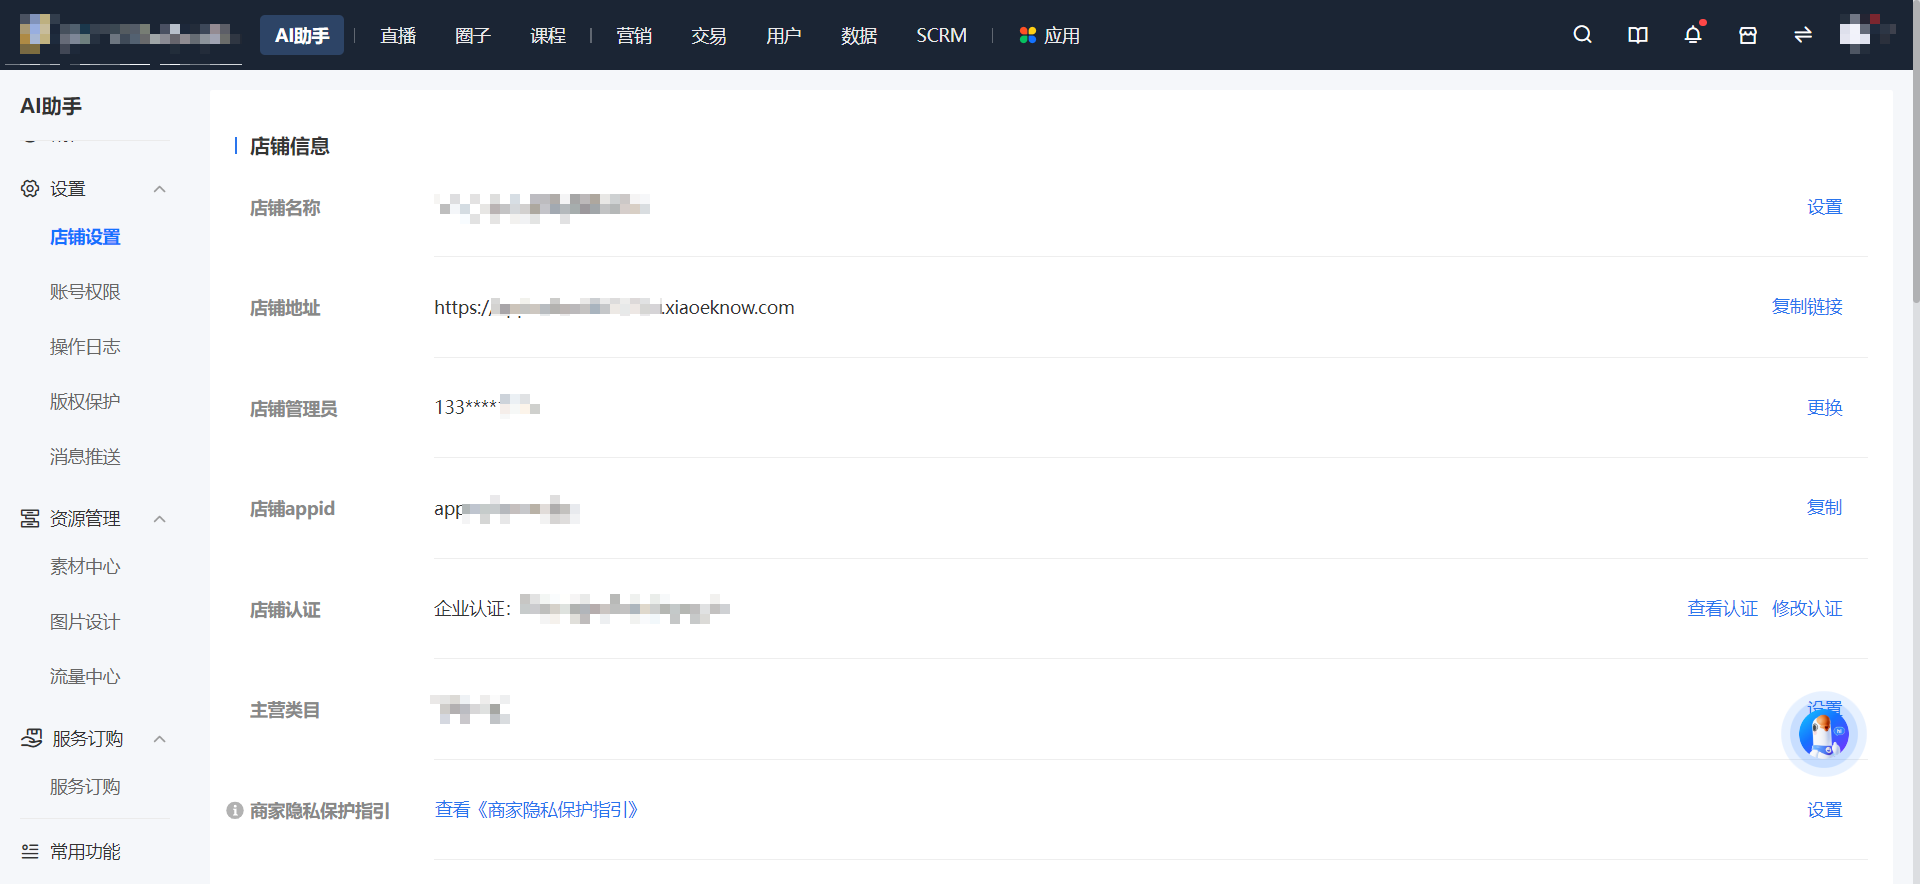
Operation path: Log in to the desktop management console, click [AI Assistant - Settings - Store Settings] to enter the store settings details page, and find [Store Name] to make modifications.
In the [Store Information] module, you can view the store name, store address, store administrator,Storeappid, store verification, and main business categories.
Click [Copy Link] to get the store address, then embed the link in the menu bar of the Official Account, or send it via WeChat in private chats, Communities, or Moments.
Can operation records in the operation log be deleted?
Once the operation is successful, it will be permanently saved in the operation log and cannot be deleted.
Operation Log Usage Tutorial
I. Feature Introduction
To help merchants better manage store staff and determine responsibilities, the [Operation Log] module has been newly launched. Merchants can query sensitive operations performed by store staff on the management console at any time.
**Note:Currently, the elink management consoleonly records some important and sensitive operations.It does not provide records of all functional operations. If you have new requirements, you can report the sensitive operations you expect to be recorded through the service steward. We will regularly update and maintain this function.
II. Operation Path
elink Management Console - AI Assistant - Settings - Operation Log
III. Usage Tutorial
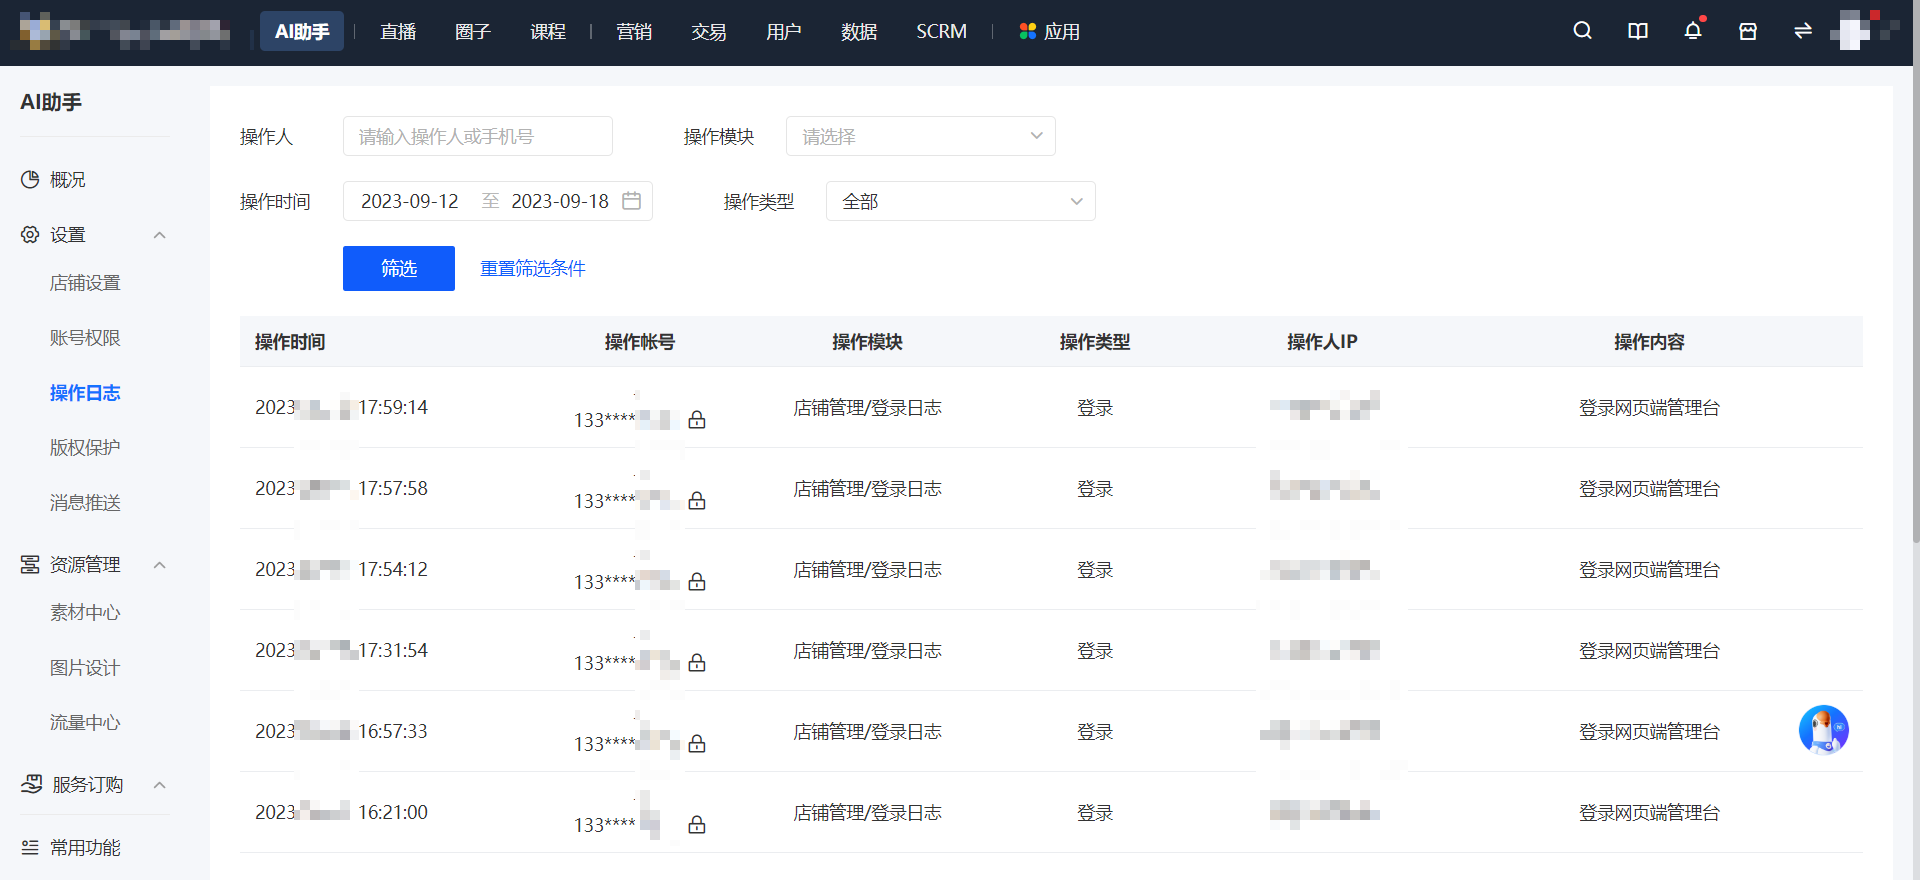
1. By default, the operation records recently executed in the current store are provided. If there are too many records, merchants can narrow the query scope and obtain more accurate operation records by filtering by operator, operation module, operation type, and operation time.
2. Courses and physical products can be restored with one click within 30 days after deletion.
3. By default, the [Operation Log] permission is assigned to senior administrators and ordinary administrators. Administrators can independently configure permissions for other roles.
Can the operation records in the operation log be exported?
Operation records can be viewed on the management console and are not currently supported for export.
When will the operation records in the store backend be synchronized in the operation log?
The operation records on the management console are synchronized in real-time.
Tutorial on Changing the Store Administrator
I. Feature Introduction
During the operation of an online store, there may be changes in the administrator (person - in - charge). In the past, it was necessary to contact customer service to go through the process. Now, you can change the store administrator self - service.
II. Purpose of Use
When an online store needs to change its administrator, you can change it self - service, which is safe and efficient.
III. Operation Path
Merchant side: Merchant backend AI Assistant → Settings → Store Settings → Store Administrator

IV. Usage Tutorial
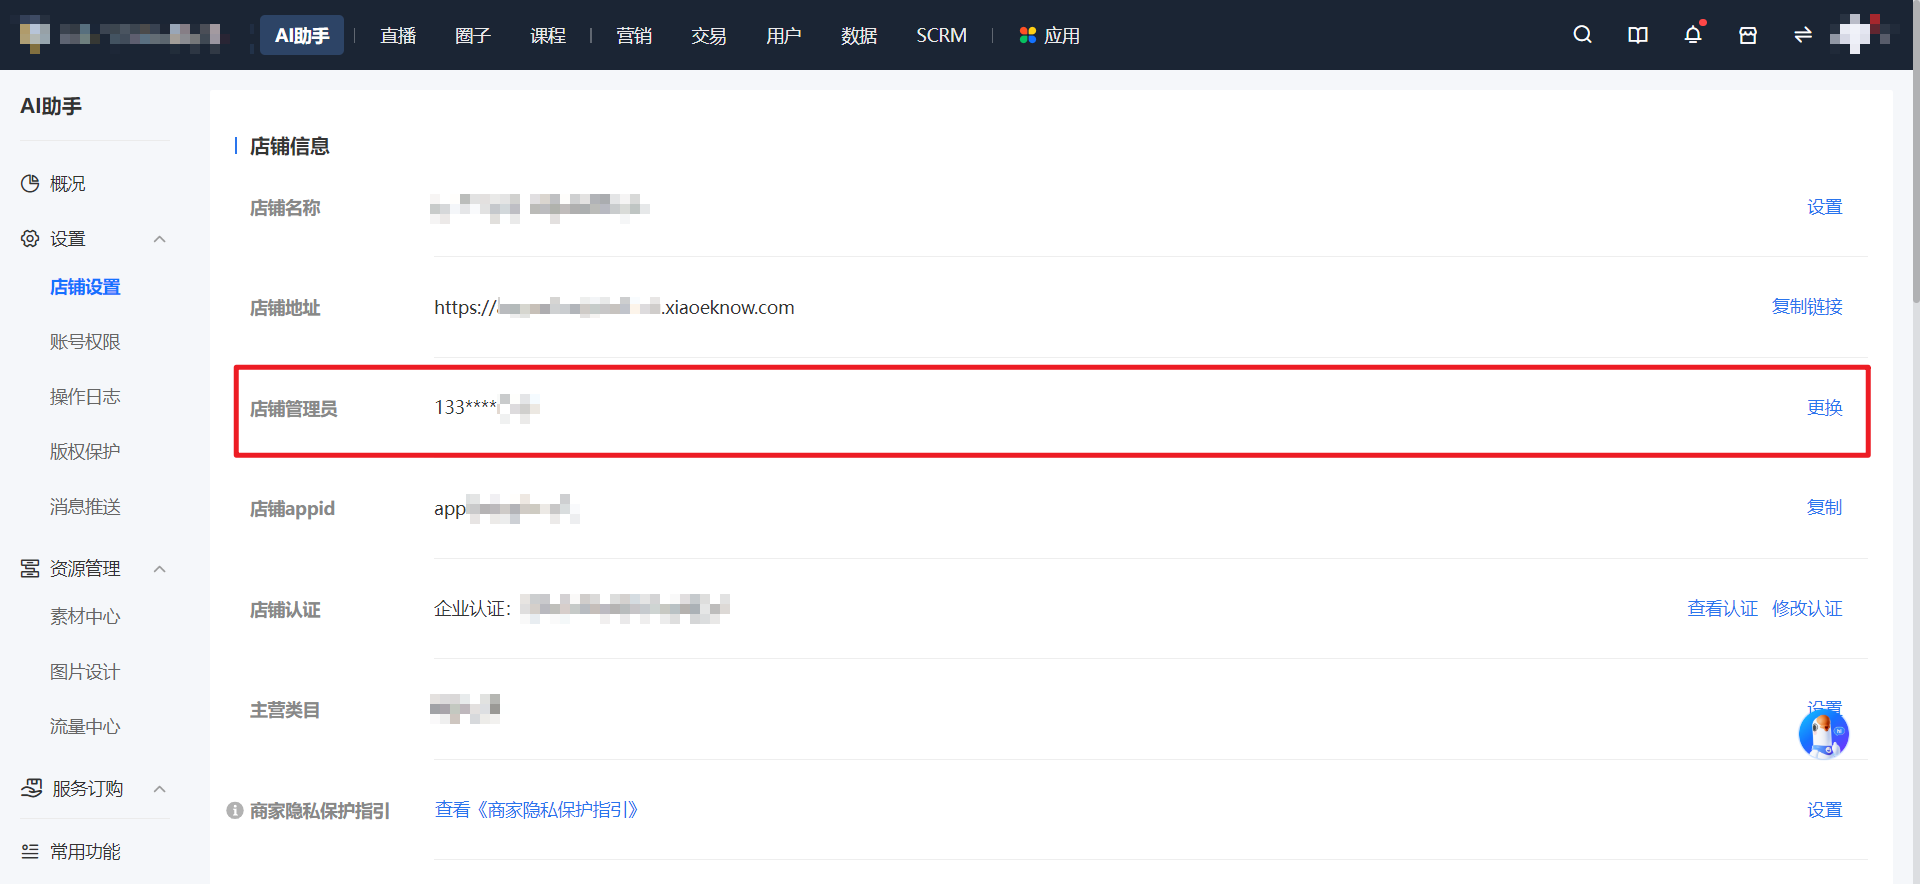
Step 1:Click the 'Change' button on the store settings page(Management backend)
On the store settings page, find the store administrator and click the [Change] button.
**Special attention:
1. The change is only allowed after the verification of the original store administrator.
2. Only one change is allowed within 30 days.
3. For old accounts, there will be a pop - up window prompting that the account needs to be upgraded before the change can be made.
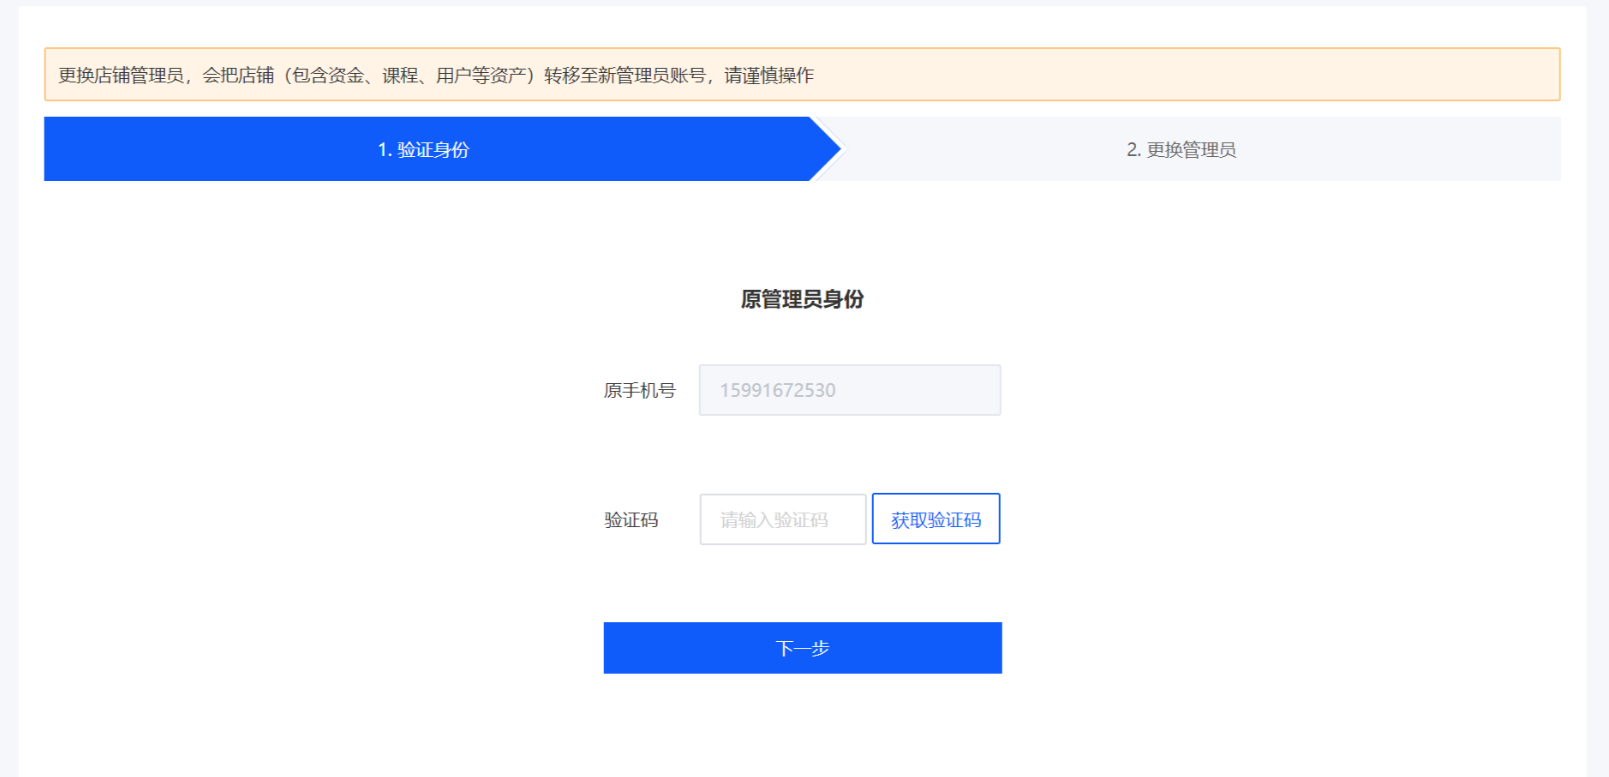
Step 2: Administrator identity verification(H5 store)
1. For the identity verification of the original store administrator, you need to enter the SMS verification code.
(Identity verification step)
2. For the identity verification of the new store administrator, you need to enter the SMS verification code.
**Special attention:The mobile phone number of the new store administrator must be registered on elink. If not, please register in advance.
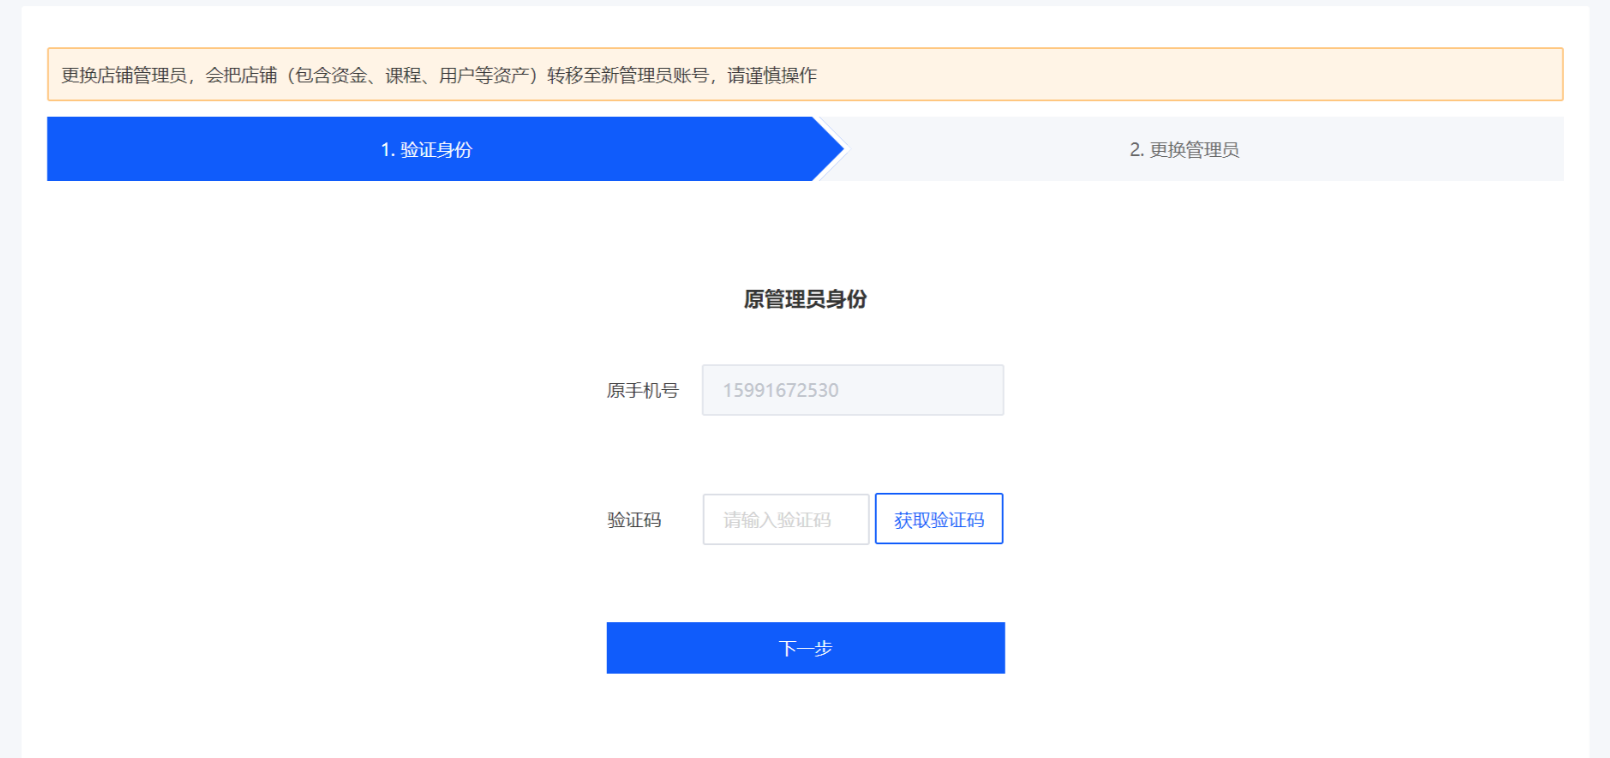
(Change step)
Step 3: The name should be consistent with that in the flow chart(H5 store)
After the change is successful, the system will automatically jump to the login page. At this time, you can log in with the new store administrator account to view the store;
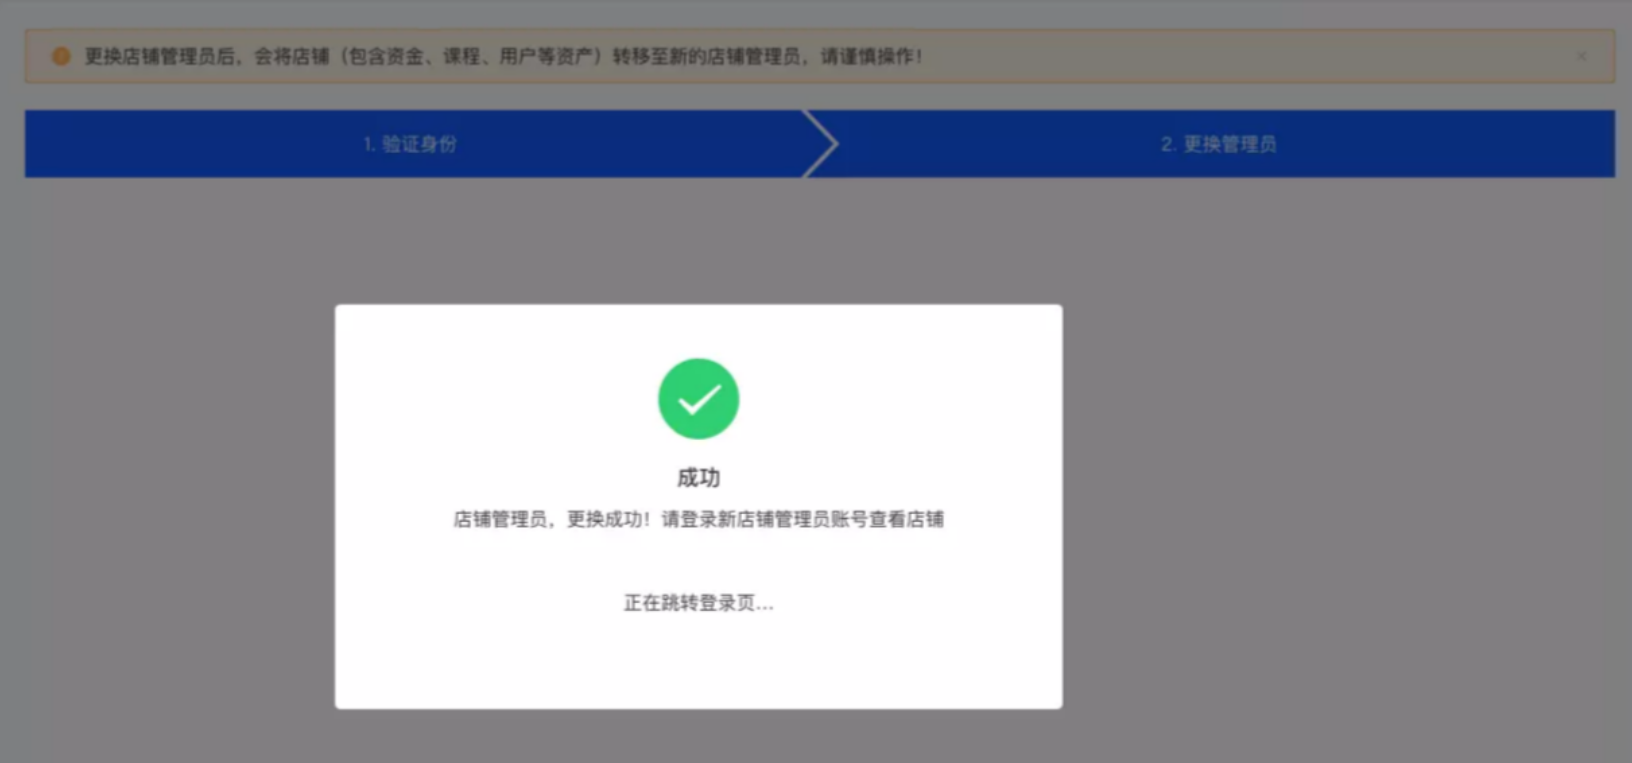
(Pop - up window for successful change)
Tutorial on the restricted use of login devices
I. Feature Introduction
Restrict students from logging in to the same account simultaneously on different browsers at the same time. The restriction applies to channels opened via browsers on PC and mobile devices.
II. Purpose of Use
Merchants can independently control the number of devices that students can log in to simultaneously, preventing phenomena such as malicious account sharing, selling course accounts, and course viewing fraud by students, thus protecting the interests of merchants.
III. Use Scenarios
This feature is used in scenarios where merchants need to prevent students from sharing accounts or engaging in course viewing fraud.
IV. Operation Path
Merchant side: AI Assistant - Settings - Store Settings - User Account Settings - Login Device Restrictions

V. Usage Tutorial
Step 1: Store Settings(Management Backend)
Enter the merchant management backend, click [Store Settings], find [Login Device Restrictions], and click [Settings].
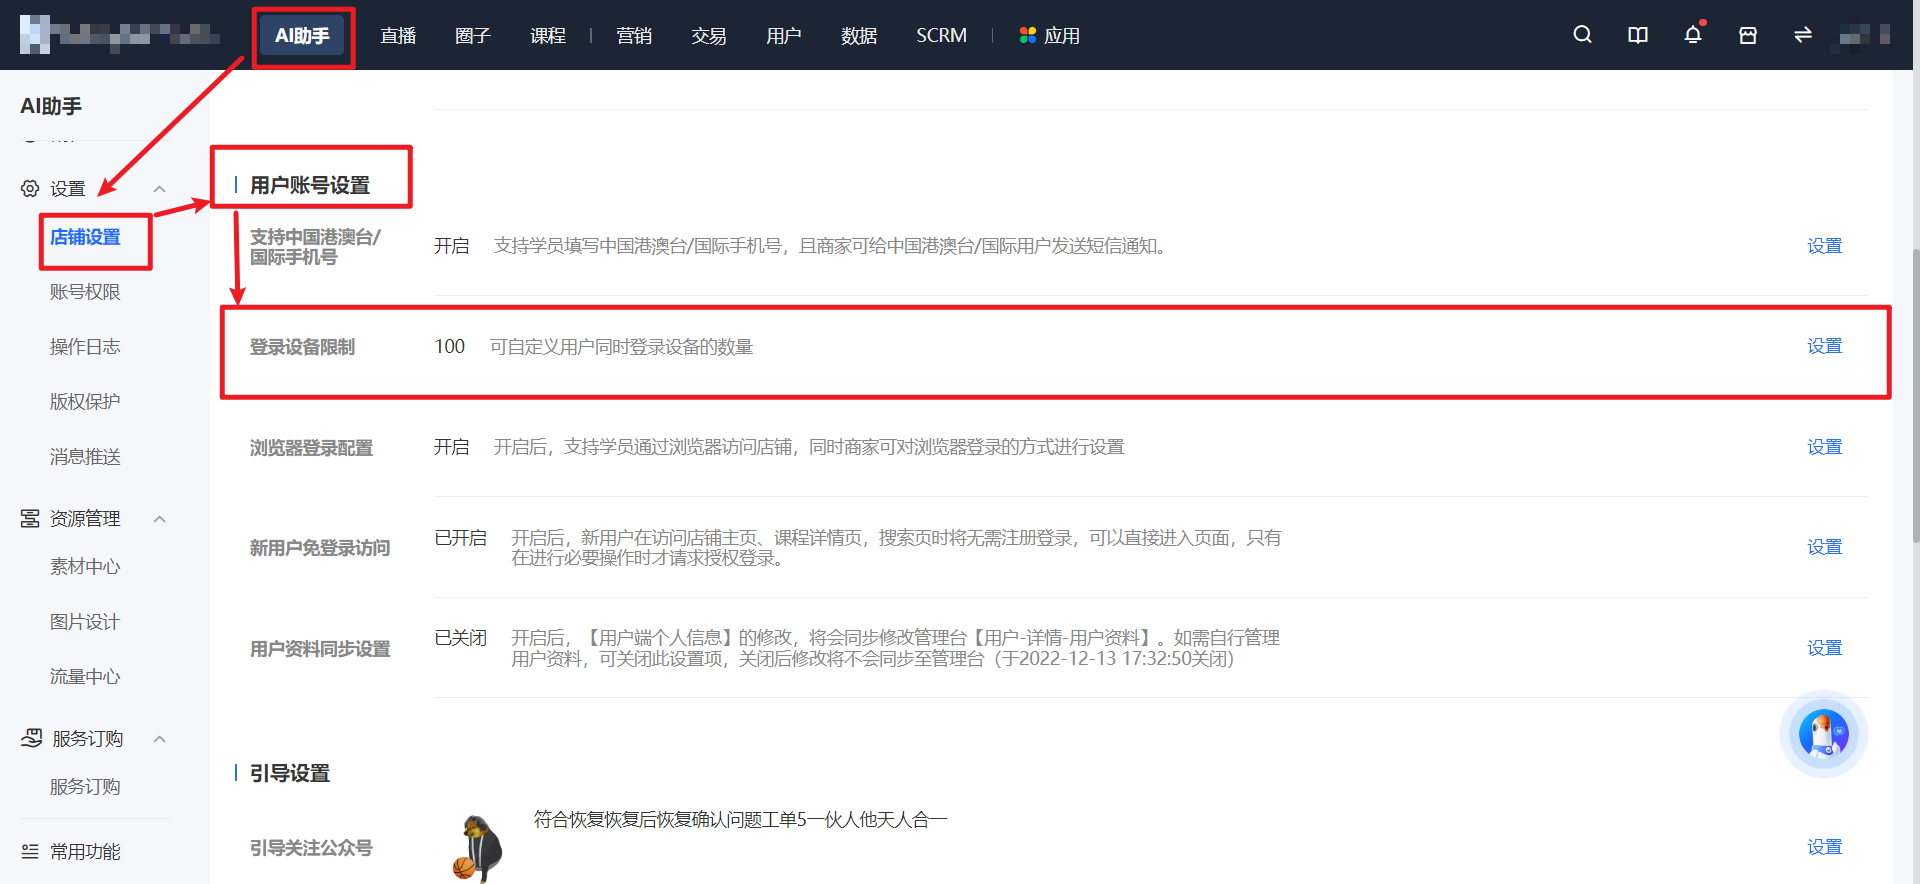
Step 2: Set the Restriction Quantity(Management Backend)
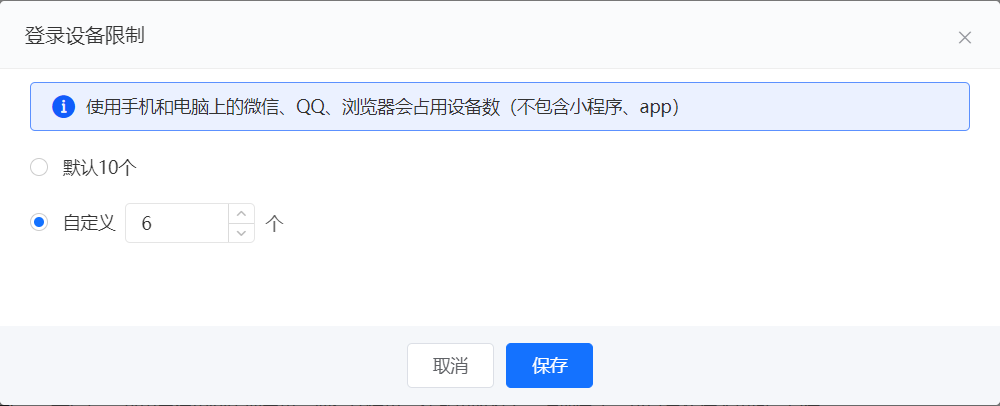
The default limit for login devices is 10, and the custom range is from 1 to 10.
View store information/store link/Modify store name
Click 'Settings' and then 'Store Settings' in the left sidebar to enter the store settings details page..