Enterprise training
- Student aid tools
- Tutorial on Using Calendar Check-ins
- Tutorial on Using Assignment Check-ins
- Usage tutorial for workbooks
- Certificate Usage Tutorial
- Exam Usage Tutorial
- Tutorial on Using Event Management
- Tutorial on Using the Question Bank
- Practice Tutorials
- Course management
- Graphic and text usage tutorial
- Video Tutorial
- Audio Usage Tutorial
- E-book Usage Tutorial
- Column Usage Tutorial
- Tutorial on setting the visible range
- Video Live Streaming Usage Tutorial
- Tutorial on Using Voice Live Streaming
- Tutorial on downloading and using corporate training courseware
- A Beginner's Guide to Corporate Training
- Trainee Management (Enterprise Personnel Management)
- Course Mall
- Live broadcast management
Student aid tools
Tutorial on Using Calendar Check-ins
I. Function Introduction
Calendar punch-in is a punch-in activity based on the unit of 'day'. Administrators can create punch-in activities for trainees, allowing them to submit punch-in content within the valid time period every day.
II. Purpose of Use
Administrators can effectively keep track of trainees' daily activity completion status by setting up calendar punch-ins.
III. Usage Scenarios
Calendar punch-ins are suitable for scenarios where trainees need to output corresponding content every day, and only need to do so once. For example, morning run punch-ins, early sleep punch-ins, etc. Through continuous daily punch-ins, good behavior habits can be developed.
It is also suitable for scenarios where there is a need for daily management of trainees, such as morning meeting punch-ins, daily corporate culture learning punch-ins, etc.
IV. Operation Path
Merchant side: Management backend → Learning assistance → Punch-in → Calendar punch-in → Create new calendar punch-in
Trainee side: H5 Academy → My → Learning tools → Punch-in
V. Usage Tutorial

(Tutorial flow chart)
Step 1: Configure calendar punch-in(Management backend)

(Management backend)
2. Set punch-in information
Fill in the title of the punch-in activity, select the start and end dates of the punch-in, the punch-in time period, timed reminders, the number of make-up punch-ins allowed, friend-assisted punch-ins, participation conditions, punch-in rules, and other settings;

(Management backend)
3. Fill in the punch-in introduction settings. Replace the punch-in introduction cover and edit the punch-in introduction content. Click 'Publish' to create a calendar punch-in.

(Management backend)
(1) Return to the calendar punch-in list. Click the [Share] button to share the QR code and link. Trainees can enter the punch-in activity by scanning the code on WeChat;

(2) More settings after creating the calendar punch-in (optional)
Click [Learning assistance] - [Punch-in] - [Calendar punch-in] - [Details] to enter the calendar punch-in details page. More settings can be made.

Step 2: Punch-in - Trainee side
Method 1: Trainees directly scan the punch-in code shared by the administrator to enter the punch-in homepage. Click 'Punch-in' to complete the punch-in.

Method 2: Trainees enter the H5 Academy. Through the path [My] - [Learning tools] - [Punch-in], select the activity to be punched in and click to enter the punch-in page to complete the punch-in.

Tutorial on Using Assignment Check-ins
I. Function Introduction
Assignment check-in is a check-in activity based on "assignments". The administrator assigns a certain amount of assignment tasks to students. Students need to complete them within the specified time and can adjust the order of assignment completion by themselves, so as to independently control the learning pace and provide learning feedback.
II. Purpose of Use
Check-in can be used to urge students to complete assignments, enabling them to arrange their learning pace and assignment completion time independently. At the same time, by setting a time limit for assignment completion, students will feel a sense of urgency to complete assignments as soon as possible, thus being urged to finish their learning.
III. Usage Scenarios
For students, some assignments require more preparation time. For example, writing a book review, an after - class reflection, or an article expressing opinions often takes several days to complete. In this case, assignment check - in can be used to reasonably arrange the check - in time, allowing students to more flexibly control the assignment completion time.
IV. Operation Path
Merchant side: Management background → Courses → Interaction Management →Check - in → Assignment Check - in → Create New Assignment Check - in
Student side: H5 Academy → My → Learning Tools → Check - in
V. Usage Tutorial
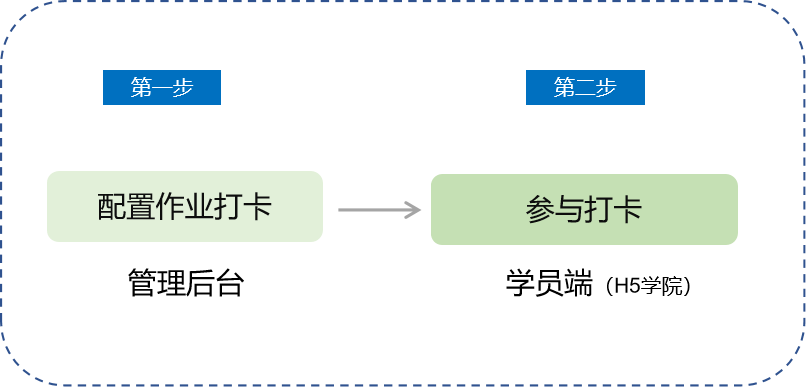
(Tutorial Flowchart)
Step 1: Configure Assignment Check - in(Management background)
1. Create a New Assignment Check - in
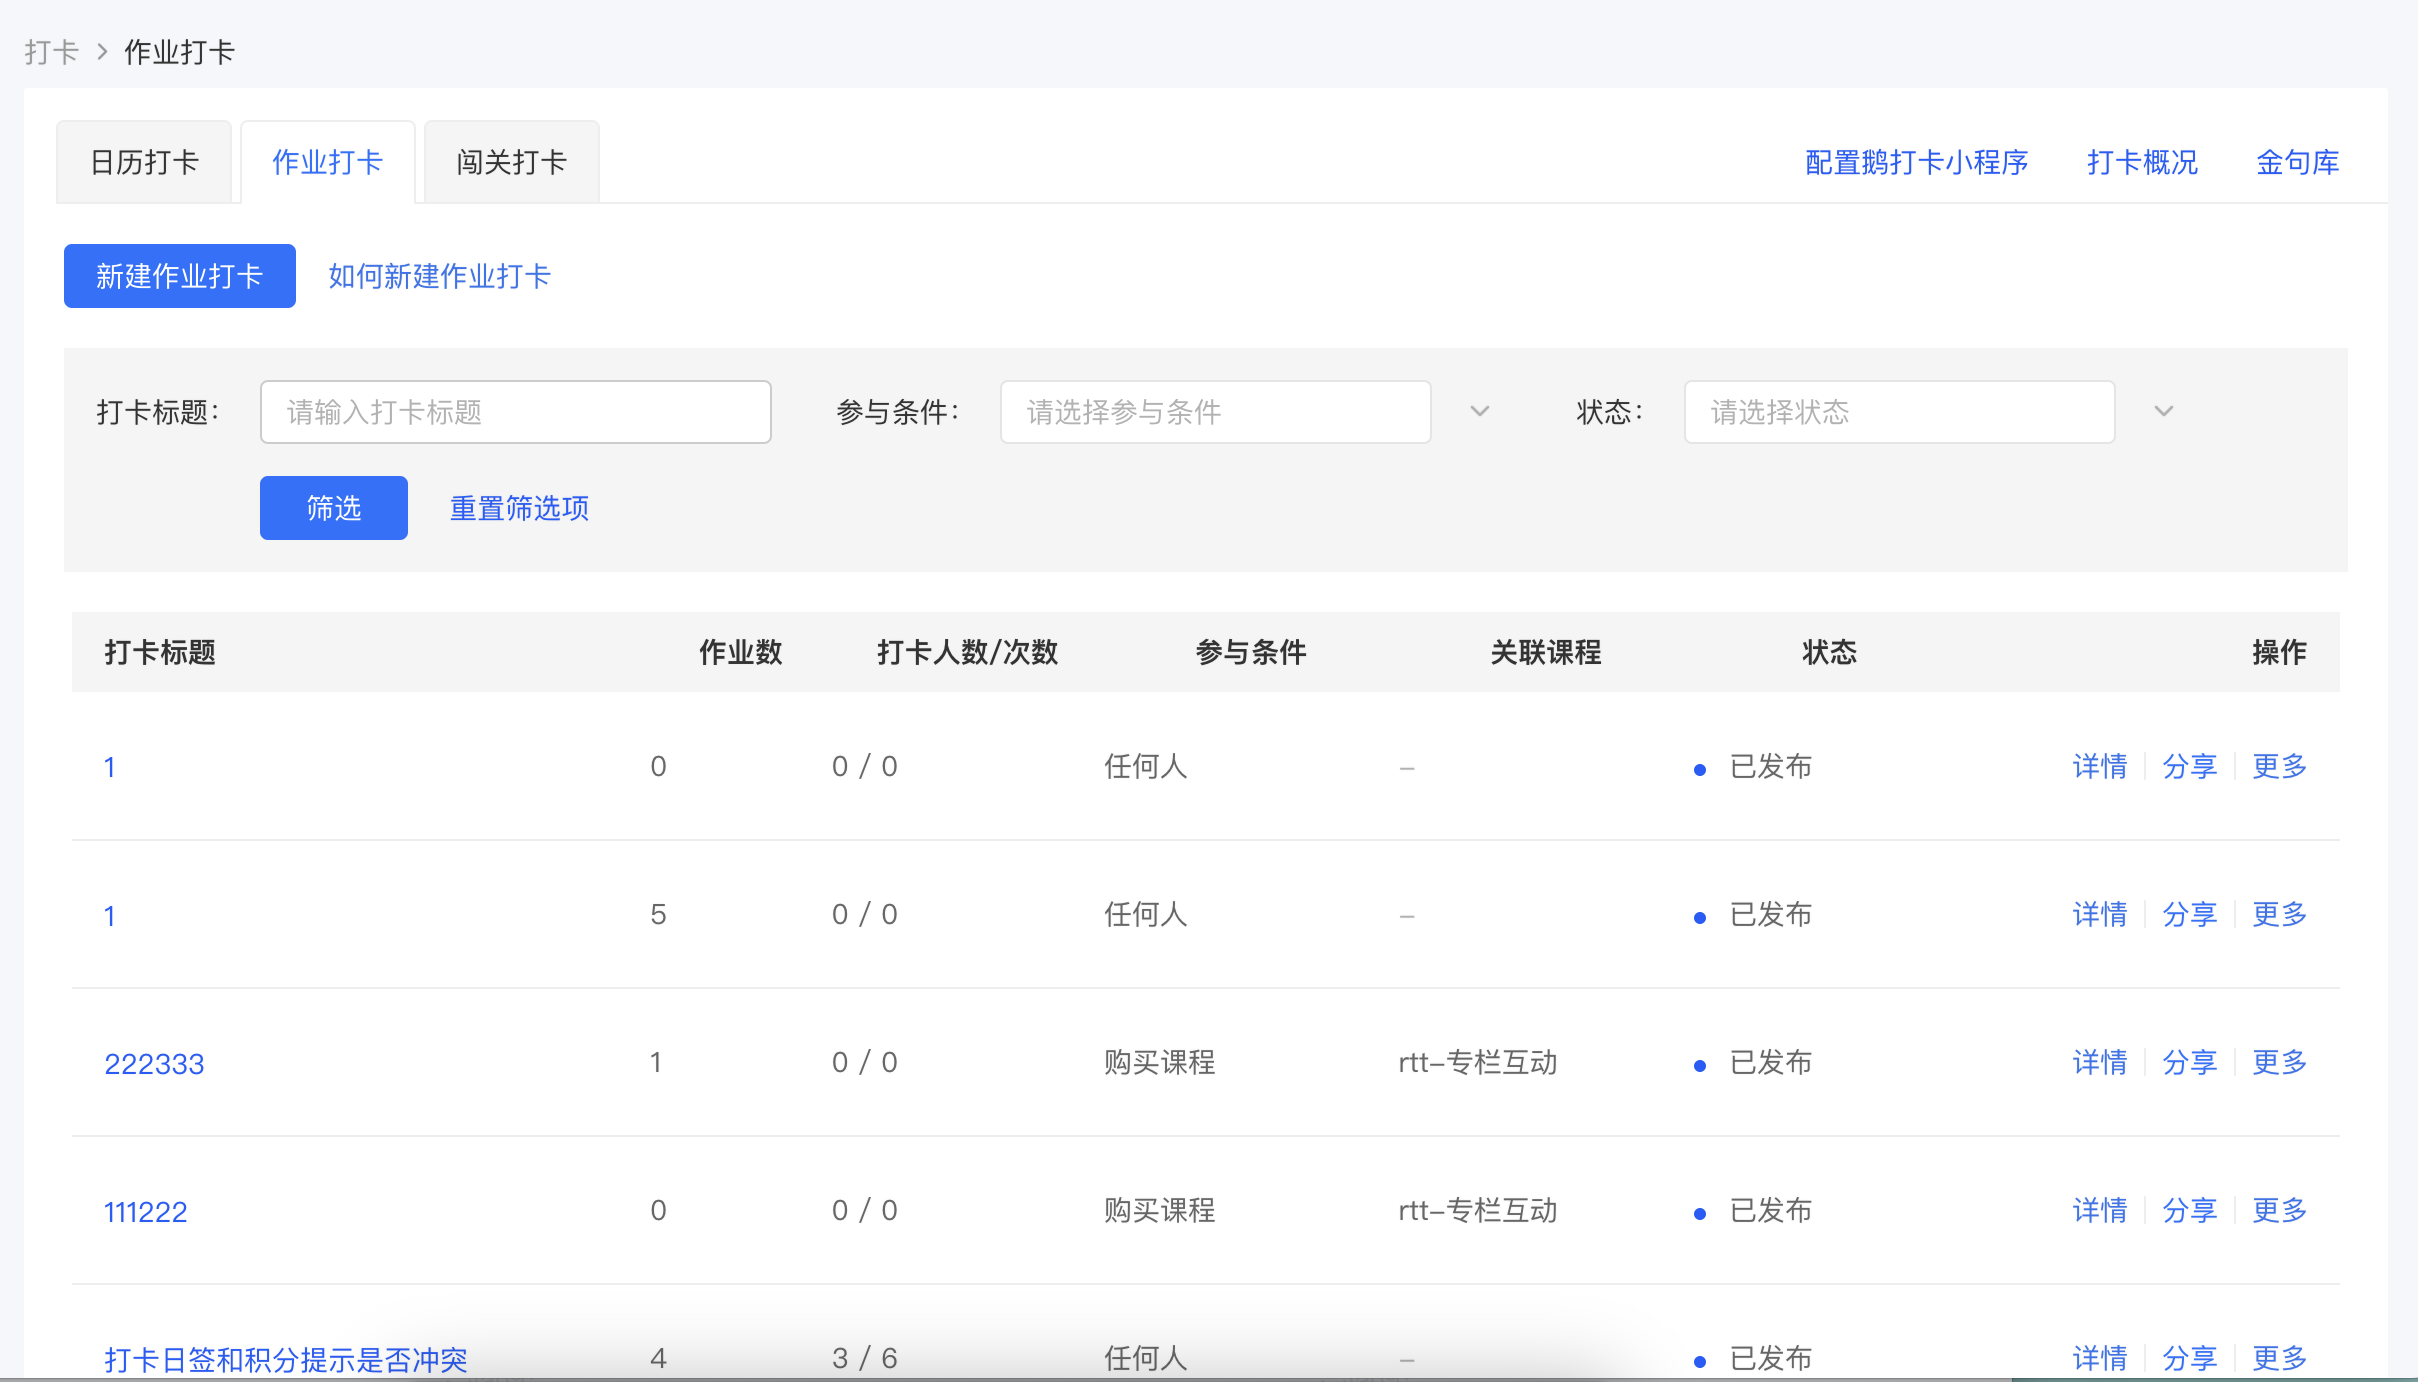
(Management background)
2. Set Check - in Information
Fill in the check - in name and select the participation conditions, which are required fields. The check - in rules and other settings can be set optionally.
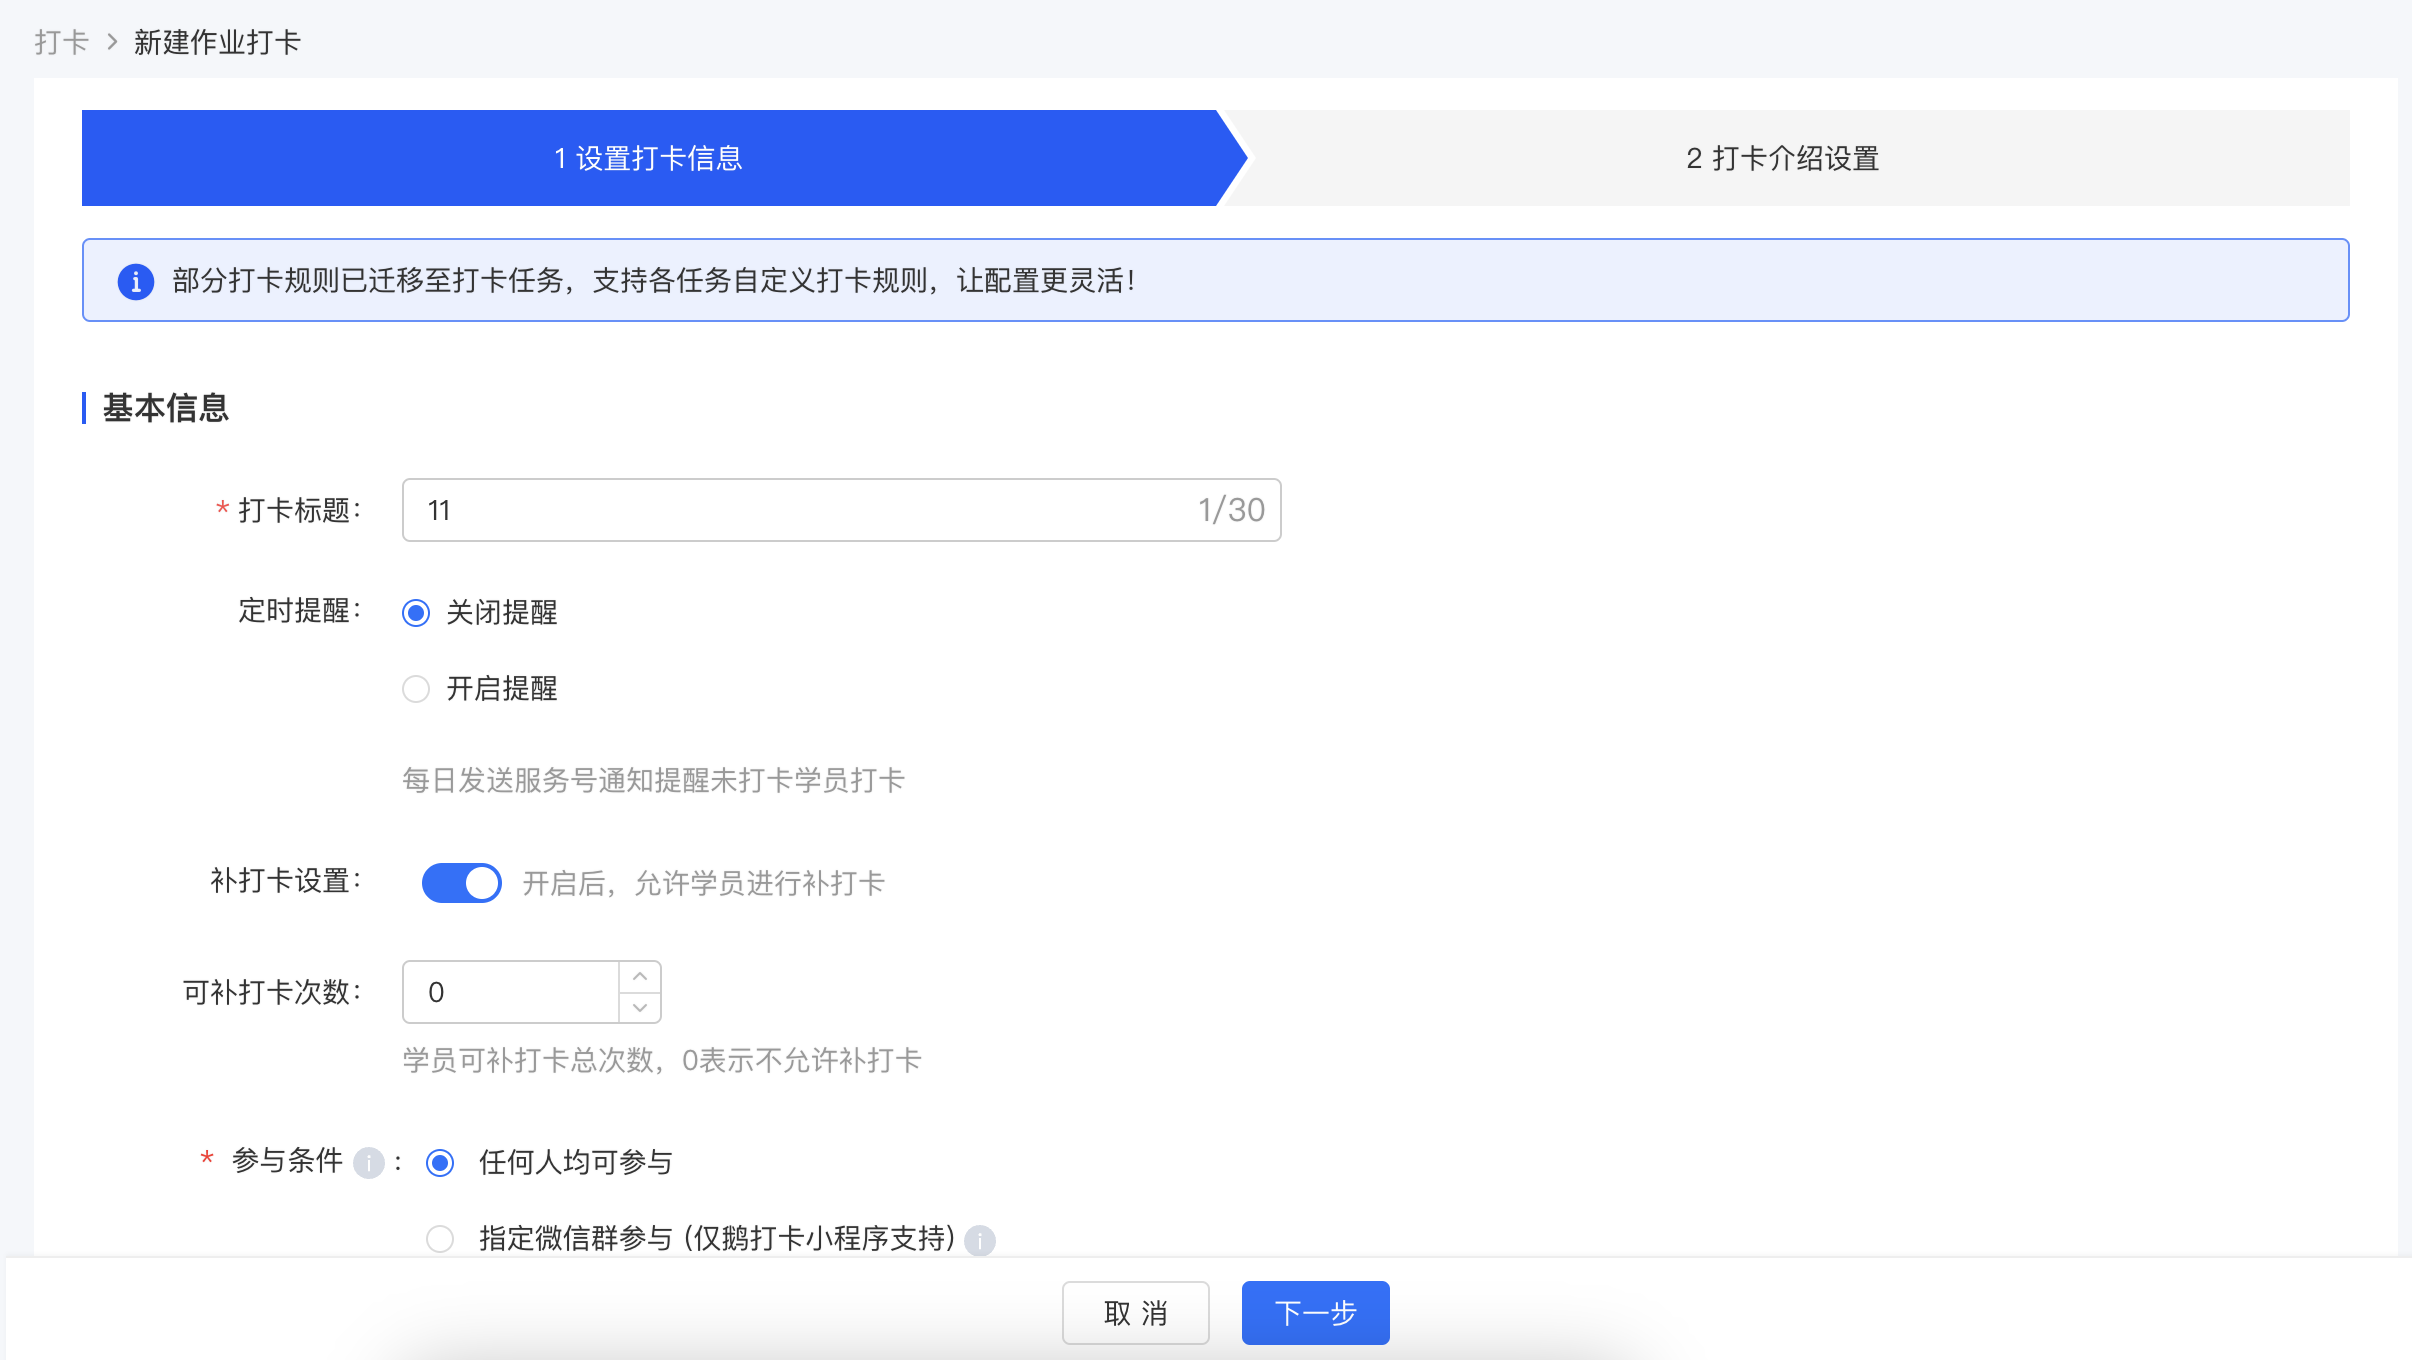
(Management background)
3. Fill in the Check - in Introduction Settings. Replace the check - in introduction cover and edit the check - in introduction content. Click Publish to create an assignment check - in.
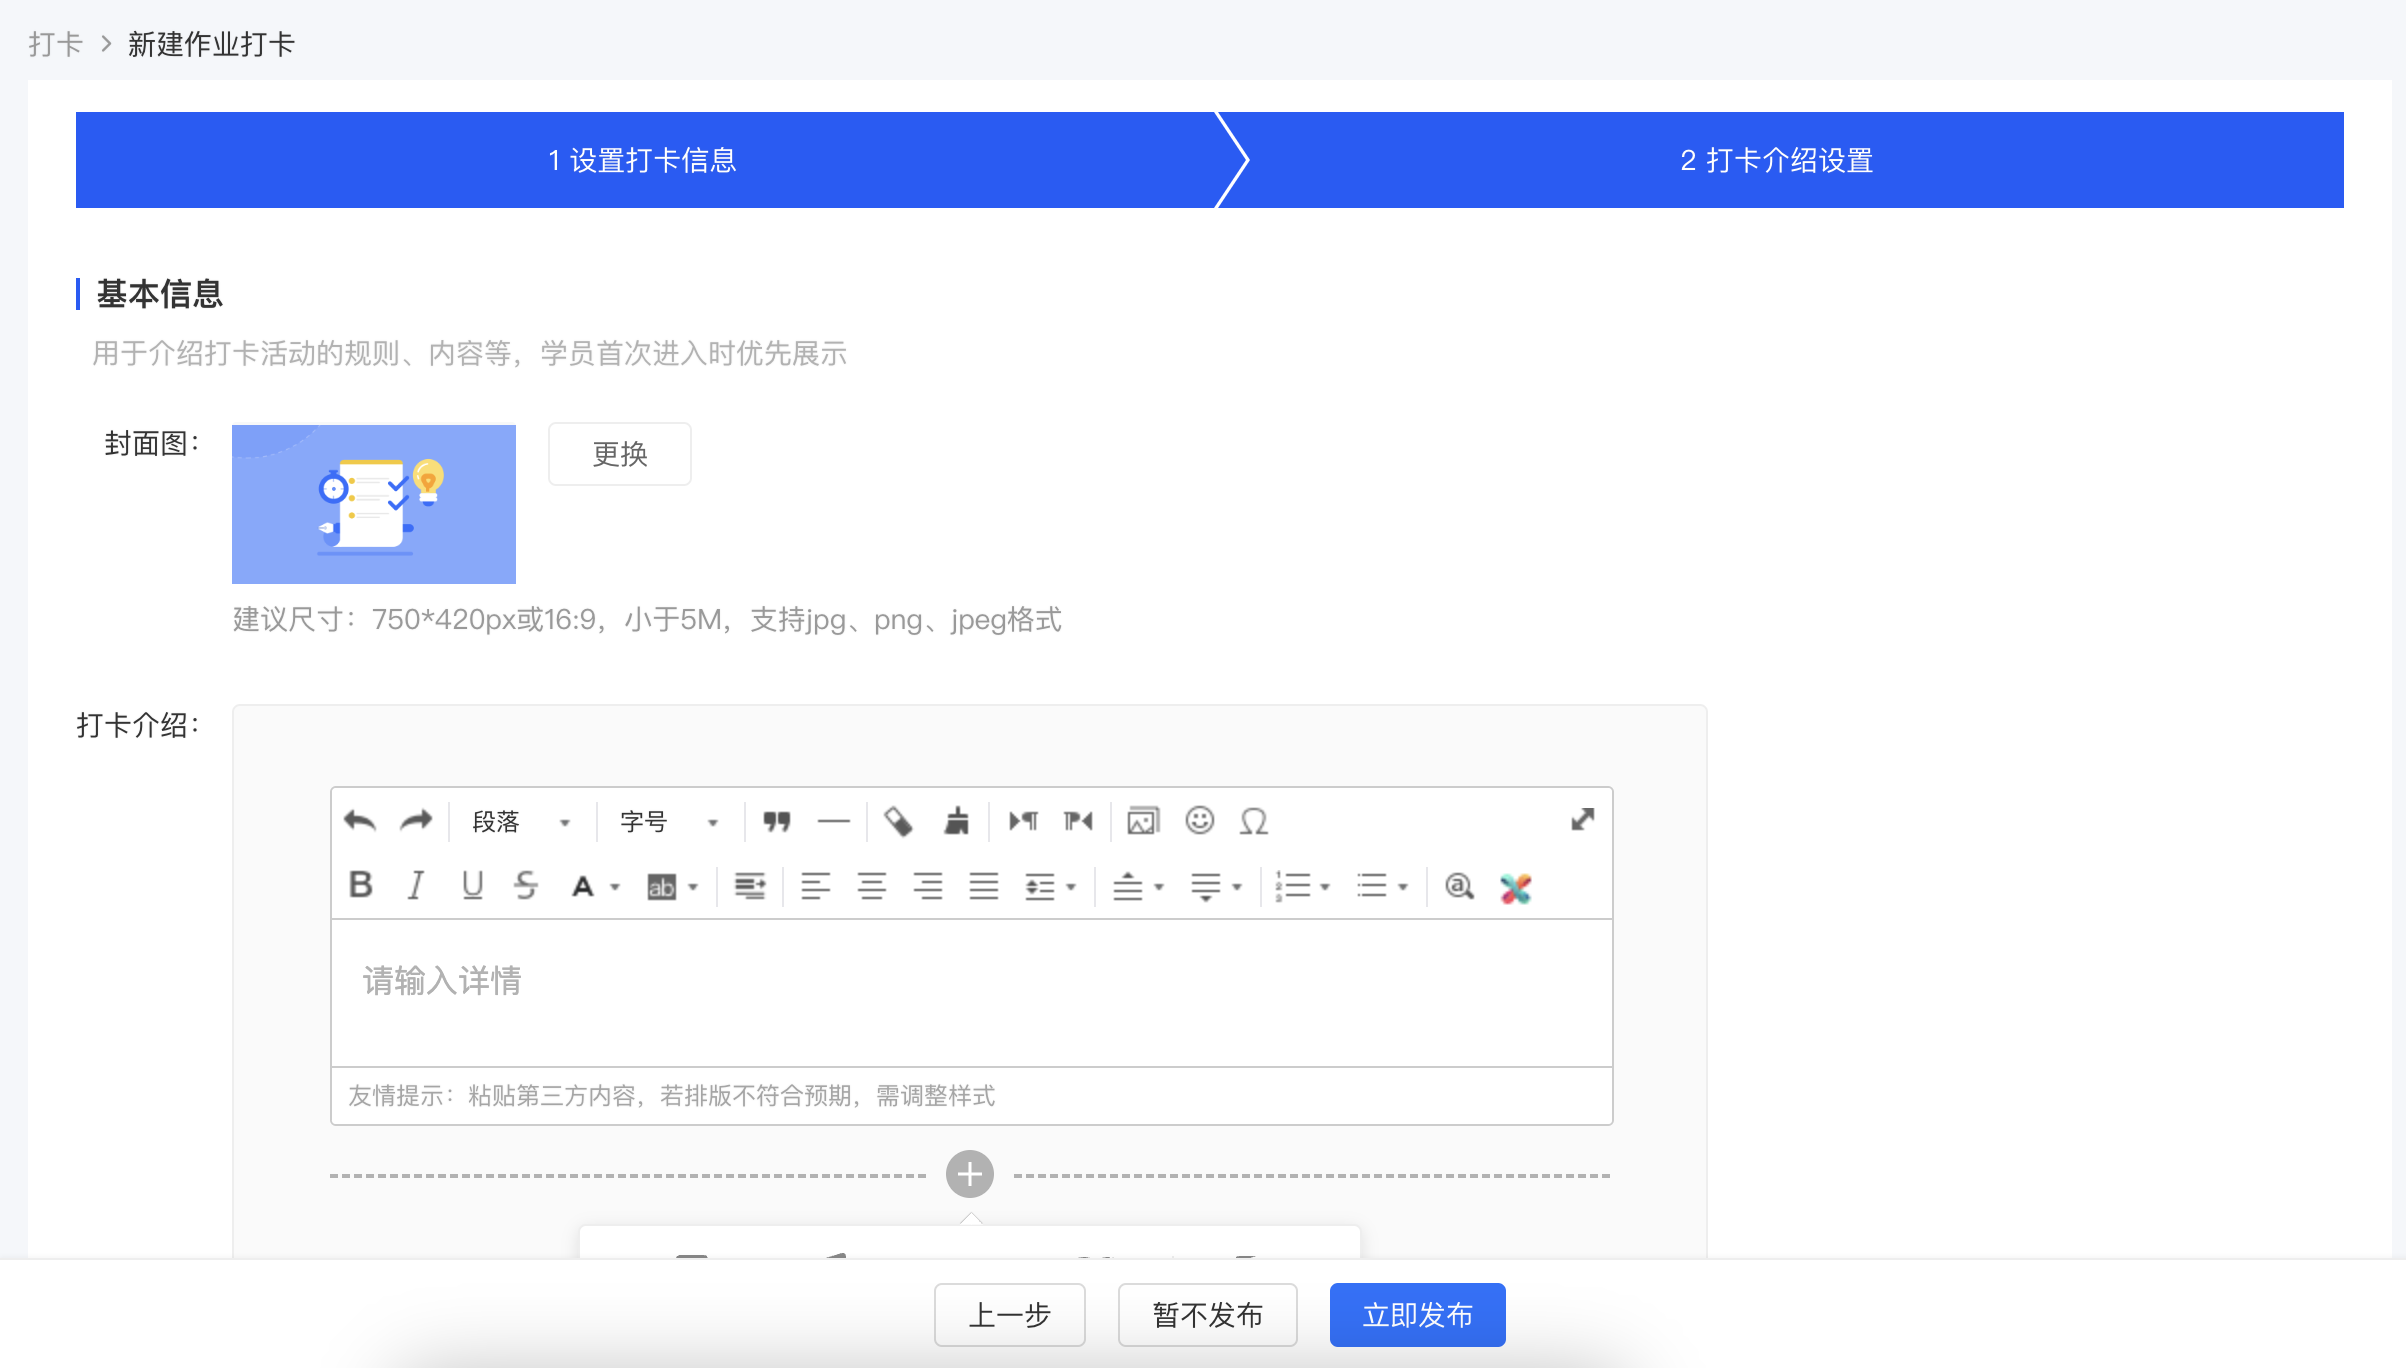
(Management background)
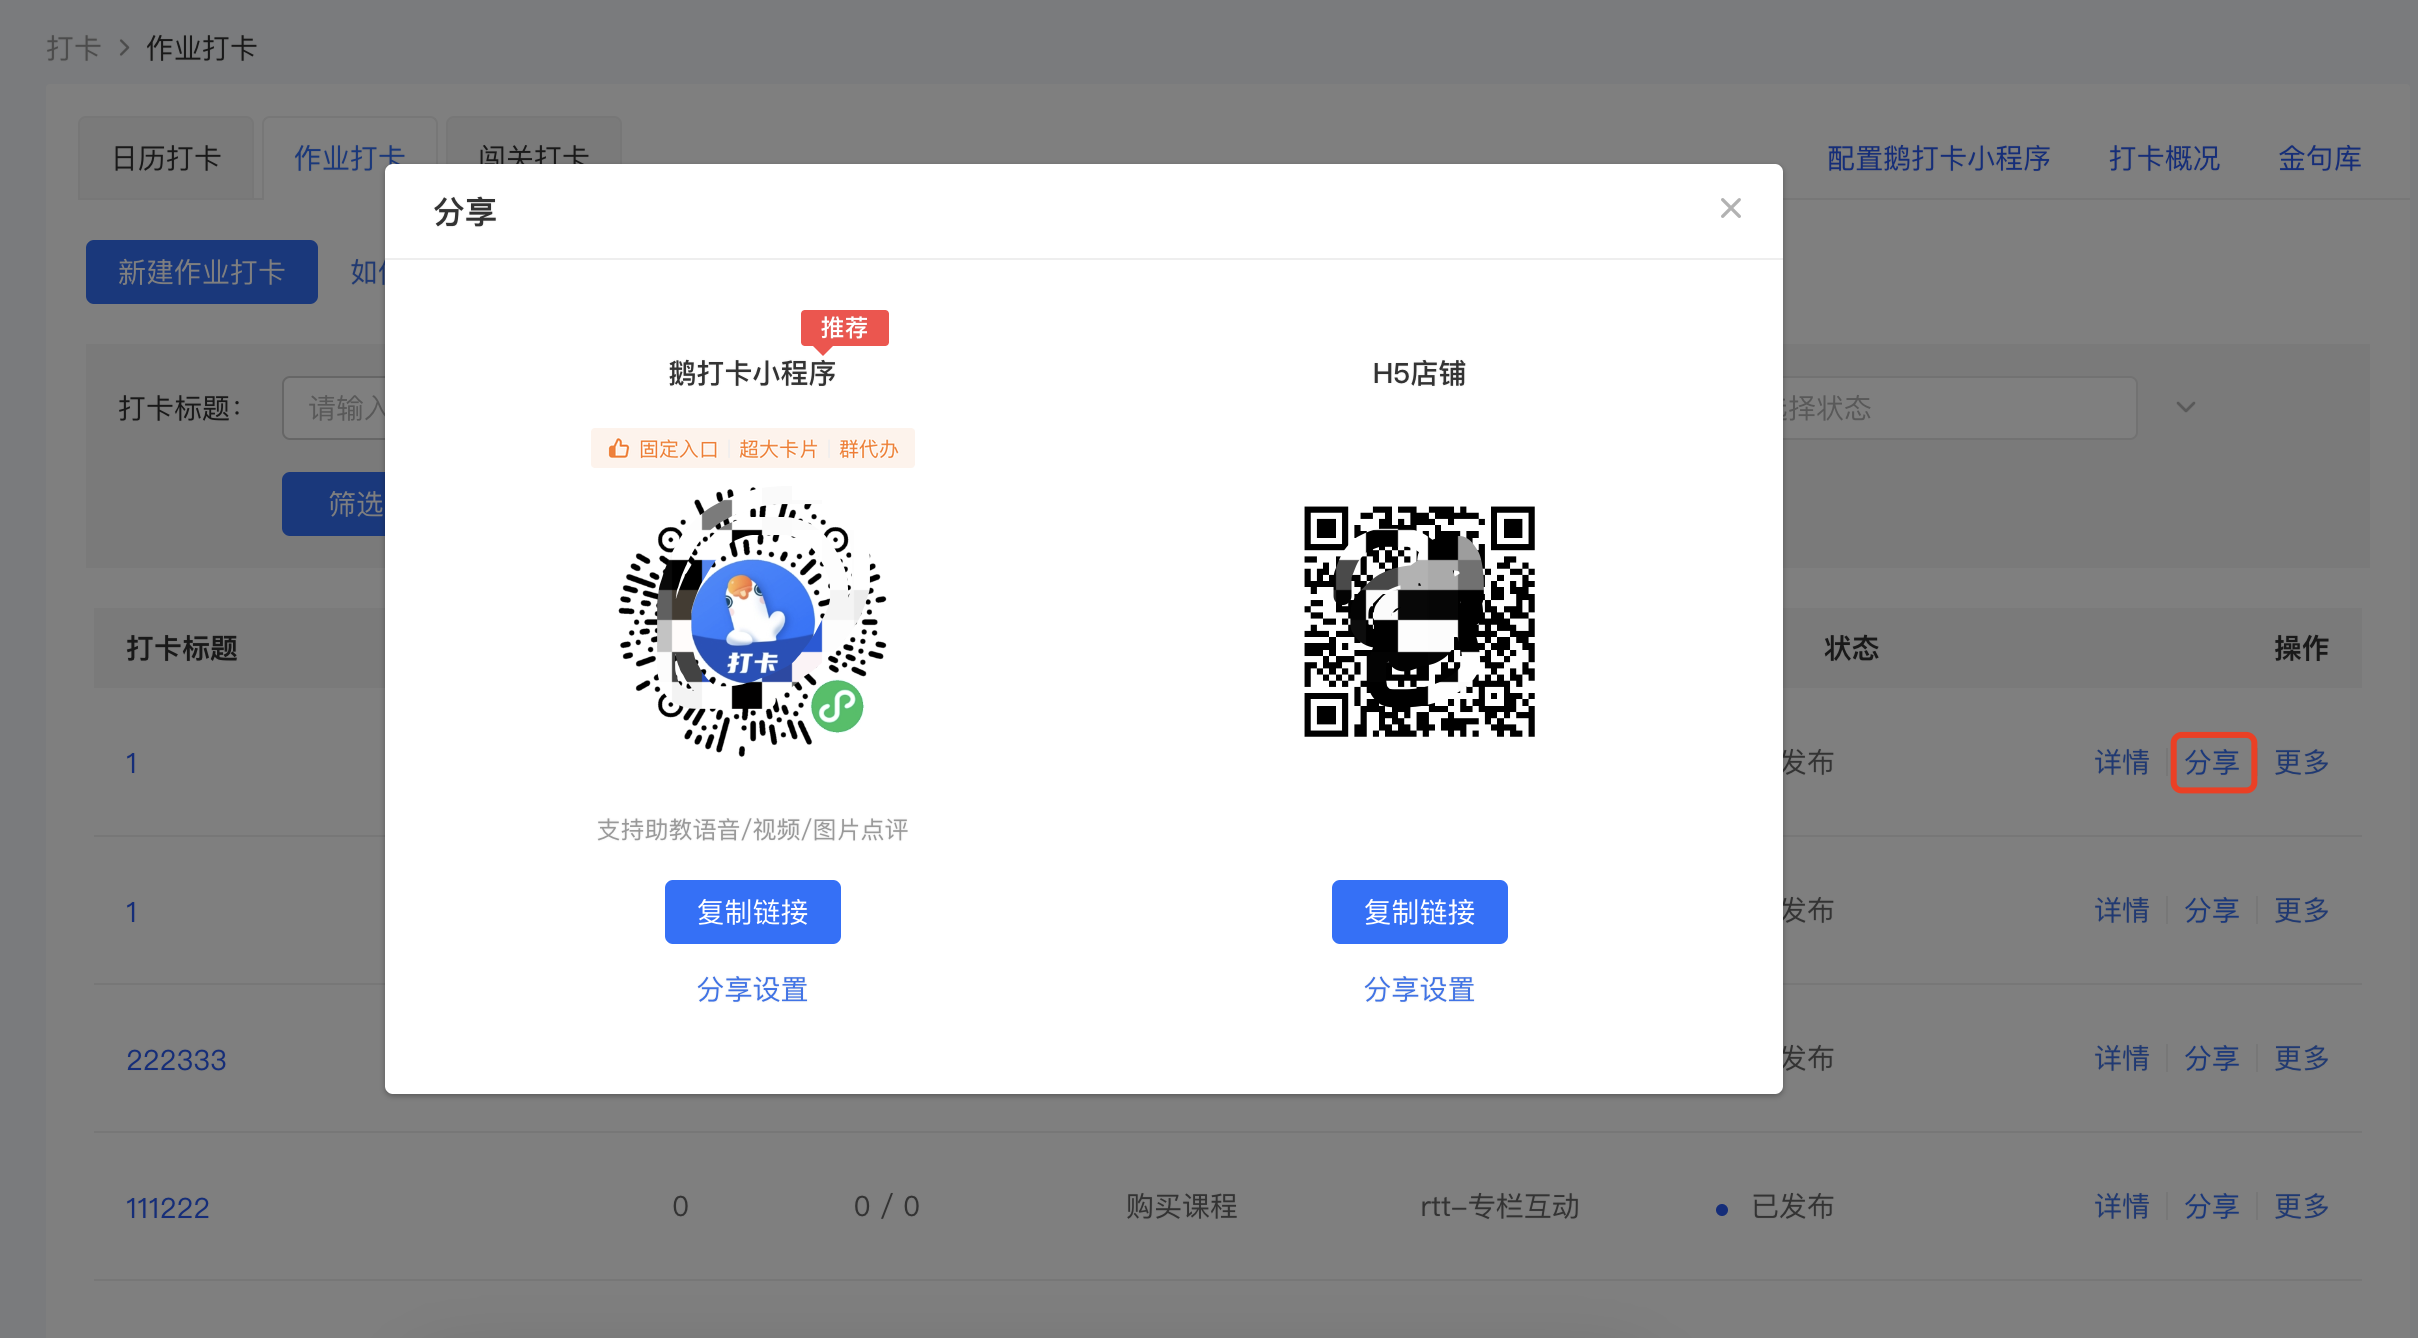
(Management background)
5. Make More Settings after Creating the Assignment Check - in (Optional). Click 【Student Support】-【Interaction Management】-【Check - in】-【Assignment Check - in】-【Details】 to enter the assignment check - in details page and make more settings.
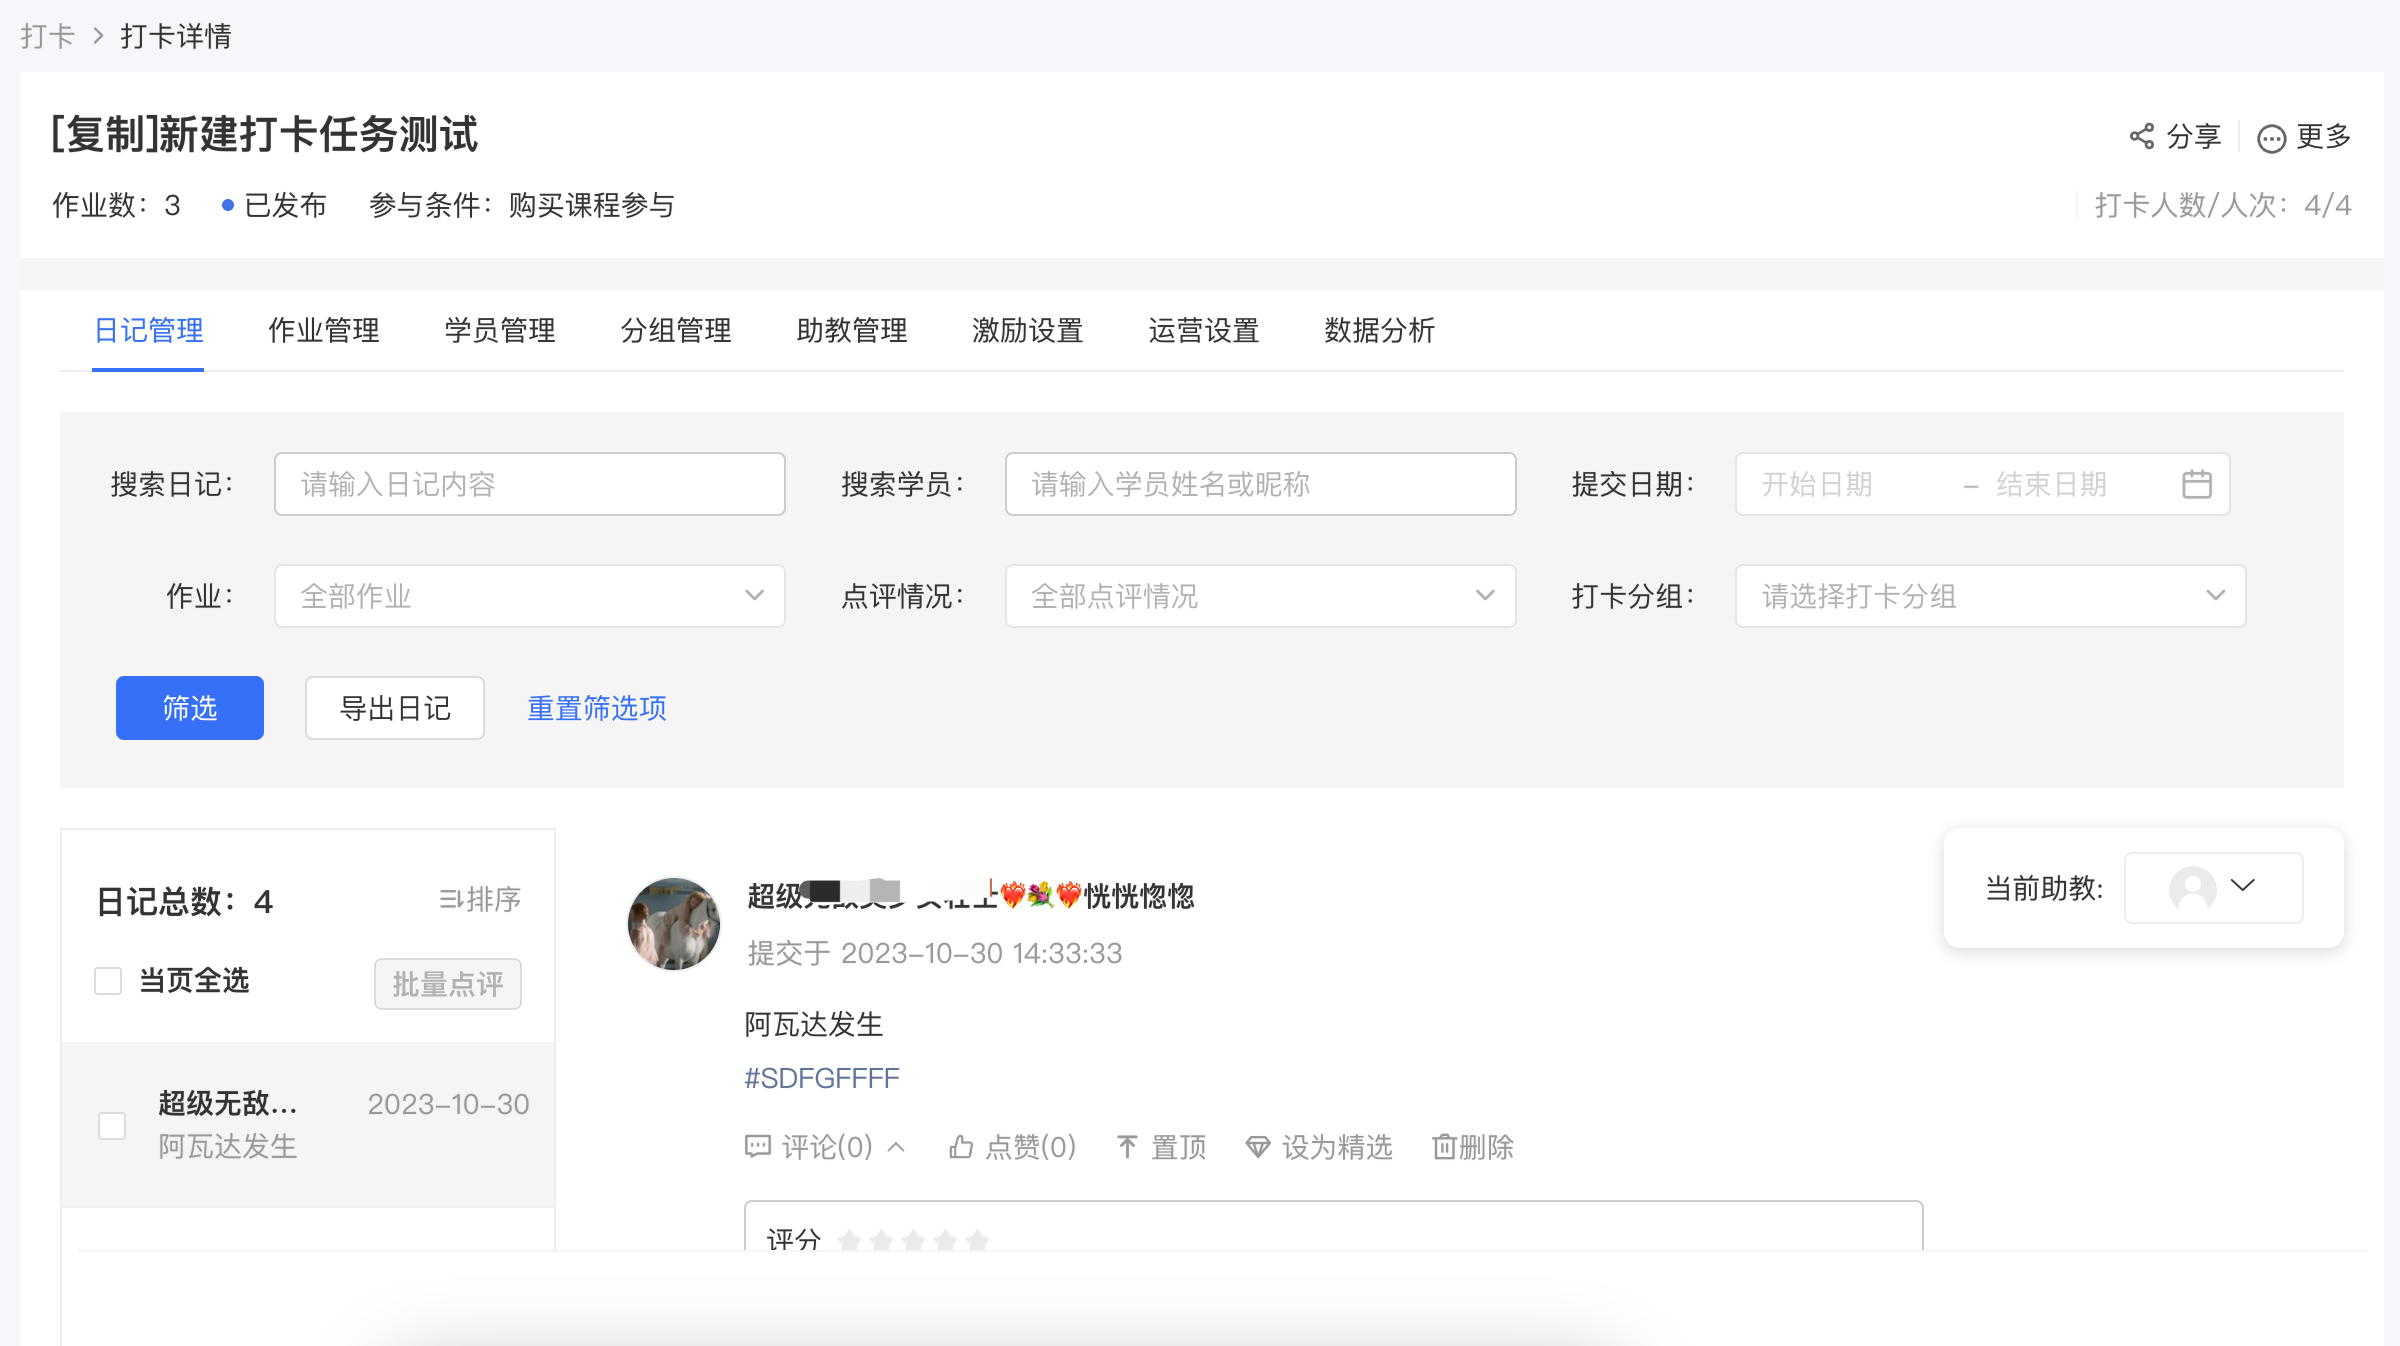
(Management background)
Step 2: Check - in - Student Side
Method 1: Students directly scan the check - in code shared by the administrator to enter the "Check - in Introduction" homepage. Click "Participate in Check - in" to enter the check - in homepage. Select the assignment you want to check in for, enter the "Assignment Details", and click 【Check in Now】 to enter the "Publish Diary" page.
Fill in the diary content (optional) to complete the assignment check - in.
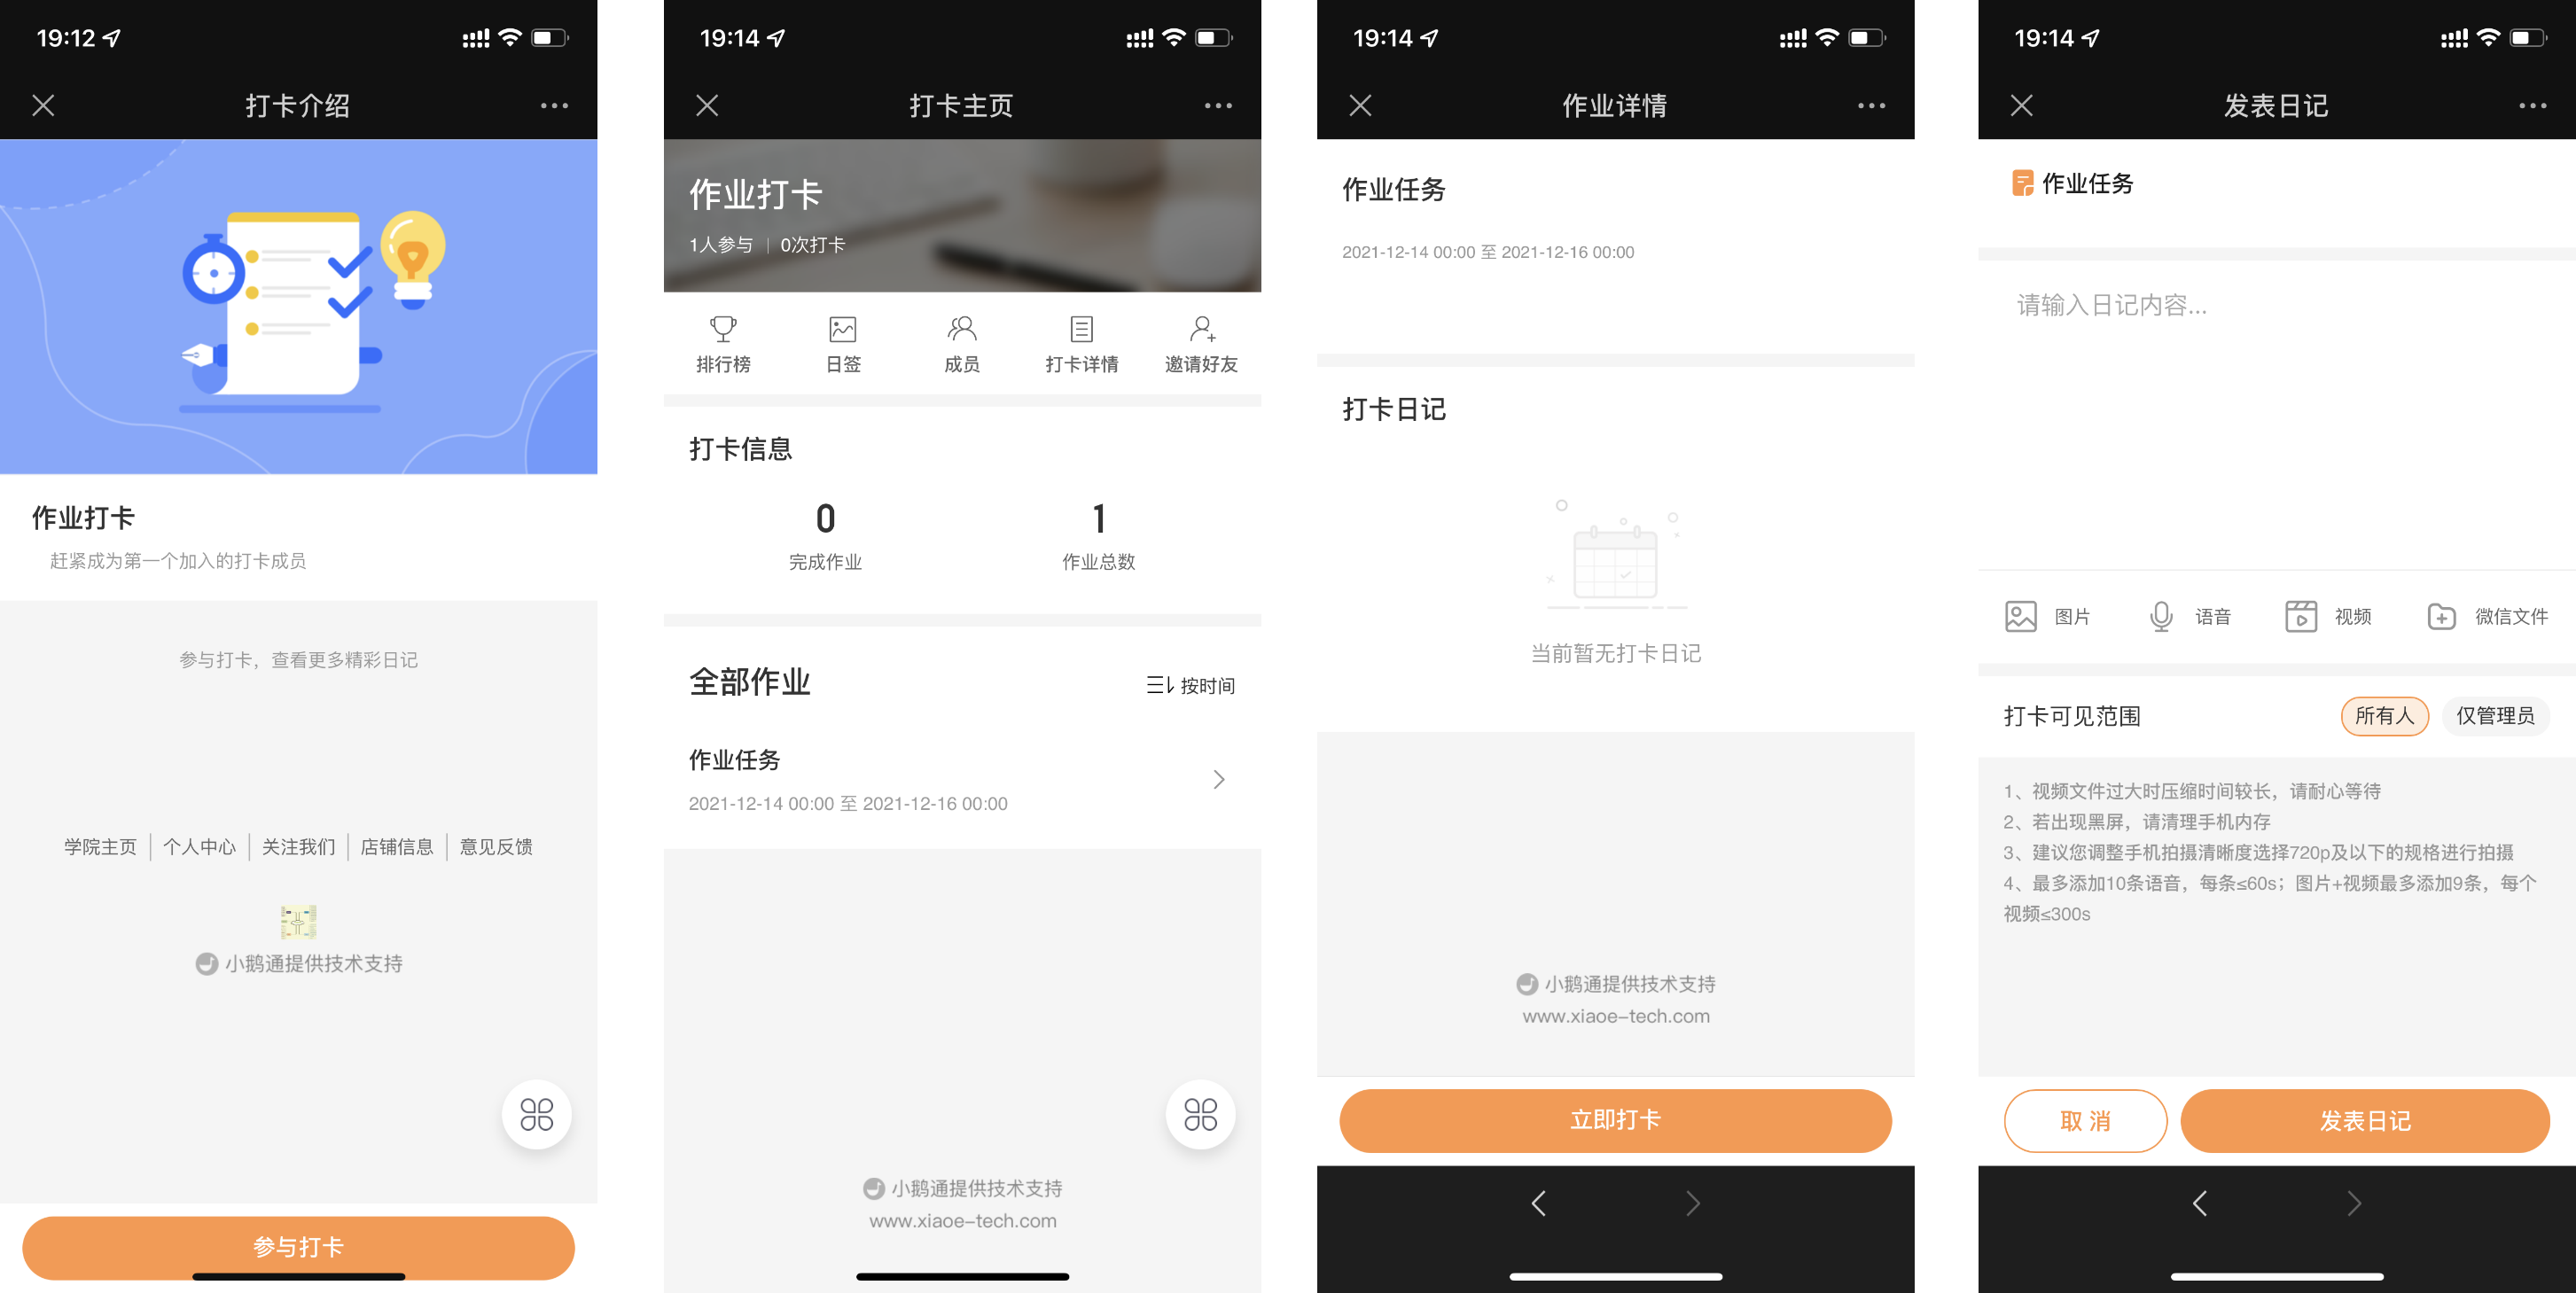
Method 2: Students enter the H5 Academy. Through the path 【My】-【Learning Tools】-【Check - in】- 【My Check - ins】, select the activity that needs to be checked in for and click 【Check in】 to enter the check - in page and complete the check - in.
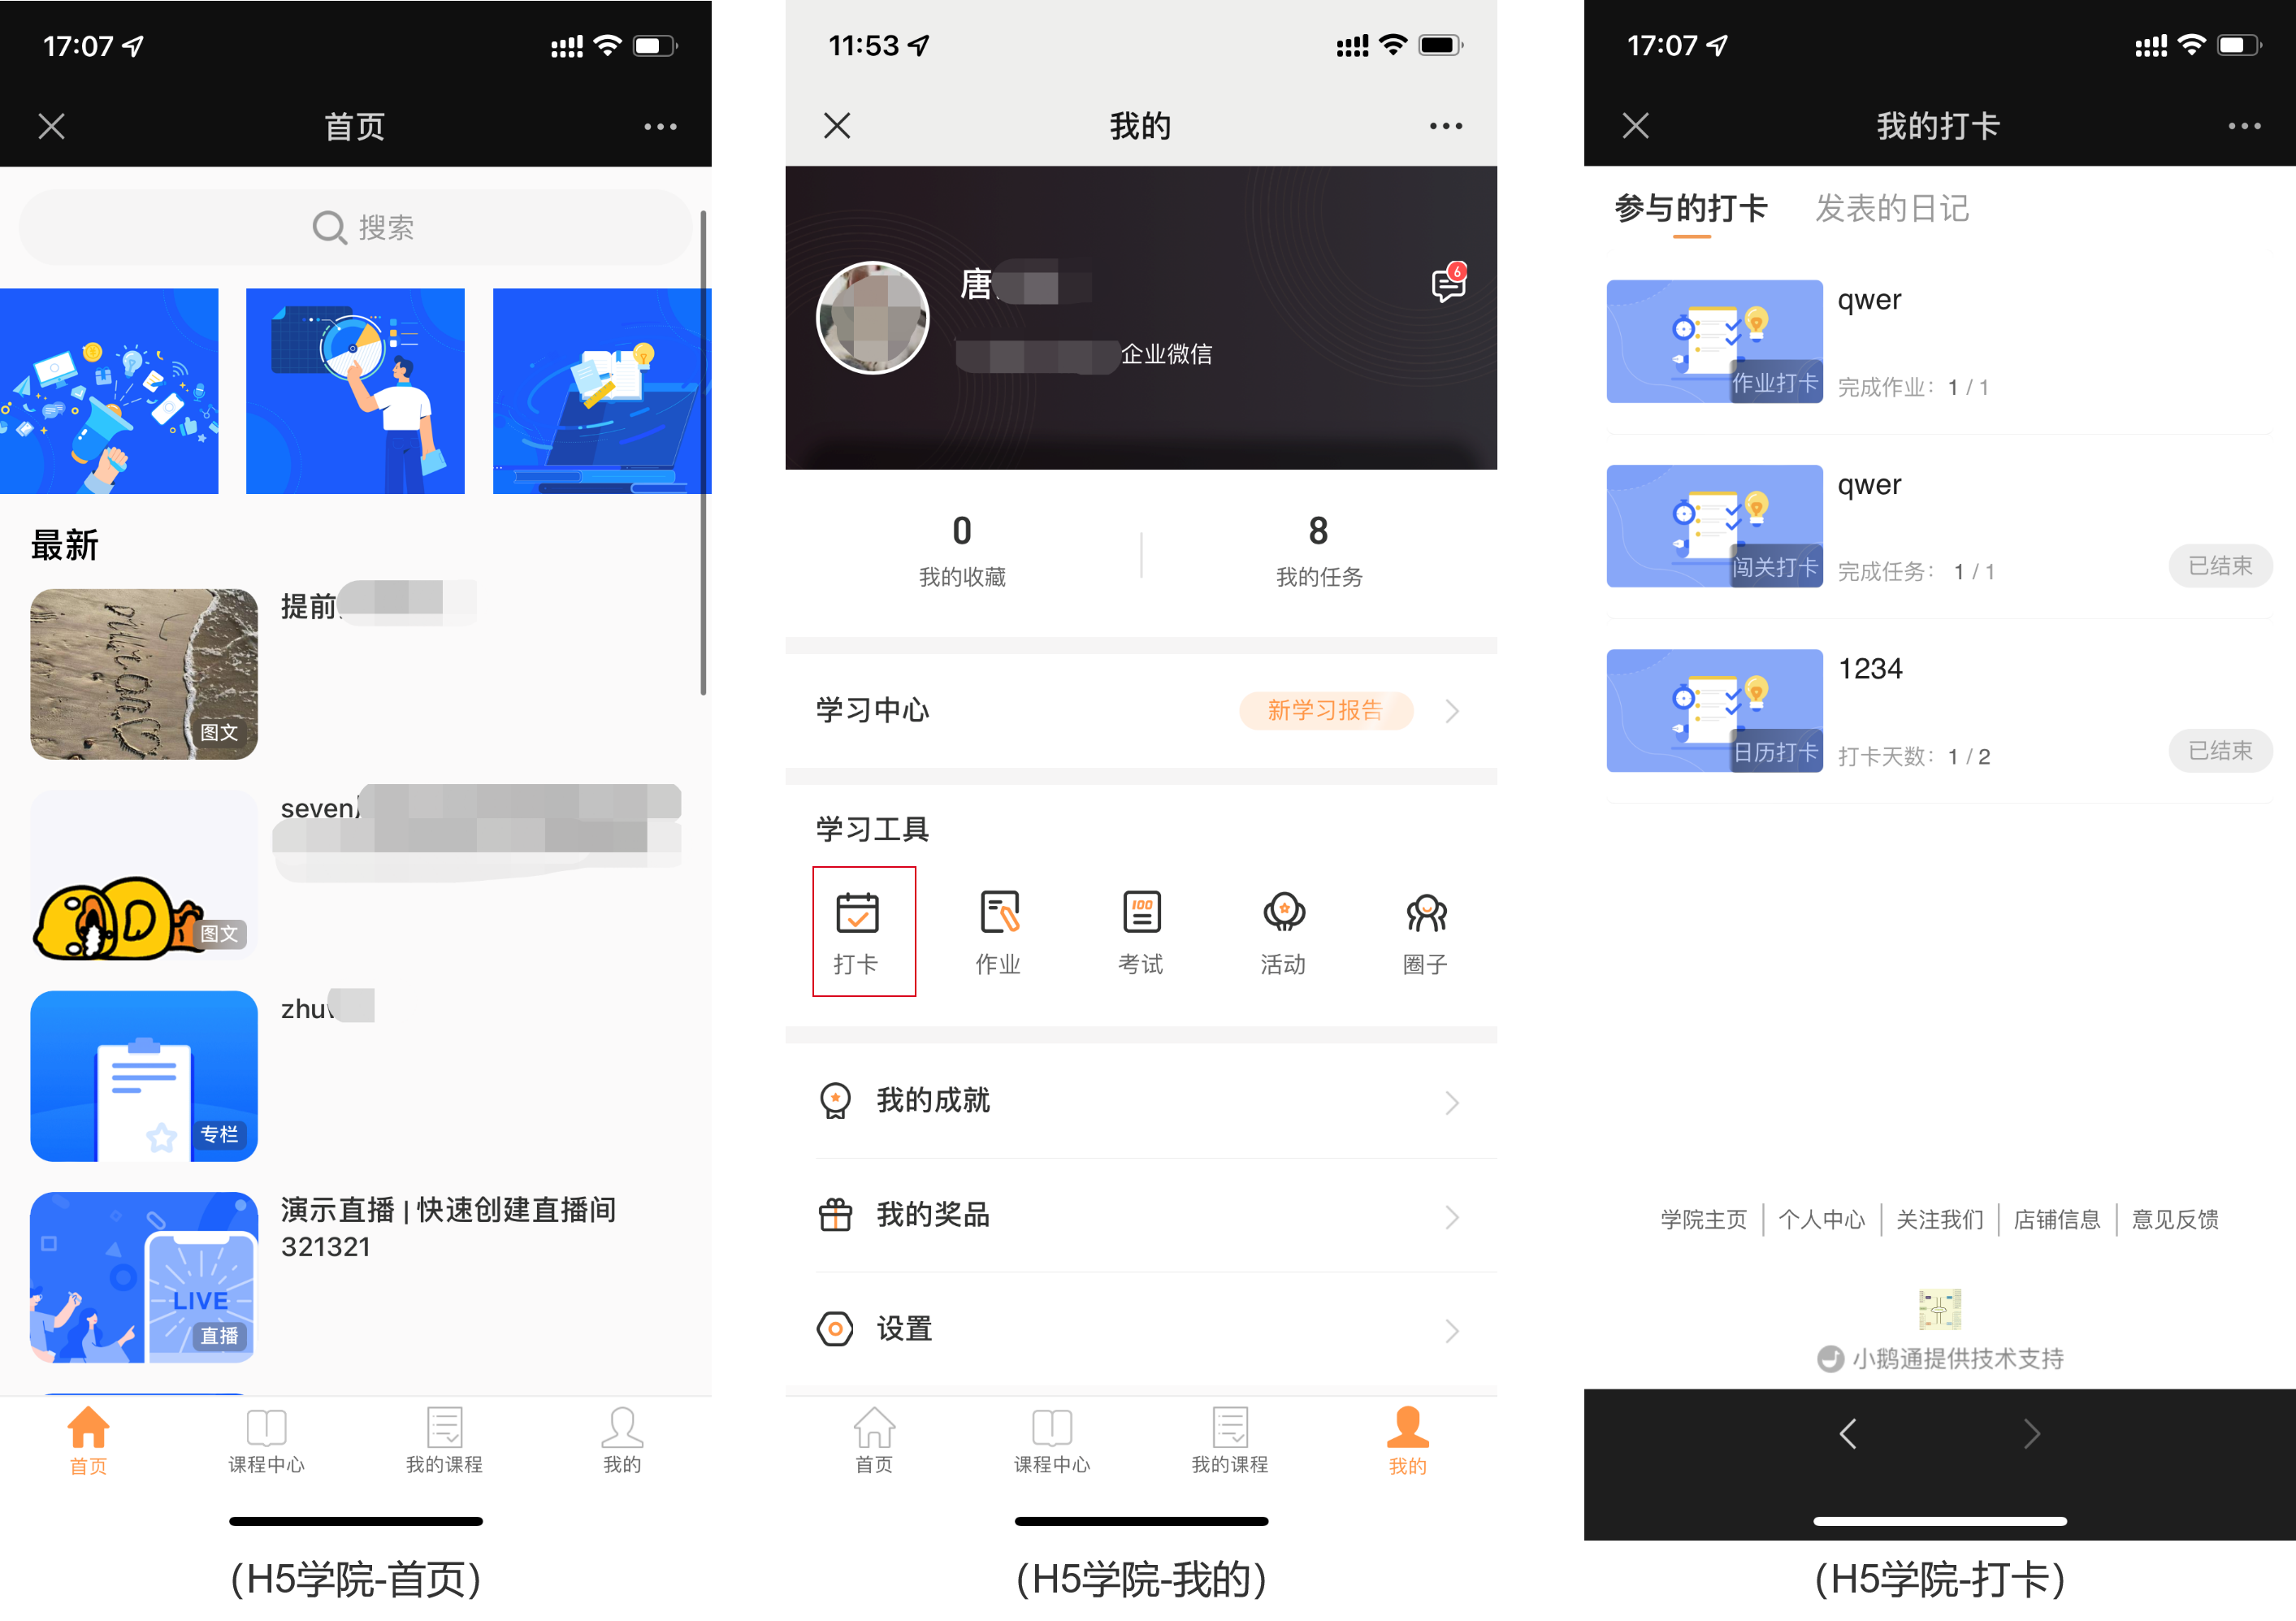
Usage tutorial for workbooks
I. Function Introduction
A learning tool that allows teachers to assign homework after classes and test students' knowledge mastery. It supports the release, submission, and review of homework in the form of pictures, voice, and text.
II. Purpose of Use
The homework book function enables teachers to understand students' learning progress and provide targeted feedback and guidance.
III. Usage Scenarios
A company invited its in - house business experts to teach the sales team. The teaching mode is offline classes plus online live streaming, with a total of 7 classes, one per week. After each class, the teacher assigns homework to the students and reviews and explains the submitted homework.
IV. Operation Path
Management Console: Desktop management backend → Learning Assistance → Homework Book → Create New Homework Book
Student End: H5 Academy → My Learning → Learning Tools → Homework
V. Usage Tutorial

Step 1: Configure the Homework Book Module(Management Backend)
1. Create a New Homework Book
Click [Learning Assistance] - [Homework Book] - [Create New Homework Book] on the management console to enter the new homework book creation page;


(Management Backend)
2. Configure Homework Information
Fill in the name of the homework book and associate it with a course (column/audio/video/picture - text/live stream). You can also associate the homework book with a community.
Click the save button.
*Note: If the teacher has already assigned homework, the associated course of the homework book cannot be modified again.

(Management Backend)
3. Add Teachers:
(1) On the homework book list page, click [Teacher Management] to open the teacher management pop - up window.
(2) Click [Add Teacher], search for the employee's name, and add the employee as a teacher.
(3) Click [OK], and then click [Save] to confirm the addition.

(Management Backend)
4. Assign Homework
(1) On the homework book list page, click [Homework List] to enter the homework list page, and then click [Assign Homework].
(2) It supports two assignment methods: manual assignment and importing questions from the question bank.
(3) The homework content supports text, pictures, and audio.

(Management Backend)

(Management Backend)
5. Review Homework
Click [Learning Assistance] - [Homework Book] - [Homework List] - [Student Homework] - [View] - [Review Homework]

(Management Backend)

(Management Backend)
Step 2: Students Do Their Homework
Method 1: Students directly scan the homework code shared by the administrator to enter the 'Homework Details' homepage. Click [Do Homework] to enter the 'Do Homework' page. After completing the homework, click [Submit Homework] to finish.

(Management Backend)

(Homework Details)
Method 2: Students enter the academy homepage through the enterprise training QR code sharing. Through the path [My Learning] - [Learning Tools] - [Homework], select the homework to be completed and enter the homework details page to finish.

(Student - end 'My' Page)
Certificate Usage Tutorial
I. Function Introduction
You can issue certificates to students who meet the specified conditions to enhance their sense of achievement upon completing the courses. Currently, certificates are supported for: Exams, Check-ins, Communities, Camps, Camps Pro, and Training Programs.
II. Purpose of Use
Administrators can configure certificates for different training scenarios, supporting custom certificate styles and issuance rules. By issuing certificates, students can gain a sense of accomplishment for completing tasks, which encourages them to persevere in finishing the tasks.
III. Use Scenarios
1. Exams:Instructors can customize the background and comments of exam certificates. Students who achieve high scores or meet the standards will automatically receive exam certificates after passing the exams, enhancing their sense of achievement in learning outcomes.
2. Check-ins:Administrators or operators can set up check-in certificates in advance when creating check-ins and inform students in the check-in introduction that they can obtain completion certificates by meeting certain conditions, thus motivating students to persist in completing the check-ins as required. When students meet the certificate issuance rules, the system will automatically issue the configured certificates.
3. Communities:Community owners can set up community certificates in advance when creating community courses. When students meet the certificate issuance rules during the process of completing course tasks in the community, the system will automatically issue the certificates.
4. Camps:Instructors can set up camp certificates in advance after creating camp sessions. When students meet the certificate issuance rules during the process of completing camp session tasks, the system will automatically issue the certificates. Note: Free camps do not support certificate settings.
5. Camps Pro:Instructors can set up Camps Pro certificates in advance after creating Camps Pro. When students meet the certificate issuance rules during the process of completing Camps Pro, the system will automatically issue the certificates. Note: Free Camps Pro supports certificate settings.
6. Training Programs:A company has launched a corporate culture training course for newly recruited employees. To showcase the training results of employees and recognize those who have passed the training exams, the company can set assessment criteria in the training program. Students who pass the assessment will automatically receive training certificates.
IV. Operation Path
Administrator: Management Backend → Courses → (Interactive Management) Certificates → New Certificate
Student End:WeChat H5 → My → My Achievements
V. Usage Tutorial
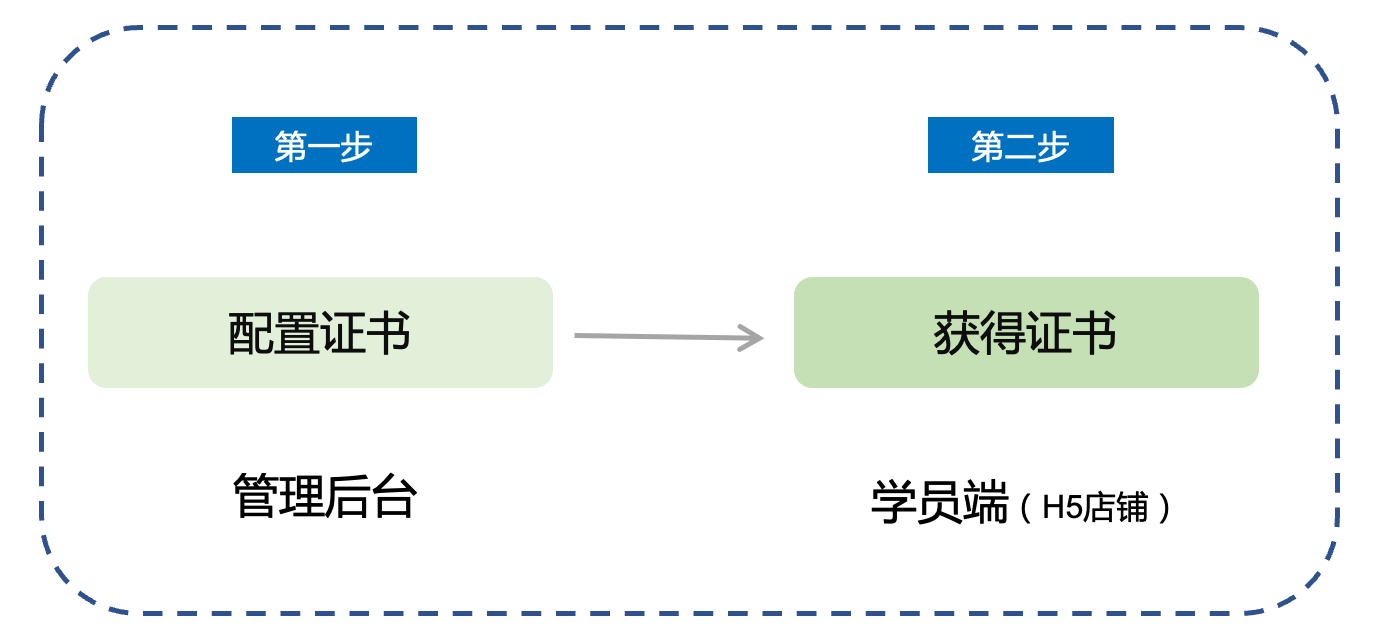
Step 1: Configure Certificates - Management Backend
Four ways to configure certificates:
Method 1: Click “New Certificate” through “Courses → Interactive Management → Certificates”, select the certificate type, and associate the created exams/check-ins/communities/camps/courses/training programs to complete the certificate settings.
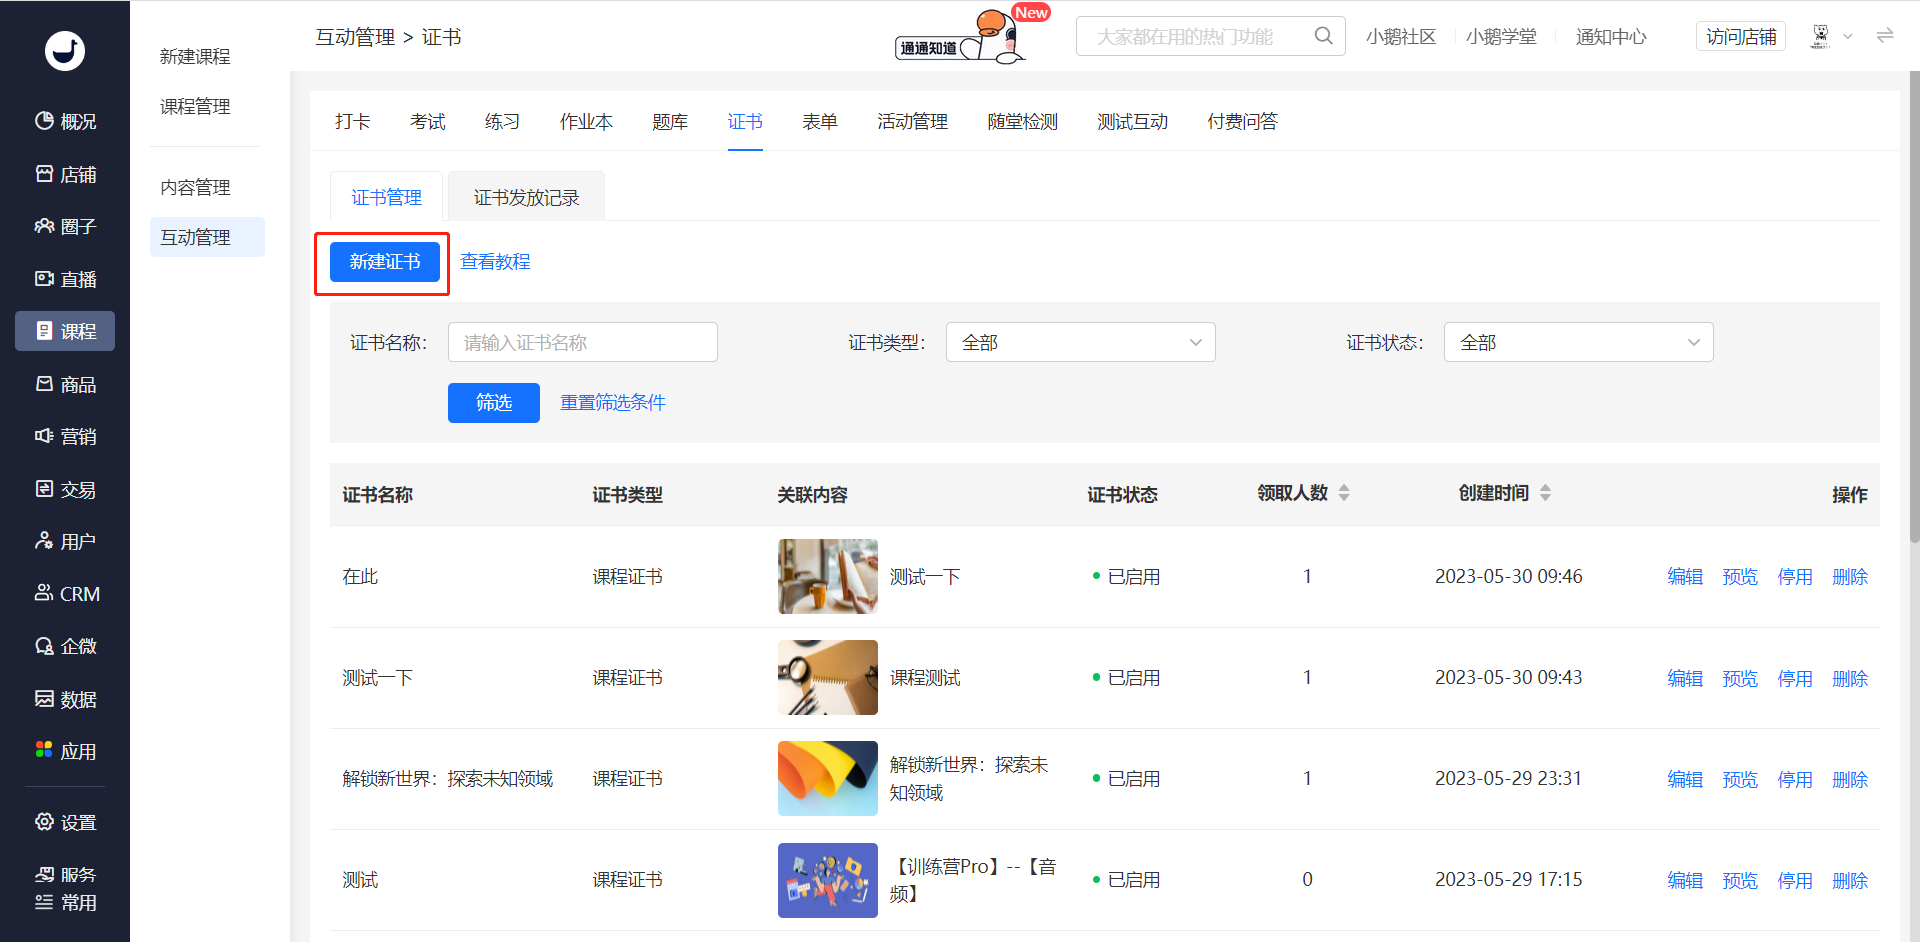
Method 2:After creating check-ins, communities, or courses, enter the certificate settings through the settings on other pages.

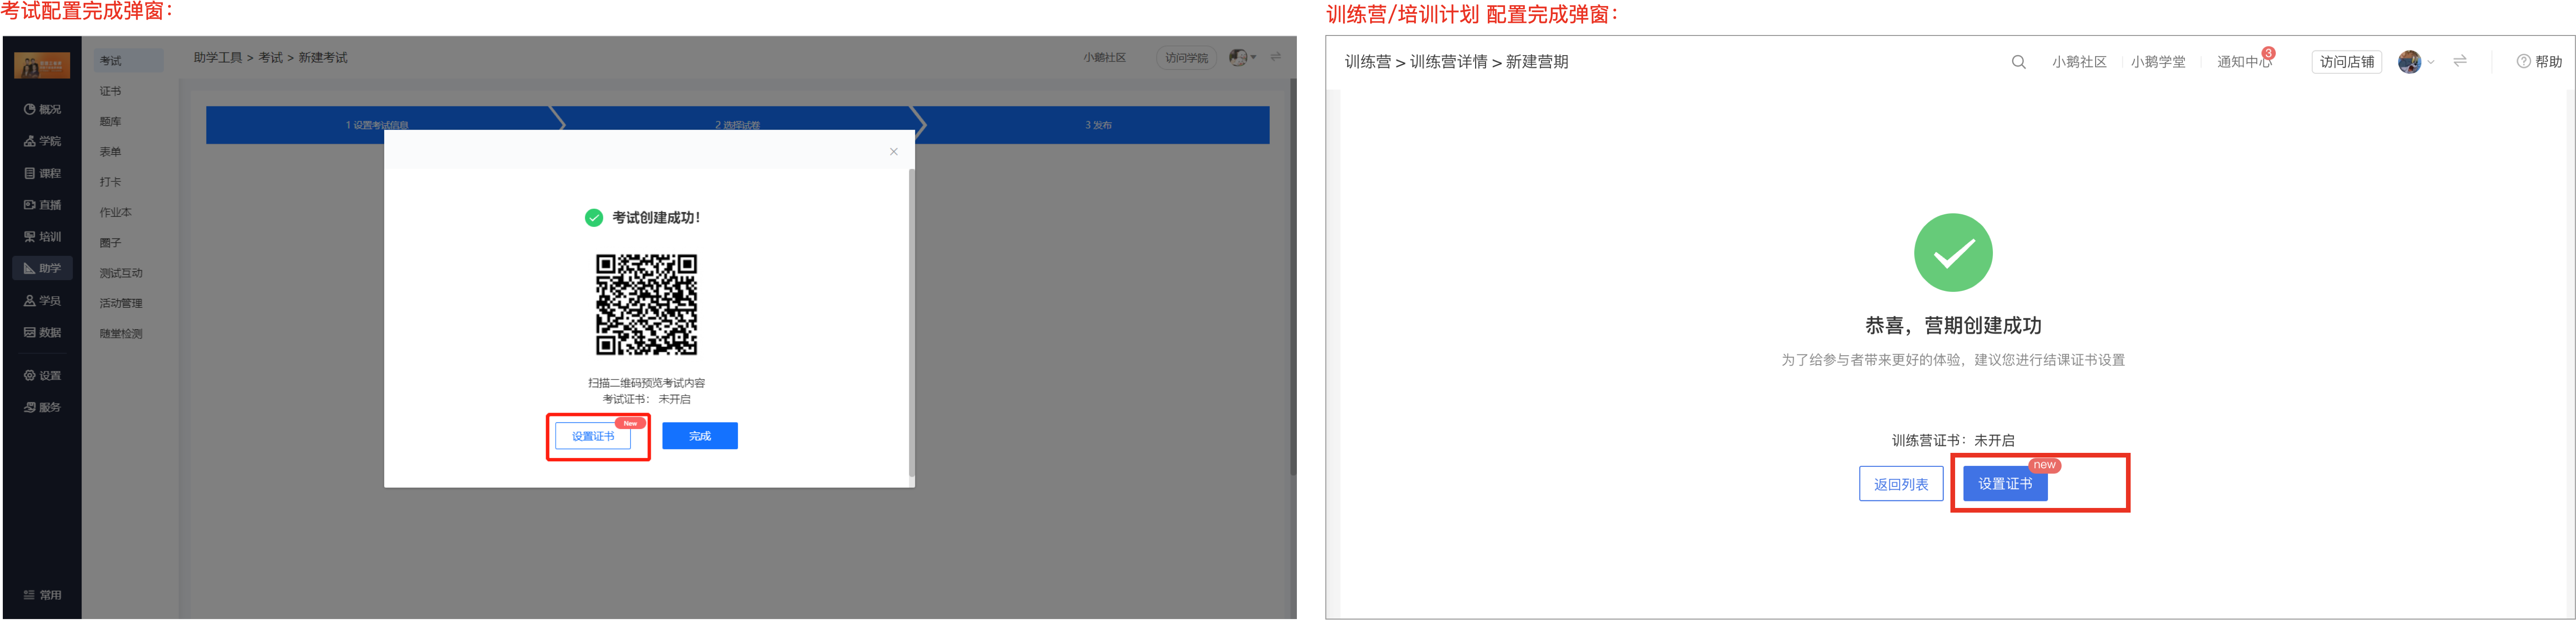
Method 3:In the final step of creating exams, camps, or training programs, jump to the certificate settings.
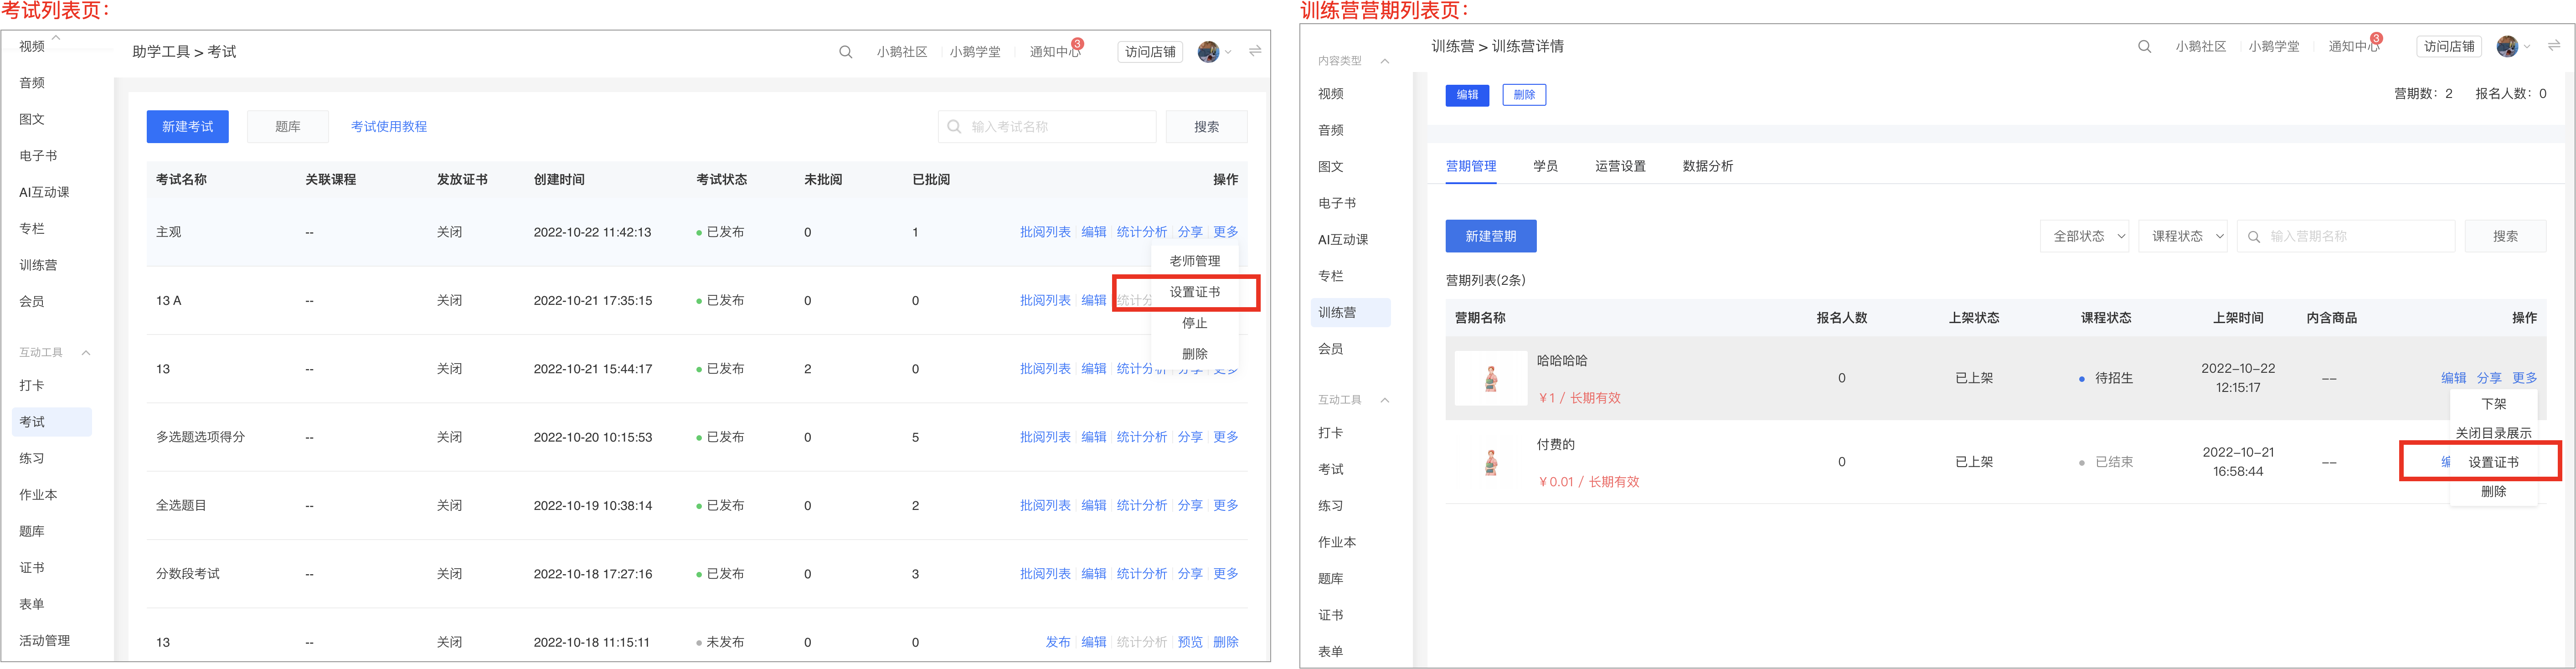
Method 4:On the list pages of configured exams or camps, jump to configure certificates through the list.
*Note: The [Certificates] function needs to be used in conjunction with functions that support certificates. Certificates cannot be issued independently.
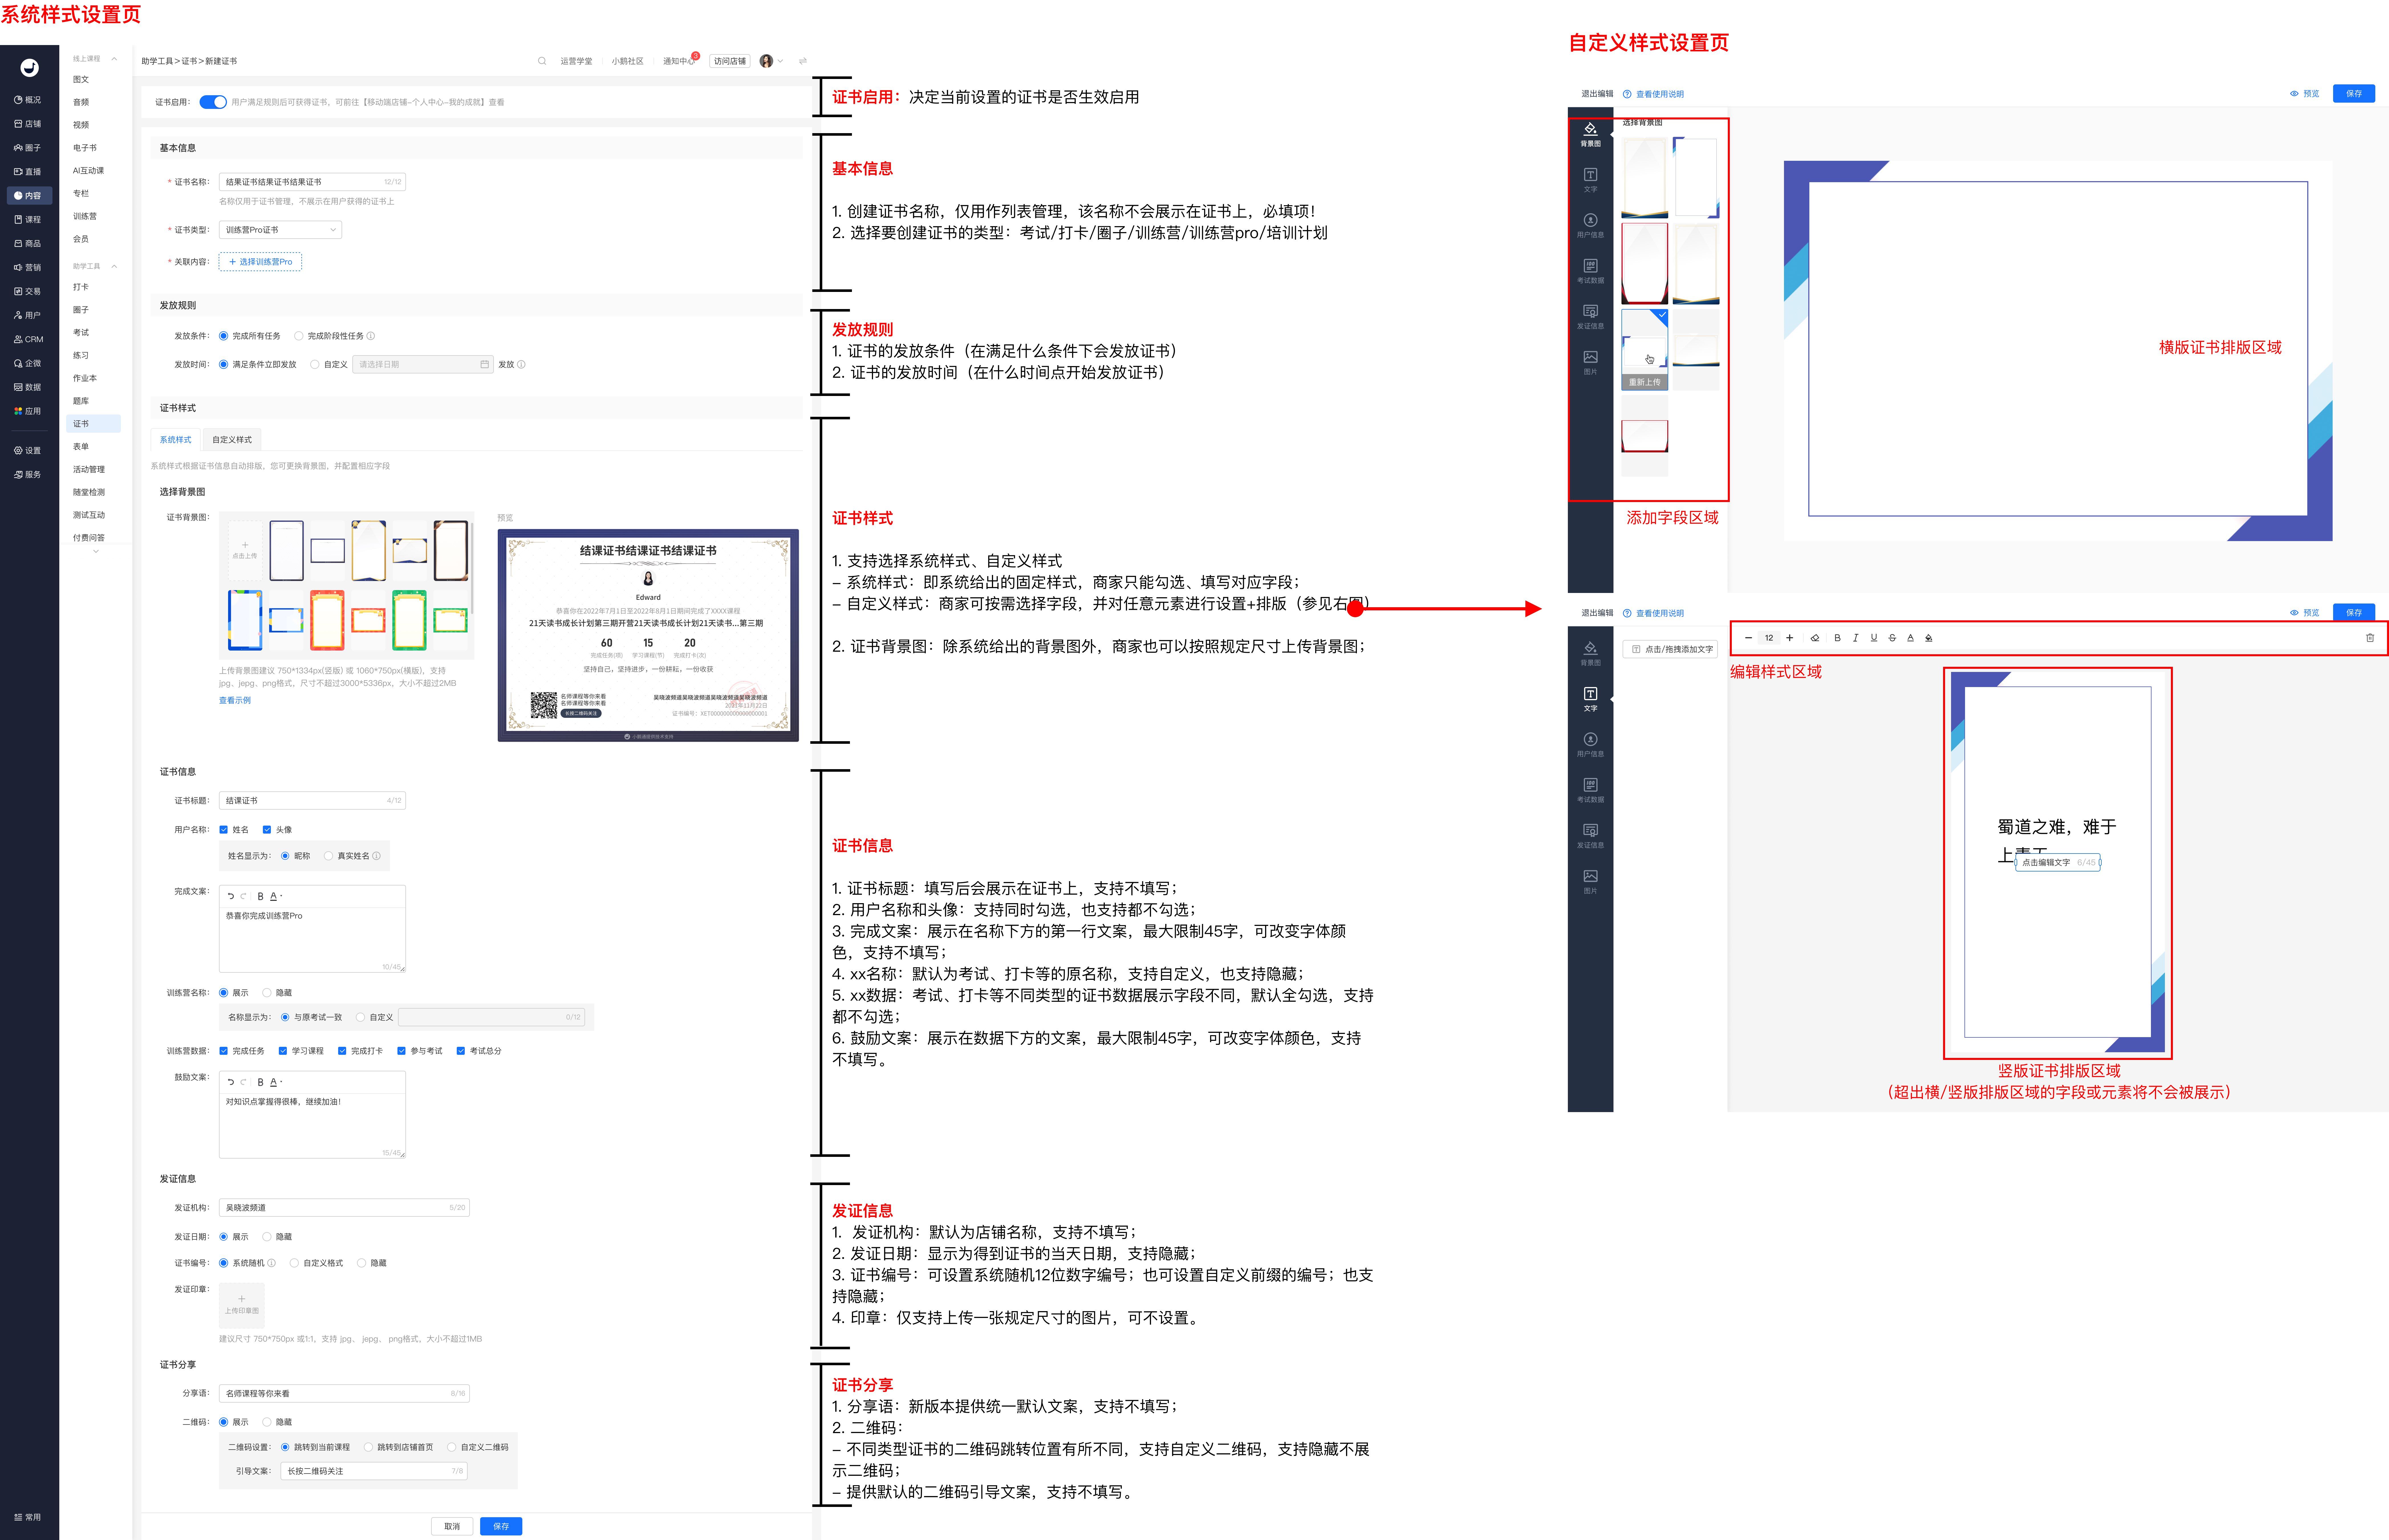
Certificate Settings Page - Setting Instructions:
Taking the Camps Pro certificate as an example, the settings of other types of certificates are similar, with only some field settings being different. Please refer to the page display for details.
Step 2: View Certificates - Student End
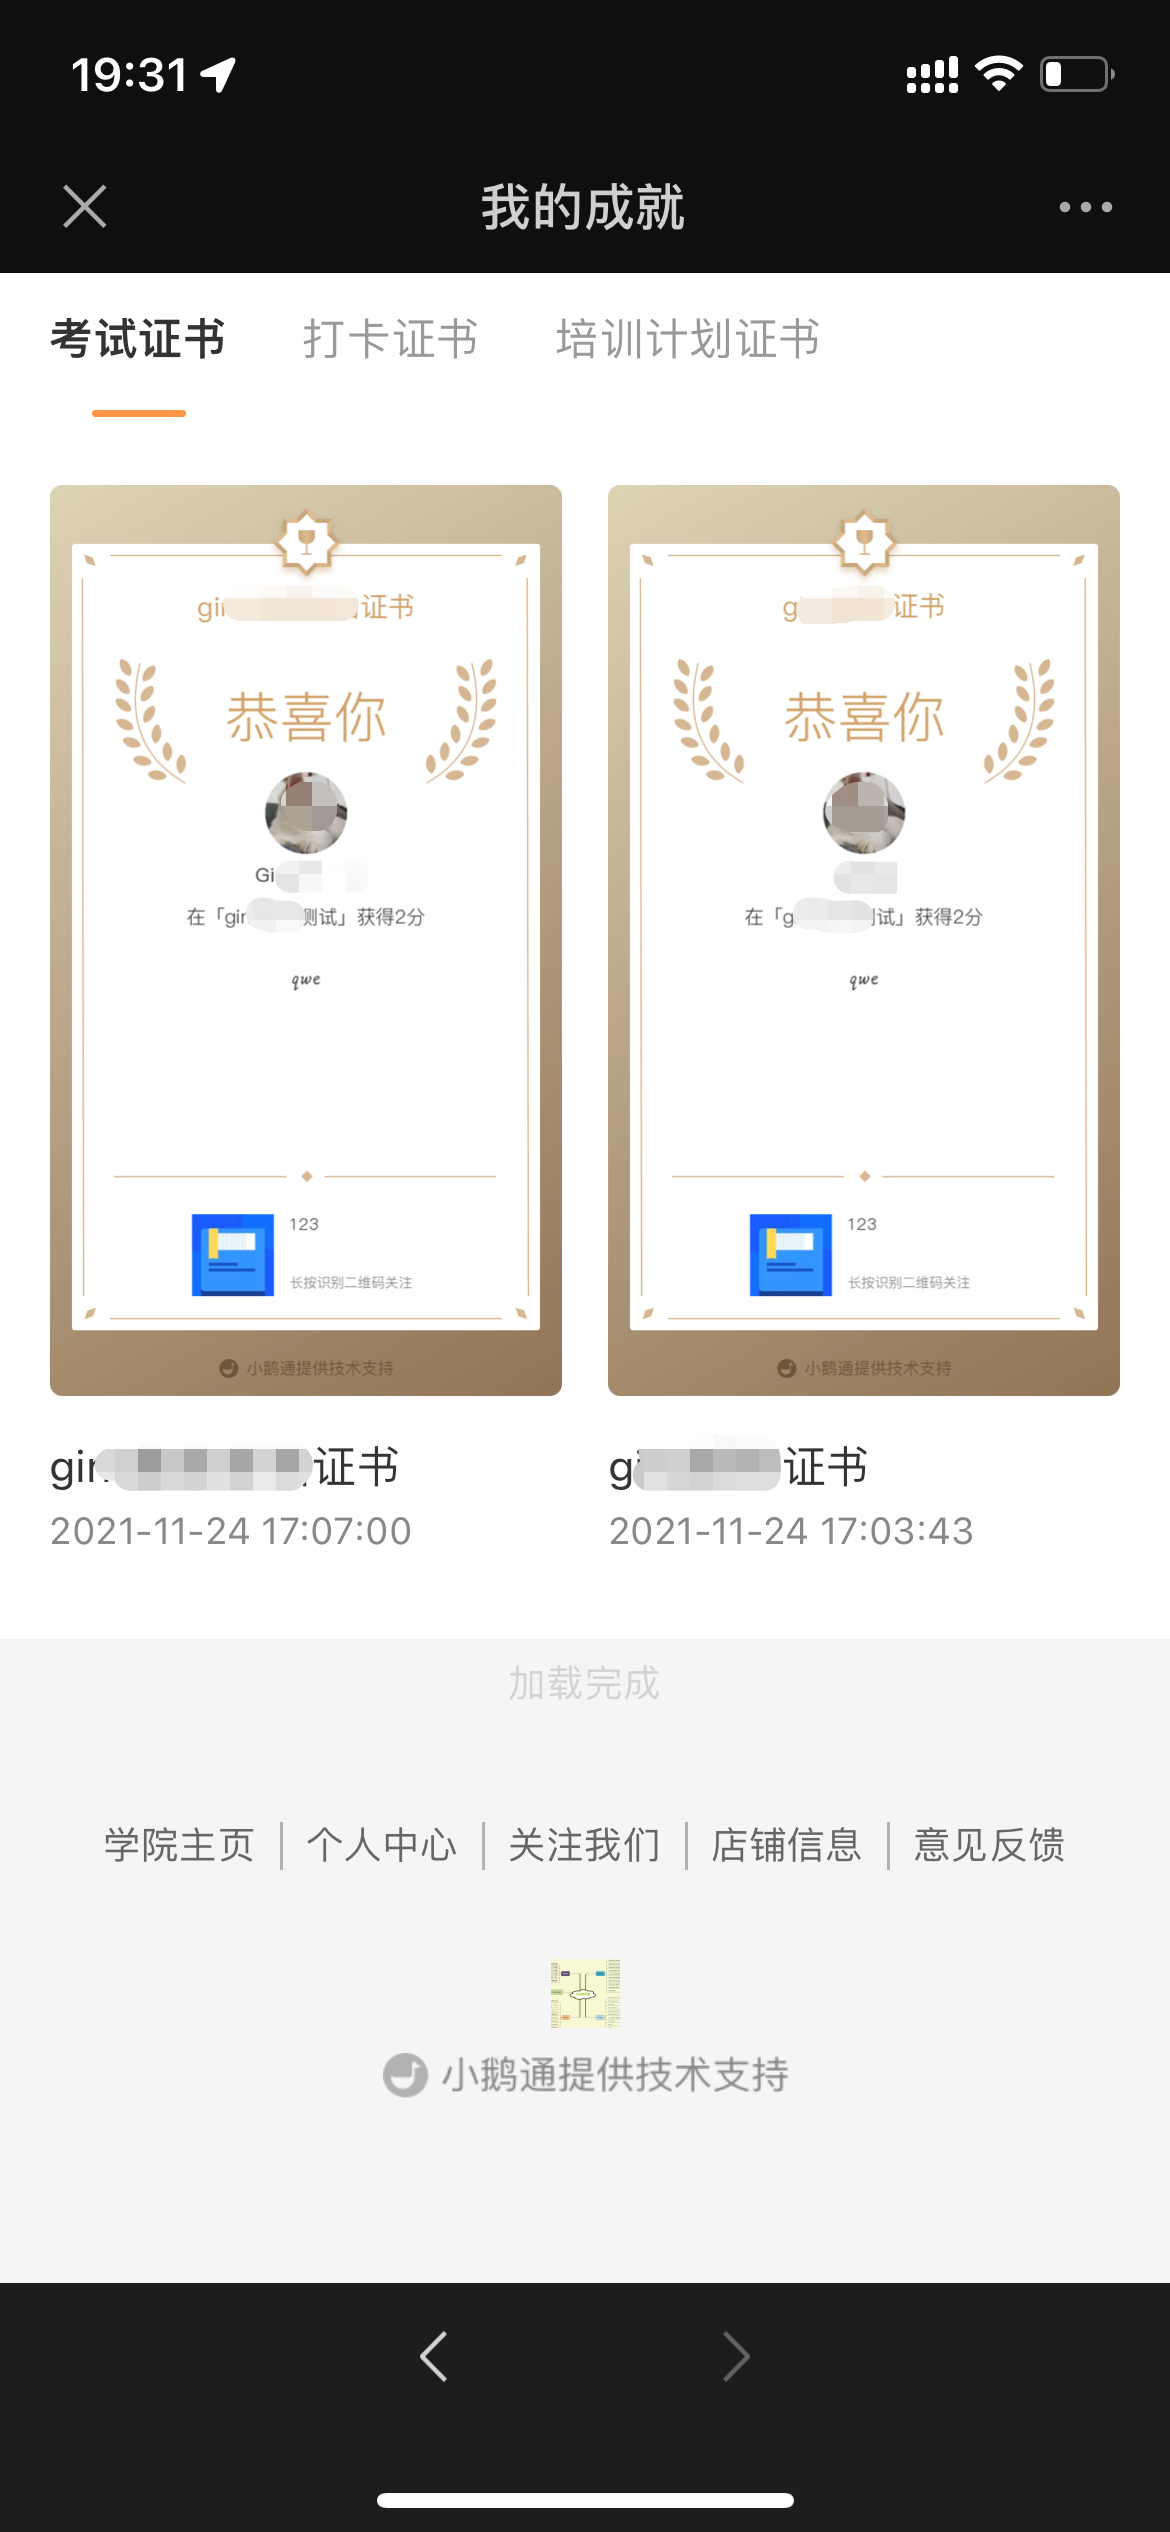
Students can view relevant certificates by clicking [My] - [My Achievements]
Exam Usage Tutorial
I. Function Introduction
Administrators can design exams based on course content. Exams can consist of multiple question types, including single-choice, multiple-choice, true-false, and Q&A questions.
II. Purpose of Use
A function used to assess the learning effectiveness of students.
III. Use Scenarios
A college has created many courses, but after they were launched, it has no idea whether students have truly mastered the course content, and there is also a lack of direction on how to optimize the courses in the future. After using the exam function, students can take in-class exams while learning the courses to consolidate their knowledge. Based on their exam scores, students will then study the courses more targeted, truly improving their learning effectiveness. Meanwhile, administrators can get feedback on the learning effectiveness through the exam results and optimize the subsequent courses according to the feedback.
IV. Operation Paths
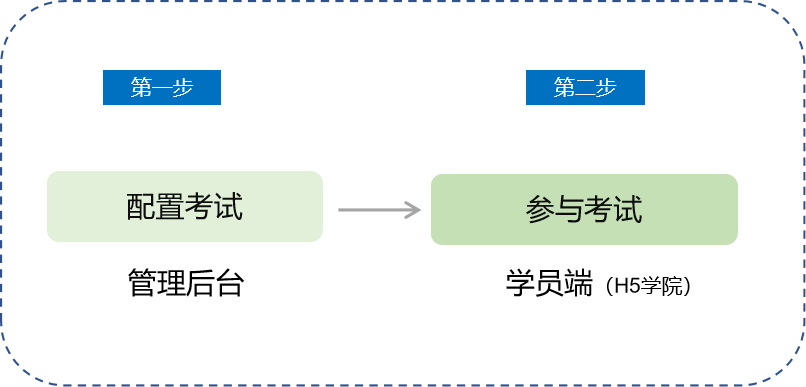
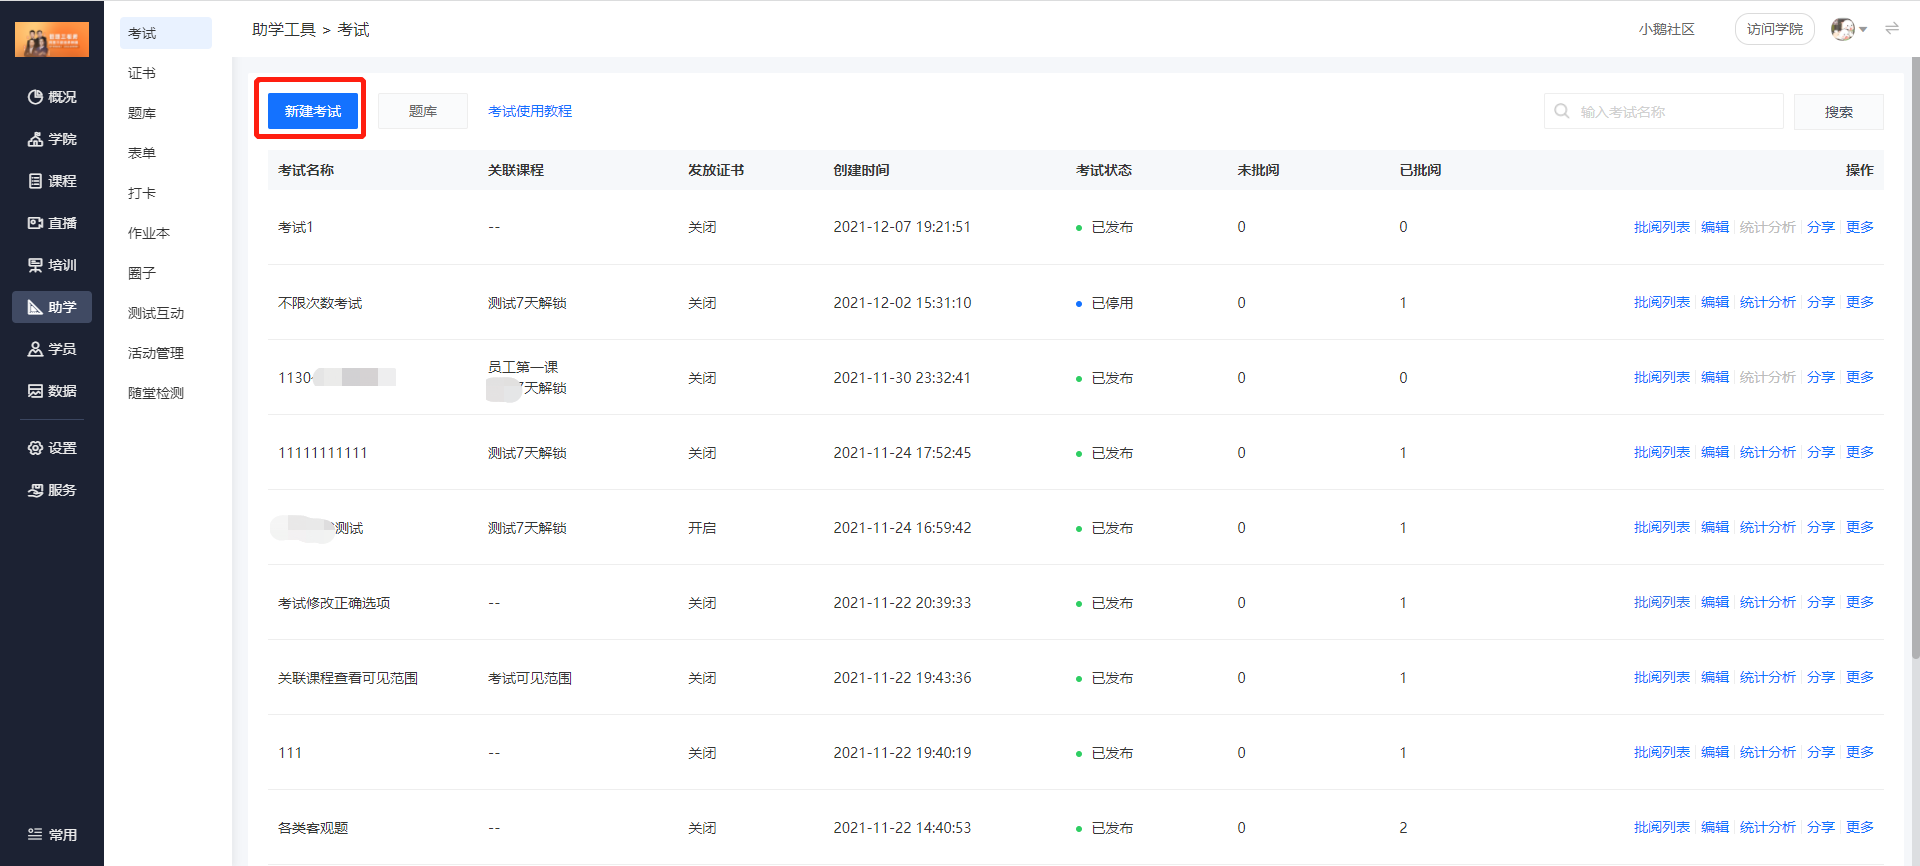
Merchant side: Management console → Learning assistance → Exams → Create a new exam
Student side: H5 College → My → Learning tools → Exams
V. Usage Tutorial
Step 1: Configure the exam
(Management console)
2. Set the exam information
(1) Basic information: Fill in the exam name and details, and upload the cover image.
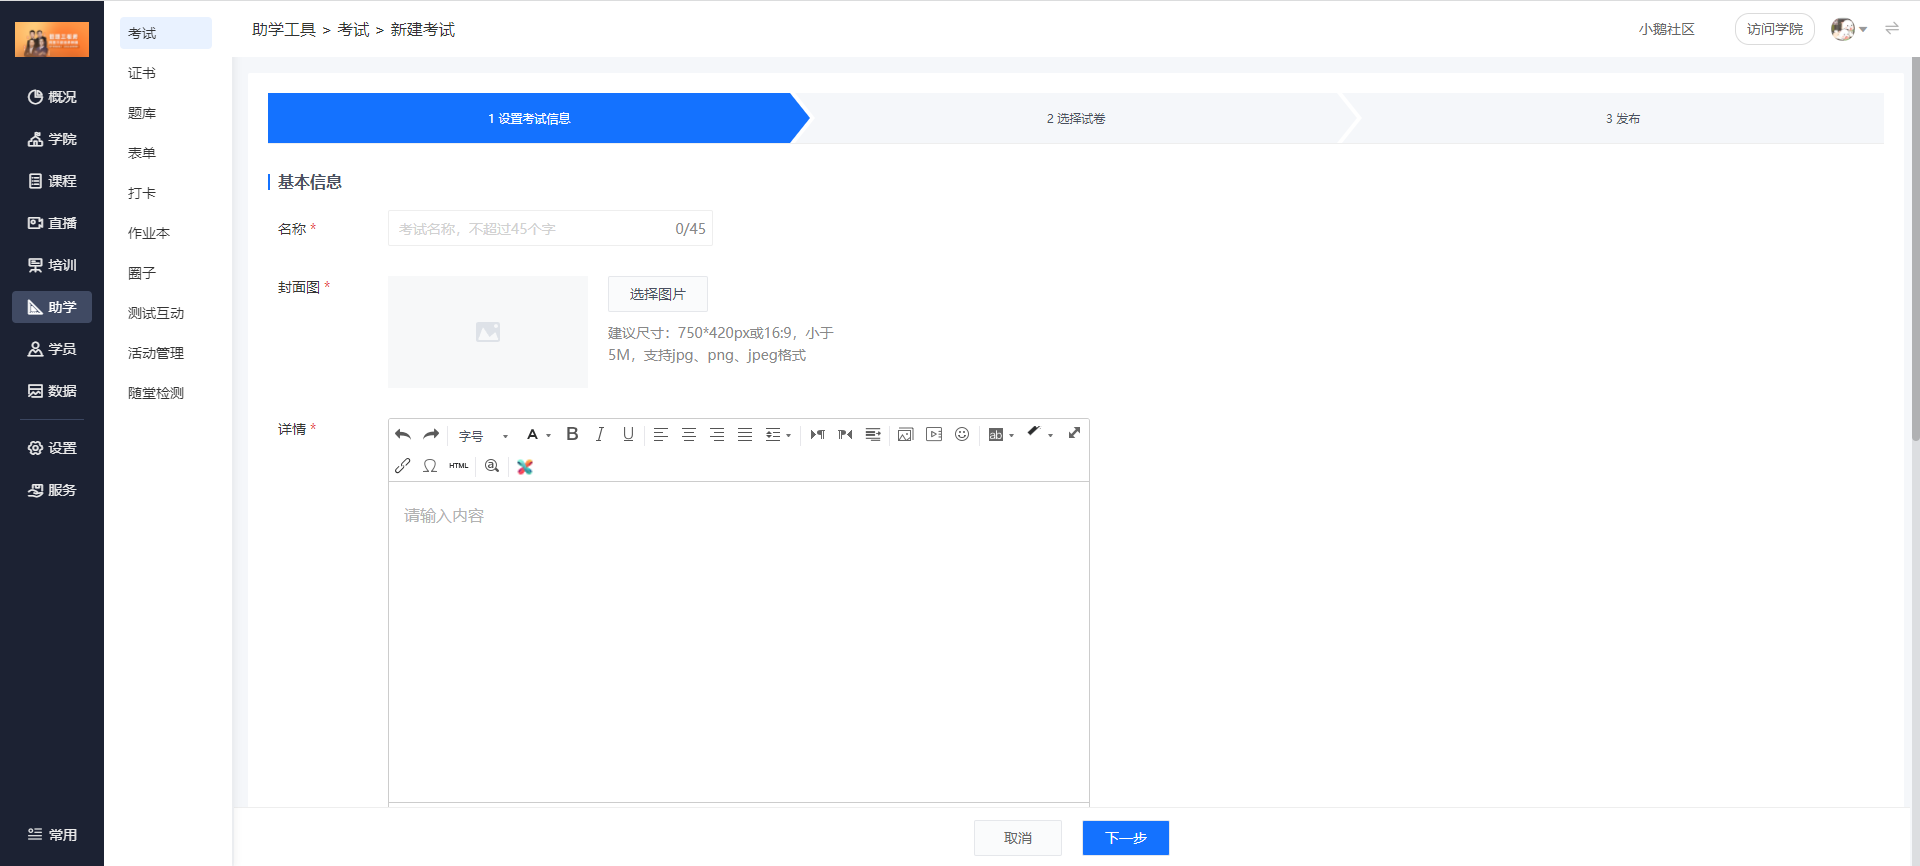
(Management console)
(2) Associate courses: You can associate the exam with text, audio, video, and columns. Multiple courses can be associated (optional to not associate).
(3) Exam settings: Set the scope of candidates, exam time limit, duration for taking the exam, number of exam attempts, etc.
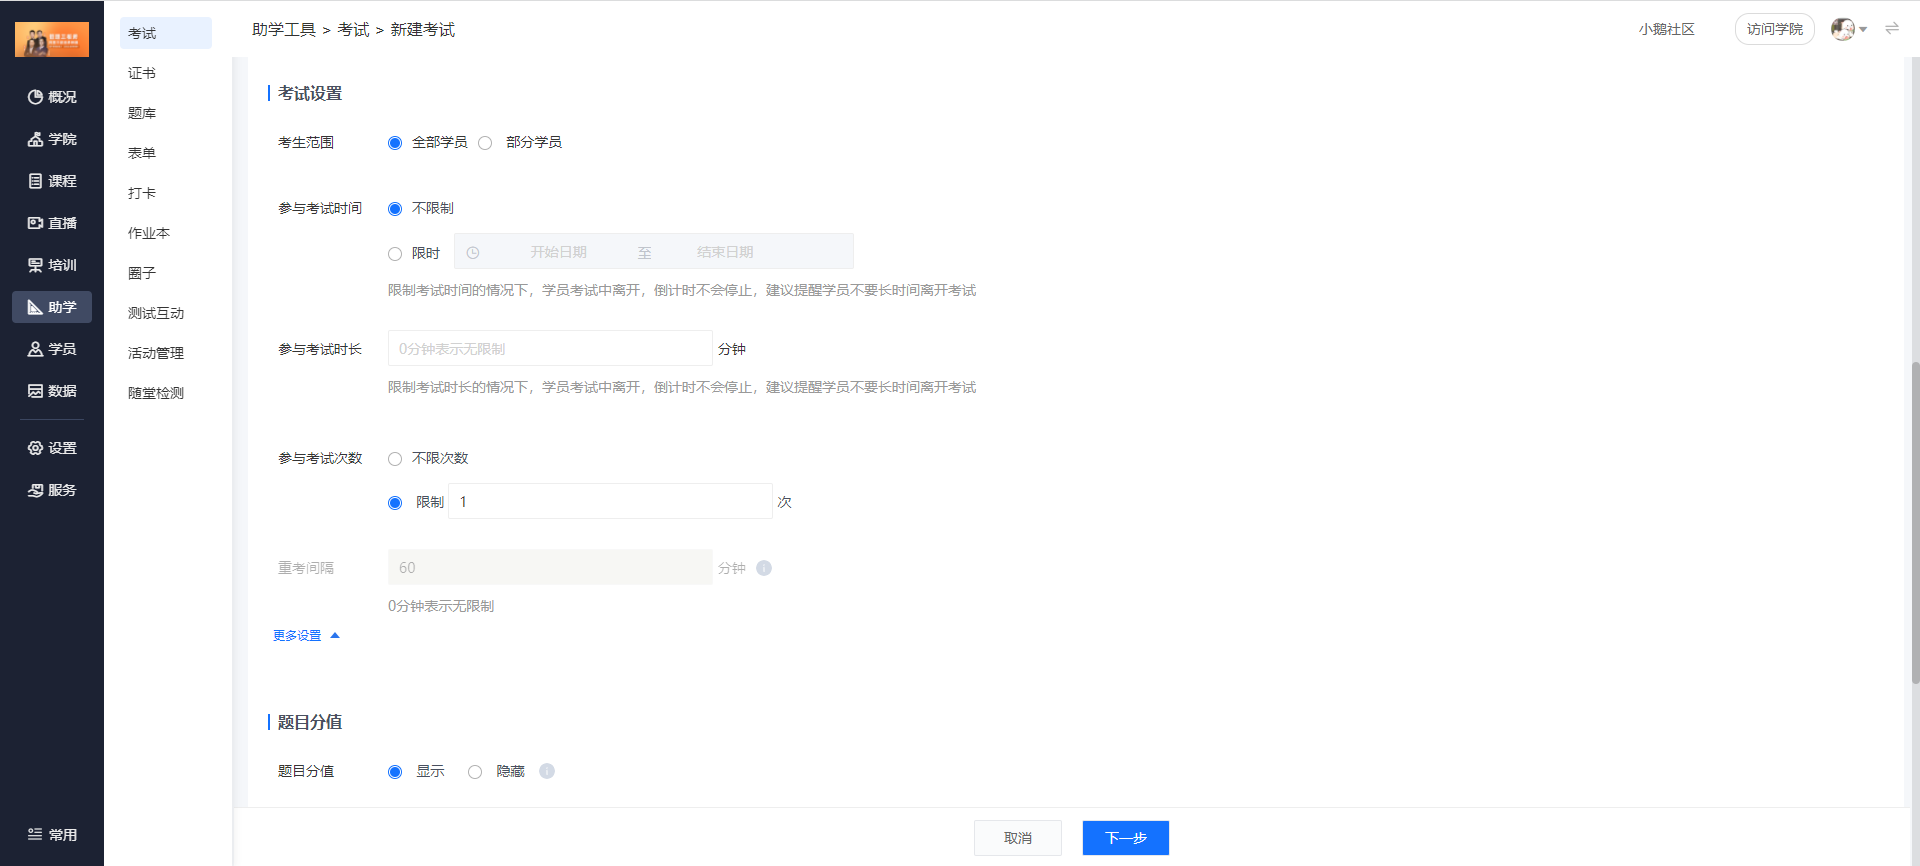
(Management console)
(4) Click "Next" to add questions.
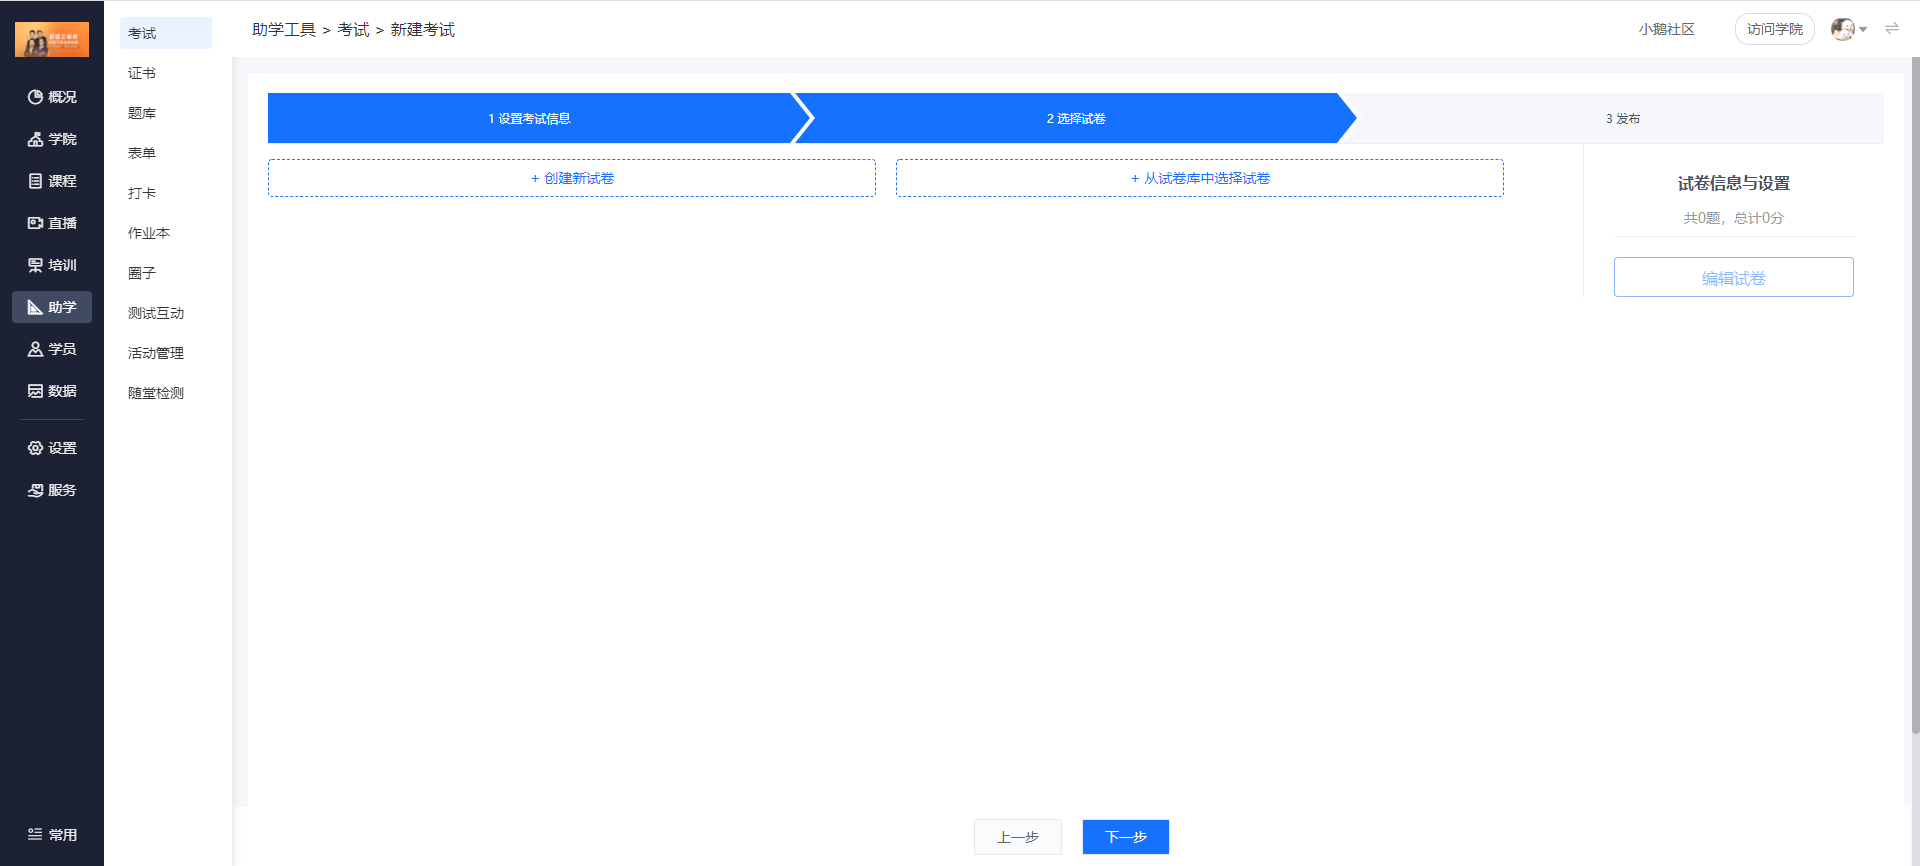
(Management console)
(5) Add questions: Create a new test paper or select a test paper from the test paper library.
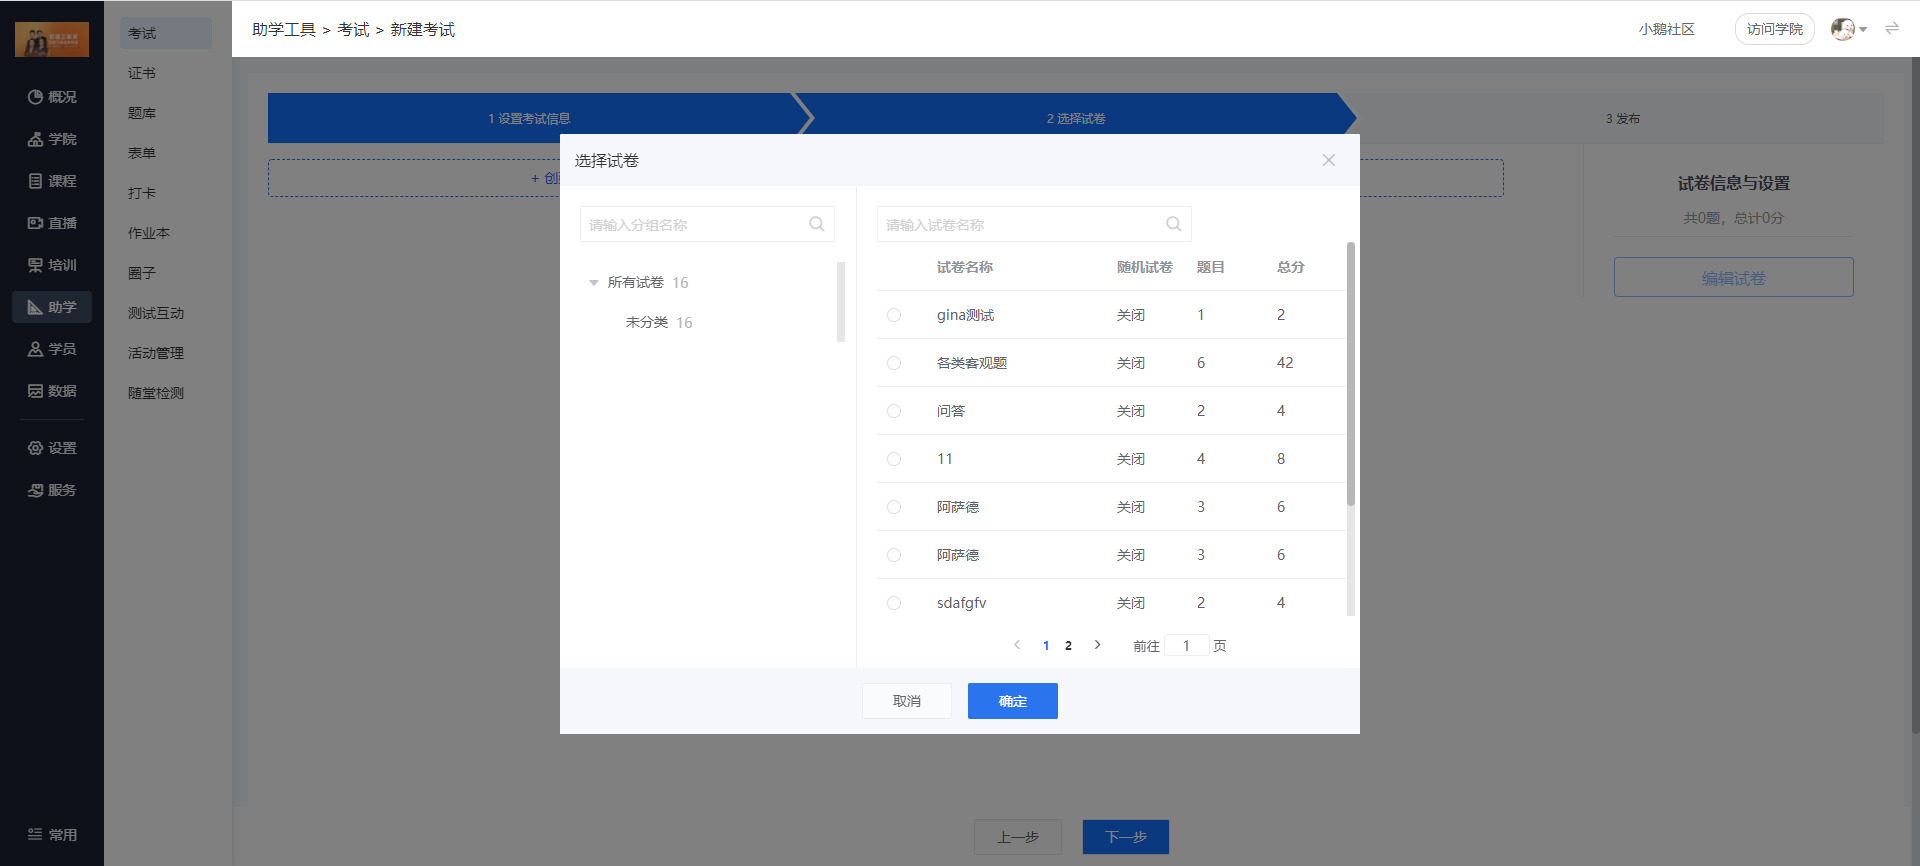
(Management console)
(6) Publish the exam: Click "Create" to complete the creation of the exam.
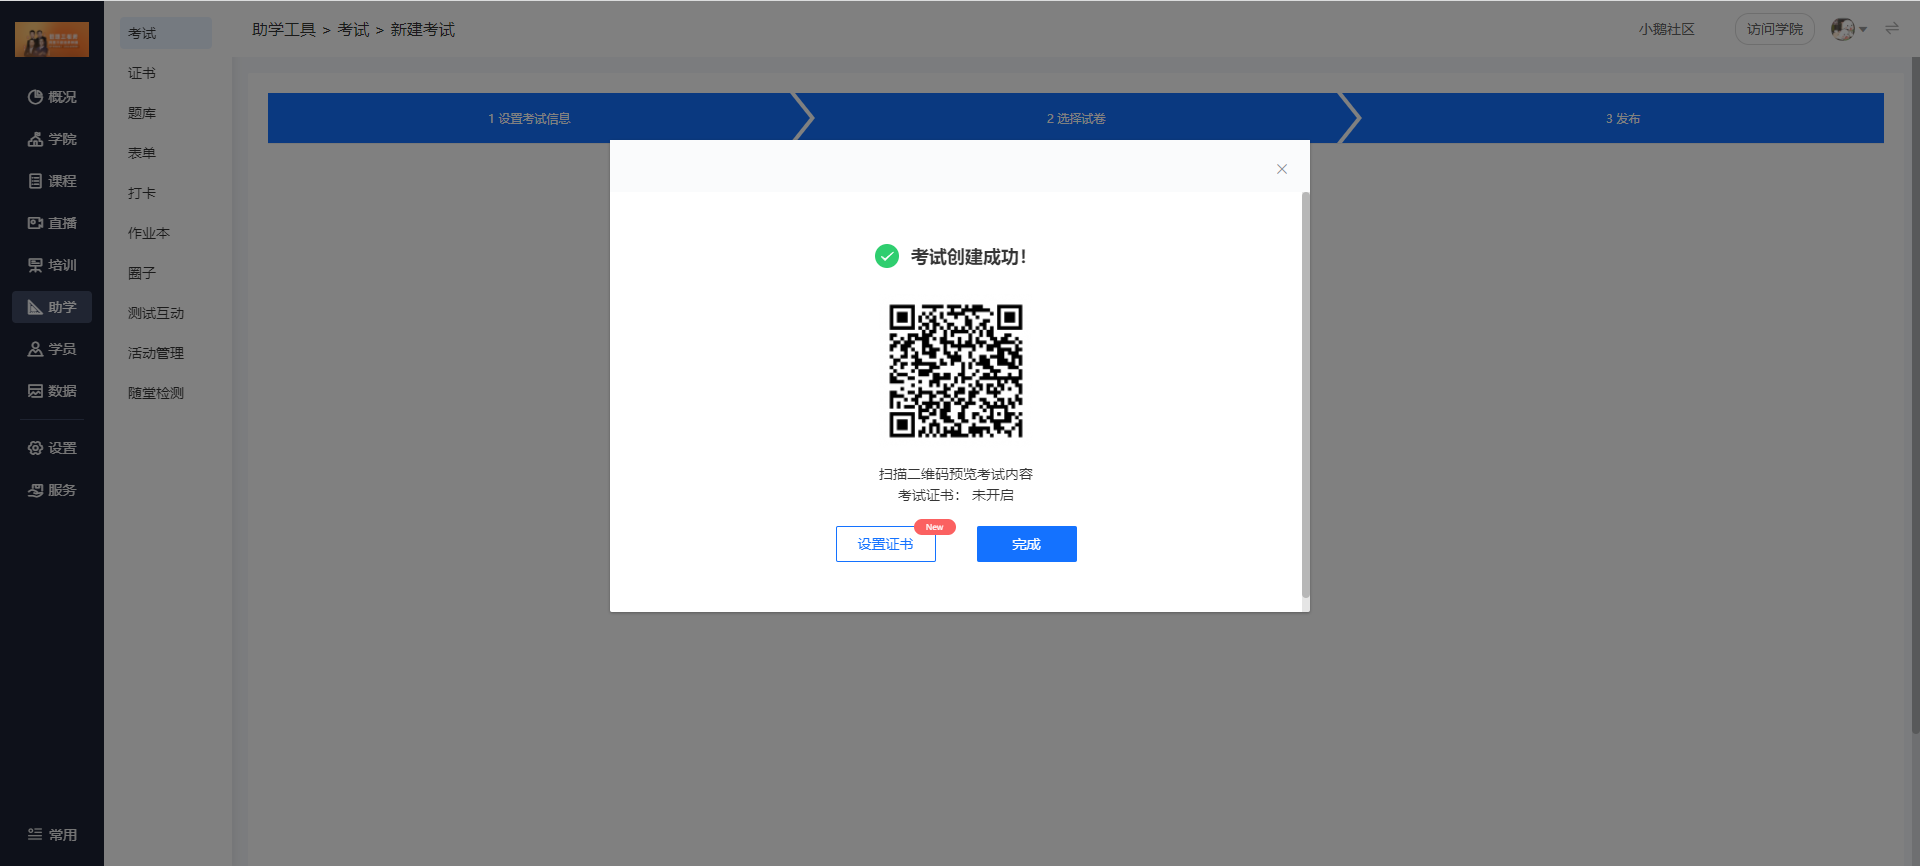
(Management console)
(7) Set certificates: You can add certificates to the exam.
3. Grade the exams
(1) Click [Grading list] - [Grade] to enter the exam grading page.

(Management console)
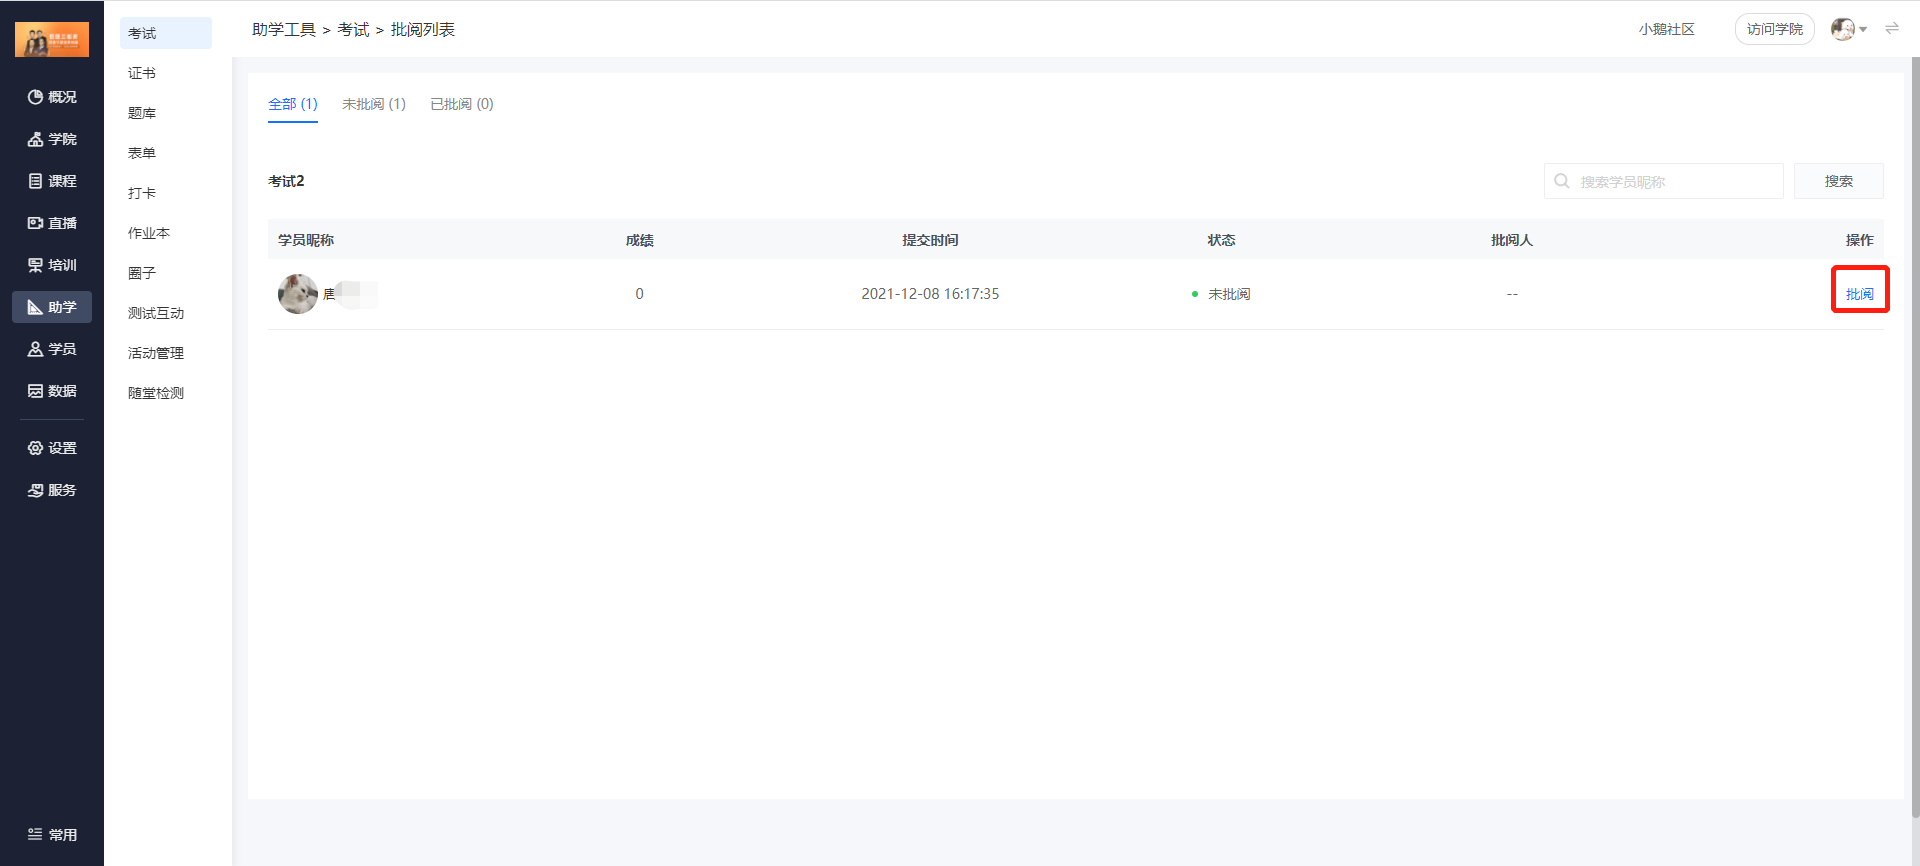
(Management console)
(2) Score: Enter the score directly in the [Score] box.
The system will automatically grade multiple-choice questions, while essay questions need to be graded manually. If the exam content consists entirely of multiple-choice questions, the system will grade directly, and students can get their scores without waiting for teachers to grade.
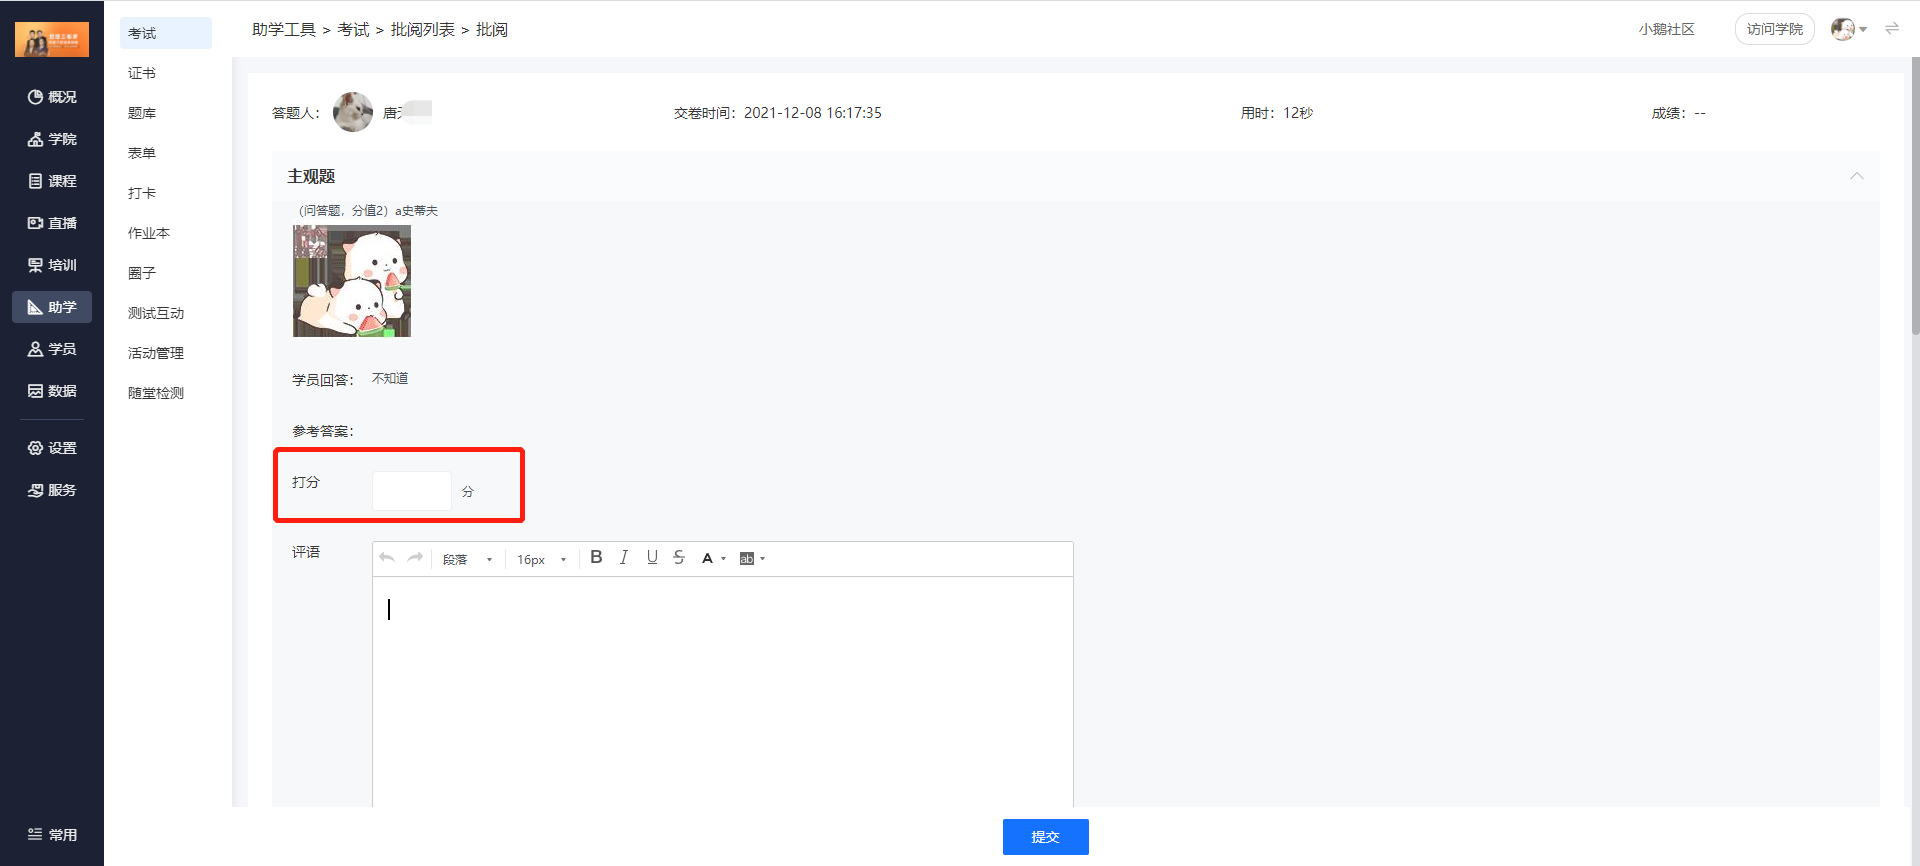
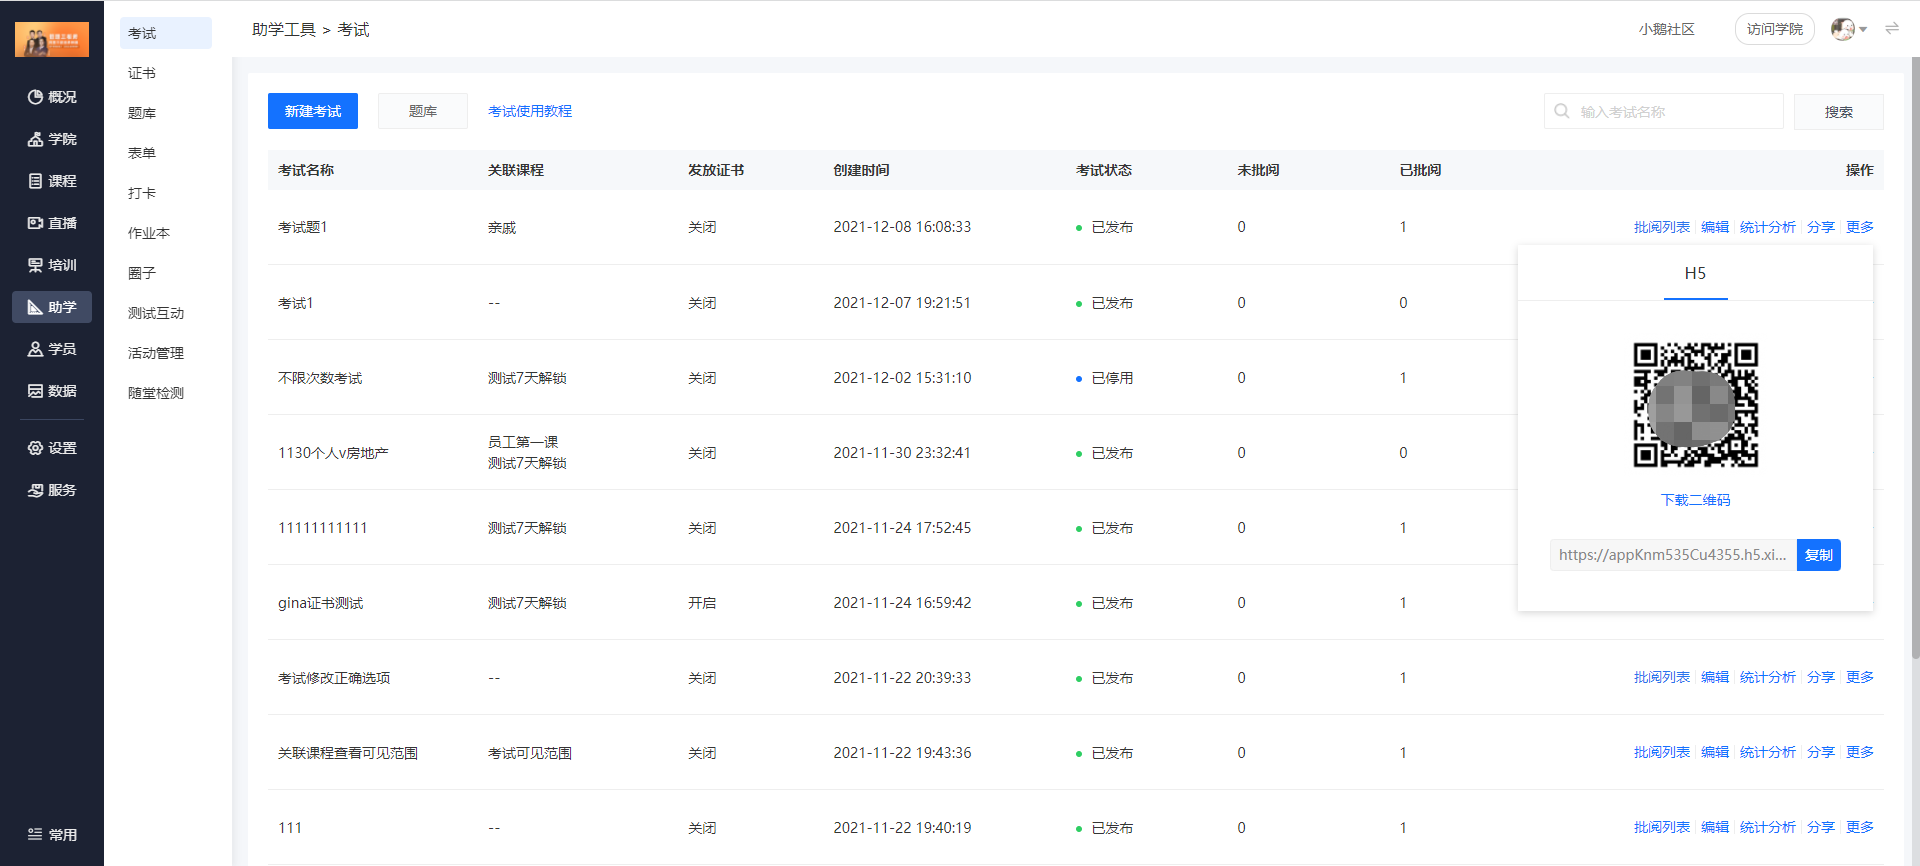
(Management console)
Step 2: Exams - Student side (Two methods)
Method 1: Students directly scan the exam code shared by the administrator to enter the "Start the exam" page. Click [Start the exam] to enter the formal exam page and start answering questions.
After finishing answering the questions, click [Submit the test paper] to complete the exam and enter the grading page.

Method 2: Students enter the college homepage through the enterprise training QR code shared. Through the path [My] - [Learning tools] - [Exams] - [My exams], select an exam and enter the formal exam page to participate in the exam.

("My" on the student side)
View scores: Students can view their scores through [My] - [Exams] - [Submitted]

Tutorial on Using Event Management
I. Feature Introduction
You can use the event management feature to organize offline events and complete the processes of online event information publishing, user registration, collection of registered user information, management of registration status, on-site check-in, etc. in one stop.
II. Purpose of Use
It can be used to organize and manage offline events, inform users of event details, manage registration status, and handle on-site check-in, etc.
III. Use Scenarios
A company invites external guests to give sharing sessions to employees every week. The administrator uses the event management feature to publish the event information for each sharing session, and employees register online. At the sharing event site, employees complete the check-in to indicate their attendance.
IV. Operation Path
Merchant side: Desktop management console → Courses→ Interactive Management → Event Management
Student side: WeChat H5 store → My → Events → Registration
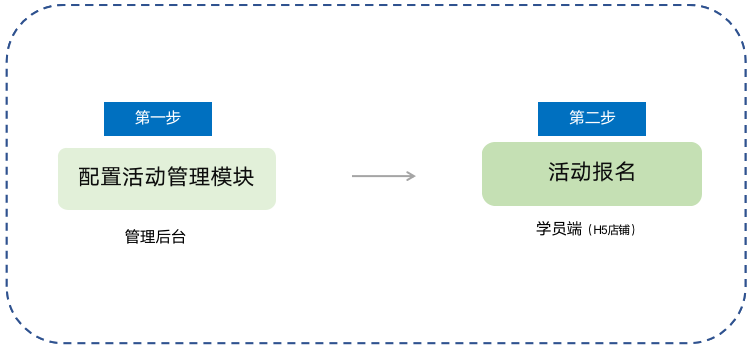
V. Usage Tutorial
Step 1: Configure the event management module - Backend
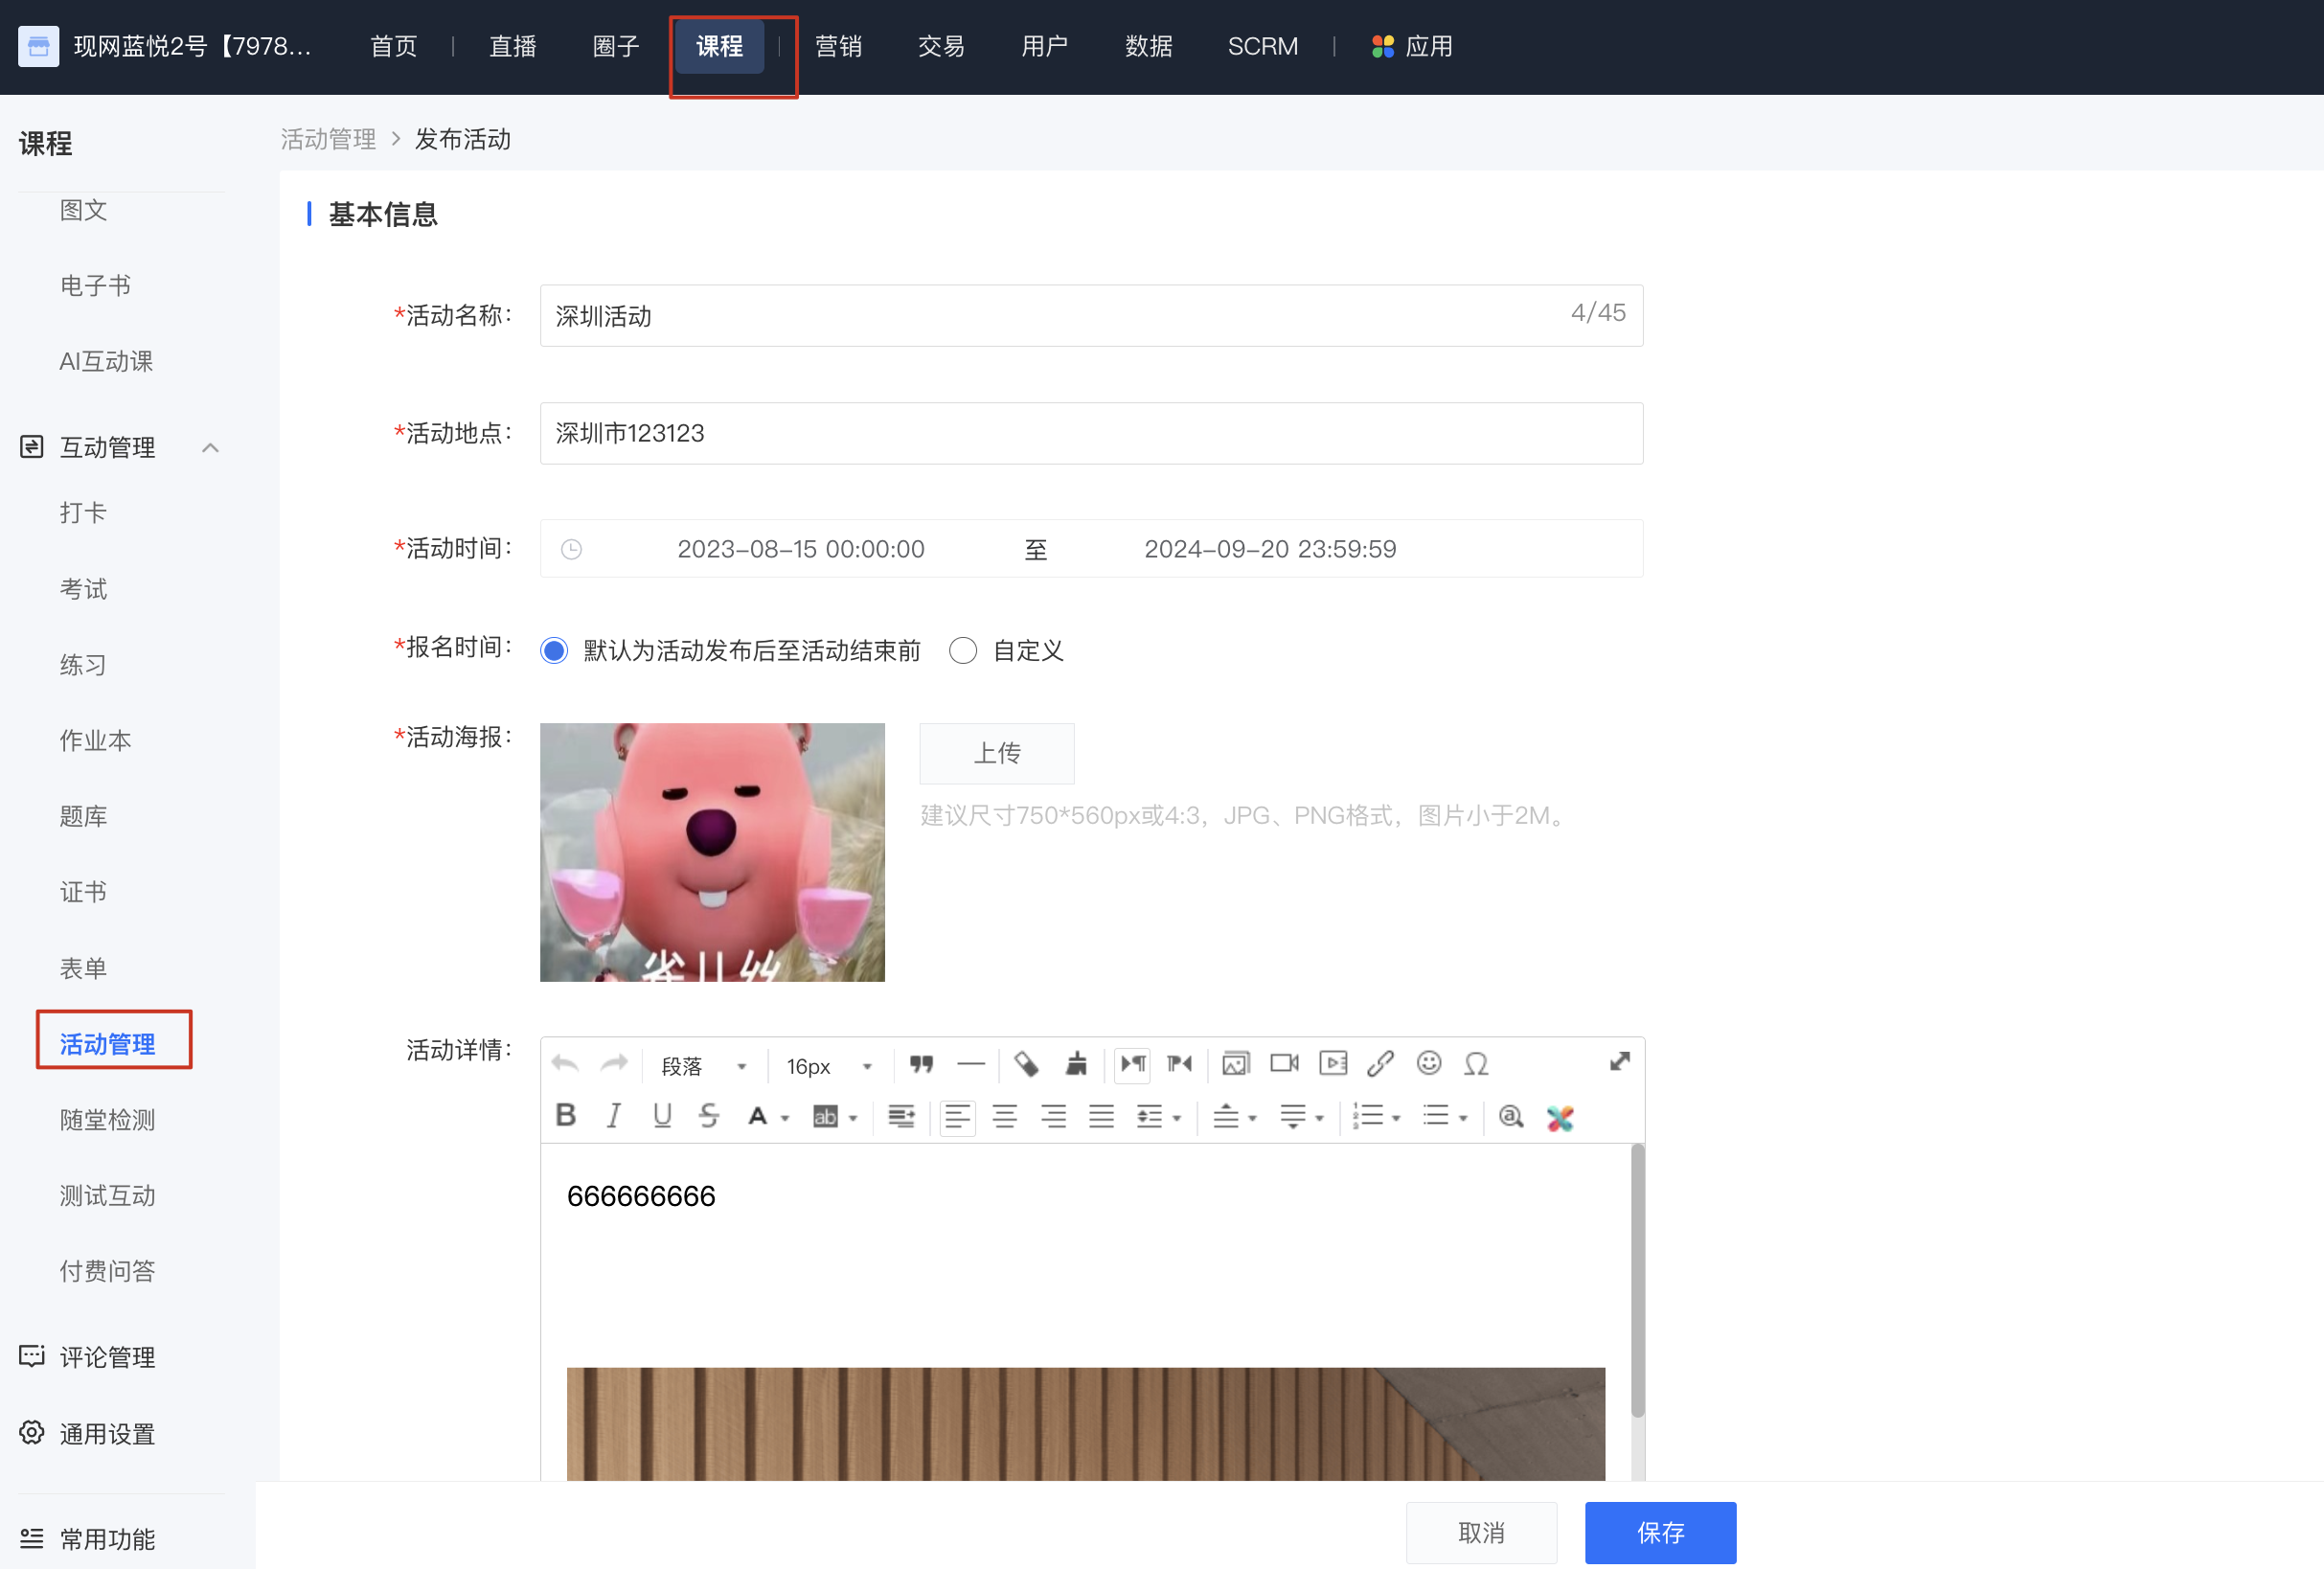
1. [Courses] - [Interactive Management] - [Event Management] - [Publish Event]:
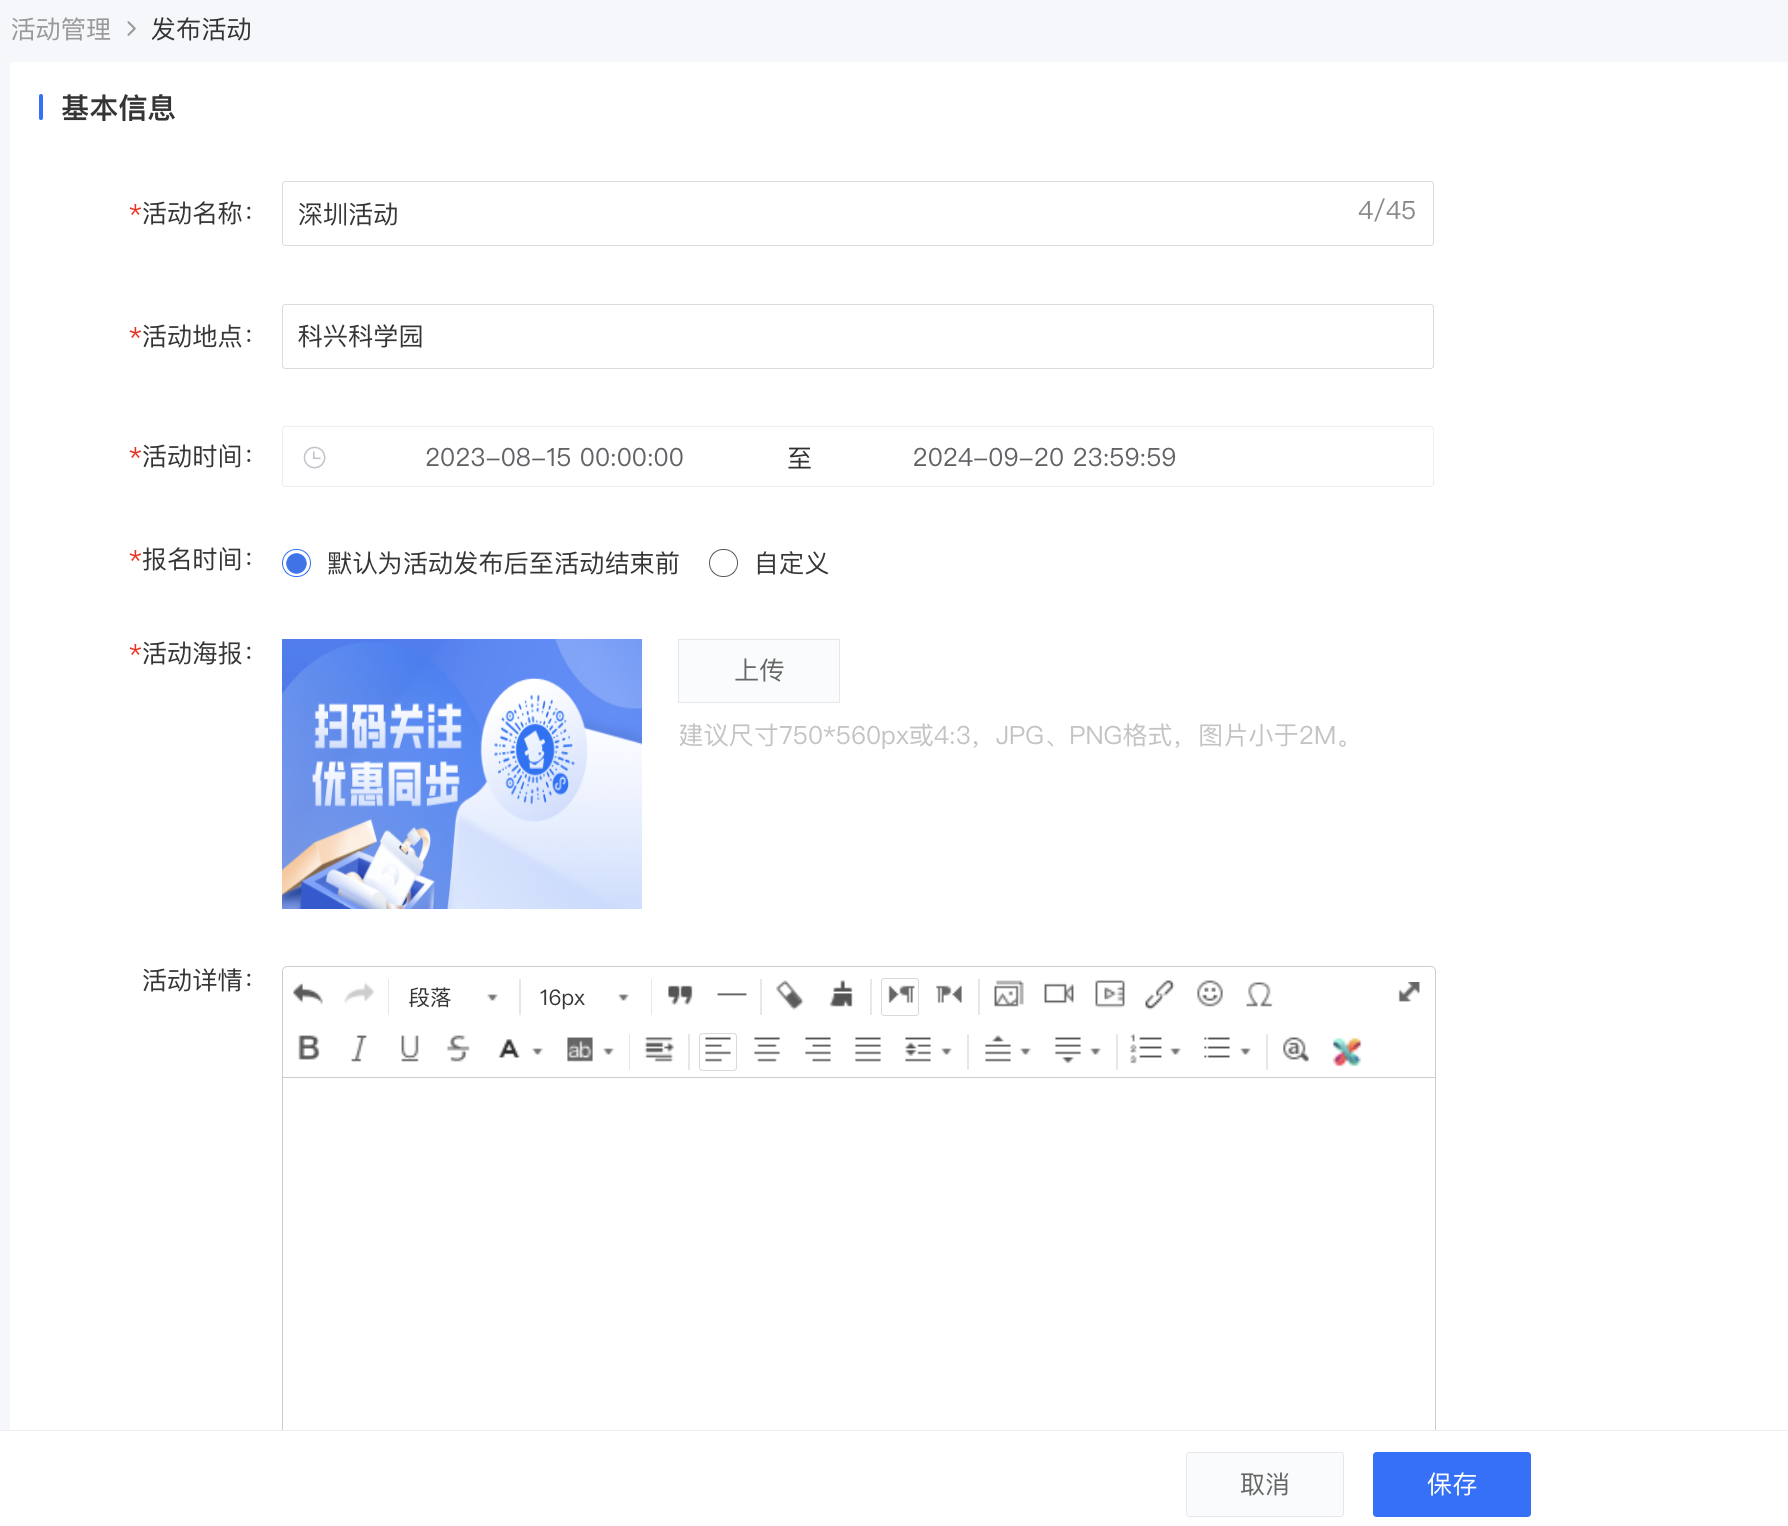
2. Fill in basic information: Fill in the event name, location, event time, registration time, event details, and upload the event poster.
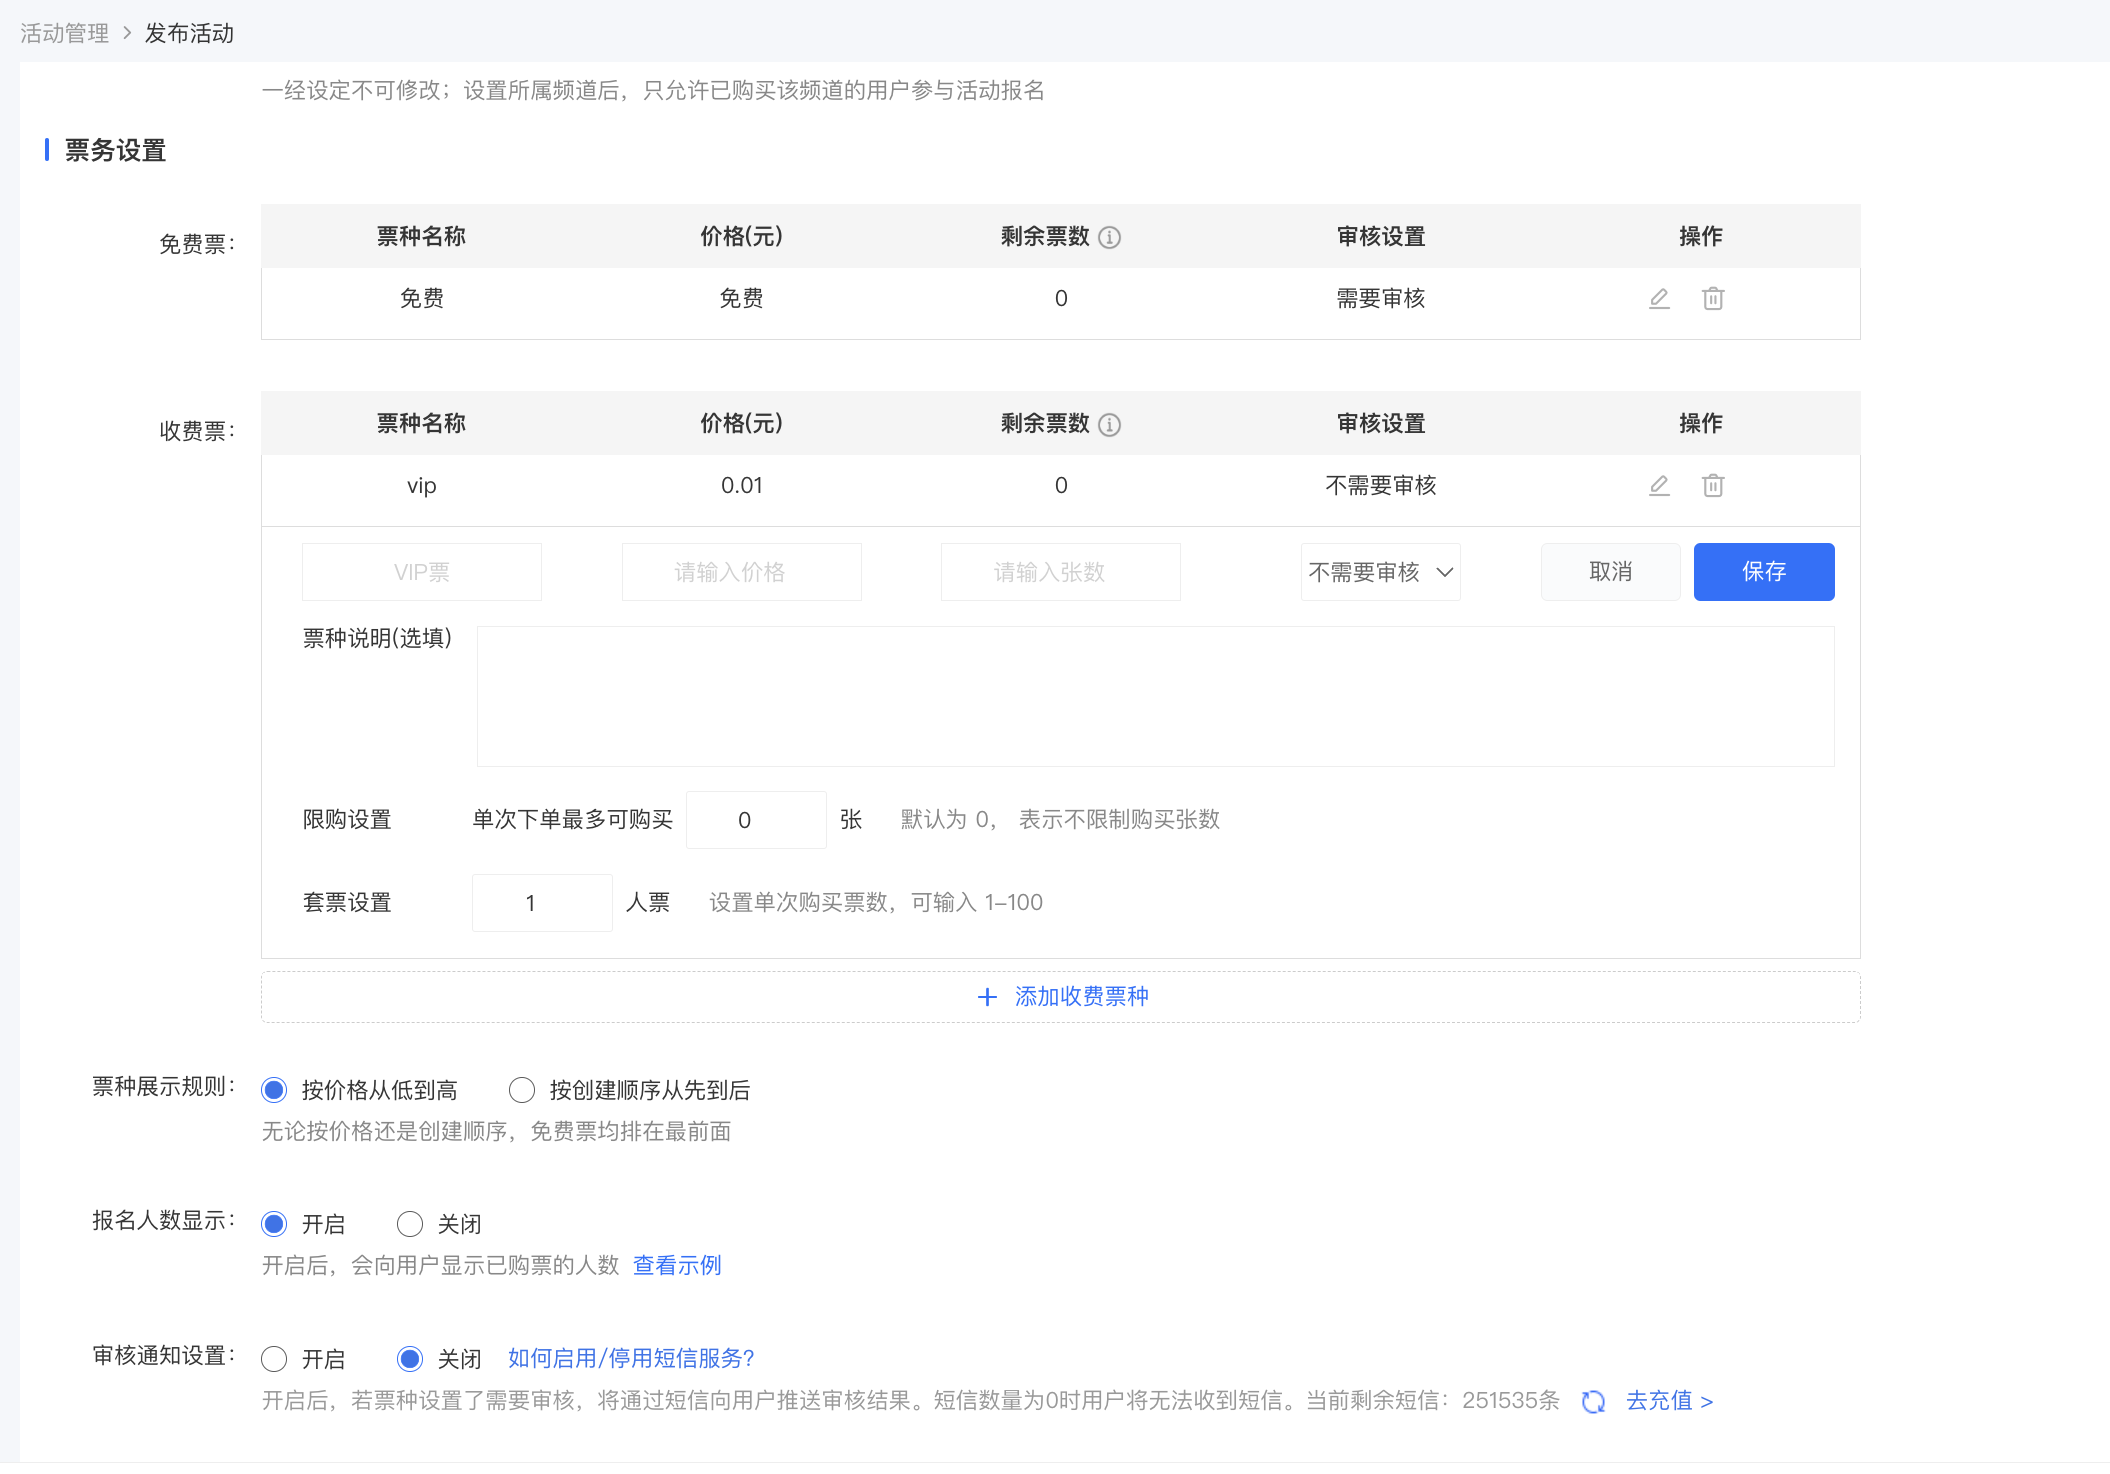
3. Ticket settings: Add event ticket types, set the number of tickets, review settings, and purchase limit settings. You can fill in the ticket type description. You can choose whether to display the number of registered users on the event registration page.
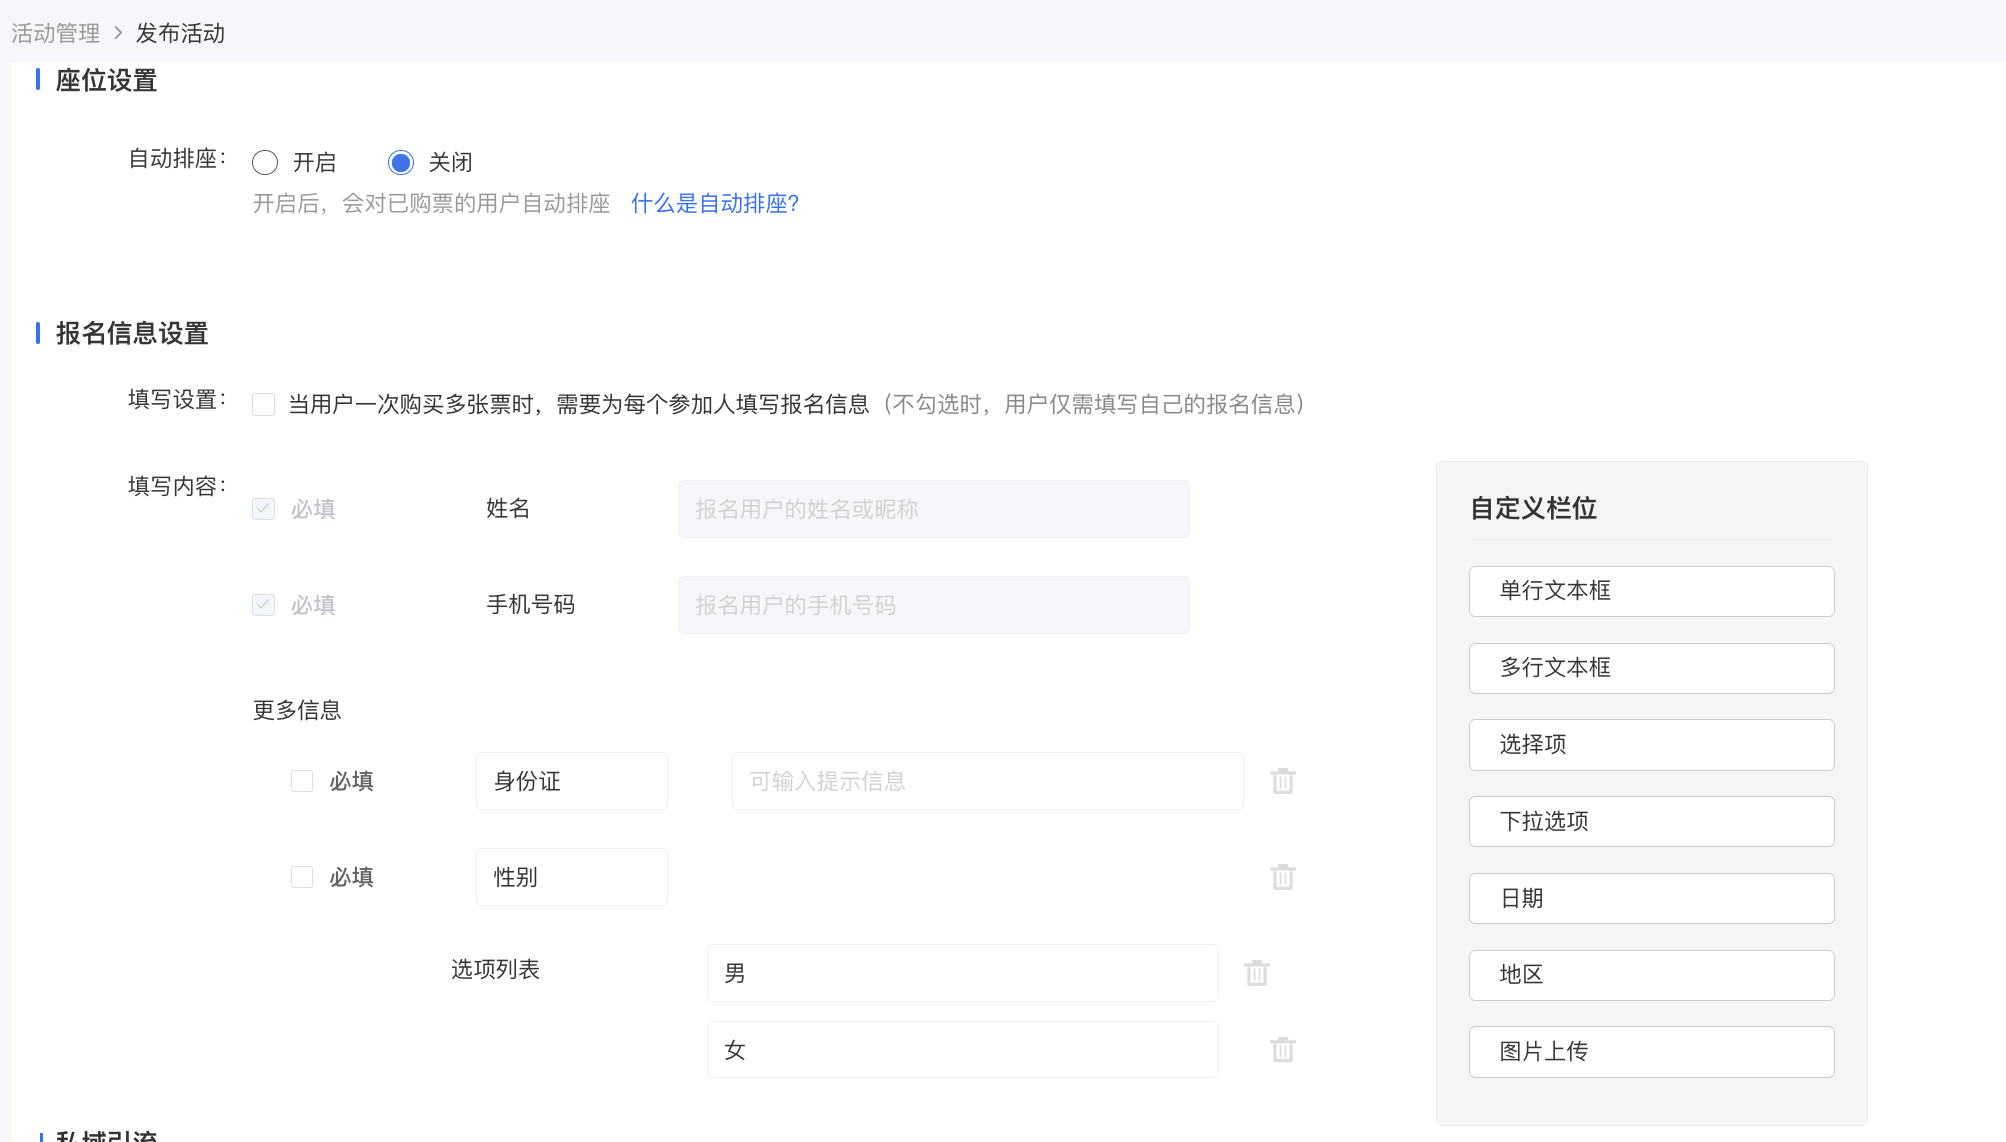
4. Form settings: You can enable the registration form to collect information from registered users. The registration form collects the name and mobile phone number by default. You can use components to customize other information to be collected.
5. Registration and review
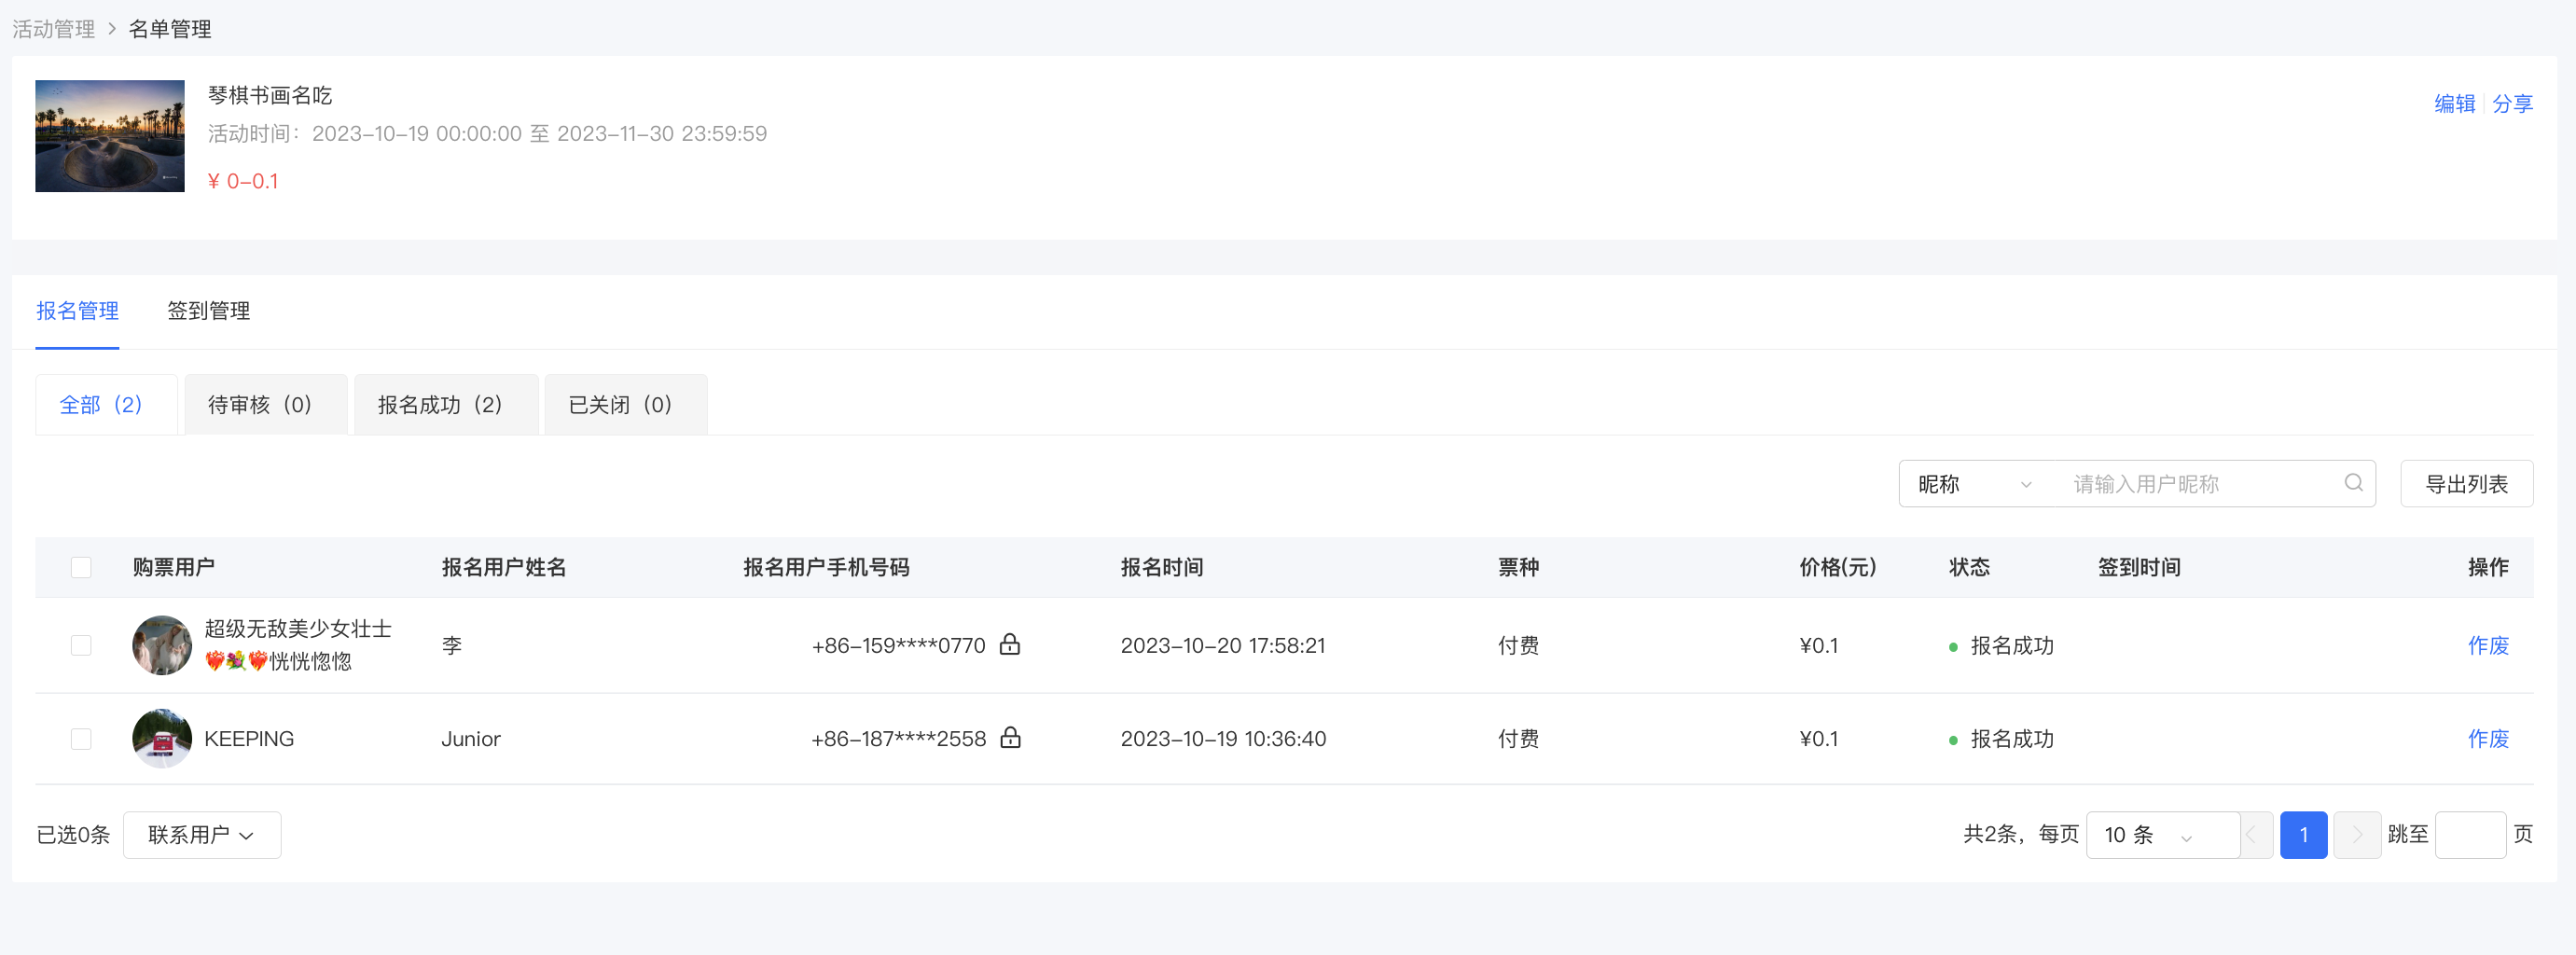
After the event is published, you can view and manage the registration status of users on the management console.
1) Click [Learning Assistance Tools] - [Event Management] - [List Management] - [Registration Management] on the management console.
2) For events that require registration review, you can choose to 'Approve' or 'Reject' users' registrations; for events that do not require registration review, users' registrations will be automatically approved after they register.
3) After a user's registration is approved, the status will show as 'Registration Successful', and the user will receive a ticket to participate in the event. Before the user checks in, you can invalidate the user's ticket, and the user will not be able to participate in the event after the ticket is invalidated.
6. On-site check-in
Method 1: Scan the QR code to check in
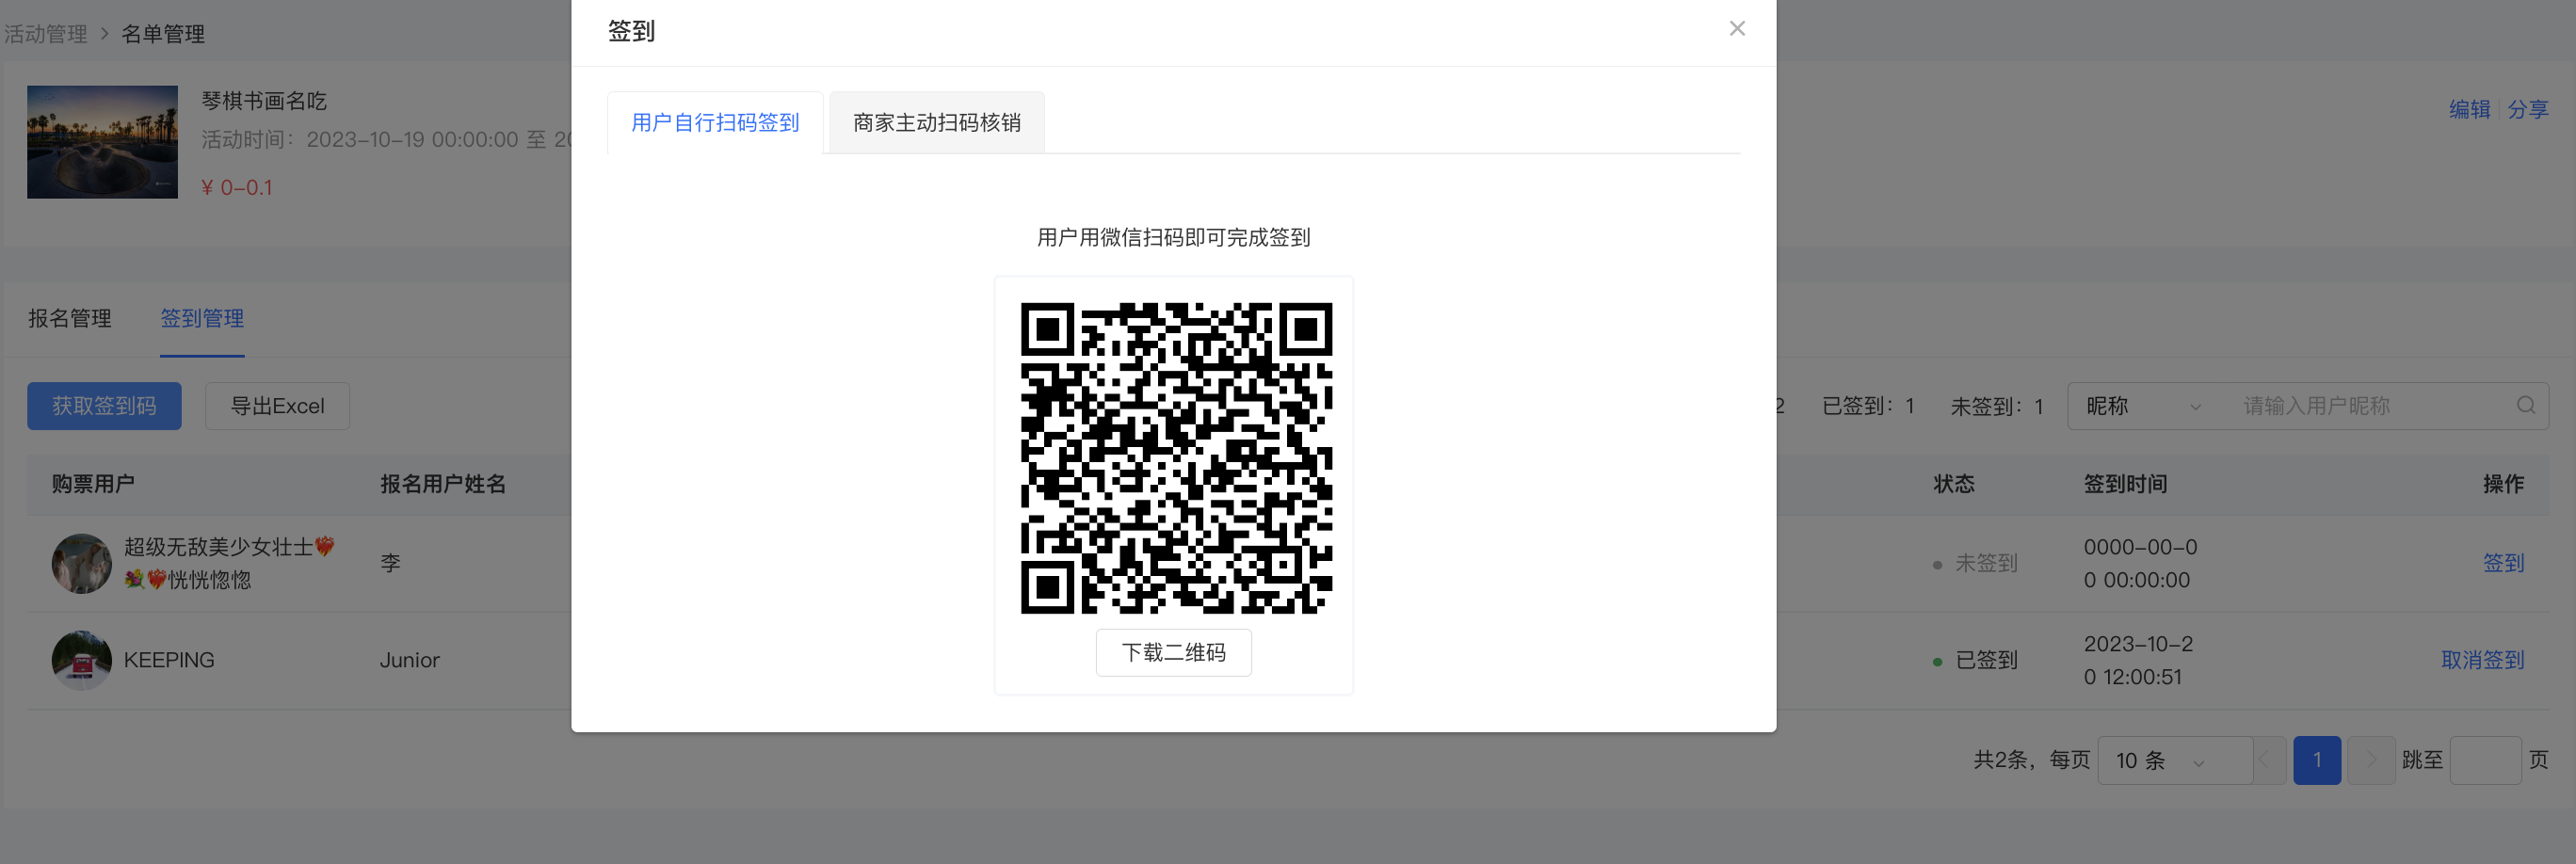
elink automatically generates a unique check-in QR code for each event. Download and print the check-in QR code and place it at the event venue. Users can complete the check-in by scanning the QR code with WeChat after arriving at the venue.
Path: Management console [Courses] - [Interactive Management] - [Event Management] - [List Management] - [Check-in Management] - [QR Code Check-in]
Method 2: Manual check-in
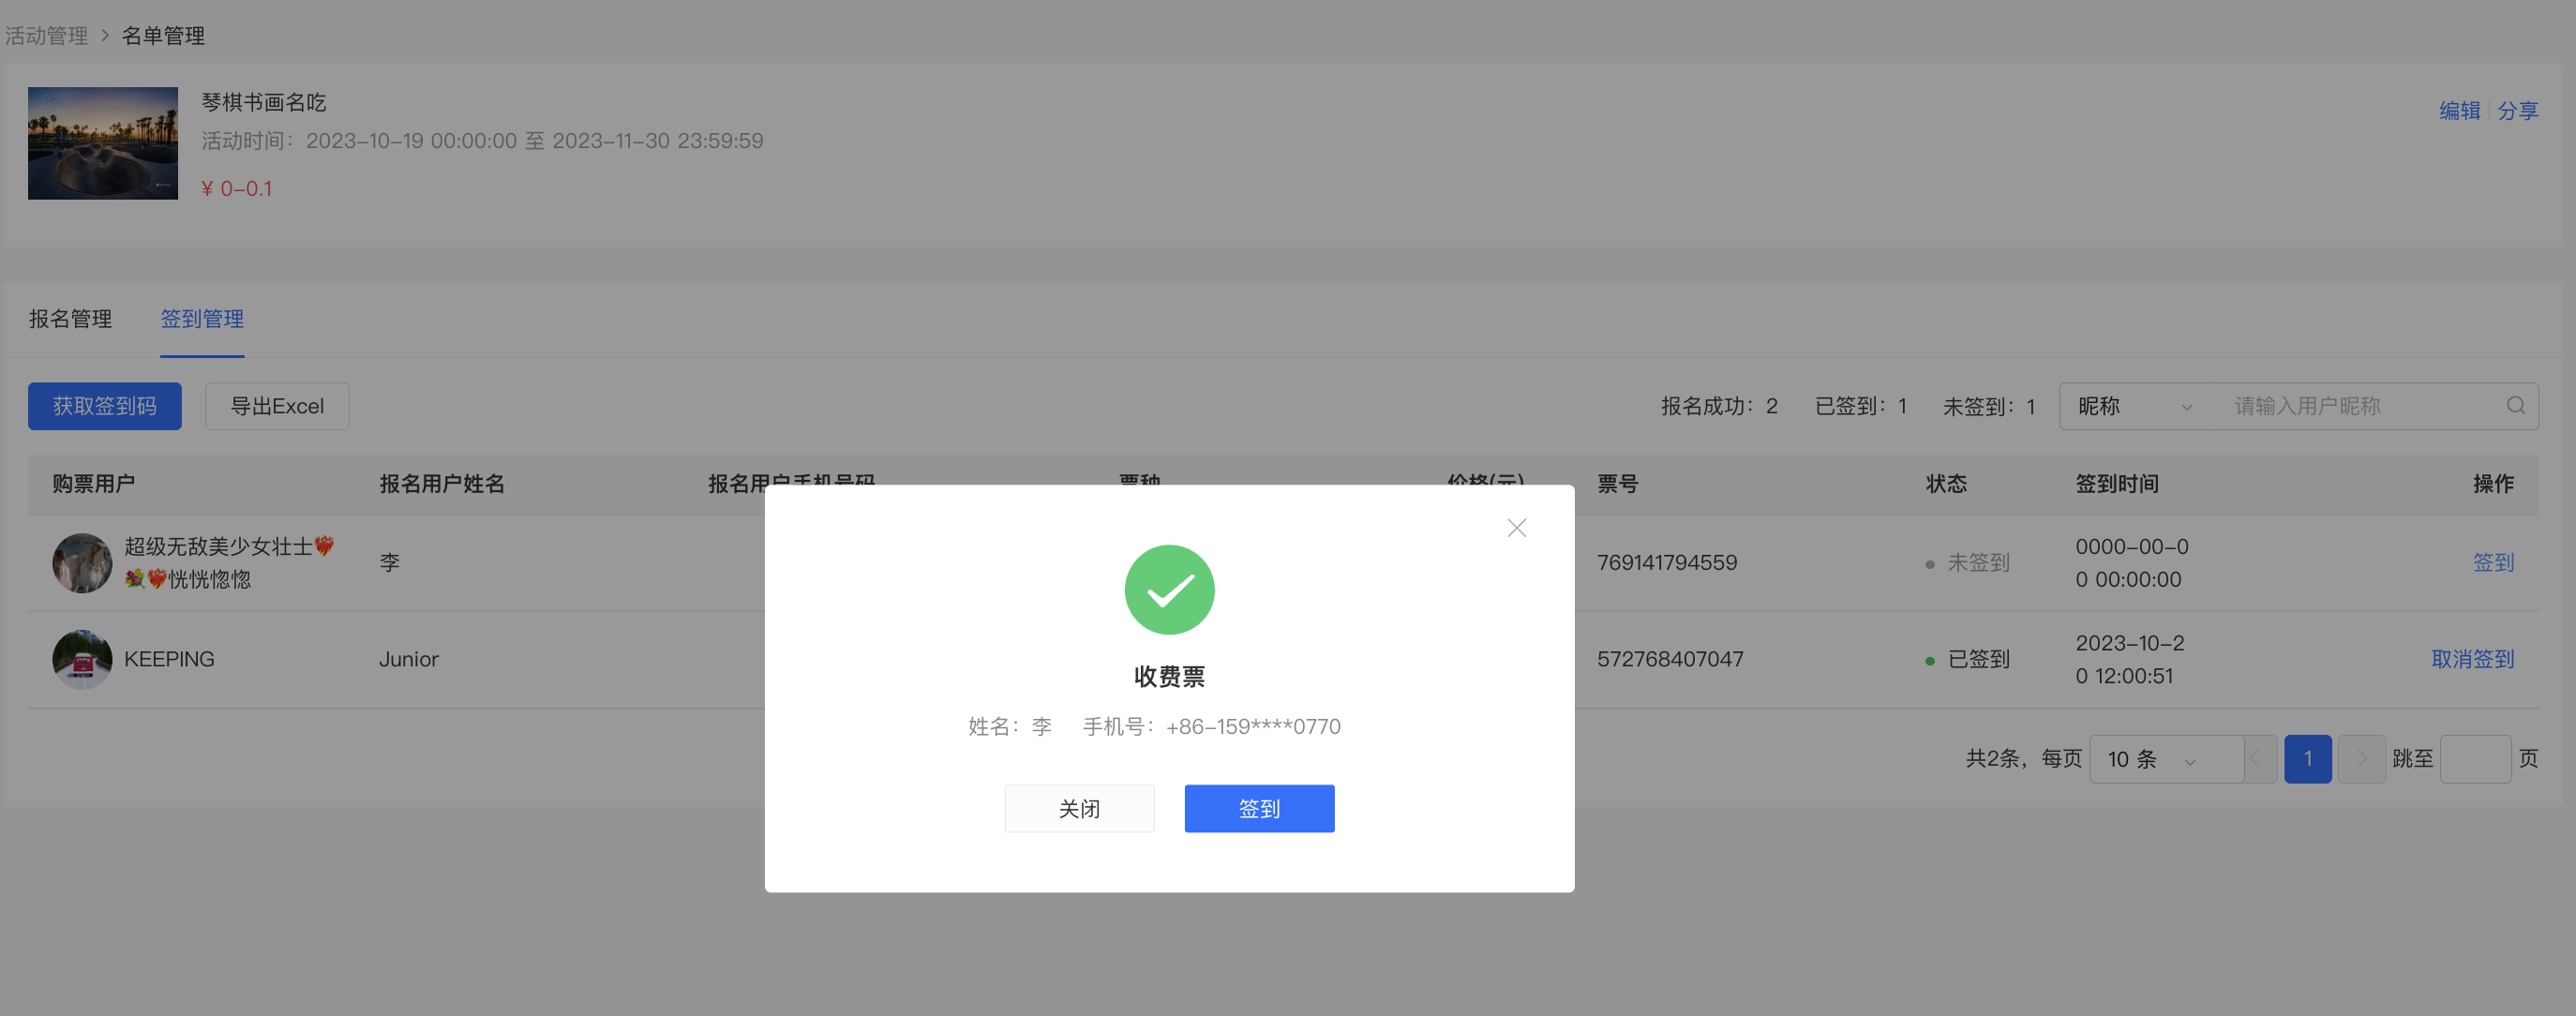
In case of unexpected situations such as unstable network environment at the event site or a user's mobile phone being turned off, which prevent users from completing the check-in by scanning the QR code, you can temporarily complete the 'manual check-in' through a paper check-in form. Then search for the name or mobile phone number of the registered user on the management console and click the [Check-in] button on the right side of the user list to complete the event check-in statistics.
Path: Management console [Courses] - [Interactive Management] - [Event Management] - [List Management] - [Check-in Management]
Step 2: Event registration - Student side
1. Students can enter the event registration page through the sharing link or QR code and complete the event registration information according to the page prompts to participate in the event. After successful registration, users will receive an event ticket.
2. Enter the 'My Events' page through the 'My' page - [Events] of the college to view the list of registered events.
3. Click on an event to view the ticket. 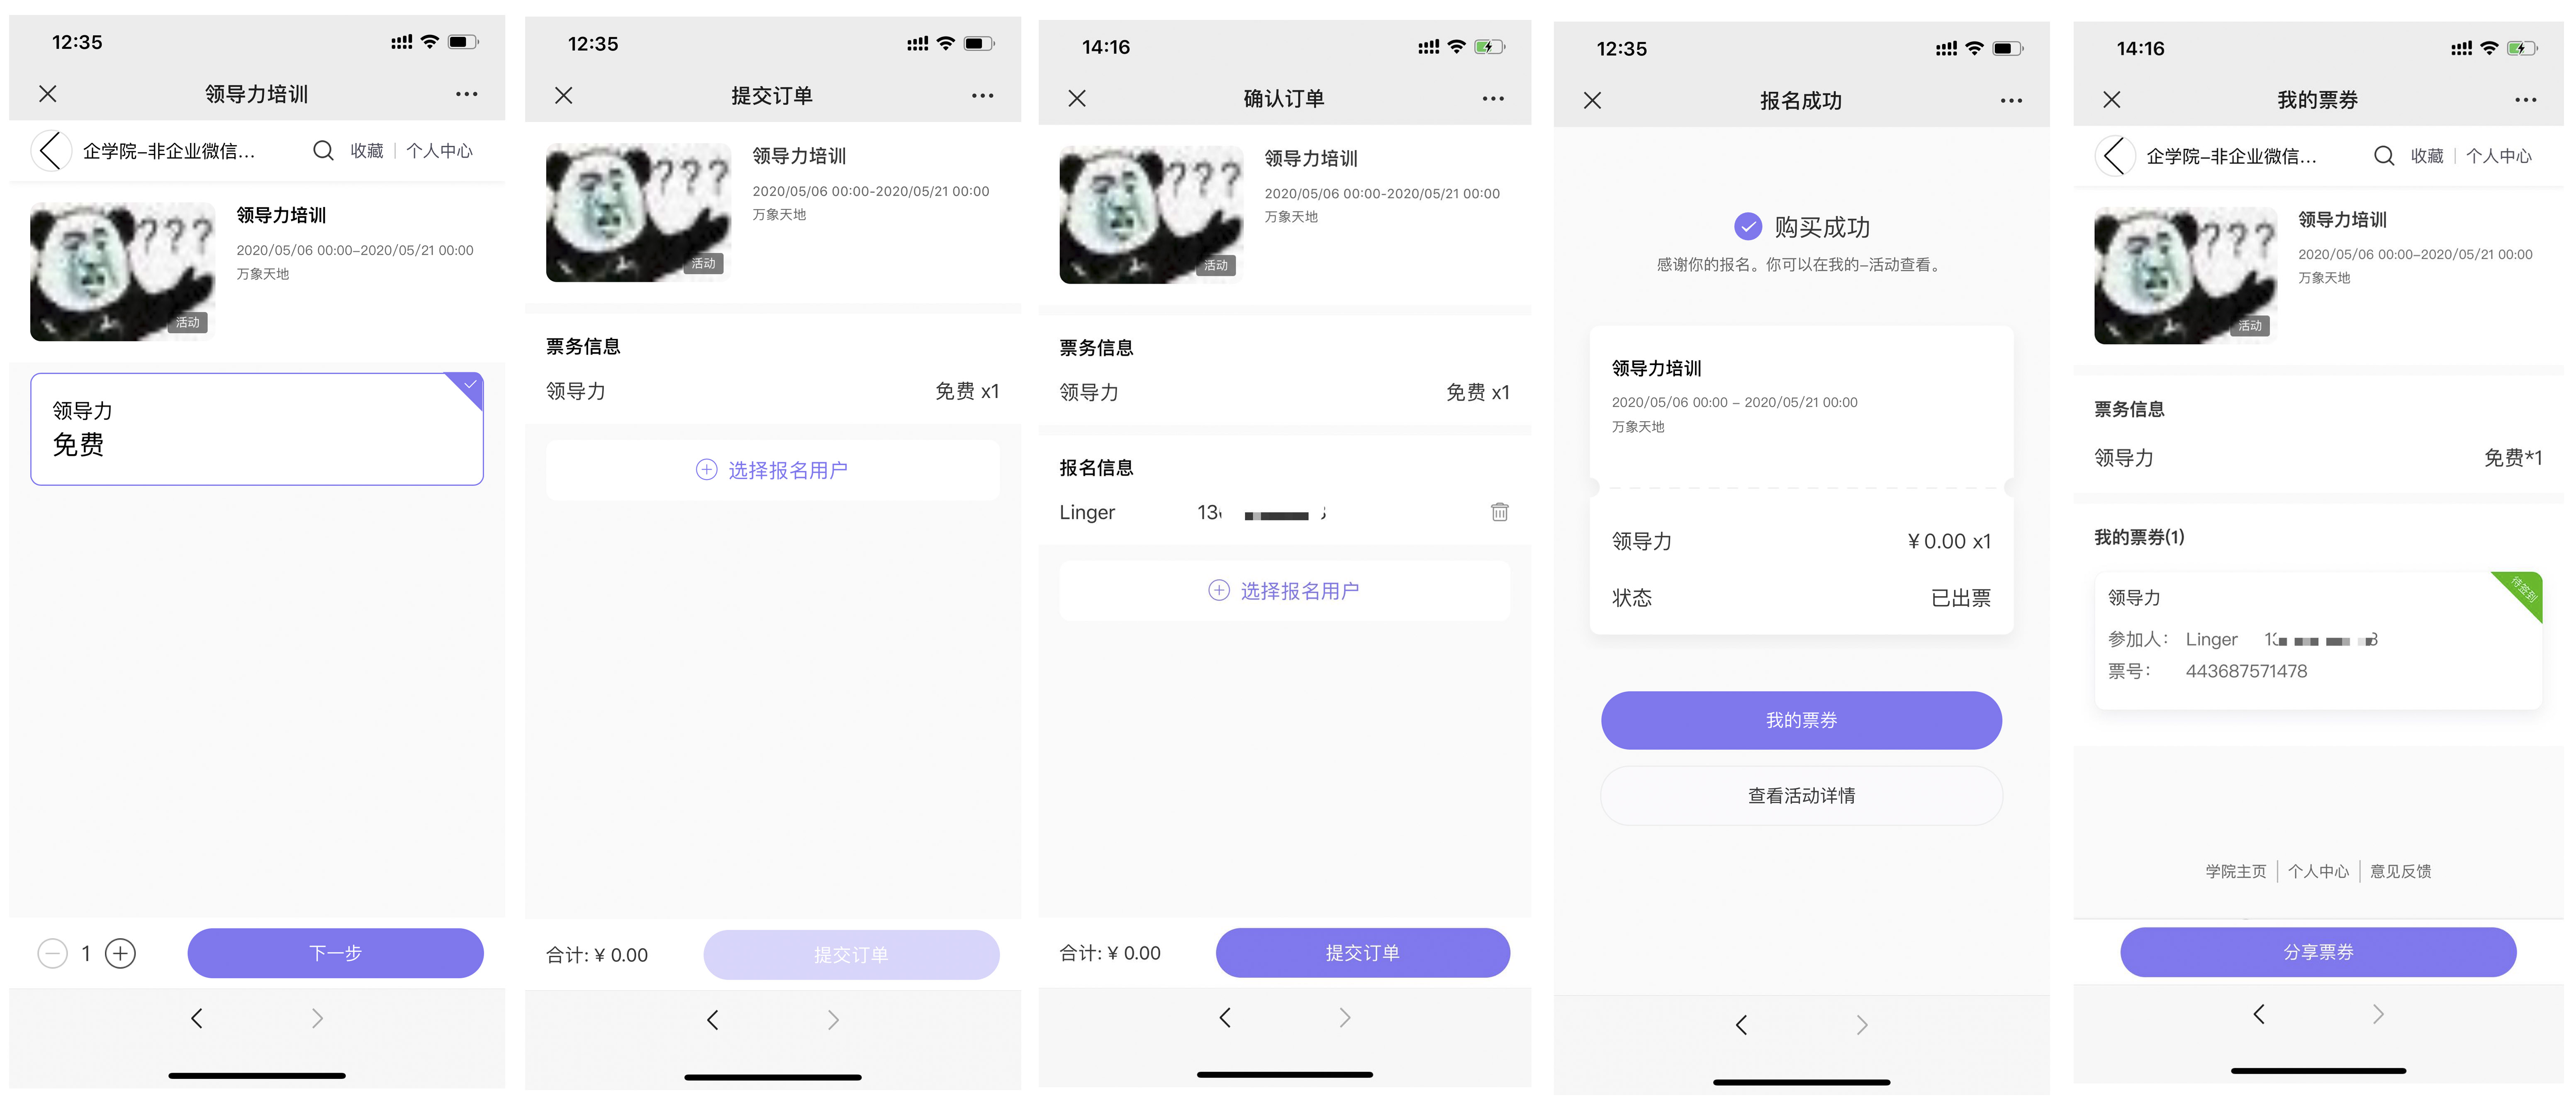
Tutorial on Using the Question Bank
I. Function Introduction
The question bank is a feature that enables rapid import and creation of a vast number of test questions. The question bank supports different types of questions, such as single-choice, multiple-choice, true-false, fill-in-the-blank, and short-answer questions. It also supports custom categorization and storage of questions. By combining the question bank with the assignment and exam functions, questions can be imported in advance and called up at any time, improving the management efficiency of administrators.
II. Purpose of Use
Using the question bank allows for centralized management of test questions.
III. Usage Scenarios
Administrators can enter questions into the question bank at any time and categorize them. When creating assignments and exams, they only need to call up the questions from the question bank, which simplifies the process.
IV. Operation Paths
Merchant side: Management console → Learning assistance → Question bank → Add questions
Student side: H5 Academy → My → Exams/Assignments → Answer questions
V. Usage Tutorial

(Tutorial flowchart)
Step 1: Configure the question bank module(Management console)
1. Category management
You can create the required categorization structure for questions or test papers in advance in the 'Question bank' or 'Test paper library', such as a 'Subject - Chapter - Section' structure, to facilitate the categorization management of questions when creating them. Up to five levels of categorization are supported.
Path:
① Management console [Learning assistance] - [Question bank] - [Question bank - Question categories]
② Management console [Learning assistance] - [Question bank] - [Test paper library - Test paper categories]

(Management console)
(1) Click the plus sign '+' next to the question category to create a custom primary category.
(2) Click the plus sign '+' next to the sub - category to create a custom lower - level category.
(3) A category cannot be deleted if it contains questions or lower - level categories.

(Management console)

(Management console)
2. Add questions
Supports 7 types of questions: single - choice, multiple - choice, indefinite - choice, true - false, fill - in - the - blank, short - answer, and material - based questions.
Supports three ways to add questions:
Manually create questions: Suitable for creating a small number of questions.
Batch enter questions: Suitable for quickly entering questions stored in a Word document into the system.
Import from Excel: Suitable for quickly importing questions stored in an Excel document into the system.
When adding questions, you can select a question category. If no category is selected, the questions will be added to the 'Uncategorized' category.

(Management console)
(1) Manually add questions - Select question category
Click [Modify category] to categorize newly created questions before adding them.

(Management console)

(Management console)
(2) Batch enter questions - Select question category

(Management console)

(Management console)
(3) Import from Excel - Select question category

(Management console)

(Management console)
3. Call up questions
After questions are added to the question bank, they can be imported into test papers in the [Test paper library]. When creating exams/assignments, you can directly select the test papers, which improves efficiency.
Step 2: Answer questions - Student side
Students can complete the corresponding questions through the [Exams] and [Assignment books] assigned by the administrator.
Practice Tutorials
I. Function Introduction
The practice feature meets the need of students for an independent question - answering practice tool. Clicking on the answer will immediately show the explanation. Students can deepen their memory and improve their learning effectiveness through repeated practice.
II. Purpose of Use
Repeatedly practicing questions can improve students' learning effectiveness. For example, if you have 100 real - exam questions each year that you want users to practice, you can assign these 100 questions to one or more categories in the question bank. Then, use the practice feature to associate with the question - bank categories, set up the relevant practice settings, and students can practice answering questions on their mobile devices.
III. Usage Scenarios
Used when students need to practice answering questions independently.
IV. Operation Path
Instructor's end (Computer - based management console): Content → Create New Practice → Share
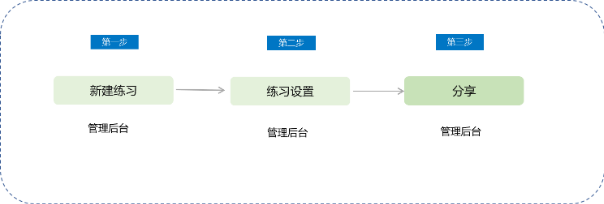
V. Operation Steps
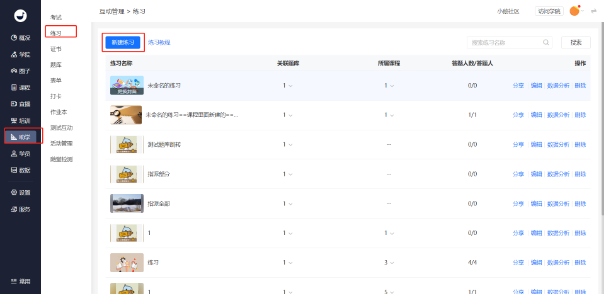
Step 1: Enter the practice function page and click 'Create Practice'.
Step 2: Fill in the relevant setting information and save it.
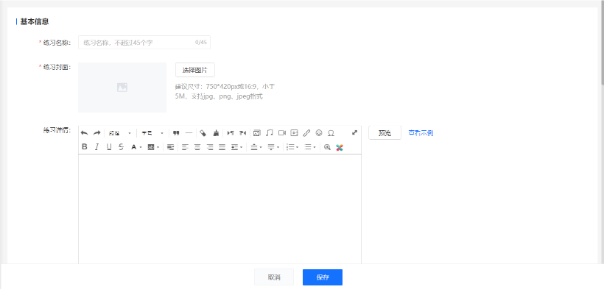
Explanation of relevant settings:
1. Practice Name: The name of the practice, such as 'Real exam questions for the ** exam in 2019'. The maximum length of the practice name is 45 characters.
2. Practice Cover: The cover image of the practice. It is recommended to choose an image with a size of 750*420px or in a 16:9 ratio.
4. Practice Introduction: Optional. Write a concise introduction for your practice.
5.Associated Question Bank: You can associate one or more categories in the question bank. Subjective questions are not supported for now, and relevant question types will be filtered out after selection.
6.Visibility Scope: You can set the visibility scope for students.
7. Question - Answering Settings: You can set the questions to be presented randomly or in order. If set to random, the specified number of questions will be randomly selected from the associated question bank. If set to order, questions will be presented in the order of the associated question - bank categories (if multiple question - bank categories are selected, you can sort the categories). The questions in the question bank will be cyclically selected according to the specified number of questions.
8. Number of Questions: The number of questions in a single practice. For example, if set to 20, students will practice 20 questions each time. The maximum number of questions per practice can be set to 1000.
9. Difficulty Setting: Set a difficulty coefficient for your practice, which will also be displayed on the mobile device.
10,SelectionCourse Participation: You can setthe practice to be associated with a certain course, so that students can access and learn the practice from the video or the course.;
11,Private Domain Traffic Generation: You can set to display contact information such as QR codes in the practice.
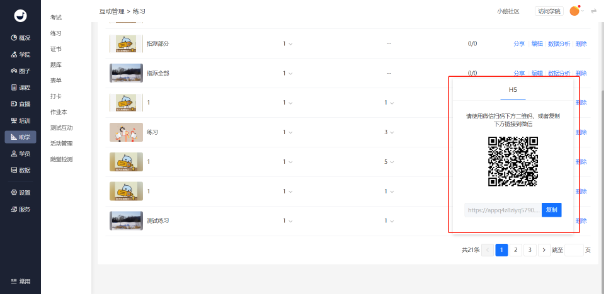
After creation is completed, click 'Share' to get the relevant link and QR code, and you cansharethe practice with students.
Step 4: Click 'Data Analysis' in the practice list to view students' practice data.
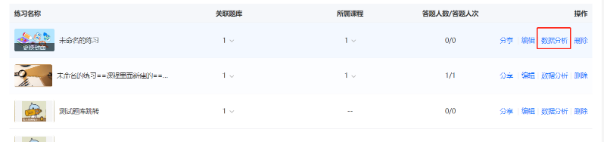
(Practice List)
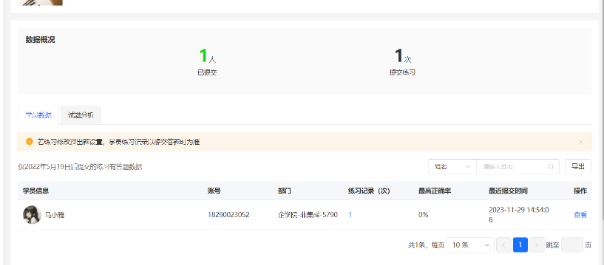
(Practice Data Analysis)
Course management
Graphic and text usage tutorial
I. Feature Introduction
Image-text courses are learning courses with content in the form of images and text. They are easy to create and convenient for learners to view.
II. Purpose of Use
Provide training to learners with various types of courses.
III. Use Scenarios
Suitable for learning content with a large amount of text and images.
IV. Operation Path
Merchant side: Enterprise Training Management Console → Courses → Image-text
Learner side: H5 Academy → Course Home Page
V. Usage Tutorial

Step 1: Configure the Image-text Course(Management Backend)
1. Log in to the management console. Select [Image-text] from [Courses] → [Create New Image-text] to enter the new image-text creation page.

(Management Backend - Courses - Image-text)
2. Basic information: Fill in the name and details of the image-text, set information such as text anti-copying, and upload the cover image.

(Management Backend - Courses - Image-text - Create New Image-text)
3. Course information:
Associated courses: You can choose to associate with columns and training plans. After saving, the course information will be displayed in the details of the columns and training plans.
Course grouping: A function to categorize and display courses.
4. Visibility scope: Set the course to be visible to specified learners. For details, please readTutorial on Setting Visibility Scope.
5. Listing Settings: Set the listing time of the course. For details, please readTutorial on Listing and Delisting Settings.
6. Guide to join the community: Configure relevant communities for different courses and guide learners to join the community on the course details page. The steps are to enable the guide to join the community; set the guiding message; upload the community QR code.
7. Click [Save] to successfully create the image-text course.
Step 2: Course Learning(H5 Academy)
1. Learners log in to the academy.

(H5 Academy - Course Home Page)
2. Learners select the corresponding image-text course from the courses to start learning.

(H5 Academy - Course Home Page)
Video Tutorial
I. Function Introduction
Video courses are courses with video content. High-quality online video courses need to be pre-recorded or downloaded, which are convenient for students to watch and learn online.
II. Purpose of Use
Provide training to students with various types of courses.
III. Usage Scenarios
Students can learn more diverse course content by watching videos in a WIFI environment.
IV. Operation Path
Merchant side: Corporate Training Management Console → Courses → Videos
Student side: H5 Academy → Classroom Homepage
V. Usage Tutorial

Step 1: Configure Video Courses(Management Backend)
1. Log in to the management console. Select [Videos] from [Courses] → [New Video] to enter the new video page.

(Management Backend - Videos)
2. Basic Information: Enter the video name, upload the video, cover image, video贴片, and fill in the detailed information.

(Management Backend)
3. Course Information
Associated Courses: You can choose to associate with columns and training plans. After saving, the course information will be displayed in the details of columns and training plans.
Course Grouping: A function to classify and display courses.
4. Visible Scope: Set the course to be visible to specified students. For details, please readUsage Tutorial for Setting Visible Scope.
5. Shelving Settings: Set the shelving time of the course. For details, please readUsage Tutorial for Shelving and Unshelving Settings.
6. Guide to Join the Community: Configure relevant communities for different courses and guide students to join the community on the course details page. The steps are to enable the guide to join the community; set the guiding message; upload the community QR code.
7. Anti-screen Recording Marquee: After the anti-screen recording marquee is enabled, whether students are watching video courses or live courses, their usernames and IDs will be displayed in a marquee on the course playback page (Note: When the system player is in full-screen playback, the marquee will not work. The academy needs to set it to the elink player). For details, please readUsage Tutorial for Anti-screen Recording Marquee.
8. Click [Save] to successfully create a video course.
Step 2: Course Learning(H5 Academy)
1. Students log in to the academy on the student side.

(H5 Academy - Classroom Homepage)
2. Students select the corresponding video course from the courses to learn.

(H5 Academy - Video Course Details Page)
Audio Usage Tutorial
I. Feature Introduction
Audio courses are courses with audio content that need to be pre - recorded. They are convenient for students to listen and learn online.
II. Purpose of Use
Provide training to students with various types of courses.
III. Usage Scenarios
Suitable for students to learn on the go during their commute, making use of fragmented time.
IV. Operation Path
Merchant side: Corporate Training Management Console → Courses → Audio
Student side: H5 Academy → Course Homepage
V. Usage Tutorial

Step 1: Configure the audio course(Management background)
1. Log in to the management console. Select [Audio] from [Courses] → [New Audio].

(Management background - Courses - Audio)
2. After entering the new audio page, fill in the audio name, upload the audio, upload the cover, and fill in the detailed information.

(Management background - Courses - Audio - New Audio)
3. Course information
Associated courses: You can choose to associate with columns and training plans. After saving, the course information will be displayed in the details of the columns and training plans.
Course grouping: A function to classify and display courses.
4. Visible scope: Set the course to be visible to specified students. For details, please readTutorial on setting the visible scope.
5. Listing settings: Set the listing time of the course. For details, please readTutorial on listing and delisting settings.
6. Guide to join the community: Configure relevant communities for different courses and guide students to join the community on the course details page. The steps are to enable the guide to join the community; set the guiding message; upload the community QR code.
7. Click [Save] to successfully create the audio course.
Step 2: Course learning(H5 Academy)
1. Students log in to the academy.

(H5 Academy - Course Homepage)
2. Students select the corresponding audio course from the courses to learn.

(H5 Academy - Audio Course Details Page)
E-book Usage Tutorial
I. Function Introduction
E-books support one-click import of local resources. The system automatically parses the book chapters, enabling easy online management of e-books. Learners can read on their mobile devices, with support for functions such as regional touch page-turning, highlighting, bookmarking, and background changing.
II. Purpose of Use
Train learners with various types of courses.
III. Usage Scenarios
You can upload PDF files such as company regulations and onboarding manuals as materials for employee training on company regulations.
IV. Operation Path
Management Console: Enterprise Academy Management Console → Courses → E-books
Learner End: WeChat H5 Academy → E-book Courses
V. Usage Tutorial
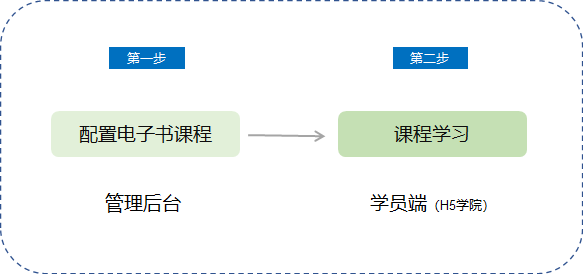
Step 1: Configure E-book Courses(Management Backend)
Log in to the management console. Select [E-books] from [Courses] → [New E-book].

(Management Backend - Course Management - E-books)
2. Enter the new e-book page, upload an e-book (size limit: 100M, supports two formats: PDF and EPUB; PDF e-books do not currently support highlighting and theme changing). Fill in the book title, author, and description, and upload the cover. Note that re-uploading a file will overwrite the previously uploaded one.

(Management Backend - Courses - E-books - New E-book)
3. Course Information
Associated Courses: You can choose to associate with columns and training plans. After saving, the course information will be displayed in the details of the columns and training plans.
4. Visibility Scope: Set the course to be visible to specified employees. For details, please readUsage Tutorial for Setting Visibility Scope.
5. Publishing Settings: Set the publishing time of the course. For details, please readUsage Tutorial for Publishing and Unpublishing Settings.
6. Group Joining Promotion: Configure relevant communities for different courses and guide employees to join the communities on the course details page. The steps are to enable group joining promotion, set the promotional message, and upload the community QR code.
7. Click [Save] to successfully create an e-book course.
Step 2: Course Learning(H5 Academy)
1. Learners log in to the academy.
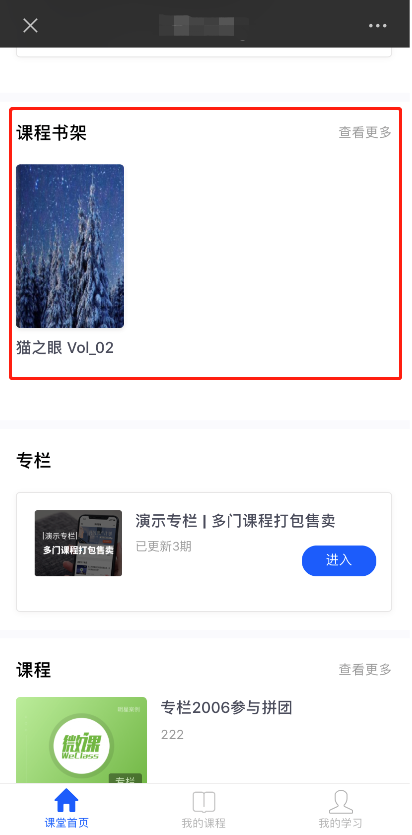
2. Select the corresponding e-book course from the courses for learning.
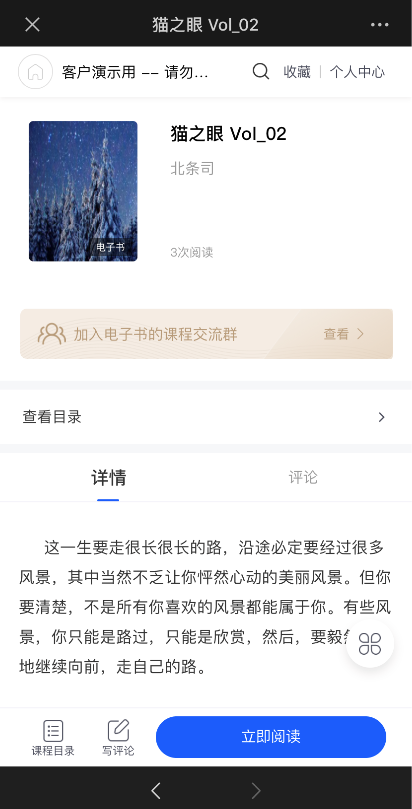
(H5 Academy - E-book Course Details Page)
Column Usage Tutorial
I. Feature Introduction
Columns support packaging and combining various types of courses (text - image, audio, video, live streaming) to form a systematic learning framework and content.
II. Purpose of Use
Provide a learning framework for students and create an immersive learning experience within the column.
III. Use Scenarios
Provide students with a combination of learning courses for a certain type of skill or topic.
Example: To cultivate the professional skills of sales staff, set up a sales - related column containing courses related to sales skills.
IV. Operation Path
Merchant side: Enterprise Training Management Console → Courses → Columns
Student side: H5 Academy → Classroom Homepage
V. Usage Tutorial

Step 1: Configure the Column(Management Backend)
Log in to the management console. Select [Columns] → [New Column] from [Courses].

(Management Backend - Courses - Columns)
2. Enter the new column page, fill in the column name, column introduction, column details, and upload the column cover.

(Management Backend - Courses - Columns - New Column)
3. Course Information
Course grouping: A function to classify and display courses.
4. Visible Scope: Set the courses to be visible to specified employees. Please read the Usage Tutorial for Setting Visible Scope.
5. Listing Settings: Set the listing time of the courses. Please read the Usage Tutorial for Listing and Delisting Settings.
6. Guide to Join the Community: Configure relevant communities and guide employees to join the community on the column details page. The steps are to enable the guide to join the community; set the guiding message; upload the community QR code.
7. Click [Save] to successfully create the column.
8. Select the corresponding column → [Content Management] → [Add Course].

(Management Backend - Courses - Columns - Content Management)
After adding courses, you can use the sorting function to adjust the order of courses within the column.
Note: A single - item course can be added to multiple columns.

(Management Backend - Courses - Columns - Content Management - Add Course)
Step 2: Course Learning(H5 Academy)
1. Students log in to the academy on the student side.

(H5 Academy - Classroom Homepage)
2. Students select the corresponding column from the courses. After entering the column, click on the courses to start learning.

(H5 Academy - Column Course Catalog Page)
Tutorial on setting the visible range
I. Function Introduction
Administrators can use the visibility scope function to assign learning permissions for courses. Employees can only learn the courses assigned to them.
II. Purpose of Use
Configure different learning content for different target learners.
III. Use Scenarios
The visibility scope function applies to all courses, including text - image courses, audio courses, video courses, live courses, e - books, columns, and purchased courses (columns, live courses).
IV. Operation Path
Merchant side: Corporate Training Management Console → Courses → Edit Course
Learner side: H5 Academy → Course Homepage
V. Usage Tutorial
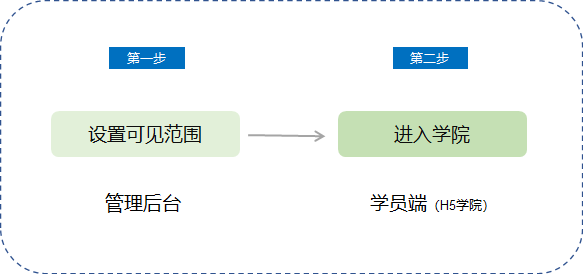
Step 1: Set the Visibility Scope(Management Backend)
1. Log in to the management console. Select the course for which you need to set the scope from [Courses], and click [Edit] to enter the course editing page.
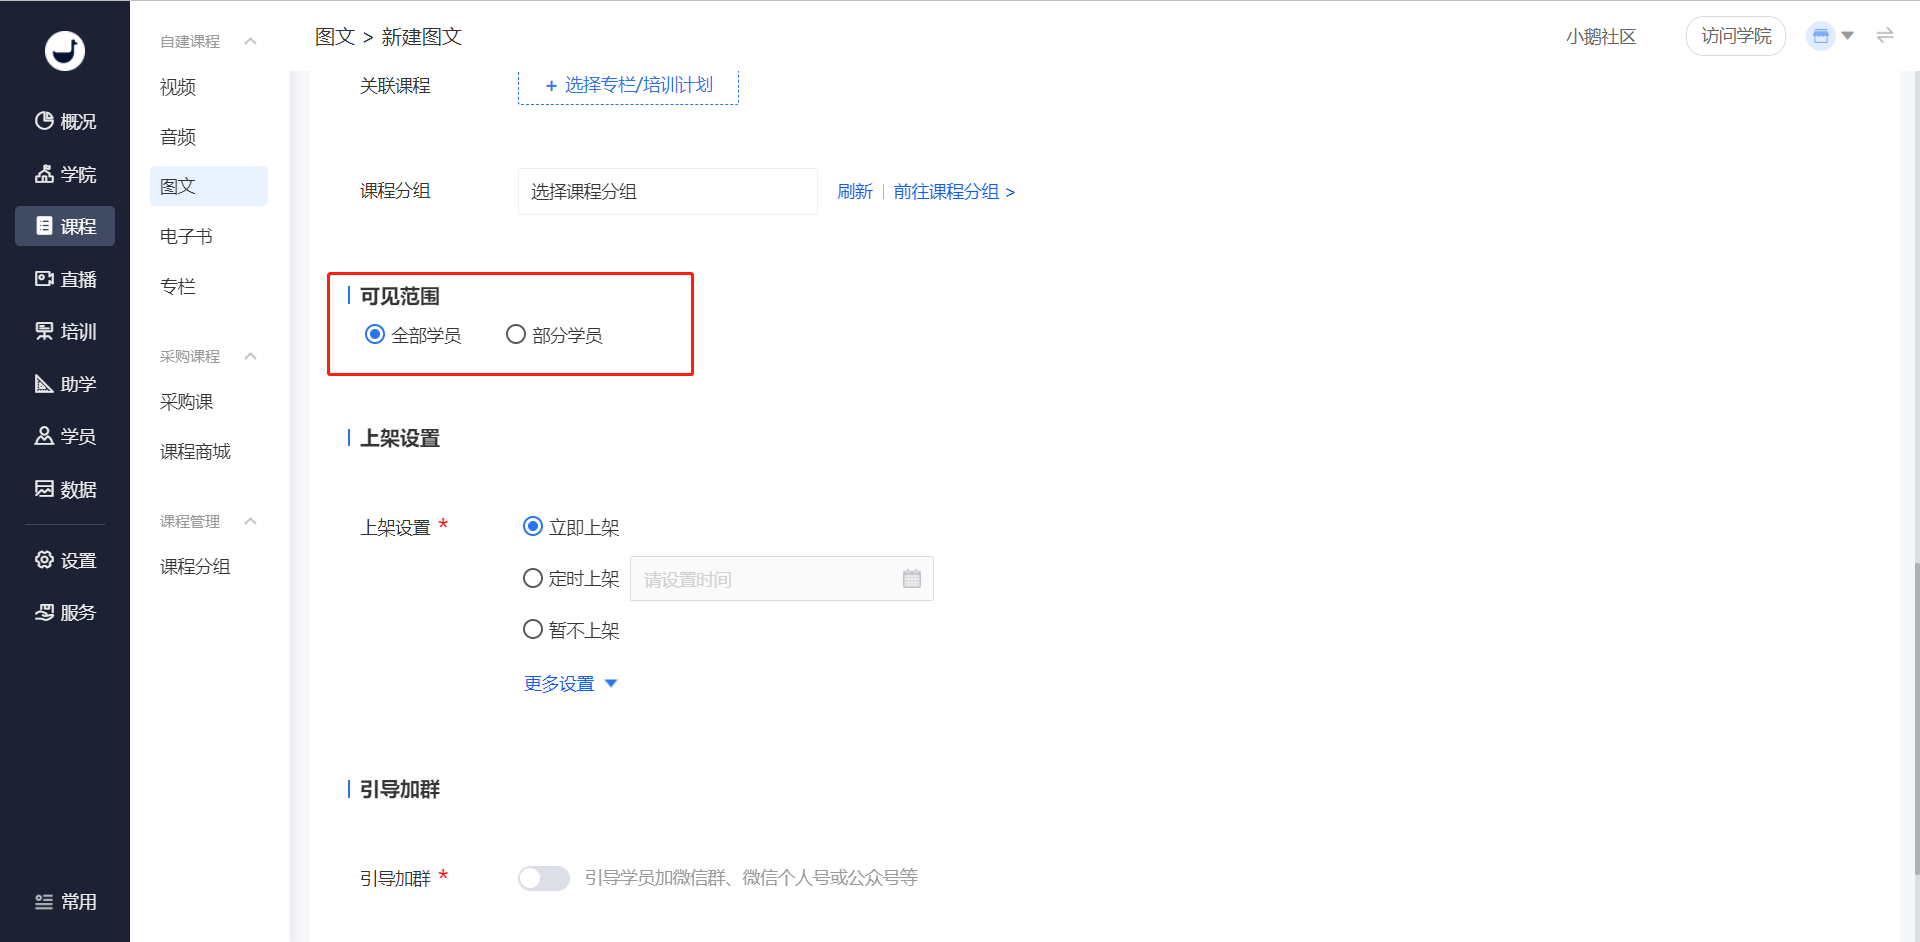
(Management Backend - Course Editing Page)
2. Select the visibility scope.
All learners: All learners can study this course;
Some learners: Select the corresponding department learners or the corresponding learners under the department. After selection, only the specified learners can see the course.
Note: Paid purchased courses have inventory limits. When setting the visibility scope, please allocate according to the inventory quantity. If the number of allocated learners exceeds the course inventory, the allocation will fail. Free purchased courses have no quantity limit.

(Management Backend - Course Editing Page - Select Some Learners Visible)
3. Click [Save] to save the visibility scope settings.
Step 2: Course Learning(H5 Academy)
1. Learners log in to the academy.
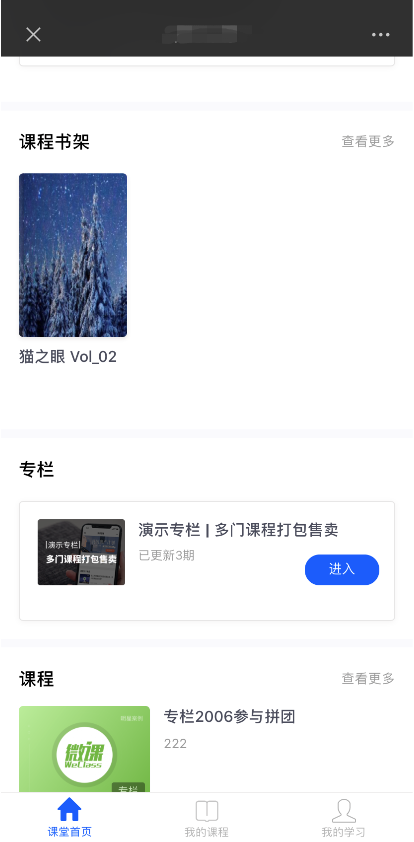
(H5 Academy - Course Homepage)
2. Learners within the course visibility scope can select courses from the courses for learning.
Video Live Streaming Usage Tutorial
I. Function Introduction
Video live streaming supports the combination of real-time video with functions such as courseware, whiteboard brushes, and desktop sharing for live streaming, which is suitable for real-time video interaction with students.
II. Purpose of Use
By starting video live streaming, real-time video, courseware & desktop sharing and other live streaming content can be realized.
III. Usage Scenarios
Suitable for scenarios that require desktop sharing, courseware display, and real-time video live streaming with students.
IV. Operation Path
Merchant side: Enterprise training management background → Live streaming → Video live streaming
Student side: H5 Academy → Watch live streaming

V. Usage Tutorial
Step 1 Configure video live streaming(Management background)
1. Log in to the management console, click [Live streaming], select [Video live streaming] → [Create live streaming], and enter the page for creating video live streaming;

(Management background - Live streaming)
2. Fill in the basic information of the live streaming room
Fill in the live streaming name and live streaming time;
Set the visible scope: You can set the course to be visible to some students;
Live streaming replay settings: Set whether to enable the live streaming replay for users after the live streaming ends;
Completion conditions: You can set the shortest learning time for students;

(Management background - Live streaming - Create video live streaming)
3. Other settings
Details cover: The picture displayed when students view the details of the live streaming course;
Live streaming warm-up picture: The picture displayed in the video area before the live streaming starts;
Live streaming promotion cover: The picture displayed at the live streaming entrance on the academy homepage;
Associated courses: You can choose to associate a column or a training plan. After saving, the course information will be displayed in the details of the column and the training plan.
Course grouping: A function to classify and display courses.
Anti-screen recording marquee: After the anti-screen recording marquee is enabled, whether students watch video courses or live streaming courses, their usernames and IDs will be displayed in the form of a marquee on the course playback page. (Note: The marquee will become invalid when playing in full screen).
Shelf settings: Set the shelf time of the course.
4. Click [Save] to create a video course.
5. After creating the live streaming, you need to set up the lecturer. (Note: Only those who have bound WeChat can be added as lecturers. Please ask the lecturer to visit the enterprise training link to bind WeChat first).

(Management background - Live streaming - Lecturer management)
Step 2 Go live(Management background)
Click [Operation] - [Go live], select a suitable terminal for live streaming. Currently, the computer side supports: web browser, client, and OBS/camera for live streaming; the mobile side supports live streaming via the APP. (You can still switch to other terminals for live streaming after selecting the live streaming terminal).
Different terminals support different functions (corresponding to different display pages on the employee side). The suitable scenarios for each terminal are as follows:
(1) Web browser: Supports PPT courseware display and lecturer taking the stage. You can start the live streaming immediately without downloading software;
(2) Client: Supports desktop sharing, whiteboard brushes, and courseware display combined with real-time video for classroom scenario live streaming;
(3) OBS/camera for live streaming: Suitable for using third - party tools for live streaming;
(4) Mobile APP: You can start the live streaming using the mobile APP, which supports video streaming, beautification, and viewing comments.

(Management background - Live streaming - Go live)
Step 3 Course learning(H5 Academy)
1. Students log in to the academy.

(H5 Academy - Classroom homepage)
2. Students select the corresponding video live streaming course from the courses for learning.

(H5 Academy - Video live streaming)
Tutorial on Using Voice Live Streaming
I. Function Introduction
Voice live streaming courses can send a large amount of voice, text, and images, thus achieving the purpose of interacting with students.
II. Purpose of Use
Provide training to students in the form of voice live streaming.
III. Usage Scenarios
Suitable for learning scenarios with a large amount of learning materials and the need to interact with students simultaneously. Students can learn by watching the voice live stream, ask questions, and the instructor can answer them immediately.
IV. Operation Path
Merchant side: Enterprise Academy Management Console → Course Management → Live Streaming → Voice Live Streaming
Student side: WeChat H5 Academy → Classroom Homepage
V. Usage Tutorial
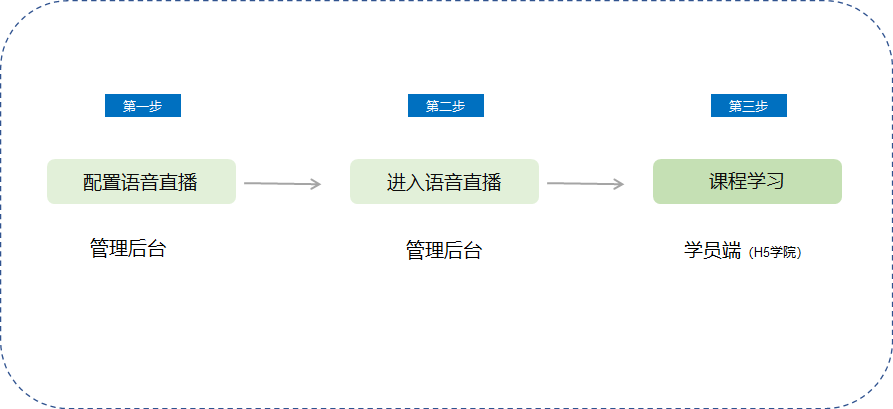
Step 1: Configure Voice Live Streaming (Management Backend)
1. Log in to the management console. Select [Live Streaming] → [Voice Live Streaming] → [Create Live Streaming] from [Course Management] to enter the page for creating voice live streaming.
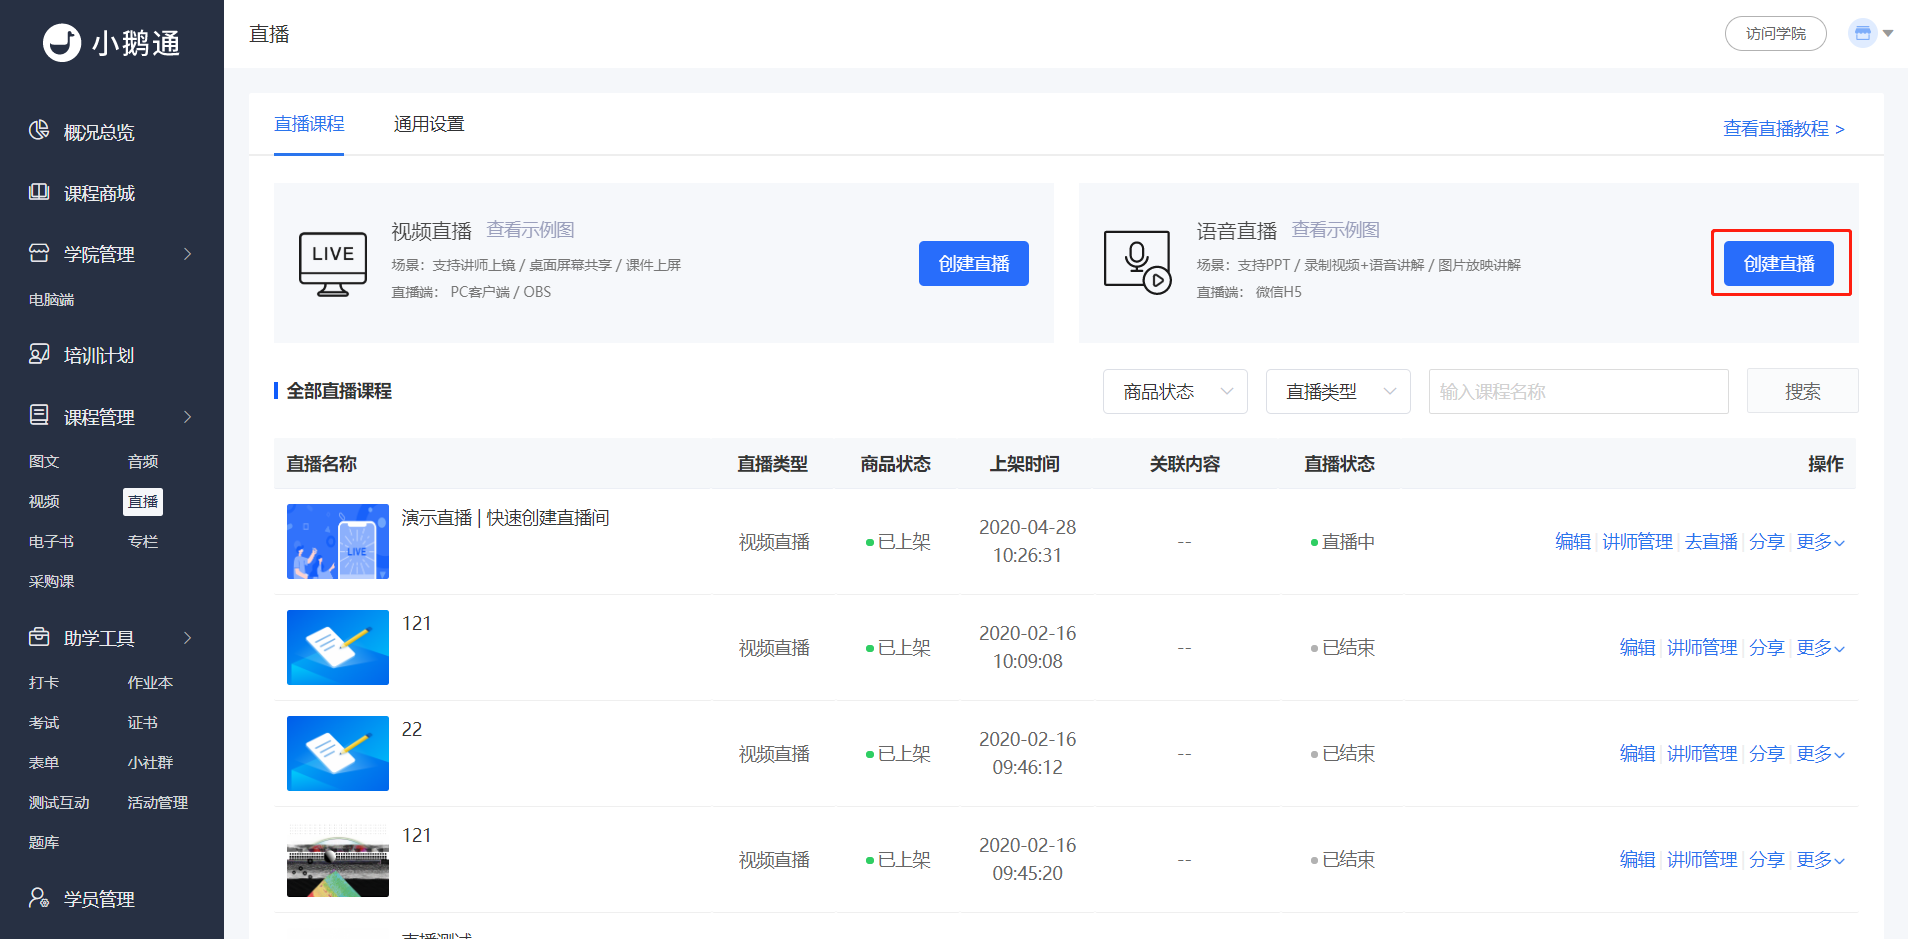
(Management Backend - Live Streaming)
2. Basic Information
Live streaming information: Fill in the live streaming name and time;
Set the visibility range: Set the course to be visible to specified students. For details, please readSet the Visibility Range;
Add courseware:
Do not add: If you choose not to add, guests can still upload PPTs after entering the live streaming room, but they cannot upload videos.
Add courseware: Currently, uploading PPTs on the management console is not supported. Guests can enter the live streaming room to upload courseware.
Add videos: The uploaded videos will automatically play after the live streaming starts. 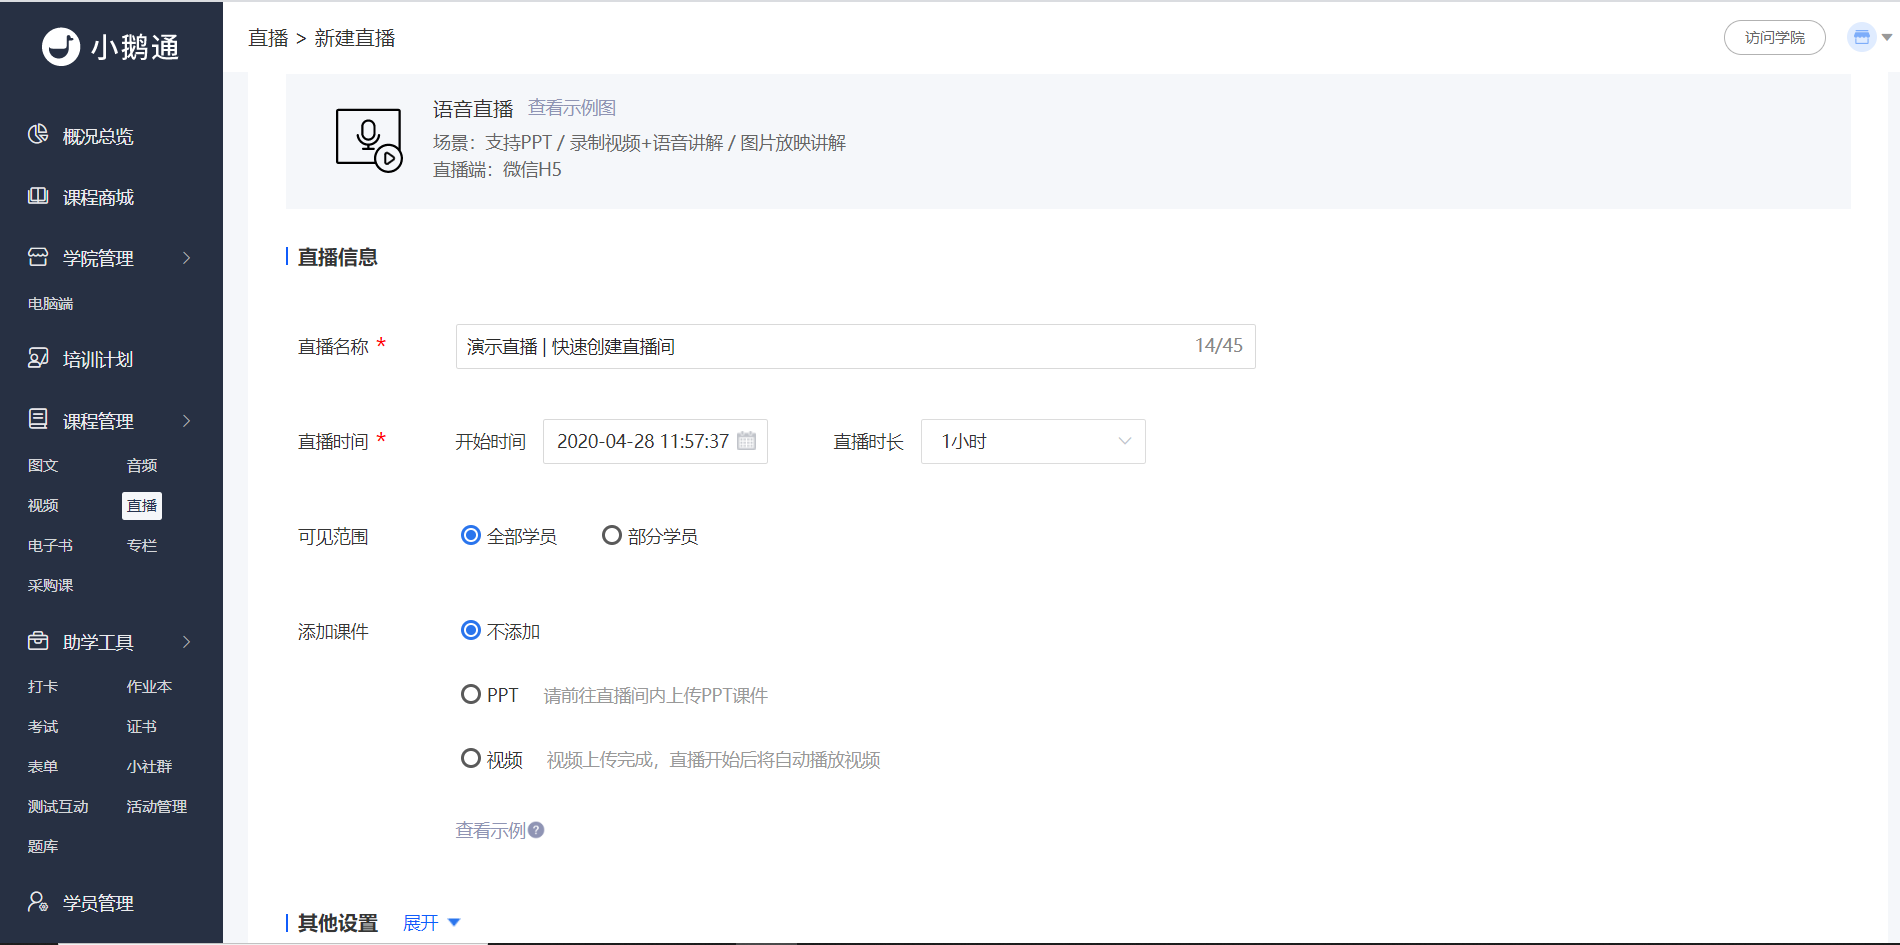
(Management Backend - Live Streaming - Create Voice Live Streaming)
3. Other Settings
Information: Fill in the live streaming introduction and details;
Details cover: The picture displayed when students view the details of the live streaming course;
Live streaming warm - up picture: The picture displayed in the video area before the live streaming starts;
Live streaming promotion cover: The picture displayed at the live streaming entrance on the academy homepage for students;
Associated courses: You can choose to associate with a column or training plan. After saving, the course information will be displayed in the details of the column and training plan.
Course grouping: A function to classify and display courses. For details, please readCourse Grouping Usage Tutorial.
Shelving settings: Set the shelving time of the course. For details, please readShelving and Unshelving Settings.
4. Click [Save] to create an audio course.
5. After returning to the interface, the system will prompt you to add an instructor. Select to add an instructor. Or click [Instructor Management] for the corresponding live streaming to add (Note: Only those who have bound their WeChat accounts can be added as instructors. Please ask the instructors to log in to the enterprise academy to bind their WeChat accounts first).
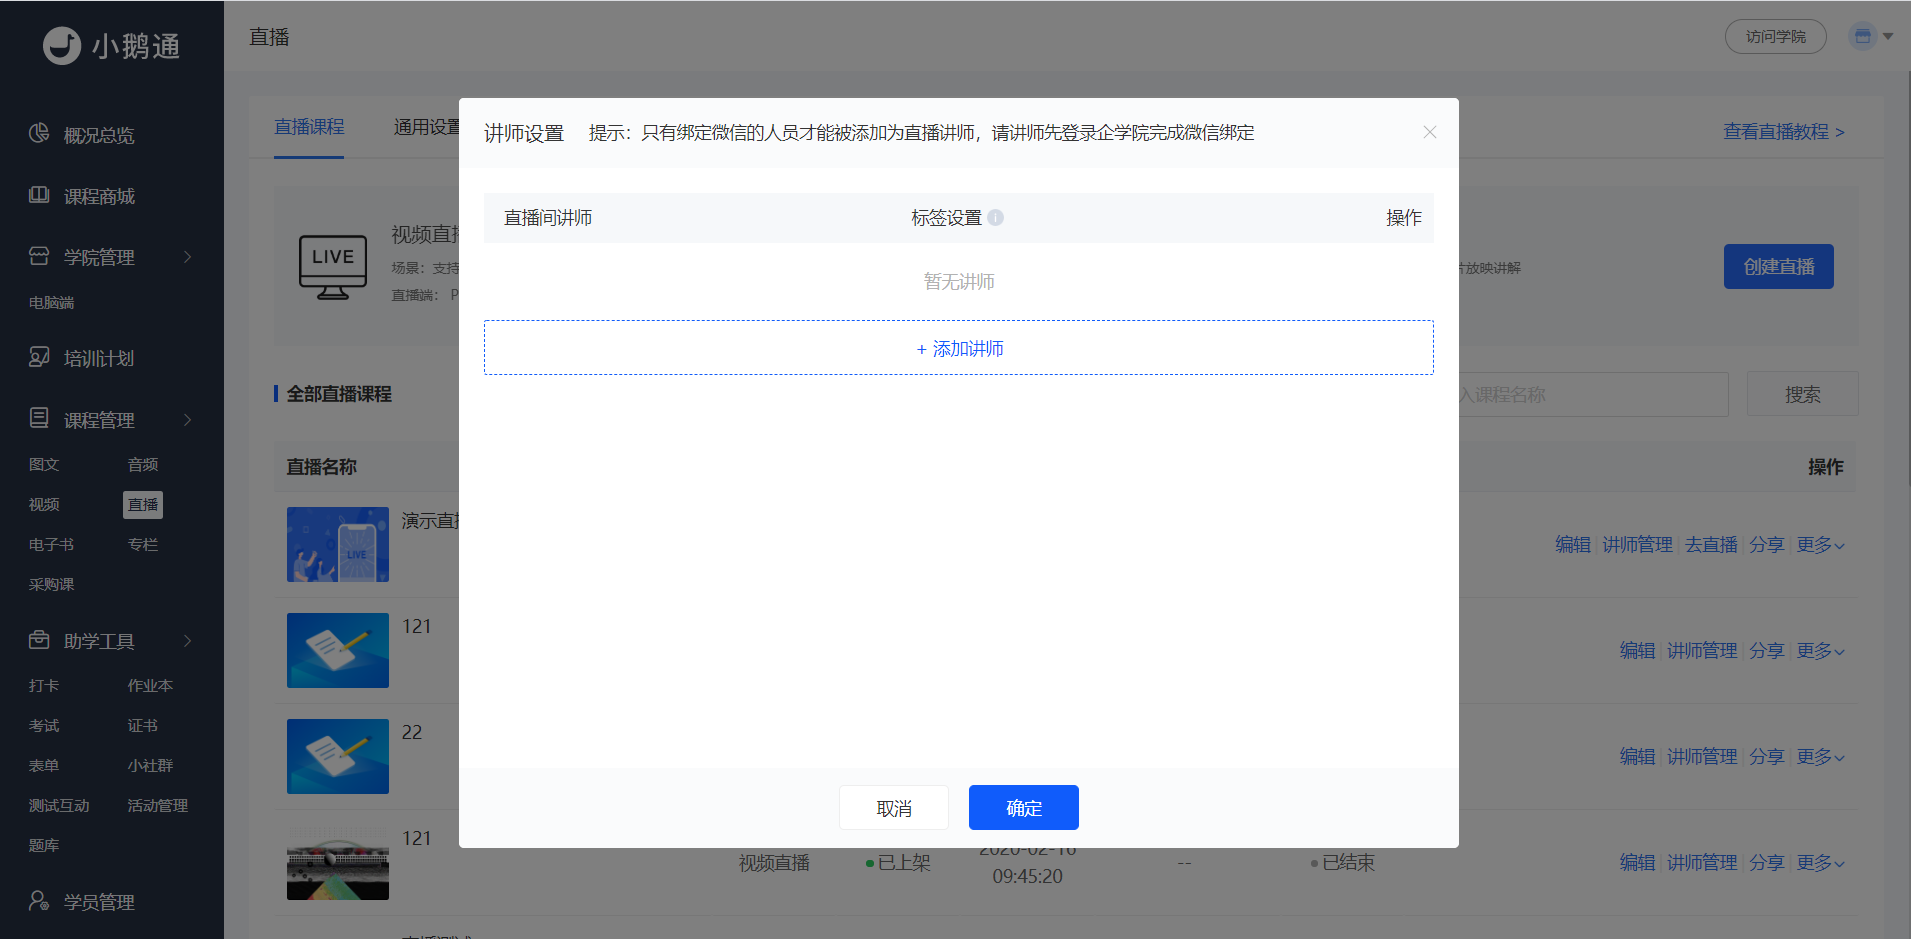
(Management Backend - Live Streaming - Instructor Management)
6. Select the instructor to be added, click [Add] → [OK] to complete the addition of the instructor. You can use the "Tag Settings" function to edit the title of the instructor displayed in the live streaming room.
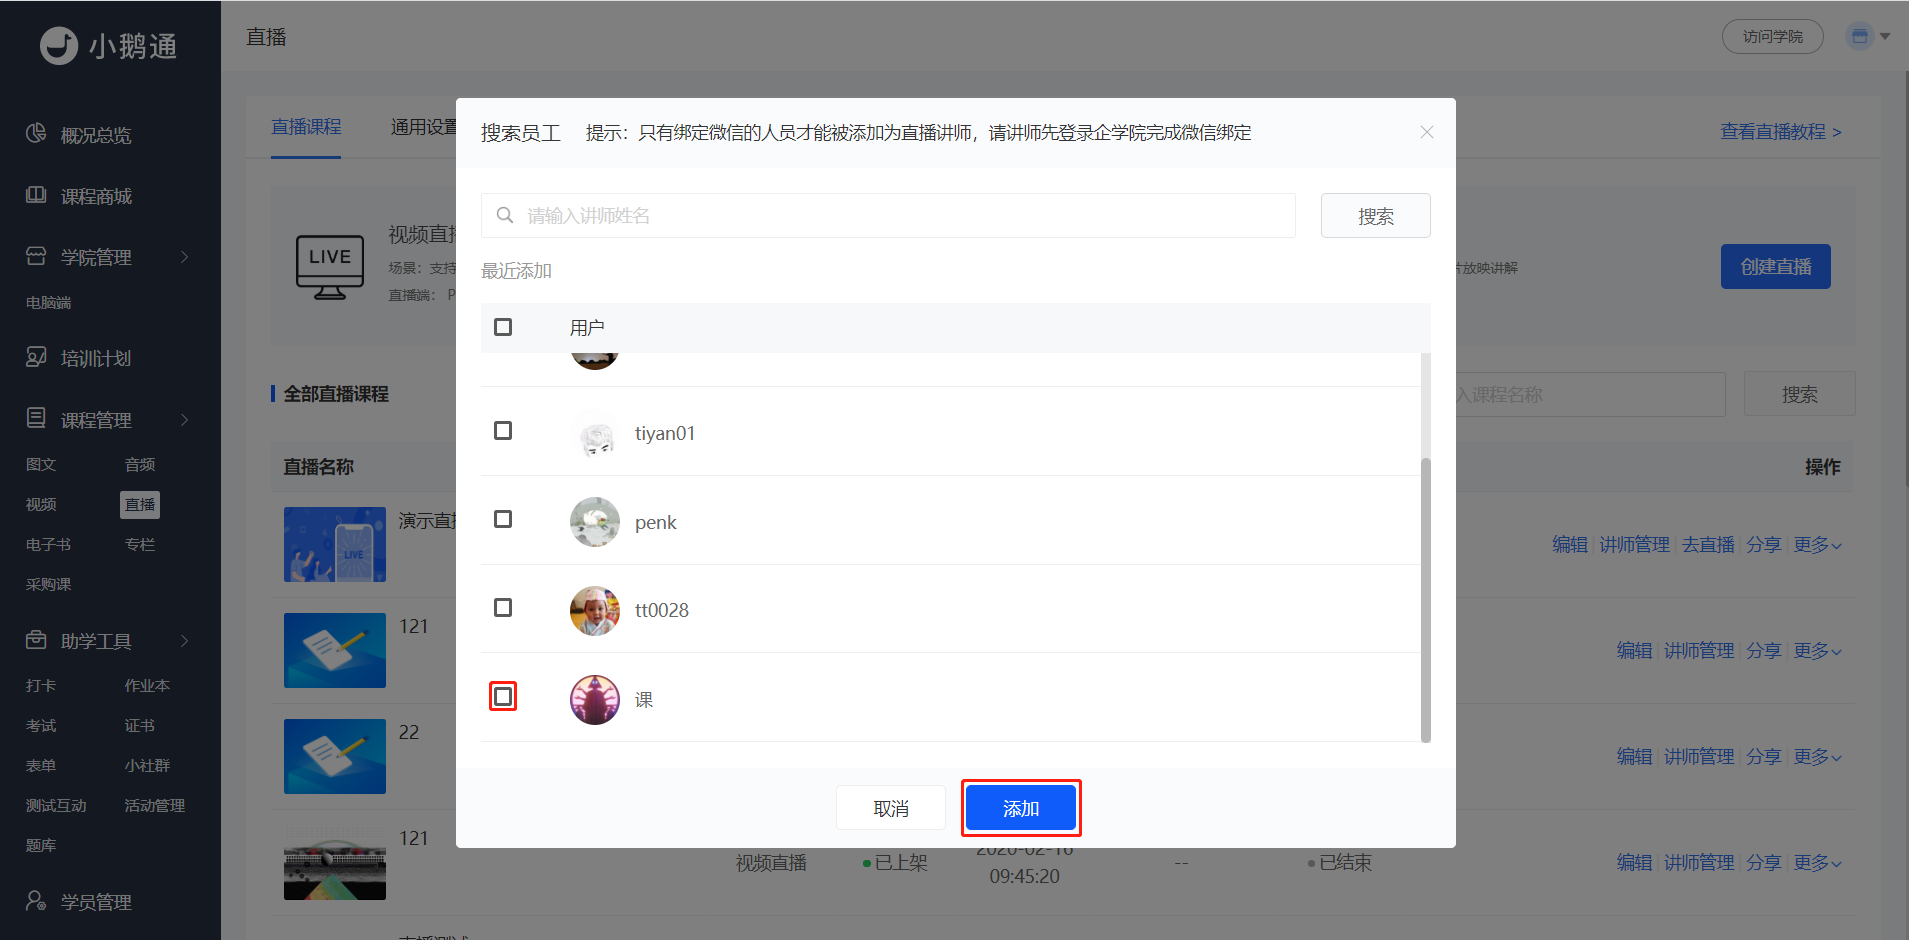
(Management Backend - Live Streaming - Instructor Management)
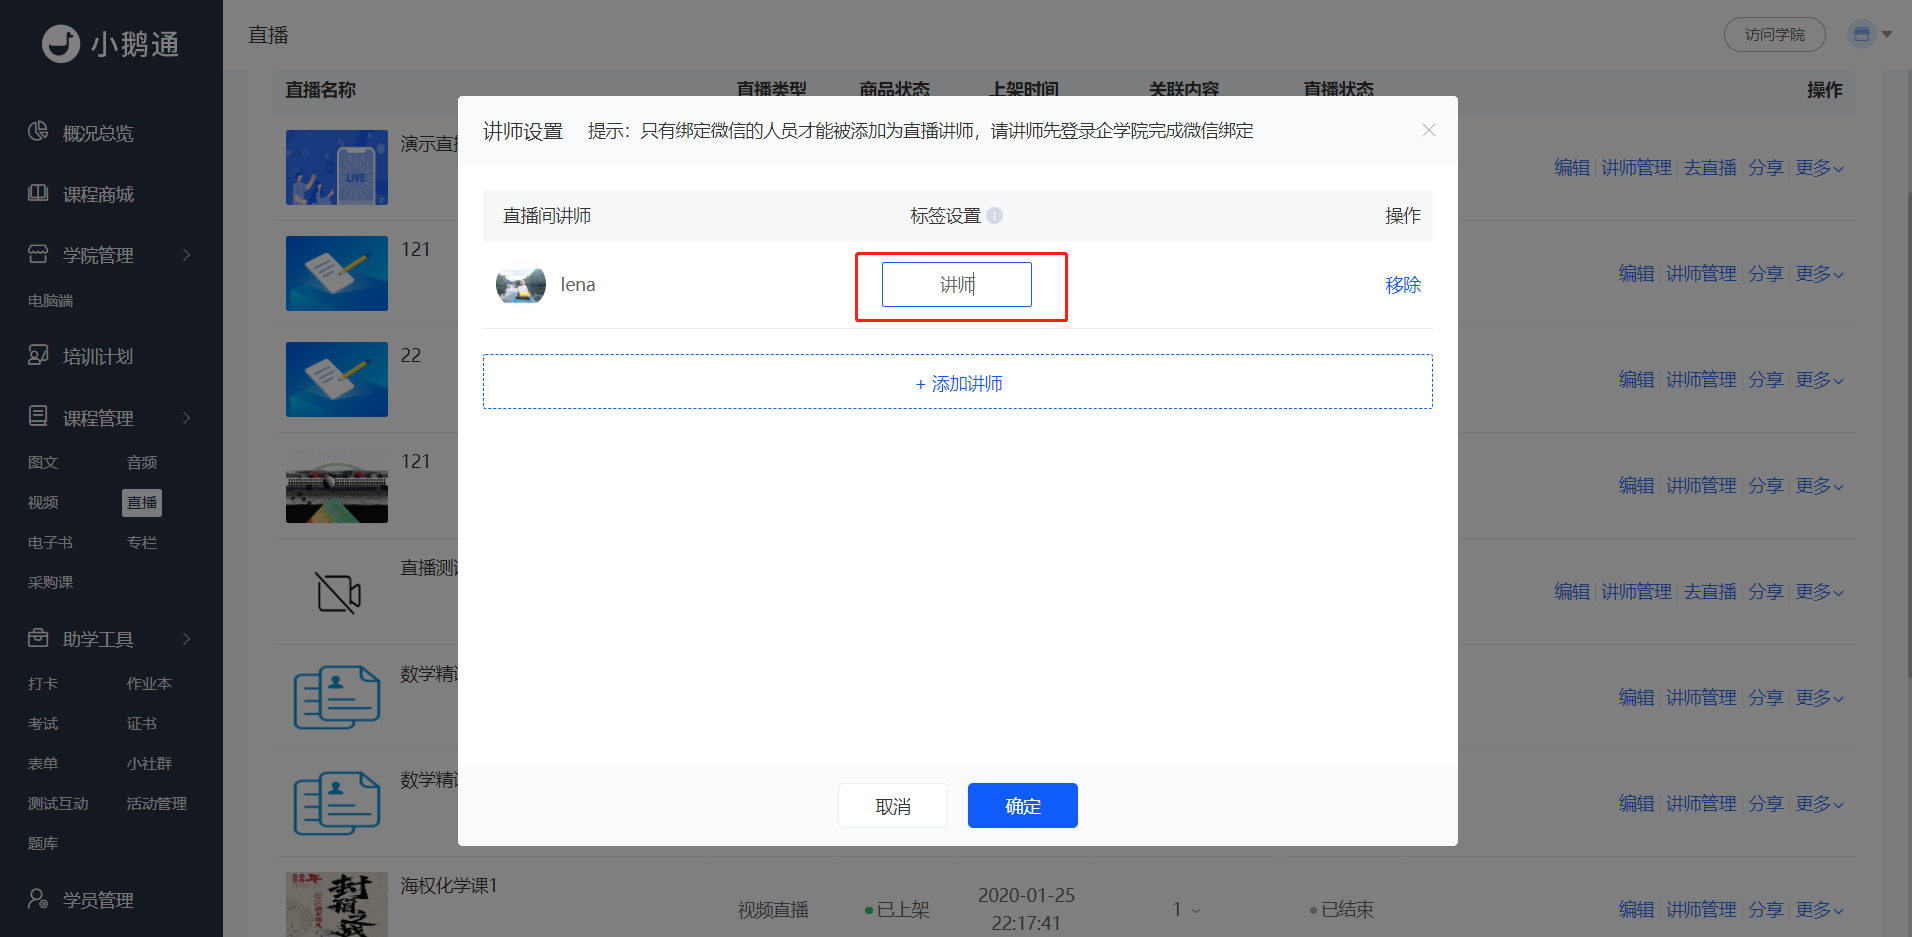 (Management Backend - Live Streaming - Instructor Management)
Step 2: Enter Voice Live Streaming (Management Backend)
Click [Operation] - [Go to Live Streaming], and select a suitable terminal for live streaming. Currently supported: Web terminal, WeChat terminal.
Different terminals support different functions (the display pages on the employee side are different). Suitable scenarios for each terminal:
(1) Web terminal: Supports PPT and voice explanations for recorded videos or pictures. For details, please readVoice and Image - Text Live Streaming Instructor - Side Usage Tutorial;
(2) WeChat terminal: Supports voice explanations for pre - uploaded PPTs, videos, or pictures. For details, please readVoice and Image - Text Live Streaming Usage Tutorial;
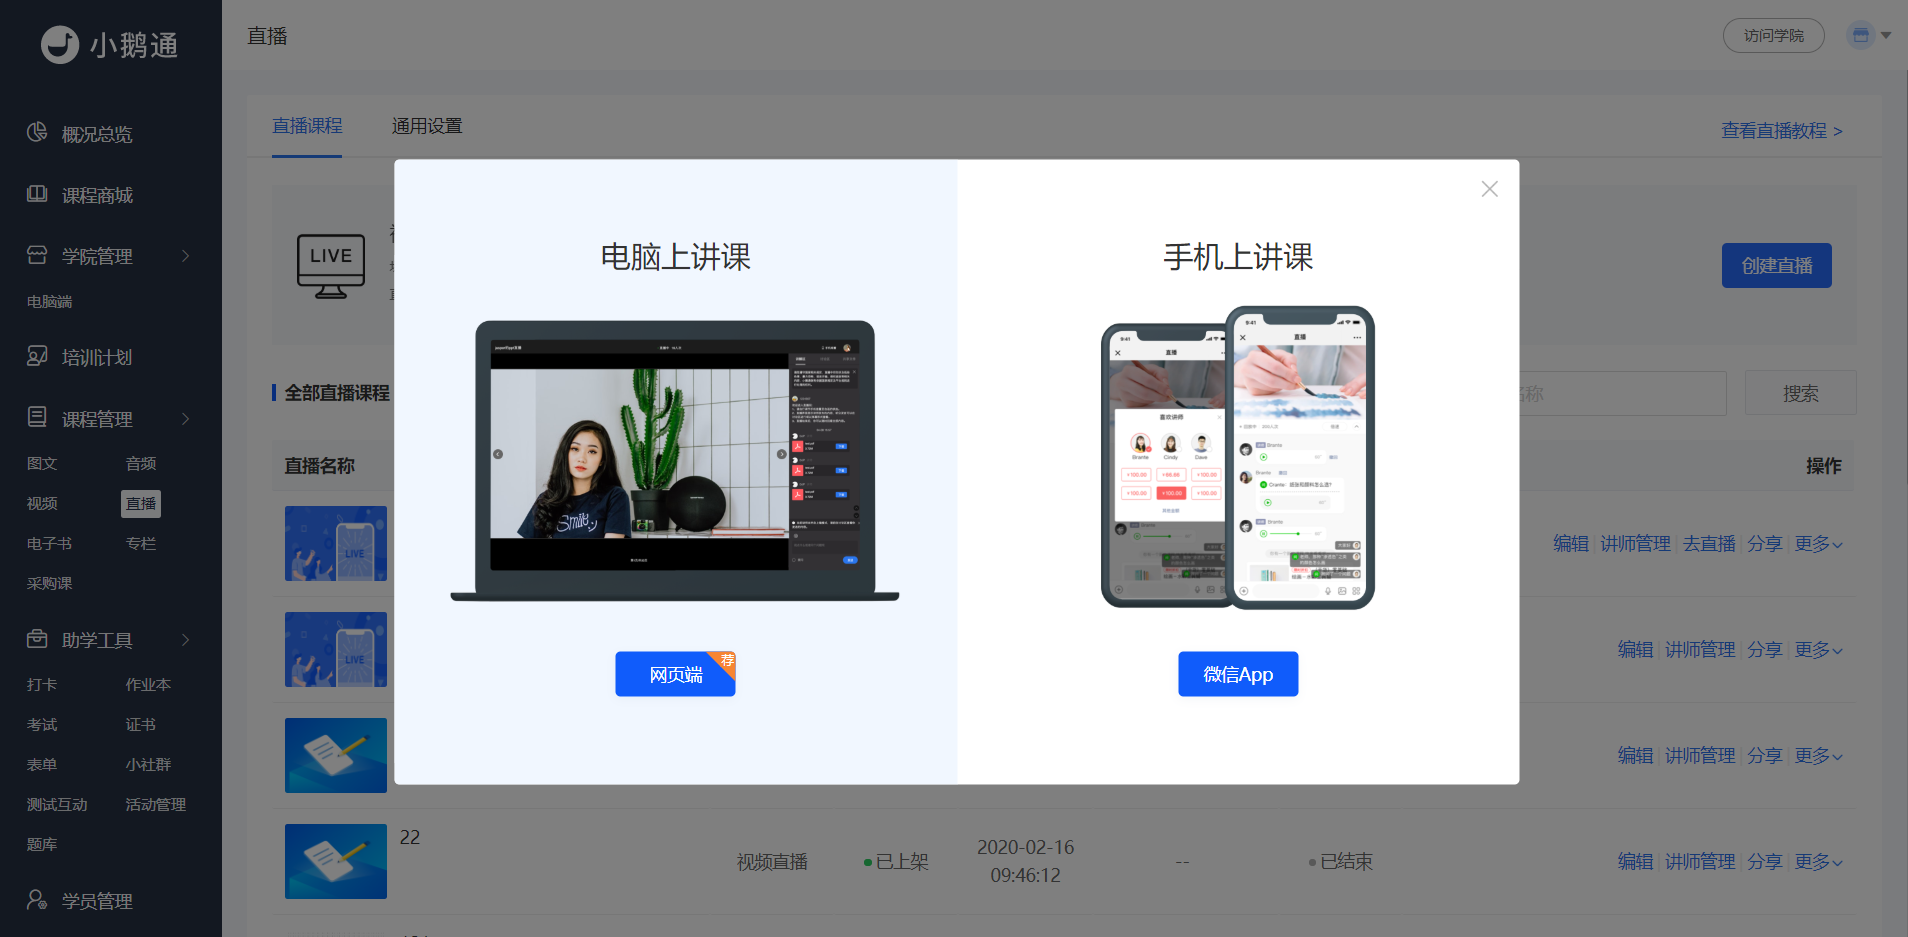
(Management Backend - Live Streaming - Go to Live Streaming)
Step 3: Course Learning (H5 Academy)
1. Students log in to the academy.
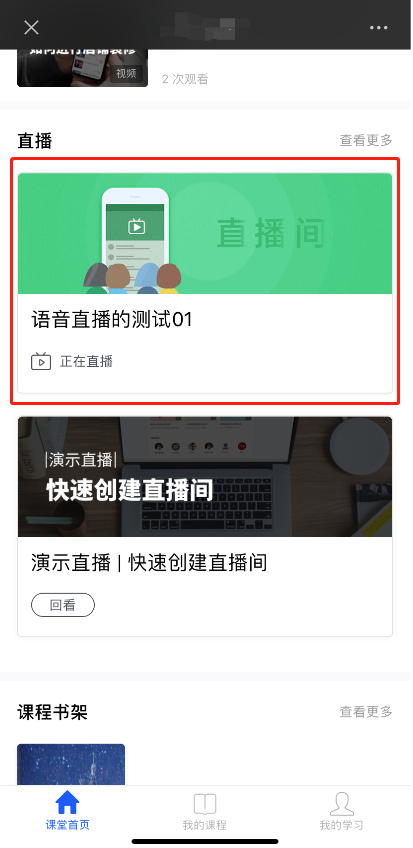
(H5 Academy - Classroom Homepage)
2. Students select the corresponding video live streaming course from the courses to learn.
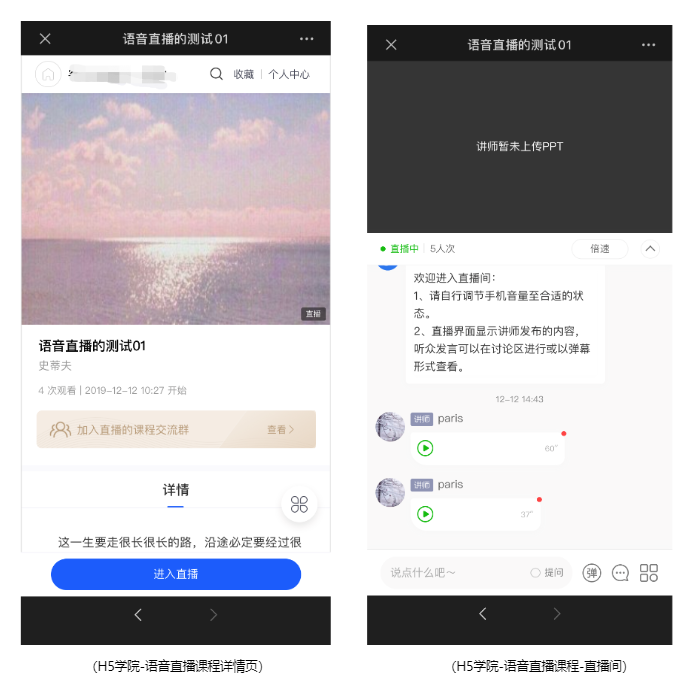
Tutorial on downloading and using corporate training courseware
I. Function Introduction
Administrators can set the relevant courseware materials for a course when creating/editing it. Learners can download the courseware materials while studying the course.
II. Purpose of Use
To help administrators quickly set up supporting materials for courses and facilitate learners to download courseware when studying courses.
III. Operation Path
Administrator side: Management backend → Courses → Create/Edit Course → Related Materials (Add Materials)
Learner side: WeChat, Enterprise WeChat H5 / PC Online Store → Course Details → Download Related Materials

IV. Usage Tutorial
Step 1: Set Course Materials
1. When creating/editing a course, administrators can set courseware materials in the [Related Materials] section.
[For Courses]: Text - images, Audio, Video, E - books, Columns, Training Plans
[Supported File Formats]: All [Image, Audio, Video, Document] formats supported by the material center.
[Supported File Quantity]: A single course supports a maximum of 20 files.
[Download Conditions]: Learners can download the materials when they enter the course details page.


(Management backend)
Step 2: Learners Enter the Course Details Page to Download Courseware Materials(H5 / PC)
1. [H5 Side]: If administrators set courseware materials when creating a course, the [Download Related Materials] entry will be displayed on the course details page for learners. Learners can download the courseware materials when entering the course details page.
[For Courses]: Text - images, Audio, Video, E - books, Columns, Training Plans.

(H5 Course Details Page)
2. [PC Side]: If administrators set courseware materials when creating a course, the [Download Related Materials] entry will be displayed on the course details page for learners. Learners can download the courseware materials when entering the course details page.
[For Courses]: Text - images, Audio, Video, Columns (E - books and Training Plans are not available on the PC side for now)


V. Frequently Asked Questions
Q1: Which courses are supported by the courseware library?
A: Text - images, Audio, Video, E - books, Columns, Training Plans.
Q1: Where do administrators need to set the materials?
A: In the management backend, enter the above - mentioned course module, click Create/Edit Course, and you can set the materials in the 'Related Materials' section.
Q1: Which file formats are supported by the courseware library? Is there a limit on the number of files?
A: All [Image, Audio, Video, Document] formats supported by the material center are supported. The limit is 20 files.
Q1: Which learner - side platforms are supported by the courseware library?
A: It supports WeChat, Enterprise WeChat H5, and PC browsers.
A Beginner's Guide to Corporate Training
Tutorial on Using Message Interaction
I. Feature Introduction
The message interaction feature provides a communication platform for administrators and trainees. Through this feature, administrators can send messages to trainees and view the comments made by trainees during the learning process.
II. Purpose of Use
III. Use Scenarios
The message interaction feature covers modules including images and texts, audio, video, and e-books.
IV. Operation Path
Merchant side: Corporate Training Management Console → Course Management → View Comments
Trainee side: WeChat H5 Academy → Course Homepage → Course Details → Comments
V. Usage Tutorial
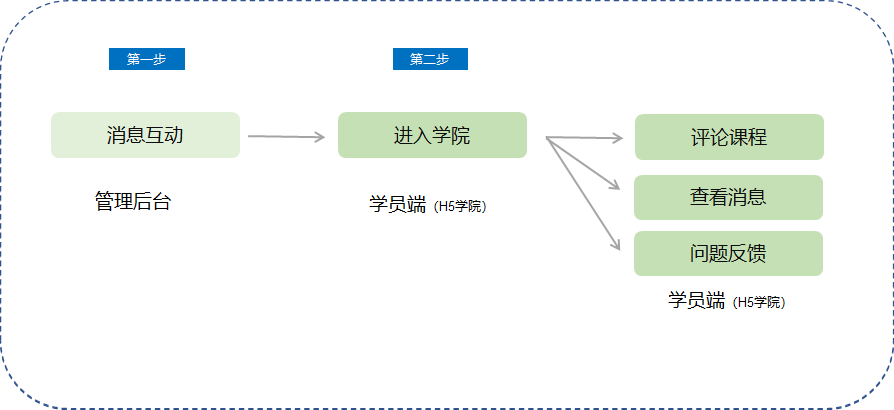
Step 1: Message Interaction(Management Backend)
1. Taking video as an example, select [Operation] → [View Comments] to view message interactions. Message interactions include message push and comment management.
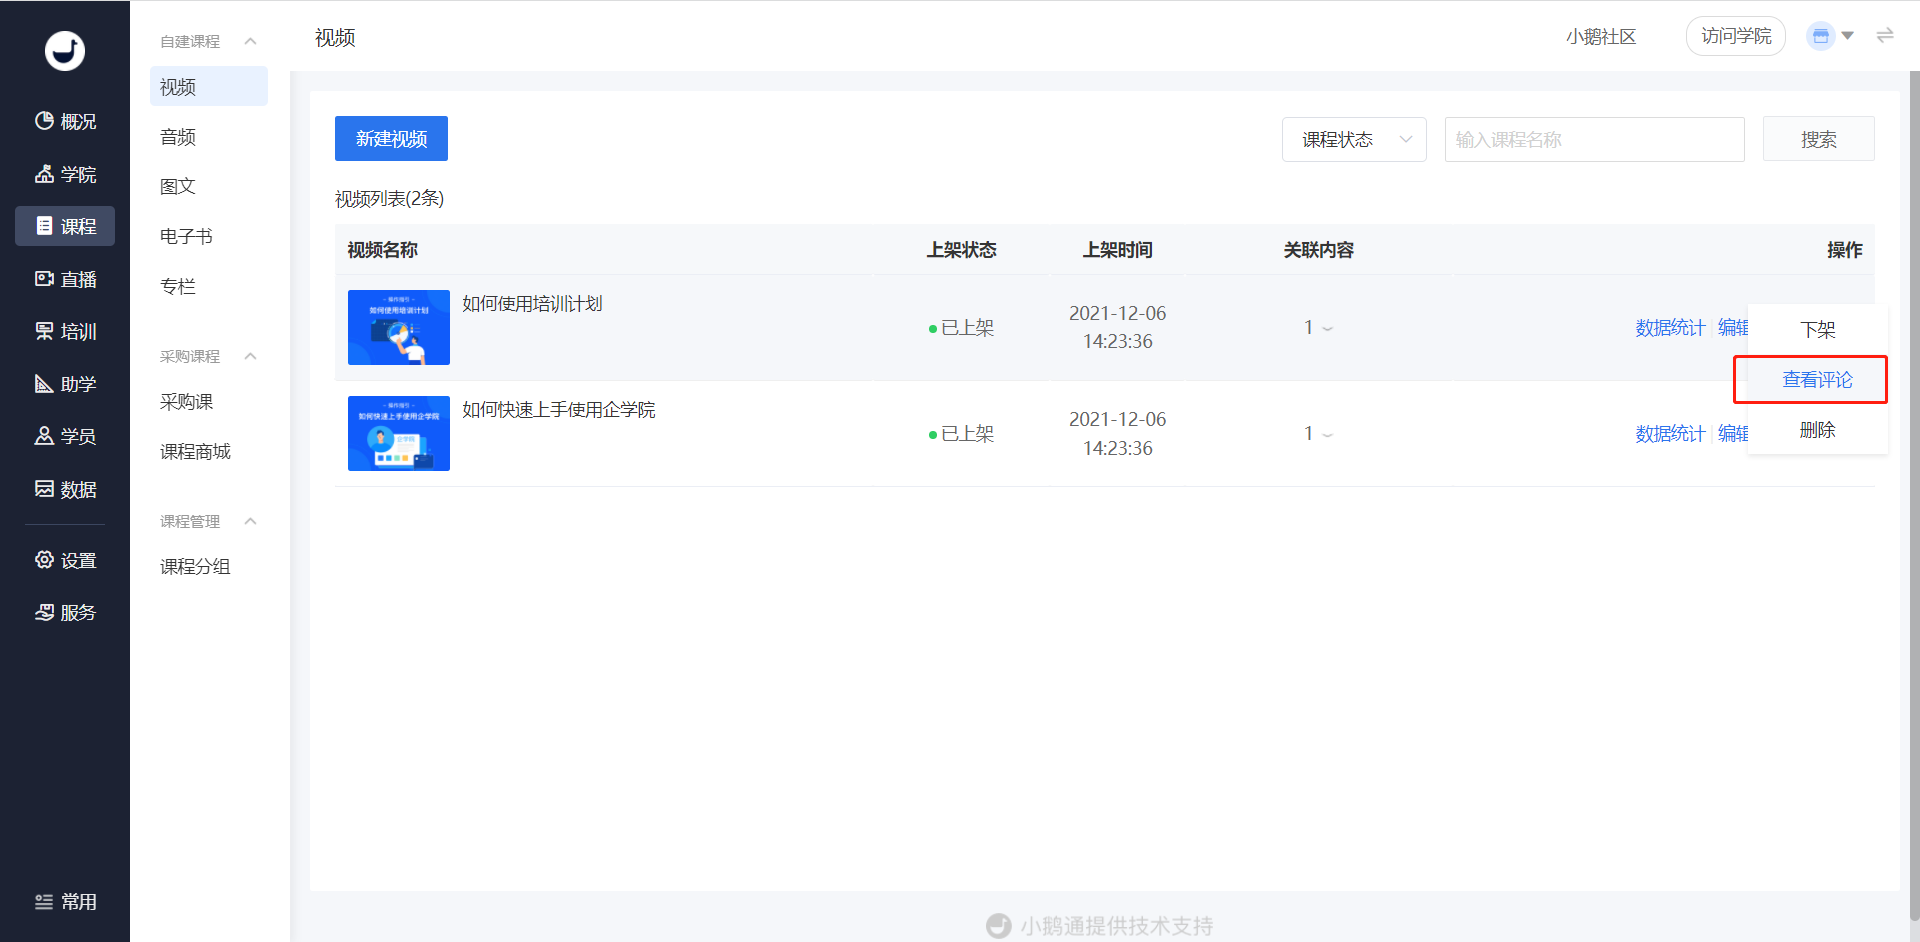
(Management Backend - Course Management - Video)
2. Comment Management
In the comment management module, you can view and manage the comments made by employees in the courses. You can reply to trainees' comments, send private messages, hide/show comments, set trainees' comments as featured comments, etc. You can also select multiple trainees' comments for batch hiding/showing.
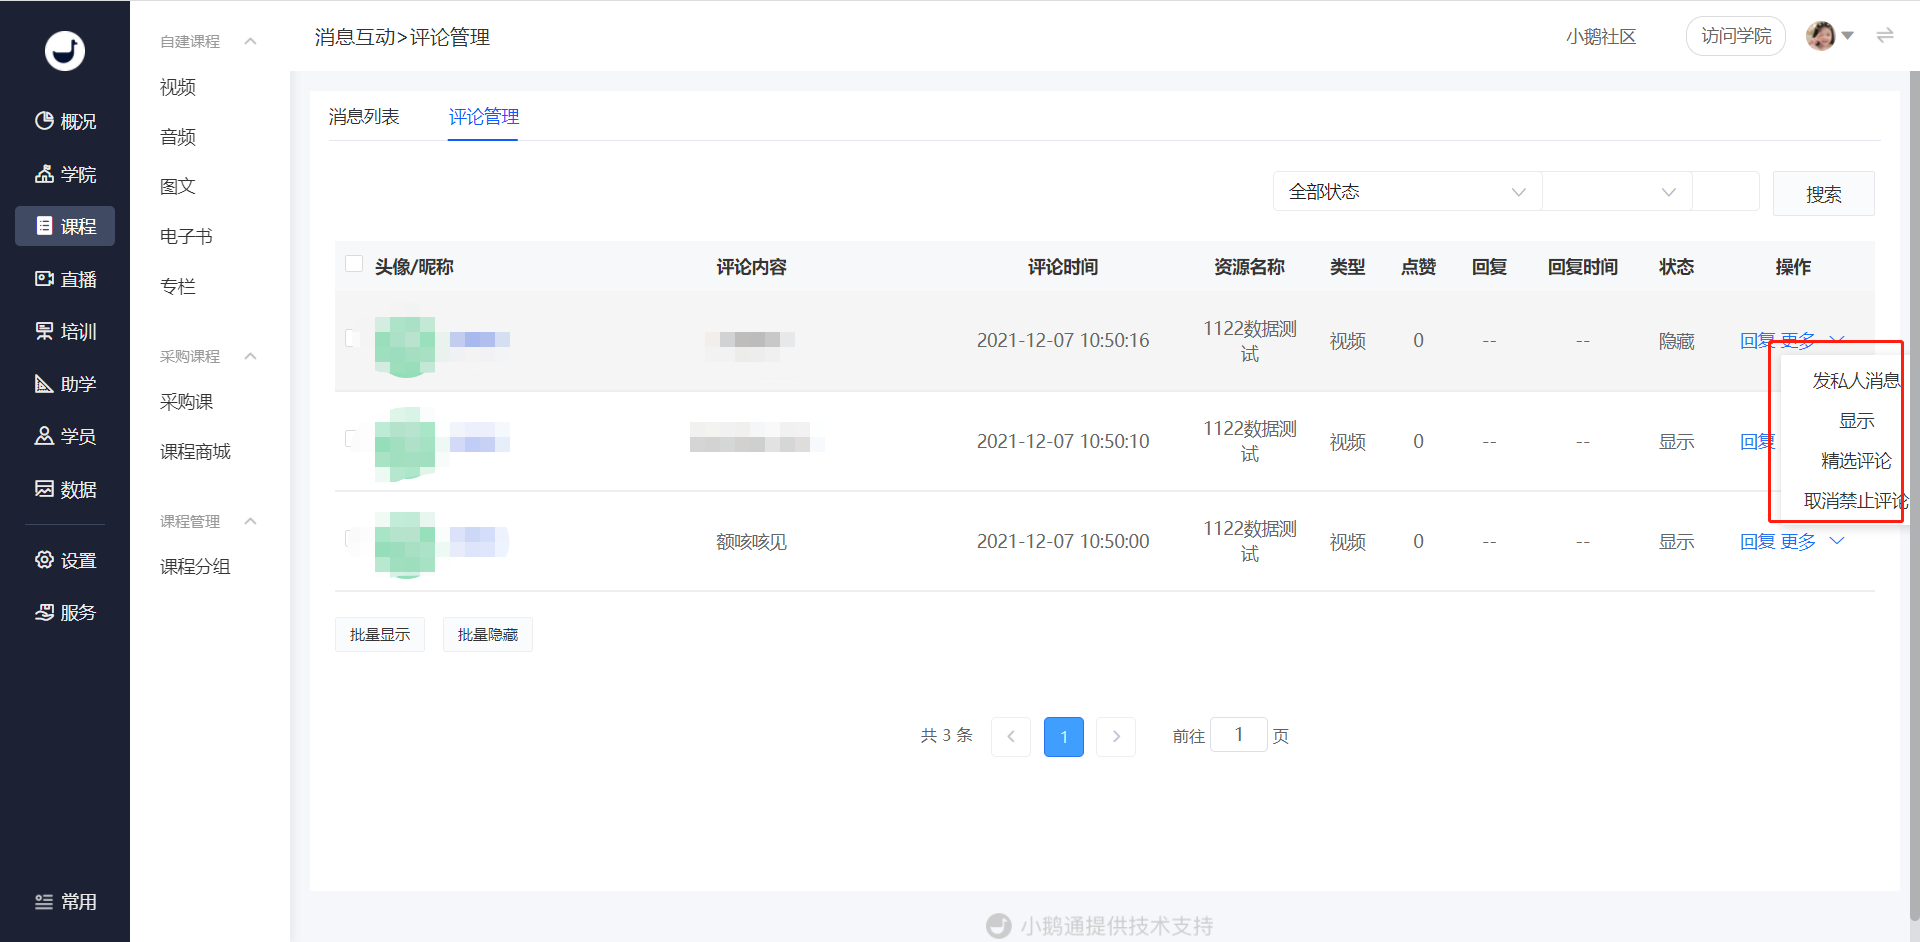
(Management Backend - View Comments)
3. Message List
In the message list, you can view the messages sent by the administrator to trainees and send messages to all trainees at the same time.
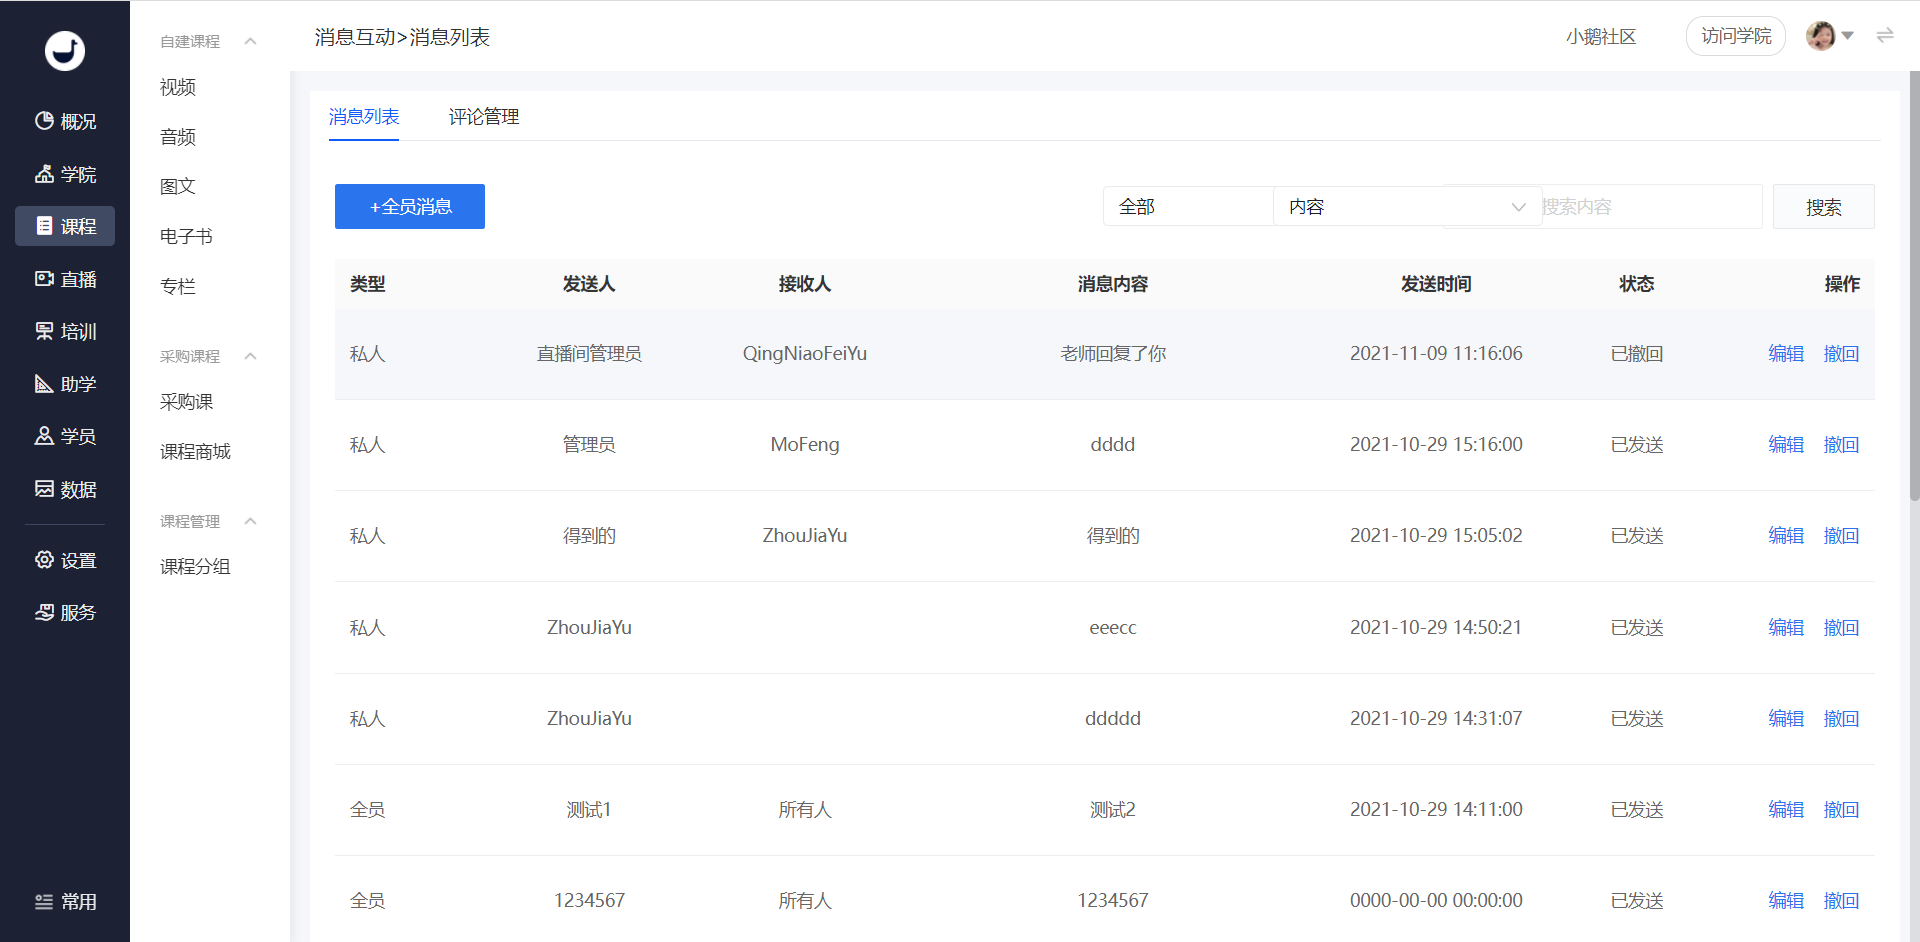
(Management Backend - Message Interaction - Message List)
Send messages to all trainees: Fill in the push information, including the push time, sender, message content, and link information. If necessary, you can fill in a message with a link. After filling in, click [Push Message], and the push message will be automatically sent to all trainees at the specified time. All - trainee messages can be edited again before the push time.
Sent messages cannot be edited. Please check carefully before sending.
Mis - sent messages can be recalled by clicking the [Recall] button.

(Management Backend - Course Management - Audio - Message Interaction - Message List - Send Messages to All Trainees)
Step 2: Enter the Academy(H5 Academy)
Trainees log in to the academy on the trainee side.
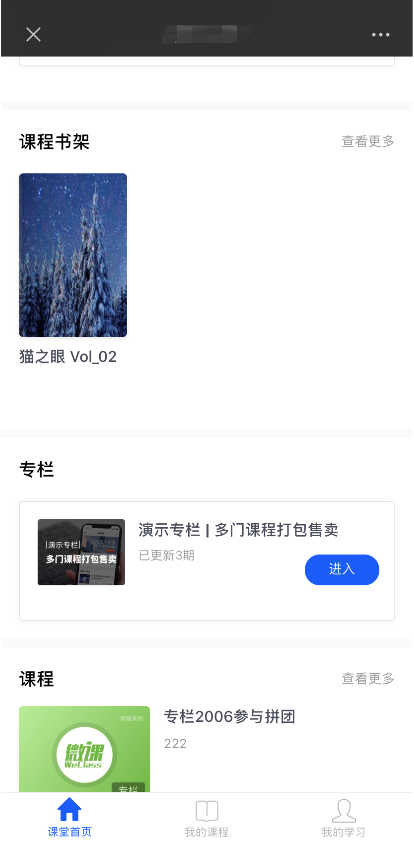
(H5 Academy - Classroom Homepage)
1. Comment on the Course
Trainees click [Write a Comment] on the corresponding course learning page, enter the comment content, and click [Publish].
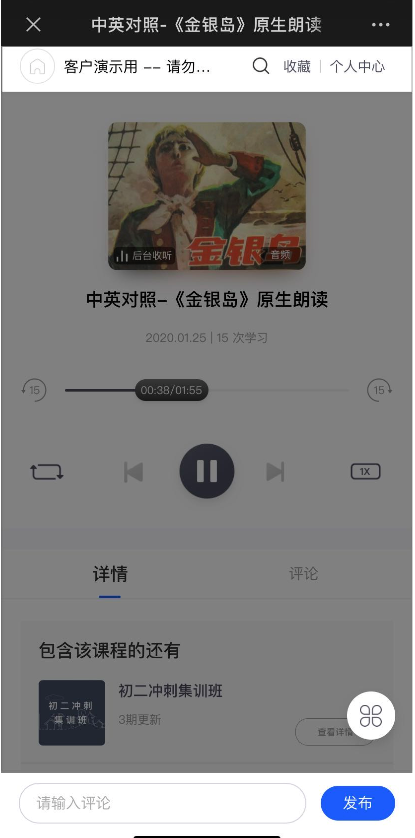
(H5 Academy - Course Details Page - Write a Comment)
2. View Messages
Click [My]. When there are new messages, there will be a message prompt in the upper - right corner. Click the icon button to view the message list.

Trainee Management (Enterprise Personnel Management)
Administrator Settings Tutorial
I. Function Introduction
Administrator settings are a module provided for enterprises to create and manage multiple administrator accounts (sub - accounts). The super administrator creates administrator accounts and assigns module permissions to the accounts. Administrators can log in to the management background using their accounts and view or use corresponding functional modules according to the assigned permissions.
II. Purpose of Use
Enterprises need to set up multiple personnel to operate and manage the enterprise training background and define their management permissions according to different management responsibilities.
III. Use Scenarios
Use scenarios for administrator settings
Enterprise training requires each department to organize courses and arrange training independently. Therefore, training responsible personnel from each department need to enter the management background to manage courses and set up training personnel on their own. The enterprise's super administrator can add personnel in the administrator settings module and complete the permission assignment for these personnel.
Use scenarios for role management
Enterprises need to standardize some roles and group permissions under a certain role. For example, the HR department needs to have personnel management permissions, so relevant personnel permissions can be grouped under this role and standardized as the 'HR trainer' role. When adding an HR colleague as an administrator, this role can be assigned to the administrator.
IV. Operation Path
Administrator: Management background → Settings → Administrator settings → Add administrator
V. Usage Tutorial
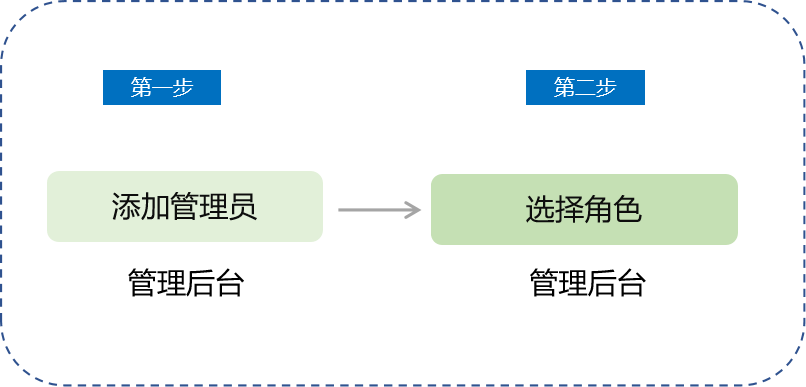
Rule Explanation
Each enterprise training has an unlimited number of administrator accounts;
● For enterprise training not integrated with Enterprise WeChat:
1. The administrator account needs to be filled in as a mobile phone number, and this mobile phone number needs to be registered with elink;
2. If the 'Senior administrator' or 'Ordinary administrator' system - built - in roles are selected when adding an account, verification with the mobile phone number of the enterprise training creator is required.
● For enterprise training integrated with Enterprise WeChat:
1. When adding an administrator, you need to select from the student accounts that have been synchronized to the student management address book;
2. You can directly synchronize Enterprise WeChat administrators as enterprise training administrators, and their permissions are all senior administrator permissions.
Step 1: Fill in the basic information of the administrator(Management background)
● For enterprise training not integrated with Enterprise WeChat
1. Enter the page through [Settings] - [Administrator settings] - [Add administrator] in the management background
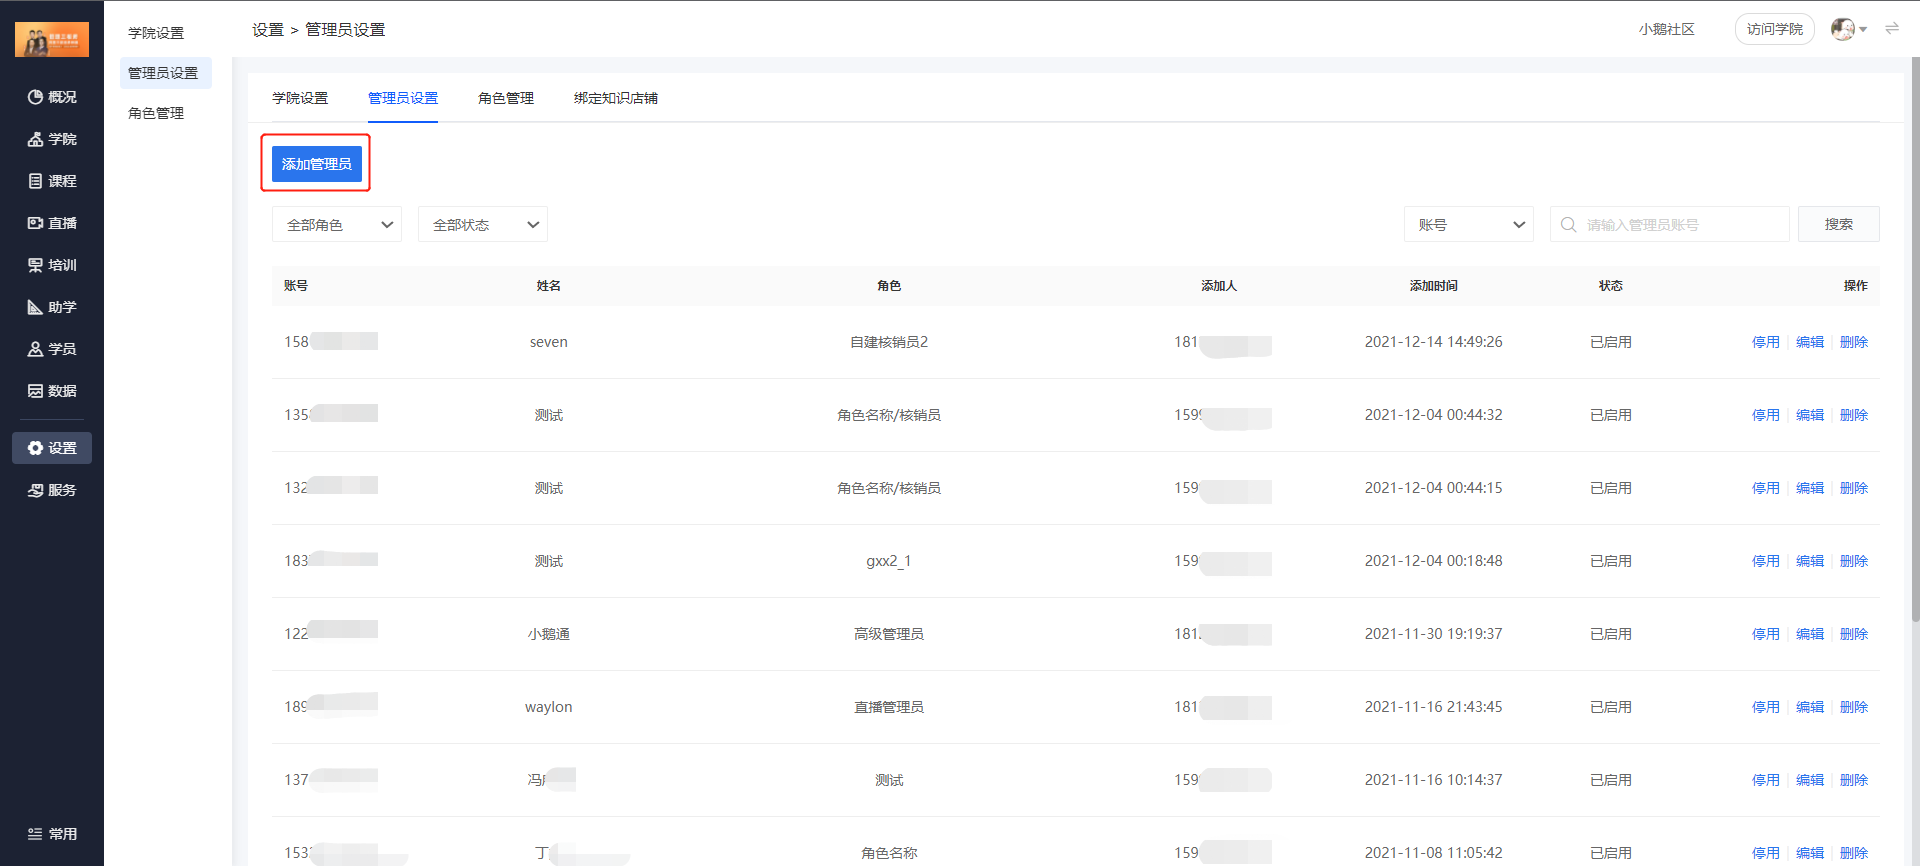
(Management background)
2. Fill in the basic information of the administrator
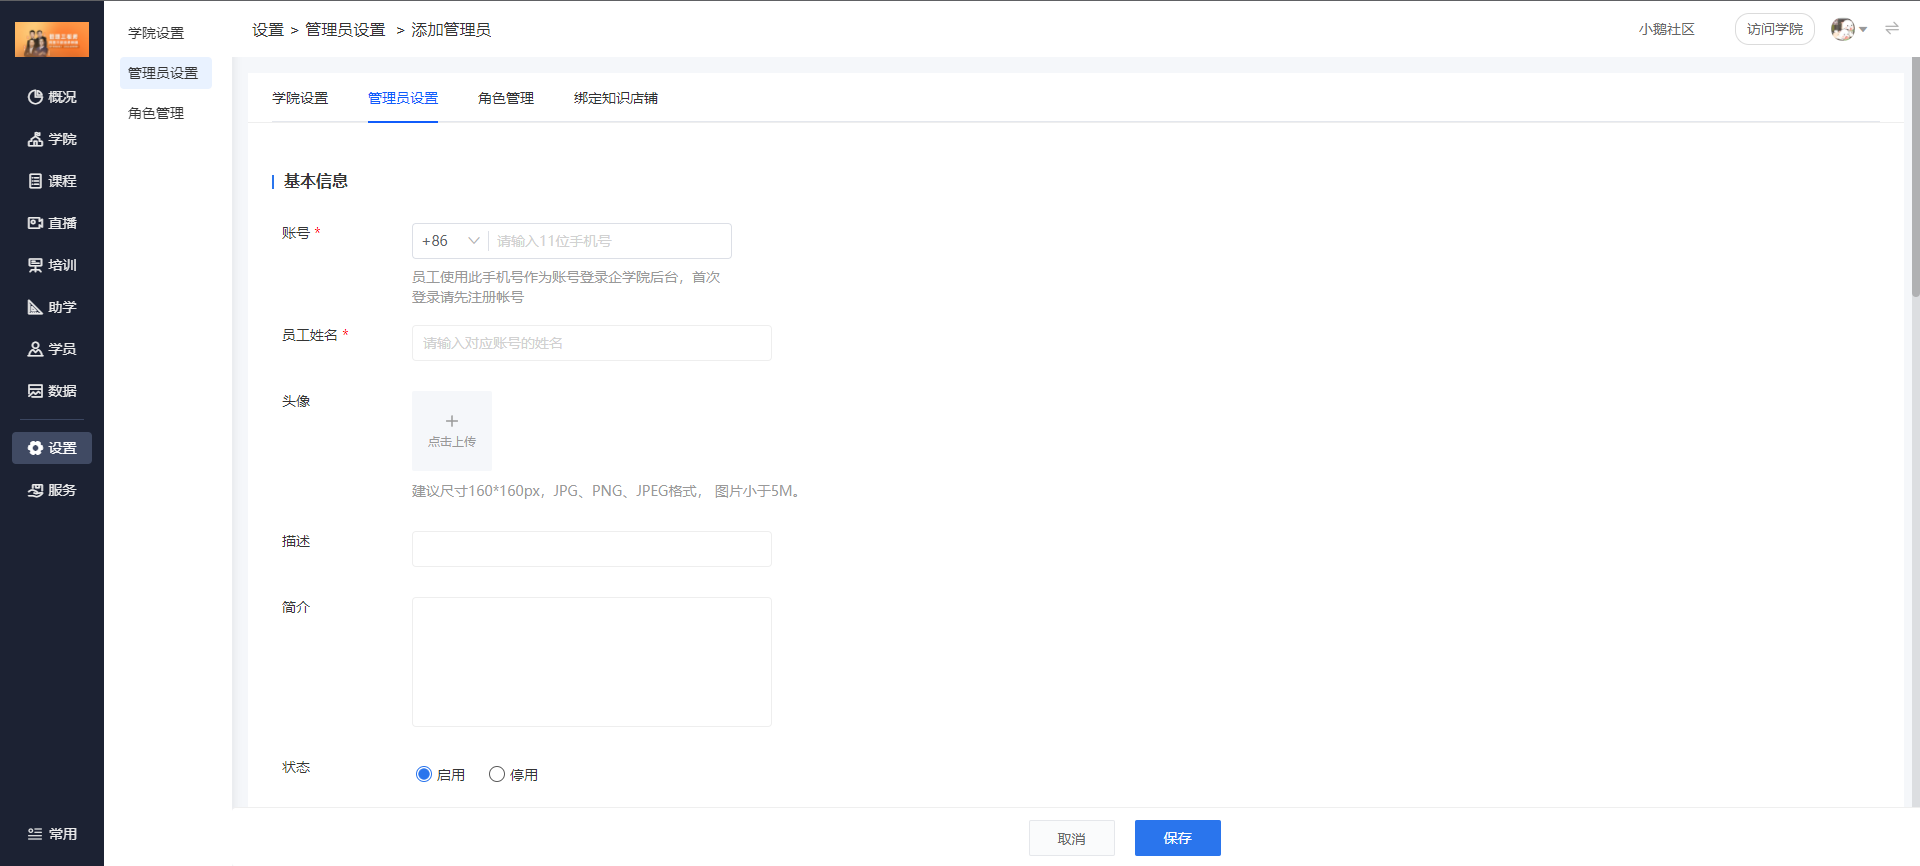
(Management background)
● For enterprise training integrated with Enterprise WeChat
1. Through [Settings] - [Administrator settings] - [Add administrator] in the management background, select a student account from the synchronized address book in student management. After saving, the account will be directly added as an ordinary administrator;

(Management background)
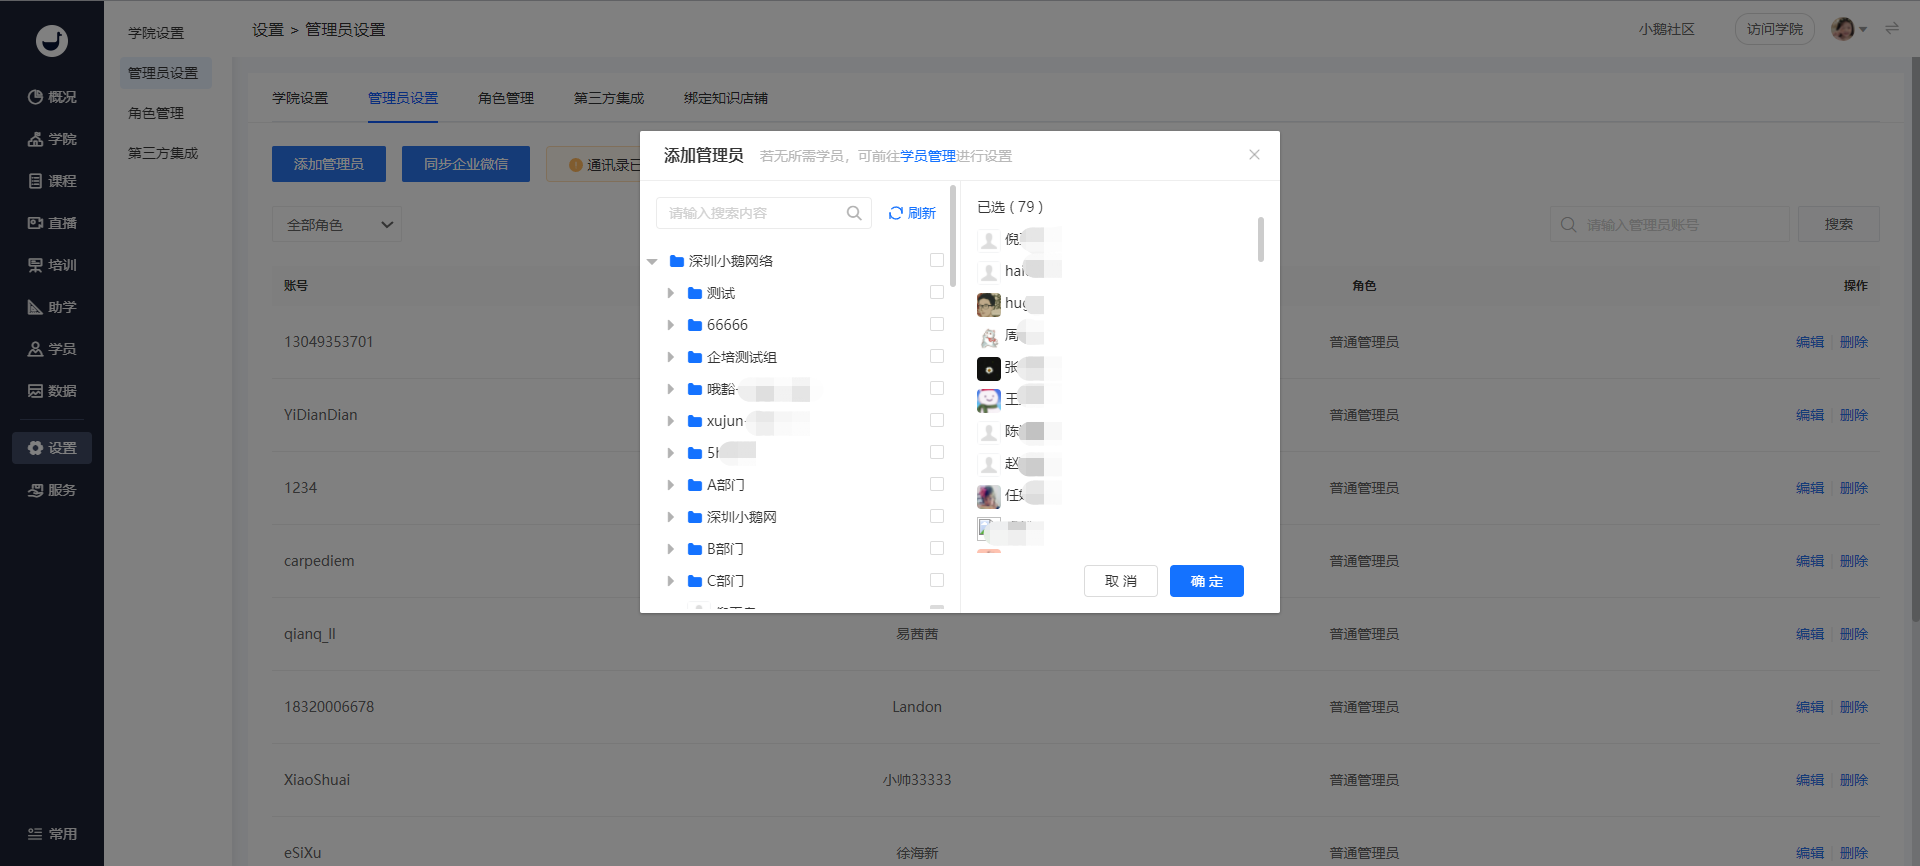
(Management background)
2. You can also click [Synchronize with Enterprise WeChat] to directly synchronize Enterprise WeChat administrators to enterprise training and add them as senior administrators;
Note: After clicking the 'Synchronize with Enterprise WeChat' button, the permissions of Enterprise WeChat administrators in elink enterprise training will be directly overwritten as senior administrator permissions (with all functional permissions).
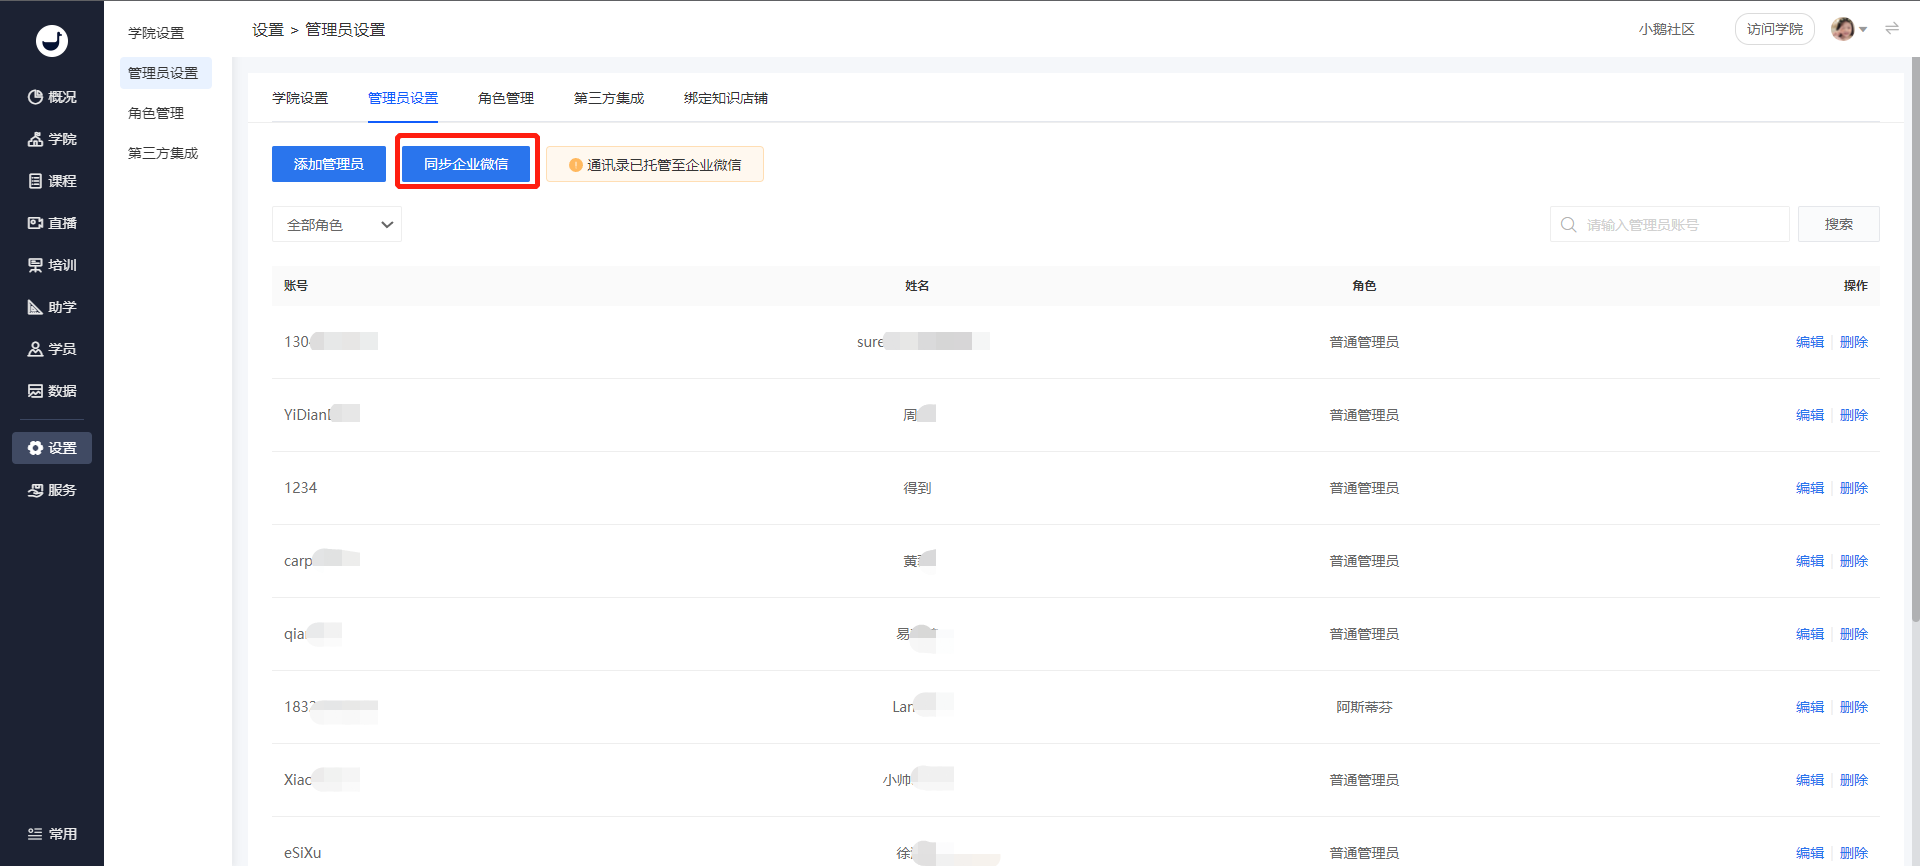
(Management background)
Step 2: Select a role and clarify the corresponding permissions under this role
● For enterprise training not integrated with Enterprise WeChat
After selecting the corresponding role, click 'Save' to complete the addition of the administrator;
If the senior administrator or ordinary administrator is selected, click to obtain the verification code of the mobile phone number of the enterprise training creator for verification
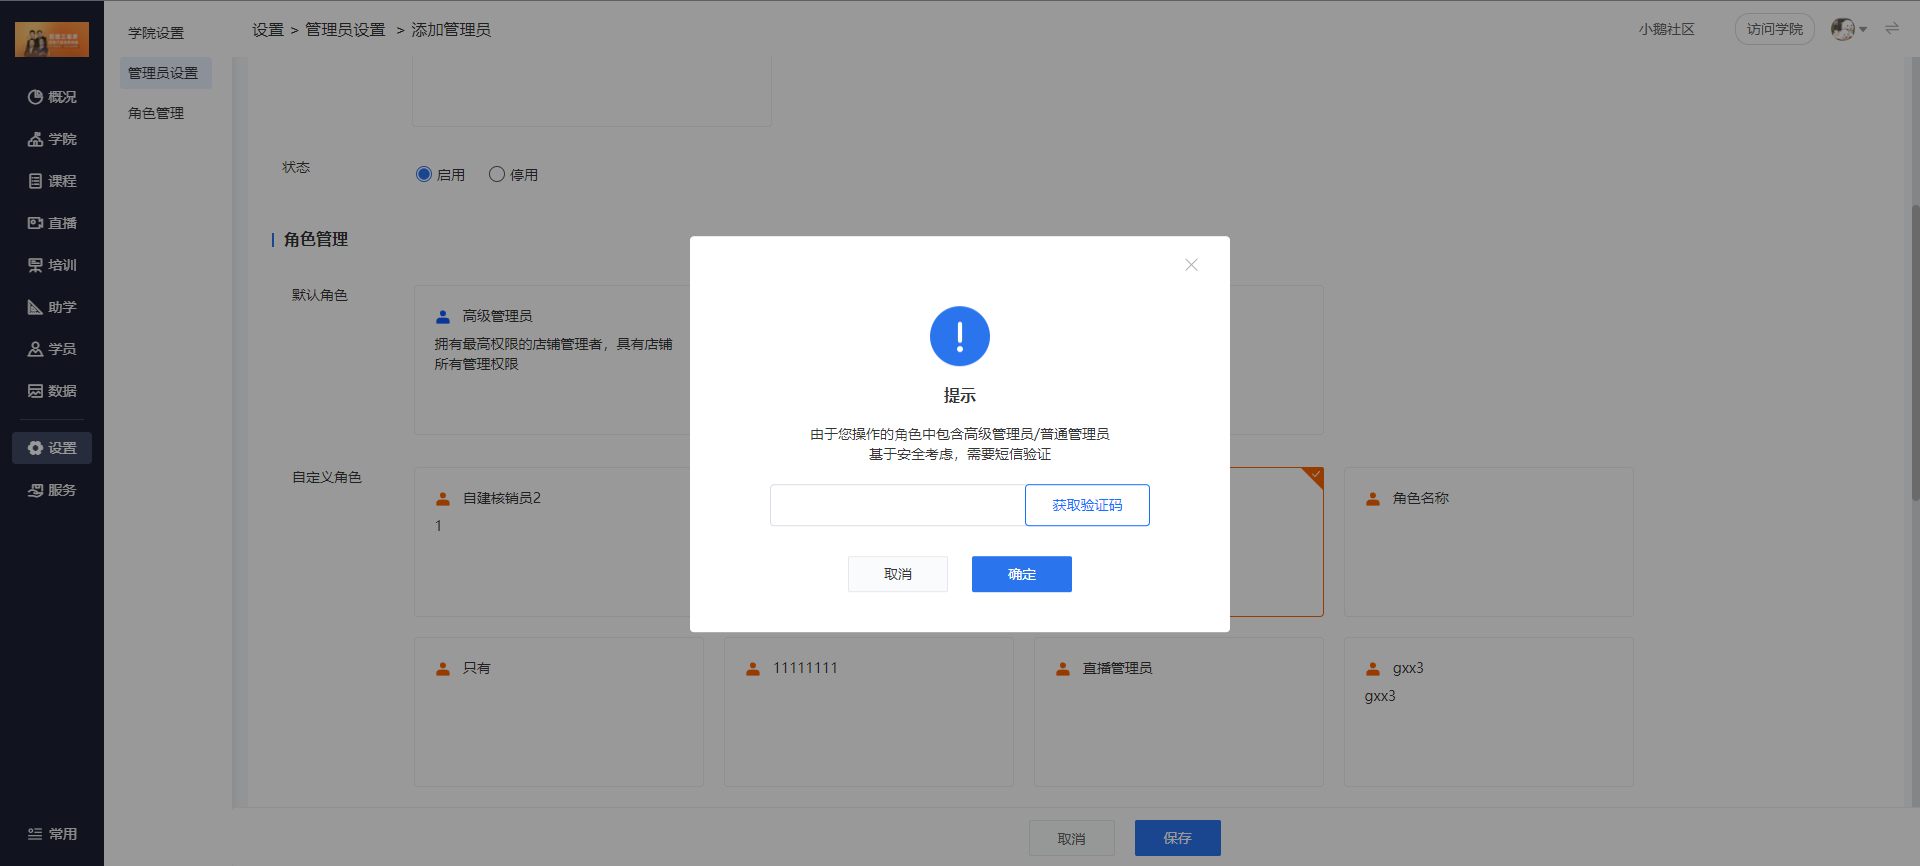
(Management background)
● For enterprise training integrated with Enterprise WeChat
In the administrator list, click [Edit] to modify the administrator's role and permissions.
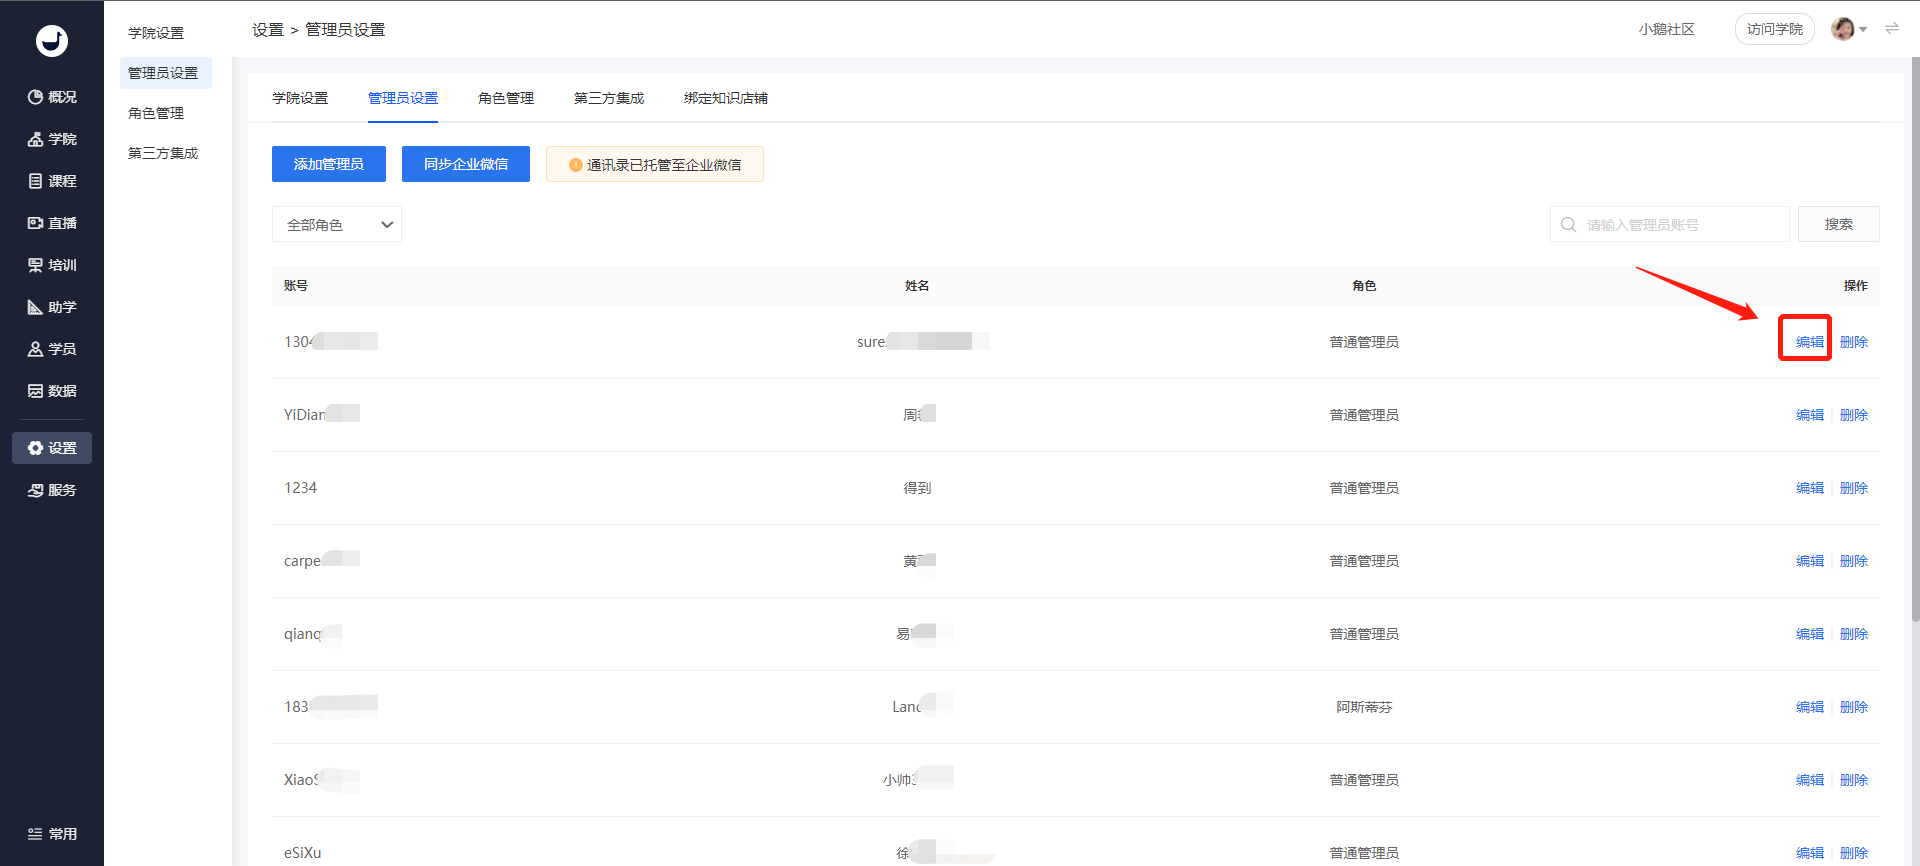
(Management background)
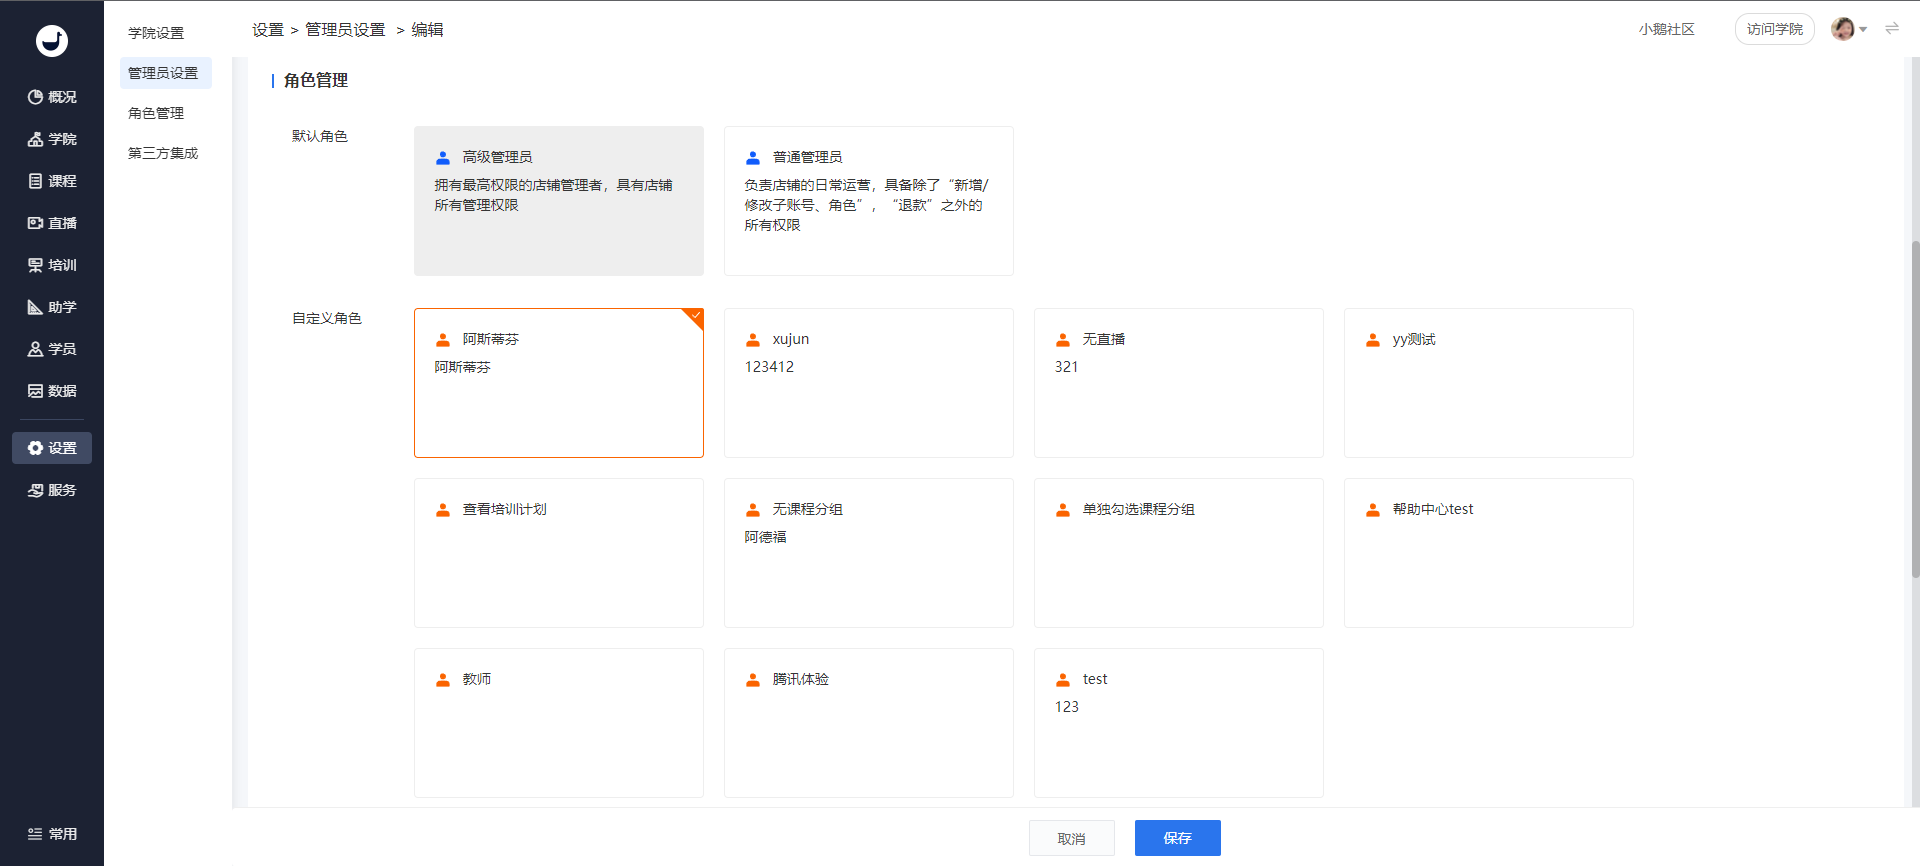
(Management background)
Tutorial on Role Management Settings
I. Function Introduction
Role management is a module that aggregates permissions under a certain role. When setting administrator permissions, you can directly select the corresponding role, and the administrator will be directly granted the permissions under this role.
II. Purpose of Use
When setting administrator permissions, you can directly select the corresponding role without re - configuring permissions, which improves the efficiency of adding administrators.
III. Use Scenarios
An enterprise needs to standardize some roles and aggregate permissions under a certain role. For example, the HR department needs to have the permission to manage employees. You can aggregate employee - related permissions under this role and solidify it as the 'HR Trainer' role. When adding an HR colleague as an administrator, you can assign this role to the administrator.
IV. Operation Path
Administrator: Management Console → Settings → Role Management
V. Usage Tutorial

Rule Explanation
There are 2 default built - in roles (Senior Administrator and General Administrator) in role management. They cannot be edited and only support viewing.
Step 1: Add a Role
1. Enter the role management page through [Settings] - [Role Management]

(Management Console)
2. Click the plus sign '+' next to the role to create a new role, and fill in the role name and description
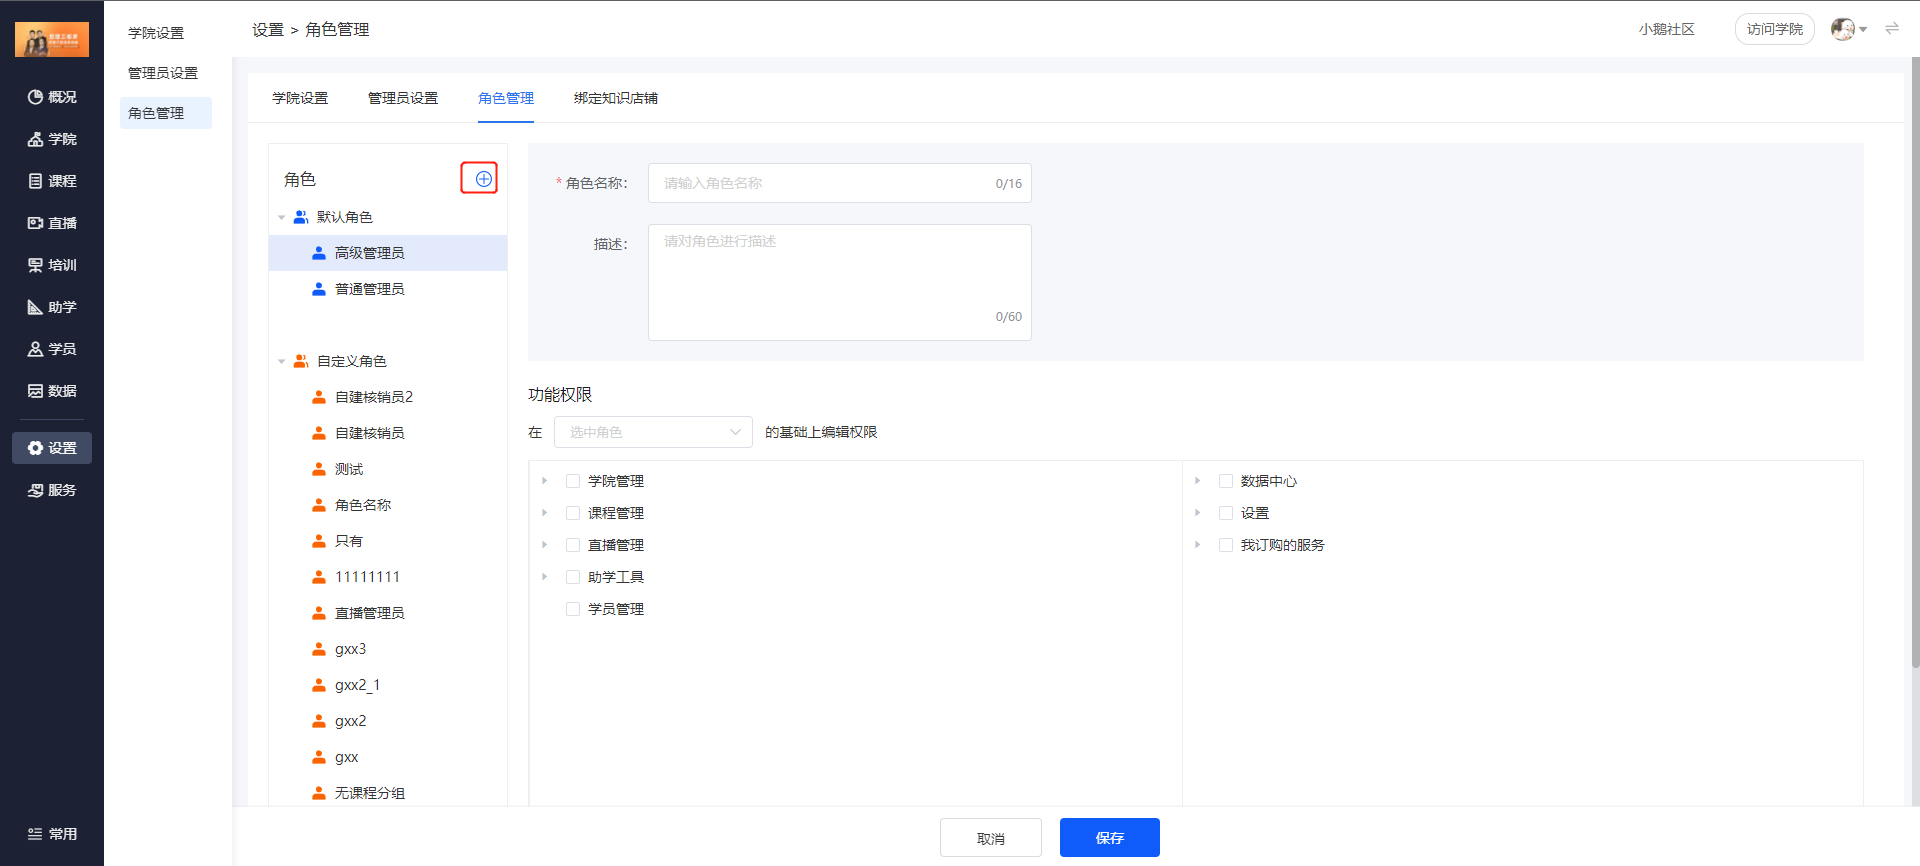
(Management Console)
Step 2: Set Permissions
1. Under functional permissions, you can choose to edit permissions based on an existing role

(Management Console)
2. You can select an existing role to modify the permissions under this role

(Management Console)
Course Mall
Tutorial on Using the Course Product Collections
I. Function Introduction
The Course Marketplace collaborates with top instructors and training institutions in various fields to provide enterprises with high-quality courses in different industries and sub-categories. Enterprises can purchase courses as needed and allocate them to employees for use.
After purchasing a course, users can study it permanently within the platform's validity period. However, when the college's subscription expires, course access will be restricted due to limited platform usage. In this case, users can resume learning by renewing the platform subscription.
II. Purpose of Use
When enterprises conduct internal training, they need to purchase or introduce external courses. The Course Marketplace can meet these needs.
III. Usage Scenarios
Courses are essential for enterprise internal training. However, developing internal courses can be costly and requires high - level internal instructors. Therefore, enterprises can purchase high - quality courses through the Course Marketplace and make them available to employees in their college.
IV. Operation Path
Path: Courses → Course Marketplace → Courses → Purchase Courses
V. Usage Tutorial
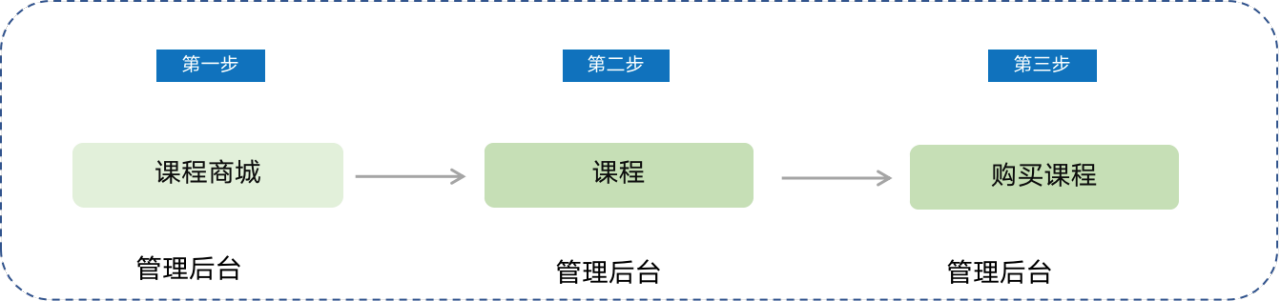
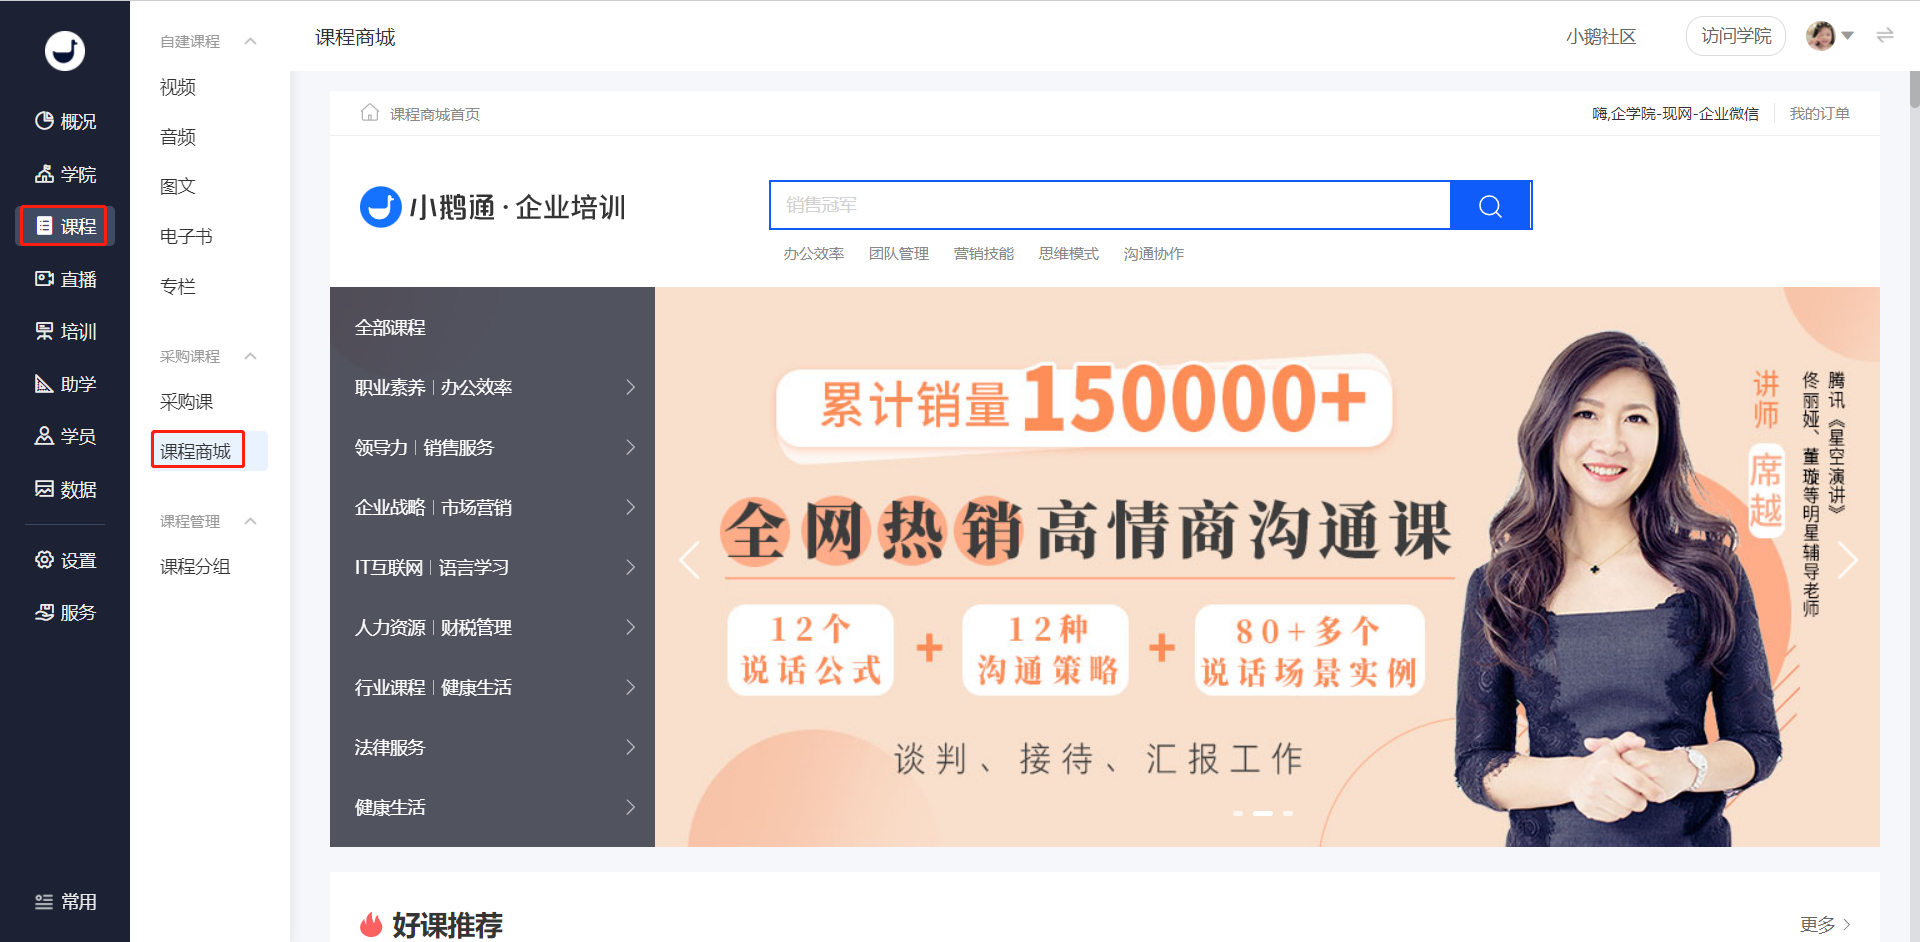
Click to enter the Course Marketplace.
View course details: Enter the course details page. Administrators can learn about the course through the course introduction, syllabus, and trial preview, and decide whether to purchase it.
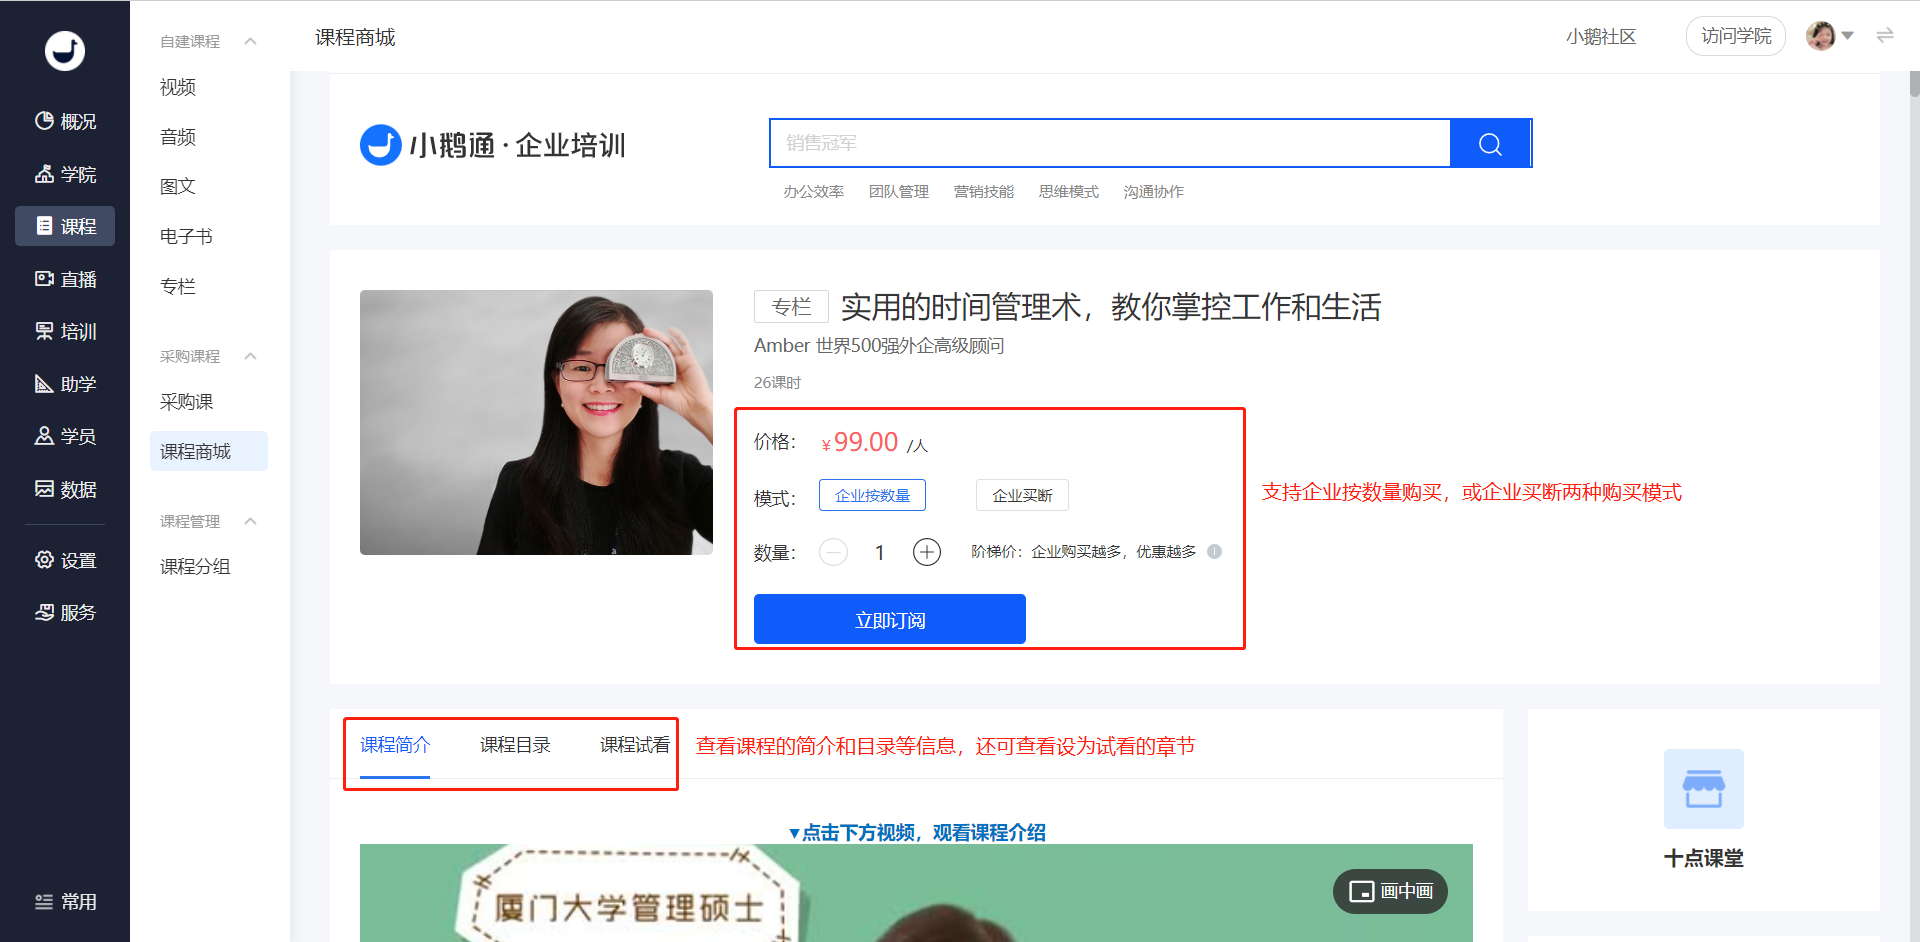
Select the purchase mode: The courses support two subscription models: purchase by quantity/enterprise buy - out.
a. If purchasing by quantity, administrators need to select the number of courses to buy. Generally, the more courses an enterprise purchases, the greater the discount. After purchase, administrators need to allocate learning quotas to employees.
b. For enterprise buy - out, there is no limit on the number of learning quotas for the purchased courses. Enterprises can allocate them to all employees for learning.
c. Free courses have no limit on learning quotas.
Confirm the course purchase order
After clicking 'Order Now', you will enter the course order details page. After confirming that the order information is correct, click 'Pay Now'.
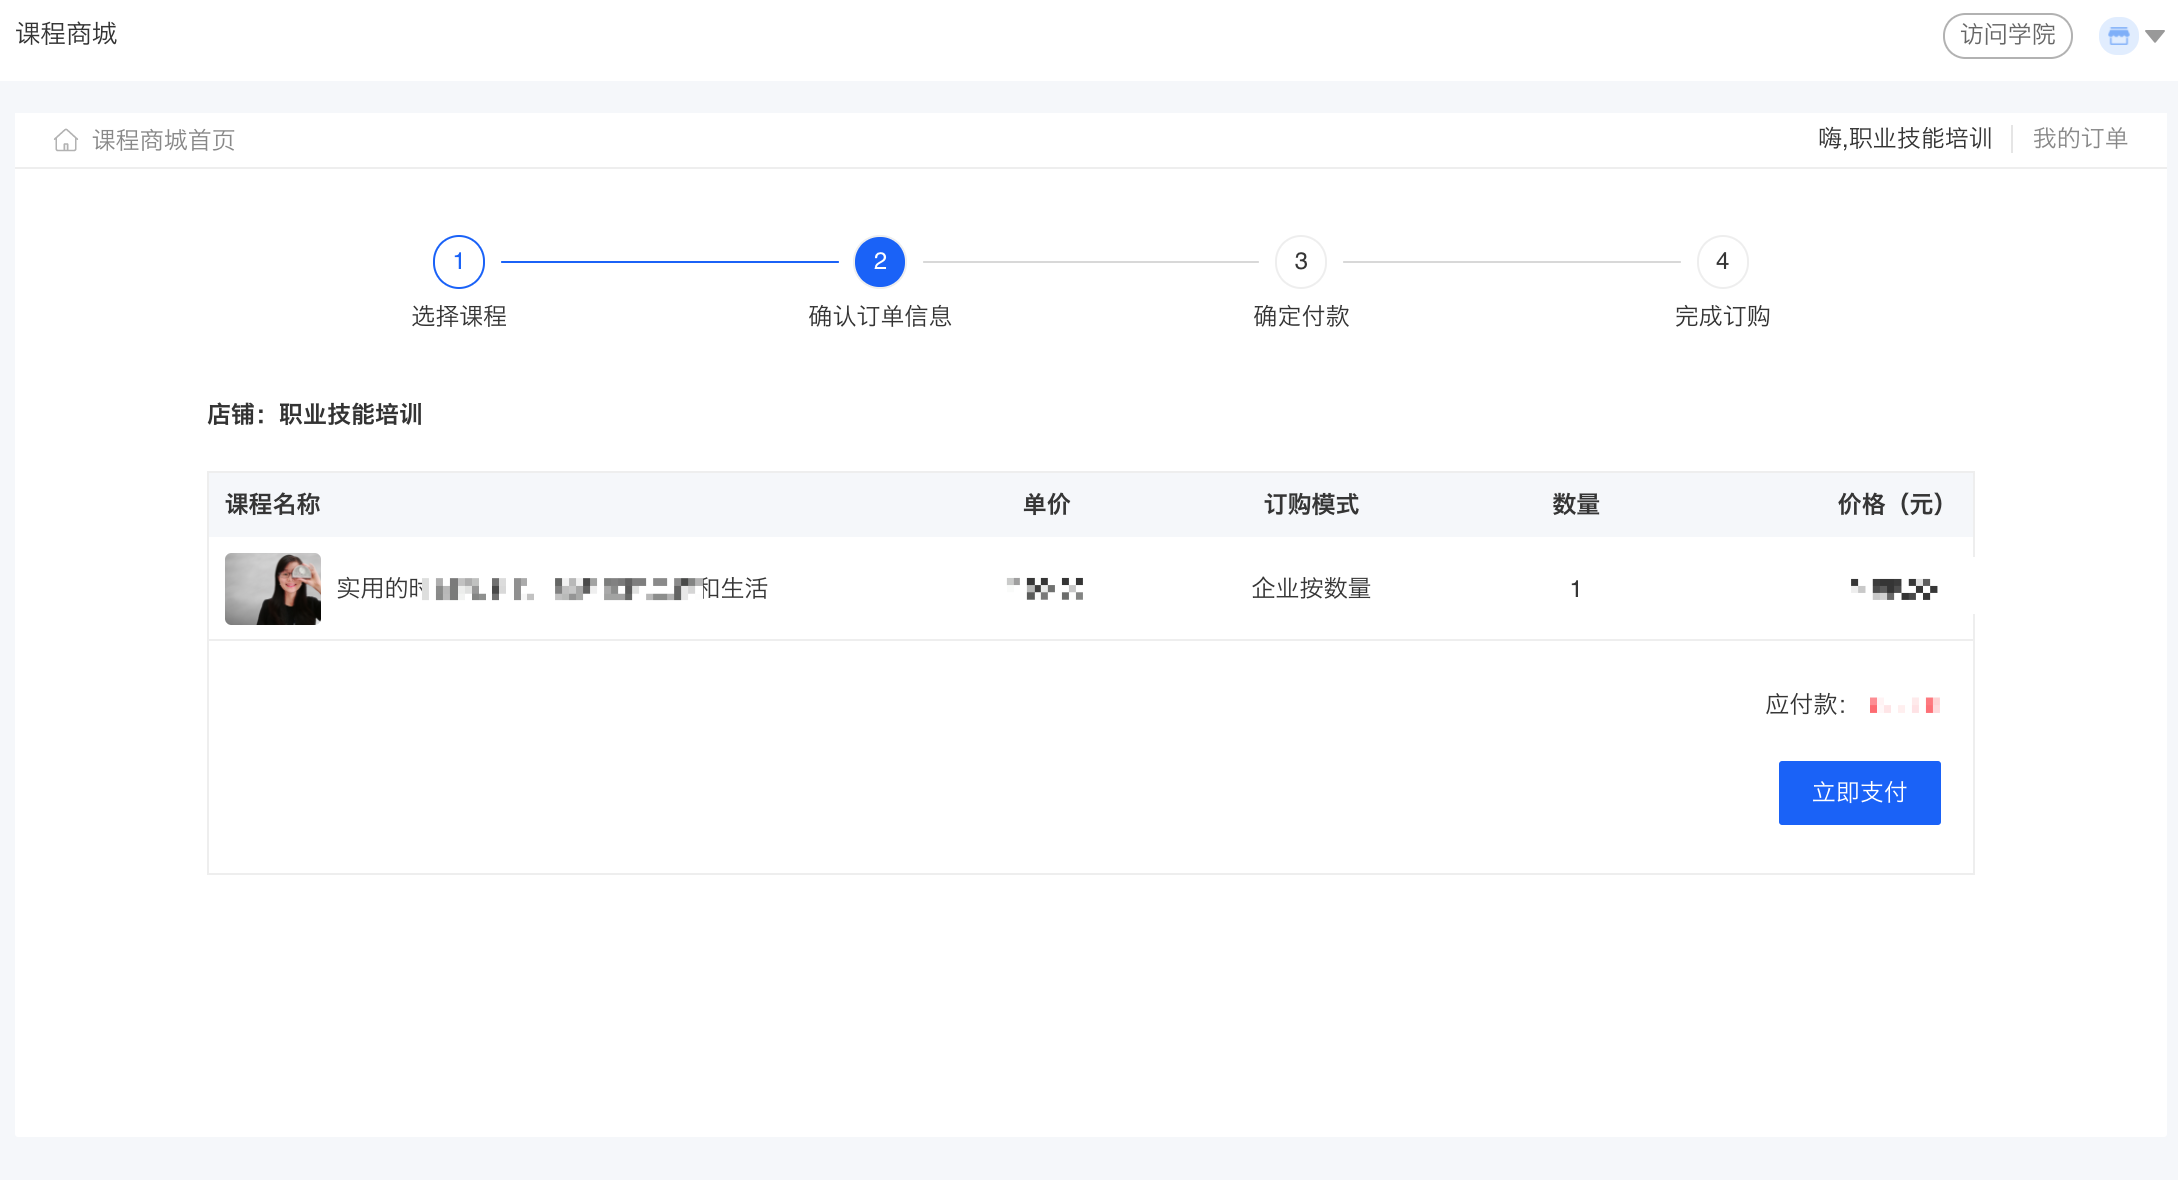
Confirm payment
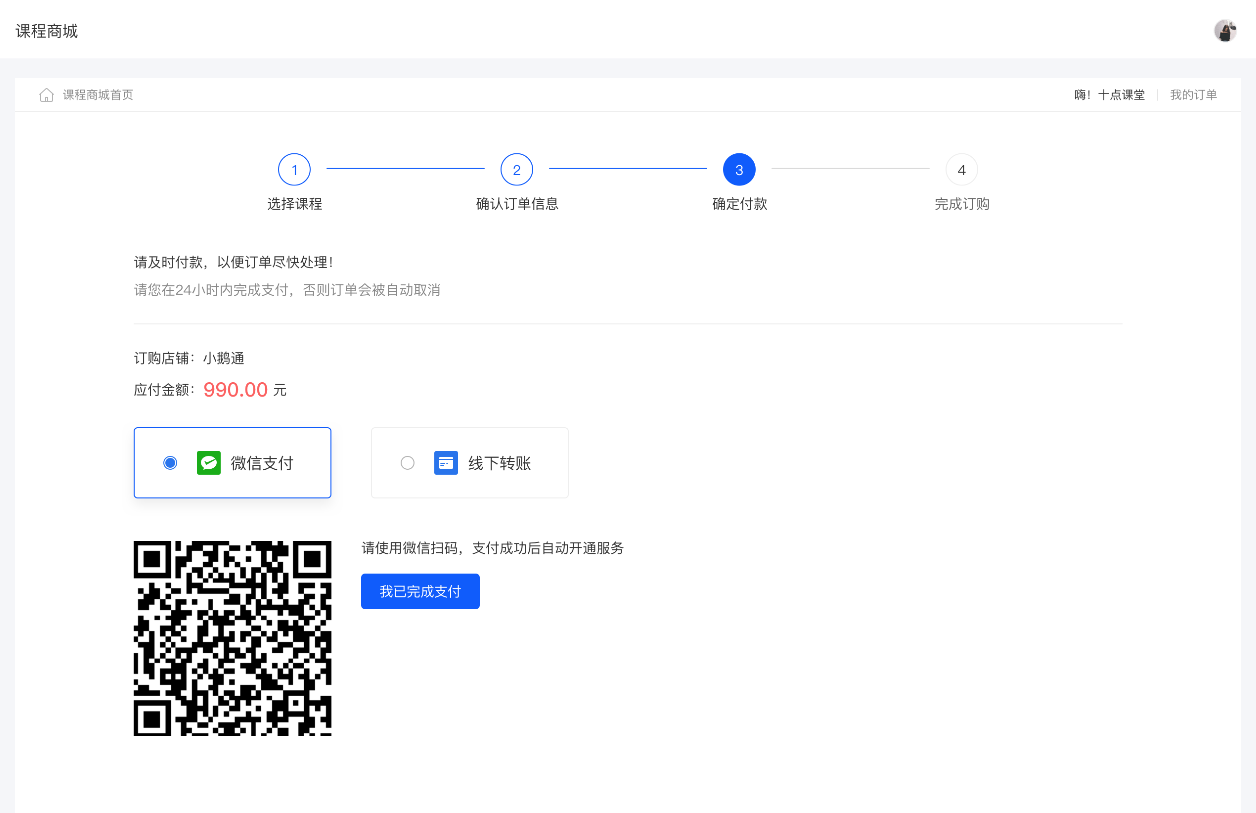
Currently, two payment methods are supported: WeChat Pay, offline transfer [Manual adjustment required]
For WeChat Pay, simply scan the QR code with WeChat to complete the payment.
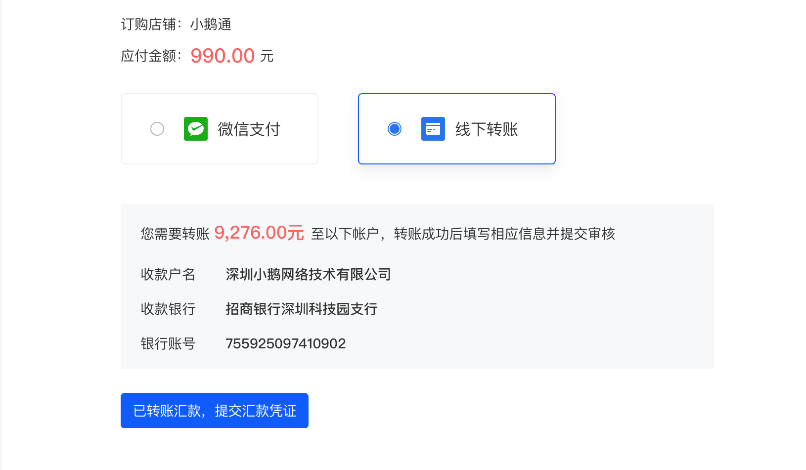
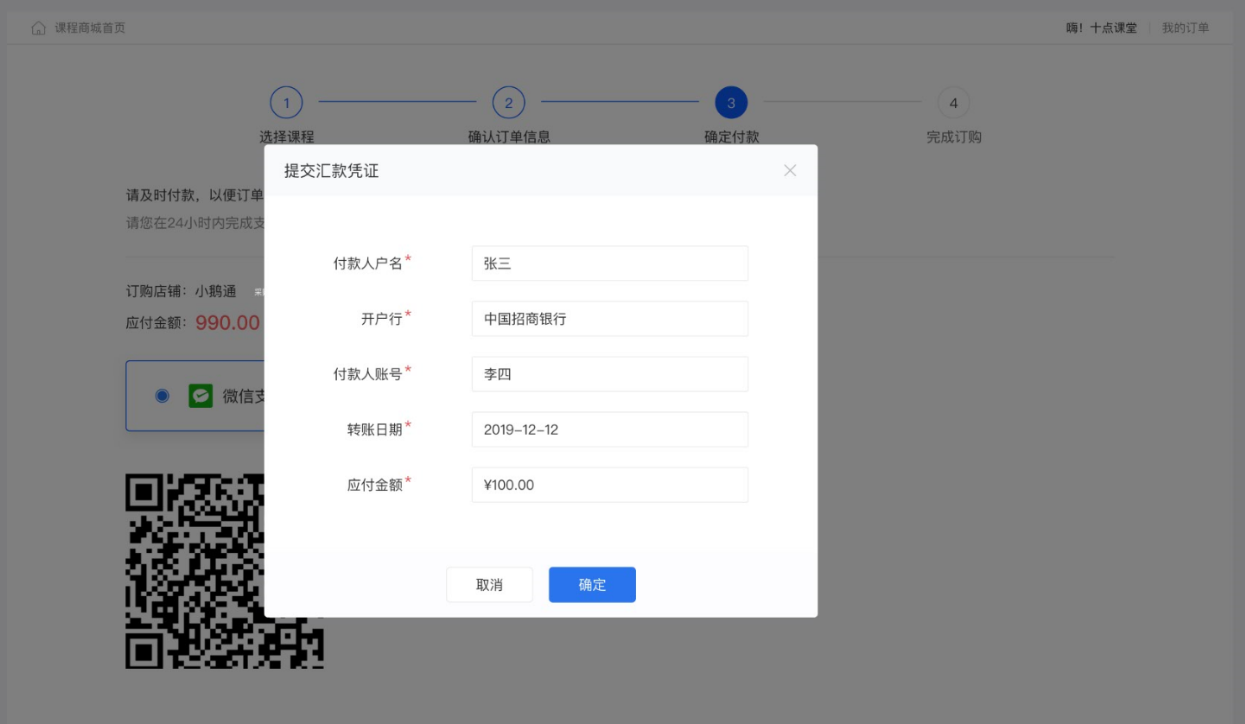
For offline transfer, first obtain the elink collection account. After completing the transfer, find the ordered product in 'My Orders' and click 'Submit Remittance Certificate' to submit the corresponding remittance information. elink will have a dedicated team for review. After the review is approved, you can view the purchased courses in the 'Course Management - Purchased Courses' module.
Live broadcast management
Video Live Streaming - Tutorial for Web Version
I. Function Introduction
Instructors can conduct video live streaming via the web - based platform without the need to download software, and can start the live stream immediately. This is suitable for live - streaming scenarios that require desktop sharing, courseware display, and instructor on - camera. Compared with the computer client, it is easier for instructors to get started and operate when using the web - based platform for live streaming.
PS: To conduct live streaming via the web - based platform, you need to use Google Chrome. Google Chrome has better compatibility and will provide a better live - streaming effect!
II. Purpose of Use
Using the web - based platform to start a video live stream allows for convenient live streaming directly on the web without software download, enabling real - time video, courseware & desktop sharing and other live - streaming content.
III. Use Scenarios
Web - based live streaming is suitable for scenarios that require desktop sharing, courseware display, and real - time video live streaming with students.
IV. Operation Path
Instructor End: Management Backend → Live Streaming → Go Live → Teach on Computer → Web - based Platform
V. Usage Tutorial
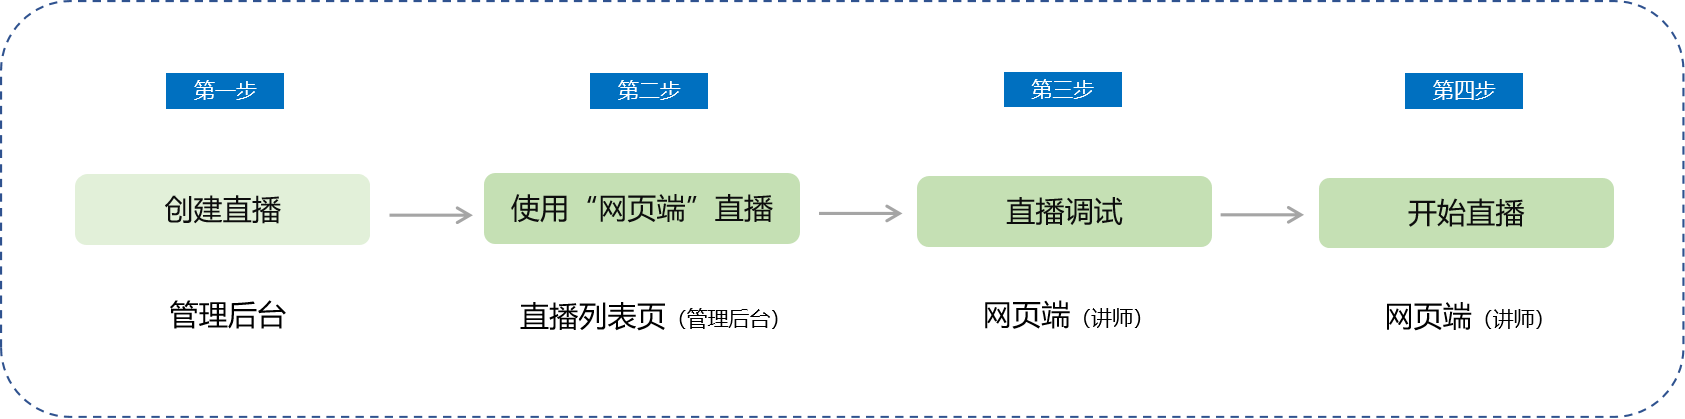
Step 1: Create a Live Stream(Management Backend)
1. Enter the Management Backend - Live Streaming and create a video live stream.
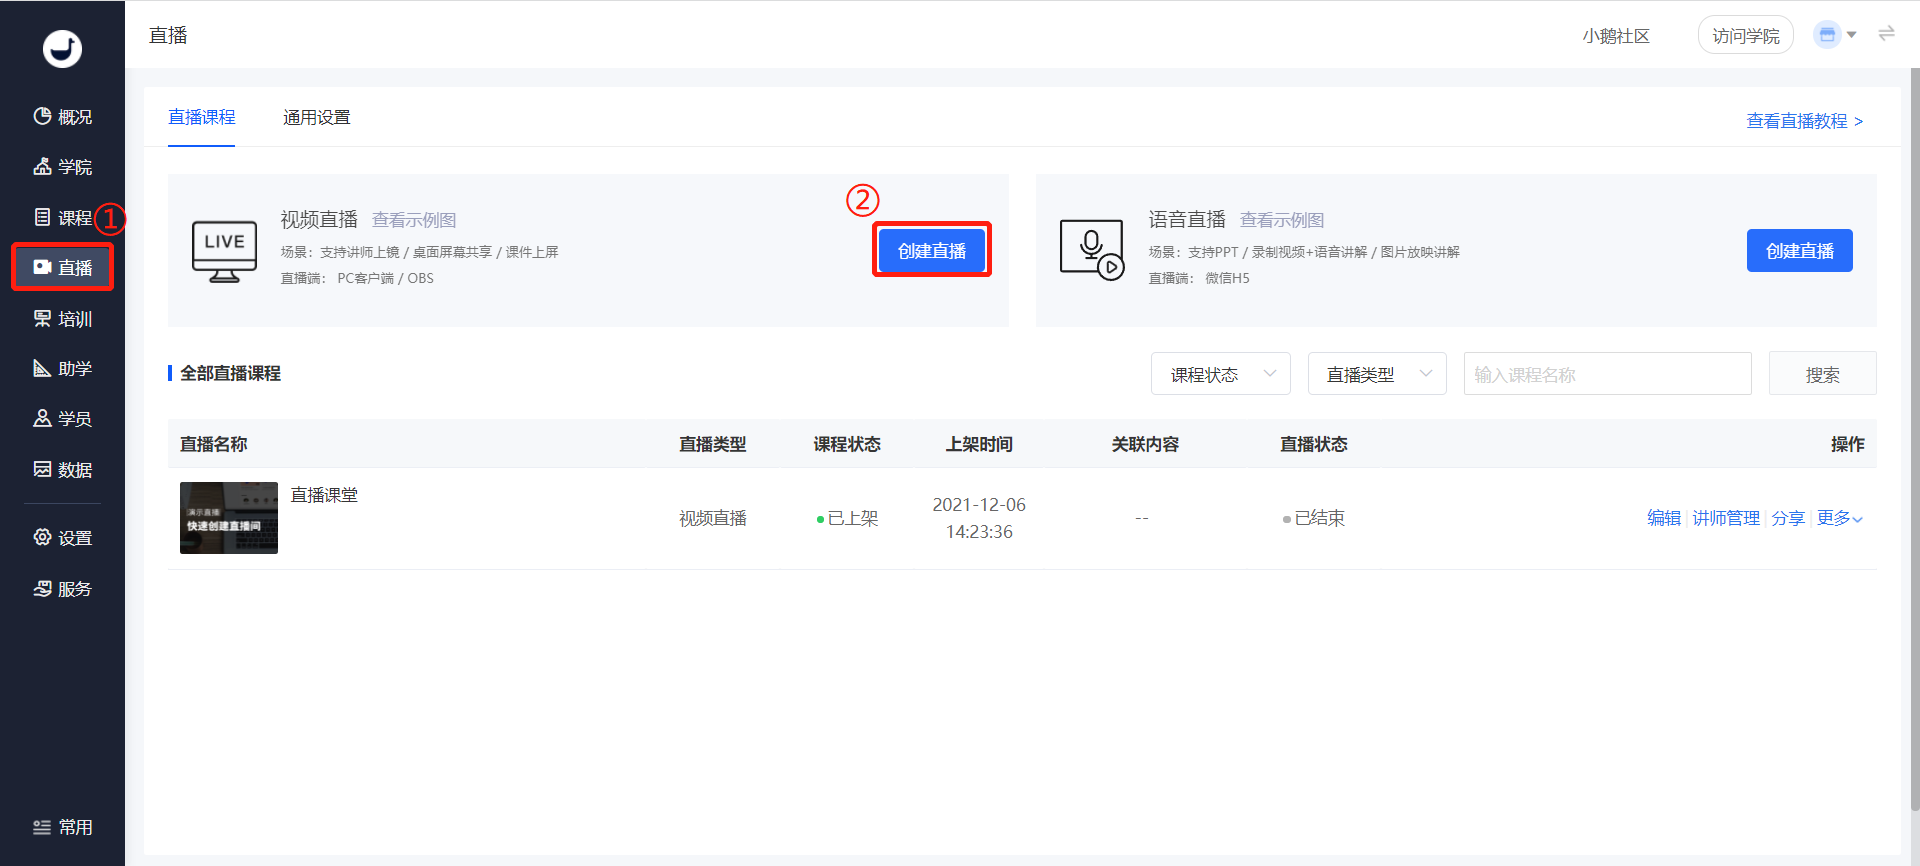
(Management Backend - Live Streaming)
2. Fill in the live - stream information and click the Save button to complete the live - stream creation.
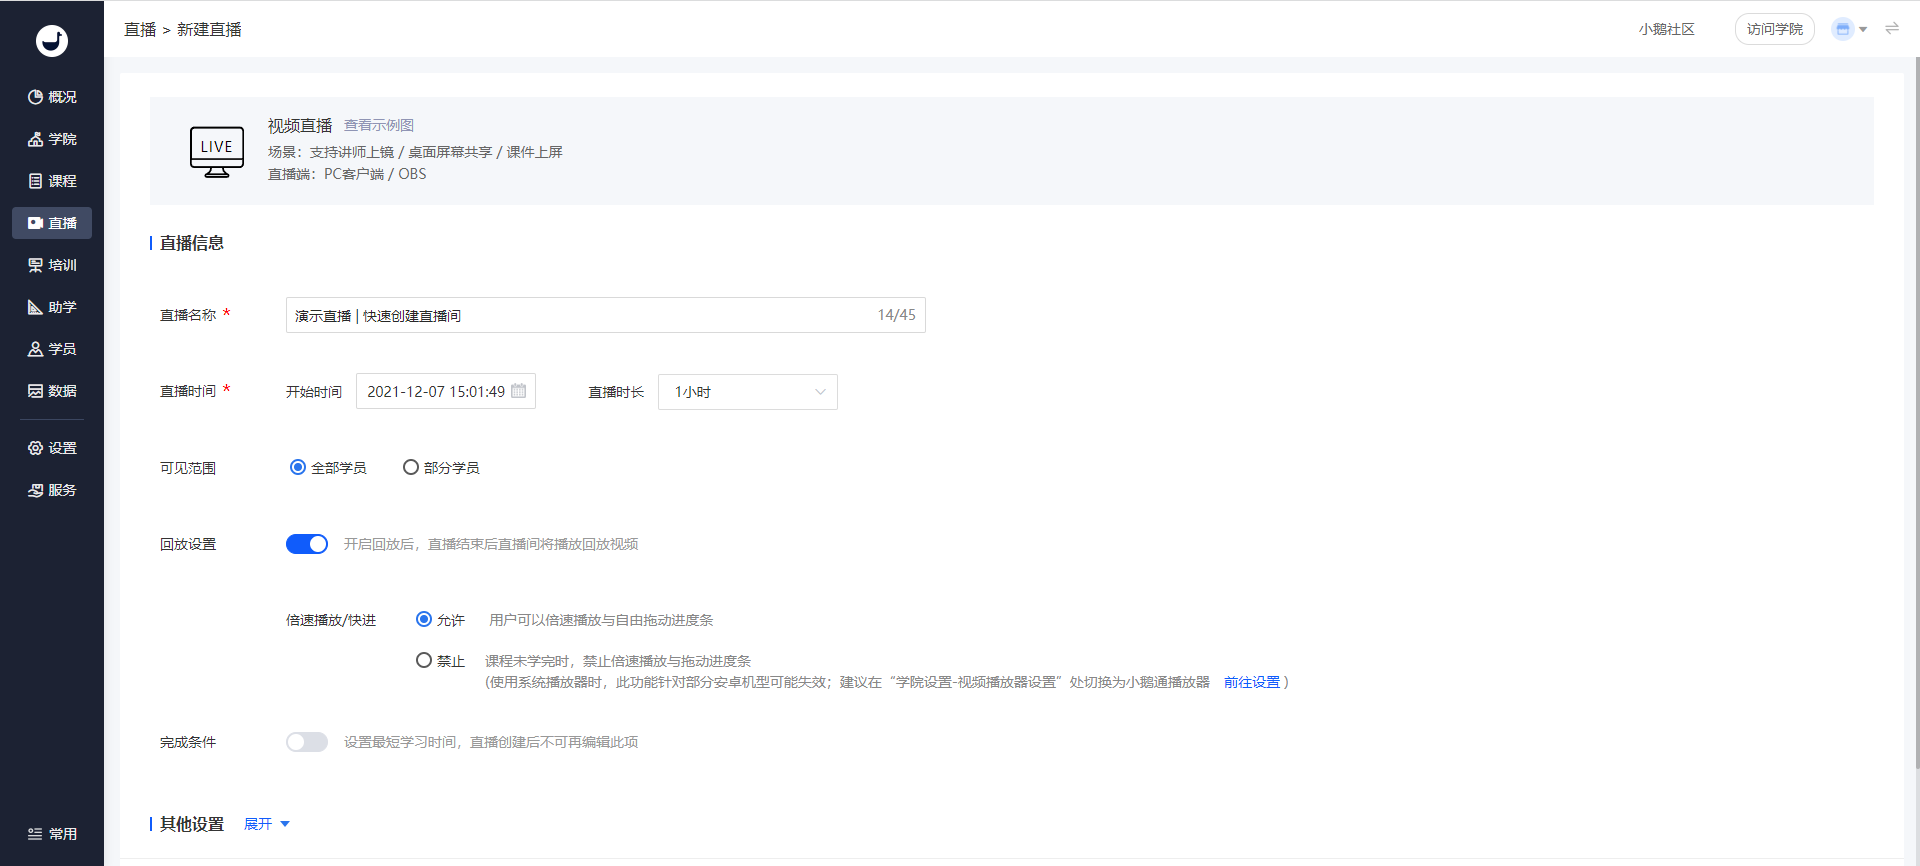
(Live - Stream Creation Page)
3. After creating the live stream, set up the instructor.
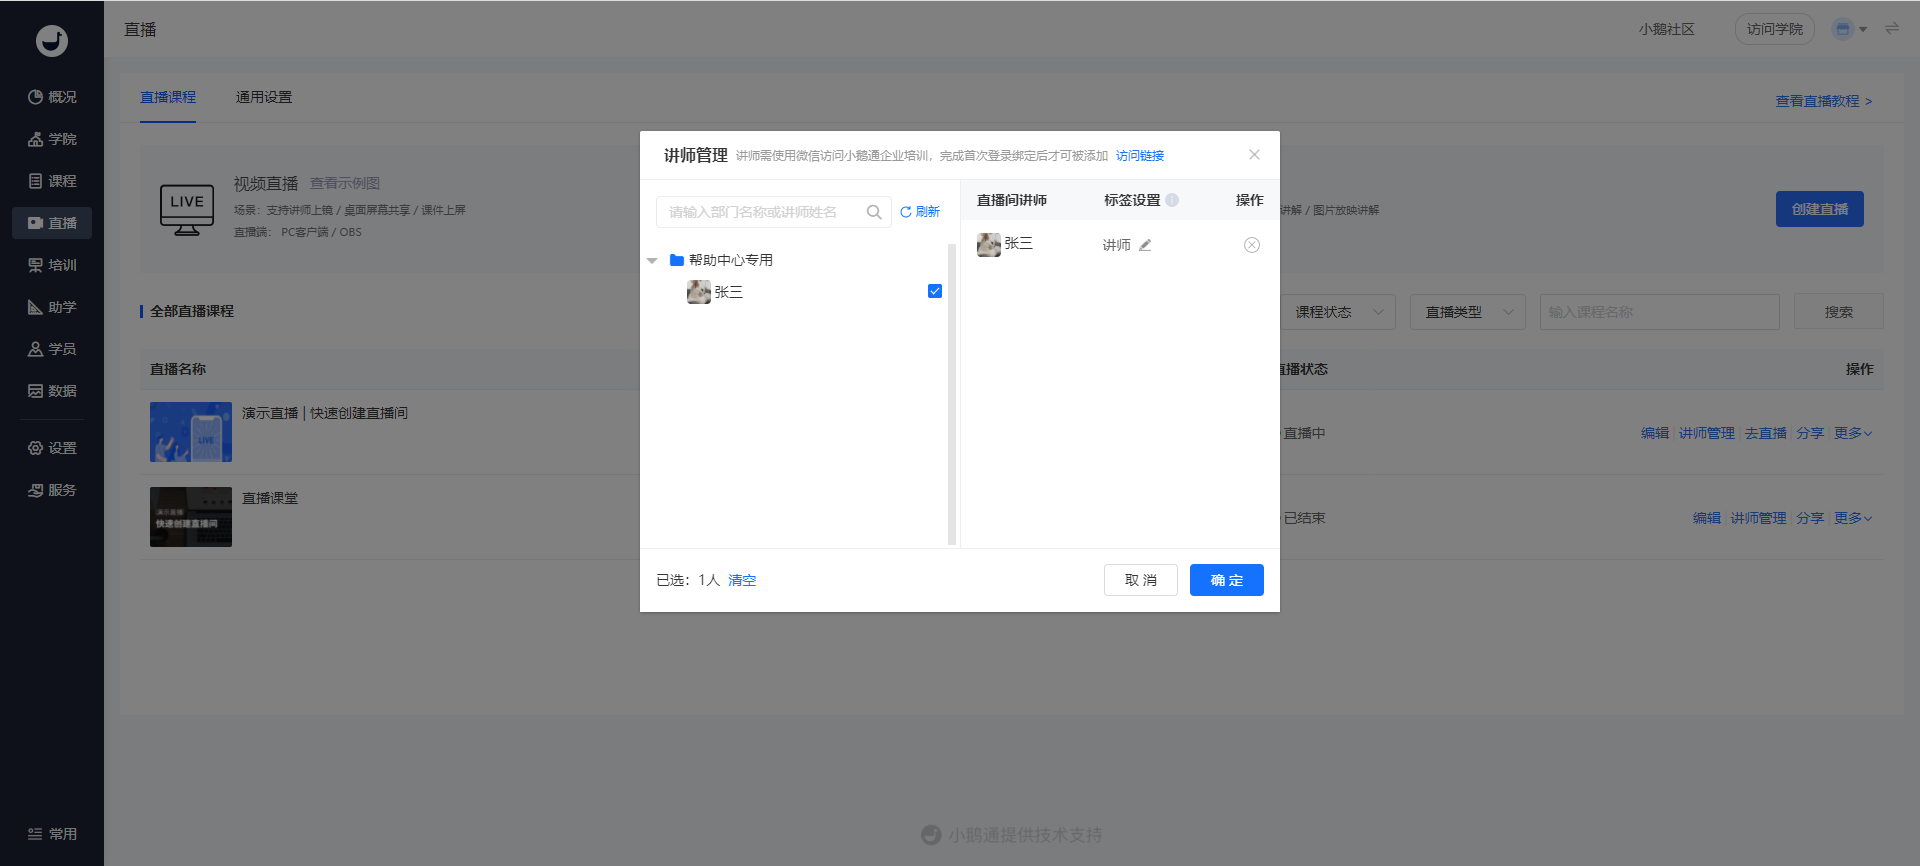
(Instructor Management Pop - up Window)
Step 2: Use the 'Web - based Platform' for Live Streaming(Management Backend)
1. After completing the live - stream creation, click the 'Go Live' button on the live - stream list page.
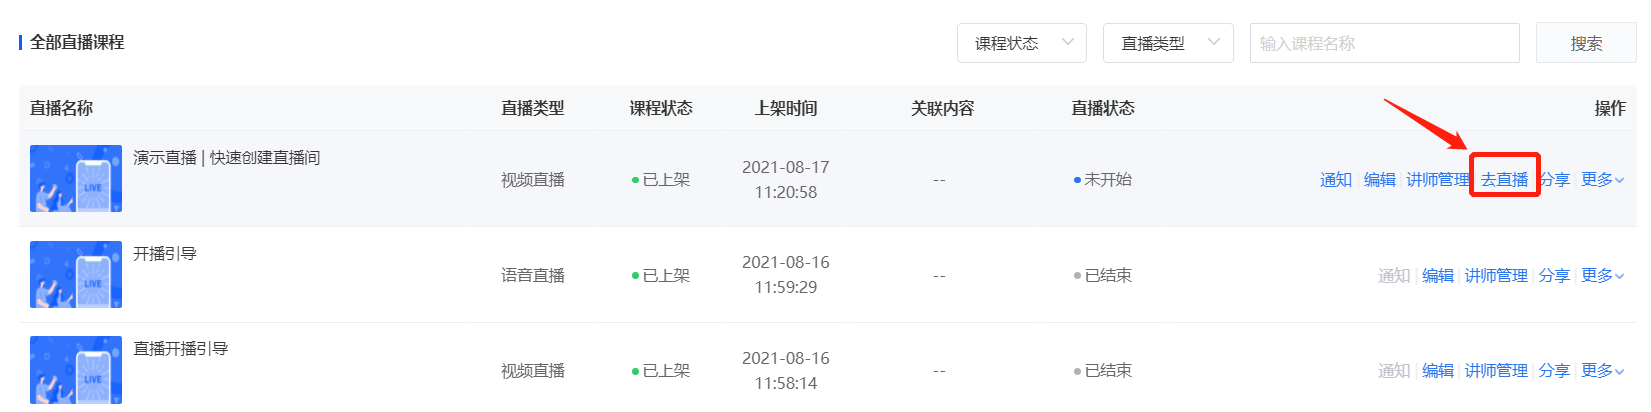
(Live - Stream Management - Live - Stream List)
2. Select the 'Web - based Platform' for live streaming.
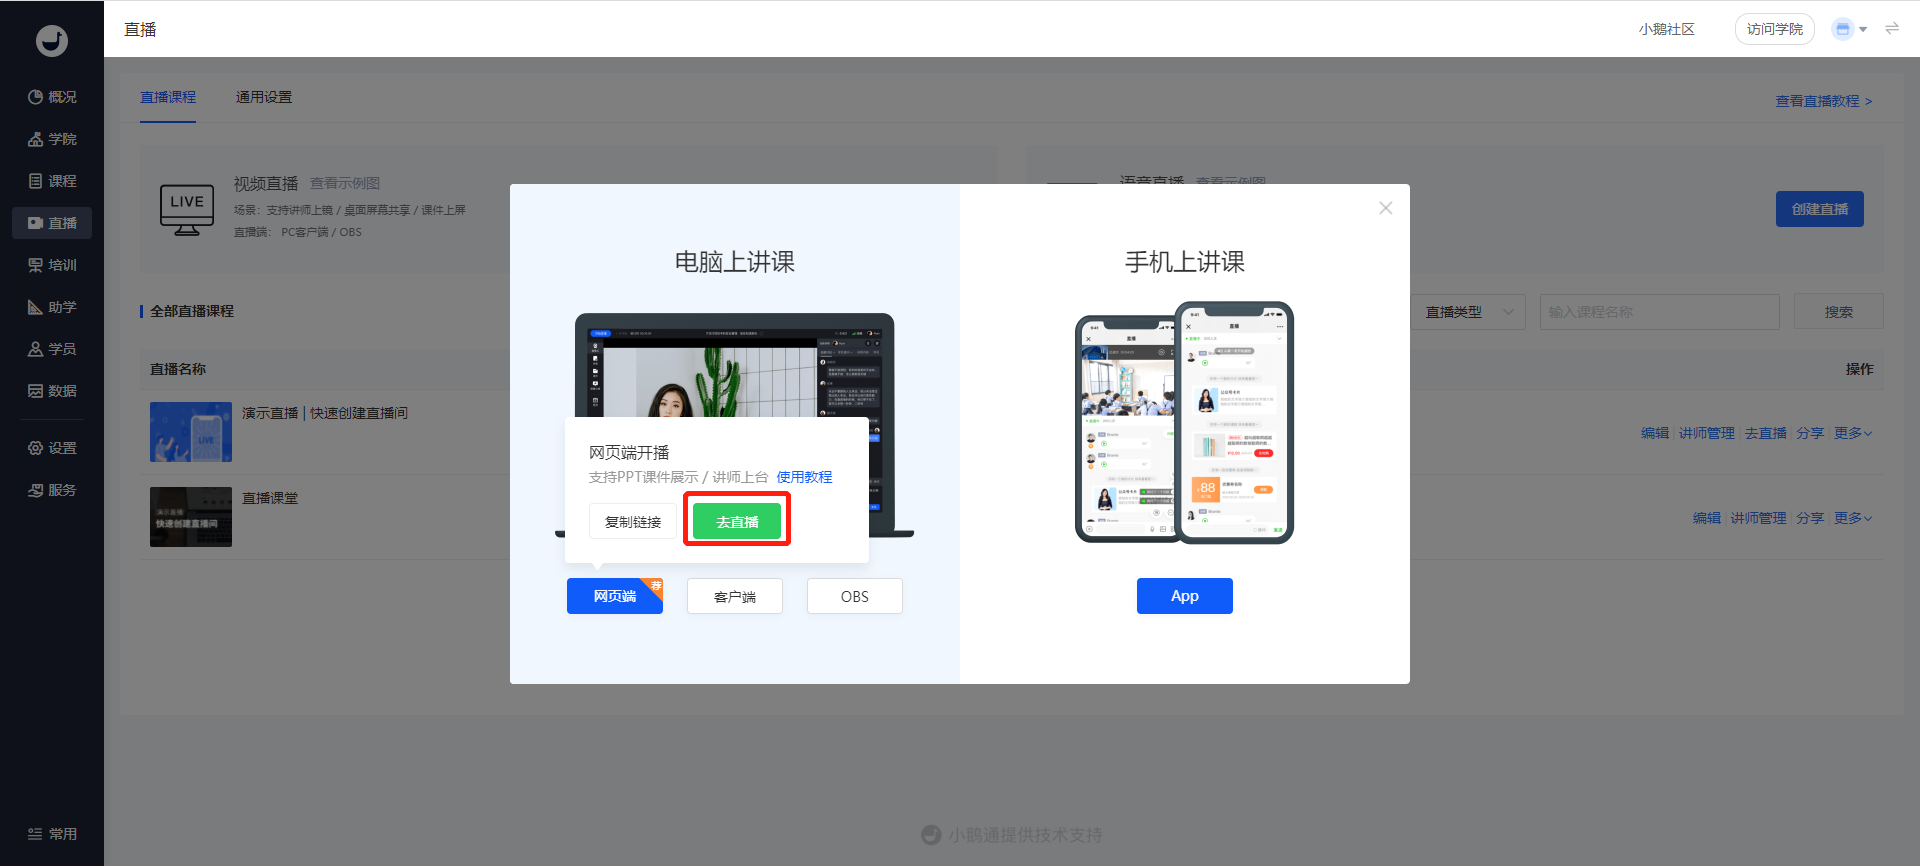
(Live - Streaming - Go Live)
Step 3: The instructor enters the web - based platform and conducts live - stream debugging.(Web - based Platform)
1. After the instructor enters the live - stream room, check whether the camera and microphone are working properly as prompted.
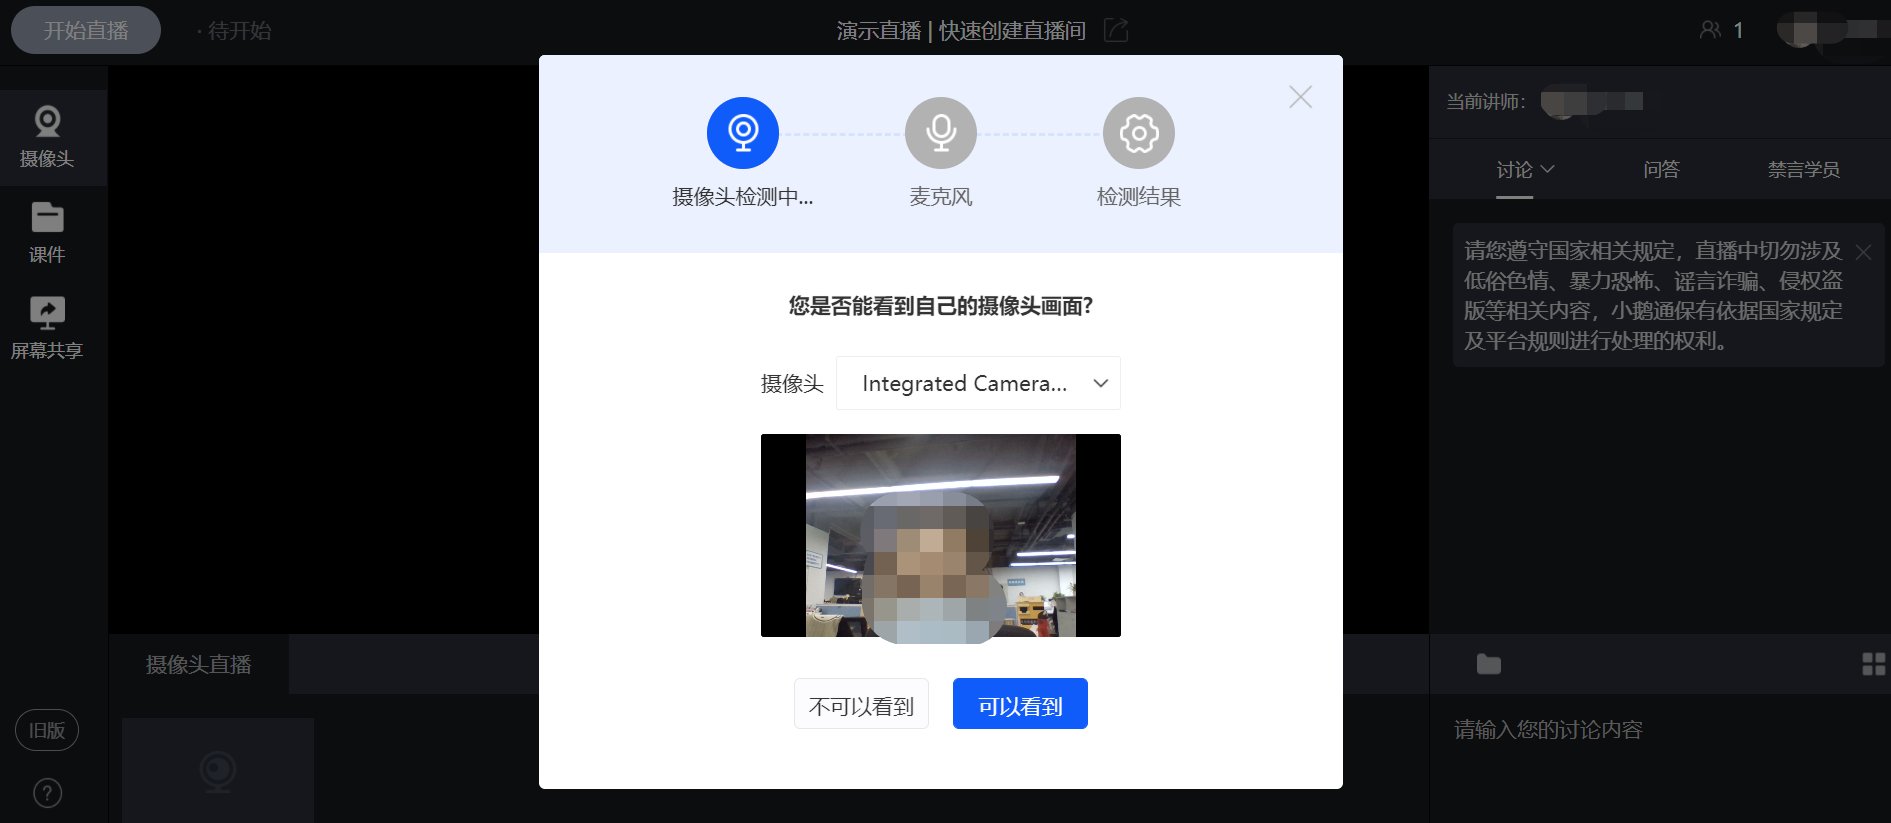
(Web - based Live - Stream Instructor End)
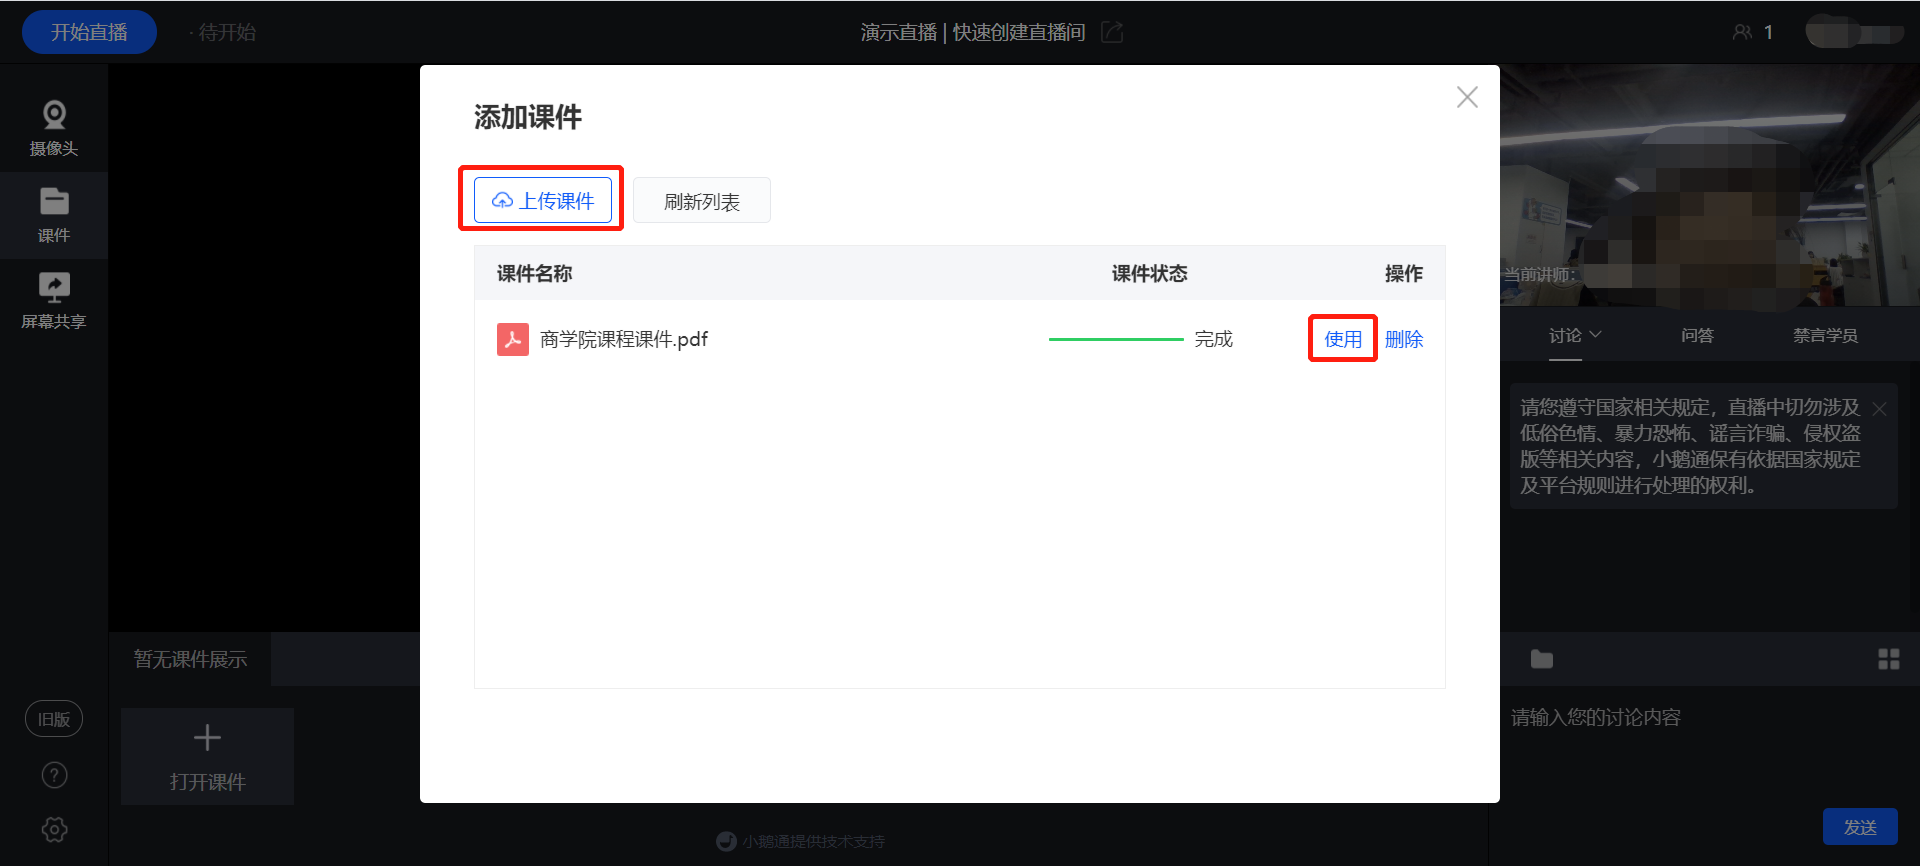
2. You can upload relevant courseware PDFs in advance.
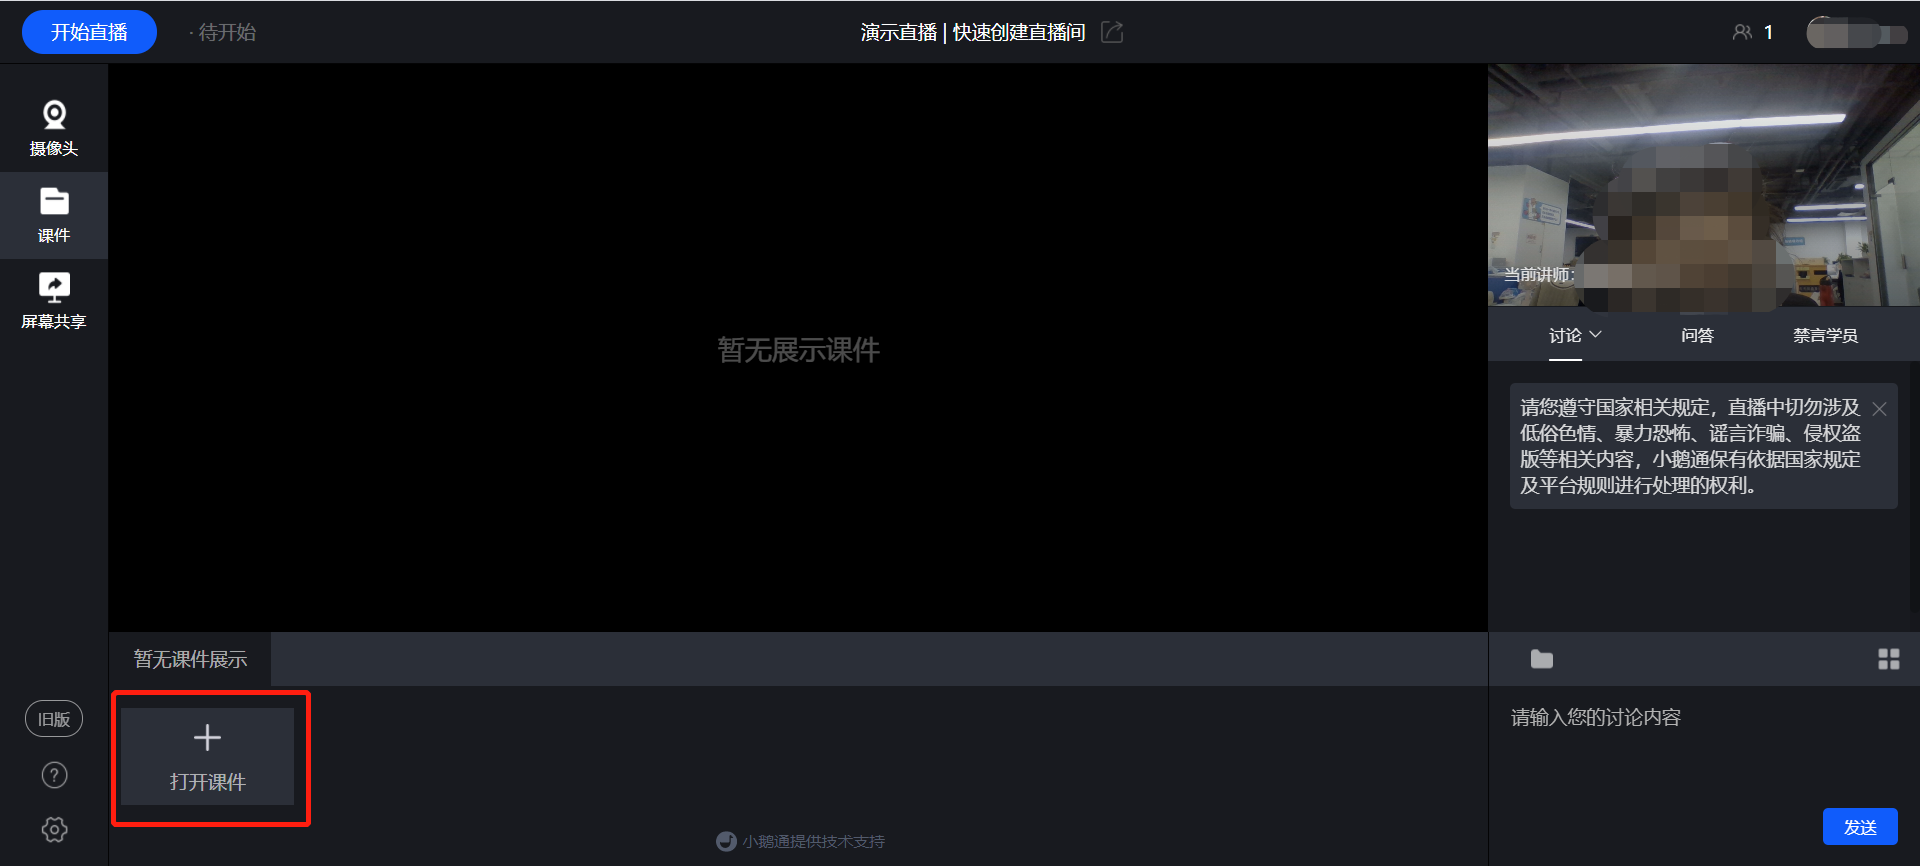
(Web - based Live - Stream Instructor End)
(Web - based Live - Stream Instructor End)
Step 4: Start the Live Stream(Web - based Platform)
1. After completing the live - stream debugging, click 'Start Live Streaming' in the upper - left corner to start the live stream.
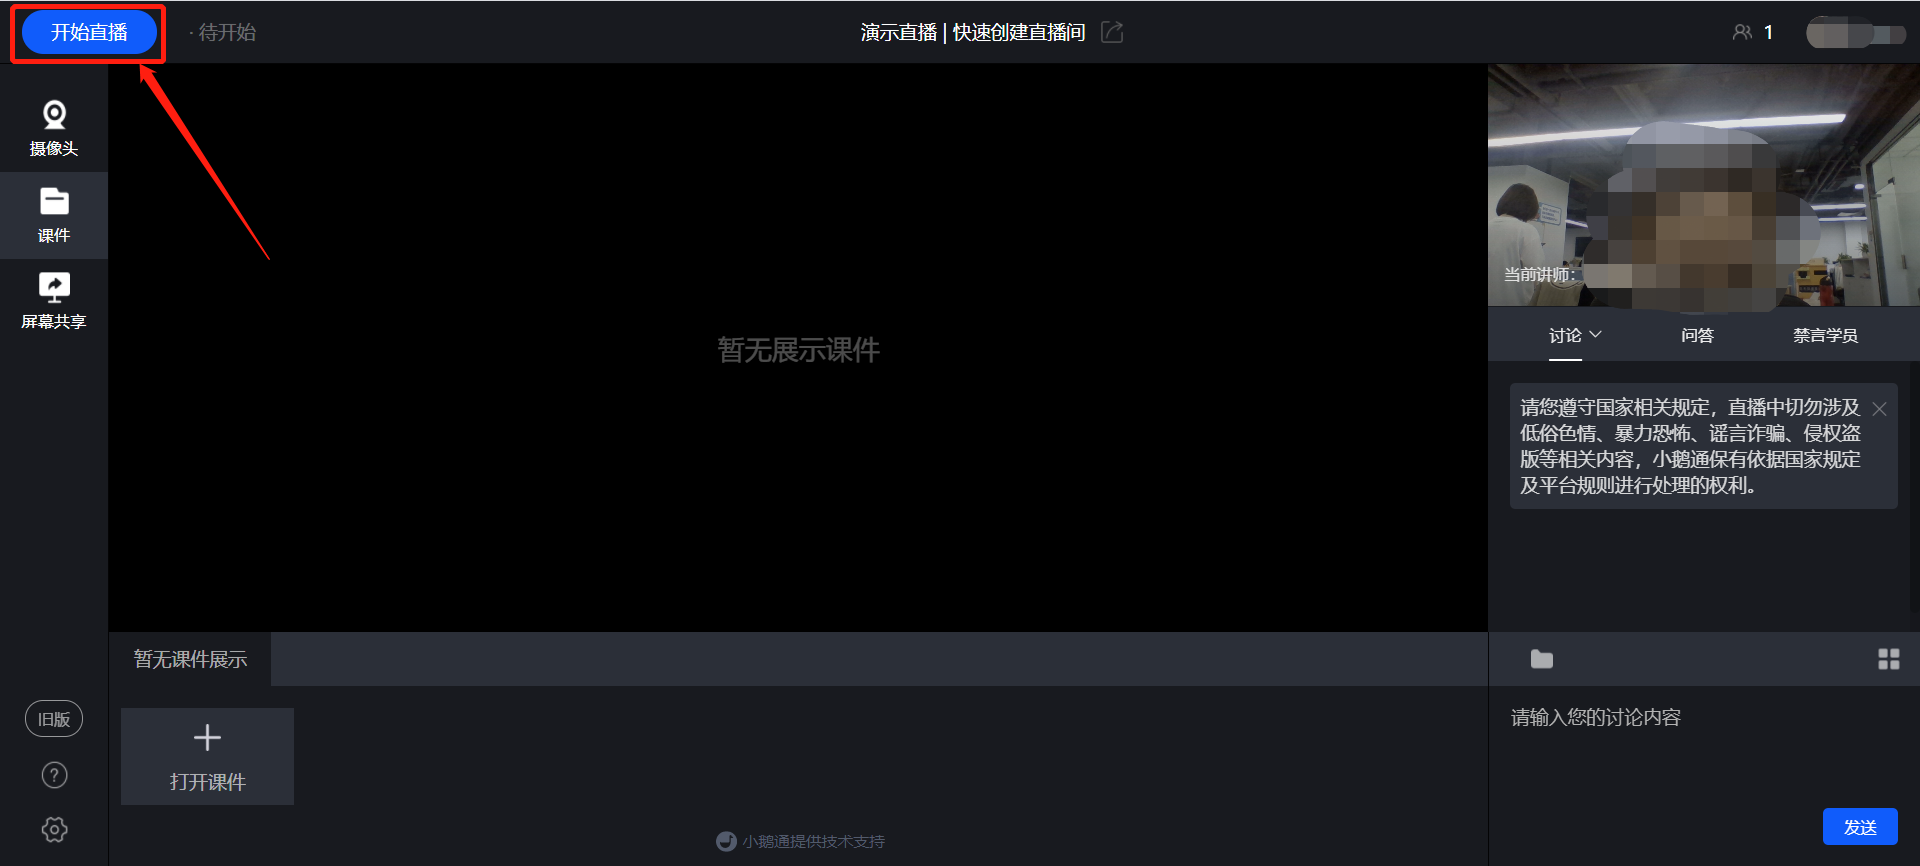
(Web - based Live - Stream Instructor End)
2. Click 'Camera', 'Courseware' & 'Screen Sharing' on the left side to switch the live - stream mode at any time.
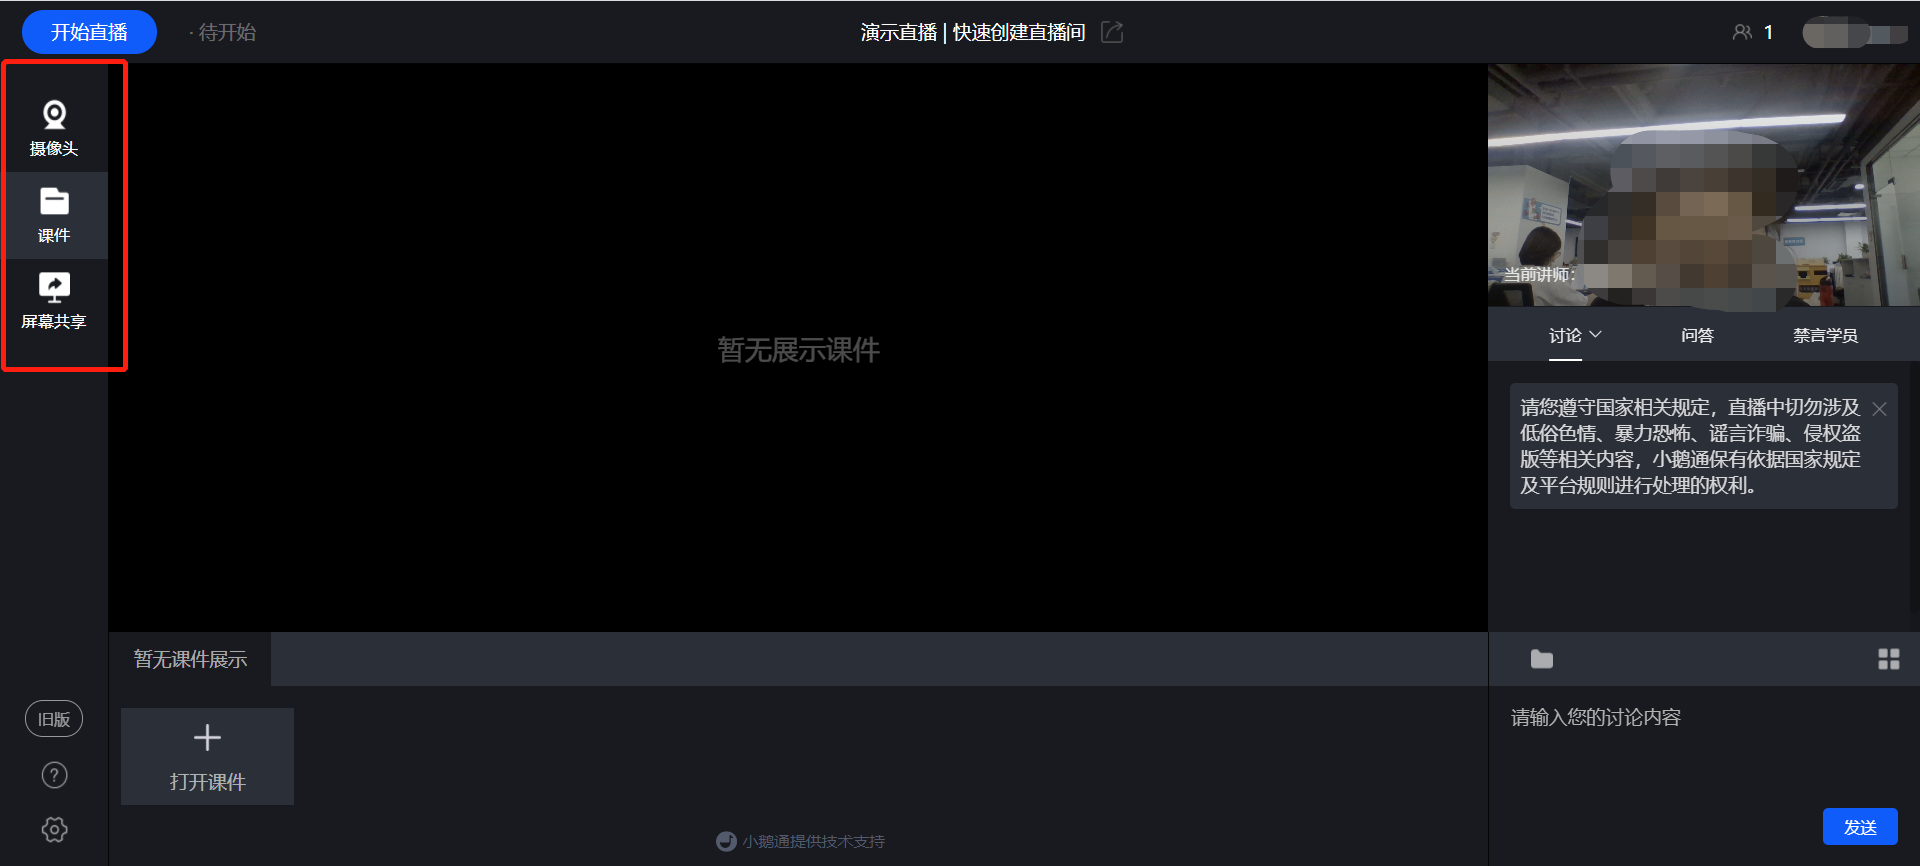
(Web - based Live - Stream Instructor End)
When the live - stream mode is 'Screen Sharing', click 'Switch Window' on the right side to switch the screen window.
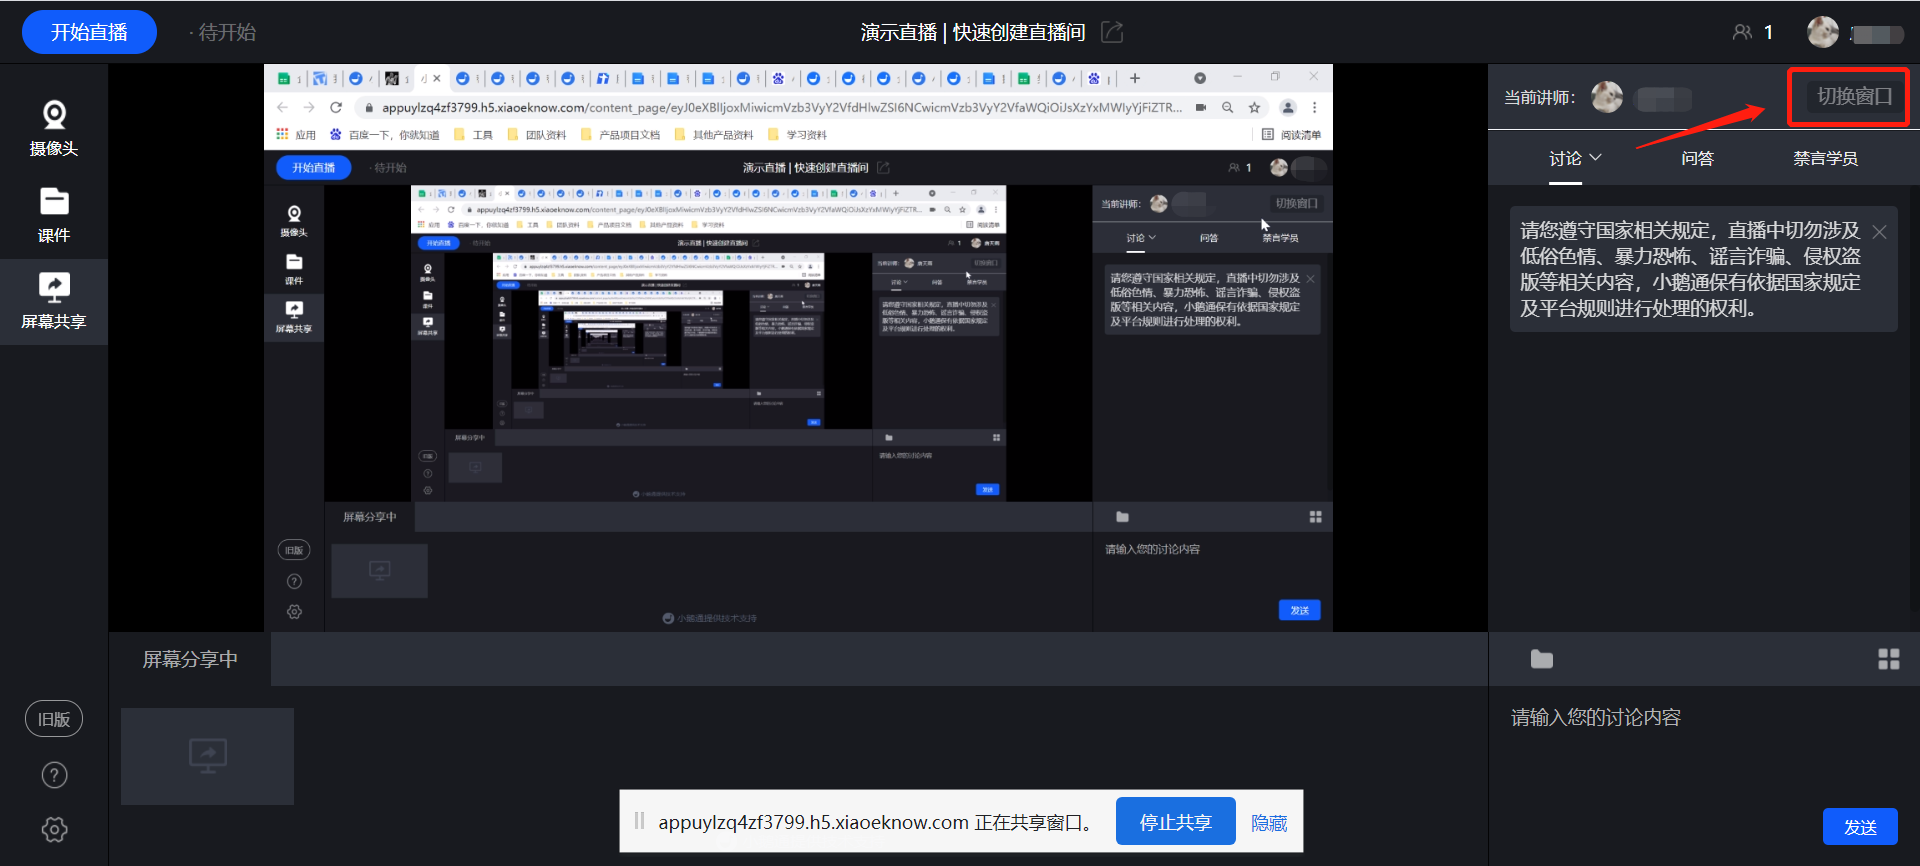
(Web - based Live - Stream Instructor End)
3. Click the folder icon in the lower - right corner to send the lecture content in the interaction area.
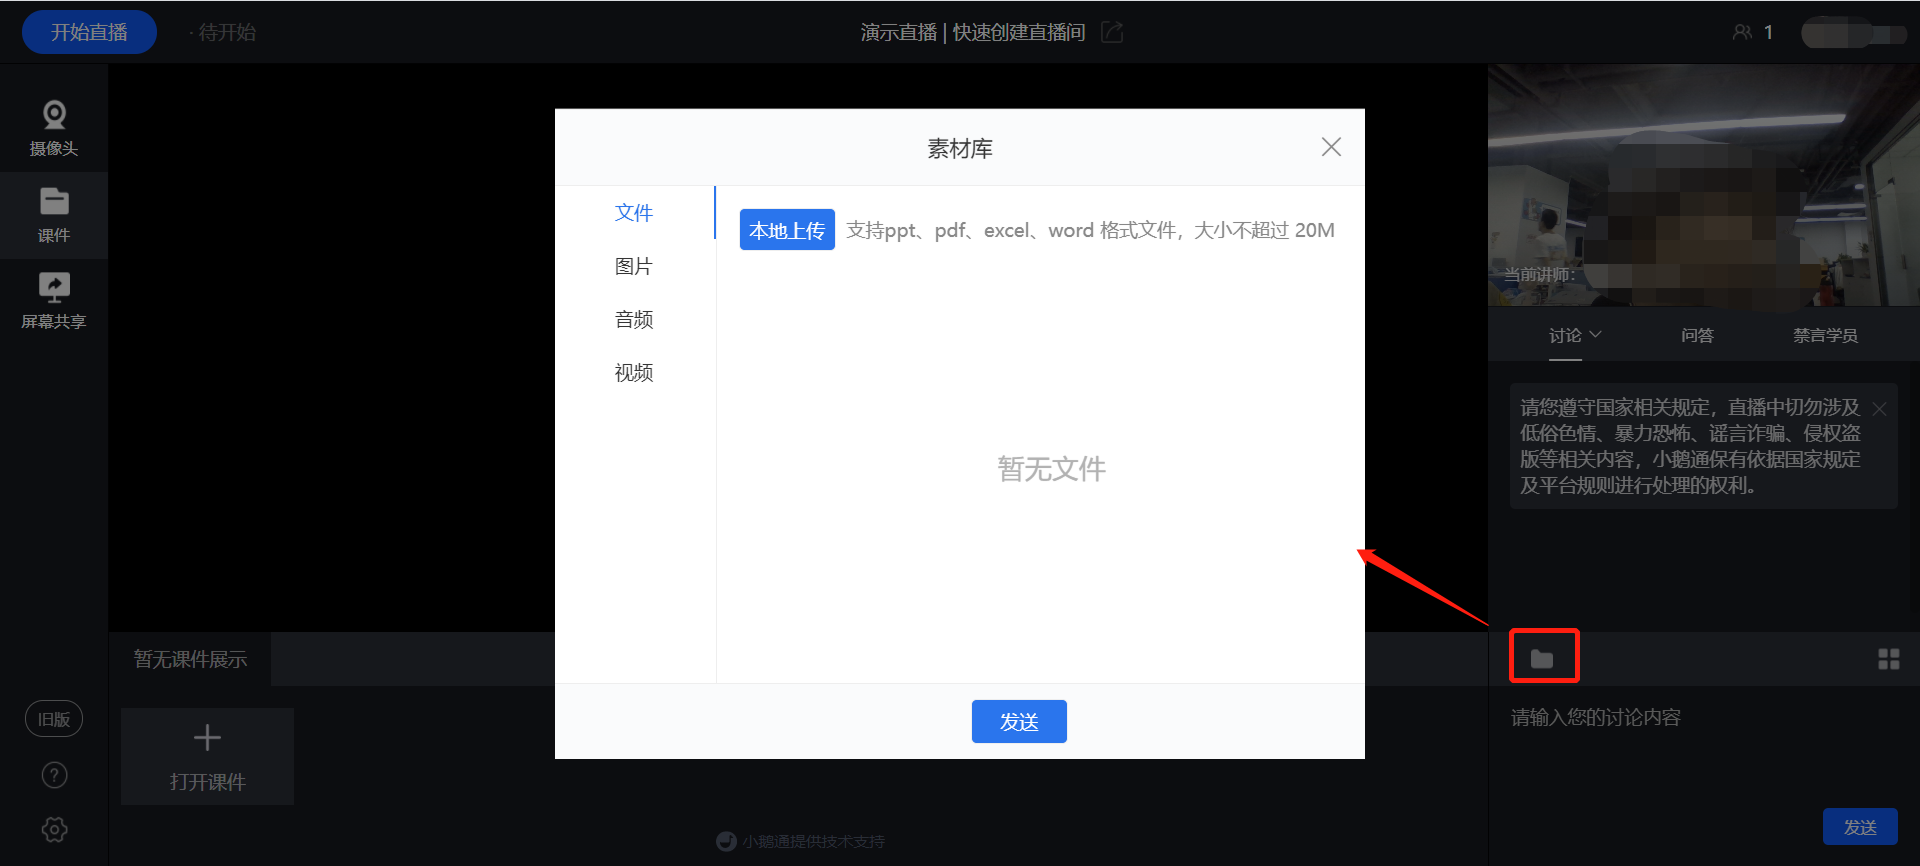
(Web - based Live - Stream Instructor End)
Click the operation icon in the lower - right corner to set user speaking permissions.
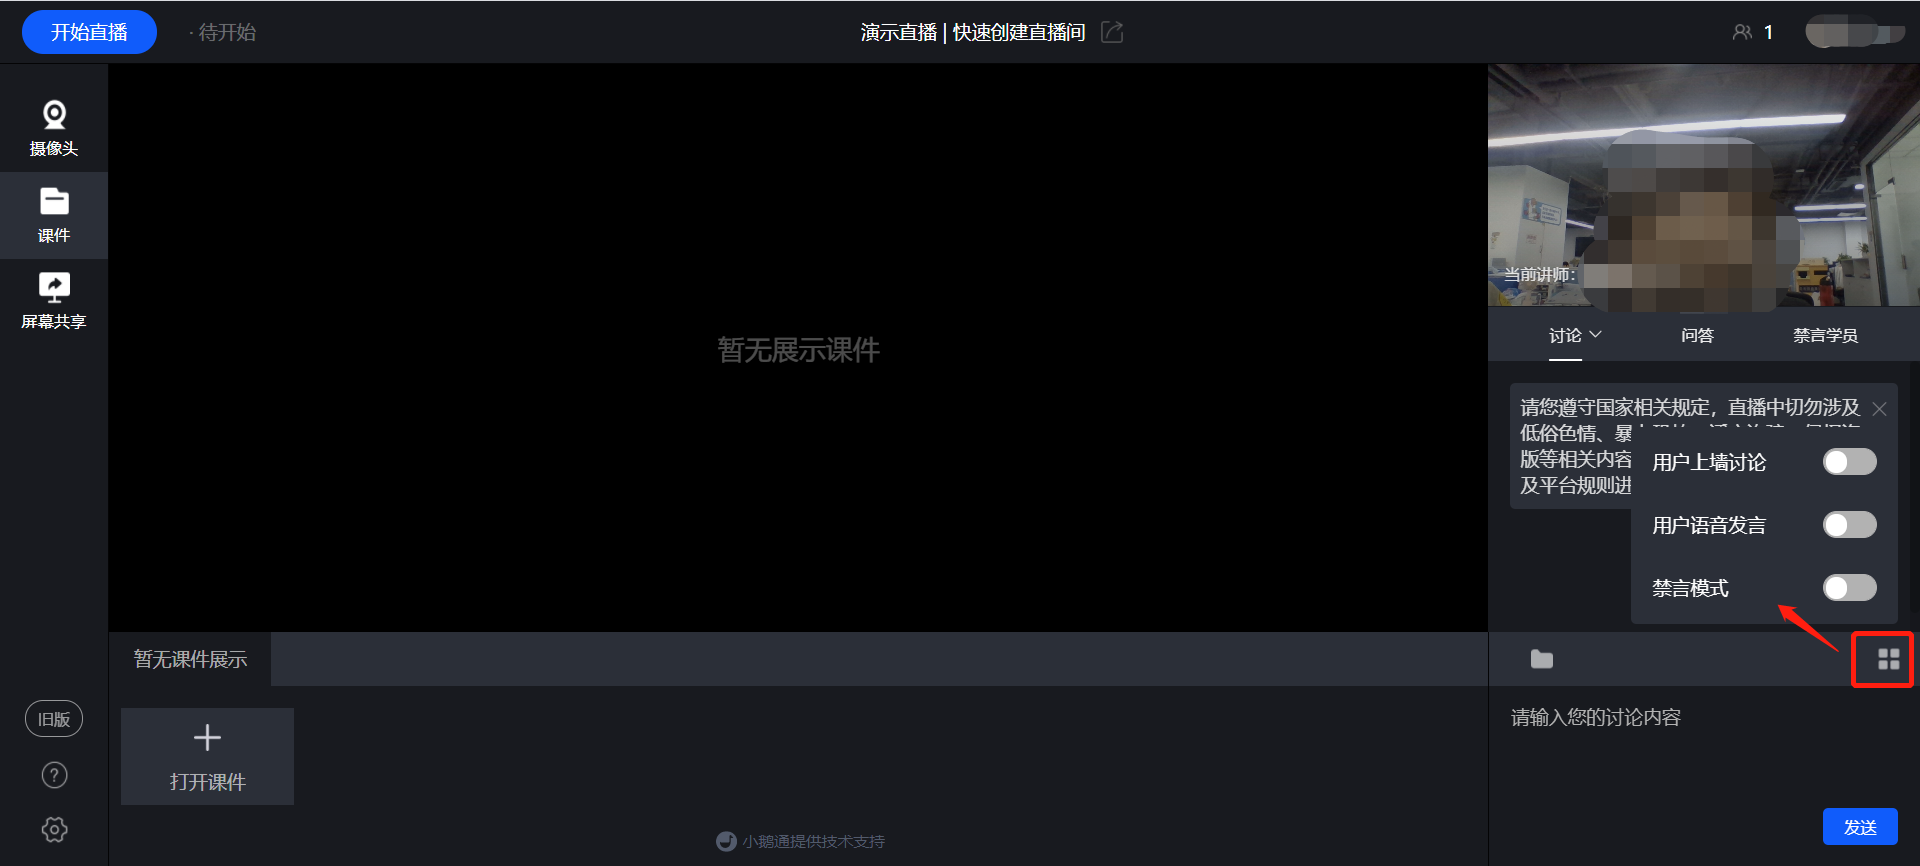
(Web - based Live - Stream Instructor End)
Video Live Streaming - Tutorial on Using OBS Client
I. Function Introduction
The OBS client is a tool for pushing live video sources to the server, mainly suitable for real-time live streaming scenarios where the desktop is shared with trainees.
II. Purpose of Use
You can use the OBS client to connect a camera device for live streaming. Meanwhile, you can add any live streaming materials in the live streaming room to create rich live courses.
III. Use Scenarios
A training instructor needs to conduct a large-scale outdoor lecture live stream and requires professional camera equipment. The OBS client can be used to complete the live stream.
IV. Operation Path
Instructor side: Create a live stream → Download and install the client → Configure live streaming content → Start live streaming

V. Usage Tutorial
Step 1: Create a live stream(Management background)
*Click to view the tutorial on creating and using video live streams
Step 2: Download and install the OBS client(Management background) (Skip this step if already downloaded)
1. After creating a live stream, click the [Go live] button on the “Live stream list page”;

(Live stream management - Live stream list)
2. Select [OBS] and download and install the OBS client according to different computer versions (Mac, Windows);

(Live stream start method selection page)
Step 3: Copy the streaming URL and stream name(Management background or H5 live streaming room)
Method 1: Select [Go live - OBS] and copy the streaming URL and stream name of the live stream;

(OBS configuration information page)
Method 2:On the live stream list page, click [Share] and scan the QR code to copy the streaming URL and stream name with one click on the mobile device;

After scanning the code, the mobile device shows:

Step 4: Complete the URL and stream name configuration in OBS(OBS client)
1. After downloading the OBS client, open the main interface and click [Settings] in the OBS software

2. Enter the address code for streaming (i.e., the streaming URL and stream name)
Select “Stream” in the left function bar, choose “Custom streaming server” at the stream type. Paste the URL and stream name copied from the elink management background into the corresponding positions of URL and stream name in the OBS software, or copy them to the corresponding server and streaming key fields (The following are the configuration information for win7 and win10 respectively, with slightly different names);

(OBS client - win7 configuration)

(OBS client - win10 configuration)
Step 5: Select scenarios and sources(OBS client)
1. Monitor capture: Capture the entire computer operation interface
After clicking “+” at the scenario to add a scenario, click “+” at the source and select “Monitor capture” from the pop-up list.
Enter a name in the pop-up window and click OK;

Click OK on the monitor capture page to complete the addition successfully.

2. Window capture: Capture only the selected window
After clicking “+” at the scenario to add a scenario, click “+” at the source and select “Window capture” from the pop-up list.
Enter a name in the pop-up window and click OK
On the window capture page, select the software to be live-streamed at the window and click OK to complete the addition successfully.
Step 6: Start live streaming(OBS client)
Click “Start streaming” in the function list at the bottom right to start live streaming. To end the live stream, click “Stop streaming” in the OBS software and then click “End live stream” in the live streaming room.

Tutorial on Using Voice Live Streaming
I. Function Introduction
Audio live streaming is a lightweight live streaming format suitable for content that doesn't require a camera. Instructors can send voice, text, images, courseware, and videos in real - time in the live - streaming room to teach, explain, and interact with students.
II. Purpose of Use
With audio live streaming, there's no need to turn on the camera. Instructors can send content such as voice, text, and images in the live - streaming room to achieve real - time explanation and interaction with students.
III. Use Scenarios
If an instructor doesn't need to turn on the camera and needs to conduct a live stream with a large amount of voice, text, and images, they can use audio live streaming to complete the live - streaming content.
IV. Operation Path
Instructor side: Management background → Create audio live stream → Select the live - streaming terminal → Start live streaming
Student side: Enter the live - streaming room → Watch the live stream
V. Usage Tutorial
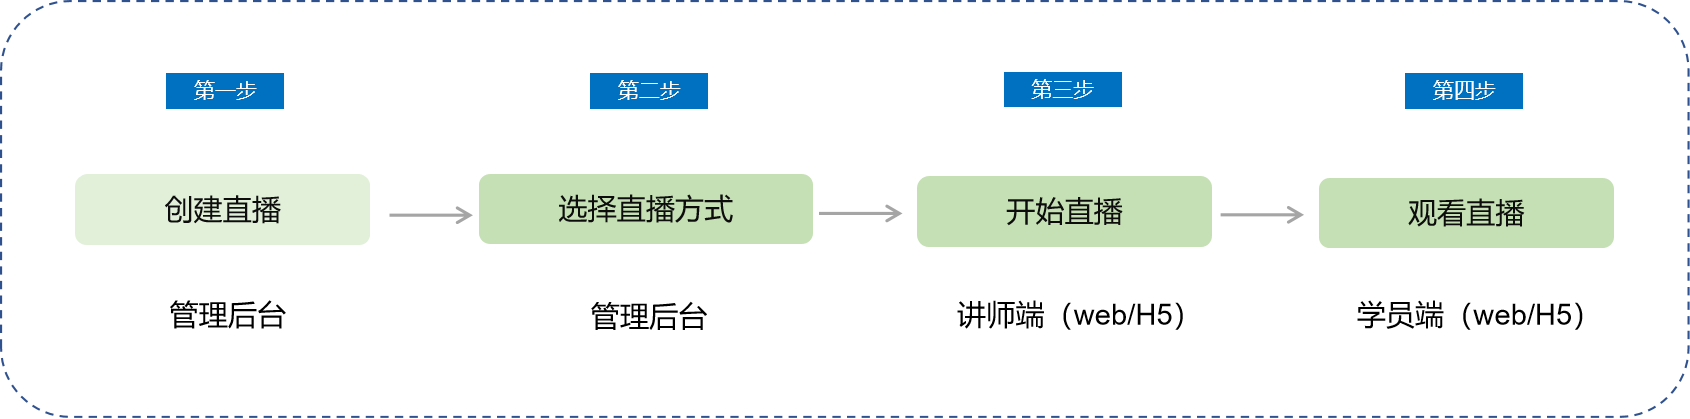
Step 1: Create a live stream(Management background)
1. Enter the management background - Live - streaming management and create an audio live stream.
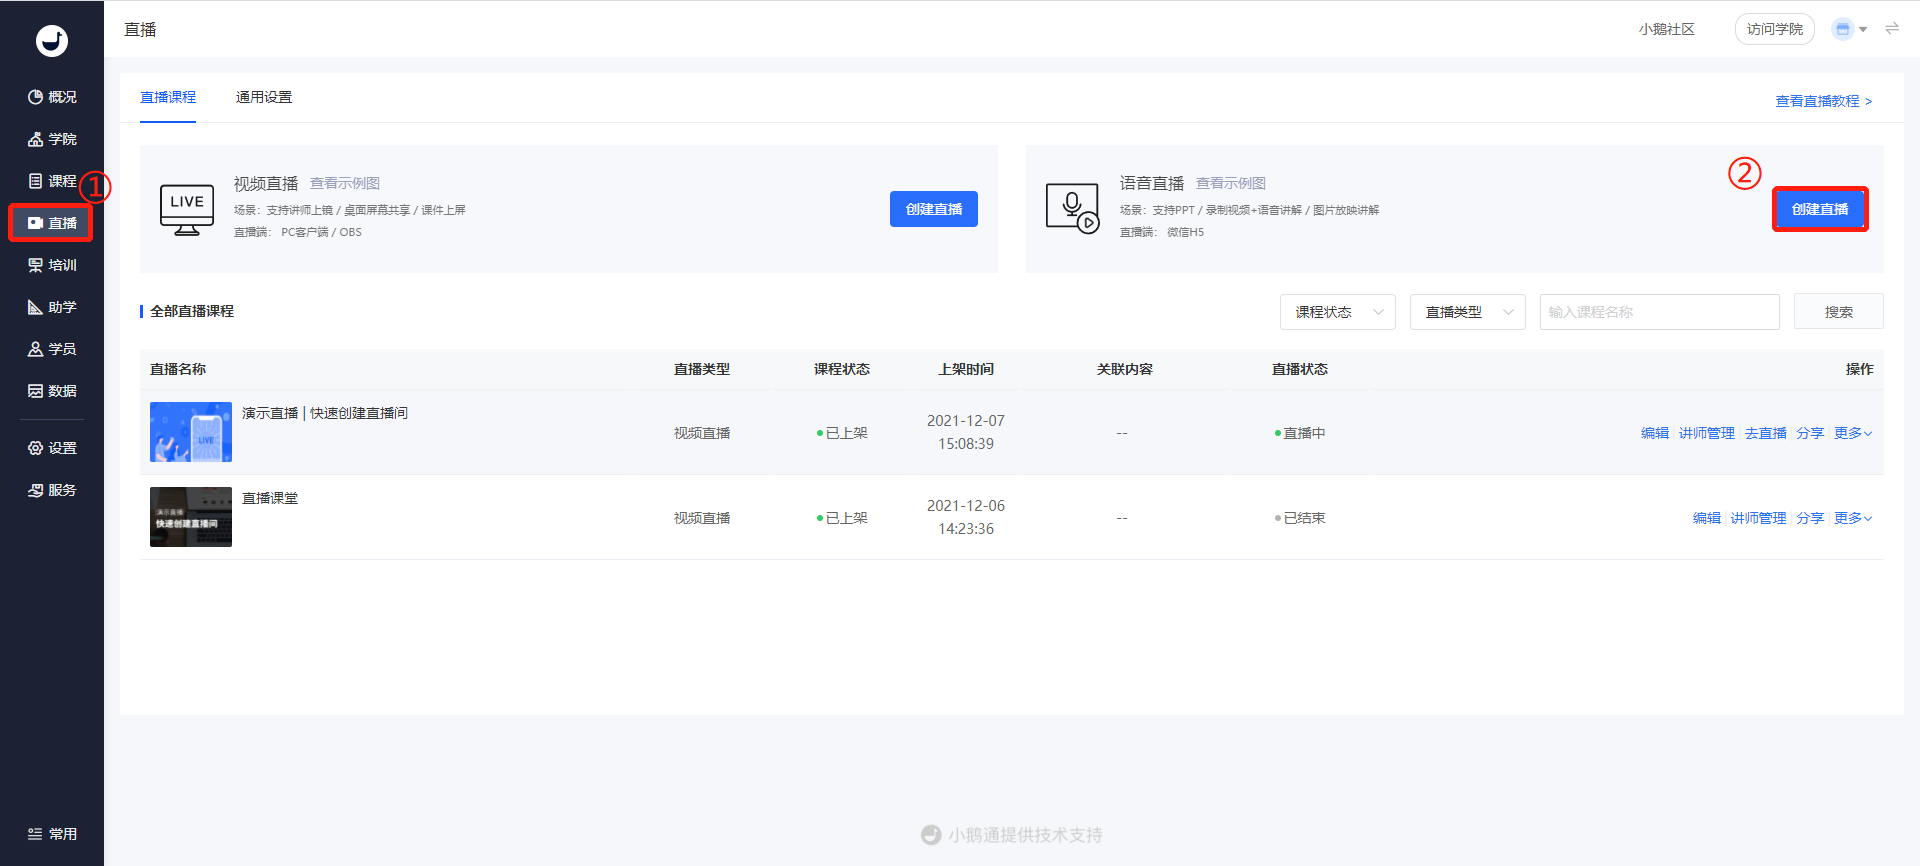
(Management background - Live streaming)
2. Fill in the live - streaming information and click the save button to complete the live - stream creation.
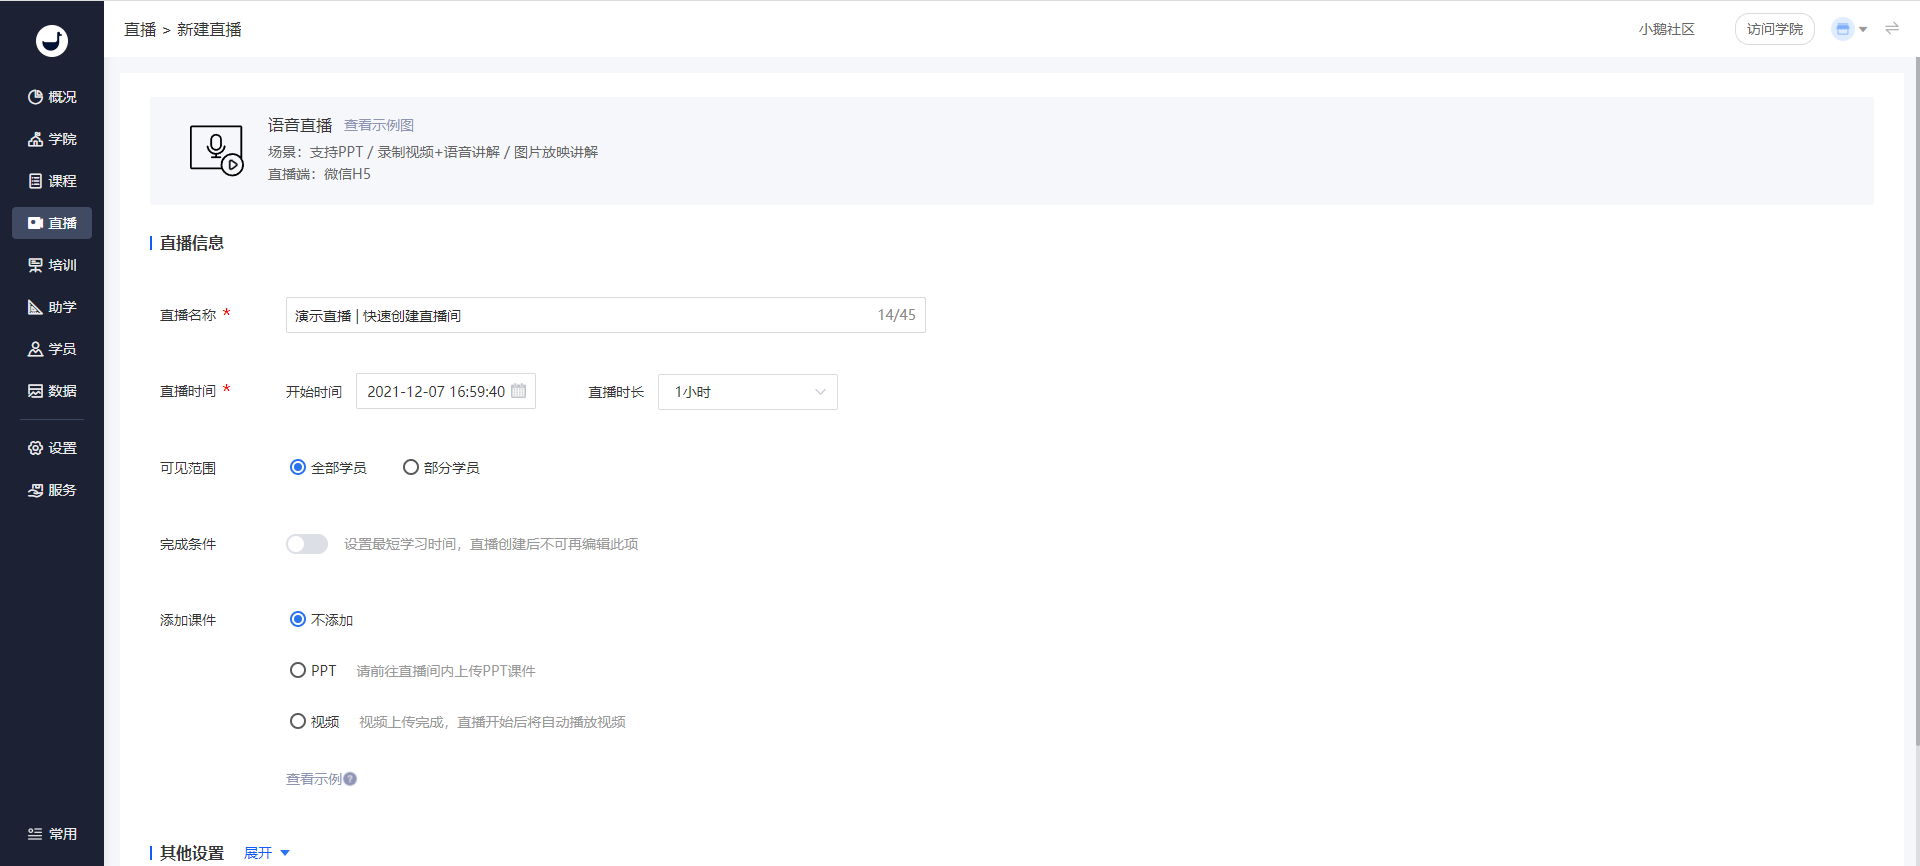
(Live - stream creation page)
3. After creating the live stream, set up the instructor.
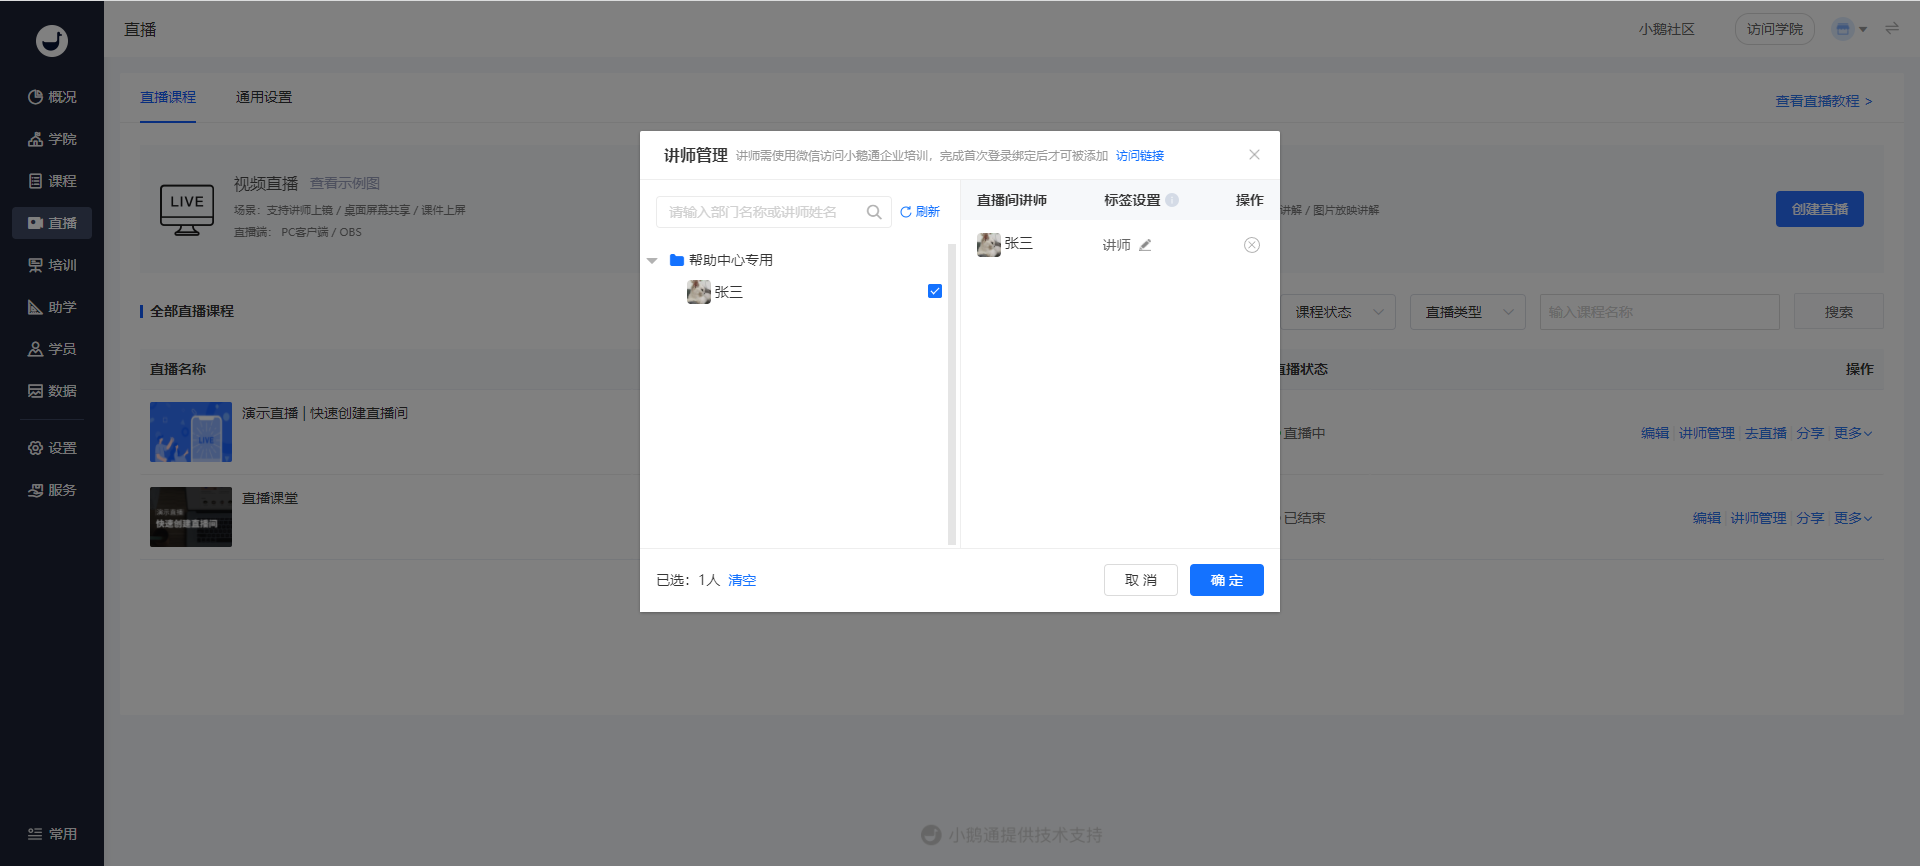
(Instructor management pop - up window)
Step 2: Select the live - streaming method(Management background)
1. After completing the live - stream creation, click the 'Go live' button on the live - stream list page.
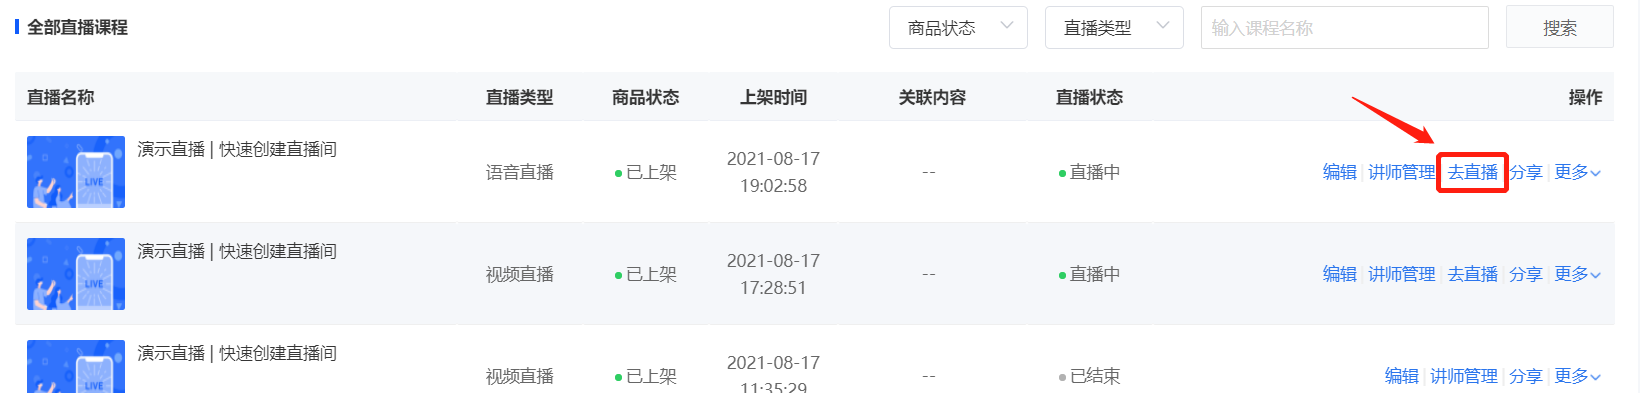
(Live - streaming management - Live - stream list)
2. Select 'Web version' or 'WeChat H5' to start the live stream.
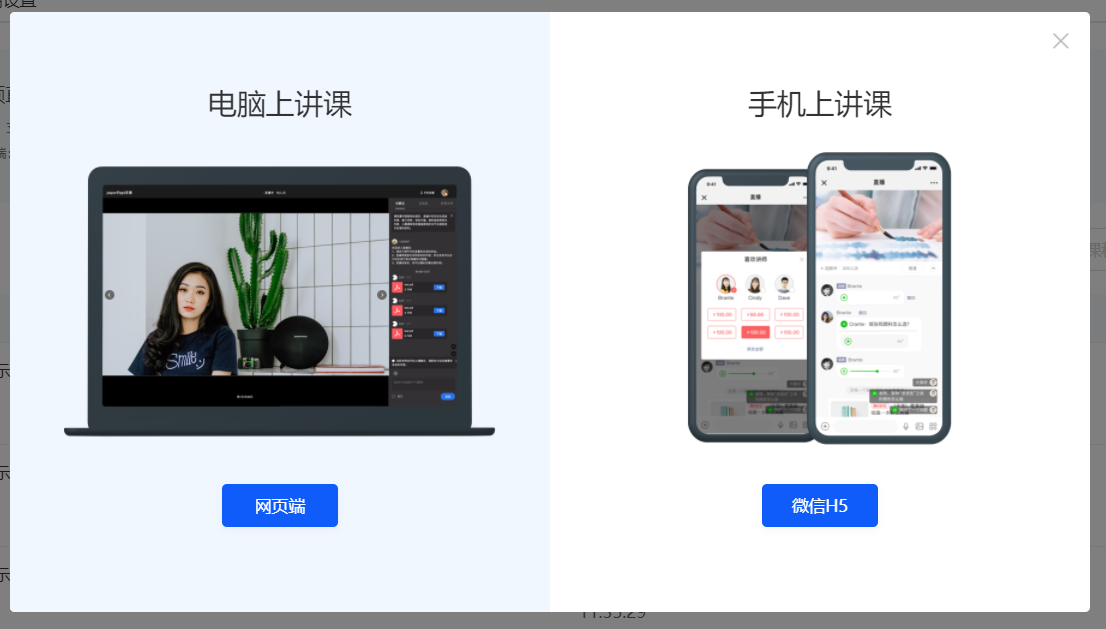
(Live - streaming management - Go live)
Step 3: Instructor starts the live stream(Web version or H5)
● Web - based live streaming
1. Click 'Web version' live streaming to enter the web - based audio live - streaming page.
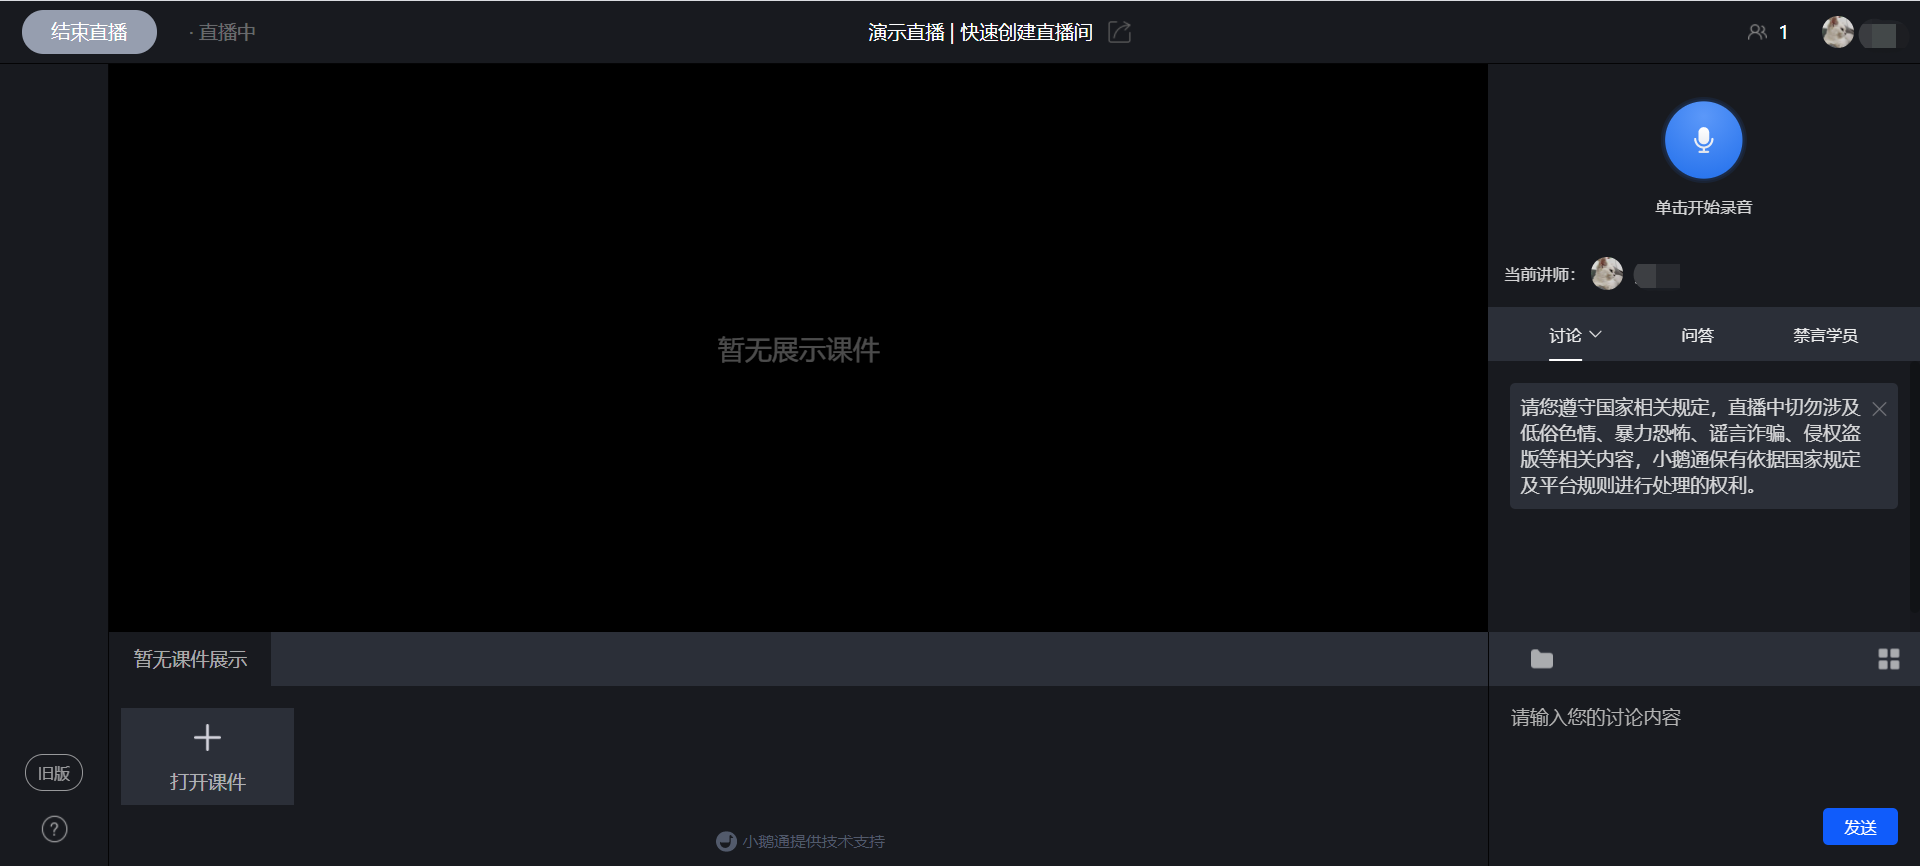
(Audio live streaming - Web version)
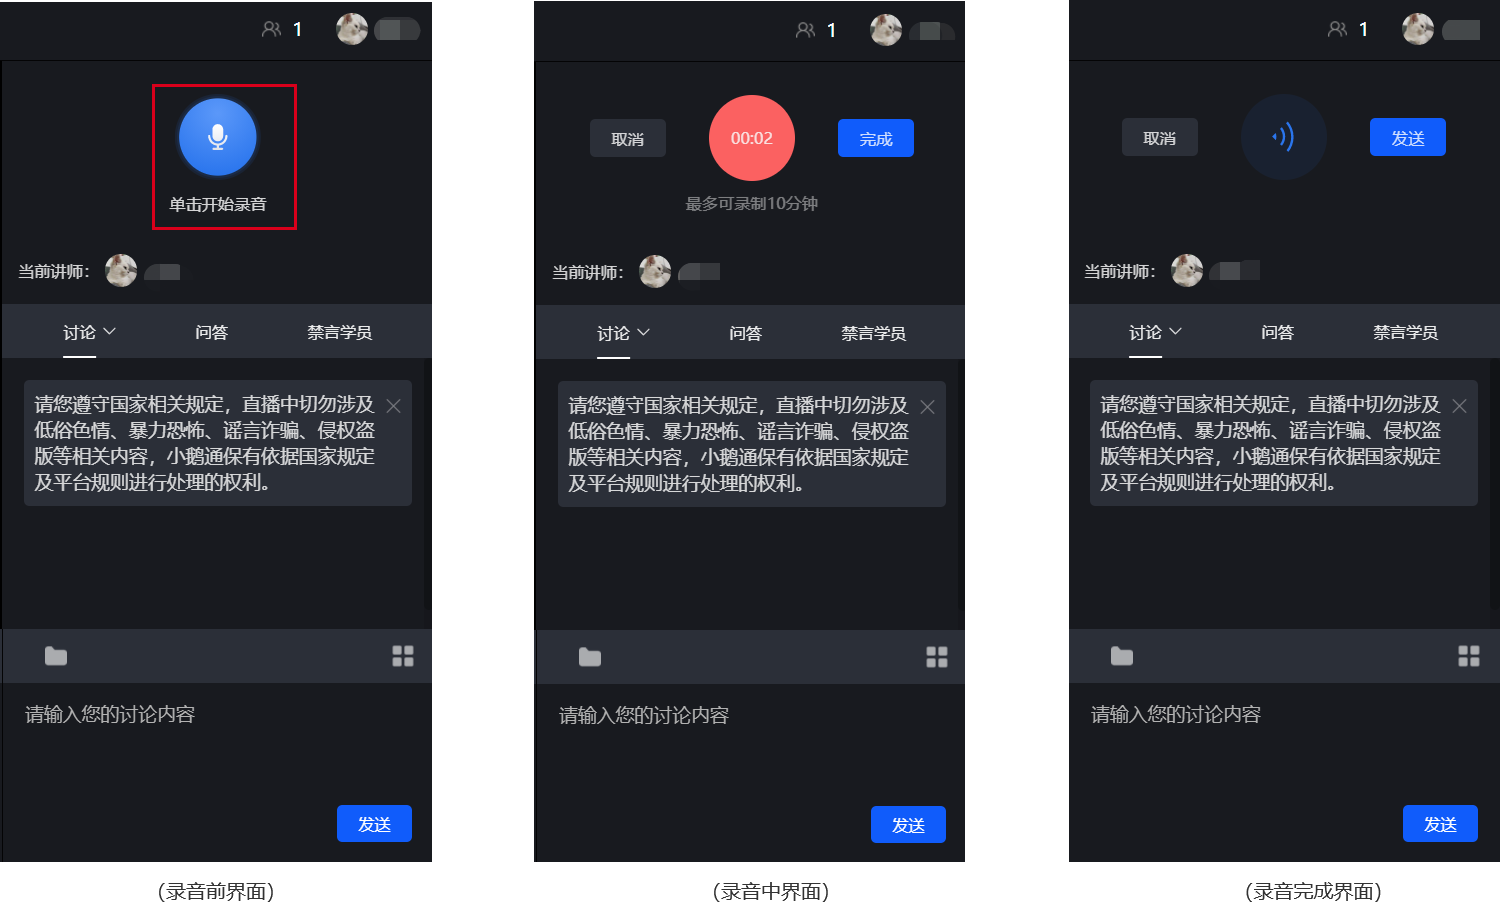
2. Send voice
① Click the microphone icon to start voice recording.
② Click again to end voice recording. Click 'Complete' to finish voice recording, or click 'Cancel' to cancel the recording.
③ After voice recording is completed, click the send button to send the voice, or click 'Cancel' to cancel sending.
3. Courseware display
① Click 'Open courseware' at the bottom of the live - streaming room to upload images. Single or multiple image uploads are supported.
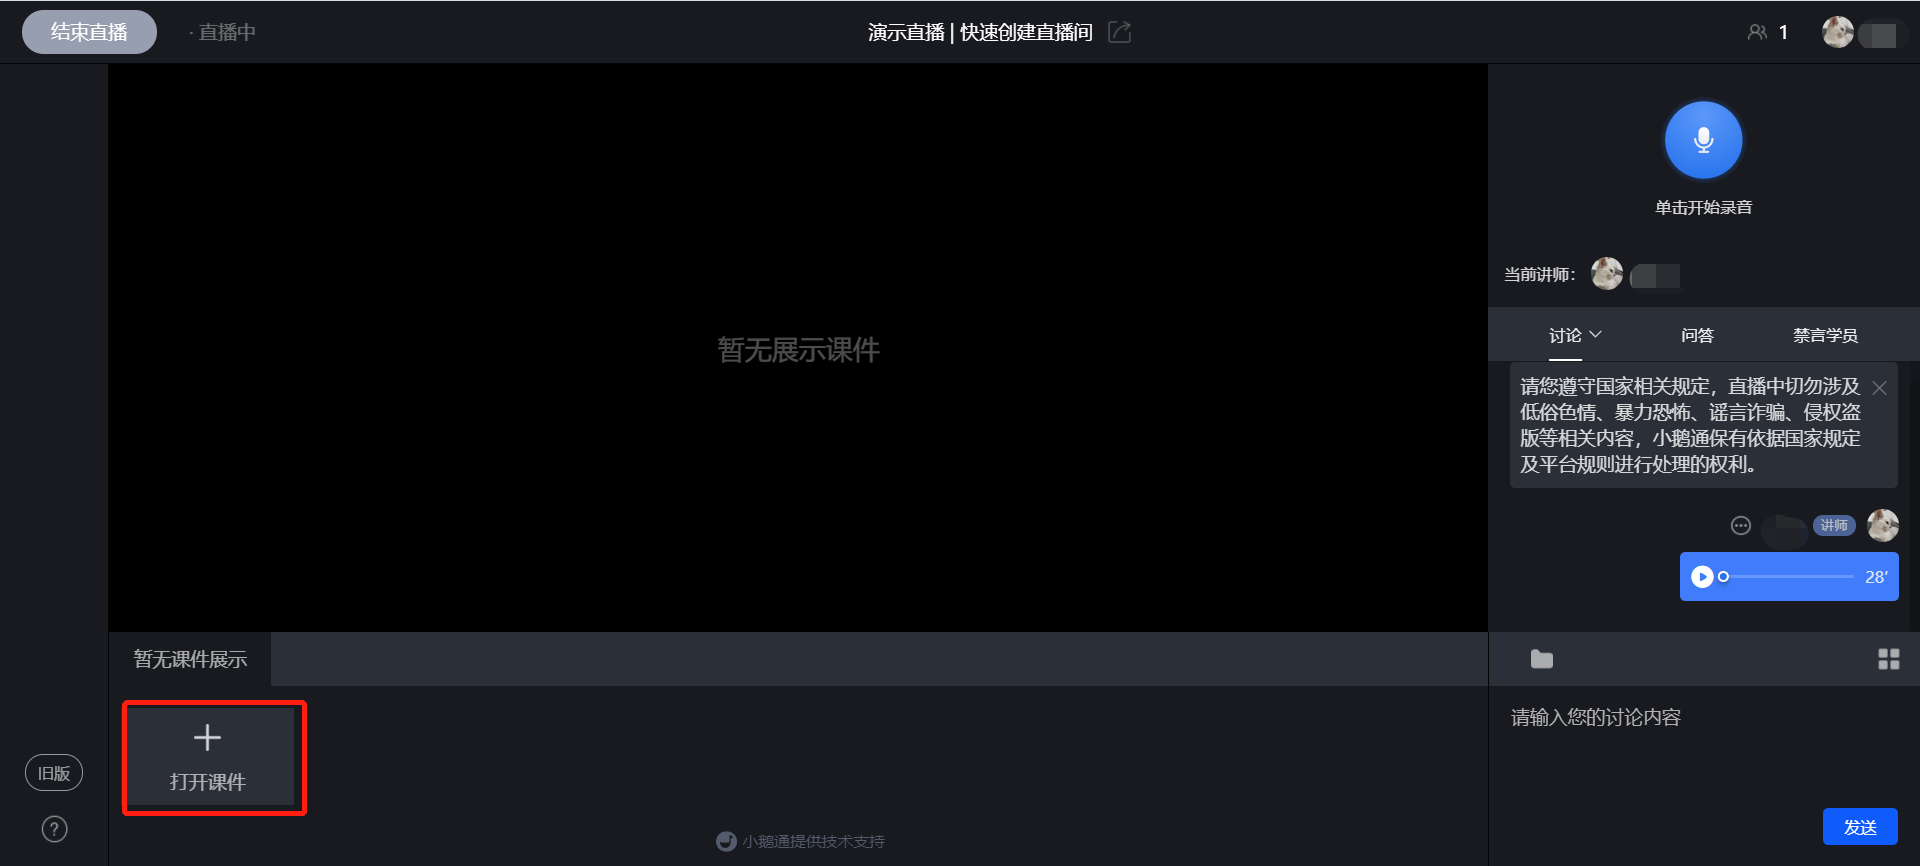
(Web version - Upload courseware)
② After uploading, click the left and right arrows in the courseware display area to turn pages. The student side will synchronize the page - turning.
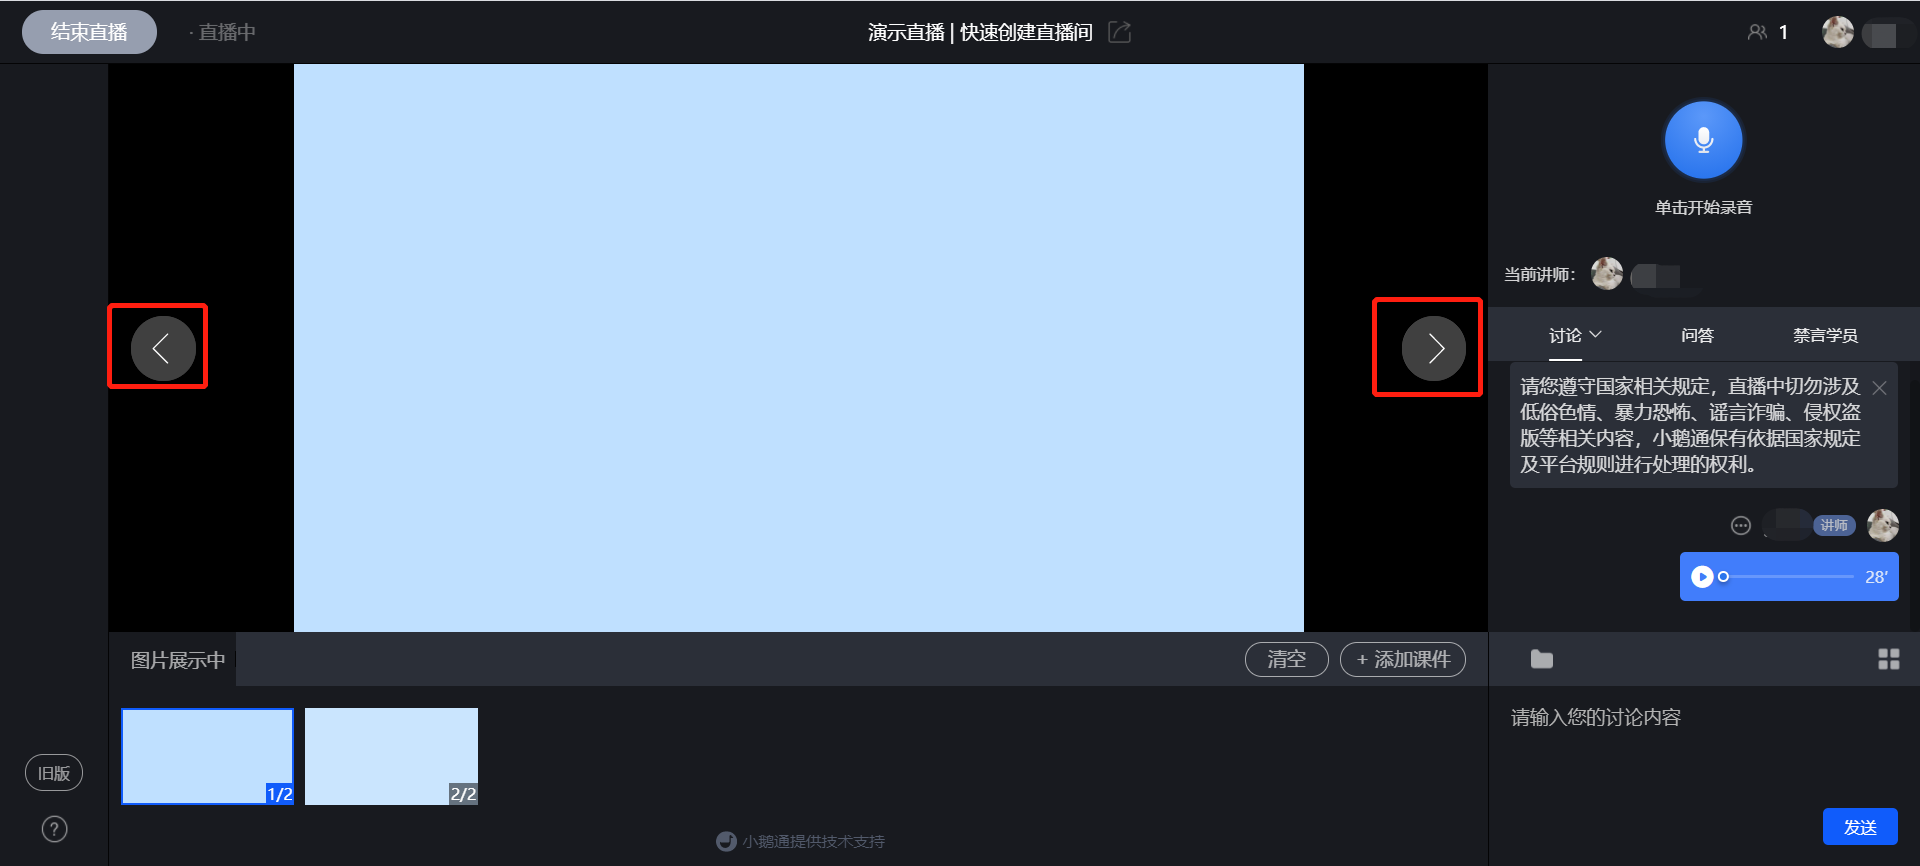
(Web version - Courseware page - turning)
③ Click the 'Folder' button in the lower - right corner to enter the material library, where you can upload and send files in other formats.
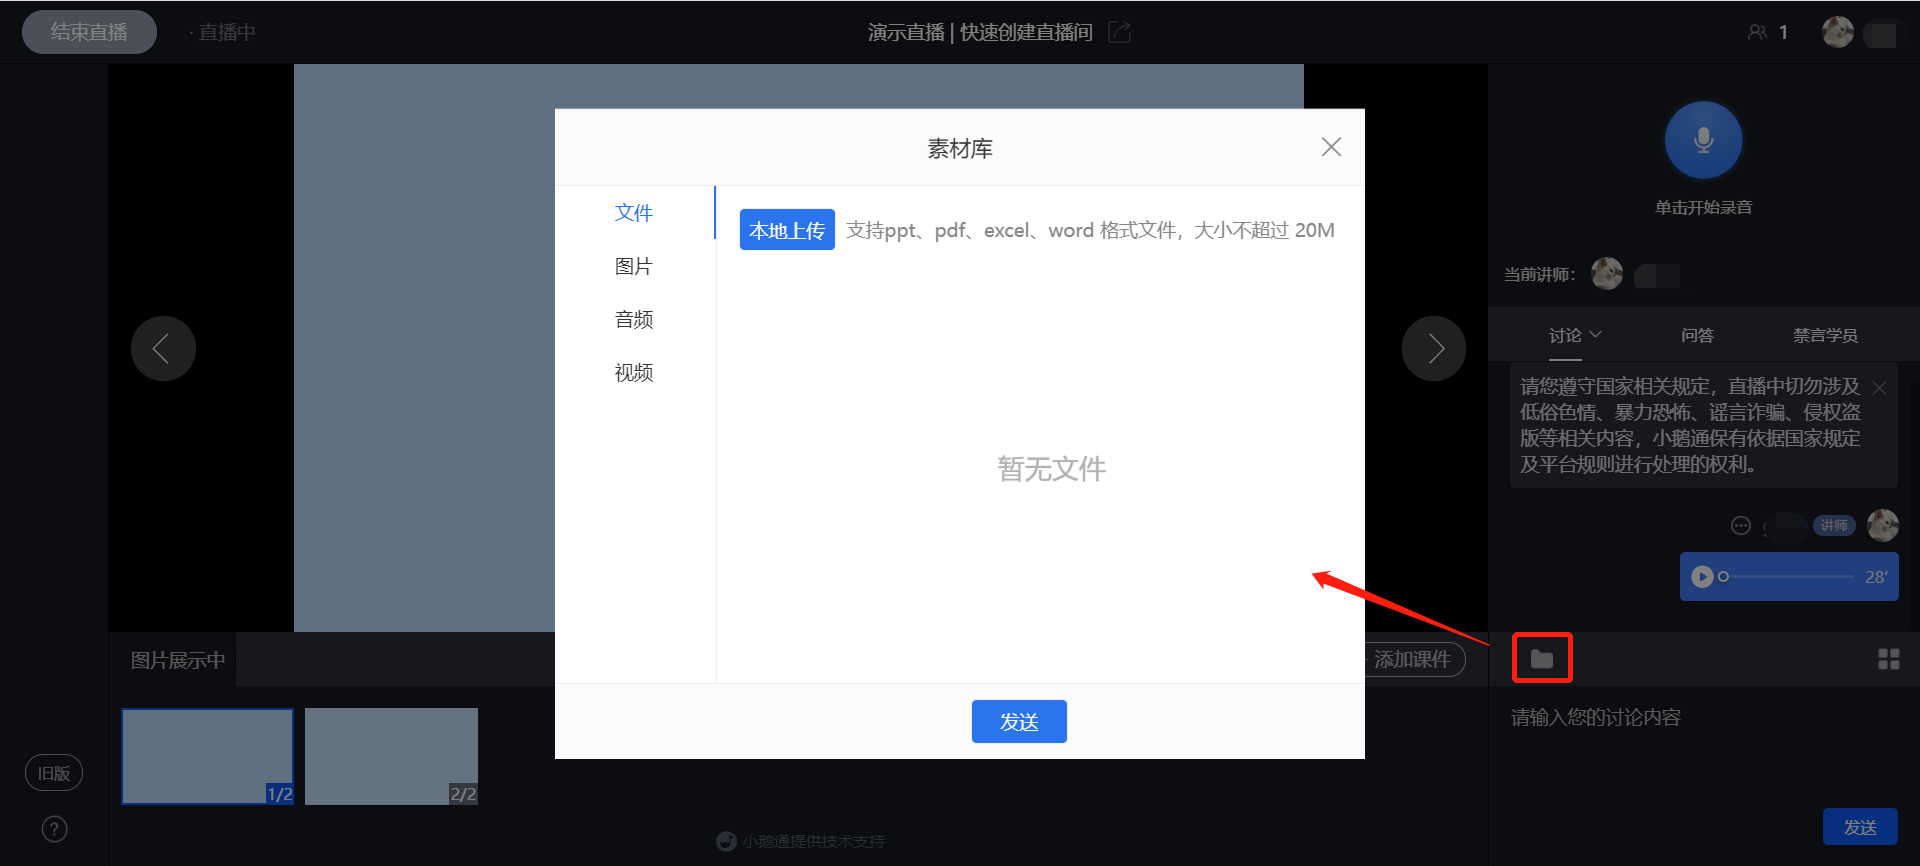
(Web version - Material library)
4. End the live stream
When the instructor needs to end the live stream, click the operation button in the upper - left corner to end the live stream.
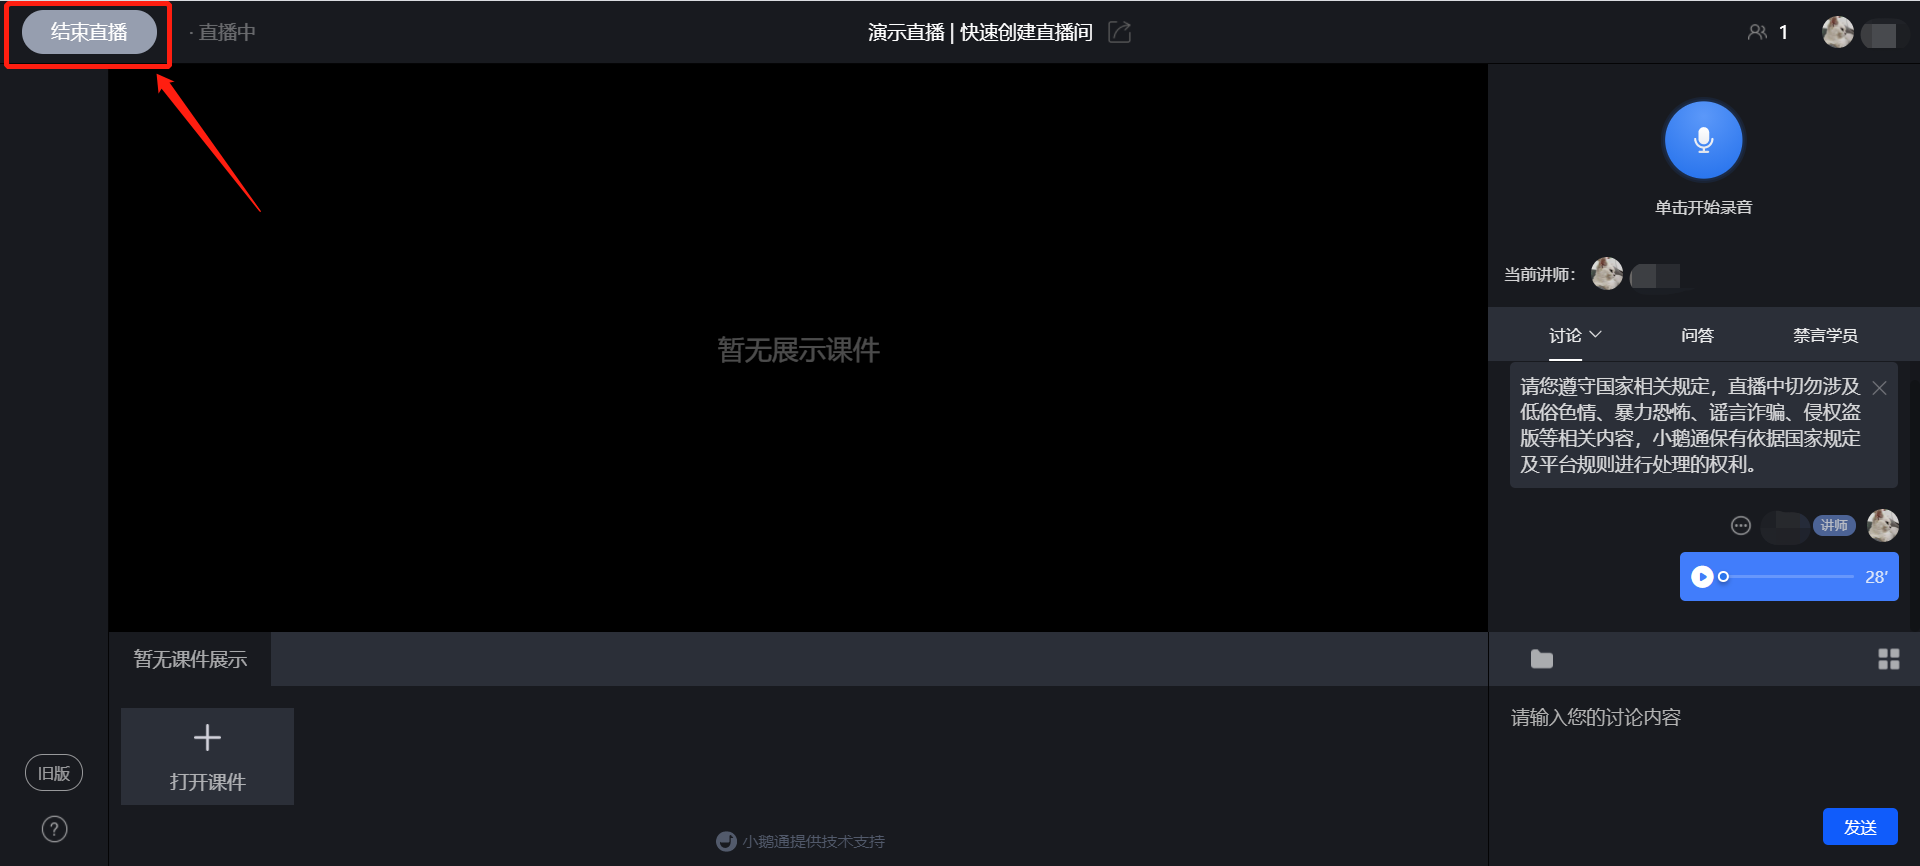
(Web version - End live stream)
● H5 live streaming
1. Click 'WeChat H5' live streaming to enter the H5 audio live - streaming room page.
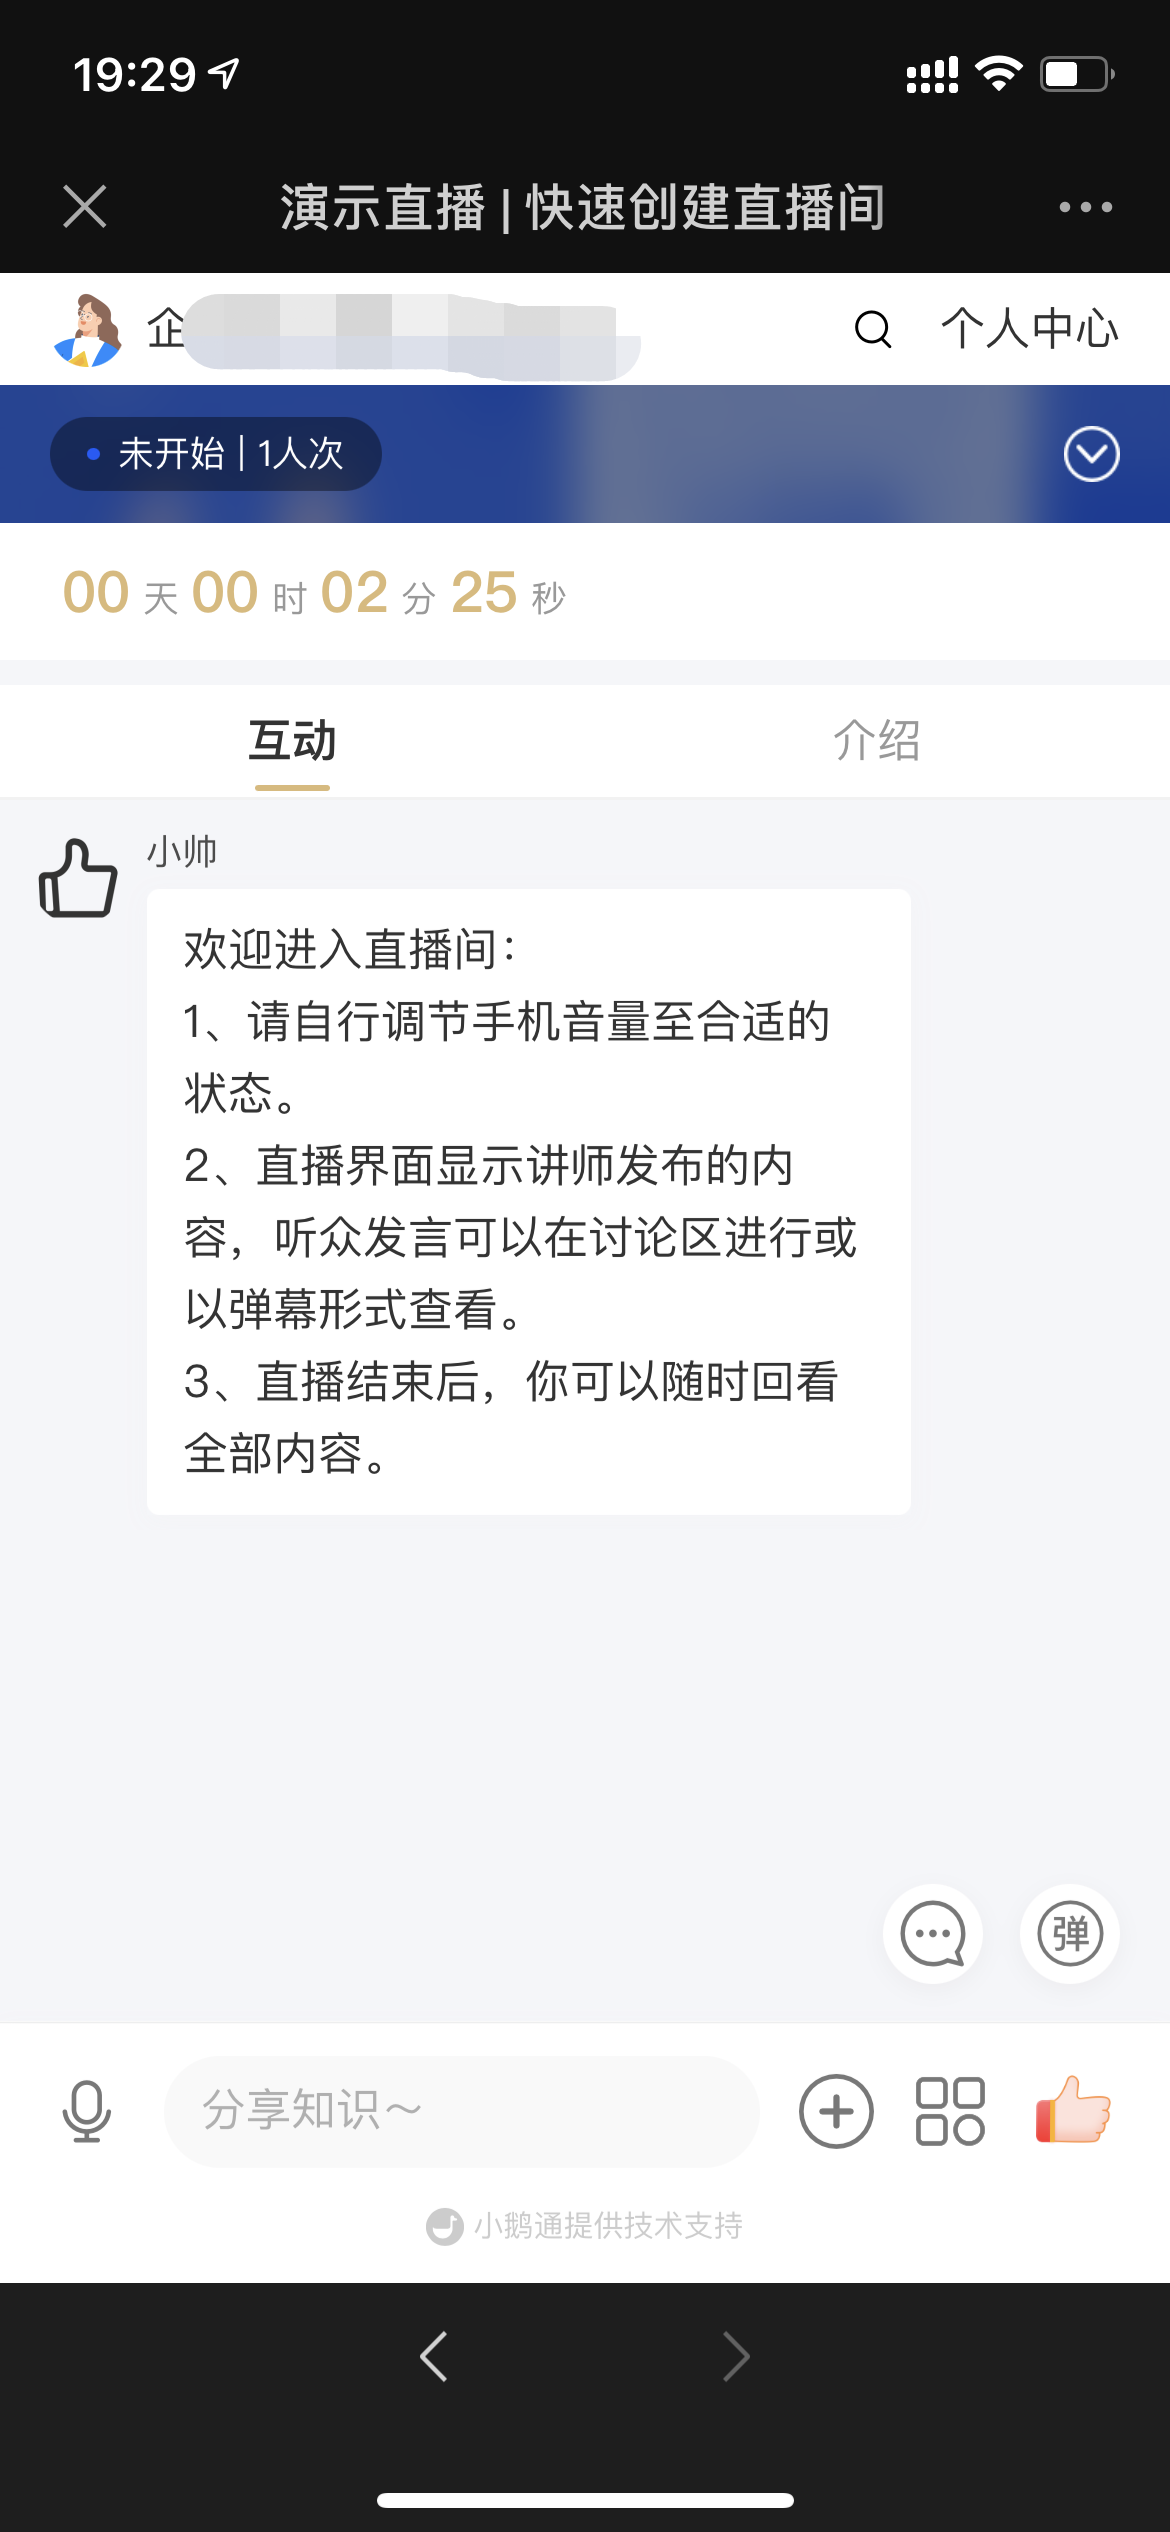
(Audio live streaming - H5 live - streaming room)
2. Send voice
① Click the microphone icon to start voice recording.
② Click again to end voice recording.
③ After voice recording is completed, click the'record again' button to record again, click the 'preview' button to preview the voice, click the'send' button to send the voice, or click the 'close' button to cancel sending.
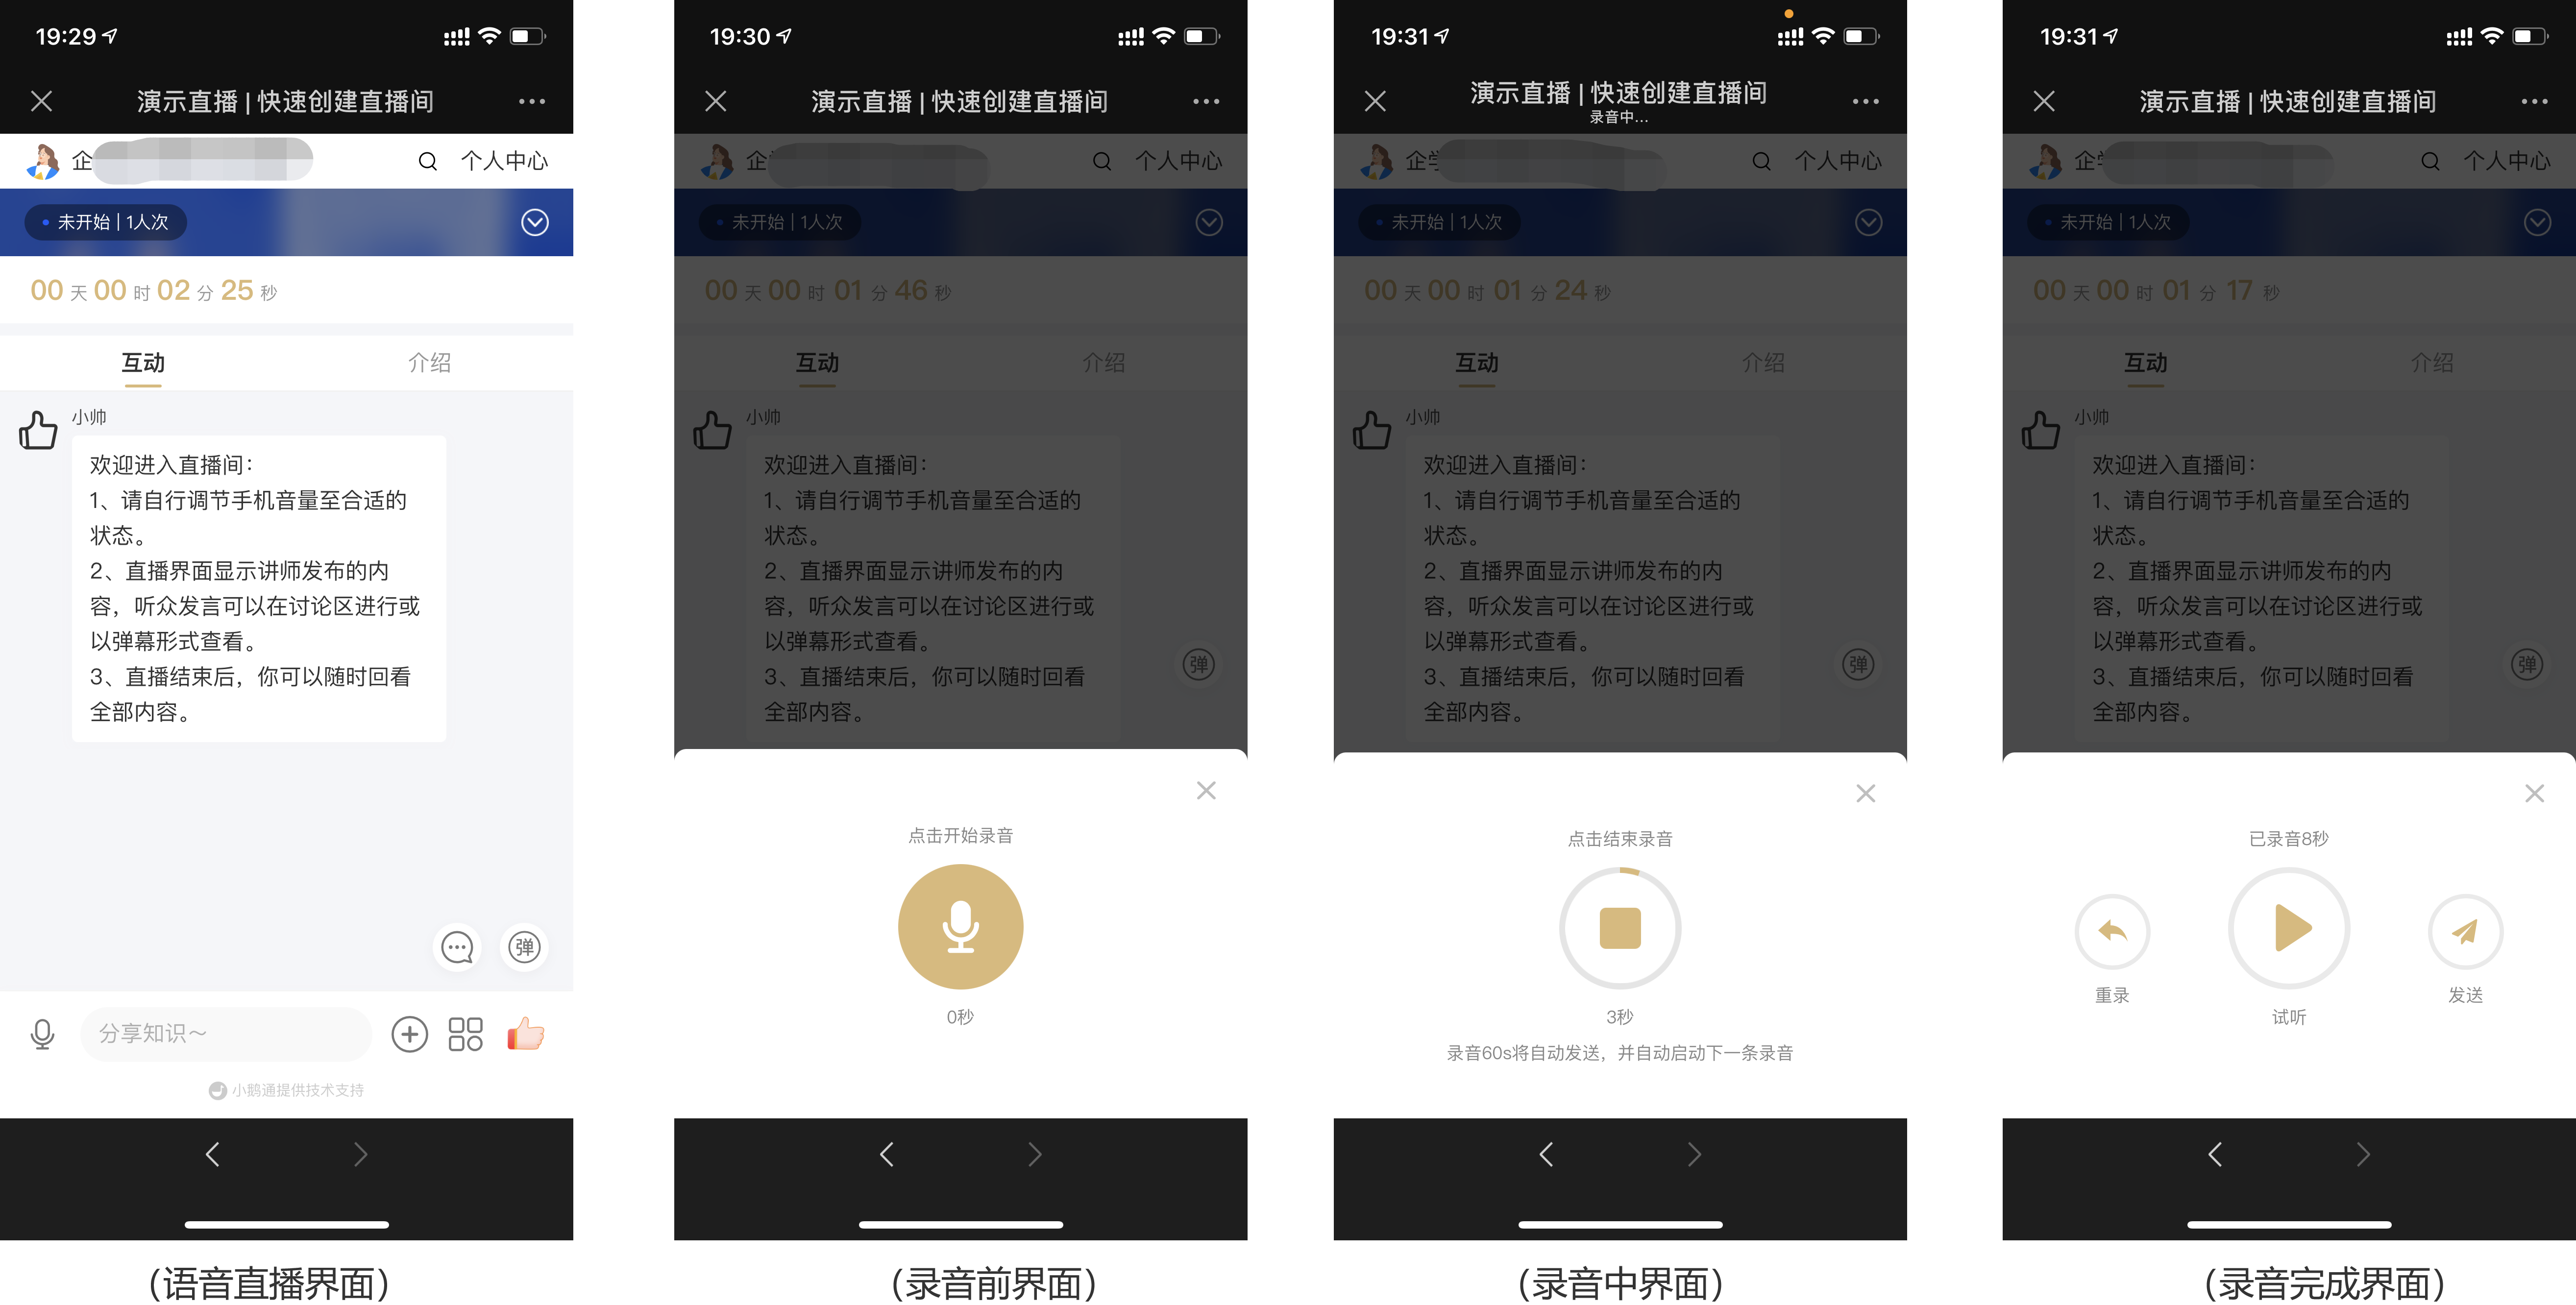
The live - streaming room supports continuous voice recording by the instructor. The instructor doesn't need to manually click to send the recording. The recording will be automatically sent after 60 seconds, and the next recording will start automatically. This allows the instructor to teach at their own pace without being interrupted by the action of sending voice.
3. Courseware display
① Click the '+' in the lower - right corner of the live - streaming room, then click 'Image', 'Image library', or 'PPT library' to select and upload images. Single or multiple image uploads are supported.
② After uploading, the corresponding courseware will be displayed at the top of the live - streaming room. Slide to turn pages.
③ Click the 'File library' or 'Audio - video library' to upload content in other formats (uploading needs to be completed using an Android phone or a PC browser).
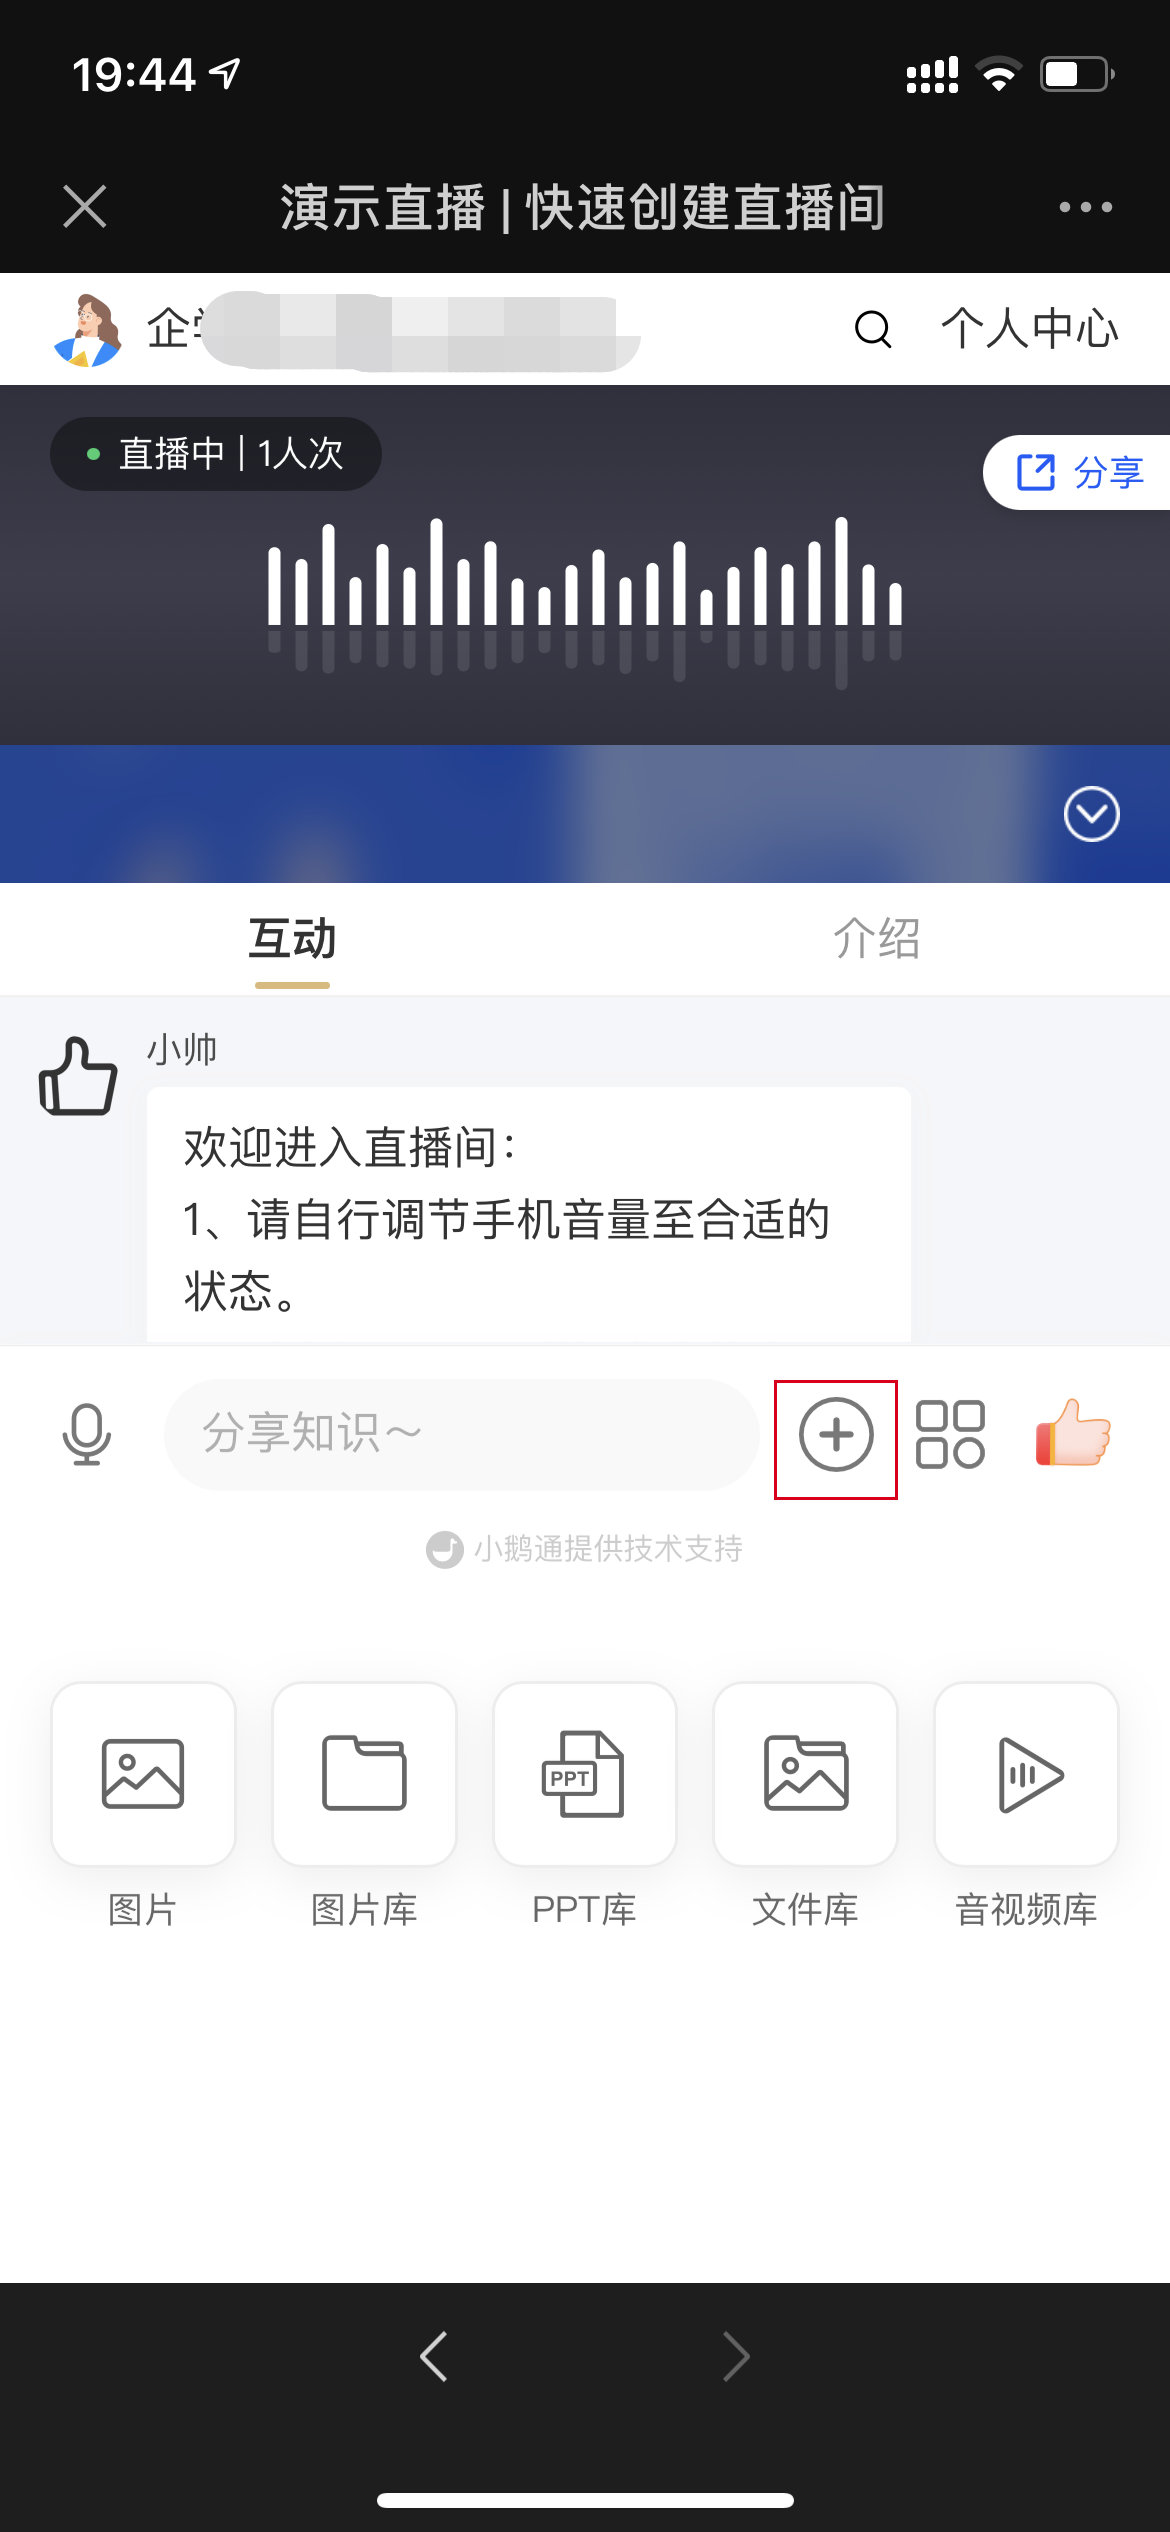
(H5 live - streaming room - Upload courseware)
4. End the live stream
When the instructor needs to end the live stream, click the'more' button in the lower - right corner and click 'End live stream' in the pop - up dropdown box to end the live stream.
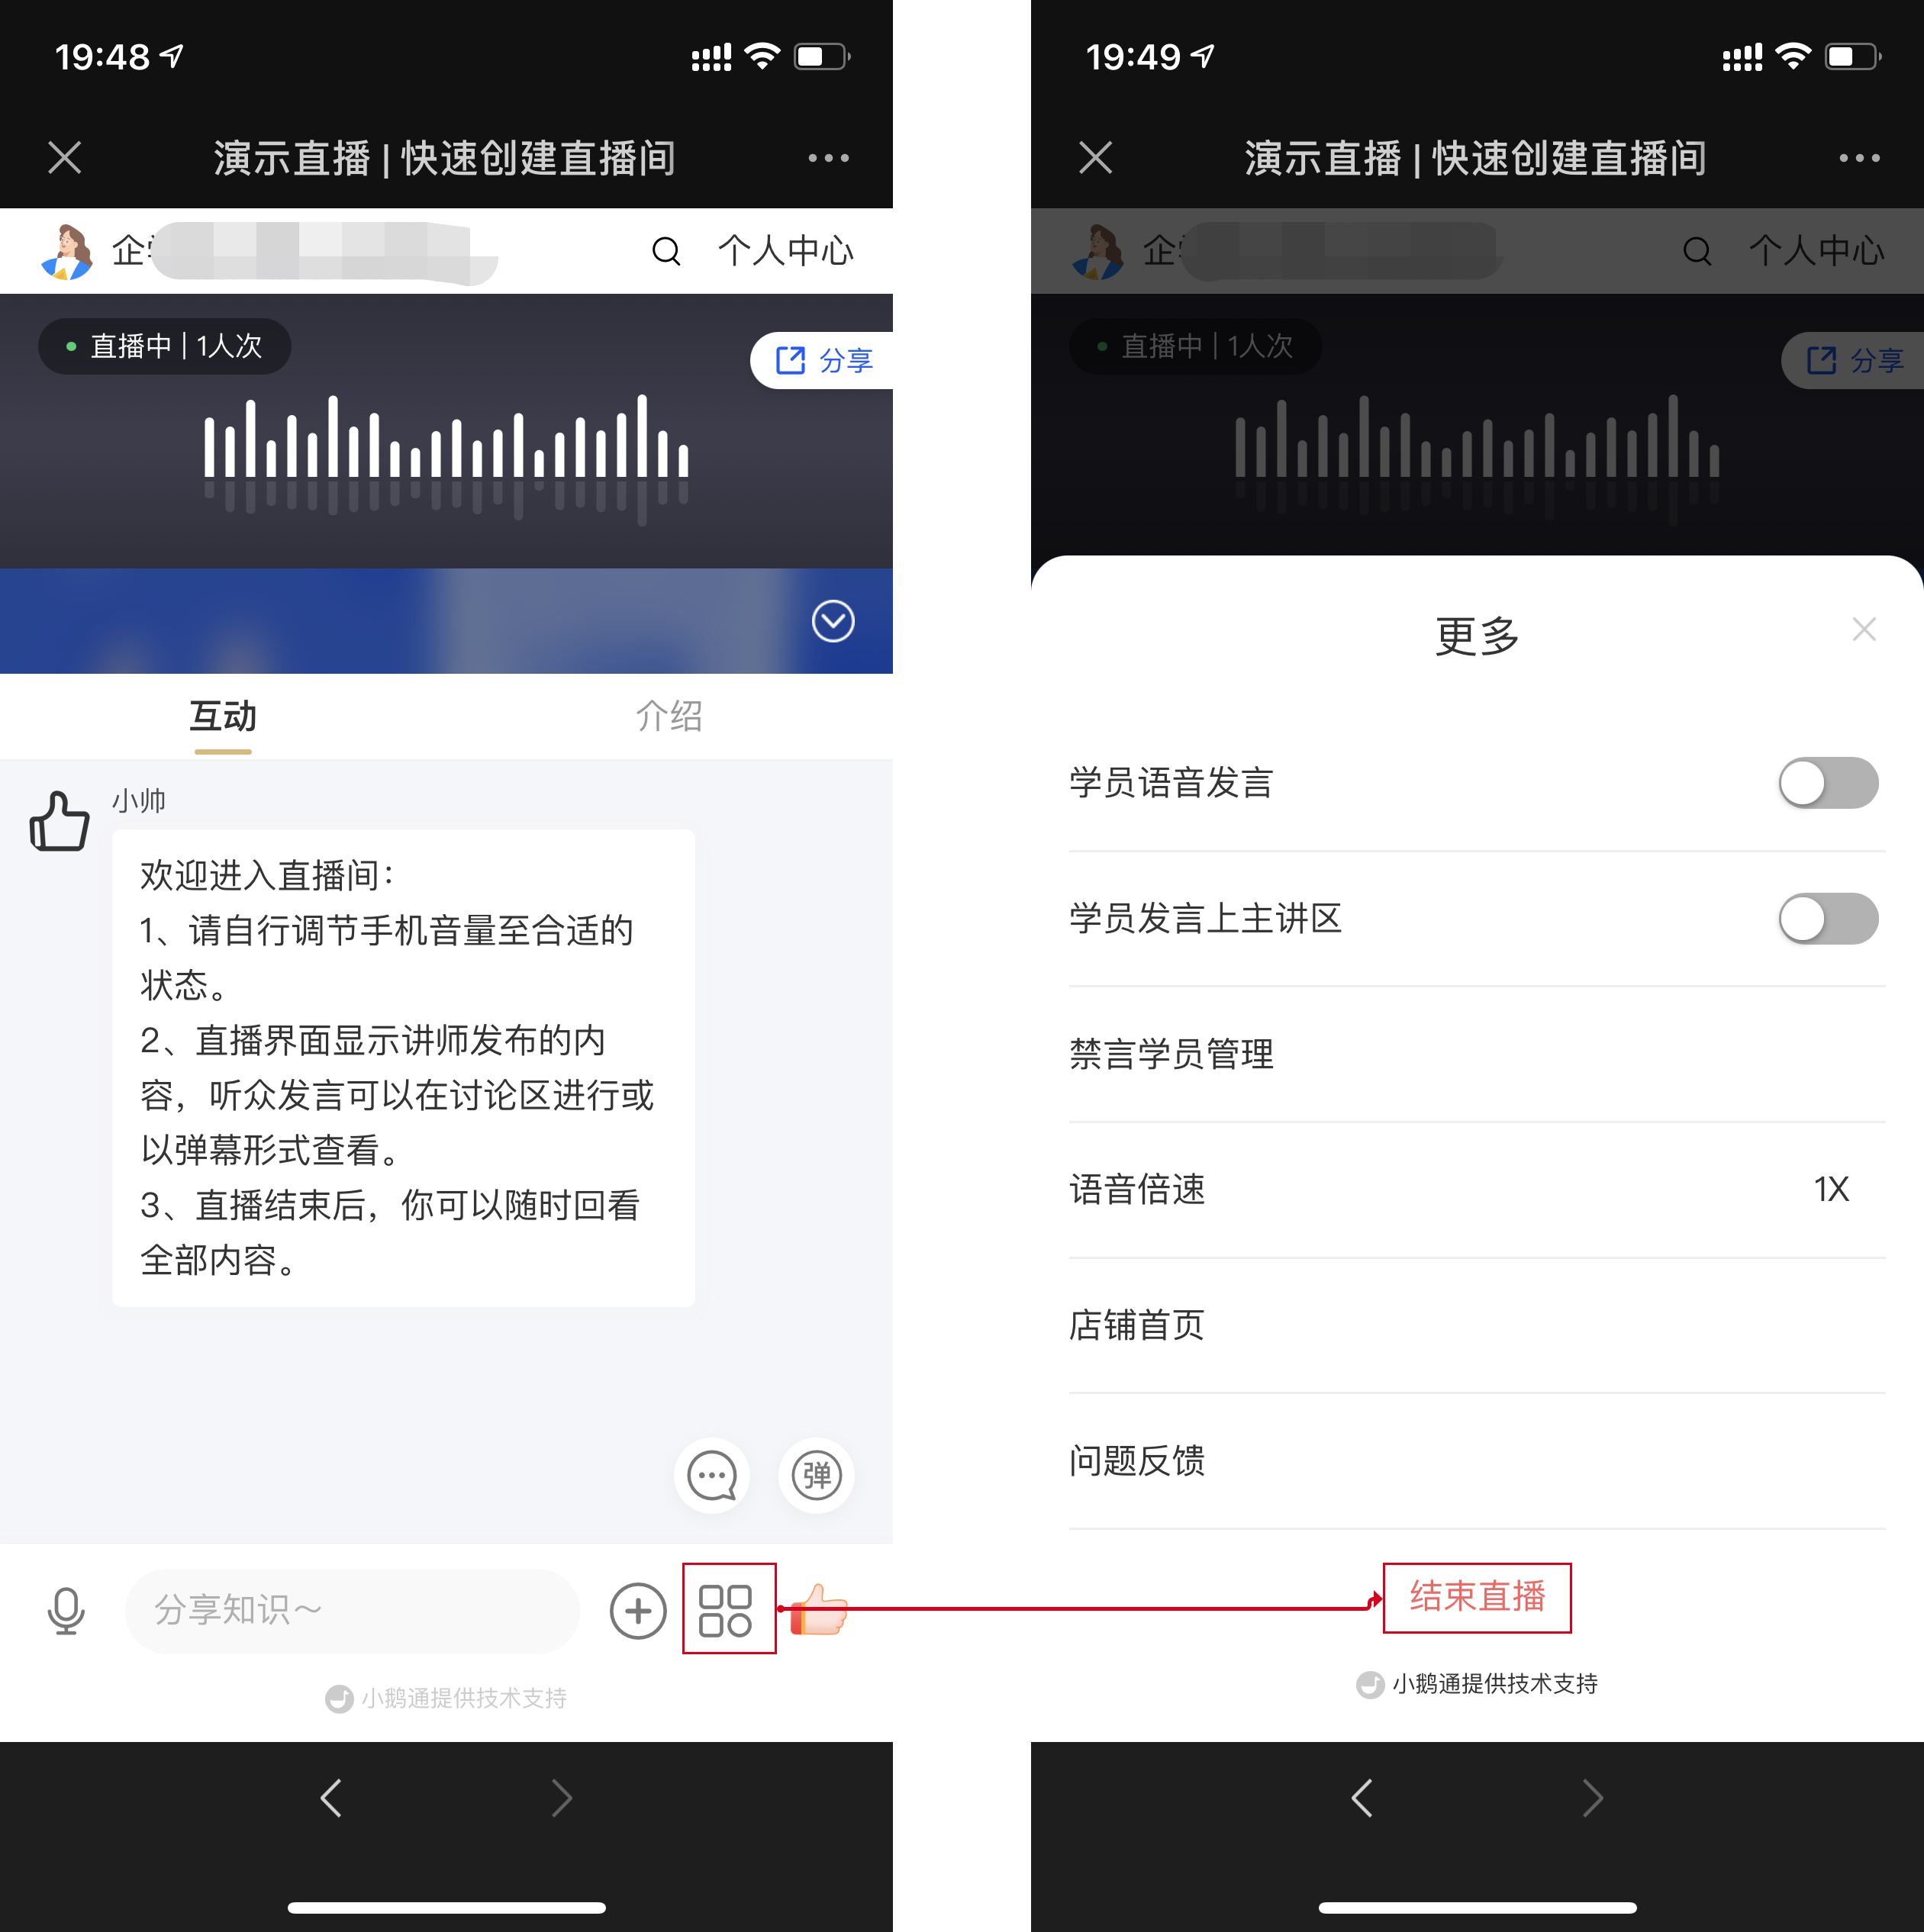
(Audio live streaming - H5 live - streaming room)
Step 4: Watch the live stream(PC web or H5)
1. Students can enter the live - streaming room by scanning the QR code or opening the link.
2. After entering the live - streaming room, students can interact with the instructor by sending text content, asking questions, etc.
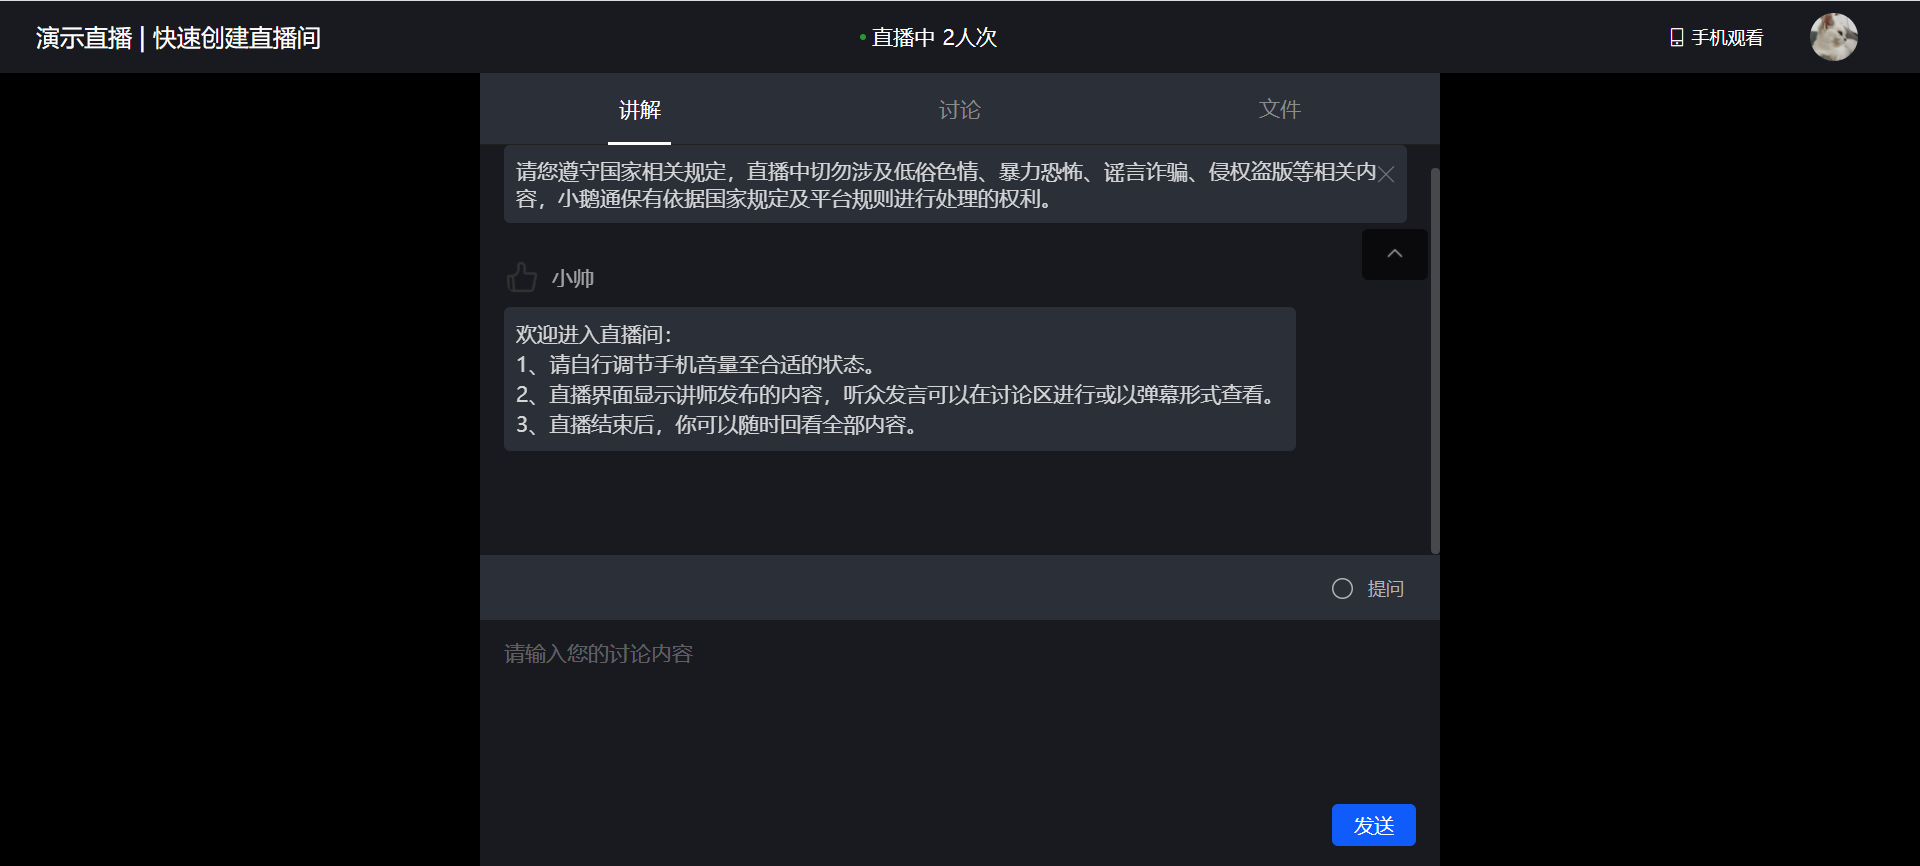
(Student side - PC web)
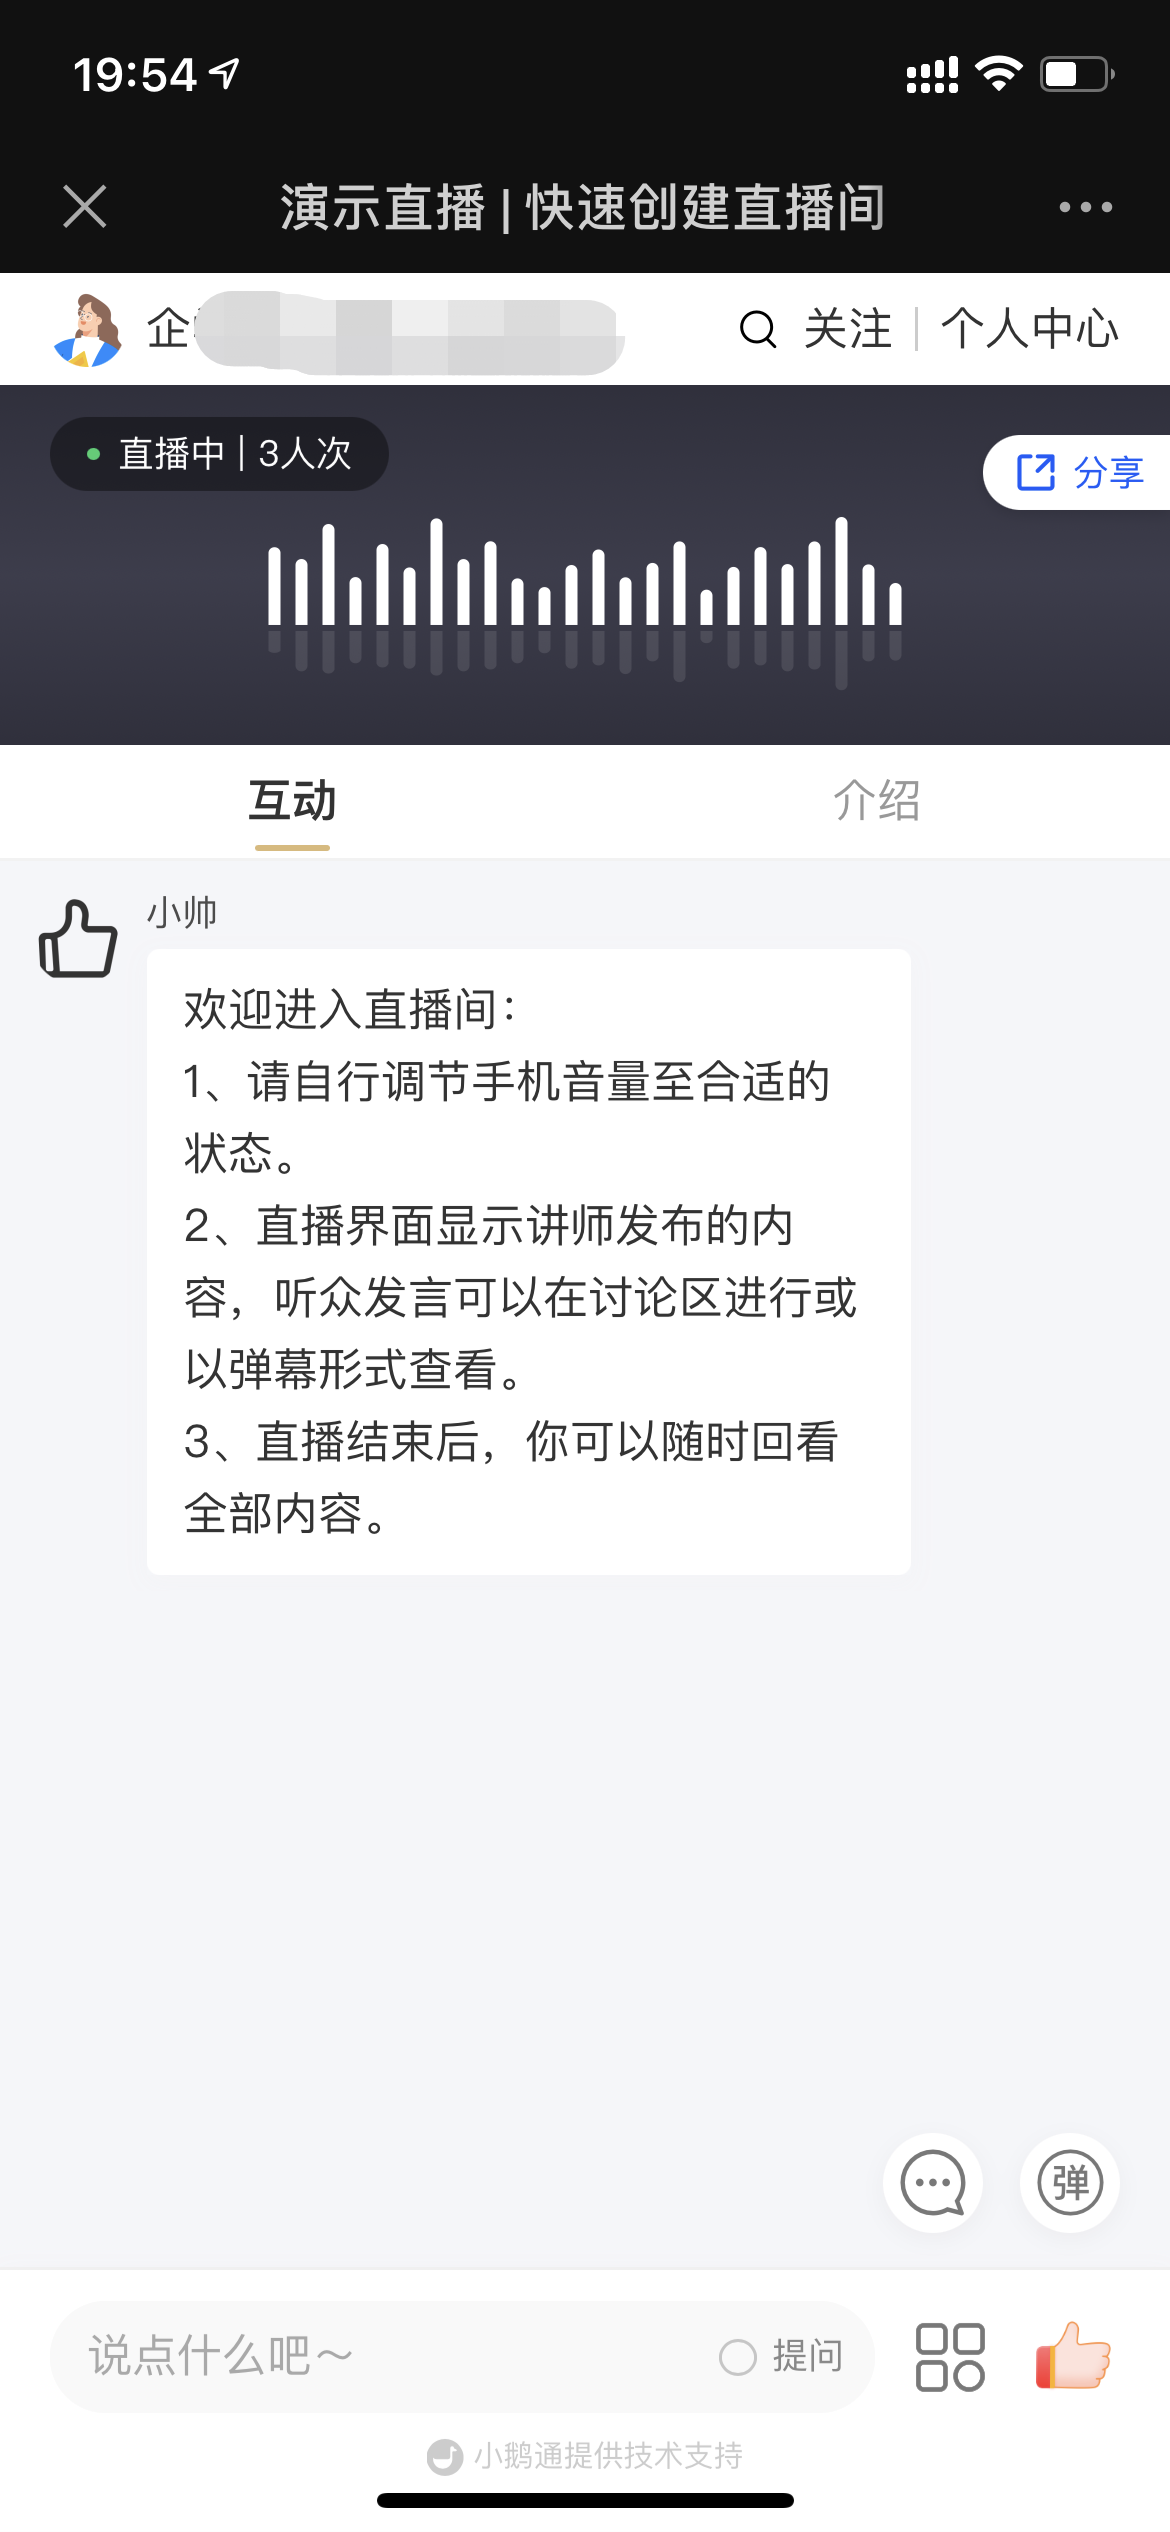
(Student side - H5)
【Corporate Training】Tutorial on Using Live Interactive Lotteries
I. Function Introduction
Live interactive lottery is an interactive tool used to enhance the activity in the live streaming room. It is configured by the administrator on the management console, initiated by the instructor in the live streaming room, and participated in by the students in the live streaming room. The administrator can set 'Online' or 'Commenting' as the participation conditions, and cooperate with the instructor's live narration in the live streaming room to guide students to interact and participate in the lottery.
II. Purpose of Use
1. Enhance the activity in the live streaming room;
2. Increase the viewing time of users in the live streaming room;
III. Use Scenarios
An enterprise needs to hold a monthly staff meeting in the form of a live stream. A lottery session is set up in the live streaming room, with the company's mascot as the prize. The lottery is initiated at irregular intervals during the live stream. Users who are [Online] or [Commenting] in the live streaming room are eligible to participate, which enhances the interactivity in the live streaming room and the enthusiasm of the students.
IV. Operation Path
Management console: Live Streaming → Live Streaming List → More → Interactive Settings → Lottery Switch;
Instructor's end (Mobile): Live Streaming Room → Bottom Toolbar → More → Lottery;
Instructor's end (PC Web): Live Streaming Room → Left Toolbar → Interactive Tools → Lottery;
Student's end: Live Streaming Details Page → Live Streaming Room → Click on the Lottery Icon;

V. Usage Tutorial
(1) Management Console
Step 1: Turn on the lottery switch and add a lottery(Management background)
1. Find [Live Streaming - More], click [Interactive Settings], and turn on the lottery switch. After it is turned on, the instructor can see the lottery entry when entering the live streaming room; 2. When adding a lottery, you need to configure [Lottery Name], [Participation Conditions], and [Prize Settings]

● Lottery Name: No more than 20 characters;
● Participation Conditions: Online, Commenting;
● The prize redemption methods support both custom and WeChat ID

Step 2: View lottery data

(Management background)● After this round of the lottery ends, you can view the winning list; ○ Viewing path: Live Streaming → Live Streaming List → More → Data Statistics → Lottery Details;
● For lottery activities in the [Ended] status, you can view the winning list.
● Prize redemption status description:

○ [Redeemed]: The student has successfully received the prize. The prize redemption status on the management console is 'Redeemed', and the status of the prize on the student's end is 'Received';

○ [Not Redeemed]: The student has not received the prize. The prize redemption status on the management console is 'Not Redeemed', and the status of the prize on the student's end is 'Click to Receive';
(2) Instructor's End
Step 1: The instructor initiates the lottery in the live streaming room
(H5, PC Web)
Step 2: The instructor draws the winning numbers(H5, PC Web)

After the lottery draw, the instructor can view the winning list;(3) Student's End
Step 1: Participate in the lottery

(H5, PC Web)
During the lottery initiation period, if the student meets the lottery participation conditions (Commenting/Online participation in the lottery configured on the management console), they will be eligible to participate in the lottery; Step 2: Lottery results(H5, PC Web, APP)
There are three lottery results, namely:

● Did not participate in this round of the lottery: The student did not meet the participation conditions during the lottery initiation period;● Sorry, you did not win: The student successfully participated in this round of the lottery but did not win;
● Congratulations, you won: You participated and won. You can receive the prize on the current page and view the winning list; Step 3: Redeem the prize
(H5)
The student needs to actively contact the merchant for redemption; Step 4: View my prizes
(H5)

● Path 1: In the live streaming room, click More - My Prizes in the lower right corner● Path 2: Outside the live streaming room, click Personal Center - My Prizes
VI. Frequently Asked Questions:

Q1: How many rounds of lotteries can be initiated in one live stream?Answer: Currently, a maximum of 50 rounds are supported. You can configure it freely according to your needs.
Q2: Is there a limit to the number of prizes?
Answer: Currently, only 5 types of prizes can be set per round, and the number of each type of prize cannot exceed 50.

Q3: Which platforms does the current lottery function support?
Answer: Instructor's end: Lotteries can be initiated on H5 and PC Web; Student's end: Both H5 and PC Web support participation in the lottery;
Q4: How do students receive the prizes?
Answer: There are 3 ways: ① Receive the prize on the winning page; ② After winning, click the button in the lower right corner of the live streaming room, view My Prizes, and you can receive the won prizes; ③ Click [Personal Center], click [My Prizes], and you can view the won prizes.
Q5: What are the lottery rules when the number of participants is less than the number of prizes?
Answer: When the number of participants is less than or equal to the number of prizes: Participants will definitely win, and the prizes are randomly distributed; when the number of participants is greater than the number of prizes: The number of winners is equal to the total number of prizes, and the prizes are randomly matched with the winners.
Answer: Instructor side: You can initiate a lottery on the H5 and PC web pages.
Student side: Both the H5 and PC web pages support participation in the lottery.
Q4: How can students claim their prizes?
Answer: There are 3 ways: ① Claim on the winning page; ② After winning, click the button in the lower right corner of the live - streaming room, view 'My Prizes' to claim the won prizes; ③ Click [Personal Center], then click [My Prizes] to view the won prizes.
Q5: What are the lottery rules when the number of participants is less than the number of prizes?
Answer: When the number of participants is less than or equal to the number of prizes: Participants will definitely win, and the prizes are randomly distributed; when the number of participants is greater than the number of prizes: The number of winners is equal to the total number of prizes, and the prizes are randomly matched with the winners.