# Live broadcast management
# Video Live Streaming - Tutorial for Web Version
[中文](/books/8e6b4/page/d9640)
**I. Function Introduction**
Instructors can conduct video live streaming via the web - based platform without the need to download software, and can start the live stream immediately. This is suitable for live - streaming scenarios that require desktop sharing, courseware display, and instructor on - camera. Compared with the computer client, it is easier for instructors to get started and operate when using the web - based platform for live streaming.
PS: To conduct live streaming via the web - based platform, you need to use Google Chrome. Google Chrome has better compatibility and will provide a better live - streaming effect!
**II. Purpose of Use**
Using the web - based platform to start a video live stream allows for convenient live streaming directly on the web without software download, enabling real - time video, courseware & desktop sharing and other live - streaming content.
**III. Use Scenarios**
Web - based live streaming is suitable for scenarios that require desktop sharing, courseware display, and real - time video live streaming with students.
**IV. Operation Path**
Instructor End: Management Backend → Live Streaming → Go Live → Teach on Computer → Web - based Platform
**V. Usage Tutorial**
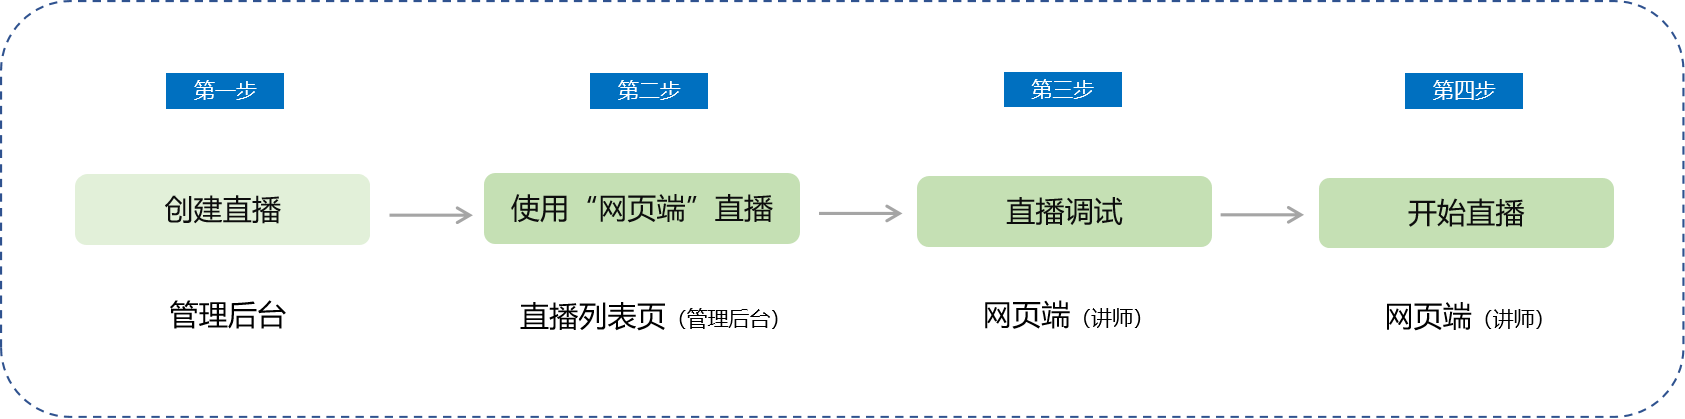
**Step 1: Create a Live Stream***(Management Backend)*
1. Enter the Management Backend - Live Streaming and create a video live stream.
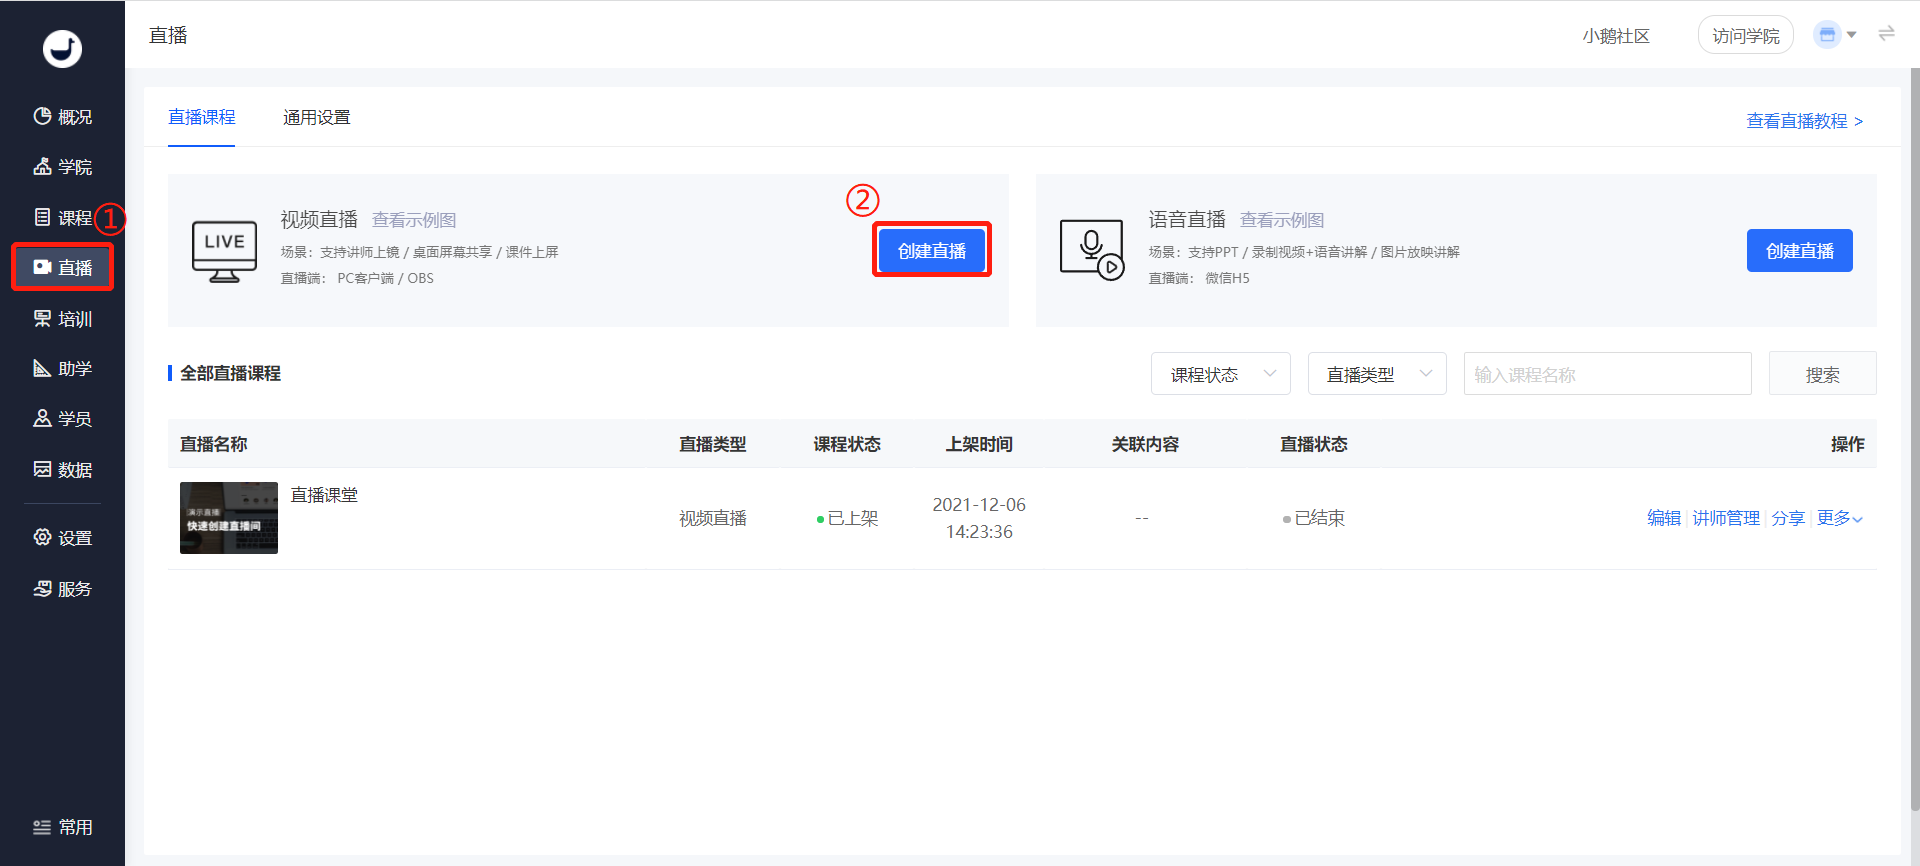
(Management Backend - Live Streaming)
2. Fill in the live - stream information and click the Save button to complete the live - stream creation.
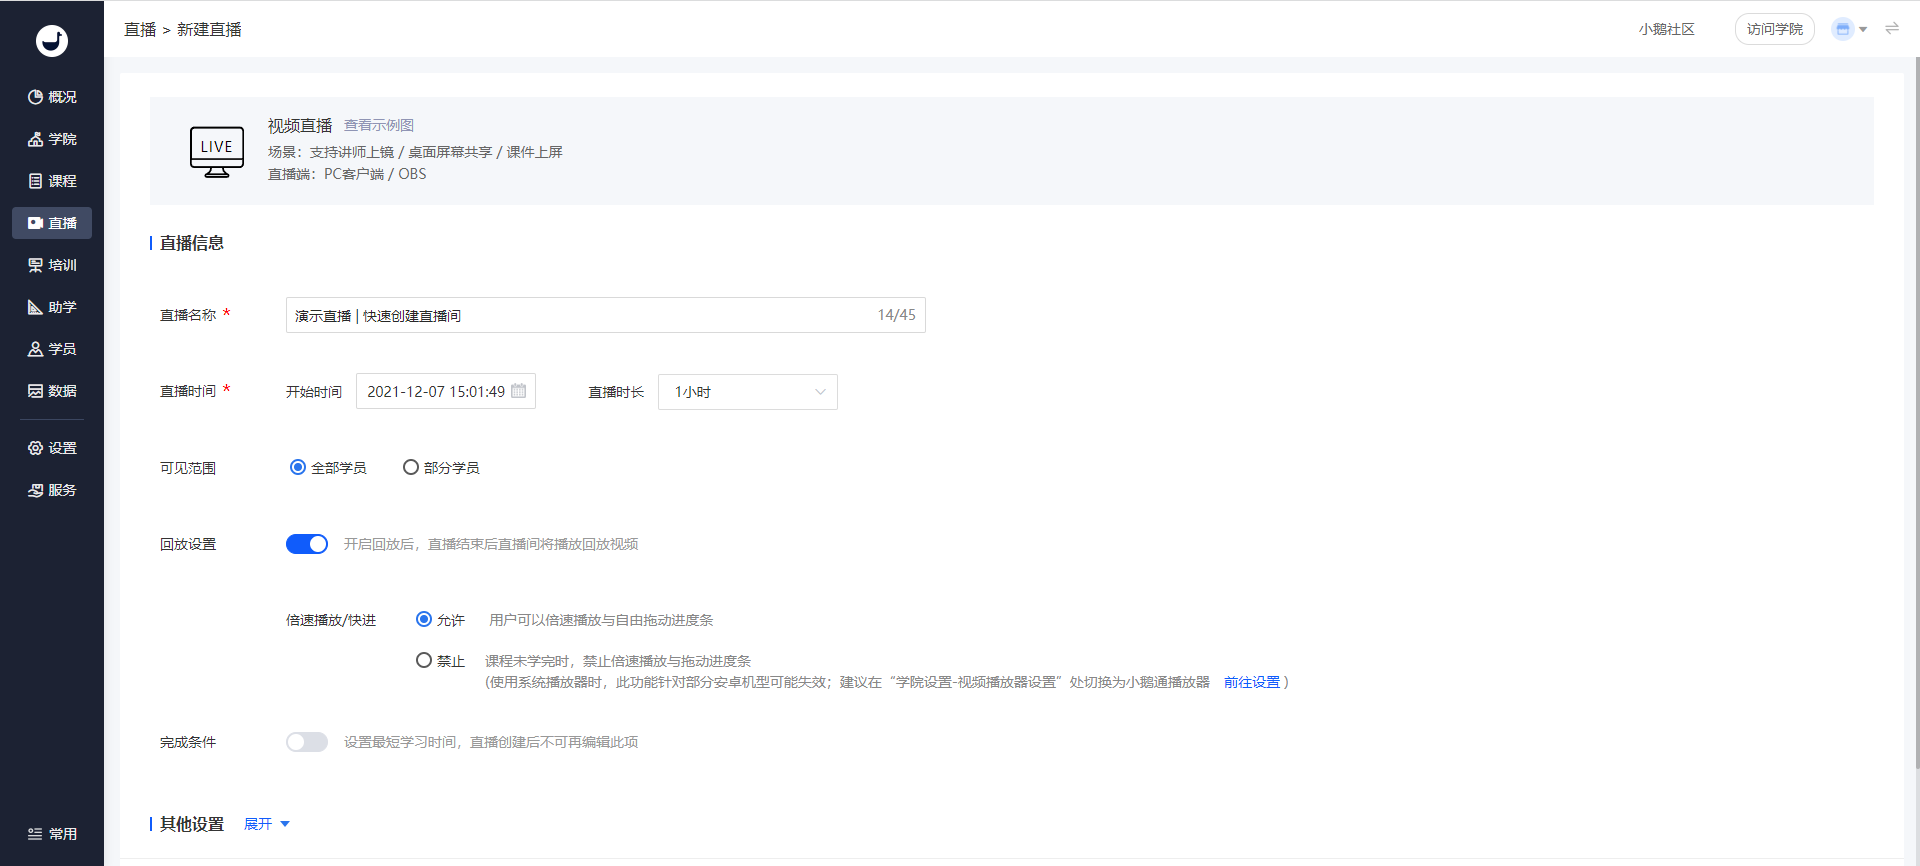
(Live - Stream Creation Page)
3. After creating the live stream, set up the instructor.
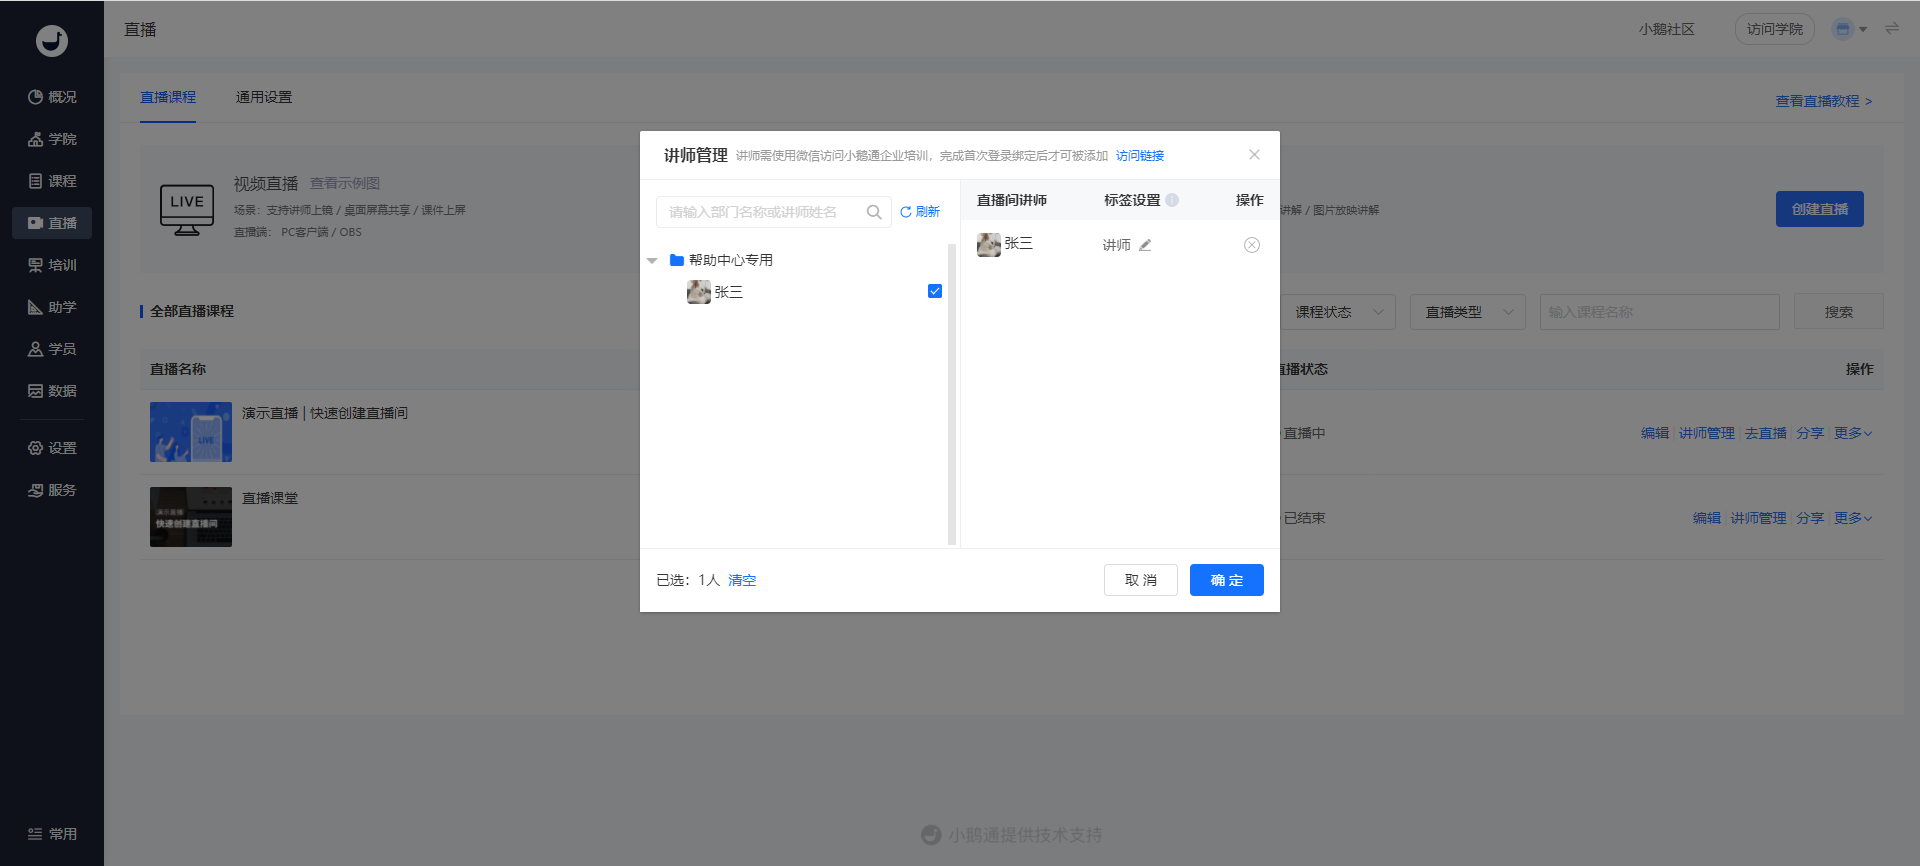
(Instructor Management Pop - up Window)
**Step 2: Use the 'Web - based Platform' for Live Streaming***(Management Backend)*
1. After completing the live - stream creation, click the 'Go Live' button on the live - stream list page.
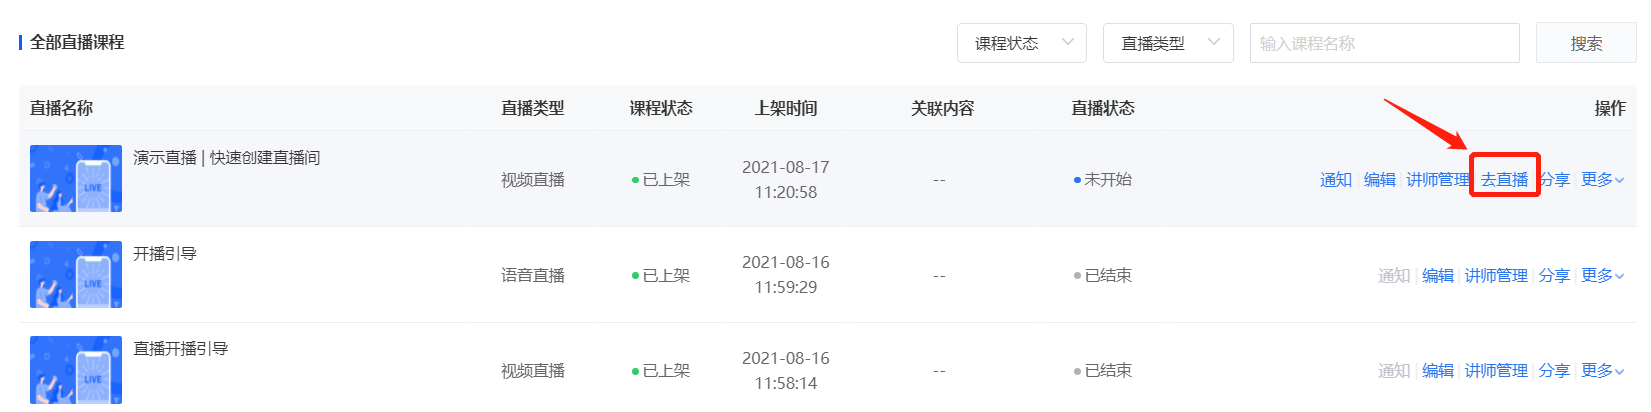
(Live - Stream Management - Live - Stream List)
2. Select the 'Web - based Platform' for live streaming.
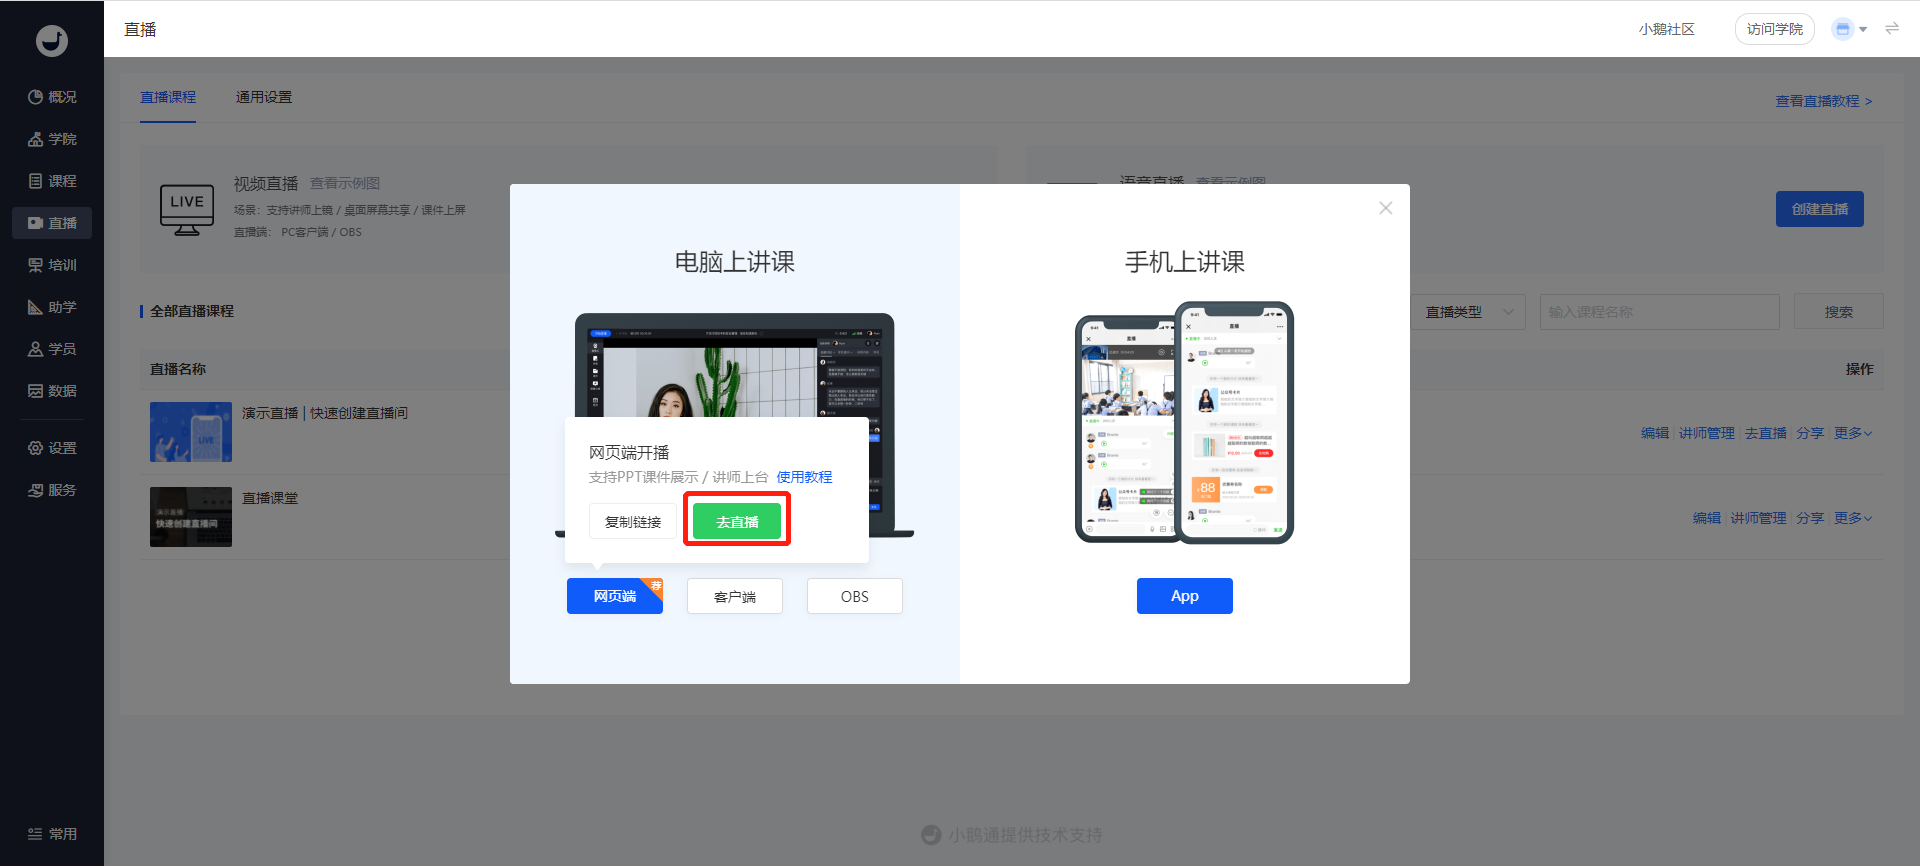
(Live - Streaming - Go Live)
**Step 3: The instructor enters the web - based platform and conducts live - stream debugging.***(Web - based Platform)*
1. After the instructor enters the live - stream room, check whether the camera and microphone are working properly as prompted.
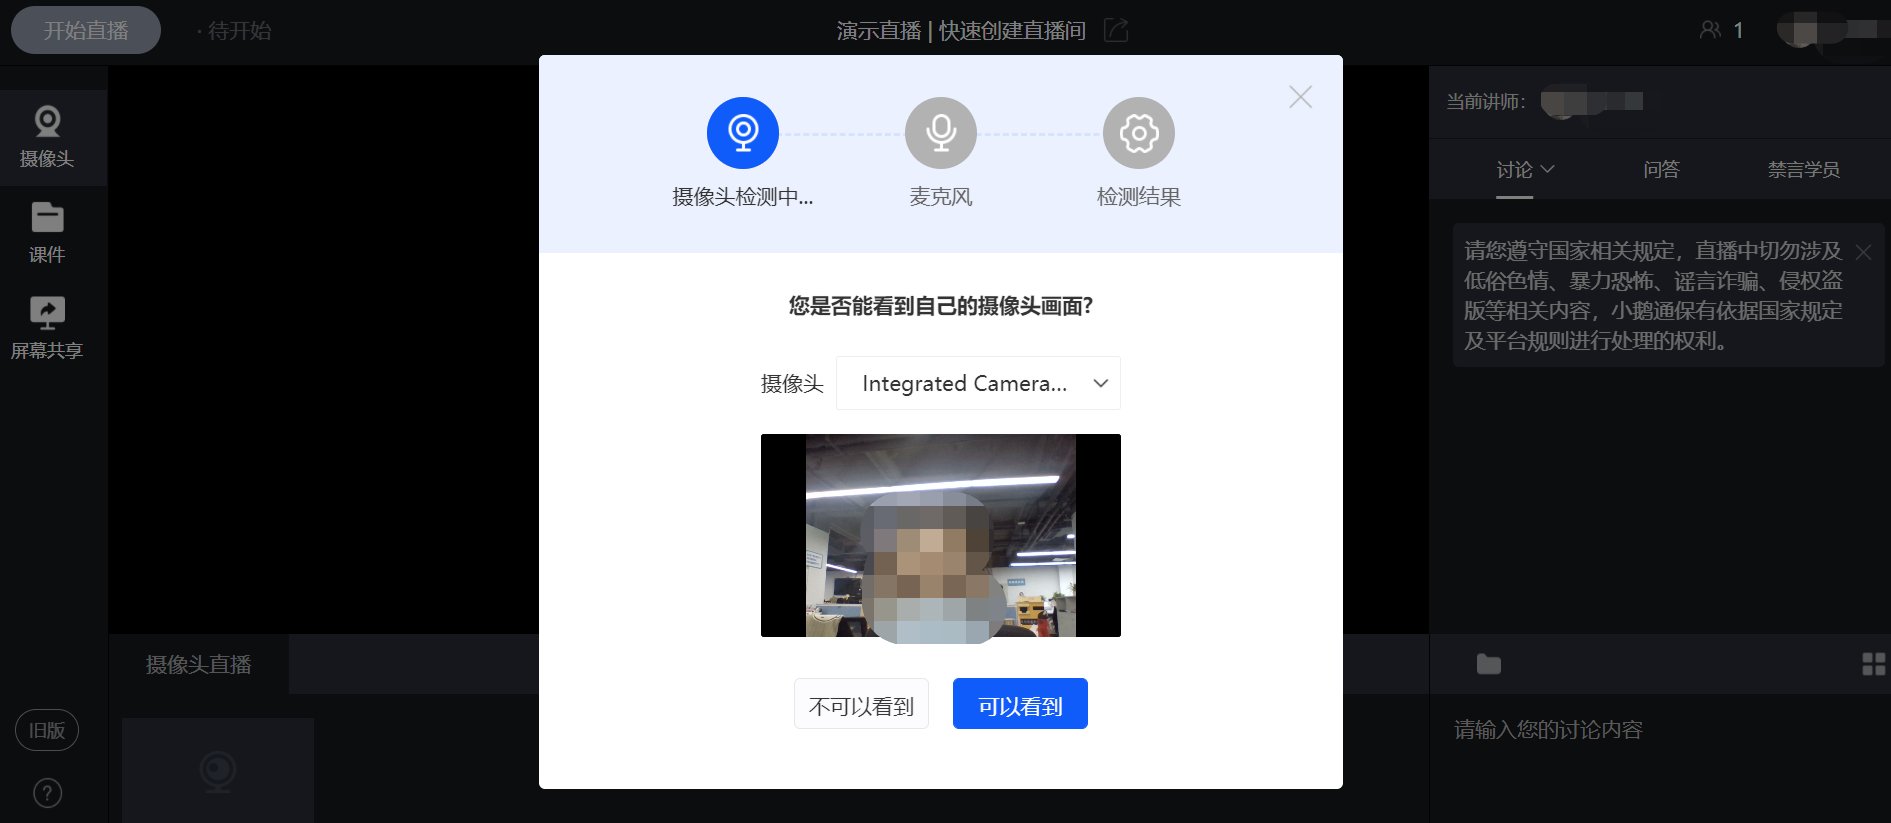
(Web - based Live - Stream Instructor End)
2. You can upload relevant courseware PDFs in advance.
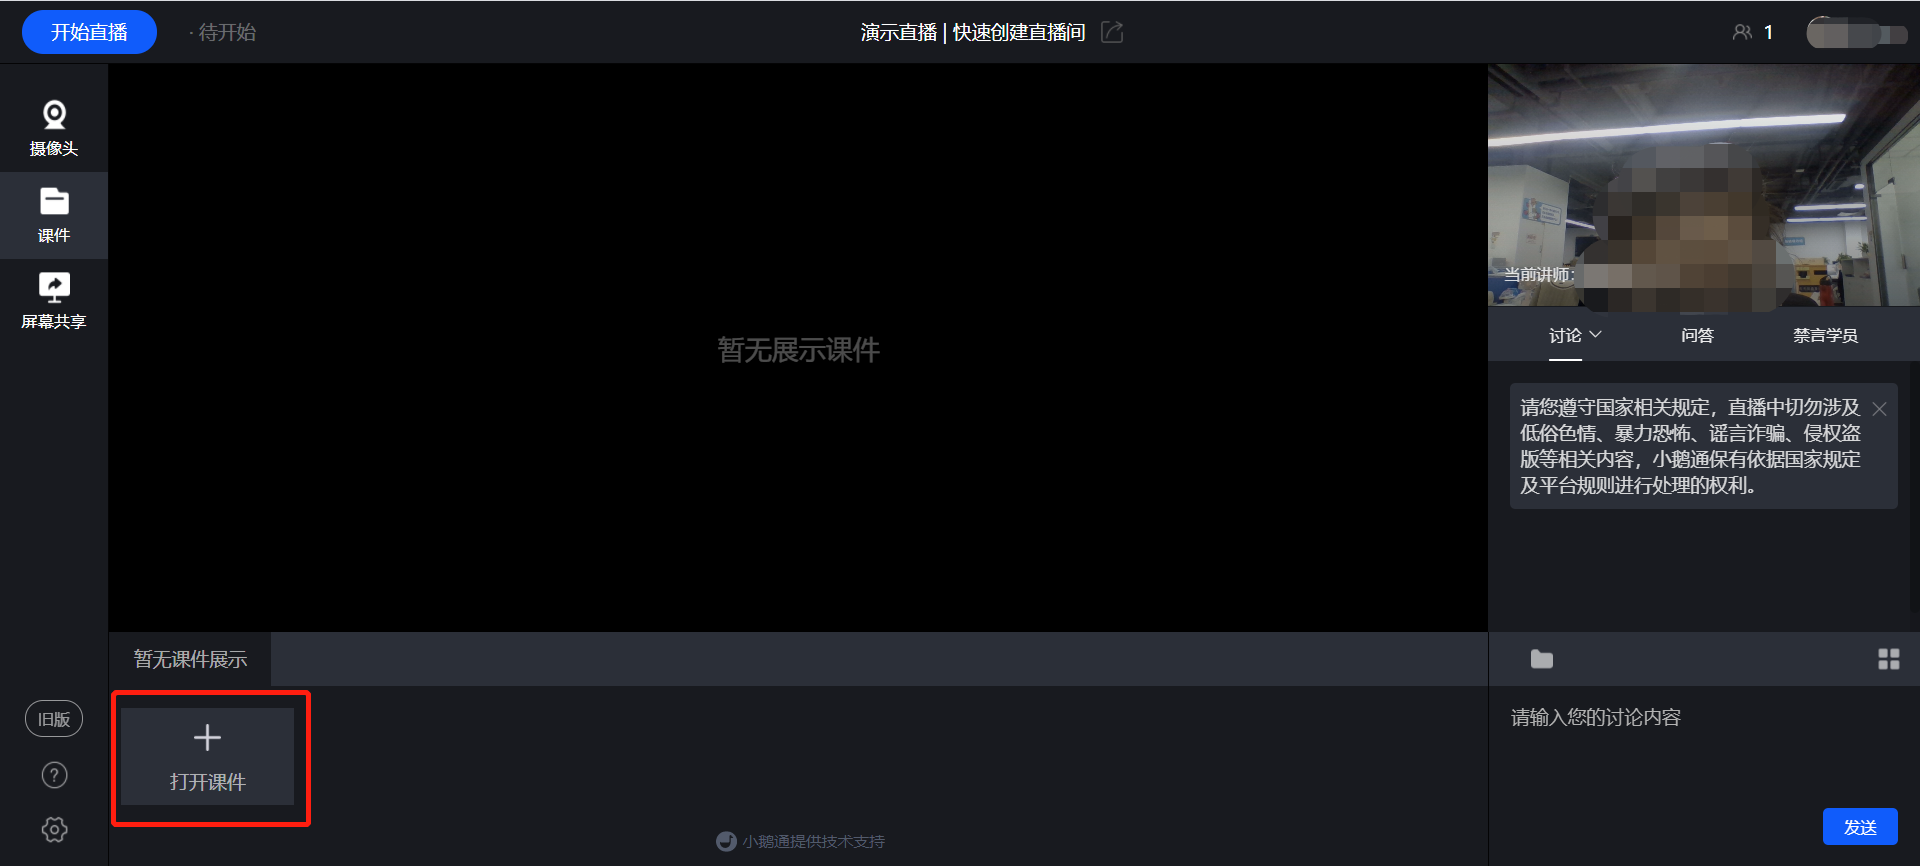
(Web - based Live - Stream Instructor End)
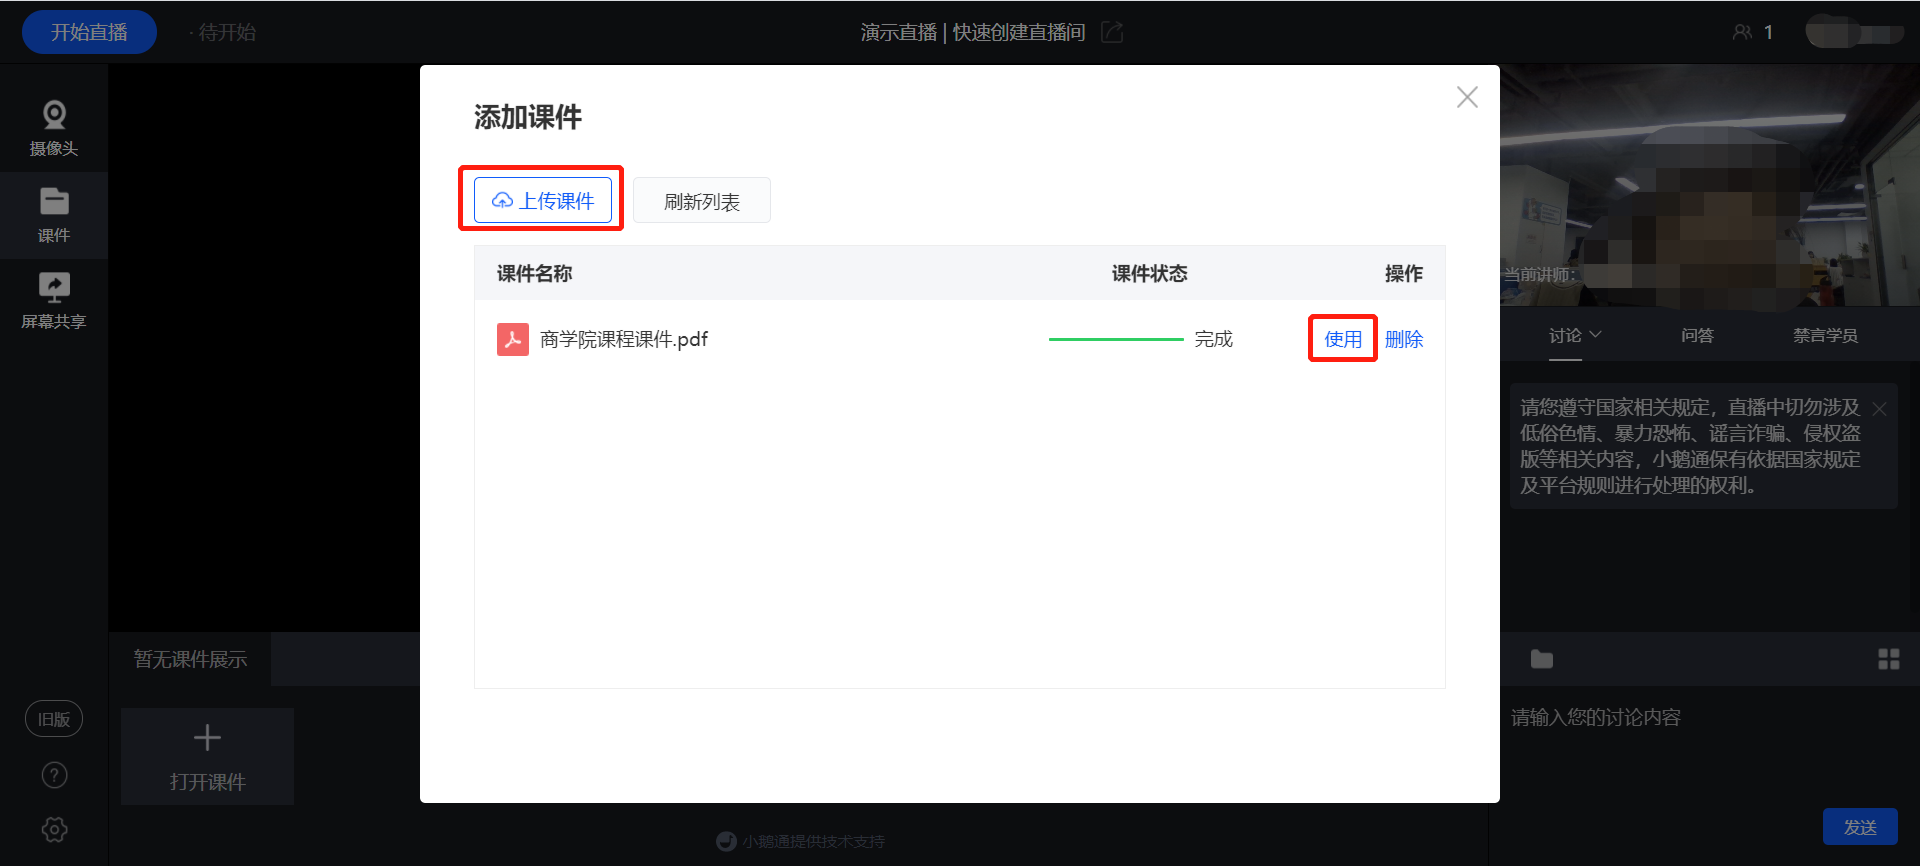
(Web - based Live - Stream Instructor End)
**Step 4: Start the Live Stream***(Web - based Platform)*
1. After completing the live - stream debugging, click 'Start Live Streaming' in the upper - left corner to start the live stream.
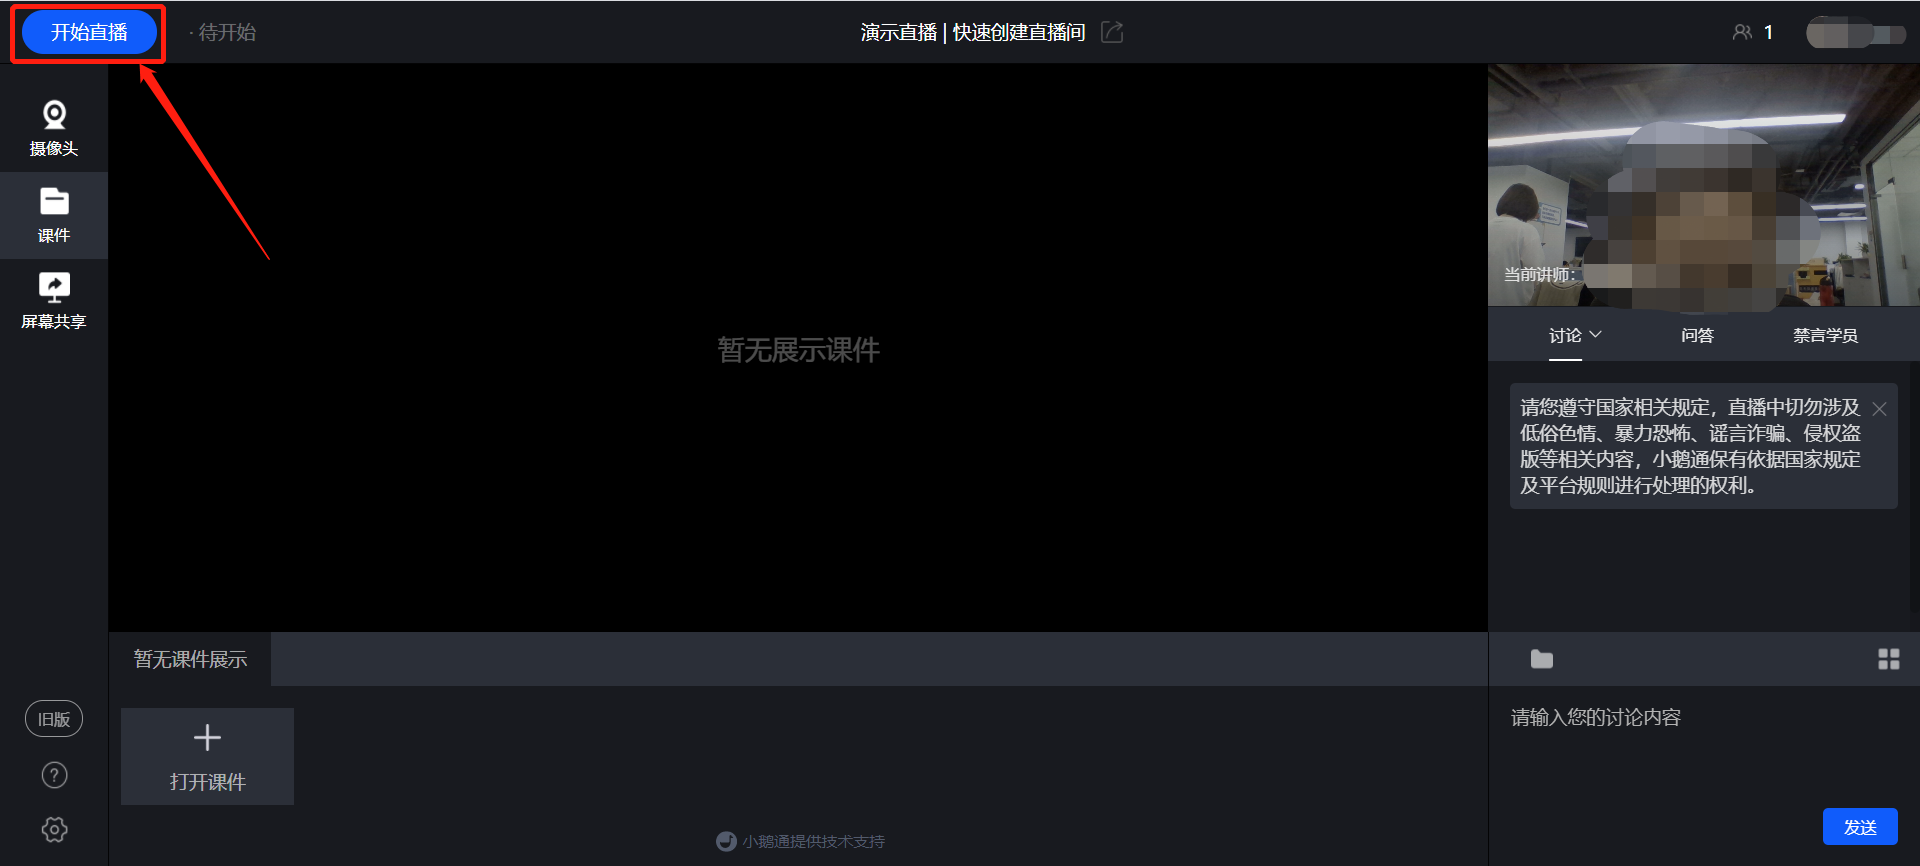
(Web - based Live - Stream Instructor End)
2. Click 'Camera', 'Courseware' & 'Screen Sharing' on the left side to switch the live - stream mode at any time.
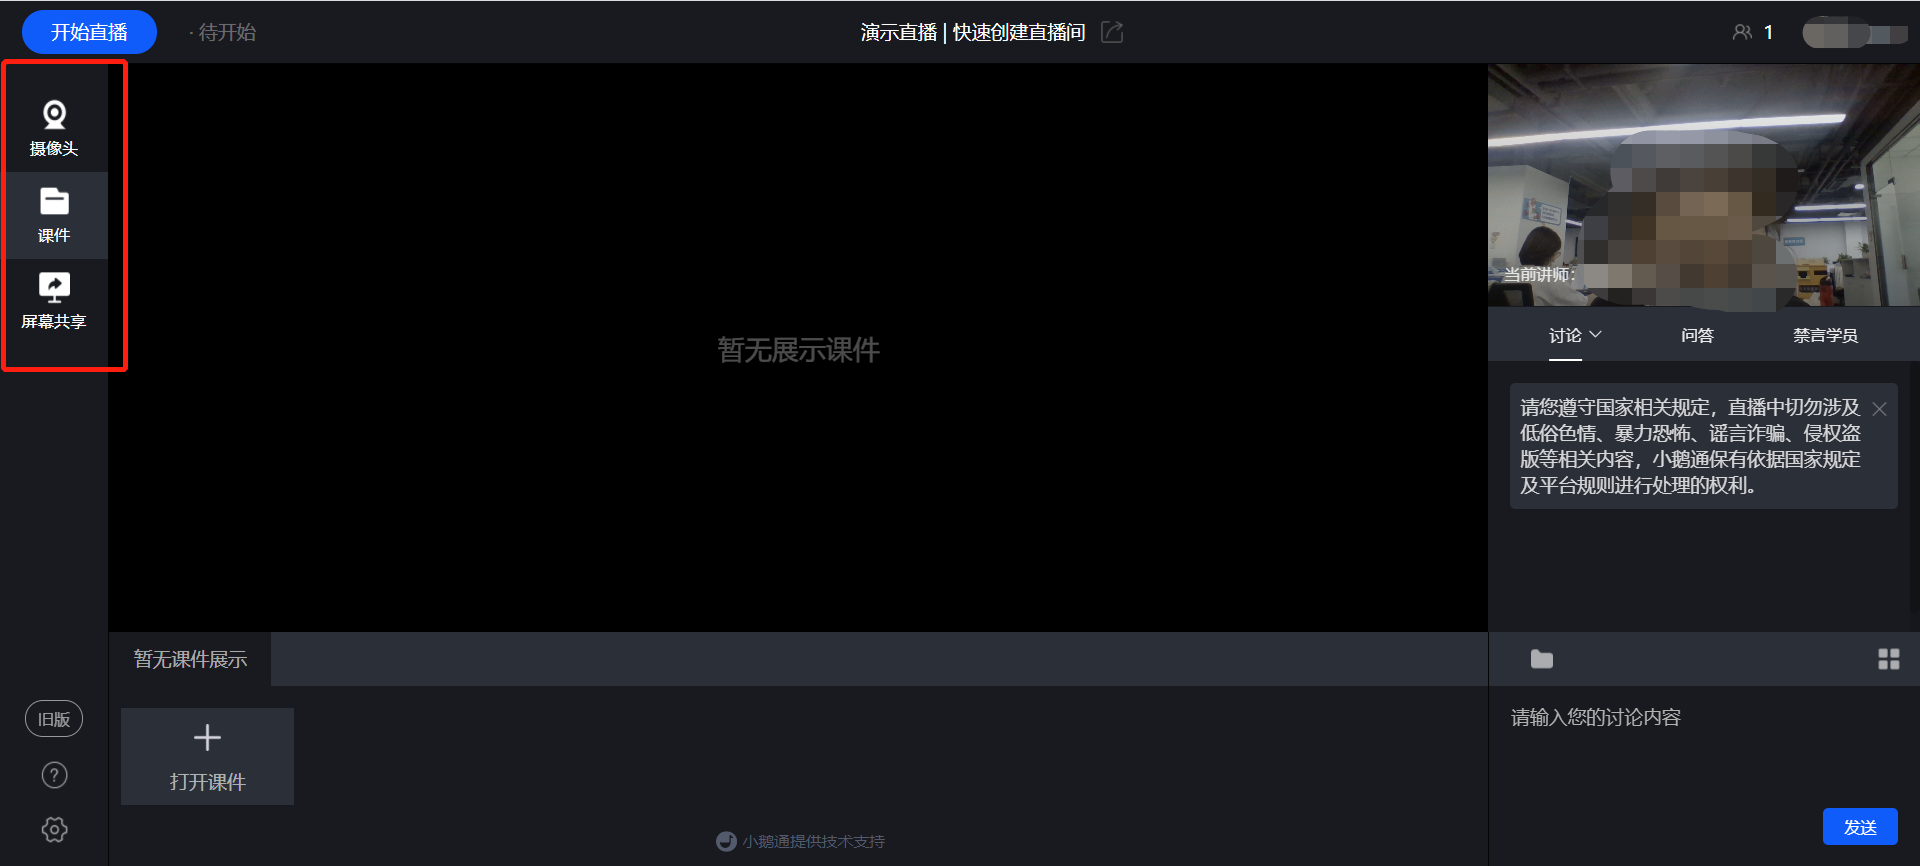
(Web - based Live - Stream Instructor End)
When the live - stream mode is 'Screen Sharing', click 'Switch Window' on the right side to switch the screen window.
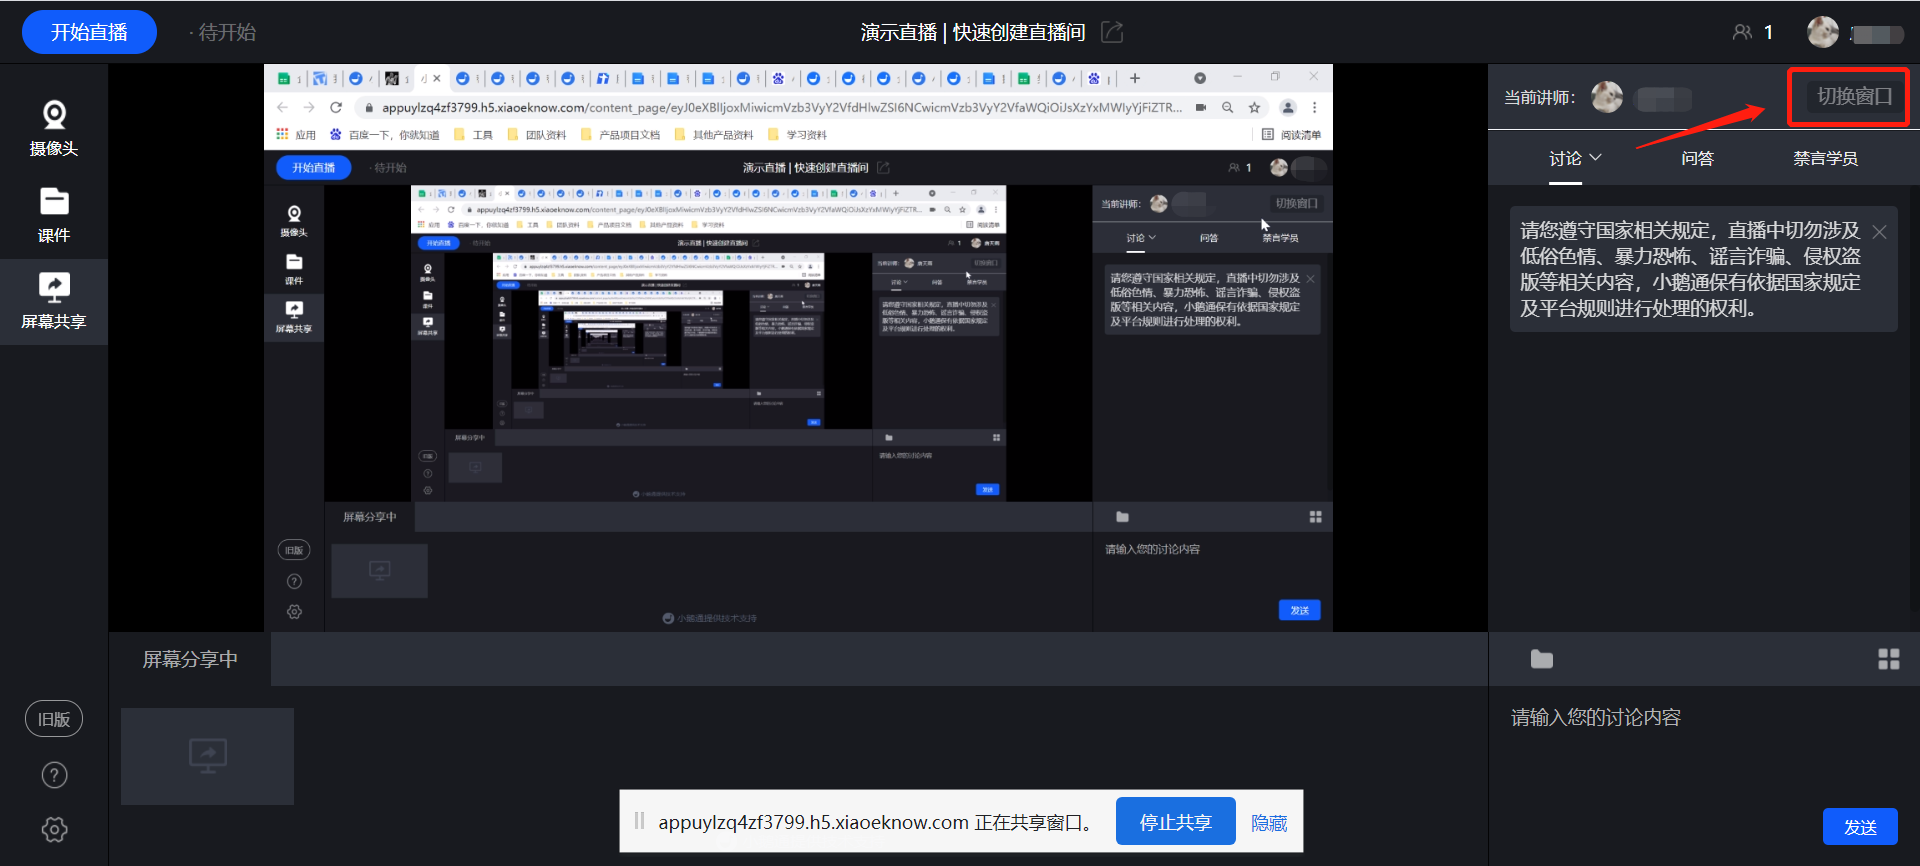
(Web - based Live - Stream Instructor End)
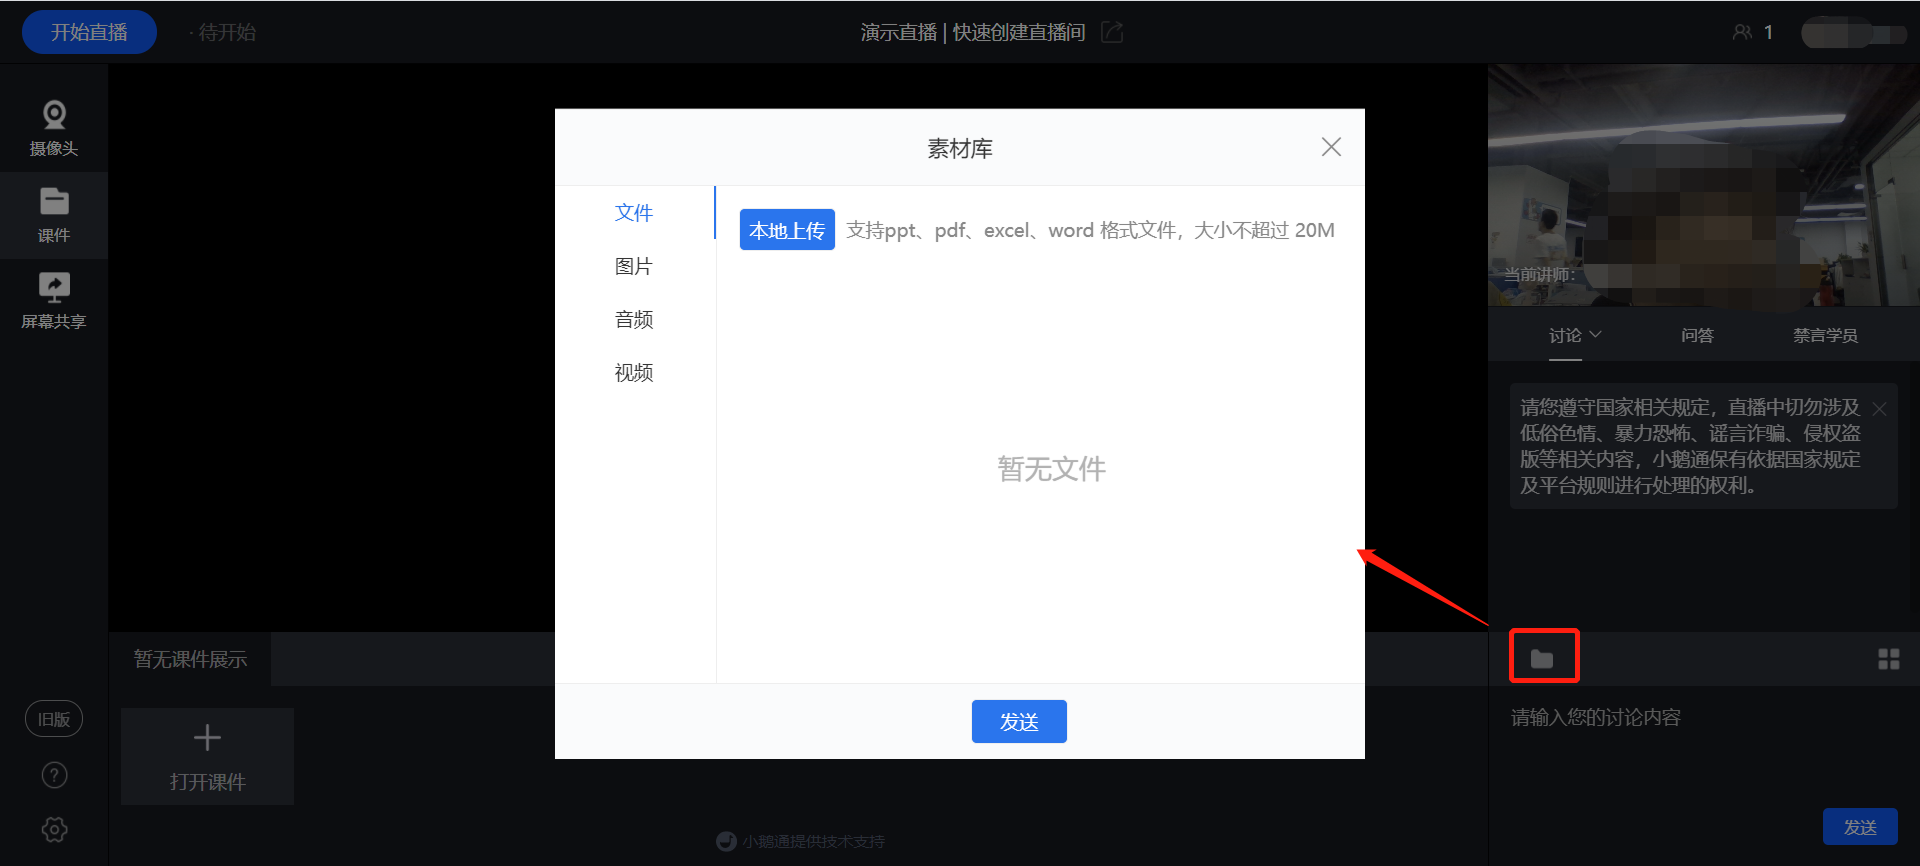
3. Click the folder icon in the lower - right corner to send the lecture content in the interaction area.
(Web - based Live - Stream Instructor End)
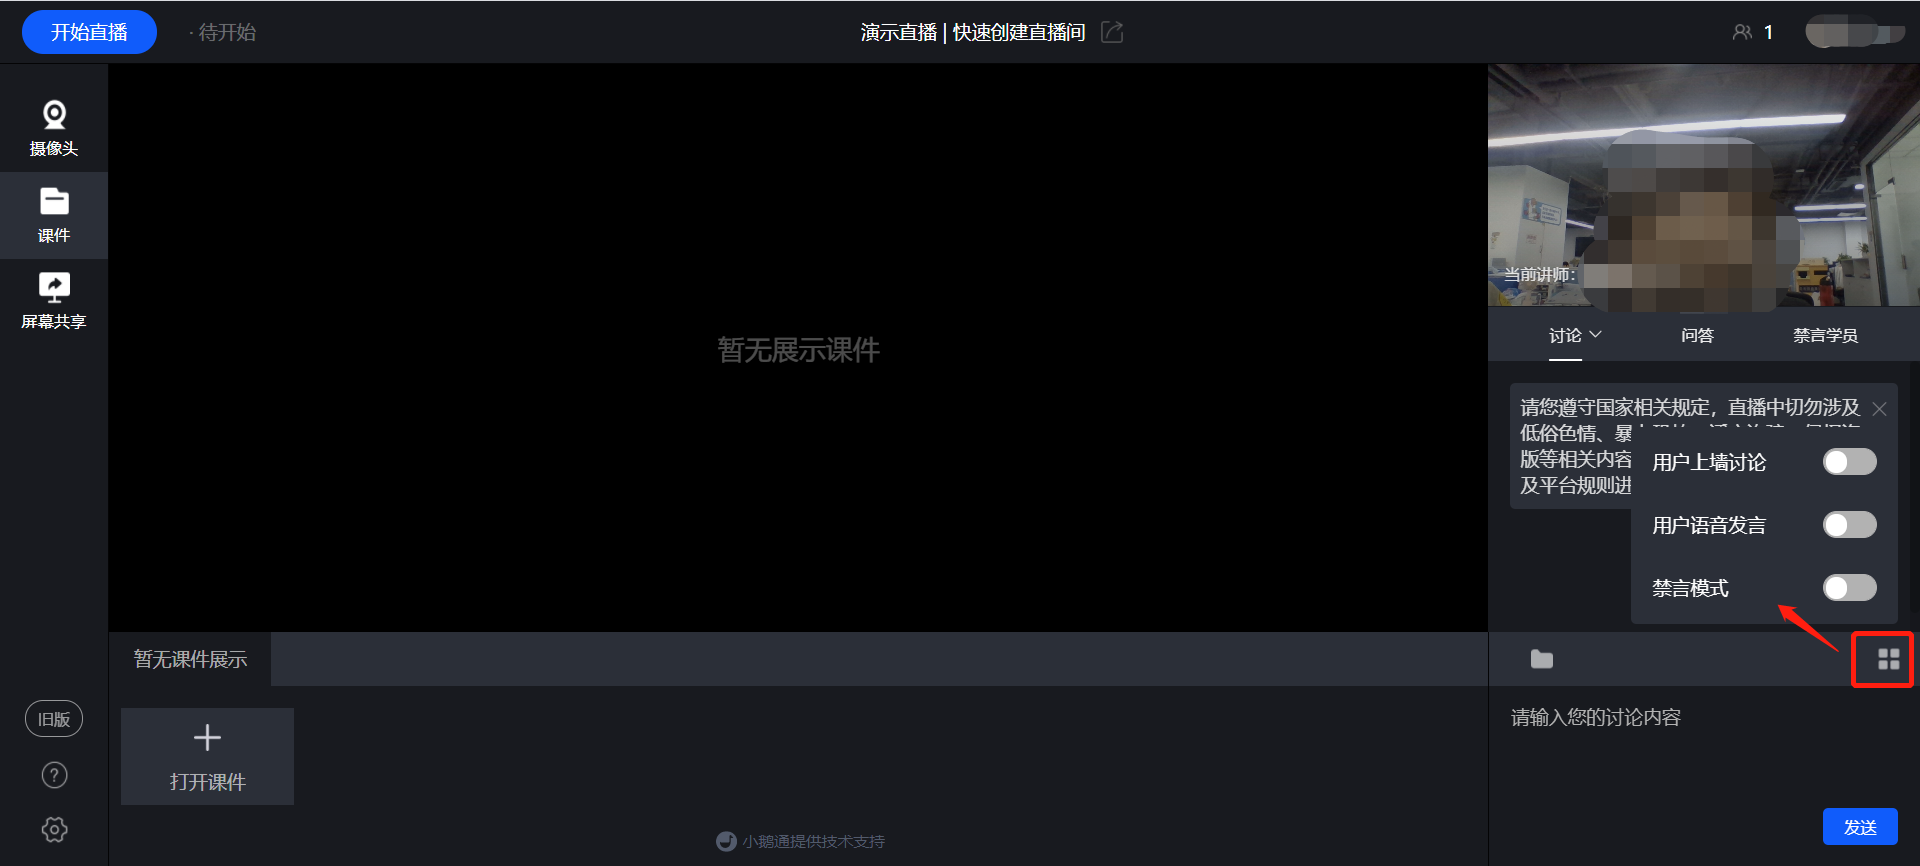
Click the operation icon in the lower - right corner to set user speaking permissions.
(Web - based Live - Stream Instructor End)
# Video Live Streaming - Tutorial on Using OBS Client
[中文](/books/8e6b4/page/obs)
**I. Function Introduction**
The OBS client is a tool for pushing live video sources to the server, mainly suitable for real-time live streaming scenarios where the desktop is shared with trainees.
**II. Purpose of Use**
You can use the OBS client to connect a camera device for live streaming. Meanwhile, you can add any live streaming materials in the live streaming room to create rich live courses.
**III. Use Scenarios**
A training instructor needs to conduct a large-scale outdoor lecture live stream and requires professional camera equipment. The OBS client can be used to complete the live stream.
**IV. Operation Path**
Instructor side: Create a live stream → Download and install the client → Configure live streaming content → Start live streaming

**V. Usage Tutorial**
****
**Step 1: Create a live stream***(Management background)*
[\*Click to view the tutorial on creating and using video live streams](https://admin.xiaoe-tech.com/helpCenter/problem?first_id=600&second_id=444&document_id=doc_5eb7cbc83966f_D558T)
**Step 2: Download and install the OBS client***(Management background) (Skip this step if already downloaded)*
1. After creating a live stream, click the \[Go live\] button on the “Live stream list page”;

(Live stream management - Live stream list)
2. Select \[OBS\] and download and install the OBS client according to different computer versions (Mac, Windows);

(Live stream start method selection page)
**Step 3: Copy the streaming URL and stream name***(Management background or H5 live streaming room)*
Method 1: Select \[Go live - OBS\] and copy the streaming URL and stream name of the live stream;

(OBS configuration information page)
Method 2:On the live stream list page, click \[Share\] and scan the QR code to copy the streaming URL and stream name with one click on the mobile device;

After scanning the code, the mobile device shows:

**Step 4: Complete the URL and stream name configuration in OBS***(OBS client)*
1. After downloading the OBS client, open the main interface and click \[Settings\] in the OBS software

2. Enter the address code for streaming (i.e., the streaming URL and stream name)
Select “Stream” in the left function bar, choose “Custom streaming server” at the stream type. Paste the URL and stream name copied from the elink management background into the corresponding positions of URL and stream name in the OBS software, or copy them to the corresponding server and streaming key fields (The following are the configuration information for win7 and win10 respectively, with slightly different names);

(OBS client - win7 configuration)

(OBS client - win10 configuration)
**Step 5: Select scenarios and sources***(OBS client)*
1. Monitor capture: Capture the entire computer operation interface
After clicking “+” at the scenario to add a scenario, click “+” at the source and select “Monitor capture” from the pop-up list.
Enter a name in the pop-up window and click OK;

Click OK on the monitor capture page to complete the addition successfully.

2. Window capture: Capture only the selected window
After clicking “+” at the scenario to add a scenario, click “+” at the source and select “Window capture” from the pop-up list.
Enter a name in the pop-up window and click OK
On the window capture page, select the software to be live-streamed at the window and click OK to complete the addition successfully.
**Step 6: Start live streaming***(OBS client)*
Click “Start streaming” in the function list at the bottom right to start live streaming. To end the live stream, click “Stop streaming” in the OBS software and then click “End live stream” in the live streaming room.

# Tutorial on Using Voice Live Streaming
[中文](/books/8e6b4/page/33e75)
**I. Function Introduction**
Audio live streaming is a lightweight live streaming format suitable for content that doesn't require a camera. Instructors can send voice, text, images, courseware, and videos in real - time in the live - streaming room to teach, explain, and interact with students.
**II. Purpose of Use**
With audio live streaming, there's no need to turn on the camera. Instructors can send content such as voice, text, and images in the live - streaming room to achieve real - time explanation and interaction with students.
**III. Use Scenarios**
If an instructor doesn't need to turn on the camera and needs to conduct a live stream with a large amount of voice, text, and images, they can use audio live streaming to complete the live - streaming content.
**IV. Operation Path**
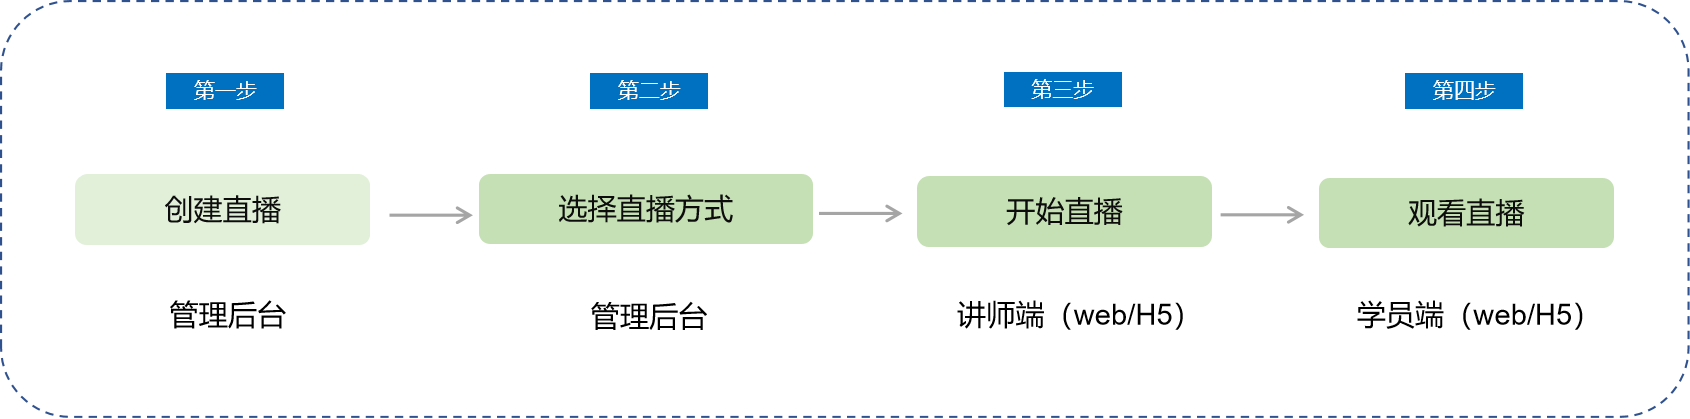
Instructor side: Management background → Create audio live stream → Select the live - streaming terminal → Start live streaming
Student side: Enter the live - streaming room → Watch the live stream
**V. Usage Tutorial**
**Step 1: Create a live stream***(Management background)*
1. Enter the management background - Live - streaming management and create an audio live stream.
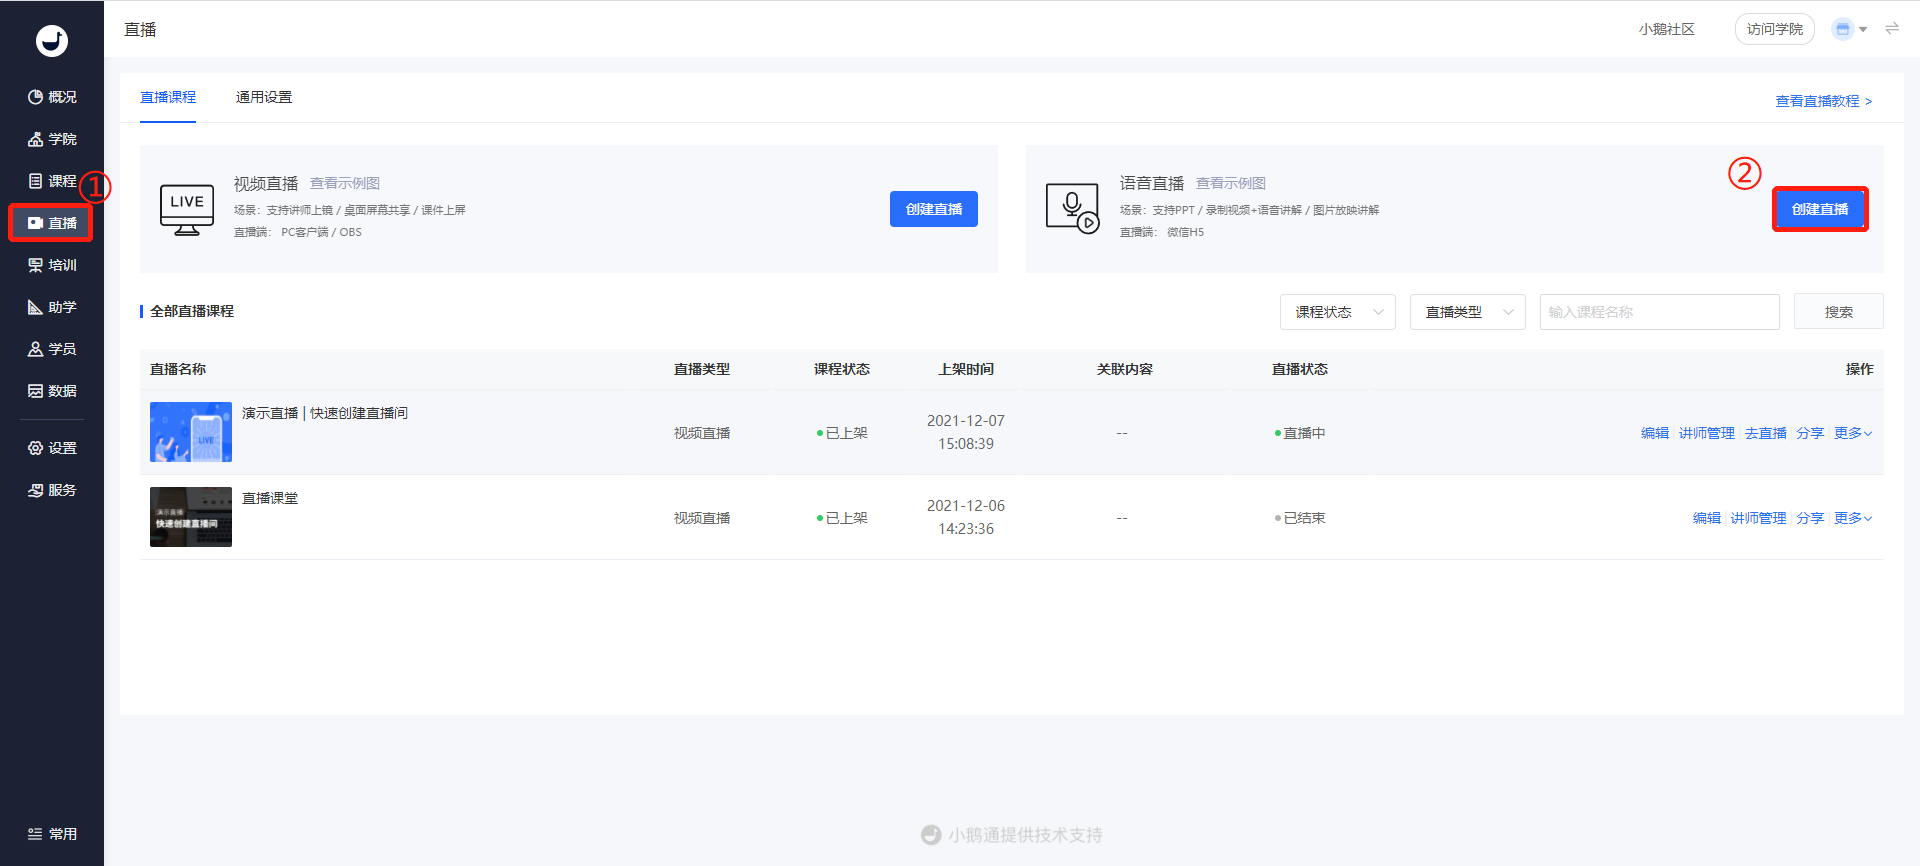
(Management background - Live streaming)
2. Fill in the live - streaming information and click the save button to complete the live - stream creation.
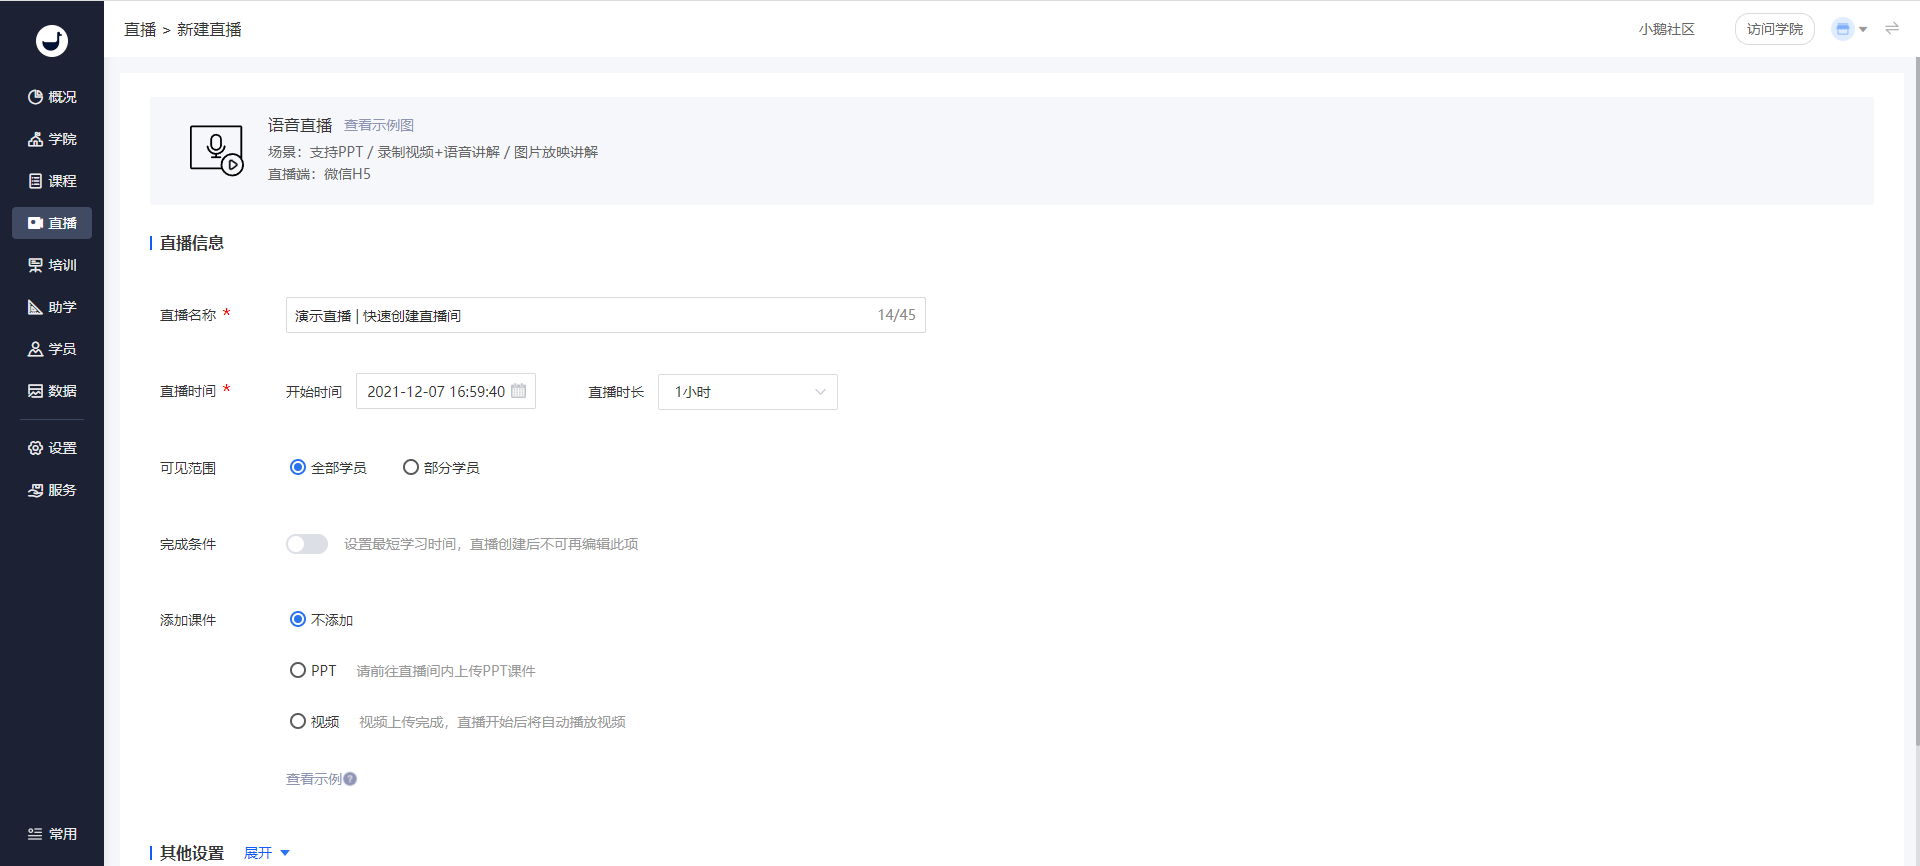
(Live - stream creation page)
3. After creating the live stream, set up the instructor.
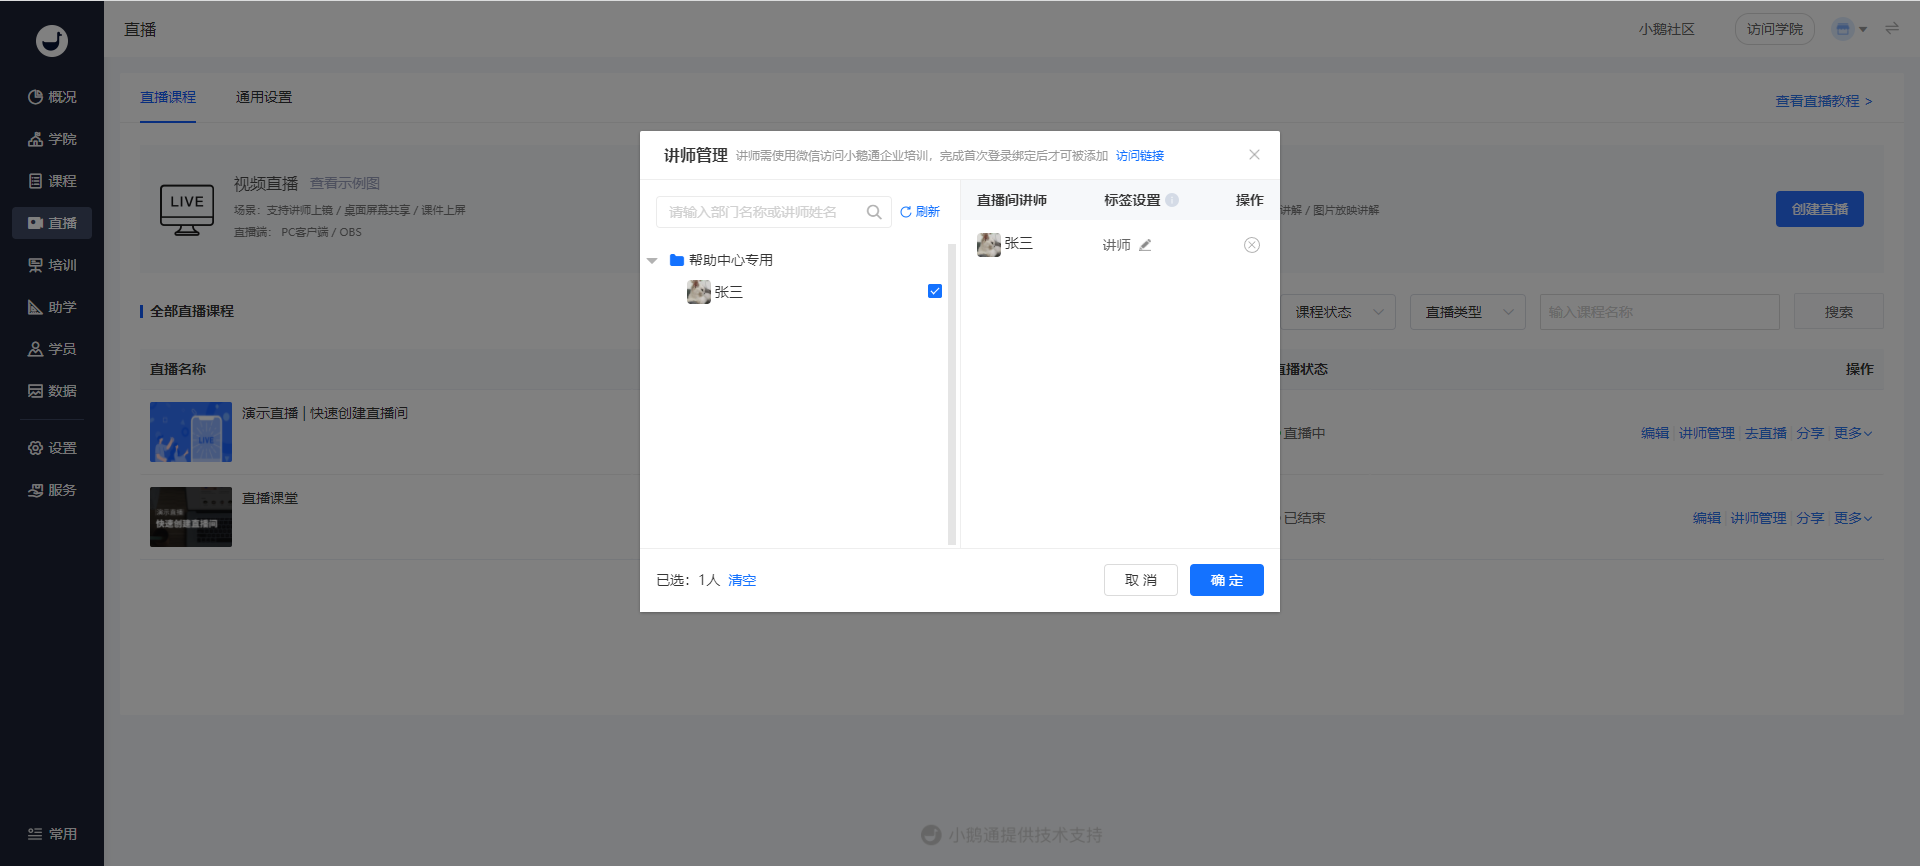
(Instructor management pop - up window)
**Step 2: Select the live - streaming method***(Management background)*
1. After completing the live - stream creation, click the 'Go live' button on the live - stream list page.
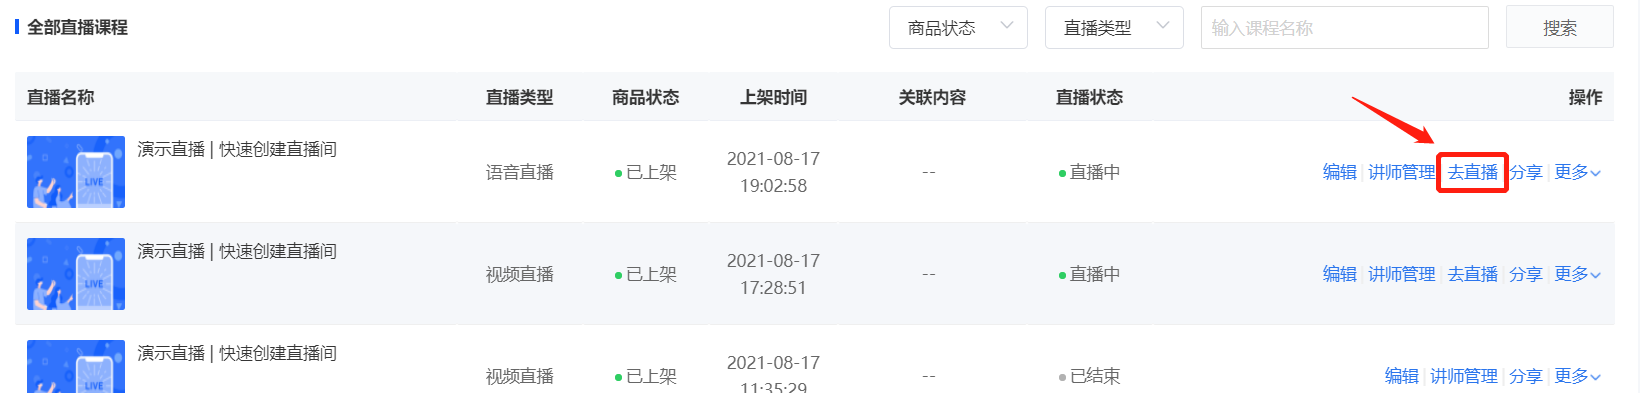
(Live - streaming management - Live - stream list)
2. Select 'Web version' or 'WeChat H5' to start the live stream.
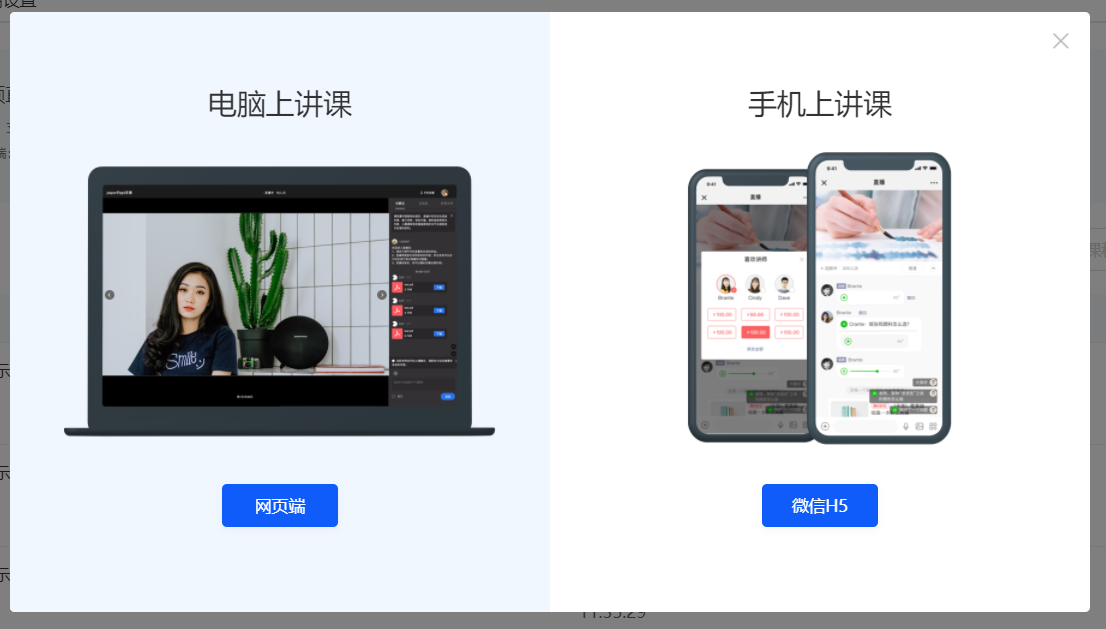
(Live - streaming management - Go live)
**Step 3: Instructor starts the live stream***(Web version or H5)*
● Web - based live streaming
1. Click 'Web version' live streaming to enter the web - based audio live - streaming page.
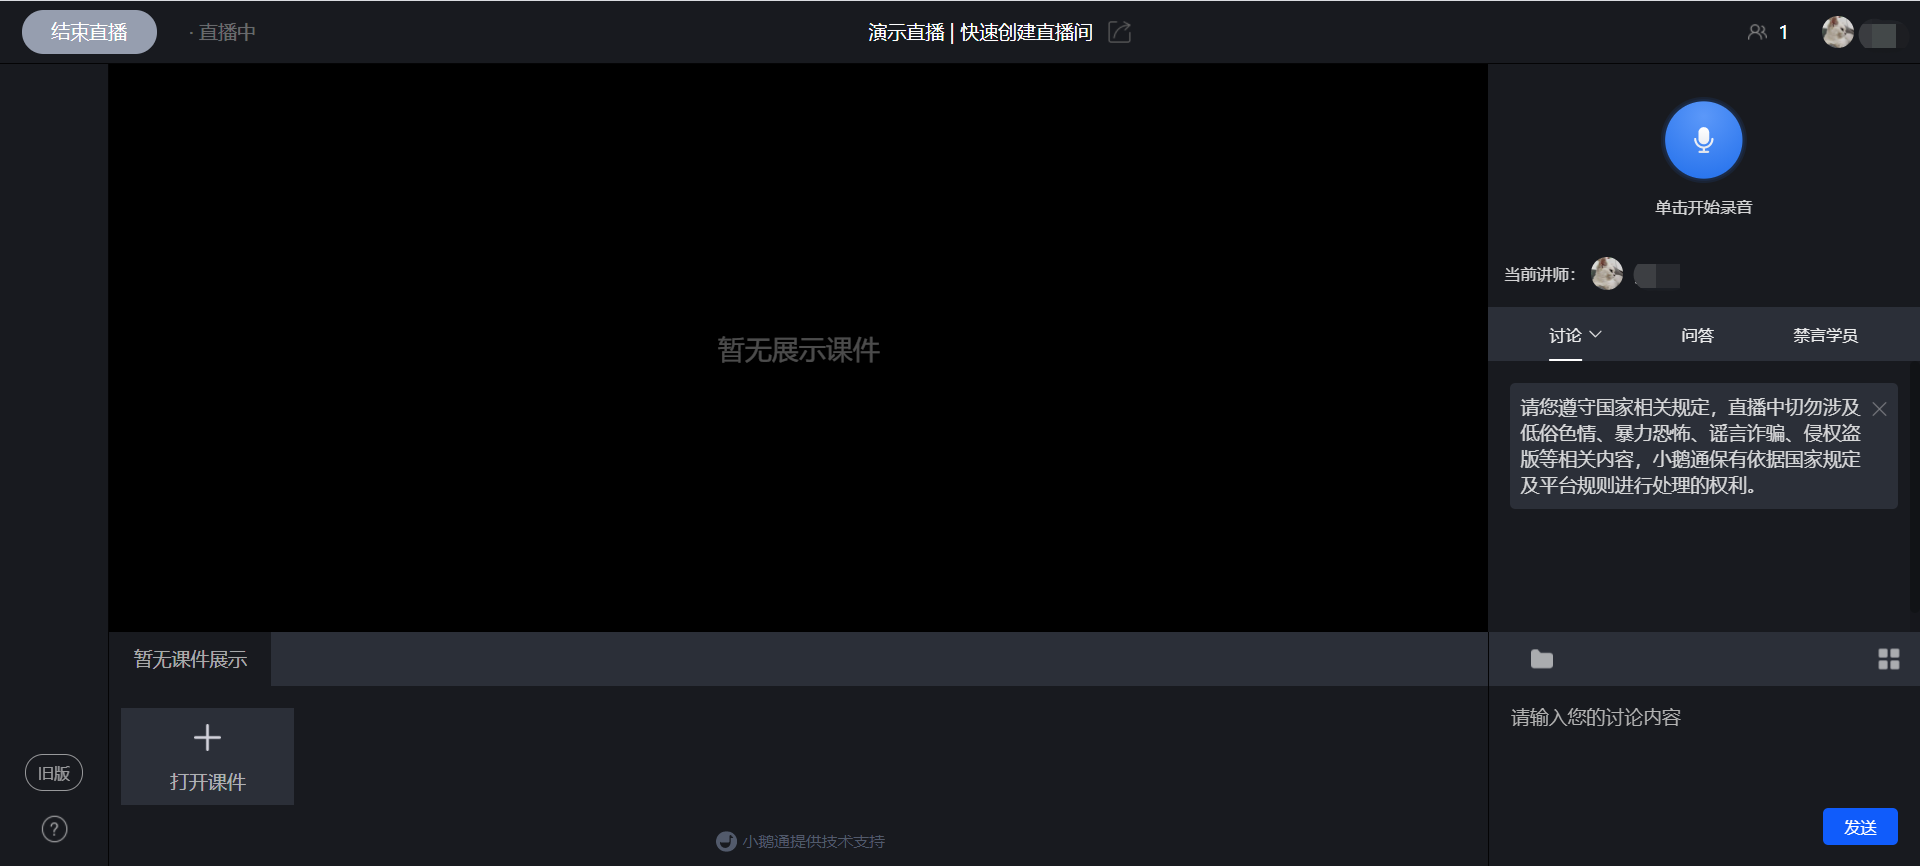
(Audio live streaming - Web version)
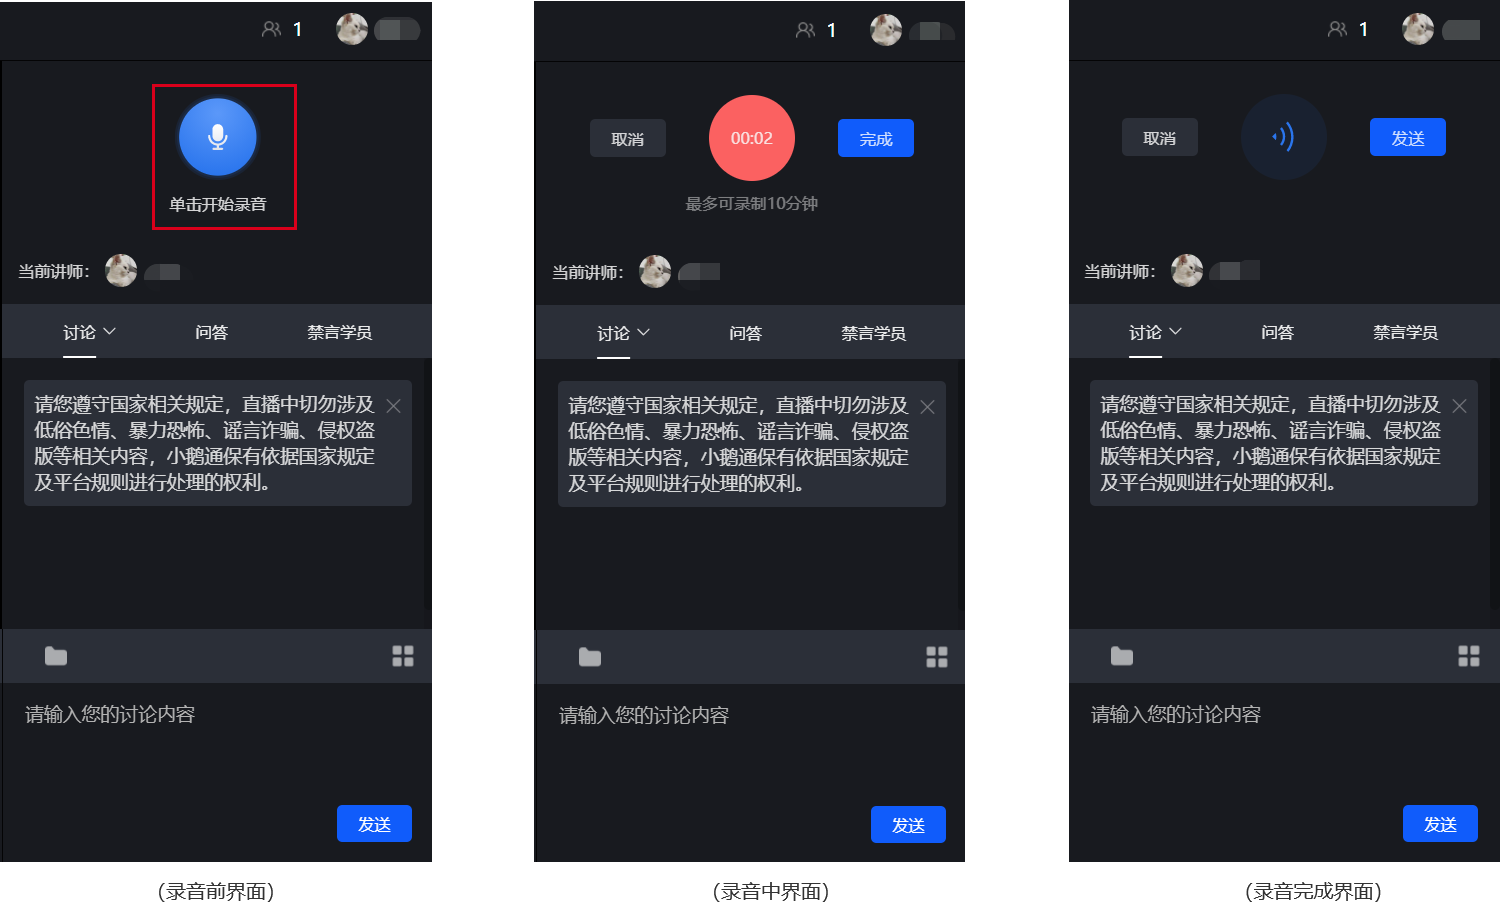
2. Send voice
① Click the microphone icon to start voice recording.
② Click again to end voice recording. Click 'Complete' to finish voice recording, or click 'Cancel' to cancel the recording.
③ After voice recording is completed, click the send button to send the voice, or click 'Cancel' to cancel sending.
3. Courseware display
① Click 'Open courseware' at the bottom of the live - streaming room to upload images. Single or multiple image uploads are supported.
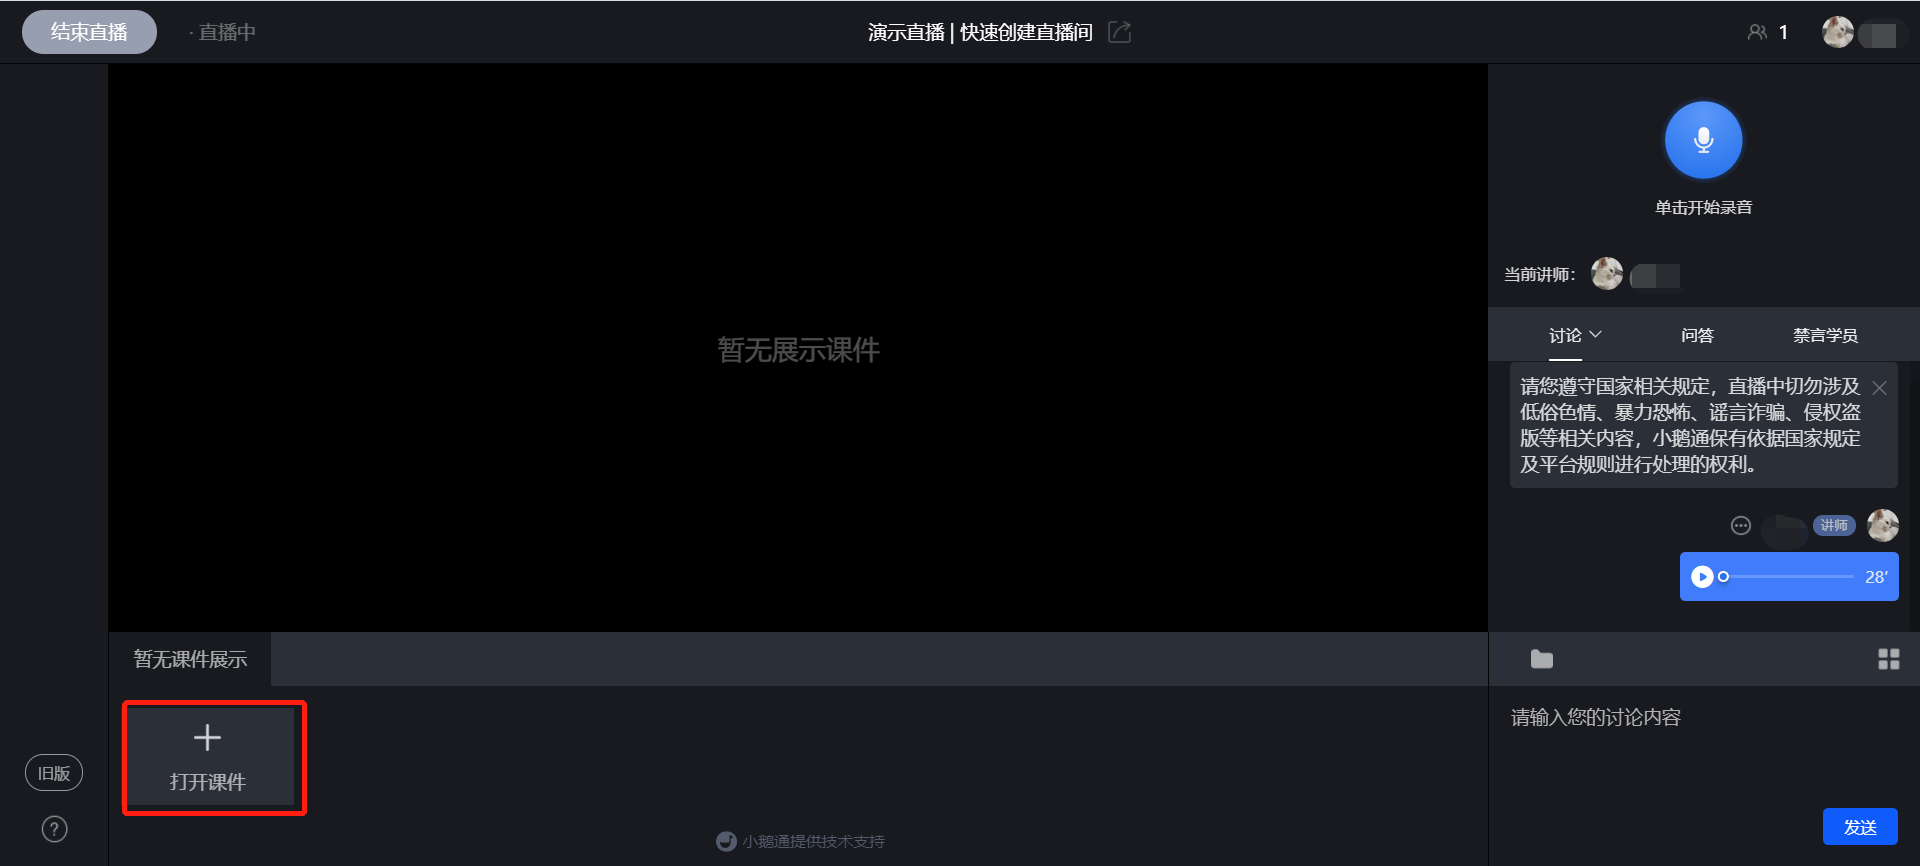
(Web version - Upload courseware)
② After uploading, click the left and right arrows in the courseware display area to turn pages. The student side will synchronize the page - turning.
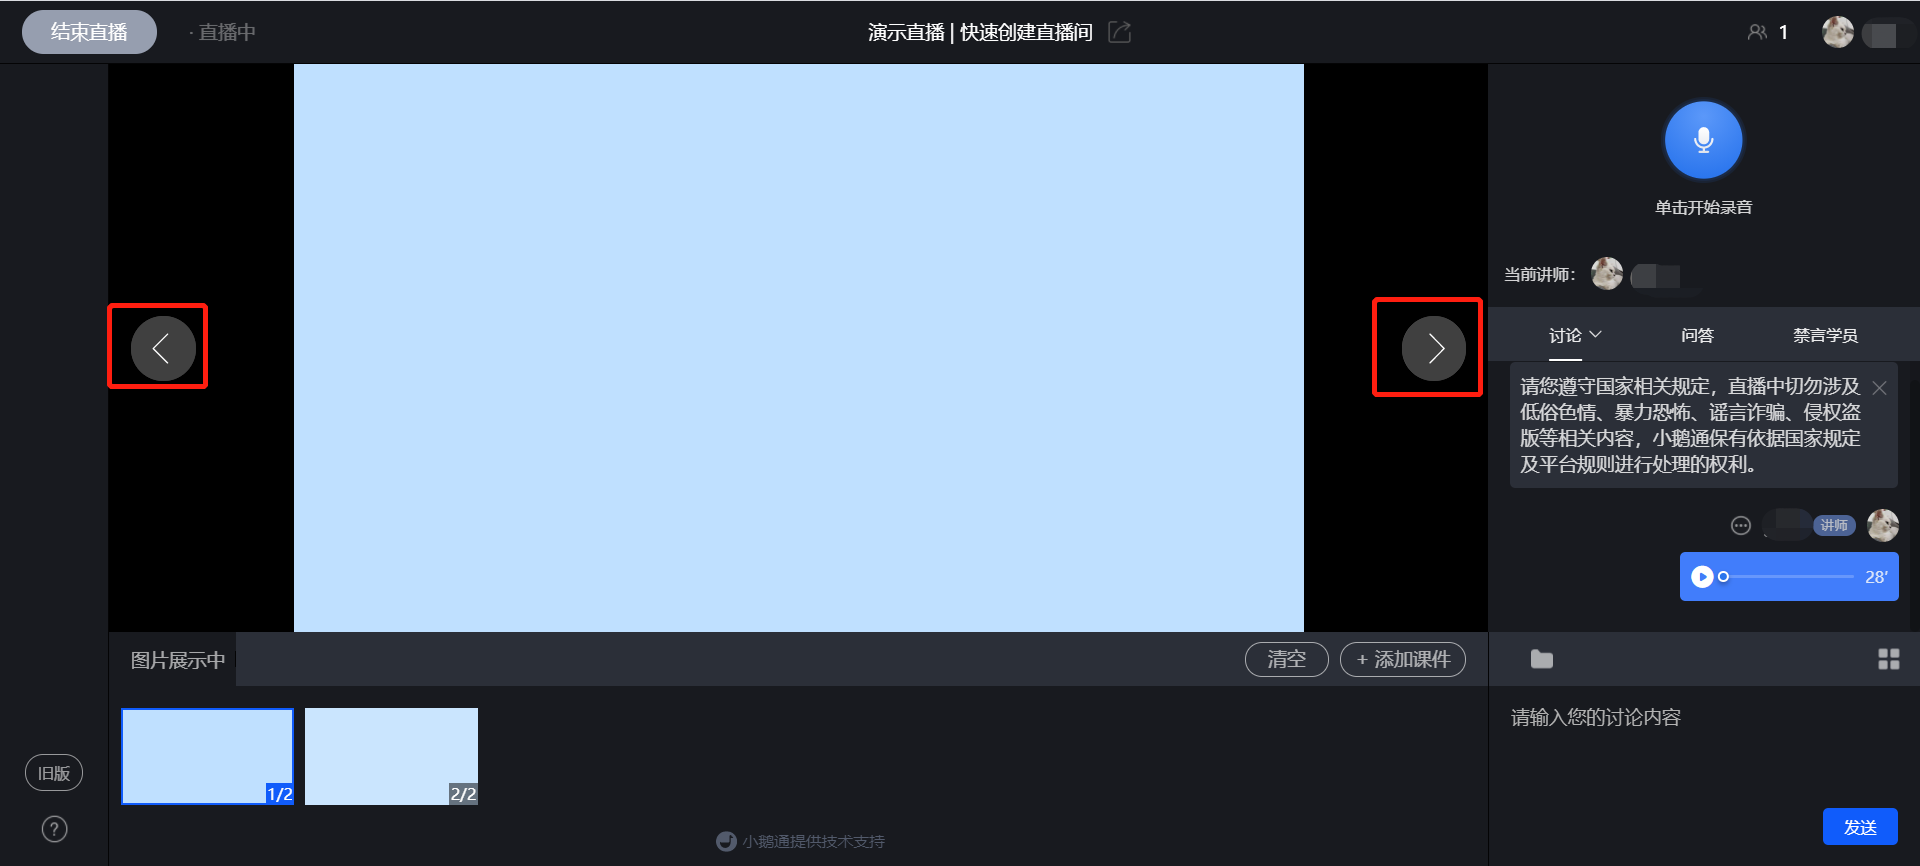
(Web version - Courseware page - turning)
③ Click the 'Folder' button in the lower - right corner to enter the material library, where you can upload and send files in other formats.
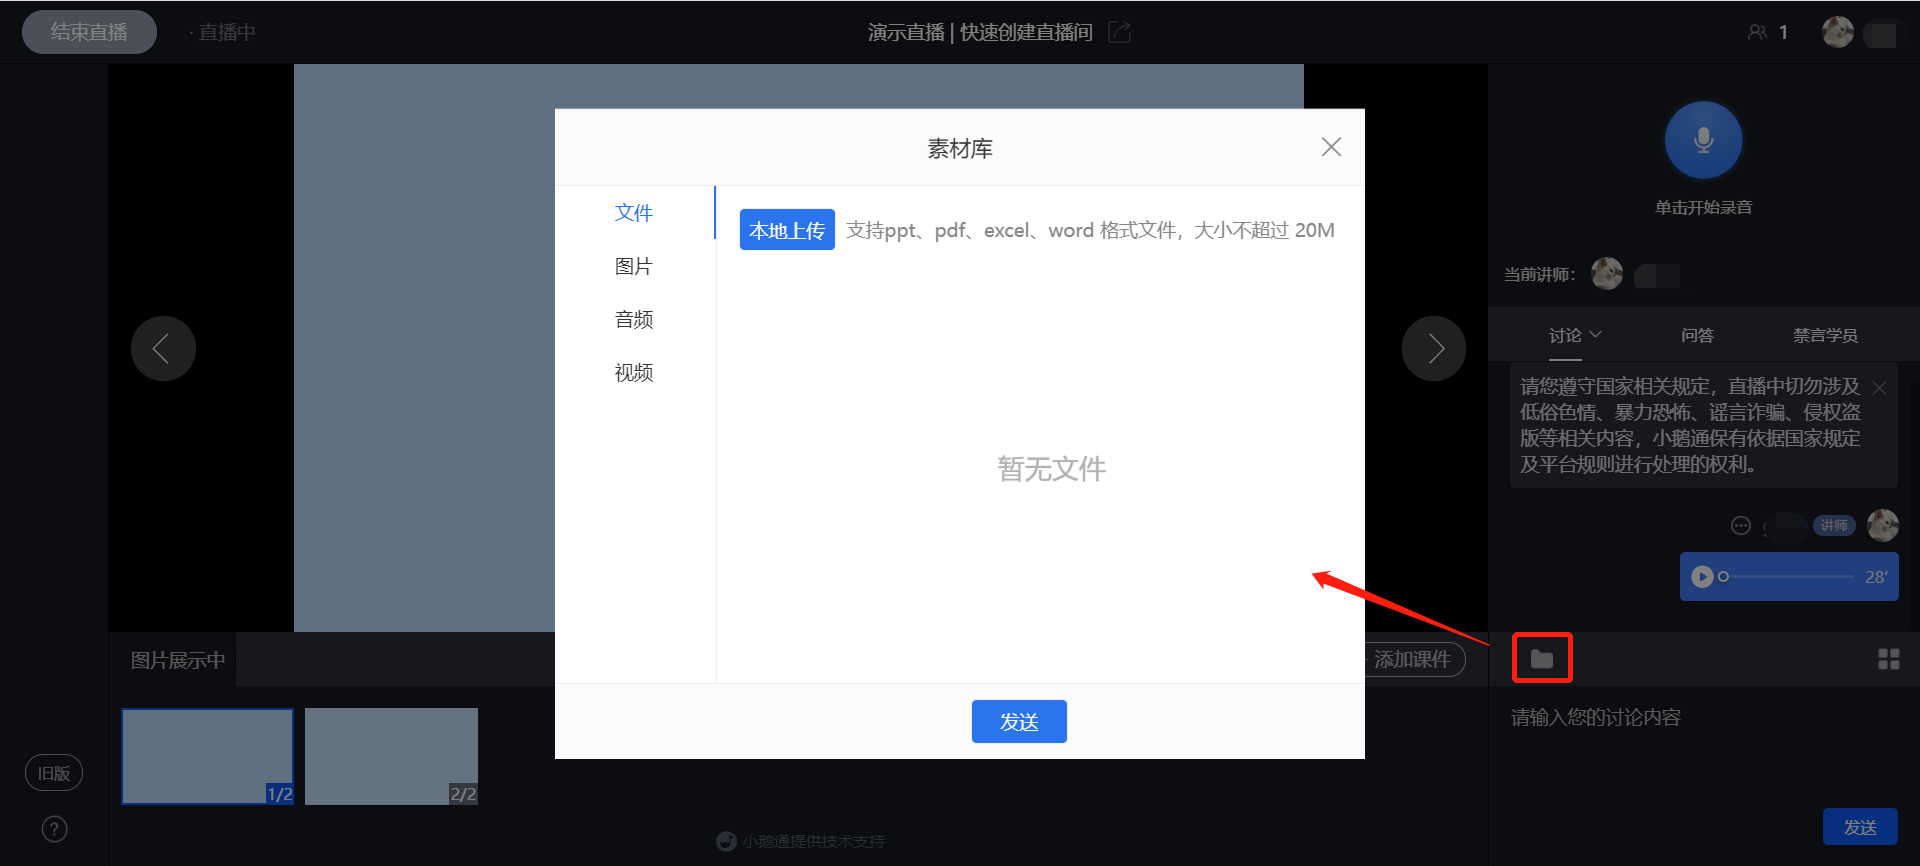
(Web version - Material library)
4. End the live stream
When the instructor needs to end the live stream, click the operation button in the upper - left corner to end the live stream.
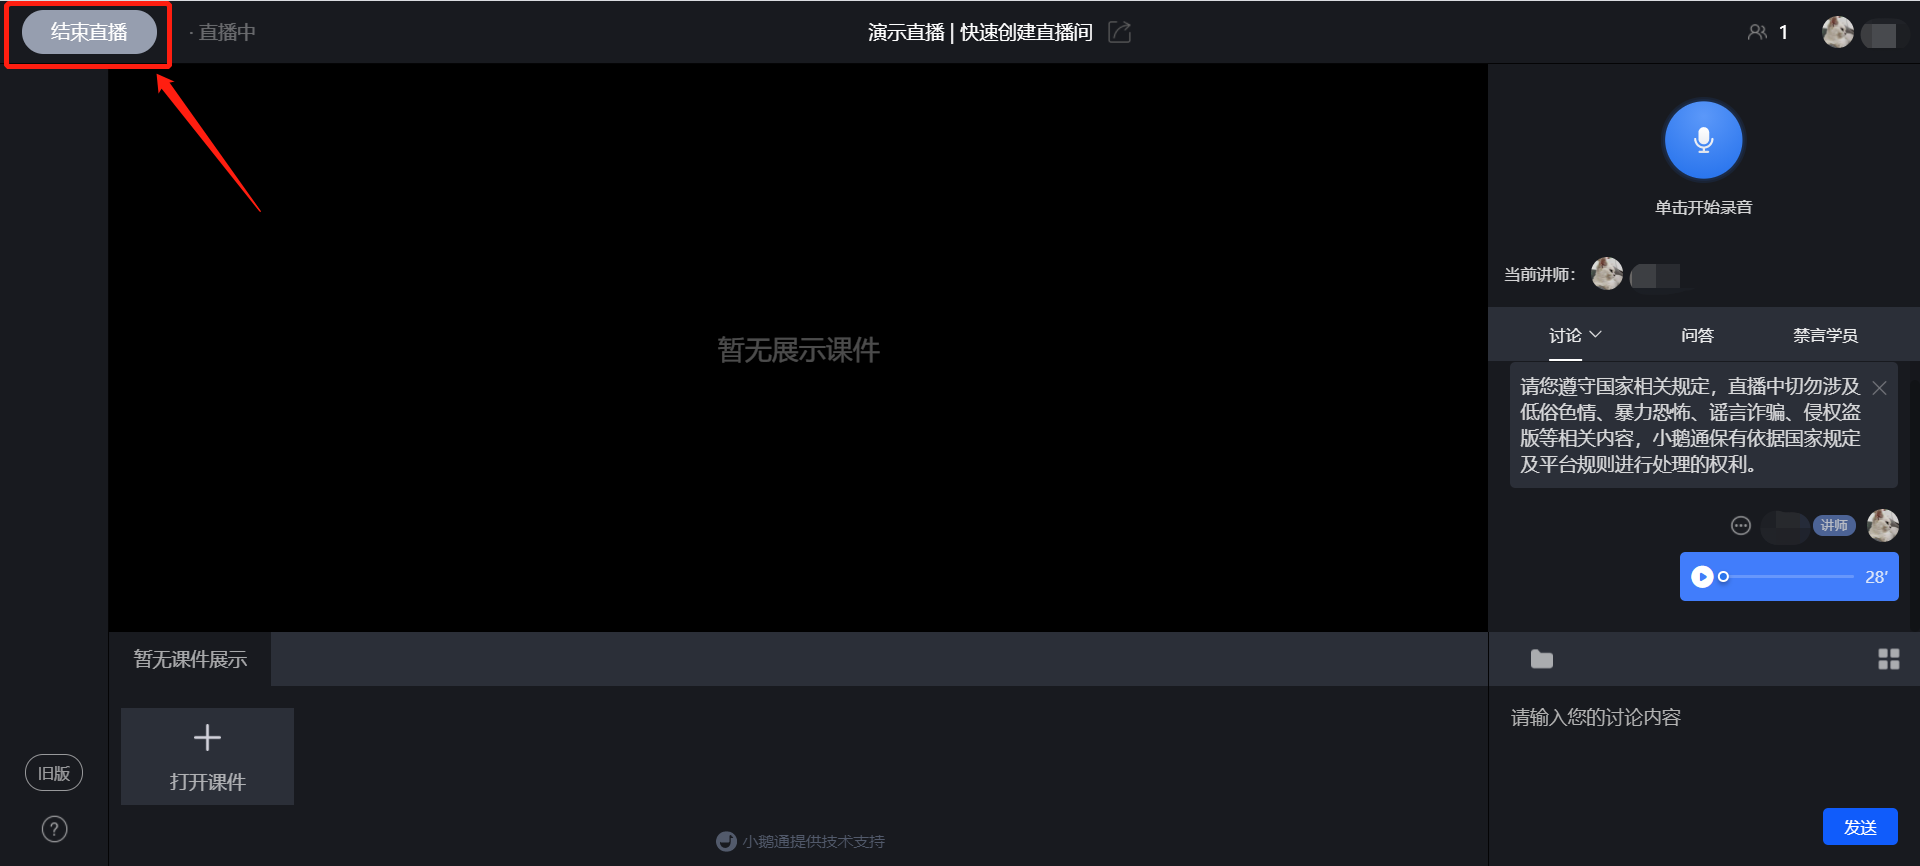
(Web version - End live stream)
● H5 live streaming
1. Click 'WeChat H5' live streaming to enter the H5 audio live - streaming room page.
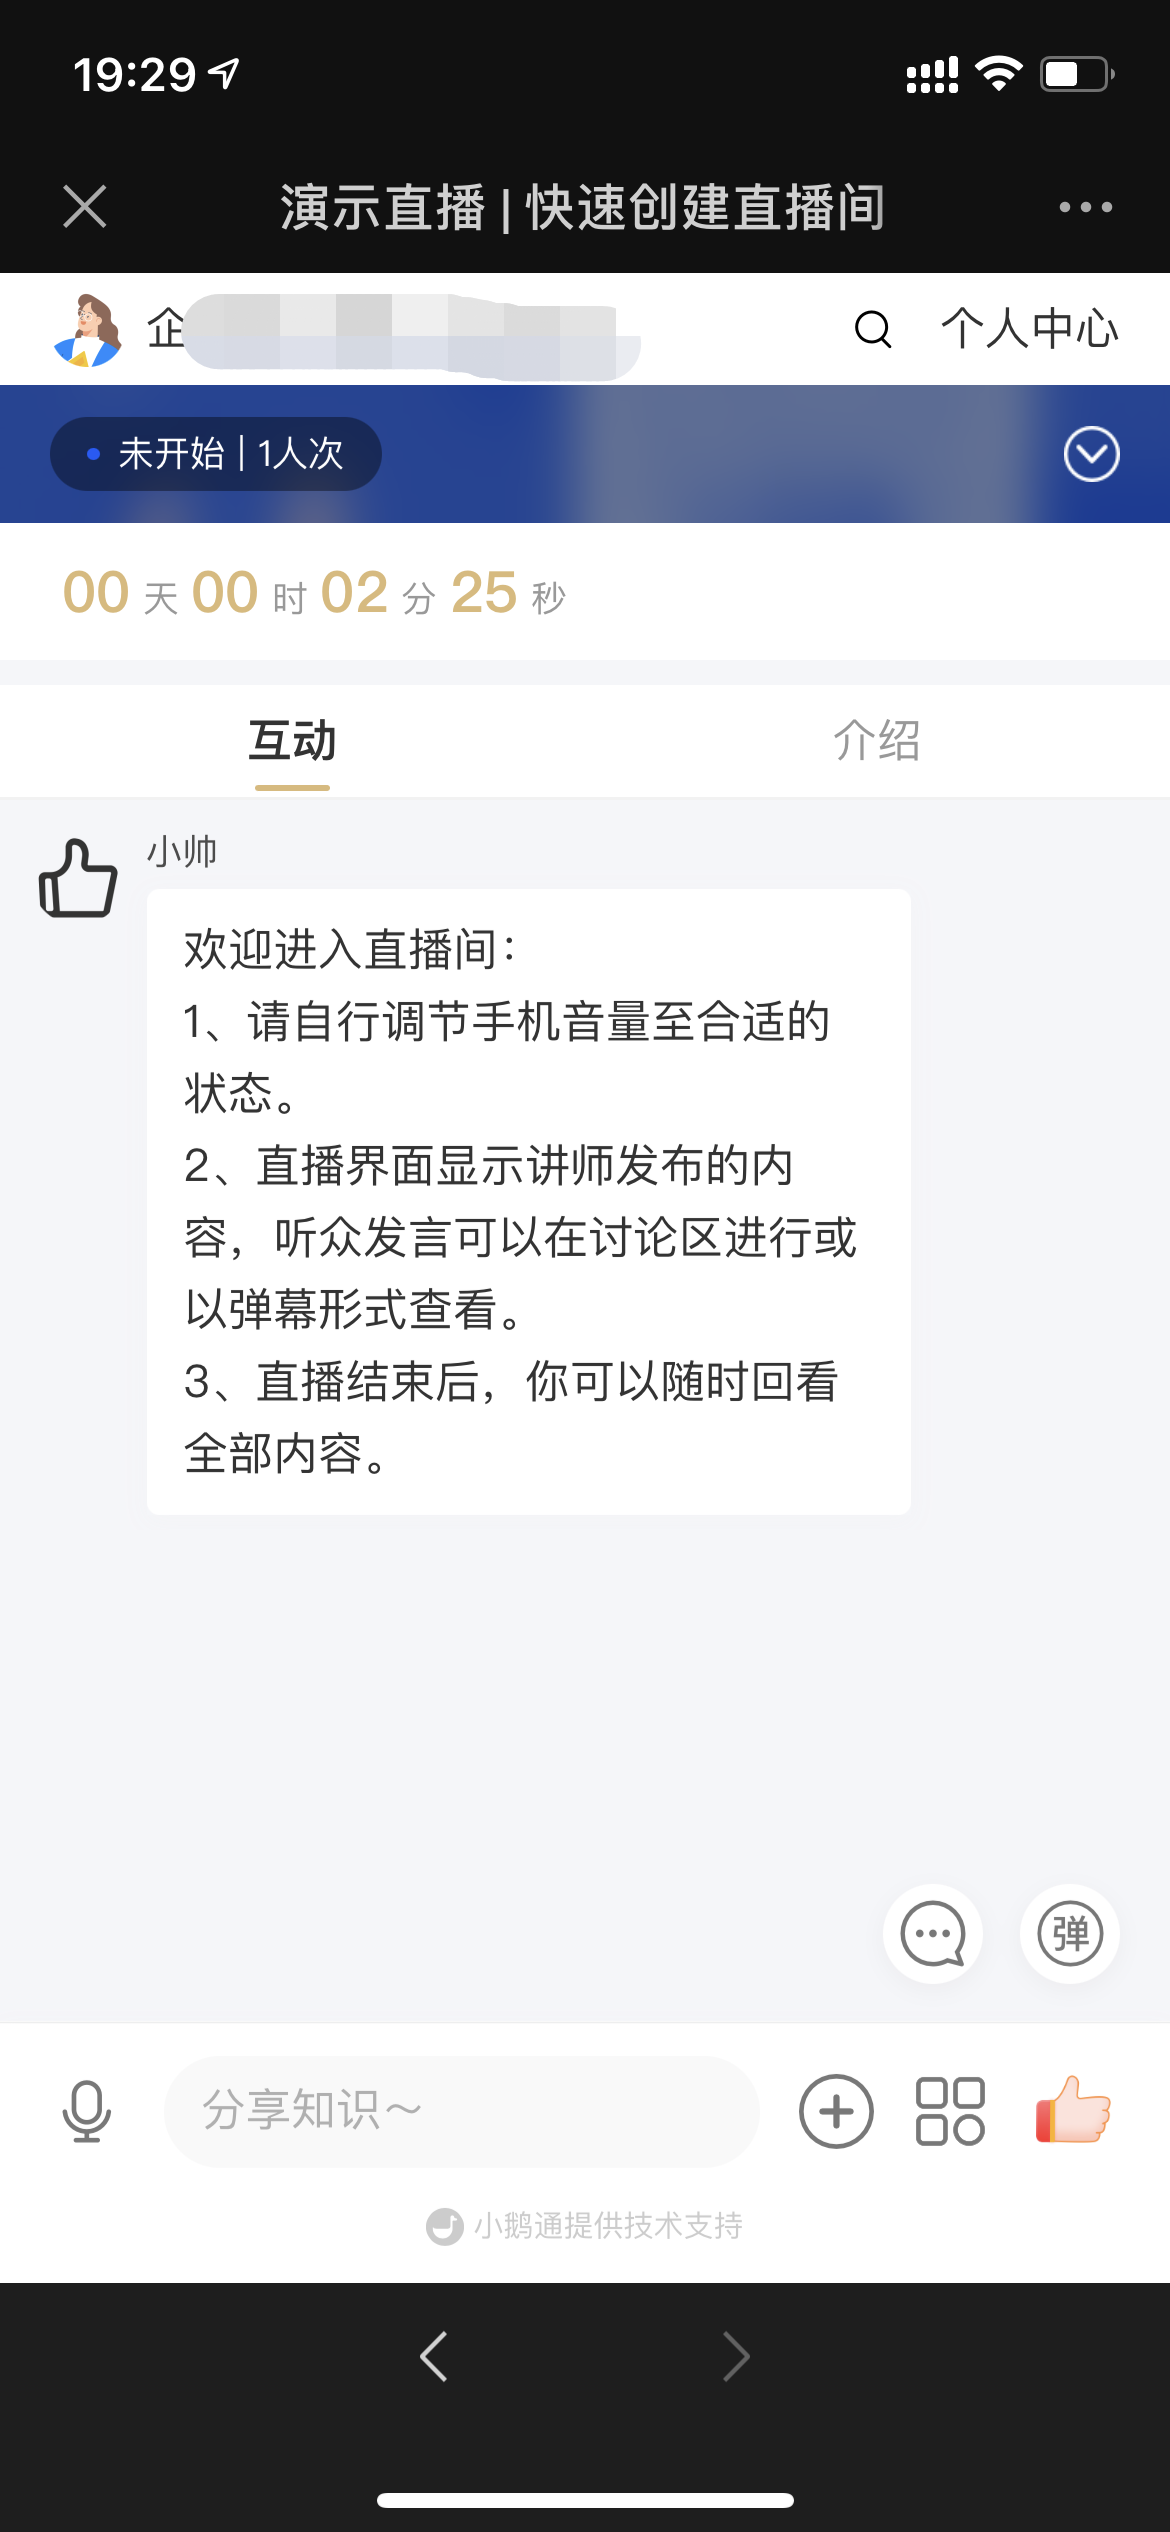
(Audio live streaming - H5 live - streaming room)
2. Send voice
① Click the microphone icon to start voice recording.
② Click again to end voice recording.
③ After voice recording is completed, click the'record again' button to record again, click the 'preview' button to preview the voice, click the'send' button to send the voice, or click the 'close' button to cancel sending.
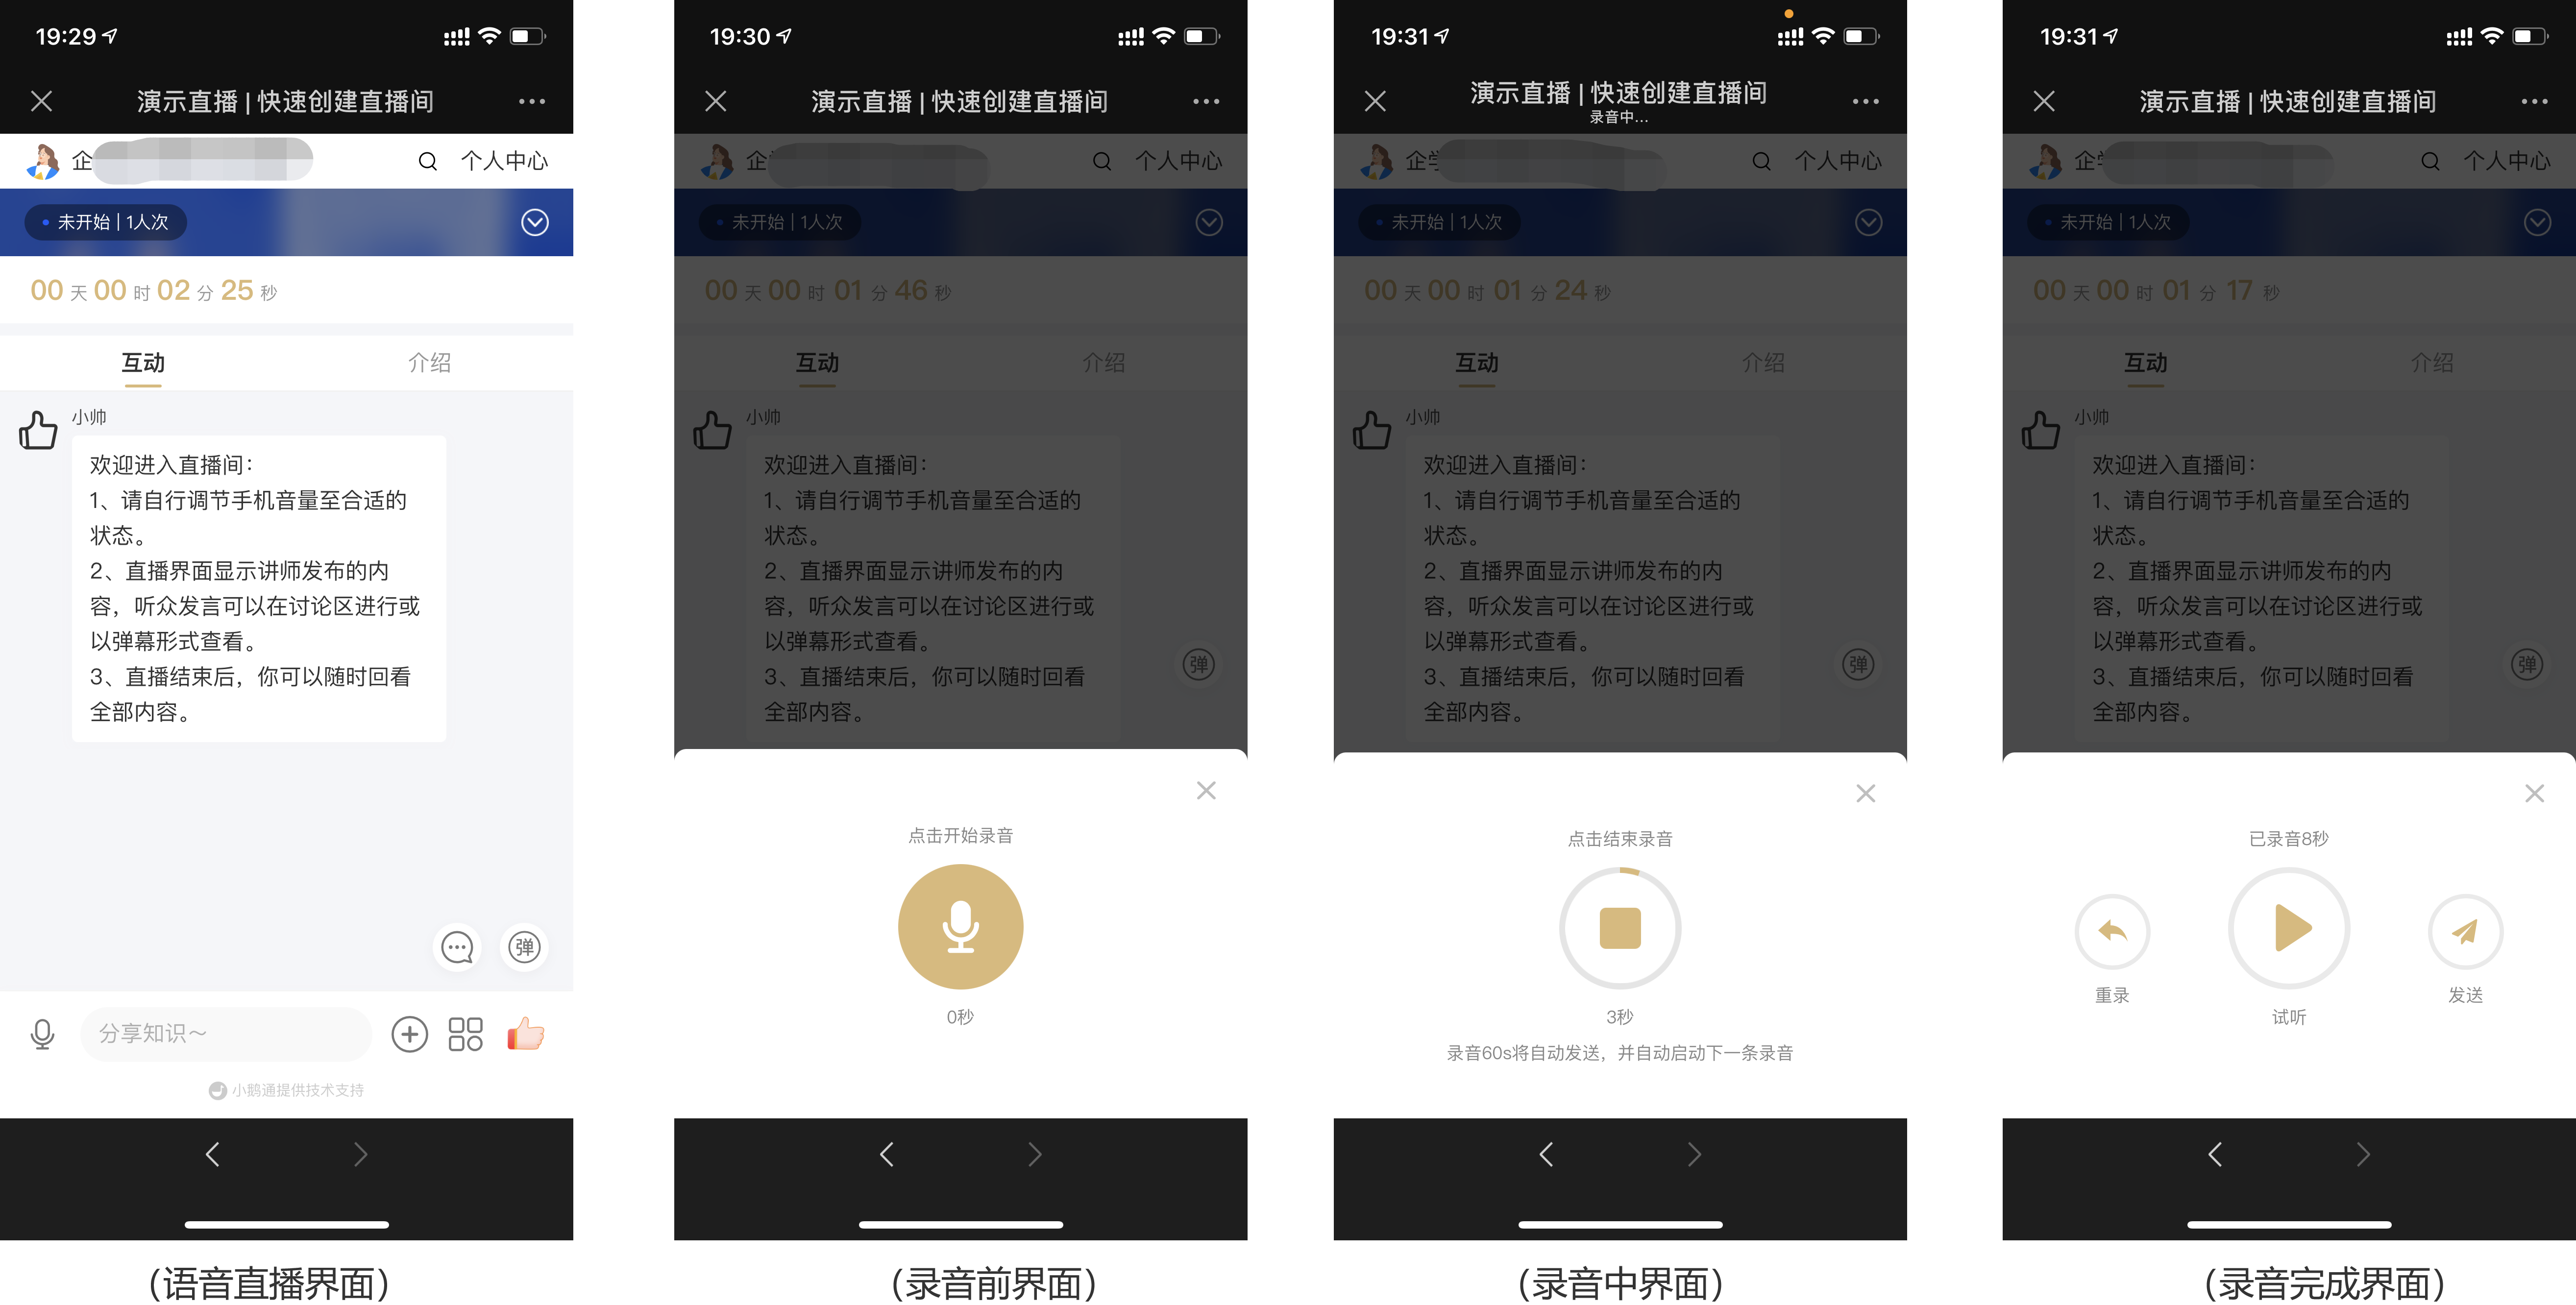
The live - streaming room supports continuous voice recording by the instructor. The instructor doesn't need to manually click to send the recording. The recording will be automatically sent after 60 seconds, and the next recording will start automatically. This allows the instructor to teach at their own pace without being interrupted by the action of sending voice.
3. Courseware display
① Click the '+' in the lower - right corner of the live - streaming room, then click 'Image', 'Image library', or 'PPT library' to select and upload images. Single or multiple image uploads are supported.
② After uploading, the corresponding courseware will be displayed at the top of the live - streaming room. Slide to turn pages.
③ Click the 'File library' or 'Audio - video library' to upload content in other formats (uploading needs to be completed using an Android phone or a PC browser).
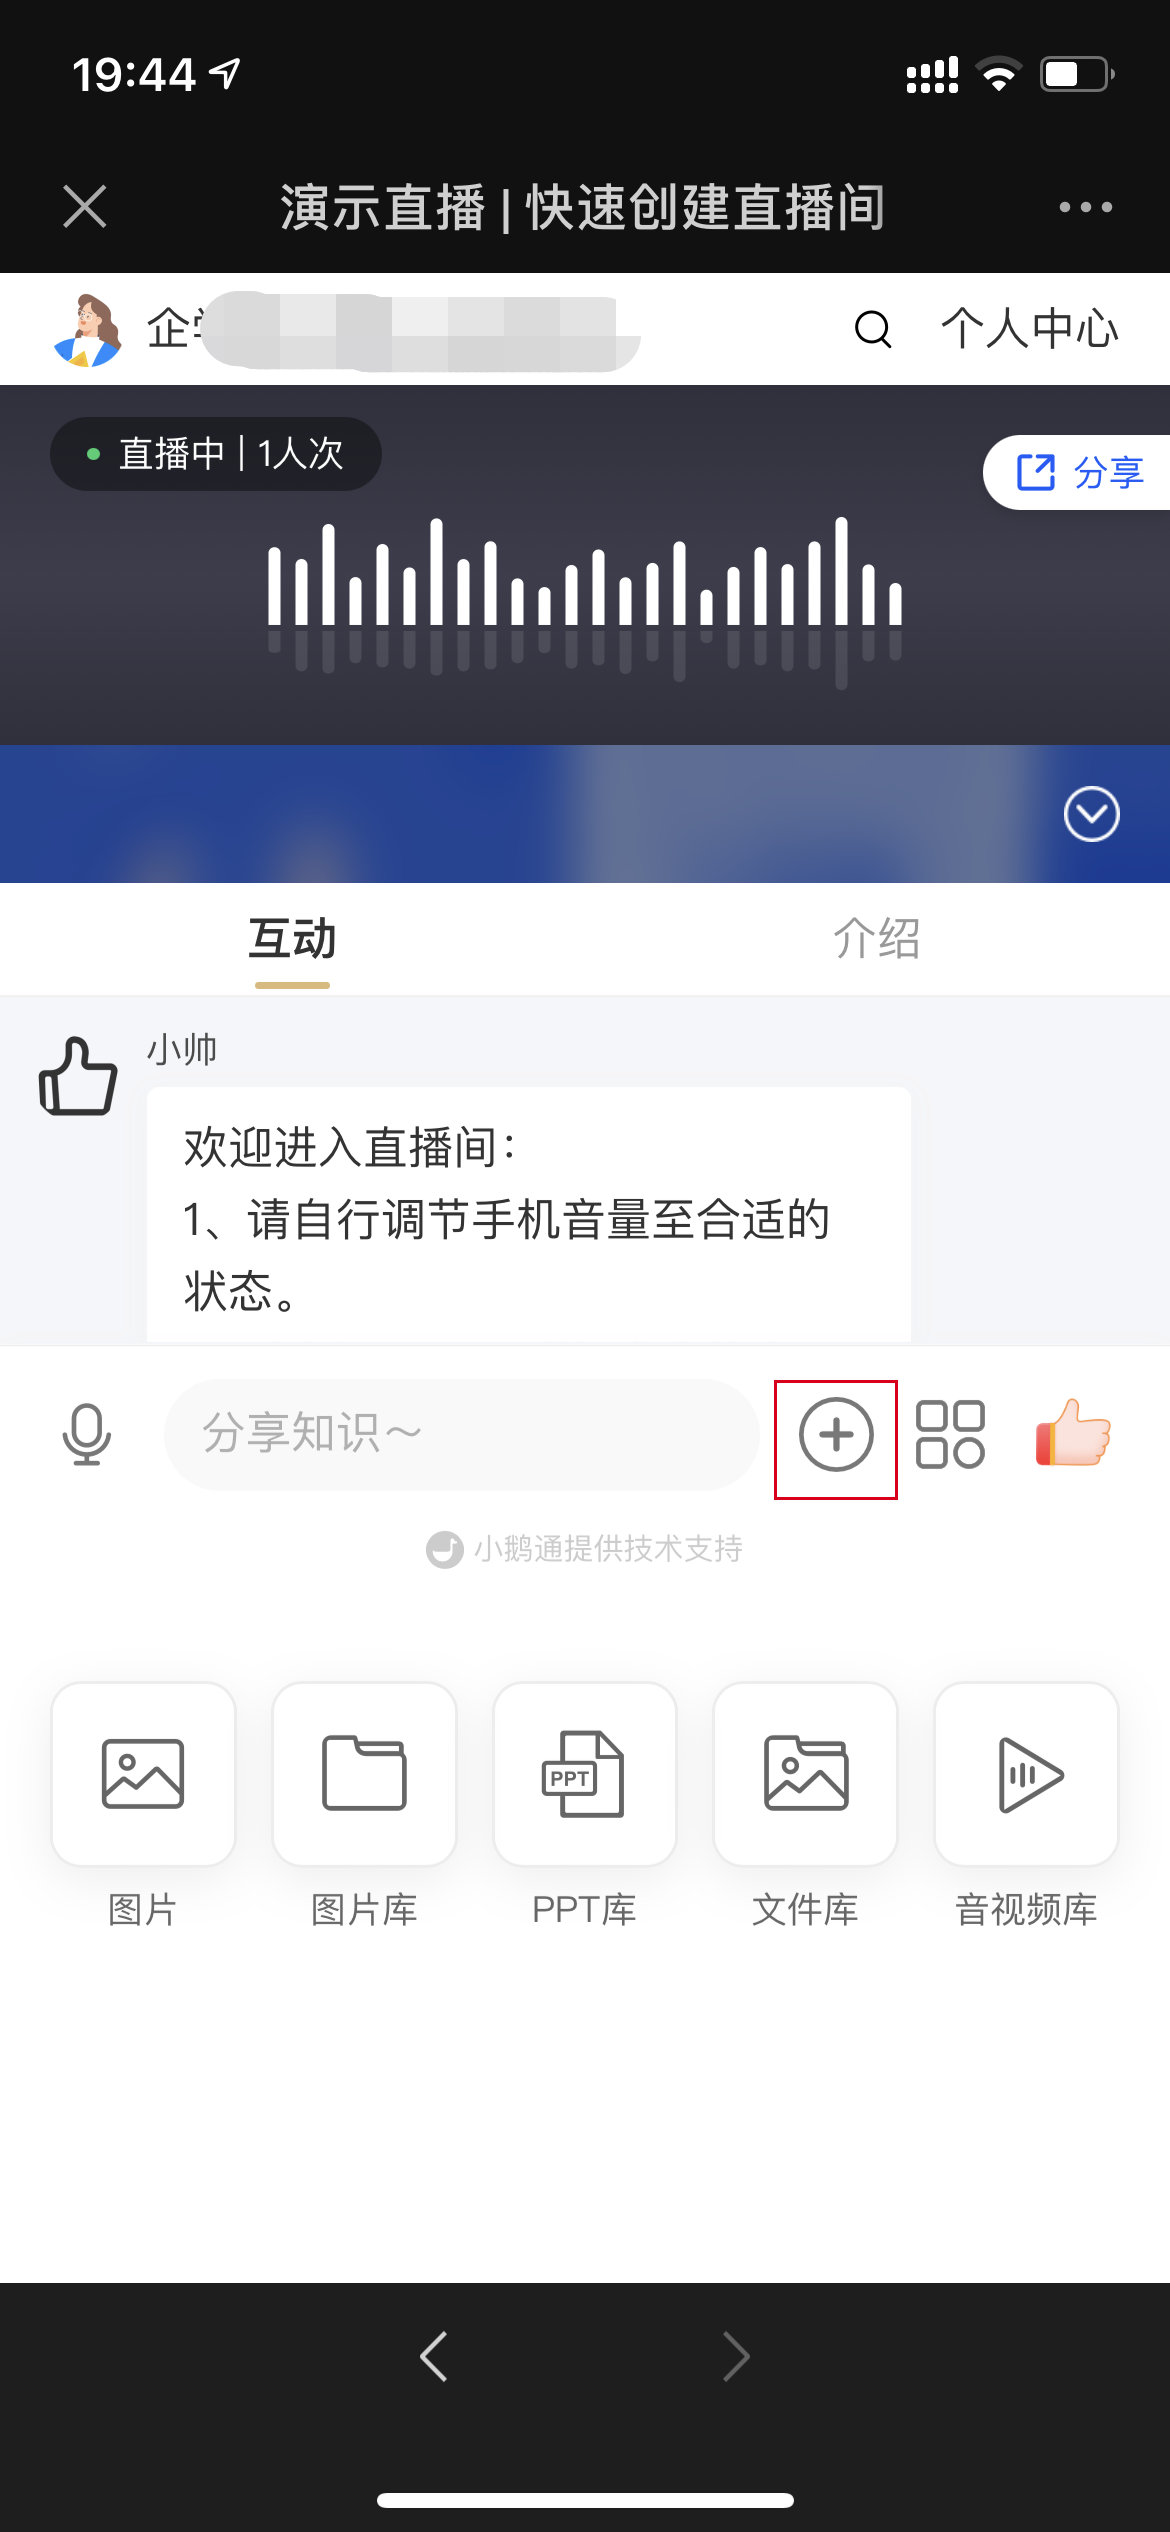
(H5 live - streaming room - Upload courseware)
4. End the live stream
When the instructor needs to end the live stream, click the'more' button in the lower - right corner and click 'End live stream' in the pop - up dropdown box to end the live stream.
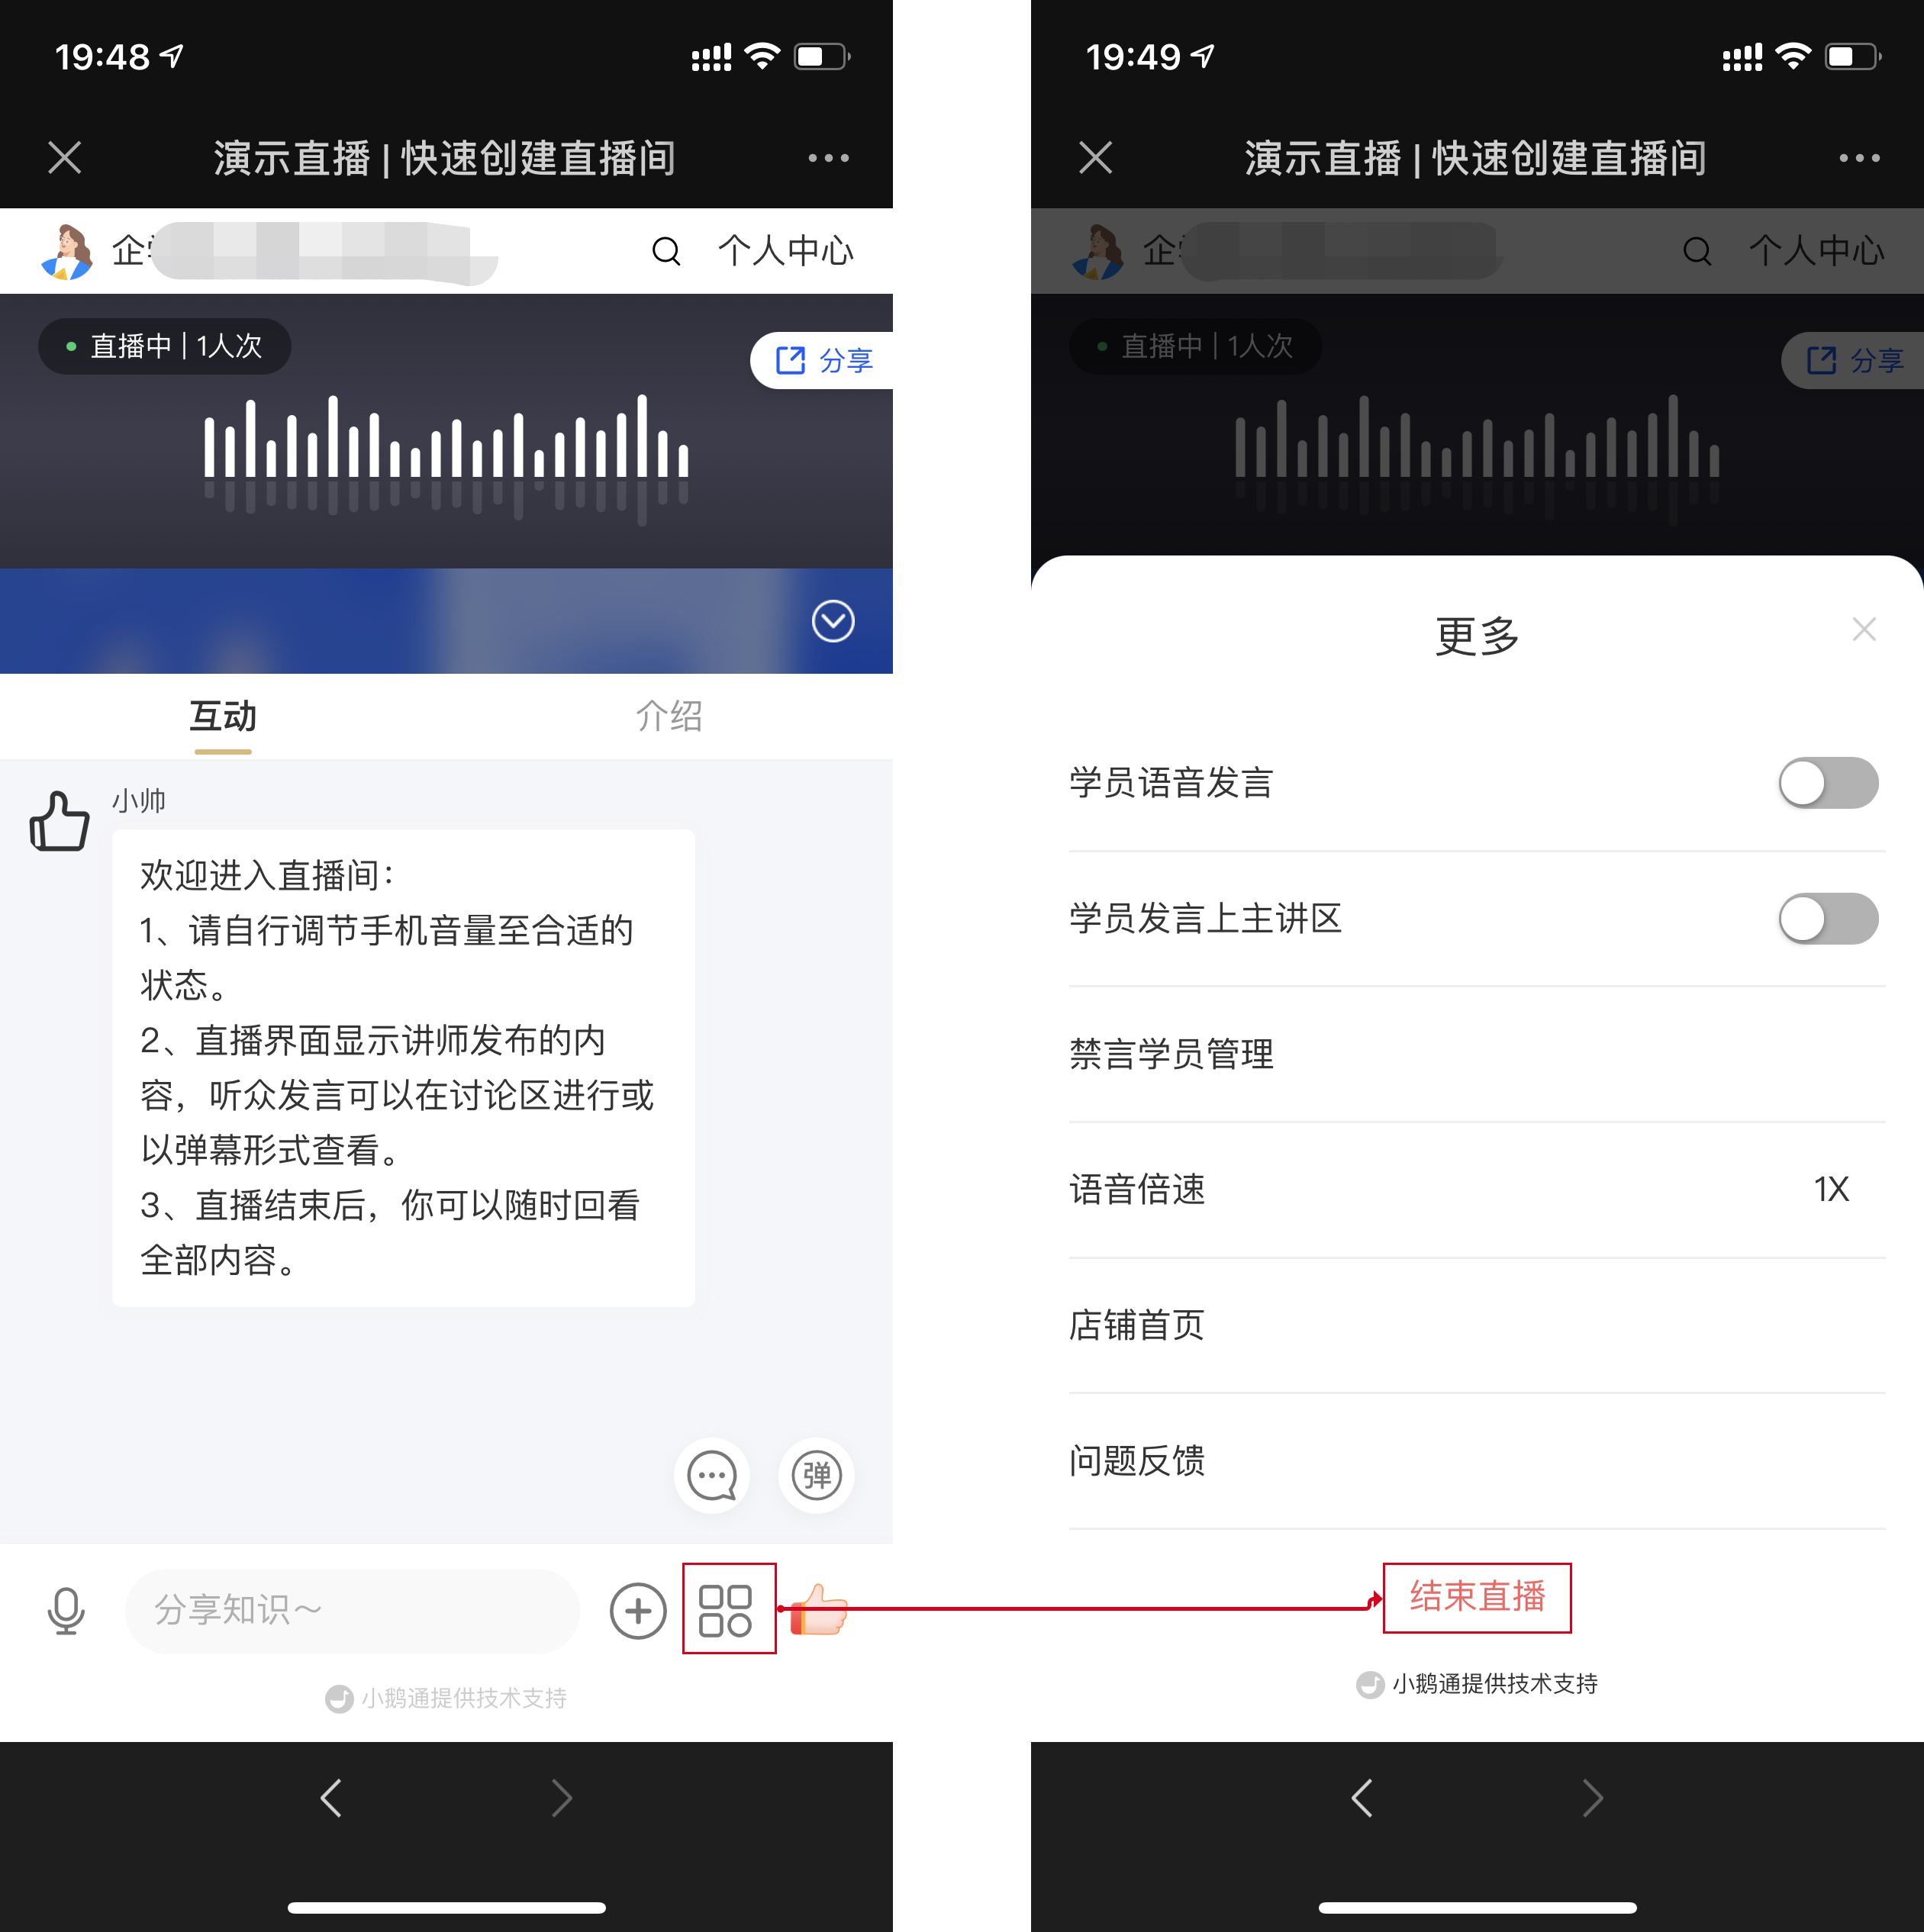
(Audio live streaming - H5 live - streaming room)
**Step 4: Watch the live stream***(PC web or H5)*
1. Students can enter the live - streaming room by scanning the QR code or opening the link.
2. After entering the live - streaming room, students can interact with the instructor by sending text content, asking questions, etc.
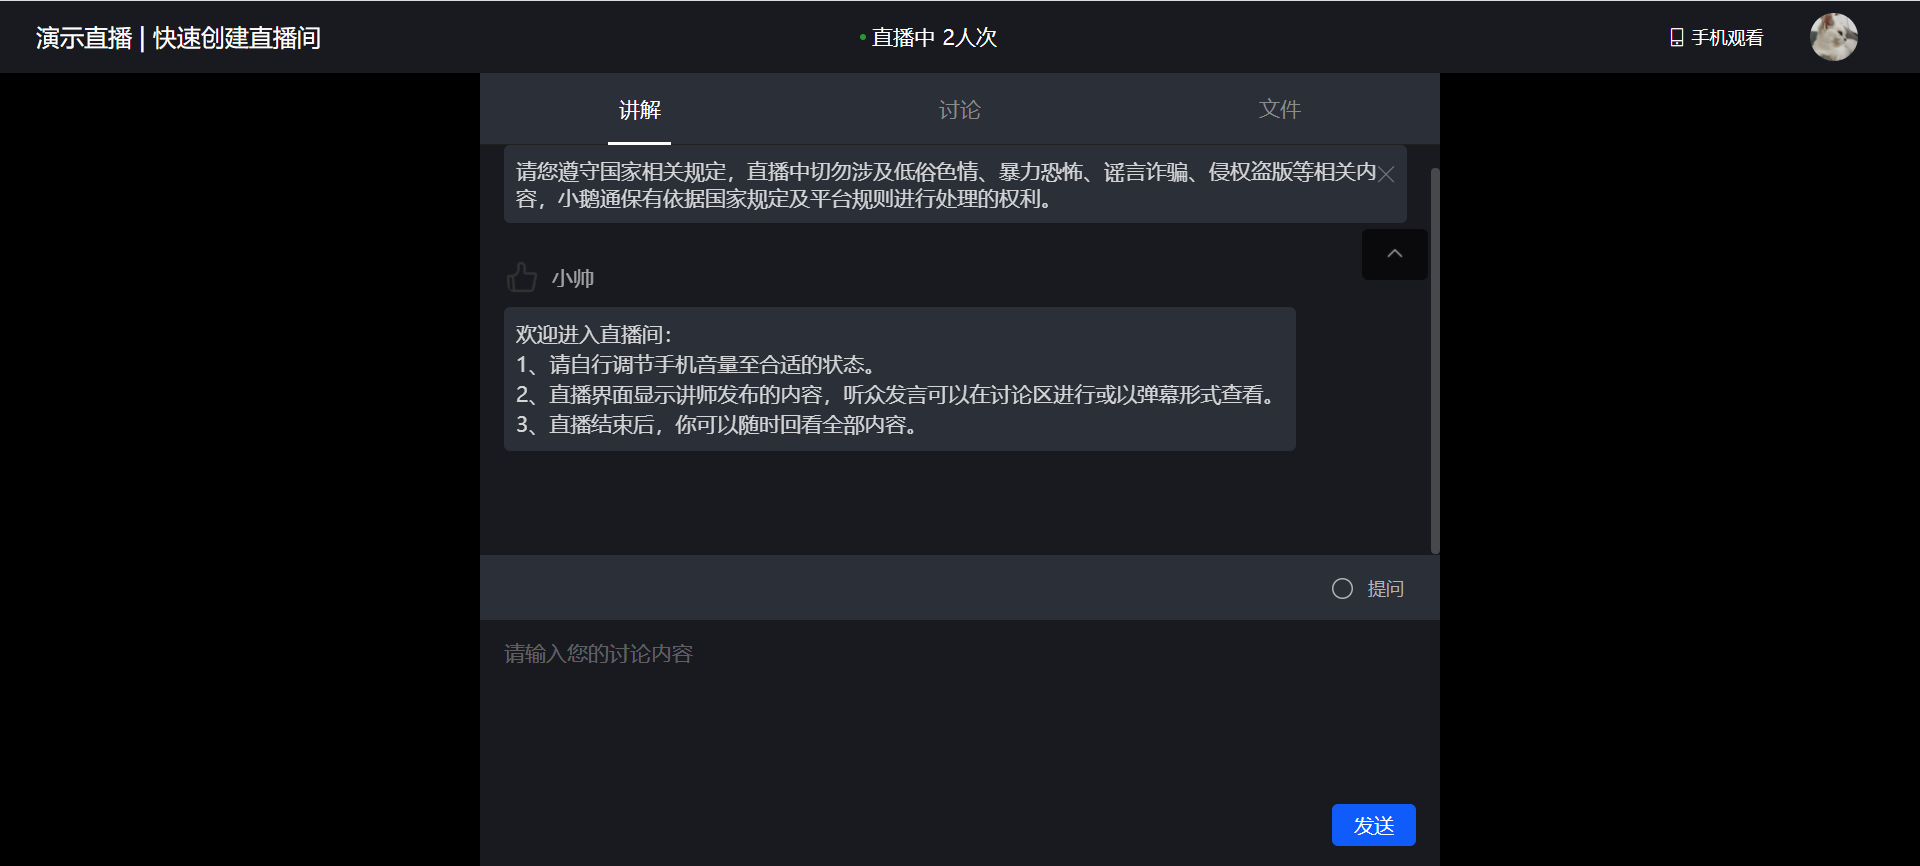
(Student side - PC web)
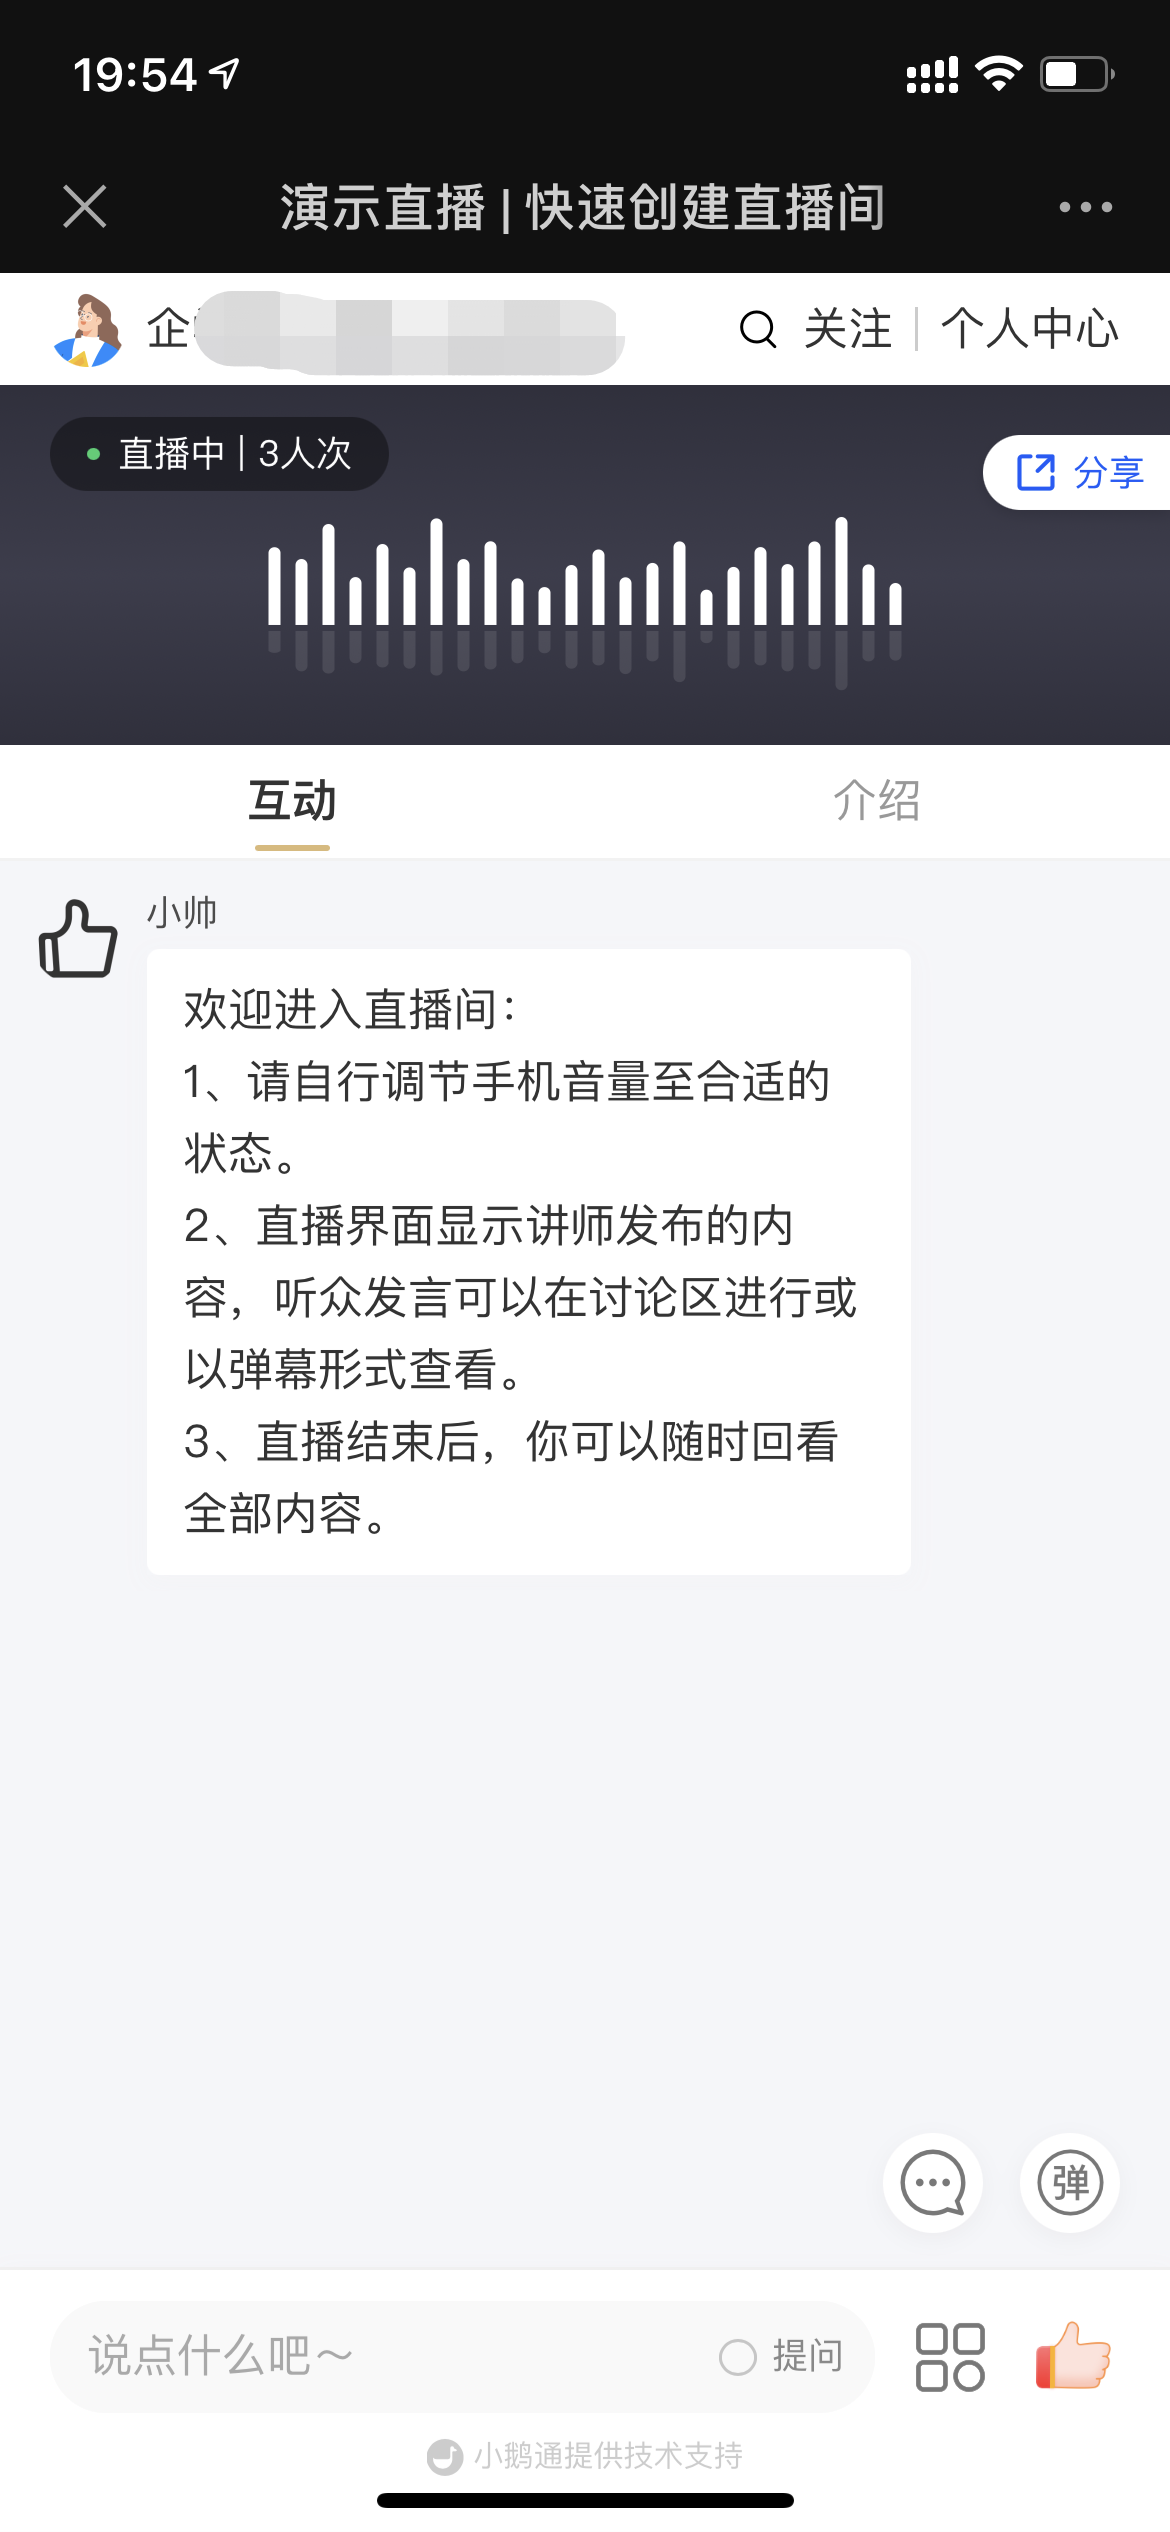
(Student side - H5)
# 【Corporate Training】Tutorial on Using Live Interactive Lotteries
[中文](/books/8e6b4/page/6ecbd)
**I. Function Introduction**
Live interactive lottery is an interactive tool used to enhance the activity in the live streaming room. It is configured by the administrator on the management console, initiated by the instructor in the live streaming room, and participated in by the students in the live streaming room. The administrator can set 'Online' or 'Commenting' as the participation conditions, and cooperate with the instructor's live narration in the live streaming room to guide students to interact and participate in the lottery.
**II. Purpose of Use**
1. Enhance the activity in the live streaming room;
2. Increase the viewing time of users in the live streaming room;
**III. Use Scenarios**
An enterprise needs to hold a monthly staff meeting in the form of a live stream. A lottery session is set up in the live streaming room, with the company's mascot as the prize. The lottery is initiated at irregular intervals during the live stream. Users who are \[Online\] or \[Commenting\] in the live streaming room are eligible to participate, which enhances the interactivity in the live streaming room and the enthusiasm of the students.
**IV. Operation Path**
Management console: Live Streaming → Live Streaming List → More → Interactive Settings → Lottery Switch;
Instructor's end (Mobile): Live Streaming Room → Bottom Toolbar → More → Lottery;
Instructor's end (PC Web): Live Streaming Room → Left Toolbar → Interactive Tools → Lottery;
Student's end: Live Streaming Details Page → Live Streaming Room → Click on the Lottery Icon;

**V. Usage Tutorial**
**(1) Management Console**
**Step 1: Turn on the lottery switch and add a lottery***(Management background)*
1. Find \[Live Streaming - More\], click \[Interactive Settings\], and turn on the lottery switch. After it is turned on, the instructor can see the lottery entry when entering the live streaming room; 2. When adding a lottery, you need to configure \[Lottery Name\], \[Participation Conditions\], and \[Prize Settings\]

● Lottery Name: No more than 20 characters;
● Participation Conditions: Online, Commenting;
● The prize redemption methods support both custom and WeChat ID

Step 2: View lottery data

**(Management background)***● After this round of the lottery ends, you can view the winning list; ○ Viewing path: Live Streaming → Live Streaming List → More → Data Statistics → Lottery Details;*
● For lottery activities in the \[Ended\] status, you can view the winning list.
● Prize redemption status description:

○ \[Redeemed\]: The student has successfully received the prize. The prize redemption status on the management console is 'Redeemed', and the status of the prize on the student's end is 'Received';

○ \[Not Redeemed\]: The student has not received the prize. The prize redemption status on the management console is 'Not Redeemed', and the status of the prize on the student's end is 'Click to Receive';
(2) Instructor's End
Step 1: The instructor initiates the lottery in the live streaming room
**(H5, PC Web)**
**Step 2: The instructor draws the winning numbers***(H5, PC Web)*

**After the lottery draw, the instructor can view the winning list;***(3) Student's End*
Step 1: Participate in the lottery

**(H5, PC Web)**
**During the lottery initiation period, if the student meets the lottery participation conditions (Commenting/Online participation in the lottery configured on the management console), they will be eligible to participate in the lottery; Step 2: Lottery results***(H5, PC Web, APP)*
There are three lottery results, namely:

**● Did not participate in this round of the lottery: The student did not meet the participation conditions during the lottery initiation period;***● Sorry, you did not win: The student successfully participated in this round of the lottery but did not win;*
● Congratulations, you won: You participated and won. You can receive the prize on the current page and view the winning list; Step 3: Redeem the prize
(H5)
The student needs to actively contact the merchant for redemption; Step 4: View my prizes
(H5)

**● Path 1: In the live streaming room, click More - My Prizes in the lower right corner***● Path 2: Outside the live streaming room, click Personal Center - My Prizes*
VI. Frequently Asked Questions:

**Q1: How many rounds of lotteries can be initiated in one live stream?***Answer: Currently, a maximum of 50 rounds are supported. You can configure it freely according to your needs.*
Q2: Is there a limit to the number of prizes?
Answer: Currently, only 5 types of prizes can be set per round, and the number of each type of prize cannot exceed 50.

**Q3: Which platforms does the current lottery function support?**
Answer: Instructor's end: Lotteries can be initiated on H5 and PC Web; Student's end: Both H5 and PC Web support participation in the lottery;
Q4: How do students receive the prizes?
Answer: There are 3 ways: ① Receive the prize on the winning page; ② After winning, click the button in the lower right corner of the live streaming room, view My Prizes, and you can receive the won prizes; ③ Click \[Personal Center\], click \[My Prizes\], and you can view the won prizes.
Q5: What are the lottery rules when the number of participants is less than the number of prizes?
Answer: When the number of participants is less than or equal to the number of prizes: Participants will definitely win, and the prizes are randomly distributed; when the number of participants is greater than the number of prizes: The number of winners is equal to the total number of prizes, and the prizes are randomly matched with the winners.
Answer: Instructor side: You can initiate a lottery on the H5 and PC web pages.
Student side: Both the H5 and PC web pages support participation in the lottery.
Q4: How can students claim their prizes?
Answer: There are 3 ways: ① Claim on the winning page; ② After winning, click the button in the lower right corner of the live - streaming room, view 'My Prizes' to claim the won prizes; ③ Click \[Personal Center\], then click \[My Prizes\] to view the won prizes.
Q5: What are the lottery rules when the number of participants is less than the number of prizes?
Answer: When the number of participants is less than or equal to the number of prizes: Participants will definitely win, and the prizes are randomly distributed; when the number of participants is greater than the number of prizes: The number of winners is equal to the total number of prizes, and the prizes are randomly matched with the winners.