Course management
- Graphic and text usage tutorial
- Video Tutorial
- Audio Usage Tutorial
- E-book Usage Tutorial
- Column Usage Tutorial
- Tutorial on setting the visible range
- Video Live Streaming Usage Tutorial
- Tutorial on Using Voice Live Streaming
- Tutorial on downloading and using corporate training courseware
Graphic and text usage tutorial
I. Feature Introduction
Image-text courses are learning courses with content in the form of images and text. They are easy to create and convenient for learners to view.
II. Purpose of Use
Provide training to learners with various types of courses.
III. Use Scenarios
Suitable for learning content with a large amount of text and images.
IV. Operation Path
Merchant side: Enterprise Training Management Console → Courses → Image-text
Learner side: H5 Academy → Course Home Page
V. Usage Tutorial

Step 1: Configure the Image-text Course(Management Backend)
1. Log in to the management console. Select [Image-text] from [Courses] → [Create New Image-text] to enter the new image-text creation page.

(Management Backend - Courses - Image-text)
2. Basic information: Fill in the name and details of the image-text, set information such as text anti-copying, and upload the cover image.

(Management Backend - Courses - Image-text - Create New Image-text)
3. Course information:
Associated courses: You can choose to associate with columns and training plans. After saving, the course information will be displayed in the details of the columns and training plans.
Course grouping: A function to categorize and display courses.
4. Visibility scope: Set the course to be visible to specified learners. For details, please readTutorial on Setting Visibility Scope.
5. Listing Settings: Set the listing time of the course. For details, please readTutorial on Listing and Delisting Settings.
6. Guide to join the community: Configure relevant communities for different courses and guide learners to join the community on the course details page. The steps are to enable the guide to join the community; set the guiding message; upload the community QR code.
7. Click [Save] to successfully create the image-text course.
Step 2: Course Learning(H5 Academy)
1. Learners log in to the academy.

(H5 Academy - Course Home Page)
2. Learners select the corresponding image-text course from the courses to start learning.

(H5 Academy - Course Home Page)
Video Tutorial
I. Function Introduction
Video courses are courses with video content. High-quality online video courses need to be pre-recorded or downloaded, which are convenient for students to watch and learn online.
II. Purpose of Use
Provide training to students with various types of courses.
III. Usage Scenarios
Students can learn more diverse course content by watching videos in a WIFI environment.
IV. Operation Path
Merchant side: Corporate Training Management Console → Courses → Videos
Student side: H5 Academy → Classroom Homepage
V. Usage Tutorial

Step 1: Configure Video Courses(Management Backend)
1. Log in to the management console. Select [Videos] from [Courses] → [New Video] to enter the new video page.

(Management Backend - Videos)
2. Basic Information: Enter the video name, upload the video, cover image, video贴片, and fill in the detailed information.

(Management Backend)
3. Course Information
Associated Courses: You can choose to associate with columns and training plans. After saving, the course information will be displayed in the details of columns and training plans.
Course Grouping: A function to classify and display courses.
4. Visible Scope: Set the course to be visible to specified students. For details, please readUsage Tutorial for Setting Visible Scope.
5. Shelving Settings: Set the shelving time of the course. For details, please readUsage Tutorial for Shelving and Unshelving Settings.
6. Guide to Join the Community: Configure relevant communities for different courses and guide students to join the community on the course details page. The steps are to enable the guide to join the community; set the guiding message; upload the community QR code.
7. Anti-screen Recording Marquee: After the anti-screen recording marquee is enabled, whether students are watching video courses or live courses, their usernames and IDs will be displayed in a marquee on the course playback page (Note: When the system player is in full-screen playback, the marquee will not work. The academy needs to set it to the elink player). For details, please readUsage Tutorial for Anti-screen Recording Marquee.
8. Click [Save] to successfully create a video course.
Step 2: Course Learning(H5 Academy)
1. Students log in to the academy on the student side.

(H5 Academy - Classroom Homepage)
2. Students select the corresponding video course from the courses to learn.

(H5 Academy - Video Course Details Page)
Audio Usage Tutorial
I. Feature Introduction
Audio courses are courses with audio content that need to be pre - recorded. They are convenient for students to listen and learn online.
II. Purpose of Use
Provide training to students with various types of courses.
III. Usage Scenarios
Suitable for students to learn on the go during their commute, making use of fragmented time.
IV. Operation Path
Merchant side: Corporate Training Management Console → Courses → Audio
Student side: H5 Academy → Course Homepage
V. Usage Tutorial

Step 1: Configure the audio course(Management background)
1. Log in to the management console. Select [Audio] from [Courses] → [New Audio].

(Management background - Courses - Audio)
2. After entering the new audio page, fill in the audio name, upload the audio, upload the cover, and fill in the detailed information.

(Management background - Courses - Audio - New Audio)
3. Course information
Associated courses: You can choose to associate with columns and training plans. After saving, the course information will be displayed in the details of the columns and training plans.
Course grouping: A function to classify and display courses.
4. Visible scope: Set the course to be visible to specified students. For details, please readTutorial on setting the visible scope.
5. Listing settings: Set the listing time of the course. For details, please readTutorial on listing and delisting settings.
6. Guide to join the community: Configure relevant communities for different courses and guide students to join the community on the course details page. The steps are to enable the guide to join the community; set the guiding message; upload the community QR code.
7. Click [Save] to successfully create the audio course.
Step 2: Course learning(H5 Academy)
1. Students log in to the academy.

(H5 Academy - Course Homepage)
2. Students select the corresponding audio course from the courses to learn.

(H5 Academy - Audio Course Details Page)
E-book Usage Tutorial
I. Function Introduction
E-books support one-click import of local resources. The system automatically parses the book chapters, enabling easy online management of e-books. Learners can read on their mobile devices, with support for functions such as regional touch page-turning, highlighting, bookmarking, and background changing.
II. Purpose of Use
Train learners with various types of courses.
III. Usage Scenarios
You can upload PDF files such as company regulations and onboarding manuals as materials for employee training on company regulations.
IV. Operation Path
Management Console: Enterprise Academy Management Console → Courses → E-books
Learner End: WeChat H5 Academy → E-book Courses
V. Usage Tutorial
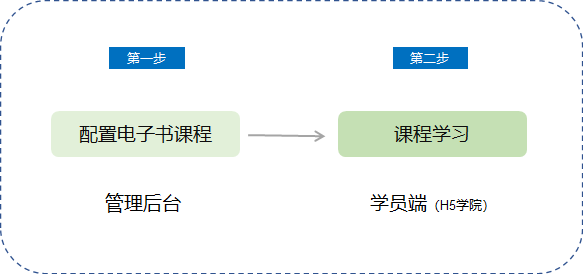
Step 1: Configure E-book Courses(Management Backend)
Log in to the management console. Select [E-books] from [Courses] → [New E-book].

(Management Backend - Course Management - E-books)
2. Enter the new e-book page, upload an e-book (size limit: 100M, supports two formats: PDF and EPUB; PDF e-books do not currently support highlighting and theme changing). Fill in the book title, author, and description, and upload the cover. Note that re-uploading a file will overwrite the previously uploaded one.

(Management Backend - Courses - E-books - New E-book)
3. Course Information
Associated Courses: You can choose to associate with columns and training plans. After saving, the course information will be displayed in the details of the columns and training plans.
4. Visibility Scope: Set the course to be visible to specified employees. For details, please readUsage Tutorial for Setting Visibility Scope.
5. Publishing Settings: Set the publishing time of the course. For details, please readUsage Tutorial for Publishing and Unpublishing Settings.
6. Group Joining Promotion: Configure relevant communities for different courses and guide employees to join the communities on the course details page. The steps are to enable group joining promotion, set the promotional message, and upload the community QR code.
7. Click [Save] to successfully create an e-book course.
Step 2: Course Learning(H5 Academy)
1. Learners log in to the academy.
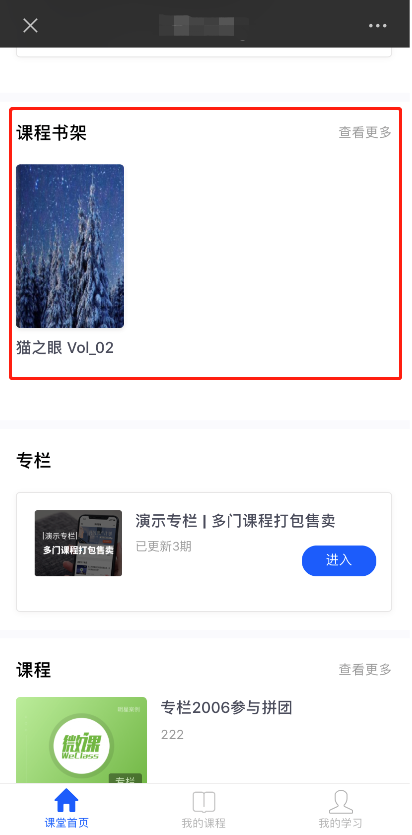
2. Select the corresponding e-book course from the courses for learning.
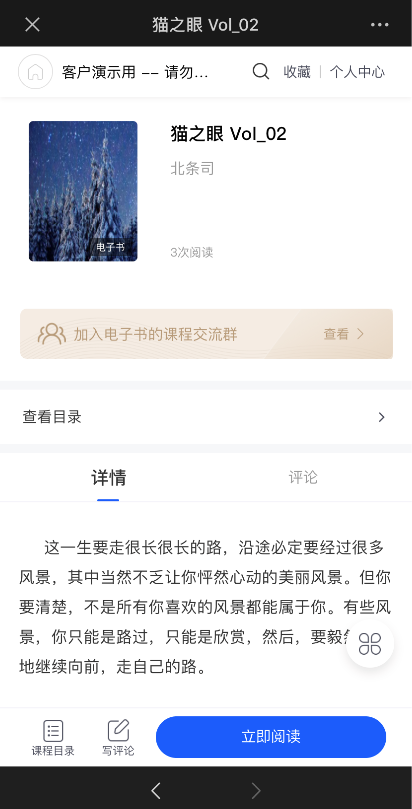
(H5 Academy - E-book Course Details Page)
Column Usage Tutorial
I. Feature Introduction
Columns support packaging and combining various types of courses (text - image, audio, video, live streaming) to form a systematic learning framework and content.
II. Purpose of Use
Provide a learning framework for students and create an immersive learning experience within the column.
III. Use Scenarios
Provide students with a combination of learning courses for a certain type of skill or topic.
Example: To cultivate the professional skills of sales staff, set up a sales - related column containing courses related to sales skills.
IV. Operation Path
Merchant side: Enterprise Training Management Console → Courses → Columns
Student side: H5 Academy → Classroom Homepage
V. Usage Tutorial

Step 1: Configure the Column(Management Backend)
Log in to the management console. Select [Columns] → [New Column] from [Courses].

(Management Backend - Courses - Columns)
2. Enter the new column page, fill in the column name, column introduction, column details, and upload the column cover.

(Management Backend - Courses - Columns - New Column)
3. Course Information
Course grouping: A function to classify and display courses.
4. Visible Scope: Set the courses to be visible to specified employees. Please read the Usage Tutorial for Setting Visible Scope.
5. Listing Settings: Set the listing time of the courses. Please read the Usage Tutorial for Listing and Delisting Settings.
6. Guide to Join the Community: Configure relevant communities and guide employees to join the community on the column details page. The steps are to enable the guide to join the community; set the guiding message; upload the community QR code.
7. Click [Save] to successfully create the column.
8. Select the corresponding column → [Content Management] → [Add Course].

(Management Backend - Courses - Columns - Content Management)
After adding courses, you can use the sorting function to adjust the order of courses within the column.
Note: A single - item course can be added to multiple columns.

(Management Backend - Courses - Columns - Content Management - Add Course)
Step 2: Course Learning(H5 Academy)
1. Students log in to the academy on the student side.

(H5 Academy - Classroom Homepage)
2. Students select the corresponding column from the courses. After entering the column, click on the courses to start learning.

(H5 Academy - Column Course Catalog Page)
Tutorial on setting the visible range
I. Function Introduction
Administrators can use the visibility scope function to assign learning permissions for courses. Employees can only learn the courses assigned to them.
II. Purpose of Use
Configure different learning content for different target learners.
III. Use Scenarios
The visibility scope function applies to all courses, including text - image courses, audio courses, video courses, live courses, e - books, columns, and purchased courses (columns, live courses).
IV. Operation Path
Merchant side: Corporate Training Management Console → Courses → Edit Course
Learner side: H5 Academy → Course Homepage
V. Usage Tutorial
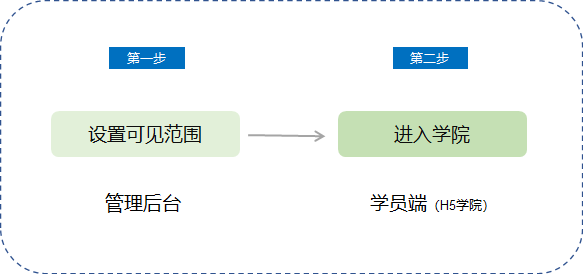
Step 1: Set the Visibility Scope(Management Backend)
1. Log in to the management console. Select the course for which you need to set the scope from [Courses], and click [Edit] to enter the course editing page.
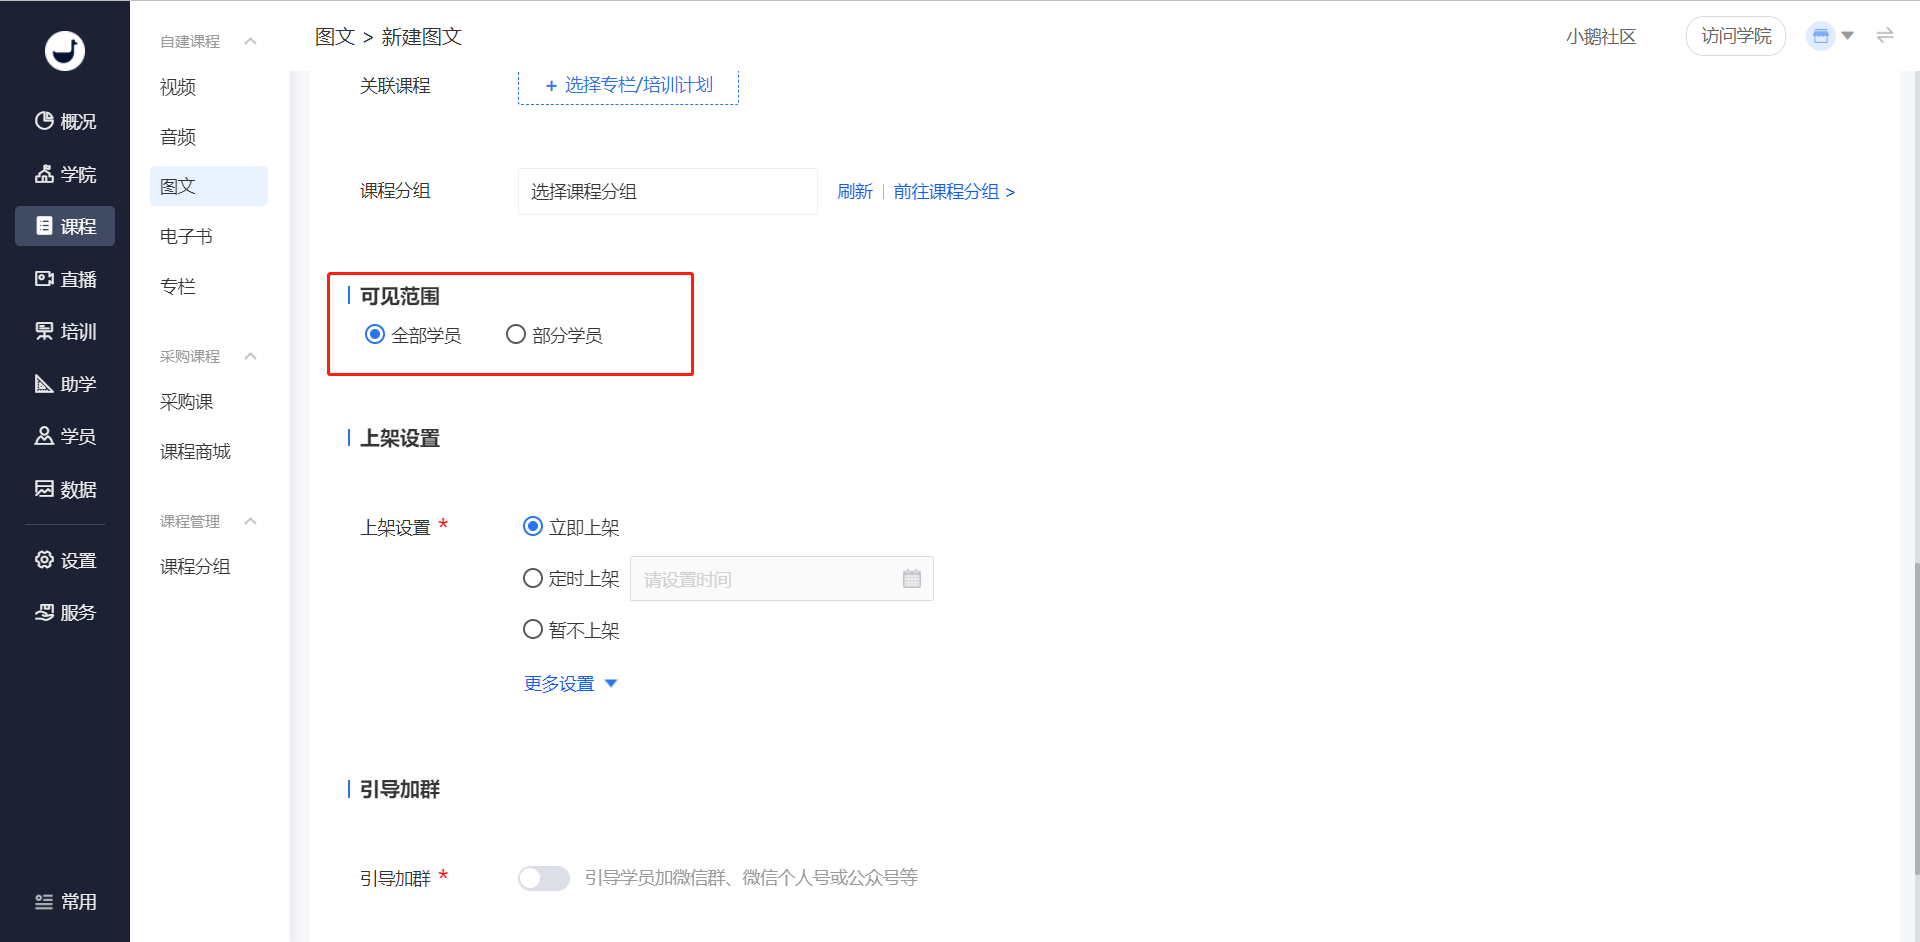
(Management Backend - Course Editing Page)
2. Select the visibility scope.
All learners: All learners can study this course;
Some learners: Select the corresponding department learners or the corresponding learners under the department. After selection, only the specified learners can see the course.
Note: Paid purchased courses have inventory limits. When setting the visibility scope, please allocate according to the inventory quantity. If the number of allocated learners exceeds the course inventory, the allocation will fail. Free purchased courses have no quantity limit.

(Management Backend - Course Editing Page - Select Some Learners Visible)
3. Click [Save] to save the visibility scope settings.
Step 2: Course Learning(H5 Academy)
1. Learners log in to the academy.
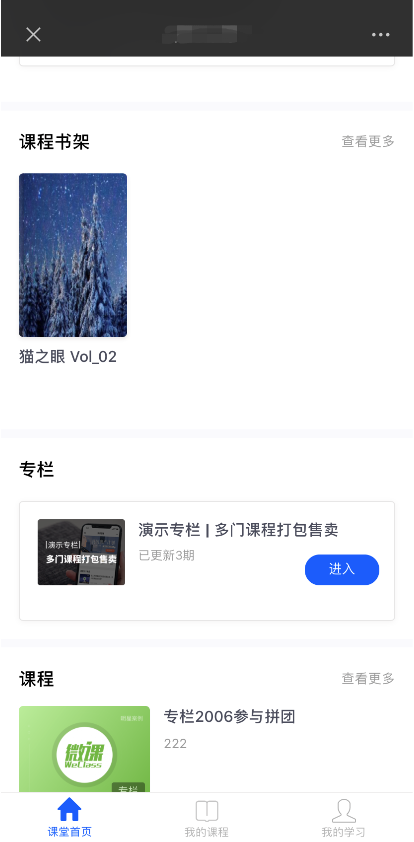
(H5 Academy - Course Homepage)
2. Learners within the course visibility scope can select courses from the courses for learning.
Video Live Streaming Usage Tutorial
I. Function Introduction
Video live streaming supports the combination of real-time video with functions such as courseware, whiteboard brushes, and desktop sharing for live streaming, which is suitable for real-time video interaction with students.
II. Purpose of Use
By starting video live streaming, real-time video, courseware & desktop sharing and other live streaming content can be realized.
III. Usage Scenarios
Suitable for scenarios that require desktop sharing, courseware display, and real-time video live streaming with students.
IV. Operation Path
Merchant side: Enterprise training management background → Live streaming → Video live streaming
Student side: H5 Academy → Watch live streaming

V. Usage Tutorial
Step 1 Configure video live streaming(Management background)
1. Log in to the management console, click [Live streaming], select [Video live streaming] → [Create live streaming], and enter the page for creating video live streaming;

(Management background - Live streaming)
2. Fill in the basic information of the live streaming room
Fill in the live streaming name and live streaming time;
Set the visible scope: You can set the course to be visible to some students;
Live streaming replay settings: Set whether to enable the live streaming replay for users after the live streaming ends;
Completion conditions: You can set the shortest learning time for students;

(Management background - Live streaming - Create video live streaming)
3. Other settings
Details cover: The picture displayed when students view the details of the live streaming course;
Live streaming warm-up picture: The picture displayed in the video area before the live streaming starts;
Live streaming promotion cover: The picture displayed at the live streaming entrance on the academy homepage;
Associated courses: You can choose to associate a column or a training plan. After saving, the course information will be displayed in the details of the column and the training plan.
Course grouping: A function to classify and display courses.
Anti-screen recording marquee: After the anti-screen recording marquee is enabled, whether students watch video courses or live streaming courses, their usernames and IDs will be displayed in the form of a marquee on the course playback page. (Note: The marquee will become invalid when playing in full screen).
Shelf settings: Set the shelf time of the course.
4. Click [Save] to create a video course.
5. After creating the live streaming, you need to set up the lecturer. (Note: Only those who have bound WeChat can be added as lecturers. Please ask the lecturer to visit the enterprise training link to bind WeChat first).

(Management background - Live streaming - Lecturer management)
Step 2 Go live(Management background)
Click [Operation] - [Go live], select a suitable terminal for live streaming. Currently, the computer side supports: web browser, client, and OBS/camera for live streaming; the mobile side supports live streaming via the APP. (You can still switch to other terminals for live streaming after selecting the live streaming terminal).
Different terminals support different functions (corresponding to different display pages on the employee side). The suitable scenarios for each terminal are as follows:
(1) Web browser: Supports PPT courseware display and lecturer taking the stage. You can start the live streaming immediately without downloading software;
(2) Client: Supports desktop sharing, whiteboard brushes, and courseware display combined with real-time video for classroom scenario live streaming;
(3) OBS/camera for live streaming: Suitable for using third - party tools for live streaming;
(4) Mobile APP: You can start the live streaming using the mobile APP, which supports video streaming, beautification, and viewing comments.

(Management background - Live streaming - Go live)
Step 3 Course learning(H5 Academy)
1. Students log in to the academy.

(H5 Academy - Classroom homepage)
2. Students select the corresponding video live streaming course from the courses for learning.

(H5 Academy - Video live streaming)
Tutorial on Using Voice Live Streaming
I. Function Introduction
Voice live streaming courses can send a large amount of voice, text, and images, thus achieving the purpose of interacting with students.
II. Purpose of Use
Provide training to students in the form of voice live streaming.
III. Usage Scenarios
Suitable for learning scenarios with a large amount of learning materials and the need to interact with students simultaneously. Students can learn by watching the voice live stream, ask questions, and the instructor can answer them immediately.
IV. Operation Path
Merchant side: Enterprise Academy Management Console → Course Management → Live Streaming → Voice Live Streaming
Student side: WeChat H5 Academy → Classroom Homepage
V. Usage Tutorial
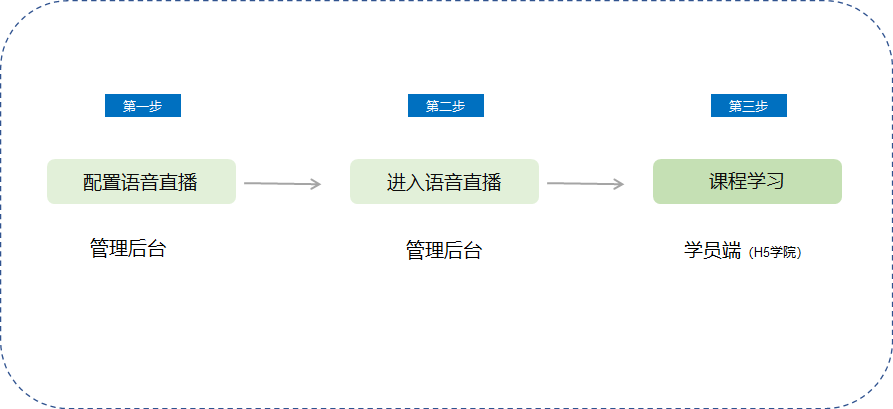
Step 1: Configure Voice Live Streaming (Management Backend)
1. Log in to the management console. Select [Live Streaming] → [Voice Live Streaming] → [Create Live Streaming] from [Course Management] to enter the page for creating voice live streaming.
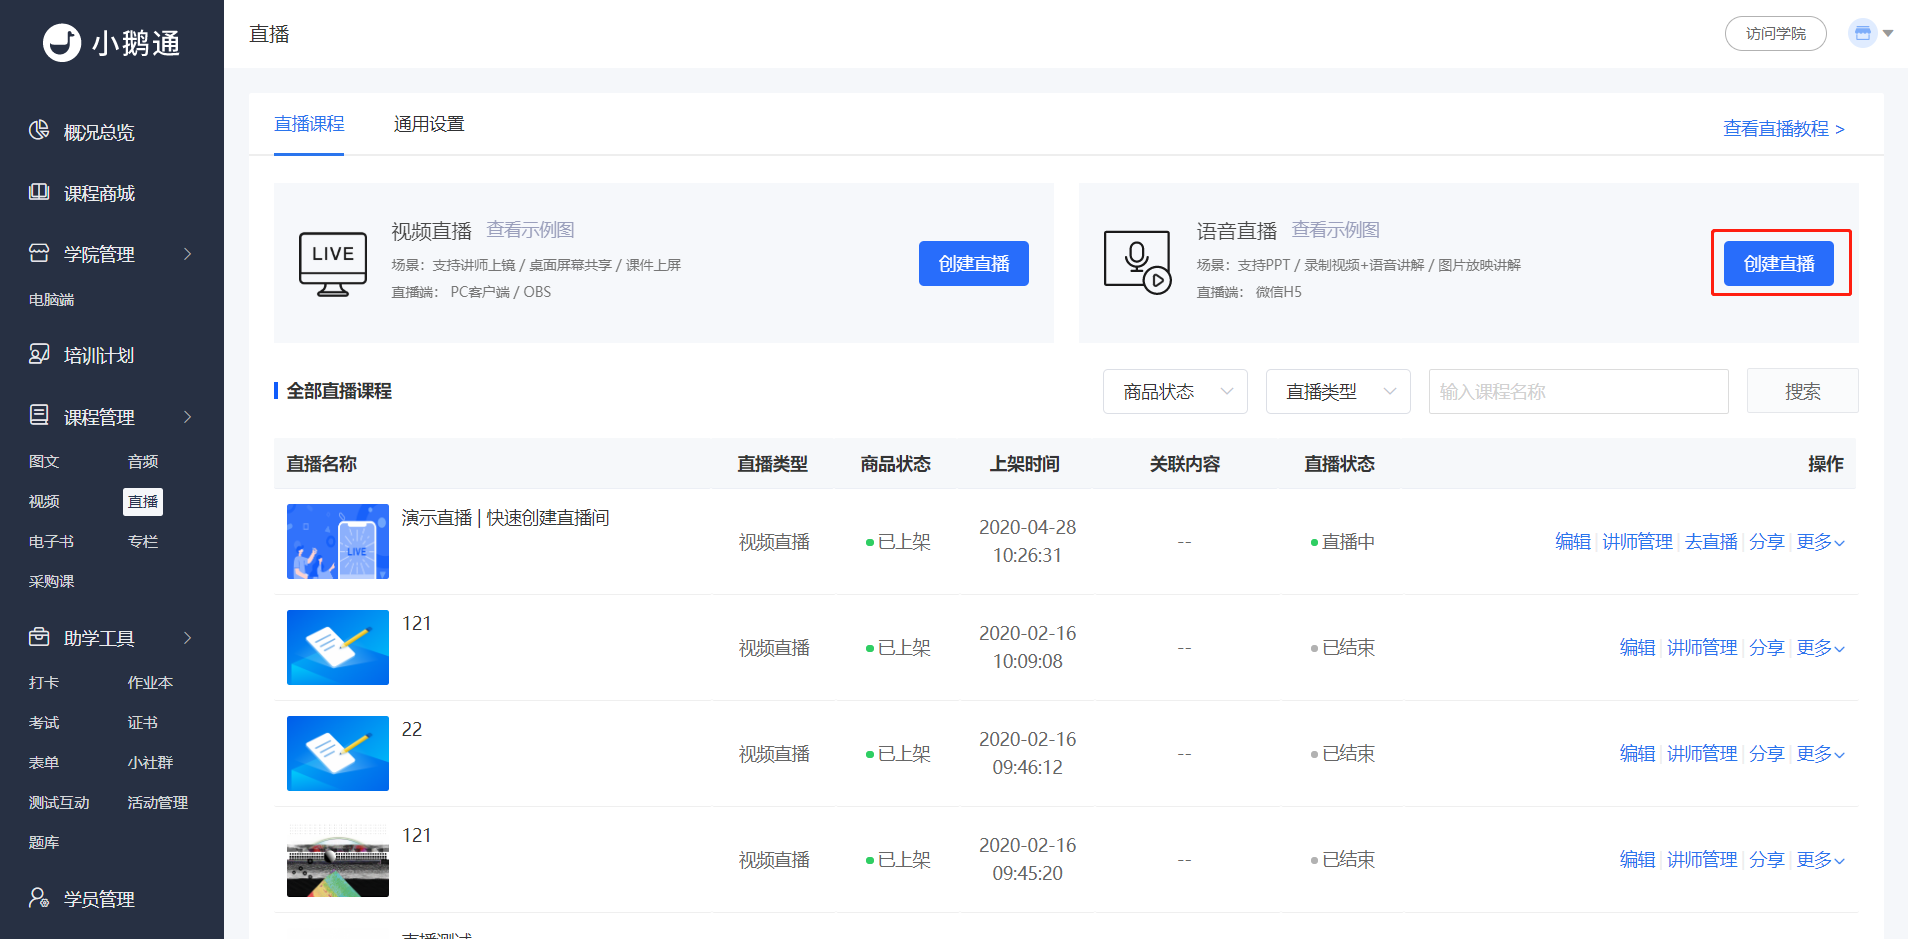
(Management Backend - Live Streaming)
2. Basic Information
Live streaming information: Fill in the live streaming name and time;
Set the visibility range: Set the course to be visible to specified students. For details, please readSet the Visibility Range;
Add courseware:
Do not add: If you choose not to add, guests can still upload PPTs after entering the live streaming room, but they cannot upload videos.
Add courseware: Currently, uploading PPTs on the management console is not supported. Guests can enter the live streaming room to upload courseware.
Add videos: The uploaded videos will automatically play after the live streaming starts. 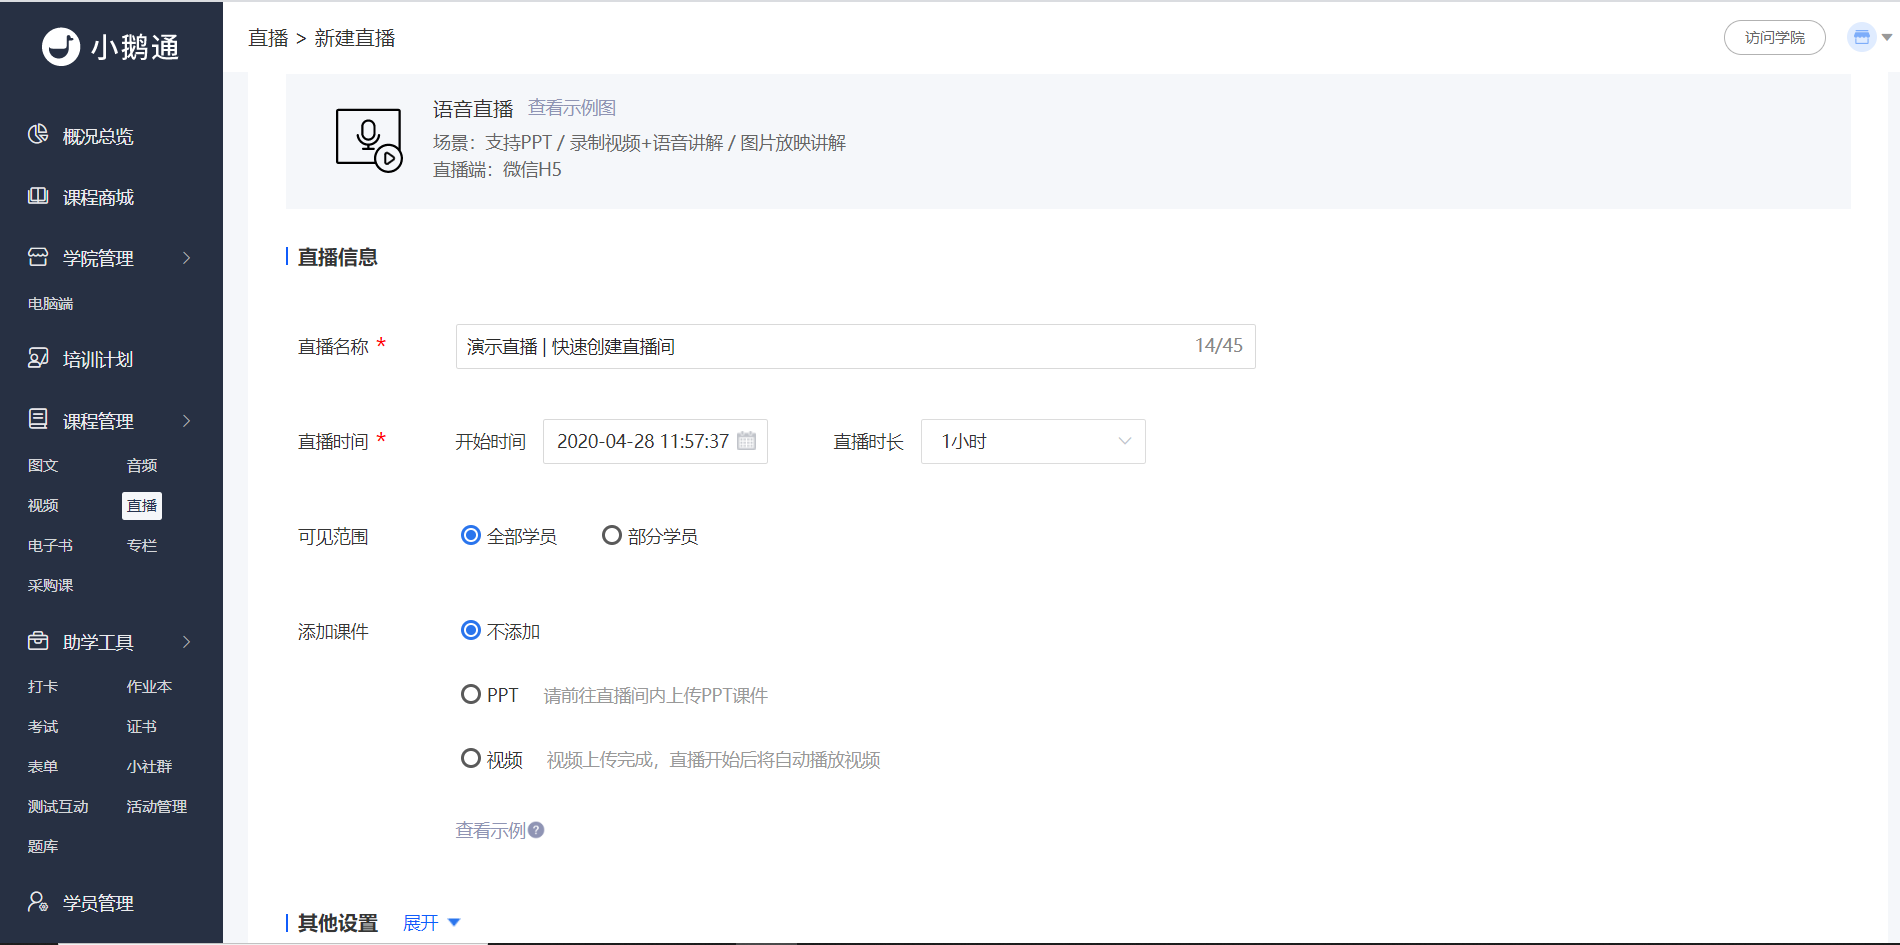
(Management Backend - Live Streaming - Create Voice Live Streaming)
3. Other Settings
Information: Fill in the live streaming introduction and details;
Details cover: The picture displayed when students view the details of the live streaming course;
Live streaming warm - up picture: The picture displayed in the video area before the live streaming starts;
Live streaming promotion cover: The picture displayed at the live streaming entrance on the academy homepage for students;
Associated courses: You can choose to associate with a column or training plan. After saving, the course information will be displayed in the details of the column and training plan.
Course grouping: A function to classify and display courses. For details, please readCourse Grouping Usage Tutorial.
Shelving settings: Set the shelving time of the course. For details, please readShelving and Unshelving Settings.
4. Click [Save] to create an audio course.
5. After returning to the interface, the system will prompt you to add an instructor. Select to add an instructor. Or click [Instructor Management] for the corresponding live streaming to add (Note: Only those who have bound their WeChat accounts can be added as instructors. Please ask the instructors to log in to the enterprise academy to bind their WeChat accounts first).
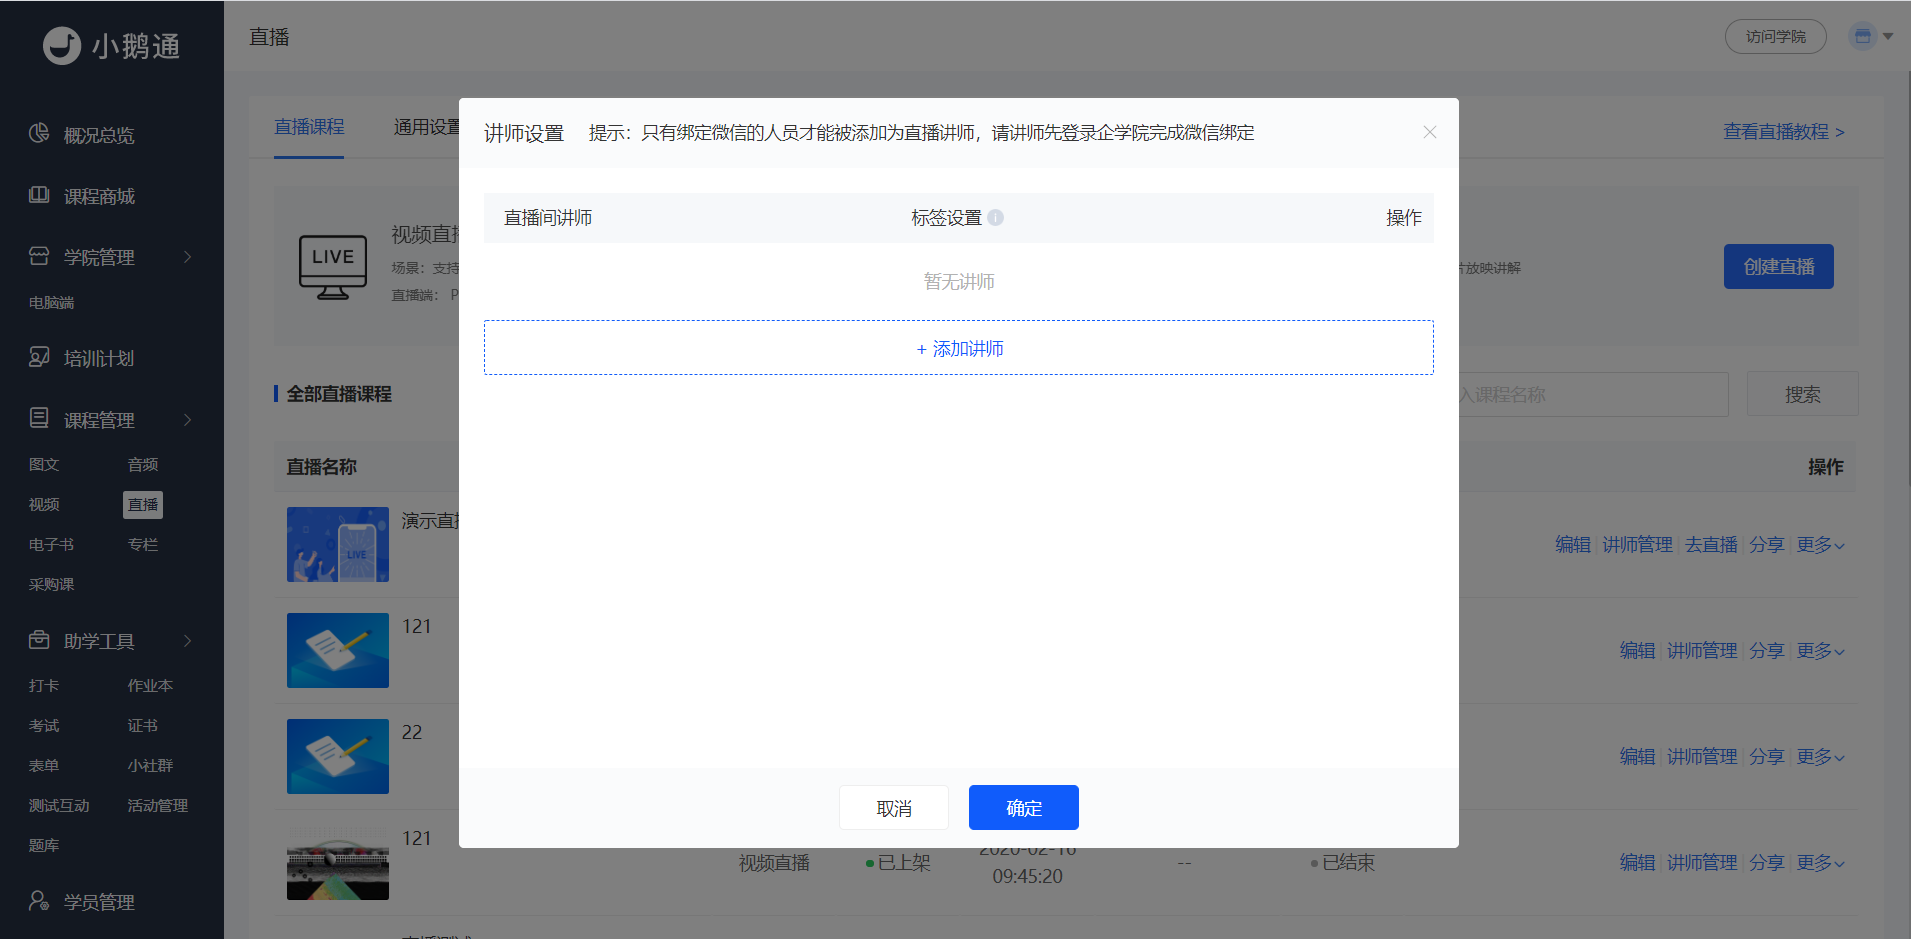
(Management Backend - Live Streaming - Instructor Management)
6. Select the instructor to be added, click [Add] → [OK] to complete the addition of the instructor. You can use the "Tag Settings" function to edit the title of the instructor displayed in the live streaming room.
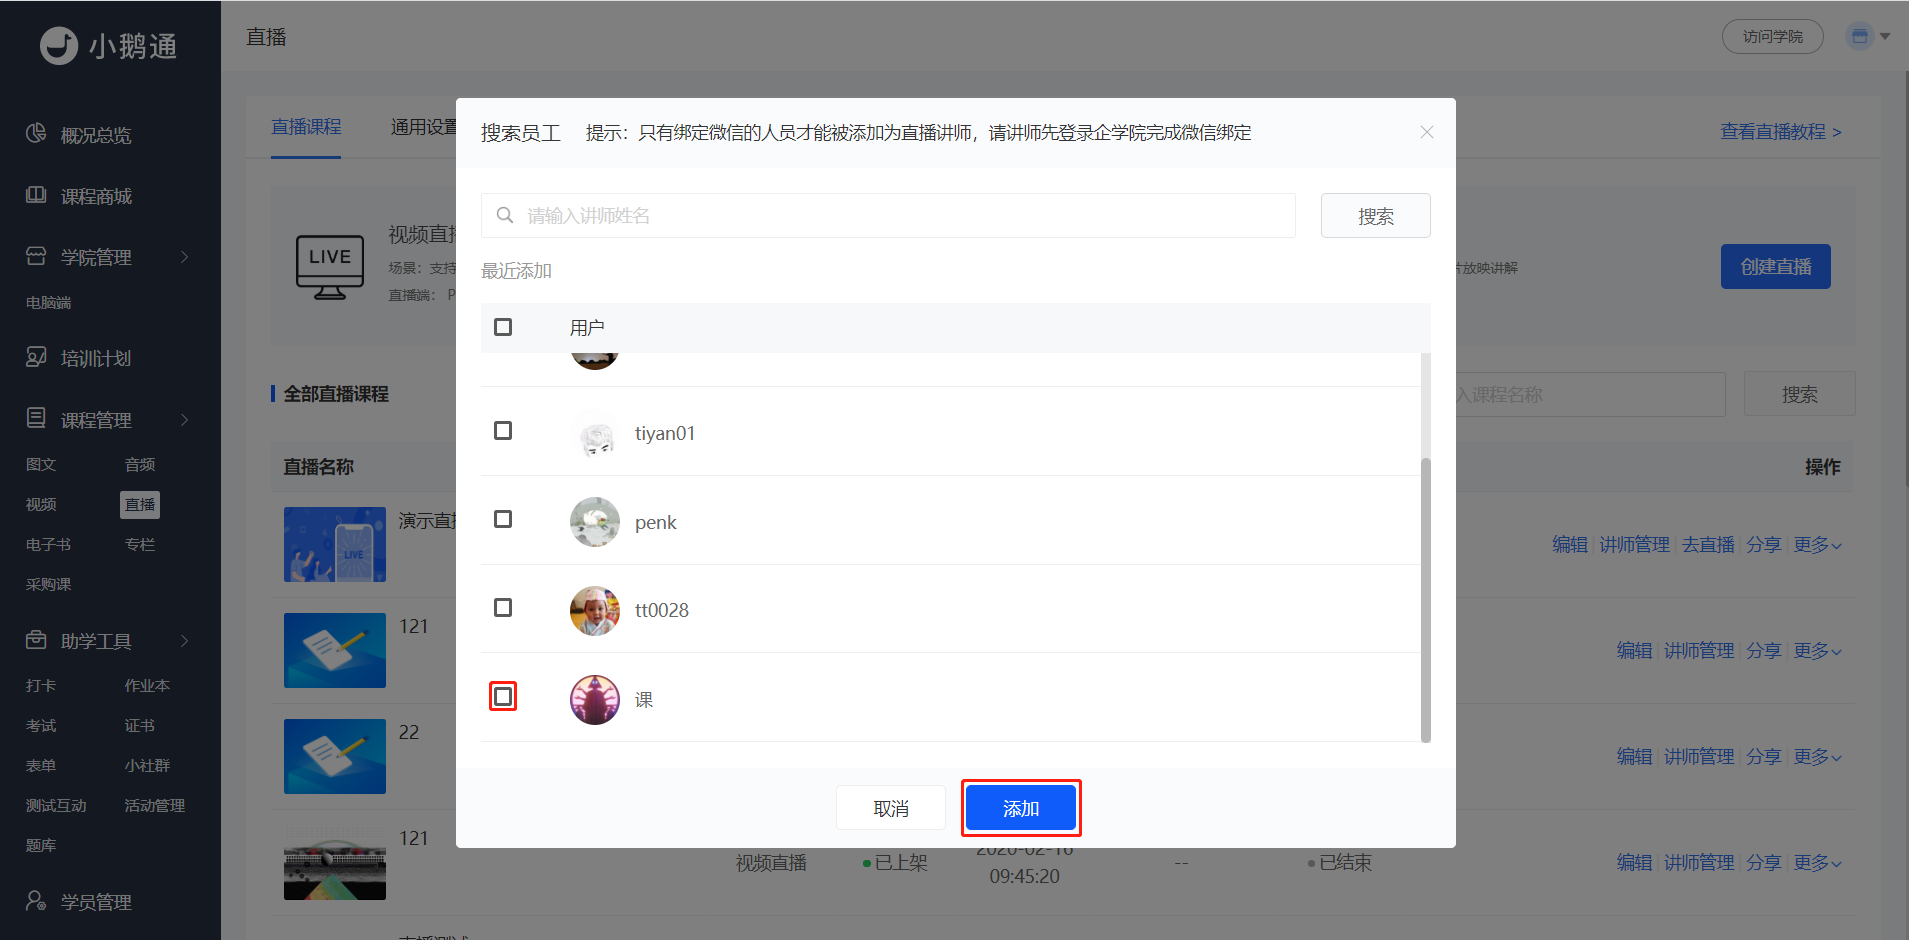
(Management Backend - Live Streaming - Instructor Management)
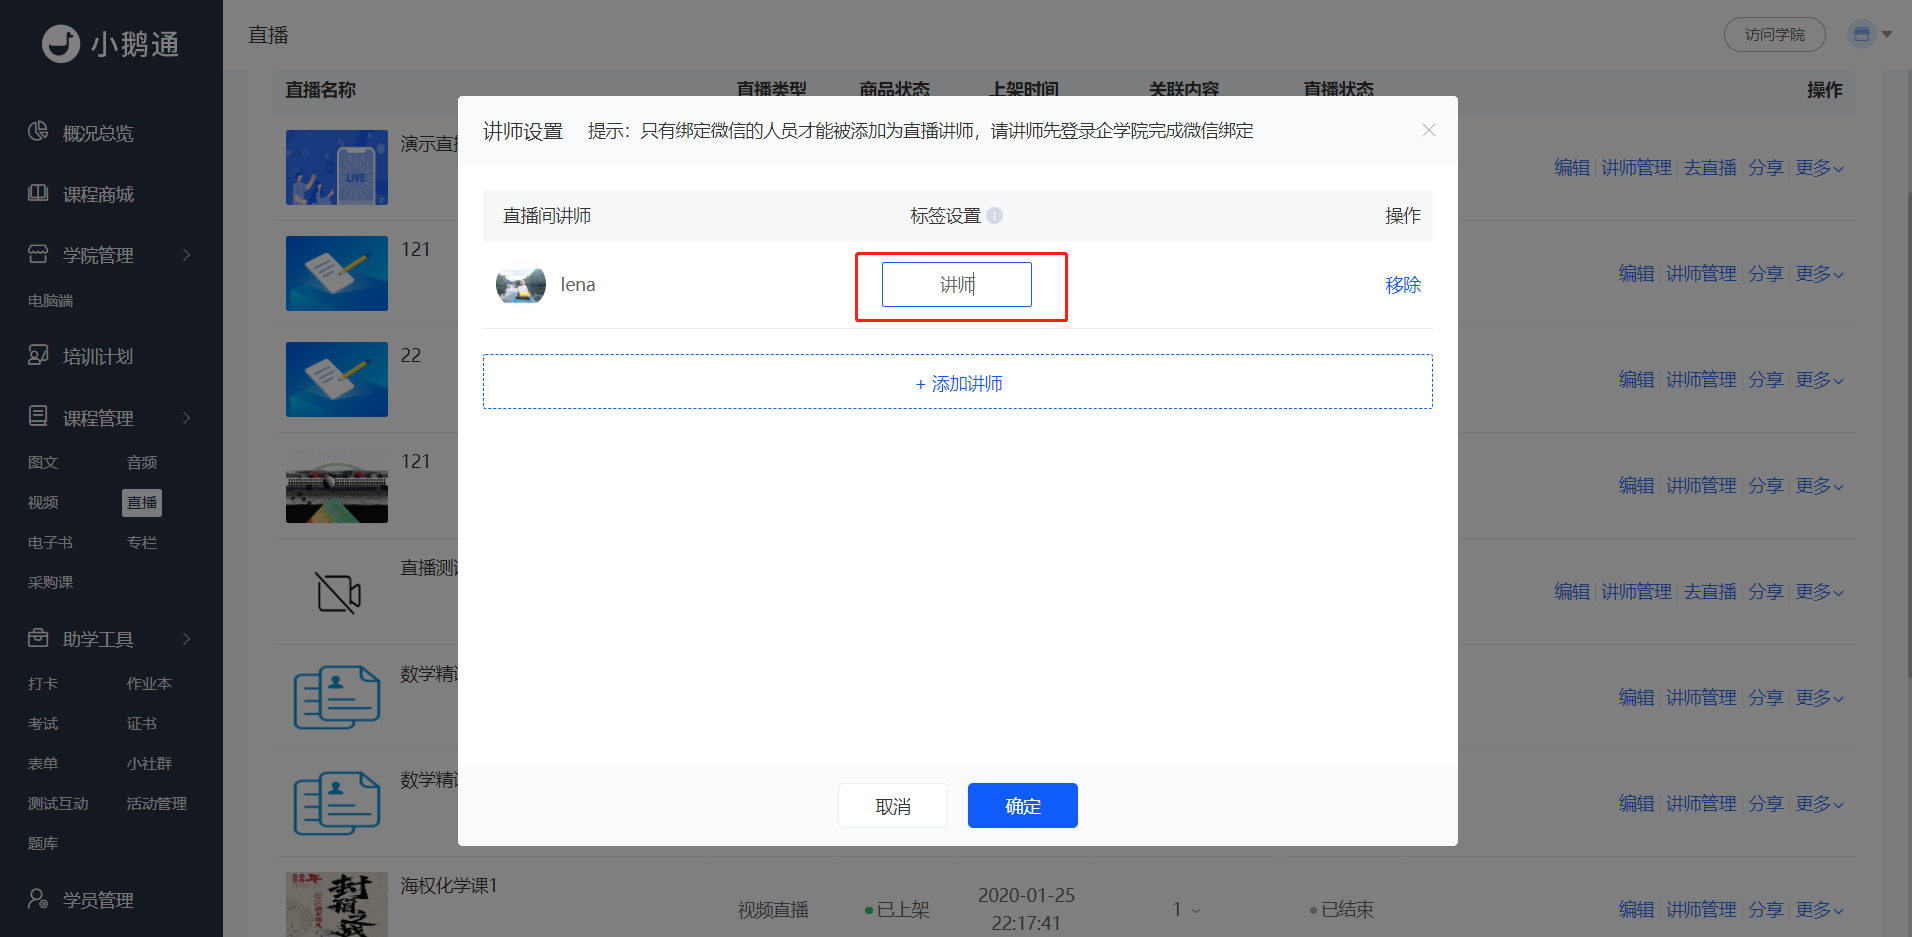 (Management Backend - Live Streaming - Instructor Management)
Step 2: Enter Voice Live Streaming (Management Backend)
Click [Operation] - [Go to Live Streaming], and select a suitable terminal for live streaming. Currently supported: Web terminal, WeChat terminal.
Different terminals support different functions (the display pages on the employee side are different). Suitable scenarios for each terminal:
(1) Web terminal: Supports PPT and voice explanations for recorded videos or pictures. For details, please readVoice and Image - Text Live Streaming Instructor - Side Usage Tutorial;
(2) WeChat terminal: Supports voice explanations for pre - uploaded PPTs, videos, or pictures. For details, please readVoice and Image - Text Live Streaming Usage Tutorial;
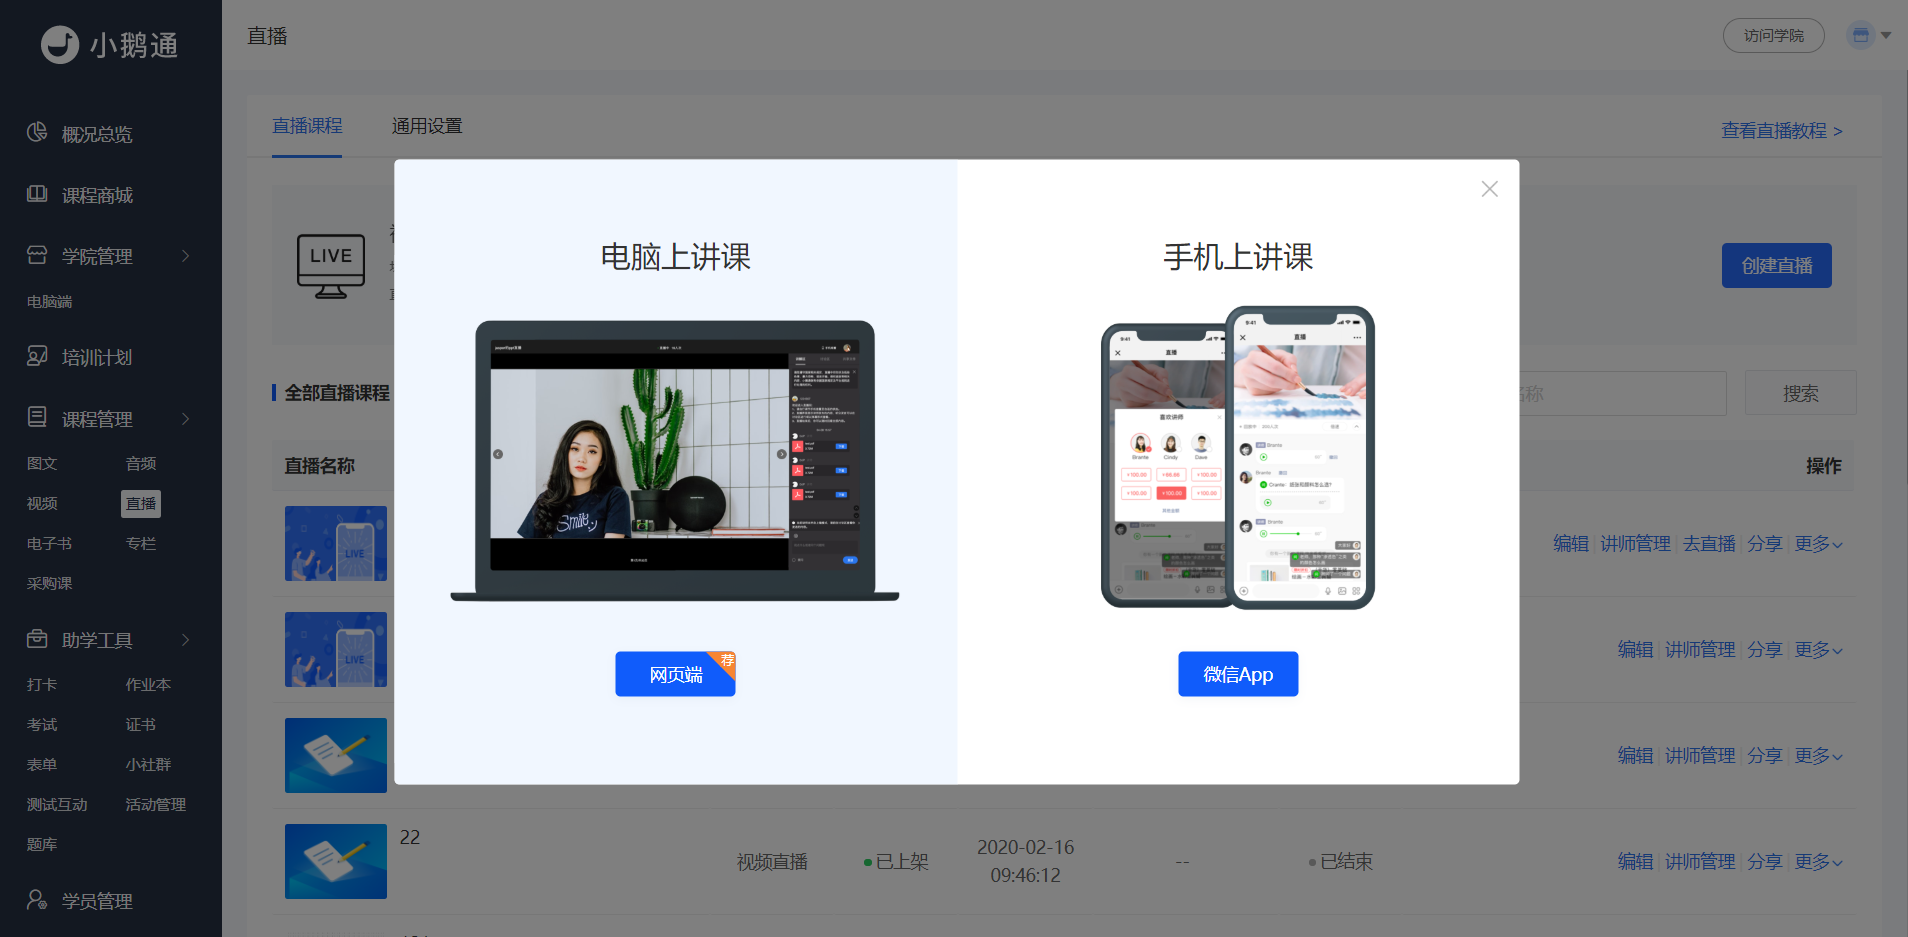
(Management Backend - Live Streaming - Go to Live Streaming)
Step 3: Course Learning (H5 Academy)
1. Students log in to the academy.
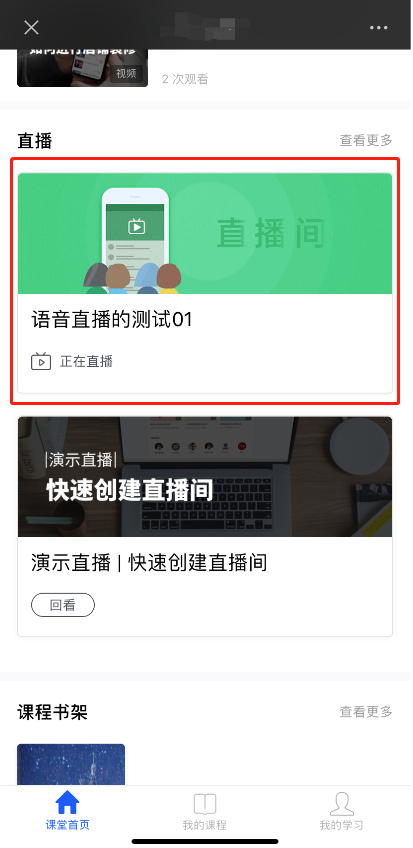
(H5 Academy - Classroom Homepage)
2. Students select the corresponding video live streaming course from the courses to learn.
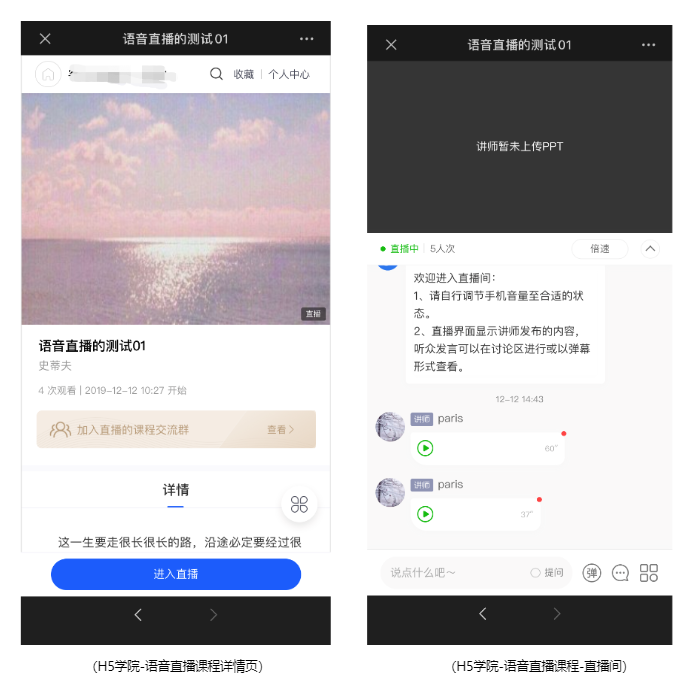
Tutorial on downloading and using corporate training courseware
I. Function Introduction
Administrators can set the relevant courseware materials for a course when creating/editing it. Learners can download the courseware materials while studying the course.
II. Purpose of Use
To help administrators quickly set up supporting materials for courses and facilitate learners to download courseware when studying courses.
III. Operation Path
Administrator side: Management backend → Courses → Create/Edit Course → Related Materials (Add Materials)
Learner side: WeChat, Enterprise WeChat H5 / PC Online Store → Course Details → Download Related Materials

IV. Usage Tutorial
Step 1: Set Course Materials
1. When creating/editing a course, administrators can set courseware materials in the [Related Materials] section.
[For Courses]: Text - images, Audio, Video, E - books, Columns, Training Plans
[Supported File Formats]: All [Image, Audio, Video, Document] formats supported by the material center.
[Supported File Quantity]: A single course supports a maximum of 20 files.
[Download Conditions]: Learners can download the materials when they enter the course details page.


(Management backend)
Step 2: Learners Enter the Course Details Page to Download Courseware Materials(H5 / PC)
1. [H5 Side]: If administrators set courseware materials when creating a course, the [Download Related Materials] entry will be displayed on the course details page for learners. Learners can download the courseware materials when entering the course details page.
[For Courses]: Text - images, Audio, Video, E - books, Columns, Training Plans.

(H5 Course Details Page)
2. [PC Side]: If administrators set courseware materials when creating a course, the [Download Related Materials] entry will be displayed on the course details page for learners. Learners can download the courseware materials when entering the course details page.
[For Courses]: Text - images, Audio, Video, Columns (E - books and Training Plans are not available on the PC side for now)


V. Frequently Asked Questions
Q1: Which courses are supported by the courseware library?
A: Text - images, Audio, Video, E - books, Columns, Training Plans.
Q1: Where do administrators need to set the materials?
A: In the management backend, enter the above - mentioned course module, click Create/Edit Course, and you can set the materials in the 'Related Materials' section.
Q1: Which file formats are supported by the courseware library? Is there a limit on the number of files?
A: All [Image, Audio, Video, Document] formats supported by the material center are supported. The limit is 20 files.
Q1: Which learner - side platforms are supported by the courseware library?
A: It supports WeChat, Enterprise WeChat H5, and PC browsers.