# Tutorial on Using Exam Certificates

<div data-elink-language-switch="1" id="bkmrk-%E4%B8%AD%E6%96%87" style="border:1px solid #d6d9de;border-radius:6px;padding:10px 12px;margin:0 0 18px 0;background:#f8fafc;font-size:14px;">[中文](/books/bcbe3/page/40008-DJb)</div>**<span style="font-size:17px;">I. Function Introduction</span>**

<span style="font-size:15px;">Instructors can customize the background and comments of exam certificates. Students who achieve high scores or meet the requirements will automatically receive exam certificates after passing the exam. They can then share and show off these certificates.</span>

**<span style="font-size:17px;">II. Purpose of Use</span>**

<span style="font-size:15px;">Enhance students' engagement with the courses and their initiative in learning. Encourage students to actively promote the exam certificates, thereby attracting traffic to the courses.</span>

**<span style="font-size:17px;">III. Use Scenarios</span>**

<span style="font-size:15px;">Merchants organize an exam and want to award certificates to outstanding students.</span>

**<span style="font-size:17px;">IV. Operation Path</span>**

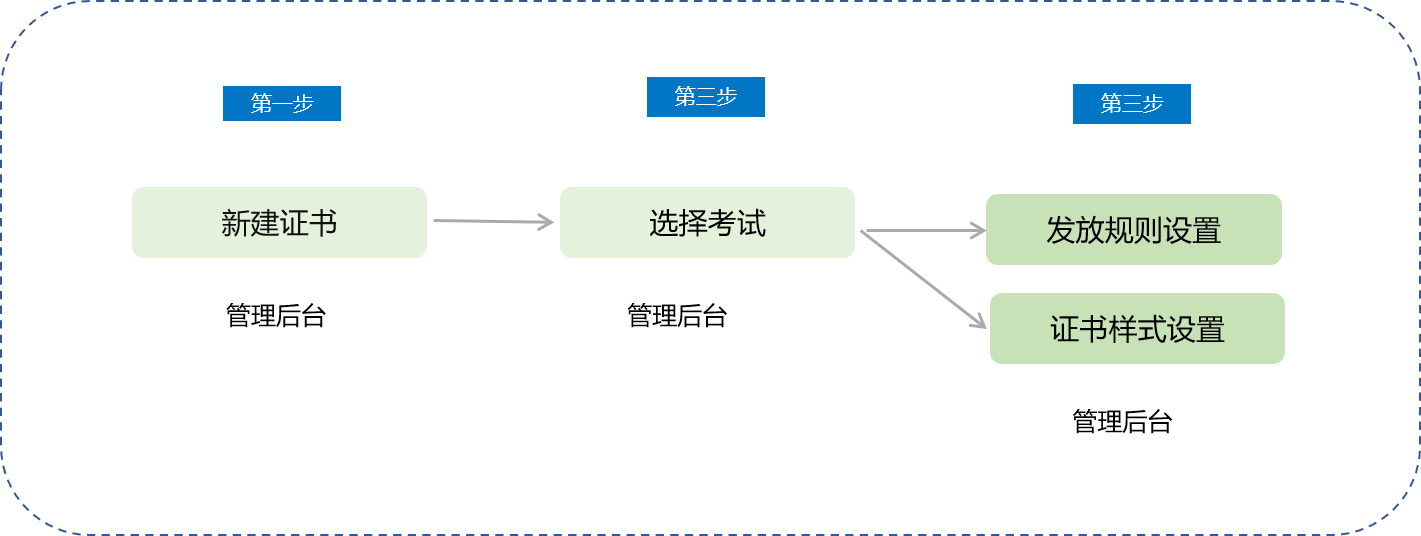
<span style="font-size:15px;">Associate an existing exam on the certificate function page:</span>

<span style="font-size:15px;">Management Console → Courses → Interactive Management → Certificates → New Certificate → Select Exam → Certificate Settings</span>

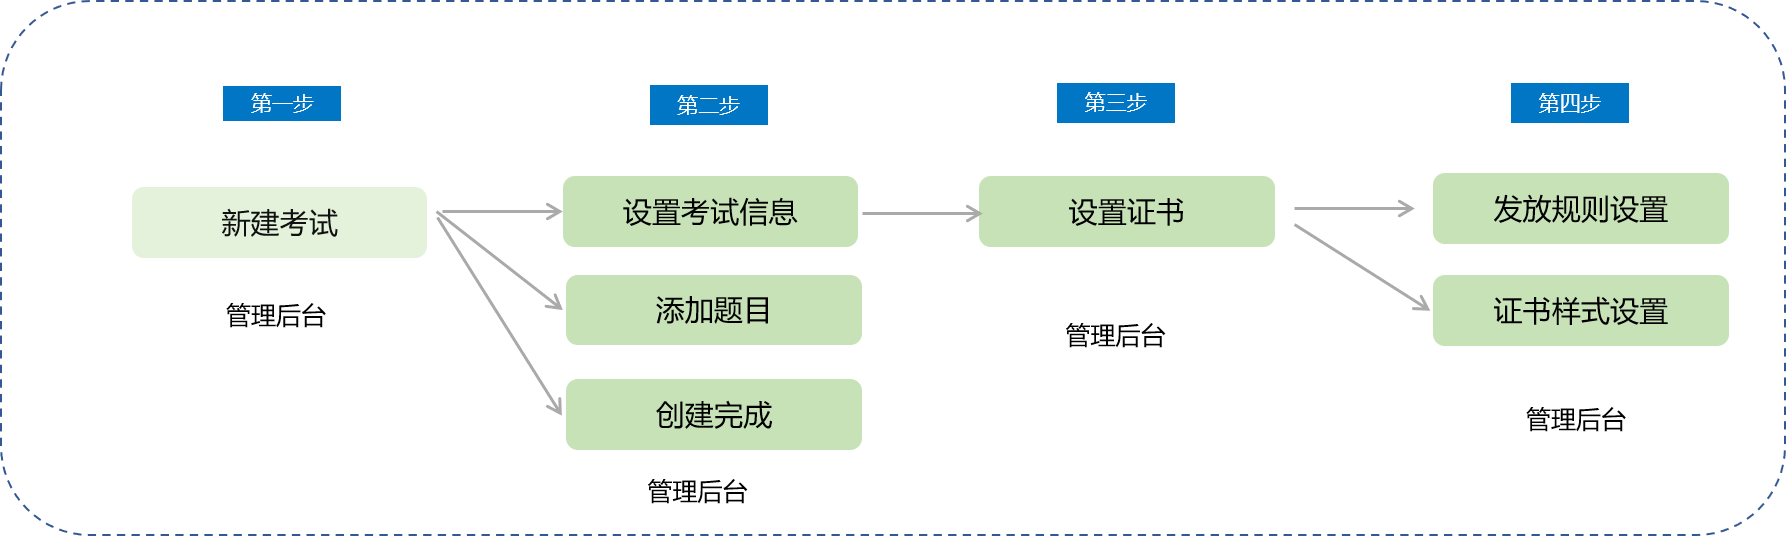
<span style="font-size:15px;">Configure and add certificates at the end of the exam creation process:</span>

<span style="font-size:15px;">Management Console → Courses →<span style="font-size:15px;">Interactive Management → Exams →</span>New Exam → Set Exam Information/Add Questions/Complete Creation → Set Certificate → Certificate Settings</span>

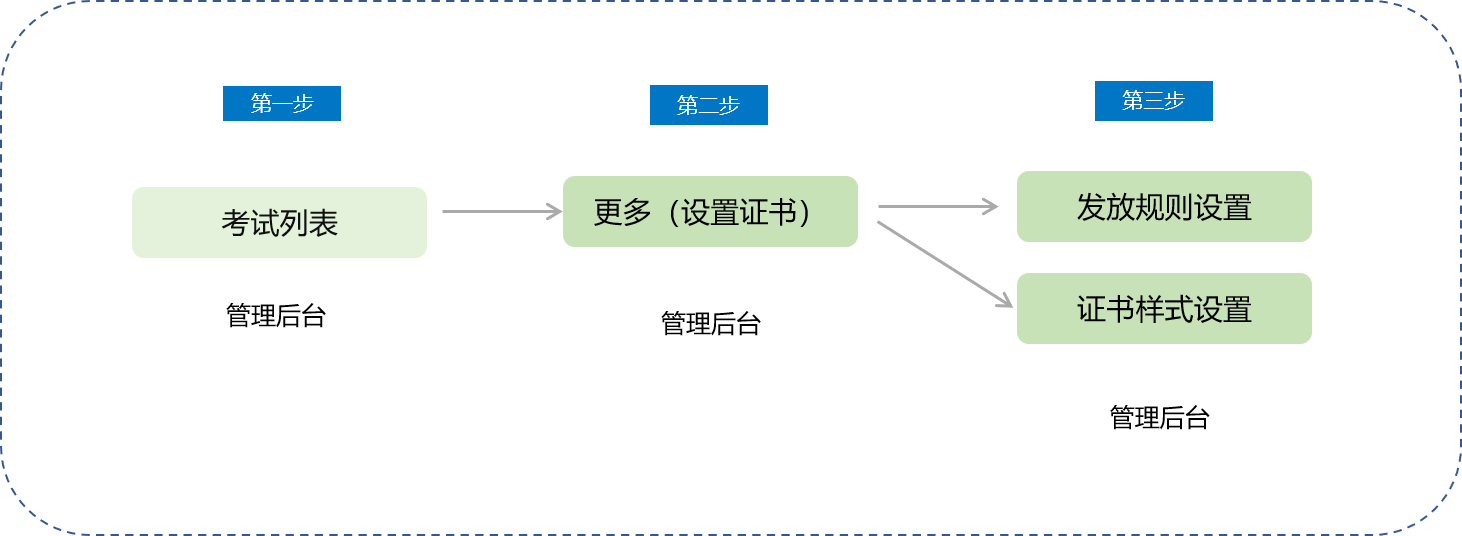
<span style="font-size:15px;">Supplement the configuration and add certificates for an existing exam on the exam function page:</span>

<span style="font-size:15px;">Management Console → Exam List → More (Set Certificate) → Certificate Settings</span>

**<span style="font-size:17px;">V. Usage Tutorial</span>**

<span style="font-size:15px;">Associate an existing exam on the certificate function page:</span>

<span class="image-wrapper" style="display:inline-block;overflow:hidden;width:550px;height:207px;"> ![98300900_1699607766.png](https://wechatapppro-1252524126.file.myqcloud.com/help_document/image/ueditor/98300900_1699607766.png)</span>

<span style="font-size:15px;">Configure and add certificates at the end of the exam creation process:</span>

<span class="image-wrapper" style="display:inline-block;overflow:hidden;width:550px;height:170px;"> ![13825800_1699607767.png](https://wechatapppro-1252524126.file.myqcloud.com/help_document/image/ueditor/13825800_1699607767.png)</span>

<span style="font-size:15px;">Supplement the configuration and add certificates for an existing exam on the exam function page:</span>

<span class="image-wrapper" style="display:inline-block;overflow:hidden;width:550px;height:202px;"> ![29526700_1699607767.png](https://wechatapppro-1252524126.file.myqcloud.com/help_document/image/ueditor/29526700_1699607767.png)</span>

<span style="font-size:15px;">Method 1:  
</span>

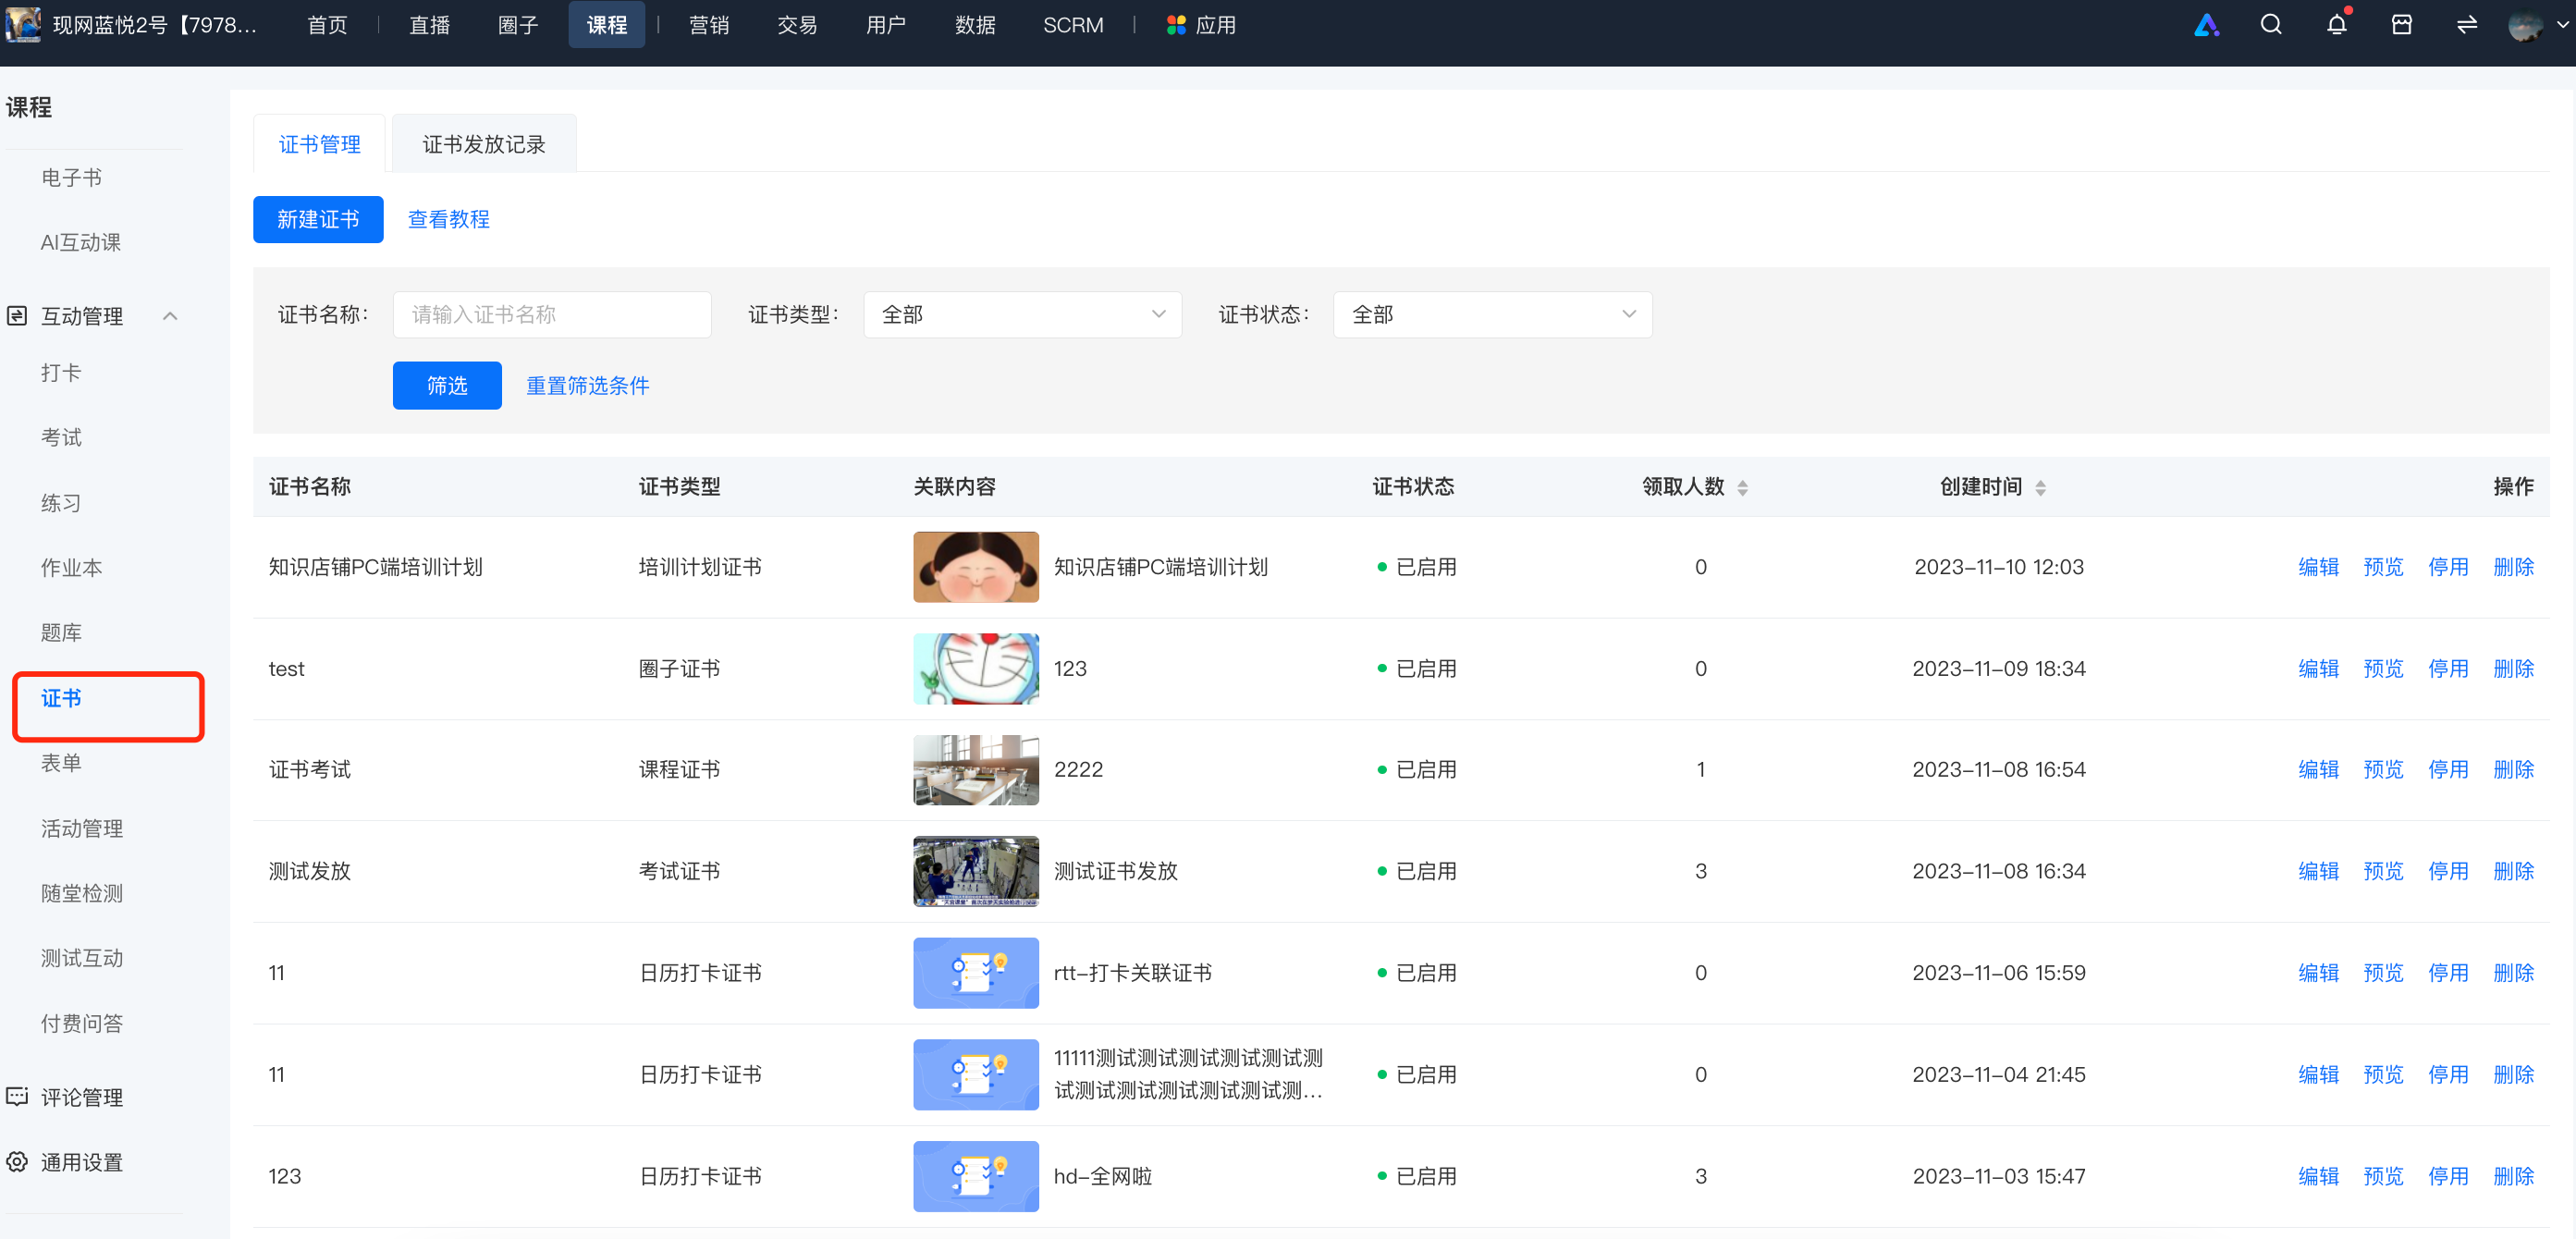
<span style="font-size:15px;">Step 1: Enter the certificate management page through the \[Learning Tools\] - \[Certificates\] entry on the management console, and click the \[New Certificate\] button.</span>

<span class="image-wrapper" style="display:inline-block;overflow:hidden;width:550px;height:269px;"> ![image.png](https://wechatapppro-1252524126.file.myqcloud.com/help_document/image/ueditor/49393400_1699607804.png ".png")</span>

<span style="font-size:15px;">Step 2: Create a new exam certificate.  
</span>

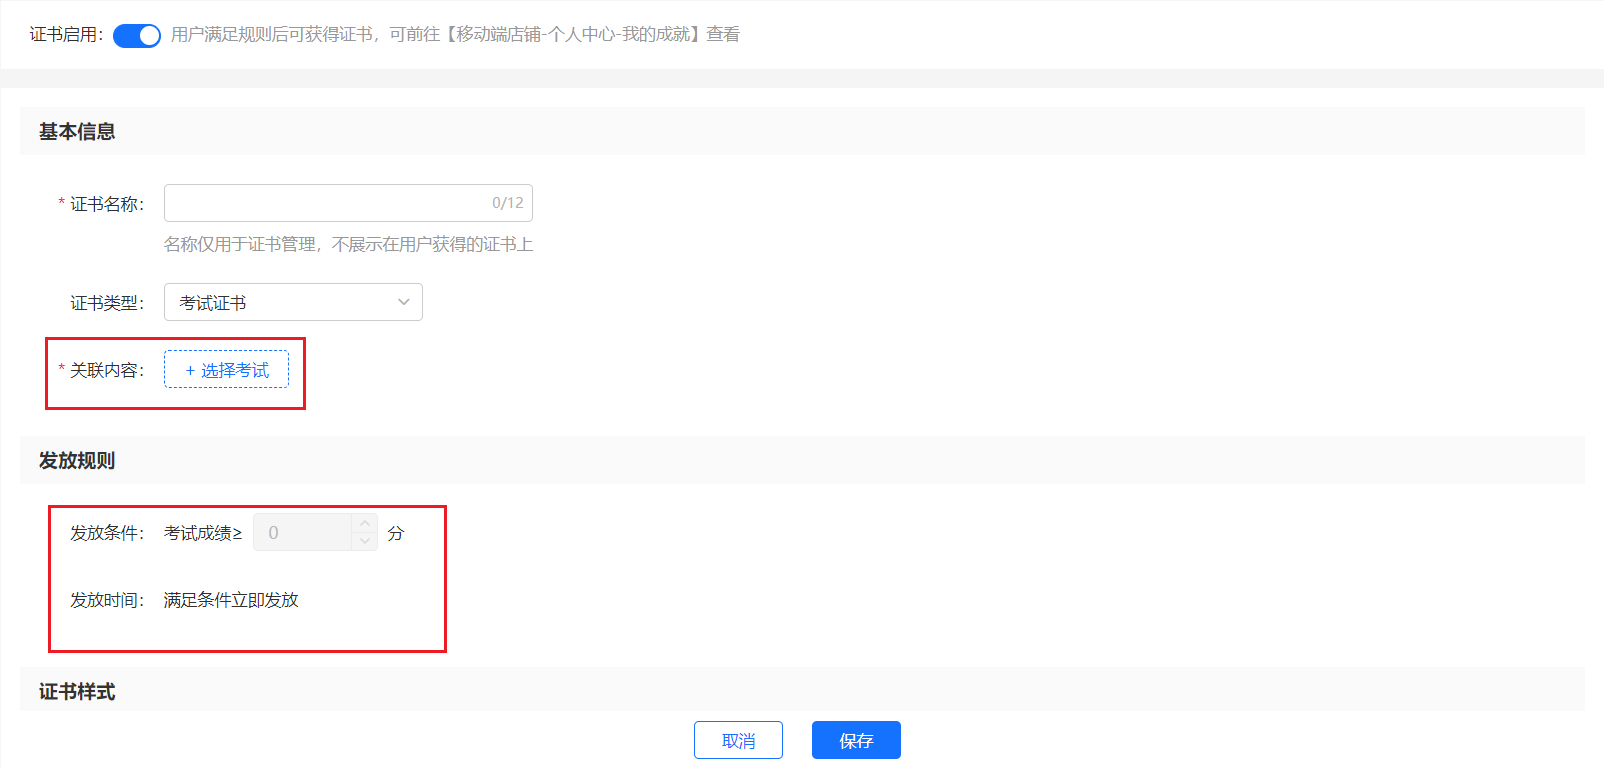
<span style="font-size:15px;">① Associate an exam and set the rules for issuing certificates. Certificates will only be issued when students' exam scores are higher than a certain score.</span>

<span style="font-size:15px;">![image.png](https://wechatapppro-1252524126.file.myqcloud.com/help_document/image/ueditor/43369500_1699607767.png ".png")</span>

<span style="font-size:15px;">  
</span>

<span style="font-size:15px;">Related settings description: The switch button for \[Enable Exam Certificate\]: You can choose whether to issue certificates after the exam ends.</span>

<span style="font-size:15px;">1. Enable the exam certificate switch: You can choose whether to issue certificates after the exam ends.</span>

<span style="font-size:15px;">2. Exam score: You can choose the minimum score required for students to obtain the certificate.</span>

<span style="font-size:15px;">3. Certificate name: The name of the certificate, for example, \*\* Honor Certificate in 2020;</span>

<span style="font-size:15px;"> Certificate background: The background of the certificate. You can use the default background or upload a custom image background;</span>

<span style="font-size:15px;">4. Score settings: You can set different comments for certificates based on different score ranges;</span>

<span style="font-size:15px;">5. QR code settings: You can upload the course QR code for traffic attraction after sharing;</span>

<span style="font-size:15px;">6. Sharing message: Limited to within 20 characters, you can briefly introduce the course content.</span>

<span style="font-size:15px;">Method 2:</span>

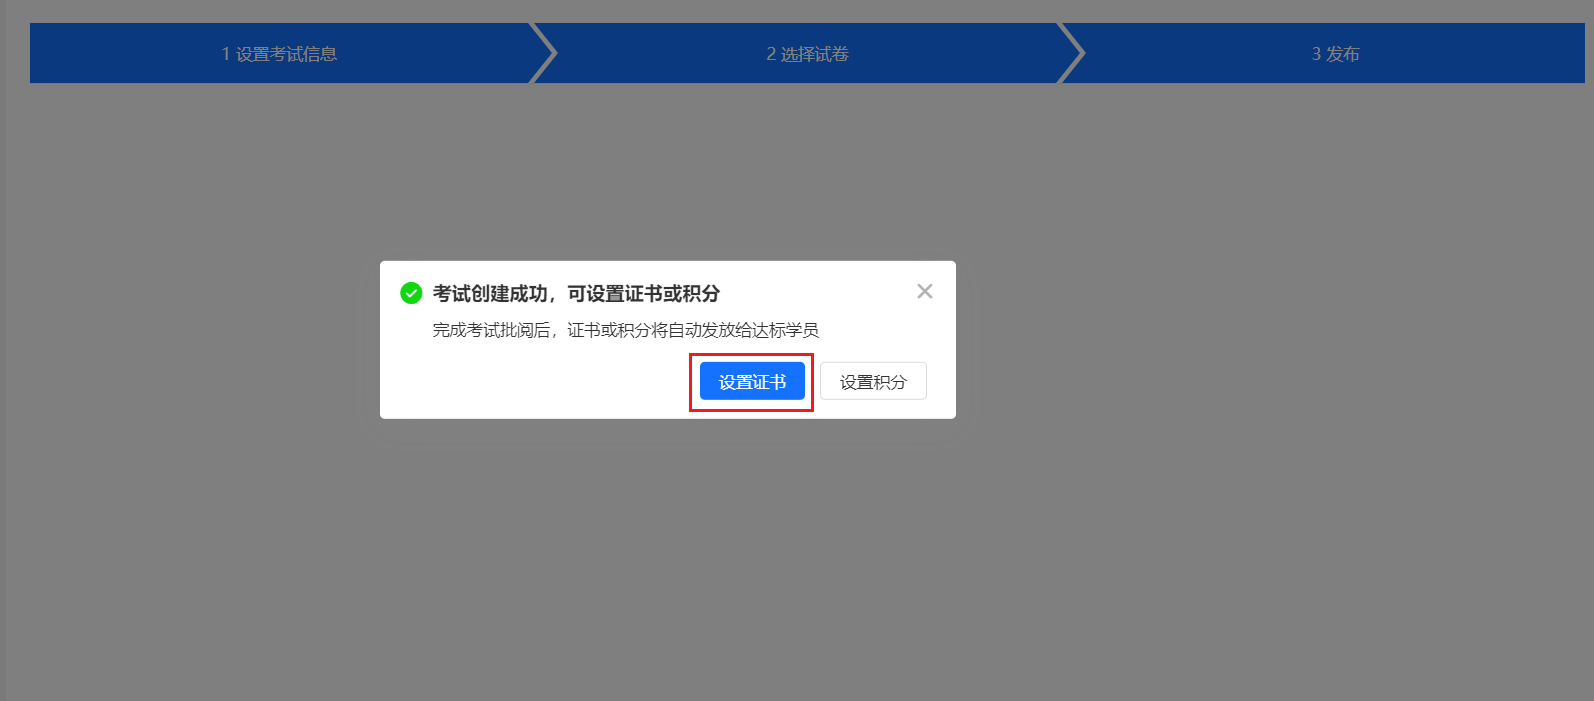
<span style="font-size:15px;">At the last step of creating an exam, you can conveniently go directly to the certificate setting process. Click the \[Set Certificate\] button to jump to the certificate setting page (refer to the certificate settings in Method 1).</span>

<span class="image-wrapper" style="display:inline-block;overflow:hidden;width:550px;height:269px;">![image.png](https://wechatapppro-1252524126.file.myqcloud.com/help_document/image/ueditor/58533600_1699607767.png ".png")</span>

<span style="font-size:15px;">  
</span>

<span style="font-size:15px;">Method 3:  
</span>

<span style="font-size:15px;">After an exam is created, or add a certificate to an exam created previously.</span>

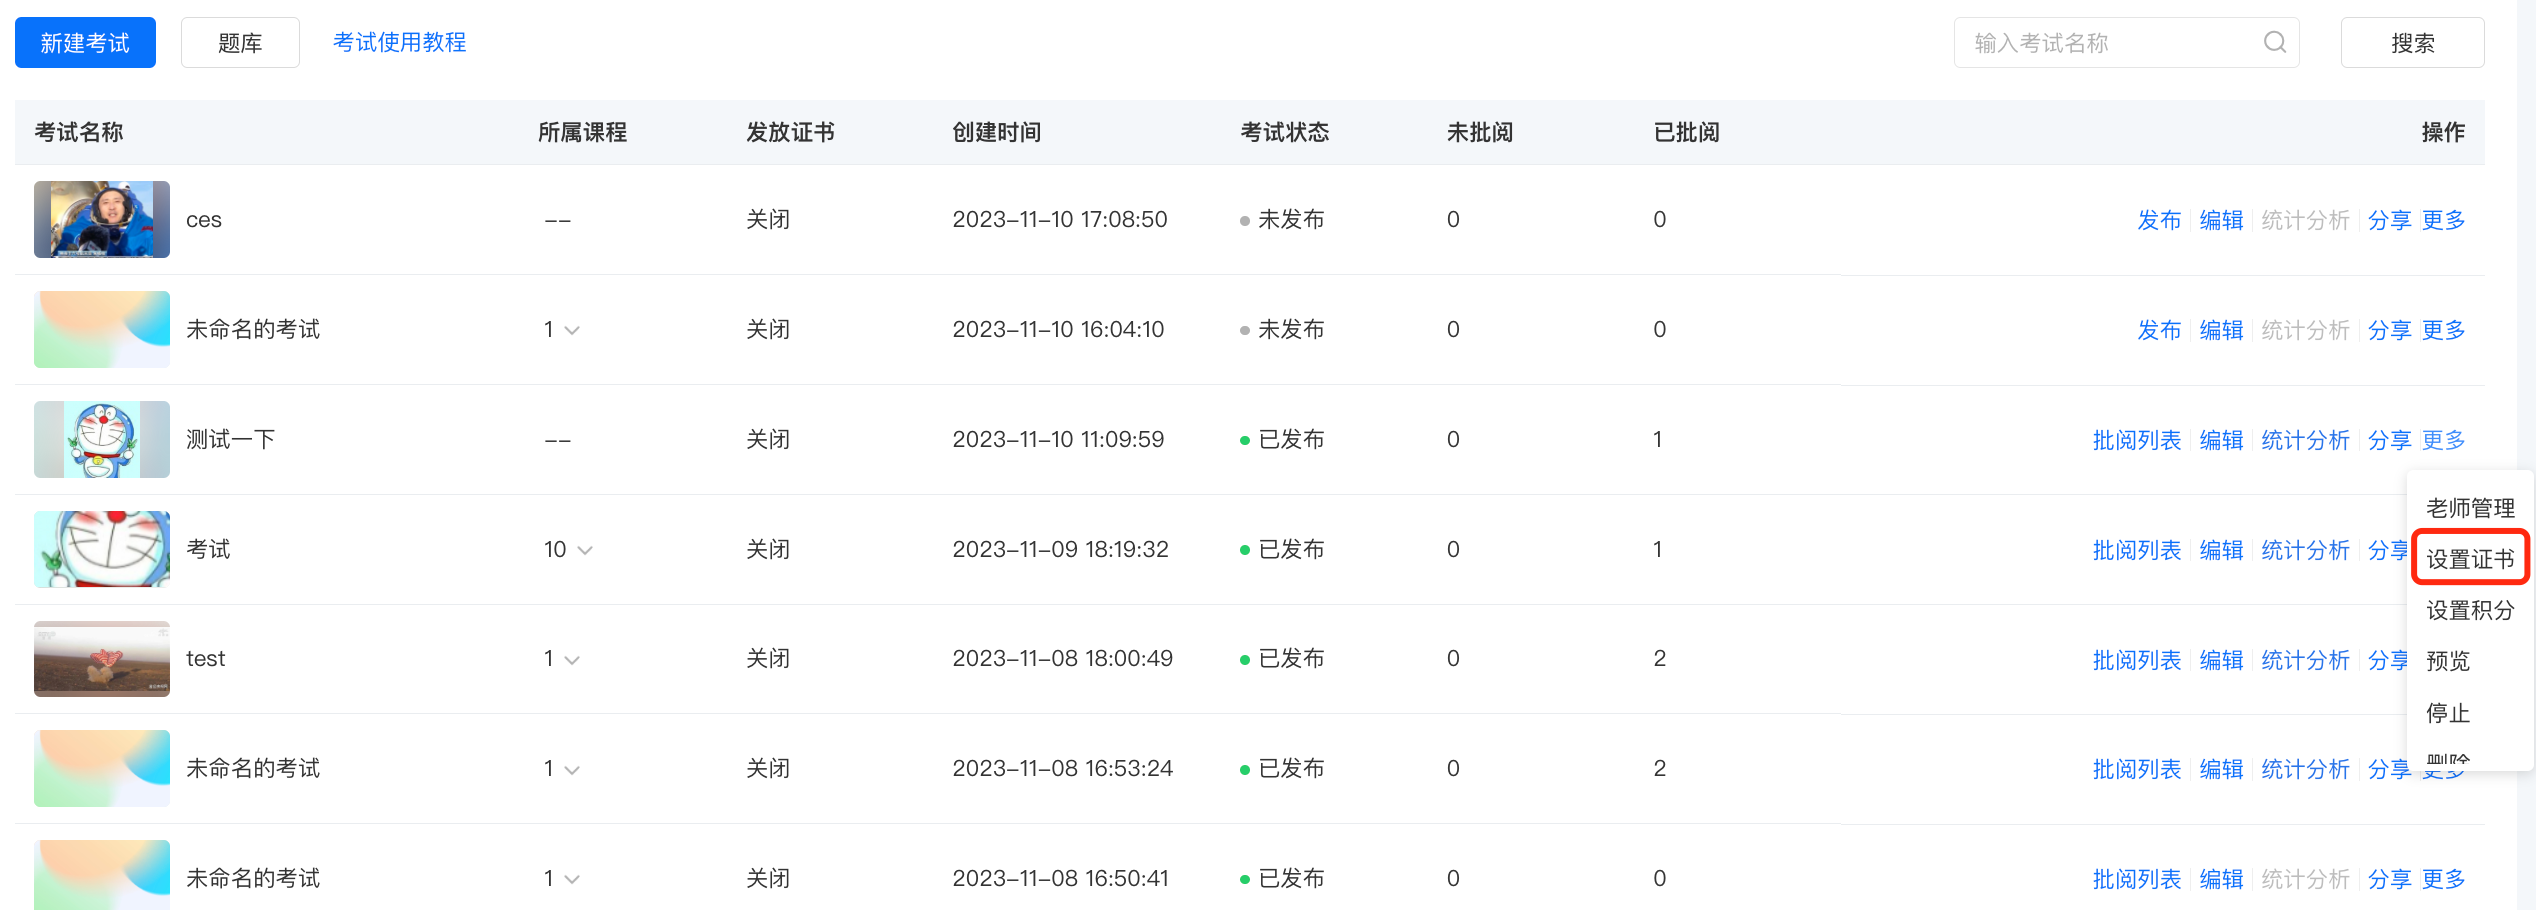
<span style="font-size:15px;">Through the \[Courses\] -<span style="font-size:15px;">\[Interactive Management\] -</span>\[Exams\] entry on the management console, you can enter the exam management page to view previously created exams. Click \[More\] - \[Set Certificate\] to enter the certificate setting interface, and then start setting according to the certificate setting process introduced in Method 1.</span>

![image.png](https://wechatapppro-1252524126.file.myqcloud.com/help_document/image/ueditor/11045100_1699607804.png ".png")

**VI. C - end User Display Screen**

**![image (5).png](https://wechatapppro-1252524126.file.myqcloud.com/help_document/image/ueditor/3453300_1699607768.png ".png")**
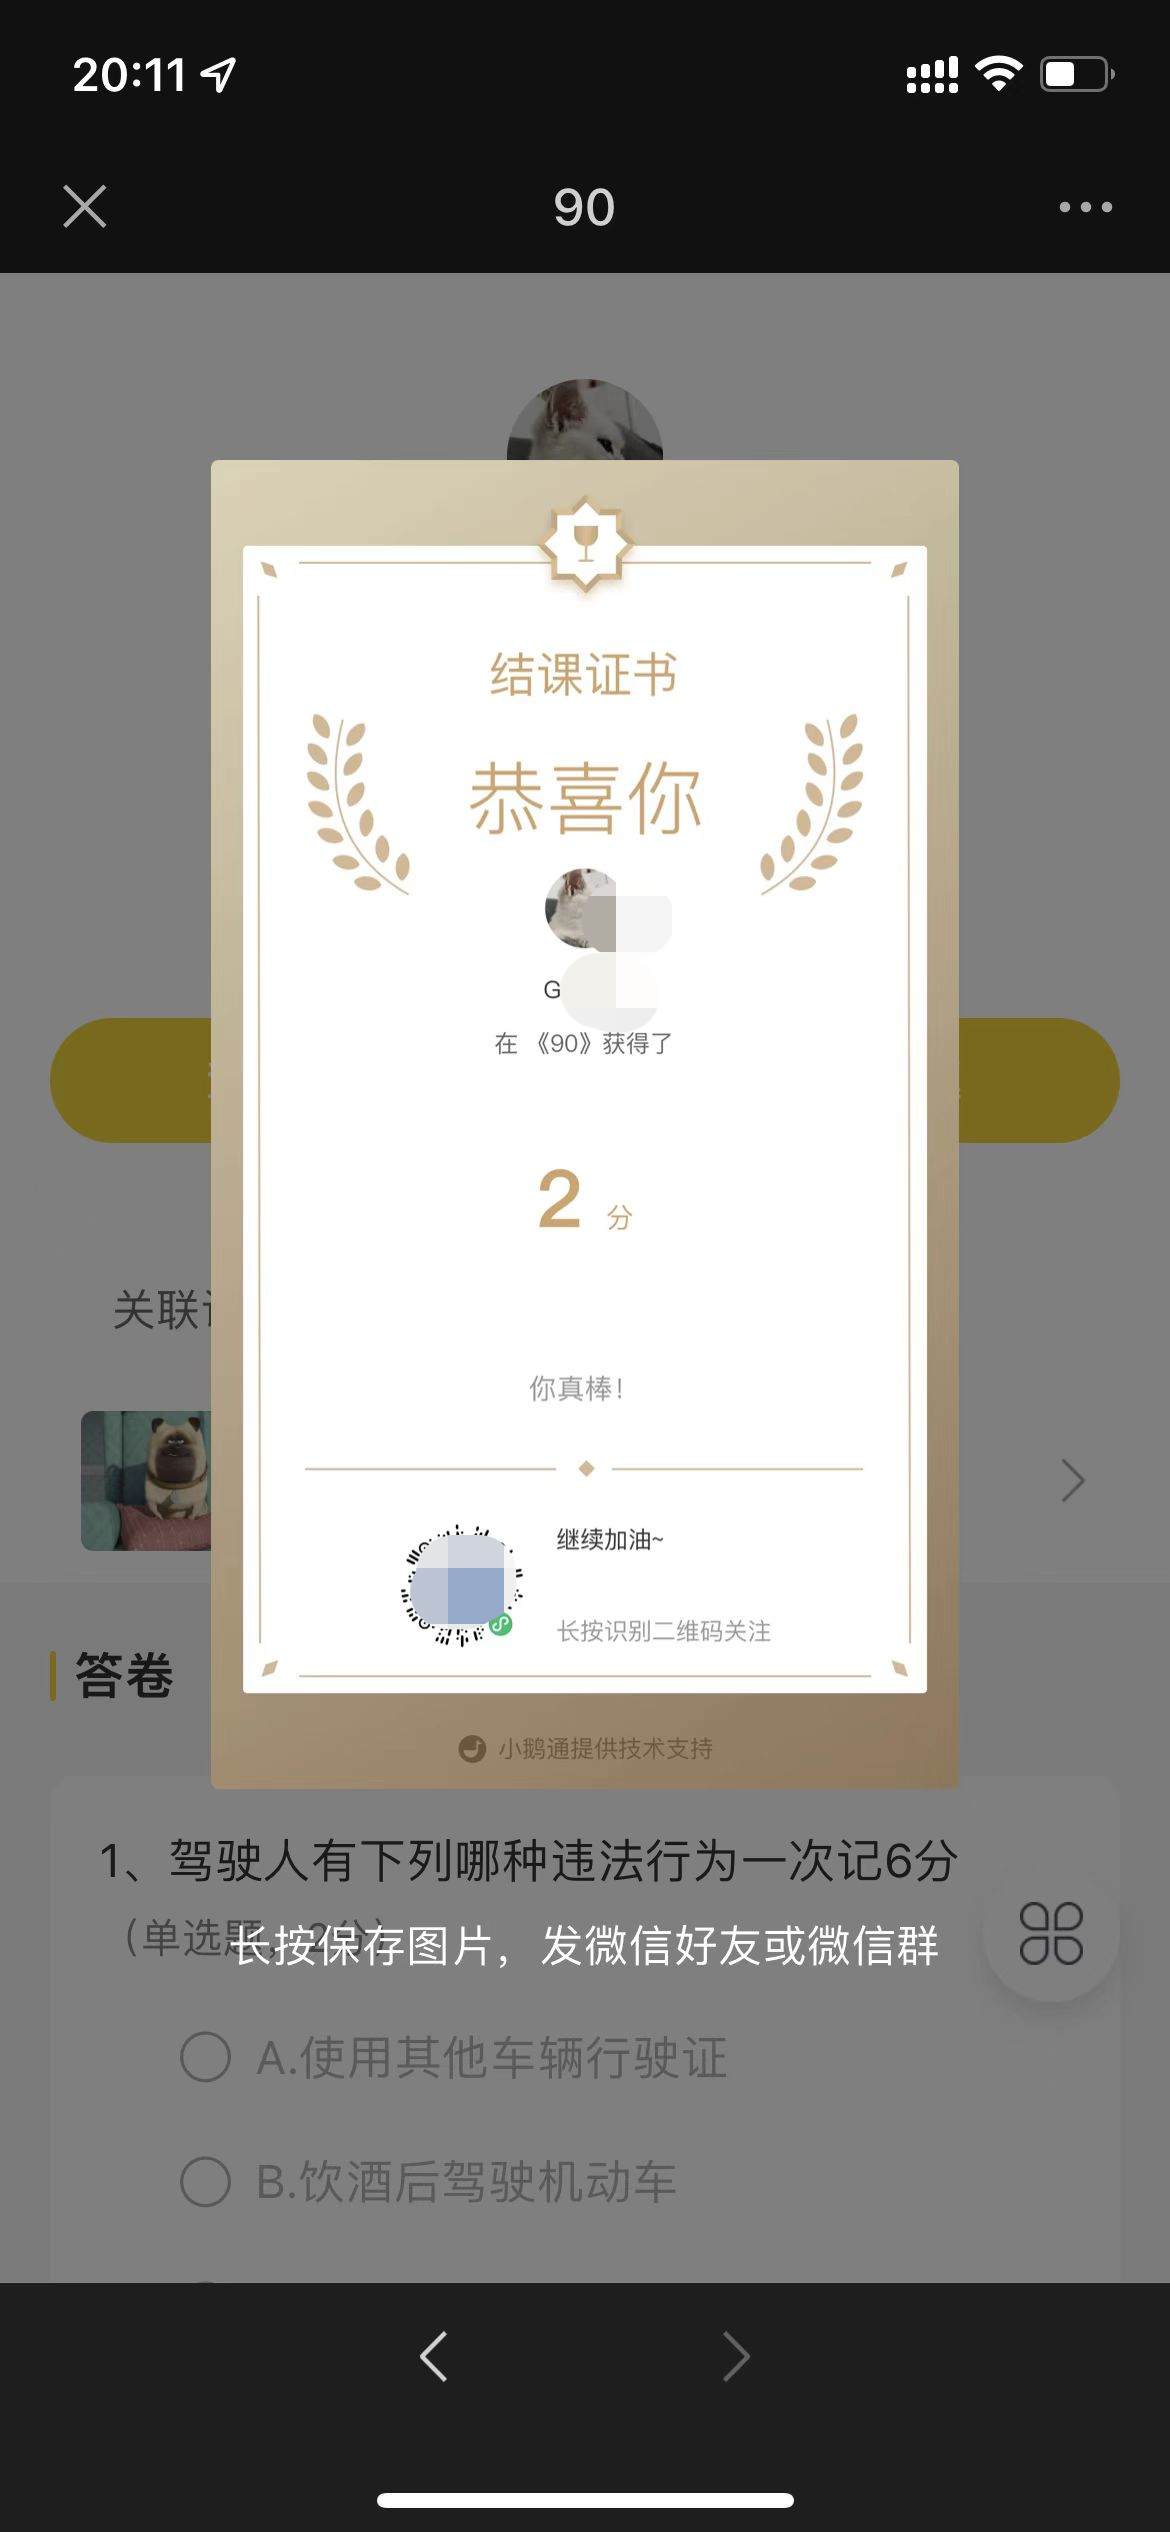
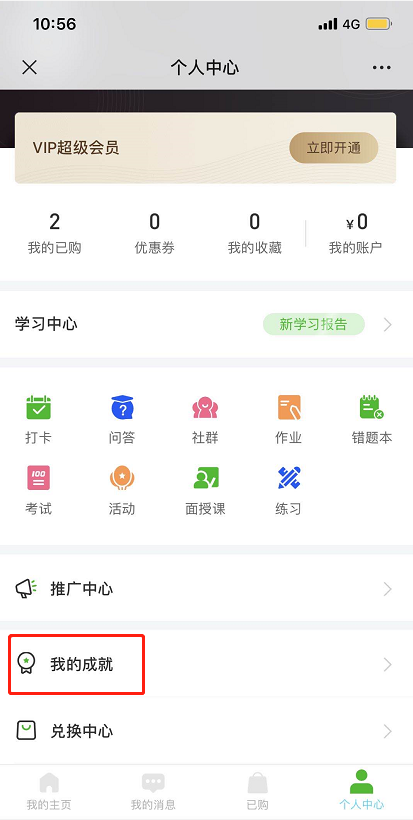
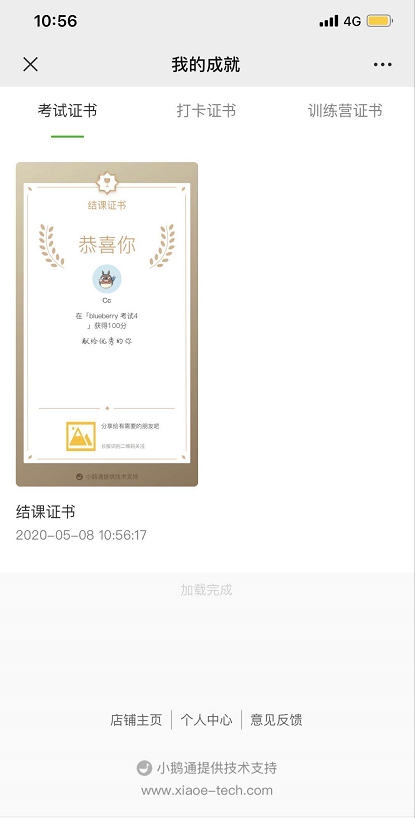
<span style="font-size:15px;">View all obtained certificates through \[Personal Center\] → \[My Achievements\];</span>

 ![20974400_1699607768.png](https://wechatapppro-1252524126.file.myqcloud.com/help_document/image/ueditor/20974400_1699607768.png)

<span class="image-wrapper" style="display:inline-block;overflow:hidden;width:415px;height:818px;"> ![34825500_1699607768.png](https://wechatapppro-1252524126.file.myqcloud.com/help_document/image/ueditor/34825500_1699607768.png)</span>