Tutorial on Using Calendar Check-in
I. Function Introduction
Calendar check-in is a check-in mode based on the 'day' unit. The operator creates a check-in activity, and students need to submit check-in content within the valid time period every day.
II. Purpose of Use
Improve student activity and help students develop good behavior habits through daily check-ins.
III. Use Scenarios
Scenarios suitable for calendar check-in: Students need to output corresponding content every day, and only need to output once a day, such as morning run check-in, early sleep check-in, etc.
IV. Operation Paths
Merchant Side:
1. Interactive Calendar Check-in: Desktop Management Console → Interactive Management → Check-in → Calendar Check-in → New Calendar Check-in2. Course Calendar Check-in: Desktop Management Console → Series Course Management → Course Mode → Check-in Function → New Calendar Check-in
1. H5 Store/Merchant Mini Program → My → Learning Tools → Check-in2. eLink Check-in Mini Program → Home Page3. elink Student APP → My Courses on the Home Page → View More → Navigation Bar → Learning Assistance
V. Usage Tutorial
(I)Create an Interactive Calendar Check-in
Step 1: New Calendar Check-in
Log in to the store management background, click [Courses] in the top menu bar, select [Interactive Management] → [Check-in] → [Calendar Check-in], and click [Create Now].

Step 2: Fill in Check-in Information
1.Set check-in information: Fill in the title of the check-in activity and configure the check-in rules.2.Check-ins can be used independently for sharing or associated with series courses/single courses. One check-in activity supports association with one series course/single course. Currently, the types of series courses/single courses supported by check-ins are: text and images, audio, video, live streaming, columns, memberships, large columns, and class courses.Note: For the calendar check-in of [Series Courses] - [Courses], refer tothe introduction of course calendar check-in in '(II) Create a Course Calendar Check-in'.
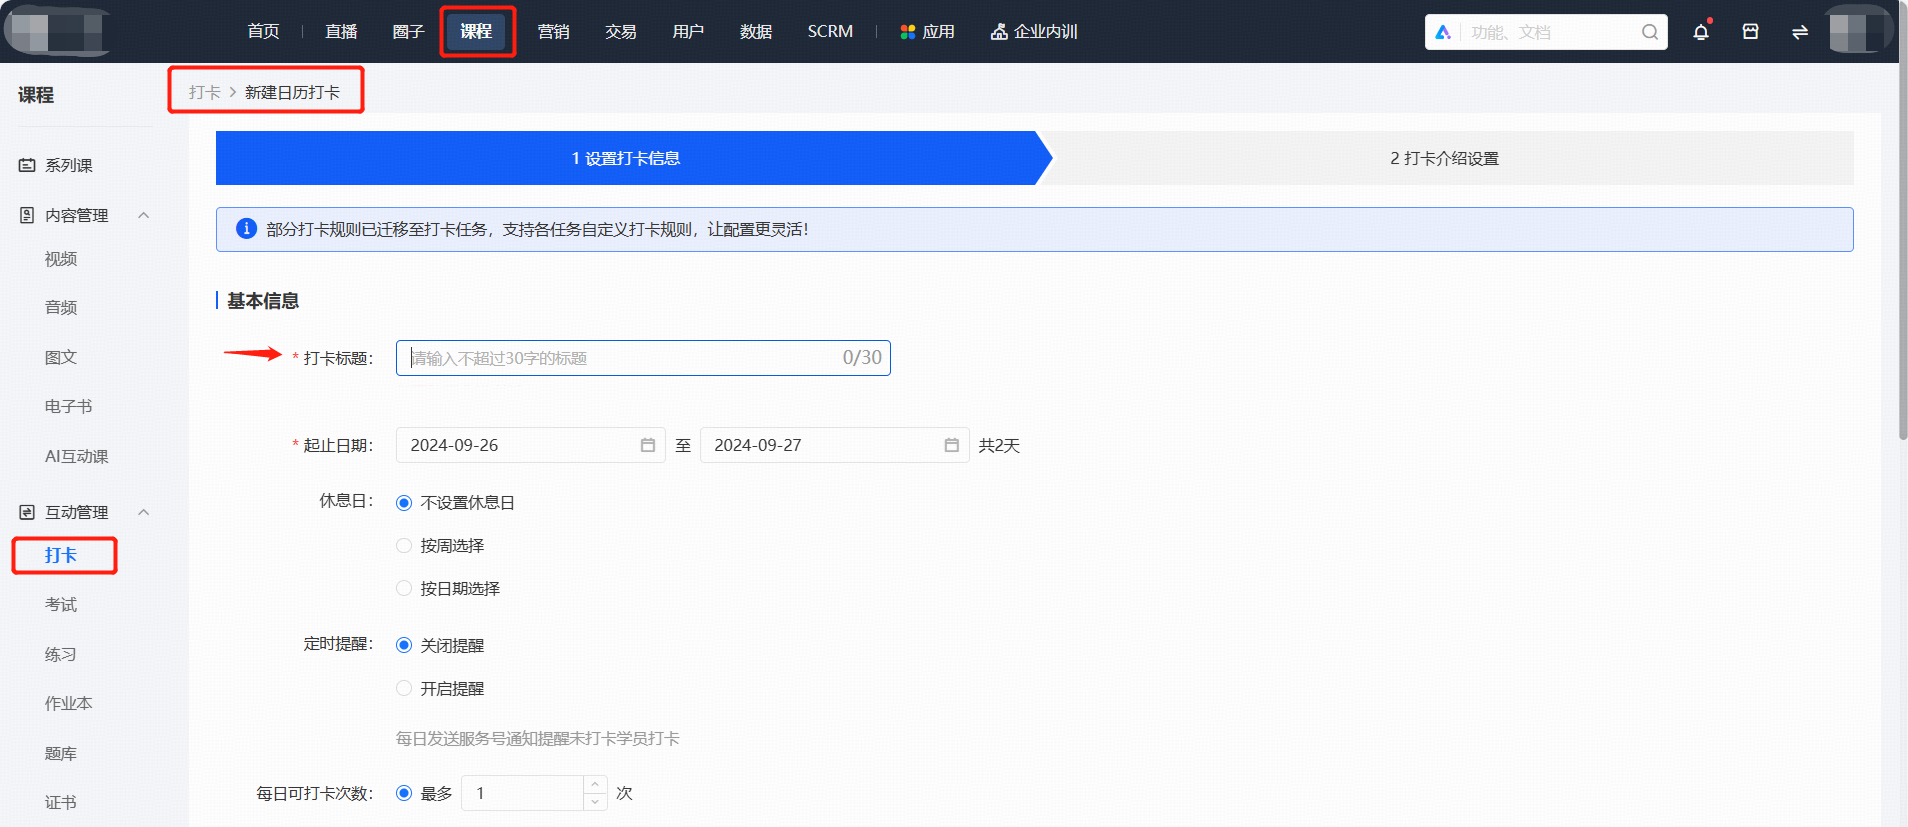
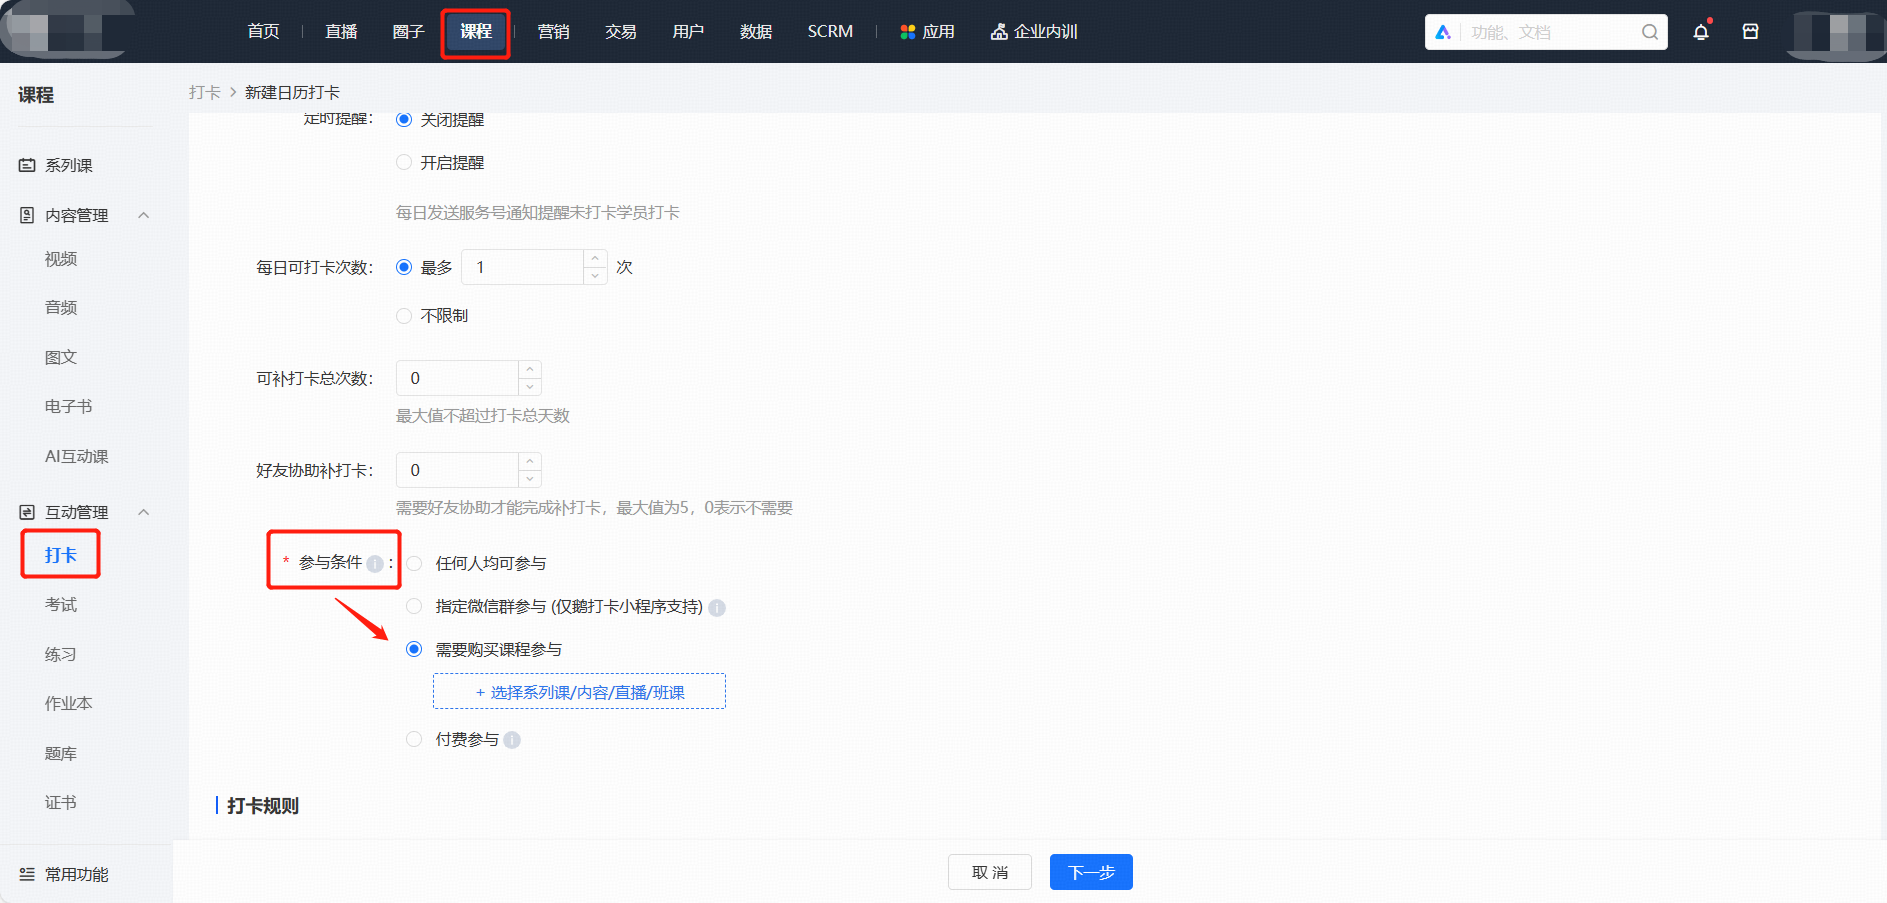
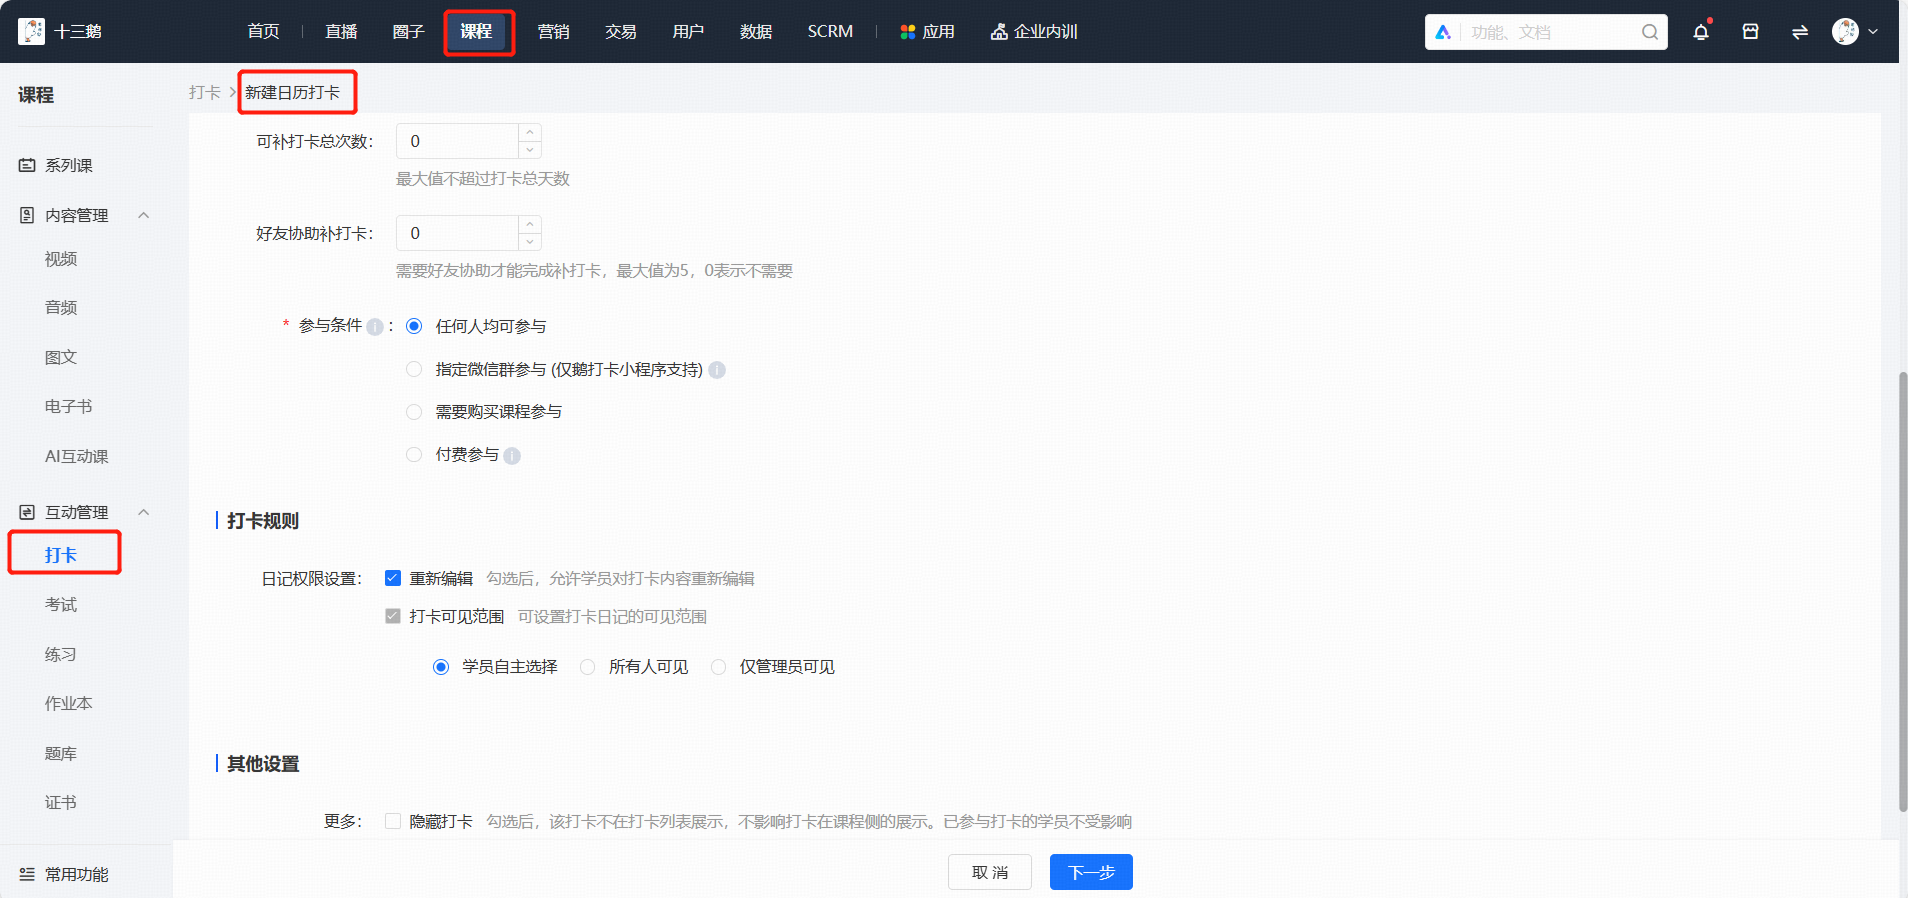
3. Check-in Introduction Settings: Replace the check-in introduction cover and edit the check-in introduction content, then click the [Publish Now] button below to generate a new calendar check-in.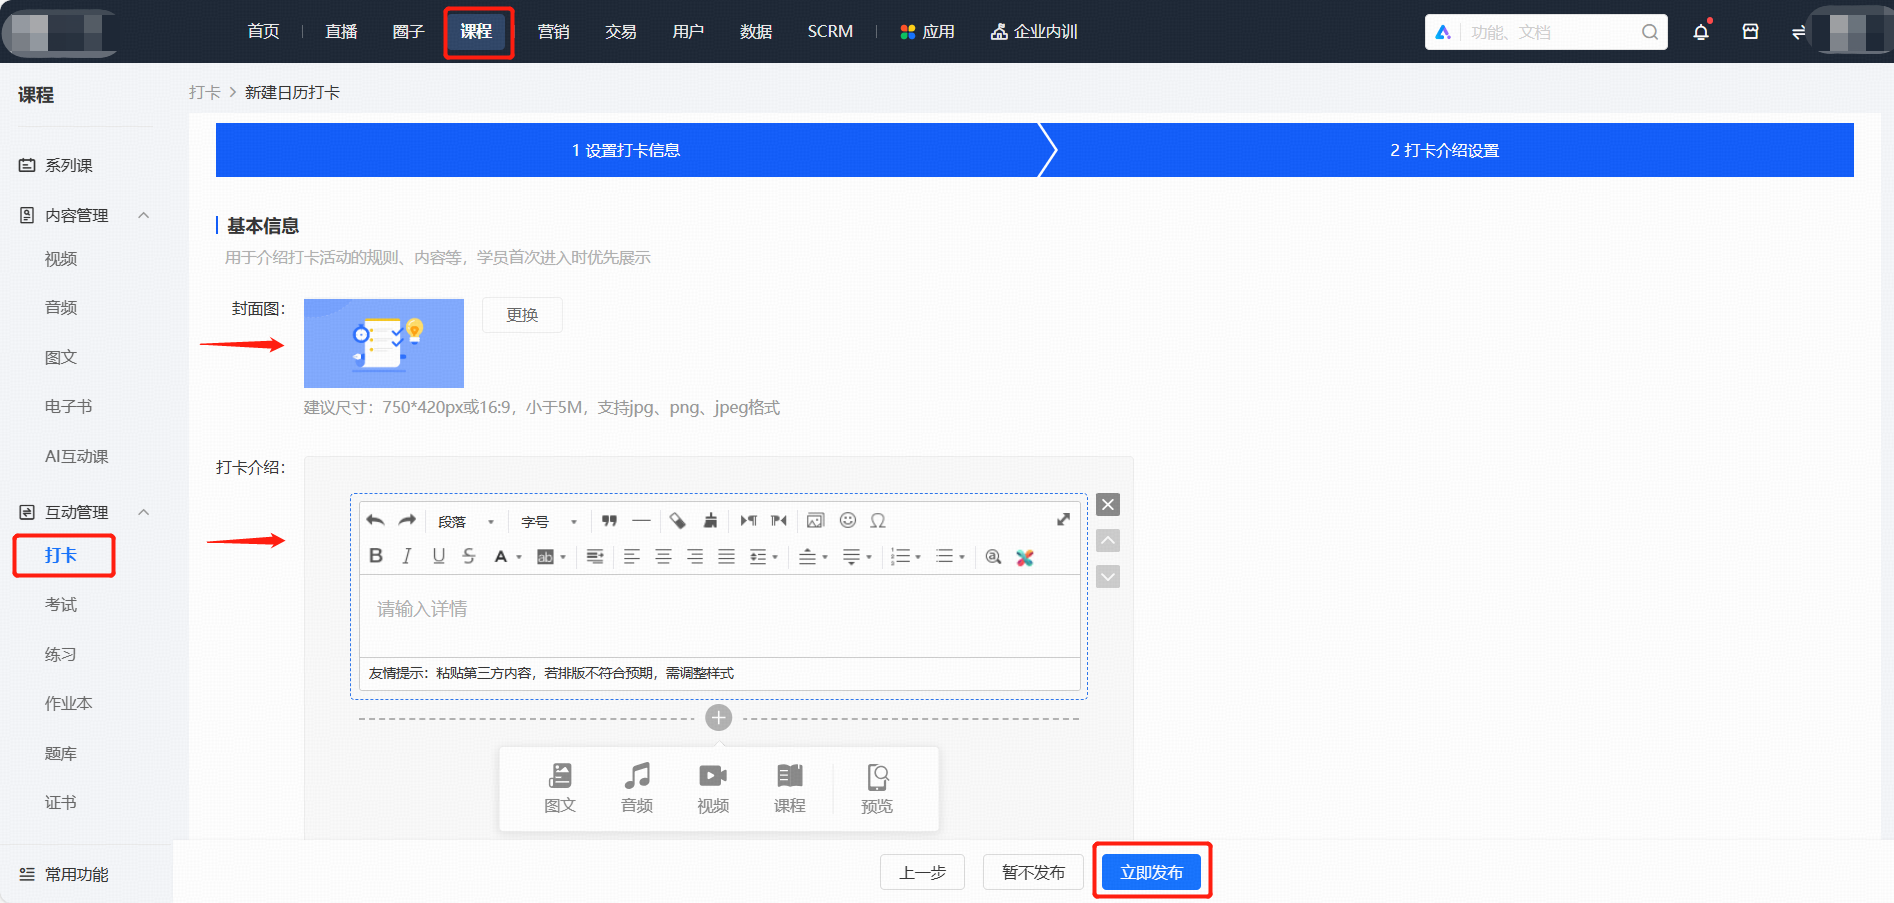
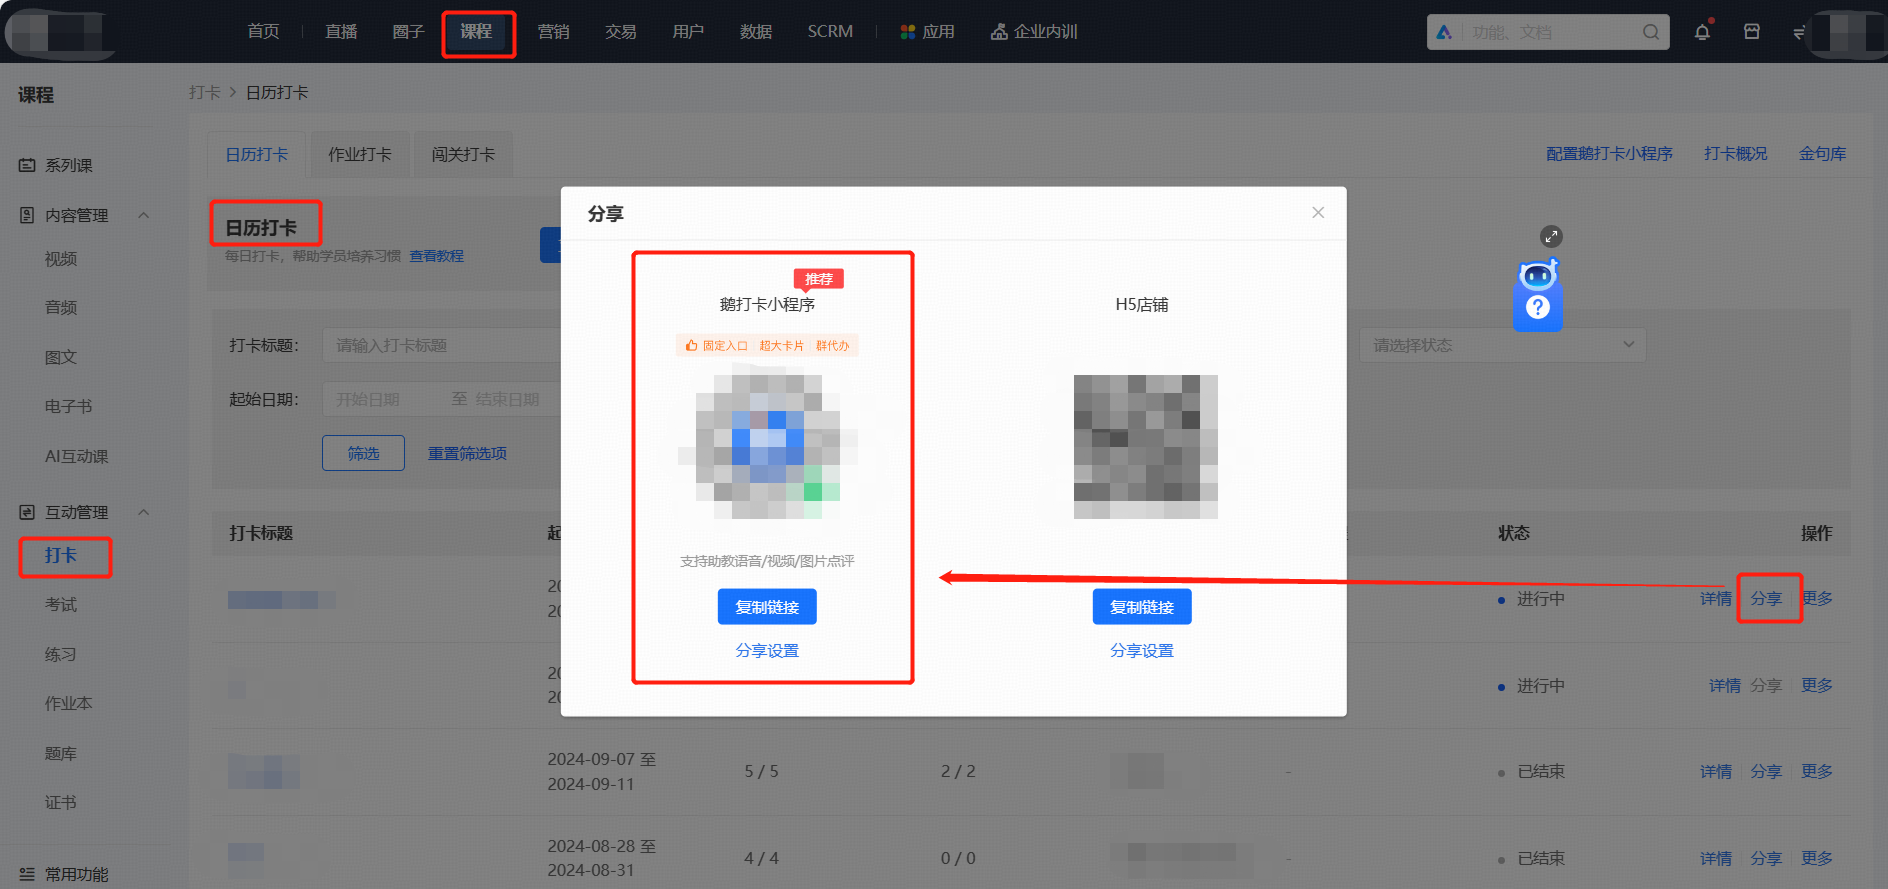
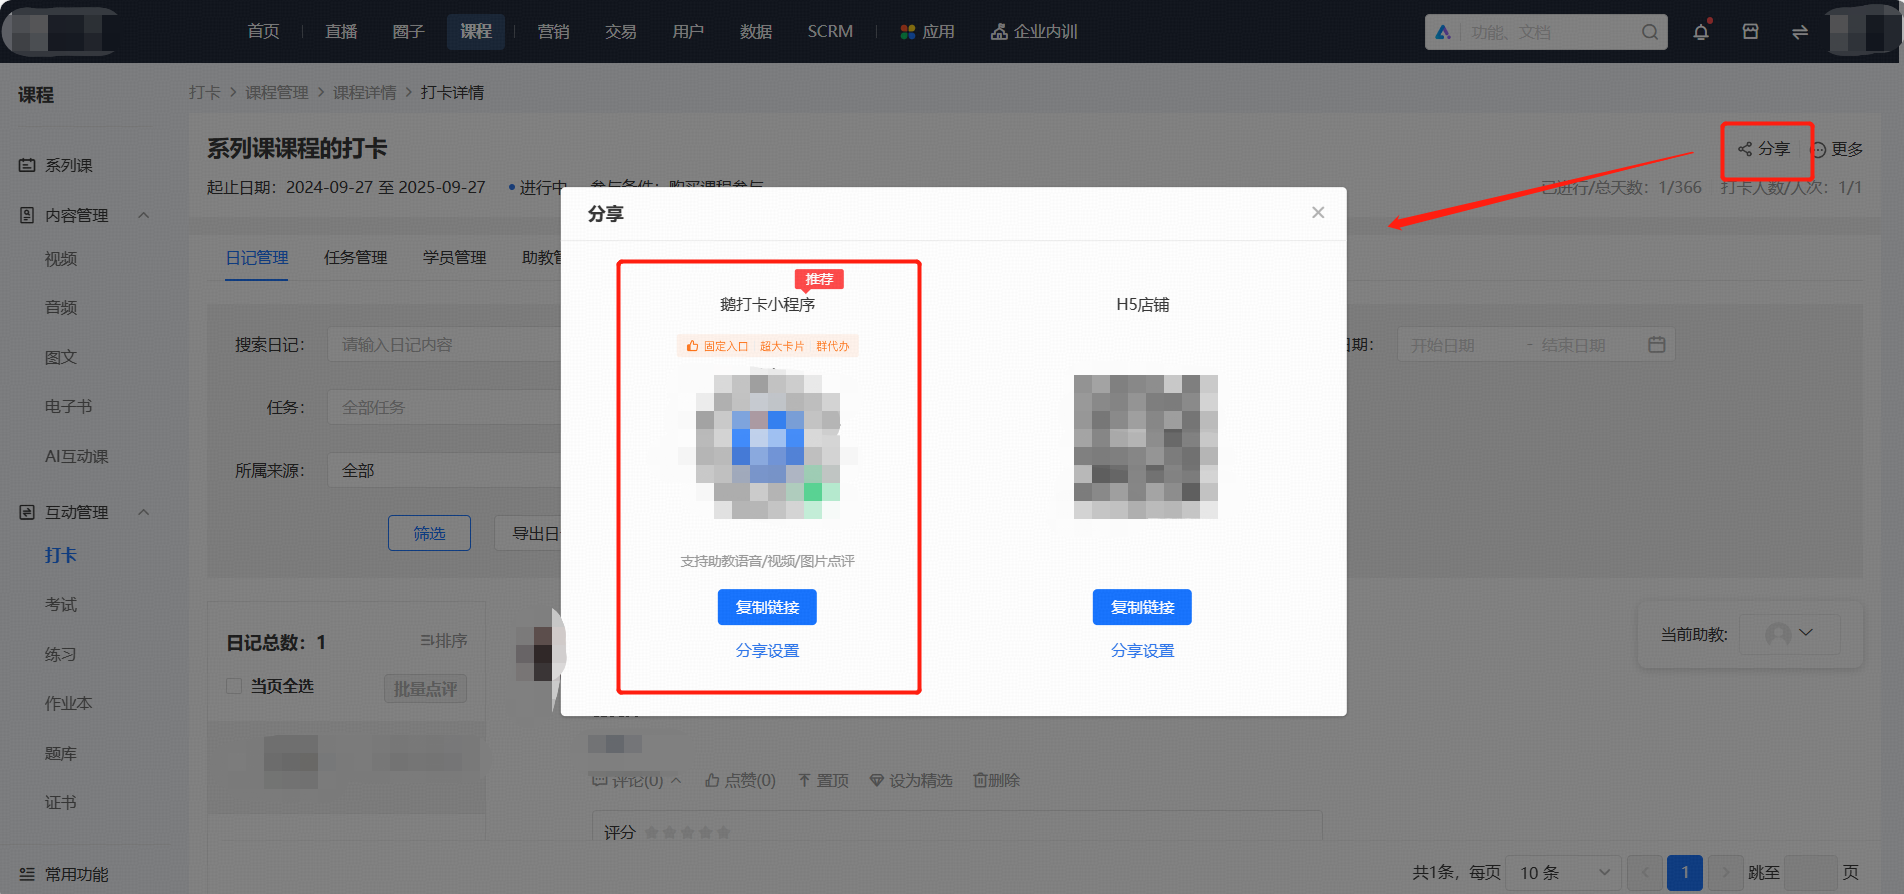
Step 3: Share the Check-inAfter creating the check-in, click [Share] to get the sharing code and link of the corresponding check-in.
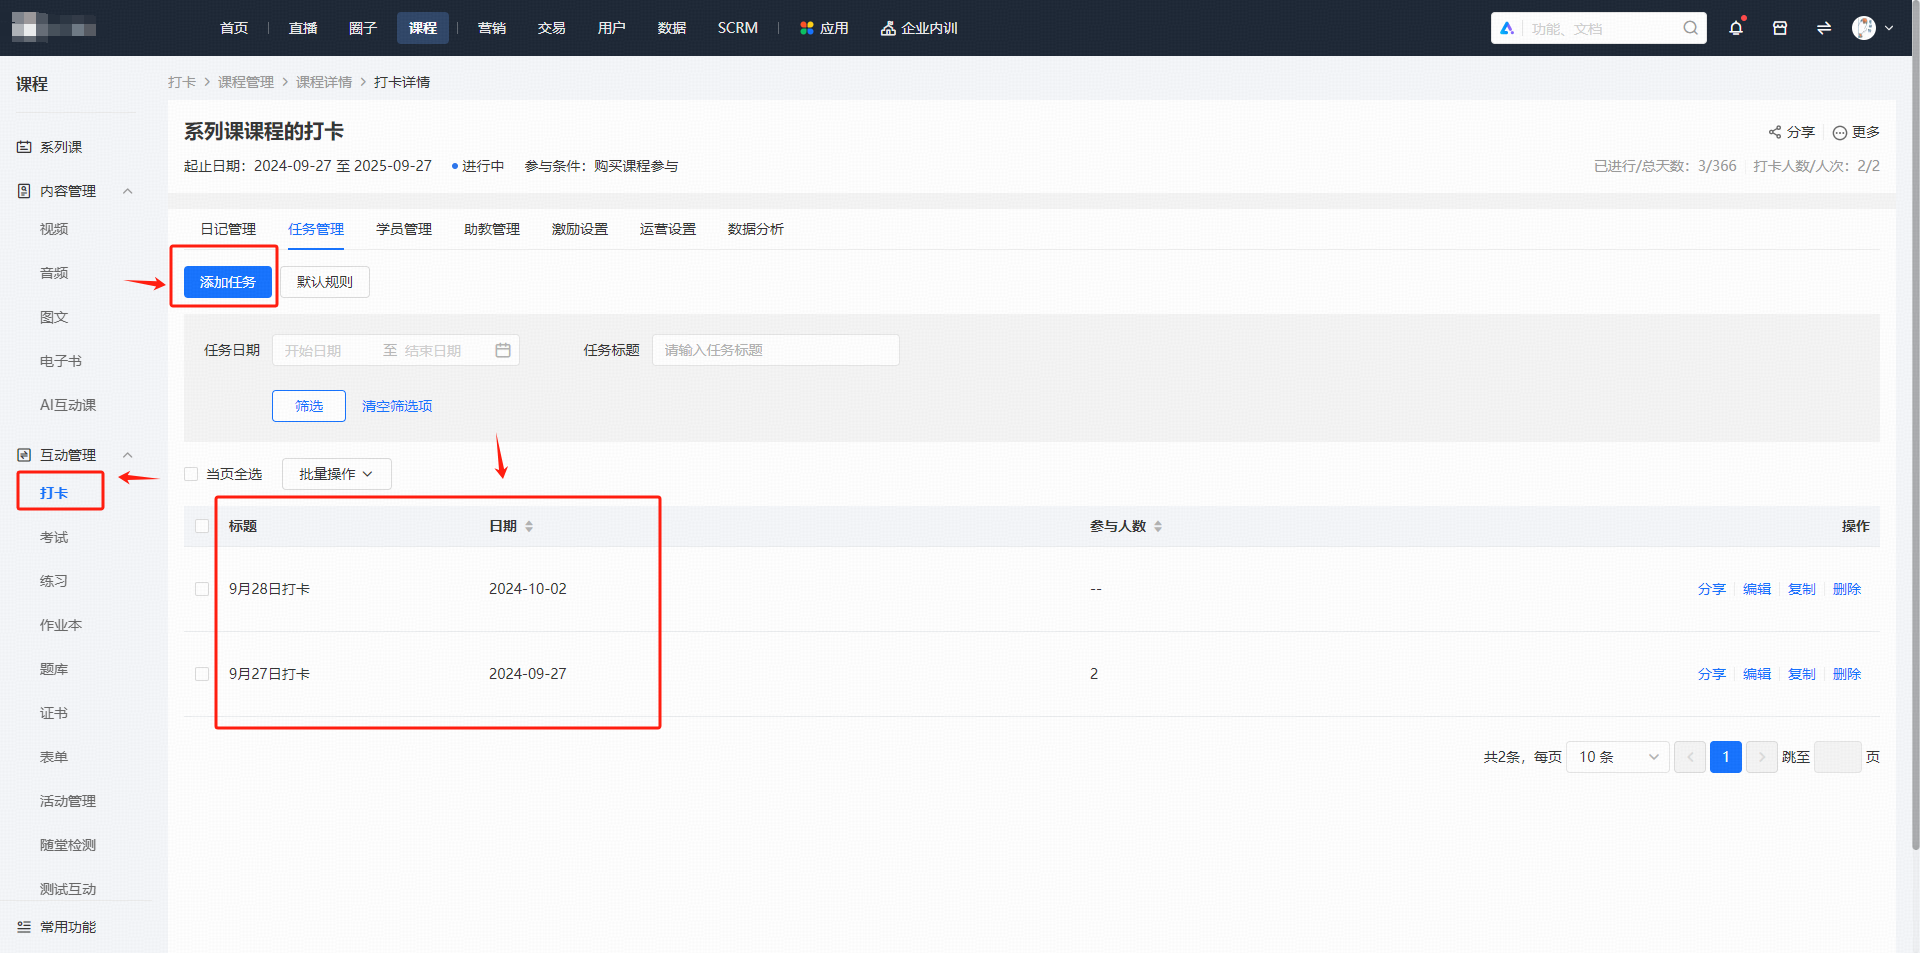
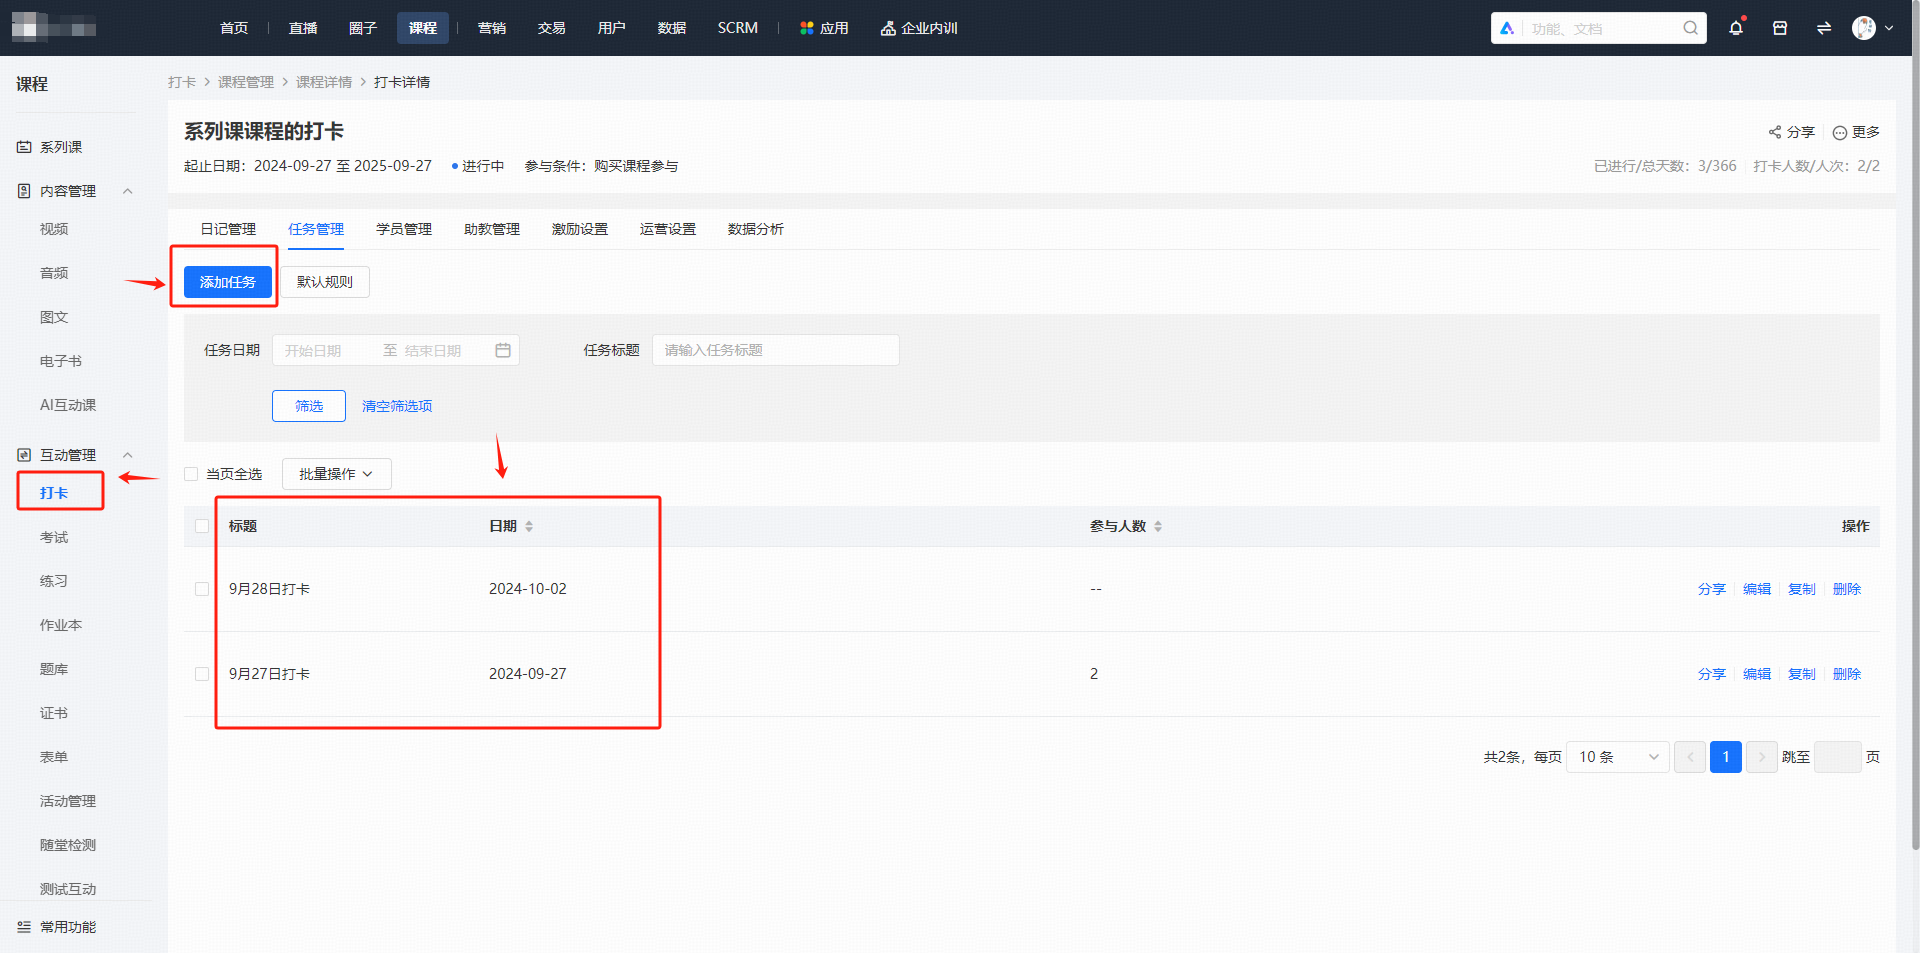
Note: Students can only check in after a check-in task is created in [Task Management].
(II) Create a Course Calendar Check-inStep 1: New Calendar Check-in1.Log in to the store management background, enter [Series Courses - Courses], click [Manage], and enter the management interface.
2. Select [Course Mode], enable , and select [New Calendar Check-in].
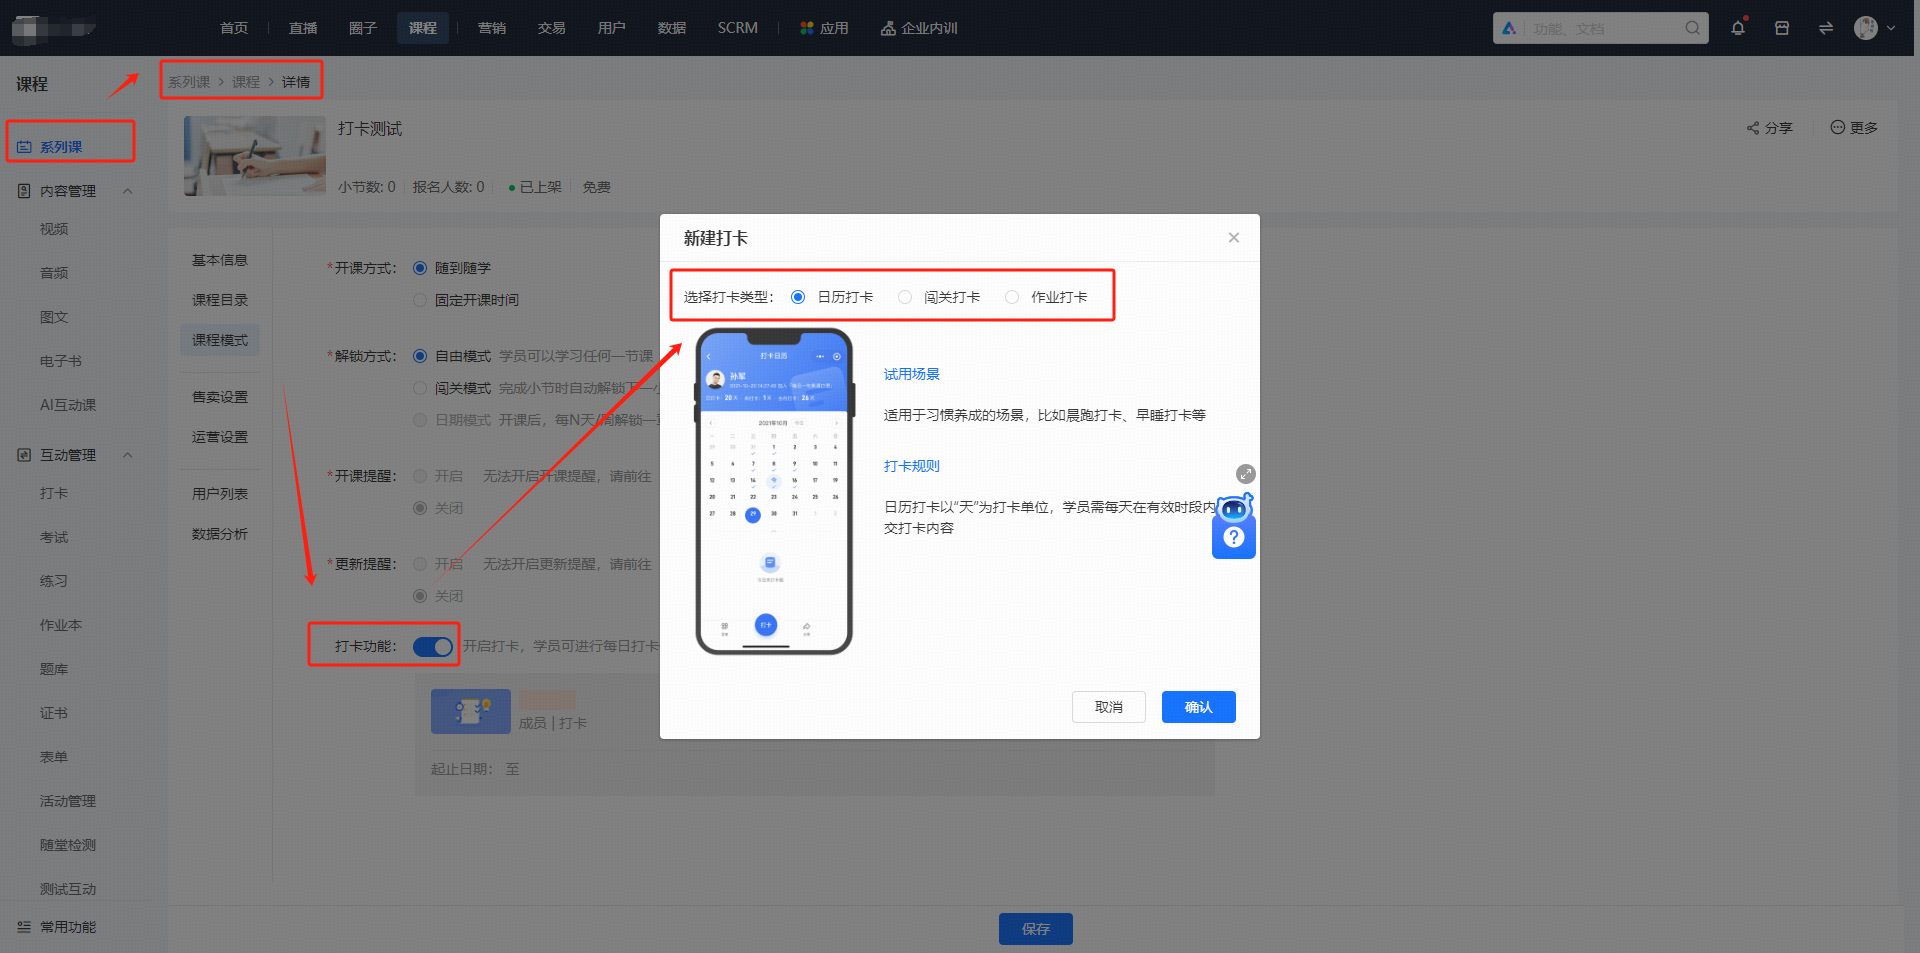
Step 2: Fill in Check-in Information
1.Fill in the title of the check-in activity and configure the check-in rules. After configuration, click [Next].
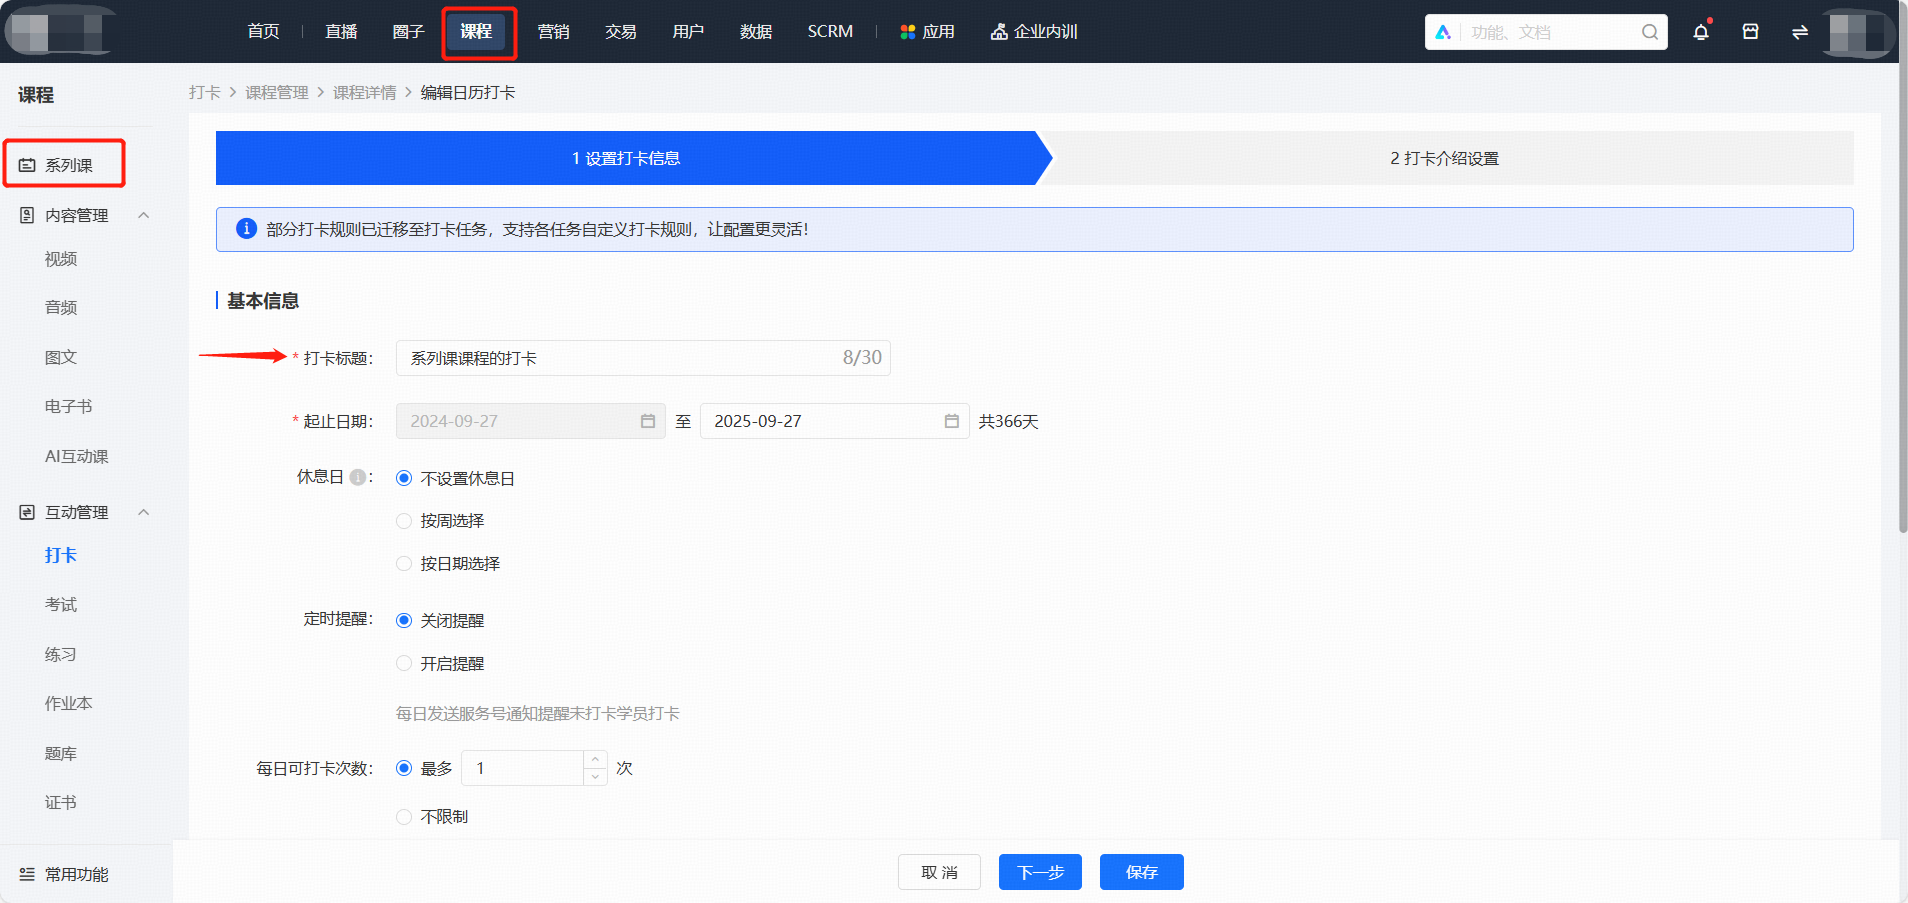
2. Replace the check-in introduction cover and edit the check-in introduction content, then click the [Save] button below to generate a new calendar check-in.
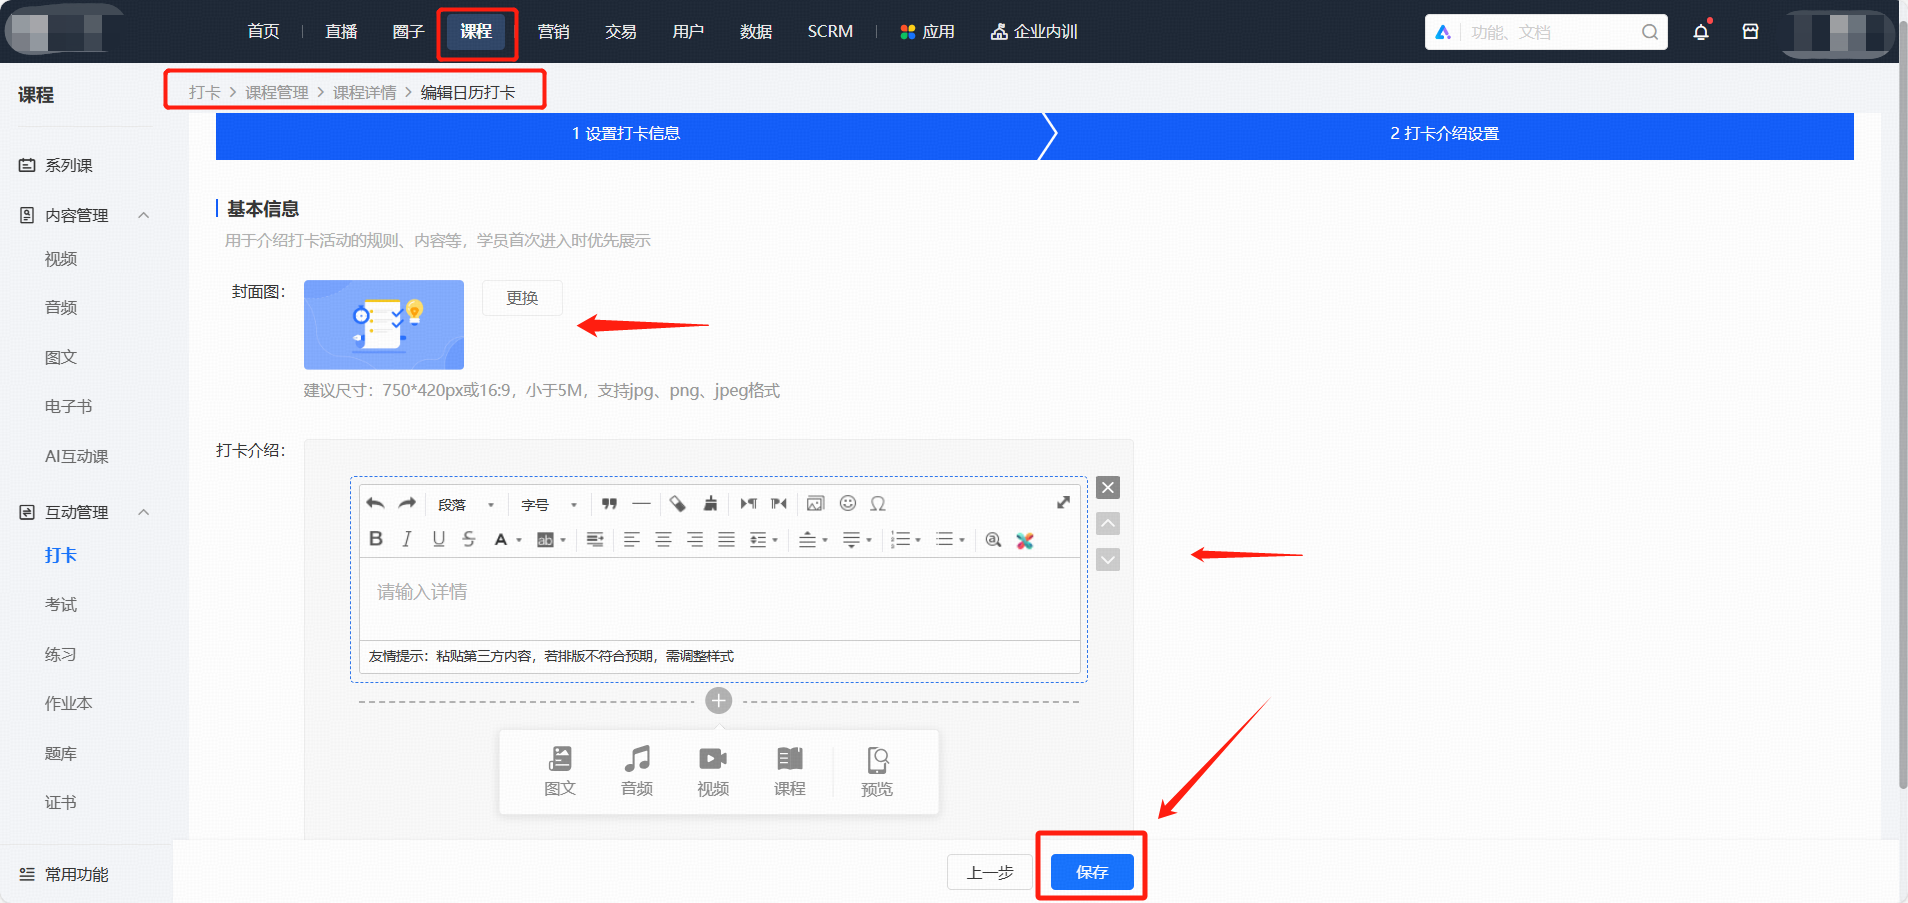
Step 3: Share the Check-in
After creating the check-in, click [Share] to get the sharing code and link of the corresponding check-in.Note: Students can only check in after a check-in task is created in [Task Management].
VI. Student Check-in Usage Guide
1. Check-in Guide for H5 Store/Merchant Mini ProgramPath: H5 Store/Merchant Mini Program → My → Learning Tools → Check-in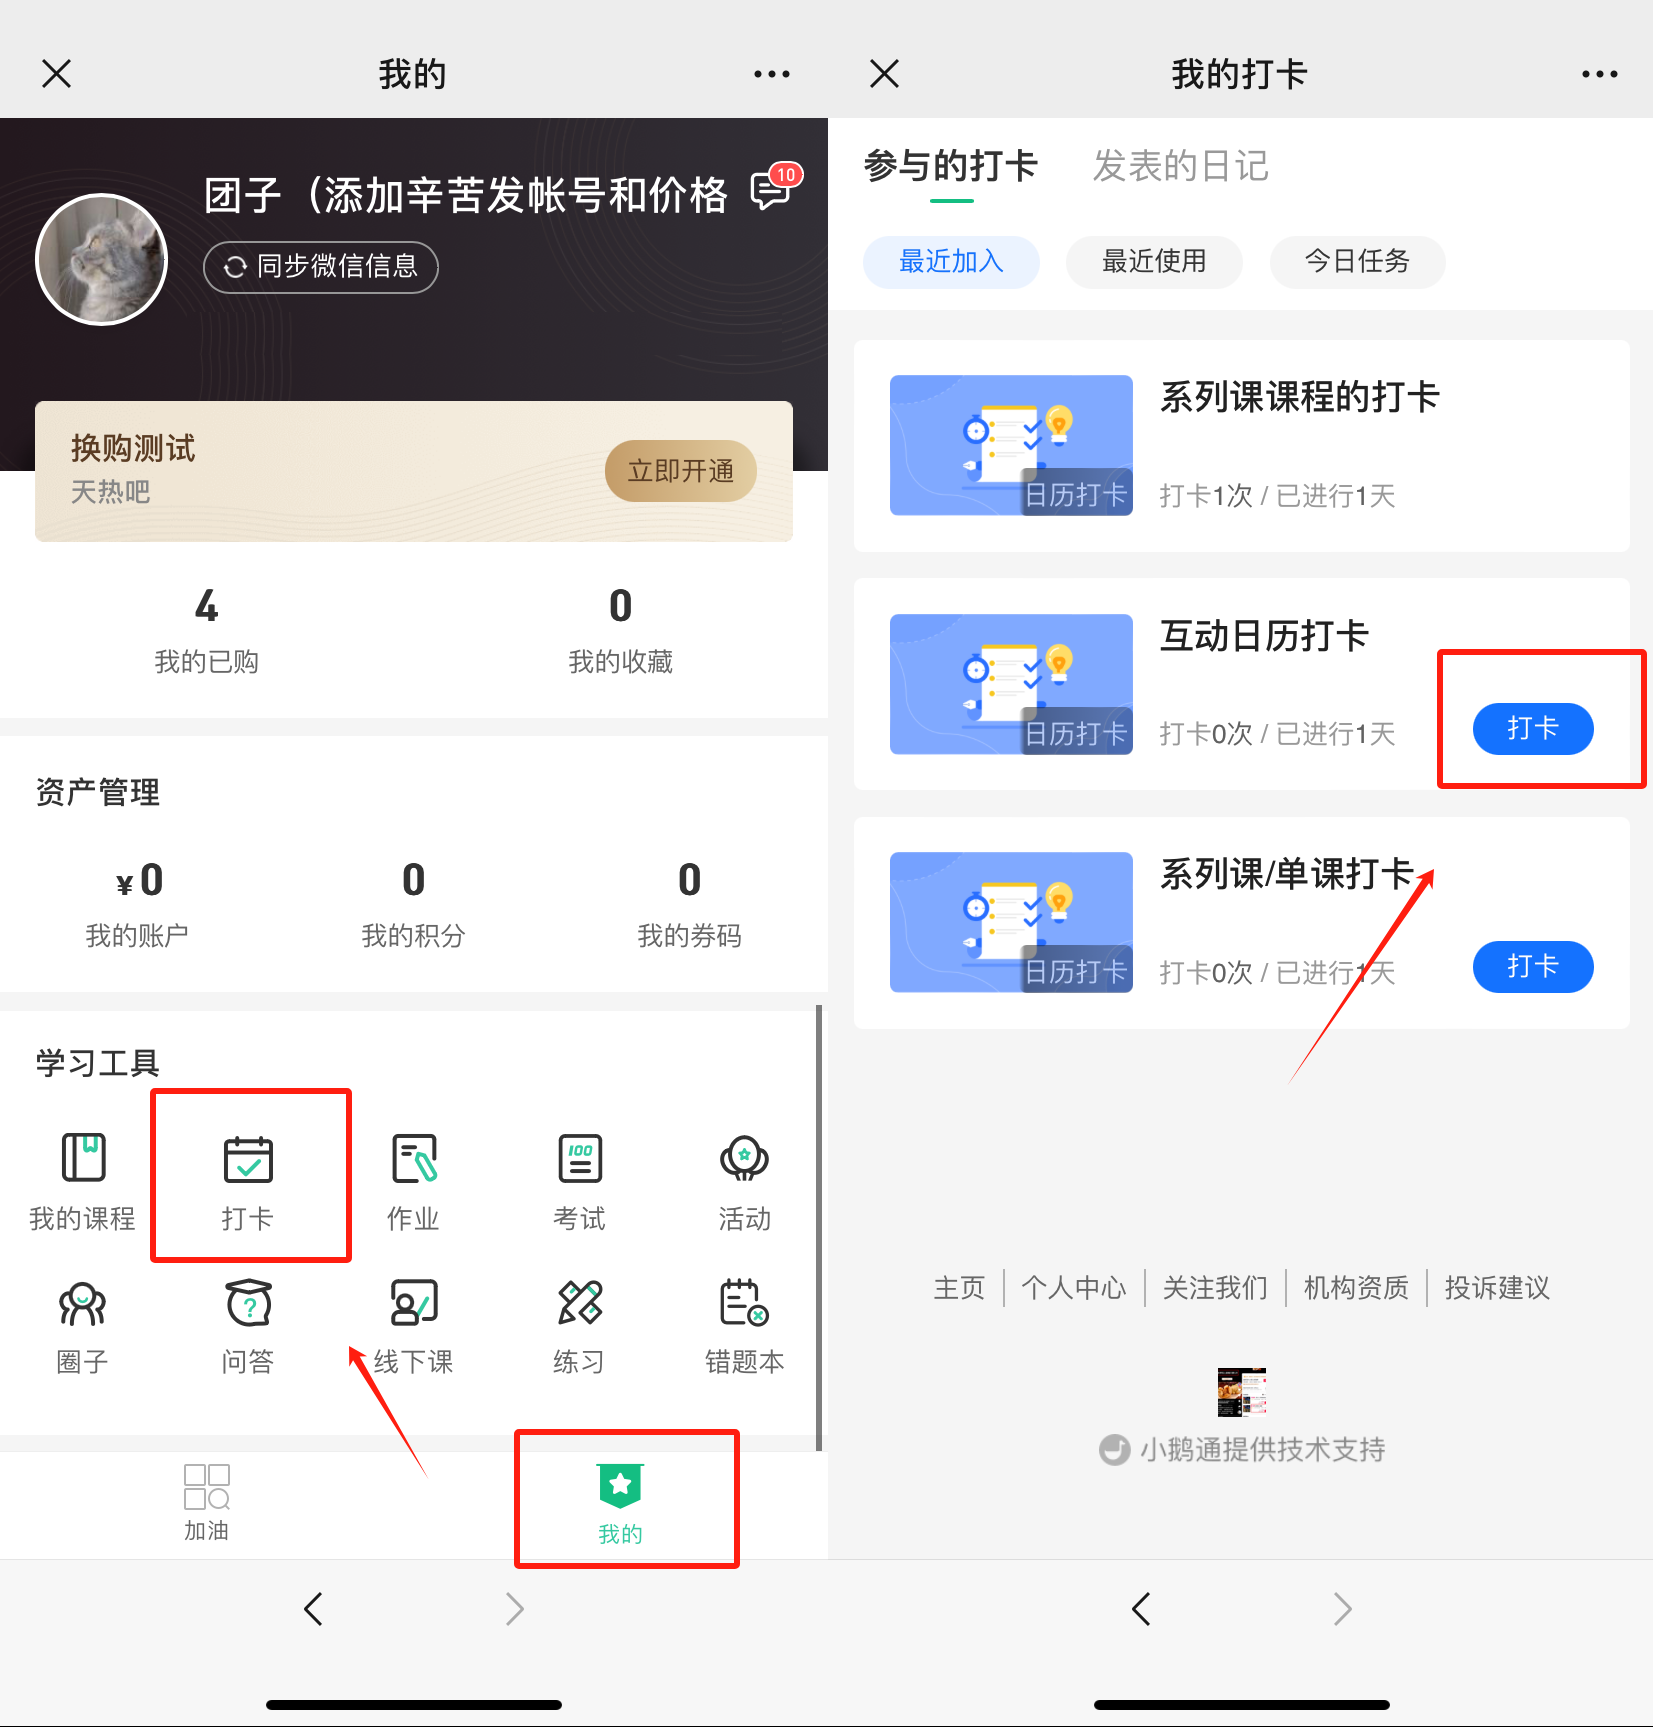
2. Check-in Guide for eLink Check-in Mini ProgramPath: eLink Check-in Mini Program → Home Page
3. Check-in Guide for elink Student APPPath: elink Student APP → My Courses on the Home Page → View More → Navigation Bar → Learning Assistance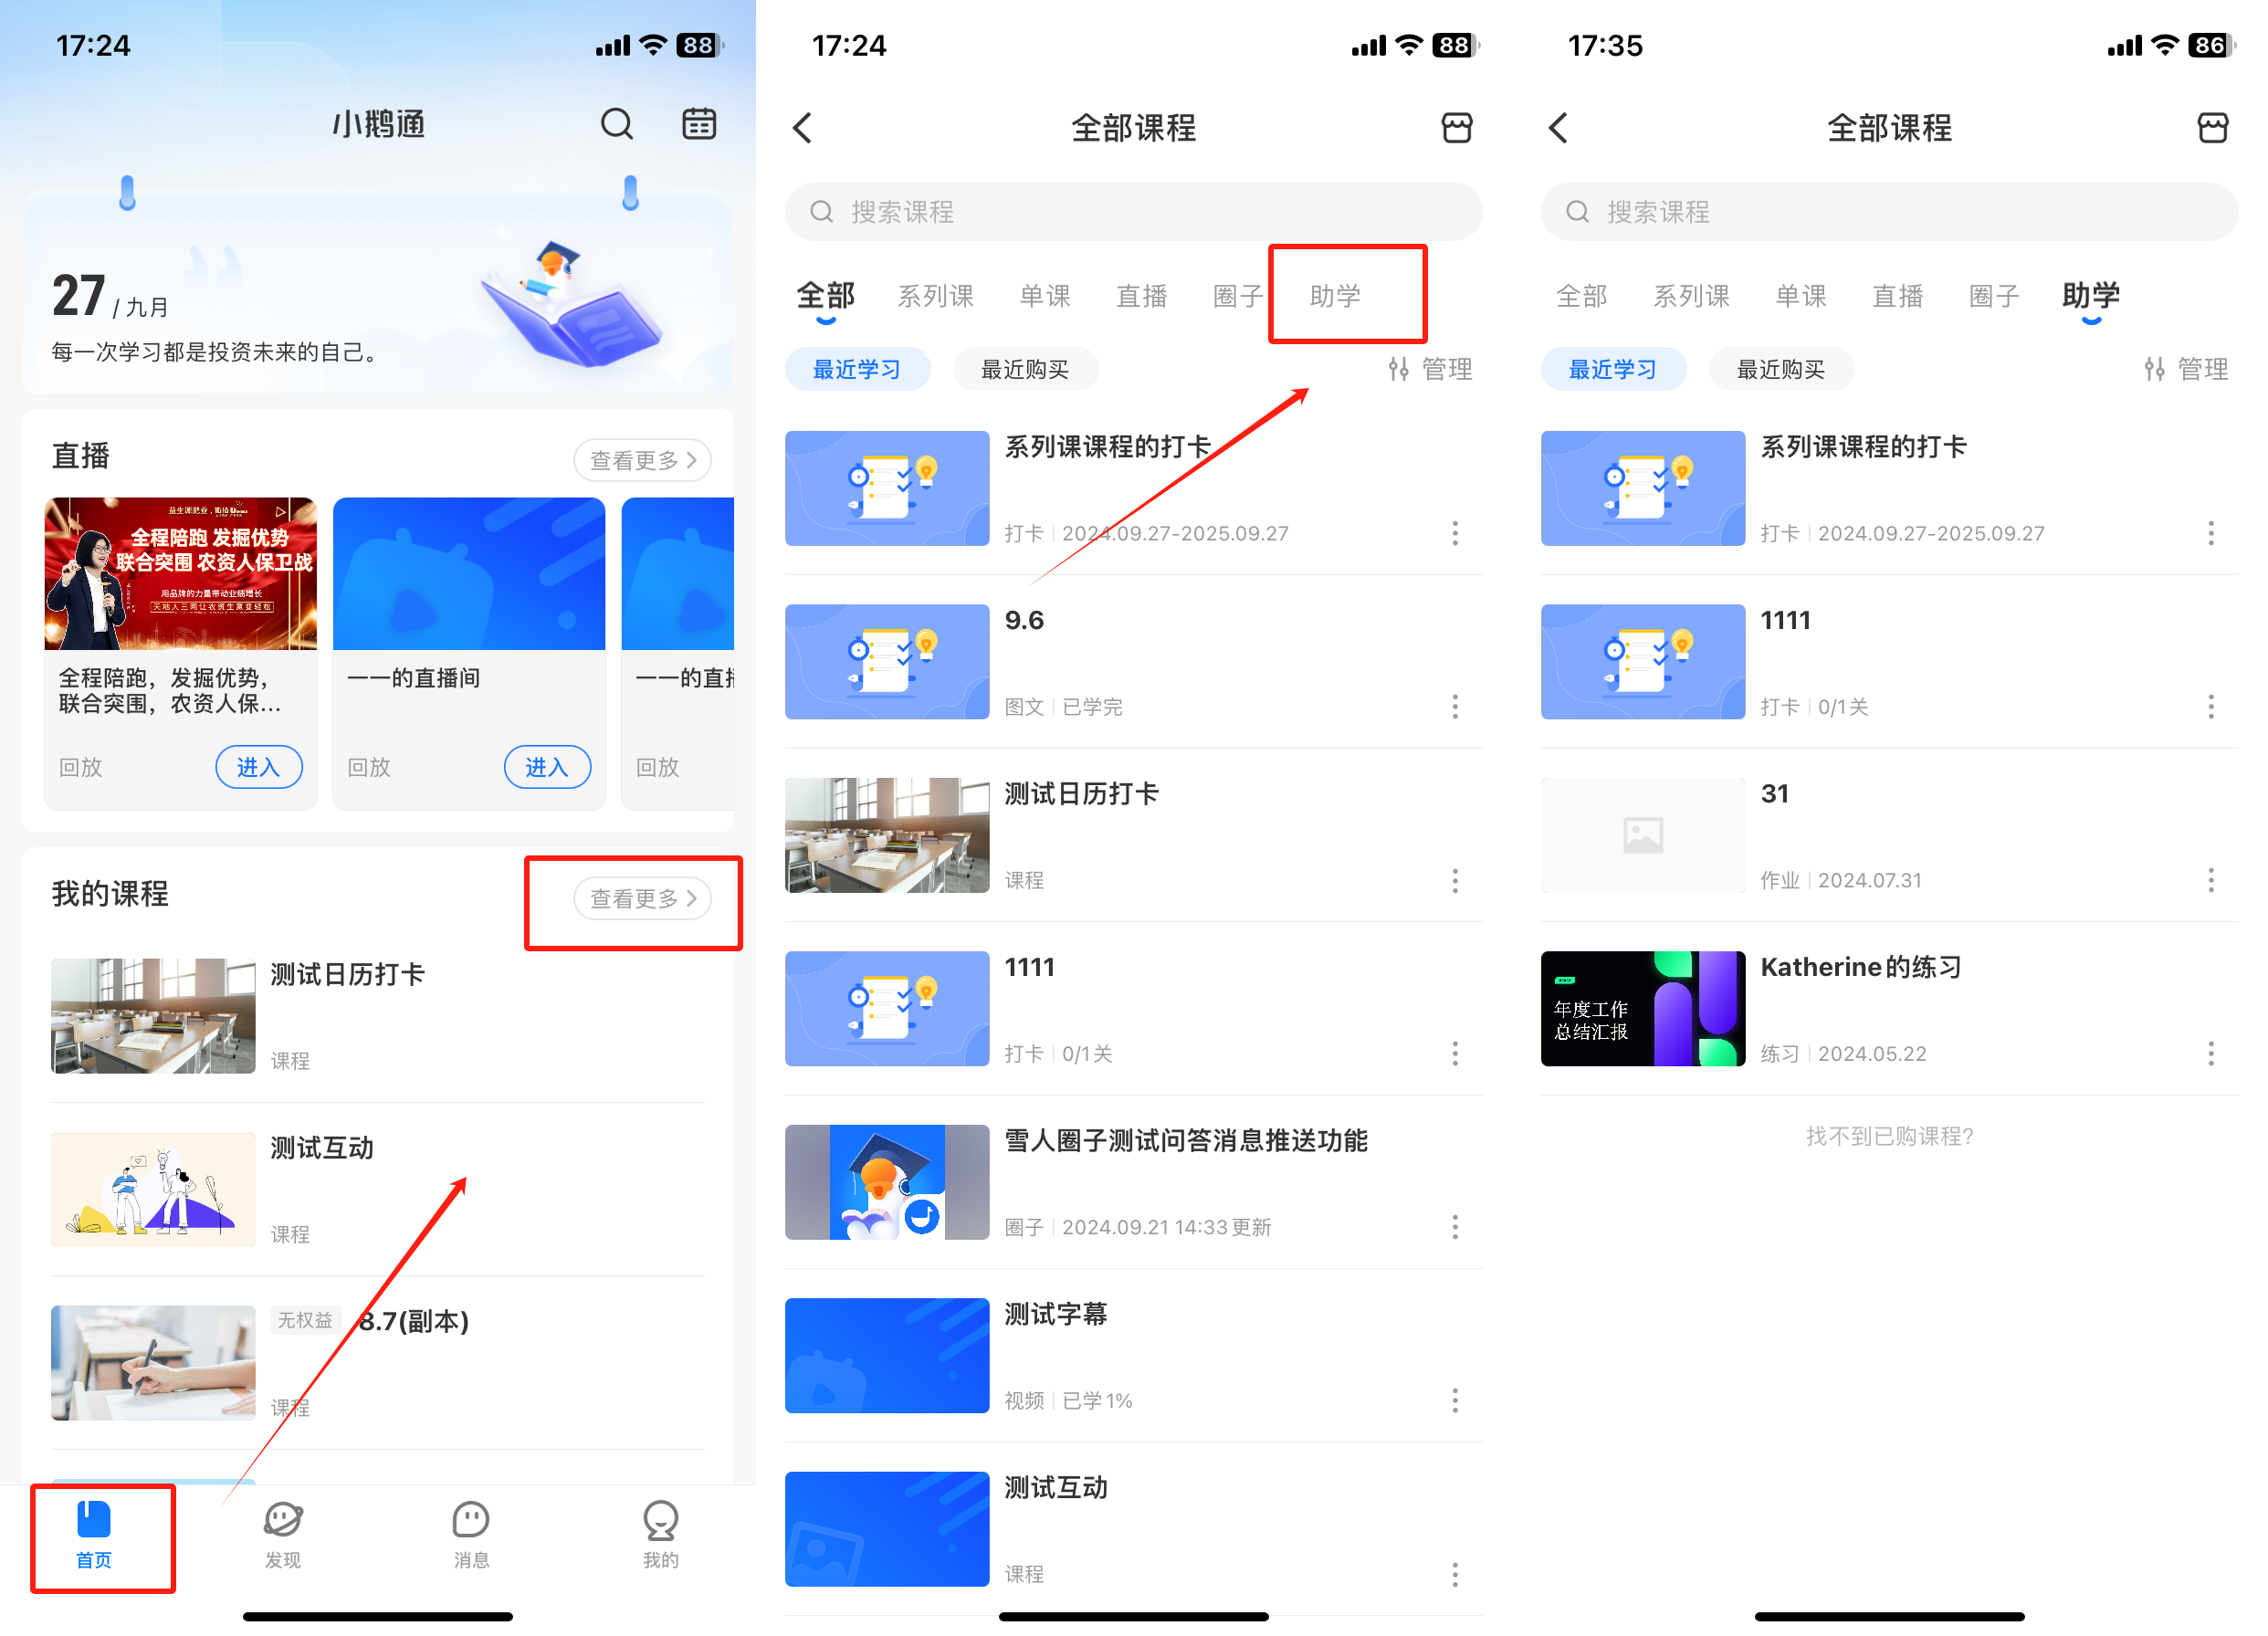
VII. Frequently Asked Questions
1. Will the calendar check-in created in [Series Courses] - [Courses] be displayed in the check-ins of interactive management?
It will not be displayed. If you need to edit and manage it, you need to operate in Series Courses - Courses → Manage → Check-in Settings.2. If you want students to check in within the course catalog, how can you add the check-in created in interactive management to the course catalog?You need to add it manually. The operation path is as follows: In the course catalog of the series course → Add Section → Check-in → Select a valid check-in.
(Professional and flagship stores support adding check-ins to the catalog, while basic stores do not support it.)
3. Can the check-in be associated with courses?Check-ins can be used independently for sharing or associated with series courses/single courses. One check-in activity supports association with one series course/single course. Currently, the types of series courses/single courses supported by check-ins are: text and images, audio, video, live streaming, columns, memberships, large columns, and class courses.Note: For the [Courses] in [Series Courses], you need to set the check-in in the course mode or add the check-in to the course catalog.4. After sharing the check-in, users do not have the check-in interface and cannot check in. How to handle this situation?First, log in to the store management background to check if a check-in task has been created.Operation path: [Check-in] - [Manage] - [Task Management].If there is no task, click [Add Task] before students can check in. If there is a check-in task but students cannot receive the check-in, you can contact yourdedicated service managerfor details.