Check in
- Can I set a fee for check-ins?
- Can the participation conditions of the check-in activity be changed?
- Can I modify the end time of the punch-in activity?
- Can the number of levels in the challenge punch card be modified?
- Can I modify the makeup punch-in settings after the punch-in activity starts?
- Can I modify the punch-in settings after the punch-in starts?
- What content formats are supported for check-ins?
- What are the differences between calendar check-ins, assignment check-ins, and challenge check-ins?
- What's the function of customizing daily signatures, long images, and invitation cards?
- Can the famous quotes in the daily check-in signature images be modified?
- What's the purpose of featuring a student's diary?
- Can check-ins be associated with courses?
- How to set up make-up clock-ins?
- How to add teaching assistants to the punch-in activity?
- How to set up check-in rules for the challenge check-in?
- Can the anti-cheating mode be enabled after the check-in starts?
- How to configure the Attendance Certificate?
- Where can I view the attendance certificates?
- Can the qualification for obtaining the打卡 certificate be set?
- How to manage teaching assistants for punch-in activities?
- Is it possible to export the content of students' check-ins?
- How to remind trainees to clock in?
- Tutorial on Using the Challenge Check-in Feature
- Tutorial on Using Calendar Check-in
- Tutorial on Using Assignment Check-ins
- Customization tutorial for check-in daily sign-in images, long images, and invitation cards
- Tutorial on Using Certificates for Check-in Results
- Common Issues with Check-ins
- Tutorial on Setting Up Punch-in Message Push
- What are the impacts after trainees pause clocking in?
- Tutorial on setting up punch-in message push
- Tutorial on Using Check-in Groups
- How to use the 'Default Rules' for check-ins
- How to import trainees for check-ins?
- Tutorial on Using the New Version of the Mobile Check-in Feature
- How to configure the clock-in time
Can I set a fee for check-ins?
Yes, merchants can select the [Participation Conditions] as a paid form when creating a punch-in activity.
Can the participation conditions of the check-in activity be changed?
Replacement conditions vary depending on different situations. The specific details are as follows:
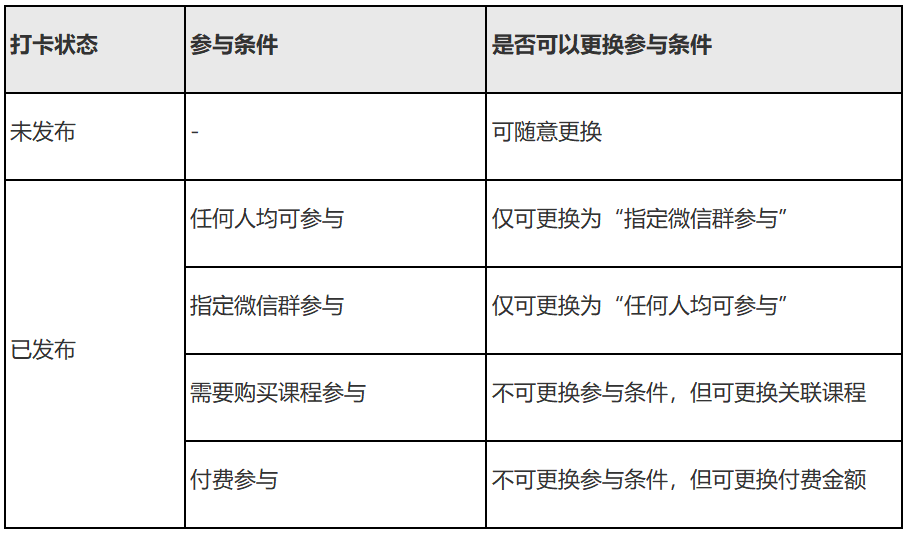
Can I modify the end time of the punch-in activity?
If the punch-in activity has not ended, the end time of the punch-in can be modified.
If the activity has ended, it cannot be modified.
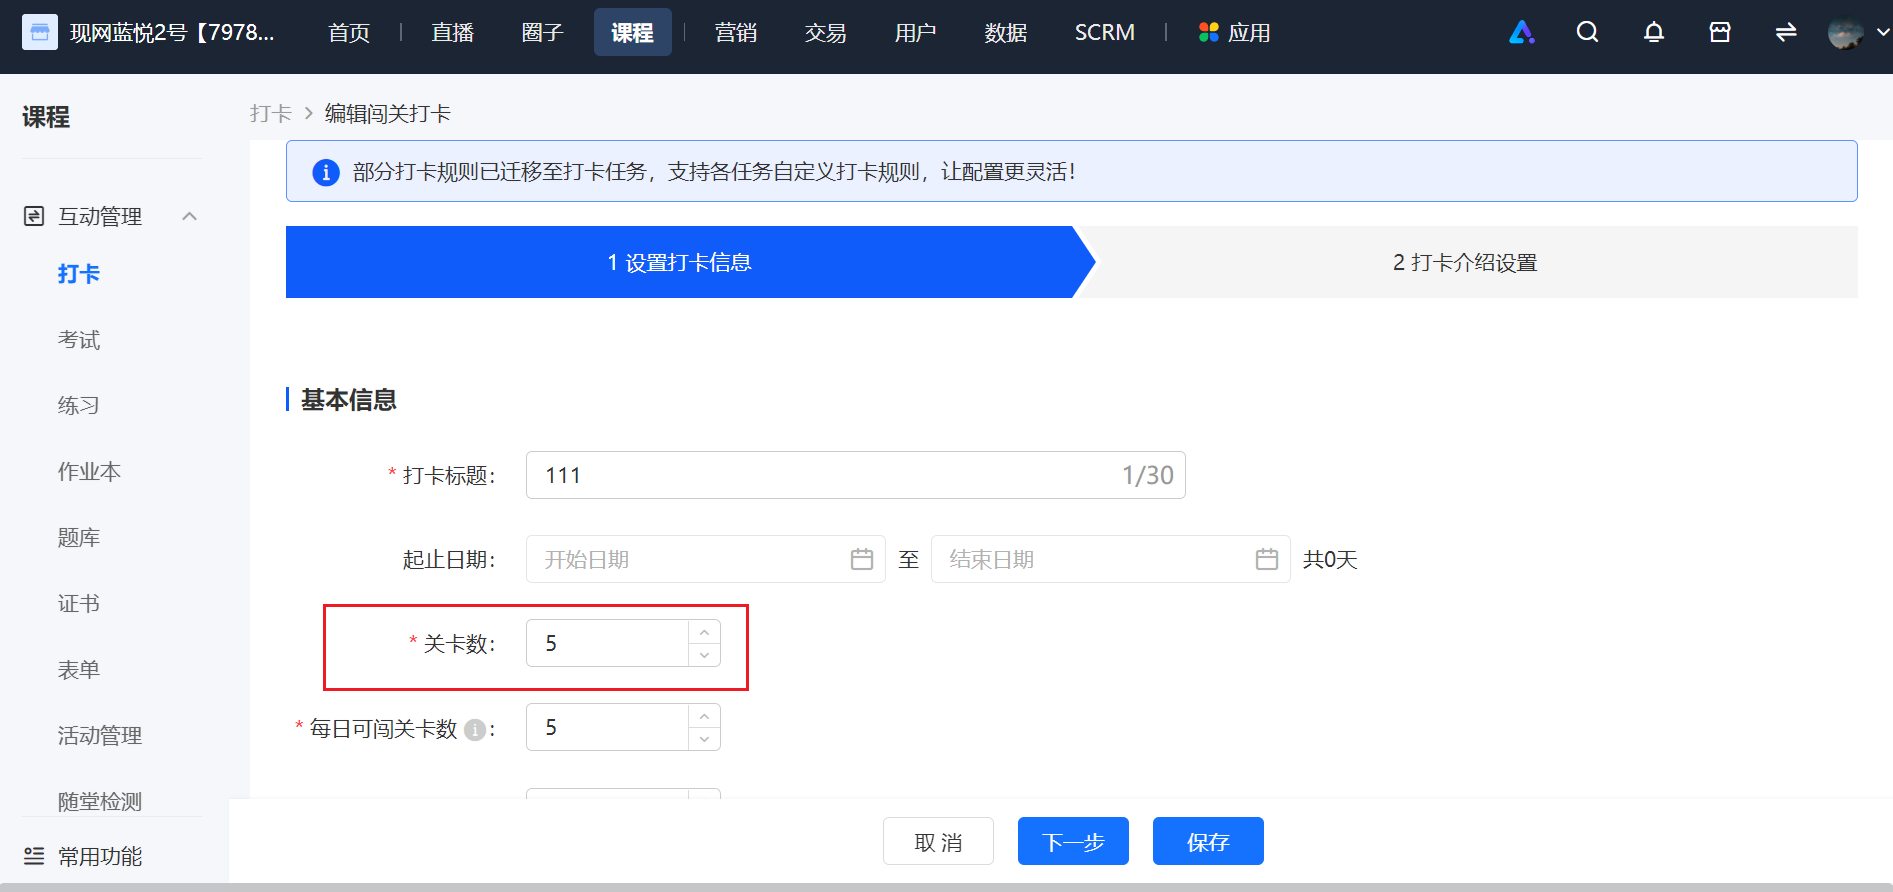
Can the number of levels in the challenge punch card be modified?
Yes, you can modify the number of levels on the page of the Challenge Punch-in feature.
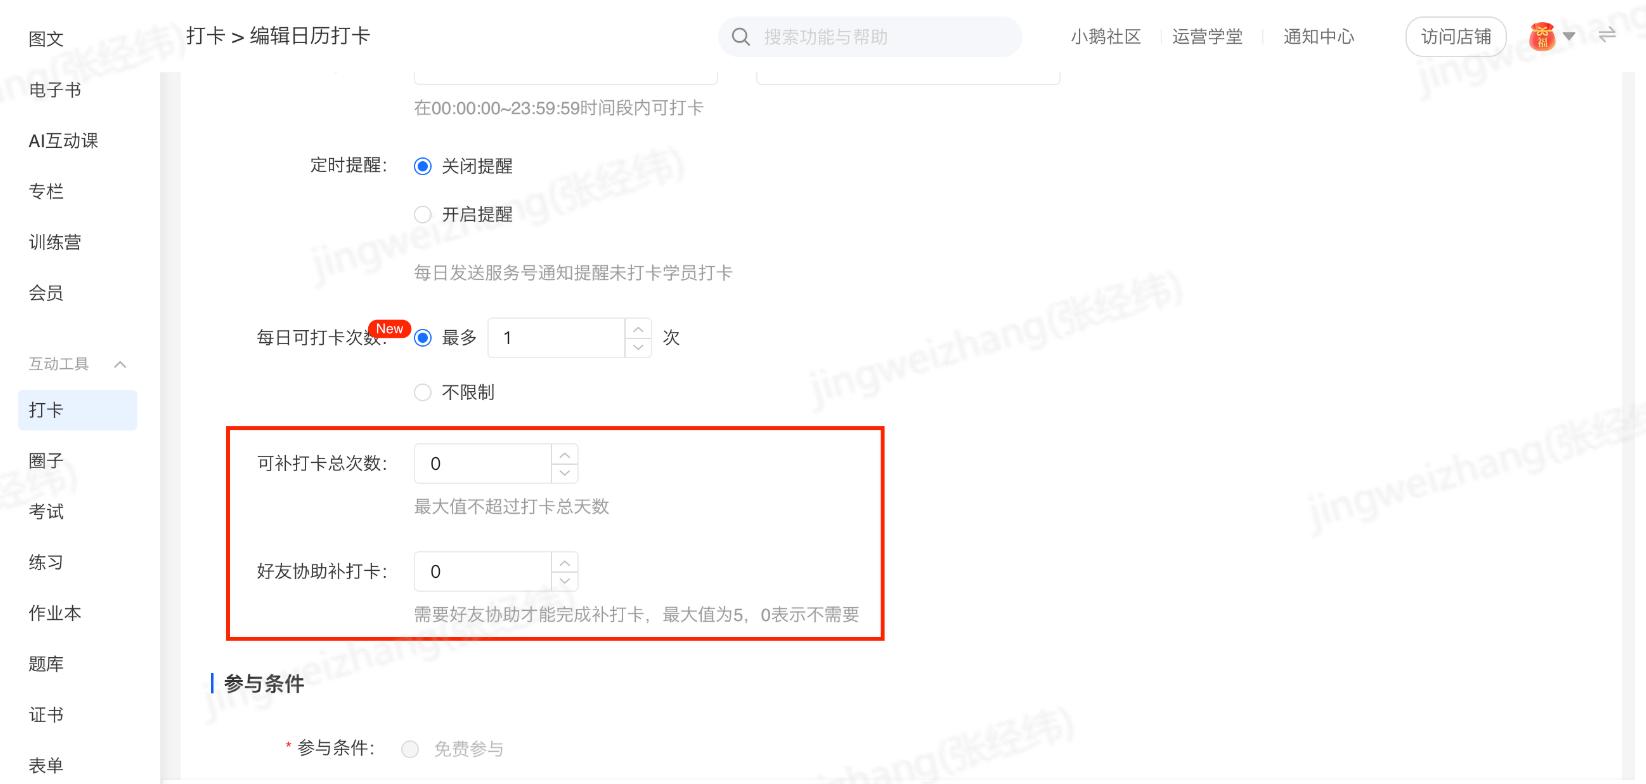
Can I modify the makeup punch-in settings after the punch-in activity starts?
Yes, on the page of the calendar/assignment check-in, you can modify the number of make-up check-ins available to students.
Can I modify the punch-in settings after the punch-in starts?
The following describes three types of punch-in modes: calendar punch-in, assignment punch-in, and challenge punch-in:
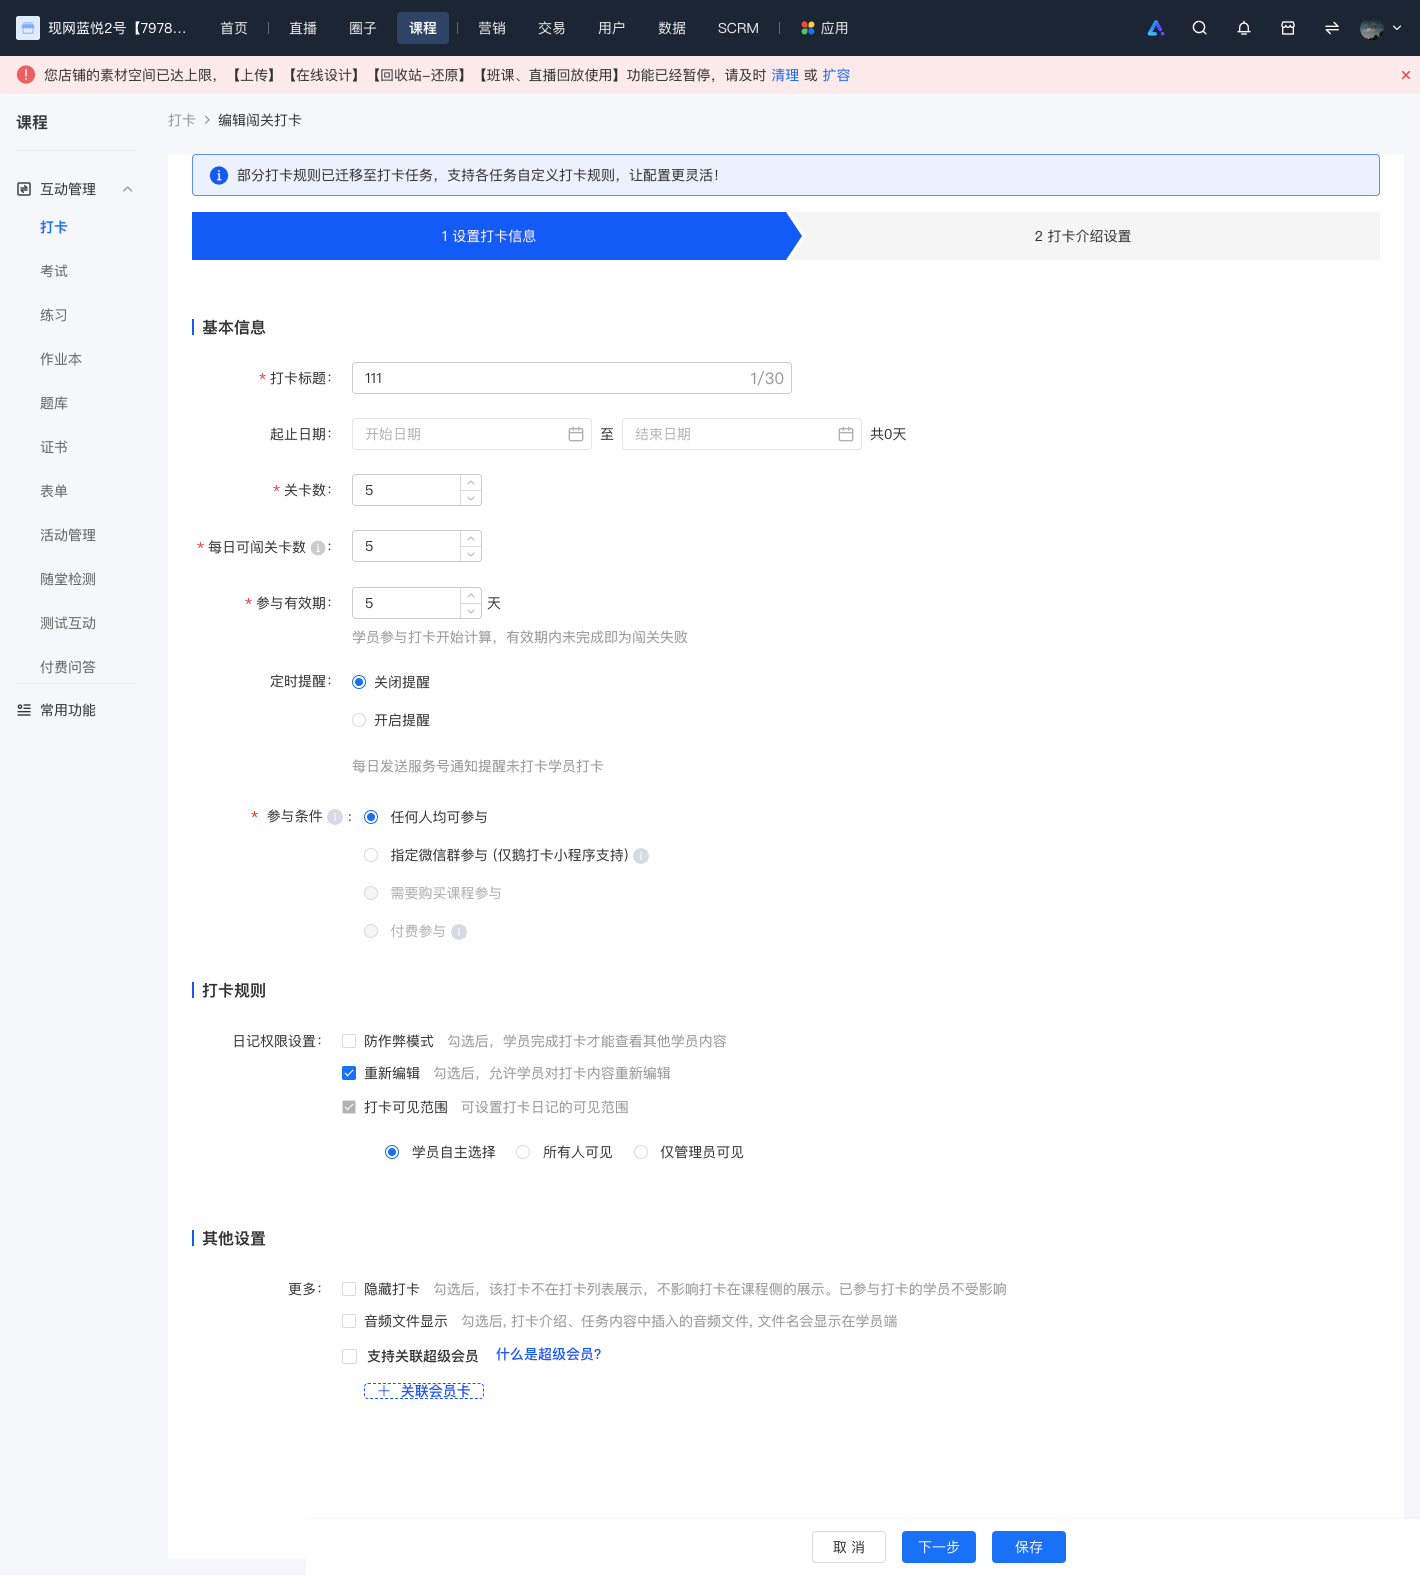
1. For calendar punch-in, after the punch-in starts, all settings except the start date and participation conditions can be modified.
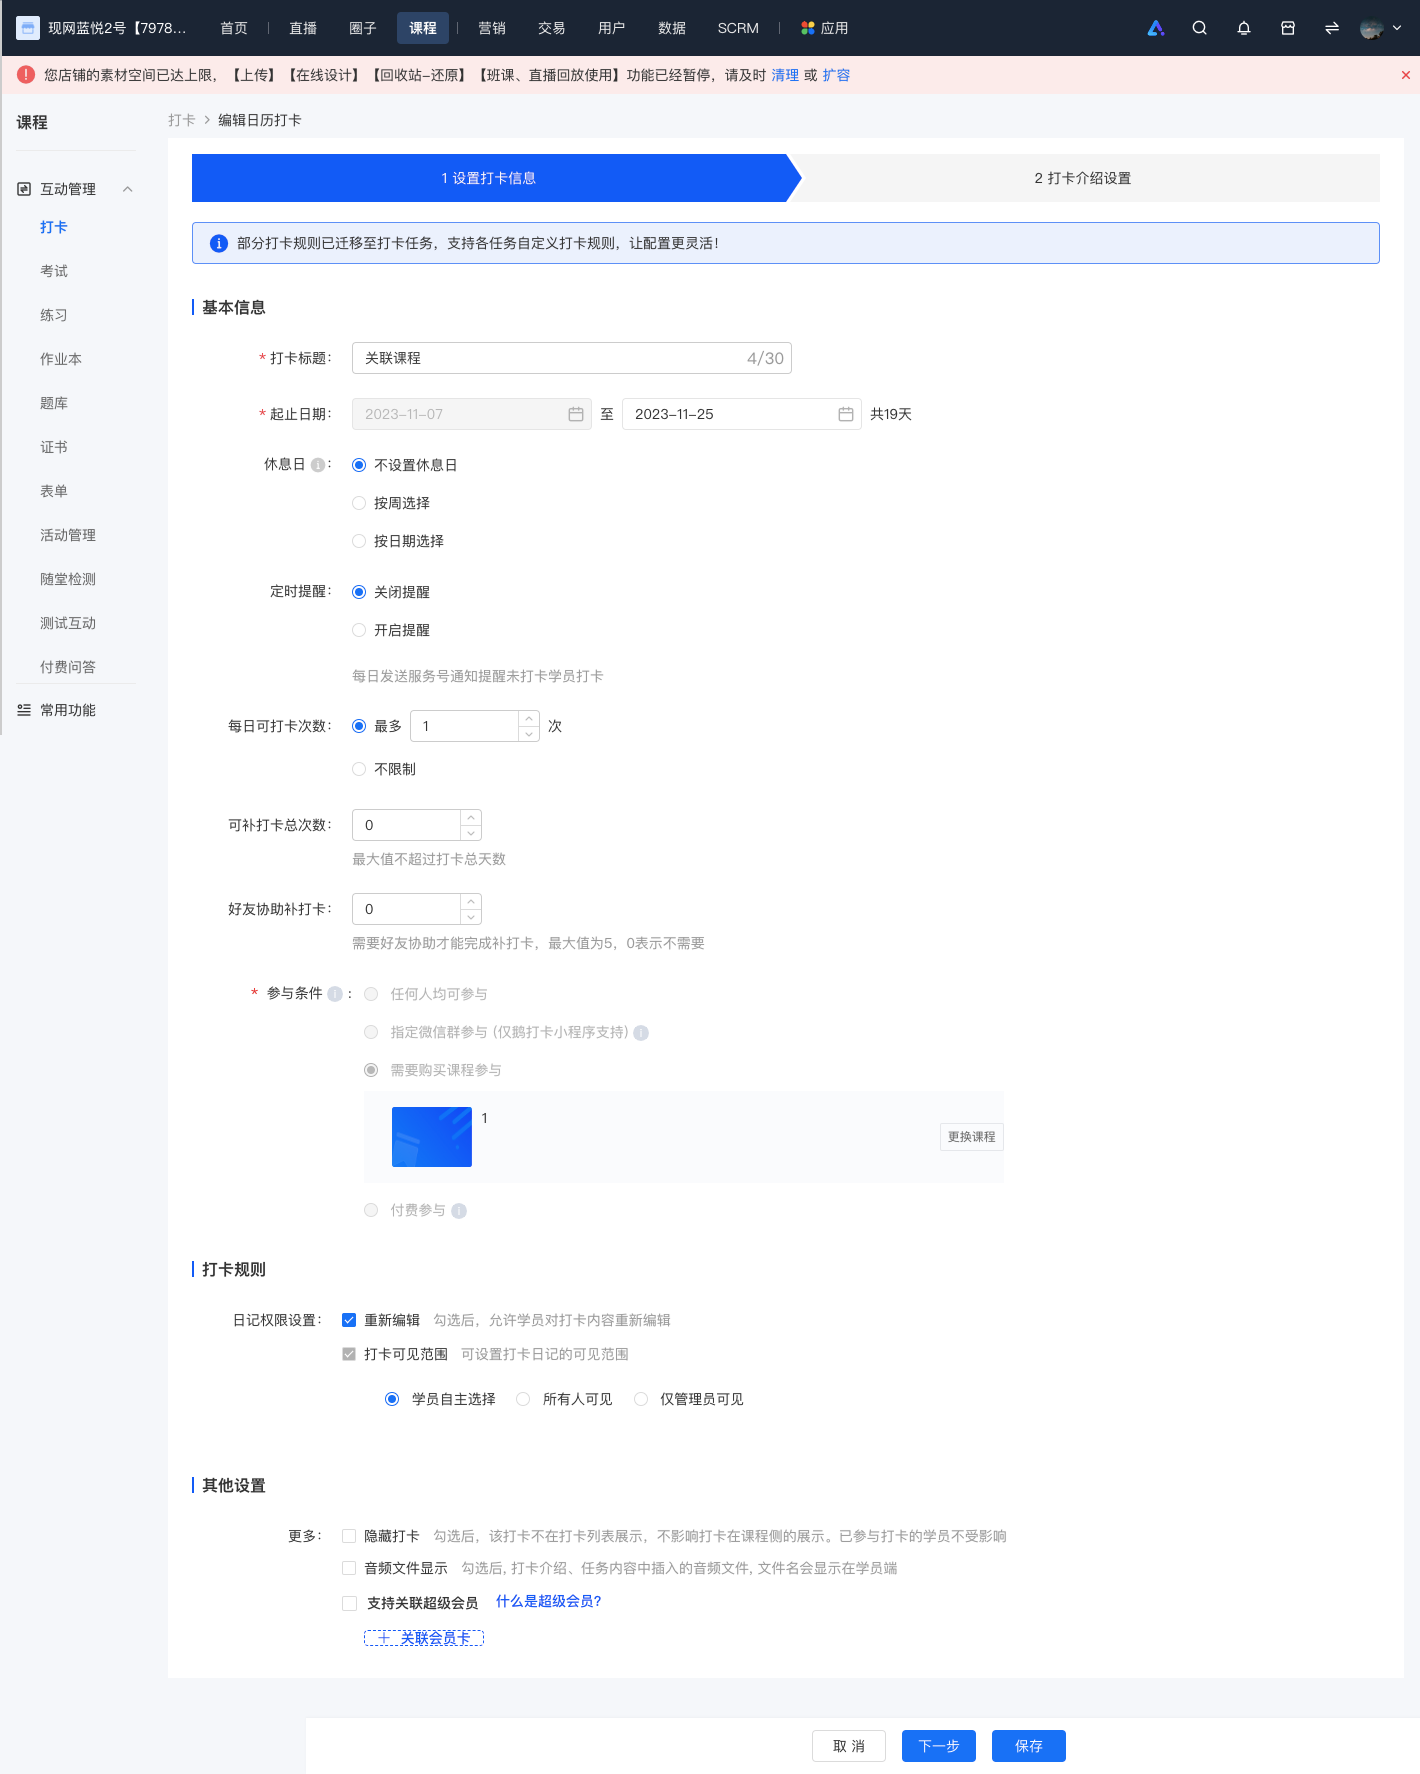
2. For assignment punch-in, all settings except the participation conditions can be modified.
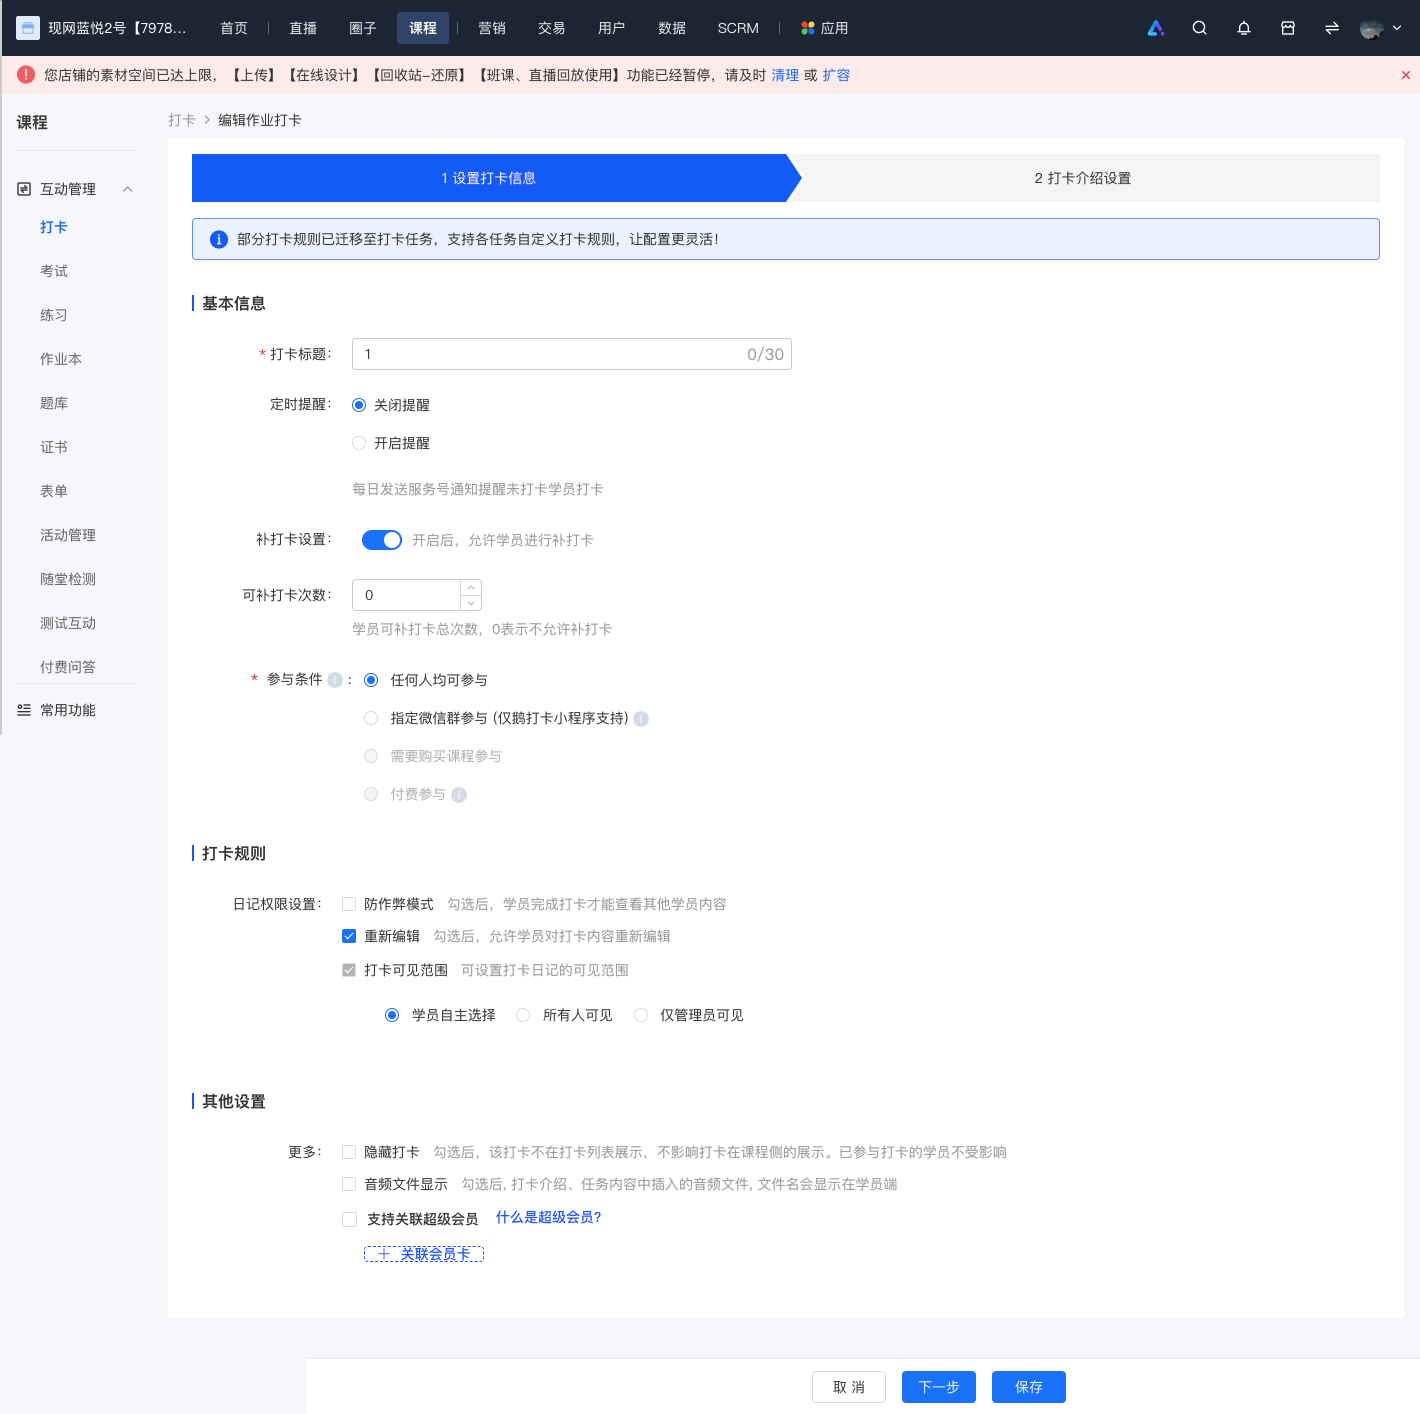
3. For challenge punch-in, all settings except the start time can be modified. It should be noted that the valid participation period for students can only be extended, not shortened.
What content formats are supported for check-ins?
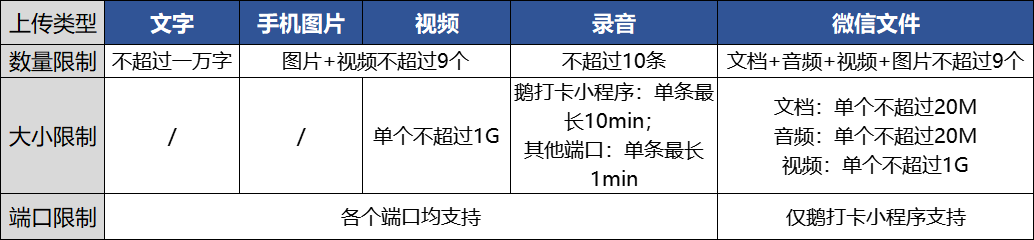
Currently, the check-in feature allows trainees to upload text, audio recordings, mobile phone photos, mobile phone videos, and WeChat files. The specific quantity and size limits are as follows:
What are the differences between calendar check-ins, assignment check-ins, and challenge check-ins?
1. Calendar Check-inA check-in mode based on a daily unit. Students are required to submit check-in content within the valid time period each day. It is suitable for scenarios of habit formation, such as morning run check-in and early sleep check-in.
2. Assignment Check-inA check-in mode based on assignments. Students need to complete their assignments within the specified time, which is suitable for teaching assessment scenarios.
3. Level-based Check-inA check-in mode based on levels. Students must finish learning the current lesson and complete the check-in to unlock the next lesson. Students can freely arrange their check-in time, which is suitable for scenarios where the check-in time is not fixed.
What's the function of customizing daily signatures, long images, and invitation cards?
Merchants can customize the daily cards, long pictures, and invitation cards shared by users in the punch-in activity, and personalize the style and background of user sharing.
With this setting, you can enable users to generate unique punch-in content with brand personality. This not only encourages users to share more actively but also enhances brand exposure and influence during the sharing process.
Can the famous quotes in the daily check-in signature images be modified?
Yes, you can customize the famous quotes in the daily signature image by referring to the following steps.
Step 1: Enter the quote library
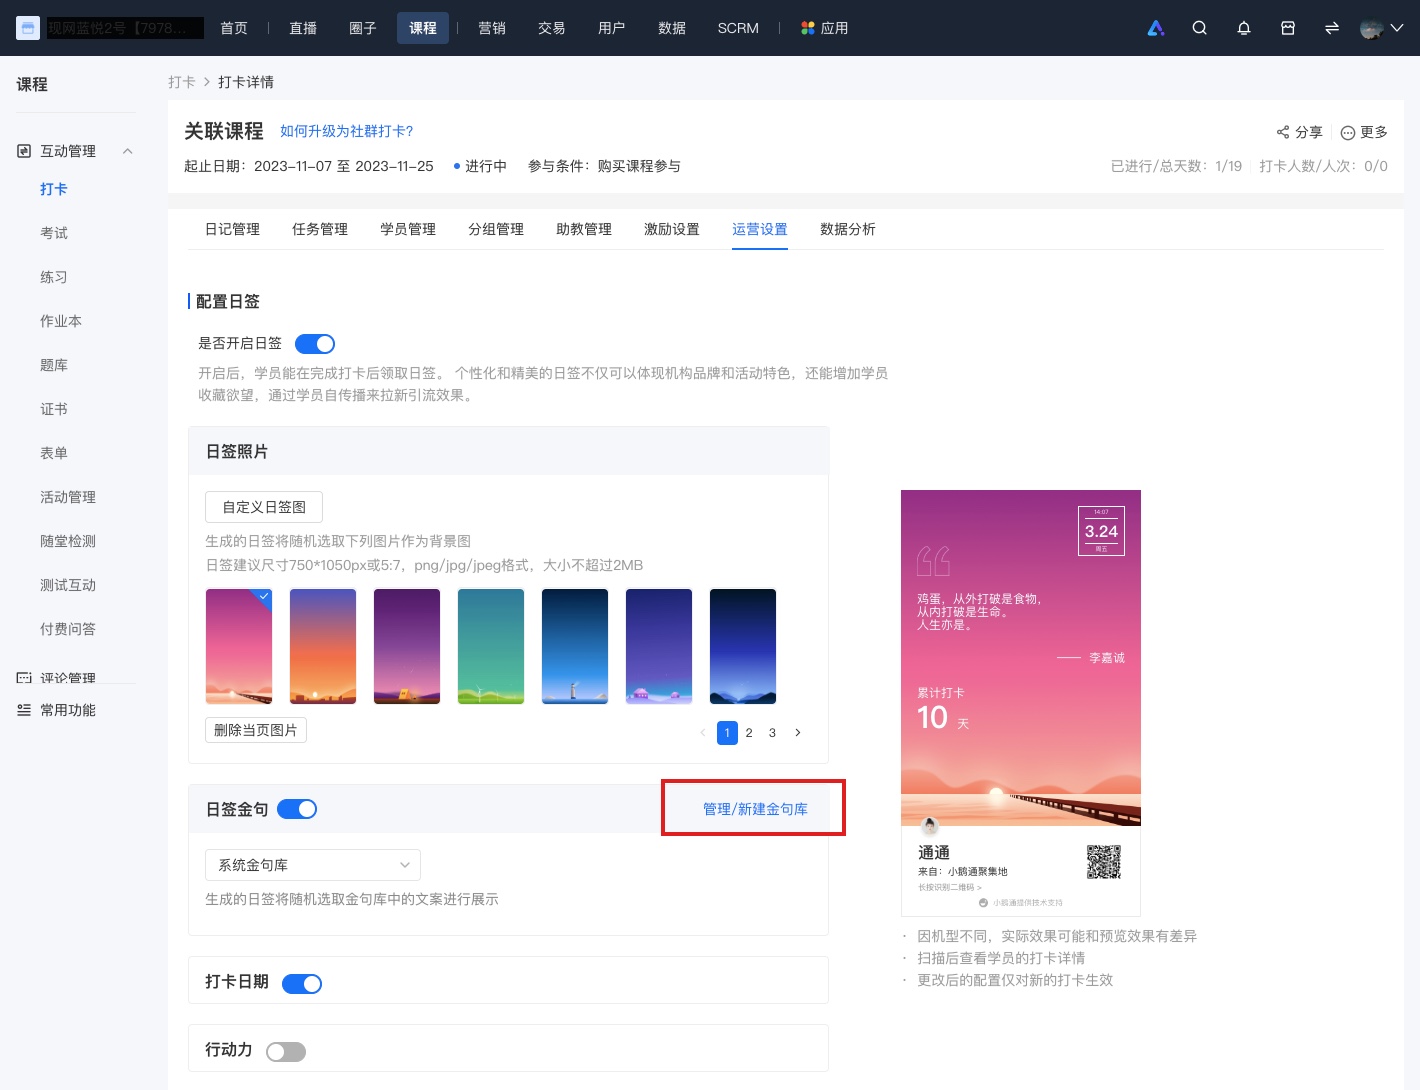
1. Enter the check-in where you need to configure the quotes for the daily signature image, and click [Operation Settings].
2. Find [Daily Signature Quotes], click [Manage/Create New Quote Library], and enter the quote library list.
Step 2: Create a new quote library
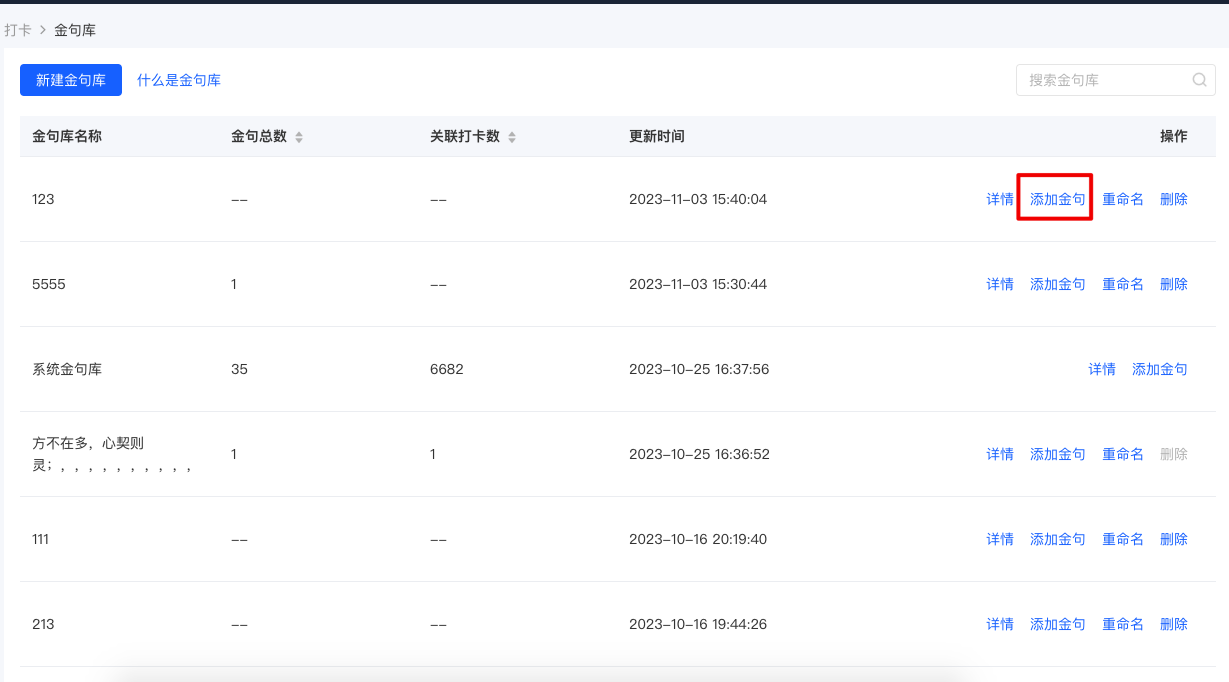
1. Click [Create New Quote Library] and set a name for the quote library.
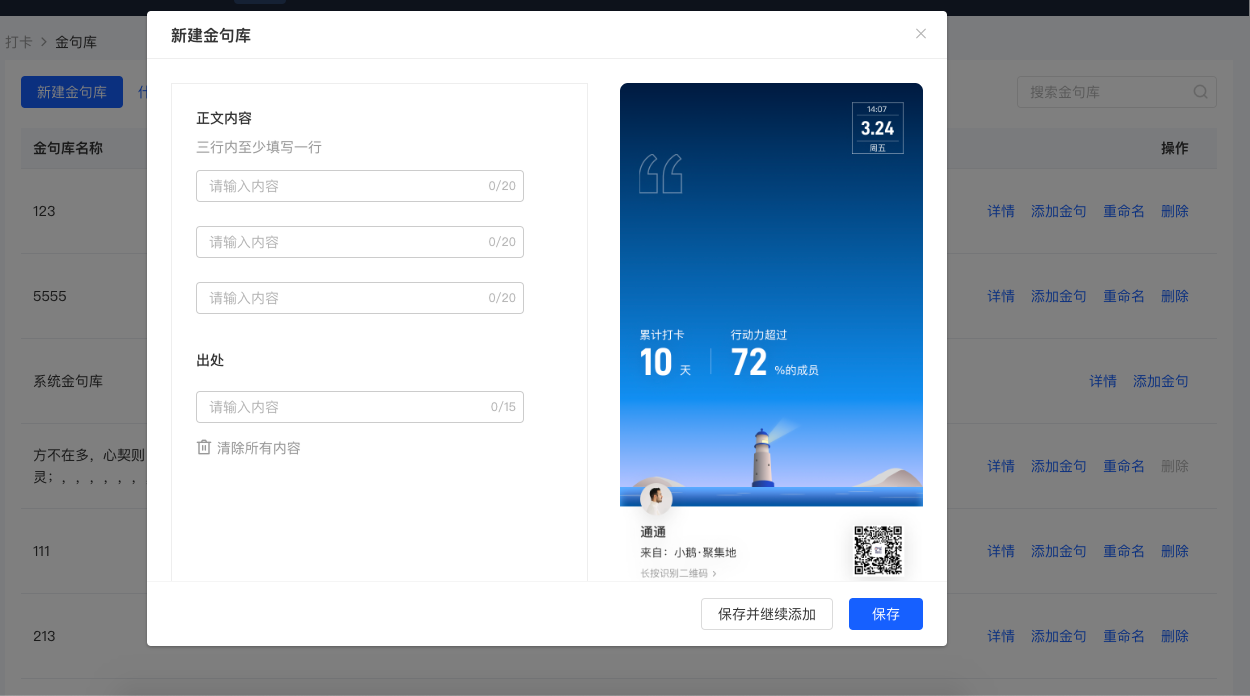
2. After creating the quote library, click [Add Quote] and fill in the content and source of the quote. 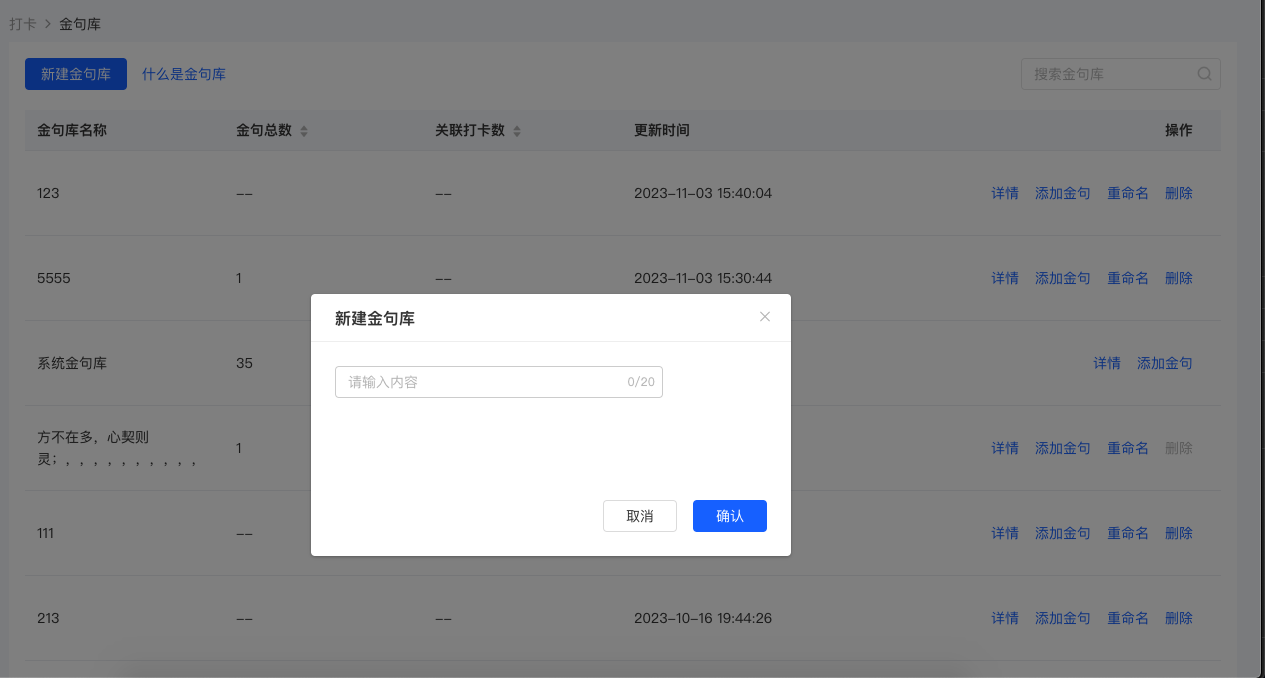
Step 3: Configure the quote library for the corresponding check-in
Select the check-in you need to configure, enter the check-in details, select [Operation Settings], and choose the corresponding quote library.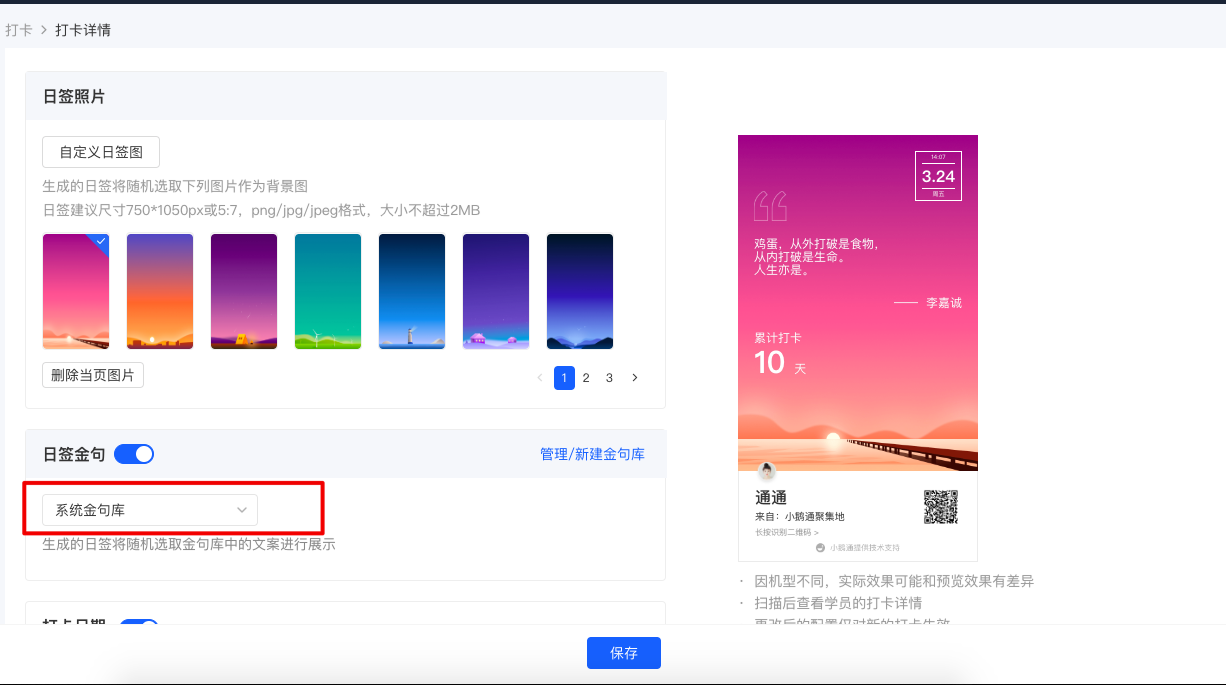
What's the purpose of featuring a student's diary?
After being selected, the student's diary will be prioritized for display, increasing the exposure of high-quality content and encouraging students to produce excellent work.
Can check-ins be associated with courses?
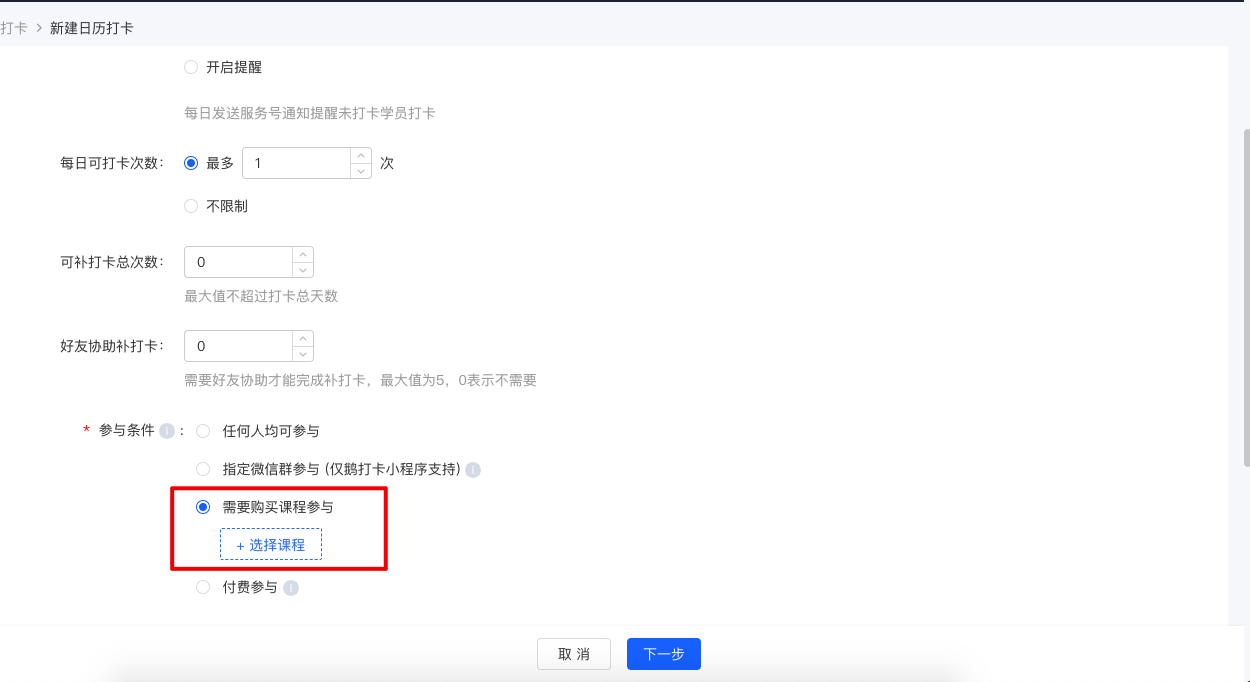
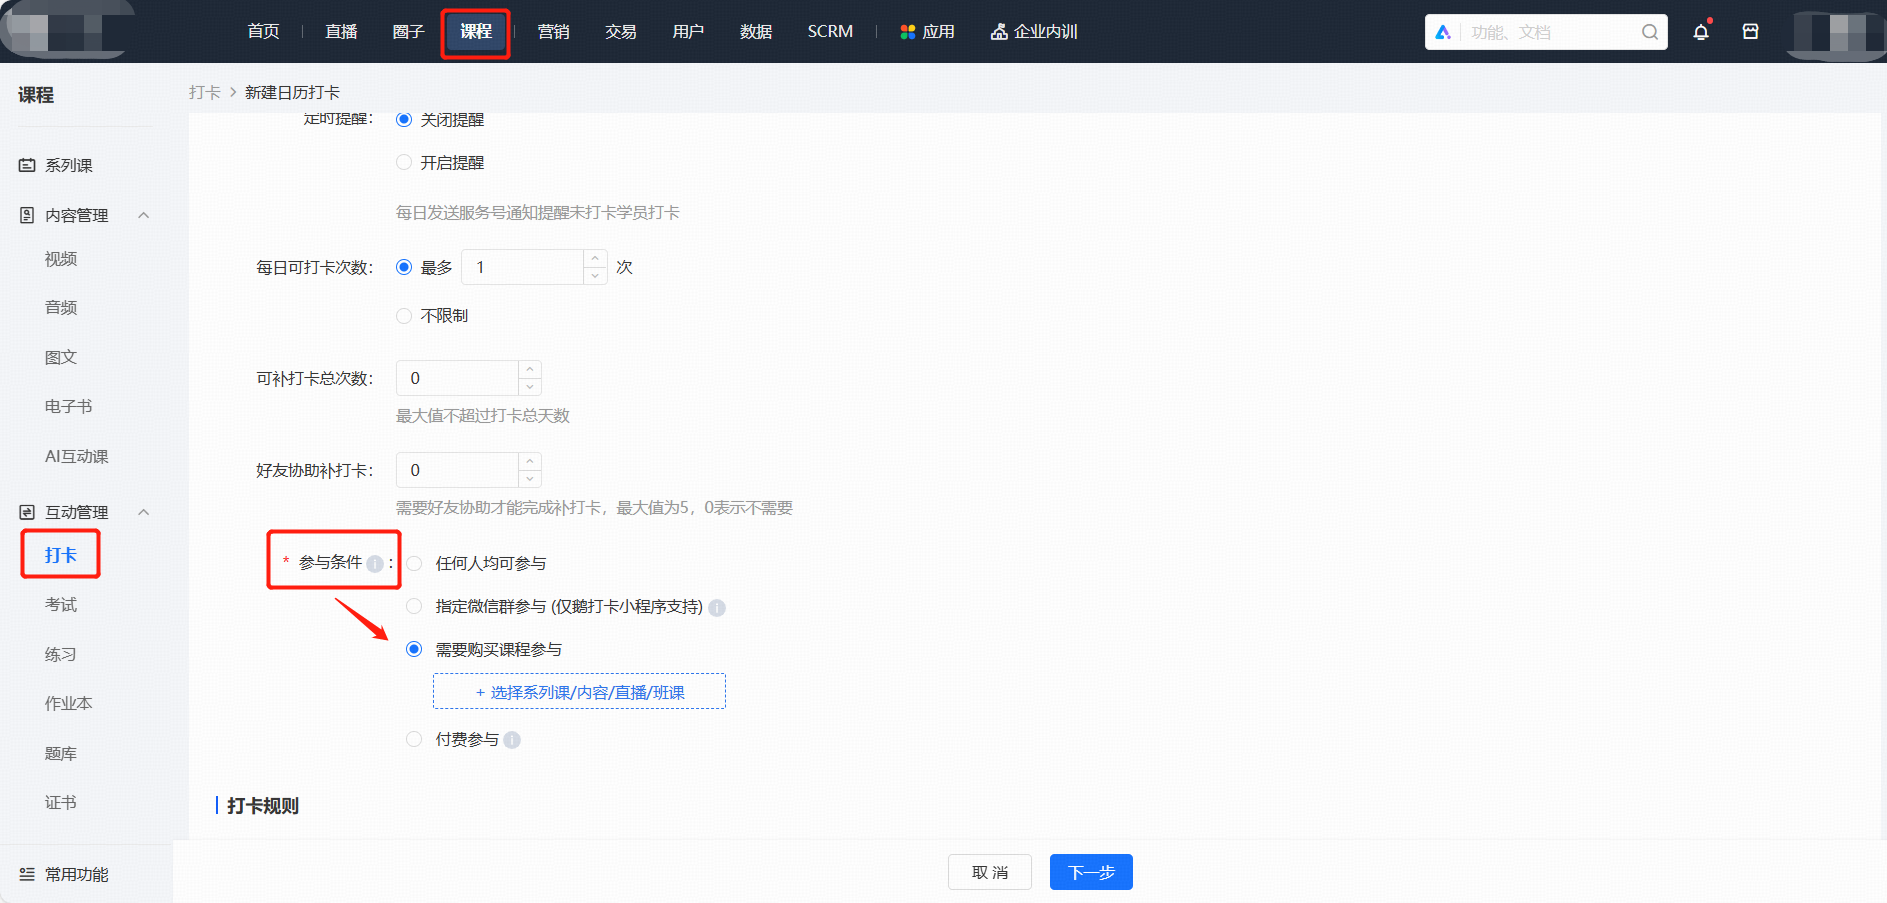
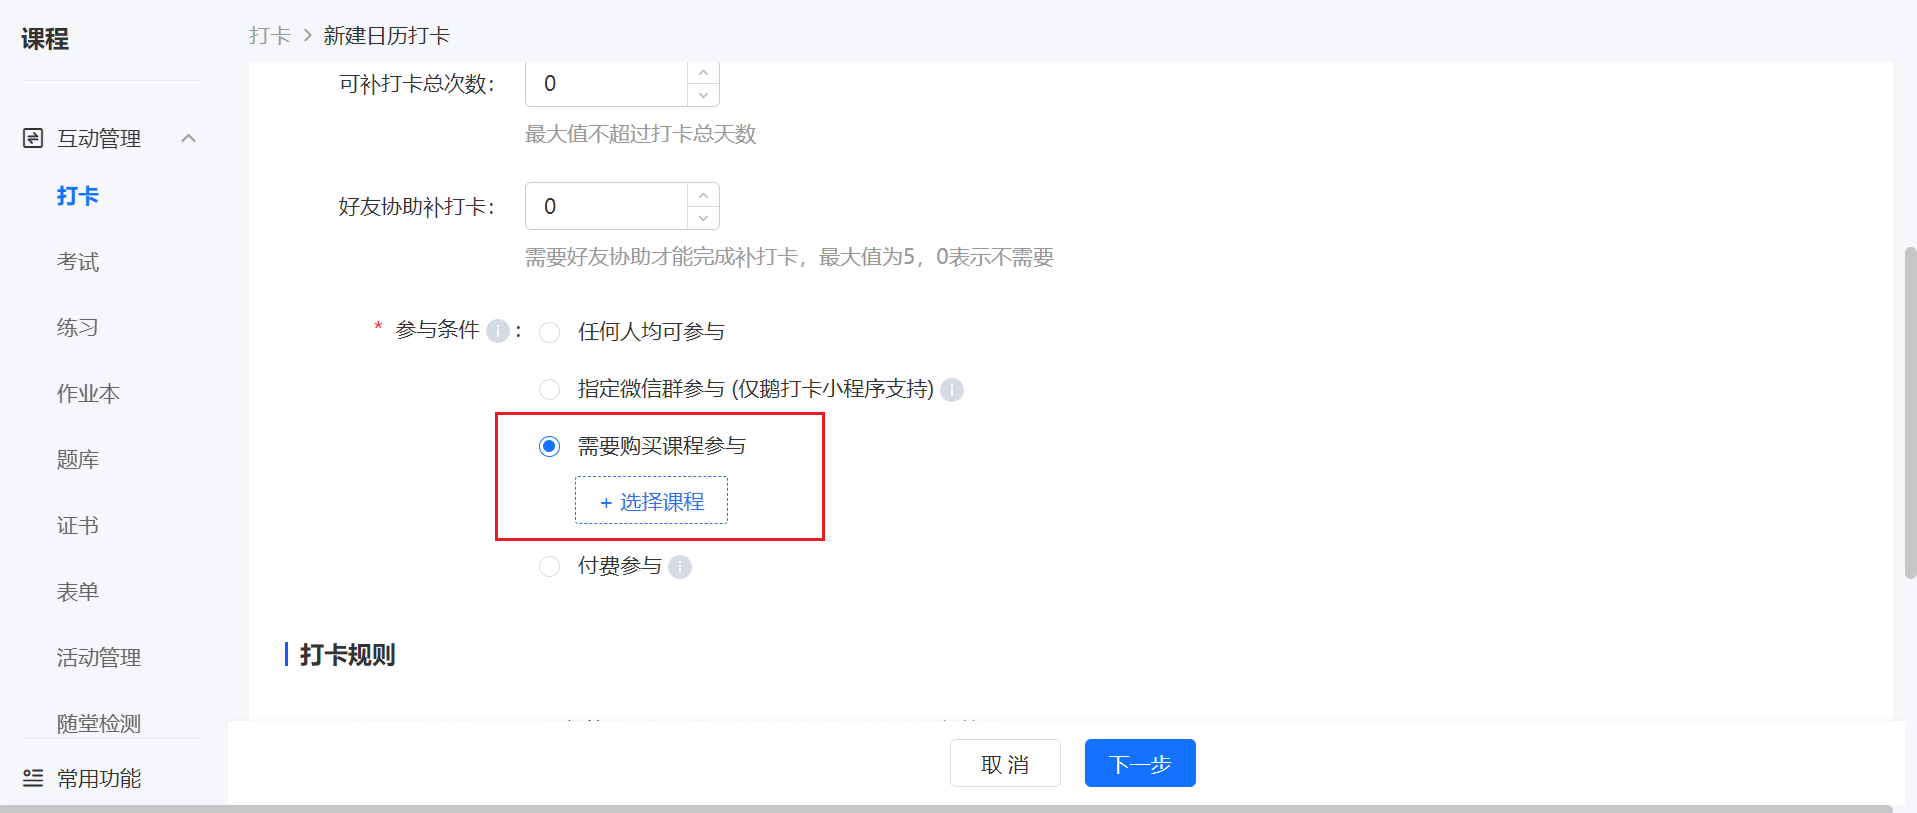
Yes, it's possible.On the [Management Console - Courses - Learning Support Tools - Check-ins], select [Participate after Purchasing the Course] in the [Participation Conditions] of the check-in configuration.One check-in activity supports association with one course. Currently, the course types supported by check-ins are:图文, audio, video, live streaming,Membership,Columns, Mega Columns, and Class Courses.
How to set up make-up clock-ins?
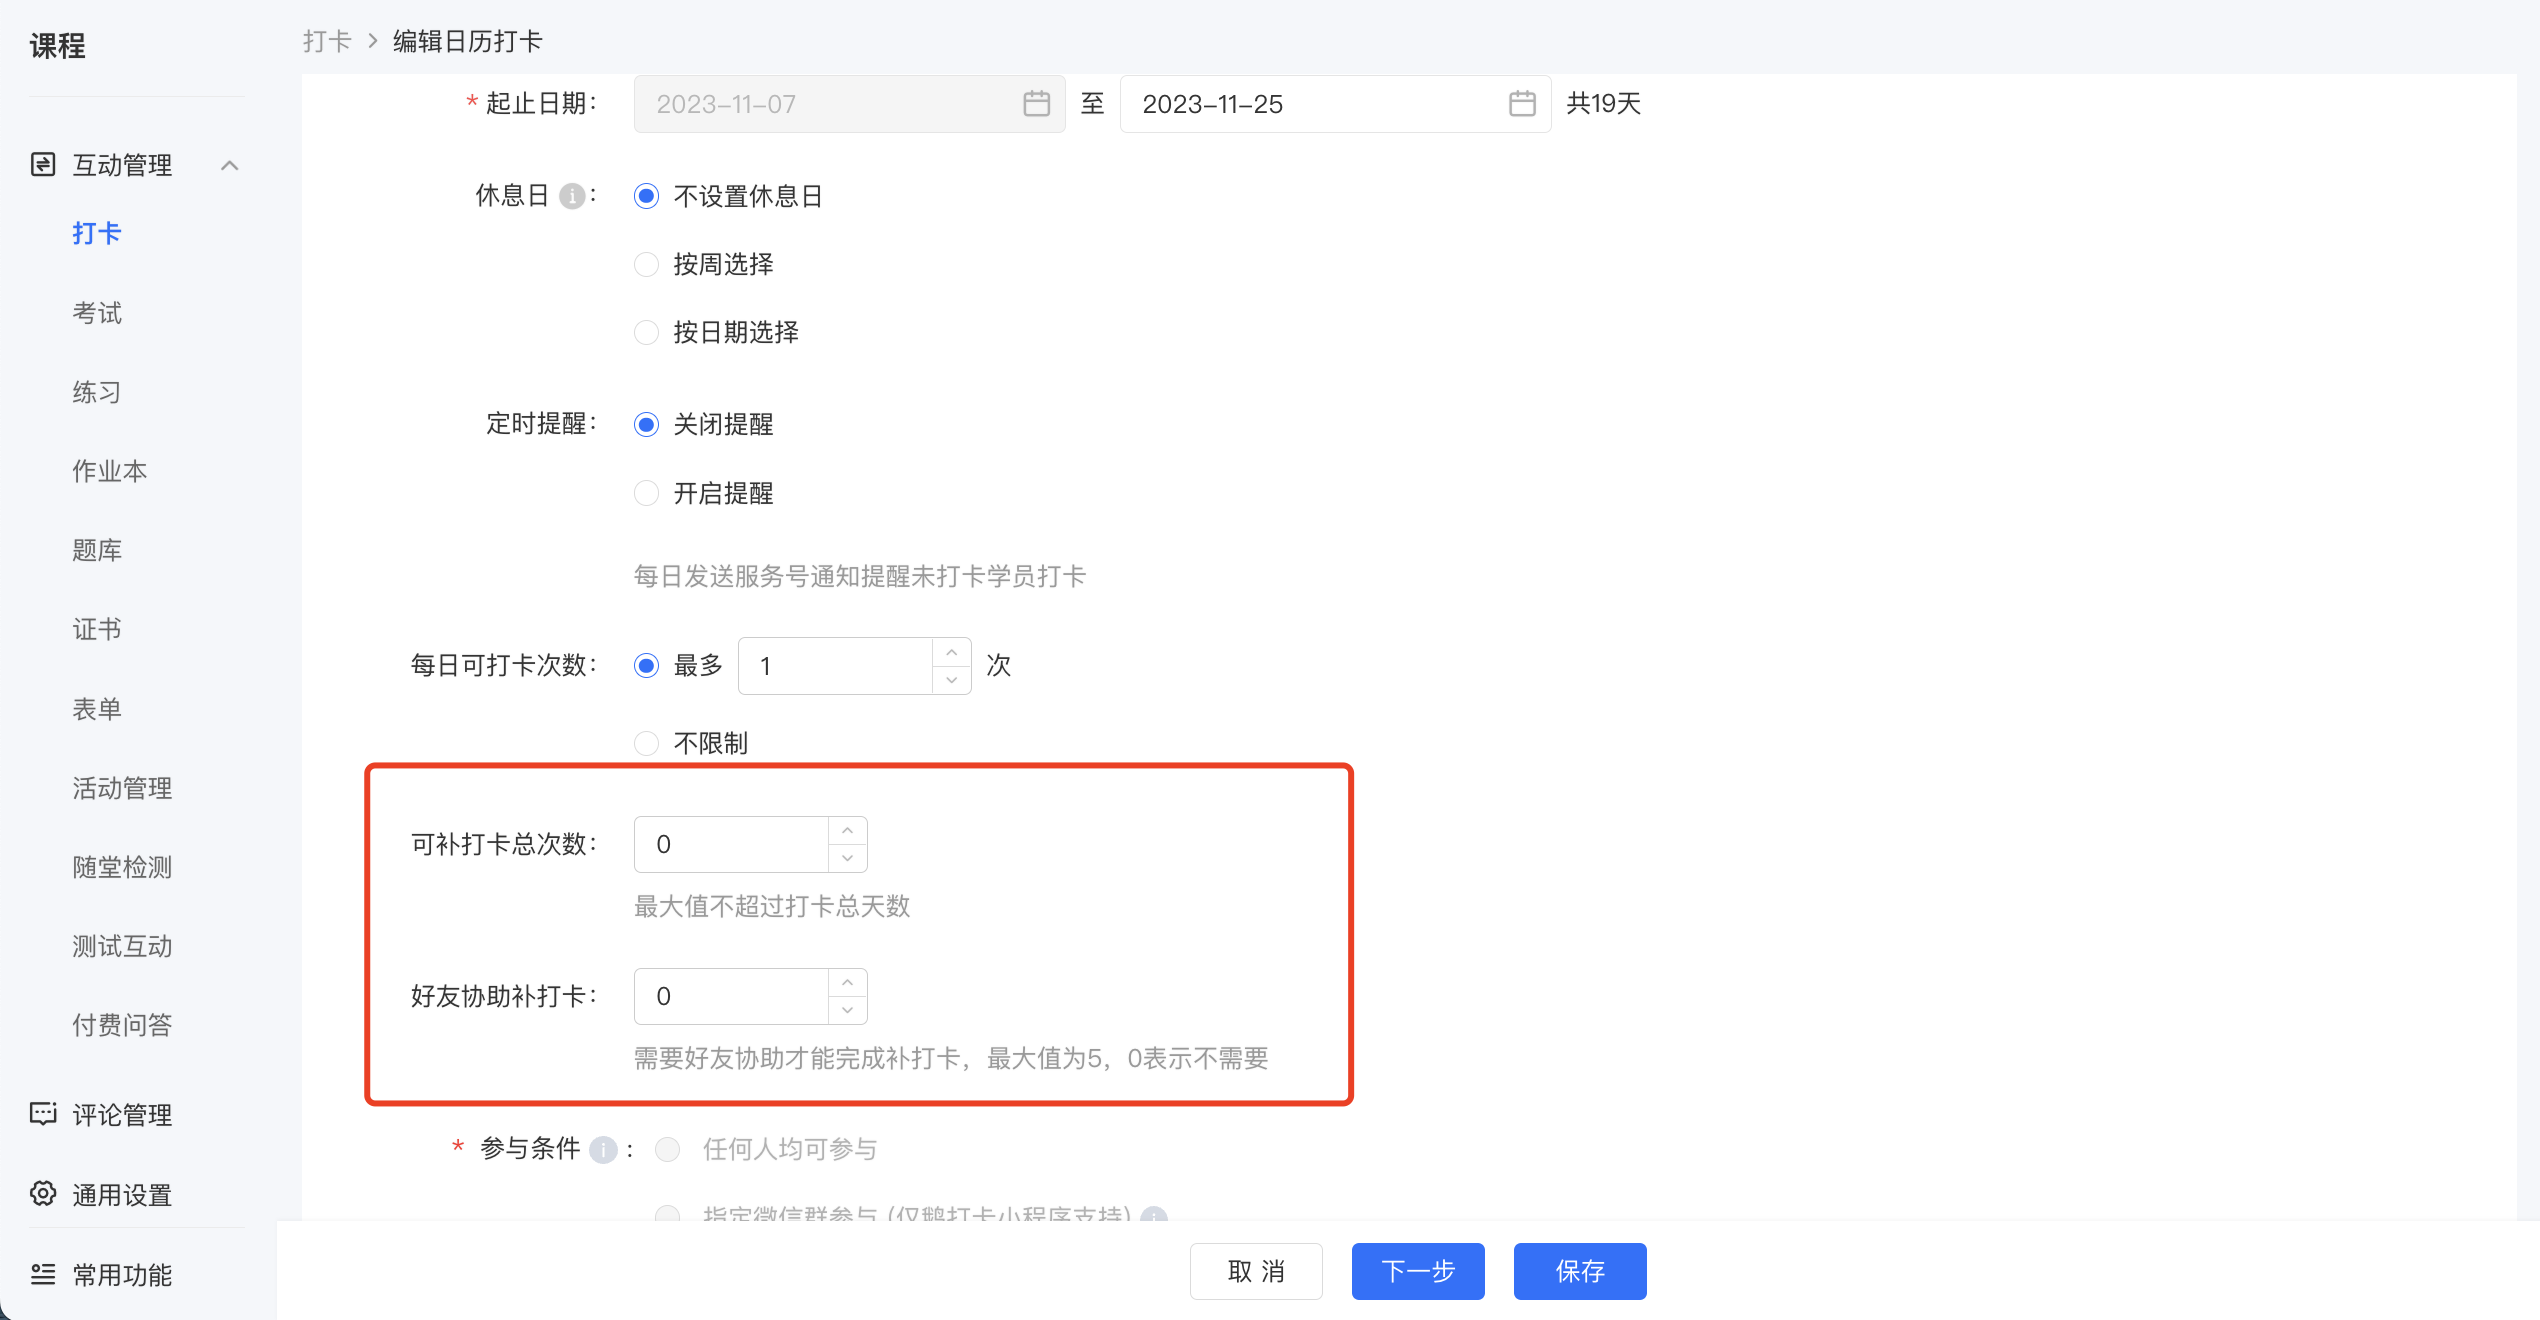
For calendar check-ins and assignment check-ins, you can set the number of make-up check-ins for students on the or page.
1. The default number of make-up check-ins is 0, which means make-up check-ins are not allowed.
2. For calendar check-ins, the maximum number of make-up check-ins cannot exceed the number of check-in days.
3. For calendar check-ins, students are not allowed to make up check-ins after the check-in period ends.
How to add teaching assistants to the punch-in activity?
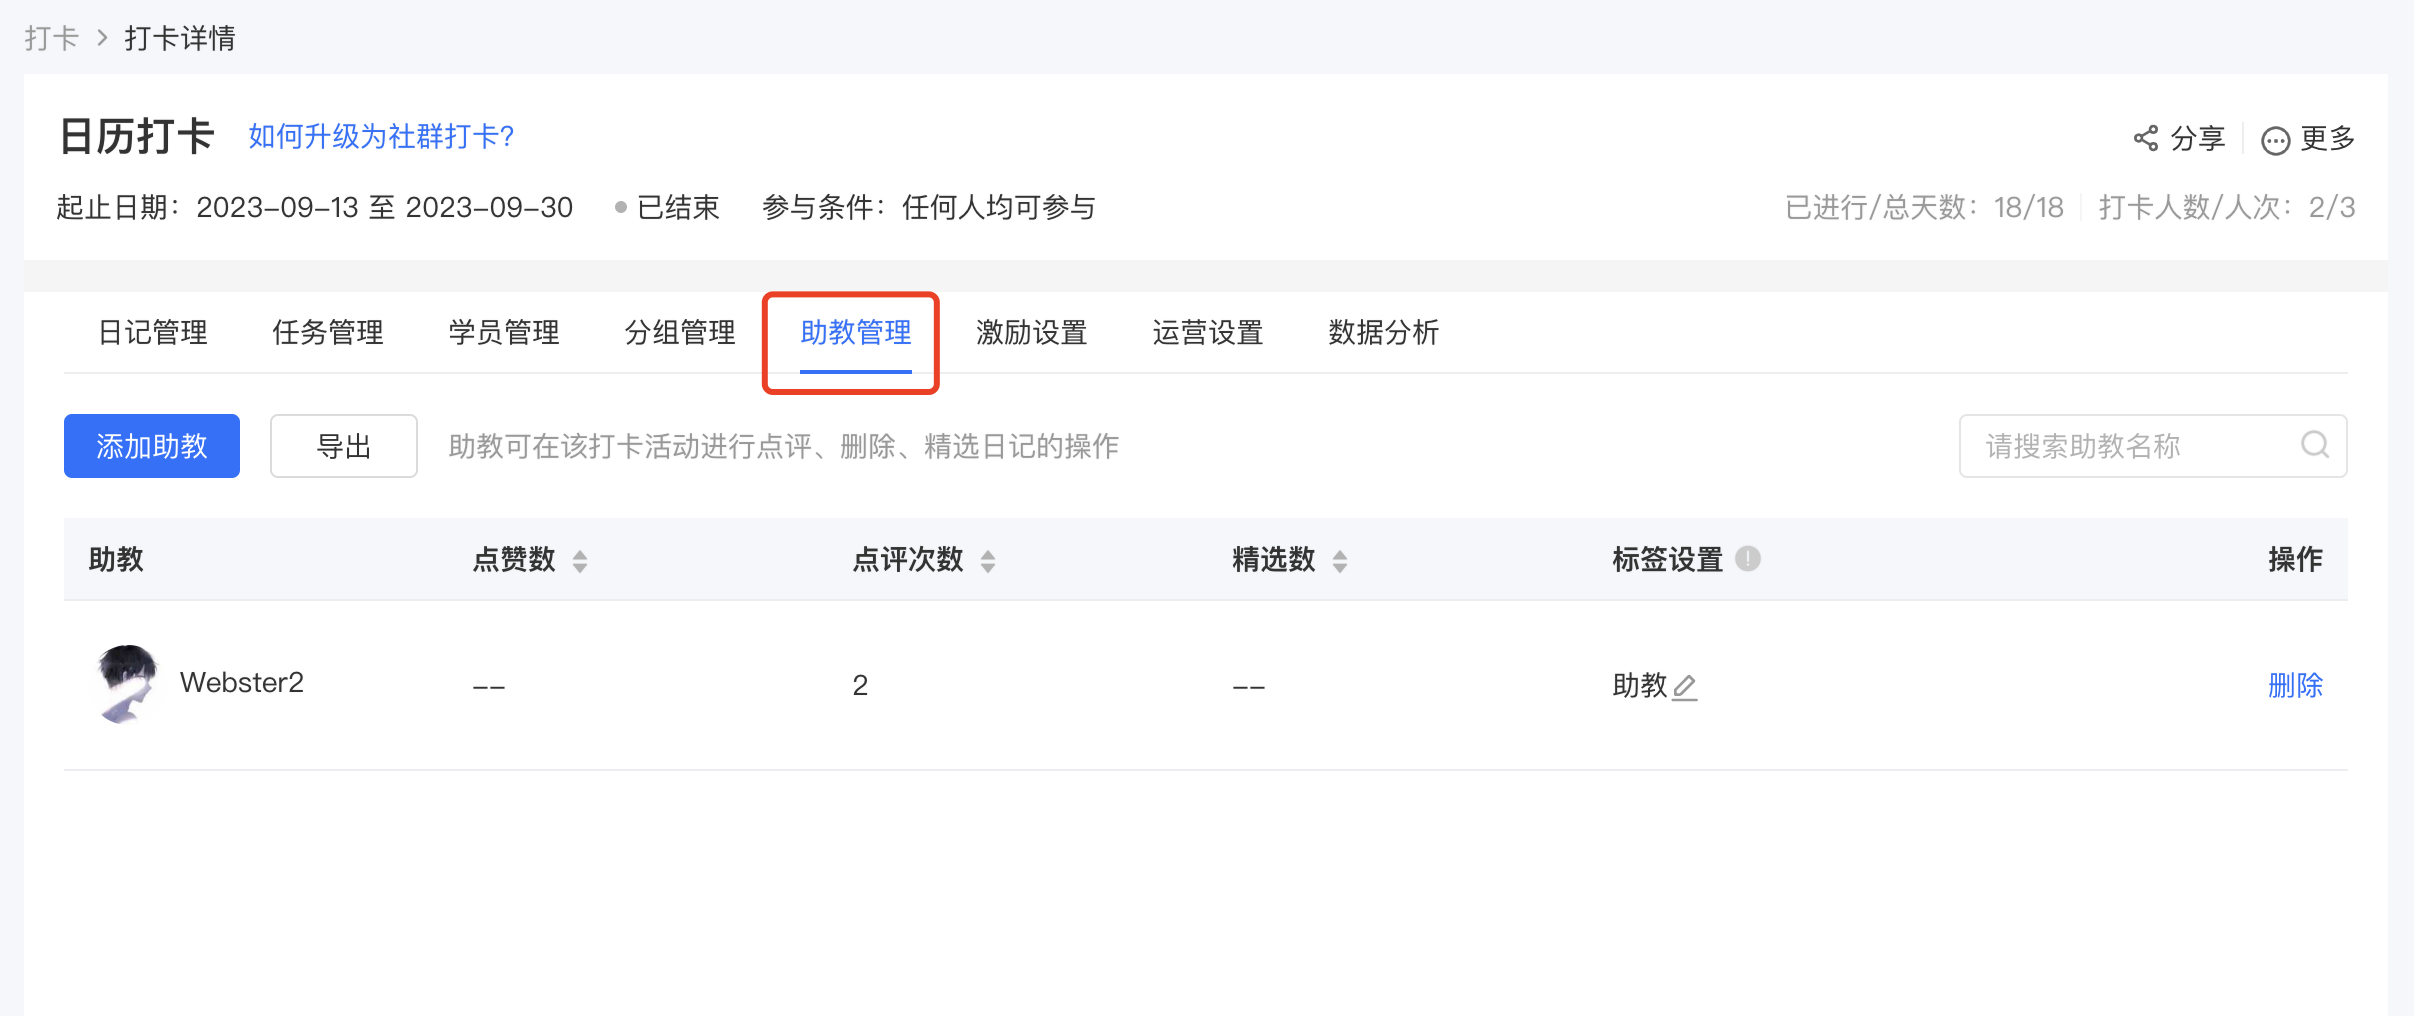
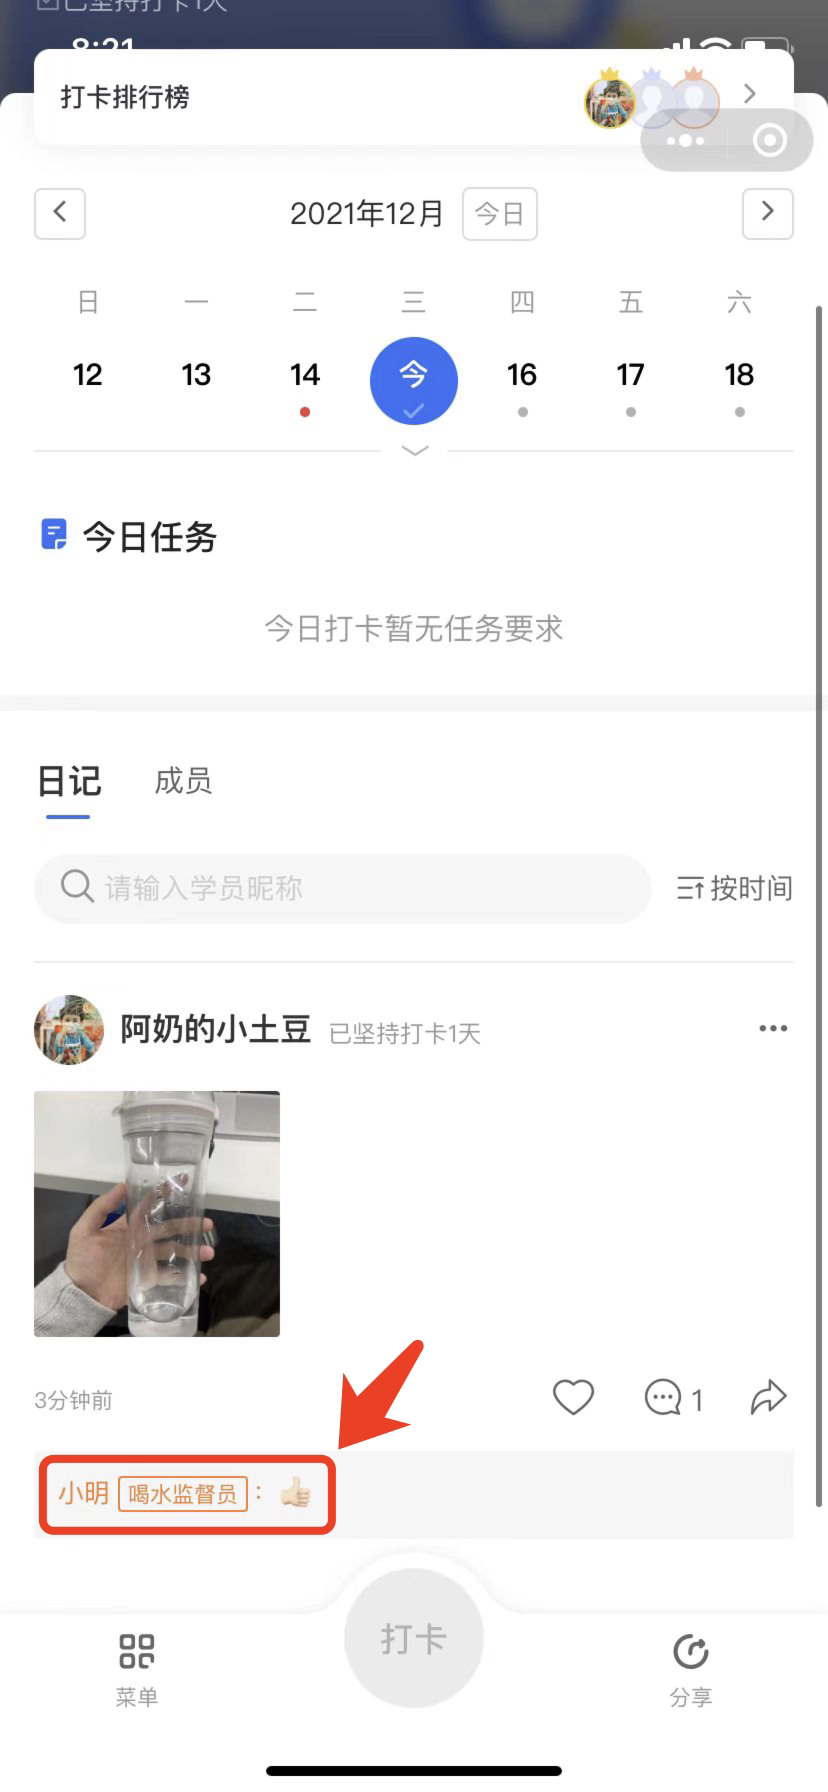
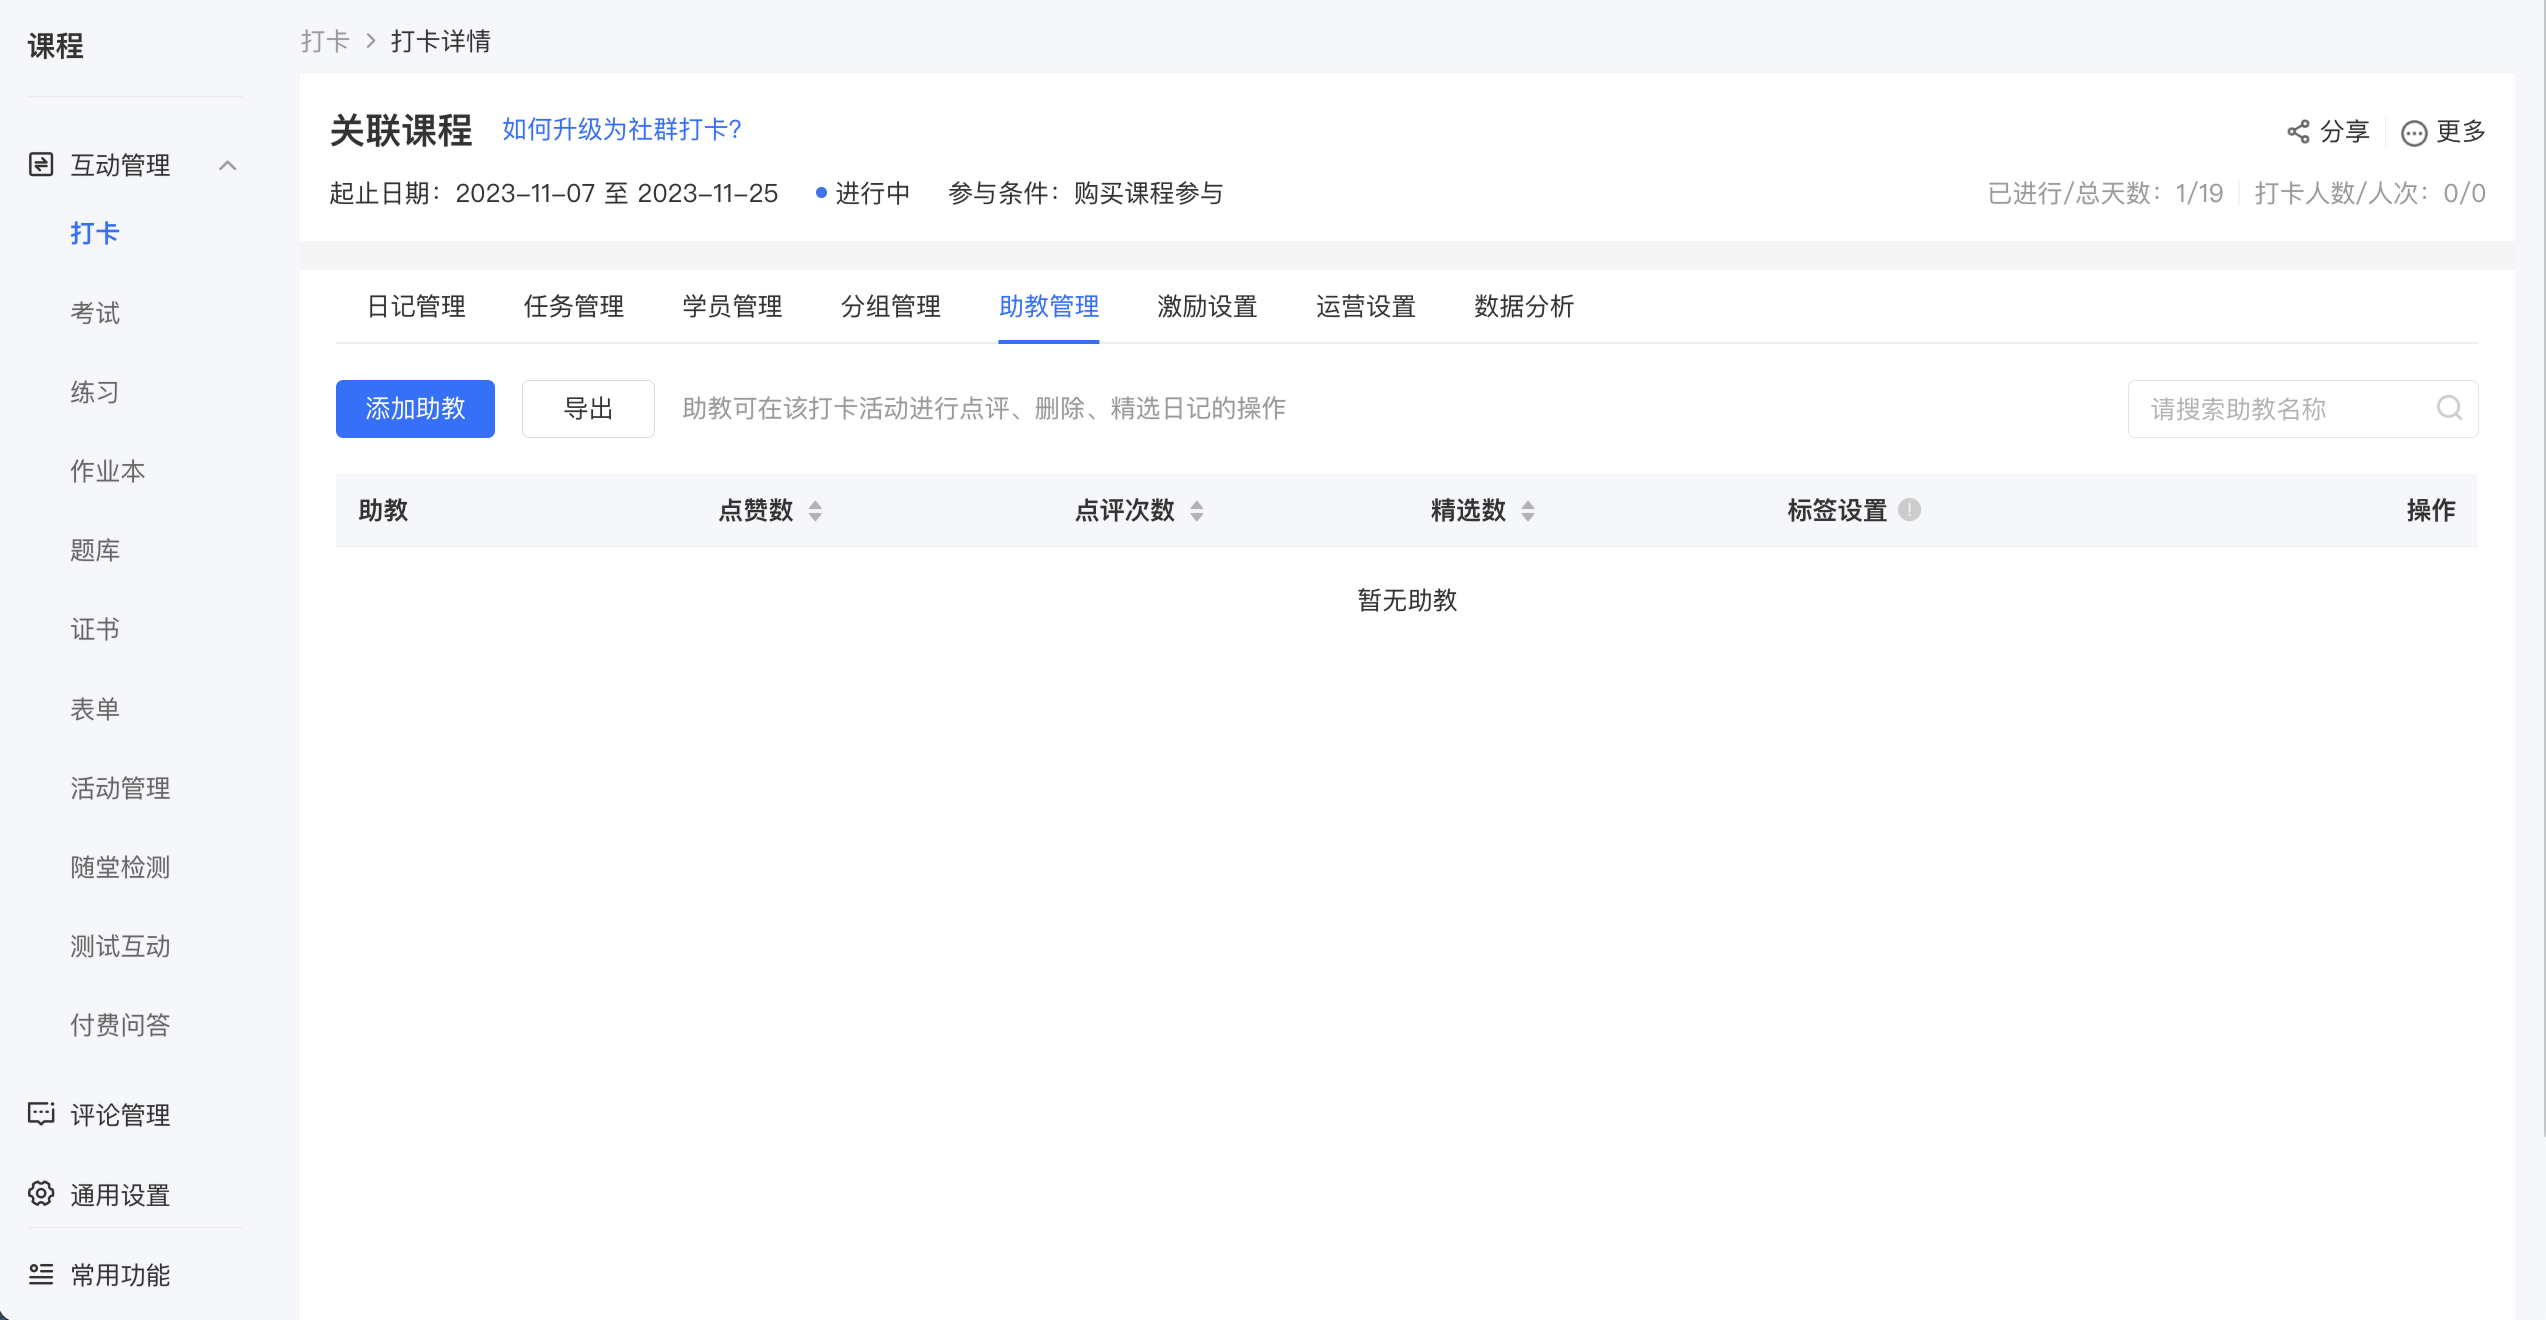
In the created punch cards, you can click [Details] - [Teaching Assistant Management] to add teaching assistants. Teaching assistants can comment on, delete, select as featured, and pin the punch card content of students.
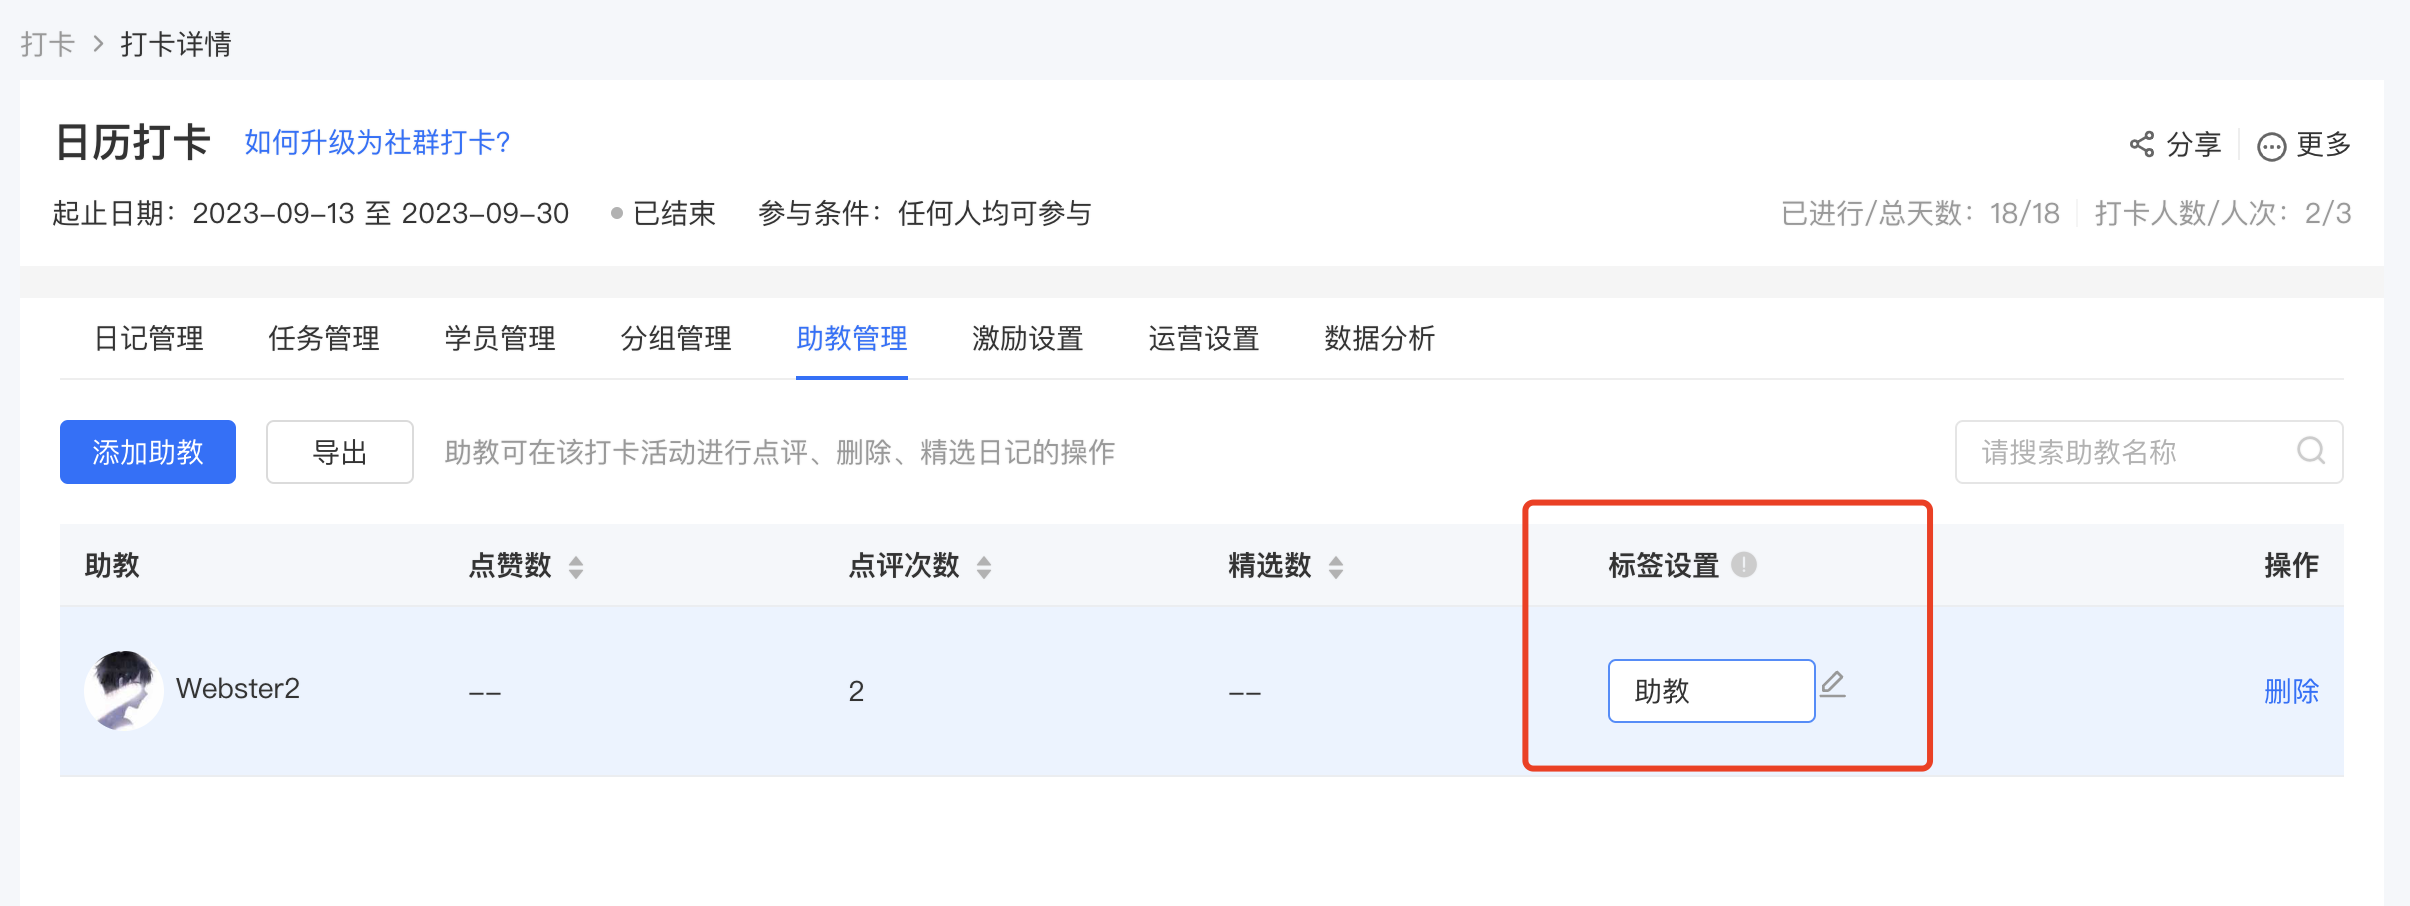
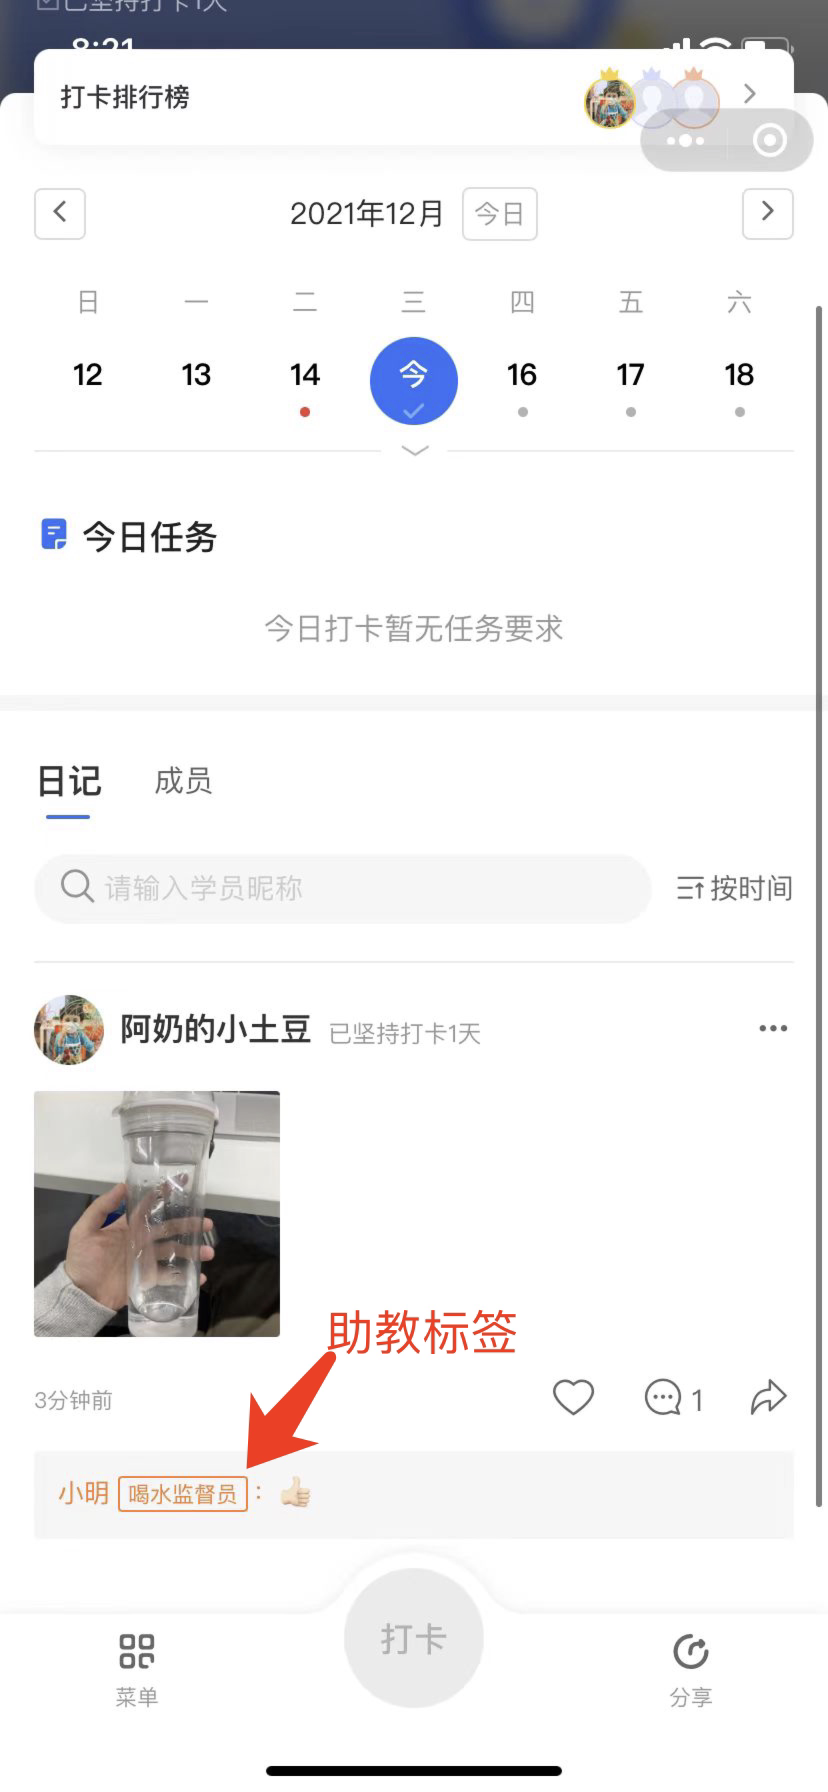
After adding teaching assistants, you can also modify their labels, which will be displayed on the student side.
How to set up check-in rules for the challenge check-in?
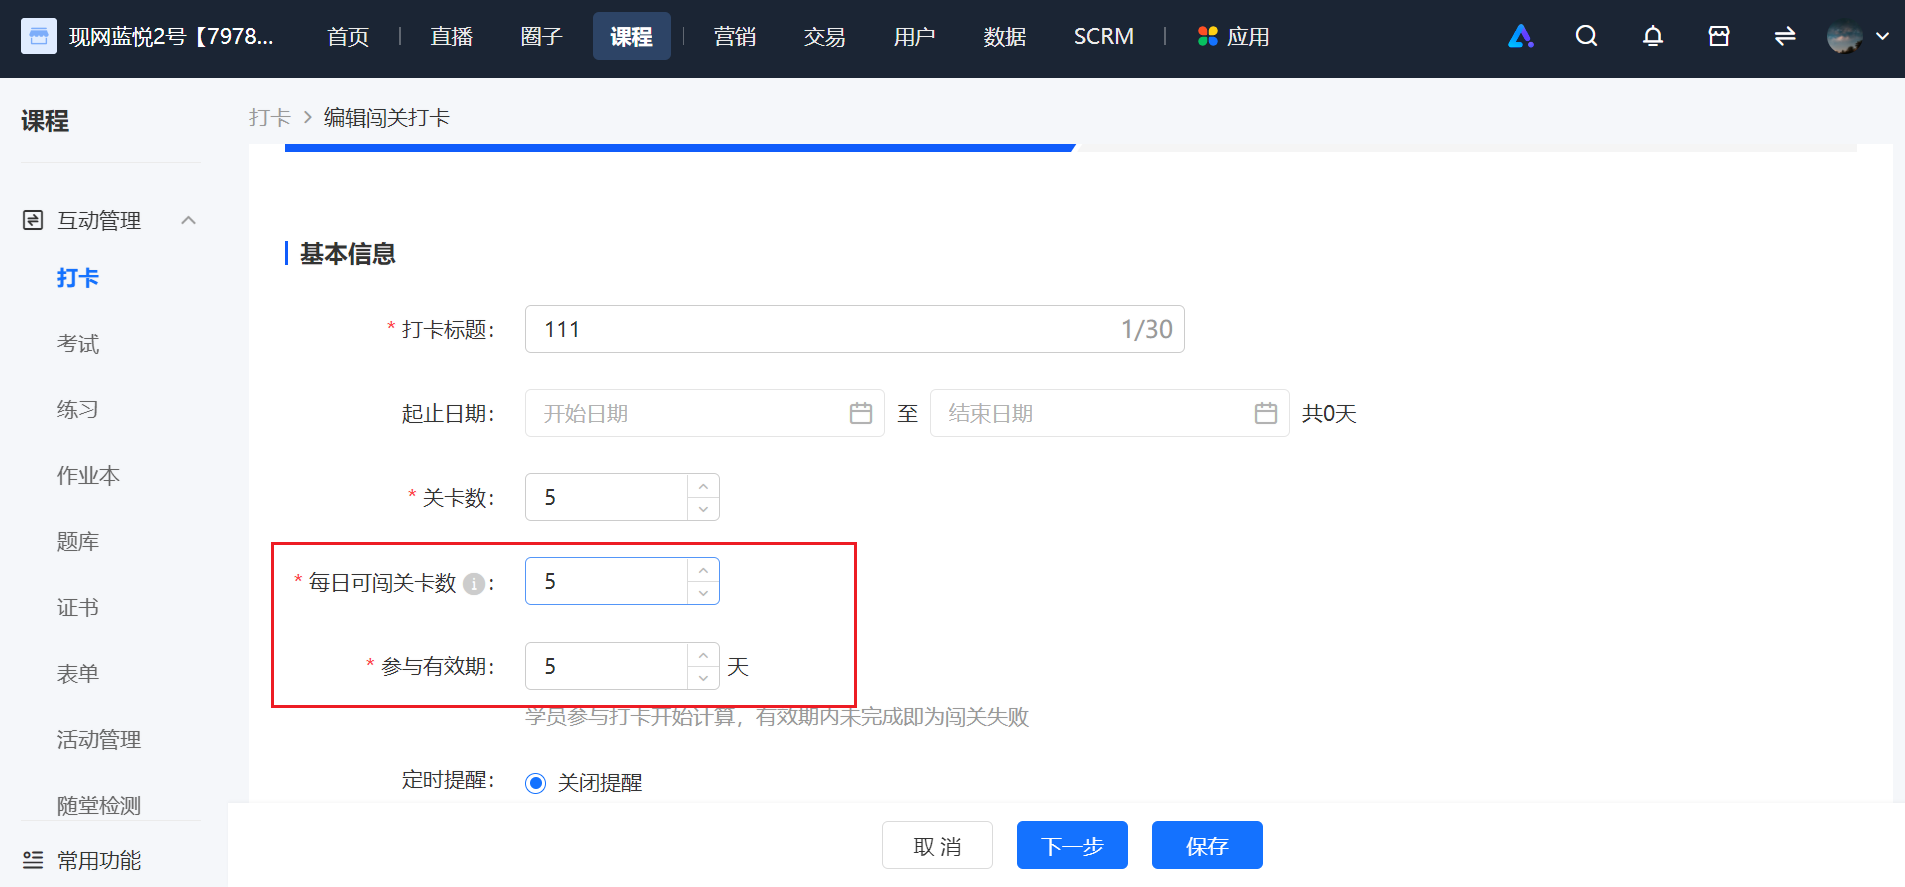
Challenge check-ins can stimulate the activity of trainees by setting the [Daily challenge levels available] and [Validity period for participation].
The validity period for participation is calculated from the time the trainee starts participating in the check - in. Failure to complete the challenge within the validity period results in a failed challenge.
Can the anti-cheating mode be enabled after the check-in starts?
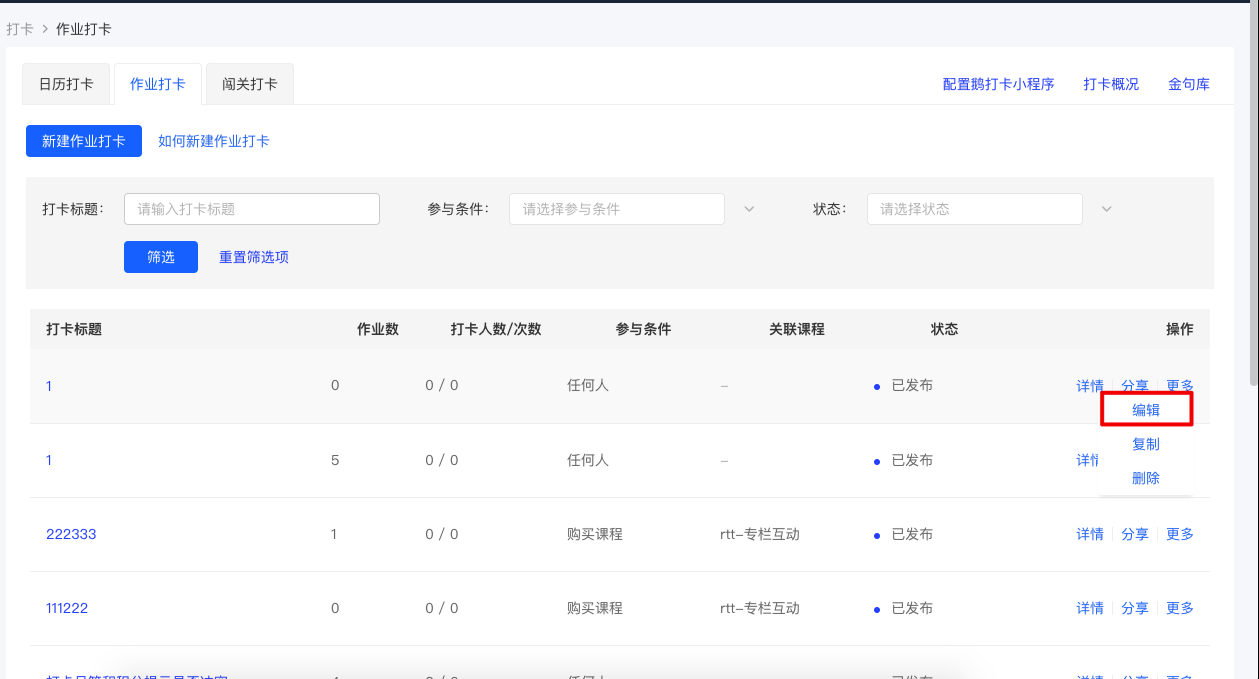
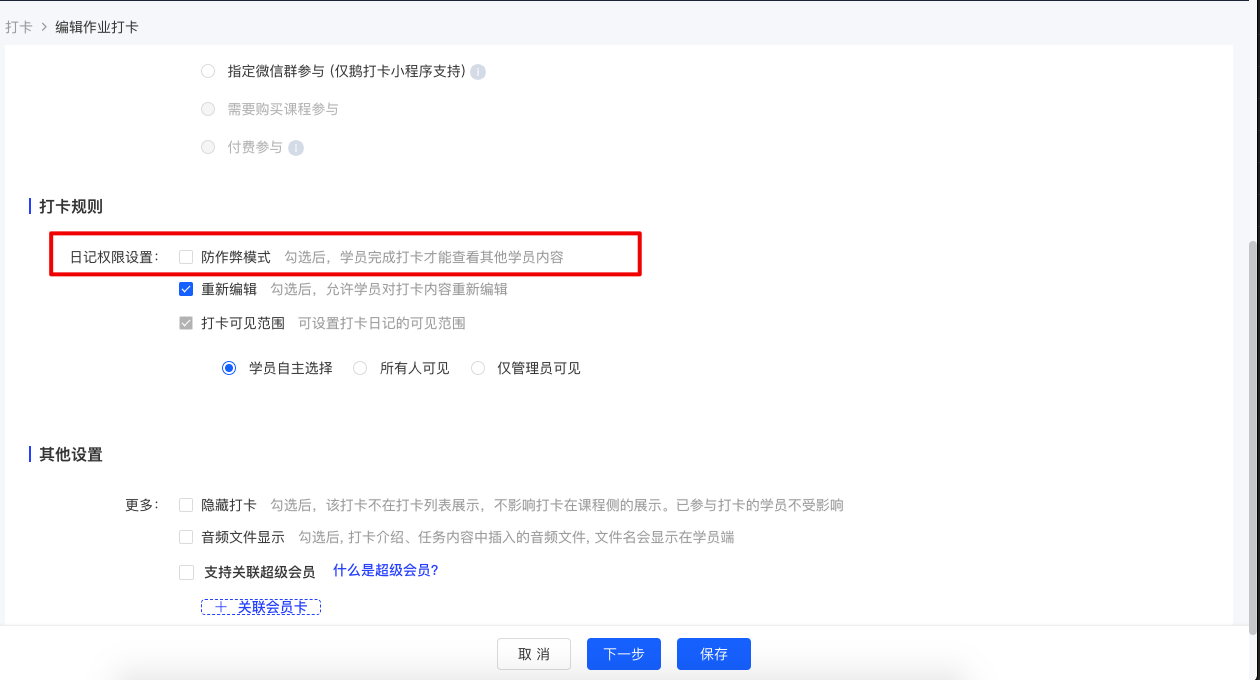
Yes, for assignment check-ins and challenge check-ins, you can enable the anti-cheating mode on the check-in editing page. After enabling it, learners need to complete the check-in before they can view the check-in content of other learners.
How to configure the Attendance Certificate?
There are three ways to configure the打卡 certificates:
1. Associate the created打卡 activity on the certificate function page.
2. Configure the certificate for the created打卡 activity in the打卡 function -打卡 details - incentive settings.
For specific operation steps, please refer to:Tutorial on using the打卡 course completion certificate
Where can I view the attendance certificates?
1. After checking in, students who meet the issuance criteria will see the following course completion certificate pop up.
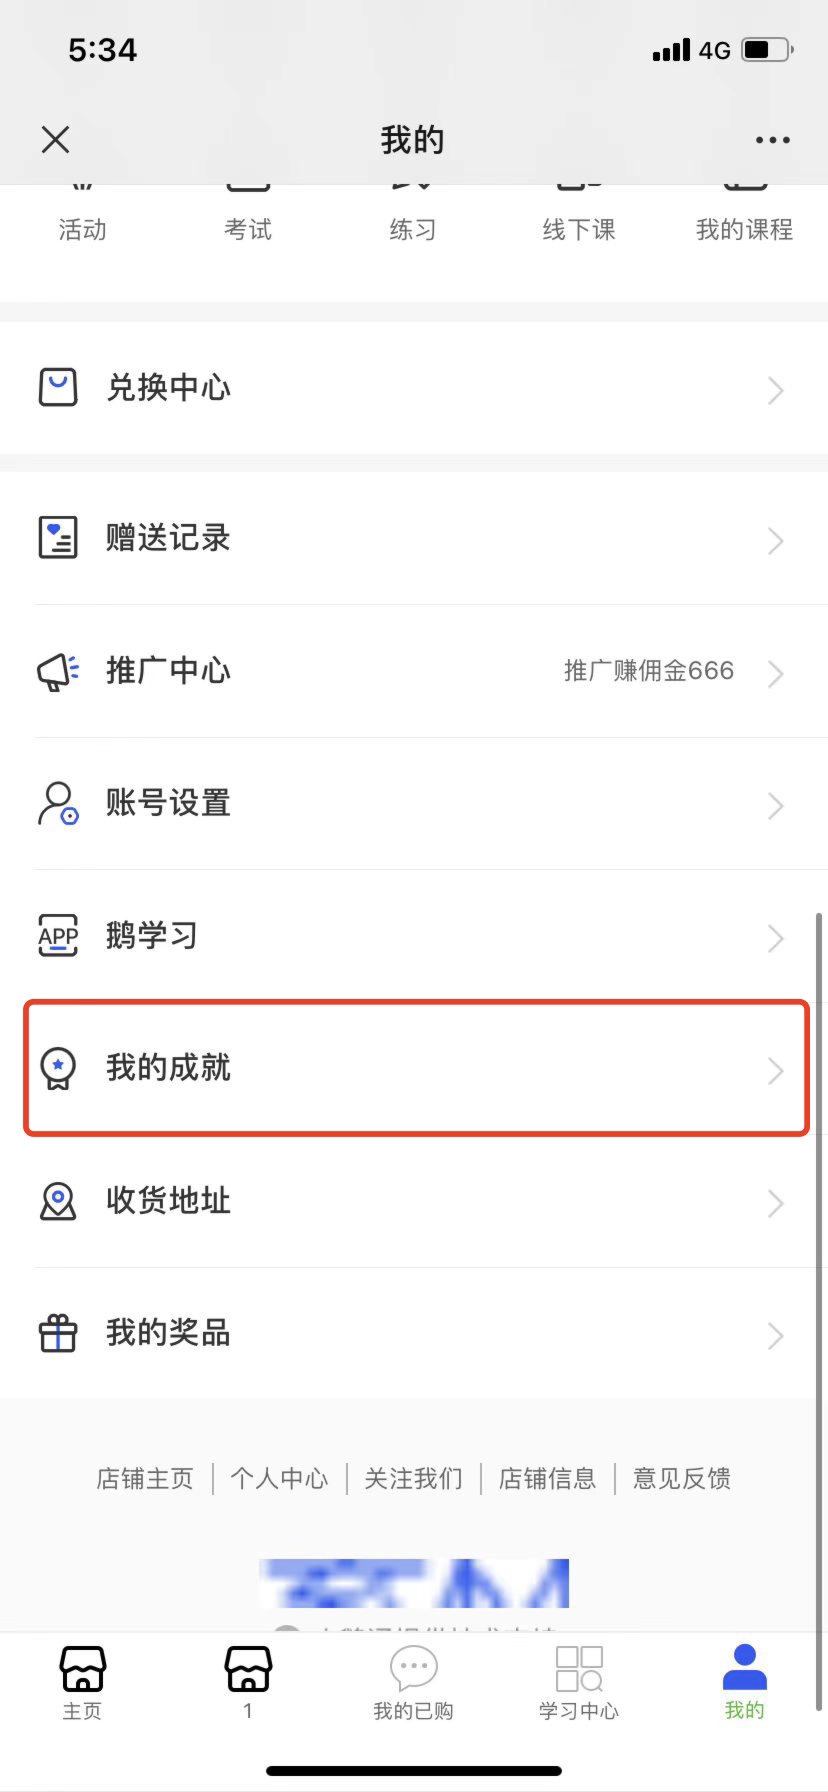
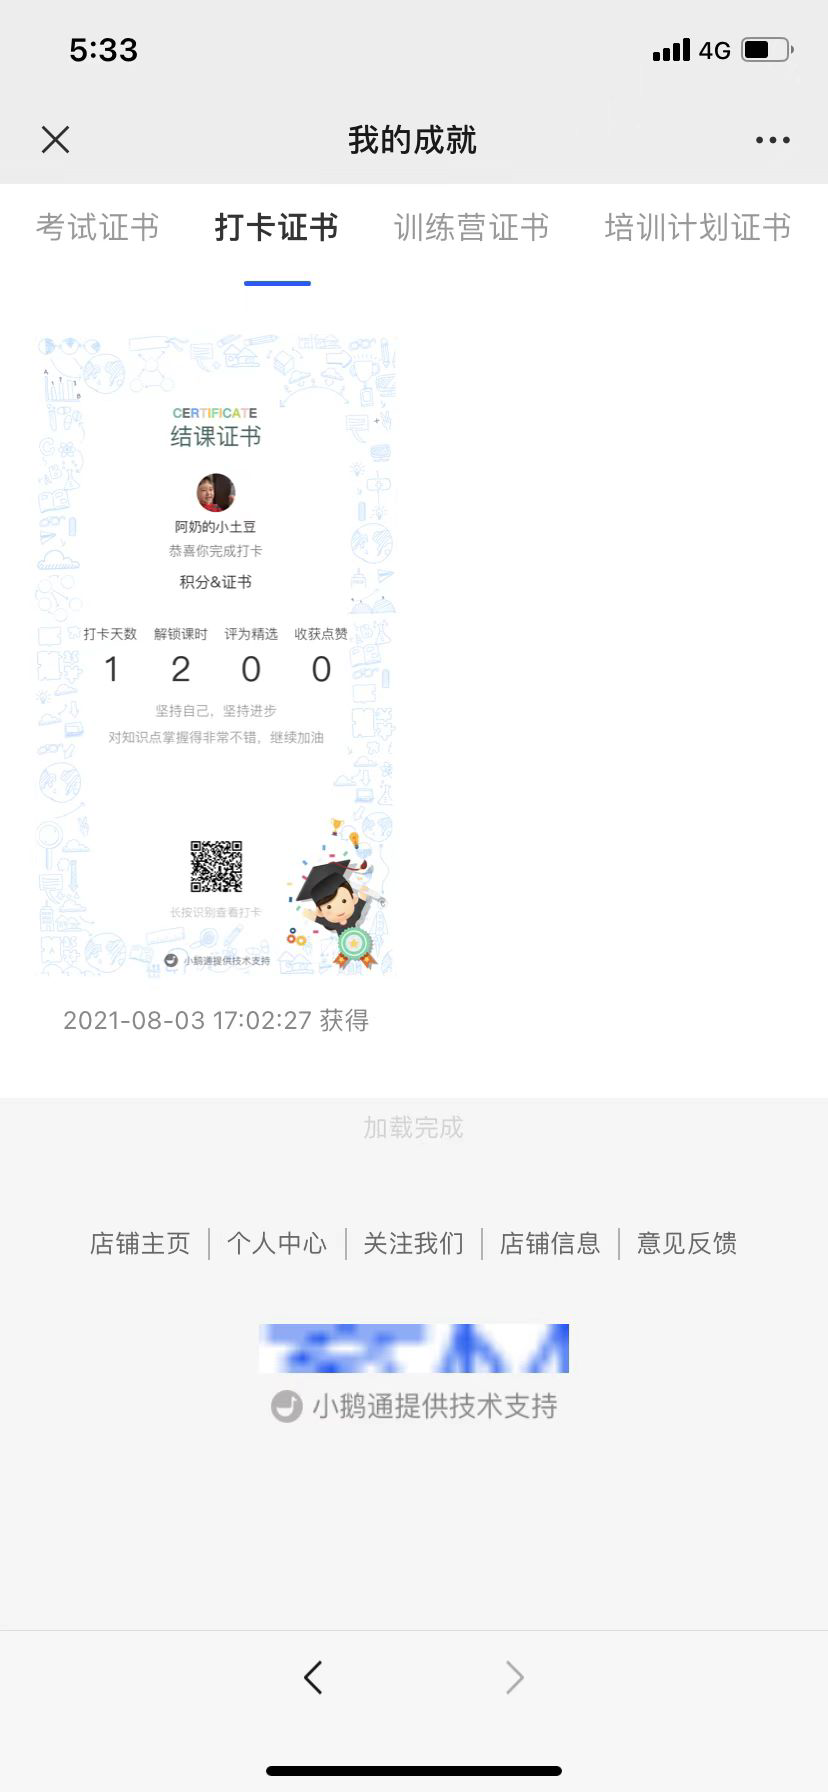
2. If you set the course completion certificate after the check-in process has been ongoing for some time or after it has ended, the system will reissue the certificates to students who meet the requirements. Students can view the certificates in [My - My Achievements].

Can the qualification for obtaining the打卡 certificate be set?
When creating a new punch-in activity, you can set the acquisition of course completion certificates according to different punch-in types.
1. Calendar punch-in is set based on the number of completed punch-ins.
2. Assignment punch-in is set based on the number of completed assignments.
3. Challenge punch-in is set based on the number of completed levels.
How to manage teaching assistants for punch-in activities?
In the [Teaching Assistant Management] module on the [Check-in] details page under [Courses], you can view the relevant data of the teaching assistant, add or delete teaching assistants, and set the labels displayed for teaching assistants on the learner side.
Is it possible to export the content of students' check-ins?
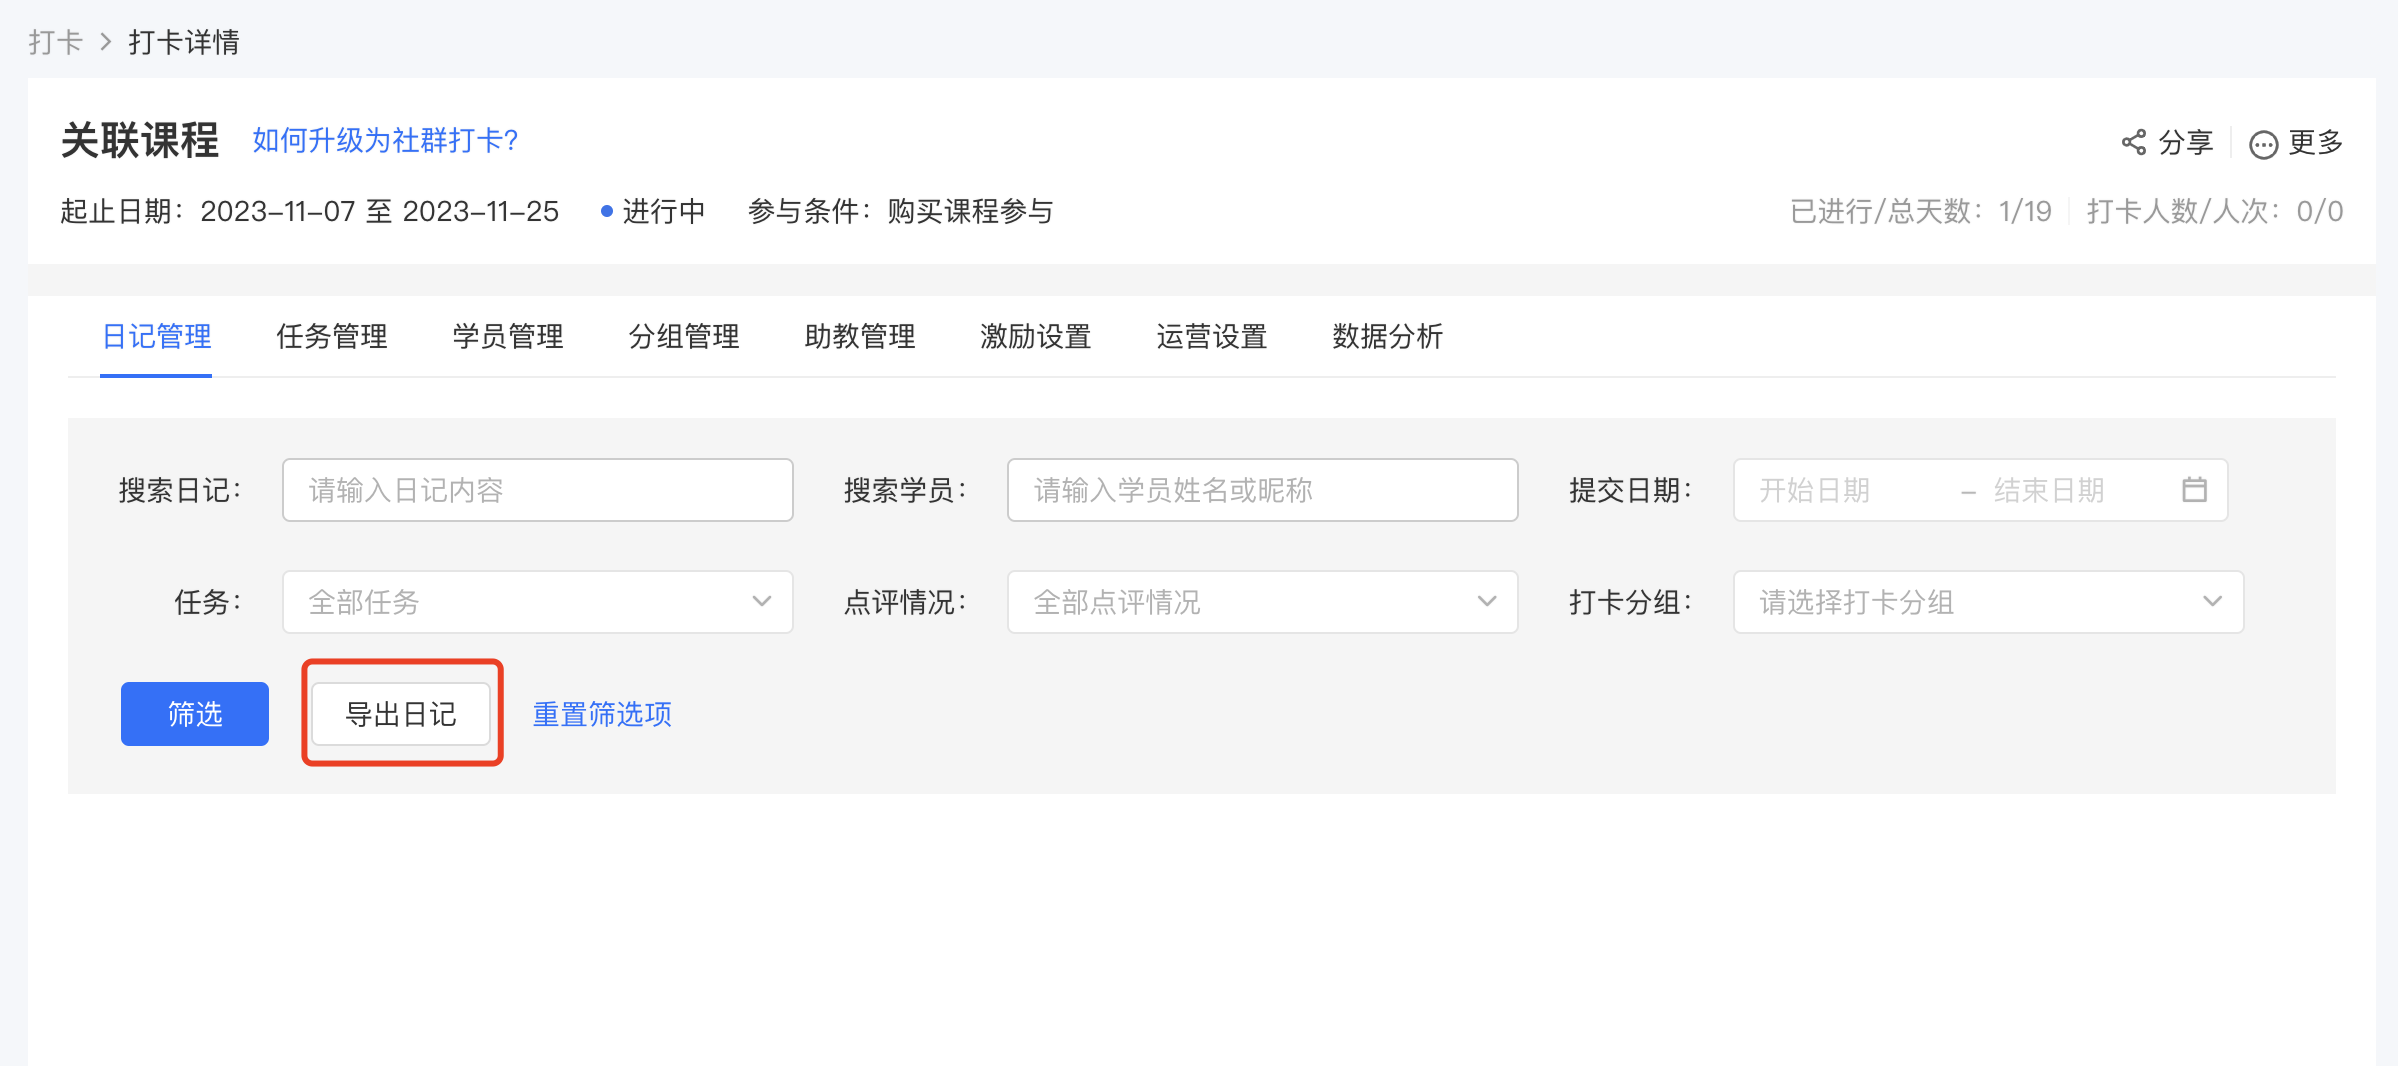
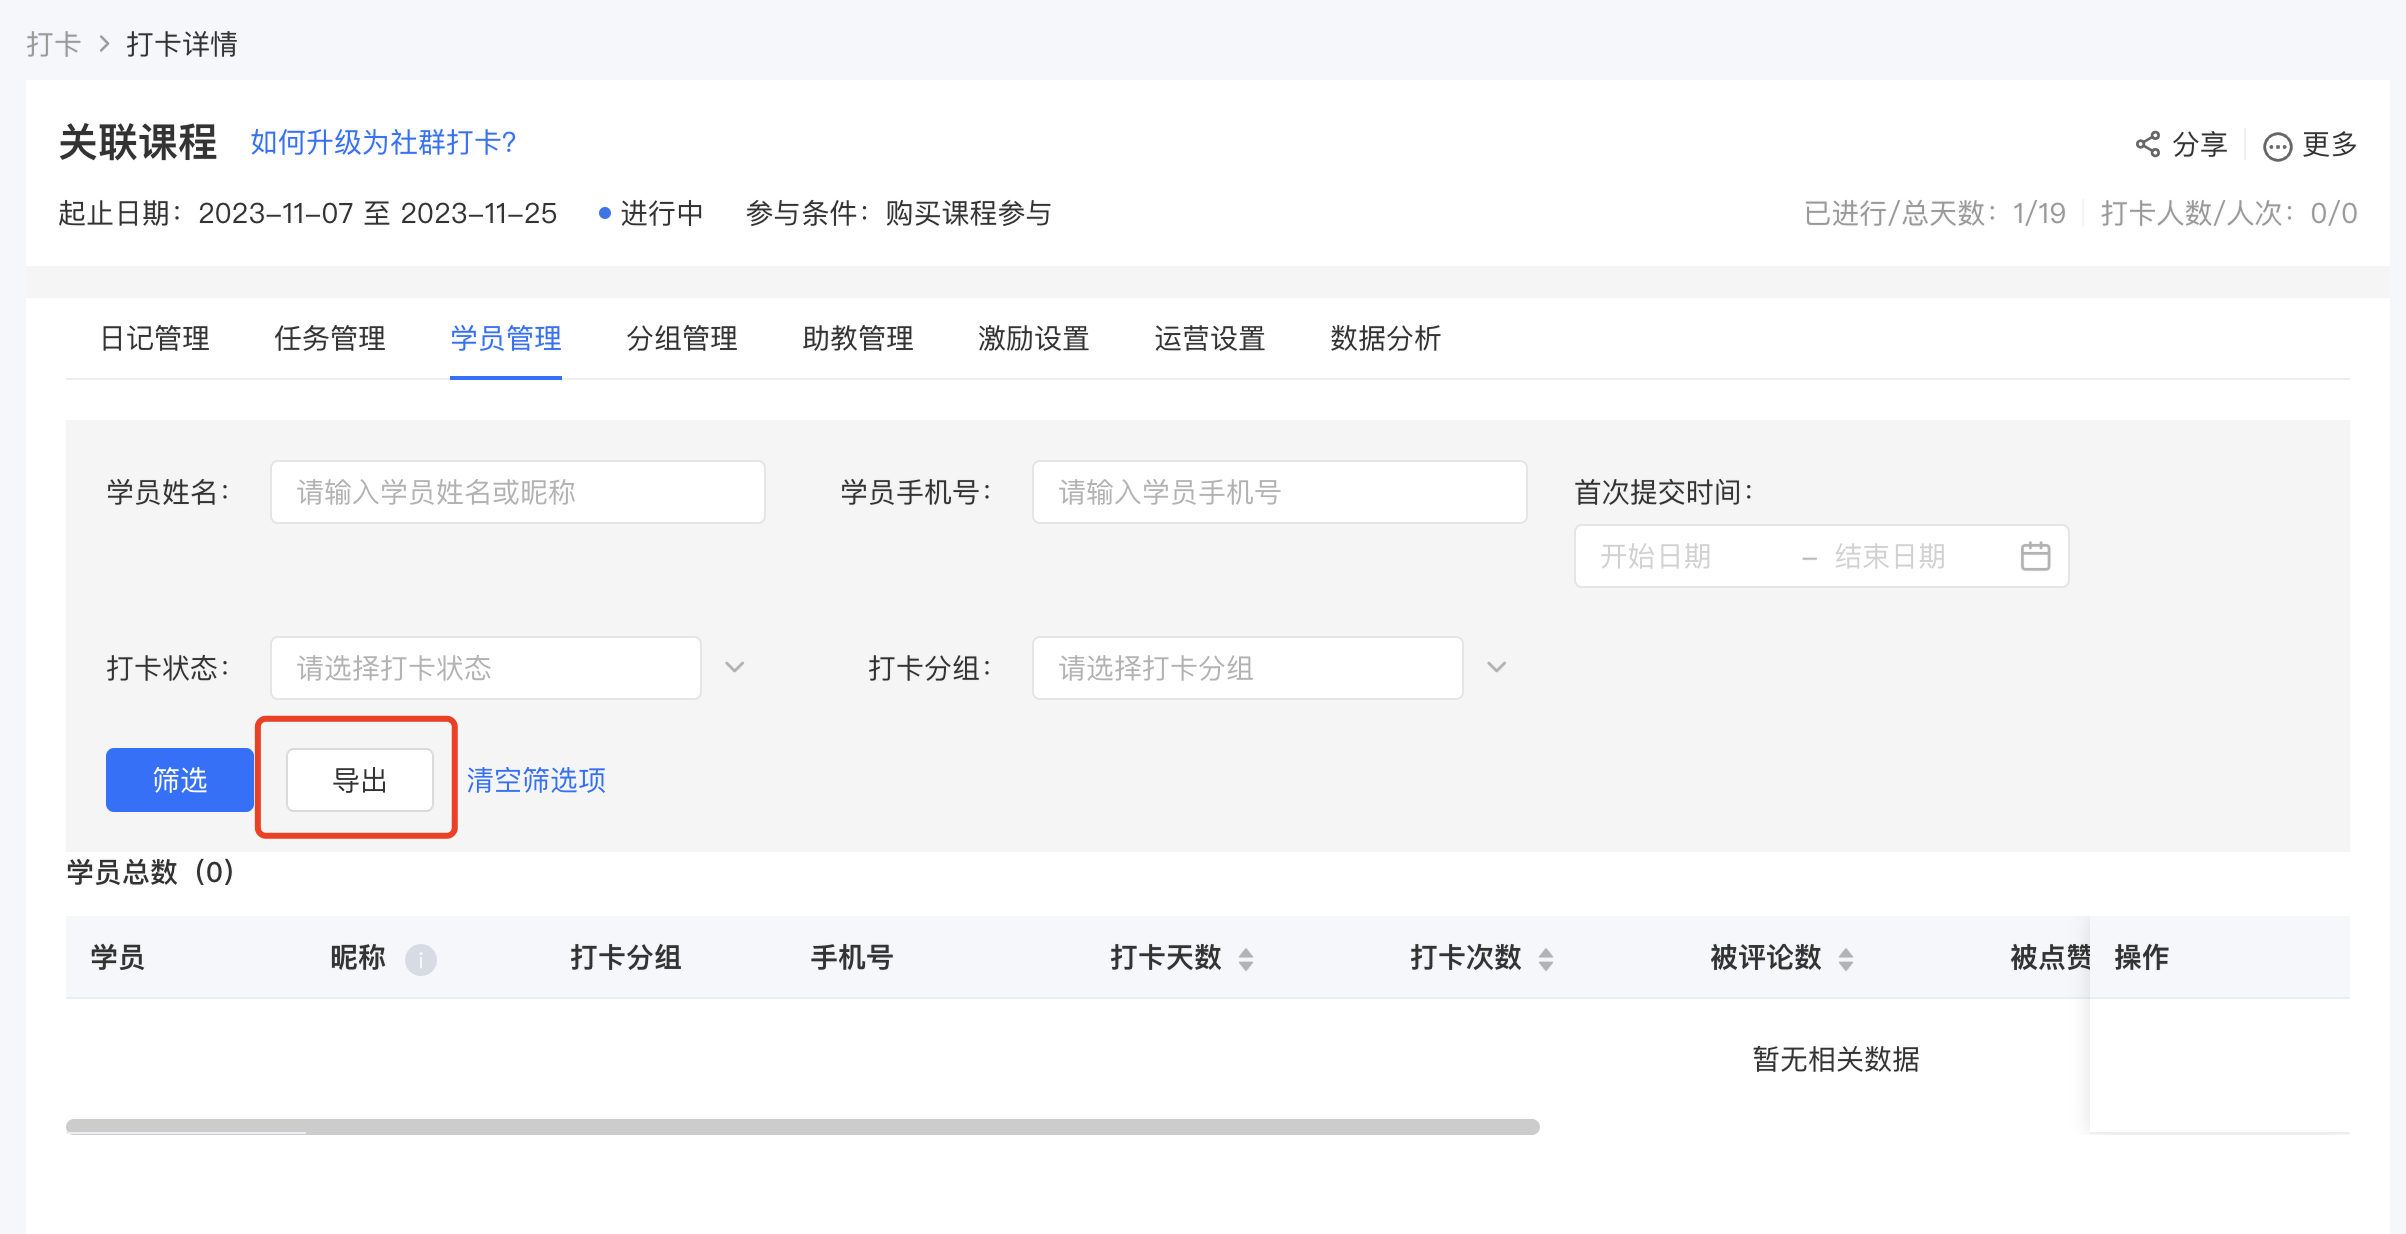
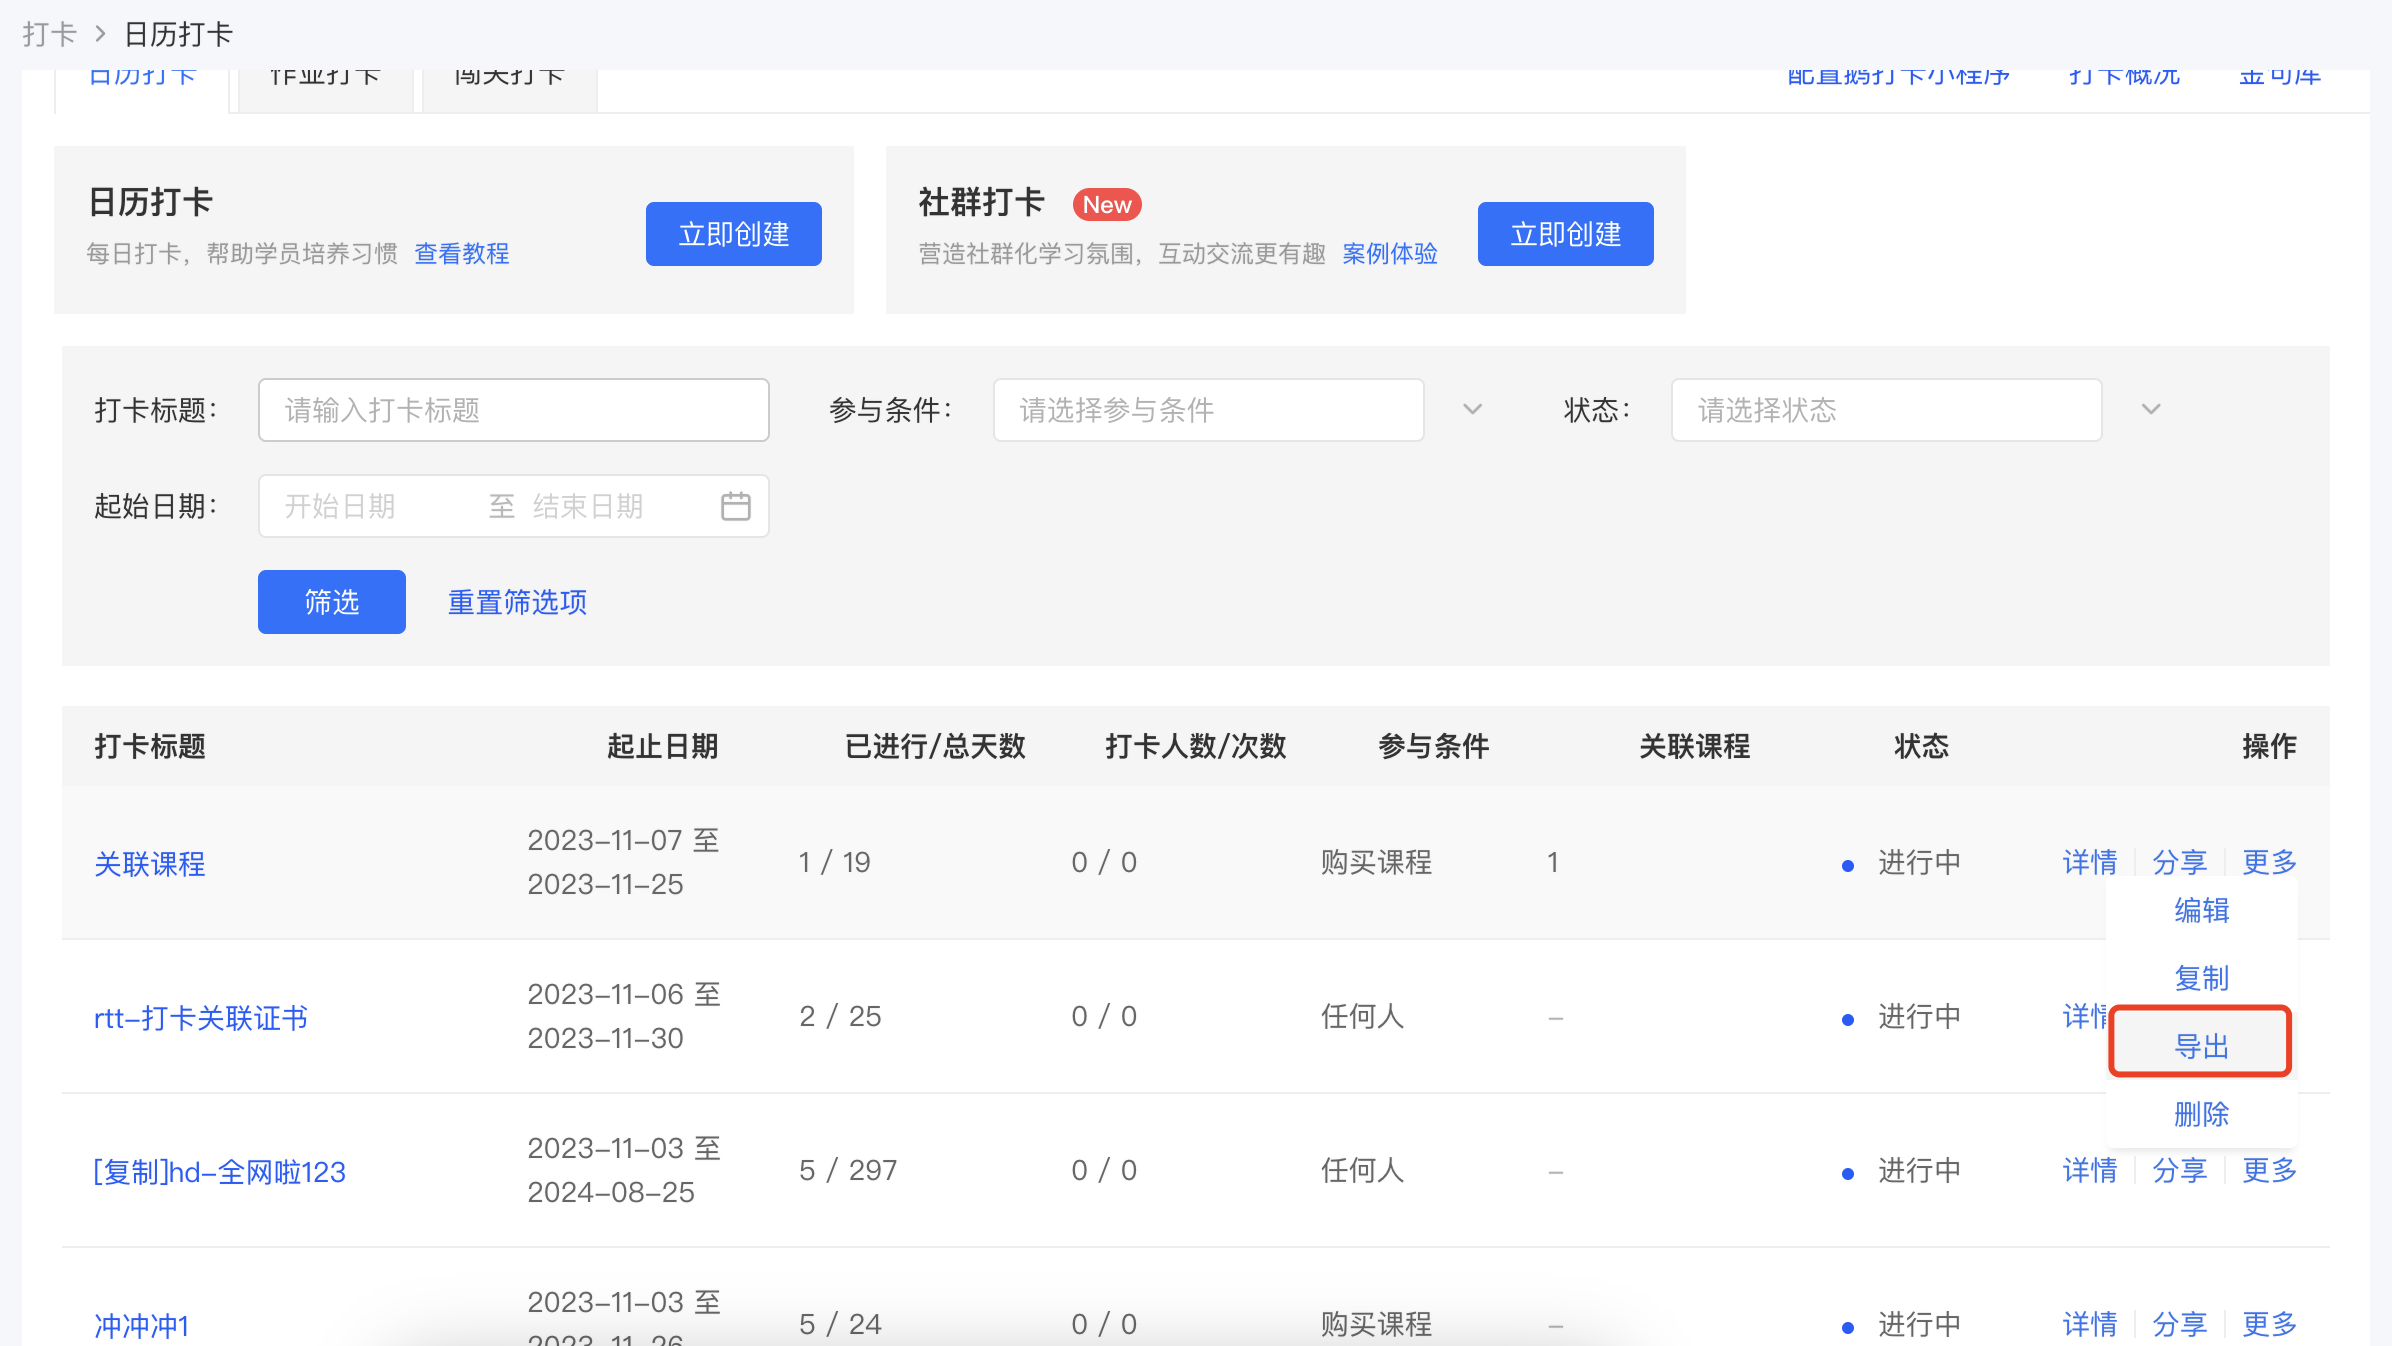
Yes, and it also supports exporting the check-in data of trainees and the overall check-in data.
1. The check-in content of trainees can be exported in [Diary Management]. It supports exporting text, audio, video, pictures and other content. However, the audio, video and picture content are in the form of links, which need to be opened for viewing.
2. The check-in data of trainees can be exported in [Trainee Management], including: the number of check-ins, the number of likes received, the number of comments received, the number of reviews received, the number of selections of a single trainee, etc.
3. The overall check-in data can be exported in [Data Analysis], including: the number of check-ins, the number of people who checked in, new trainees, the number of likes, the number of comments, the number of reviews and the number of selections of a single check-in activity.
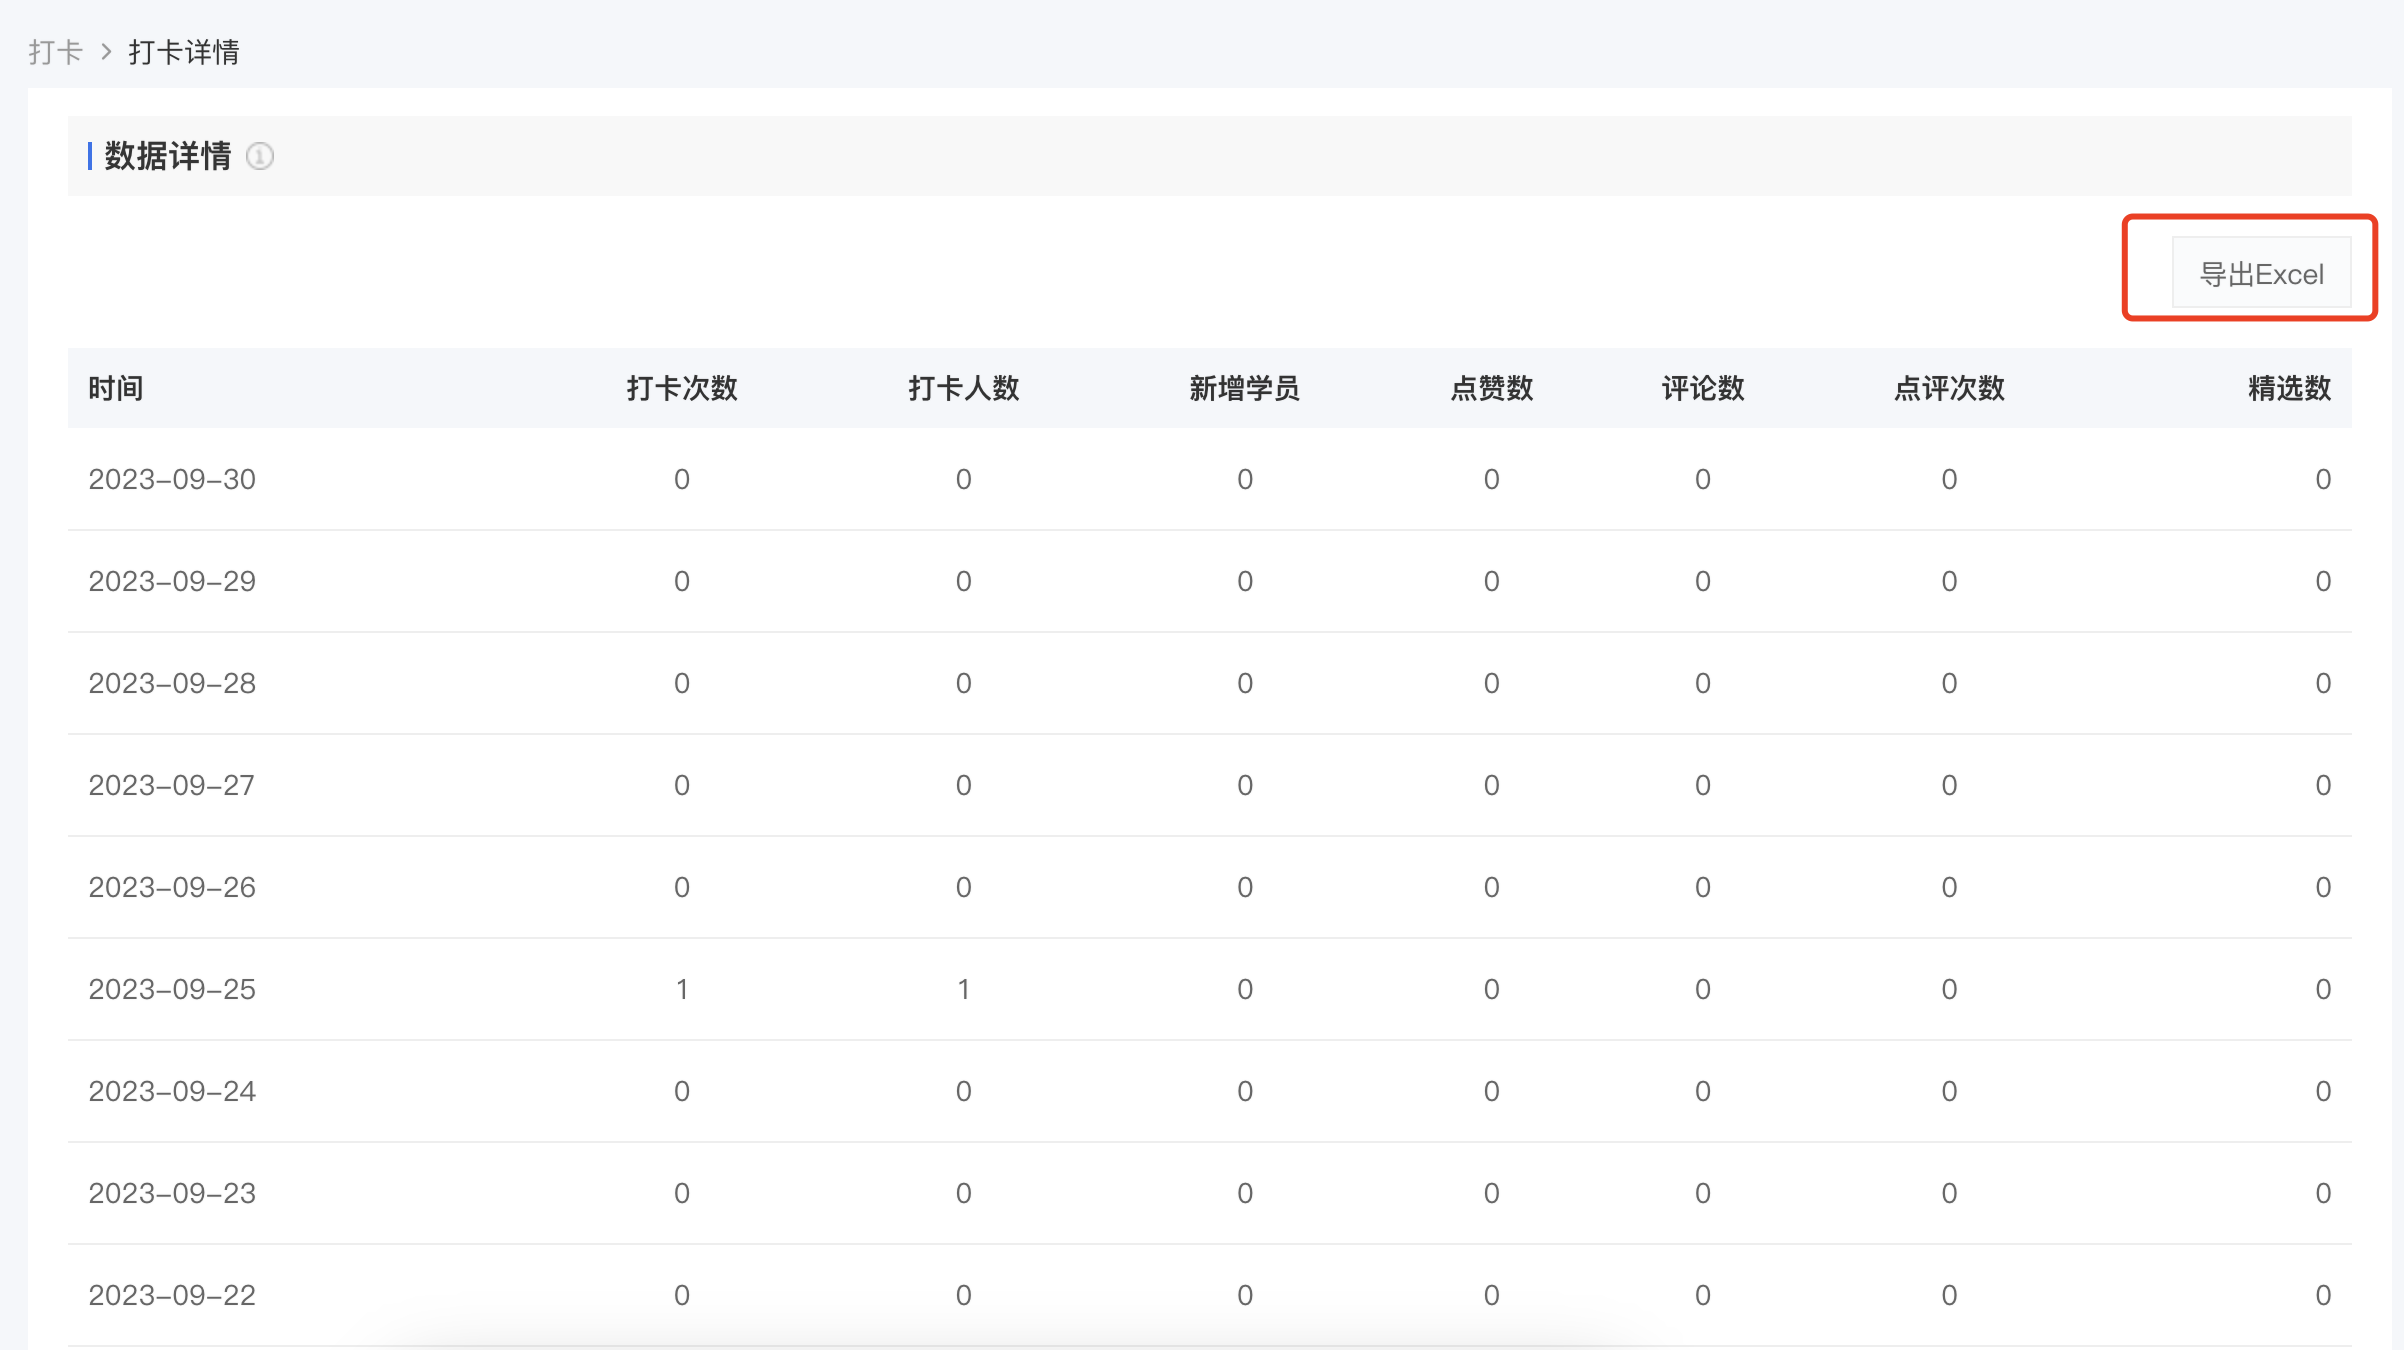
In addition, for calendar check-ins, you can also export the daily check-in status to see if each trainee checked in every day.
How to remind trainees to clock in?
When creating a punch-in activity, you can set whether to remind trainees to punch in.
1. Punch-in types that support message push: Calendar punch-in, Assignment punch-in, and Challenge punch-in.
2. Push frequency: Calendar punch-in and Challenge punch-in will send daily reminders.
3. Push time: Calendar punch-in and Challenge punch-in support setting specific time points for message push; the message push for Assignment punch-in varies according to the assignment creation time.
Message time rules.Click to view the tutorial on using the punch-in message push settings.
Tutorial on Using the Challenge Check-in Feature
I. Feature Introduction
Level-based punch-in is a punch-in mode based on "levels". Operators can set course level checkpoints. Learners must complete the current lesson and punch in before they can unlock the content of the next lesson.
II. Purpose of Use
Enable learners to complete the entire series of courses like playing a level-based game. Effectively stimulate learners' autonomous learning and allow them to complete the entire series of courses while having fun in the process of clearing levels.
III. Usage Scenarios
Using level-based punch-in can make learning as interesting as playing a game. Learners must punch in after completing the current task before they can unlock the content of the next task, making knowledge the reward for clearing levels and forming a positive incentive feedback mechanism.
IV. Operation Path
Merchant side: Desktop management console → Courses → Interactive Management →Punch-in → Level-based Punch-in → Create New Level-based Punch-in
Learner side:
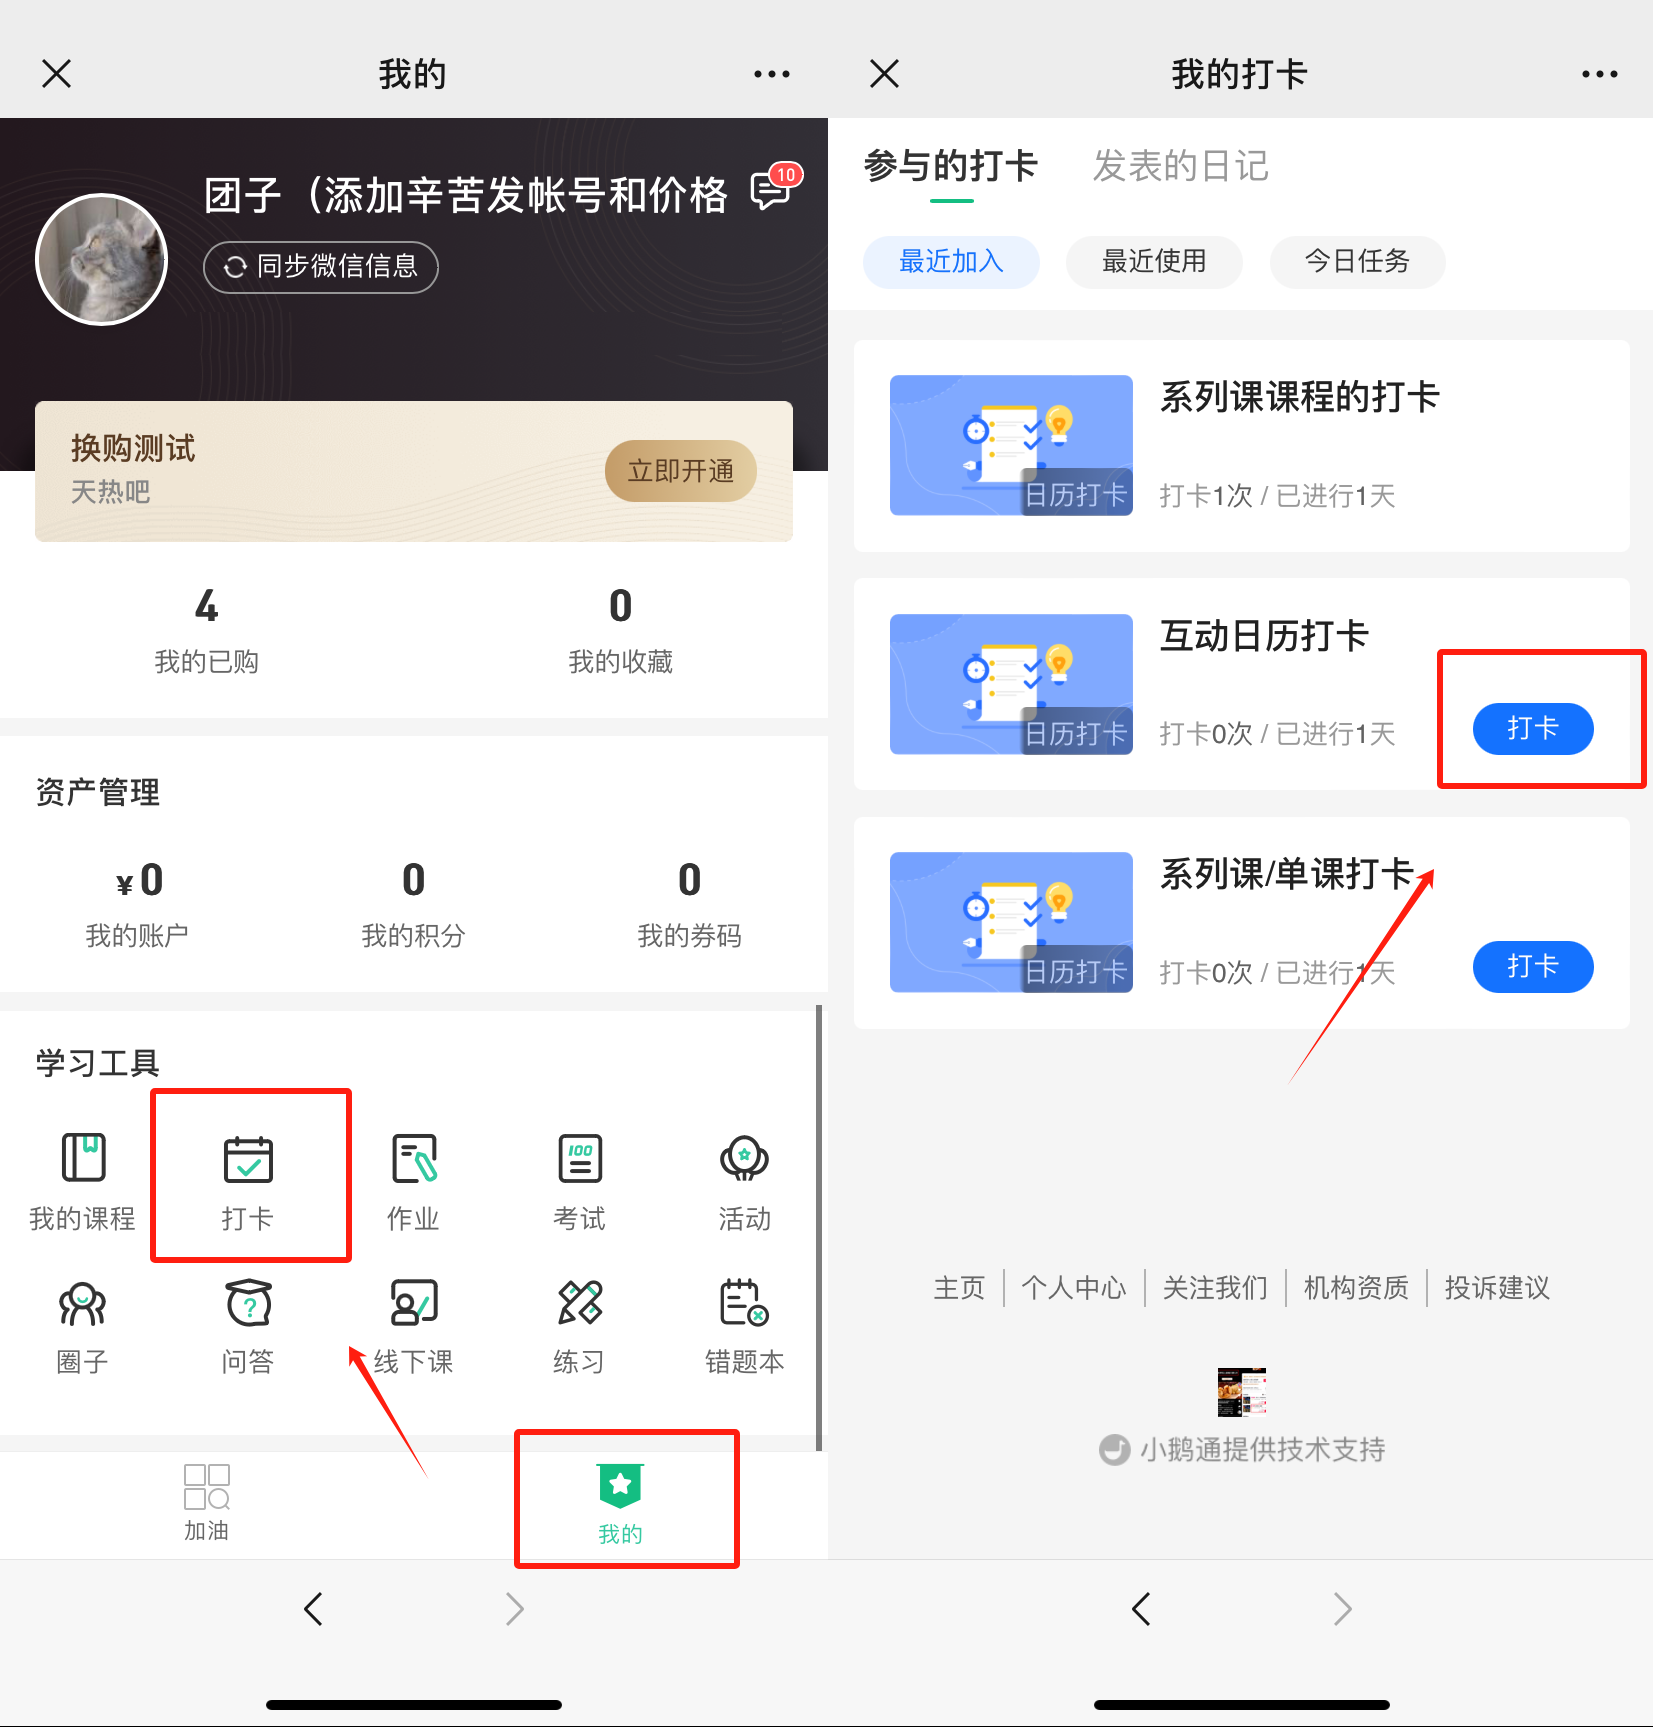
1. H5 store/Merchant Mini Program → My → Learning Tools → Punch-in
2. elink Punch-in Mini Program → Home Page → My Participations
3. elink app → Learning Center → Classroom Interaction → Punch-in
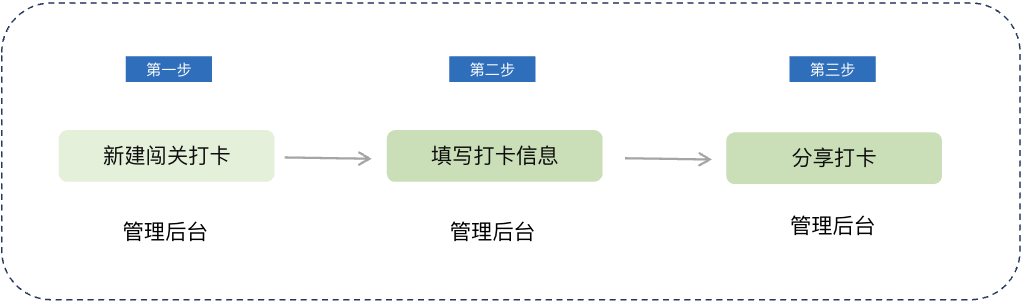
V. Usage Tutorial
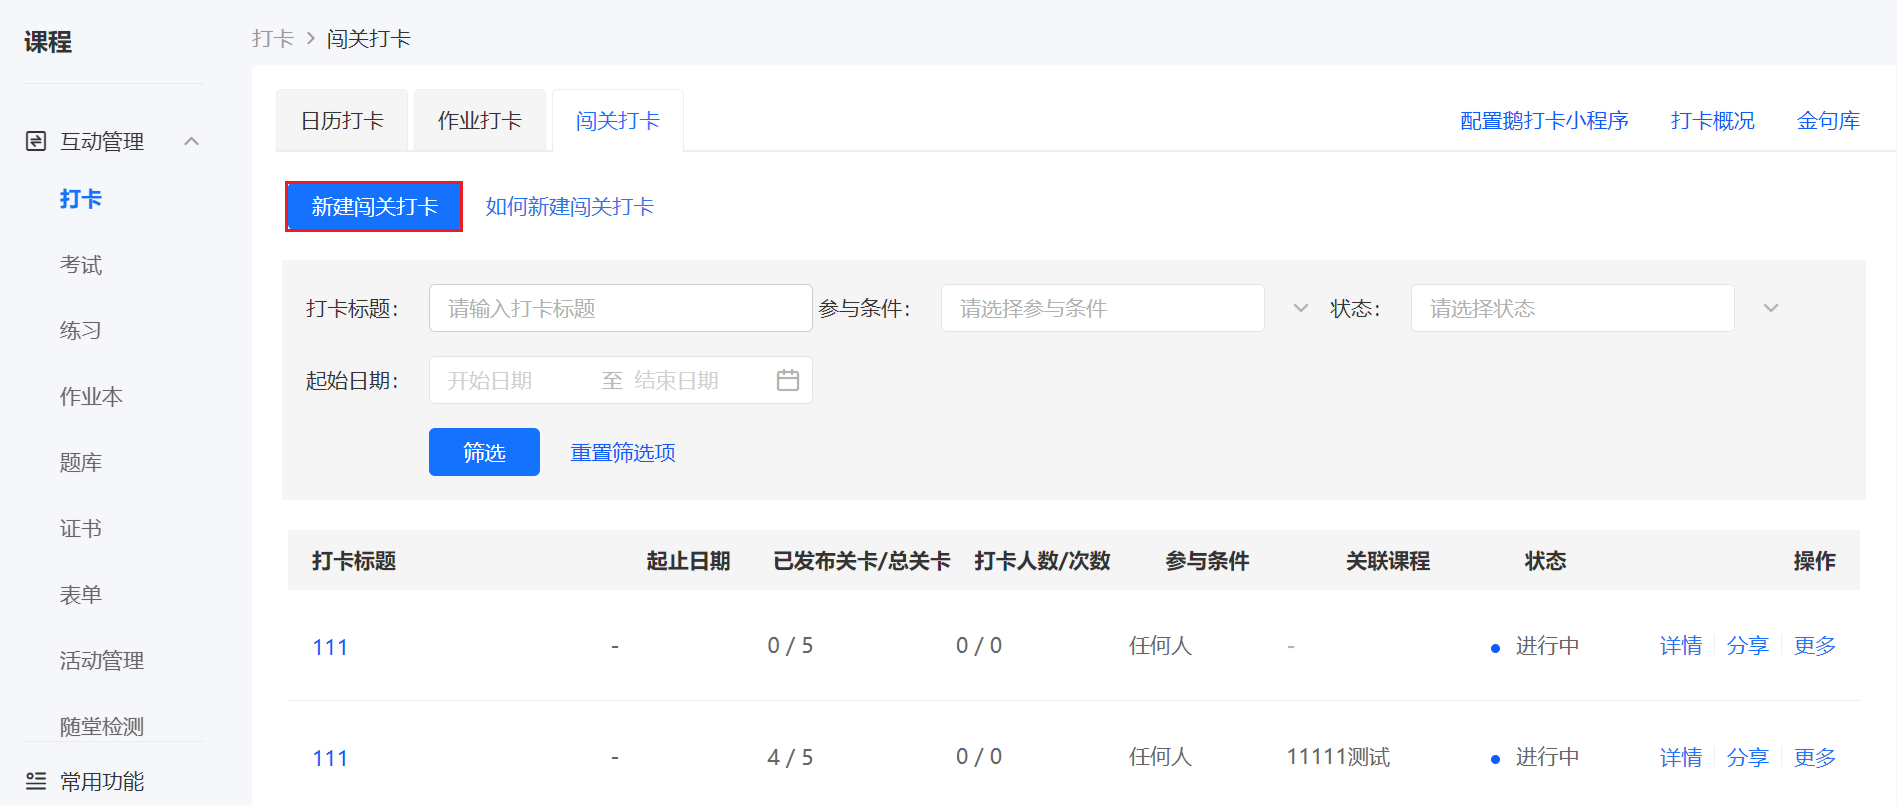
Step 1 Create a New Level-based Punch-in(Management background)
Log in to your elink account, click [Content] in the left sidebar, select [Punch-in], enter the page, select [Level-based Punch-in], and click [Create New Level-based Punch-in];
Step 2 Fill in Punch-in Information(Management background)
Fill in the title of the level-based punch-in and configure the punch-in rules;
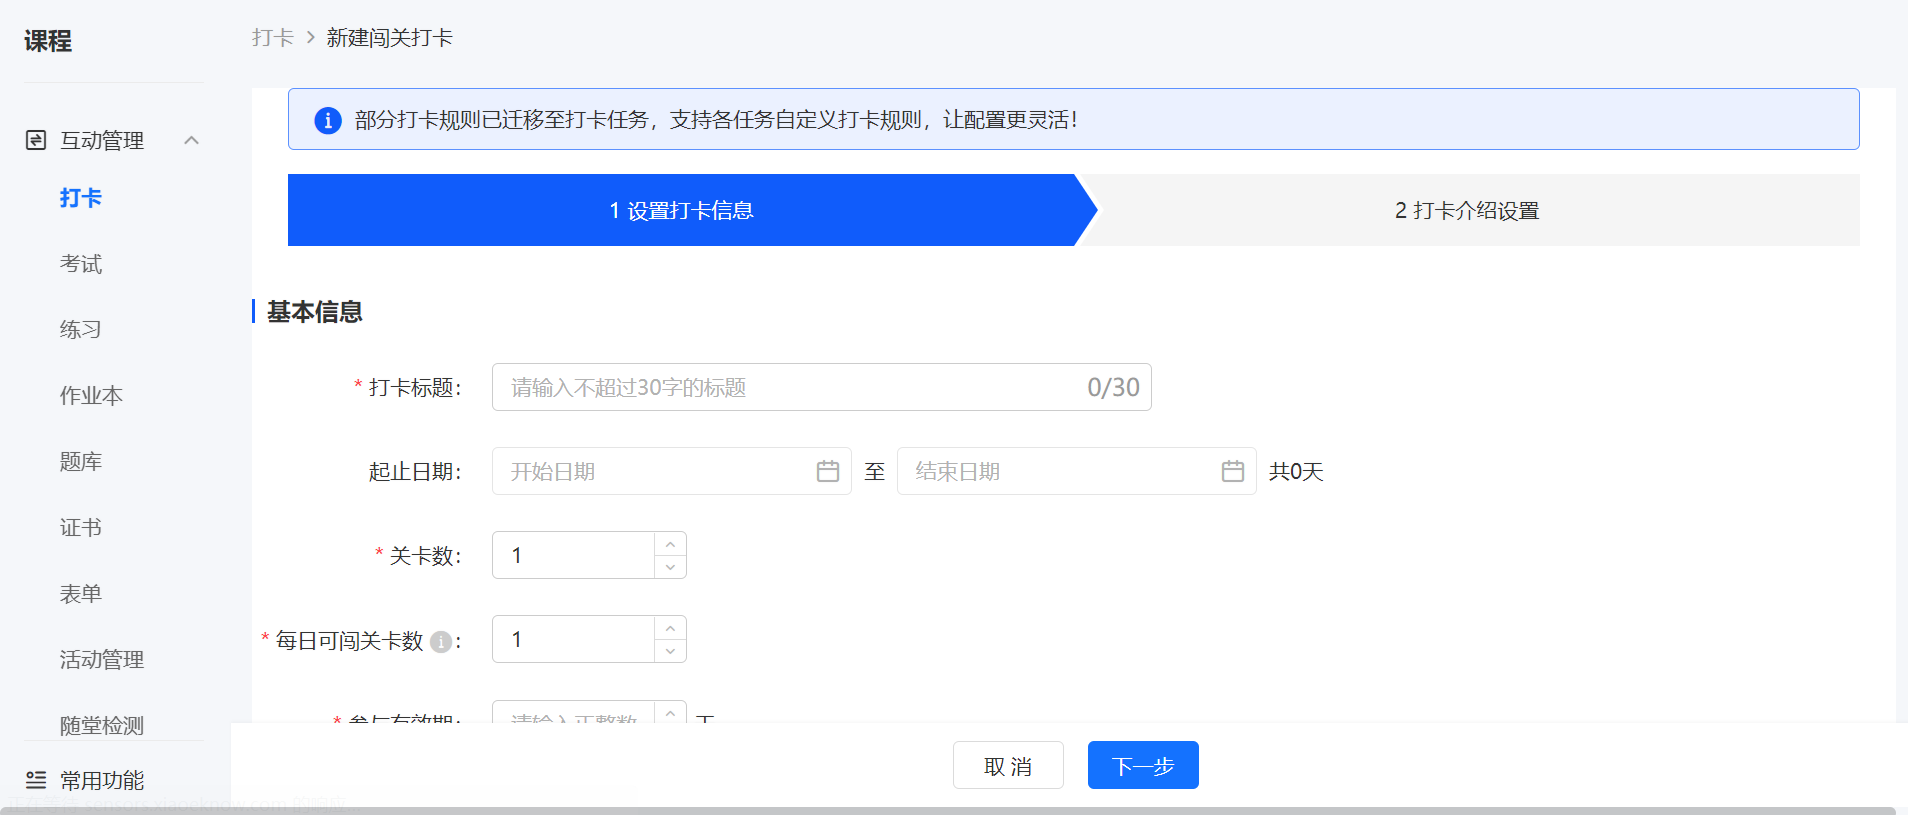
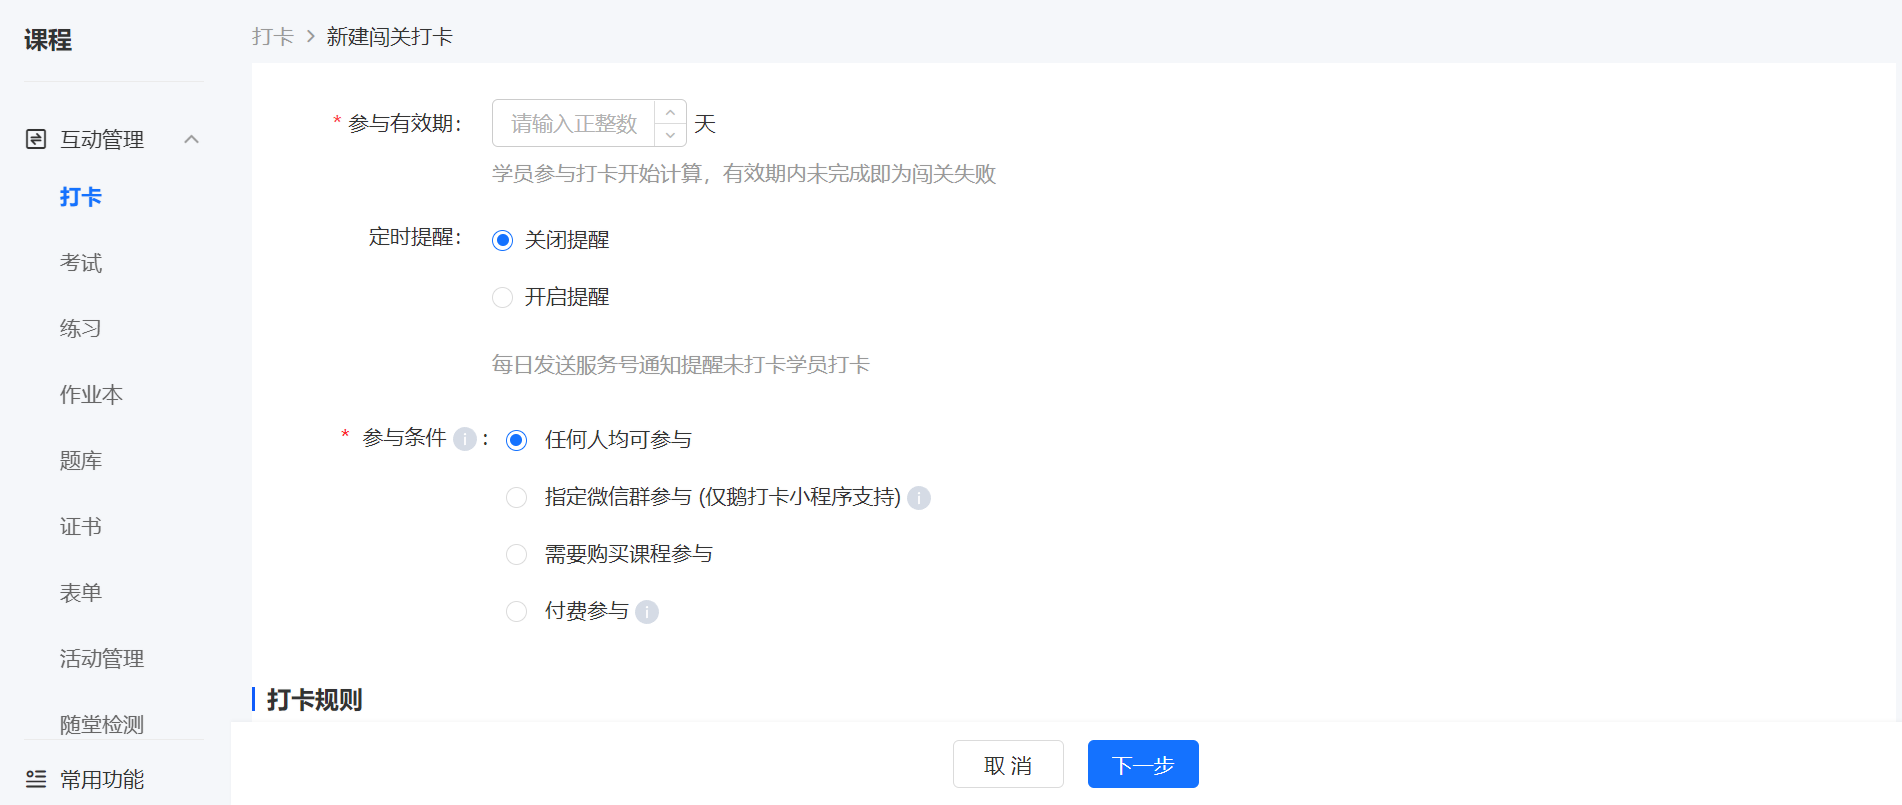
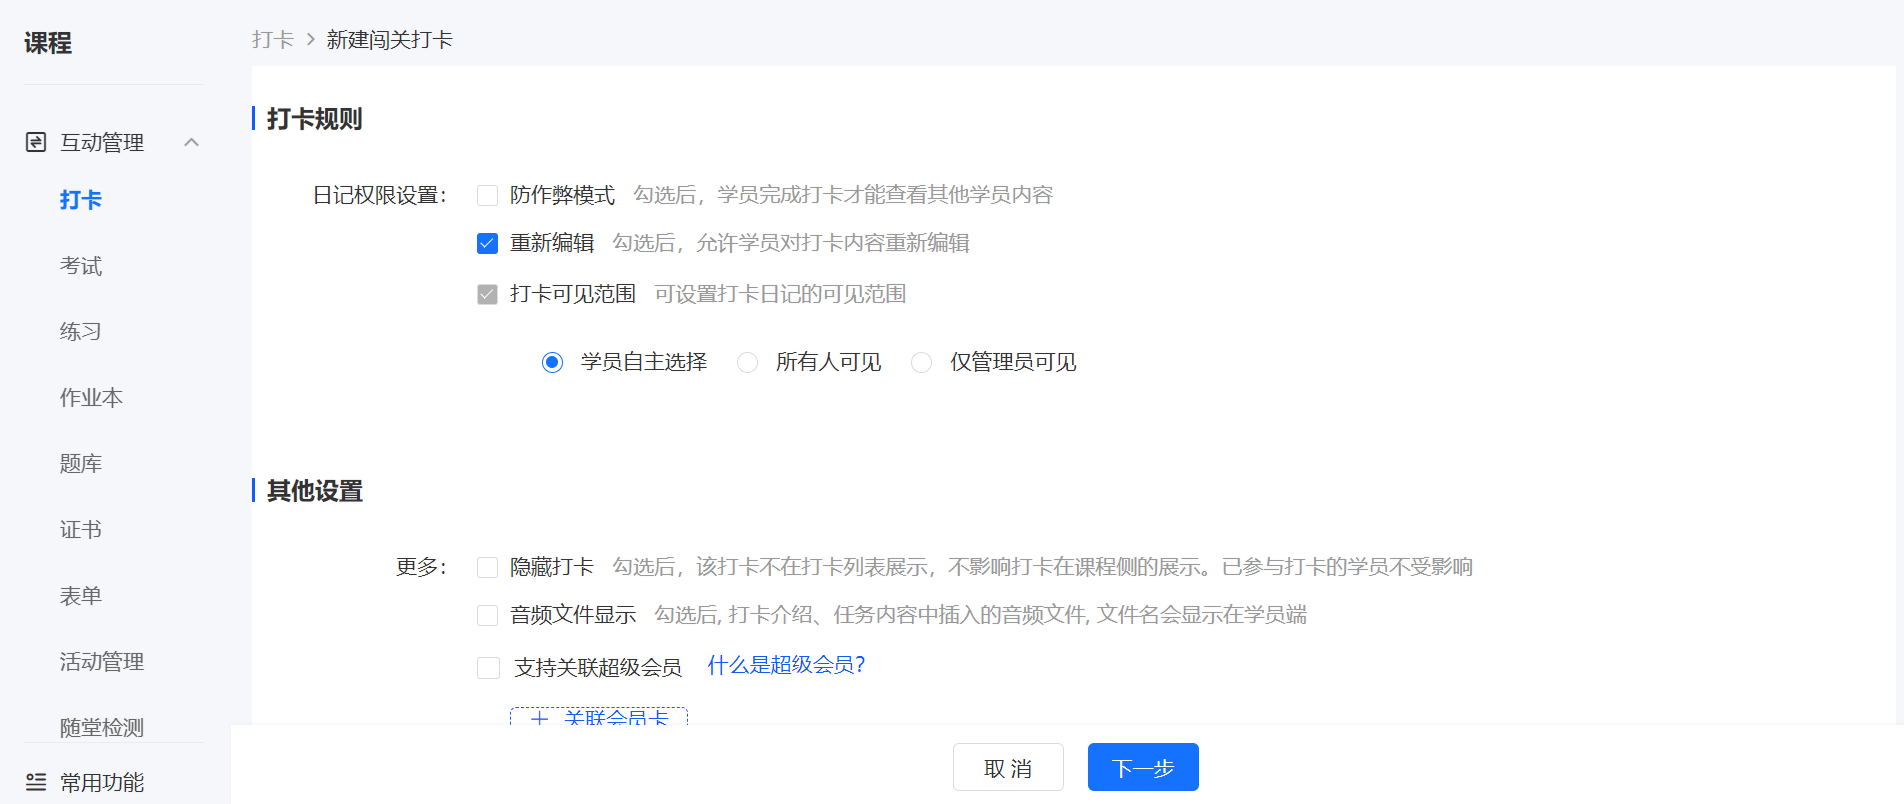
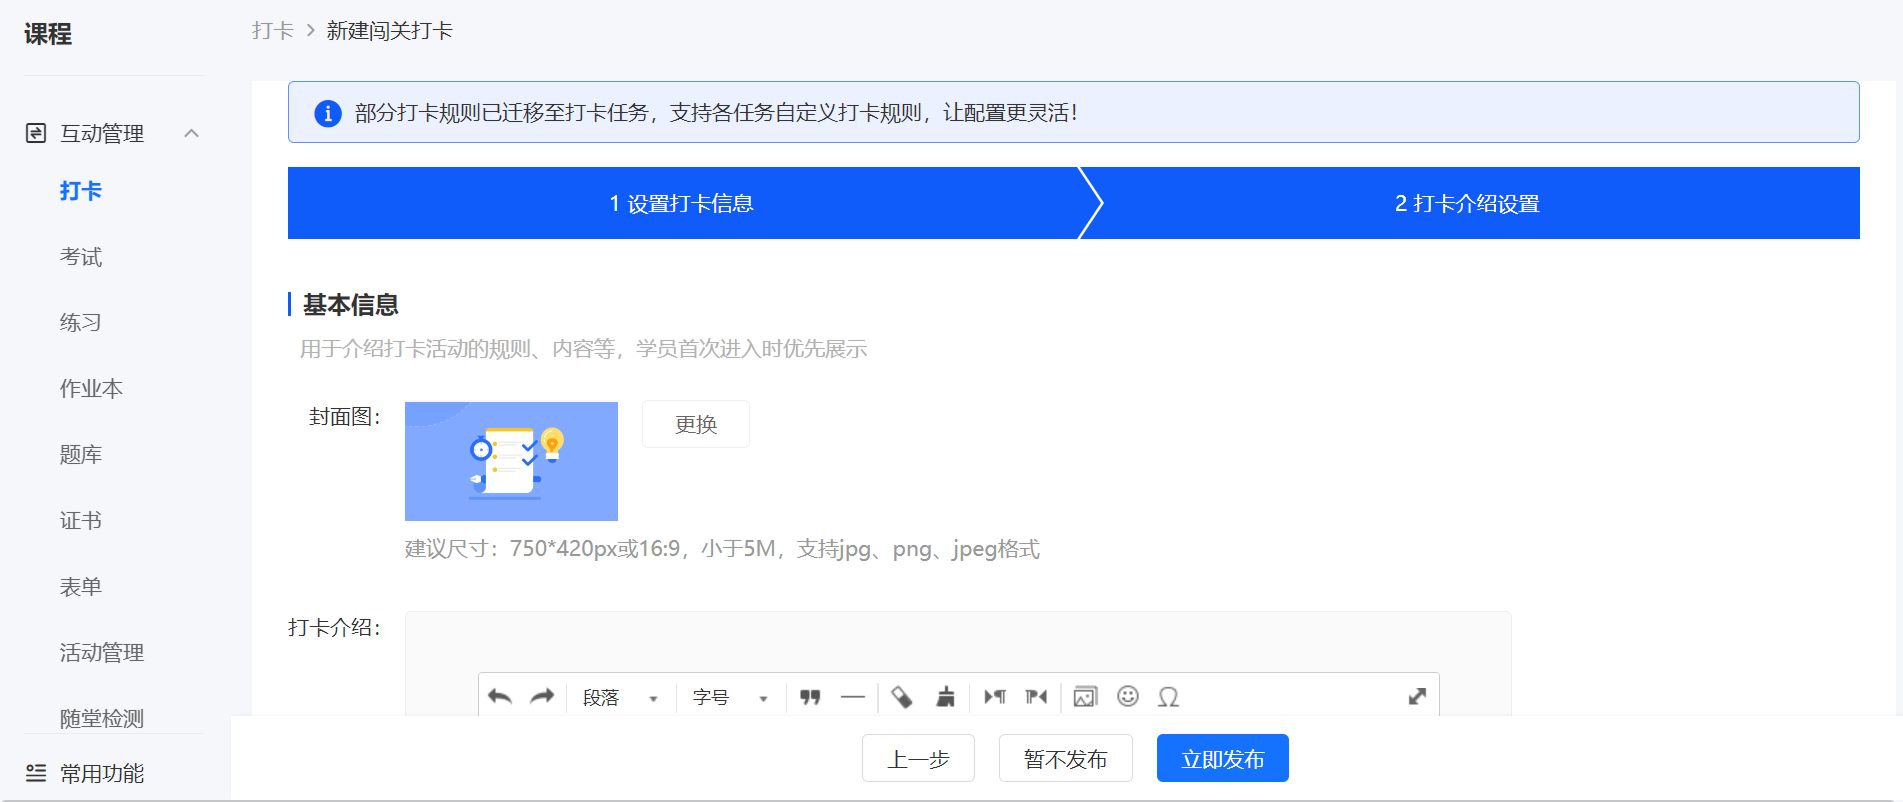
2. Replace the punch-in introduction cover and edit the punch-in introduction content, then click the [Save as Draft] or [Publish Now] button below to generate a new level-based punch-in.
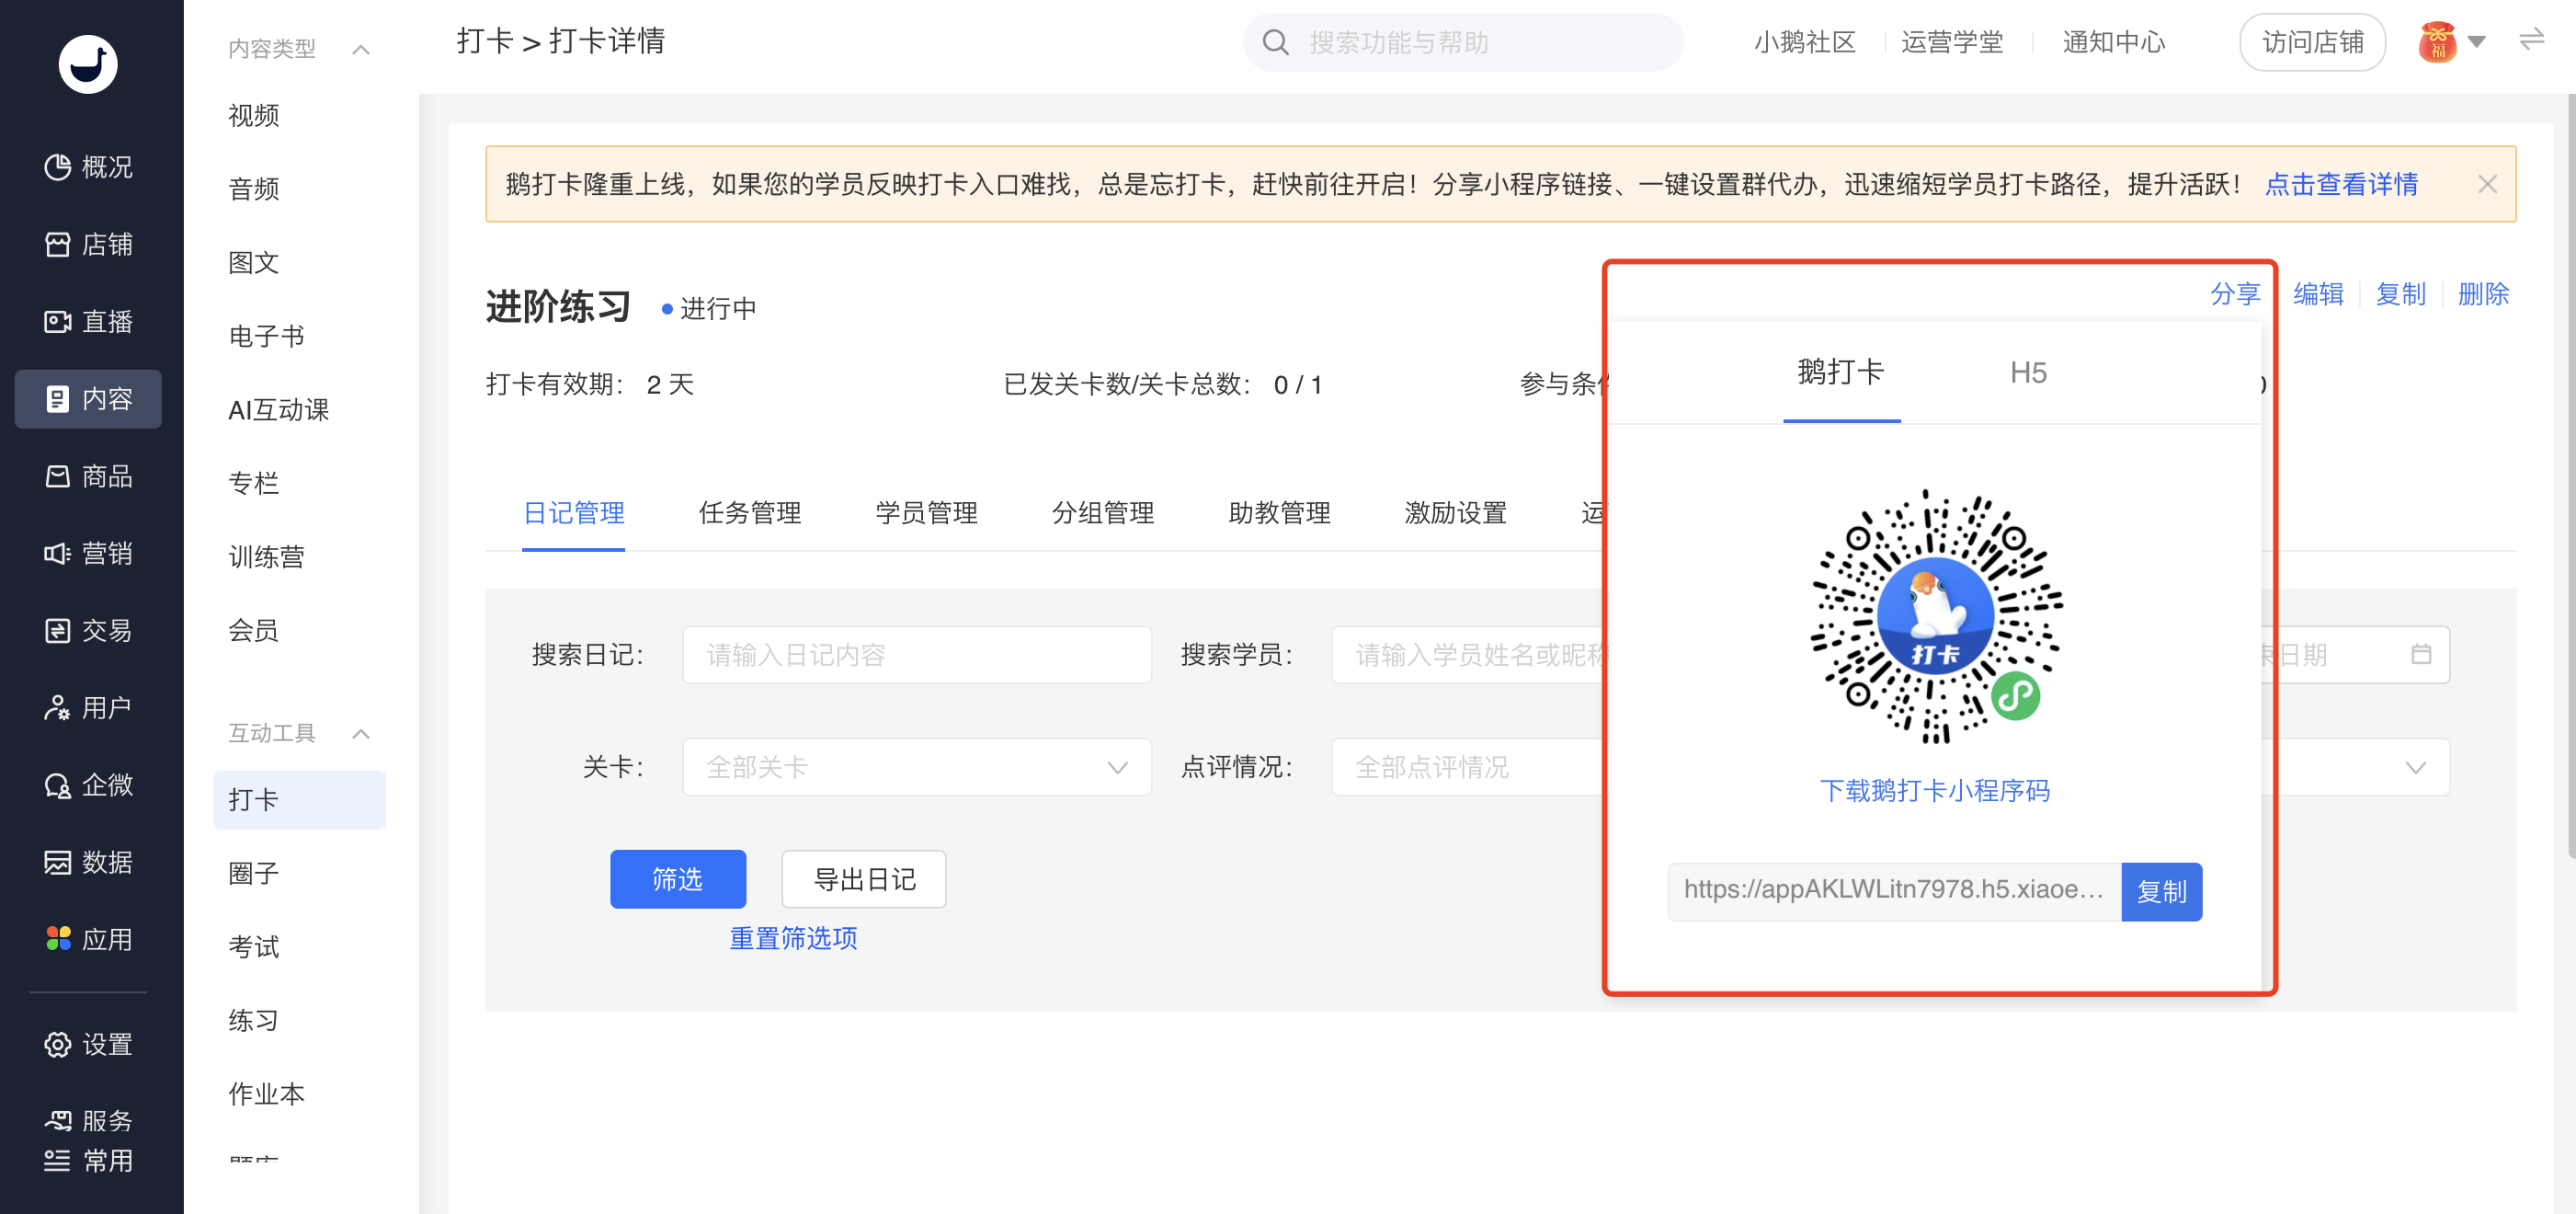
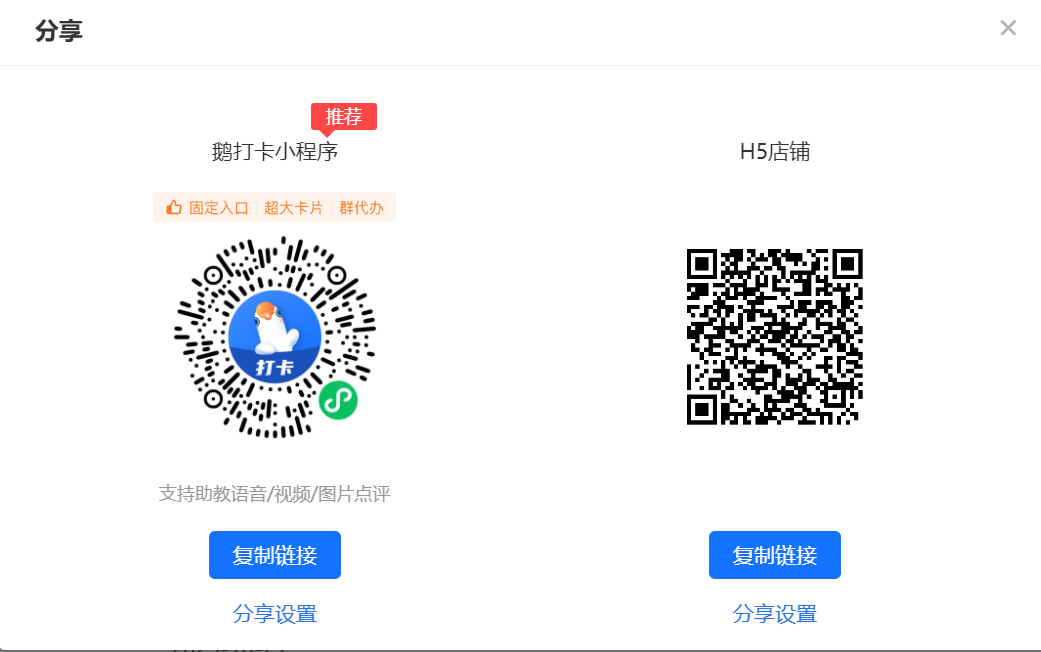
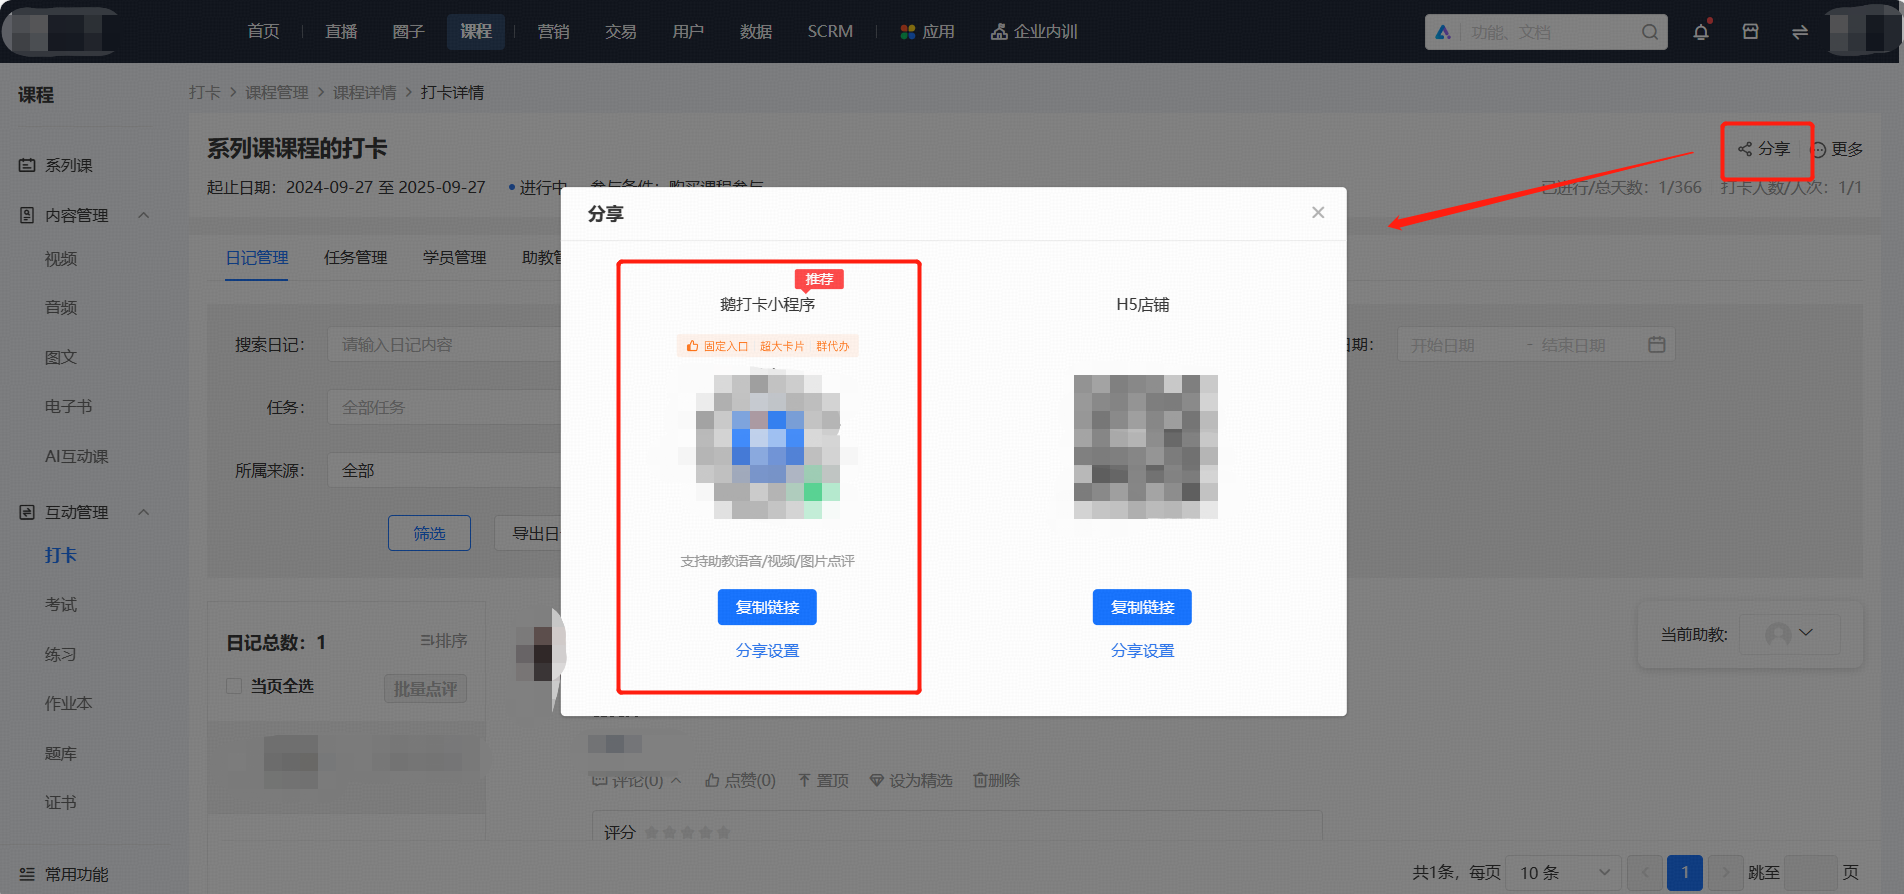
After creating the punch-in, click [Share] to get the sharing code and link for the corresponding punch-in.
Tutorial on Using Calendar Check-in
I. Function Introduction
Calendar check-in is a check-in mode based on the 'day' unit. The operator creates a check-in activity, and students need to submit check-in content within the valid time period every day.
II. Purpose of Use
Improve student activity and help students develop good behavior habits through daily check-ins.
III. Use Scenarios
Scenarios suitable for calendar check-in: Students need to output corresponding content every day, and only need to output once a day, such as morning run check-in, early sleep check-in, etc.
IV. Operation Paths
Merchant Side:

V. Usage Tutorial
(I)Create an Interactive Calendar Check-in
Step 1: New Calendar Check-in
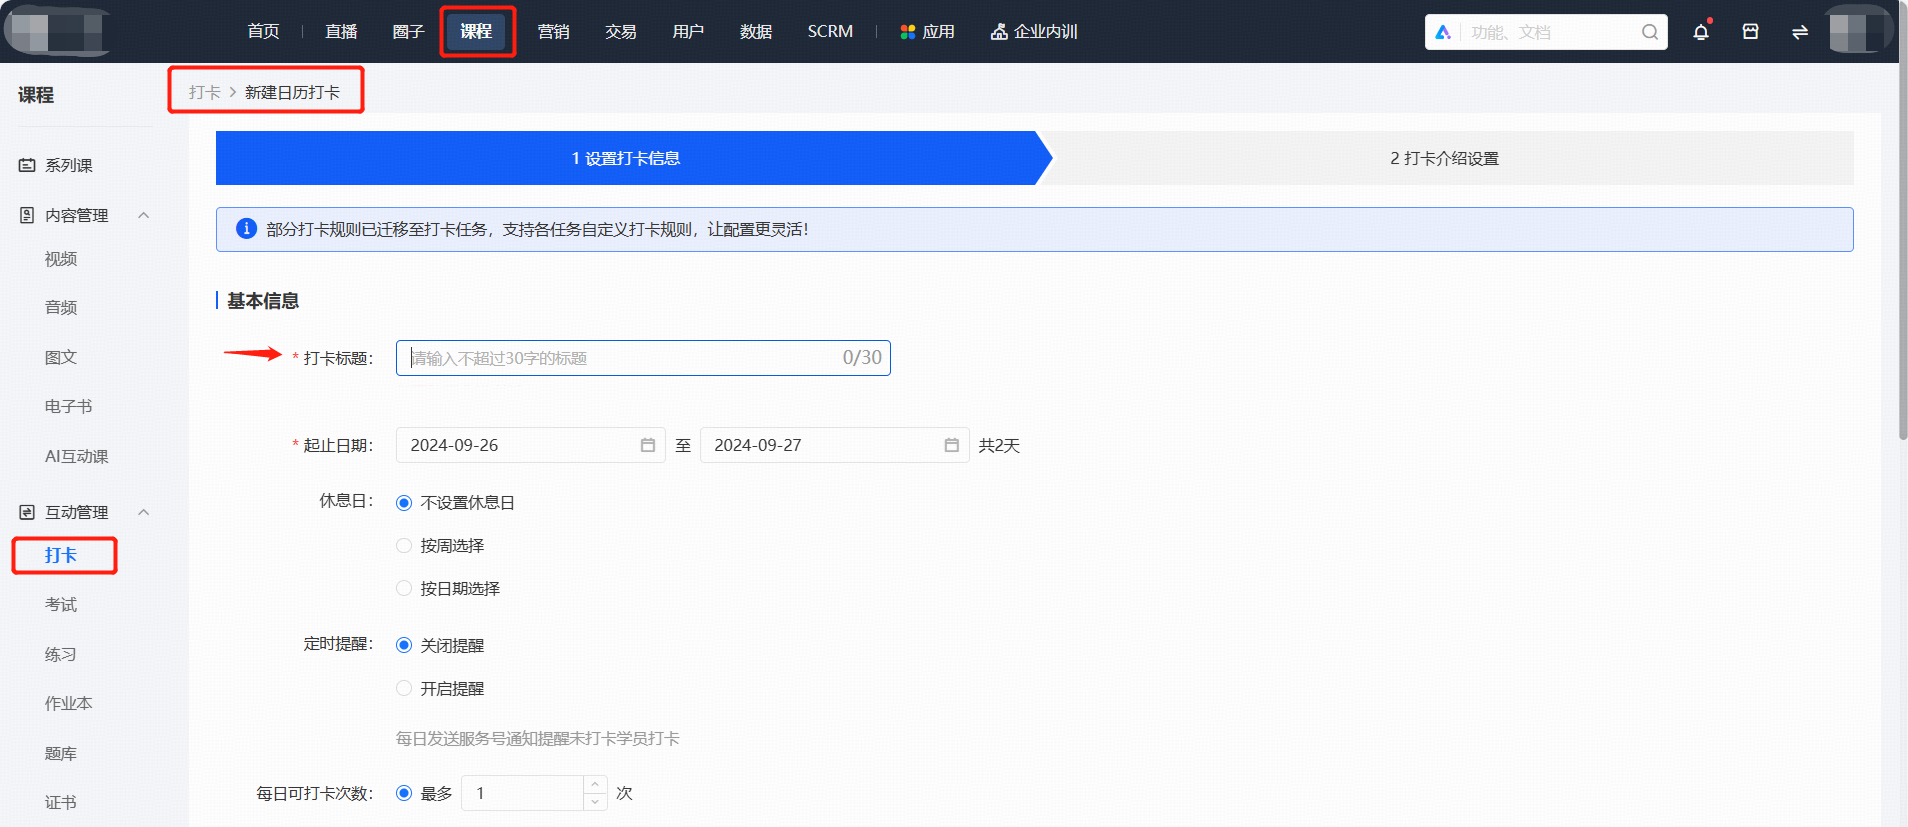
Log in to the store management background, click [Courses] in the top menu bar, select [Interactive Management] → [Check-in] → [Calendar Check-in], and click [Create Now].

Step 2: Fill in Check-in Information
Note: For the calendar check-in of [Series Courses] - [Courses], refer tothe introduction of course calendar check-in in '(II) Create a Course Calendar Check-in'.
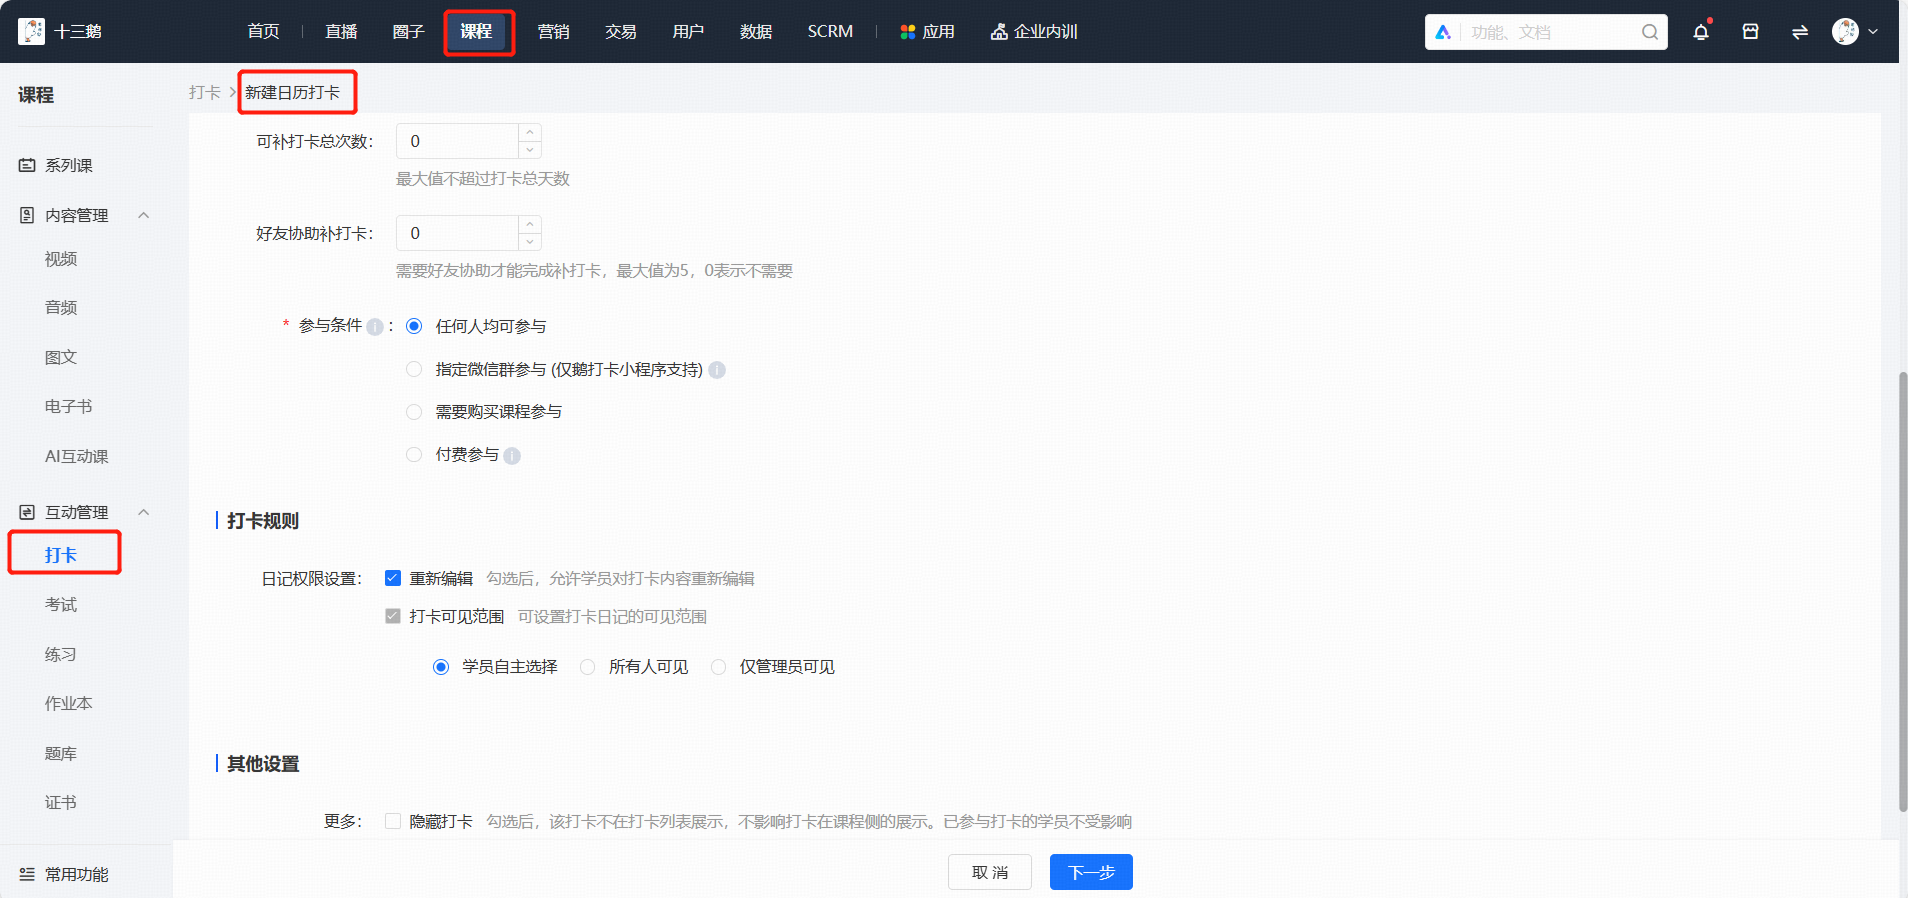
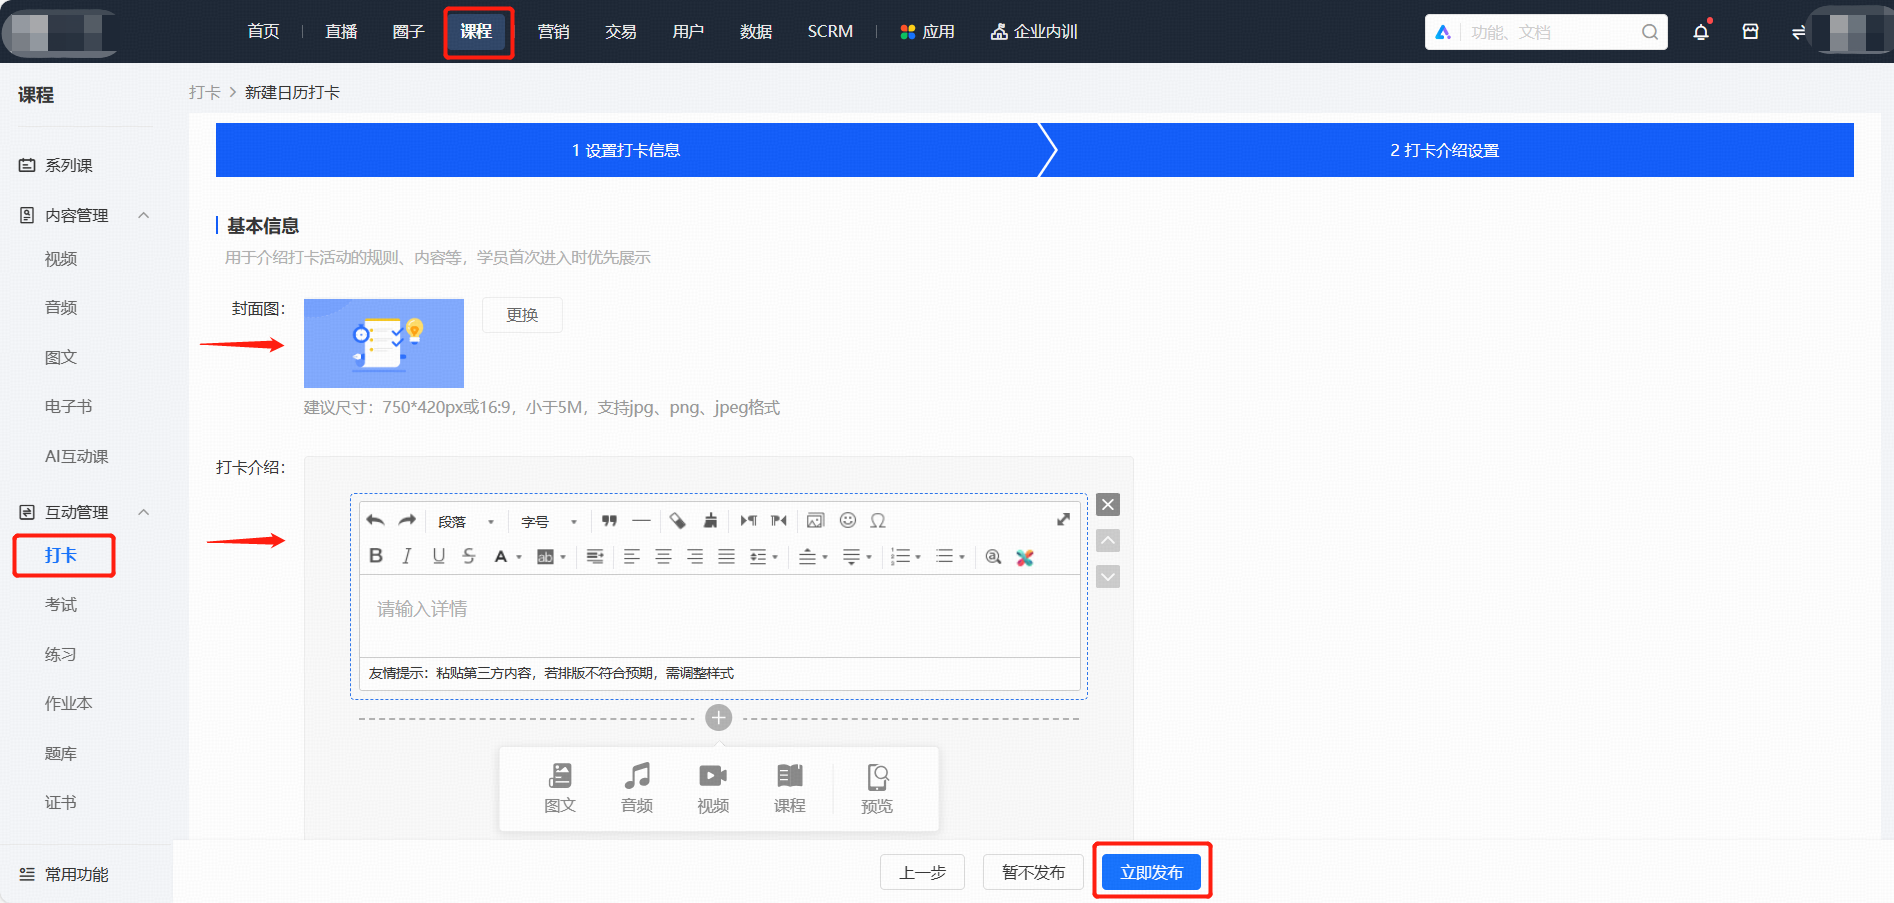
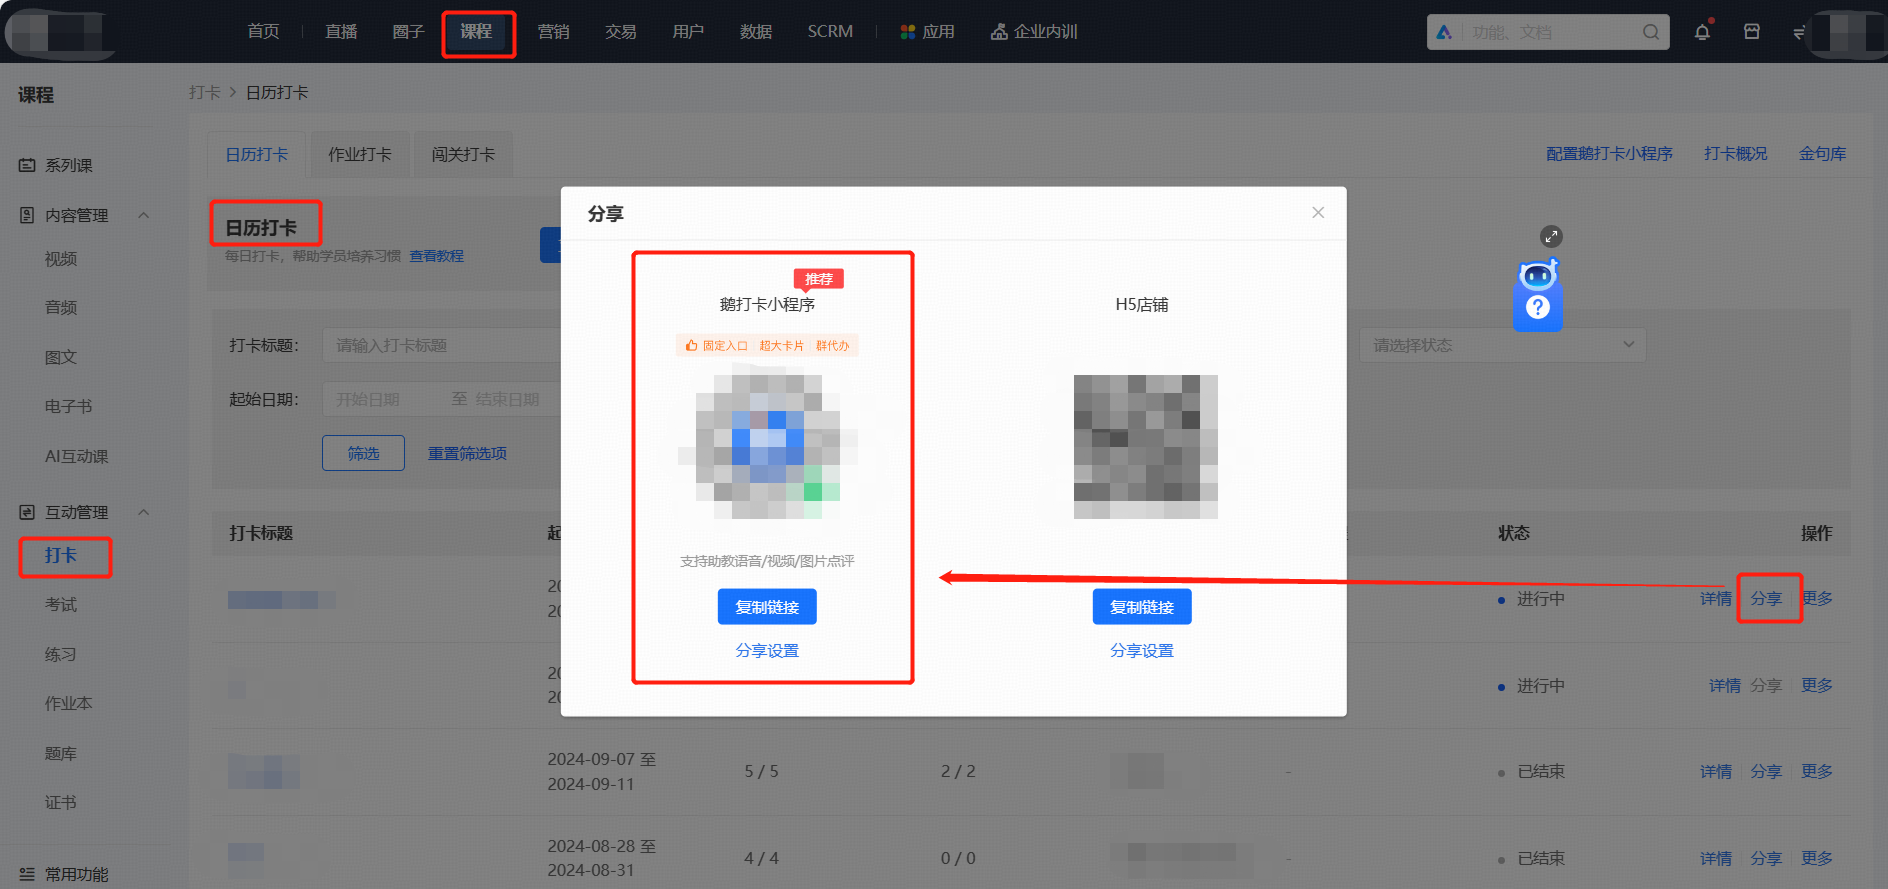
After creating the check-in, click [Share] to get the sharing code and link of the corresponding check-in.
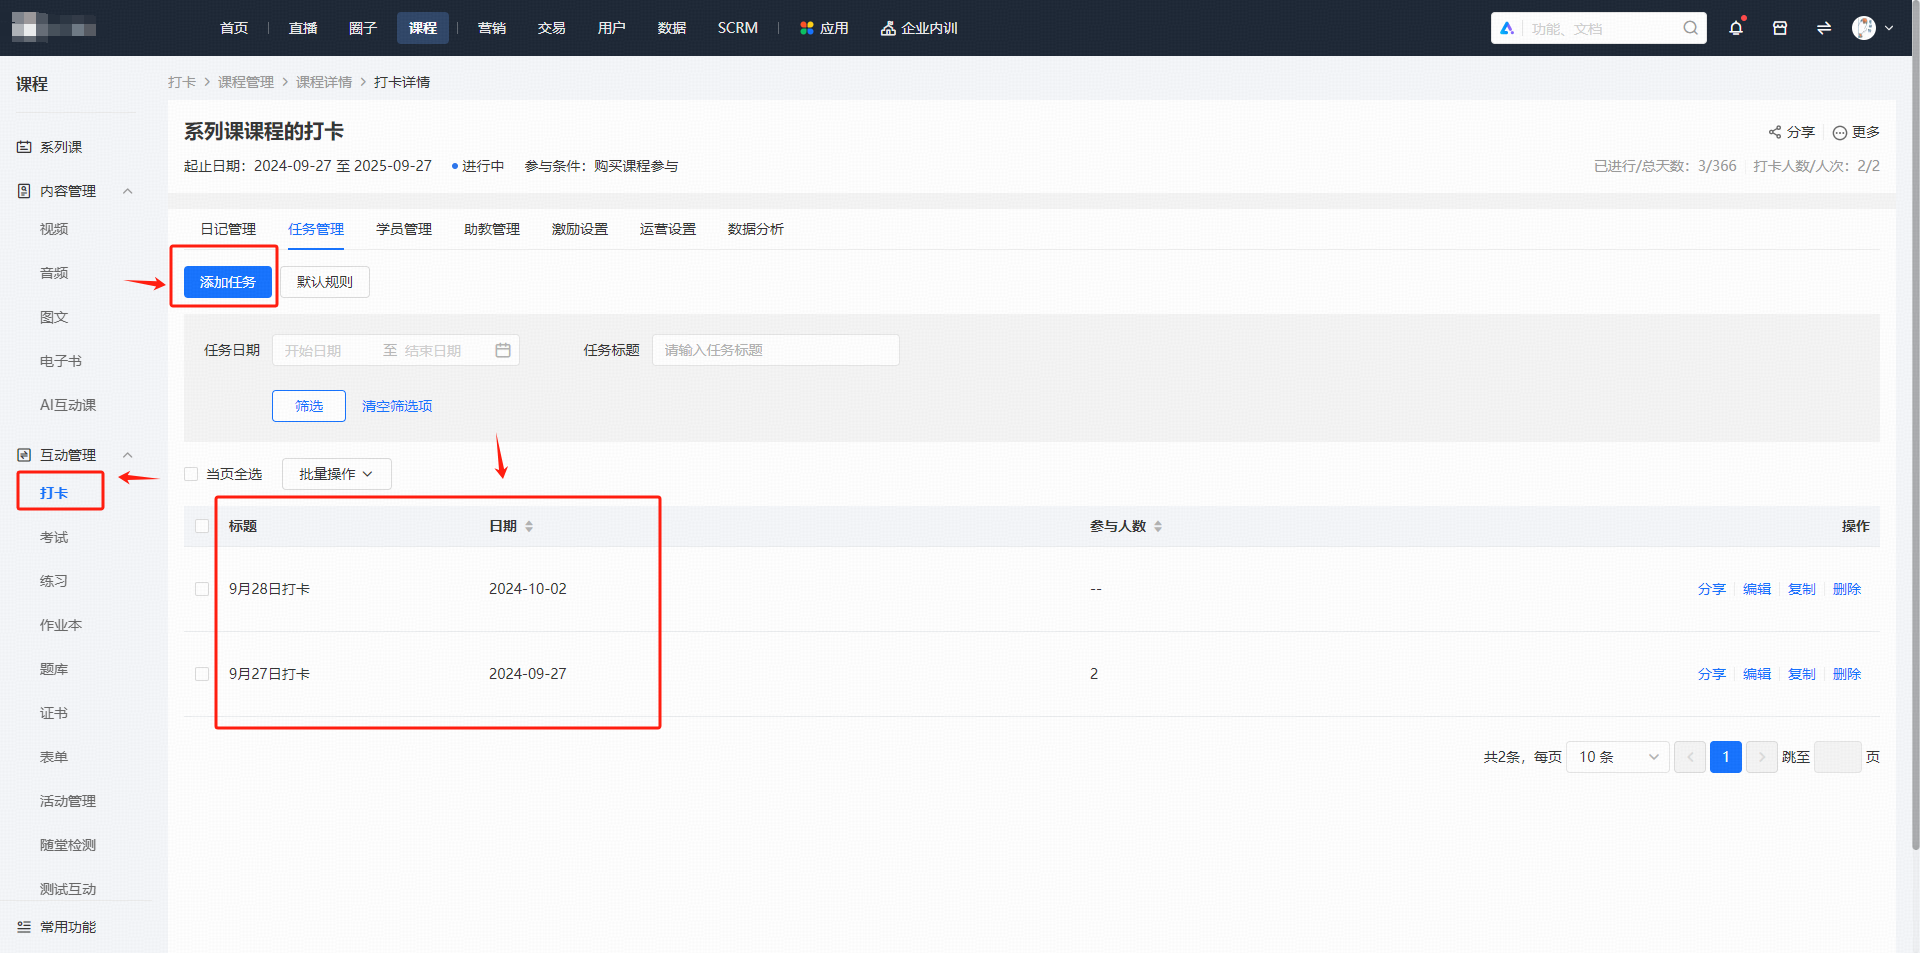
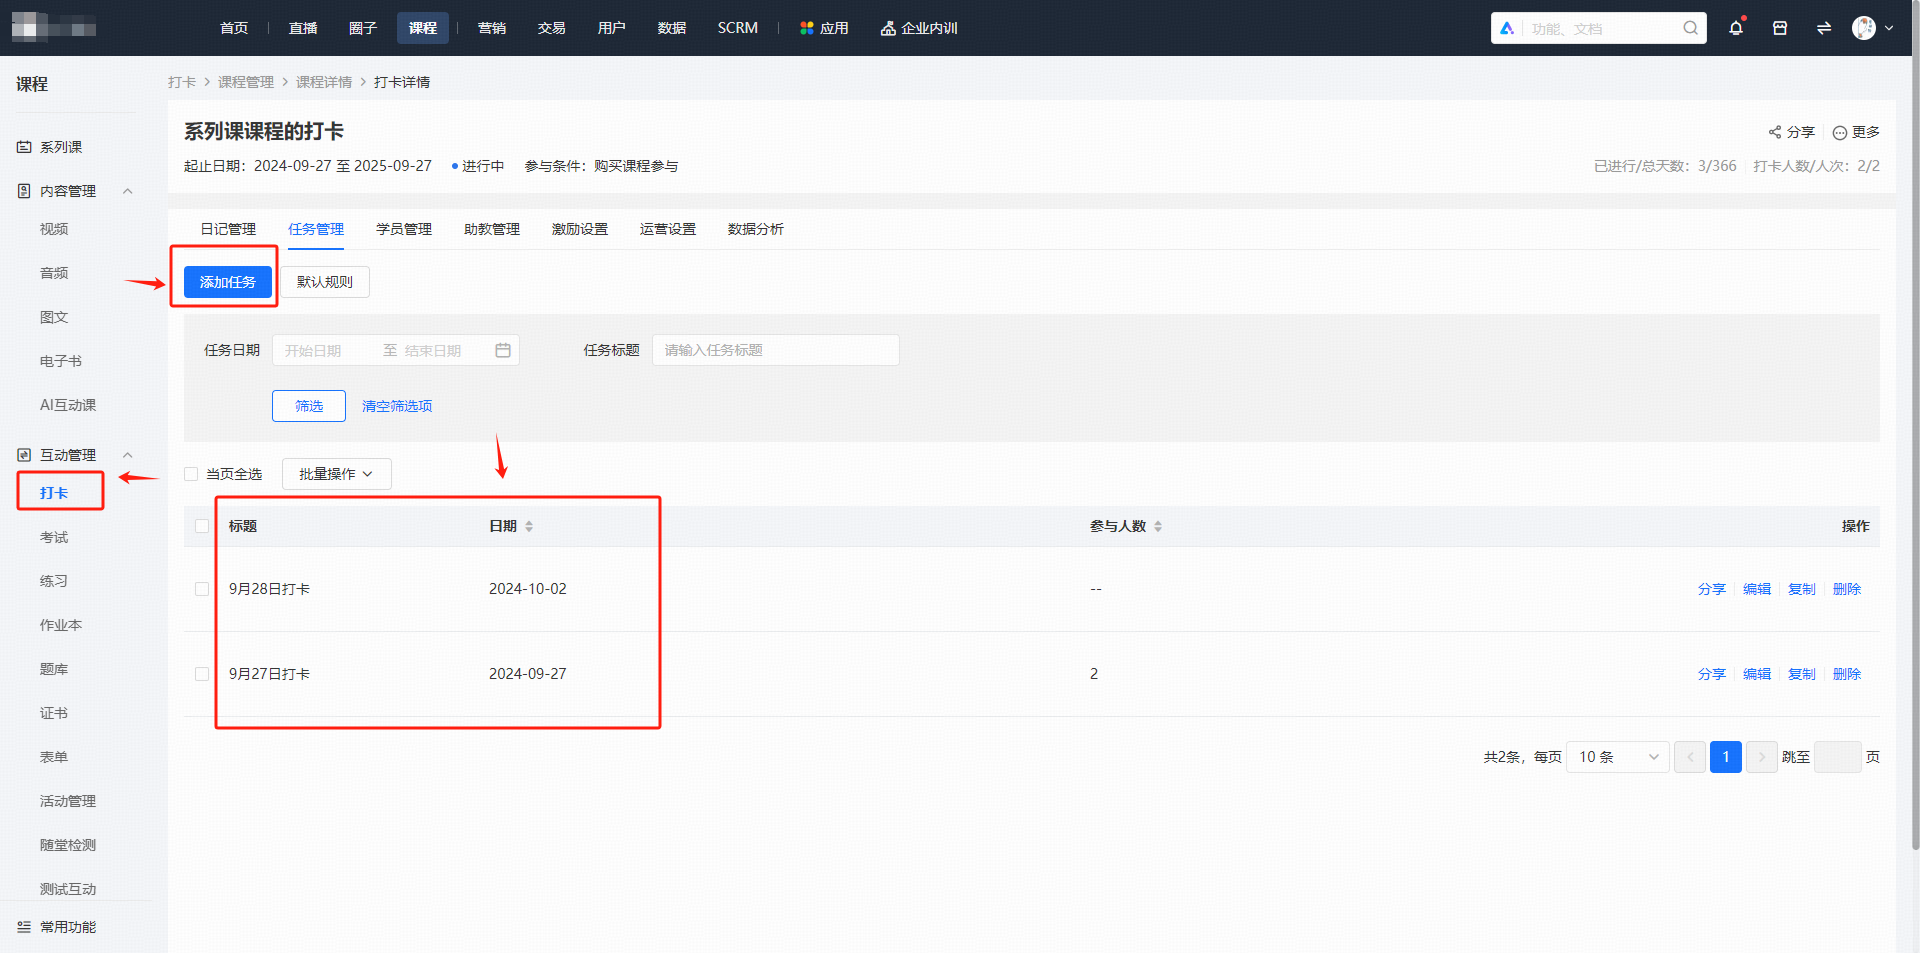
Note: Students can only check in after a check-in task is created in [Task Management].

2. Select [Course Mode], enable , and select [New Calendar Check-in].
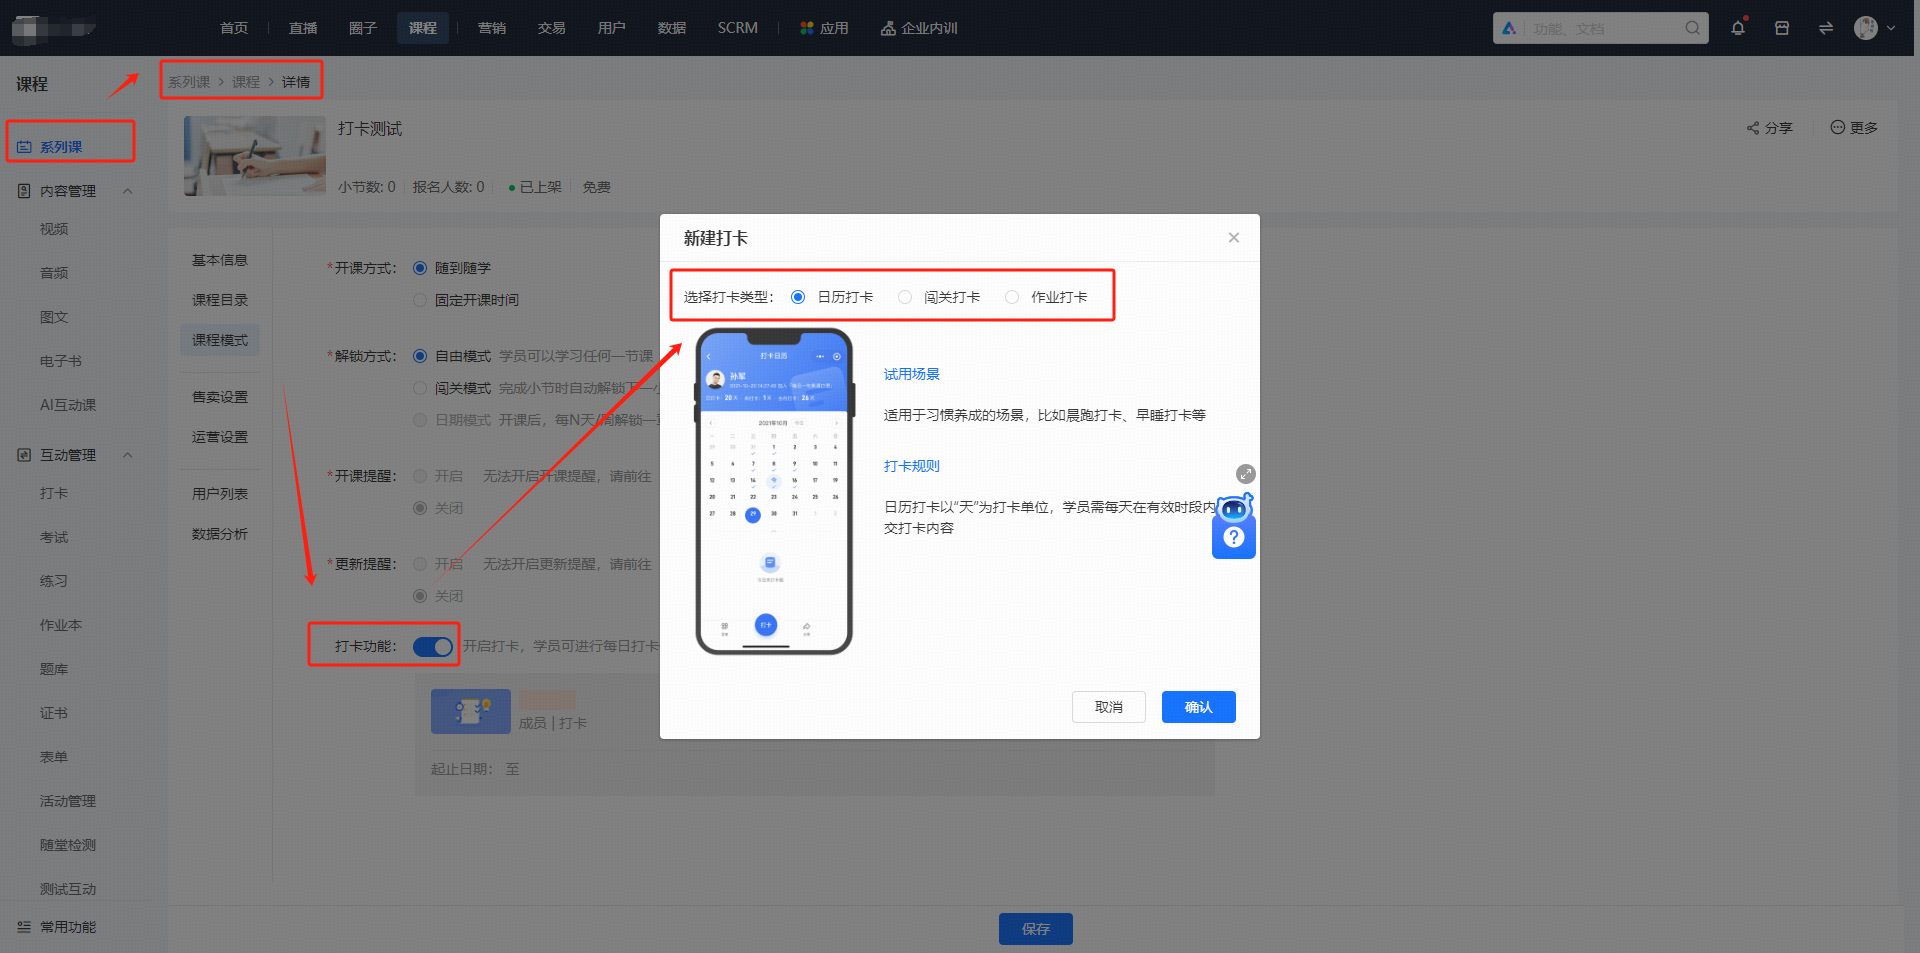
Step 2: Fill in Check-in Information
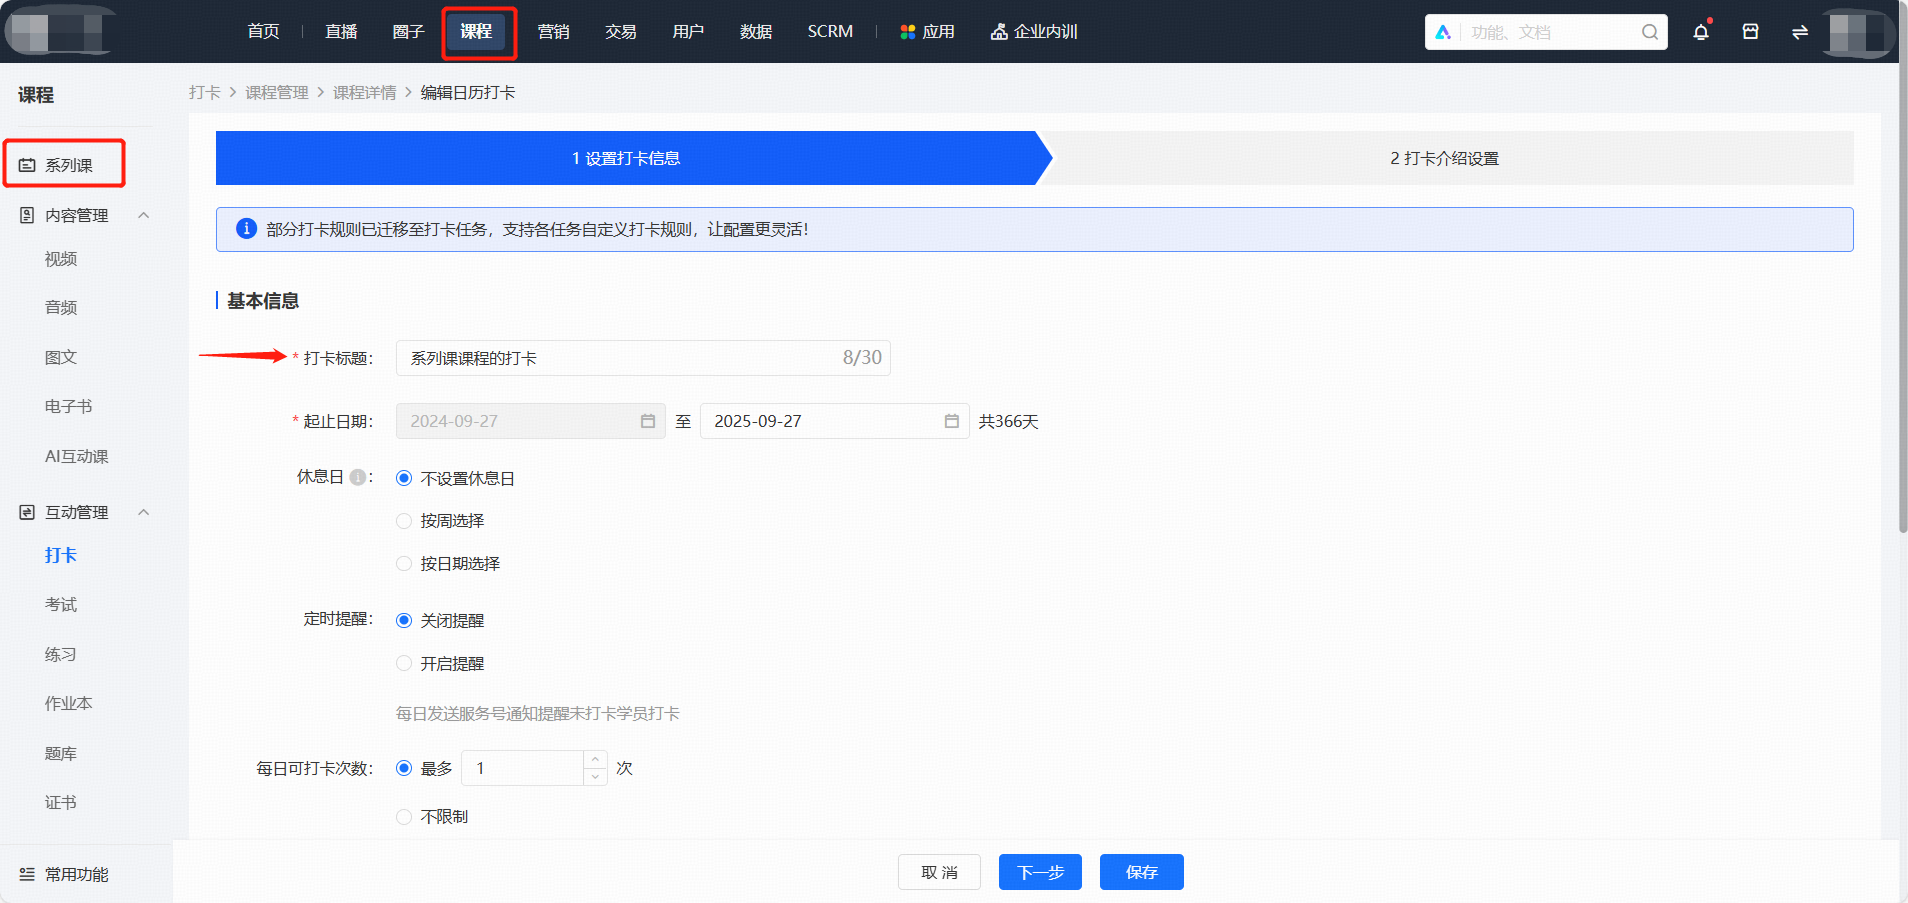
1.Fill in the title of the check-in activity and configure the check-in rules. After configuration, click [Next].
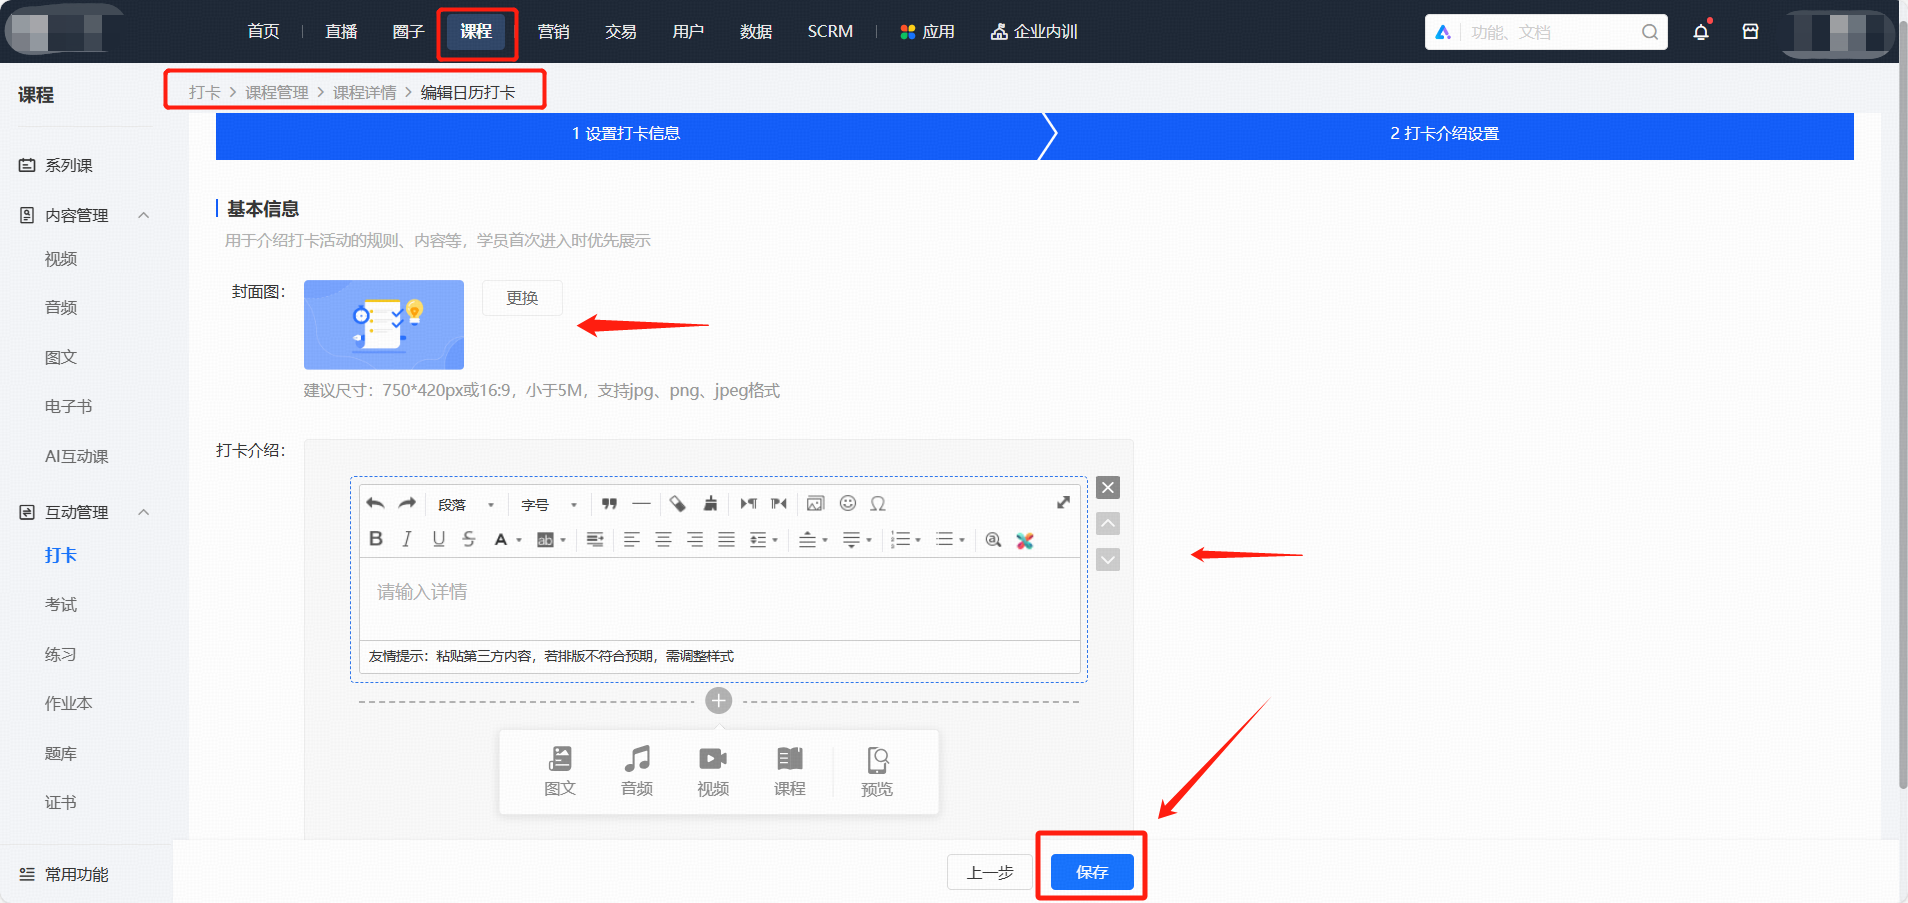
2. Replace the check-in introduction cover and edit the check-in introduction content, then click the [Save] button below to generate a new calendar check-in.
Note: Students can only check in after a check-in task is created in [Task Management].
VI. Student Check-in Usage Guide

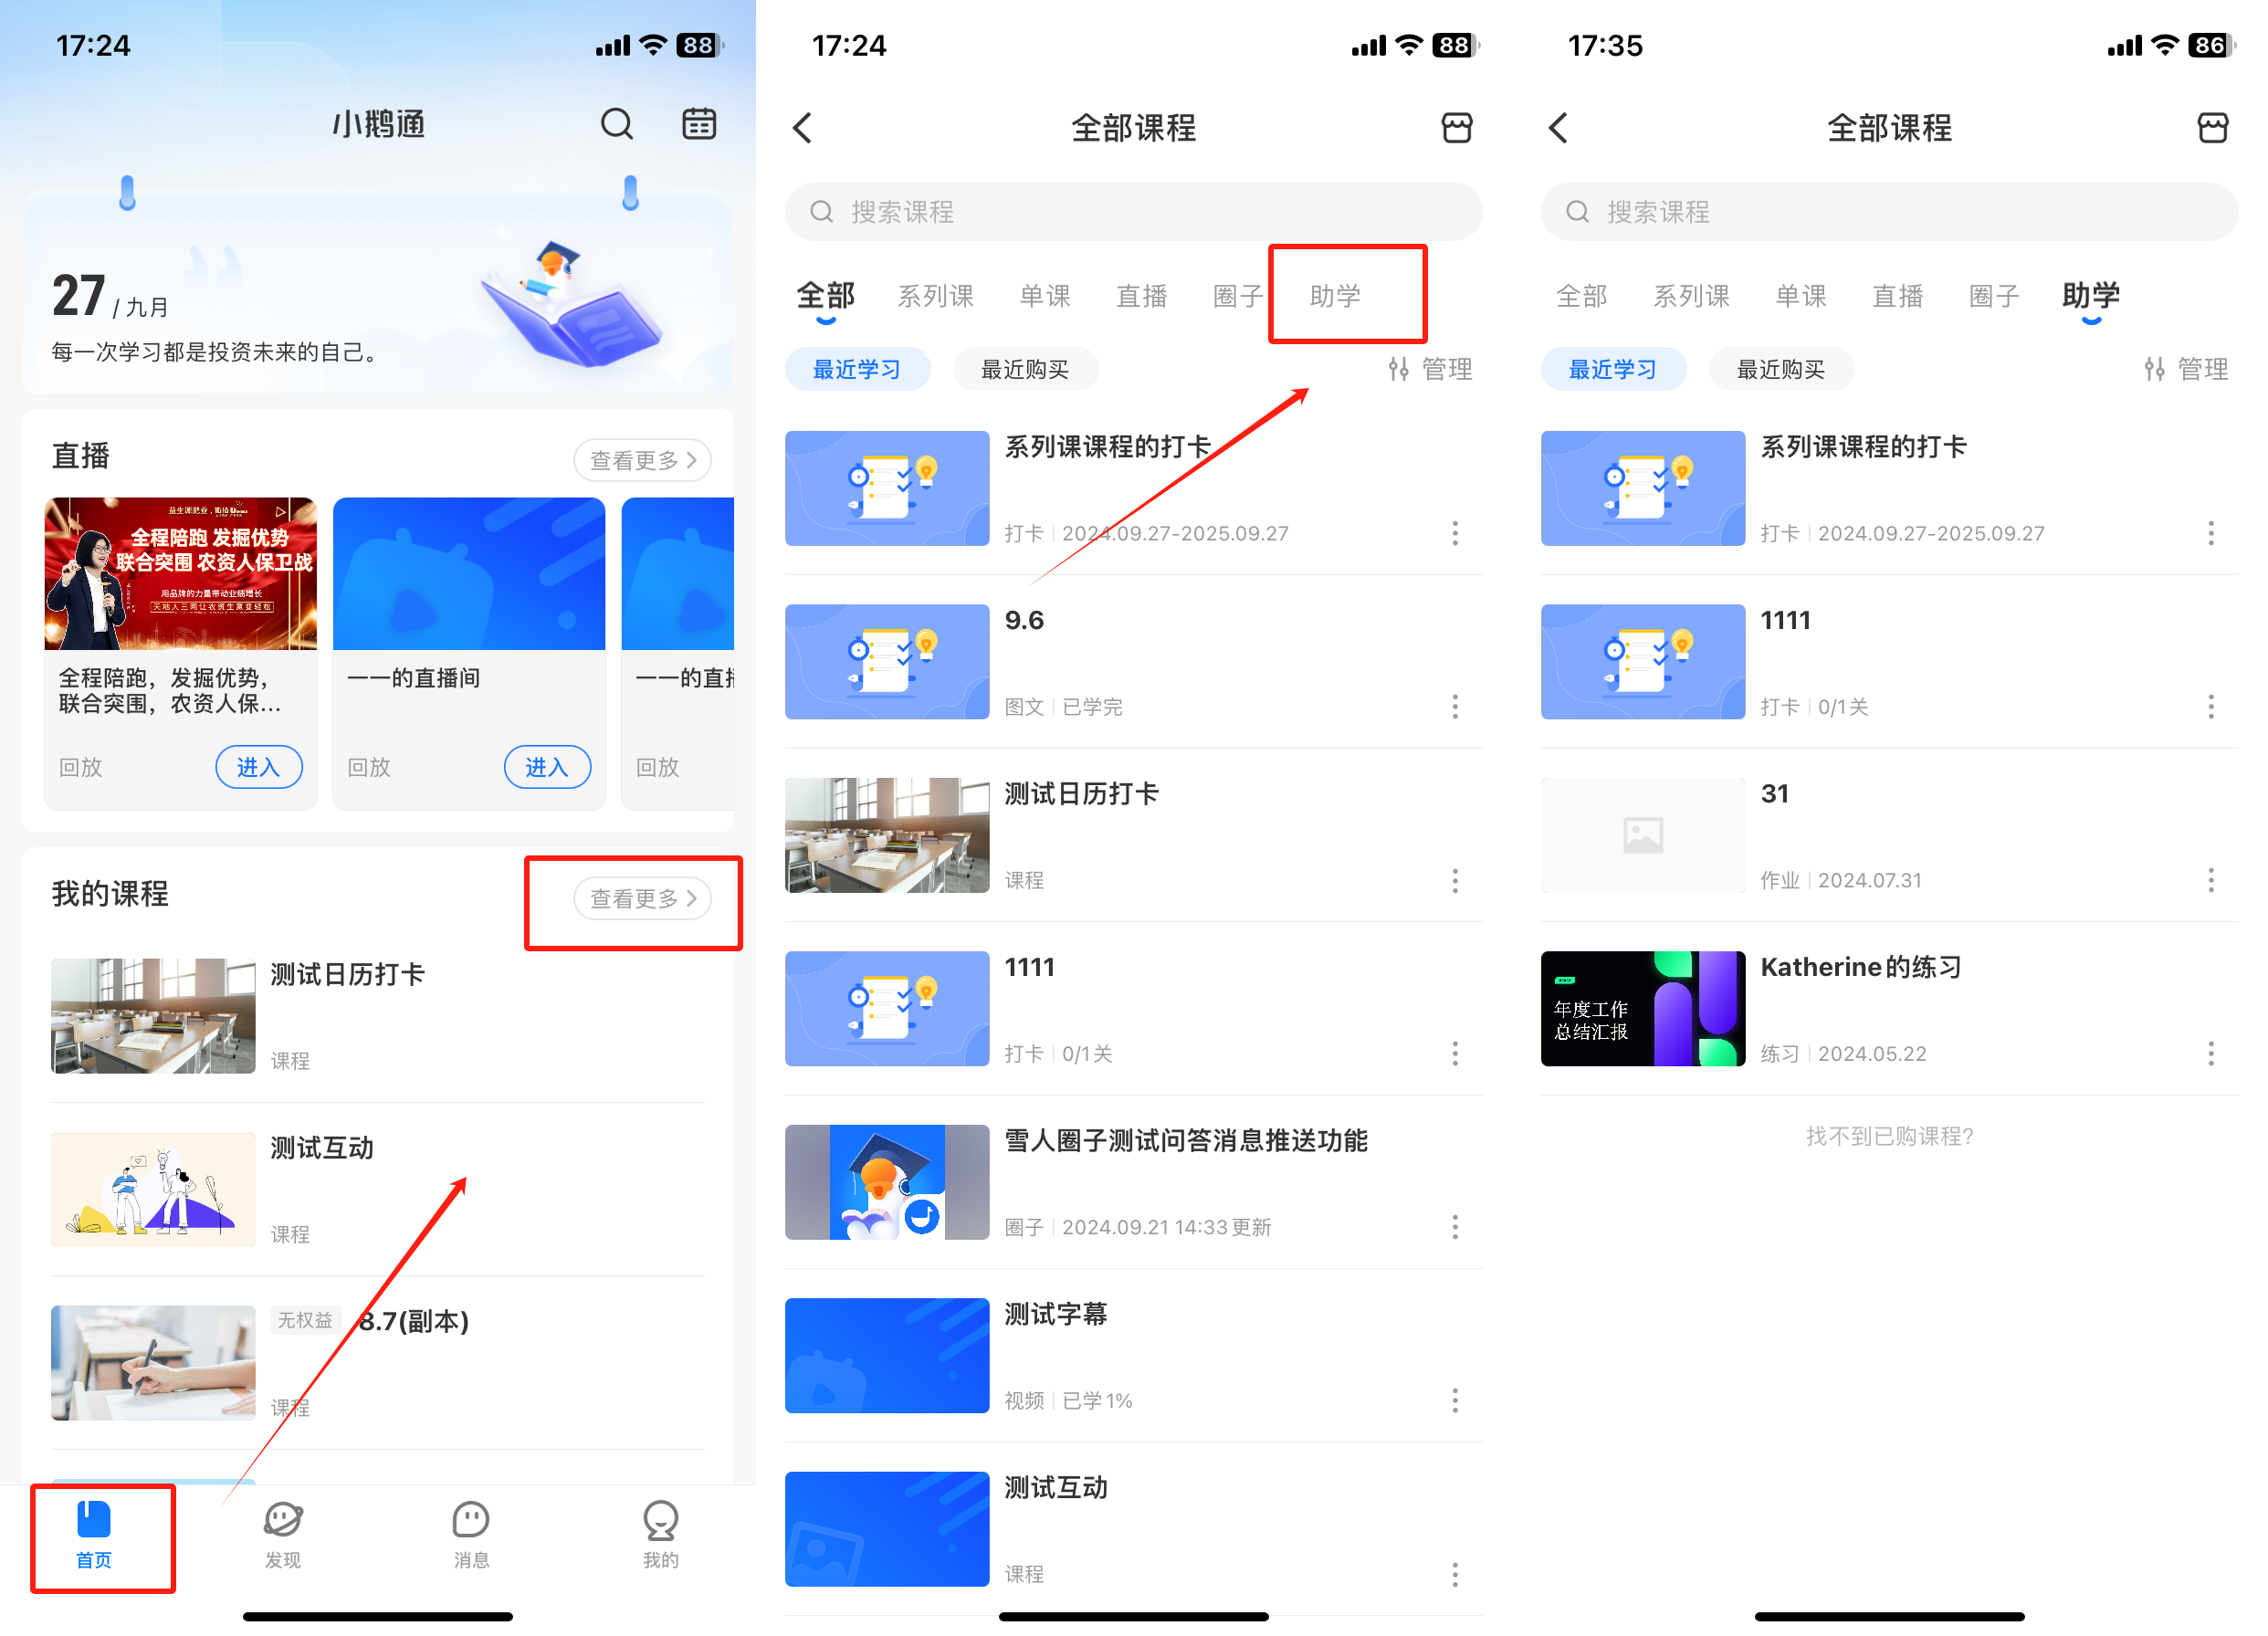
VII. Frequently Asked Questions
1. Will the calendar check-in created in [Series Courses] - [Courses] be displayed in the check-ins of interactive management?
You need to add it manually. The operation path is as follows: In the course catalog of the series course → Add Section → Check-in → Select a valid check-in.
(Professional and flagship stores support adding check-ins to the catalog, while basic stores do not support it.)
Tutorial on Using Assignment Check-ins
I. Function Introduction
Assignment check-in is a check-in model based on 'assignments'. The operator assigns a certain amount of assignment tasks to the students. The students need to complete them within the limited time. Meanwhile, the students can adjust the order of completing the assignments by themselves to control their learning pace independently.
II. Purpose of Use
Assignment check-in can be used to test the teaching quality. At the same time, the time limit for completing the assignments can be set to make the students feel the urgency to complete the assignments as soon as possible and urge them to study.
III. Usage Scenarios
For students, some assignments require more preparation time. For example, writing a reading note, a post-class reflection, or an article expressing opinions often takes several days to complete.
IV. Operation Path
Merchant End
Desktop Management Console → Content → Check-in → Assignment Check-in → Create New Assignment Check-in
Student End
1. H5 Store/Merchant Mini Program → My → Learning Tools → Check-in
2. eLink Check-in Mini Program → Home Page → What I'm Participating In
3. eLink Student Edition App →My Courses on the Home Page → View More → Navigation Bar → Learning Assistance

V. Usage Tutorial
Step 1: Create a New Assignment Check-in(Management Background)
Log in to your eLink account. Click [Content] in the left sidebar, select [Check-in], enter the page, select [Assignment Check-in], and click [Create New Assignment Check-in].

Step 2: Fill in the Check-in Information(Management Background)
1. Set the check-in information: Fill in the title of the check-in activity and configure the check-in rules.
2. The check-in can be used for independent sharing or associated with a series of courses/single courses. One check-in activity supports associating with one series of courses/single course. Currently, the types of series of courses/single courses supported by the check-in are: text and pictures, audio, video, live streaming, columns, memberships, major columns, and class courses.


3. Set the check-in introduction: Replace the cover of the check-in introduction and edit the content of the check-in introduction. Then click the [Publish Immediately] button below to generate a new assignment check-in.


When adding tasks, you can modify the template individually or directly use the template of the [Default Rules].


VI. Guide for Students to Use the Check-in
Path: H5 Store/Merchant Mini Program → My → Learning Tools → Check-in

Path: eLink Check-in Mini Program → Home Page

Path: eLink Student Edition App → My Courses on the Home Page → View More → Navigation Bar → Learning Assistance
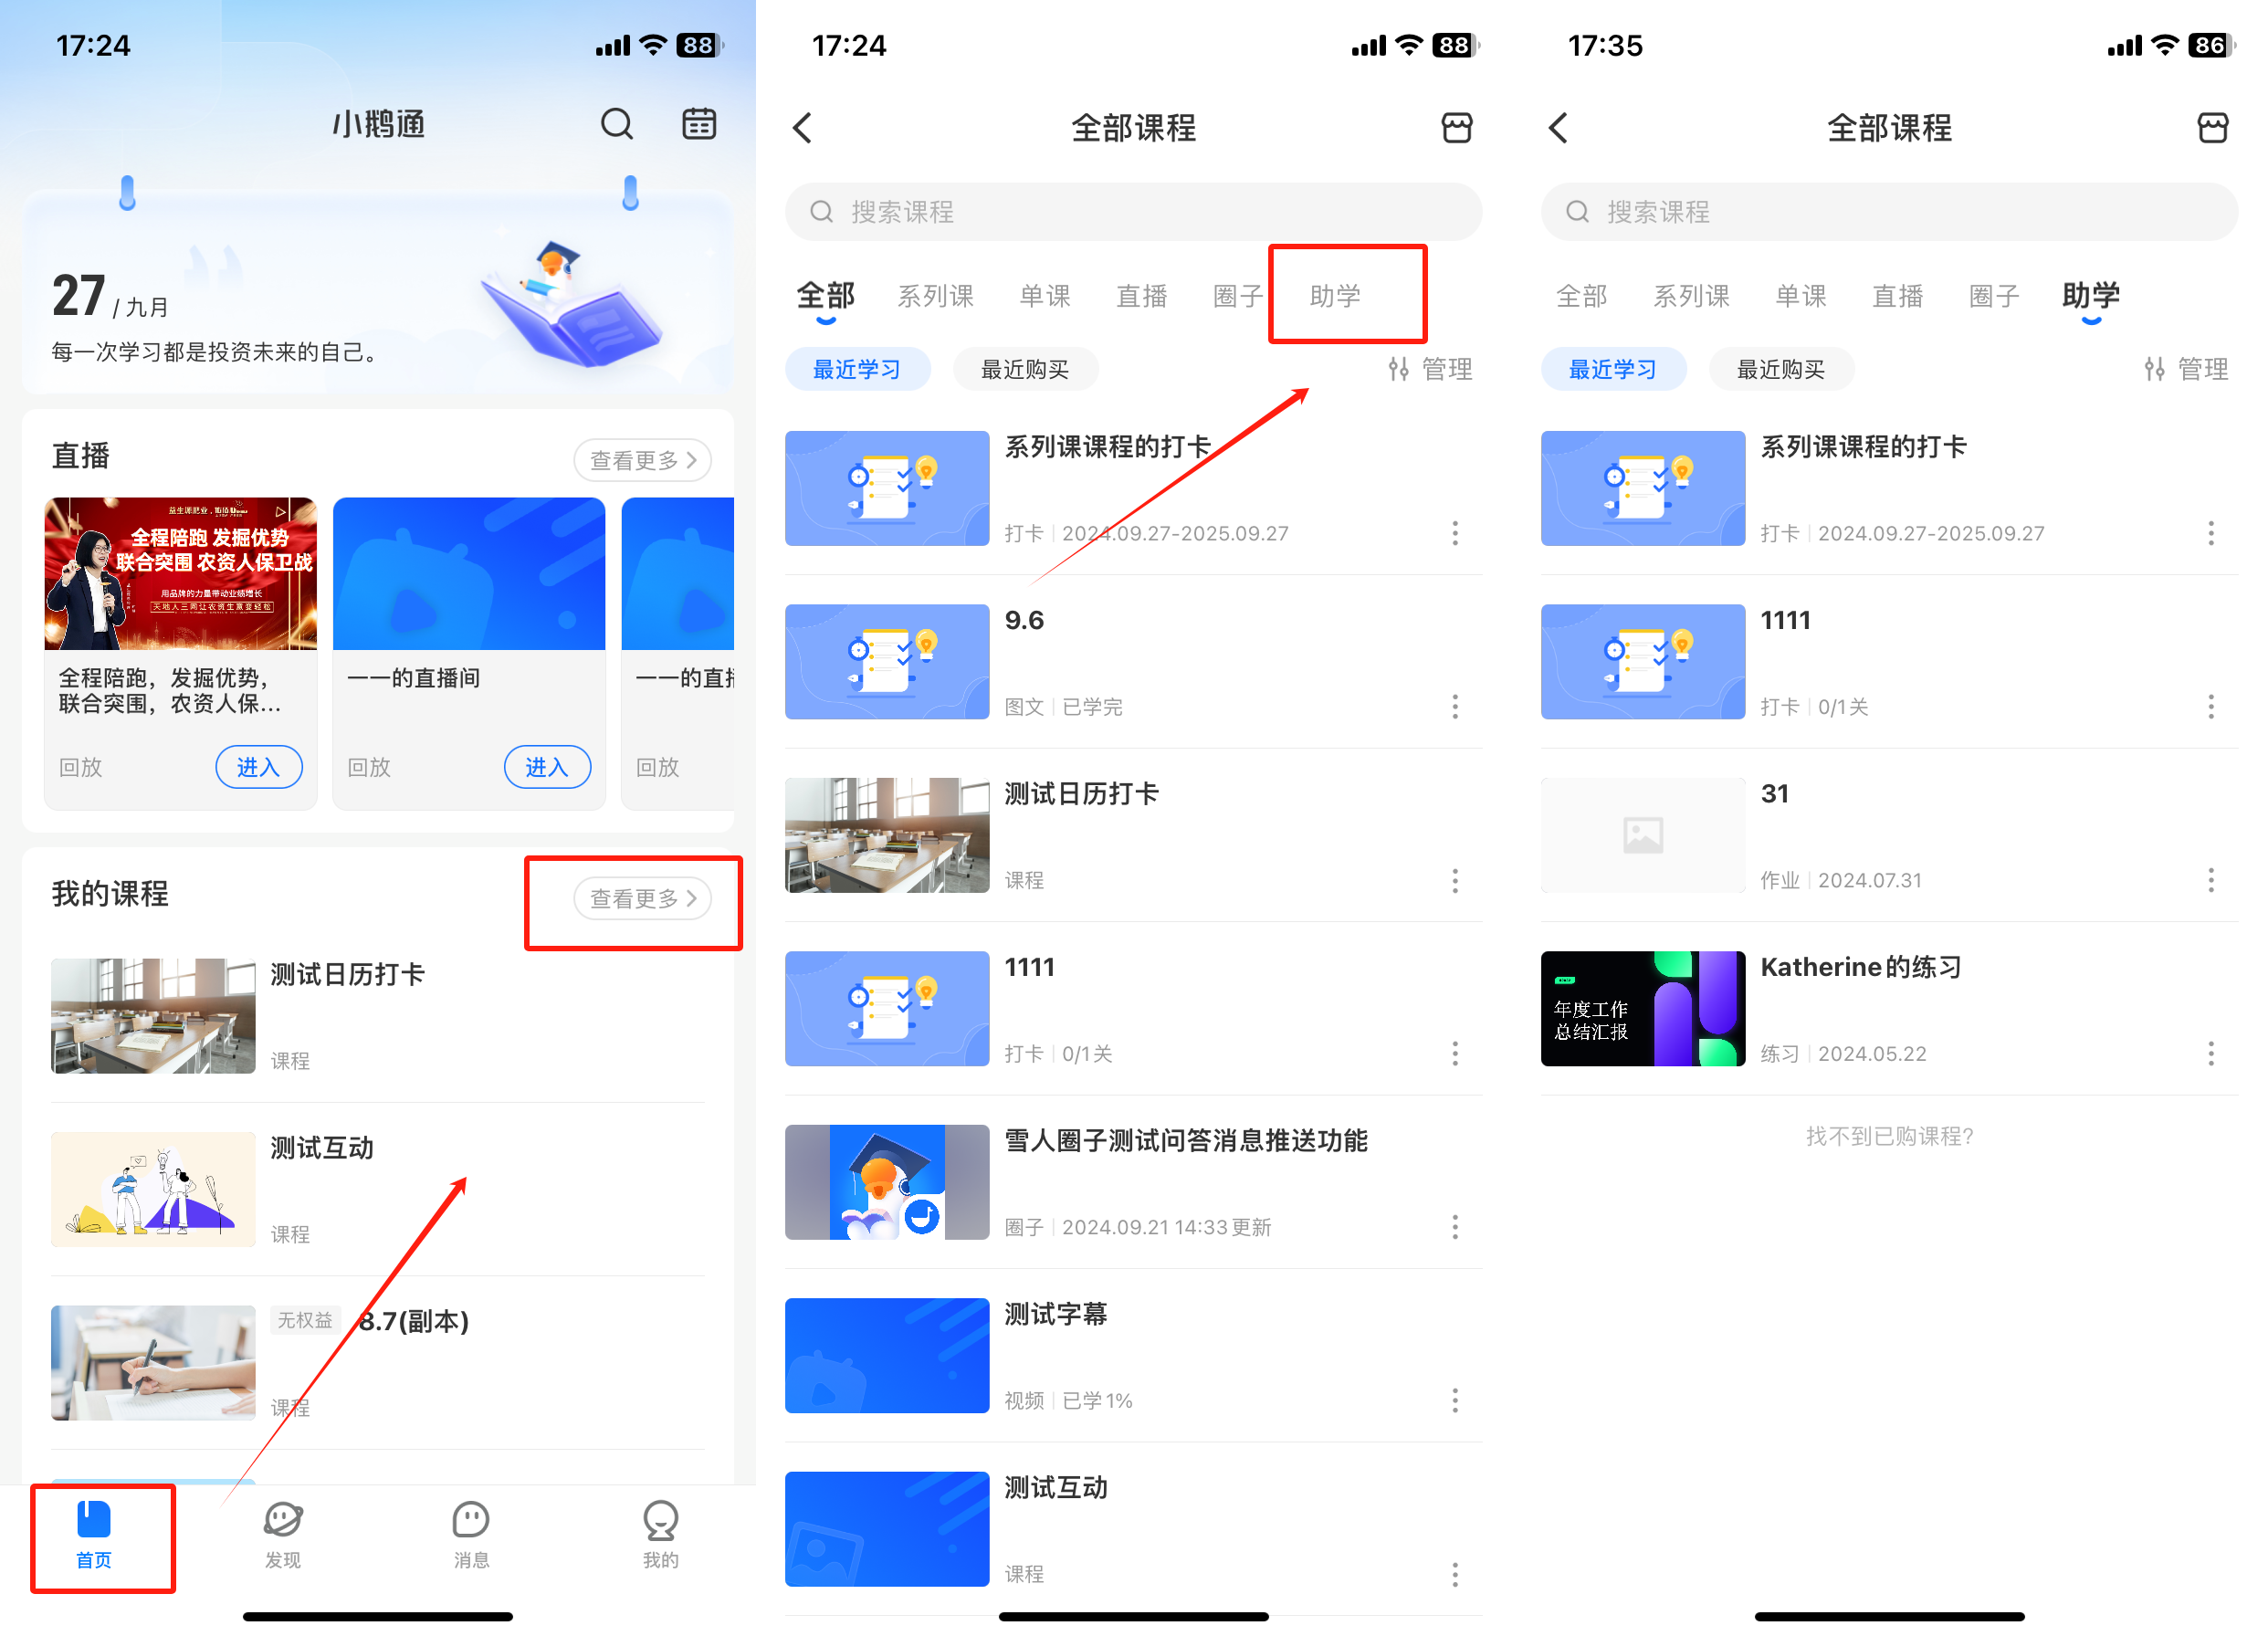
Customization tutorial for check-in daily sign-in images, long images, and invitation cards
I. Function Introduction
Daily check-in cards, long images (posters), and invitation cards arethe images shared by trainees in the check-in activity. Itallows merchants to customize the styles and backgrounds in the backend.
II. Purpose of Use
With this setting, you can enable users to generate unique check-in content with brand personality. This not only encourages users to share more actively but also enhances brand exposure and influence during the sharing process.
III. Use Scenarios
A training institution uses the check-in feature to launch a trainee check-in activity. After trainees check in daily, daily check-in cards are automatically generated. Meanwhile, long sharing images containing check-in content can be generated in the check-in records. Through the operator's custom settings, the daily check-in cards and long sharing images better showcase the institution's brand characteristics. After trainees share these images, the institution's brand is widely promoted.
IV. Operation Path
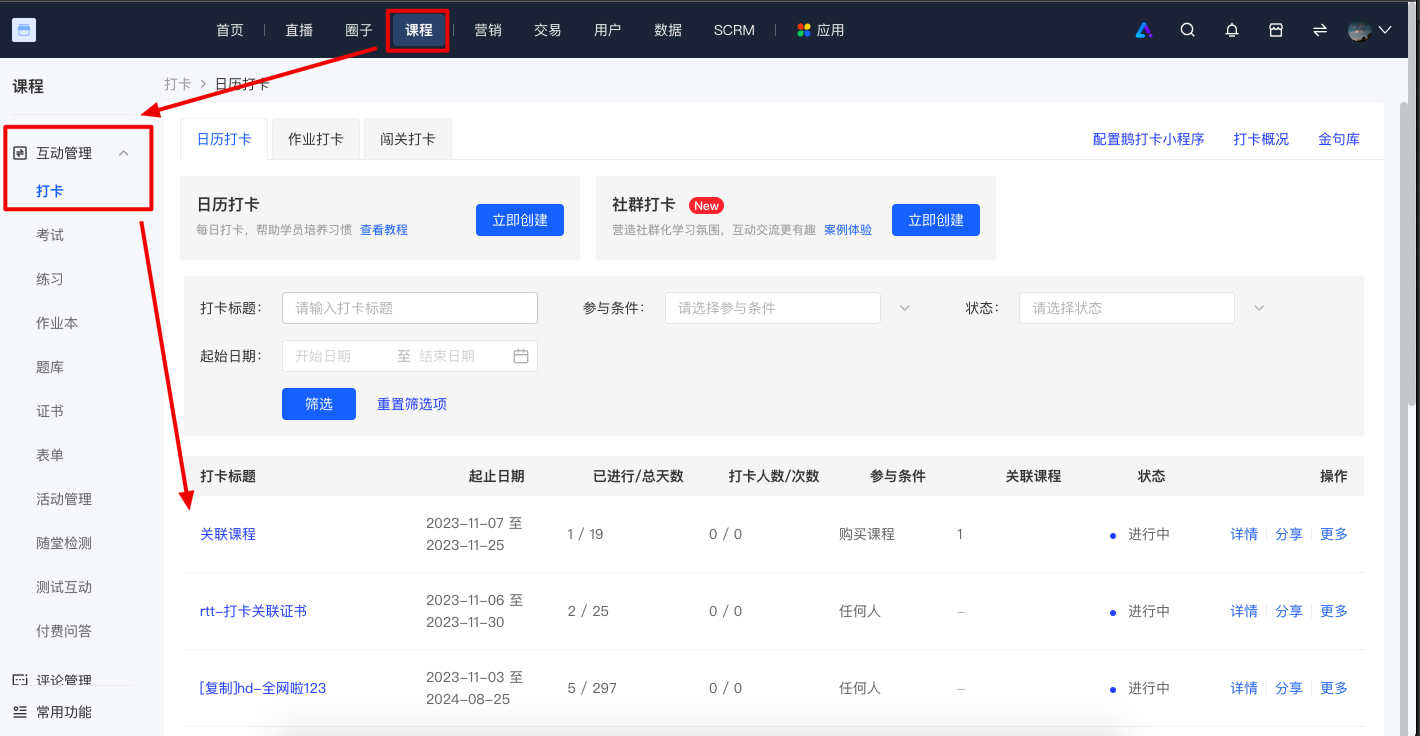
Merchant side: Desktop management console → Courses → Interaction Management → Check-in → Check-in details → Operation Settings
V. Usage Tutorial
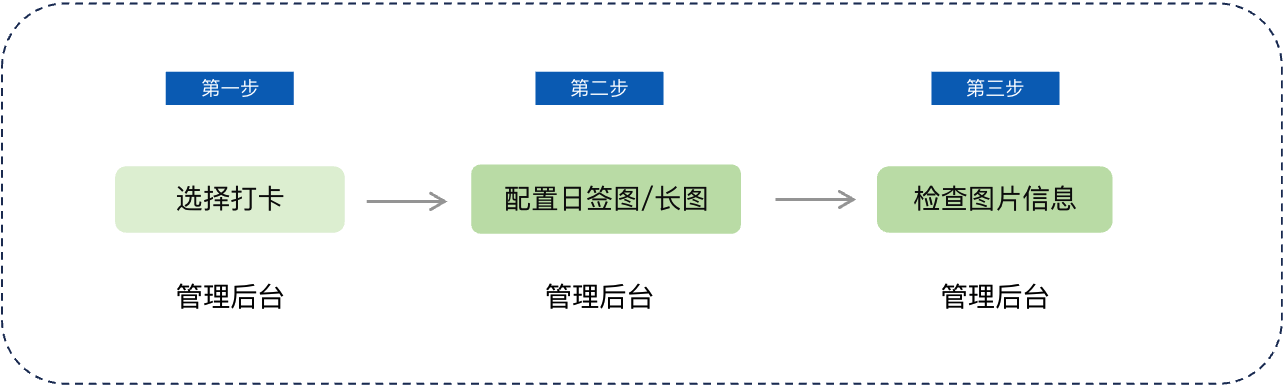
Step 1: Select a check-in (Management backend)
Log in to your elink account. Click [Content] in the left sidebar, then click [Check-in], and select the check-in to be configured.
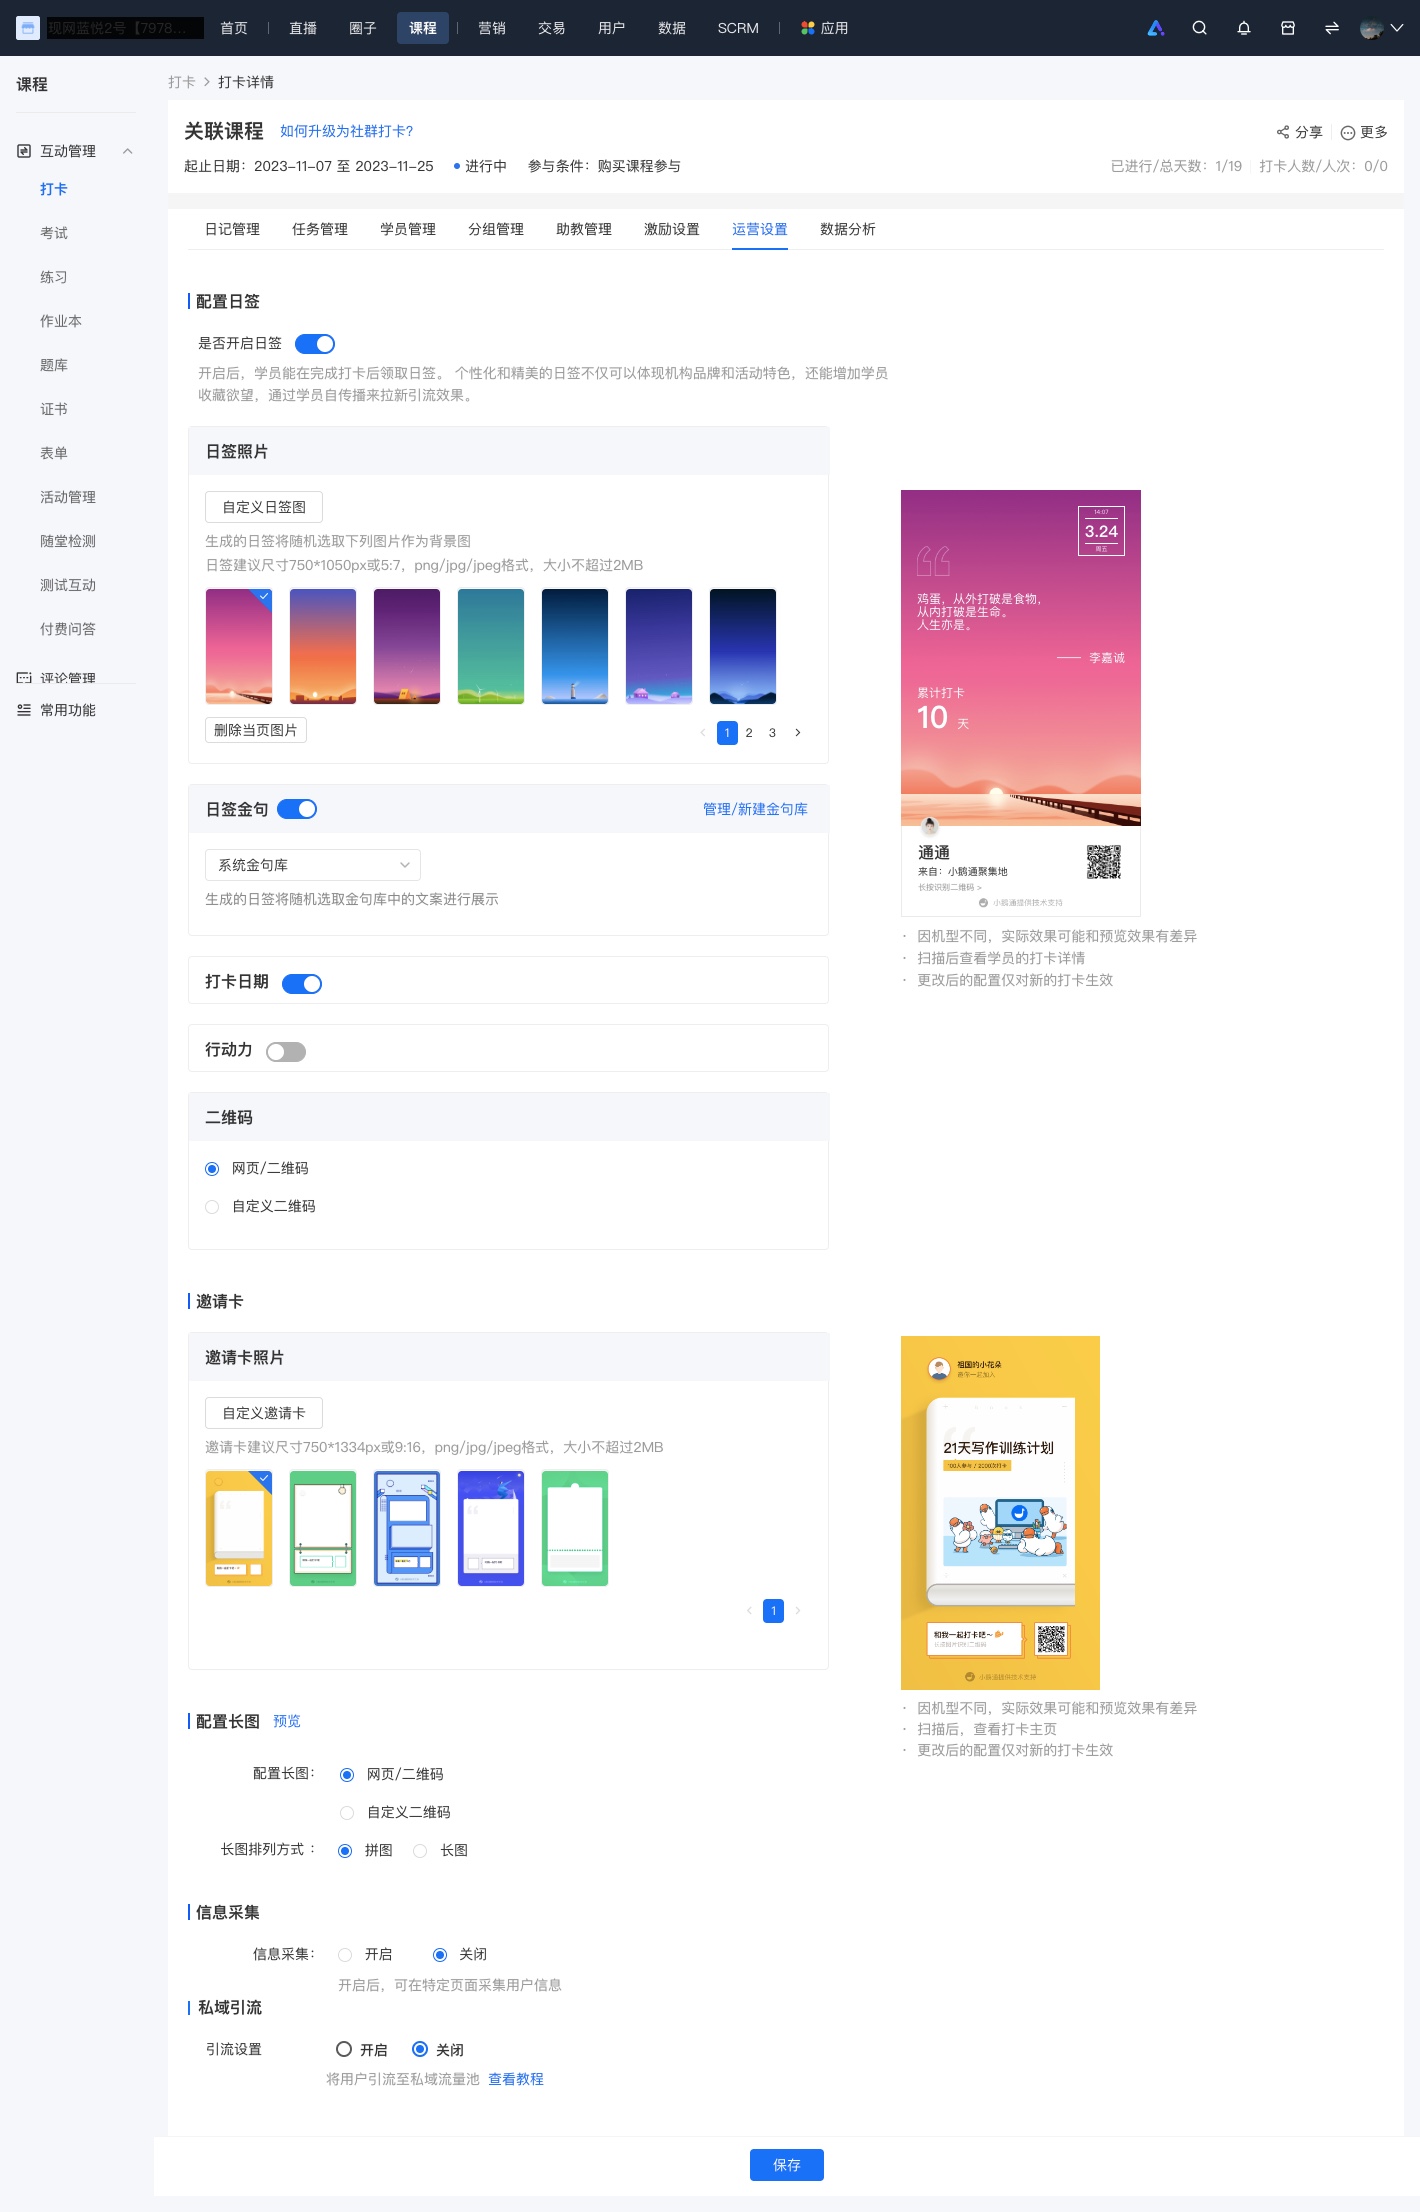
Step 2 Configure daily check-in cards/long images/invitation cards (Management backend)
Enable the daily check-in card feature. You can choose to add a custom background image and configure whether to display inspiring quotes, QR codes, and other information.
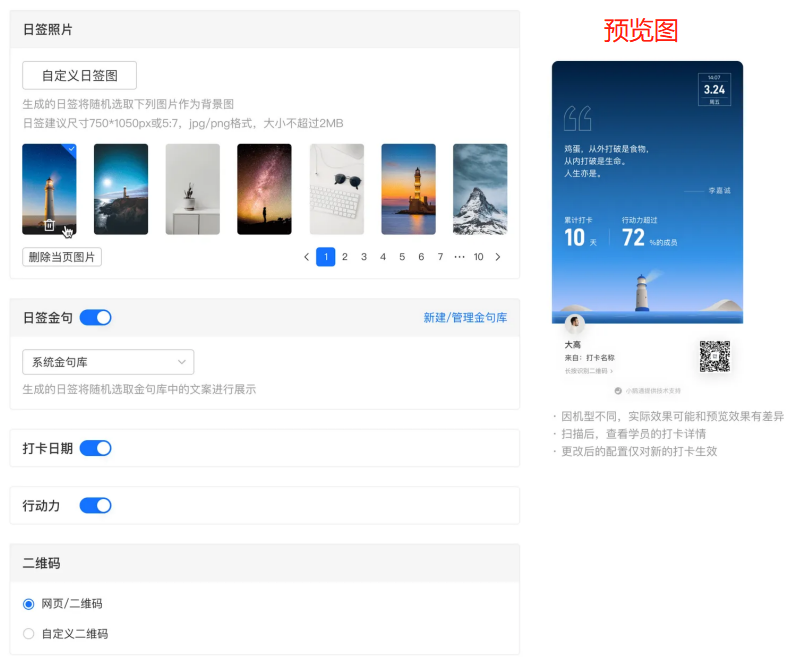
Step 3: Check image information (Management backend)
You can preview the daily check-in cards and long images. After confirming the information, click the [Save] button at the bottom.
① Daily check-in card
② Invitation card
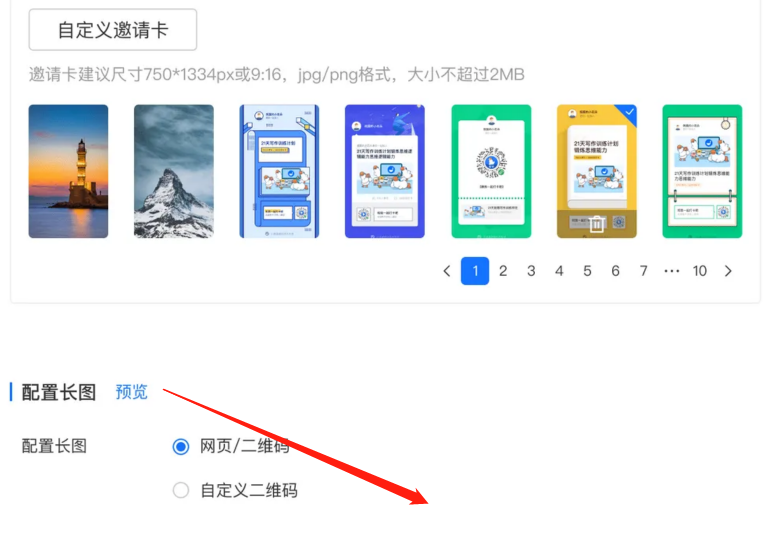
③ Long image
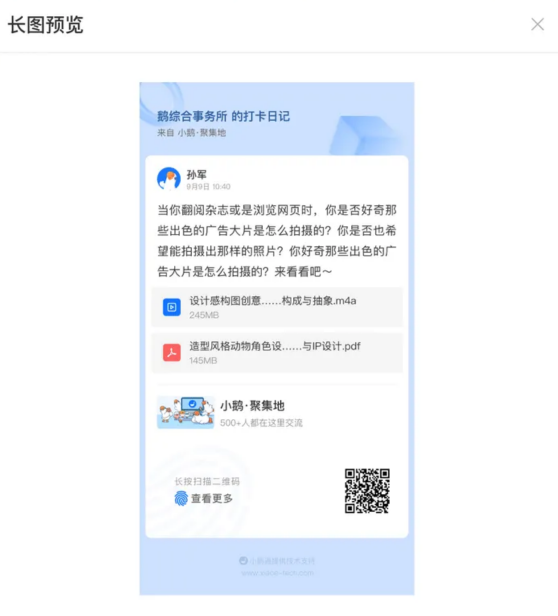
Tutorial on Using Certificates for Check-in Results
I. Feature Introduction
Merchants can configure certificates for check-ins, giving learners a sense of purpose in check-ins and motivating them to complete the check-in tasks. Certificates support customizing the display information and issuance rules.
II. Purpose of Use
Completion certificates can enhance learners' sense of achievement in check-ins, prompting them to share on their social media feeds for wider dissemination and helping merchants attract new learners.
III. Use Scenarios
Merchants can set up check-in certificates in advance when creating check-in tasks and inform learners in the check-in introduction that they can obtain a completion certificate by meeting certain requirements, thus motivating learners to complete the check-ins as required. When learners meet the requirements, the system will automatically issue the pre - set certificates.
IV. Operation Path
Merchant side: Desktop management console → Courses → Interactive Management →Check - in → Check - in Details → Incentive Settings → Certificates
Or
Merchant backend → Content → Certificates → Check - in → Create New Certificate
V. Usage Tutorial
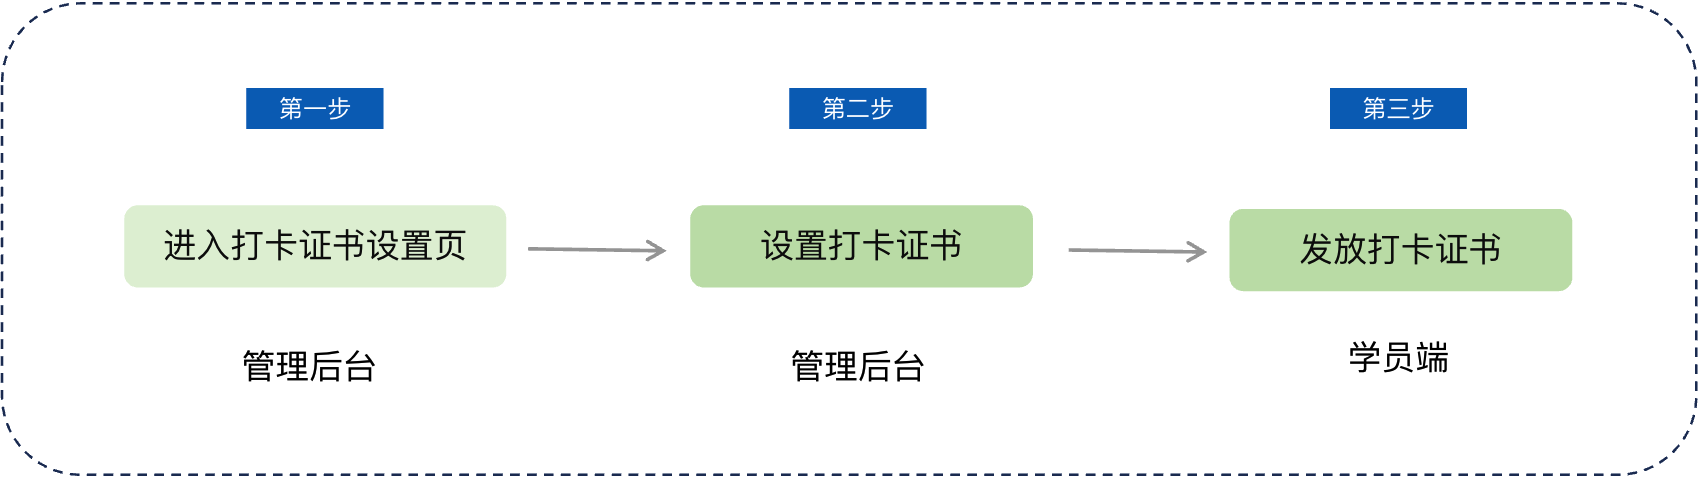
Step 1: Enter the check - in certificate settings page (Management backend)
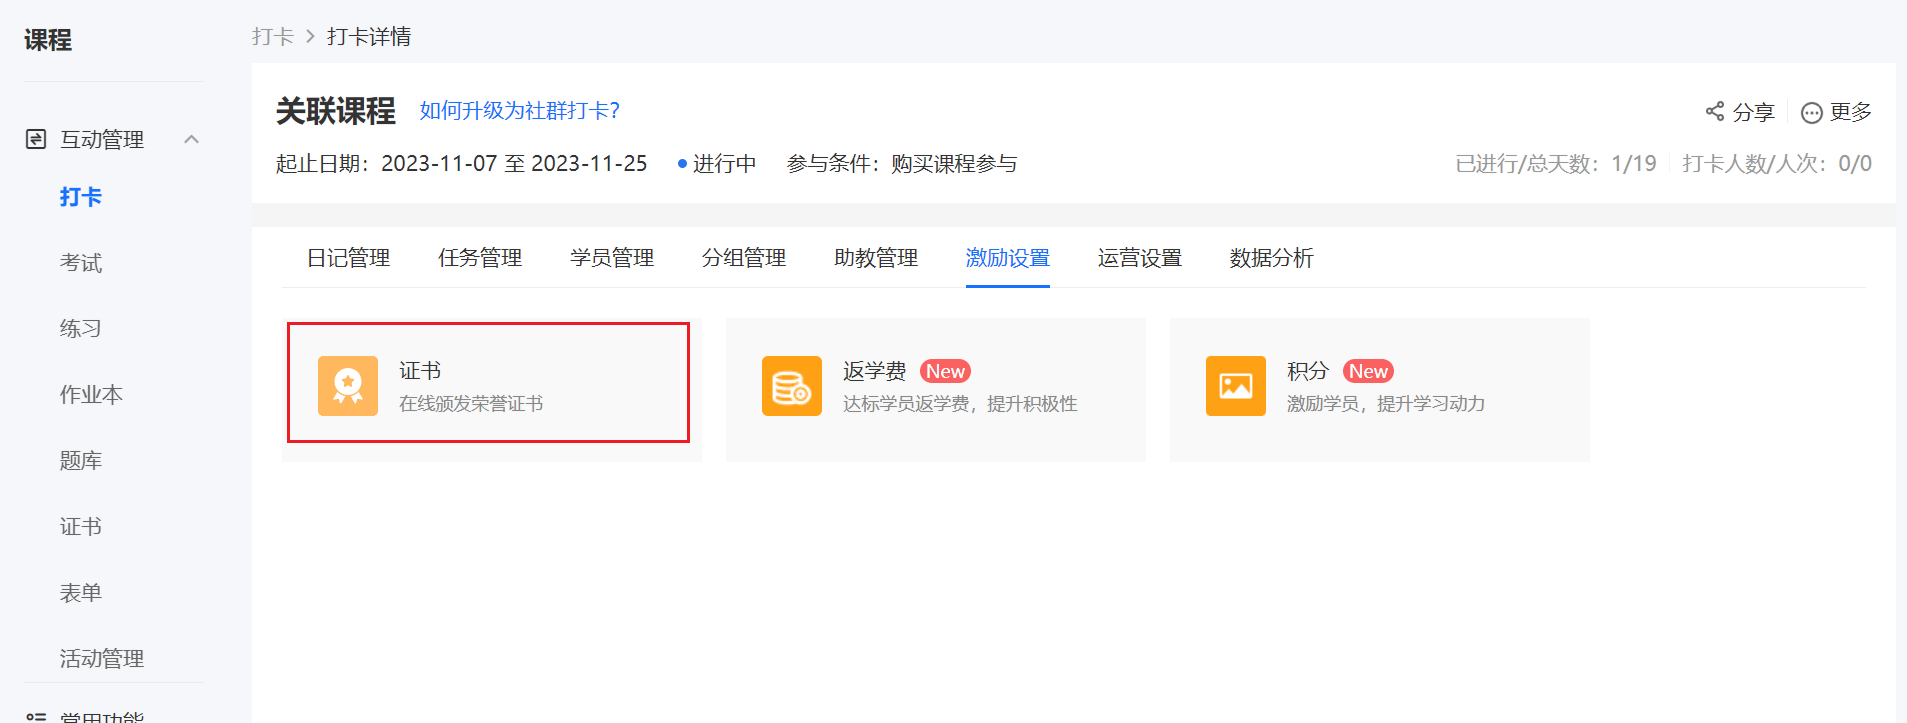
Method 1: Log in to the elink account, click [Courses] in the left sidebar, select [Check - in] under [Interactive Management], enter the check - in task for which you need to configure a certificate, click [Incentive Settings], and select [Certificates].
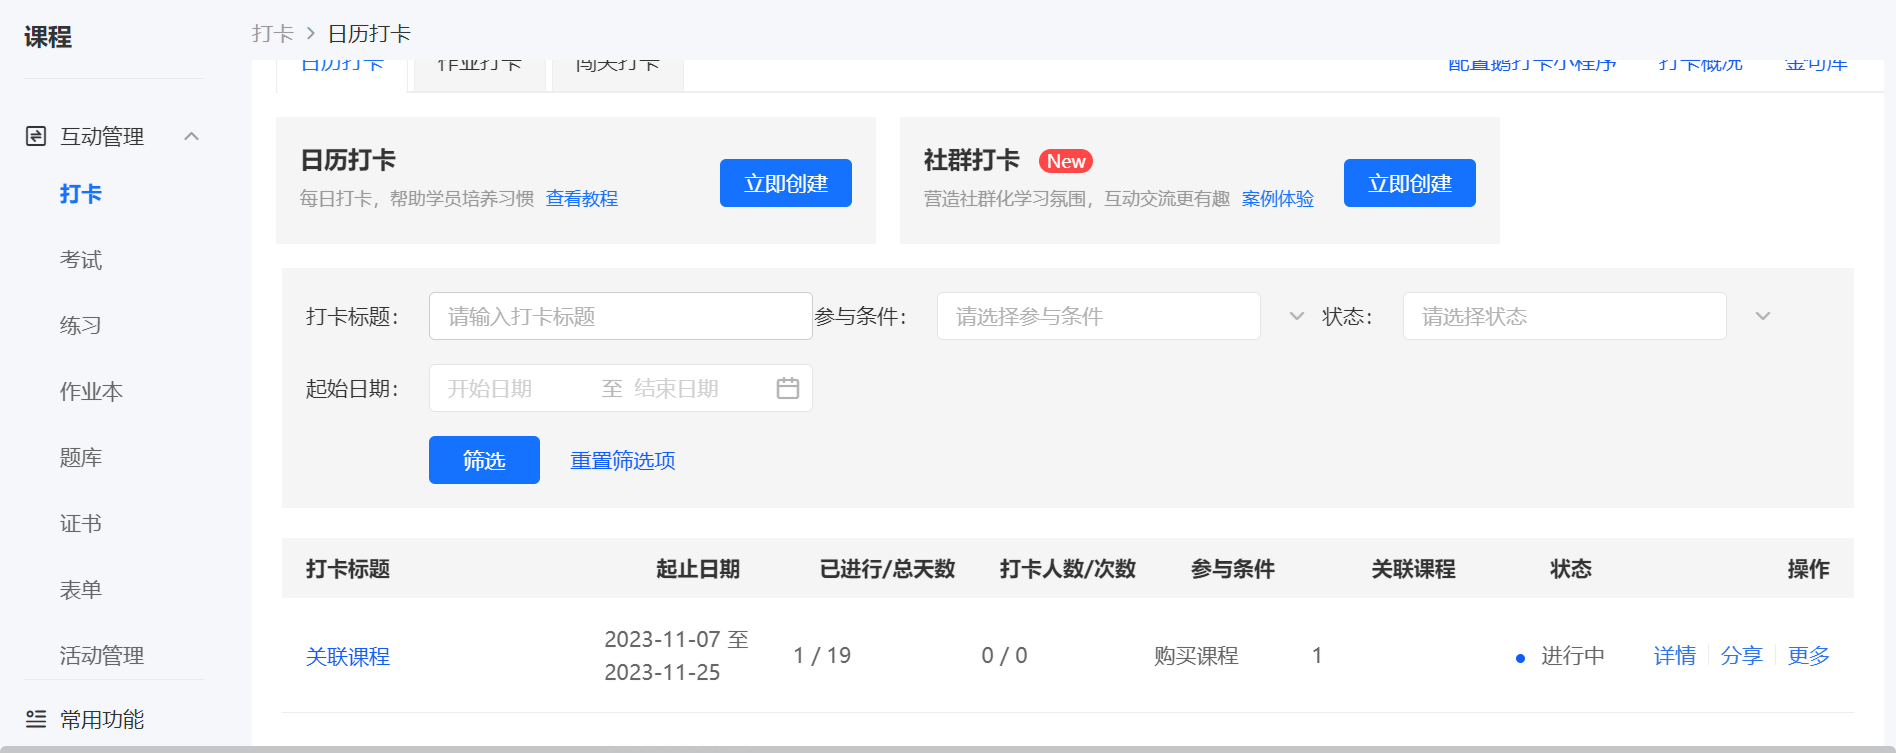
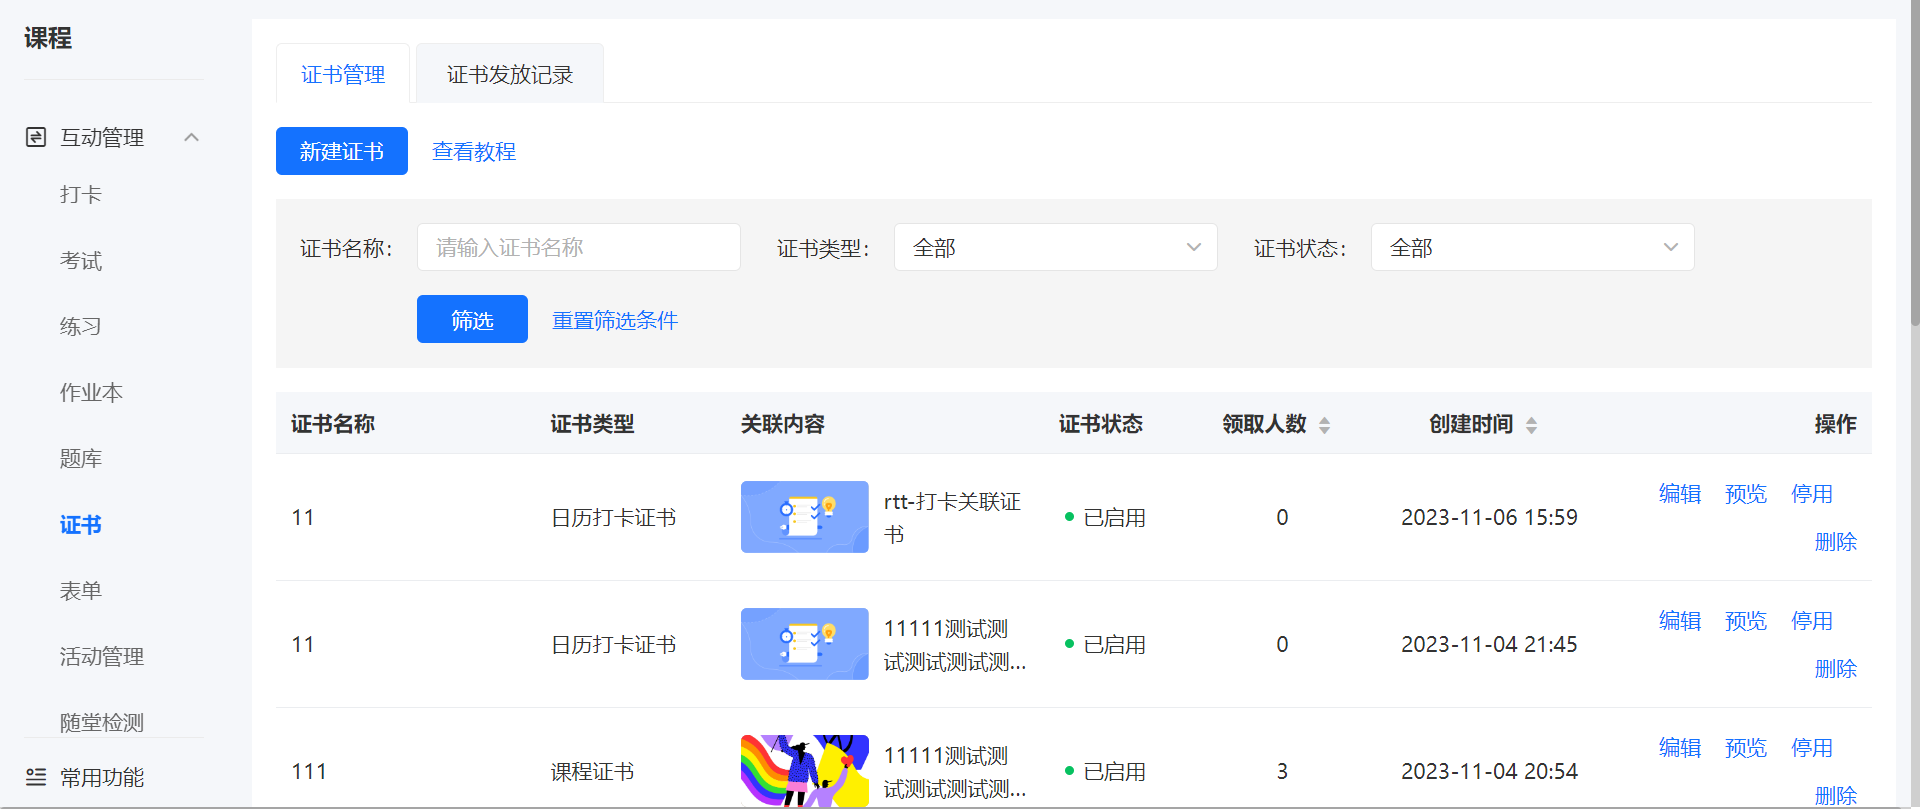
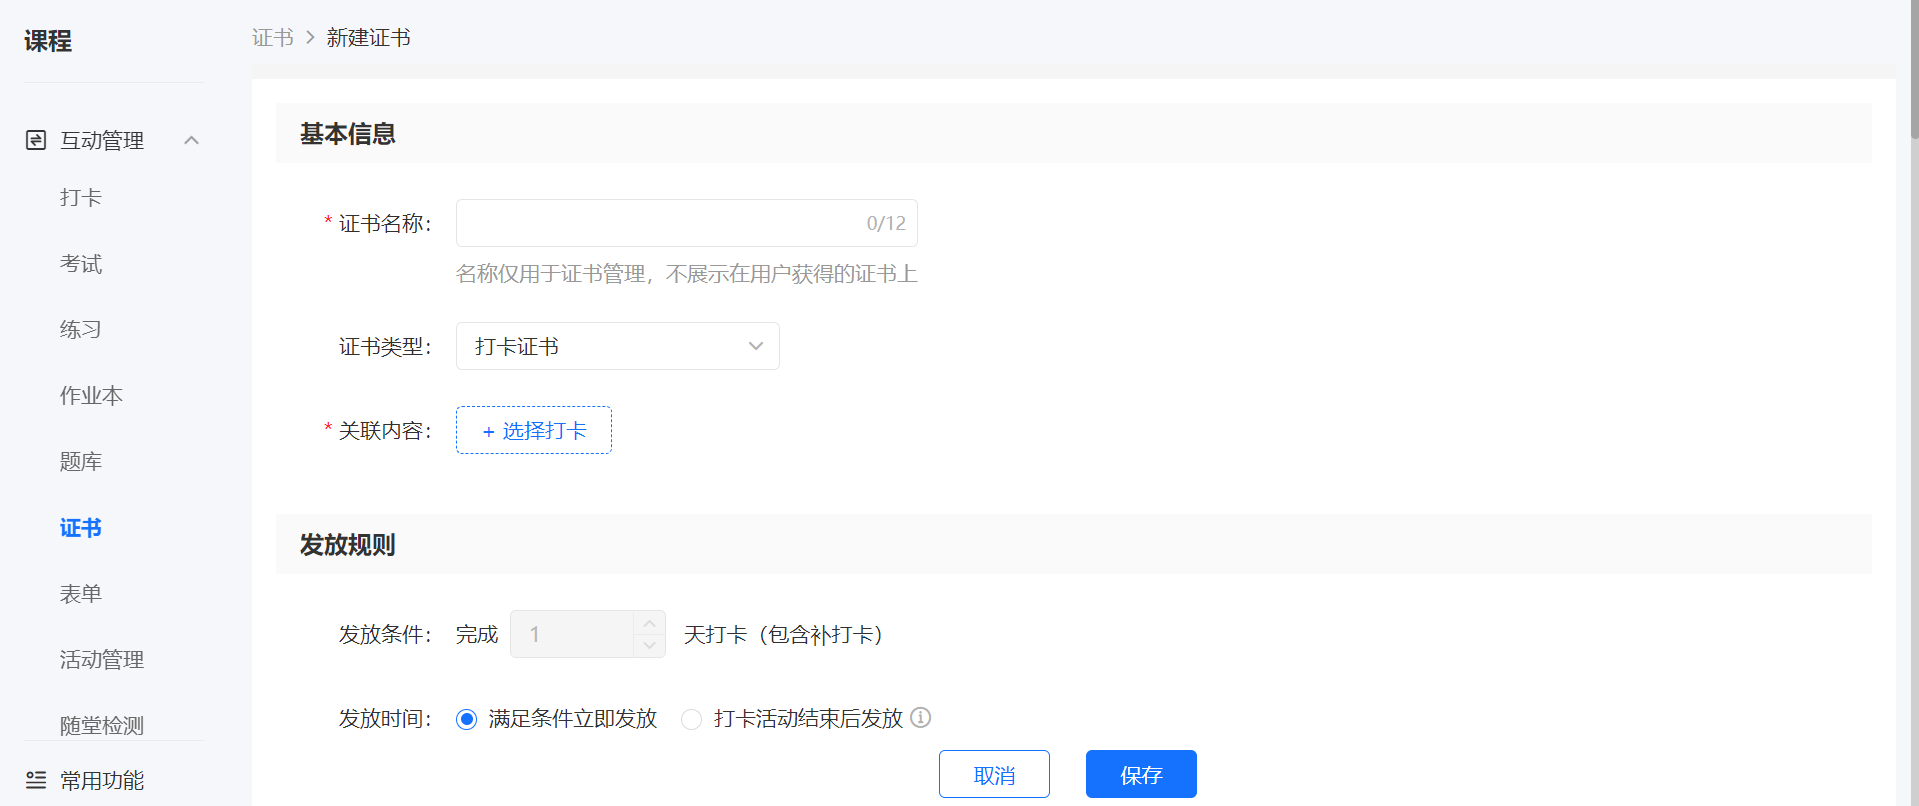
Method 2: Click [Courses] in the left sidebar, select [Certificates] under [Interactive Management], enter the certificate management list, click [Create New Certificate], enter the new check - in creation page, and select the check - in type and associated content.
Step 2: Set certificate information (Management backend)
Certificate issuance condition settings: You can set the number of check - ins required to obtain a completion certificate.
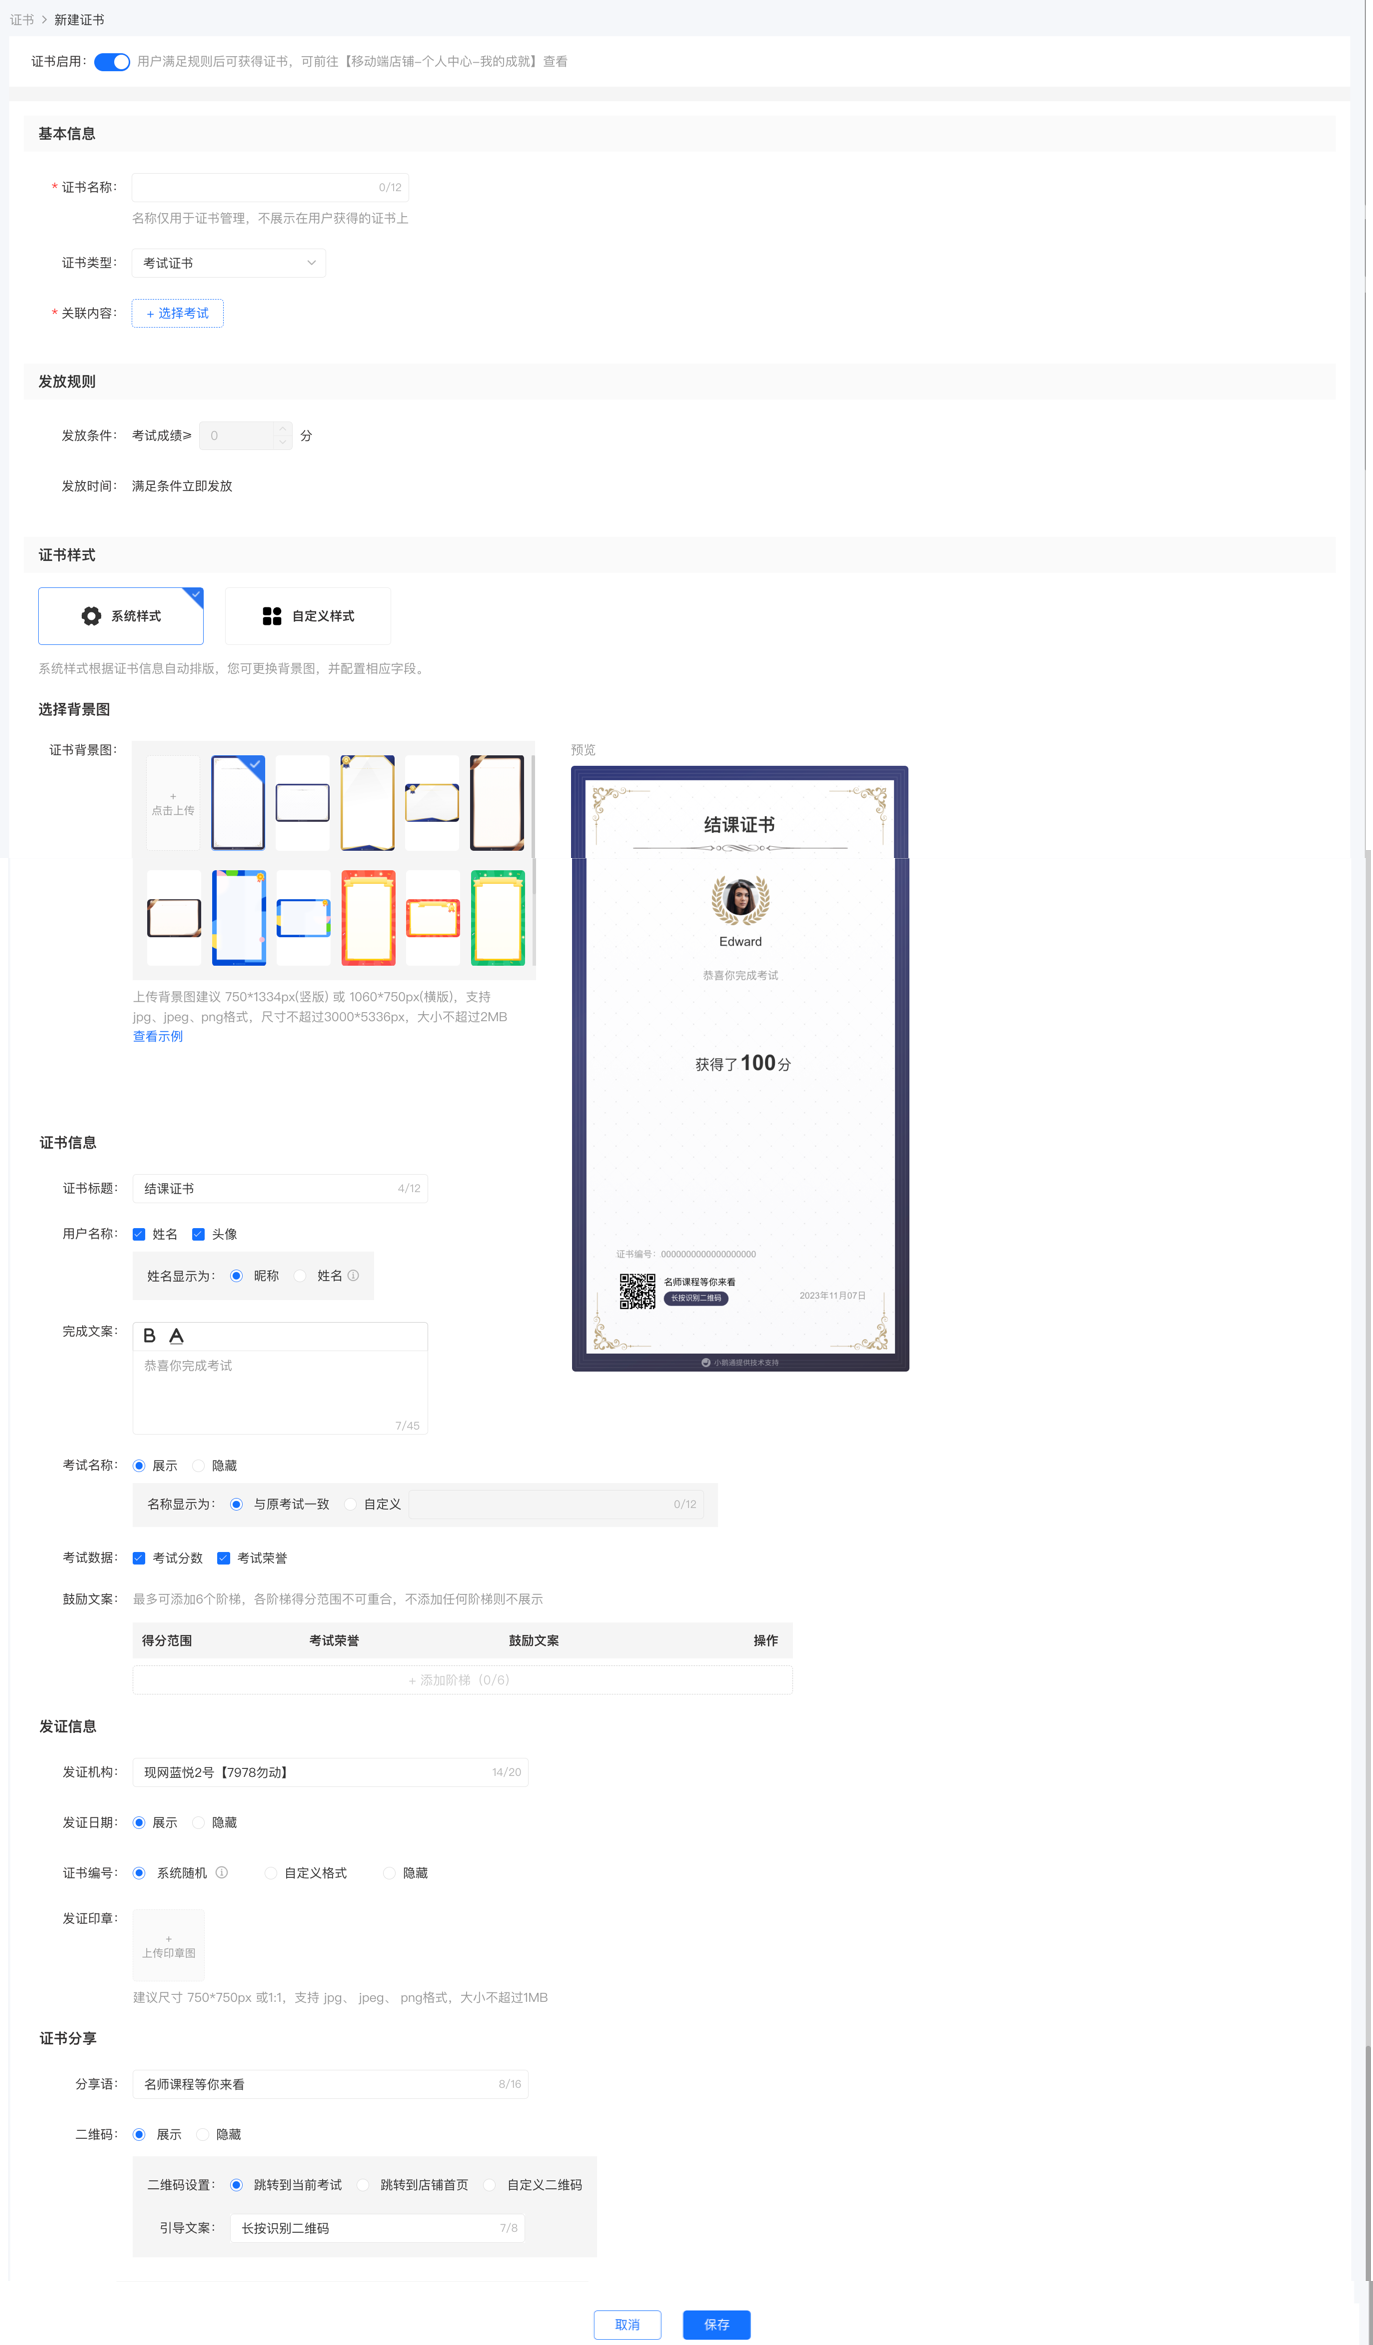
Certificate style settings: There are two modes to choose from. One is [Use fixed - style completion certificate], which supports configuration. The other is [Upload completion certificate], which supports uploading your existing certificate images.
Next, the configuration of [Use fixed - style completion certificate] is introduced:
a. The certificate name can be modified.
b. Multiple display data items can be selected or none at all.
c. Up to 2 encouragement messages can be added.
d. The institution name defaults to the store name and can be modified.
e. You can set a QR code for a specified course or upload your own QR code.
f. You can choose a background image provided by the system or upload your own background image.
Step 3: Issue check - in certificates (Learner side)
1. Learners who meet the issuance conditions will see the following completion certificate pop - up after check - in.
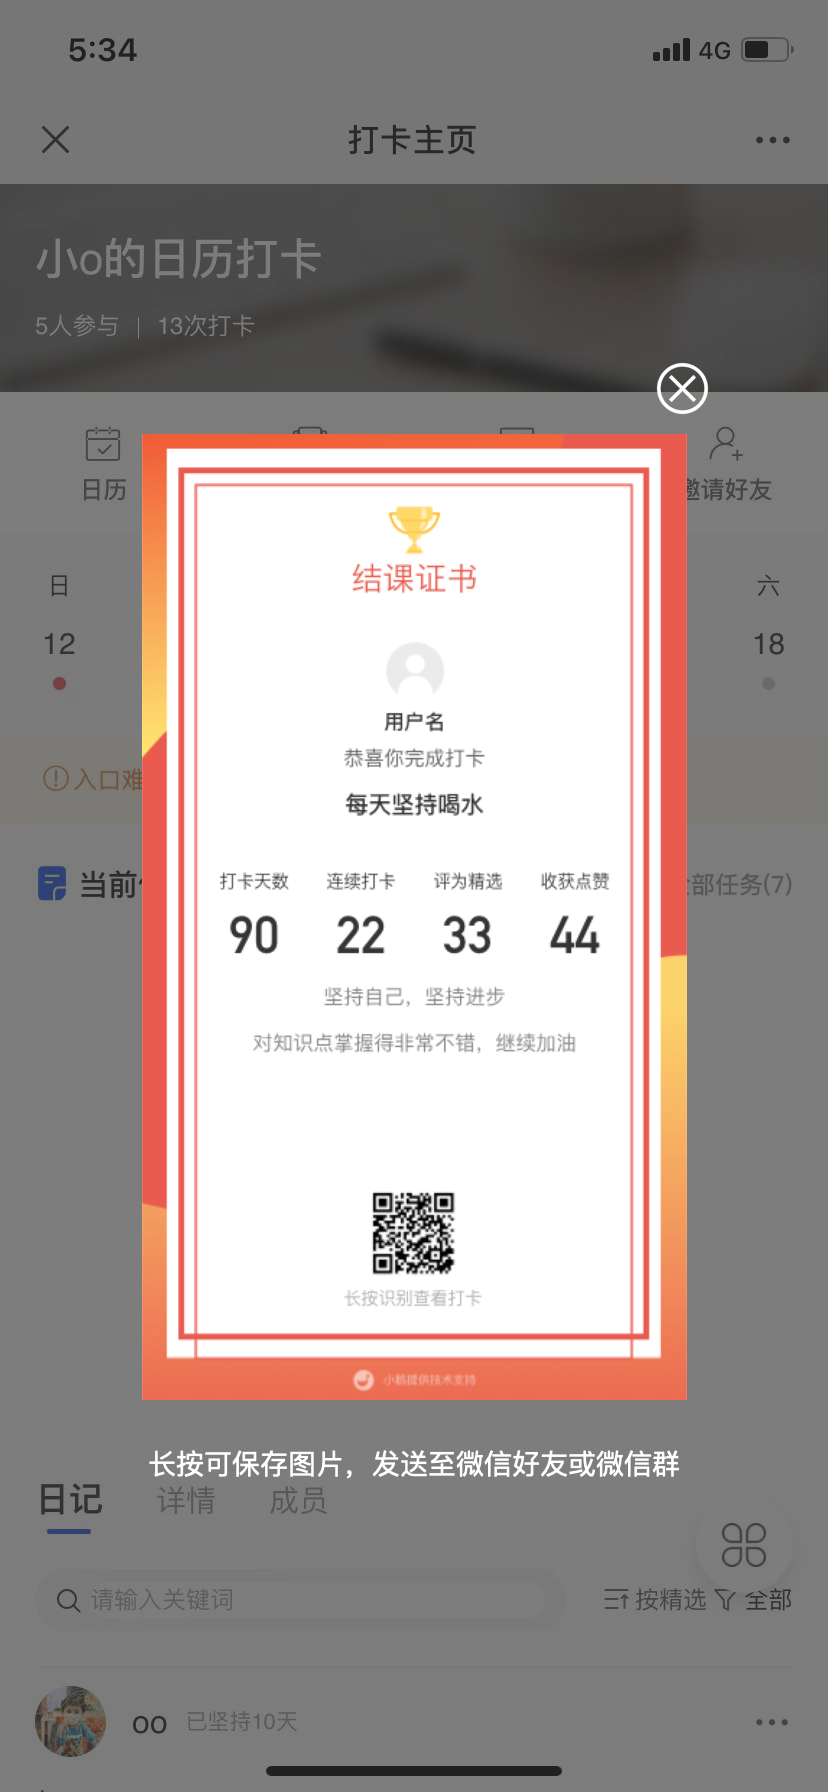
2. If you set the completion certificate after the check - in has been going on for some time or after it ends, the system will re - issue the certificates to learners who meet the requirements. Learners can view the certificates in [My - My Achievements].

Common Issues with Check-ins
1. Can I set a payment requirement for check-ins?
Yes, merchants can choose the participation condition as a paid form when creating a check-in activity.
2. Can a check-in activity be associated with a course?
Yes, one check-in activity supports associating with one course. Currently, the supported course types for check-ins are:图文, audio, video, live streaming, columns, memberships, major columns, and class courses.
In [Set Check-in Information] - [Participation Conditions], select [Require Course Purchase to Participate] and then choose the corresponding course.
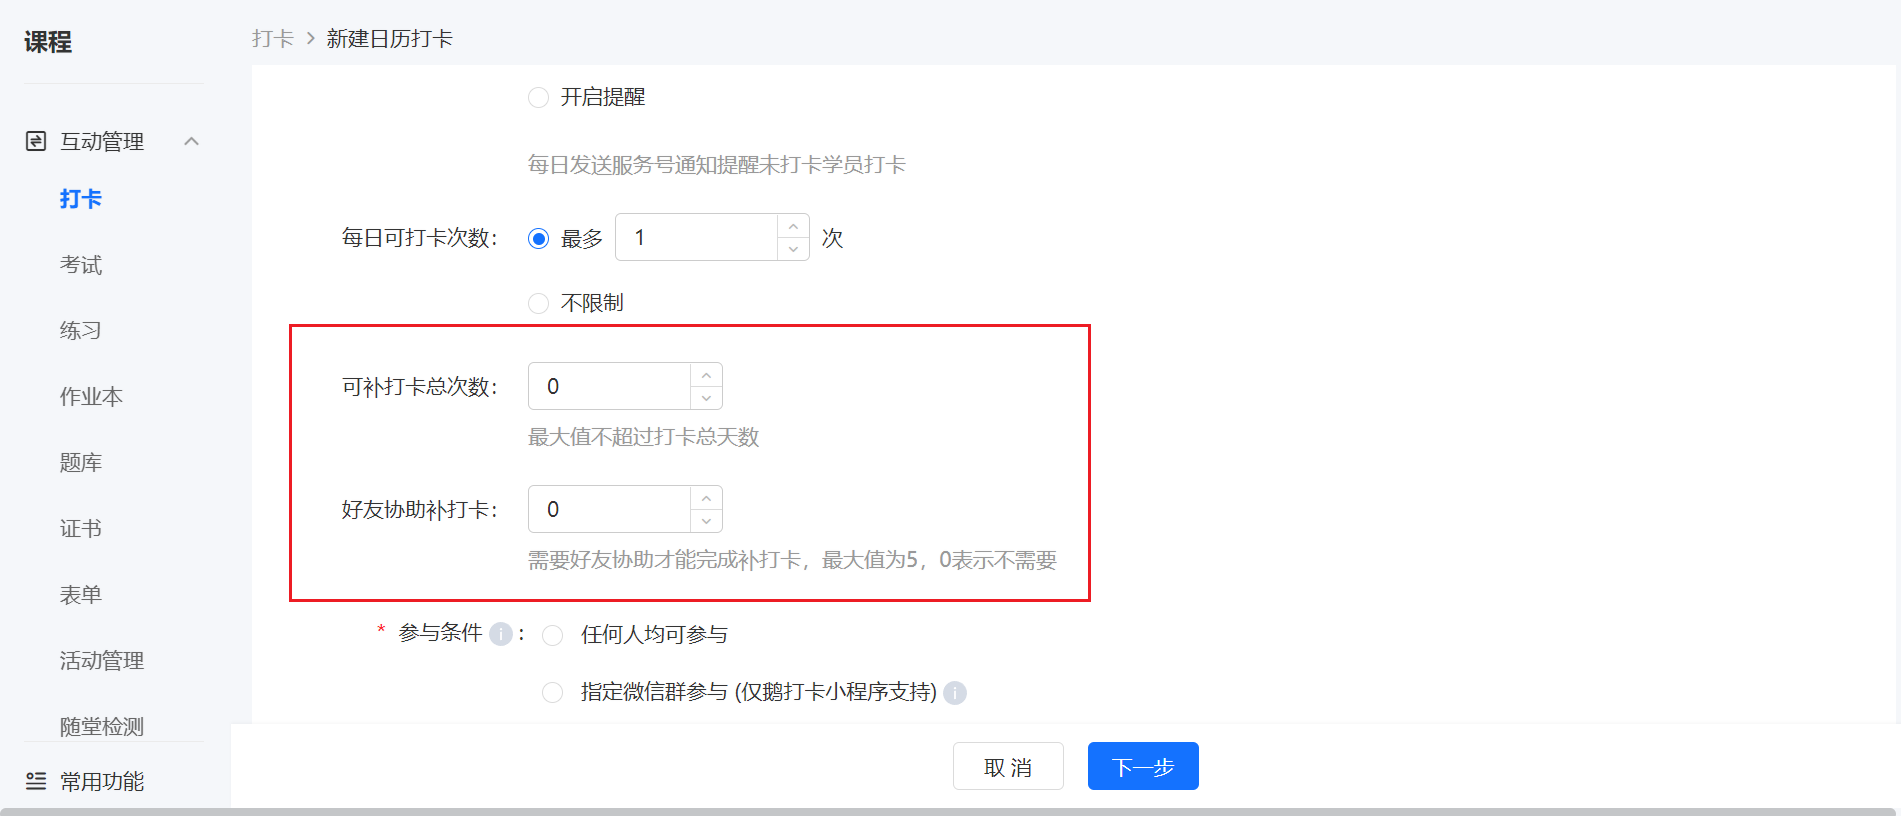
3. How to set up make-up check-ins?
For calendar check-ins and assignment check-ins, you can set the number of make-up check-ins for students on theorpage.
The default number of make-up check-ins is 0, which means make-up check-ins are not allowed.
For calendar check-ins, the maximum number of make-up check-ins cannot exceed the number of check-in days.
For calendar check-ins, students are not allowed to make up check-ins after the check-in period ends.
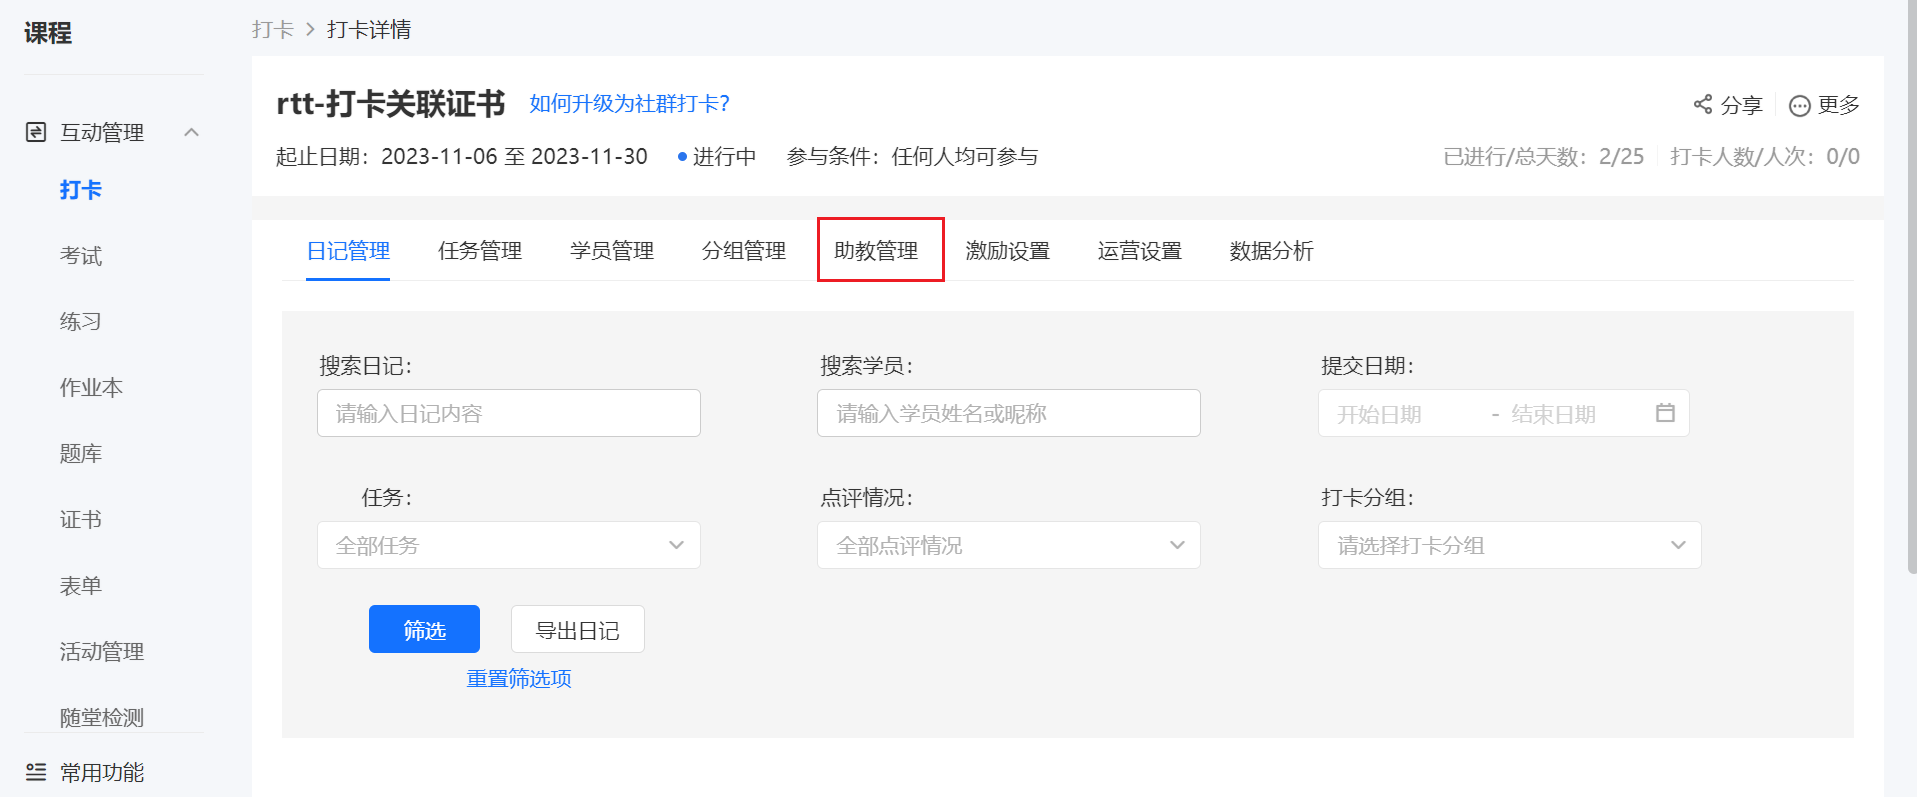
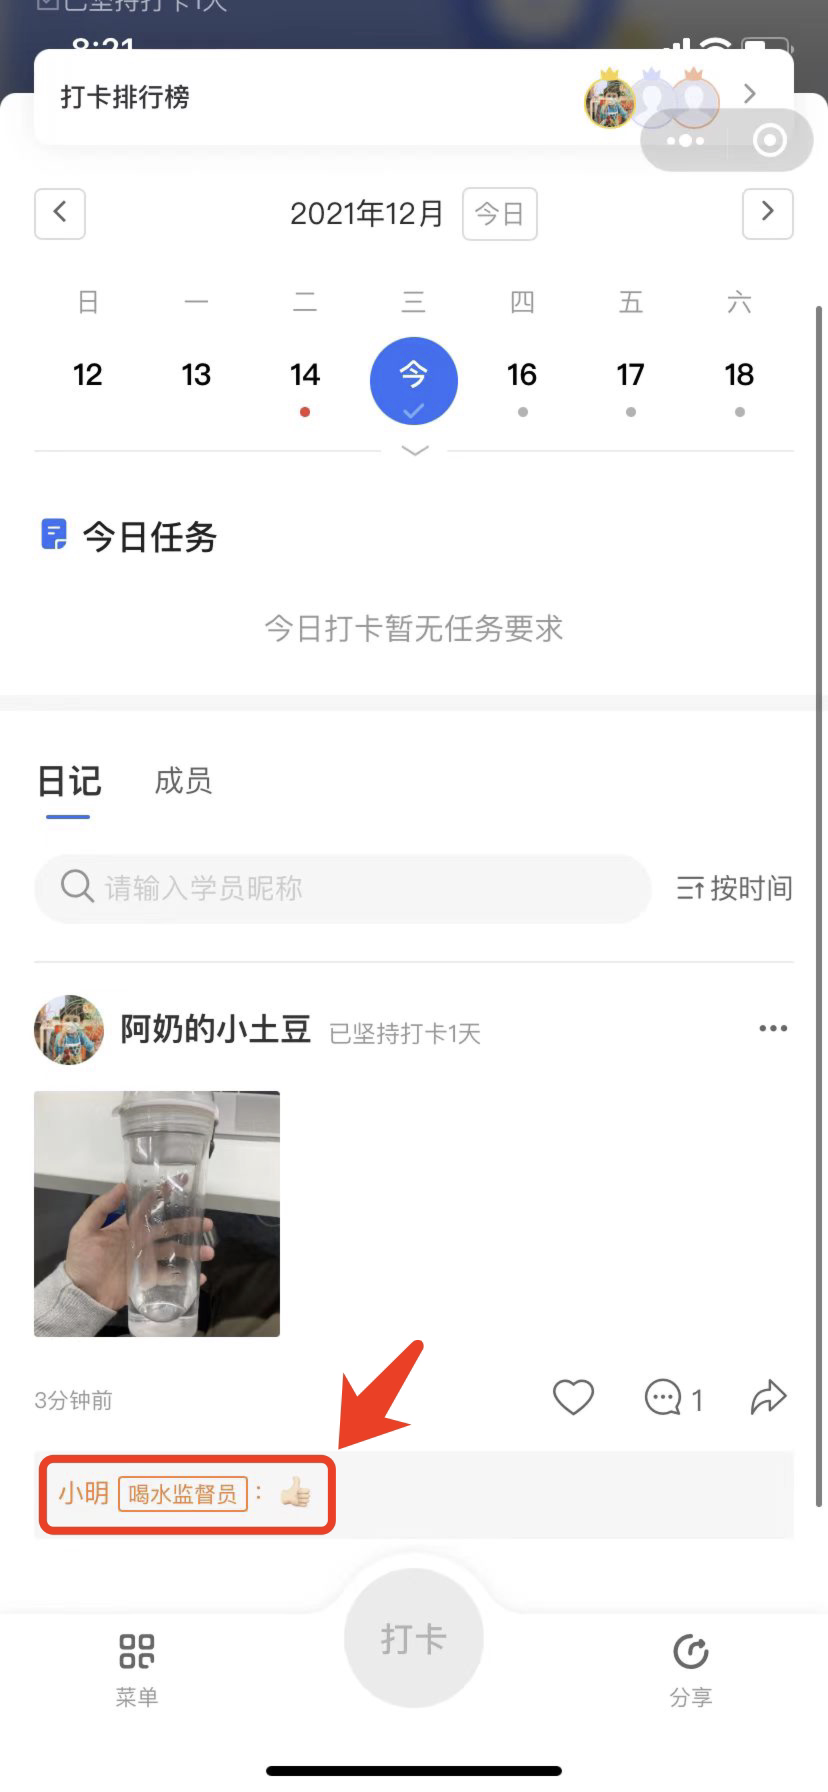
4. How to add teaching assistants?
In an existing check-in activity, click [Details] - [Teaching Assistant Management] to add teaching assistants. Teaching assistants can comment on, delete, select as featured, and pin students' check-in content.
5. How to set up certificates?
There are three ways to configure check-in certificates:
1. Associate an existing check-in activity on the certificate function page.
2. Configure a certificate for an existing check-in activity on the--page.
6. Can I change the participation conditions of a check-in activity?
The participation conditions cannot be changed after a check-in activity is successfully created, but you can change the associated course and modify the registration fee for paid participation.
7. Can I enable the anti-cheating mode after the activity starts?
Yes, for assignment check-ins and level-based check-ins, you can enable the anti-cheating mode on the edit check-in page. After enabling, students need to complete their check-ins before they can view other students' check-in content.
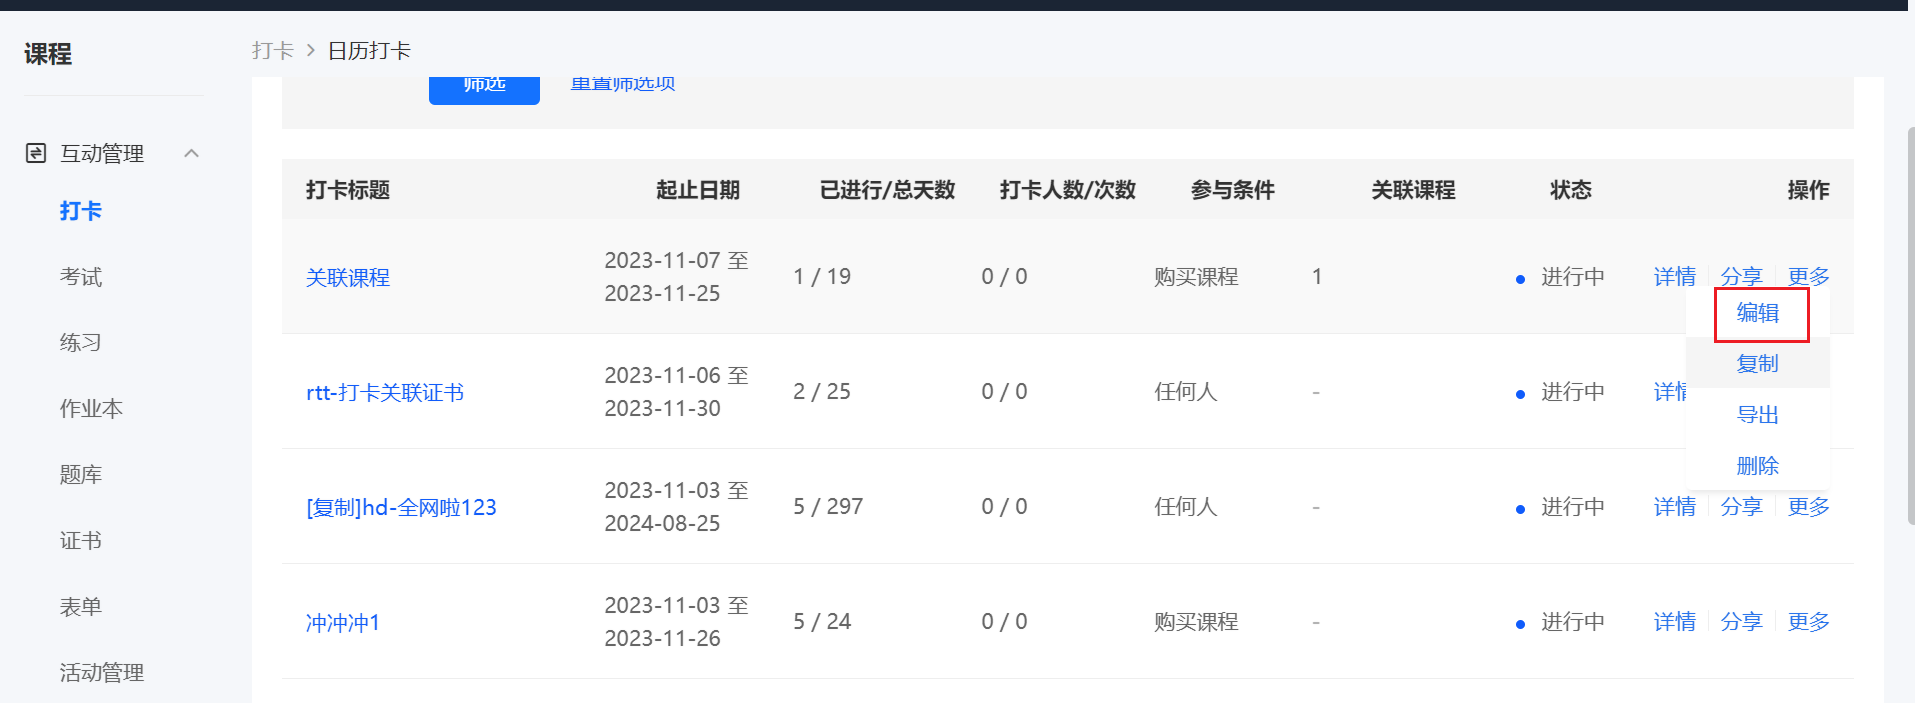
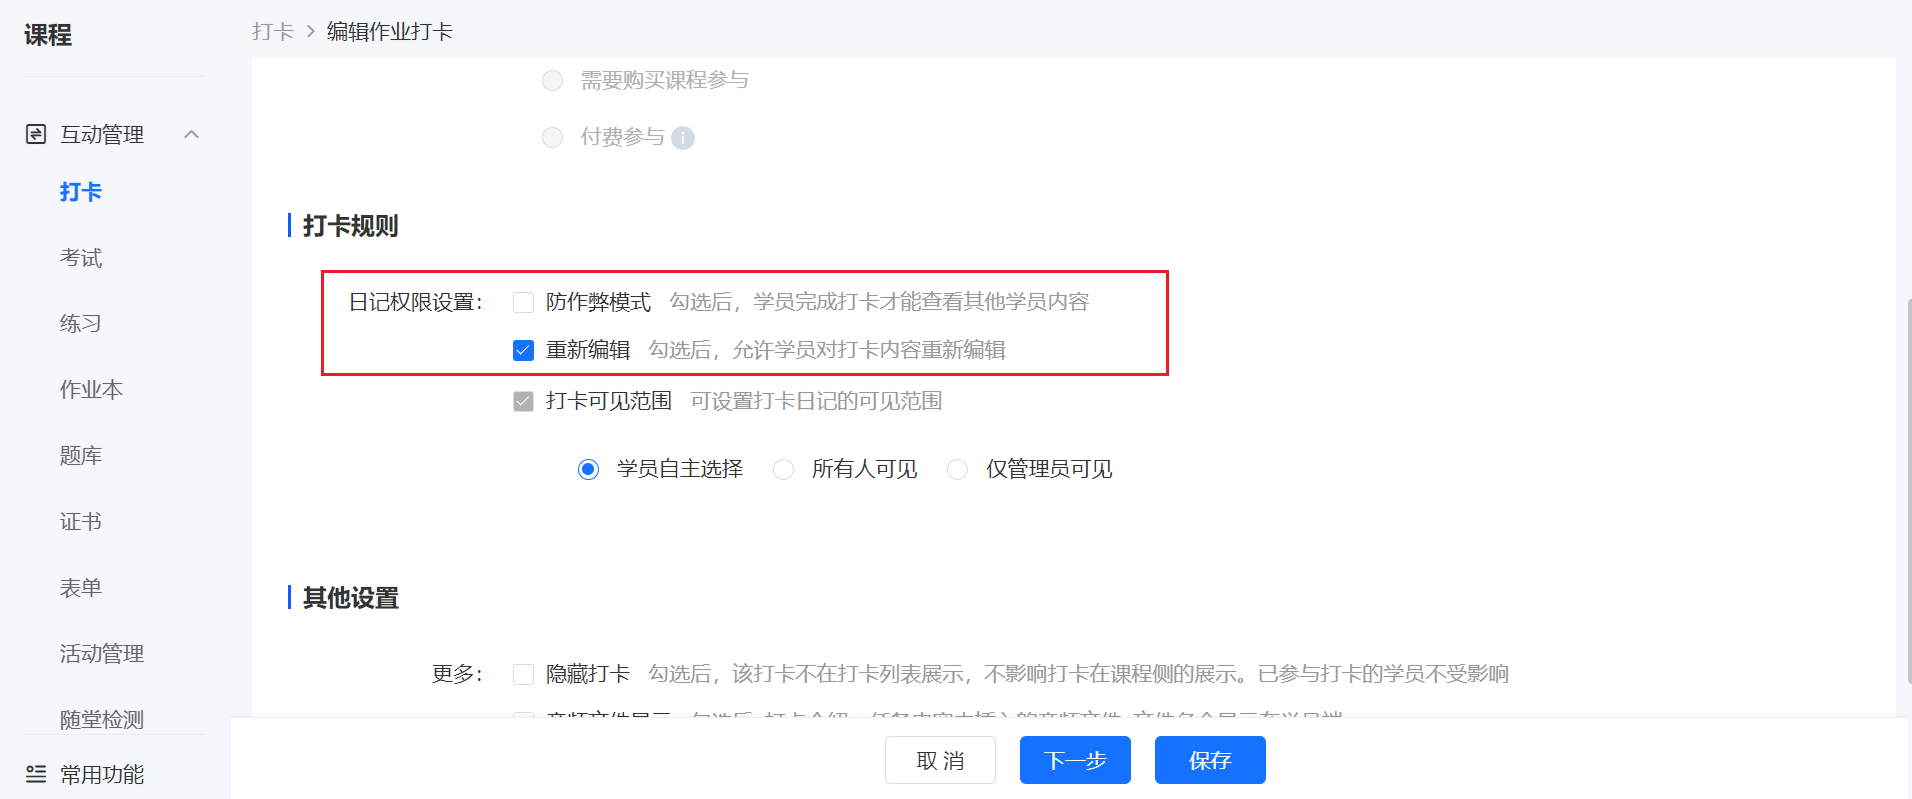
8. Can I modify the check-in requirements after the activity starts?
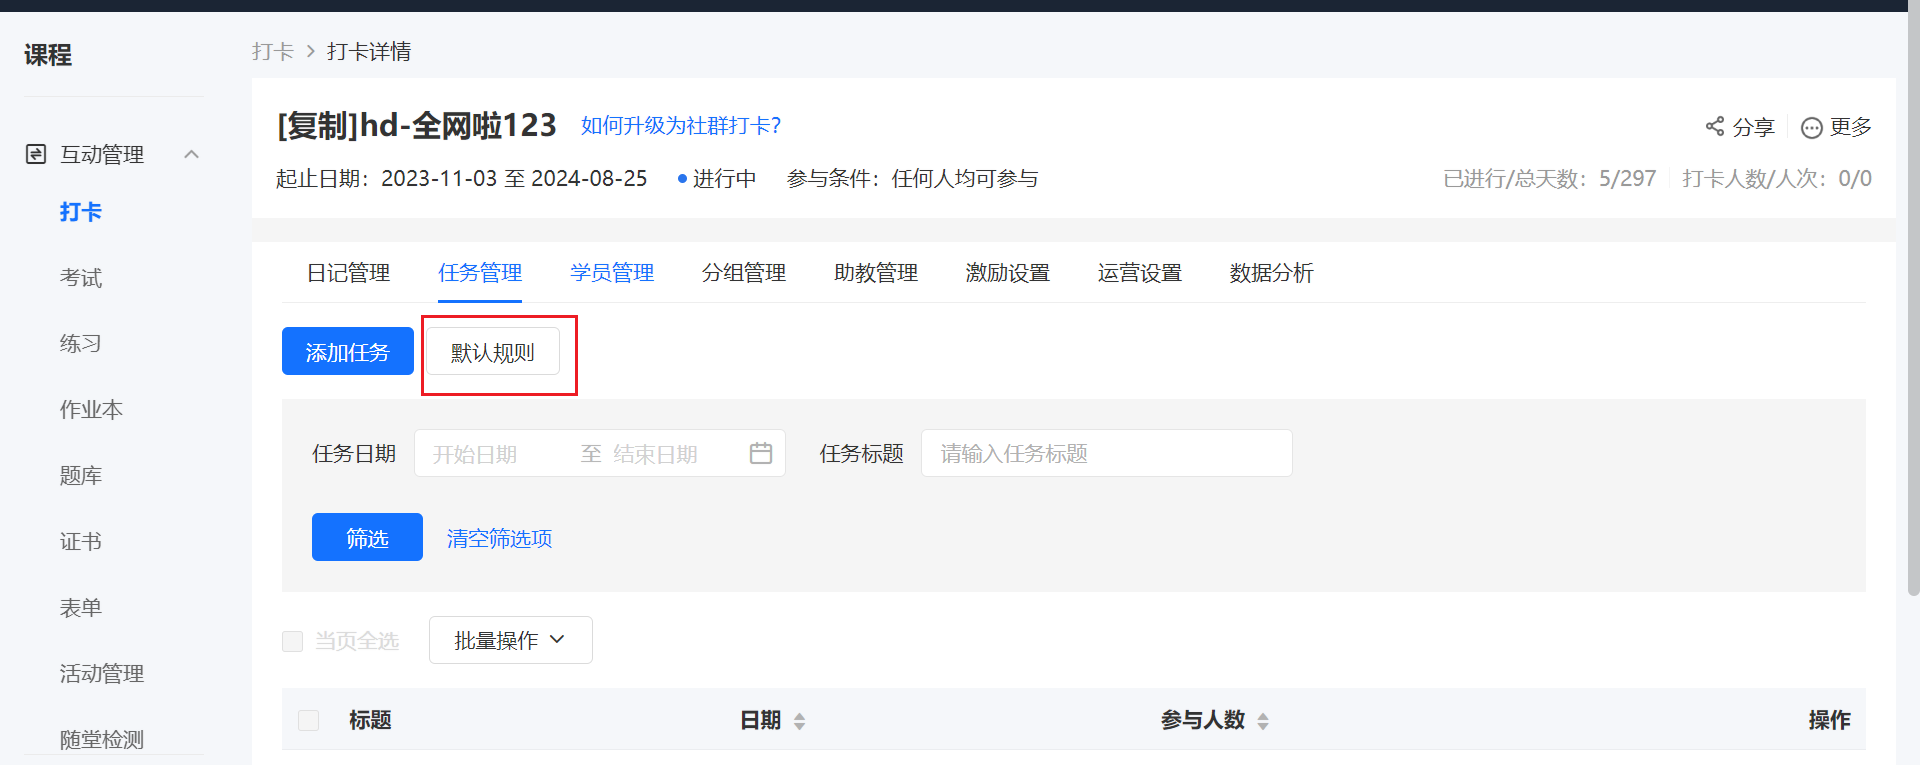
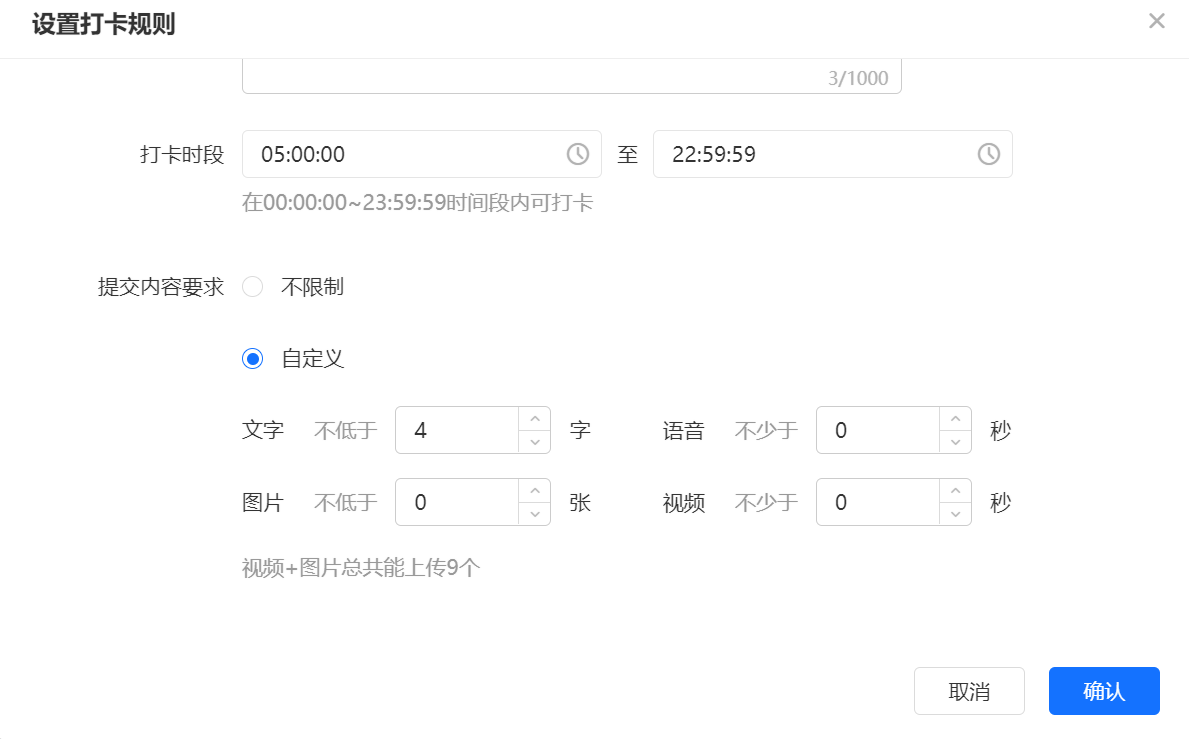
Yes, you can modify the requirements in [Default Rules] on the——>page. After the modification, students who have already checked in will not be affected, and students who have not checked in need to meet the latest check-in requirements to check in successfully.
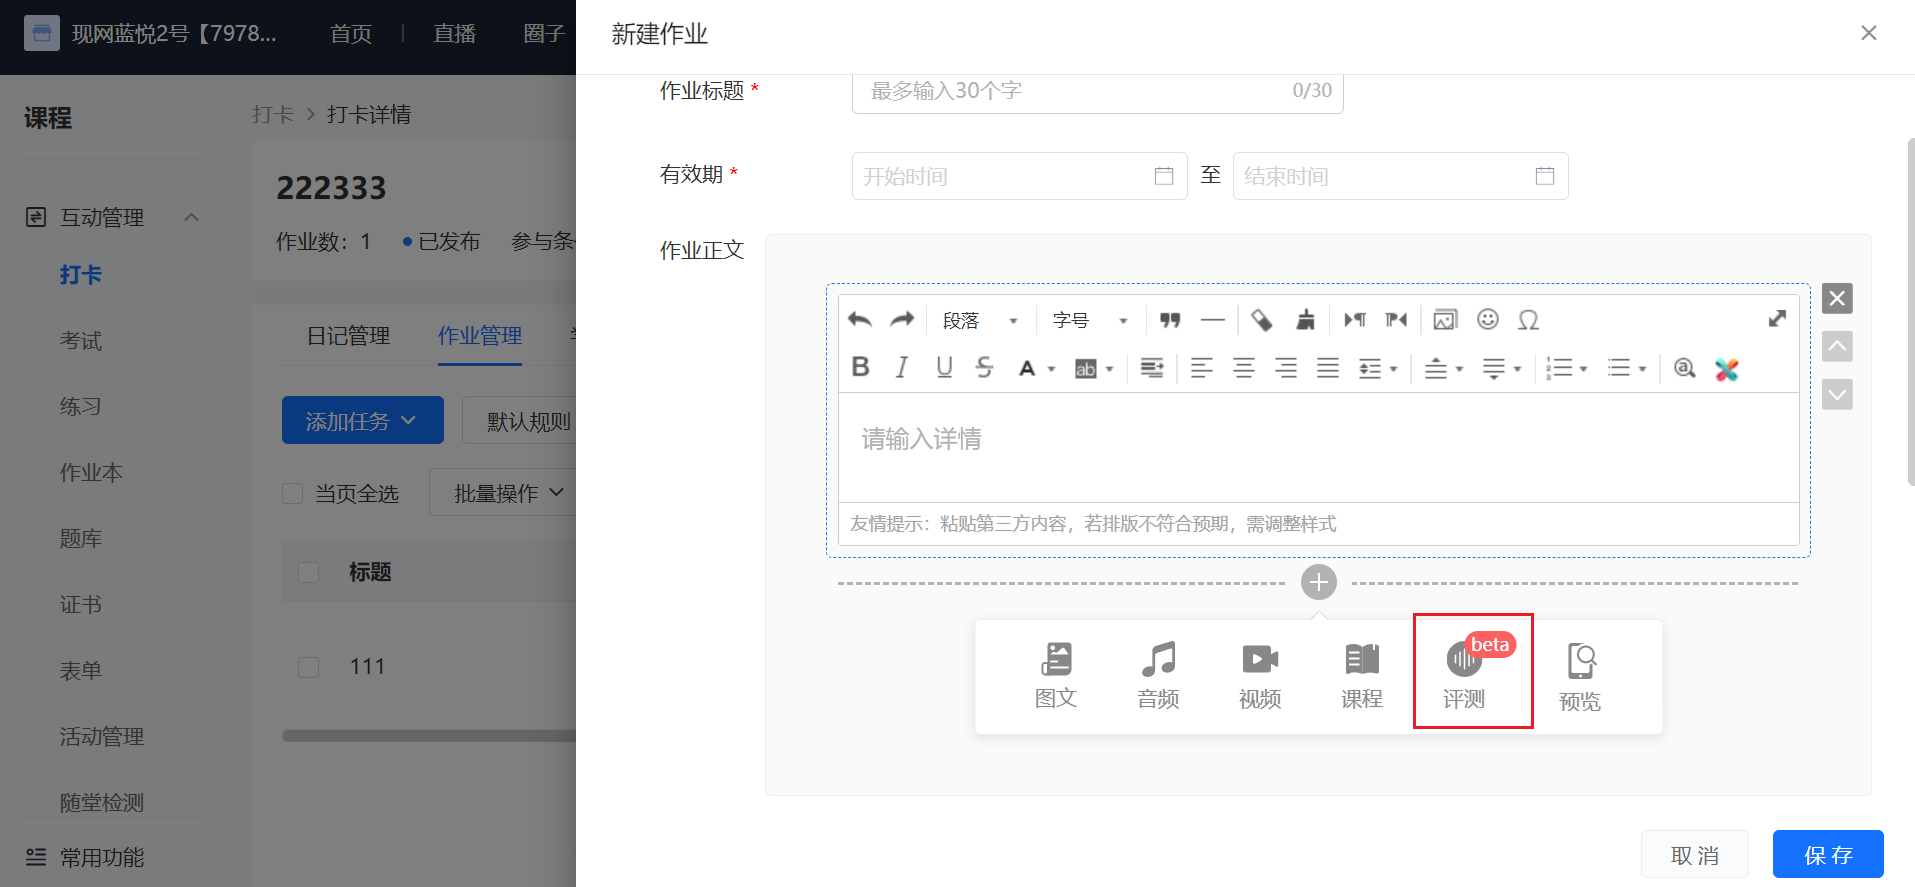
9. How to add AI voice assessment?
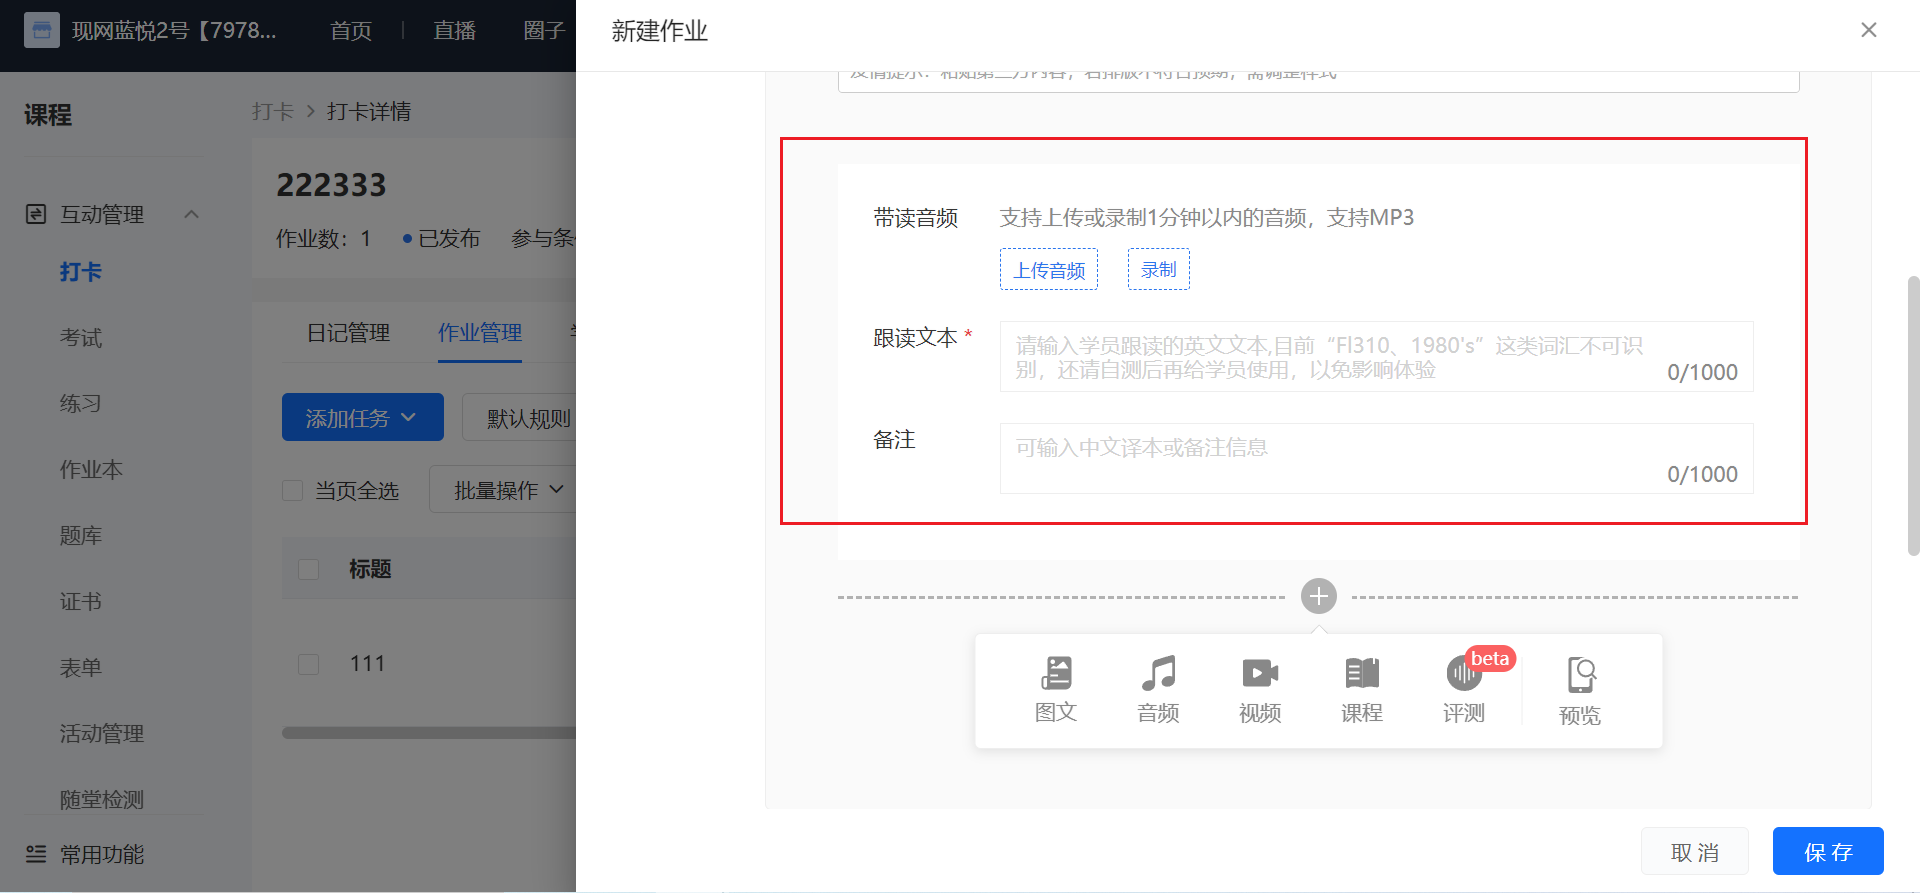
Merchants can add an assessment module when creating an assignment check-in - adding an assignment. When students post their diaries, they can listen to the model reading audio, view the text for imitation, and then record their own imitation voice. After recording, they can see the score. After submitting the diary, they can view the words that need improvement and those with excellent pronunciation. You can set the following content according to requirements:
1. Model reading audio: You can choose to upload or record the model reading audio.
2. Imitation text (required): Only English characters and English punctuation marks are allowed.
Note: You can enter Chinese translations or other note information.
10. What kind of content can students upload for check-ins?
Currently, students can upload text, recordings, mobile phone pictures, mobile phone videos, courses, and WeChat files for check-ins. Courses include图文, audio, video, live streaming, memberships, columns, major columns, and class courses. The specific quantity and size limits are as follows:

11. What are the differences between calendar check-ins, assignment check-ins, and level-based check-ins?
Calendar check-ins are based on a 'day' unit. Students need to submit check-in content within the valid period every day. It is suitable for scenarios of habit formation, such as morning run check-ins and early sleep check-ins.
Assignment check-ins are based on an 'assignment' unit. Students need to complete the assignment within the limited time. It is suitable for teaching assessment scenarios.
Level-based check-ins are based on a 'level' unit. Students need to finish the current class and complete the check-in to unlock the next class. Students can arrange their check-in time freely. It is suitable for scenarios where the check-in time is not fixed.
12. What will happen after a student is added to the blacklist?
After a student is blacklisted, the user will not be able to access all check-in activities in the store, and all of the user's check-in diaries will be hidden from other users. However, you can remove the user from the blacklist at any time.
13. Can I modify a check-in activity after it is created?
The following explains the three check-in modes of calendar check-ins, assignment check-ins, and level-based check-ins respectively:
1. For calendar check-ins, after the check-in starts, all settings except the check-in start date and participation conditions can be modified.
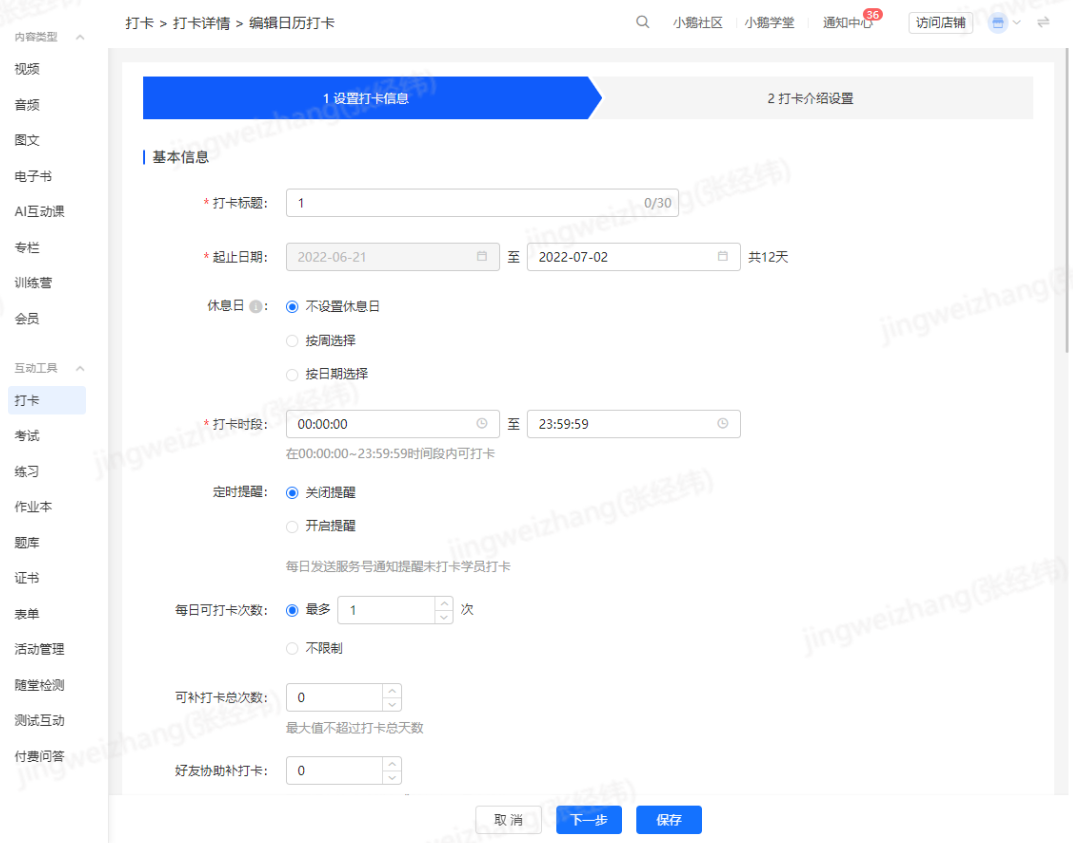
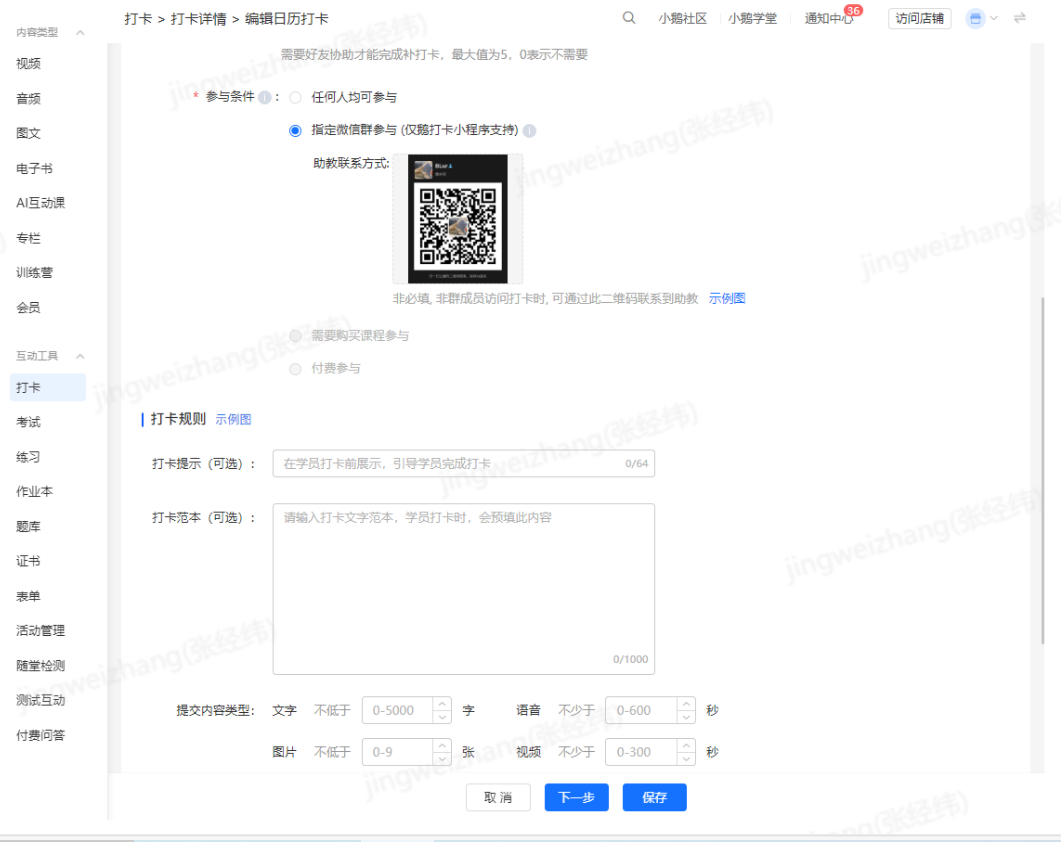
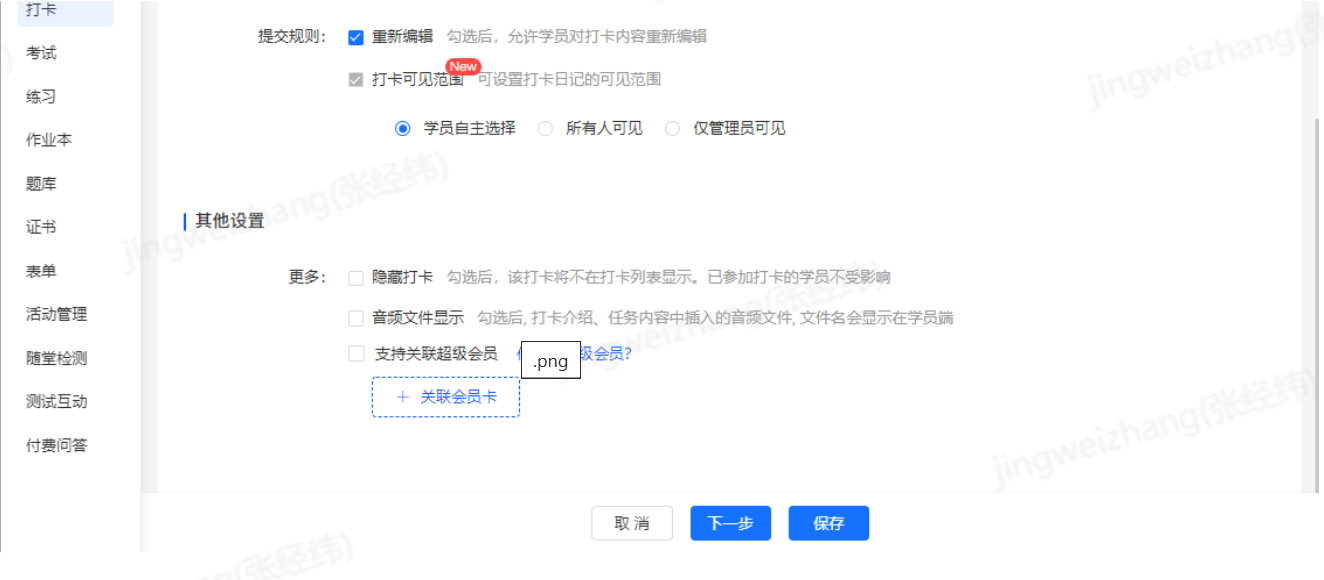
2. For assignment check-ins, all settings except the participation conditions can be modified.
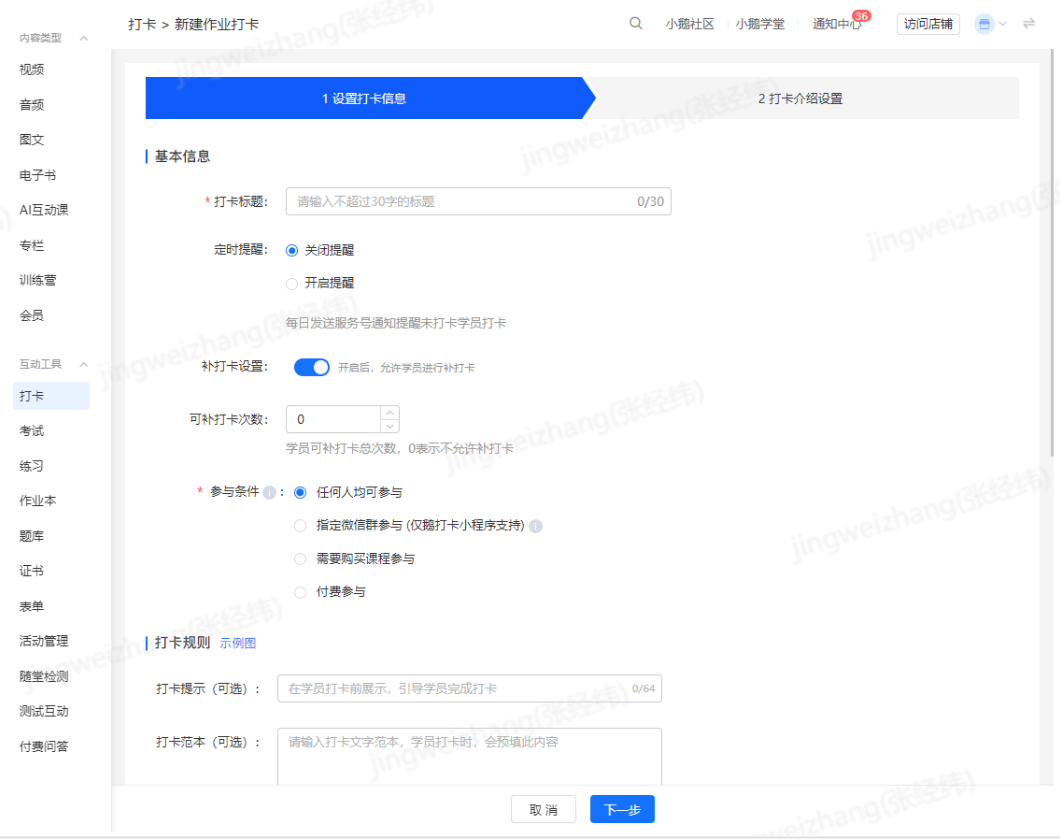
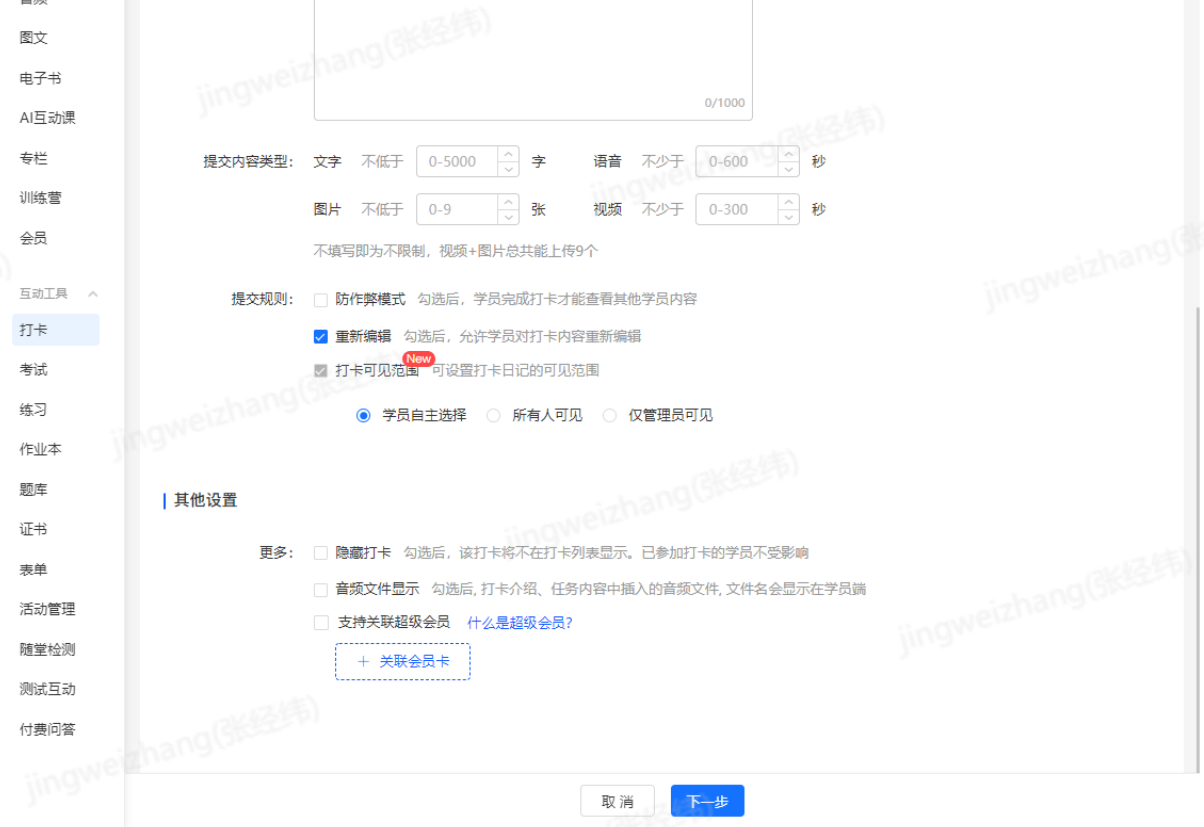
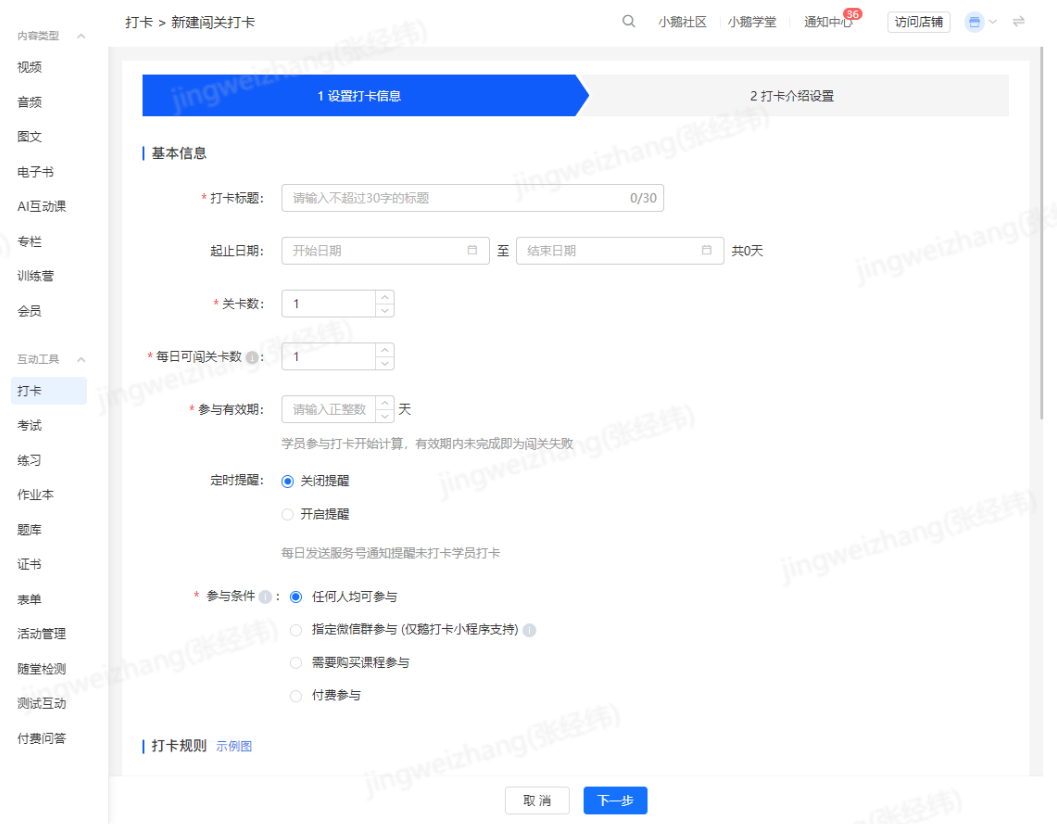
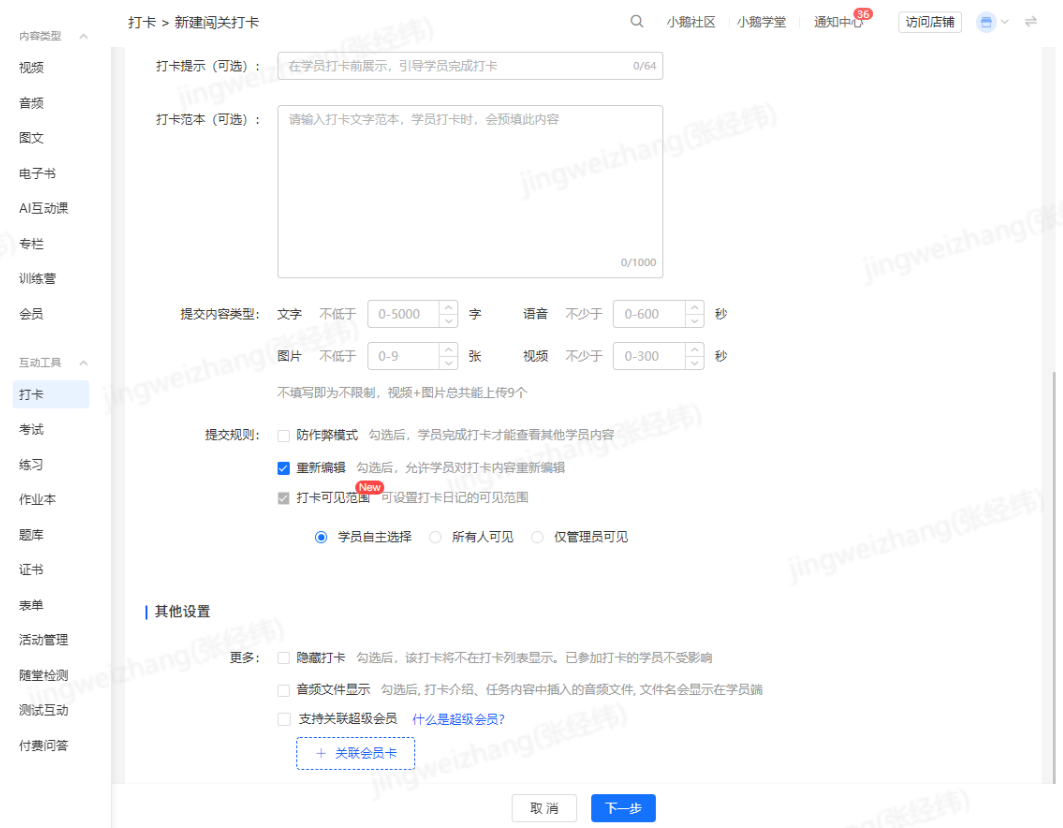
3. For level-based check-ins, all settings except the start time can be modified. Note that the validity period for students' participation can only be extended, not shortened.
Tutorial on Setting Up Punch-in Message Push
I. Function Introduction
The message push function for punch - in activities wakes up and re - activates students who have participated in punch - in activities by sending WeChat reminder messages, promoting continuous punch - ins and making punch - in activities an effective form of continuous interaction.
II. Overview
1. Merchants with authorized service accounts/Mini Programs or those who have enabled elink's message forwarding service can enable punch - in reminders when creating punch - in activities.
2. After merchants enable punch - in reminders, to avoid disturbing users, users need to actively subscribe to message notifications on the punch - in homepage to receive punch - in message pushes.
3. After users actively subscribe to message notifications, they can also actively turn off the subscription notifications.
4. If merchants do not enable punch - in reminders when creating punch - in activities, there will be no subscription entry for punch - in messages on the punch - in homepage.
III. Message Push Recipients
The recipients of message pushes are users who have participated in punch - in activities and actively subscribed to punch - in reminders.
IV. Message Push Scenarios
The pushed message notifications include reminders for students to punch in and reminders for interactive content with students.
Whether to remind students to punch in can be set through the punch - in reminder switch when creating punch - in activities.
(I) Remind Students to Punch In
1. Punch - in types that support message pushes: Calendar punch - in, Assignment punch - in, Challenge punch - in
2. Push frequency: Calendar punch - in and Challenge punch - in will send reminders daily.
3. Push time:
Calendar punch - in and Challenge punch - in support setting specific time points for pushing messages.
The message push time rules for Assignment punch - in vary according to the assignment creation time. See the table below for details.
(II) Interactive Scenario Reminders
1. Users will receive message reminders when their punch - in diaries receive comments.
2. Users will receive message reminders when their punch - in diaries receive evaluations.
V. Message Push Types
The message push notification types are divided into two categories: Service account template messages and Mini Program template messages.
(I) Sending Methods
1. If merchants authorize their service accounts to the elink platform, they can send message notifications through their service accounts. View the service account authorization guide.
2. If merchants authorize their Mini Programs to the elink platform, they can send Mini Program template messages. View the Mini Program authorization guide.
3. If merchants authorize both service accounts and Mini Programs to the elink platform, message notifications will be sent through both channels.
4. If merchants have not authorized service accounts or Mini Programs but have enabled elink's message forwarding service, message notifications will be sent through the elink Knowledge Assistant.
(II) Differences between Service Account Template Messages and Mini Program Template Messages
1. Service account template messages: Template messages are pushed using the WeChat official accounts that merchants have certified as service accounts or using the elink Knowledge Assistant. Send message notifications as shown in the figure below.
Note: To prevent complaints, each user can only receive the first two messages of each punch - in push per day.


Note: To prevent complaints, each user can only receive the first two messages of each punch-in push per day.
2. Mini Program template messages: Mini Program template messages are sent through the unified WeChat entry 'Service Notifications'. The sent content is from the Mini Program template messages of various platforms and merchants, as shown in the figure below:


Note: If a user participates in a punch - in activity but has not interacted with the store for 7 days, messages cannot be pushed to the user.
VI. How C - end Users Can Receive Service Account Notifications
1. How can users receive template messages?
If merchants enable punch - in reminders when creating punch - in activities, C - end users can actively subscribe to punch - in reminders during the punch - in activity. After users actively subscribe and follow the merchant's service account/elink Knowledge Assistant, they can receive template messages for punch - in reminders.
2. If users do not follow the service account before participating in the punch - in activity, the operation interface for C - end users
(1) After C - end users enter the punch - in homepage, a pop - up window with the service account QR code will appear, guiding users to follow the service account as shown in the figure below:

(2) When users click 'Get Reminders', a QR code pop - up window will appear. Scan the code to follow as shown in the figure below:


3. After C - end users scan the QR code, they will enter the page to follow the service account. After following the service account, they will receive a customer service message replied by the service account.
(1) In the customer service message, click 'Click here to return to the punch - in activity you just signed up for >>>' to return to the punch - in homepage.
(2) Click 'Too many notifications, click to unsubscribe' to jump to the punch - in homepage and cancel the punch - in reminder notification at the same time, as shown in the figure below:

4. If users have followed the service account before participating in the punch - in activity, they can successfully subscribe by clicking 'Get Reminders' on the punch - in homepage.
(1) After successful subscription, the punch - in reminder button changes to 'Turn off Reminders'. Click the button to cancel the subscription notification.
(2) After users successfully subscribe, they can receive the subscribed punch - in notifications when the punch - in reminder time arrives, as shown in the figure below:


VII. Message Push Rules for Store Punch - in Activities

What are the impacts after trainees pause clocking in?
学员暂停打卡后,学员可以正常进入打卡但无法继续完成打卡,已打卡的内容不受影响。恢复打卡后可以正常继续打卡。
Tutorial on setting up punch-in message push
I. Function Introduction
The message push function for punch - in activities wakes up and activates trainees who have participated in punch - in by sending WeChat reminder messages, promoting continuous punch - in and making punch - in activities an effective form of continuous interaction.
II. Overview
1. Merchants who have authorized service accounts/Mini Programs or enabled elink's message proxy service can enable punch - in reminders when creating punch - in activities.
2. After merchants enable punch - in reminders, to avoid disturbing users, users need to actively subscribe to message notifications on the punch - in homepage to receive punch - in message pushes.
3. After users actively subscribe to message notifications, they can also actively turn off the subscription notifications.
4. If merchants do not enable punch - in reminders when creating punch - in activities, there will be no subscription entry for punch - in messages on the punch - in homepage.
III. Message Push Targets
The targets of message pushes are users who have participated in punch - in and actively subscribed to punch - in reminders.
IV. Message Push Scenarios
The pushed message notifications include reminders for trainees to punch in and reminders for interactive content with trainees.
Whether to remind trainees to punch in can be set through the punch - in reminder switch when creating punch - in activities.
(I) Remind Trainees to Punch In
1. Punch - in types that support message pushes: Calendar punch - in, Assignment punch - in, Challenge punch - in
2. Push frequency: Calendar punch - in and Challenge punch - in will send reminders daily.
3. Push time:
Calendar punch - in and Challenge punch - in support setting specific time points for pushes.
The message push time rules for Assignment punch - in vary according to the assignment creation time. See the table below for details.
(II) Interactive Scenario Reminders
1. Users will receive message reminders when their punch - in diaries receive comments.
2. Users will receive message reminders when their punch - in diaries receive reviews.
V. Message Push Types
There are two types of message push notifications: Service account template messages and Mini Program template messages.
(I) Sending Methods
1. Merchants who have authorized service accounts/Mini Programs to the elink platform can send message notifications through their service accounts. View the service account authorization guide.
2. Merchants who have authorized Mini Programs to the elink platform can send Mini Program template messages. View the Mini Program authorization guide.
3. If merchants have authorized both service accounts and Mini Programs to the elink platform, message notifications will be sent through both channels.
4. If merchants have not authorized service accounts or Mini Programs but have enabled elink's message proxy service, message notifications will be sent through the elink Knowledge Assistant.
(II) Differences between Service Account Template Messages and Mini Program Template Messages
1. Service account template messages: Use WeChat official accounts that have been certified as service accounts by merchants or the elink Knowledge Assistant to push template messages. Send message notifications, as shown in the figure below.
Note: To prevent complaints, each user can only receive the first two messages pushed for each punch - in activity per day.
说明:为了防止被投诉,每个用户每天只能接收到每个打卡推送的前两条消息
2. Mini Program template messages: Mini Program template messages are sent through WeChat's unified entry 'Service Notifications'. The sent content is Mini Program template messages from various platforms and merchants, as shown in the figure below:
Note: If users participate in punch - in but do not interact with the store for 7 days, messages cannot be pushed to them.
VI. How C - end Users Can Receive Service Account Notifications
1. How can users receive template messages?
If merchants enable punch - in reminders when creating punch - in activities, C - end users can actively subscribe to punch - in reminders during the punch - in activity. After users actively subscribe and follow the merchant's service account/elink Knowledge Assistant, they can receive template messages for punch - in reminders.
2. If users do not follow the service account before participating in punch - in, the operation interface for C - end users
(1) After C - end users enter the punch - in homepage, a pop - up window with the service account QR code will appear, guiding users to follow the service account, as shown in the figure below:
(2) When users click 'Get Reminders', a QR code pop - up window will appear. Scan the code to follow, as shown in the figure below:
3. After C - end users scan the QR code, they will enter the page to follow the service account. After following the service account, they will receive customer service messages replied by the service account.
(1) In the customer service message, click 'Click here to return to the punch - in activity you just signed up for >>>' to return to the punch - in homepage.
(2) Click 'Too many notifications, click to unsubscribe' to jump to the punch - in homepage and cancel the punch - in reminder notifications at the same time, as shown in the figure below:
4. If users have followed the service account before participating in punch - in, click 'Get Reminders' on the punch - in homepage to subscribe successfully.
(1) After successful subscription, the punch - in reminder button changes to 'Turn off Reminders'. Click the button to cancel the subscription notifications.
(2) After users subscribe successfully, they will receive the subscribed punch - in notifications when the punch - in reminder time arrives, as shown in the figure below:
VII. Message Push Rules for Store Punch - in
Tutorial on Using Check-in Groups
I. Feature Introduction
Check-in grouping refers to the ability of operators to manage trainees participating in check-ins in groups.
II. Purpose of Use
When there are a large number of trainees participating in check-ins, you can divide the trainees into several groups and assign a teaching assistant to each group for management, which can greatly improve management efficiency. In addition, teaching assistants can also use the filtering function to select the trainees' diaries in the groups they are responsible for to provide comments, which can improve the efficiency of comment - giving.
III. Use Scenarios
A training institution uses check - ins to launch a trainee check - in activity, but the large number of participants makes unified management difficult. By grouping the trainees and assigning a teaching assistant to each group to comment on the trainees' diaries, the management efficiency of the institution has been greatly improved.
IV. Operation Path
Merchant side: Merchant background → Courses → Interactive Management → Check - in → Check - in Details → Group Management
V. Usage Tutorial
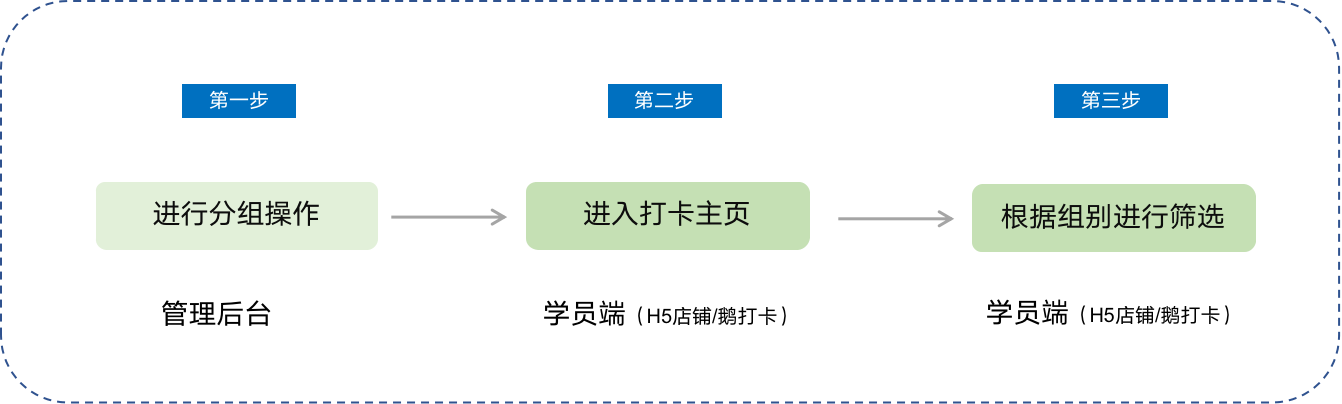
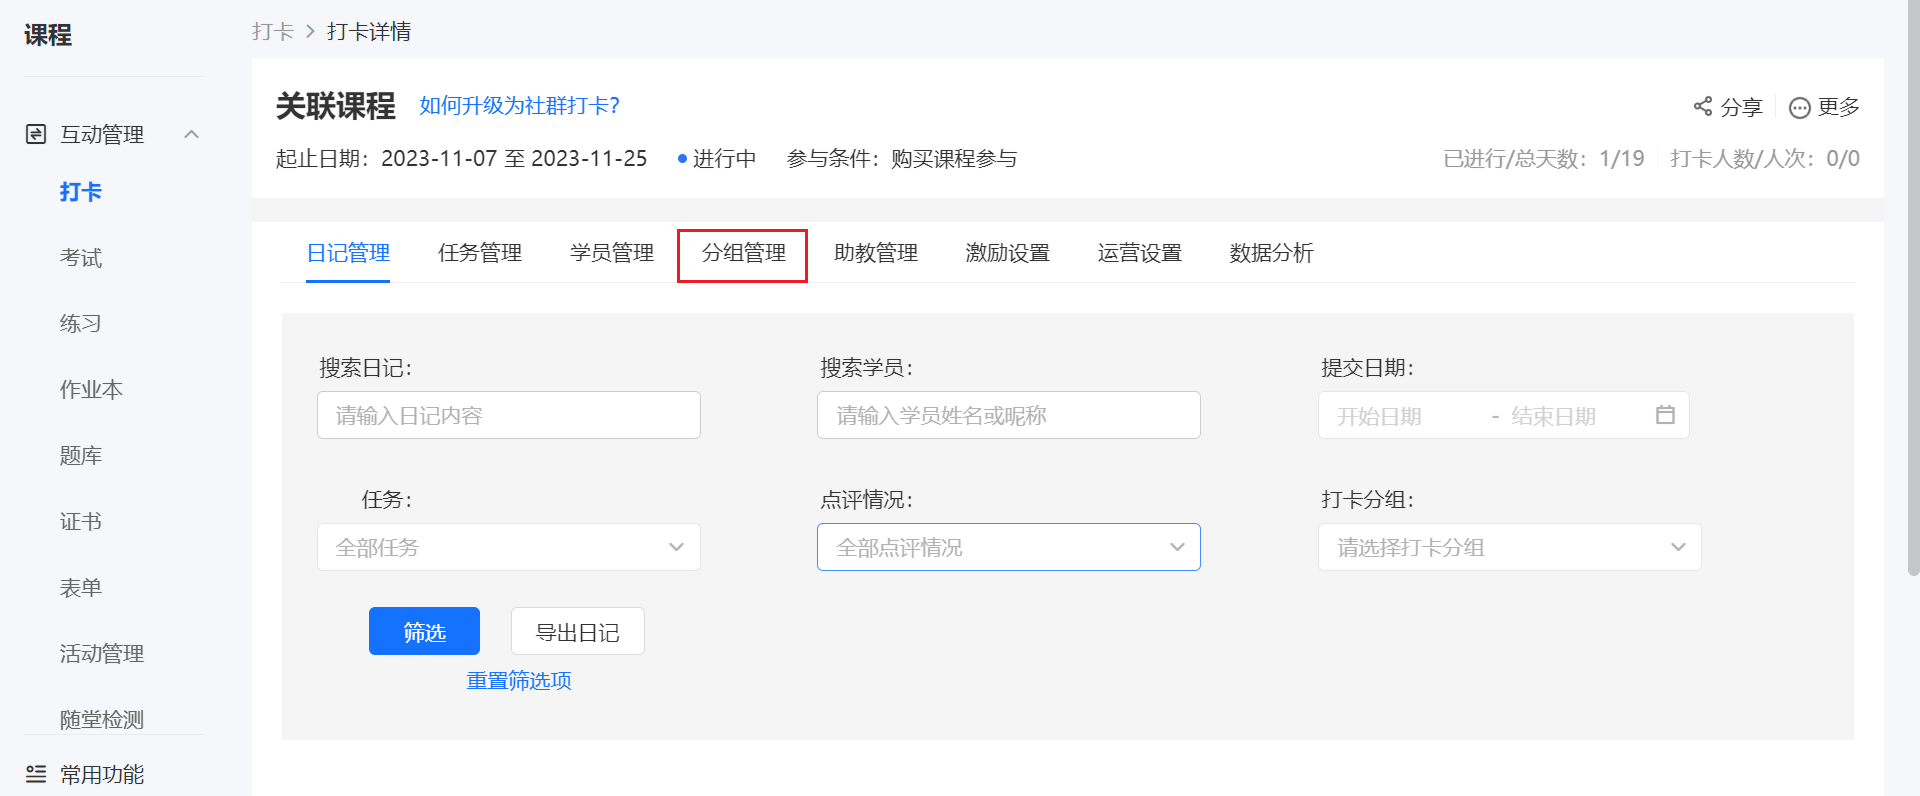
Step 1: Perform grouping operations (Management background)
1. Enter the and select [Group Management];
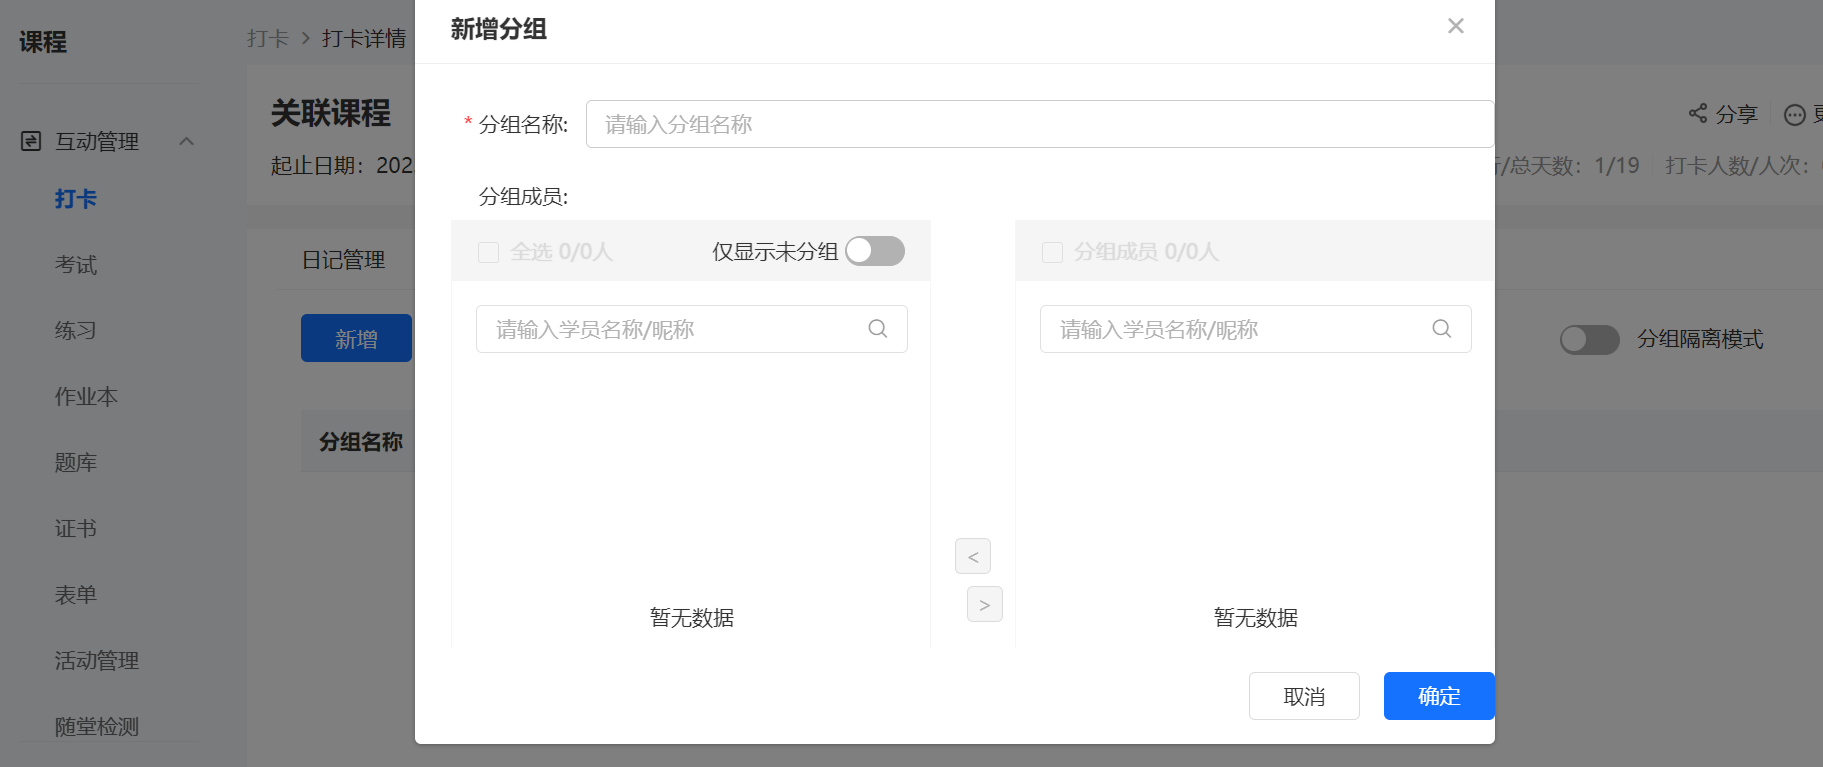
2. Click the [New Button], enter the group name, and select the corresponding trainees to join the group;
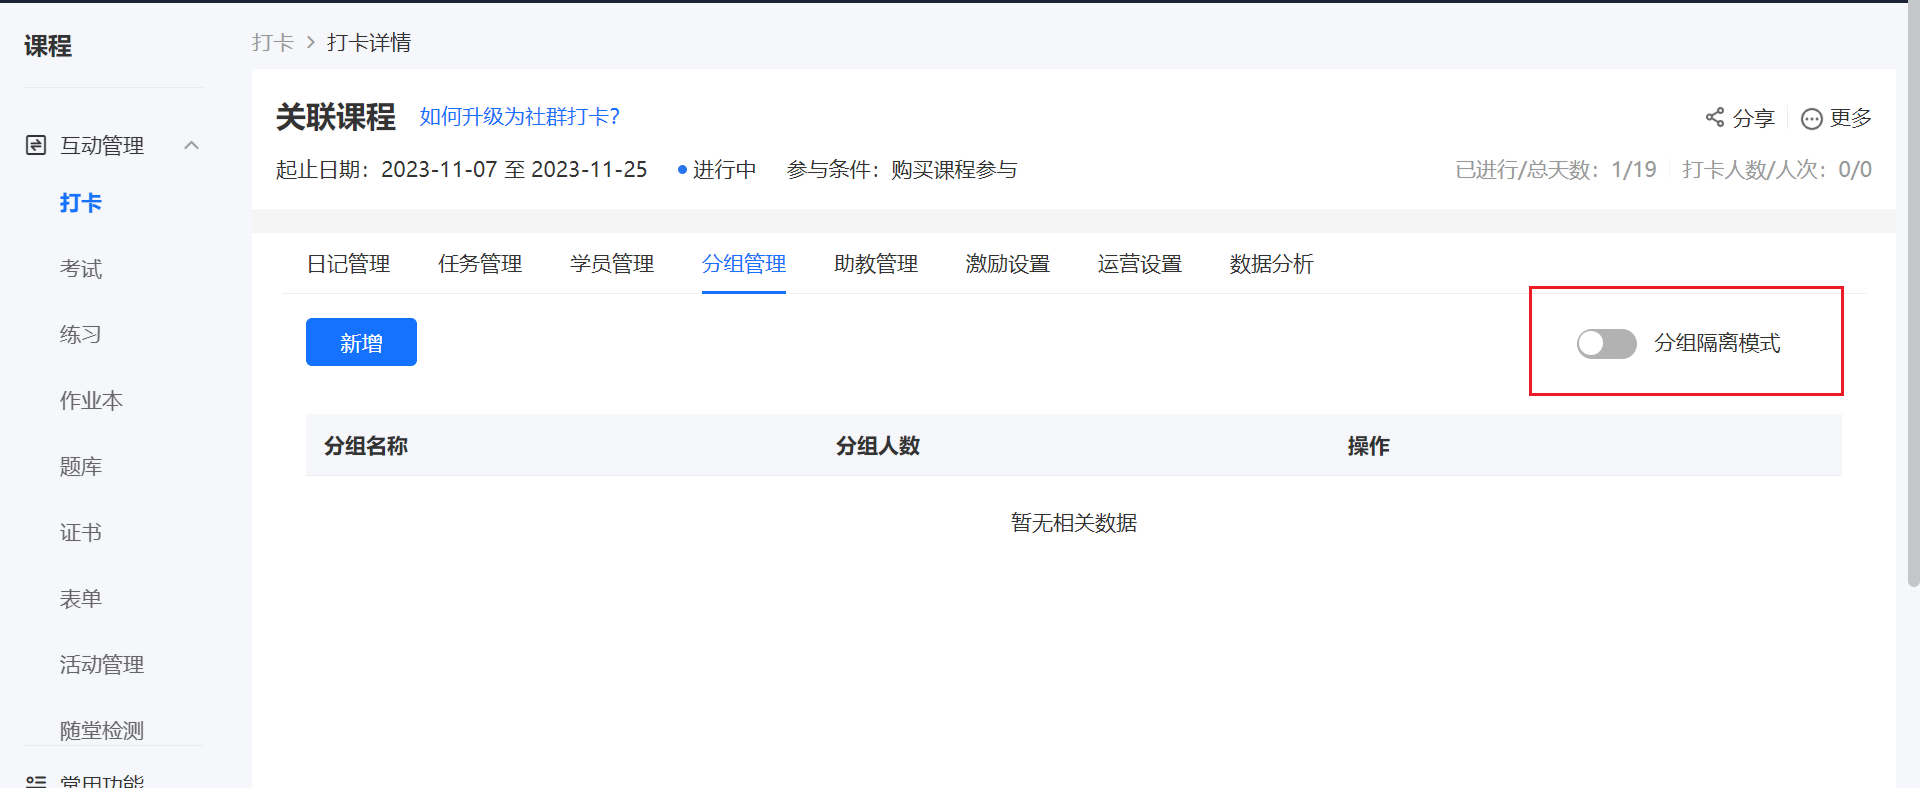
3. You can choose to enable the [Group Isolation Mode]. After enabling, trainees can only view the diaries of other members in the same group.
Step 2: Administrators/Teaching assistants enter the check - in homepage (H5/elink Check - in Mini Program)
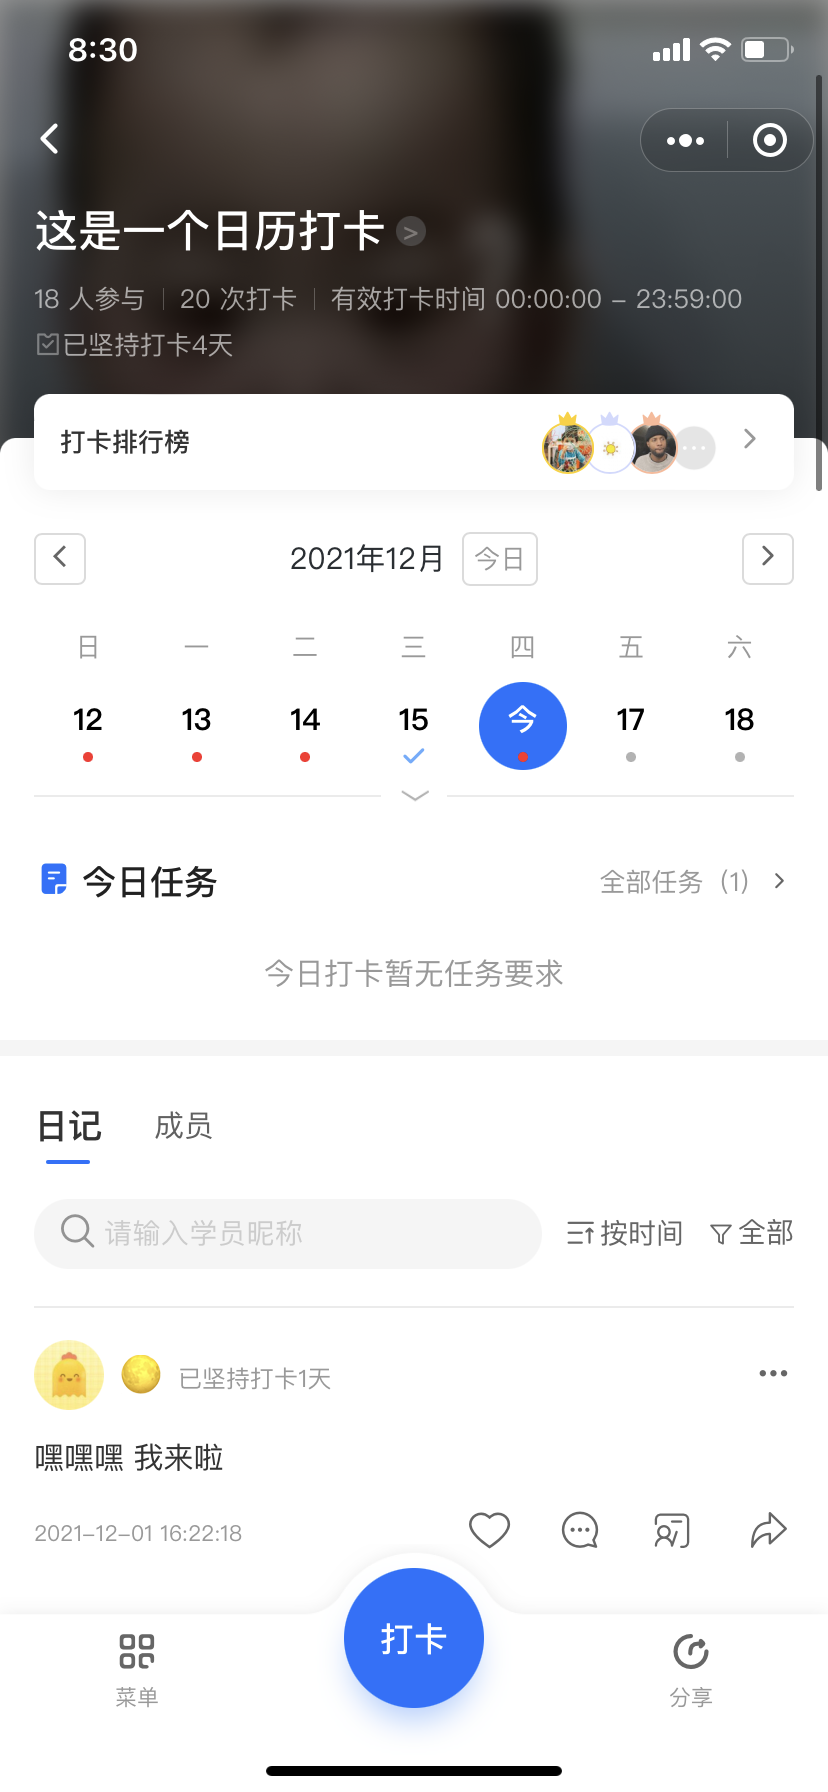
Step 3: Filter by group (H5/elink Check - in Mini Program)
Click the filter button to select the corresponding group to view the diaries. (Currently, the grouping situation is only visible to administrators & teaching assistants, and trainees cannot view it.)
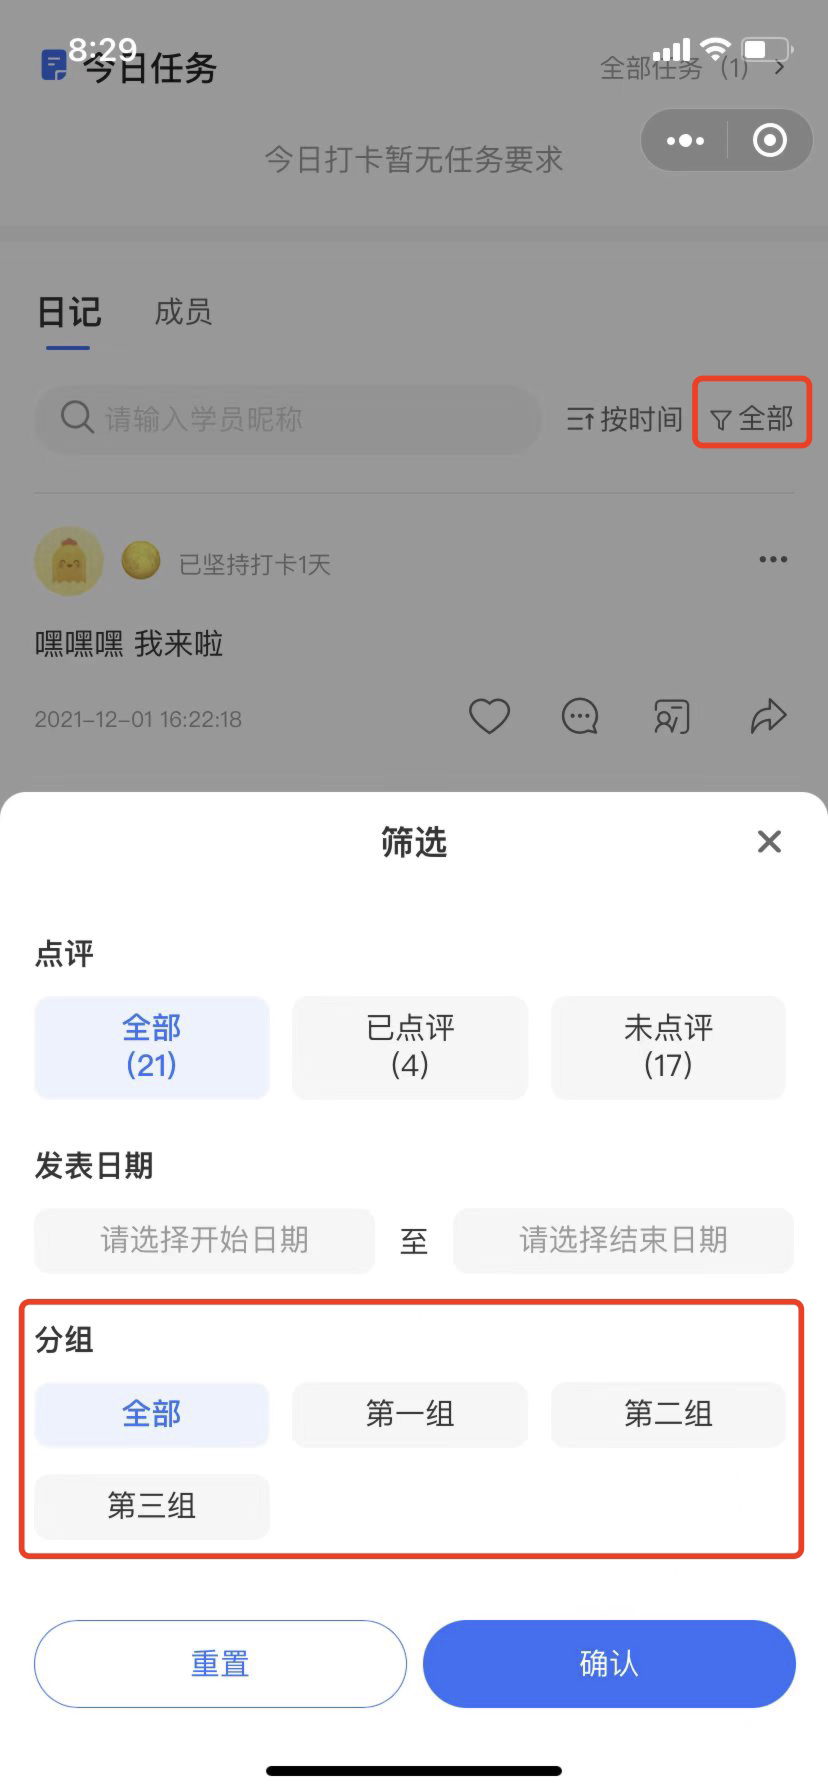
How to use the 'Default Rules' for check-ins
I. The function of default rules
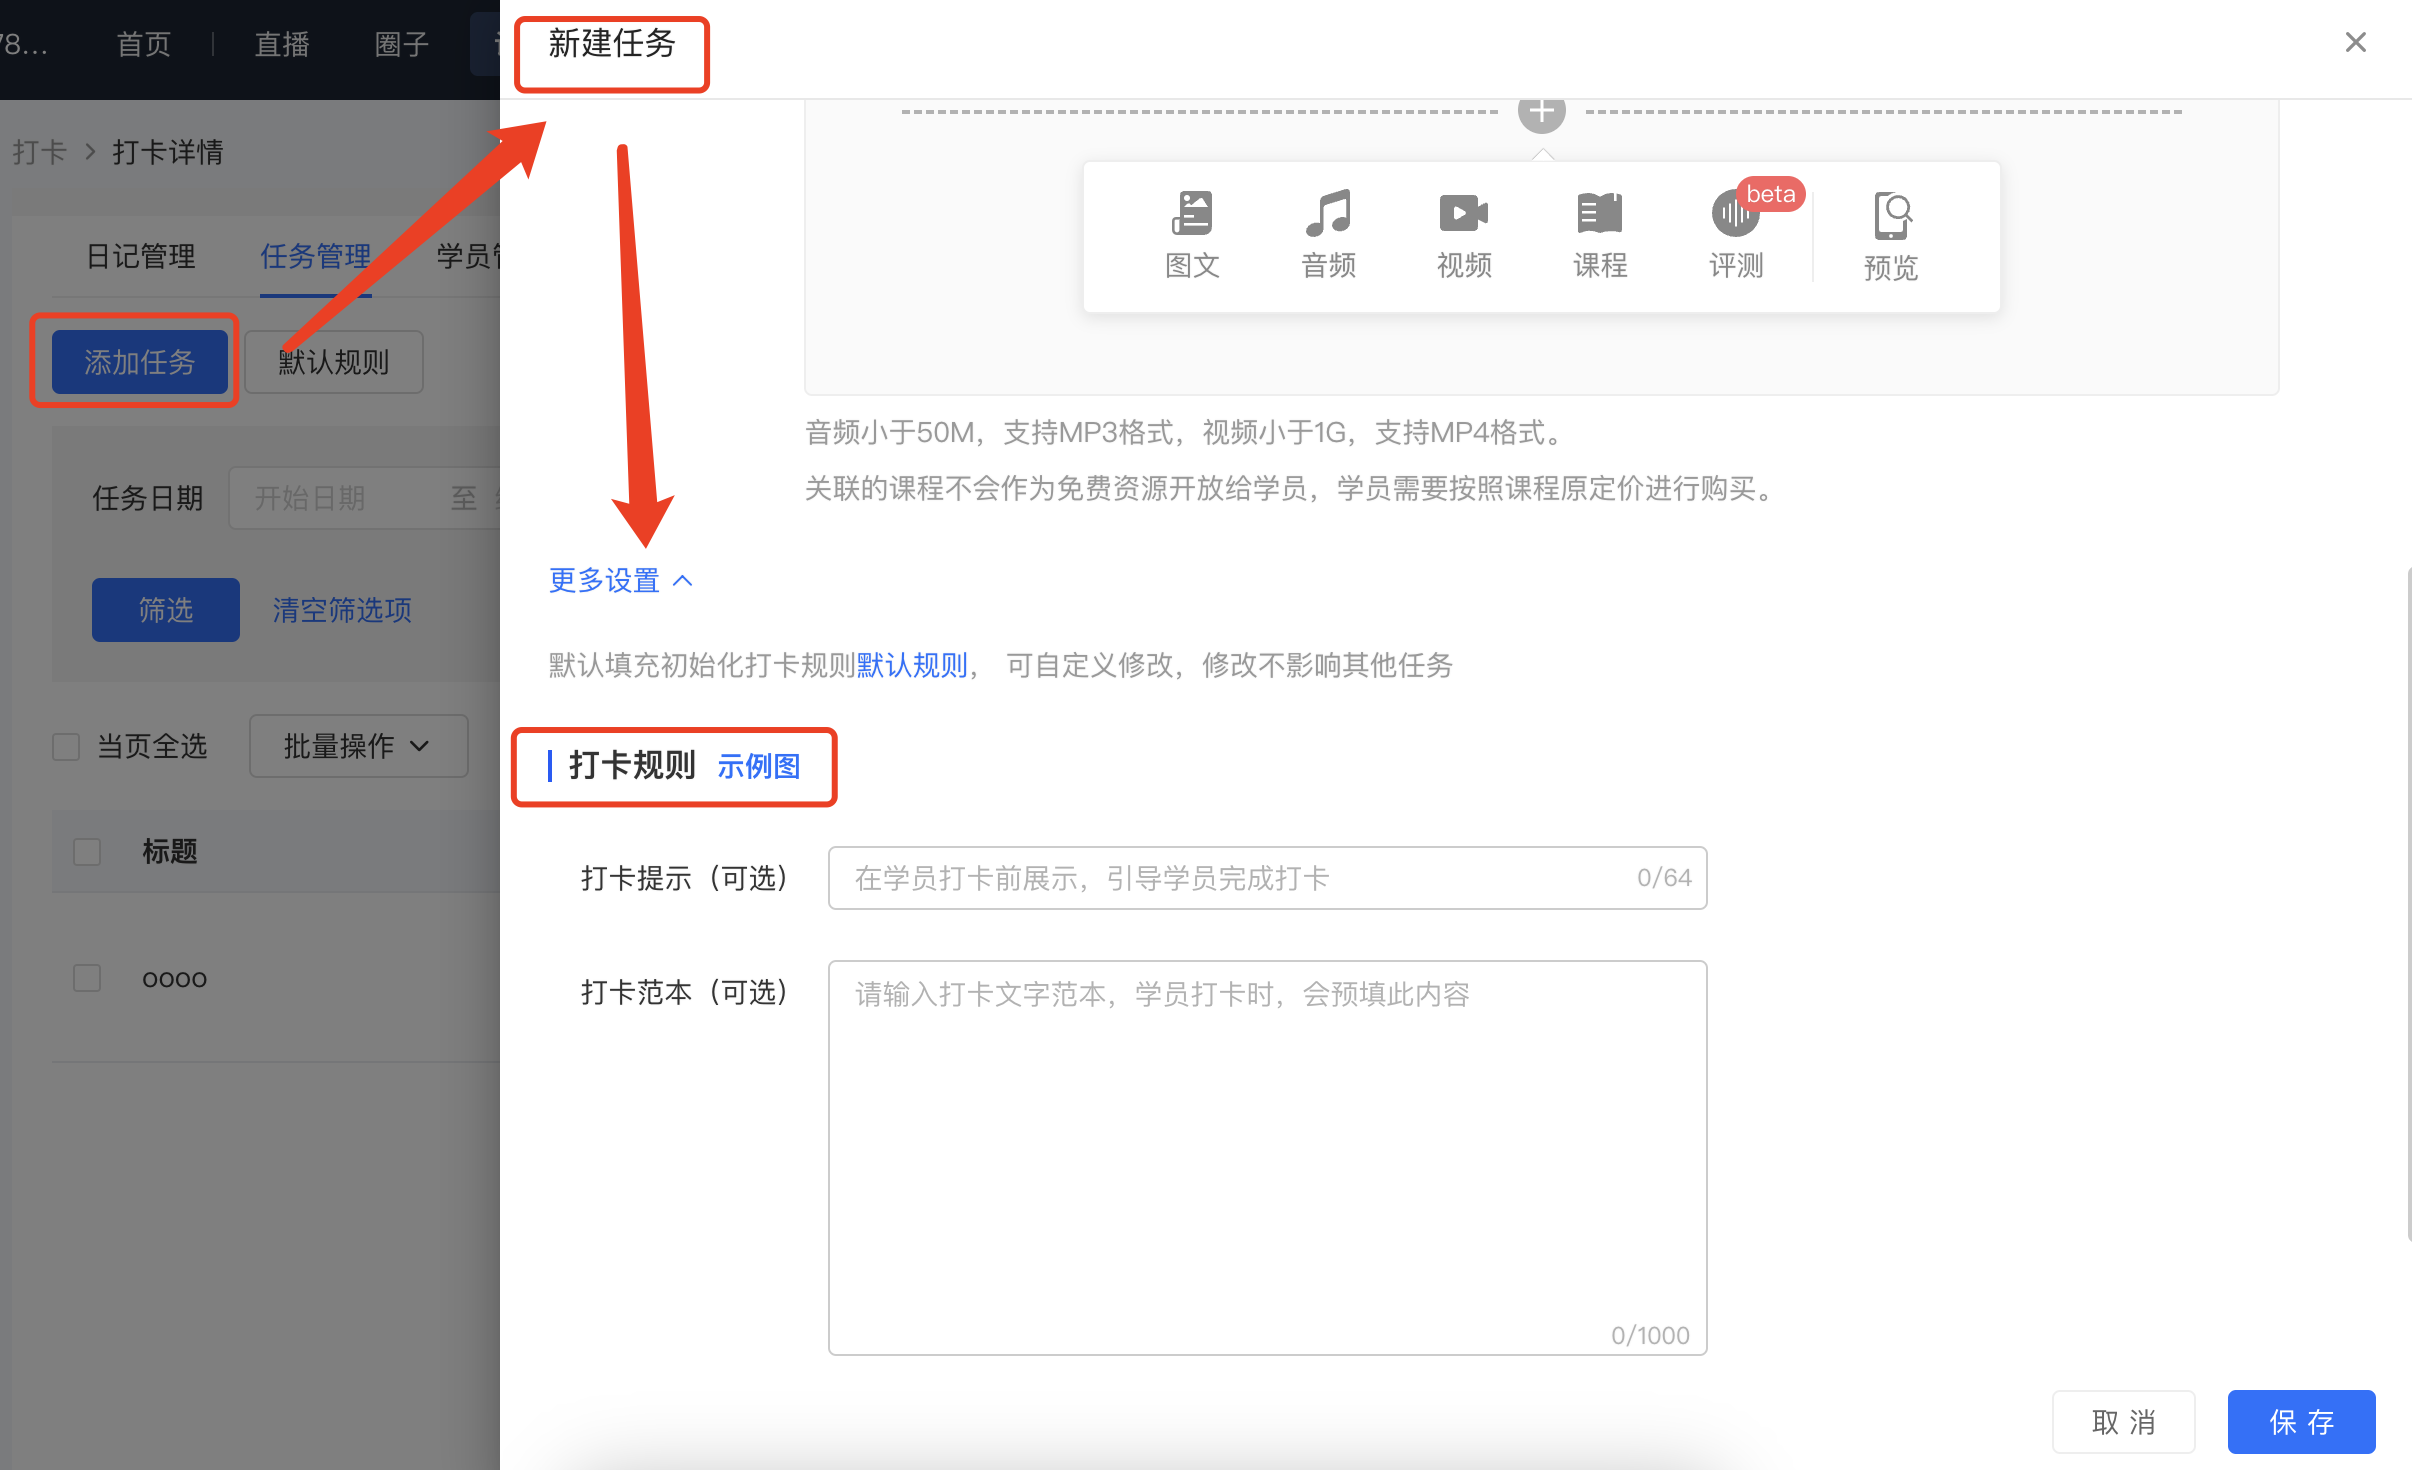
Since self-punch-in tasks support custom punch-in rules, there will be a cumbersome operation of configuring punch-in rules for each task separately. To improve operational efficiency, you can use the "Default Rules" to help configure the initial punch-in rules. When creating a new task, the configuration content in the "Default Rules" will be automatically filled in, eliminating the need for repeated configuration.
II. How to use default rules
1. Configure the [Default Rules]
Log in to your elink account. Click [Courses] in the menu bar, select [Interactive Management], and enter the [Punch-in] module. Find the punch-in task you need to operate on, click the [Details] button in the right-hand operation column, enter the punch-in details page, and find [Task Management]. Click the [Default Rules] button to enter the configuration pop-up window and configure the default rules.
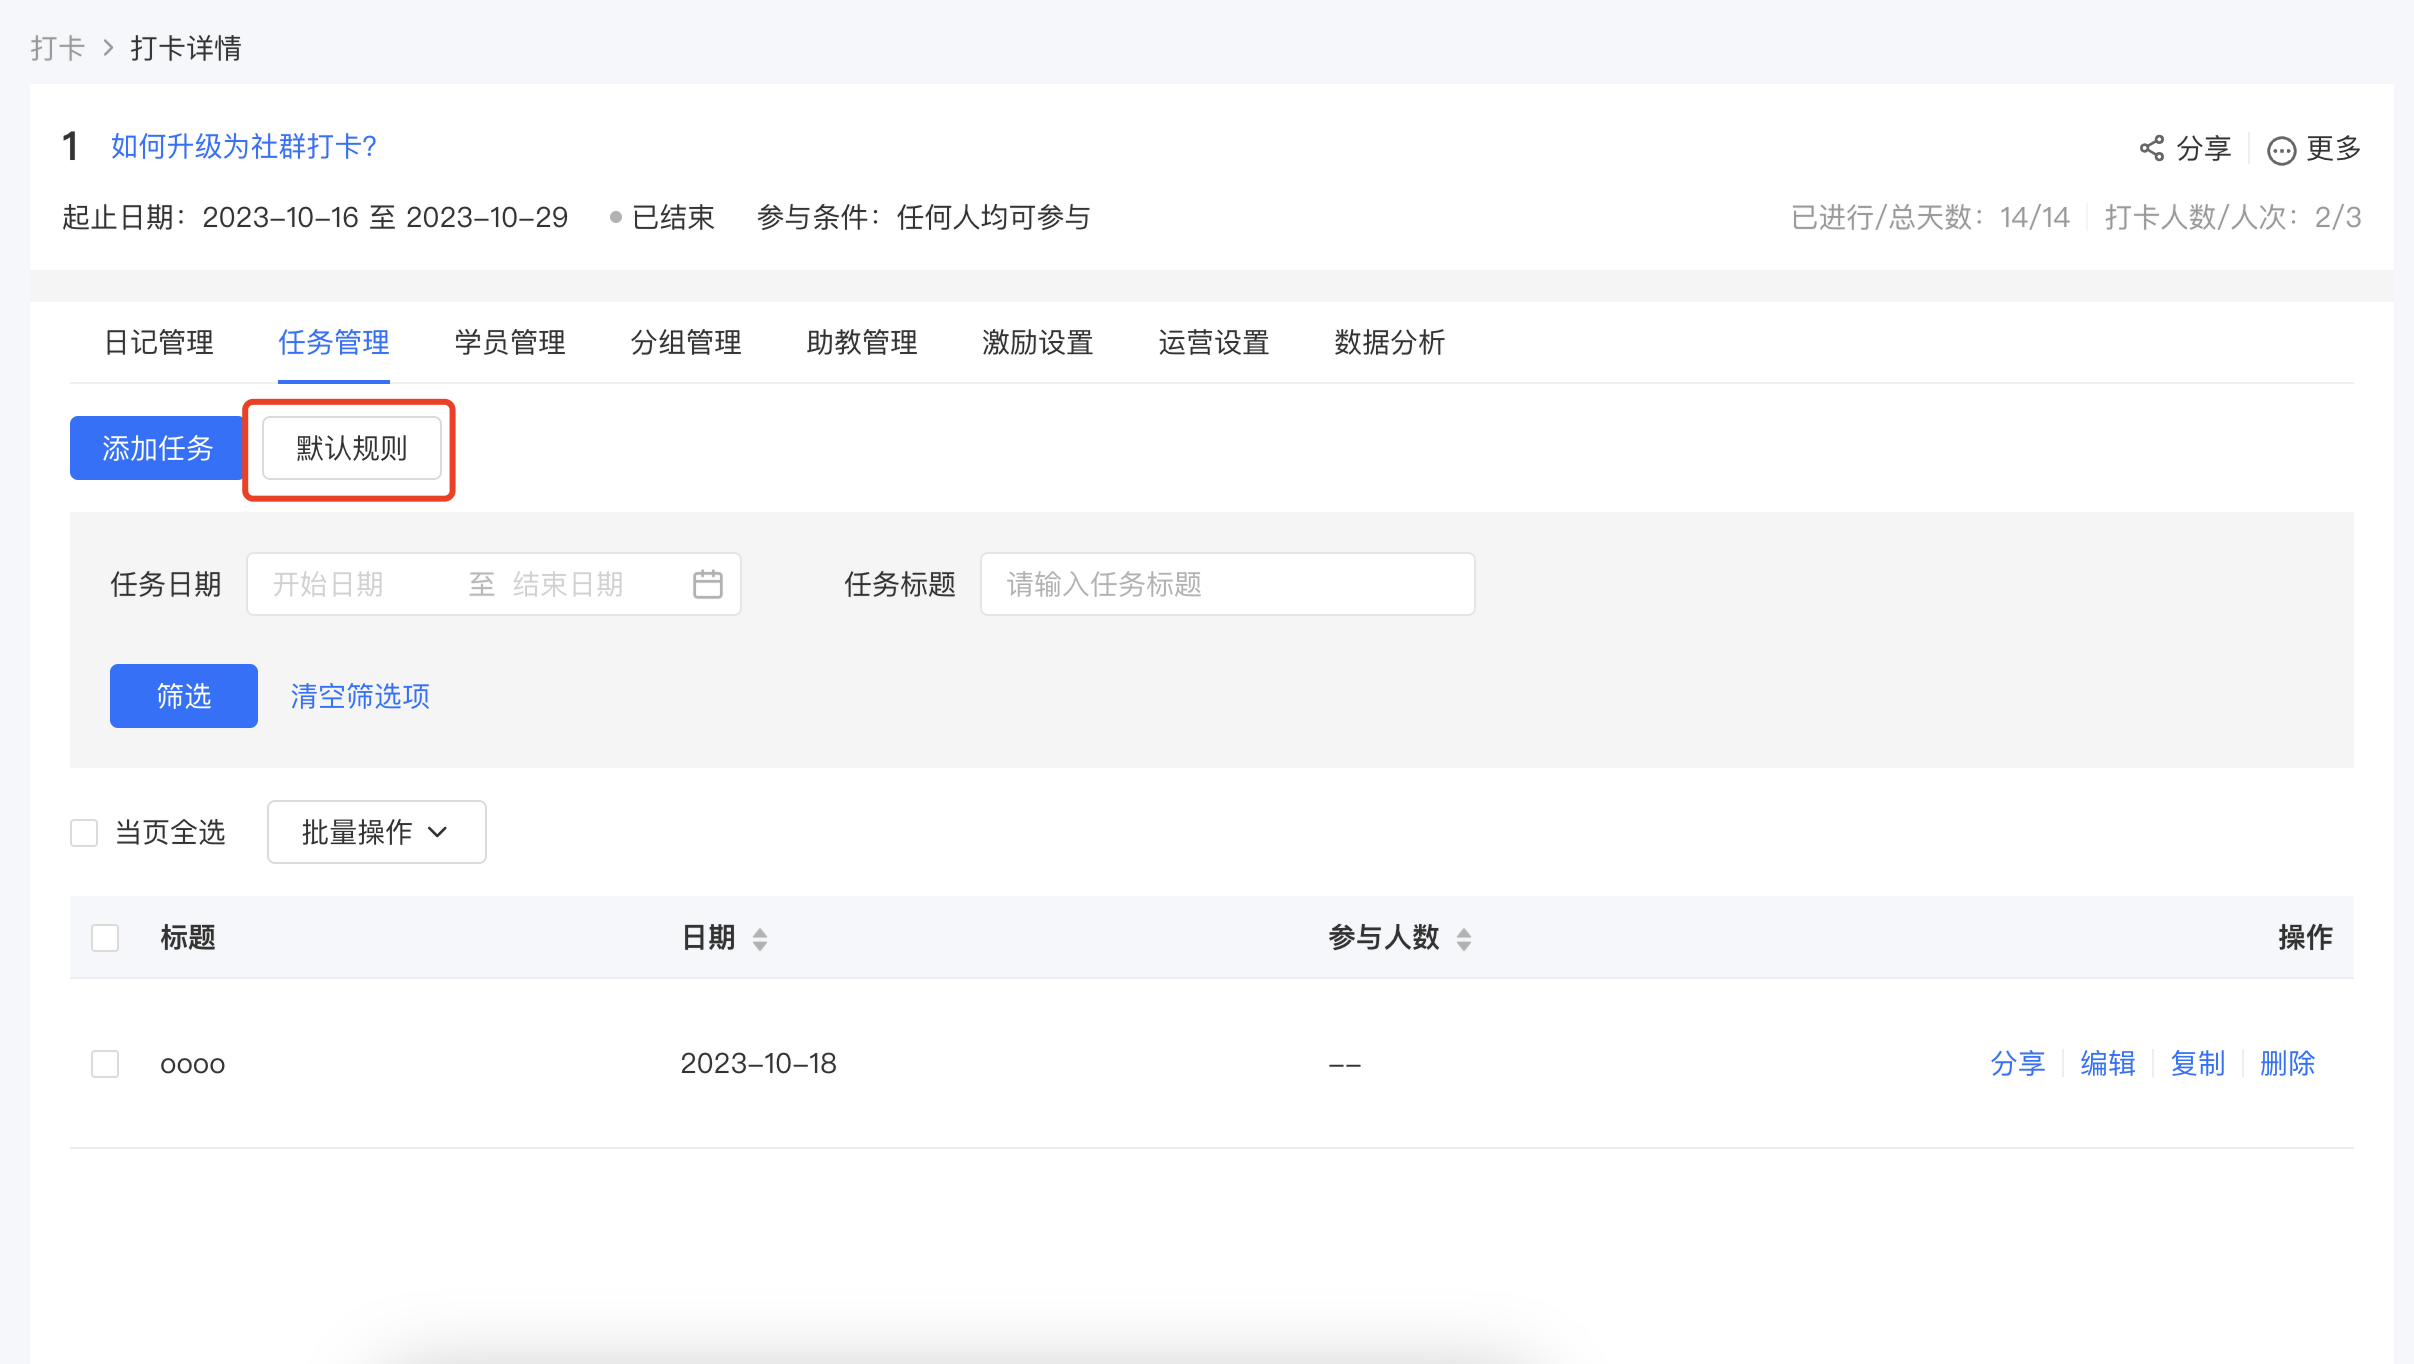
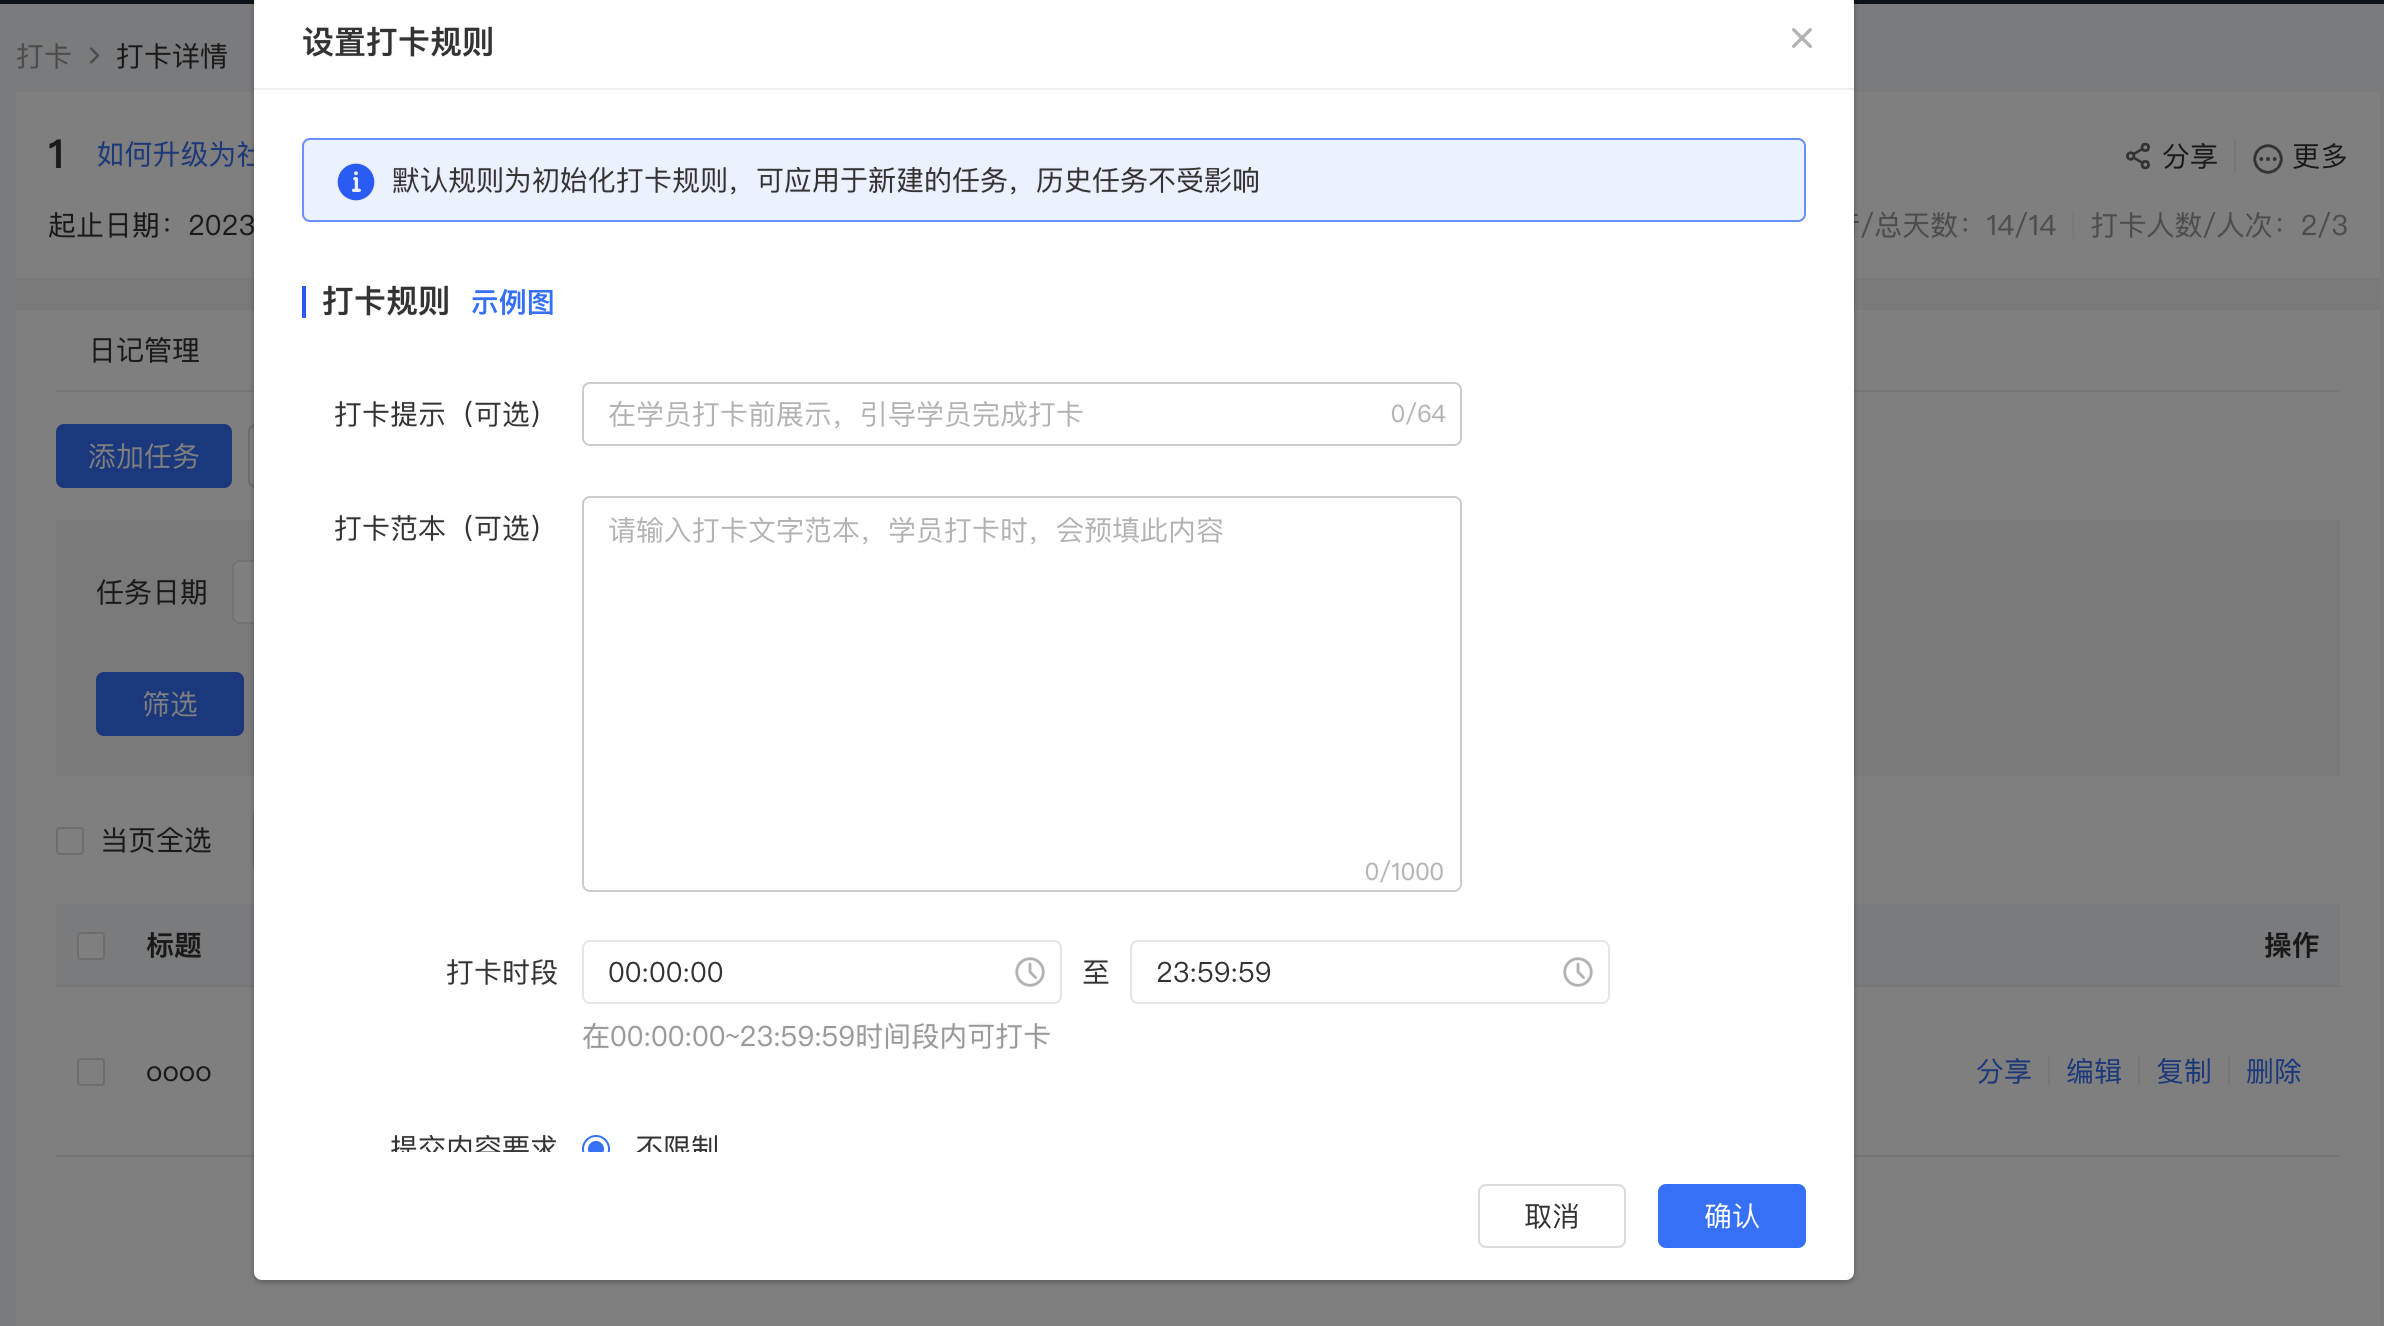
2. Apply the [Default Rules]
Scenario 1: As a specification when "students do not select a task for punch-in"
In calendar punch-in, when students do not select a task for punch-in, the punch-in behavior will be regulated according to the "Default Rules".
Scenario 2: As the initial punch-in rule configuration for "creating a new task"
In calendar punch-in/homework punch-in/level-up punch-in, when students select a task for punch-in, the punch-in behavior will be regulated according to the punch-in rules configured for that task. At this time, the [Default Rules] only serve as the initial configuration when creating a new task. Each task can customize and modify the punch-in rules, and the modification will not affect the "Default Rules".
It should be noted that modifying the [Default Rules] will not affect the configuration of existing tasks. It only serves as the initial setting when creating a new task.
How to import trainees for check-ins?
Tutorial on Importing Students for Check-ins
I. Function Introduction
The check-in function supports importing students. There are two import methods: quick import and file import. You can import existing users in the store or create new users for import. After successful import, students will directly gain check-in privileges and can directly participate in the check-in activity.
II. Purpose of Use
On the student side, the check-in import function allows users to quickly participate in check-ins, creating a good check-in experience. On the merchant side, it can reduce labor costs and improve the efficiency of student management.
III. Use Scenarios
When students purchase check-ins offline or through other channels and cannot participate in check-ins directly, and the process of obtaining privileges using invitation codes or redemption codes is complicated. Merchants need to teach and supervise students to obtain privileges for subsequent student management operations, which greatly increases labor costs and is inefficient. Merchants can import students in a unified manner to allow students to directly participate in check-ins and conduct relevant management operations independently, such as grouping.
IV. Operation Path
Merchant side: Merchant background → Courses → Interaction Management → Check-ins → Student Management → Import Students
Student side:
elink Check-in Mini Program: Check-in List
H5: Personal Center - Check-ins
V. Use Tutorial
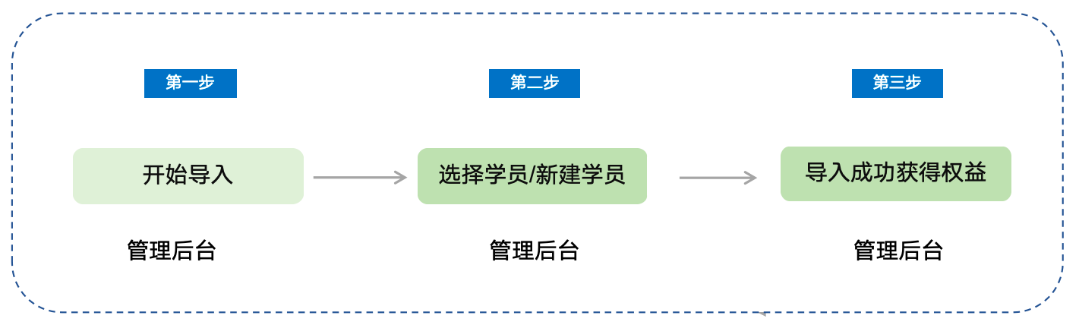
Step 1 Start Importing
1. Through the management background - Courses - Interaction Management - Check-ins, click on a specific check-in to enter the student management page, and then click [Import Students] to enter the student import page.
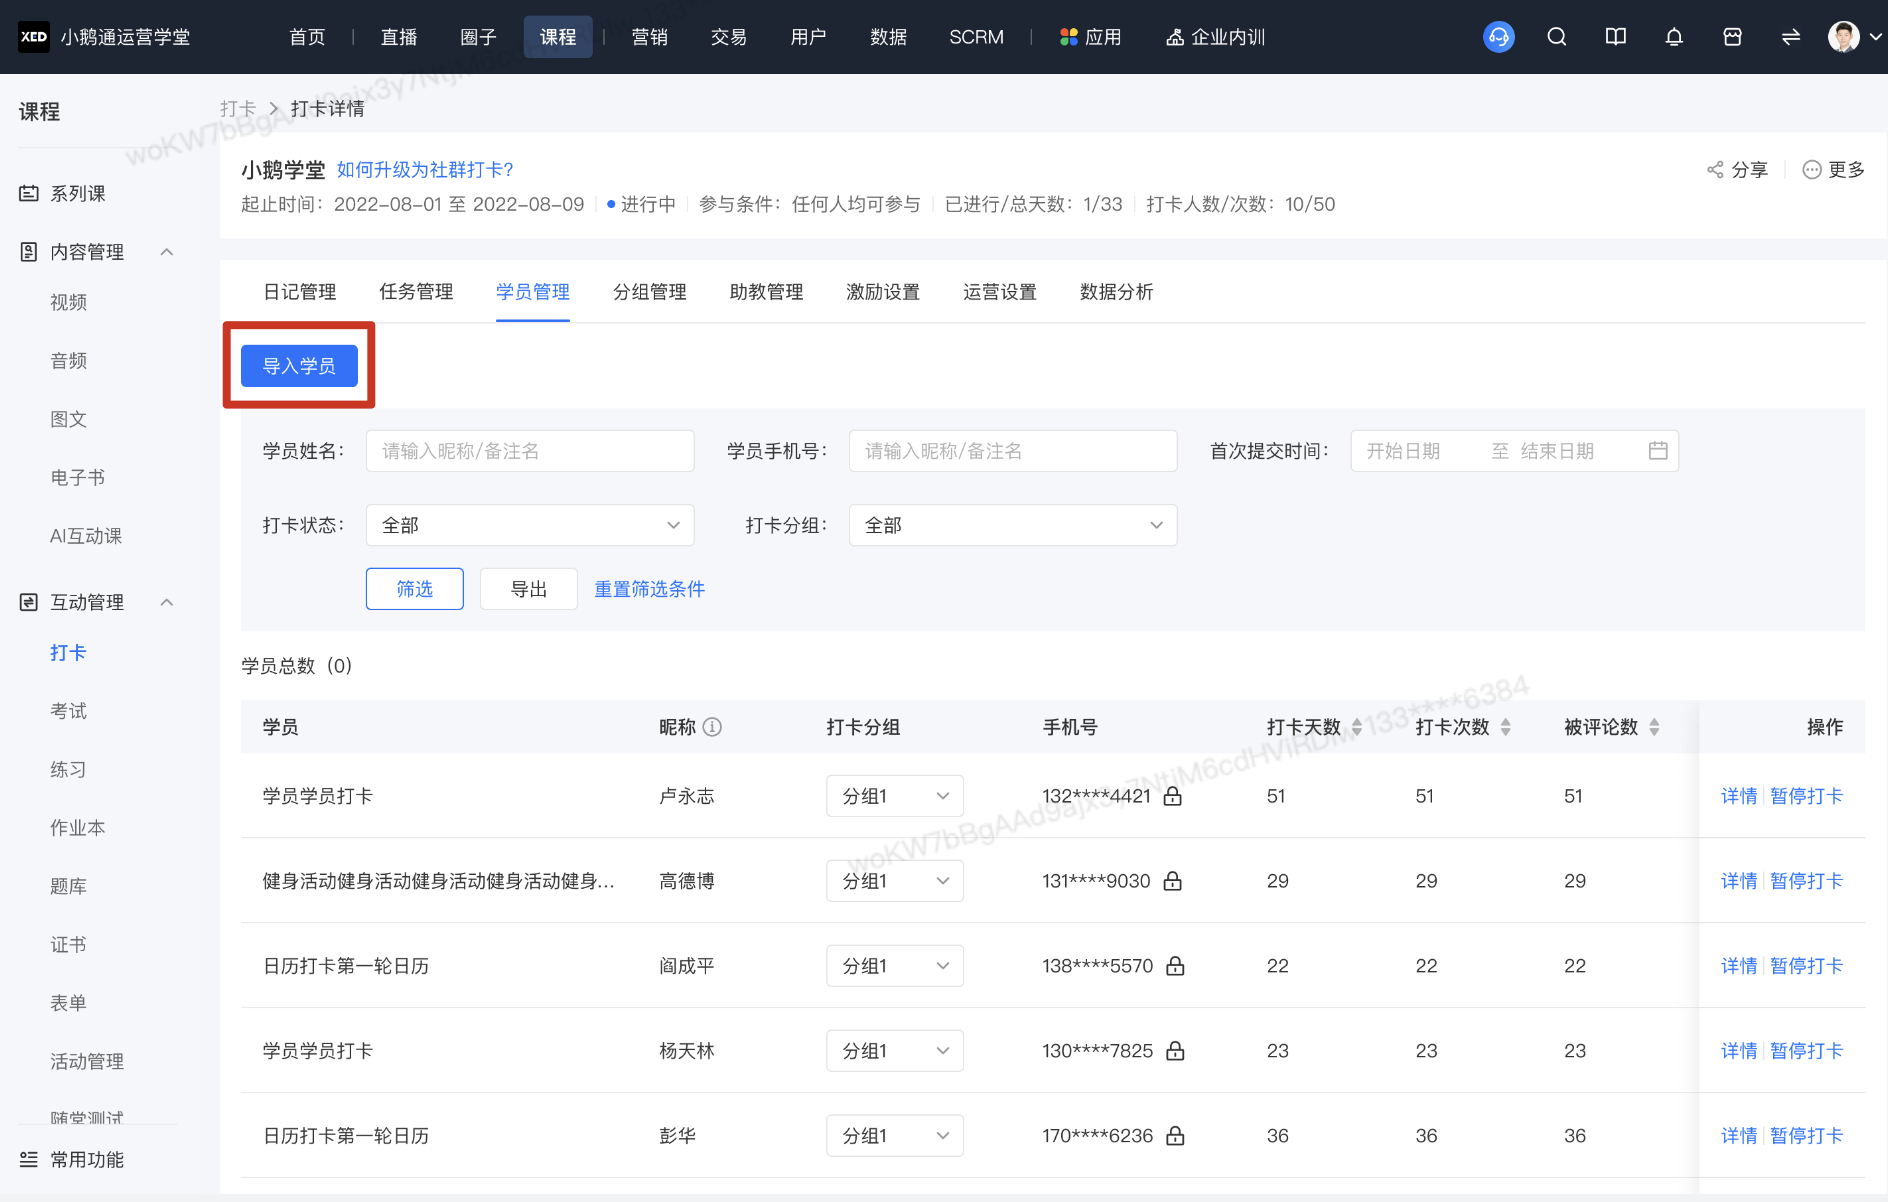
Student Import Entry
2. Student import supports two methods: quick import and file import.
Student Import Page
Step 2 Select Students/Create New Students
Quick Import:
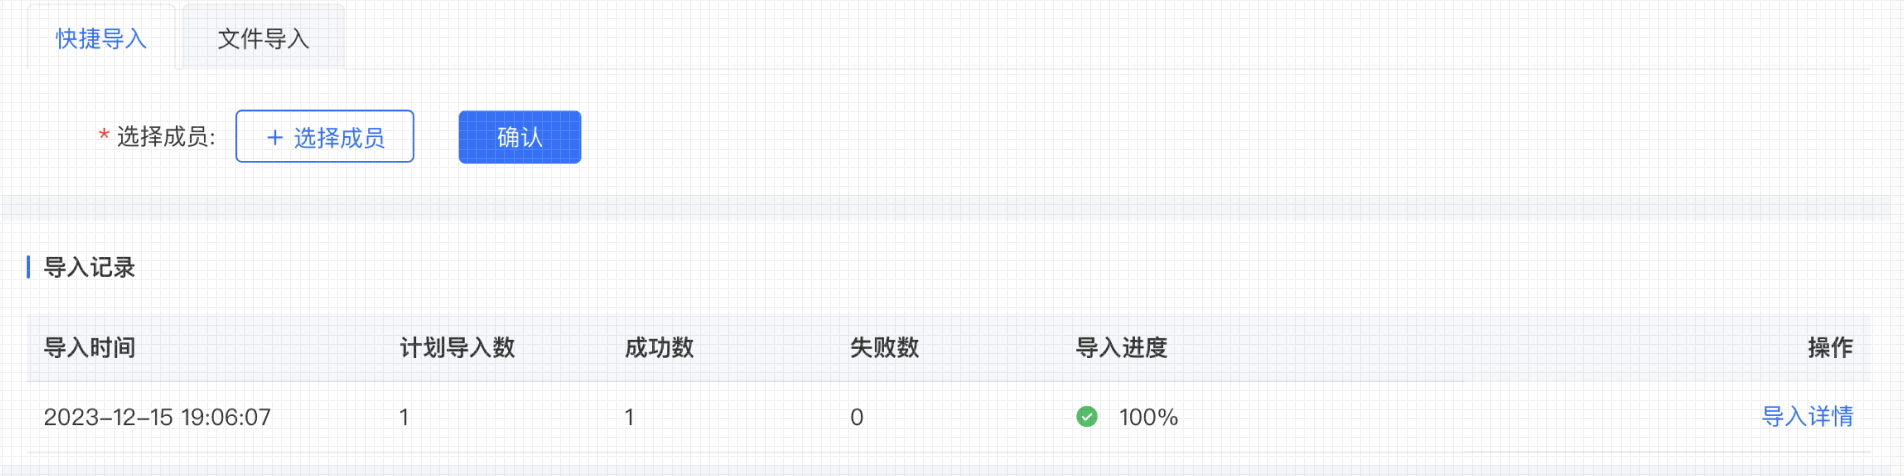
1. Click [Select Students] to display the pop-up window for selecting store users, and perform relevant operations to select students for import.
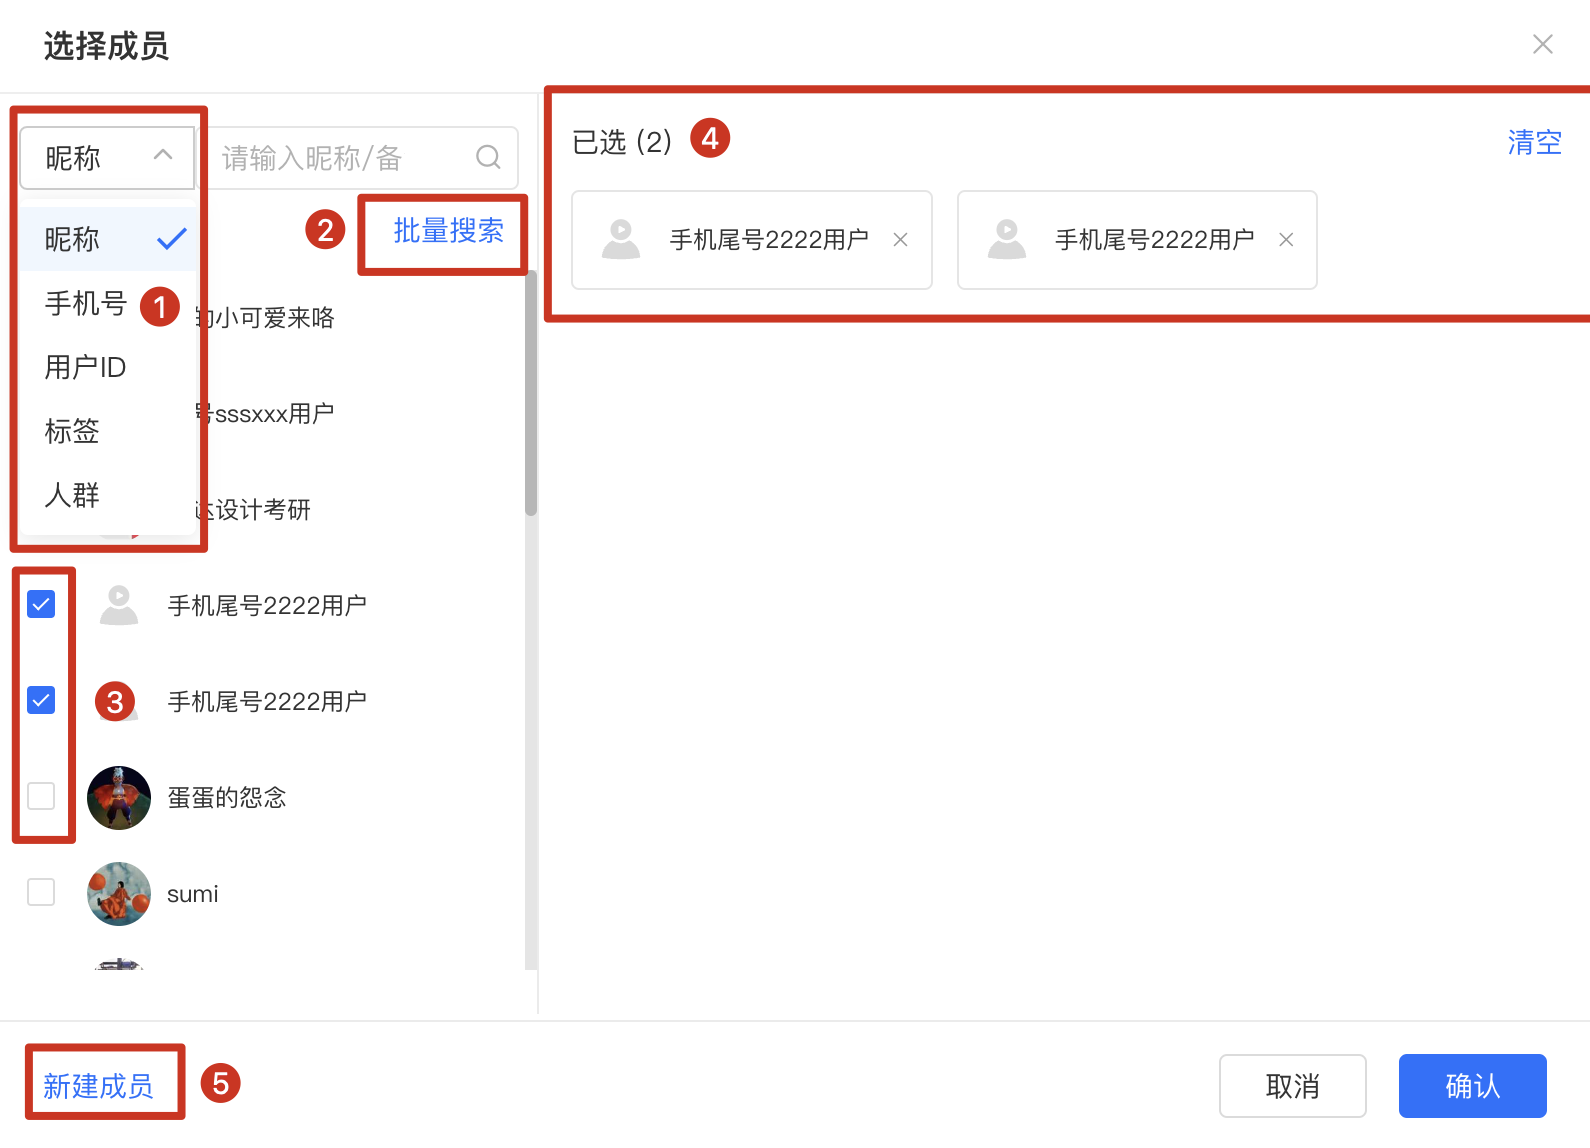
Student Selection Pop-up Window
① User search items: Support searching for store users by nickname, mobile phone number, user ID, tags, and user groups.
② Batch search: You can enter multiple nicknames/remark names to search for users in batches.
③ User selection: Check the users to be imported, and they will appear in ④
④ User list: You can clear individual selected users or clear all selected users.
⑤ Create new user: You can enter a mobile phone number to create a single new user, and the user information will be displayed in the pop-up window list after creation.
2. Click [Confirm] to start the import.
3. After importThe import record will be refreshed, and you can view the import details.

Student Import Record
File Import:
1. Click [Download Template] to download the import file and fill in the information of users to be imported.
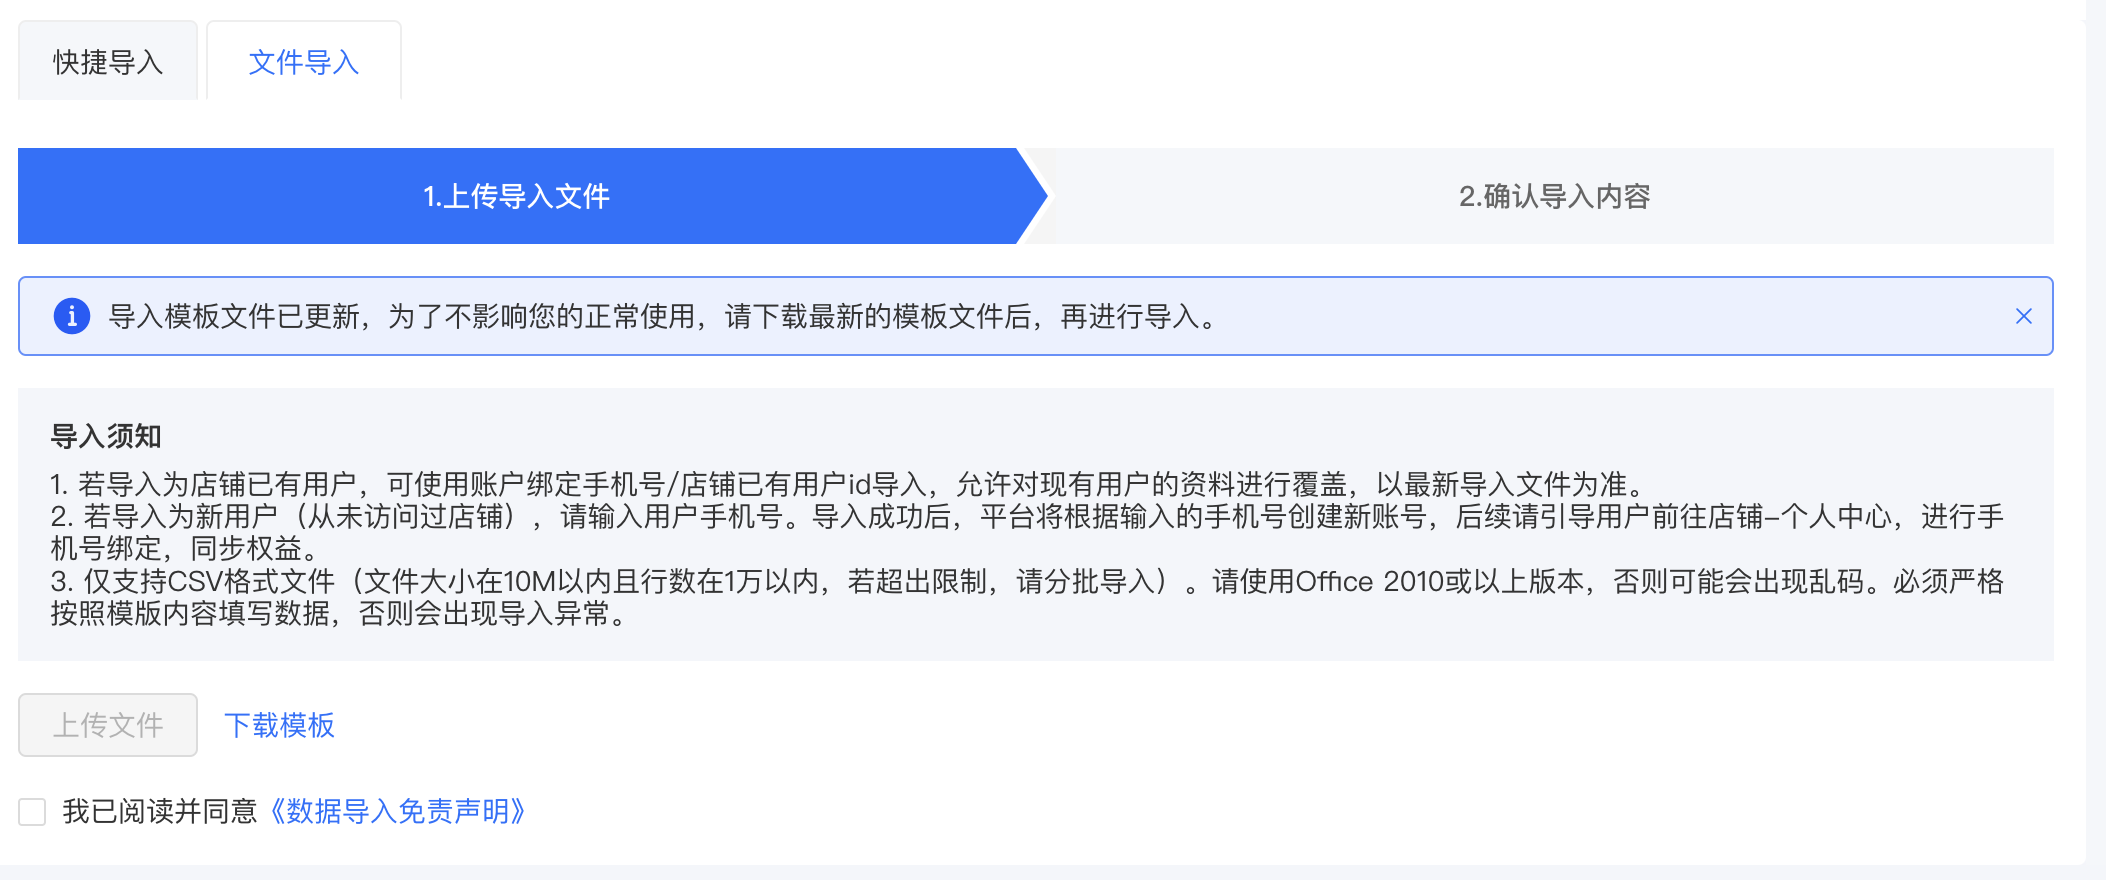
File Import Page
2. After checking the 《Data Import Disclaimer》, upload the file.
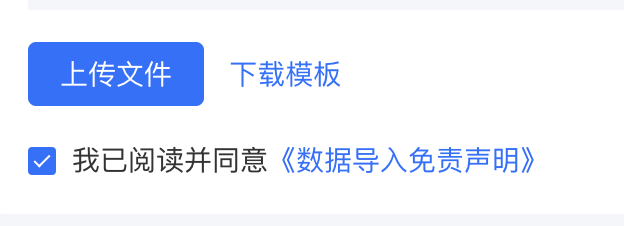
Upload File
3. Confirm the import content, and you can modify or delete error information.
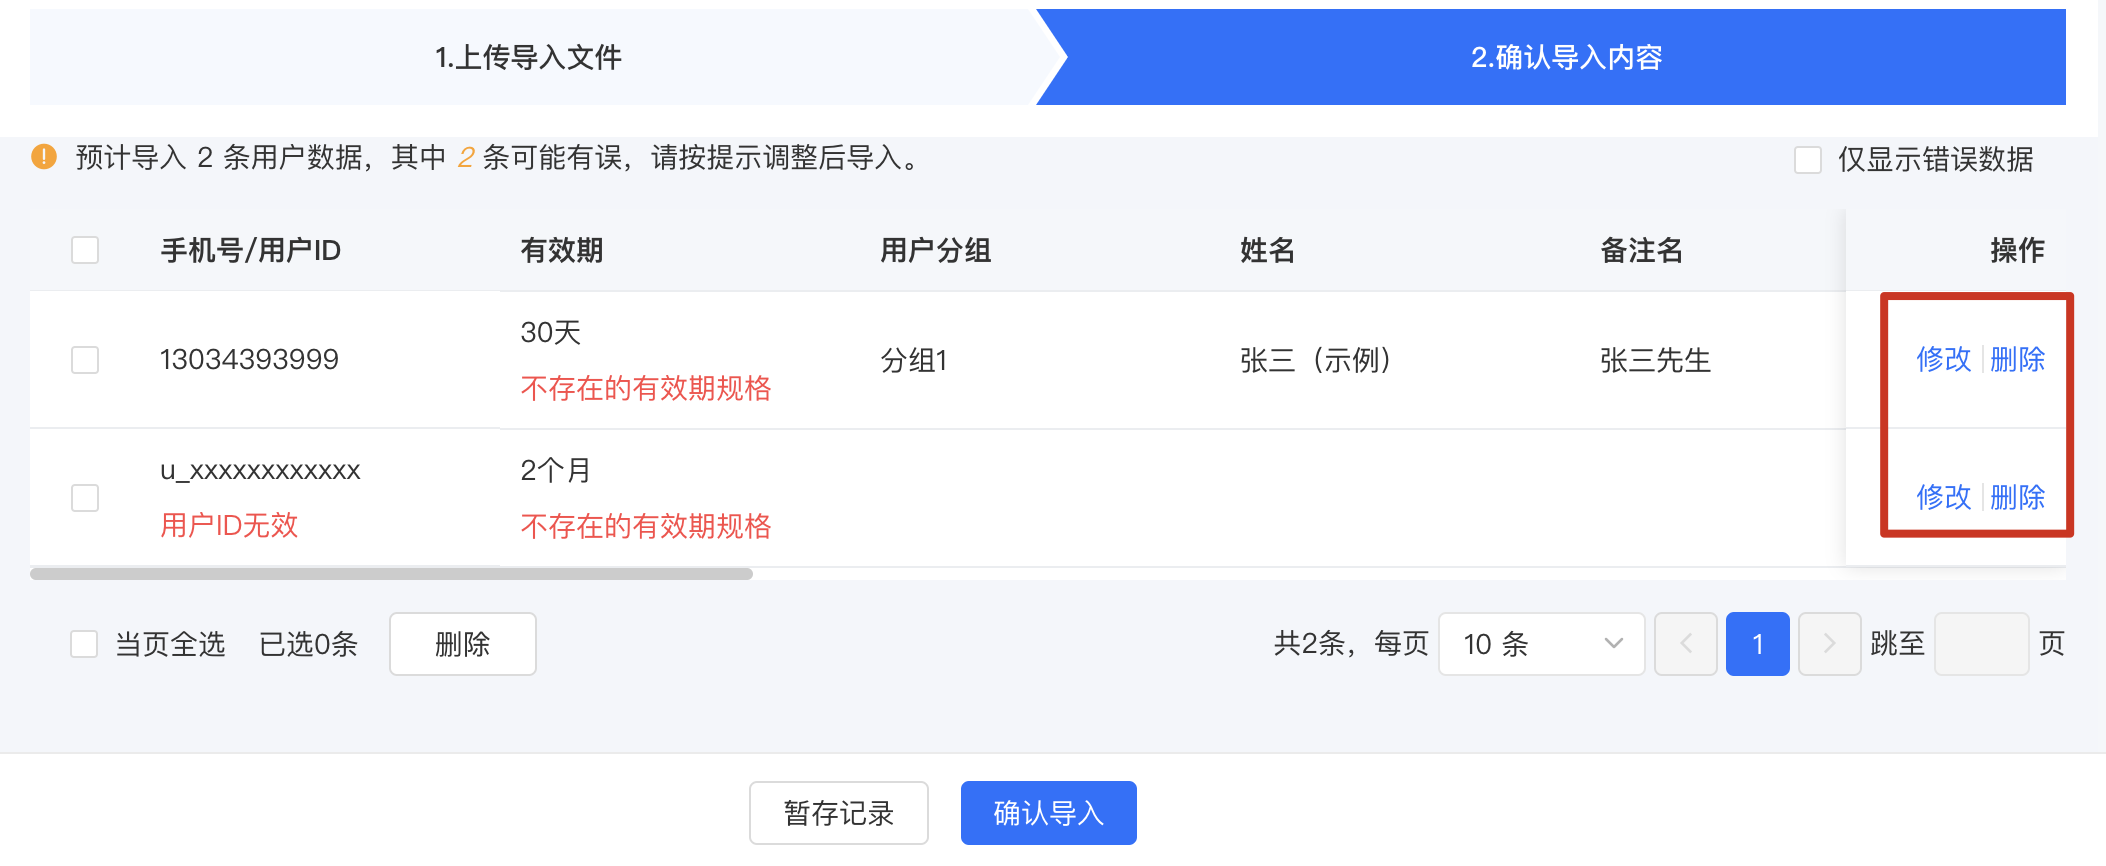
Confirm Import Content
4. You can temporarily save or immediately import the imported data. After selection, the import record will display the corresponding data accordingly.
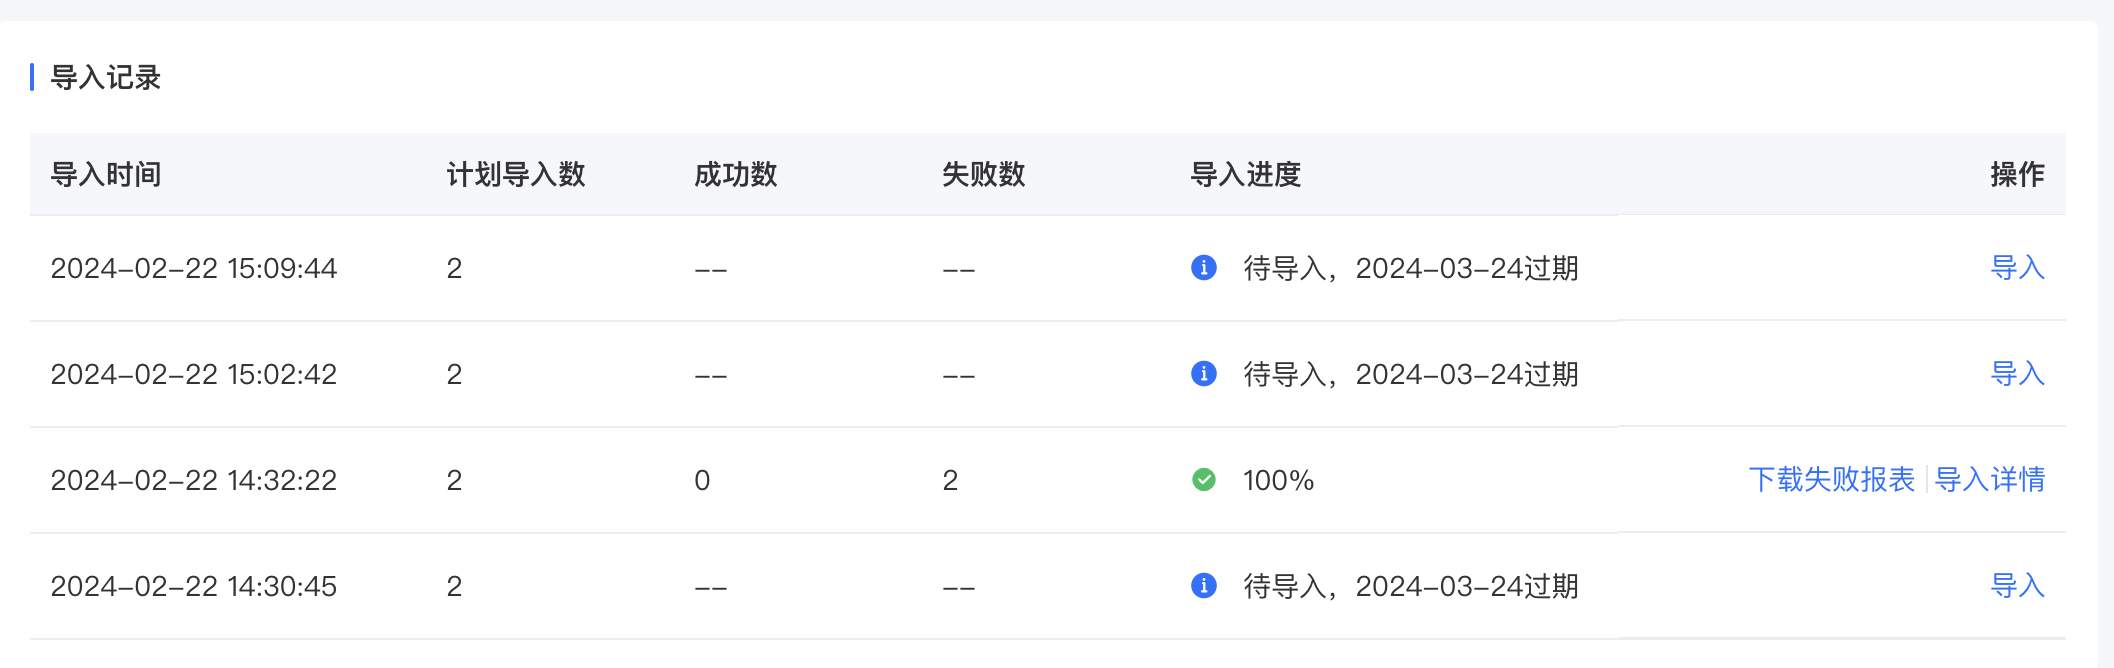
Import Record
Step 3 Obtain Privileges after Successful Import
After successful import, the imported users will be displayed in the user list on the check-in - student management page in ascending order of import time. Users have defaulted to obtain check-in privileges and can directly participate in check-ins on the elink Check-in Mini Program and H5 page.
Tutorial on Using the New Version of the Mobile Check-in Feature
I. Upgrade Instructions
Punch-in is a tool that integrates community interaction, interest-based learning, assignment distribution, effect verification, and fun challenges. Currently, to provide a better punch-in experience, a version upgrade is about to be carried out for the mobile punch-in terminals (including the elink Punch-in Mini Program, as well as the punch-in modules in the store H5, elink Learner APP, and elink Learner Mini Program). The following will introduce the upgrade content.
II.Upgrade Content
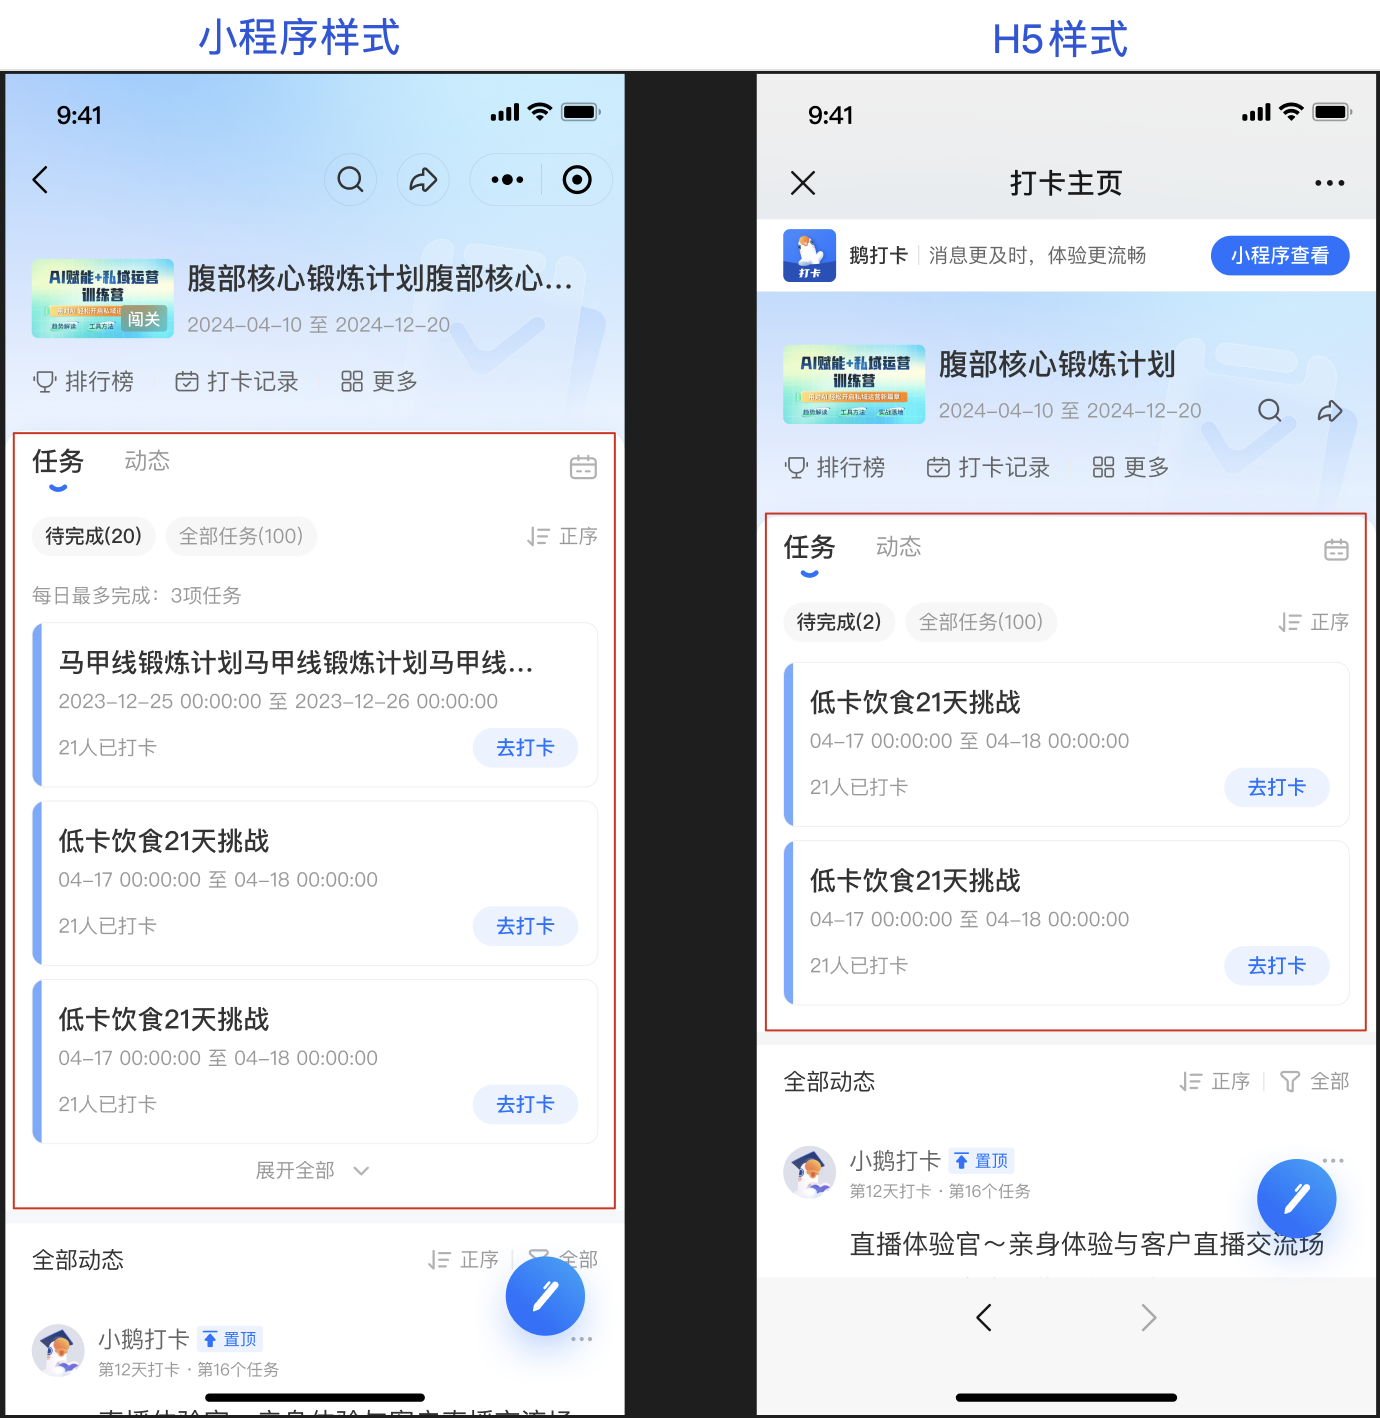
1.Punch-in Homepage -Highlight the Task Section
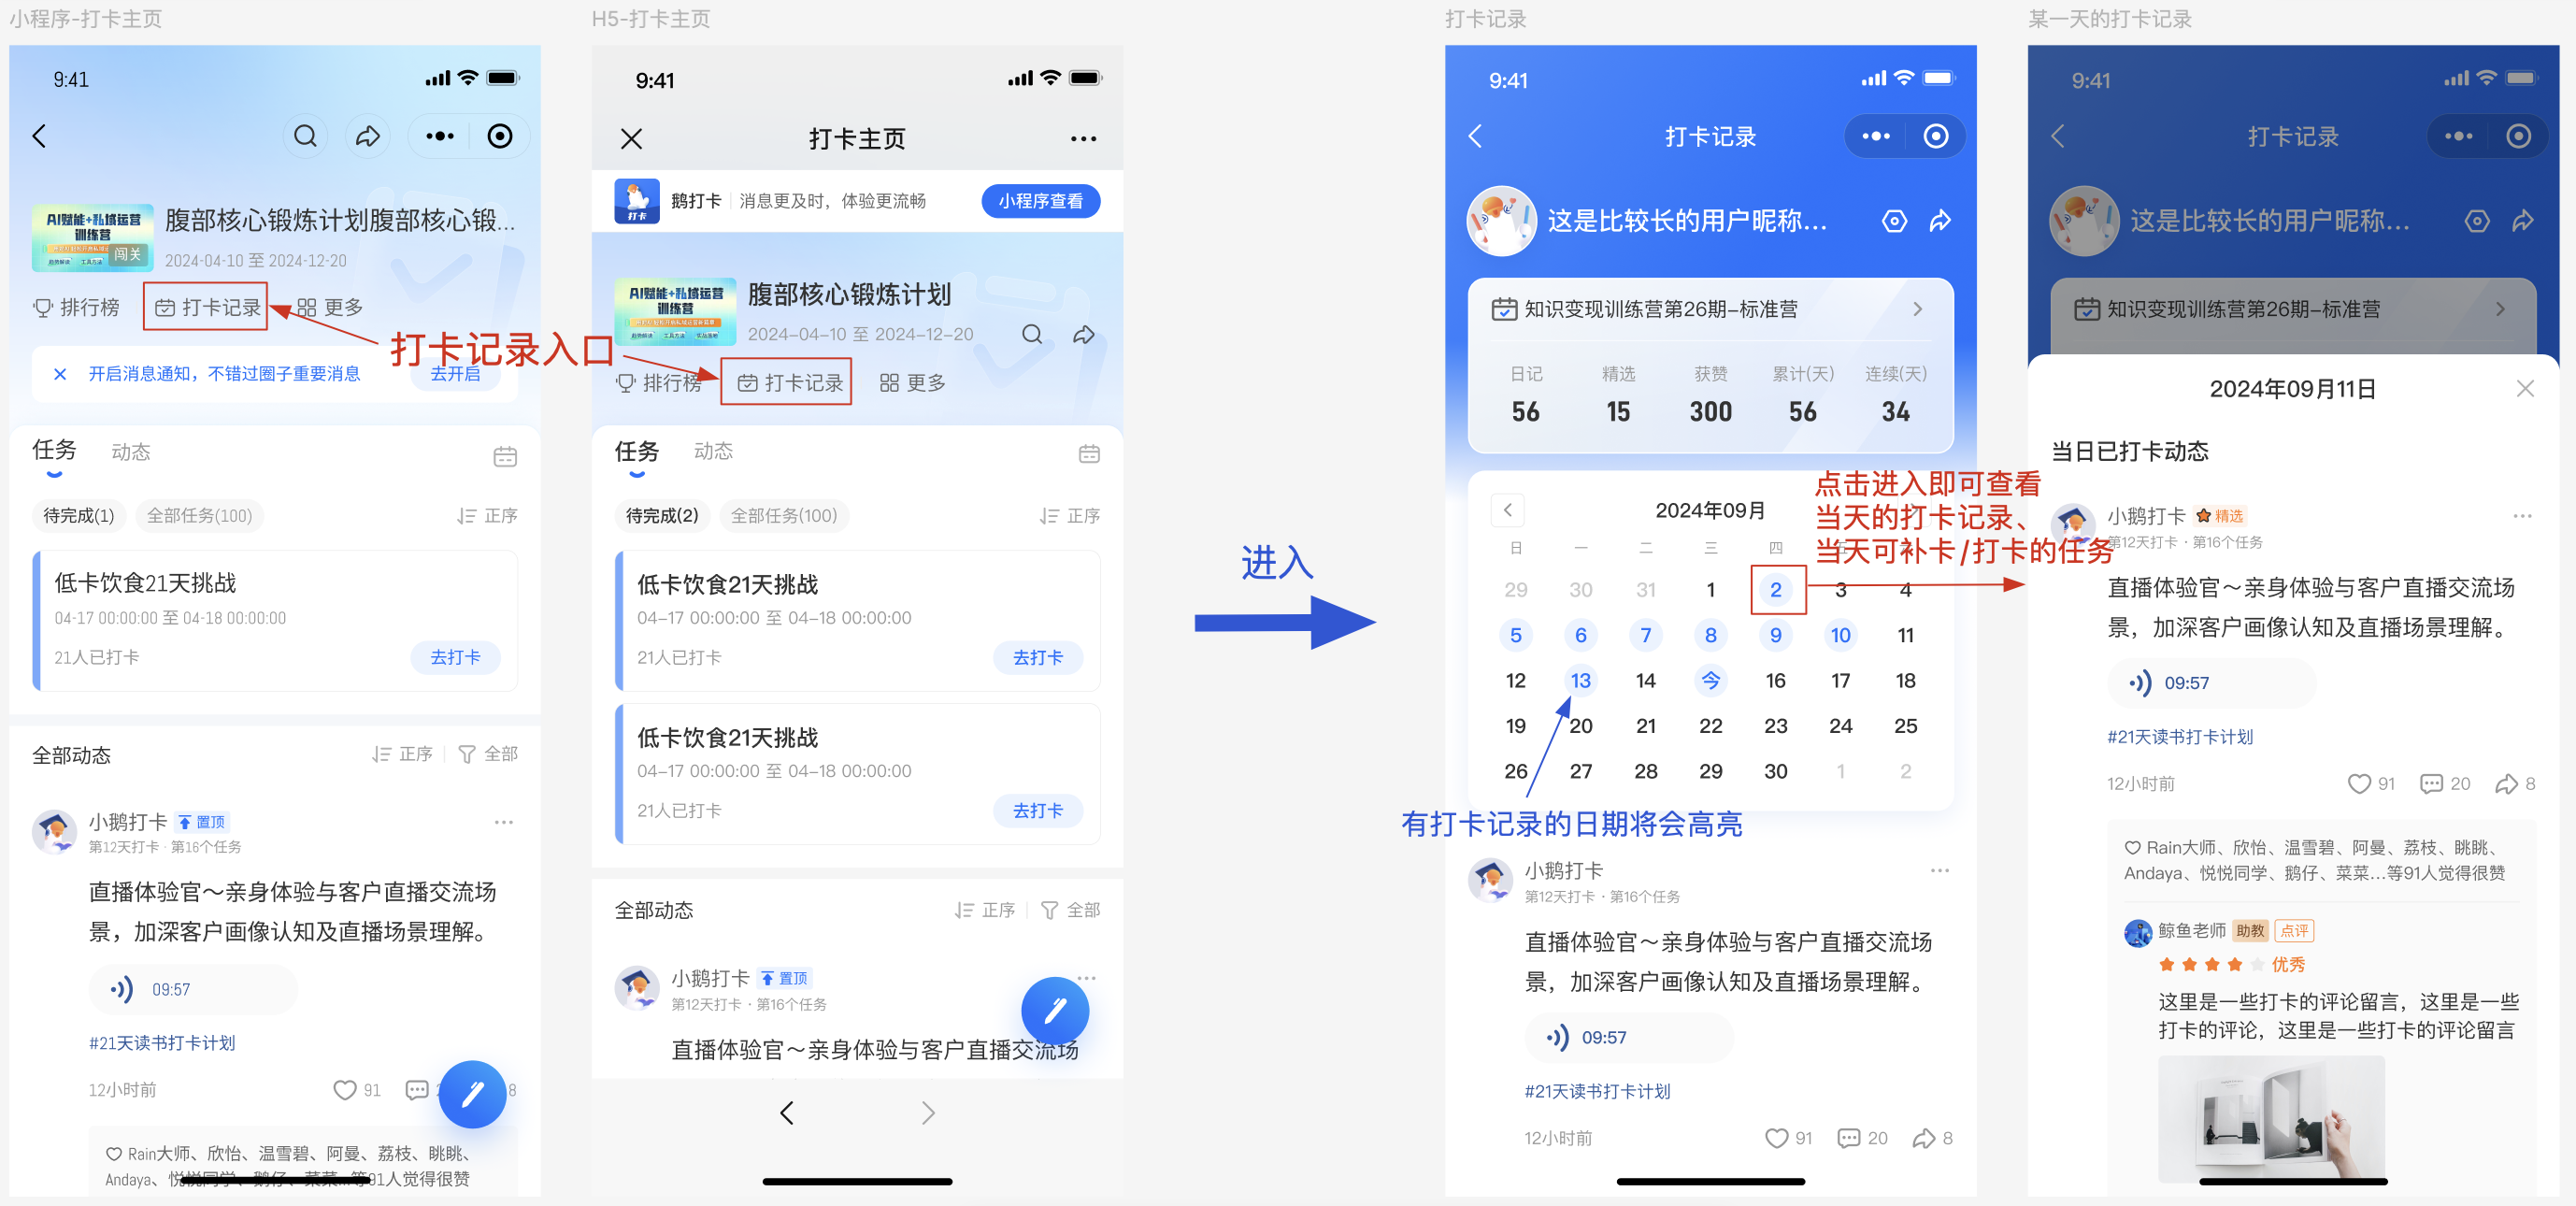
After learners enter the punch-in homepage, they will first see the 「Task Bar」. By clicking on the 【Dynamic】 tab, they can switch to the 「Dynamic Bar」. This makes it convenient for learners to know what tasks they need to complete as soon as they enter the punch-in page. At the same time, they can refer to and learn from others' punch-in content with the tasks in mind.
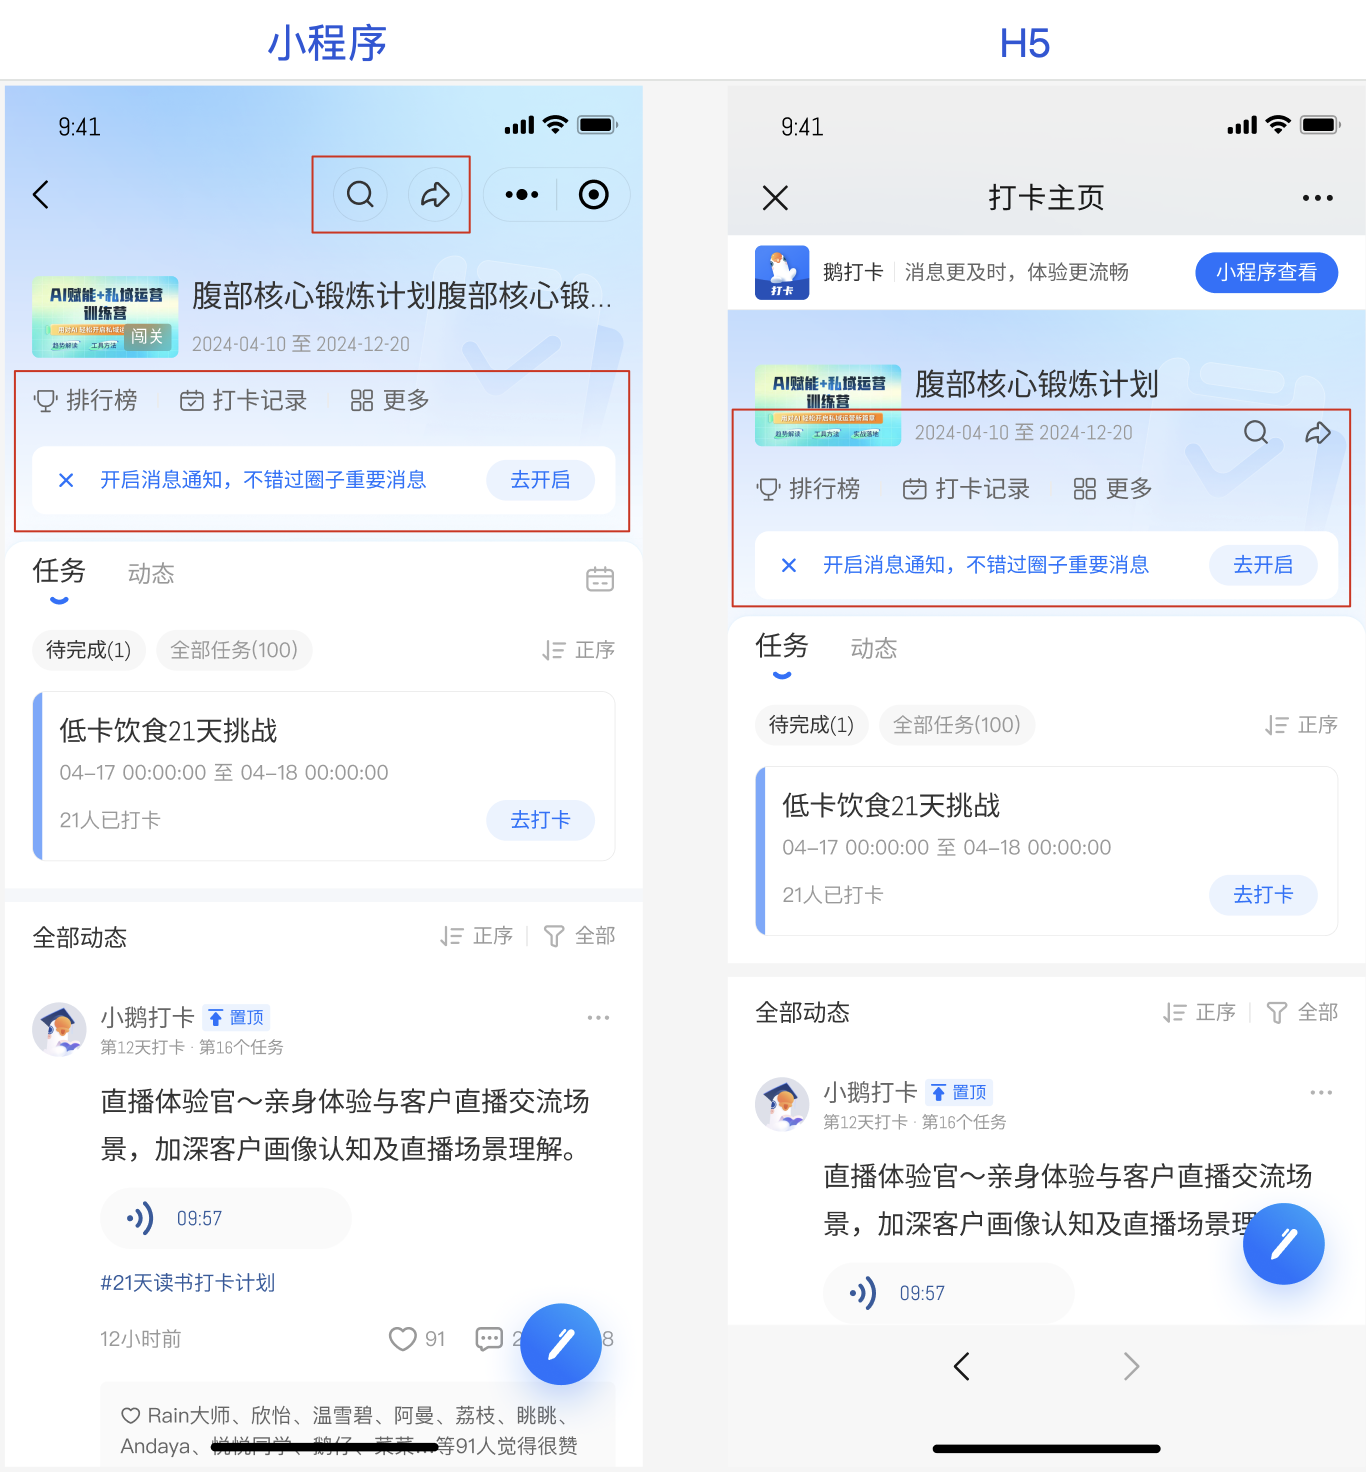
2. Punch-in Homepage - Toolbar Integration
The tools required for punch-in are uniformly placed at the top, and the tool entrances for the two types of interfaces are basically unified. This makes it convenient for learners to discover and use the tools, and also solves the problem of learners' discomfort with multi - terminal operations.
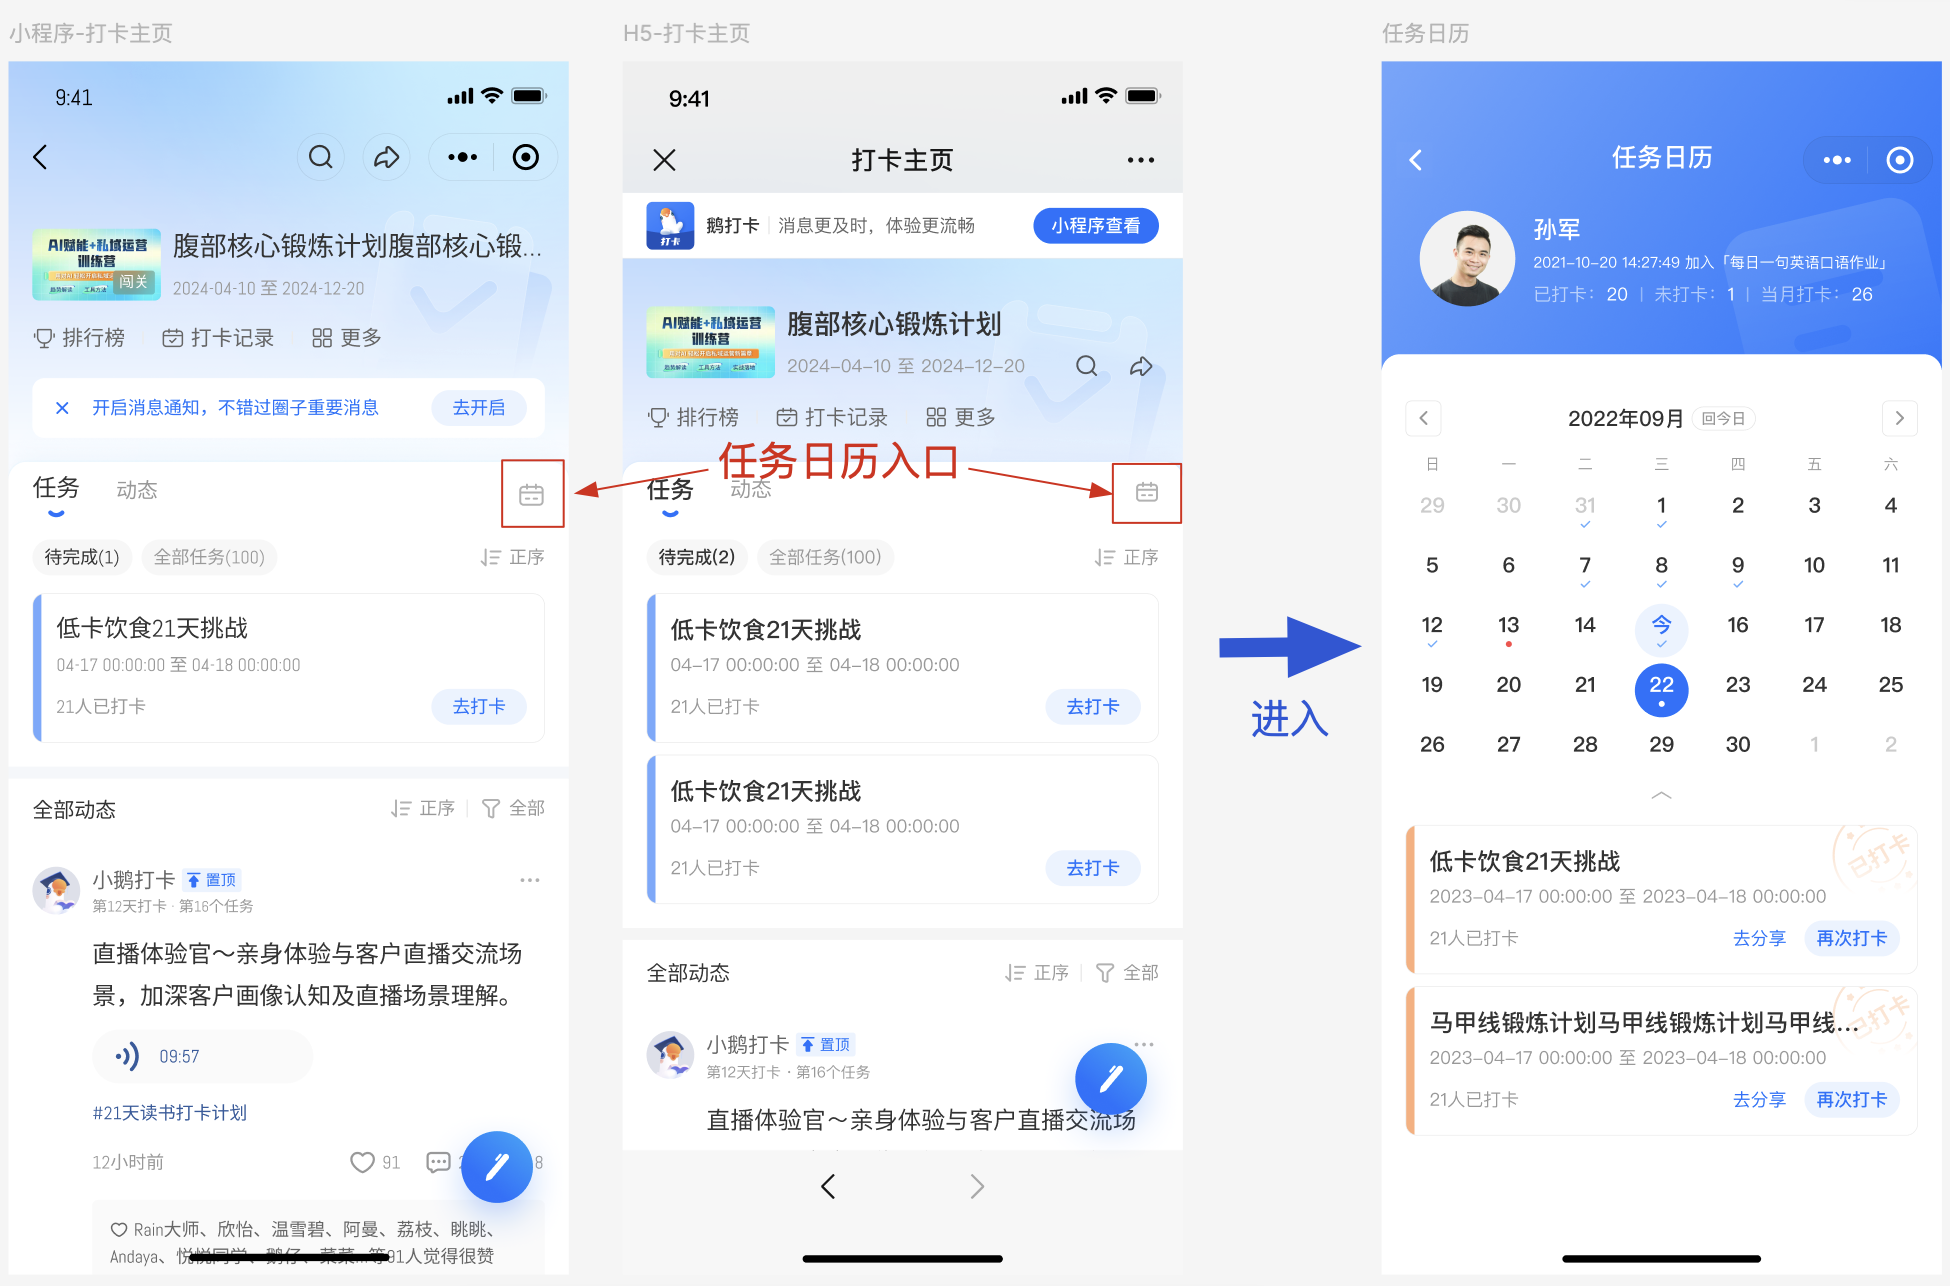
3. Support for Task Calendar
Calendar punch-in supports displaying the task calendar. Learners can see the daily task arrangements and the content available for punch-in in the task calendar, which helps them clearly understand the learning rhythm.
4.More Precise Query of Punch-in Records
Calendar punch-in supports viewing learners' punch-in calendars. Learners can immediately see their punch-in persistence at a glance. In addition to viewing the punch-in records of different dates, they can also quickly make up for the missed punch-in dates. This is convenient for users to have an overall understanding of their punch-in situation and also promotes the completion of learning.
How to configure the clock-in time
It can restrict trainees'joining time for check-ins, and also restrict trainees'actual availablecheck-in time.
I. Joining deadline
Function:Restrict the time for trainees to join the check-in. After the deadline, they can no longer enter/purchase the check-in.
Example:If the check-in activity starts in October and recruitment is carried out one month in advance, set the joining deadline as September 30 and the start time of the check-in activity as October 1.
II. Check-in time
Currently, there are two ways to set the check-in time: 1. Fixed start and end times; 2. Fixed number of days.
1. Fixed start and end times
Function:Suitable for check-ins with a unified progress. There is a fixed time cycle, and all trainees are restricted by this check-in time range.
Example:Activities with limited time, such as the reading plan in January or the daily early rising plan in 2025.
2. Fixed number of days
Function:Suitable for the check-in mode of learning at one's own pace. The specific check-in times of trainees may vary, but the number of check-in days is the same.
Example:To attract traffic, a civil service exam training institution regularly publishes an [Manual adjustment required] (Essay writing question for civil service exams) every week. Each participating trainee has only one chance to get the essay [Manual adjustment required] (Correction) within a week. The institution introduces a new batch of trainees every week and provides each trainee with 7 days for check-ins, which can achieve the business without repeatedly creating check-ins.