Text and images
- How to set the listing and delisting of graphic products?
- How to enable information collection for image-text courses?
- How to create a new graphic product?
- What is the preview content?
- What is text anti-copying?
- Can local audio and video files be added under the graphic details?
- Why is the course price display grayed out and cannot be edited?
- How to use the editor?
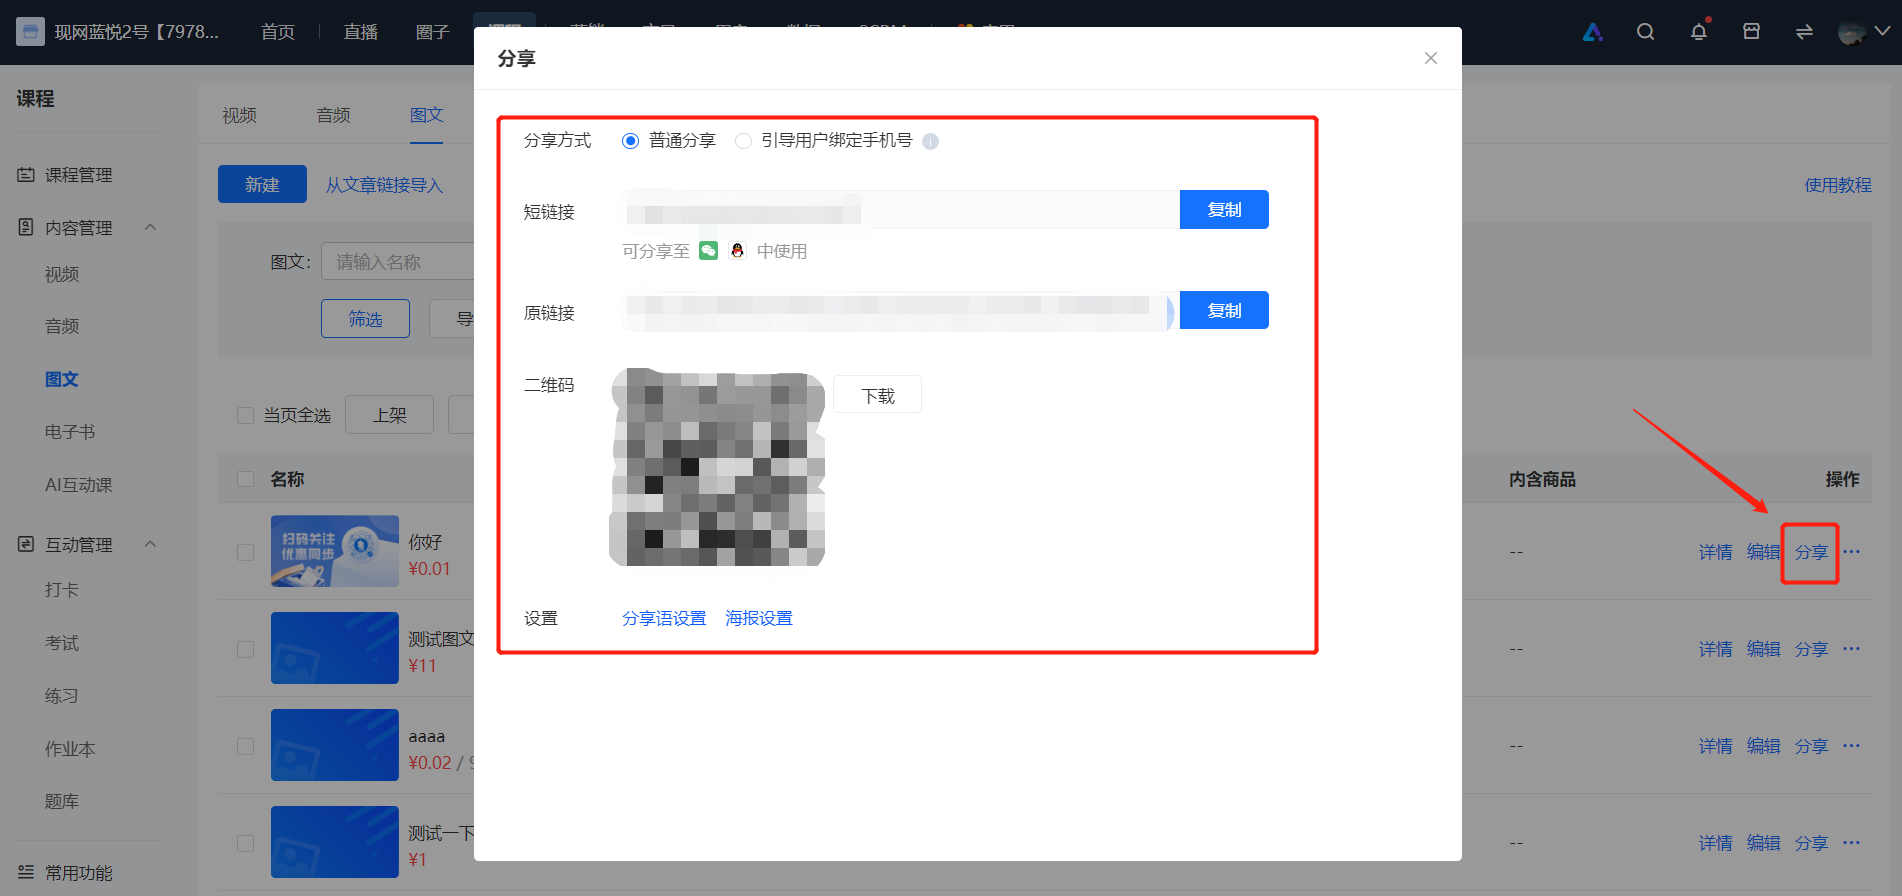
- After creating an image-text course, how can merchants share the image-text product with learners?
- Tutorial on Using Strikethrough Prices
- Tutorial on Using the Rich Text Editor
- What products do not support guiding users to join the community on the product detail page?
- Which courses support guiding users to join the community before purchase?
- Tutorial on Batch Operations for Courses
- Instructions for adjusting the cover image size
How to set the listing and delisting of graphic products?
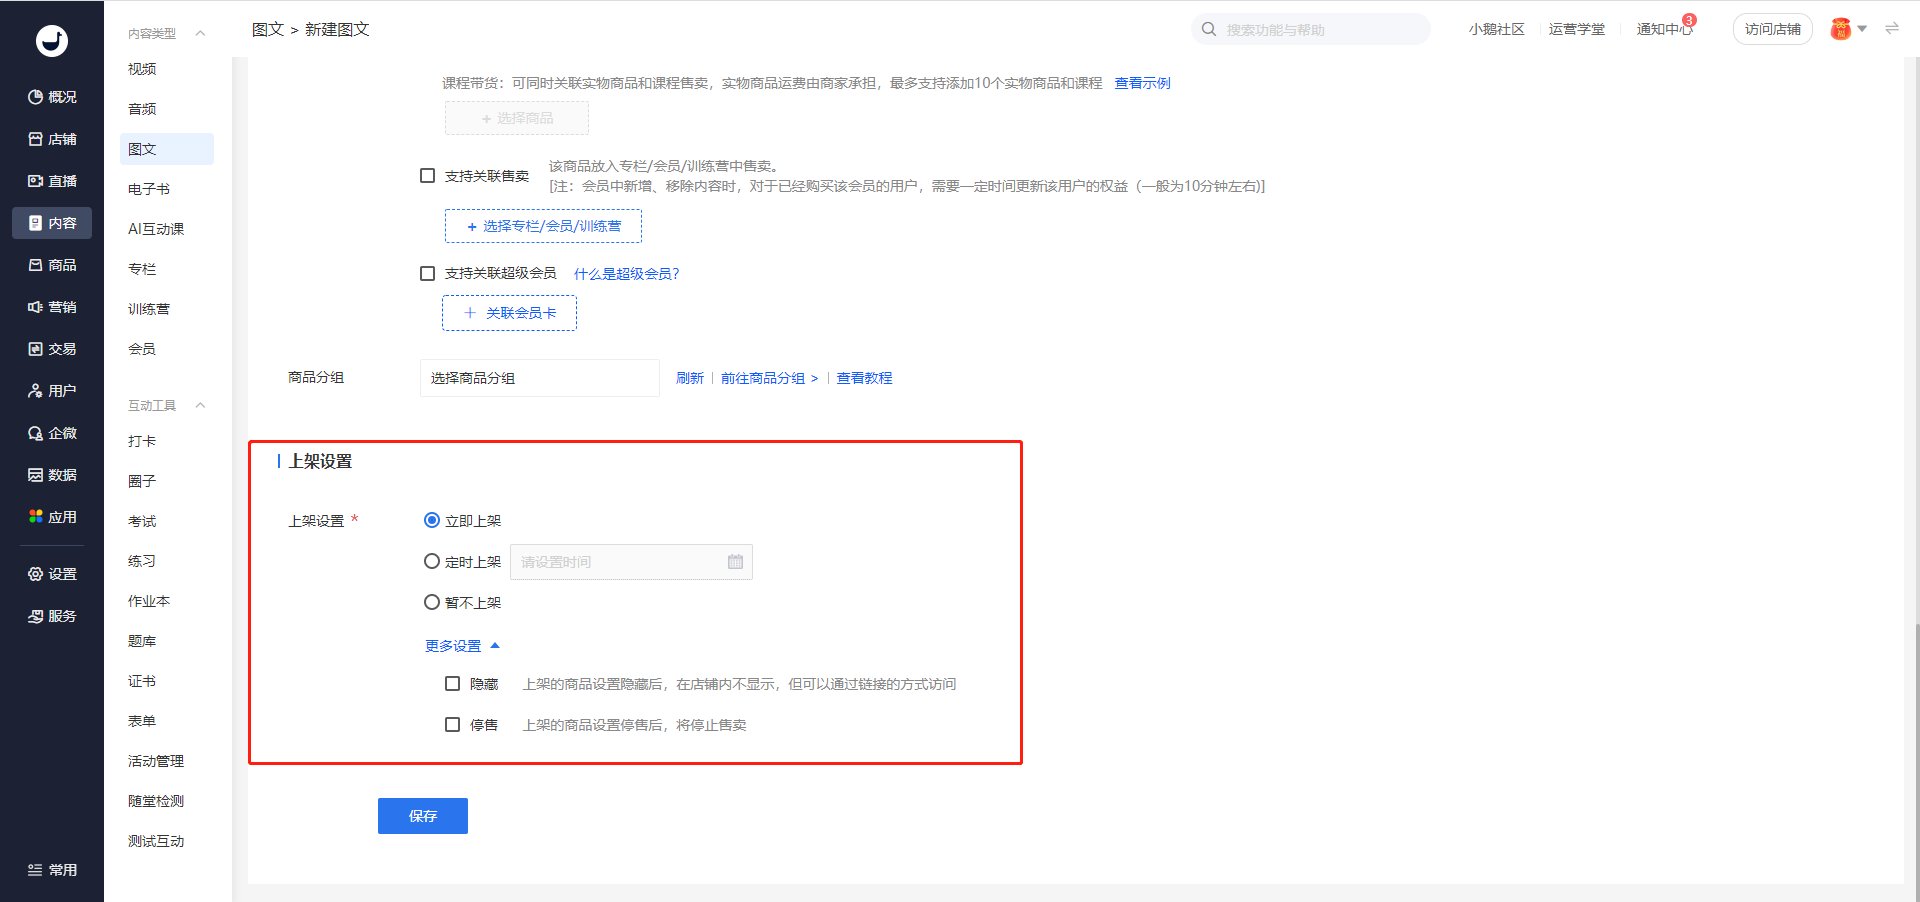
1. When creating/editing a product, merchants can set the product to be listed.
When you set the product to be listed immediately, it will be displayed in the Online Store upon publication.
When you set a scheduled listing time, the product will be displayed in the Online Store after the specified time.
When you set the product to be hidden after listing, it can only be accessed via a link.
[Graphic] - [Details/Edit] - [Sales Settings]
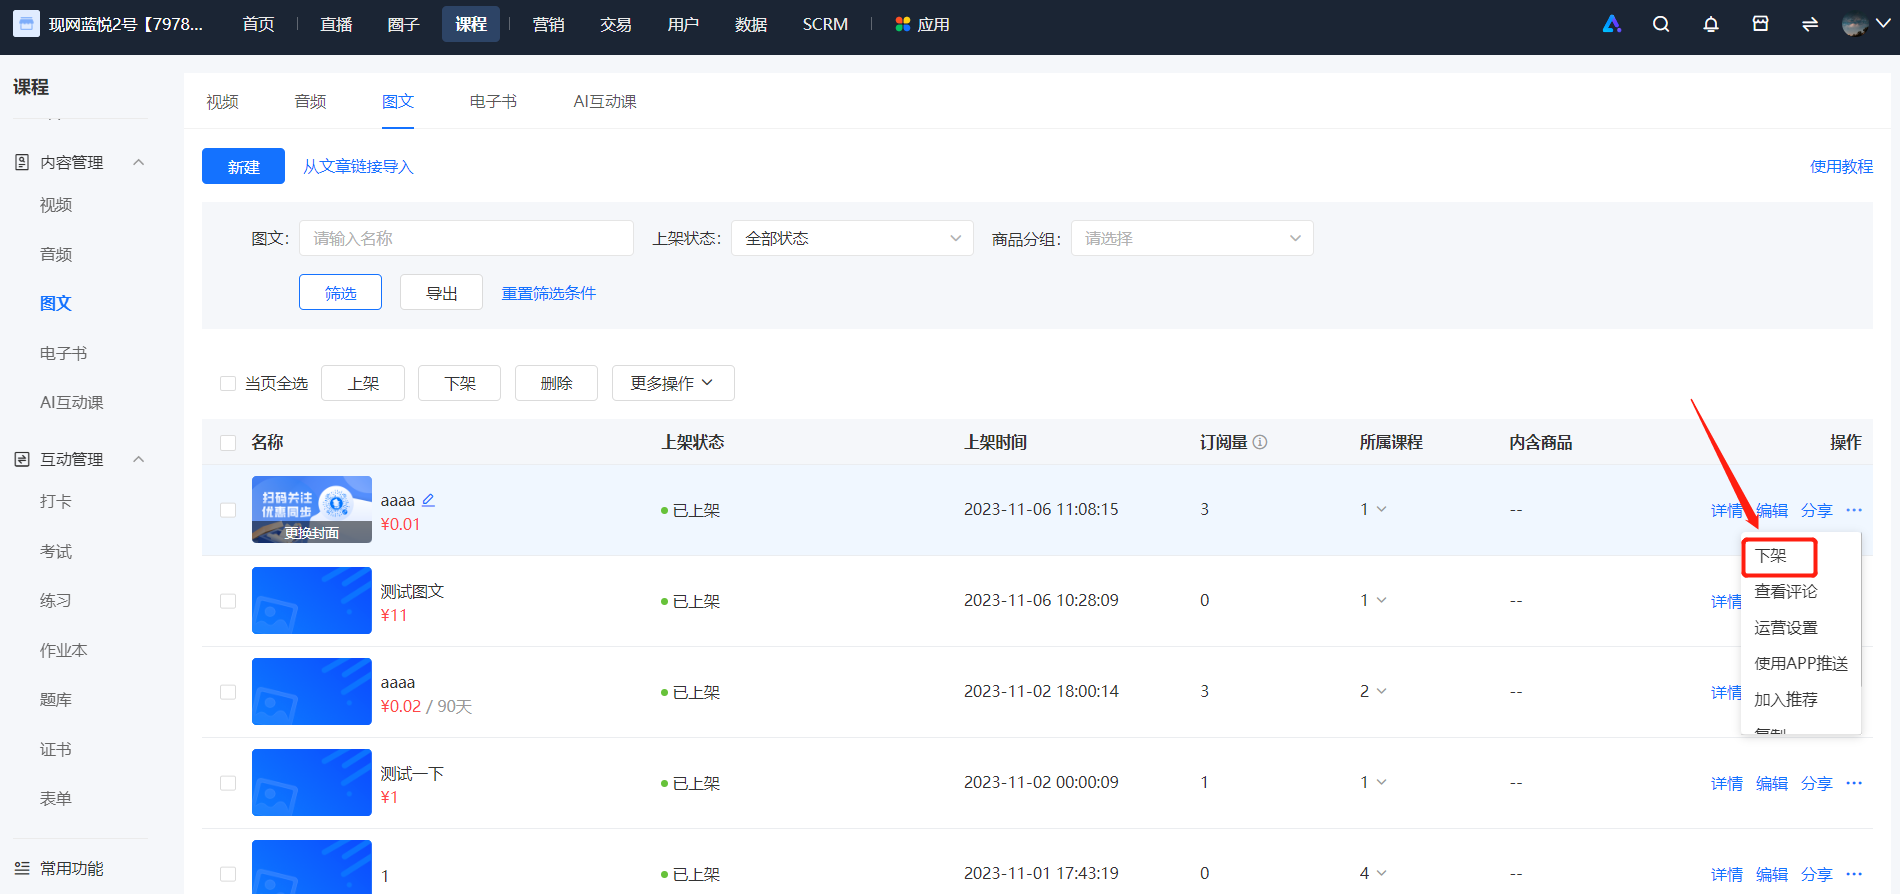
2. After saving the product, you can directly list or unlist the graphic product in the graphic list.
How to enable information collection for image-text courses?
I. Function Description
The information collection function allows you to customize the collection of paid user information, including contact information like phone numbers and WeChat IDs, as well as personalized user information, to clearly depict user profiles.
So, how do you enable information collection for text and image courses?
II. Operation Steps
1. Create or edit a product and save it.
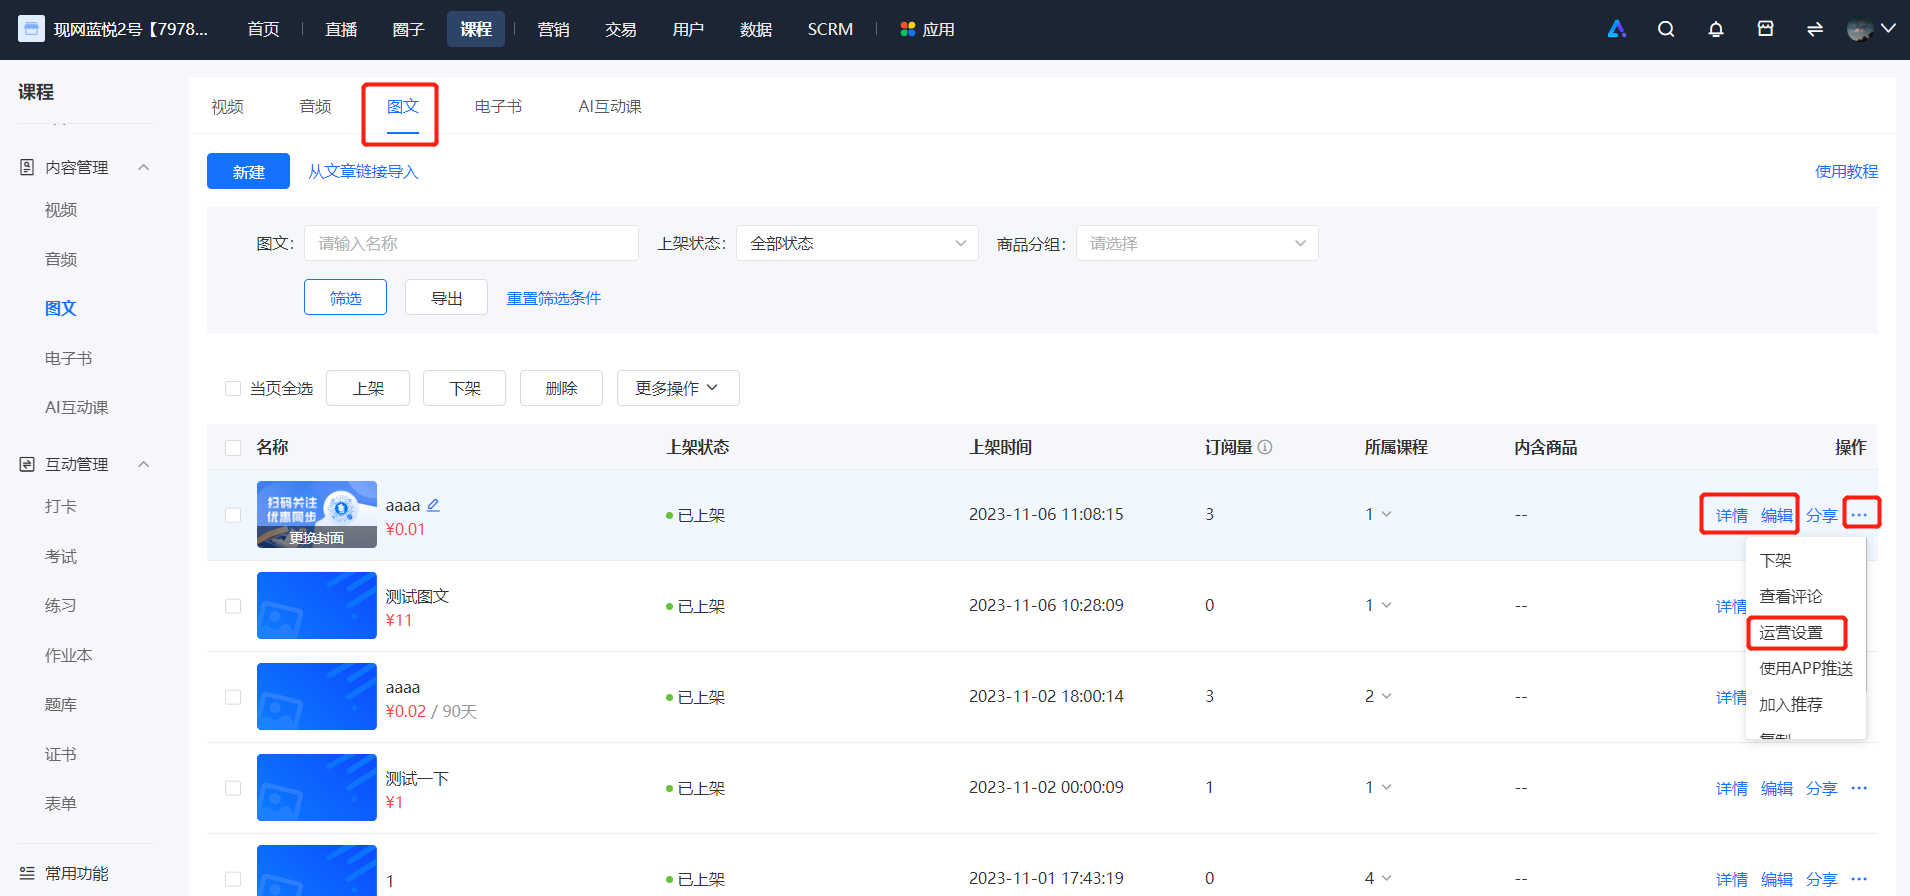
2. In the text and image list, click [···] - [Operation Settings], or click [Details/Edit].
3. On the text and image details page - Operation Settings page, enable the information collection function.
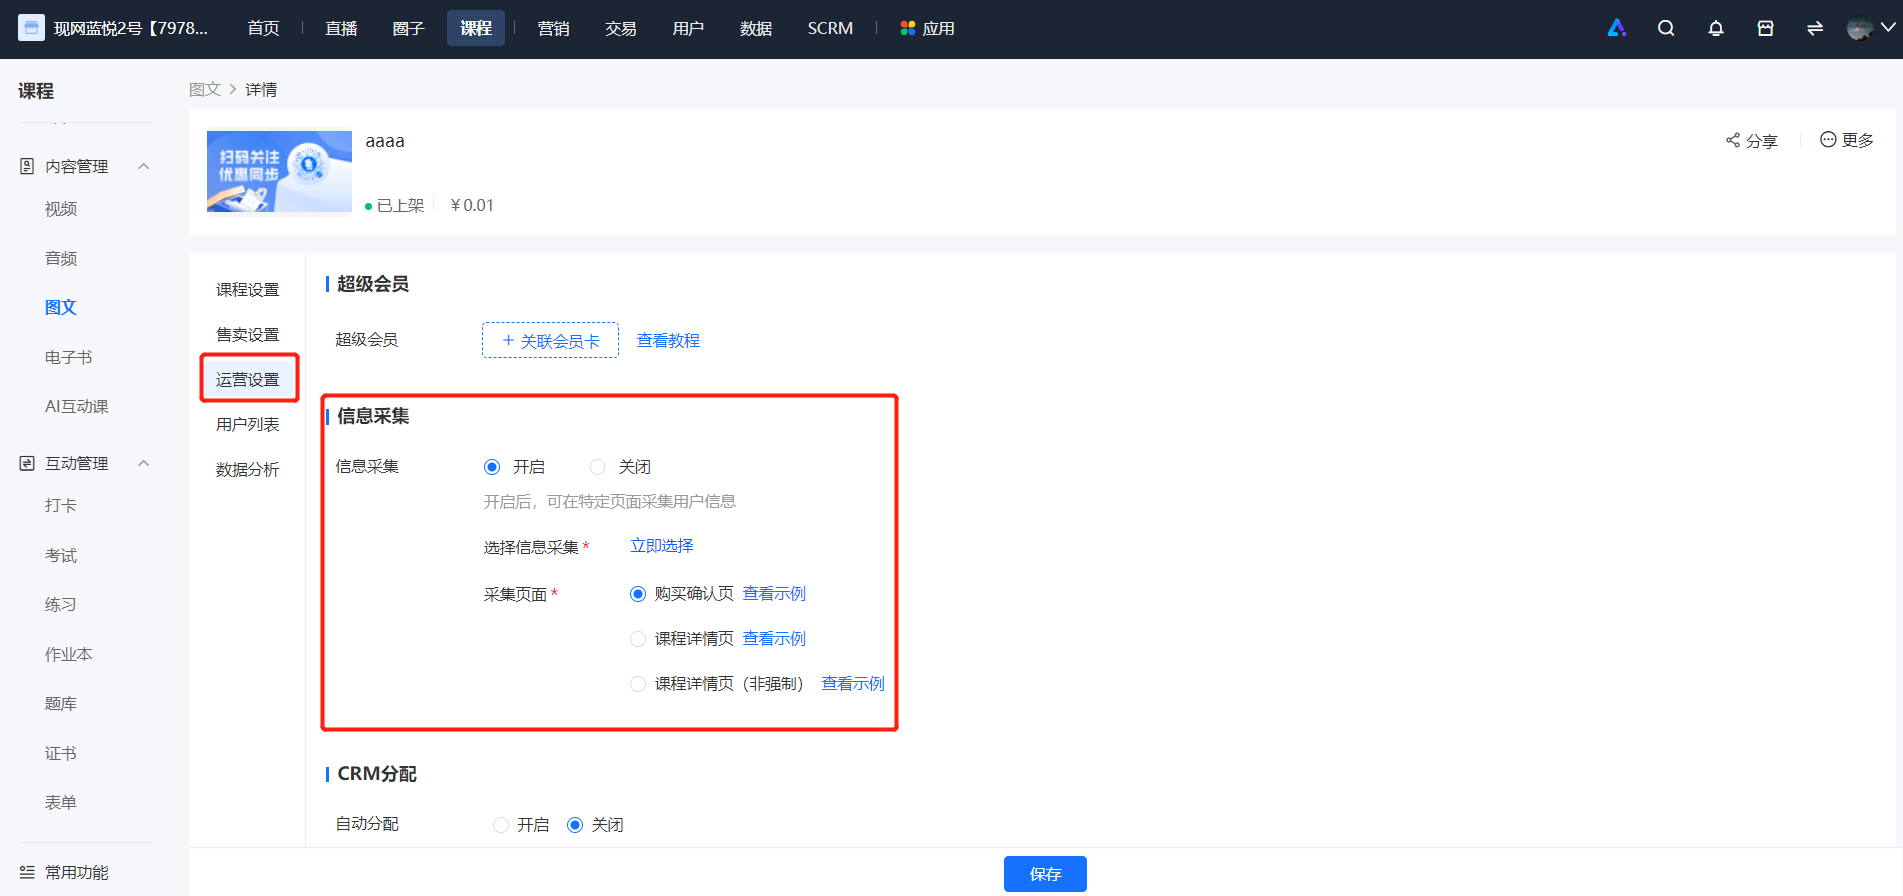
4. Select an existing information collection or create a new one; choose the collection page; and finally, save the settings.
How to create a new graphic product?
1. Enter the page: Select [Articles] from [Content Management] → [Create New Article] to enter the article product editing page.
2. Fill in information such as the article title, article cover, article details, sales method, and Shelf Settings, etc.
3. Click [Save] to successfully create the article product.
What is the preview content?
1. When a product is set as paid, users who haven't purchased the graphic course can only view the preview content you've set when accessing the course.
2. When a graphic course is set as free, or after a user has made the purchase, the user can view the full content of the graphic, i.e., the detailed content of the graphic, but cannot view the preview content.
What is text anti-copying?
Text anti-copy is a feature that prevents your paid content from being pirated. After enabling this feature, the text content of the product is prohibited from being copied, and the functions of zooming in on images by clicking and recognizing QR codes by long-pressing are not allowed to be used.
Can local audio and video files be added under the graphic details?
Yes, you can add local audio and video files under the text and image details.

Why is the course price display grayed out and cannot be edited?
Hello, if your course has participated in marketing activities such as flash sales, group buys, limited-time discounts, follower growth tools, and viral posters, you cannot modify the course price during the event period.
How to use the editor?
Rich Text Editor: Supports text editing, image insertion, audio insertion, video insertion, link insertion, H5 insertion, etc. Using the rich text editor to edit can make your content more diverse and vivid. You can use the rich text editor to edit images and texts, course details, etc.

Third - party Editor: elink supports pasting content copied from third - party editors. You can edit the content in a third - party editor and then copy it to the rich text editor. Please wait for the images to be completely uploaded to the elink server before saving. If there are deformation or display issues after pasting, it is due to compatibility problems. You need to readjust the style in the elink editor and then upload it again.
After creating an image-text course, how can merchants share the image-text product with learners?
Tutorial on Using Strikethrough Prices
I. What is the strikethrough price?
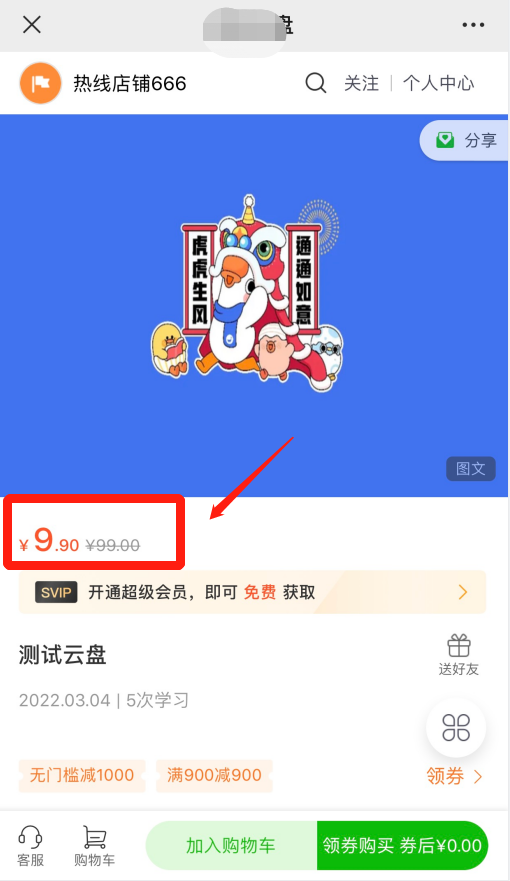
The strikethrough price refers to the price of a product displayed on the product sales page with a horizontal line through it. It is usually shown alongside the actual selling price without a strikethrough.
You can set the strikethrough price independently. It can be the original price, reference price, brand counter price, tag price, manufacturer's suggested retail price, or a previously transacted price of the product. It is not the final transaction price.
The strikethrough price you set must be real and valid. Using a fictitious price as the strikethrough price may violate relevant laws and regulations, and you will need to bear the corresponding legal responsibilities. [Manual adjustment required]
II. How to set the strikethrough price?
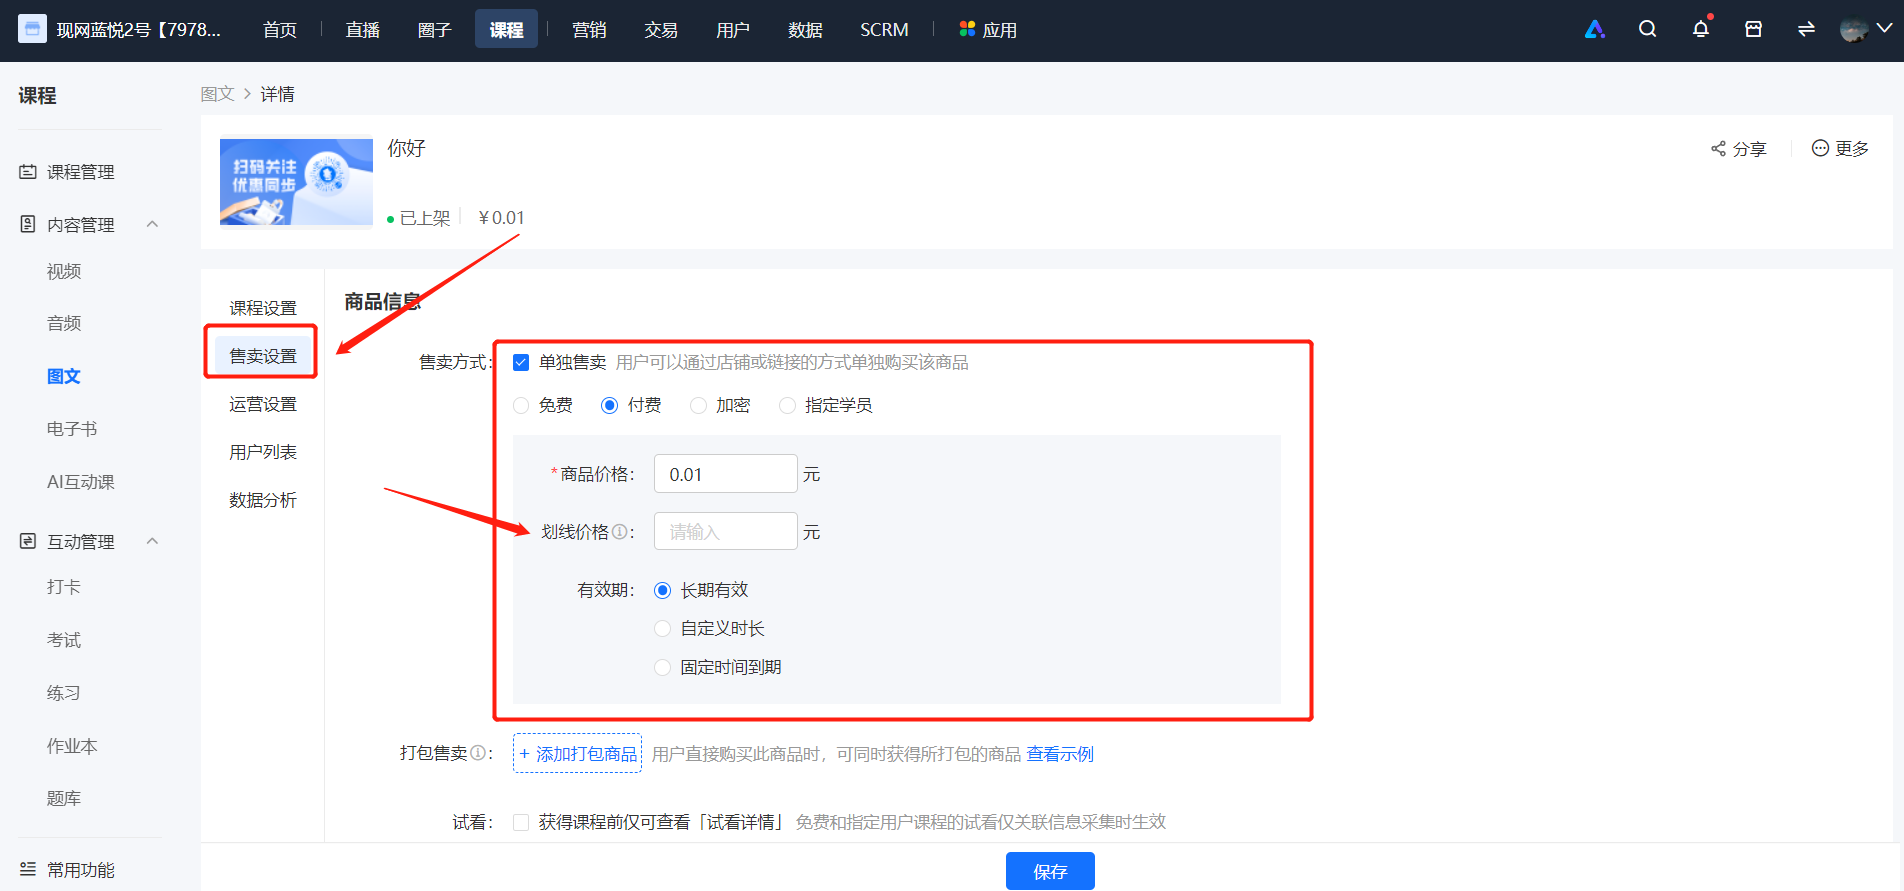
The strikethrough price can be set in [New Product - Product Information]. The strikethrough price option only appears when the product sales method is set to [Paid], and it is an optional field.If the product has no other promotional activities (such as Joint Orderg), after you fill in the strikethrough price, it will be displayed in a strikethrough format on the product details page.
* Take a text - image product as an example:
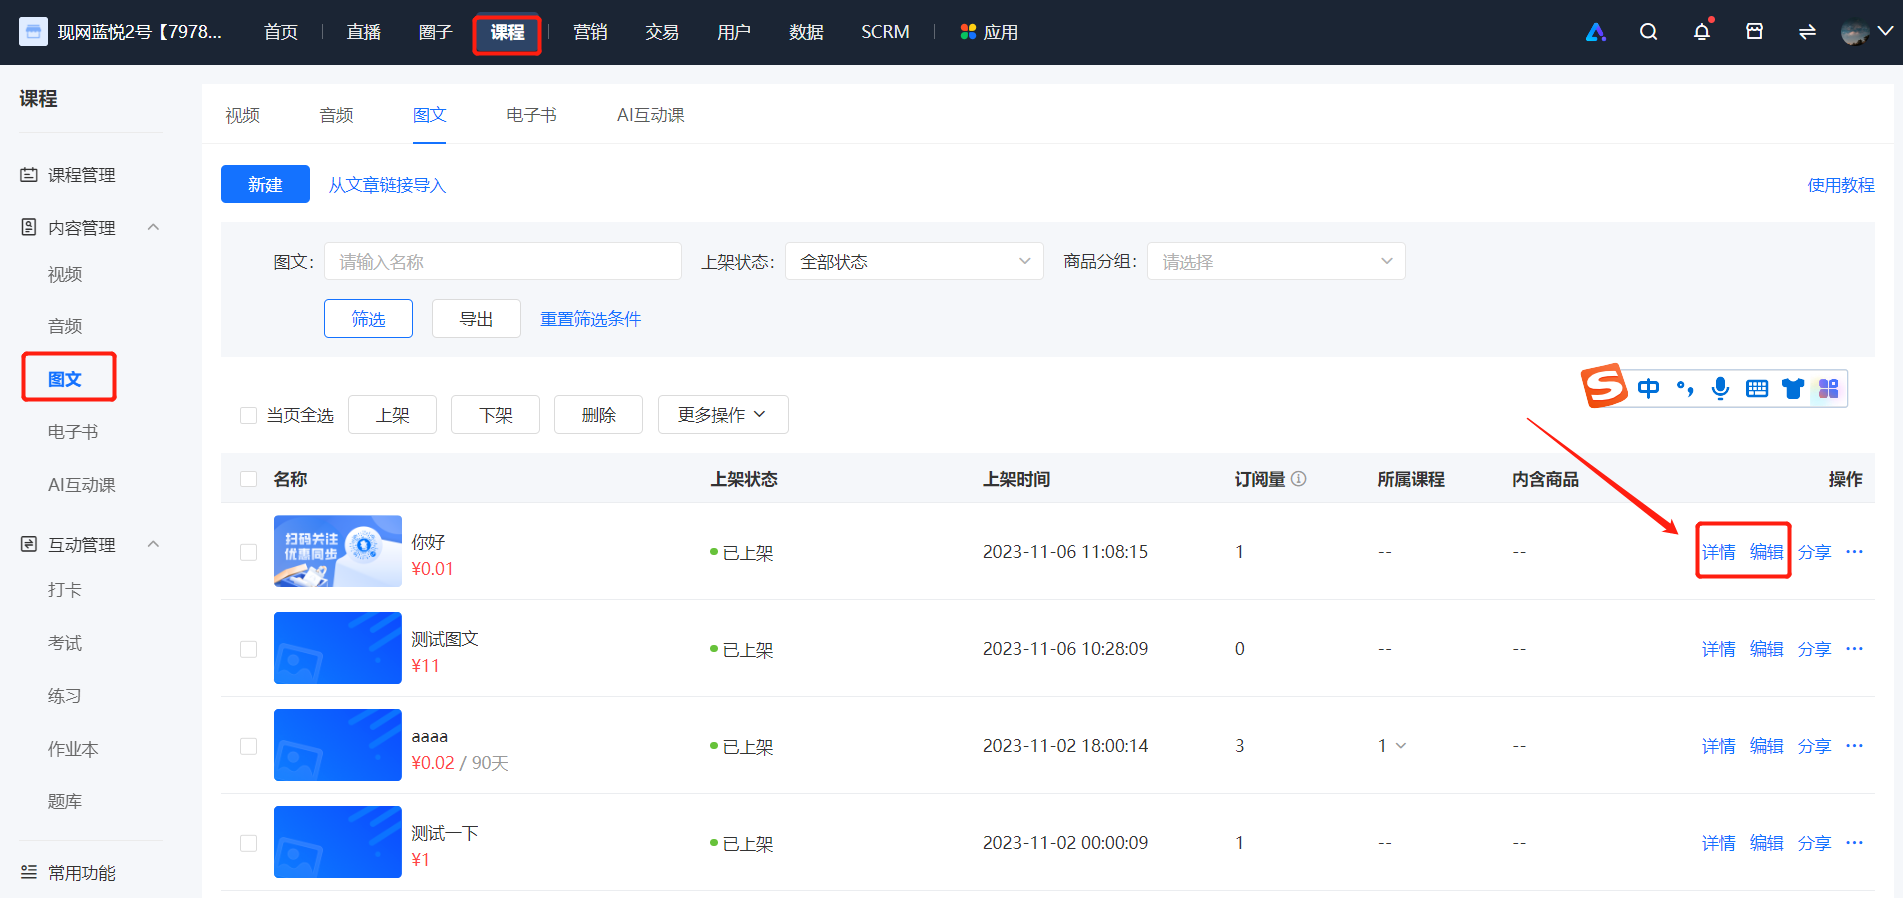
1. After creating a new [Text - Image] product, click [Details/Edit] to enter [Sales Settings]
III. Presentation effect on the H5 learner's end:
Tutorial on Using the Rich Text Editor
I. Function Description
The rich text editor supports text editing, image insertion, audio insertion, video insertion, link insertion, H5 insertion, etc. Editing with the rich text editor can make your content more diverse and engaging. Merchants can use the rich text editor to edit images and texts, course details, etc.
II. Function Usage
1. Basic editing and typesetting functions: Support basic text typesetting functions, such as font size, color, bold, line spacing, format painter, ordered list, unordered list, etc.

2. Add images: Support single-image upload and multi-image upload.
(1) [Image upload] The image size should not exceed 5M. When the uploaded image exceeds 2M, it will be compressed.
(2) [Image editing] In the rich text editor, select an image to modify its size and drag to adjust its position.

3. Add videos: Support adding local videos and third-party videos.
(1) [Local videos] Support mp4, avi, wmv, mov, flv, rmvb, 3gp, m4v, mkv, webm formats, with a size not exceeding 5GB.
(2) [Third-party videos] Can be added through [Add video - Video link]. Instructions for filling in the video link: For Tencent Video and Youku Video, you can directly paste the video link into the input box. For other videos, you can insert them by pasting the [Universal code] of the video sharing. (To have a better experience on WeChat, it is recommended to use Tencent Video when inserting third-party videos.)
(3) Instructions for the [Universal code] of video sharing. Example: Method for inserting iQiyi videos
① Open the video link;


*Note:
The course details in Mini Program V76 and above versions support the display of added local videos. Third-party videos inserted through [Add video - Video link] are not currently supported for display in the Mini Program. If you want the video to be displayed in the Mini Program, please upload a local video.
4. Add audio
Support m4a and mp3 formats, with a size not exceeding 500MB.

*Note: The course details in Mini Program V76 and above versions support the display of added audio.
5. Add links
Support adding hyperlinks to text and images;
Select an image or text, click the [Hyperlink] icon, paste the link address and confirm to complete the link insertion.

6. Add emoticons to make the images and texts more vivid

What products do not support guiding users to join the community on the product detail page?
Super Memberships, physical products, and education and training courses do not support group joining guidance on the product detail page.
Which courses support guiding users to join the community before purchase?
Paid courses (supporting individual sales) support guiding users to join the community before purchase.
Tutorial on Batch Operations for Courses
I. Feature Introduction
Provide merchants with the ability to create and manage courses in batches. Merchants can create audio, video, and live courses in batches, and perform operations such as batch publishing, unpublishing, and deletion of courses.
II. Purpose of Use
Improve the efficiency of merchants in creating and managing courses.
III. Operation Path
Merchant side: Merchant backend → Course management → Course list → Batch creation, Batch operations
IV. Usage Tutorial
(1) Batch creation of audio and video
1. On the audio (video) course list, merchants can click the “Batch new” button above to enter the batch creation page for audio (video) courses.
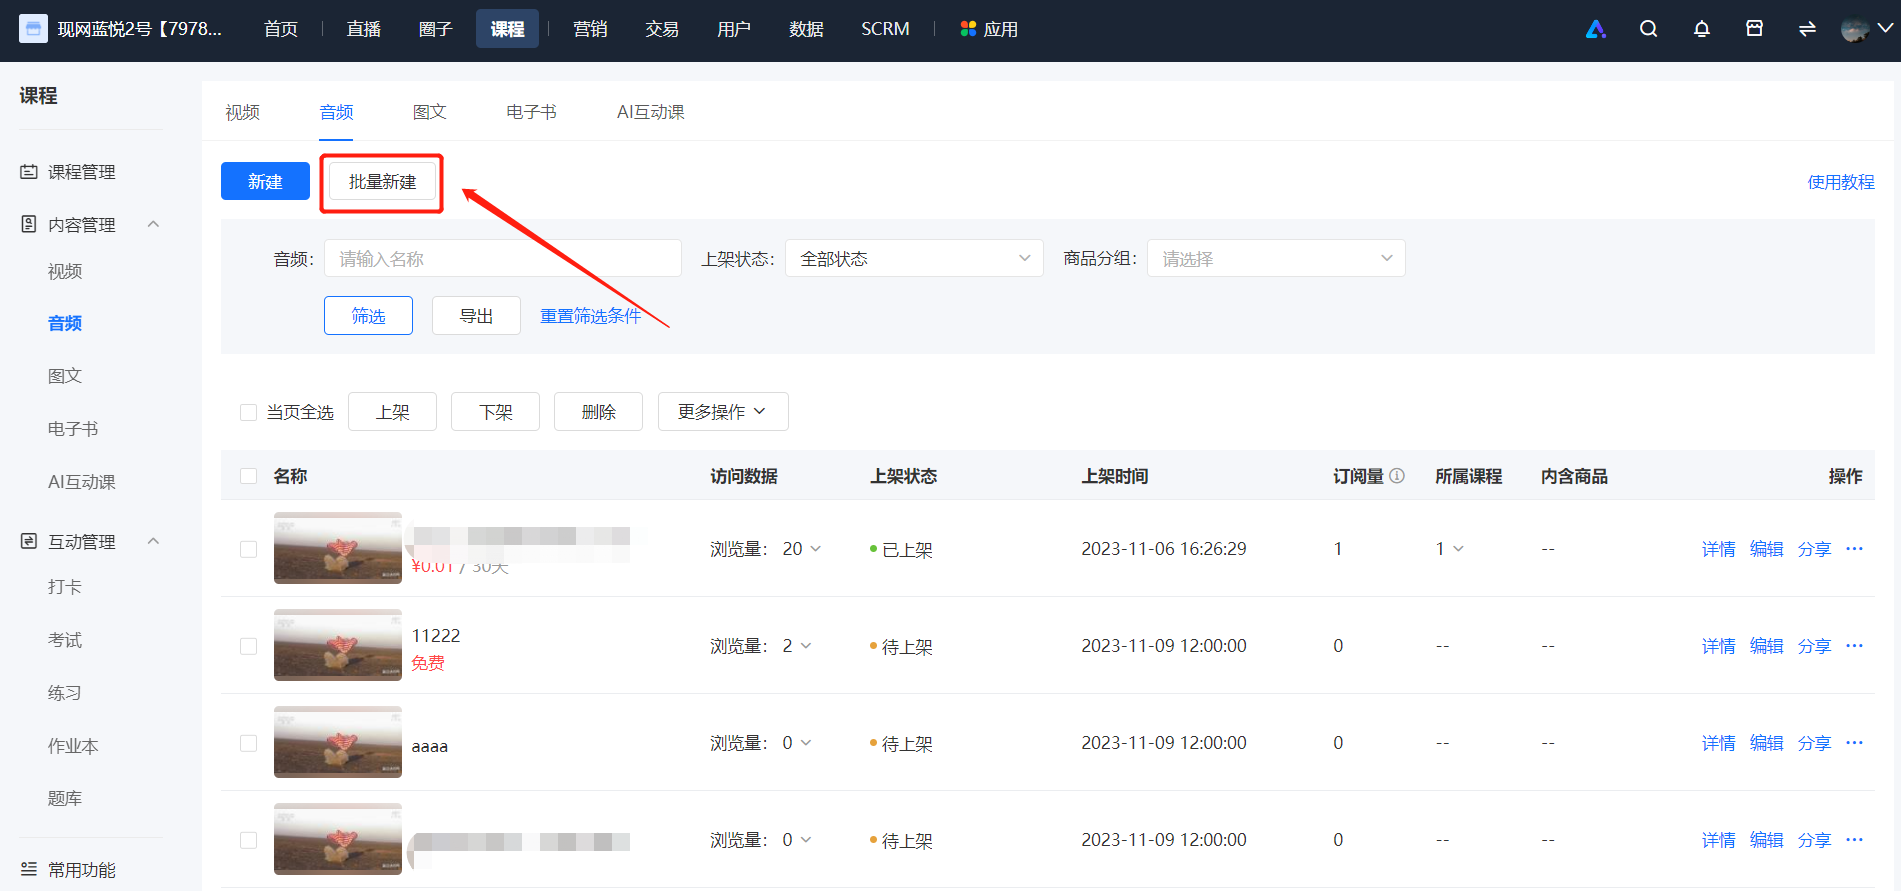
2. Batch creation of audio (video) is divided intotwo steps:
① 【Upload files】: Upload audio (video) files and set the corresponding course names (the file names are used by default) and course covers. A maximum of 50 courses can be created in batch each time.
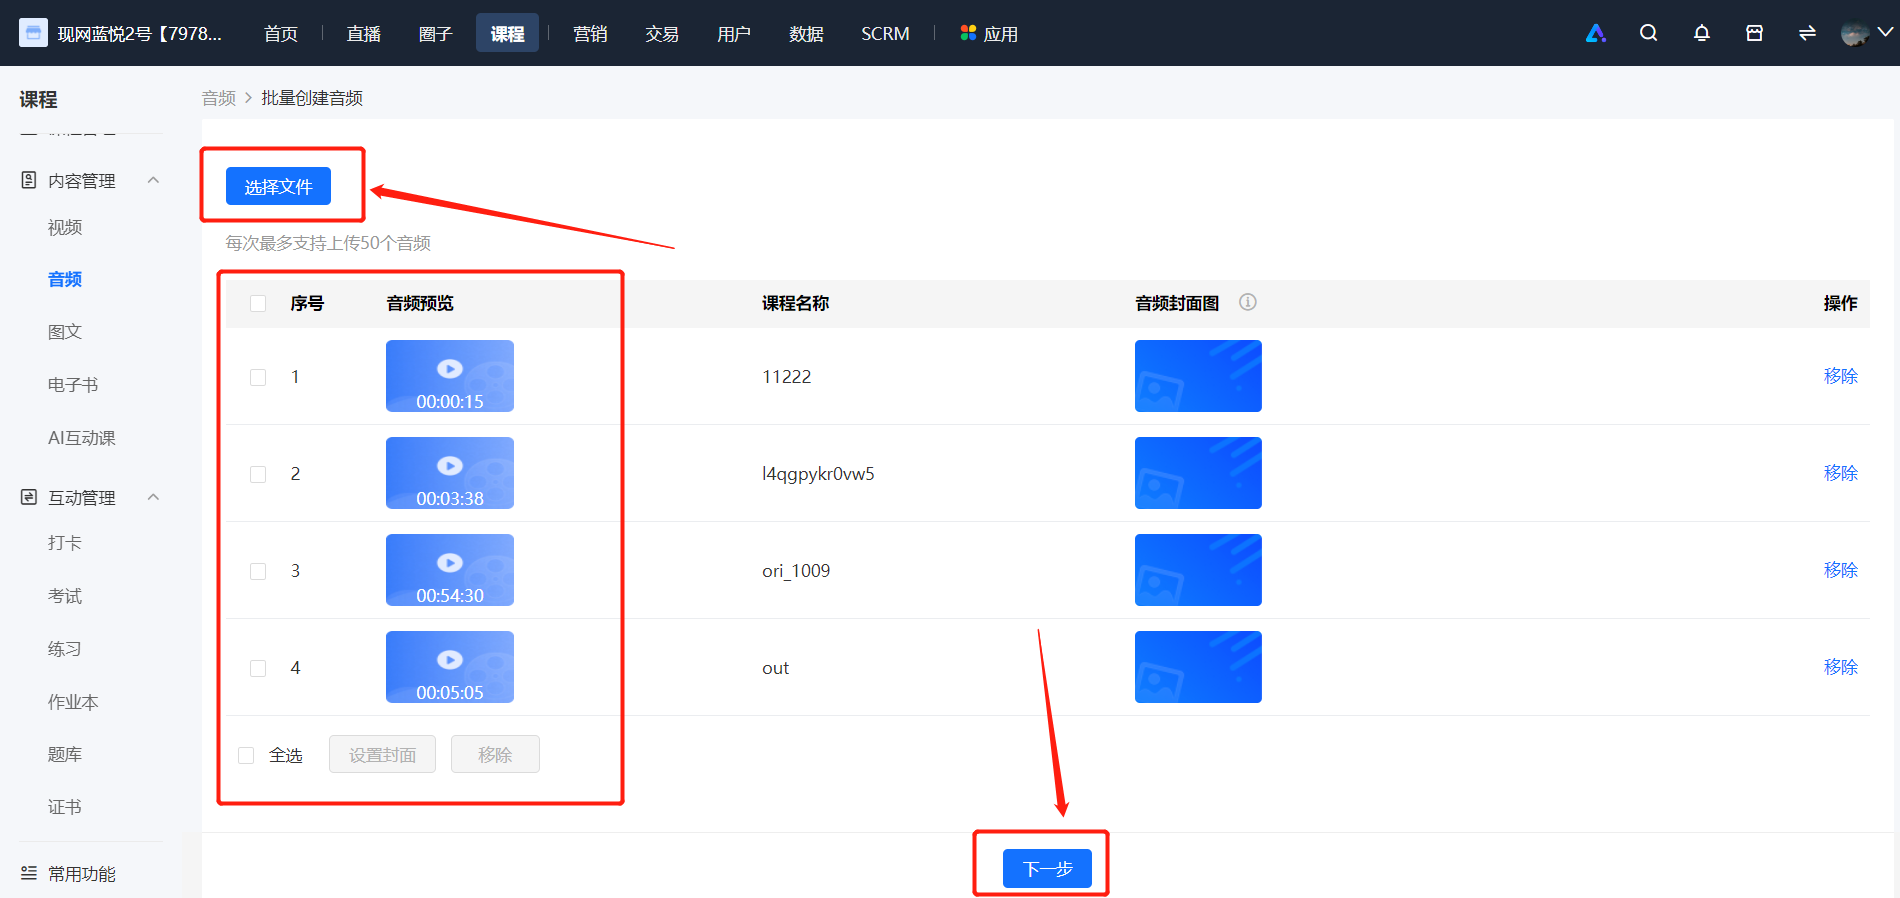
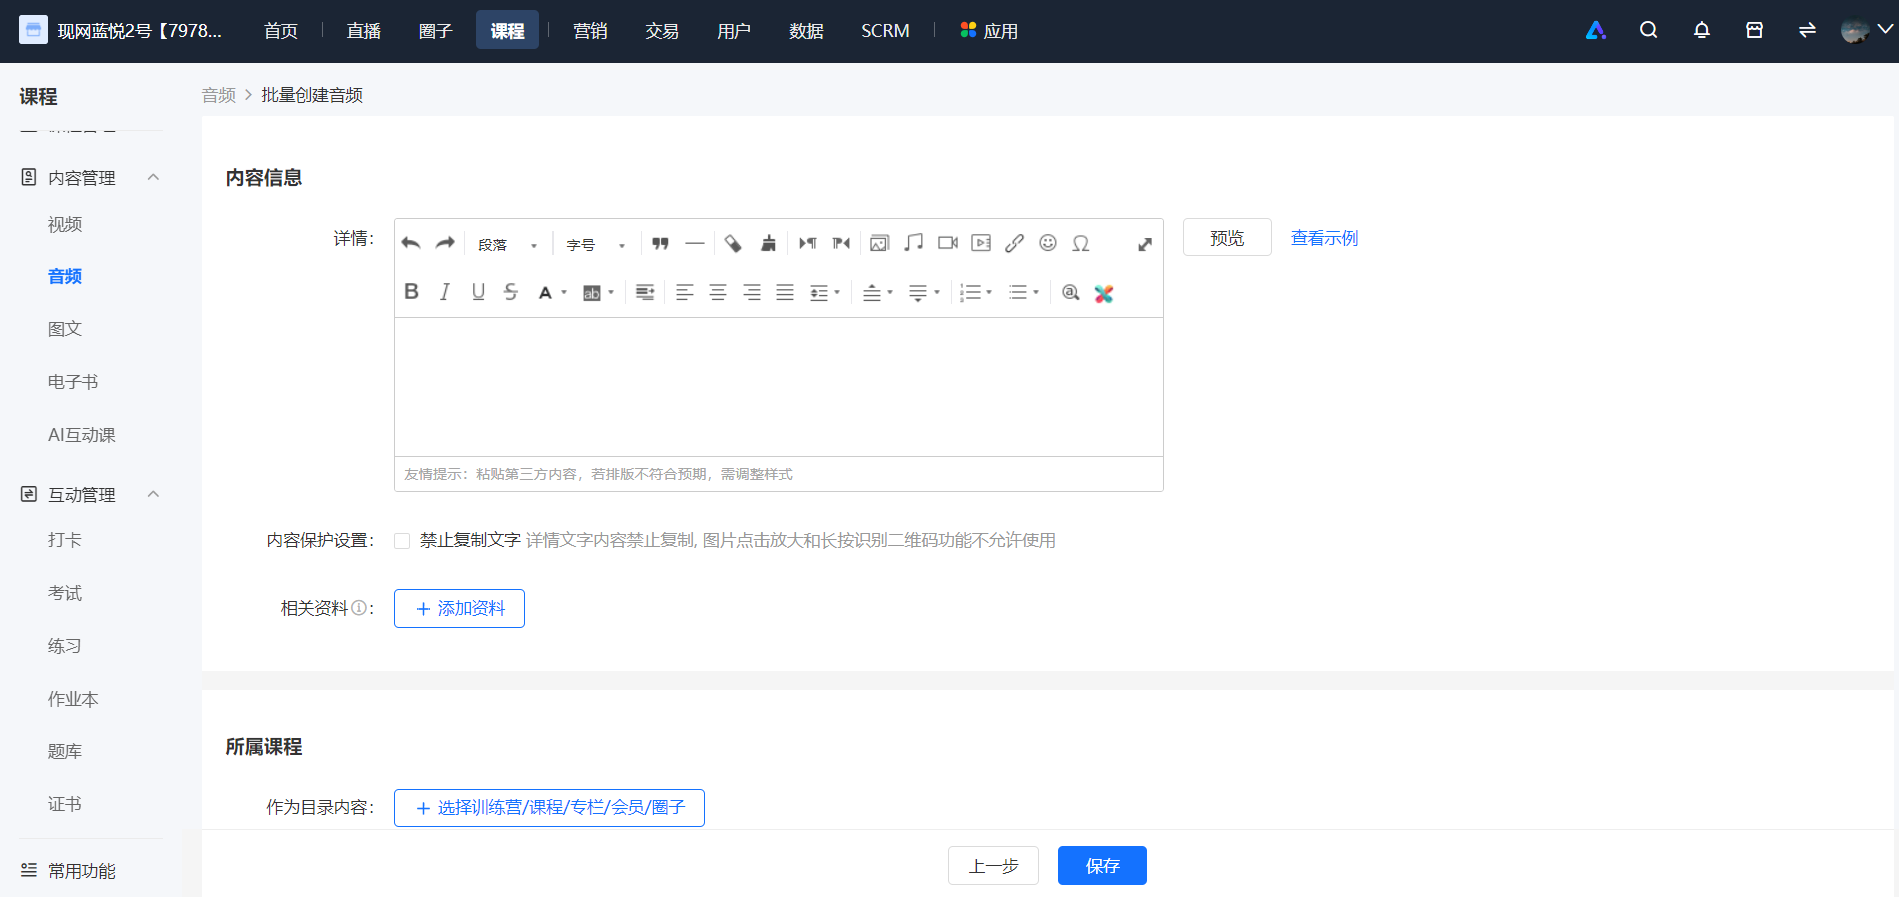
② 【Batch course settings】: After uploading, click “Next”. In this step, other information for these courses (such as content information and product information) can be set uniformly. Click “Save” after setting to start batch creation.
3. After starting batch creation, the course list will be displayed, showing the courses that have been created (batch creation takes some time. You can refresh the page later to view).
(2) Batch creation of live courses
1. On the live course list, merchants click the “Batch create” button above and select the live course mode to be created.
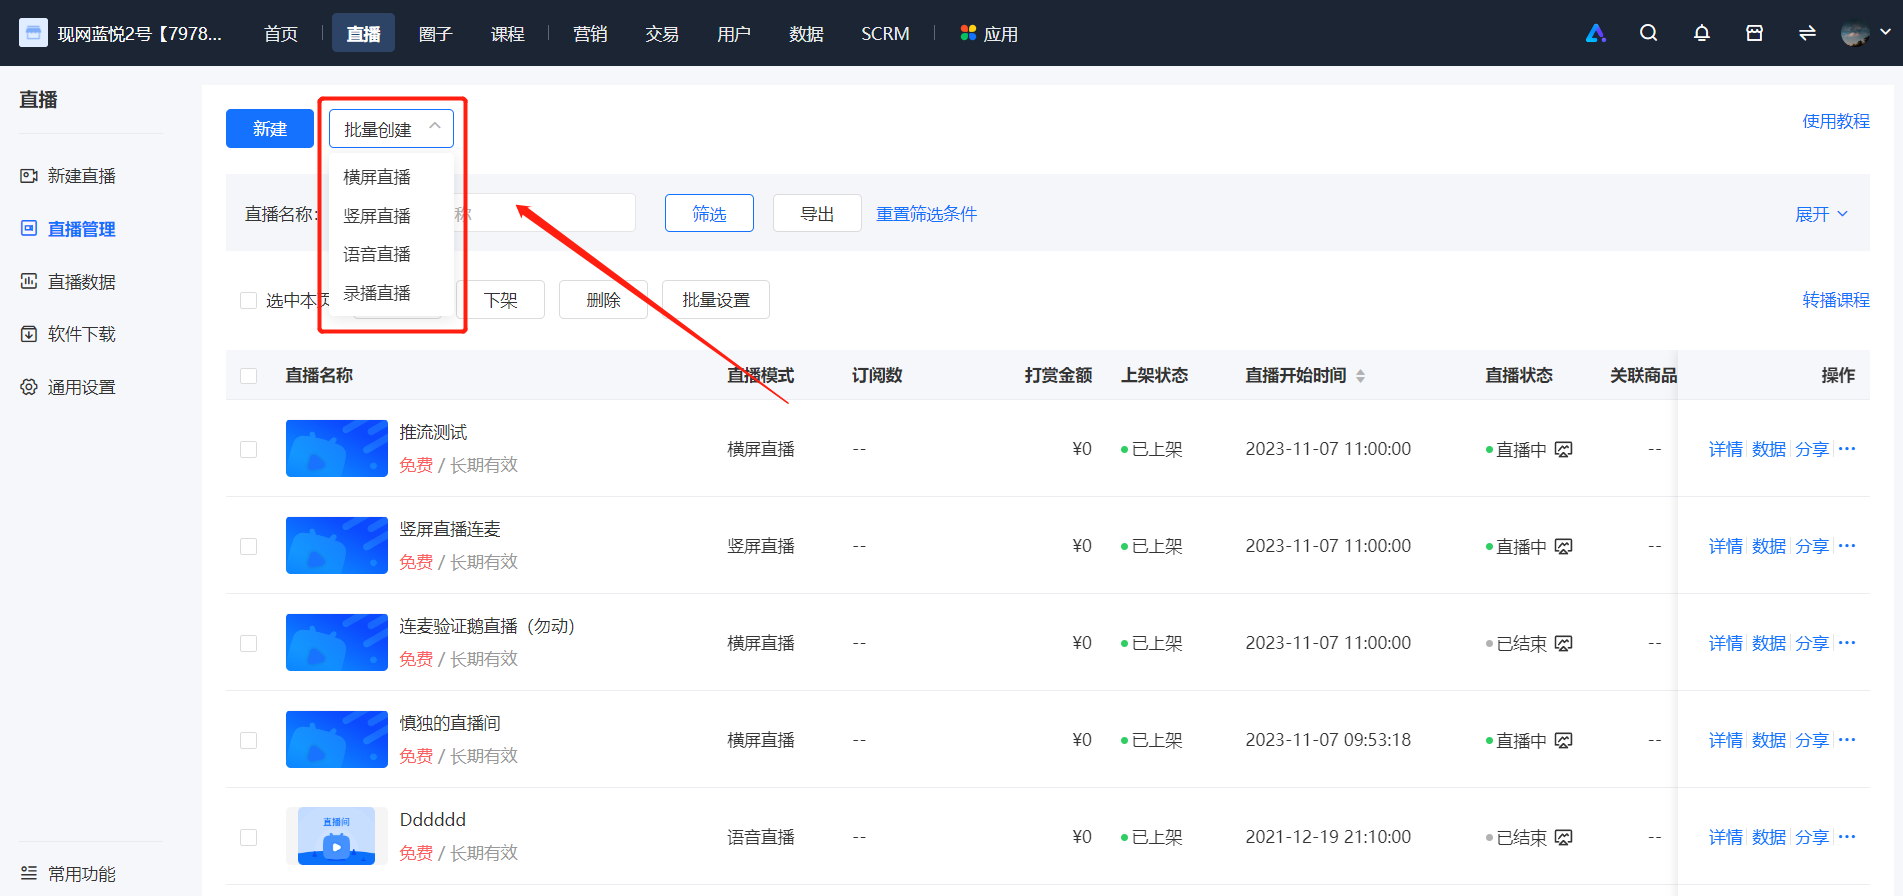
2. Batch creation of live courses is divided into two steps:
① 【Basic settings】: Create live courses and fill in the corresponding live course names (by default, they are sorted in ascending order as store name - 1, store name - 2), live course covers, start times, and live course durations. If the recorded live course mode is selected, files also need to be uploaded. A maximum of 50 live courses can be created in batch each time.
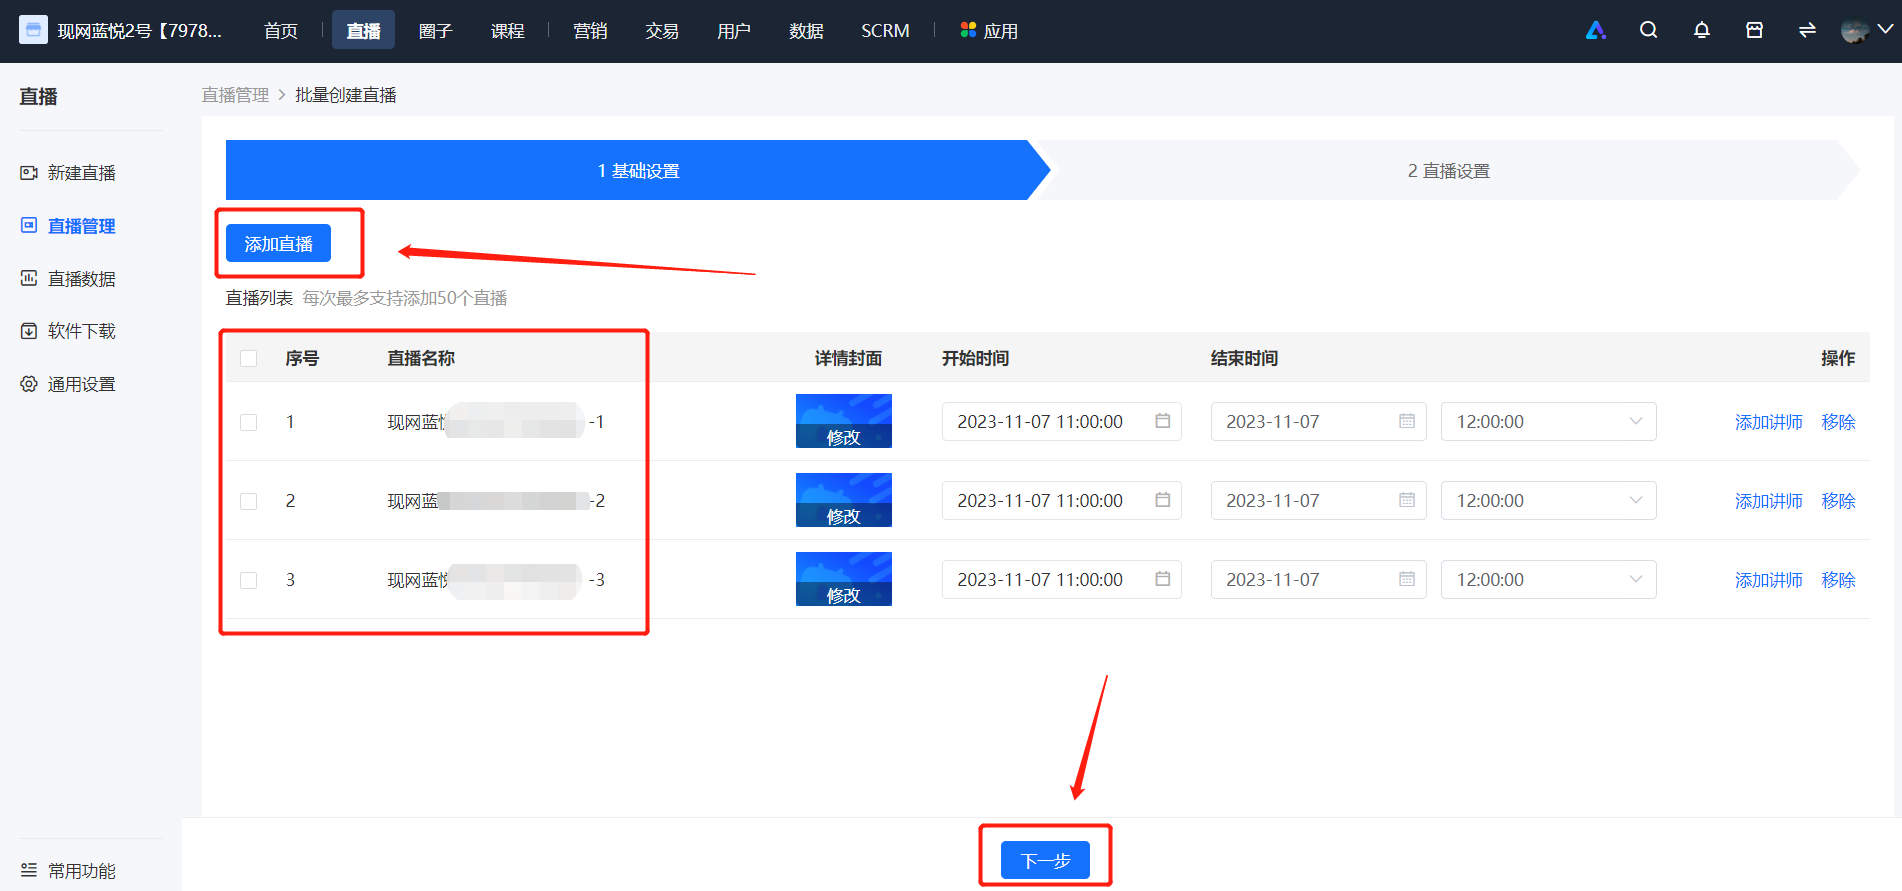
② 【Live course settings】: In this step, other information for these live courses (such as live course introductions and live course details) can be set uniformly. Click “Save” after setting to start batch creation.
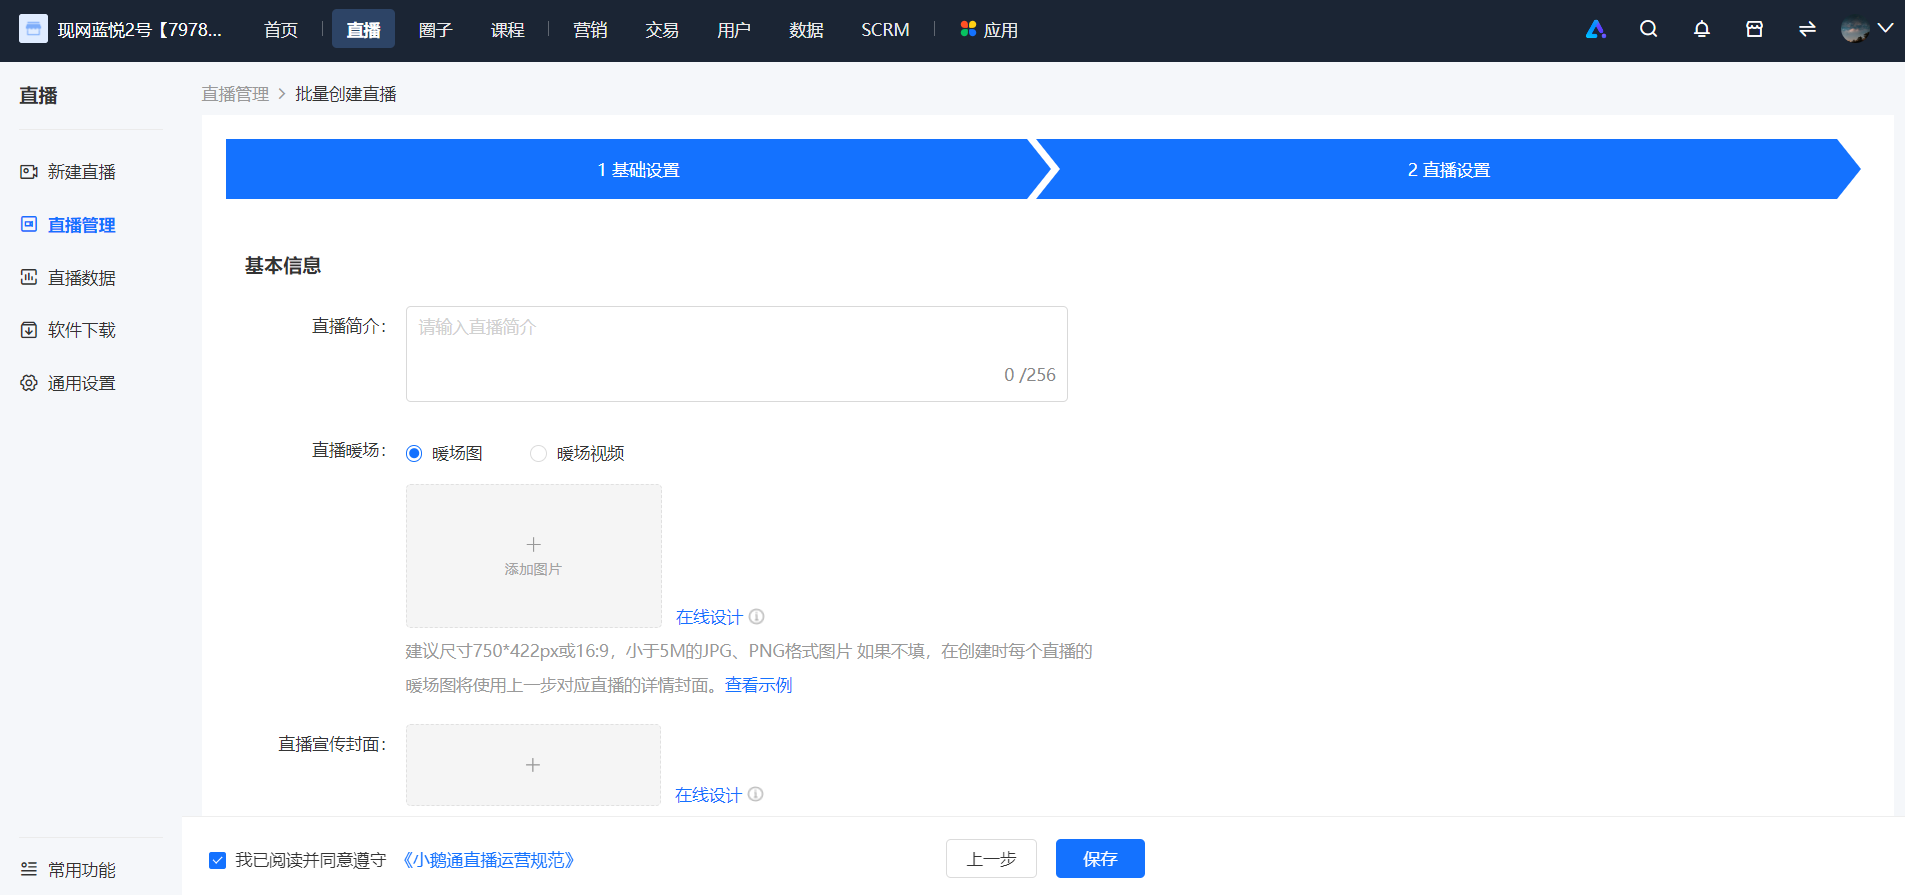
3. After starting batch creation, the live course list will be displayed, showing the live courses that have been created (batch creation takes some time. You can refresh the page later to view).
(3) Batch operations on courses
【For courses】: Text - image, audio, video, e - books, live courses, and columns.
1. On the above course list, when the mouse hovers over a list item, an edit icon will be displayed next to the course cover and course title. Click it to perform quick edit operations.
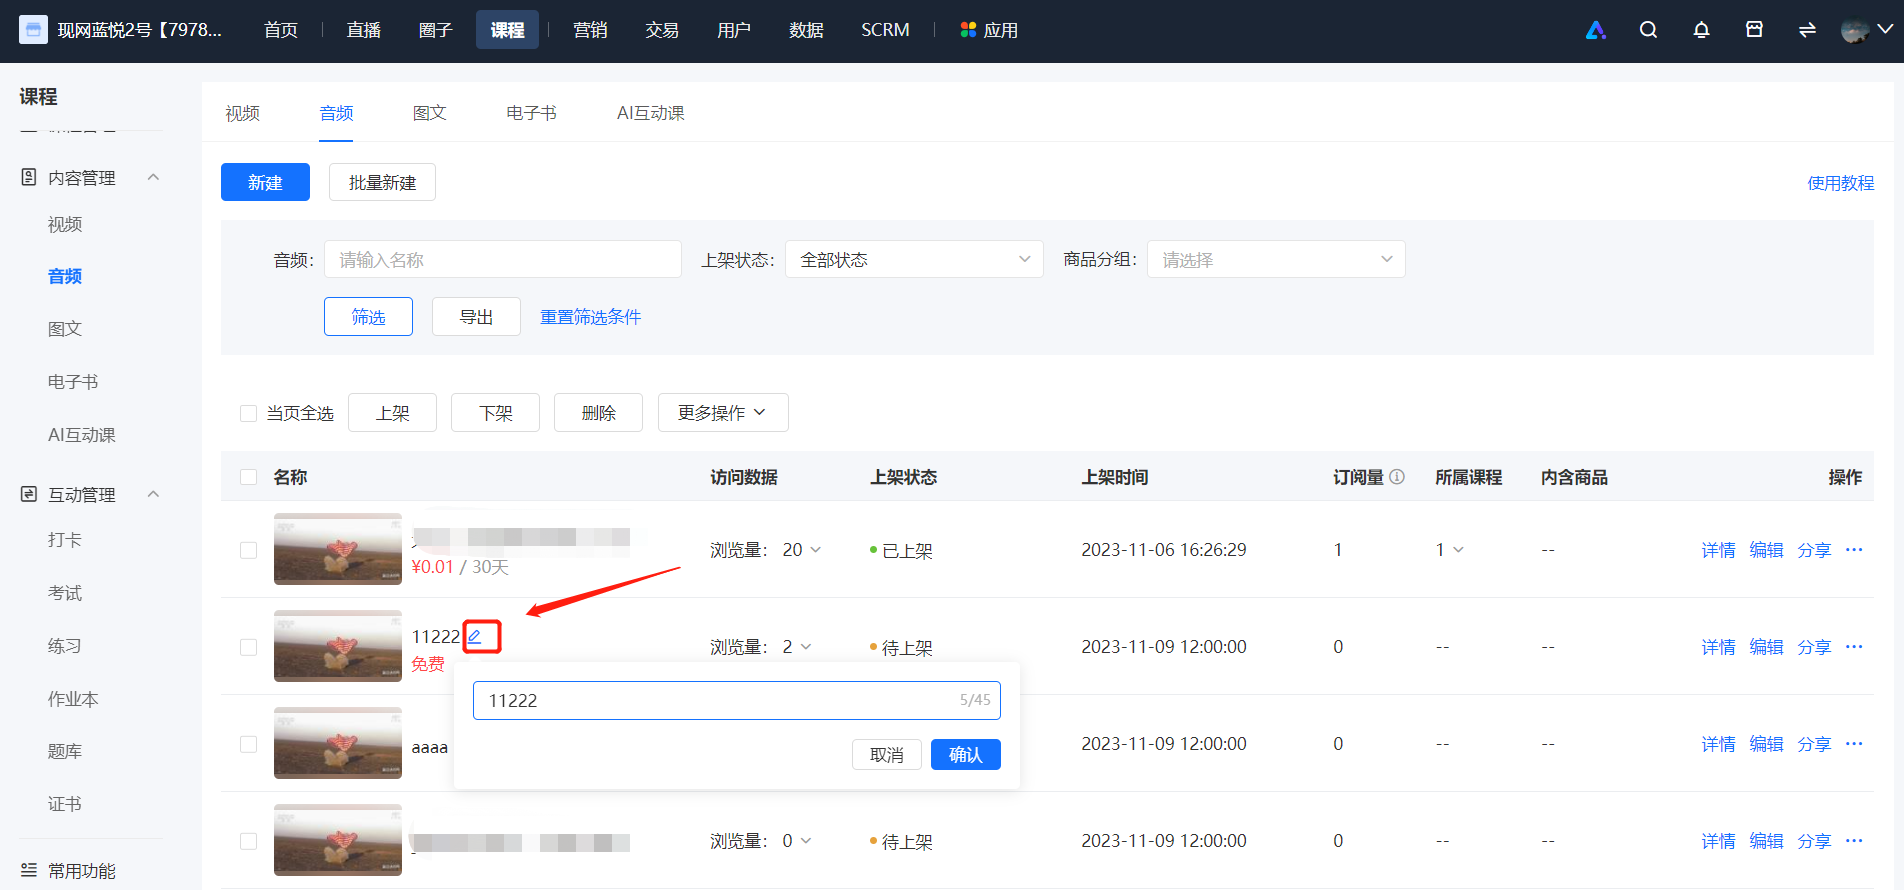
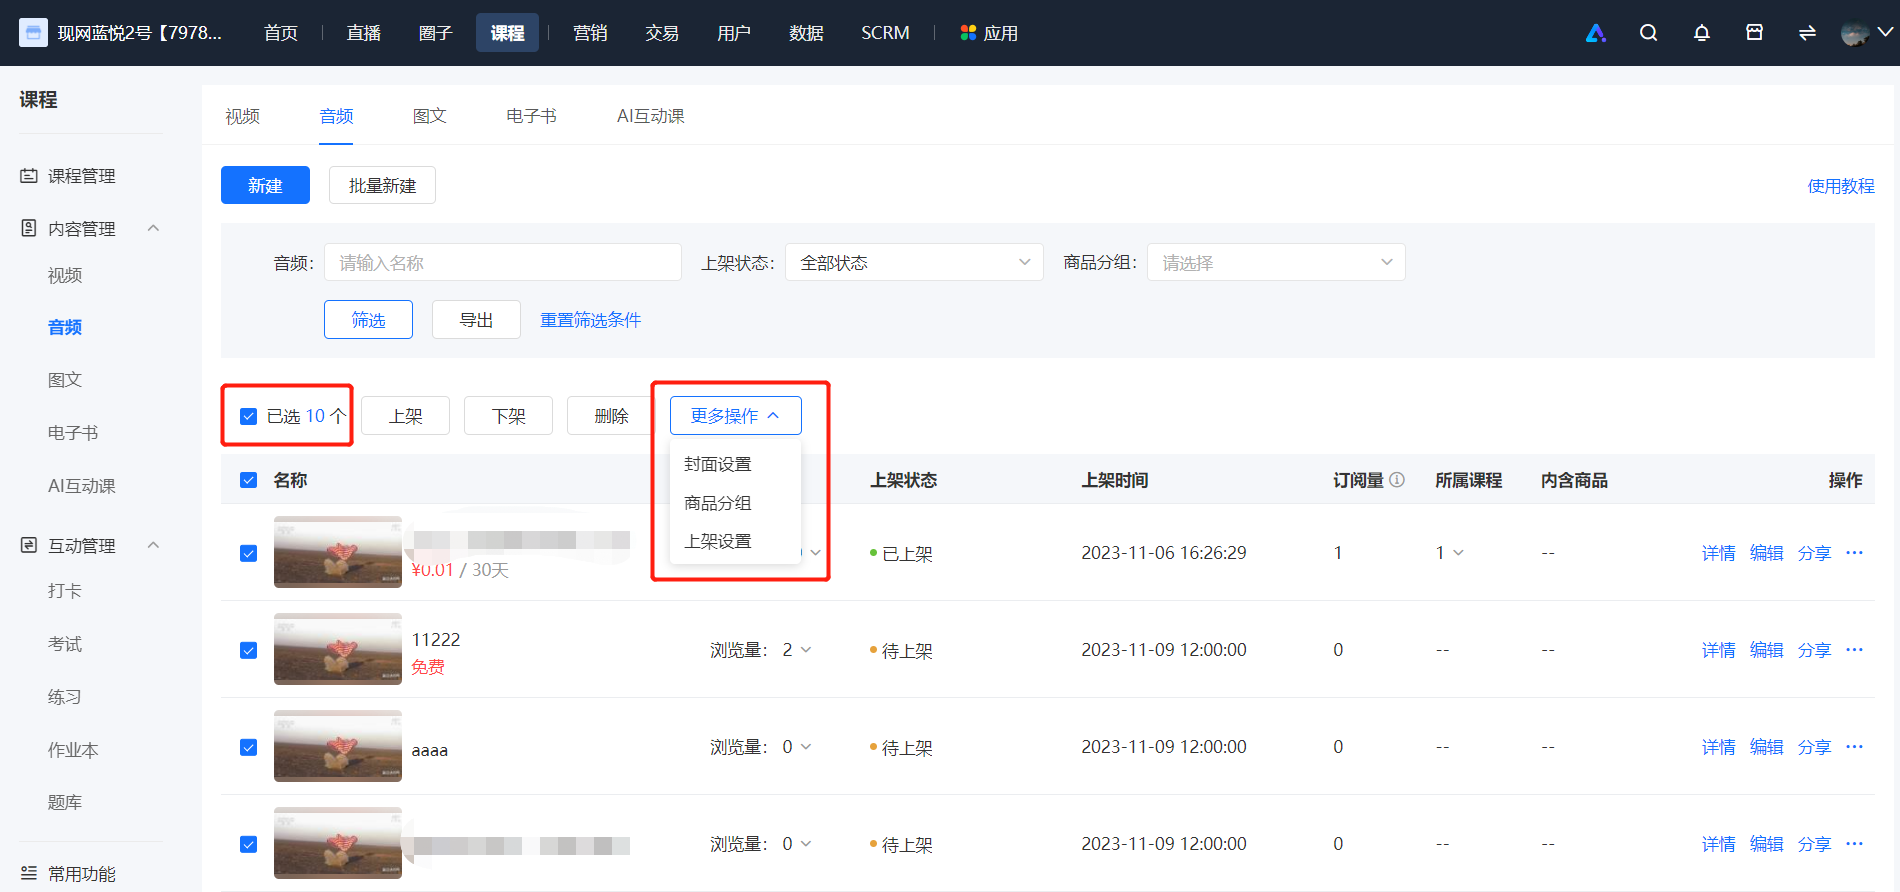
2. On the above course list, some courses can be selected for batch operations:
① Batch publishing, unpublishing, and deletion.
② More settings:
● Set course covers: Change the covers of the selected courses to the specified pictures.
● Add product groups: Add the selected courses to the specified product groups.
● Publishing settings: Modify the publishing settings of the selected courses.
(4) Batch management of columns
On the column - details - content management page, a batch content management function is provided.
1. [Quick edit course title/cover]: When the mouse hovers over a list item, you can quickly edit the course title and course cover (the function is the same as that in the course list).
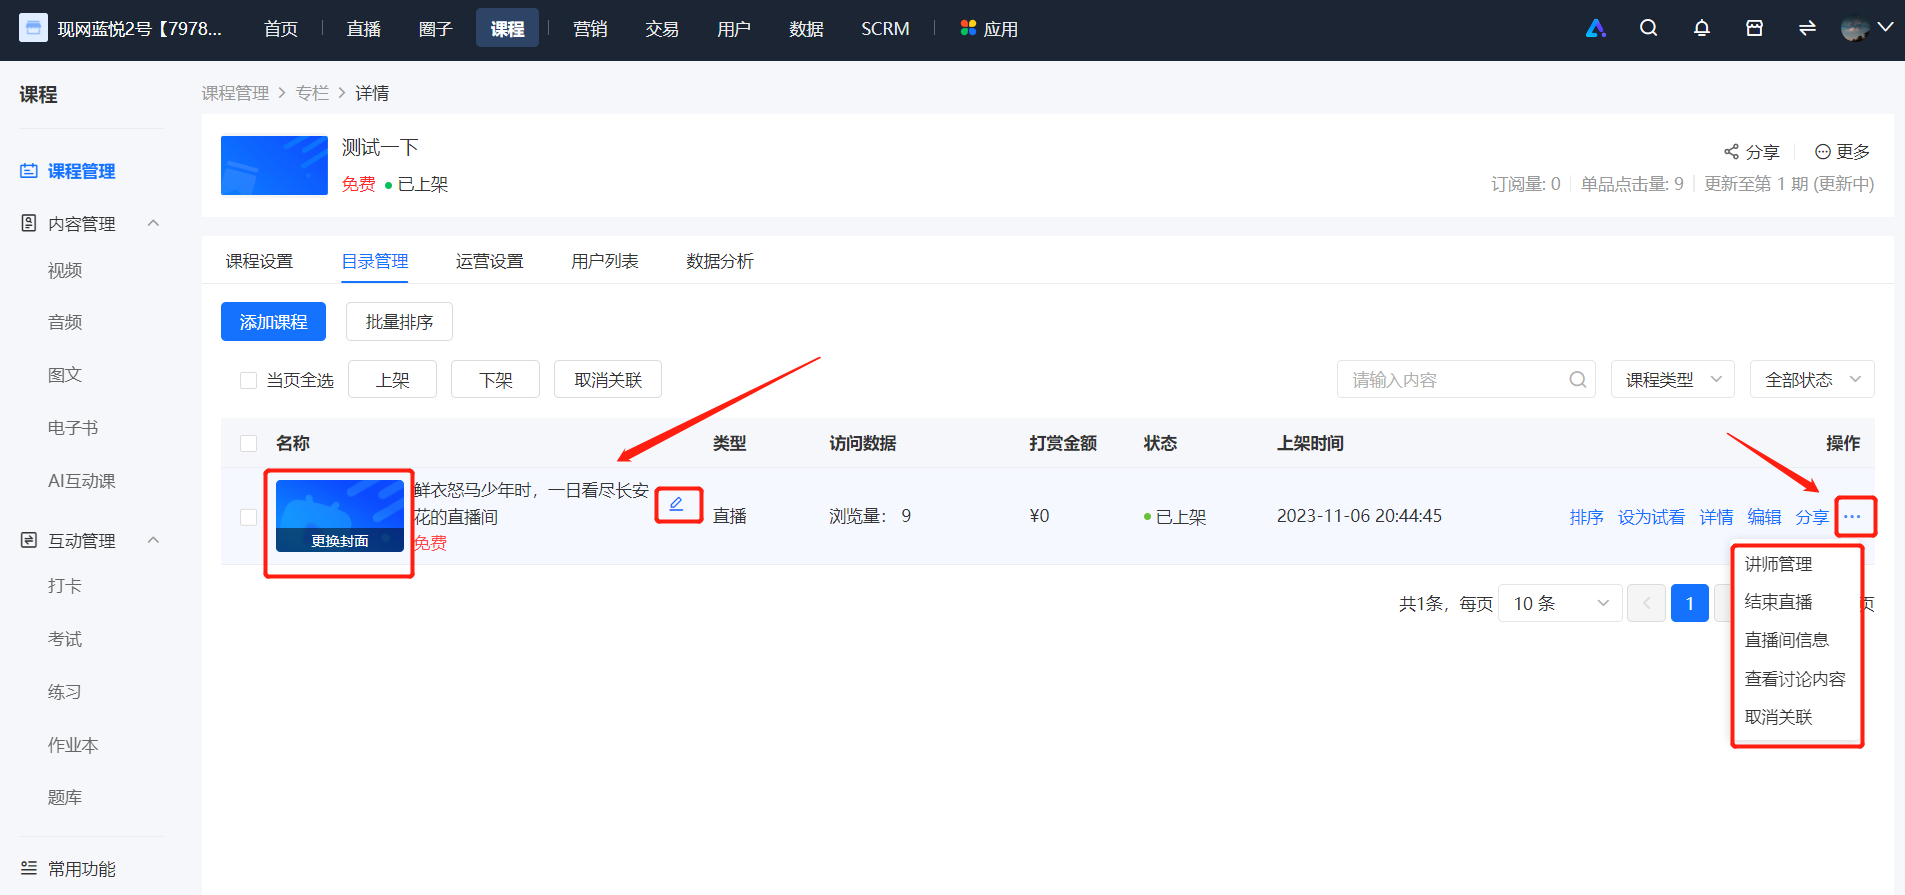
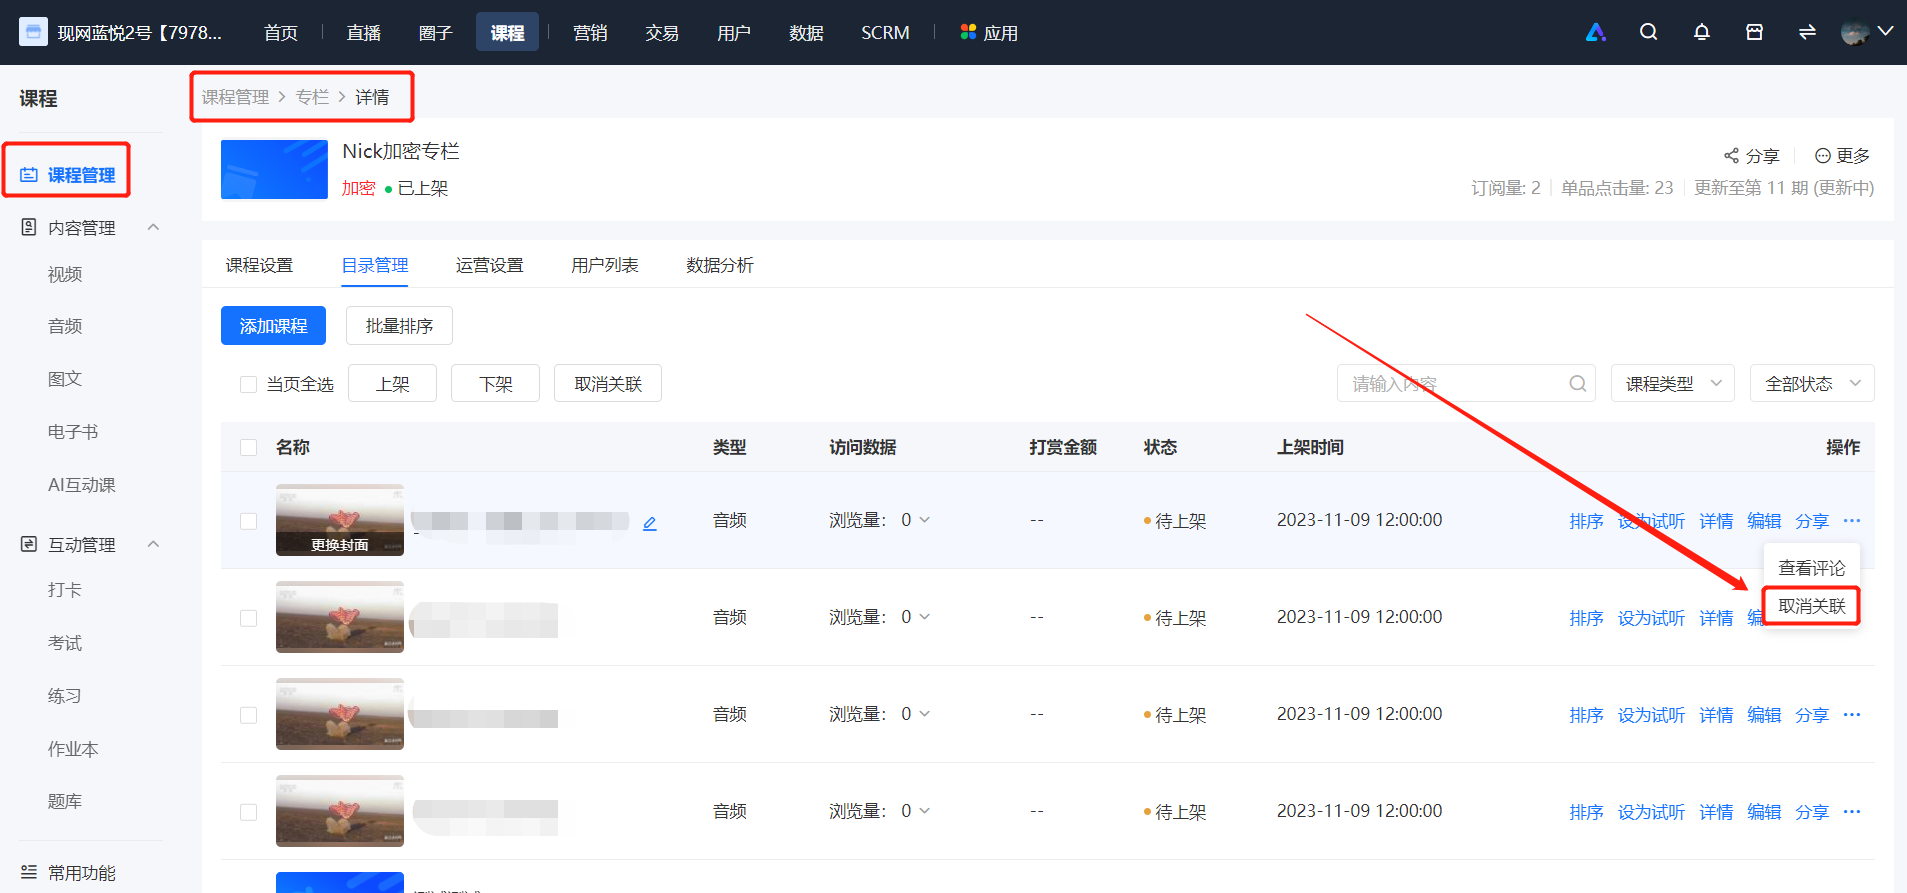
2. [Unlink]: Click the 'More - Unlink' button on the right side of the list item to remove the course from the column (users who have purchased the column will not be able to view the content of this single - course).
3. [Batch operations]: You can select some courses in the column for batch operations (batch publish/unpublish, batch unlink).
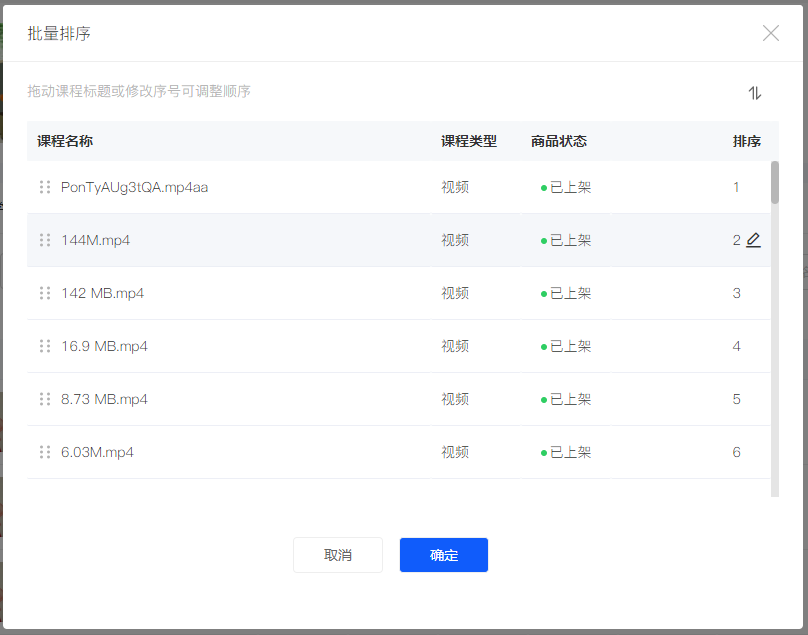
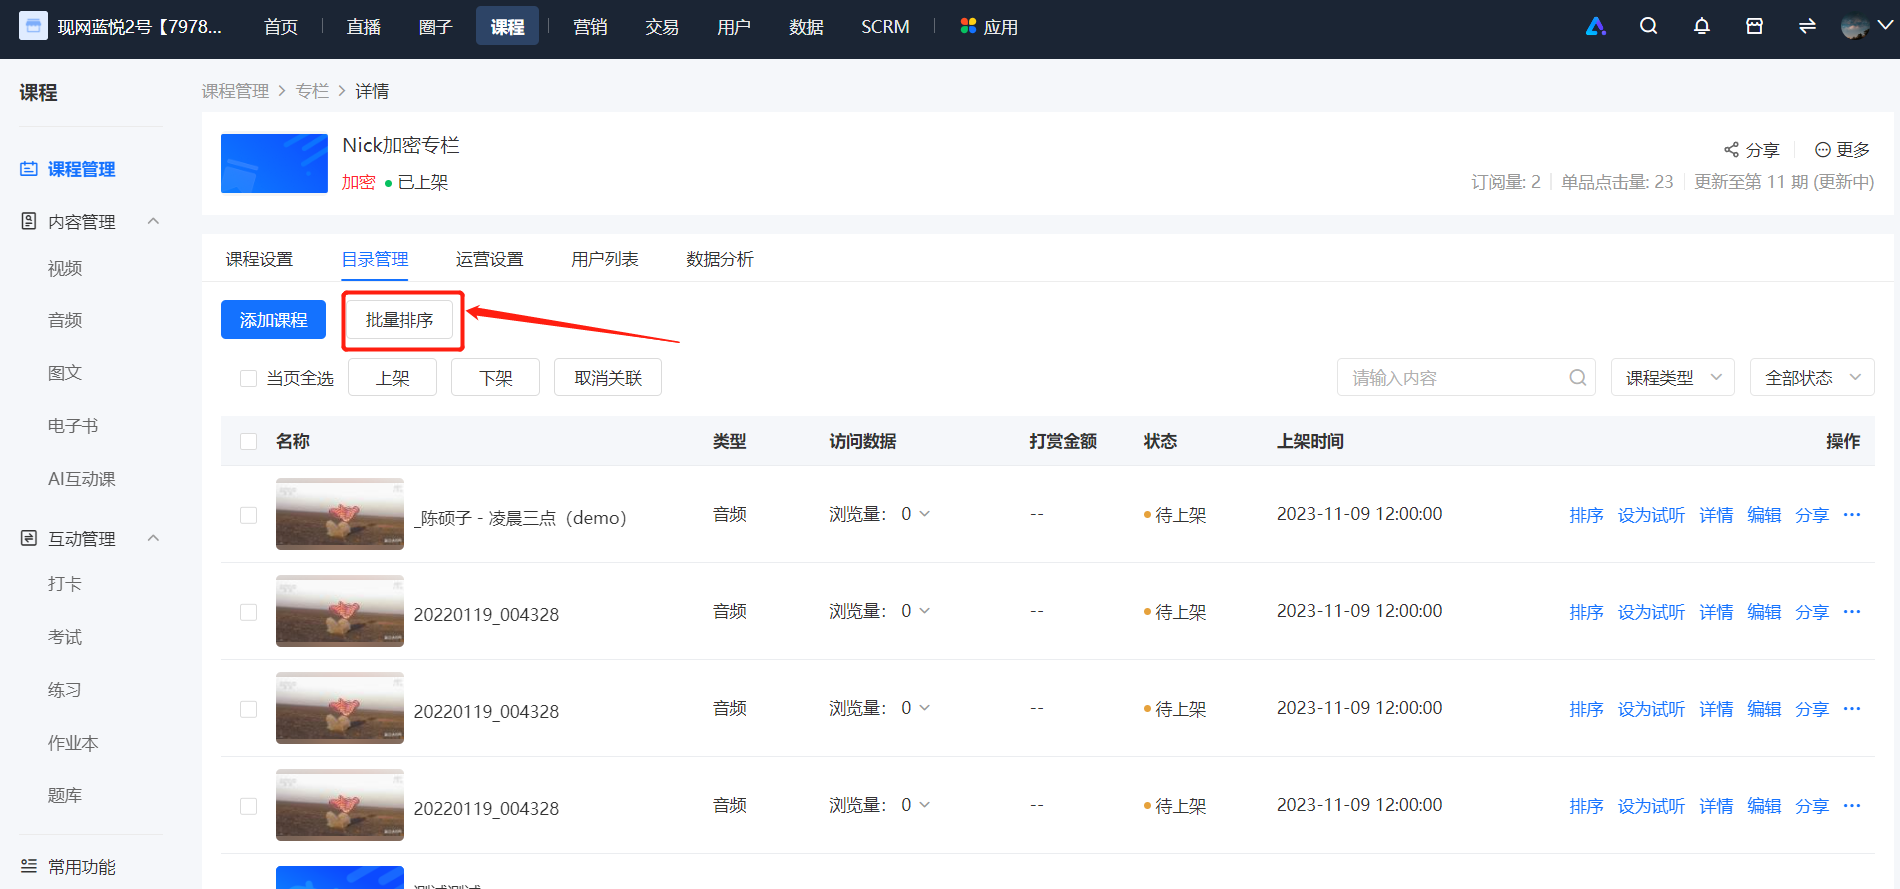
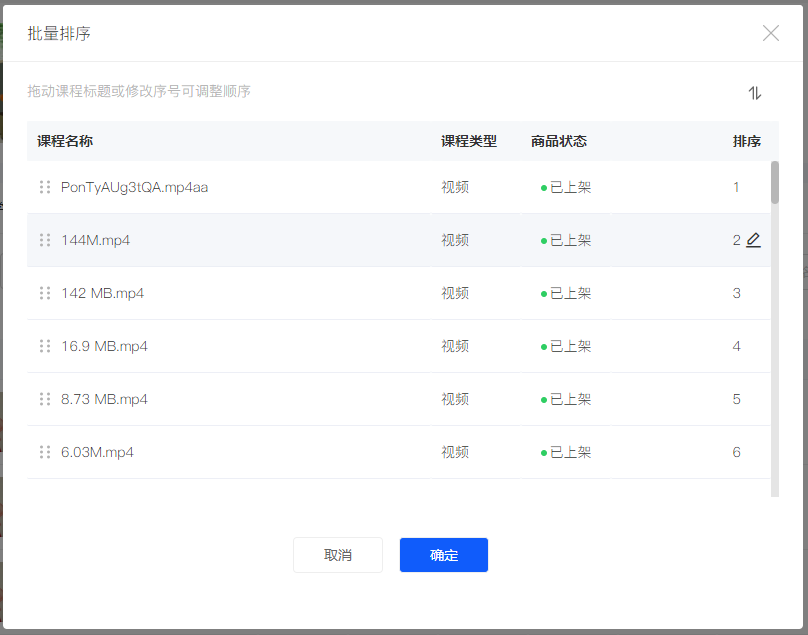
4. [Batch sorting]: Click the 'Batch sorting' button to quickly sort the course content in the column in batches. You can directly adjust the order by dragging the courses or entering the serial numbers. Click the toggle button in the upper - right corner to reverse the order of the courses in the pop - up window with one click. After adjusting the order, click 'OK' to make the changes.
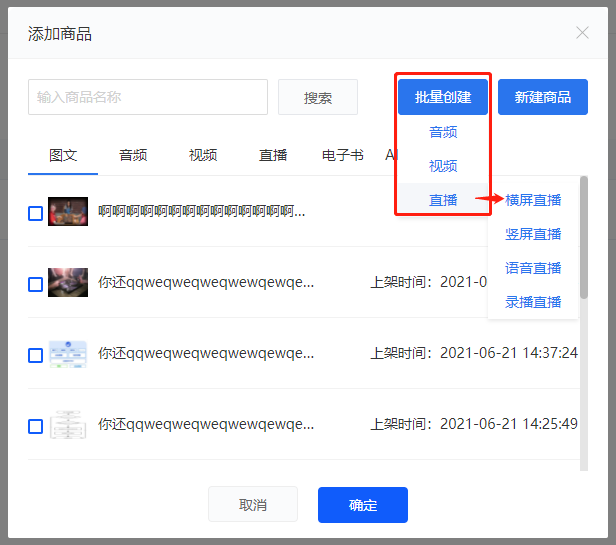
5. [Batch create courses in the column]: In the 'Add products' pop - up window of the column, click the 'Batch create' button to select to batch create audio, video, and live - streaming courses (the function is the same as that in the course list).
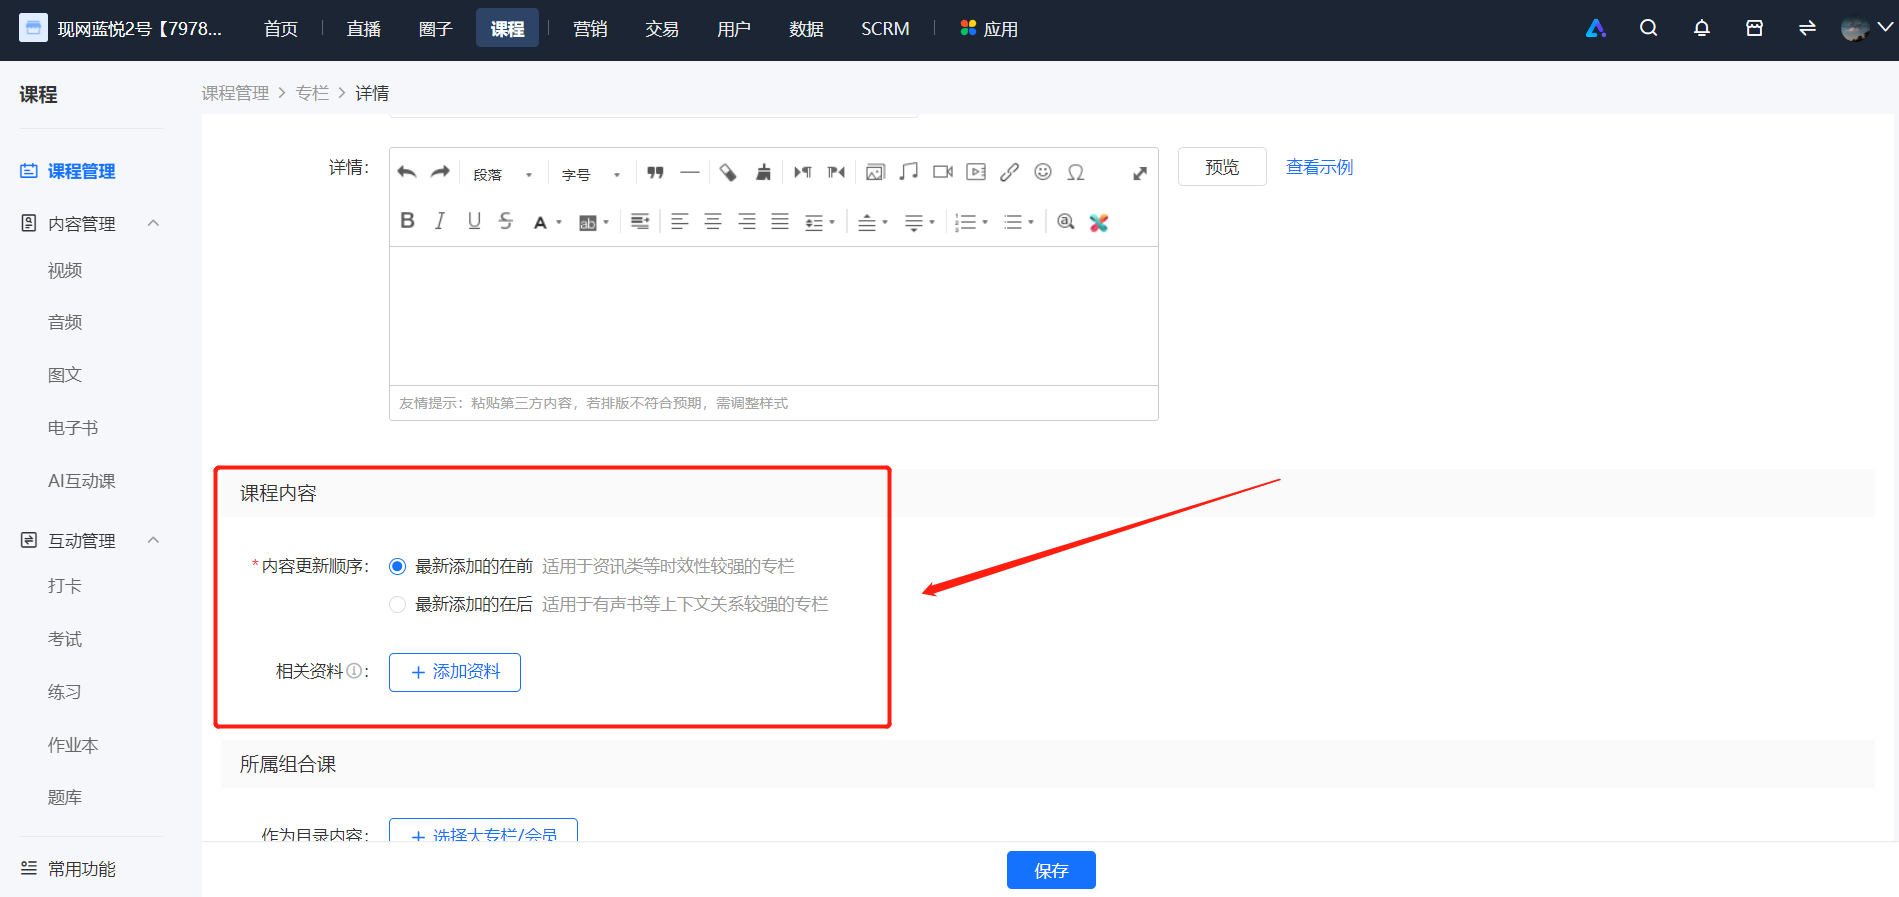
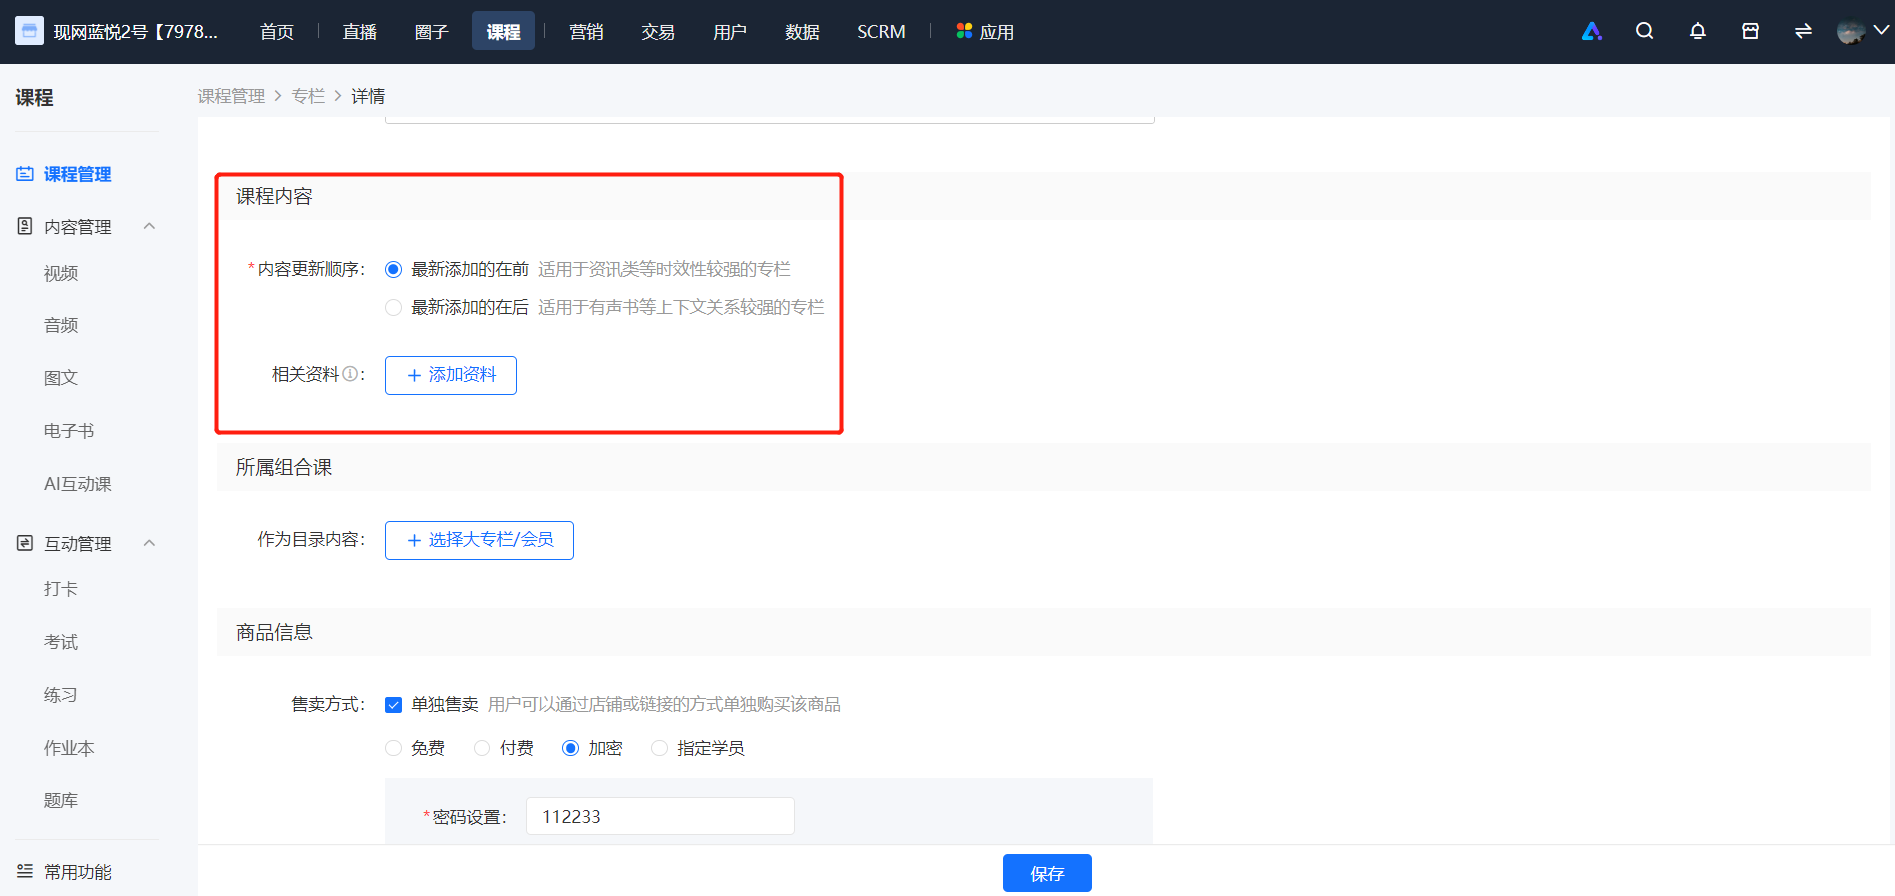
6. [Column content update order]: When creating/editing a column, you can set the 'Content update order' function.
● Newly added first: Newly added courses in the column will be ranked at the top of the list (this setting is recommended for columns with strong timeliness such as news columns).
● Newly added last: Newly added courses in the column will be ranked at the bottom of the list (this setting is recommended for columns with strong context relationships such as audiobooks).
V. Frequently Asked Questions
Q 1: Which courses support batch creation?
A: Audio, video, and live - streaming courses support batch creation.
Q2 : Is there a limit to the number of courses that can be created in batches?
A: Currently, a maximum of 50 courses can be created at a time.
Q3 : When creating courses in batches, how can I know if all the courses I created in batches were created successfully?
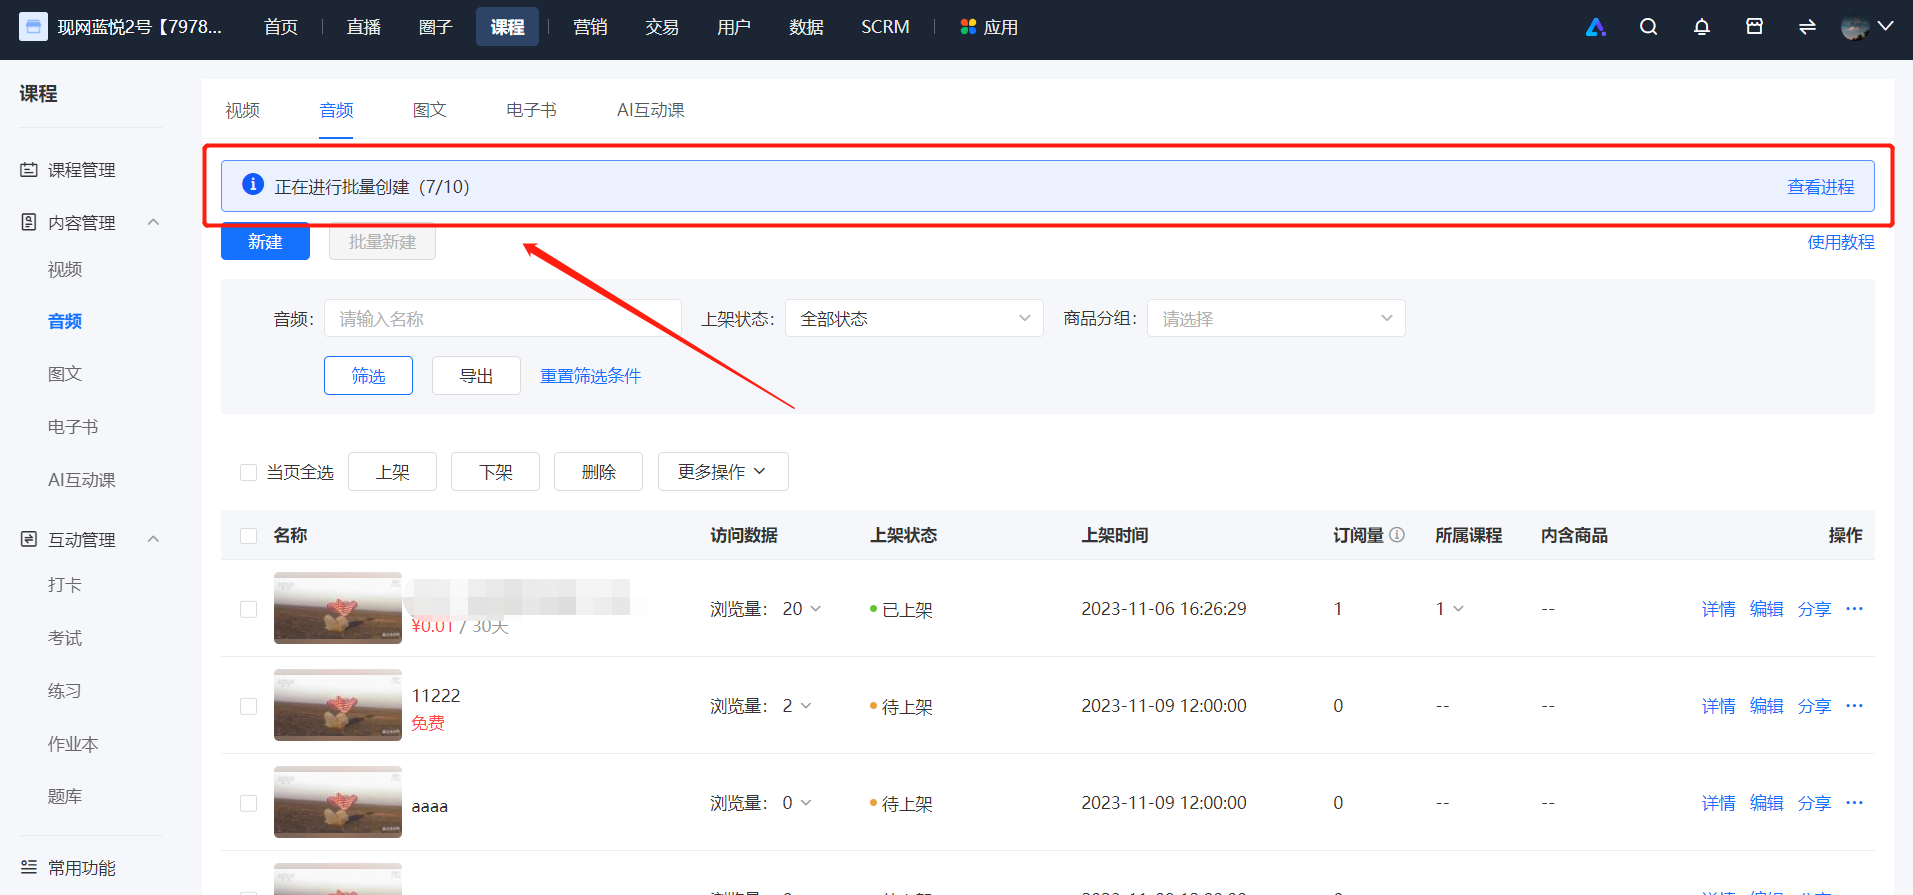
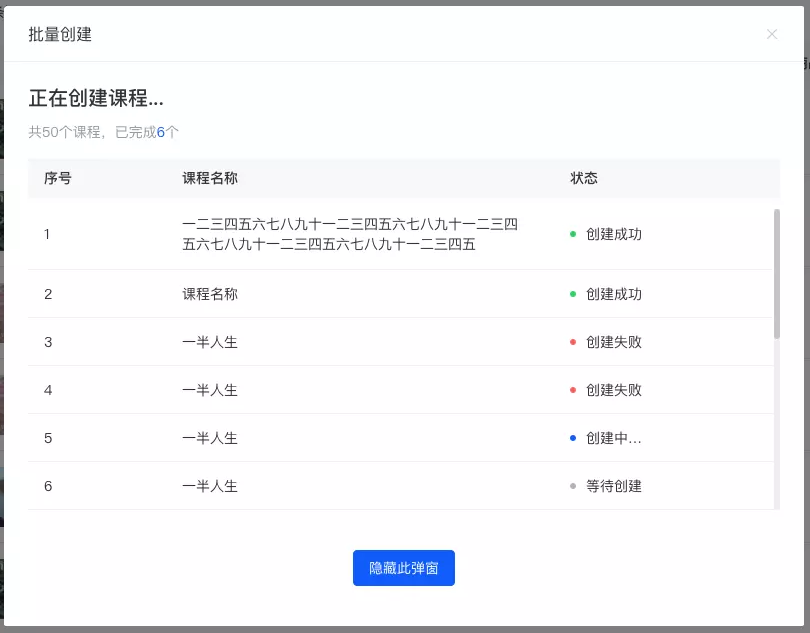
A: After initiating batch creation, the detailed progress of this batch creation task will be displayed above the course list. Click it to view the detailed task progress (you can perform other operations in the course list at this time, which will not affect the batch course creation task).
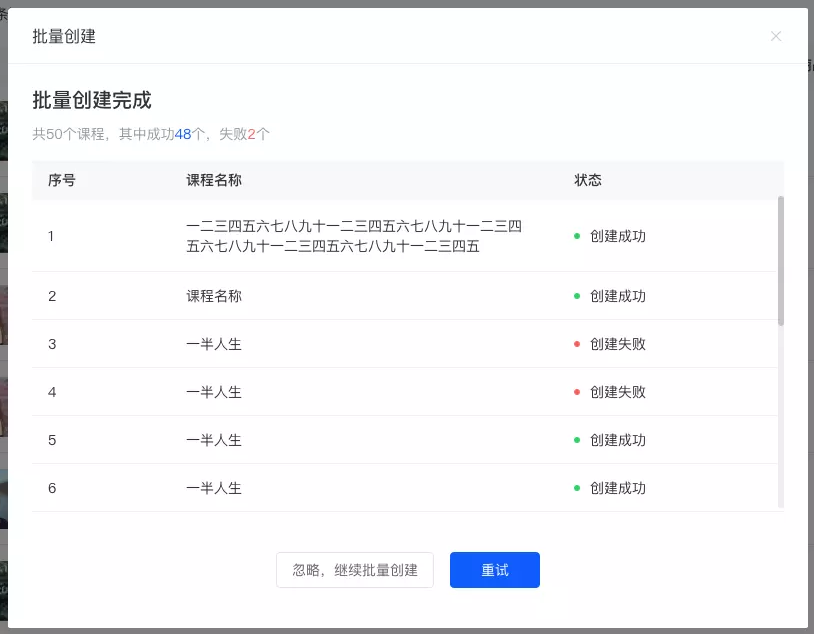
After the batch course creation task is completed, a pop - up window will appear to inform you of the result; if some courses fail to be created due to certain reasons, you can directly initiate a retry or start a new batch creation task.
Q4 : Which course lists support batch operations?
A: The lists of graphic, audio, video, e - book, live - streaming, and column courses support batch operations.
Q5 : What batch operation functions are currently supported?
A: Functions such as batch publish/unpublish, batch delete, batch modify course covers, and batch add product groups are supported.
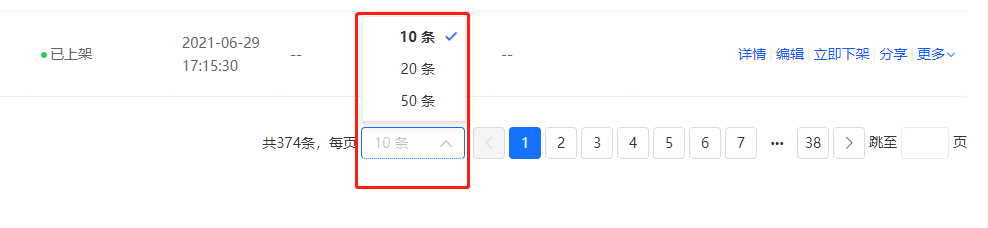
Q 6: When performing batch operations, I want to select more courses for batch operations. What should I do?
A: You can switch and set the number of items displayed per page at the bottom of the course list. The maximum number of items per page can be set to 50.
Q7 : How can I quickly sort the courses in a column?
A: In the management console - column details - content management list, click the 'Batch sorting' button above the list to quickly sort the course content in the column in batches. You can directly adjust the order by dragging the course titles or entering the serial numbers. Click the toggle button in the upper - right corner to reverse the order of the content in the pop - up window with one click. After adjusting the order, click 'OK' to make the changes.
Q8 : How can I quickly remove a course from a column?
A: In the management console - column details - content management list, click the 'More - Unlink' button on the right side of the list item to remove this course from the column. You can also select multiple courses and click the 'Unlink' button at the bottom of the list for batch removal.
Q9 : What is the function of the 'Column content update order'?
A: When creating/editing a column, you can set the 'Content update order' function.
● Newly added first: Newly added courses in the column will be ranked at the top of the list (this setting is recommended for columns with strong timeliness such as news columns).
● Newly added last: Newly added courses in the column will be ranked at the bottom of the list (this setting is recommended for columns with strong context relationships such as audiobooks).

Instructions for adjusting the cover image size
I. Function Introduction
Currently, the cover ratios of various types of courses and products on elink are not unified, and the display ratios of pictures on different pages are also inconsistent. As a result, merchants need to prepare materials of multiple sizes to create content.
This adjustment will standardize the cover upload and application positions, improve the efficiency of merchants' store operations, and ensure the complete display of merchants' pictures.
II. Impact of the Adjustment
● Newly Created Courses/Content:
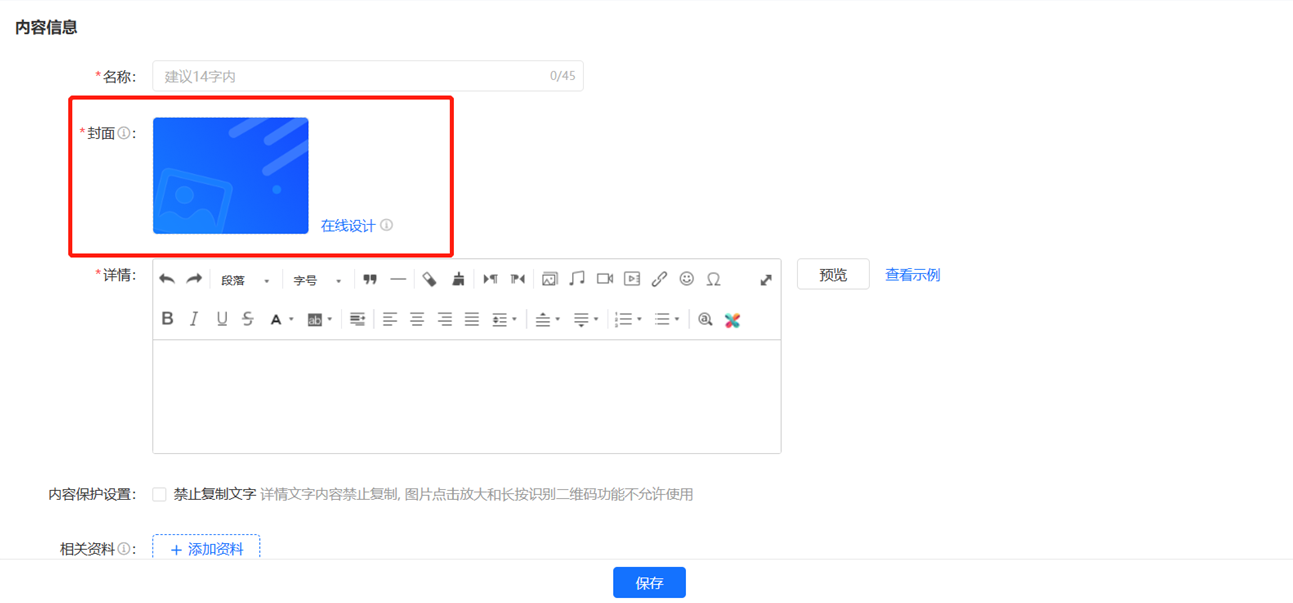
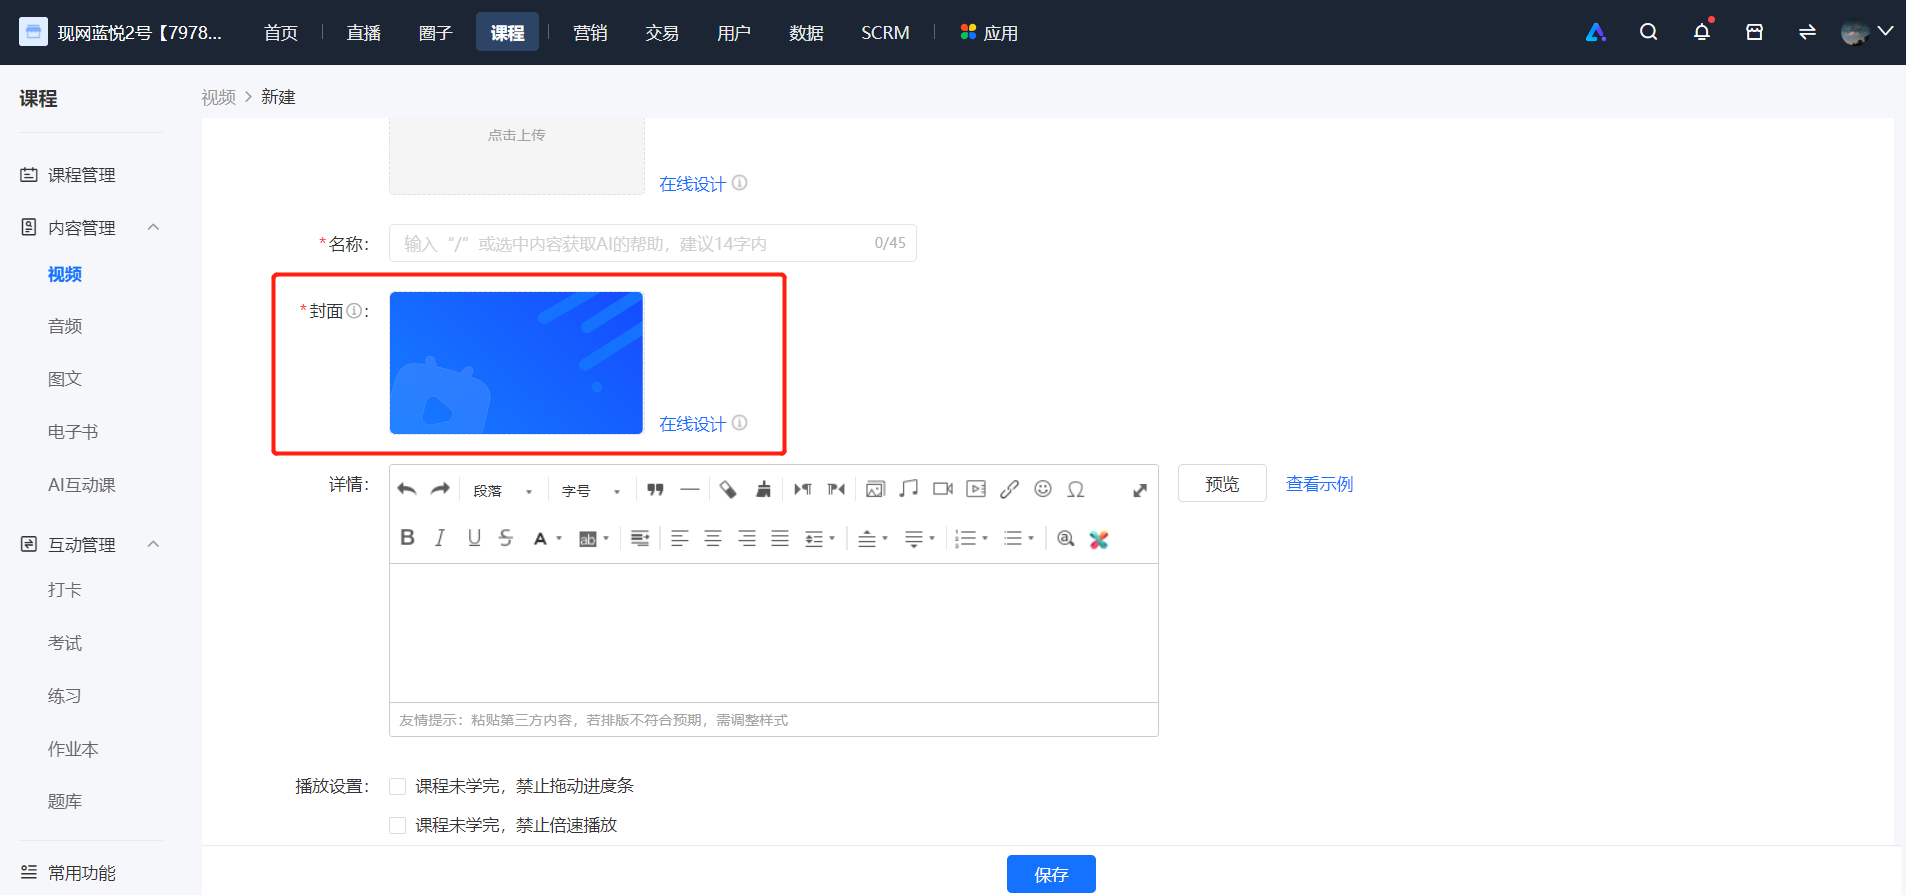
○ Adjust the picture size of [New Course/Content - Cover]. The latest recommended size is 750*422 or the ratio is 16:9. This adjustment only focuses on the picture size, and no changes will be made to the format and capacity.
○ The cover picture of [New Course/Content - Cover] will be displayed in a 16:9 picture frame. For the cover pictures created previously, a small amount of white edges will appear on the left and right sides within the display frame.A small amount of white - edge effect
○ Path: PC Management Console - Course/Content Management - New Course/Content - Cover
Before the change:
After the change:

● Courses/Content Management List:
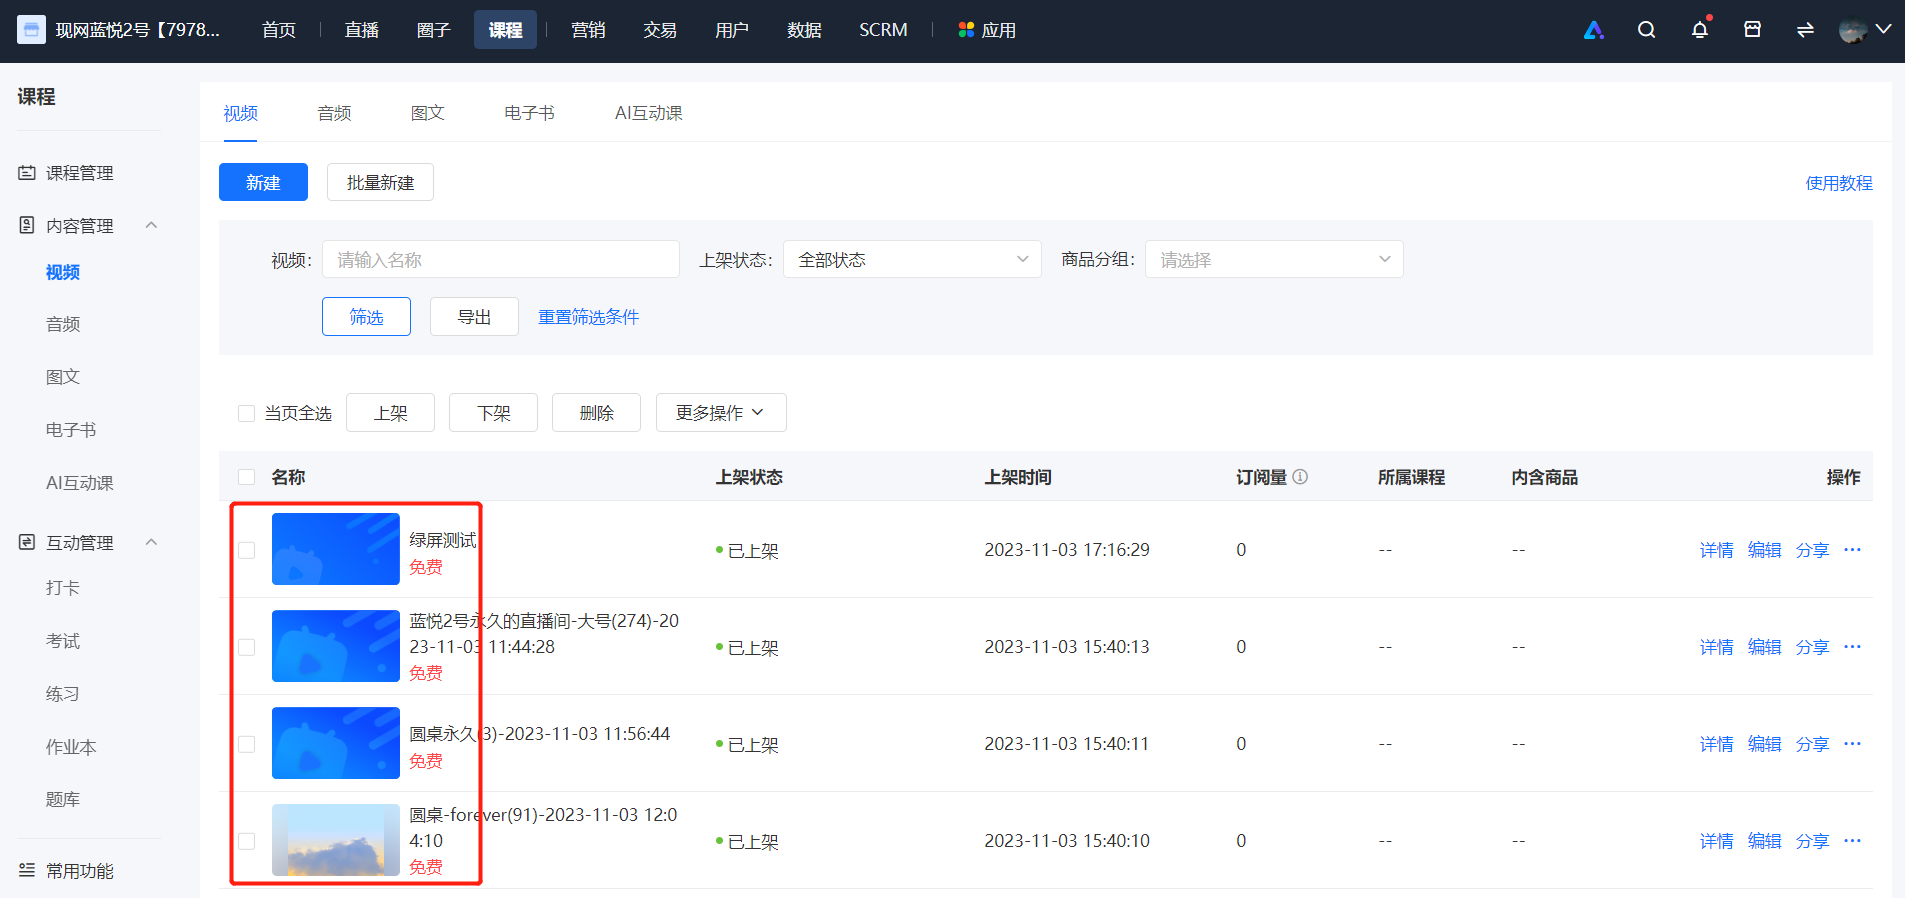
○ The cover pictures on the management list pages of various types of courses/content will be displayed in a 16:9 picture frame.
○ There is no need to modify the previously uploaded course cover pictures. The picture ratio will be automatically adjusted to 16:9 in the form ofSurrounding blurring○
○ Path: PC Management Console - Courses - Course/Content Management

● C - endCourse Details Page:
○ The cover height of the C - end course details pageDynamicallySupports the display of main pictures in 4:3 and 16:9 ratios